1
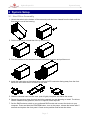
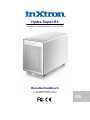
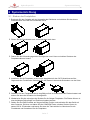
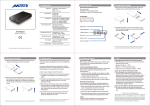
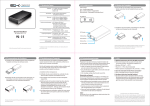
Hydra Super-S3 4-Bay RAID Storage Enclosure (3.5” SATA HDD) User Manual October 16, 2013 - v1.1 PN: E15-57811AA031 EN Hydra Super-S3 Introduction 1 Introduction 1.1 Technical Specifications 1.1.1 Supported Hard Drives • Up to four 3.5" SATA-I, SATA-II or SATA-III hard drives • 80GB - 4TB per HDD • Hard drives of identical capacities are recommended • Support large volumes in excess of 2TB 1.1.2 Power Supply • Internal power supply (UL, cUL, CE, TUV approved) • Protection: OCP, OVP, Short • Input: AC 90-264V, 47Hz/63Hz • Output: DC +19V/4.74A 1.1.3 System Requirements (PC) • USB: Windows XP or above • FireWire: Windows XP or above • eSATA: Windows XP or above • Your computer must have the correct corresponding port (e.g. USB 3.0 host controller) • eSATA Plug & Play support and Port Multiplier (Non-RAID only) for host controller 1.1.4 System Requirements (Mac) • USB 2.0: Mac OS 10.2 or above • USB 3.0: Mac OS 10.7 or above • FireWire: Mac OS 10.2 or above • eSATA: Mac OS 10.4 or above • Your computer must have the correct corresponding port (e.g. USB 3.0 host controller) • eSATA Plug & Play support and Port Multiplier (Non-RAID only) for host controller Note In order for the computer to access volumes larger than 2TB, both the hardware and OS need to have the capacity to support large volumes (e.g. Windows 7 or Mac OS 10.4 and above). 1.2 About this Manual Firmware, images and descriptions can slightly vary between this manual and the actual product you have. Functions and features may change depending on the firmware version. To download the latest manual, go to http://www.inxtron.com/support/user-manuals. 1.3 Trademarks • Microsoft, Windows XP and Windows 7 are trademarks of Microsoft Corporation. • Apple Macintosh and Mac are trademarks of Apple Computer. • All other third party brands and names are the property of their respective owners. Page 1 Hydra Super-S3 Introduction 1.4 Detailed View 1.4.1 Front View LED/Button Description Blue = Power on • • • • • CONFIRM 1.4.2 Green = Disk status normal Flashing green = Data access (e.g. read, write, system start up) Flashing orange = Rebuilding RAID array Red = HDD error OFF = Empty drive slot or interface cable is not yet connected RAID mode confirmation button. Press and hold, turn on power, wait 5 seconds and then release the button. RAID Selector Switch Switch Position Description 0 RAID 0 striping for 2-4 drives 1 RAID 1 for 2 drives or RAID 10 for 4 drives 2 Disk spanning for 2-4 drives (creates a single large volume) 3 RAID 5 for 3-4 drives 4 Non-RAID for 1-4 drives (drives can be accessed independently) Note Changing the RAID mode will erase all existing data. Make sure to backup all data first! For a RAID array, hard drives with identical capacities are recommended. 1.4.3 Rear View Label Description Security lock slot ON/OFF Power switch eSATA External SATA port FW800 FireWire 800 port USB 3.0 USB 3.0 SuperSpeed port DC 19V Power receptacle Important Always connect the interface cable and turn on your computer first, before turning on the power. Otherwise, the drives will not spin up and the data cannot be accessed. Page 2 Hydra Super-S3 Introduction 1.4.4 Smart Fan The smart fan automatically regulates the fan speed according to the temperature. When the hard drives are in stand-by, the fan is turned off. When the drives are in use, the fan runs at low speed until the temperature reaches 45 degrees. From that point on, the speed increases for every 5 degrees until 60 degrees and then runs at full speed above 61 degrees Celsius. Status/Temperature Fan Speed Stand-by Off 0-45° Low speed 46-50° Medium speed 51-60° Upper medium speed 61° and above High speed 1.5 RAID Mode Depending on the RAID mode, a certain amount of drives are required. It is not possible to add more drives to an existing RAID array without re-formatting it. To add additional drives at a later point, turn off the power, install the new drive(s) and then create a new RAID array by confirming the RAID mode again. This will erase all existing data on the drives! Note For a RAID array (e.g. RAID 0, RAID 1, RAID 5), hard drives of identical capacities are recommended. If the capacity is different, the total amount of the space that can be used will depend on the drive with the smallest capacity. 1.5.1 Disk Striping (RAID 0) The drives show up as one large single volume but the total size will depend on the drive with the smallest capacity. Used where speed is the primary objective but RAID Level 0 (also called striping) is not redundant. This form of array splits each piece of data across the drives in segments. Since data is written without parity data-checking, it allows for the fastest data transfer but if one drive fails, the whole array can become corrupted. HDD 2, 3 or 4 drives 1.5.2 Disk Mirroring (RAID 1) The drives show up as one volume but only 50% of the total capacity, depending on the drive with the smallest capacity, can be used. RAID 1 creates an exact copy (or mirror) of a set of data on the second drive. This is useful when reliability and backup are more important than capacity. When one drive fails, it can be replaced and the data rebuilt. HDD 2 drives 1.5.3 Disk Mirroring with Striping (RAID 10) The drives show up as one volume but only 50% of the total capacity, depending on the drive with the smallest capacity, can be used. RAID 1 creates an exact copy (or mirror) of a set of data. This is useful when reliability and backup are more important than data capacity. When one hard drive fails, it can be replaced and the data rebuilt automatically. HDD 4 drives Page 3 Hydra Super-S3 Introduction 1.5.4 Disk Spanning (SPAN) The drives show up as one volume, combining the storage capacity of all drives into a single large volume. Spanning is an array (not RAID) that is written sequentially across the drives. By itself, it does not provide any performance or redundancy benefits. HDD 2, 3 or 4 drives 1.5.5 Disk Striping with parity (RAID 5) The drives show up as one volume but the total capacity, depending on the drive with the smallest capacity, is the combined size minus the size of one drive. RAID 5 uses block-level striping with parity data distributed across all member disks and therefore provides the perfect balance between high performance and data integrity. When one hard drive fails, it can be replaced and the data rebuilt automatically. HDD 3 or 4 drives 1.5.6 Non-RAID (IND) The drives show up as independent volumes and no RAID array is created. This setting is ideal for drives with different capacities, without having to create a single large volume (disk spanning). HDD 1, 2, 3 or 4 drives 1.6 About Data Backup To protect your files and help prevent the loss of your data, we strongly recommend that you keep two copies of your data, one copy on your Hydra and a second copy either on your internal drive or another storage media such as CD, DVD, Tape or an additional external drive. Any loss or corruption of data while using the Hydra is the sole responsibility of the user, and under no circumstances will the manufacturer be held liable for compensation or the recovery of this data. Page 4 Hydra Super-S3 System Setup 2 System Setup 2.1 Hard Drive Assembly 1. Unlock the switch at the bottom of the case and push the inner chassis from the back until the front panel is out of the housing. 2. Pull the front panel out and then lift it up to remove it. 3. Turn the screws on the cassettes counter-clockwise to loosen and pull them out. 4. Install the hard drive as illustrated below with the SATA connector facing away from the front. Mount the drive with the six screws from the side. 5. Slide the cassette back into the case, push it lightly into place and fasten the screw. 6. Repeat the previous steps for each hard drive cassette you are planning to install. The drives can be installed at any position, there is no specific order required. 7. Set the RAID selector switch to your preferred RAID mode and connect the device to your computer. Press and hold the CONFIRM button, turn on the power, release the button after 5 seconds and replace the front panel. Create a new partition and format the drives. Page 5 Hydra Super-S3 System Setup 2.2 Setup Guide 1. Connect the interface cable (e.g. USB, FireWire or eSATA) to the device and to your computer. 2. If this is the first time, set the RAID selector switch to your preferred RAID mode, press and hold the CONFIRM button, turn on the power and release the CONFIRM button after about 5 seconds. Otherwise, you can simply turn on the power at this point. 3. Drives A&B start up first, followed about 7 seconds later by drives C&D. 4. If this is the first time, create a new partition and format the drive(s). A few remarks when using your external storage drive: • Only one interface can be used at any given time. • To use a different interface, disconnect the current cable first, before connecting the new one. • Always connect the interface cable and turn on your computer first, before turning on the power. Otherwise, the drives will not spin up and the data cannot be accessed. • For the safe removal of your drive and to assure that no data is lost, always follow the correct unplug procedure for external hardware (e.g.: Eject the drive before removal). • In order for the computer to access volumes larger than 2TB, both the hardware and OS need to have the capacity to support large volumes (e.g. Windows 7 or Mac OS 10.4 and above). 2.3 Replacing Hard Drives When one of the drives fails, the corresponding HDD LED will light up red. If only one drive is defective and the RAID mode is set to RAID 1, RAID 5 or RAID 10, the data can still be accessed but we strongly recommend replacing the faulty drive immediately to assure continued backup and data safety. If more than one drive at the same time fails or if the RAID mode is set to RAID 0 or Spanning, the data is lost and the system cannot be accessed again until the drive(s) have been replaced. 1. Check the HDD LED. The red LED indicates the defective drive. 2. Turn off the power, replace the faulty drive and turn the power back on. 3. For RAID 1, RAID 5 and RAID 10, the RAID array is rebuilt automatically. During this process, the LEDs flash orange. Rebuilding the RAID array takes several hours, depending on the drive capacity. During that time, data access might be slower than usual. 4. For RAID 0 and Spanning, press and hold the CONFIRM button after replacing the drive(s). Turn on the power and release the CONFIRM button after about 7 seconds. Create a new partition and format the drives. 5. For Non-RAID, make sure there are no existing partitions on the new drive, then simply turn on the power and format the new drive. Note We recommend not turning off the power during the rebuild process but if it is interrupted, it will continue rebuilding the data as soon as the power is turned back on. Page 6 Hydra Super-S3 Appendix 3 Appendix 3.1 Safety Information 3.1.1 Location and placing precautions Do not cover the device and do not place the unit on other heat-sensitive equipment. Avoid positioning it in the following places: • Locations with direct sunlight, next to radiators or other sources of heat with high temperatures (more than 35° C) or high humidity (more than 90%). • Locations subject to vibration, shock, or with a slope. • Do not expose the product to water or humid conditions. • Do not cover the enclosure’s ventilation holes. 3.1.2 Electricity and power plug Careful attention must be paid to the following points in order to avoid electric shock or fire: • When removing the power cable, always pull on the plug fixture and never on the cord. • Make sure the power switch is in the OFF position when you connect the cord and always connect the cord to your device first, before you plug it into the wall socket. • If the unit should emit smoke, an unusual odor or noise, switch it off immediately. • Use only the cables supplied or recommended by your vendor in order to avoid malfunction. 3.2 FAQ Q: What file system should I choose to format my drive? A: This depends on how you want to use the drive but in general, we recommend: • Windows NTFS • Mac OS X HFS+ (Mac OS Extended) • To use it on both PC and Mac FAT32 (single files size is limited to 4GB) Q: How many drives can fail before I lose my data? A: This depends on the RAID mode. For RAID 0 and Spanning, any drive failure will result in the data being lost. For RAID 1, RAID 5 and RAID 10, more than one drive failure at the same time will mean the data cannot be recovered anymore. Q: Will the hard drives spin down when my computer goes into stand-by mode? A: Yes, the drives and the fan will also go into stand-by mode. Q: Why is the LED light for some or all of the drives OFF? A: If less than 4 drives are installed, it simply indicates that there is no drive in that particular slot. Otherwise, it means that the interface cable (e.g. USB cable) is not yet connected to the computer or the computer has not yet been turned on. © Copyright 2013 by inXtron, Inc. All Rights Reserved The information contained in this manual is believed to be accurate and reliable. inXtron assumes no responsibility for any errors contained in this manual. inXtron reserves the right to make changes in the specifications and/or design of this product without prior notice. The diagrams contained in this manual may also not fully represent the product that you are using and are there for illustration purposes only. inXtron assumes no responsibility for any differences between the product mentioned in this manual and the product you may have. inXtron assumes no responsibility for any loss of data or files. Page 7 Hydra Super-S3 4-Bay RAID Festplattengehäuse (3.5” SATA HDD) Benutzerhandbuch 16. Oktober, 2013 - v1.1 Teilenummer: E15-57811AA031 DE Hydra Super-S3 Einleitung 1 Einleitung 1.1 Systemvoraussetzungen 1.1.1 Unterstützte Festplatten • Bis zu vier 3.5" SATA-I, SATA-II oder SATA-III Festplatten • 80GB - 4TB per Festplatte • Festplatten mit gleicher Kapazität sind empfohlen • Volumen mit einer Kapazität von über 2TB sind unterstützt 1.1.2 Netzteil • Internes Netzteil (UL, cUL, CE, TUV geprüft) • Schutzvorkehrung: OCP, OVP, Short • Eingabe: AC 90-264V, 47Hz/63Hz • Ausgabe: DC +19V/4.74A 1.1.3 PC Voraussetzungen • USB Verbindung; Windows XP oder neuer • FireWire Verbindung; Windows XP oder neuer • eSATA Verbindung; Windows XP oder neuer • Ihr Computer muss über den entsprechenden Anschluss (z.B. USB 3.0) verfügen • eSATA-Hostadapter mit eSATA Plug & Play Treiber und Port-Multiplier (nur für Non-RAID) 1.1.4 Mac Voraussetzungen • USB 2.0 Verbindung; Mac OS 10.2 oder neuer • USB 3.0 Verbindung; Mac OS 10.7 oder neuer • FireWire Verbindung; Mac OS 10.2 oder neuer • eSATA Verbindung; Mac OS 10.4 oder neuer • Ihr Computer muss über den entsprechenden Anschluss (z.B. USB 3.0) verfügen • eSATA-Hostadapter mit eSATA Plug & Play Treiber und Port-Multiplier (nur für Non-RAID) Hinweis Um Volumen, die eine Kapazität von 2TB überschreiten, zu unterstützen, müssen der Computer und das Betriebssystem ebenfalls große Volumen über 2TB unterstützen (z.B. Windows 7 oder Mac OS 10.4 und neuer). 1.2 Über dieses Handbuch Die Firmware, Funktionen, Bilder und Beschreibungen in diesem Handbuch können eventuell von Ihrem erworbenen Produkt abweichen. Funktionen und Eigenschaften können sich je nach Firmware-Version ändern. Die neuste Version dieses Handbuchs ist erhältlich auf unserer Webseite bei http://www.inxtron.com/support/user-manuals. 1.3 Markenschutz • Microsoft, Windows XP und Windows 7 sind unter Markenschutz von Microsoft Corporation. • Apple Macintosh und Mac sind unter Markenschutz von Apple Computer. • Alle anderen Marken und Namen sind unter Markenschutz des jeweiligen Eigentümers. Seite 1 Hydra Super-S3 Einleitung 1.4 Produktansicht 1.4.1 Frontansicht LED/Taste Zustand und Bedeutung Blau = Strom eingeschaltet • • • • • CONFIRM 1.4.2 Grün = Festplatten-Status normal Grün blinkend = Datenzugriff (z.B. schreiben/lesen) Orange blinkend = Beim Wiederherstellen des RAID-Array Rot = Defekte Festplatten Aus = Leerer Laufwerksschacht oder Schnittstellenkabel ist noch nicht and den Computer angeschlossen Bestätigungstaste für den RAID-Modus. Drücken und halten Sie die Taste, schalten Sie den Strom ein, warten Sie für 5 Sekunden und lassen Sie dann die Taste wieder los. RAID-Schalter Schalterstellung Funktion 0 RAID 0 Striping mit 2-4 Festplatten 1 RAID 1 Mirroring mit 2 oder RAID 10 mit 4 Festplatten 2 Spanning mit 2-4 Festplatten (erstellt ein einzelnes großes Volumen) 3 RAID 5 mit 3-4 Festplatten 4 Non-RAID mit 1-4 Festplatten (Platten sind unabhängig von einander) Hinweis Wenn die RAID Ein-stellung geändert wird, müssen die Festplatten neu formatiert werden und alle vorhandenen Daten werden somit gelöscht. 1.4.3 Rückansicht Beschriftung Bedeutung Sicherheitsschlüsselloch ON/OFF Ein/Ausschalter eSATA Externer SATA Anschluss FW800 FireWire 800 Anschluss USB 3.0 USB 3.0 SuperSpeed Anschluss DC 19V Netzanschluss Hinweis Schließen Sie immer zuerst das Schnittstellenkabel an und schalten Sie den Computer ein, bevor Sie das Gerät einschalten. Andernfalls laufen die Lauftwerke nicht an und Sie können somit nicht auf die Daten zugreifen. Seite 2 Hydra Super-S3 Einleitung 1.4.4 Temperaturgesteuerter Lüfter Der Lüfter passt seine Geschwindigkeit automatisch der Temperatur des Gerätes an. Wenn die Festplatten im Ruhestand sind, schaltet sich der Lüfter aus. Von 0-45 Grad Celsius läuft der Lüfter auf der niedrigsten Stufe, erhöht dann die Geschwindigkeit alle 5 Grade bis zu 60 Grad, von wo er auf der höchsten Stufe läuft. Status/Temperatur Lüftergeschwindigkeit Ruhestand Aus 0-45° Langsam 46-50° Normal 51-60° Schnell 61° und höher Maximum 1.5 RAID Modus Je nach RAID Einstellung, kann nur eine bestimmte Anzahl von Festplatten verwendet werden. Es ist nicht möglich zusätzliche Platten zu einem bestehenden RAID System hinzuzufügen, ohne die Platten neu zu formatieren. Um zusätztliche Platten zu installieren, schalten Sie das Gerät aus, installieren Sie die neuen Platten, bestätigen Sie den neuen RAID-Modus und erstellen Sie dann eine neue Partition. Dieser Prozess löscht alle vorhandenen Daten! Hinweis Für einen RAID-Array (z.B. RAID 0, RAID 1, RAID 5), Festplatten mit gleicher Kapazität sind empfohlen, andernfalls hängt die zugängliche Speicherkapazität von der Festplatte mit der kleinsten Kapazität ab. 1.5.1 Disk Striping (RAID 0) Die Festplatten werden als ein großes Volumen erkannt, aber die erhältliche Kapazität hängt von der Platte mit der kleinsten Kapazität ab. Striping bietet gesteigerte Übertragungsgeschwindigkeit, indem alle Festplatten zusammengeschlossen und Schreiboperationen auf allen parallel durchgeführt werden. Falls eine der Festplatten ausfällt, bedeutet dies der Verlust aller Daten. HDD 2, 3 oder 4 Platten 1.5.2 Disk Mirroring (RAID 1) RAID 1 macht eine Kopie (Spiegelbild) der Daten auf der zweiten Festplatte, geeignet wenn Datensicherheit und Zuverlässigkeit wichtiger sind als die Speicherkapazität. Der Benutzer hat nur Zugriff auf 50% der Gesamtkapazität, abhängig von der Festplatte mit der kleinsten Kapazität, falls jedoch eine der Platten defekt ist, kann sie ausgetauscht und die Daten wiederhergestellt werden. HDD 2 Platten 1.5.3 Disk Mirroring und Striping (RAID 10) Die Festplatten werden als ein großes Volumen erkannt. RAID 10 macht eine Kopie der Daten, geeignet wenn Datensicherheit und Zuverlässigkeit wichtiger sind als die Speicherkapazität. Der Benutzer hat nur Zugriff auf 50% der Gesamtkapazität, abhängig von der Festplatte mit der kleinsten Kapazität, falls jedoch eine der Platten defekt ist, kann sie ausgetauscht und die Daten wiederhergestellt werden. HDD 4 Platten Seite 3 Hydra Super-S3 Einleitung 1.5.4 Disk Spanning (SPAN) Die Speicherkapazität ist eine Kombination von allen Festplatten, welche als ein großes Volumen erkannt werden. Spanning bietet keine Zunahme der Leistung und falls eine der Festplatten ausfällt, bedeutet dies den Verlust der Daten. HDD 2, 3 oder 4 Platten 1.5.5 Disk Striping mit Parität (RAID 5) Die Festplatten werden als ein großes Volumen erkannt. RAID 5 ist der ideale Mittelweg zwischen Datensicherheit, Speicherkapazität und Übertragungsgeschwindigkeit für 3 oder mehrere Festplatten. Der Benutzer hat Zugriff auf die Gesamtkapazität abzüglich einer Festplatte, abhängig von der Festplatte mit der kleinsten Kapazität. Falls eine der Platten defekt ist, kann sie ausgetauscht und die Daten wiederhergestellt werden. HDD 3 oder 4 Platten 1.5.6 Non-RAID (IND) Die Festplatten werden als unabhängiges Volumen erkannt und es wird kein RAID System erstellt. Diese Einstellung ist ideal für Festplatten mit unterschiedlichen Speicherkapazitäten, wenn nicht alle mit Disk-Spanning in einem RAID System verbunden werden. HDD 1, 2, 3 oder 4 Platten 1.6 Zum Thema Datensicherung Um Datenverluste zu vermeiden, empfehlen wir, immer zwei Kopien der Daten abzuspeichern. Eine Kopie auf dem Hydra und eine Kopie auf einem anderen Speicher, wie z.B. CD, DVD oder einer anderen Festplatte. Der Benutzer trägt die Verantwortung bei Problemen oder Verluste der Daten, die auf dem Hydra gespeichert sind. Der Hersteller kann unter keinen Umständen für die Wiederherstellung oder Entschädigung bei Datenverlust verantwortlich gemacht werden. Seite 4 Hydra Super-S3 Systemeinrichtung 2 Systemeinrichtung 2.1 Einbau der Festplatten 1. Entriegeln Sie den Schalter auf der Unterseite des Gehäuses und schieben Sie das innere Gehäuse nach vorne bis die Frontblende frei ist. 2. Ziehen Sie die Frontblende nach vorne und dann nach oben. 3. Drehen Sie die Schraube gegen den Uhrzeigersinn zum Lösen und ziehen Sie dann den Festplattenrahmen heraus. 4. Installieren Sie die Festplatten so wie unten abgebildet mit dem SATA Anschluss auf der Gegenseite der Frontblende. Befestigen Sie die Platte mit den sechs Schrauben von der Seite. 5. Schieben Sie den Festplattenrahmen sorgfältig zurück ins Gehäuse bis die Platte einrastet und drehen Sie dann die Schraube im Uhrzeigersinn. 6. Wiederholen Sie die vorherigen drei Schritte für die übrigen Festplatten. Die Platten können in einer beliebigen Reihenfolge und Position eingebaut werden 7. Stellen Sie den RAID-Schalter auf die gewünschte Position und verbinden Sie das Gerät mit dem Computer. Drücken und halten Sie die CONFIRM Taste, schalten Sie den Strom ein, warten Sie für 5 Sekunden und lassen Sie dann die Taste wieder los. Montieren Sie die Frontblende und formatieren Sie die Festplatten. Seite 5 Hydra Super-S3 Systemeinrichtung 2.2 Setup-Anleitung 1. Schließen Sie das Schnittstellenkabel (z.B. USB 3.0) an das Gerät und an den Computer an. 2. Falls Sie das Gerät zum ersten Mal einschalten, stellen Sie den RAID-Schalter auf die gewünschte Position, drücken und halten Sie die CONFIRM Taste, schalten Sie den Strom ein, warten Sie für 5 Sekund und lassen Sie dann die Taste wieder los. Andernfalls können Sie an dieser Stelle einfach das Gerät einschalten. 3. Die Platten A&B laufen zuerst an und etwa 7 Sekunden später folgen die Platten C&D. 4. Falls Sie das Gerät zum ersten Mal einschalten, erstellen Sie nun eine neue Partition und formatieren Sie die Festplatten. Einige Anmerkungen zur Verwendung Ihres Speichergerätes: • Nur eine der Schnittstellen kann zur selben Zeit verwendet werden. Bevor Sie das neue Kabel anschließen, entfernen Sie zuerst alle anderen Kabel. • Schließen Sie immer zuerst das Schnittstellenkabel an und schalten Sie den Computer ein, bevor Sie das Gerät einschalten. Andernfalls laufen die Lauftwerke nicht an und Sie können somit nicht auf die Daten zugreifen. • Um Datenverluste zu verhindern, entfernen Sie zuerst das externe Gerät vom System, bevor Sie das das Kabel entfernen oder das Gerät ausschalten. • Um Volumen, die eine Kapazität von 2TB überschreiten, zu unterstützen, müssen der Computer und das Betriebssystem ebenfalls große Volumen über 2TB unterstützen (z.B. Windows 7 oder Mac OS 10.4 und neuer). 2.3 Austausch einer defekten Festplatte Wenn eine der Festplatten ausfällt, leuchtet die zuständige Festplattenanzeige Rot auf. Wenn nur eine Festplatte defekt ist und die RAID Einstellung RAID 1, RAID 5 oder RAID 10 ist, können die Daten nach wie vor gelesen werden, die defekte Platte sollte jedoch so schnell wie möglich ersetzt werden, um die Datensicherheit zu gewährleisten. Falls mehr als eine Platte zur selben Zeit ausfällt oder wenn die RAID Einstellung RAID 0 oder Spanning ist, sind alle Daten verloren und das Gerät kann erst wieder benutzt werden, nachdem die defekten Platten ausgetauscht wurden. 1. Überprüfen Sie die Festplattenanzeige. Rot bedeutet ein defektes Laufwerk. 2. Schalten Sie das Gerät aus, tauschen Sie die defekte Festplatte gegen eine neue aus und schalten Sie dann das Gerät wieder ein. 3. Für RAID 1, RAID 5 und RAID 10 beginnt nun das Wiederherstellen der Daten, welches je nach Kapazität der Festplatten mehrere Stunden dauern kann. Während dieses Vorgangs blinkt die Festplattenanzeige Orange und Datenzugriff ist langsamer als normal. 4. Für RAID 0 und Spanning, drücken und halten Sie die CONFIRM Taste nach dem Austausch des Laufwerks. Schalten Sie das Gerät ein und lassen Sie die CONFIRM Taste nach etwa 7 Sekunden wieder los. Erstellen Sie eine neue Partition und formatieren Sie die Festplatten. 5. Für Non-RAID, stellen Sie sicher, dass es keine bestehenden Partitionen auf dem Laufwerk hat, schalten Sie das Gerät ein und formatieren Sie die neue Festplatte. Hinweis Wir empfehlen während des Wiederherstellens der Daten das Gerät nicht auszuschalten aber falls es unterbrochen wird, wird der Vorgang beim Einschalten fortgeführt. Seite 6 Hydra Super-S3 Anhang 3 Anhang 3.1 Sicherheitsanweisungen 3.1.1 Vorsichtsmaßnahmen Platzieren Sie das Gerät niemals auf anderen Geräten, die sehr heiß werden können und lassen Sie genug freien Raum um das Gerät. Vermeiden Sie ebenfalls folgende Stellen: • • • • • Stellen mit direkter Sonneneinstrahlung oder neben anderen Wärmequellen über 35° C. Orte, die Vibrationen oder Stößen unterworfen sind oder Stellen, die schräg abfallen. Sehr staubige, sandige, feuchte oder nasse Orte. Bedecken Sie niemals die Lüfteröffnungen. Setzen Sie das Produkt keinesfalls Wasser oder einer feuchten Umgebung aus. 3.1.2 Elektrizität und Netzteil Um Funktionsstörungen Ihres Gerätes zu vermeiden und Verletzungen, Elektroschocks und Brände auszuschließen, müssen folgende Punkte besonders beachtet werden: • Beim Entfernen des Stromkabels immer am Stecker und niemals am Kabel ziehen und das Stromkabel nicht mit nassen Händen anstecken oder entfernen. • Stellen Sie sicher, dass der Ein-/Ausschalter auf der OFF-Position ist wenn Sie das Stromkabel anschließen und verbinden Sie erst das Stromkabel mit dem Gerät, bevor Sie es an die Steckdose anschließen. • Wenn das Gerät beschädigt ist, entfernen Sie das Stromkabel. 3.2 FAQ F: Mit welchem Dateisystem soll ich meine Festplatten formatieren? A: Es kommt darauf an, wie Sie das Gerät verwenden. Als Richtlinie empfehlen wir: • Windows NTFS • Mac OS X HFS+ (Mac OS Extended) • Geeignet für PC und Mac FAT32 (einzelne Dateigröße ist auf 4GB beschränkt) F: Wie viele Platten können ausfallen, bevor die Daten verloren gehen? A: Dies hängt von der RAID Einstellung ab. Für RAID 0 und Spanning führt bereits eine defekte Platte zum Verlust der Daten. Für RAID 1, RAID 5 und RAID 10 führt mehr als eine defekte Platte zum Verlust der Daten. F: Gehen die Festplatten mit dem Betriebssystem in den Ruhestand? A: Ja, die Laufwerke und der Lüfter gehen ebenfalls in den Ruhestand. F: Warum leuchtet die Festplattenanzeige für eine oder mehrere der Laufwerke nicht? A: Falls weniger als vier Platten installiert sind, bedeutet es lediglich, dass in dieser Schublade keine Festplatte installiert ist. Andernfalls bedeutet es, dass das Schnittstellenkabel noch nicht and den Computer angeschloßen oder der Computer noch nicht eingeschaltet ist. © Copyright 2013 by inXtron, Inc. All Rights Reserved Änderungen des Inhaltes dieser Anleitung sind ohne Vorankündigung vorbehalten. Kein Teil dieser Anleitung darf ohne die schriftliche Genehmigung des Herstellers reproduziert werden. Die in dieser Anleitung dargestellten Anzeigebeispiele und Beschreibungen können von den tatsächlichen Anzeigen des aktuellen Produkts oder dem Inhalt etwas abweichen. inXtron ist nicht verantwortlich für irgendwelche Schäden oder Verluste, die auf die Verwendung dieser Anleitung zurückzuführen sind. Seite 7