1
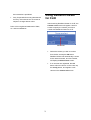
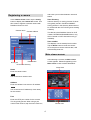
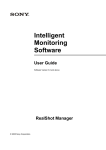
RealShot Viewer for CLIE
User’s Manual
Version 1.0
10 October 2003
© 2003 Sony Corporation
Table of Contents
Introduction
Operating environment ......................... 2
The RealShot Viewer for CLIE is an application
that allows you to use the CLIE (Palm OS 5.0
or later) to remote control your network camera
(SNC-RZ30N/P or SNC-Z20N/P), for viewing
images taken by your camera, and saving
pictures.
Notes ...................................................... 2
Registering a camera............................. 4
Main viewer screen................................ 4
Image area.......................................... 5
Control area ....................................... 5
This document shows you how to use
RealShot Viewer for CLIE to operate your
camera.
Miscellaneous controls....................... 6
Capturing pictures ................................ 6
Configuring RealShot Viewer for CLIE 7
Registering a new camera ................. 7
Operating environment
Changing camera settings ................. 7
Removing a camera............................ 7
Network settings ................................... 7
OS
Palm OS 5.0 or later (Sony
CLIE)
Required Free
Memory
Approx. 100KB
Supported
Models
CLIE:
PEG-NX70V
LAN Card:
PEGA-WL110
Compatible
Network
Camera
SNC-RZ30N/P (firmware
version 1.10 or later)
Image Size
640×480, 320×240,
160×120
SNC-Z20N/P (firmware
version 1.00 or later)
Notes
•
RealShot Viewer for CLIE is a copyright of
Sony Corporation.
•
RealShot Viewer for CLIE is distributed
without warranty. Sony Corporation is not
responsible for any damages incurred as a
result of use of this software.
•
Unauthorized distribution, reprinting, or
modification of this software or
2
documentation is prohibited.
•
Using RealShot Viewer
for CLIE
Sony Corporation does not guarantee the
accuracy of this document. Its content is
subject to change without notice.
After launching RealShot Viewer for CLIE, the
Camera select screen will appear. Use this
screen to specify the camera you wish to
control with RealShot Viewer for CLIE.
Palm OS is a registered trademark of Palm,
Inc. and its subsidiaries.
Camera list
•
Select the camera you wish to monitor
from the list, and tap the OK button.
RealShot Viewer will automatically connect
to the network camera, and if successful,
will display the Main Viewer screen.
•
If no cameras are registered, the OK
button will not be shown. In this case, tap
the Config button, and register a new
camera in the Camera edit screen.
3
and enter a port number between 1024 and
65535.
Registering a camera
Save directory
In the Camera select screen, tap the Config
button to display the Camera edit screen. Use
this screen to register a network camera with
RealShot Viewer for CLIE.
Select a directory for saving pictures. Pictures
are typically saved in /DCIM/101/MSDCF.
Saving pictures in this directory allows them to
be viewed with the CLIE Viewer (photo viewing
software).
Camera name
Camera address
The directory that RealShot Viewer for CLIE
creates, PALM/PROGRAMS/RSViewer, may
also be stored in CLIE's internal memory (if
available).
Save number
This displays current saved picture number.
Tap the Reset button to reset the counter.
Once the picture counter reaches 999, it will
automatically reset to 0.
Main viewer screen
After selecting a camera, the Main viewer
screen appears. Elements appearing in the
Main viewer screen are described below.
Reset button
HTTP port
Photo save directory
Image area
Name
Enter the camera name.
Note
You must enter a camera name.
Address
Enter the camera's host name or IP address.
Note
You must enter an IP address (or host name)
for the camera.
Port
Enter the HTTP port number for the camera.
This is typically port 80. When using a port
number other than 80, tap the lower check box,
Control area
4
Image area
If the camera's image size settings meet
RealShot Viewer for CLIE's supported sizes
(640×480, 320×240, 160×120), then the
displayed image size is fixed at 320×240.
Tapping this button returns the camera to the
factory set home position.
Pan and Tilt controls
These buttons are not available for use with
the SNC-Z20N/P.
Note
When using the SNC-RZ30N/P, you can use
the image area to control camera tilt and pan.
•
Tap the upper part of the image area. The
Tap this button to zoom in.
camera will then move to center itself on
the tapped position.
•
When using the SNC-RZ30N/P (firmware
Tap this button to zoom out.
version 2.00 or later), you can zoom in
while tilting and panning. Drag the stylus
diagonally across the upper part of the
image area. A red frame will appear. As
Tap this button for maximum zoom in (25×).
your drag the frame with the stylus, the
camera will move to center the area within
the frame, and at the same time zoom in.
Tap this button for maximum zoom out (1×).
Note
The frame rate on the CLIE will change
depending on the camera's image size. To
increase the frame rate and refresh speed, set
the image size to 160×120.
Tap this button for one-touch auto-focus. This
control is only available when focus mode is
set to Manual on the camera.
Control area
Tapping this button enables you to pan and tilt,
etc. After tapping the button, wait time or
control time will be displayed in seconds. Wait
time and control time are only displayed when
the camera's Exclusive control mode is set to
ON.
For the currently displayed picture, tap the
arrow button corresponding to the direction
you wish to move. Holding down the button will
cause the camera to continuously move in that
direction.
Tapping the STOP button will change the
displayed button to START, and viewer
operation will stop. During this time, image
refresh will stop, and pan, tilt, and zoom
control of the camera is unavailable. Tap the
Note
These buttons are not available for use with
the SNC-Z20N/P.
5
START button. The displayed button will
change to STOP, and image refresh resumes.
camera control with the CTRL button, you can
use the application buttons, scroll button, and
arrow keys to control tilt, pan, and zoom. When
not in the Main viewer screen, these buttons
behave as they normally do.
Selecting a Preset position from the popup list
causes the camera to move to a preconfigured
preset position. If no preset positions have
been recorded on the camera, then the popup
list will not be shown.
Capturing pictures
Tapping the Capture button in the Main
viewer screen displays the Capture screen,
which allows you to capture and save static
pictures of the video currently being taken by
the camera.
Displays a Capture screen.
Displays the Setting screen.
Note
The directional arrows, home button, and
Preset position are not available with the
SNC-Z20N/P.
Miscellaneous controls
Tap the Save button once to store a picture in
the directory specified in the Camera edit
screen. File names are of the form
CameraName_counter.jpg.
Controlling the camera with the jog dial
You can use the jog dial to control RealShot
Viewer for CLIE and your camera.
Rotate up:
Note
Zoom in a fixed amount
(after enabling camera
control with the CTRL
button).
Rotate down:
Zoom out a fixed amount
(after enabling camera
control with the CTRL
button).
Press and
hold:
Capture and display static
picture.
Press and
rotate down:
Display Setting screen.
If a file of the same name already exists,
RealShot Viewer for CLIE will overwrite it with
the new file.
Hardware button controls
In the Main viewer screen, after enabling
6
button will not be shown.
Configuring RealShot Viewer
for CLIE
Changing camera settings
Tap the Edit button to change the settings of a
registered camera. The Camera edit screen
will appear, allowing you to edit camera
settings.
In the Main viewer screen, tap the Setting
button to display the Setting screen, which
allows you to configure RealShot Viewer for
CLIE controls.
Removing a camera
Connect/Disconnect button
Tap the Clear button to remove a registered
camera. A confirmation message will appear
on the screen. Tap the OK button.
Network setting button
Clear button
Edit button
Camera list
If no cameras are registered, then the Clear
button will not be shown.
New button
Network settings
Connection
In the Setting screen, tap the Setting button
beside Network setting to display the
Network setting screen, which allows you to
configure camera network settings.
You can manually connect and disconnect
from the network.
Network setting
Proxy settings
To specify network settings, such as proxy
settings, tap the Setting button to display the
Network setting screen.
Timeout setting
Camera select
Select the camera you wish to monitor from
the camera list.
Registering a new camera
To register a new camera, tap the New button
to display the Camera edit screen.
Up to 16 cameras can be registered. If 16
cameras are already registered, the New
Application close network settings
7
Proxy settings
When connecting to the camera via a proxy
server, check the Use proxy check box. Enter
the address and port number of the proxy
server into the Address and Port fields.
Address and port settings remain saved until
they are replaced by new values.
Timeout setting
The connection timeout value (in seconds) can
be set to 5, 10, 20, 30, 60, or 90. Choose a
larger value when operating within a slow
network. This value defaults to 10.
Application close network settings
Choose whether to close the network
connection when RealShot Viewer for CLIE is
closed.
Close:
Close the connection.
NOT Close:
Keep the connection open.
Notify:
Display a network close/keep
open dialog window. Tap the OK
button to close the connection.
Tap the Cancel button to keep
the connection open.
8
Revision history
Version
1.0
Date
10 October 2003
Comment
First edition, first issue
9