1
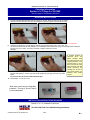
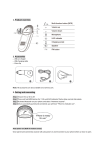
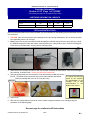
Employee Instructions - Internal Use Only
Cartridge Information
Brother LC-51 (Page 1 of 2)(OEM)*
*See subsequent page for Compatible instructions
CARTRIDGE INFORMATION / WEIGHTS
Cartridge
LC-51 B
LC-51 C / M / Y
Ink (s)
Fill mls
Empty Weight
Full Weight
B5
19
39.6
57.5*
C7 / M7 / Y3
8
35.4
44.5*
*Weights include outer casing.
REFILLING INSTRUCTIONS
Note: this process does NOT use the vacuum chamber. For more information on manual filling using the VFM 3200, see Technical Procedures.
1. CAUTION: Care must be exercised not to damage the air valve during disassembly. The air valve is the white
stem protruding from the air vent port.
2. Note: Proper care must be exercised to avoid damaging the external casing. Remove outer casing by cutting
the OEM label along the seam with a knife. Install screw driver in casing and pry open. Continue inserting the
screw driver on the same side and pry until the case pops open.
3. Remove the inner cartridge. Drill fill hole with the cartridge orientated as shown below. Note: some cartridges
have a divide, as shown below. Ensure you drill on the correct side.
4. Using the syringe draw the correct amount of ink and insert the needle fully into the
fill hole. The needle must pass all the way into the main chamber (see below).
The yellow cap should be
saved by the customer
Slowly fill cartridge with up to 19 ml of ink (8ml color).
for transportation of the
Drill Here
cartridge. This is also
recommended in the
Brother user manual.
5. Seal fill hole.
6. With a 20 ml. syringe draw air from the air vent to create a negative pressure in the cartridge using the
procedure on the following page.
See next page for continued refill instructions
© 2007 Island Ink-Jet Systems Inc.
V1.3
B8
Employee Instructions - Internal Use Only
Cartridge Information
Brother LC-51 (Page 2 of 2)(OEM)*
*See next page for Compatible instructions
REFILLING INSTRUCTIONS
7.
8.
Hold the cartridge sideways with the air vent above the ink port. Place the 20ml syringe w/ needle
removed over the white stem and push the cartridge and syringe together until they are touching.
*Note, some syringes may be too small to fit over the white plug. You may need to try several to find one that fits.
Holding the cartridge and syringe together draw the syringe plunger back to the 10 ml. mark. This
action should draw mostly air and possibly a few ink bubbles. Now separate the syringe and cartridge while holding the
plunger at the 10 ml. mark. This action will leave a negative pressure in the ink
cartridge.
9.
Insert the filled cartridge into the external casing. Secure the external casing using clear mylar
tape (BV item #08037). Cut the mylar tape in half lengthways and apply as shown in pictures
below.
Do not cover the ink monitor window with the tape!
10. Repeat steps 2 - 9 for each color.
A negative pressure is
achieved when the
plastic cartridge sides
are collapsed inward. If a
negative pressure is not
achieved there is an air
leak. This leak may have
been caused by; the refill
needle puncturing the
cartridge, the fill hole is
not properly sealed, or a
defective valve and/or
ink port.
Blue tape is used only for illustration
purposes. The use of Scotch Tape is
not recommended.
INSTALLATION INSTRUCTIONS REQUIRED
Brother LC-41 / 51 Installation Instructions
See the Help Desk for troubleshooting assistance
© 2007 Island Ink-Jet Systems Inc.
V1.1
B9