1
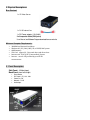
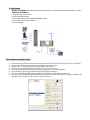
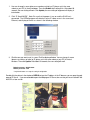
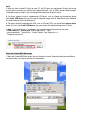
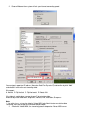
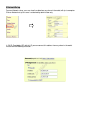
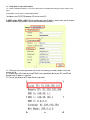
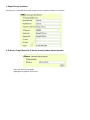
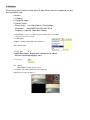
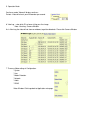
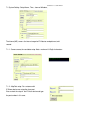
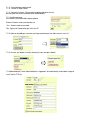
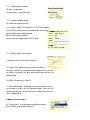
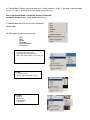
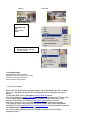
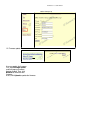
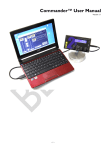
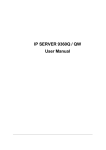
1. Product Overview
IP Video Server has an IP digital web server inside. With this great gadget you can put up 4 different sources
with only one set of IP, for example (live security observing, online education, TV shows, video games, etc) make
remote locations immediately accessible through standard web browsers.
IP Video Server is equipped with cutting edge technology, includes 4 video in, 1 audio in, a web server, and
physical Ethernet connection. Therefore it does not need to plug in front of computer, you can simply just
plug into an internet line and start observing or broadcasting from anywhere in the world.
Features:
1. Embedded Web Server
2. Support 1 audio in with 4 Video Inputs for Multi-video source from different area.
3. Round Robin: display 4 video at same screen – update in turns. and can record all four
channel in different file
4. Resolution - True 640x480, 352x288, 320x240, 176x144,& 160 *120
5. Video Quality - Low, High
6. Color adjustment: Brightness, Contrast, Hue, and Saturation
7. Motion Detection:
a. Three-Sensitivity Level.
b. E-mail the Detected Images to preset e-Mail address.
c. FTP the Detected Images to preset FTP server.
8. Support Network - Fixed IP, DHCP or PPPoE , and DDNS
9. Browser by Internet - IE (internet Explore) , NETSCAPE, Mozilla Firefox
( LINUX ).
10. Support Active X control.
11. A Linux based server
• 10/100BT LAN supported Built in JPEG Decoder Motion detection
• User may setup his email address in the system, let the system notice the user when an
event occur
• Provide some GPIOs for different application
12. Support GlobalSign – no need to lower security level.
13. Work with MSN& Yahoo Messenger, AMCAP, and WMCAP & VIDCAP program
14. Supply Exclusive IP Service for easily find on Internet by name
15. Report IP Address every two hours
2. Physical Descriptions:
Box Content
1 x IP Video Server
1 x RJ 45 internet line
1 x DC Power adopter (110~240V)
2 x Composite Cable (RCA jacks)
User Manual and Software Program download from our web site
Minimum Computer Requirements;
• 300MHz Intel Pentium II and above
• Windows 98 / SE / 2000 / ME / XP, or LINUX, MAC system
• 64MB memory
• VGA Card support Hi - Colors and above and direct draw
• Internet card - RJ 45 (CAT 5) Internet Hub / Router
•
Internet : one set of IP provided by your ISP EX:
xxx.xxx.xxx.xxx
3. Panel Description
Side Panel: 4 Video Input;
Back Panel: from left to right:
•
•
•
•
•
Reset Button
DC Power - 5V, 110 ~ 240.
Power On / Off
Network - RJ 45
Audio input
4. Installation
Before installation: Reconfirm your package content; Prepare a Hub for Internet monitor; Electricity 110 ~ 240 V
Hardware Installation:
1. Plug in IP Video Server Power
2. Plug in RJ 45 line to a HUB
3. Connect the HUB to Internet modem (ADSL/XDSL modem)
4. Connect Video source for IP Video box
5. Turn on computer
Quick Software Installation Steps:
1.
2.
3.
4.
5.
6.
7.
8.
Download the IP_Family.rar file, and uncompress the file into your PC (such as in C drive: IP_Family).
Connect the AC adapter, and make sure turning on the video server
Connect CAT 5 to a router (Internet hub), and the video server
Connect Camera video output to the video server's video input port.
Go to the uncompressed file folder (IP_Family), and click Setup for installation
Go to IP Family, and click IP_KamVid(1070) to find the IP address.
You may also click the iPEdit and you will see the IP address of IP Video: xxx.xxx.x.xx
You may either Double click the IP Video address or Open a new Internet Explorer window, and input the
IP address for viewing the video on-line. http:xxx.xxx.x.xx
1. User can change its name (please use numbers or letter) or IP (please set in the same
subnet as your PC) in the text windows. Then click Submit after setting finish. After about 20
seconds, the new setting will work. Click Update, the new setting of equipment will display in
text window.
2. Click “IP KamVid1070”. Note: Be sure that the power is turn on and the RJ45 line is
connected. The KIPEdit program will detect all active IP video server in the same local
Ethernet, and displayed similar as shown in the following window.
3. Click the one you want to set, its name, IP will be displayed below. You can change its name
(please use numbers or letter) or IP (please set in the same subnet as your PC) in the text
windows. Then click Update. After about 20 seconds, the new setting will work.
Default username : Administrator
Default password : 1234
* Only Administrator can setup the setting in configuration.
Double click the picture in the window of KIPEdit or type the IP address in the IE browser, you can open the web
page of IP Server. If you are not be able to open the web page of IP Server, be sure that you have installed IE 6.0
with SP1 or later version
NOTE:
1. After you have installed IP Family on your PC, the IP Server was registered in DirectX and can be
used as local camera by any software that supported DirectX, such as MSN, Amcap, Media encoder,
Yahoo Messenger as long as you not change the directory path of ipcam’s driver.
2. For those software that only supported old VFM driver, such as Vidcap and netmeeting, please
click install VFM device, then you can get the captured images from IP Video Server (you should be
the administrator at the first install process)
3. For those not totally compatible with VFM, such as QQ and POPO, you should click remove device
button first, then click install VFM device, then you can get the captured images from IP Server.
4. Note : if stay for long time as in webpage , you would be unable setting and see message
“ Cookie time out “ , please go to IE to change setting: “ Tools “
“ Internet operations ” , please click “ Delete Cookies “ and “Delete files “ in
“ Temporary Internet file “.
Work with Yahoo /MSN Messenger
1. Work with Yahoo /MSN Messenger: We use Yahoo for instance. Select the friend you would like to
send your video. For instance, we pick up YahooHelper.
2. Choose Webcam then system will ask your Internet connecting speed.
You can type in appointed IP address (No matter Real IP or Dynamic IP) and confirm by click “Add”
and choose if reverse the out streaming video.
We support
A. Normal B. Flip Vertical C. Flip Horizontal D. Rotate 180
If the video is upside down, you can choose D to get rotate video.
And also adjust the video color ; Brightness, contrast, Hue, Saturation, Sharpness
Note
1 : for safety issue , as transfer video by Yahoo /MSN, only Administrator can do the video
streaming. You have to type the username and password.
2 : Work with Yahoo/ MSN , the streaming speed is depend on Yahoo .MSN server.
5.NetworkSet up
From our Network set up, users can view live video from any where in the world, with just a computer.
Click on Network set up: this area is authorized by administrator only.
1. Still IP: Provided by ISP, with this IP you can connect this address from any where in the world.
Please refer the following illustration:
1-1 : Using Still IP: list your still IP address
1-2 : Choose “Reboot immediately”. Please close your browser and reboot again and type in your IP address once
again.
If using DHCP, please choose‘ Automatically by DHCP”
*And please use IP EDITOR program (Find users exact IP)
2. DHCP setup - ADSL / xDSL: ISP will provide your exact IP address, please enter your Username
and password for your provider. Please refer the following illustration:
2-1 Enter your user name, password, mail server, mail name (pass word), sender e-mail, and
receiver e-mail.
2-2 Choose Save & Dial Now, by using PPPoE it can automatically dial to your ISP, and ISP will
provide exact IP address in your mail.
2-3 Turn off your browser of IP Video Server and restart
3. Report IP every two hours:
Select the area”” send mail to tell interest IP” and you can get e-mail advice IP address every 2 hours.
4. IP Service: Supply Exclusive IP Service for easily find on Internet by name.
Step1: click “connect” green button
Step2: type the keyword in “ device name “
6. Functions
Please refer to all the function on the left side of IP Video Server; most of its configuration can only
be use by Administrator.
Functions:
1. IP address
2. Change Password
3. Camera Control:
Picture Quality - Low, High, Medium, Clarity& Motion
(Resolution)
- 640*480,352*288,320*240,176*144
Frequency – Indoor 50, Indoor 60 & Outdoor
7. Configuration: System, User, Motion detection, Network, Channel, and DDNS
8. Right click function: Record, Snap,
3-3: Color Adjust
: Brightness Contrast, Saturation, Hue, Sharpness
STD is Default color
4. Image (Split)
- 1 or 4
Support Round Robin – Display multi - channel in one IP address .
The select channel will display by turns.
4-1: 4 screen –
Plus support
“ Round Robin” function, you can select
1- 4 channel and choose split 4, than you can get four
video in on screen one IP address.
5. Operation Mode:
Continues mode: Video will display continues
Period – Video will refresh per millisecond or per second. .
6. View Log – view which IP has been visiting your Live image
Note: View/Log / Camera Window
As in View Log, the video will not show on windows, to get the video back. Please click Camera Window.
7. There are Video settings in Configuration:
* System
* User
* Motion Detection
* Network
* Audio
* DDNS
Video Window: Click to go back to Application main page.
IP VIDEO Server USER MANUAL
7-1 System Setting: Setup Name , Time , show on Windows,
The Interval (MS ) means the interval range for IP Video to send picture at mini
second.
7-1-1 : Camera name, time and date setup. Note: maximum 18 English characters
7-1-2 : Http Port setup : For customer with
IP Sharer device can setup the share port
Please check the setup in the IP Share device and type
the port number in this area.
7-1-3 : Reset to factory configuration
7-1-4 : Restart IP Video Server
7-1-5 : Renew its firmware : Please note the update procedure can not
be interrupt or the device would be not be work probably.
7-2. User Management:
Can choose user authorization require optional
Choose if viewers need a password or not.
*Yes - Viewers needs a password
*No - Open to all viewerswho logs in to users IP
7-2-2: Add user by adding a username and a password and you can add a current users list.
7-2-3: You can also delete a user by selecting its name and press delete.
7-3: Motion detection: when motion detection is triggered, it will automatically send video or image to
user E-mail or FTP site.
7-3-1: Choose motion detection:
*Disable – no detection.
*Enable: choose – Low / Mid / High
7-3-1-1: Motion Detection Setup:
Fill sender mail and receiver mail.
7-3-1-2: When send to FTP, please fill in its FTP server address,
user name, password, account and upload path, and click on
Upload images when motion detected.
Please refer the right illustration:
You can safe file in appointed file like file “abcd”
7-3-1-3 :Note setting : Future support.
7-4 Network setting : Please refer in page 14.
7-5 . Audio : Only Administrator can enable and disable
the audio . If audio is on, both administrator and guest user can hear
the audio, if the audio is off, both administrator and guest can not
hear the audio.
7-6 DDNS : Please refer in Page 25.
7-7 Click Video Window - Go back to the Camera Window, User can
try to choose the Splits and the Operation Mood. If you feel the
screen throb too fast, You can change the Periodic more than 60,
such as 500 or 600 or…
8. Mode and source select :
8-1. Fixed: select 1~ 4 for changing every different channel.
(Only one channel for display each time.)
8-2. Round Robin: Displays select channel by turns. If select 4 channel , in split 1 , the video show three video
by turns. If in split 4, all the4 channels can display in one IP by turns.
When select Round Robin , if record the channel, IP Video will
record all 4 channel Video ( record update video in turns)
9. Video Window: after click, the left screen will back to
Monitor video.
10. When right click mouse, it can also use:
-
View
Splits
Rotate
Resolution
Image Recording
Save picture
10-1 View
- Resizable: adjust screen size.
- Actual size: default to original size.
- Status Bar: show ip address, and screen size.
10-2 Split
- 1x1, 2x2, 3x3, 4x4
- Split to 1,4,9,16 continuous screen
10-3 Rotate
- Rotate 0
- Rotate 180
- Flip Horizontal
- Flip Vertical
Rotate 0
Rotate 180
10-4 Quality: Low
High
Medium Clarity
Motion
10-5 Resolution
- 640*480, 352*288 , 320*240,
176*144, 160*120
10-6 Image Recording
-Record image to JPEG and AVI file.
Both format can be recorded in the same time.
JPEG: can select how many pictures
taken in each file. And time frame.
11. Dynamic DNS (DDNS)
When the IP Server dial up to the internet network, your IP provided by your ISP is random.
So the user may difficult to find your IP Server because the ip is changing at every time it
dial up.
The Dynamic DNS service is provided by www.DynDNS.org for free.
First, user can logon the www.DynDNS.org to apply a domain name for each IP Server, then
fill in the follow textbox with proper user name, password, domain name, proxy server
(because some where can not logon the www.DynDNS.org directly, user may
find a proxy server first, such as 210.0.212.98). Click Submit to confirm the settings.
Then, every time the IP Server dial up to the internet network, it will send a data package
including its IP to the www.DynDNS.org, so www.DynDNS.org will set the domain name your
have applied before for this IP Server pointing to this IP.
So, user can type the domain name in the IE browser to find the IP Server without
knowing its exact IP.
IP VIDEO Server USER MANUAL
nother view open up
12. Firmware update
User can update the firmware.
First, click Firmware update
and it will pop up Firmware
Update window. Then, click
Browser to select the new
firmware.
At last, click Upload to update the firmware.
IP VIDEO Server USER MANUAL
FAQ
Q 1: I forgot the ID and password for the administrator account, so I cannot log into the
Administration Page.
A: Make sure IP Video Server is powered on and press the “reset” button behind sure IP Video
Server for at least 10 seconds, to help default camera setting to factory setting.
*Note: Factory Administrator ID and Password
ID: administrator
Password: 1234
Q 2 : The Web Camera does not launch?
A: Upgrade Internet Explorer or Netscape to 5.0 or higher version.
Sometimes the web camera base cannot bring 'index.html' from the web Camera when the Internet
Explorer version is at 4.0. And remember to adjust Internet default level to low when launching IP
Video’s AP for the first time.
Q 3: The Image recording cannot stop immediately?
A: If your IP is virtual IP, than it will not be happened. If your IP is true IP (EX: PPPoE or FIX IP….), than
it might be happened. You need to wait for a second and it will be return to normal.