1
Notice about the law and the standard
High Speed Colour Printer
Model: HC5000T
This product contains RFID (Radio Frequency Identification) system.
Model: 444-59003
Contains FCC ID: RPARFMHL00
This device complies with Part 15 of the FCC Rules. Operation is subject to the following two conditions: (1) this device may not
cause harmful interference, and (2) this device must accept any interference received, including interference that may cause
undesired operation.
The user is cautioned that unauthorised changes or modifications not approved could void the user’s authority to operate the
equipment.
This equipment has been tested and found to comply with the limits for a Class B digital device, pursuant to part 15 of the FCC Rules.
These limits are designed to provide reasonable protection against harmful interference in a residential installation. This equipment
generates, uses and can radiate radio frequency energy and, if not installed and used in accordance with the instructions, may cause
harmful interference to radio communications. However, there is no guarantee that interference will not occur in a particular
installation. If this equipment does cause harmful interference to radio or television reception, which can be determined by turning
the equipment off and on, the user is encouraged to try to correct the interference by one or more of the following measures:
•
•
•
•
Reorient or relocate the receiving antenna.
Increase the separation between the equipment and receiver.
Connect the equipment into an outlet on a circuit different from that to which the receiver is connected.
Consult the dealer or an experienced radio / TV technician for help.
Contains Canada IC: 4819A-RFMHL00
Operation is subject to the following two conditions: (1) this device may not cause interference, and (2) this device must accept any
interference, including interference that may cause undesired operation of the device.
This Class B digital apparatus complies with Canadian ICES-003.
Cet appareil numérique de la classe B est conforme à la norme NMB-003 du Canada.
Countries of intended use
Austria/Belgium/Denmark/Finland/France/Germany/Greece/Iceland/Ireland/Italy/Luxembourg/Netherlands/Norway/Portugal/
Spain/Sweden/Switzerland/U.K.
Copyright © 2005 RISO KAGAKU CORPORATION
i
Preface
Welcome to the world of this product!
This machine is an ink jet printer for high-speed full-colour printing that supports network. This printer allows various functions such
as data output and printer monitoring to be used from Windows and Macintosh computers.
The following three manuals are provided for this machine.
• HC5000 Series User's Manual for Printer Main Body
• HC5000 Series User's Manual for Printer Driver (this manual)
• HC5000 Series User's Manual for Console
• RISO HC5000 Navigation Book
Before using this machine or when something is not clear during use, read the relevant manual to make good use of this machine for
a long period.
About This User's Manual
Riso shall not be responsible for any damage or expense that might result from the use of this manual.
As we are constantly improving our products, the machine may differ in some respects from the illustrations used in this manual.
Riso shall not be liable for any direct, incidental, or consequential damages of any nature, or losses or expenses resulting from the
use of this product or included manuals.
Trademark Acknowledgments
Adobe®, Adobe Type Manager®, AdobePS®, ATM®, PostScript®, PostScript3®, PostScript logo, and PageMaker® are trademarks
or registered trademarks of Adobe Systems Incorporated.
AppleTalk®, Macintosh® and Mac OS® are registered trademarks of Apple Computer, Inc. in the U.S.A. and other countries.
Windows® is a registered trademark of Microsoft Corporation in the U.S.A. and other countries.
Netscape® and Netscape Navigator® are registered trademarks of Netscape Communications Corporation in the U.S.A. and other
countries.
ColorTune® is a trademark of Agfa-Gevaert N.V. registered at US Patent and Trademark Office and may be registered in other
regions of jurisdiction.
ComColor™, and FORCEJET™ are trademarks of RISO KAGAKU CORPORATION.
is a registered trademark of RISO KAGAKU CORPORATION in Japan and other countries.
All other product names and company names written in this manual are trademarks or registered trademarks of their respective
companies.
About the Manuals
The following manuals are supplied with this machine.
! HC5000 Series User's Manual for Printer Main Body
This manual explains notes that should be known before starting operation of this machine, actual printing operation on the printer,
and printer settings. This manual also explains the method of replacing consumables and troubleshooting.
! HC5000 Series User's Manual for Printer Driver
Means this manual. This manual explains the method of installing the printer and the installation procedure and the functions of
the printer driver.
! HC5000 Series User's Manual for Console
This manual describes the "Monitoring" function that is used for checking the printer status through a network.
! RISO HC5000 Navigation Book
Explains useful functions and features in colour.
ii
Notation of Explanation of Operation
The following symbols are used in this manual for description of functions, operation, and notes.
indicates items that should be noted or that are prohibited.
indicates description concerning particularly useful information or information that should be known.
indicates a title and page that should be referred to for understanding sufficiently an item. For referring to another operation
manual, the name of the manual is also written.
and
are cautions for safety. "Safety Precautions" are described in the User’s Manual for Printer Main
Body. Be sure to read these items before using this machine.
iii
Before Starting to Use
Connecting to a Computer
The machine is connected to a computer through network.
! When connecting the machine to multiple computers:
! When connecting the machine to a single computer:
• Use a commercially available S/UTP cable (shielded or non-shielded twisted pair cable) as a LAN cable.
• When connecting the printer through a network, if communication is not stable, use an STP cable as a LAN cable.
iv
Installation of Software
The supplied RISO Controller PS7R Software CD-ROM includes the following software. Install the software into your computer
before using this machine.
Following Software can be used in the following environment.
• Windows® 2000 / XP
• Mac OS® 9.2
• Mac OS® X10.2.x or later
! Printer Driver
This software is the printer driver of this machine that is needed to send original data created in the computer to this machine
for printing. When sending original data to this machine, you can set the print conditions with the printer driver.
! RISO IP Setting Tool
This software is required for setting the IP address of this machine. Before installing the printer driver, you must install this
software to set the IP address of this machine.
• Do not connect more than one machine of HC5000 when the IP address is not set (IP address is 0.0.0.0) to the same network.
• Do not set an IP address of a different segment from the computer to which IP Setting Tool is installed.
IP Address
The IP address is unique information that is assigned to each device for identification of devices on a network. For the IP address assigned to
this machine, ask the network administrator.
! ATM (Mac OS 9 only)
This software is used to display correctly PostScript fonts installed in this machine on the display of a computer.
If ATM fonts are used, an image that is close to the finished image can be displayed on the screen.
! Adobe PostScript Driver (Mac OS 9 only)
Install this if Adobe PS is not installed on your computer.
Setting of Consumables
When using this machine for the first time, you must load paper and ink cartridges into this machine in advance.
! Loading Paper
"Loading Paper" of "HC5000 User's Manual for Printer Main Body" "p.1-10
! Setting Ink Cartridge
"Ink Cartridge Replacement" of "HC5000 User's Manual for Printer Main Body" "p.3-15
v
Contents
Chapter1 Installing the Printer Driver . . . . . . . . . . . . . . . 1-1
Describes the method of installing the printer driver for this machine.
Setting on Windows Computer . . . . . . . . . . . . . . . . . . . . . . . . . . . . . . . . . . . . . . . . . . 1-2
Installing RISO IP Setting Tool . . . . . . . . . . . . . . . . . . . . . . . . . . . . . . . . . . . . . . . . . . . . . . . . . . . 1-2
Network Setting . . . . . . . . . . . . . . . . . . . . . . . . . . . . . . . . . . . . . . . . . . . . . . . . . . . . . . . . . . . . . . 1-4
Installing the Printer Driver . . . . . . . . . . . . . . . . . . . . . . . . . . . . . . . . . . . . . . . . . . . . . . . . . . . . . . 1-6
Uninstalling the Printer Driver . . . . . . . . . . . . . . . . . . . . . . . . . . . . . . . . . . . . . . . . . . . . . . . . . . . . 1-9
Setting on Macintosh (Mac OS 9) . . . . . . . . . . . . . . . . . . . . . . . . . . . . . . . . . . . . . . . 1-10
Installing RISO IP Setting Tool . . . . . . . . . . . . . . . . . . . . . . . . . . . . . . . . . . . . . . . . . . . . . . . . . . 1-10
Network Setting . . . . . . . . . . . . . . . . . . . . . . . . . . . . . . . . . . . . . . . . . . . . . . . . . . . . . . . . . . . . . 1-12
Installing Adobe PS . . . . . . . . . . . . . . . . . . . . . . . . . . . . . . . . . . . . . . . . . . . . . . . . . . . . . . . . . . 1-13
Installing the Printer Driver . . . . . . . . . . . . . . . . . . . . . . . . . . . . . . . . . . . . . . . . . . . . . . . . . . . . . 1-14
Select a Post Script Printer . . . . . . . . . . . . . . . . . . . . . . . . . . . . . . . . . . . . . . . . . . . . . . . . . . . . . 1-15
Installing ATM . . . . . . . . . . . . . . . . . . . . . . . . . . . . . . . . . . . . . . . . . . . . . . . . . . . . . . . . . . . . . . . 1-17
Setting on Macintosh (Mac OS X) . . . . . . . . . . . . . . . . . . . . . . . . . . . . . . . . . . . . . . 1-18
Chapter2 Printer Driver Operation . . . . . . . . . . . . . . . . . 2-1
Describes the settings of the printer driver that can be made through [Properties] in the [Print] dialog box.
Items That Can Be Performed with Printer Driver . . . . . . . . . . . . . . . . . . . . . . . . . . . 2-2
Description of Screen . . . . . . . . . . . . . . . . . . . . . . . . . . . . . . . . . . . . . . . . . . . . . . . . . . . . . . . . . . 2-2
Main setting . . . . . . . . . . . . . . . . . . . . . . . . . . . . . . . . . . . . . . . . . . . . . . . . . . . . . . . . 2-5
Colour mode . . . . . . . . . . . . . . . . . . . . . . . . . . . . . . . . . . . . . . . . . . . . . . . . . . . . . . . . . . . . . . . . . 2-5
Original image . . . . . . . . . . . . . . . . . . . . . . . . . . . . . . . . . . . . . . . . . . . . . . . . . . . . . . . . . . . . . . . 2-6
Duplex printing . . . . . . . . . . . . . . . . . . . . . . . . . . . . . . . . . . . . . . . . . . . . . . . . . . . . . . . . . . . . . . . 2-6
Paper feed tray . . . . . . . . . . . . . . . . . . . . . . . . . . . . . . . . . . . . . . . . . . . . . . . . . . . . . . . . . . . . . . . 2-7
Paper type . . . . . . . . . . . . . . . . . . . . . . . . . . . . . . . . . . . . . . . . . . . . . . . . . . . . . . . . . . . . . . . . . . 2-7
Ejection mode . . . . . . . . . . . . . . . . . . . . . . . . . . . . . . . . . . . . . . . . . . . . . . . . . . . . . . . . . . . . . . . . 2-8
Pause after a proof (Proof Copy) . . . . . . . . . . . . . . . . . . . . . . . . . . . . . . . . . . . . . . . . . . . . . . . . . 2-8
Output mode . . . . . . . . . . . . . . . . . . . . . . . . . . . . . . . . . . . . . . . . . . . . . . . . . . . . . . . . . . . . . . . . . 2-9
Layout . . . . . . . . . . . . . . . . . . . . . . . . . . . . . . . . . . . . . . . . . . . . . . . . . . . . . . . . . . . . 2-10
Original size . . . . . . . . . . . . . . . . . . . . . . . . . . . . . . . . . . . . . . . . . . . . . . . . . . . . . . . . . . . . . . . . 2-11
Output paper size . . . . . . . . . . . . . . . . . . . . . . . . . . . . . . . . . . . . . . . . . . . . . . . . . . . . . . . . . . . . 2-11
Zoom . . . . . . . . . . . . . . . . . . . . . . . . . . . . . . . . . . . . . . . . . . . . . . . . . . . . . . . . . . . . . . . . . . . . . 2-11
Orientation . . . . . . . . . . . . . . . . . . . . . . . . . . . . . . . . . . . . . . . . . . . . . . . . . . . . . . . . . . . . . . . . . 2-12
Pagination . . . . . . . . . . . . . . . . . . . . . . . . . . . . . . . . . . . . . . . . . . . . . . . . . . . . . . . . . . . . . . . . . . 2-13
Pages per sheet . . . . . . . . . . . . . . . . . . . . . . . . . . . . . . . . . . . . . . . . . . . . . . . . . . . . . . . . . . . . . 2-15
Page order . . . . . . . . . . . . . . . . . . . . . . . . . . . . . . . . . . . . . . . . . . . . . . . . . . . . . . . . . . . . . . . . . 2-15
Output Face (only if RISO Controller PS7R-9000 is connected) . . . . . . . . . . . . . . . . . . . . . . . . 2-15
Image processing . . . . . . . . . . . . . . . . . . . . . . . . . . . . . . . . . . . . . . . . . . . . . . . . . . . 2-16
Gamma control . . . . . . . . . . . . . . . . . . . . . . . . . . . . . . . . . . . . . . . . . . . . . . . . . . . . . . . . . . . . . . 2-16
Screening . . . . . . . . . . . . . . . . . . . . . . . . . . . . . . . . . . . . . . . . . . . . . . . . . . . . . . . . . . . . . . . . . . 2-18
Special setting . . . . . . . . . . . . . . . . . . . . . . . . . . . . . . . . . . . . . . . . . . . . . . . . . . . . . . . . . . . . . . 2-20
Options . . . . . . . . . . . . . . . . . . . . . . . . . . . . . . . . . . . . . . . . . . . . . . . . . . . . . . . . . . . 2-23
Job separation . . . . . . . . . . . . . . . . . . . . . . . . . . . . . . . . . . . . . . . . . . . . . . . . . . . . . . . . . . . . . . 2-23
Print density . . . . . . . . . . . . . . . . . . . . . . . . . . . . . . . . . . . . . . . . . . . . . . . . . . . . . . . . . . . . . . . . 2-24
Clustering . . . . . . . . . . . . . . . . . . . . . . . . . . . . . . . . . . . . . . . . . . . . . . . . . . . . . . . . . . . . . . . . . . 2-24
vi
Forms . . . . . . . . . . . . . . . . . . . . . . . . . . . . . . . . . . . . . . . . . . . . . . . . . . . . . . . . . . . . 2-26
Form print pattern . . . . . . . . . . . . . . . . . . . . . . . . . . . . . . . . . . . . . . . . . . . . . . . . . . . . . . . . . . .
Form data print face . . . . . . . . . . . . . . . . . . . . . . . . . . . . . . . . . . . . . . . . . . . . . . . . . . . . . . . . . .
Registration of form . . . . . . . . . . . . . . . . . . . . . . . . . . . . . . . . . . . . . . . . . . . . . . . . . . . . . . . . . .
How to Print a Form . . . . . . . . . . . . . . . . . . . . . . . . . . . . . . . . . . . . . . . . . . . . . . . . . . . . . . . . . .
2-27
2-27
2-28
2-29
Environment . . . . . . . . . . . . . . . . . . . . . . . . . . . . . . . . . . . . . . . . . . . . . . . . . . . . . . . 2-30
About.. . . . . . . . . . . . . . . . . . . . . . . . . . . . . . . . . . . . . . . . . . . . . . . . . . . . . . . . . . . . . 2-32
Chapter3 Operation of Optional Finisher Functions . . 3-1
If an optional HC Finisher is installed, the [Finisher] tab is displayed on the printer driver setting
screen. This chapter describes the settings of the Finisher functions.
Finisher . . . . . . . . . . . . . . . . . . . . . . . . . . . . . . . . . . . . . . . . . . . . . . . . . . . . . . . . . . . . 3-2
Add cover . . . . . . . . . . . . . . . . . . . . . . . . . . . . . . . . . . . . . . . . . . . . . . . . . . . . . . . . . . . . . . . . . . 3-3
Booklet . . . . . . . . . . . . . . . . . . . . . . . . . . . . . . . . . . . . . . . . . . . . . . . . . . . . . . . . . . . . . . . . . . . . . 3-5
Stapler . . . . . . . . . . . . . . . . . . . . . . . . . . . . . . . . . . . . . . . . . . . . . . . . . . . . . . . . . . . . . . . . . . . . . 3-7
Punching . . . . . . . . . . . . . . . . . . . . . . . . . . . . . . . . . . . . . . . . . . . . . . . . . . . . . . . . . . . . . . . . . . . 3-9
Output Tray . . . . . . . . . . . . . . . . . . . . . . . . . . . . . . . . . . . . . . . . . . . . . . . . . . . . . . . . . . . . . . . . 3-10
Offset Output . . . . . . . . . . . . . . . . . . . . . . . . . . . . . . . . . . . . . . . . . . . . . . . . . . . . . . . . . . . . . . . 3-10
Paper Fold (only if an HC Z Folder Unit is connected) . . . . . . . . . . . . . . . . . . . . . . . . . . . . . . . 3-11
Chapter4 Troubleshooting . . . . . . . . . . . . . . . . . . . . . . . 4-1
Describes measures against driver or utility installation failure and trouble in printing.
Troubleshooting for installing . . . . . . . . . . . . . . . . . . . . . . . . . . . . . . . . . . . . . . . . . . . 4-2
Other Trouble . . . . . . . . . . . . . . . . . . . . . . . . . . . . . . . . . . . . . . . . . . . . . . . . . . . . . . . 4-3
Chapter5 Appendix . . . . . . . . . . . . . . . . . . . . . . . . . . . . . 5-1
Font List . . . . . . . . . . . . . . . . . . . . . . . . . . . . . . . . . . . . . . . . . . . . . . . . . . . . . . . . . . . 5-2
Index . . . . . . . . . . . . . . . . . . . . . . . . . . . . . . . . . . . . . . . . . . . . . . . . . . . . . . . . . . . . . . 5-5
vii
viii
Chapter1 Installing the Printer Driver
This chapter describes the method of installing the printer driver for this machine. Install the printer driver
before using this machine.After installation is complete, check the environment of this machine."p.2-30
1-1
Setting on Windows Computer
Before using the printer, install and set the software in the following order.
• Install RISO IP Setting Tool only onto the computer that is used for setting the IP address of the printer.
• Install the printer driver onto all the computers that use the printer.
Installing RISO IP Setting Tool
Install the software for setting the IP address of the printer from a computer.
RISO IP Setting Tool can also be started directly from the CD-ROM.
"Network Setting" "p.1-4
1
Insert the RISO Controller PS7R Software CD-ROM into the CD-ROM drive
of the computer.
3
Click [Install RISO IP Setting Tool].
4
Click the [Next] button.
The Installer starts. If not, double-click the
"setup.exe" file in the CD-ROM.
2
1-2
Click the language which you want to
display.
5
Read the License Agreement and
click the [Yes] button.
8
Click [EXIT].
1
6
Click the [Start] button.
7
Check that [Yes] is selected and click
the [Finish] button.
The Installer exits.
If you do not set the IP address of the printer now,
select [No] and then click the [Finish] button.
Installation of RISO IP Setting Tool is now complete.
Then, specify the IP address of the printer.
If [Yes] is selected, RISO IP Setting Tool starts. Follow the instructions of step 2 and after of "Network
Setting" ("p.1-4).
If [No] is selected, proceed to step 8.
1-3
Network Setting
Start RISO IP Setting Tool and set the IP address of the printer.
• If you set the IP address continuously after installing RISO IP Setting Tool, start with step 2.
• To run RISO IP Setting Tool from the RISO Controller PS7R Software CD-ROM, insert the CD-ROM into the computer and click
[Execute RISO IP Setting Tool from CD]. Then start with step 2.
!
1
2
Before starting the following operation, be sure to connect the printer to the computer.
"Connecting to a Computer" "p.iv
Select [Start], [Programs], [RISO
PS7R], and [RISO IP Setting Tool] in
this order.
5
Input the IP address to assign to the
printer and click the [OK] button.
For the IP address of the printer, ask the network
administrator.
Check that the information of the
printer is displayed and click it.
The information is highlighted.
If the information of the printer is not displayed, check
the connection between the printer and the computer.
"Connection with Computer" "p.iv
3
Click the [Network Configuration]
icon.
6
Click the [OK] button.
7
Turn off the printer and then on again.
8
Select [File] and [Exit].
Alternatively, select [Network Configuration] from
the [Settings] menu.
4
1-4
Click the [Yes] button.
9
Click the [Yes] button.
1
IP address setting of the printer is now complete.
After the printer starts, the IP address that has been set
in step 5 becomes effective.
Then, install the printer driver. Refer to "Installing the
Printer Driver" ("p.1-6).
1-5
Installing the Printer Driver
• Install the printer driver onto all the computers that use the printer.
• Before installing the printer driver, set the IP address of the printer.
"Network Setting" "p.1-4
1
Insert the RISO Controller PS7R Software CD-ROM into the CD-ROM drive
of the computer.
4
Click the [Next] button.
5
Click "RISO HC5000" or "RISO PS7RHC5000."
The Installer starts. If not, double-click the
"setup.exe" file in the CD-ROM.
2
Click the language which you want to
display.
The string is highlighted.
6
3
Click the [Next] button.
Click [Printer driver setup].
When installing RISO HC5000, proceed to step 9.
1-6
7
Select the protocol.
10 Click the [Register] button.
Select the protocol used for the network print
1
8
Click the [Next] button.
9
Input the IP address of the printer at
"IP address" or click the information
of the printer displayed in "Search
result list."
11 Click the [Install] button.
12 Click the [Finish] button.
Input the IP address that has been assigned in step 5 of
"Network Setting" ("p.1-4).
When installing RISO Controller PS7R-9000, you can
register a "broadcast address" by clicking the [Settings] button. To register a "broadcast address," enter
the IP address and click the [Add] button.
If there are multiple "broadcast addresses," click the
desired "broadcast address" to select it and click the
[OK] button to use the address.
To delete an unnecessary address, click the address to
select it and click the [Delete] button.
1-7
13 Click [Exit].
Installation of the printer driver is now complete.
You can execute printing from the computer.
1-8
Uninstalling the Printer Driver
To delete (uninstall) the printer driver, follow the procedure below.
1
Follow steps 1 to 3 of "Installing the
Printer Driver" ("p.1-6).
2
Click the [Uninstall] button.
5
Click the [Yes] button.
1
The computer restarts. After the computer restarts, the
printer driver is deleted completely.
3
Click the printer to delete so that the
printer is highlighted.
Select PS7R or HC5000 printer that has been installed
onto the computer.
To delete all the printers installed onto the computer,
select [All printers].
4
Click the [Uninstall] button.
1-9
Setting on Macintosh (Mac OS 9)
Before using the printer, install and set the software in the following order.
• Install RISO IP Setting Tool only onto the computer that is used for setting the IP address of the printer.
• Install the printer driver onto all the computers that use the printer.
Installing RISO IP Setting Tool
Install the software for setting the IP address of the printer from a computer.
RISO IP Setting Tool can also be started directly from the CD-ROM.
"Network Setting" "p.1-12
1-10
1
Insert the RISO Controller PS7R Software CD-ROM into the CD-ROM drive
of the computer.
2
Double-click the [OS 9] and [SETUP]
files in the CD-ROM.
3
Click the language which you want to
display.
4
Click [Install RISO IP Setting Tool].
5
Click the [Next] button.
8
Check that [Yes] is selected and click
the [Finish] button.
If you do not set the IP address of the printer now,
select [No] and then click the [Finish] button.
1
6
Read the License Agreement and
click the [Yes] button.
Installation of RISO IP Setting Tool is now complete.
Then, specify the IP address of the printer.
If [Yes] is selected, RISO IP Setting Tool starts. Follow the instructions of step 2 and after of "Network
Setting" ("p.1-12).
If [No] is selected, proceed to step 9.
9
7
Click [EXIT].
Click the [Start] button.
The Installer exits.
1-11
Network Setting
Start RISO IP Setting Tool and set the IP address of the printer.
• If you set the IP address continuously after installing RISO IP Setting Tool, start with step 2.
• To run RISO IP Setting Tool from the RISO Controller PS7R Software CD-ROM, insert the CD-ROM into the computer and click
[Execute RISO IP Setting Tool from CD]. Then start with step 2.
!
1
2
Before starting the following operation, be sure to connect the printer to the computer.
"Connecting to a Computer" "p.iv
Select [RISO PS7R] and [ADMIN] created in the startup disk in this order
and click [PS7RADMIN].
5
Input the IP address to assign to the
printer and click the [OK] button.
For the IP address of the printer, ask the network
administrator.
Check to see the information of the
printer is displayed and click it.
The information is highlighted.
If the information of the printer is not displayed, check
the connection between the printer and the computer.
"Connection with Computer" "p.iv
3
Click the icon shown in the illustration.
6
Click the [Yes] button.
7
Turn off the printer and then on again.
8
Select [File] and [Exit].
Alternatively, select [Network Configuration] from
the [Settings] menu.
4
1-12
Click the [Yes] button.
9
Click the [OK] button.
Installing Adobe PS
IP address setting of the computer is now complete.
After the printer starts, the IP address that has been set
in step 5 becomes effective.
Then, install the printer driver. Refer to "Installing the
Printer Driver" ("p.1-14).
1
If Adobe PS is not installed in the computer, follow the procedure below.
1
Follow steps 1 to 3 of "Installing RISO
IP Setting Tool" ("p.1-10).
2
Click [Install Adobe PS].
3
Follow the instructions on the screen
to install Adobe PS.
1-13
Installing the Printer Driver
• Install the printer driver onto all the computers that use the printer.
• Before installing the printer driver, set the IP address of the printer.
"Network Setting" "p.1-12
1
Insert the RISO Controller PS7R Software CD-ROM into the CD-ROM drive
of the computer.
2
Double-click the [OS 9] and [SETUP]
files in the CD-ROM.
5
Click the [Install] button.
If a message prompting to close application software,
save any necessary data, close application software,
and click the [Continue] button.
If the installation destination disk can be selected from
several disks, click the [Drive] button and select the
disk in which Mac OS 9 has been installed.
6
3
Click the [Quit] button.
Click the language which you want to
display.
Installation of the printer driver is now complete.
4
1-14
Click [Printer driver setup].
Select a Post Script Printer
After installing the printer driver, select and configure the PPD(PostScript Printer Description) file of HC5000.
If Adobe PS is not installed in the computer, make sure to install Adobe PS in the future.
"Installing Adobe PS" "p.1-13
If RISO Controller PS7R has been installed:
1
Select [Chooser] from the [Apple] menu.
1
The [Chooser] dialog box appears.
Click [Adobe PS], [RISO_PS7R] is displayed.
2
Select a printer.
Select [RISO_PS7R], click the [Create] button.
3
Select the PostScript printer description file and click the [Select] button.
The [PostScript Printer Description File Selection] dialog is displayed. Select the desired file.
When the printer icon is created on the desktop, close the Chooser.
You can execute printing from the computer.
• Only when using PageMaker for printing, set [P7H5*M9PM.ppd] as [PostScript printer description file] at [Format] in the
[Print Document] dialog box of [Print].
*: A display changes with display languages chosen when installing a printer driver.
• In this case, the following functions of the printer driver are not available.
Pagination / Forms / Clustering / Image Position Adjustment
1-15
If RISO Controller PS7R-9000 has been installed:
1
Follow the operation of steps 1 and 2 of "If RISO Controller PS7R has been installed."
2
Select [P7H6JM9.ppd] in the [PostScript Printer Description File Selection] dialog and
click the [Select] button.
When the printer icon is created on the desktop, close the Chooser.
You can execute printing from the computer.
To use [General PPD] of RISO Controller PS7R-9000, install it following the procedure below.
1) Copy [ppd] - [P7H6JPGP.ppd] of the RISO Controller PS7R Software CD-ROM to the folder shown below.
System Folder / Extension / Printer Descriptions
2) Select [P7H6JPGP.ppd] in the Chooser.
Set the printer description file to [P7H6JPGP.ppd] on the print setting screen of the application and then execute printing.
1-16
Installing ATM
ATM (Adobe Type Manager) is software that displays correctly PS (PostScript) fonts installed in the hard disk of the print controller on the display of the computer. When using ATM fonts, you can check the image close to the finished image on the display
of the computer.
1
Follow steps 1 to 3 of "Installing the
Printer Driver" ("p.1-14).
2
Click [Install ATM].
3
Follow the instructions on the screen
to install the software.
1
When installation is complete, ATM can be used.
1-17
Setting on Macintosh (Mac OS X)
Install the printer driver.
• Install the printer driver onto all the computers that use the printer.
• RISO IP Setting Tool cannot be used on Mac OS X. Set the IP address of the printer using another computer or in the menu setting of
the printer.
• Before installing the printer driver, set the IP address of the printer.
1
Insert the RISO Controller PS7R Software CD-ROM into the CD-ROM drive of
the computer.
2
Double-click the [OS X], [your language], and [P7H5PDE Installer] files in
the CD-ROM.
4
Click the [Continue] button.
5
Select the installation destination disk
and click the [Continue] button.
Normally, select the startup disk.
3
Input a [Name] and [Password] on the
[Authenticate] screen and click the [OK]
button.
6
1-18
Click the [Install] button.
7
Click the [Close] button.
13 Check that the printer is added in the
printer list.
1
8
Double-click [Print centre] in the [Applications] - [Utility] folder in the Mac OS X
startup disk.
9
Click the [Add] icon.
Installation of the printer driver is now complete.
You can perform printing function from the computer.
10 Select "AppleTalk" and "Local AppleTalk Zones."
11 Click the name of the printer to install.
12 Click the [Add] button.
1-19
1-20
Chapter2 Printer Driver Operation
For printing according to your personal specifications and use, you must adjust the printer driver settings. This
chapter describes the settings of the printer driver.
2-1
Items That Can Be Performed with Printer Driver
This section describes the settings of the printer driver.
Description of Screen
The driver setting screen consists of the following eight tabs (nine tabs if an optional HC Finisher is installed).
(The screen of a Windows computer and the printer driver of UK English is used as an example here.)
[Main setting] tab
Switching between colour and monochrome, paper type, output method, etc. can be set.
"Main Setting""p.2-5
[Layout] tab
Sets the enlargement/reduction ratio in printing and the method of pagination.
"Layout""p.2-10
[Image processing] tab
Image quality for photo or anything in relation can be adjusted.
"Image processing""p.2-16
2-2
[Finisher] tab
Finisher functions can be set if an optional HC Finisher is installed.
"Chapter 3 Operation of Optional Finisher Functions" "p.3-1
2
[Options] tab
Method of job separation, print density, and clustering can be set.
"Options""p.2-23
[Forms] tab
A form registered in the printer can be overlaid on output data for printing.
"Forms""p.2-26
[Environment] tab
The IP address of this machine can be set, and the equipment configuration can be
checked.
On Windows 2000/XP, you can display this by clicking [Start], selecting [Printer and
Faxes], and opening [Properties] of HC5000.
On Mac OS 9/X, the [Environment] tab is displayed on the printer driver setting screen.
"Environment""p.2-30
2-3
[Advanced] tab
The PostScript printer driver setting screen is displayed.
Use with the default settings is recommended.
[About..] tab
The version information of the printer driver is displayed.
"About..""p.2-32
2-4
Main setting
Switching between colour print and monochrome print, paper type, output method, etc. can be set.
2
# Settings
Colour mode
Selects colour or monochrome printing.
Pause after a proof
Sets whether or not to output proof copy.
Original image
Selects image or character to which priority is given in
printing.
Output mode
Selects the output mode of data sent from the computer. The
current setting is displayed below.
Duplex printing
Selects whether or not to perform duplex printing. If duplex
printing is selected, the binding position can be selected.
Change output condition
Selects a registered output setting and a storage folder
name.
Paper feed tray
Selects the feed tray in which paper to be used for printing
is set.
default
Returns the settings on the [Main setting] tab to the default
settings.
Paper type
Selects the paper type.
Help
Displays Help.
Ejection mode
Selects whether to perform collated printing or non collated
printing.
Colour mode
Selects colour or monochrome printing. The initial setting is [Colour].
• If "Monochrome" is selected for printing from a colour original, monochrome printing is performed.
• For colour printing, the original must be created with colour data.
2-5
Original image
Selects line or photo to which priority is given in printing. The optimum colour management is obtained according to the selected
mode. The initial setting is [Photo-based].
# Settings
Line-based
Characters and illustrations are clearly printed.
Photo-based
Images such as photos are printed with natural colour
tone.
What is Colour Management?
While in the displays such as monitor, colours are expressed with "additive primary colours" (RGB: red, green, and blue), in the printers with
ink, colours are expressed with "subtractive primaries" (CMY: cyan, magenta, and yellow). Since the number of colours that can be expressed
with CMY is smaller than with RGB, colours on the monitor cannot be printed quite the same. For natural reproduction of colour tones, some
conversion technique from RGB to CMY is required. This system of conversion is called colour management. The rules of conversion vary with
the manufacturer, and each manufacturer uses its original conversion table (colour profile).
In colour management of HC5000, some kinds of colour profiles are automatically selected according to the combination of the original image
and the paper type to be used to express the optimum colours.
Colour profiles created and edited with the ColorTune® technology licensed from Agfa Monotype Corporation are used.
Duplex printing
Selects whether or not to perform duplex printing. When performing duplex printing, select the binding position.
# Settings
OFF (initial setting)
Duplex printing is not performed.
Long edge binding
Duplex printing is performed.
The long edge of the original becomes the binding position.
Short edge binding
Duplex printing is performed.
The short edge of the original becomes the binding position.
If you select [Booklet] at [Pagination] on the [Layout] tab, [Short edge binding] is automatically selected for [Duplex printing].
"Pagination""p.2-13
2-6
Paper feed tray
Selects the paper feed tray in which paper to be used for printing is loaded.
# Settings
Auto tray selection
The paper feed tray is automatically selected according
to the settings of [Paper type] on the [Main setting] tab
and [Output paper size] on the [Layout] tab.
!
If no specific feed tray meets the required
paper size and paper type, no-paper error
will occur therefore printing cannot be performed.
Setting on the printer is required in advance.
Feed Tray 1
Printing is performed onto the paper loaded in Paper
Feed Tray 1.
Feed Tray 2
Printing is performed onto the paper loaded in Paper
Feed Tray 2.
Standard Feed Tray
Printing is performed onto the paper loaded in the Standard Paper Feed Tray.
2
If Feed Tray 1/ Feed Tray 2/ Standard Feed Tray is
selected, printing is performed onto the paper loaded
in the selected paper feed tray regardless of the settings
of [Paper type] on the [Main setting] tab and [Output
paper size] on the [Layout] tab.
Paper type
Selects the paper type. In printing, ink quantity adjustment and image processing adequate for the selected paper type are performed.
# Selectable paper types
• Standard 1
• High-Quality 1
• High-Quality 2
!
• If the selected paper type is not loaded in the feed trays or the Standard Feed Tray, an error occurs and
printing cannot be performed. (The paper types of the feed trays and the Standard Feed Tray are set on
the Operation Panel of the printer. “Menu4 Configuration“ of “HC5000 User’s Manual for Printer Main
Body“ "p.2-17)
• If the relevant paper type is not included in the list, specify the equivalent type. When not specified, nopaper error occurs and printing cannot be performed.
• Selectable paper types depend on the setting of [Paper category] on the [Environment] tab.
"Environment" "p.2-30
2-7
Ejection mode
Selects whether to perform collated printing or non collated printing. The initial setting is [Non collate].
If the RISO Controller PS7R-9000 is connected, the initial setting is [Collate].
If [Pause after a proof] is enabled, proof copy is printed in the ejection mode specified here.
"Pause after a proof""p.2-8
Pause after a proof (Proof Copy)
When printing a lot of pages or printing a lot of copies, you can check the print by printing only one page or one set first (not
included in the specified number of copies). After checking, if no problem is found, press the PRINT/PAUSE key on the printer
to continue printing. If adjustment of the print position or anything in relation is required, you can adjust the setting on the printer.
The initial setting is off (no check mark).
If [Ejection mode] is set to [Non collate], proof copy is printed for a page. If [Collate] is set, one set is printed.
"Ejection mode""p.2-8
"Menu 1 Print Position Adjust" of "HC5000 User’s Manual for Printer Main Body" "p.2-13
2-8
Output mode
Selects whether to print data sent from the computer, to store it in the storage or to store it as a form in the printer.
# Settings
Direct print (initial setting)
Prints data immediately onto paper that is transmitted
from a computer.
Archive (only if RISO Controller PS7R-9000 is
connected)
Output data that is processed with RIP is stored
(archived) in the printer.
The stored data can be selected on the [Archive] tab in
[Job manager] of RISO Console PS7R for repeated
printing.
Since the data is processed with RIP, the output conditions cannot be changed but the data can be printed in a
shorter time than "Direct print" or "Storage."
"Archive" of "HC5000 User's Manual for Console"
"p.1-11
Storage
Stores the output data in the printer. Data stored in the
storage can be printed repeatedly by selecting it on the
[Storage] tab of [Job manager] of RISO Console PS7R.
"Storage"of "HC5000 User's Manual for Console"
"p.1-13
Print & Storage
Performs direct printing and also stores the output data
in the printer (Storage).
2
Form
Stores the output data as a form in the printer. The stored
form can be selected on the [Forms] tab and be overlaid
on other output data for printing.
Output data created by overlay with a form cannot be
stored in the storage.
"Forms"of "HC5000 User's Manual for Console" "p.115
Change output condition
A registered output setting can be selected if [Output mode] is not set to
[Form]. Also the storage folder to which output data is stored can be
specified.
Click the [Change output condition] button to display the [Specify output condition] screen.
# Settings
Output setting
You can select whether to print according to the printer
driver setting or to print according to output setting registered in the printer.
When printing according to the printer driver setting,
select [Printer driver setting].
When printing according to setting registered in the
printer, select one of Direct 1 - Direct 9 (or any registered name that has been set).
Select the desired setting in the pull-down menu and
click the [OK] button.
The initial setting is [Printer driver setting].
• Register output setting to the printer in [Administrator] of the Console.
"Direct Output Setting" of "HC5000 User's Manual
for Console" "p.2-20
• If the printer is not connected to a network, "Connecting to Server..." is displayed.
Storage folder name
Output data can be stored in any folder created in the
printer.
If [Print & Storage] or [Storage] is selected at [Output
mode] and folders are created in the printer, select one of
folder1 - folder9 (or any registered foldername that has
been set).
Select the desired folder in the pull-down menu and
click the [OK] button.
The initial setting is [Folder 0].
• Create folders in [Administrator] of the Console.
"Folder Setting " of "HC5000 User's Manual for
Console" "p.2-22
• If the printer is not connected to a network, "Connecting to server..." is displayed.
2-9
Layout
Sets the enlargement/reduction ratio in printing and the method of pagination.
# Settings
Original size
Selects the paper size specified with the application software.
Output paper size
Selects the paper size for printing.
Zoom
Sets the image enlargement/reduction ratio in printing.
Orientation
Selects the orientation of original for printing.
Pagination
Selects the type of pagination.
Pages per sheet
Selects the number of pages per sheet for pagination.
Page order
Selects the order of arrangement of pages for pagination.
Output face (only if RISO Controller PS7R-9000 is
connected)
Selects whether or not prints are output with the first page
face down.
default
Returns the settings on the [Layout] tab to the default settings.
Help
Displays Help.
2-10
Original size
Selects the paper size that is specified with the application software. The initial setting is [A4].
The following paper sizes can be selected.
A3W / A3 / A4 / B4 / B5 / B6 / Postcard / Foolscap / Legal / Letter / Tabloid / Statement / Custom / Custom size 1-20 (*)
* Paper sizes that have been registered in advance with [Controller setting 2] in [Administrator] of RISO Console PS7R are displayed.
If you use frequently irregular sizes, register the sizes in advance. These sizes can be easily selected from the pull-down menu.
"Controller setting 2" of "HC5000 User's Manual for Console"2-17
The registered paper sizes are also displayed as [Output Paper Size]. If you do not register the size and you specify each time, use the
following procedure.
1. Select [Custom] at [Original size] and click the [Custom Paper Entry] button.
2. Select [Unit] in the displayed [Custom Paper size] dialog.
3. Input the paper size.
Width: 90mm to 316mm (39/16" to 127/16")
Length: 148mm to 460mm(513/16" to 181/8")
4. Close the printer driver screen.
5. Start the application software for creating the original.
6. Select [Postscript Custom Paper Size] at [Size] of [Page Set up].
The original size selected in step 3 is reflected and the original can be created with the size proper for this machine.
HC5000 Series is a PS printer. Although the setting in the application software normally takes precedence, if an original is created for
a non-standard size, the [Original size] must be input in the HC5000 printer driver in advance and therefore the steps are different from
the normal procedure.
2
Output paper size
Selects the paper size for printing. The initial setting is [Same as original].
The following paper sizes can be selected.
Same as original/ A3W(*1) / A3 / A4 / B4 / B5 / B6 / Postcard / Foolscap / Legal / Letter / Tabloid / Statement / Custom
/ Custom size 1-20 (*2)
*1 The A3W size is 316 mm (W) x 460 mm (L).
*2 Paper sizes that have been registered in advance with [Controller setting 2] in [Administrator] of RISO Console PS7R are displayed.
If [Zoom] is not set (not checked), for an original size different from the output paper size, enlargement/reduction is automatically
performed according to the output paper size.
If you use frequently irregular sizes or if you specify an irregular size each time, use the same operation as [Original Size]
described above.
Zoom
Specifies the enlargement/reduction ratio for printing in %.
If you click [Zoom] to display a check mark, you can specify the enlargement/reduction ratio from 50% to 200%.
The initial setting is off.
If [Pagination] is set to any of [Multi-up (Single page)], [Multi-up (Multi-page)], [Booklet], and [Fold], Zoom cannot be specified.
2-11
Orientation
Selects the orientation of original for printing. Select Portrait or Landscape according to the setting in application. The initial setting is [Portrait].
Depending on the application, the orientation set in the application does not operate properly with the setting of the printer driver for this
machine. Check the orientation of the paper set in the machine and set the correct orientation in the printer driver.
2-12
Pagination
Selects the type of pagination.
# Settings
OFF (initial setting)
Pagination is not performed.
Multi-up (Single page)
A multiple number of same page are paginated onto a
sheet. The number of pages per sheet can be set at
[Pages per sheet].
Multi-up (Multi-page)
A multiple number of continuous pages are paginated
onto a sheet in the page order. The number of pages per
sheet can be set at [Pages per sheet]. The order can be set
at [Page order].
Booklet
A multiple number of continuous pages are paginated
and printed onto two sides so that a booklet can be
obtained by binding at the centre. Two pages are printed
on each side of paper.
The direction of page order can be set at [Reverse order
(from right to left)] under [Page order] on the [Layout]
tab.
• If [Booklet] is selected, [Duplex printing] on the
[Main setting] tab is automatically set to [Long
edge binding]. If [Duplex printing] is set to [OFF]
or [Short edge binding], this setting is set to [OFF].
• Any page with no print data becomes blank.
• If [Booklet] of the optional Finisher functions is set
to an item other than [OFF], this setting is automatically enabled.
• Printing is performed so that the first page (cover) is
output last.
2
Fold
A multiple number of continuous pages are paginated
and printed so that a book can be obtained by folding in
two (crosswise) after duplex printing, binding, and cutting. Four pages are printed onto each side of a sheet.
The direction of page order can be set at [Reverse order
(from right to left)] under [Page order] on the [Layout]
tab.
• If [Fold] is selected, [Duplex printing] on the [Main
setting] tab is automatically set to [Long edge binding]. If [Duplex printing] is set to [OFF] or [Short
edge binding], this setting is set to [OFF].
• Any page with no print data becomes blank.
2-13
2-14
Pages per sheet
If [Multi-up (Single page)] or [Multi-up (Multi-page)] is selected at [Pagination], set the number of pages per sheet for pagination.
Any of 2, 4, 8, and 16 pages/ sheet can be selected. The initial setting is 2 pages.
If [Booklet] or [Fold] is selected at [Pagination], the number of pages per sheet need not be selected. The number is automatically set.
Page order
If [Multi-up (Multi-page)] is selected at [Pagination], select the arrangement of pages.
If [Booklet] or [Fold] is selected at [Pagination], select the direction of arrangement of pages. If [Reverse order (from right to
left)] is not checked, the direction is left to right, and if checked, the direction is right to left.
# Settings
Vertical
Pages are arranged in the vertical order sequentially.
Horizontal
Pages are arranged in the horizontal order sequentially.
2
Reverse order (from right to left)
Selects the direction of arrangement of pages. If [Booklet] or [Fold] is selected at [Pagination], select the direction of arrangement of pages.
Output Face (only if RISO Controller PS7R-9000 is connected)
Selects whether or not prints are output with the first page face down.
# Settings
Auto
The output face is automatically determined according
to the setting of [Ejection mode] on the [Main setting]
tab.
Facedown
Prints are output with the first page face down. For printing data with a large number of pages, the processing
will be relatively fast.
2-15
Image processing
Specifies print quality for image materials such as photo.
# Settings
Gamma control
Adjusts the Gamma values of contrast, density and CMYK.
Screening
Selects the method of half-tone processing.
Screen frequency (lpi)
If [Dot screen] is selected at [Screening], select the screen
frequency.
Special setting
Sets the orientation of the original, print position, image
quality, etc.
default
Returns the settings on the [Image processing] tab to the
default settings.
Help
Displays Help.
Gamma control
Adjusts the Gamma values of contrast, density and CMYK.
About Gamma Value...
This means density of half tone in display and printing. The value is set for each unit of equipment such as computer and printer (2.2 for Windows computer, 1.8 for Macintosh, 1.8 for printer). If the brightness between the image displayed on the screen of a computer and the printed
image is different, adjust this value.
In the print controller of HC5000 Series...
Although value 1.8 makes bright images according to the general concept of Gamma control, this value can makes darker images with the print
controller of HC5000 Series.
Note that the value set at [Details] causes reverse effect of display.
2-16
# Settings
Contrast
Adjust the contrast (correlation between brightness and darkness) of images among five levels. High contrast increases the
difference between bright areas and dark areas, resulting in sharper images. Low contrast decreases the difference between the
brightness and darkness, resulting in greyish images on the overall area. The initial setting is standard (centre)
2
Density
Adjusts the density of images with five levels. The initial setting is standard (centre).
Details
Adjusts the Gamma value for each colour of CMYK.
Click [Details] to display a check mark and click the [Change details] button to display the
[Gamma control Details change] window.
You can click
or
to adjust the value from 0.1 to 3.0.
A smaller value makes lighter images and a larger value makes darker images.
The initial setting is 1.0.
This item is different from the general concept of Gamma control.
"p.2-16
2-17
Screening
Sets the half-tone processing method and enables/disables line smoothing.
What is Half Tone?
Half tone is a method of processing for expressing continuous colour tones with the limited number of ink types by changing the density and
size of ink discharged onto sheet.
# Selectable processing methods
The method of half-tone processing can be selected from two types.
Error diffusion (initial setting)
Expresses tones with dot density. Higher density makes darker images, and lower density makes lighter images.
Dot screen
Expresses tones by adjusting the size of dot. A larger size makes darker images, and a smaller size makes lighter images.
2-18
Line smoothing
Sets whether or not to enable line smoothing. If this item is checked, line smoothing is enabled which results in the outlines of
characters and ruled lines printing smoothly. The initial setting is off.
!
If line smoothing is used, print time increases.
What is Line Smoothing?
This function suppresses serrated outlines of characters and images which results in high resolution of printed quality. This function complements the outlines with a more defined colour between the drawing and background colours.
2
Screen frequency (lpi)
If [Screening] is set to [Dot screen], set the number of dot lines (resolution). 70 lpi and 100 lpi can be selected. 100 lpi makes finer
images.
The initial setting is 70 lpi.
"Screening""p.2-18
Dot screen setting
Cannot be set in HC5000 Series.
2-19
Special setting
Adjusts the orientation of original, print position, image quality, etc.
# Settings
Image rotation
Sets the orientation of the original.
Image position adjustment
Adjusts the print position of the original.
Image quality
Sets the quality (resolution) of printing.
Auto colour matching
Sets colour matching with ComColor™ Standard.
2-20
Image rotation
Sets the orientation of original printing which is in relation to the paper. Auto/0 degree/90 degrees/180 degrees/270 degrees can
be selected. If [Auto] is selected, the orientation of printing is automatically selected based on the orientation of the original set
in data, the orientation of the paper set in the feed tray is ready for use.
The initial setting is [Auto].
!
Depending on the original size and the size and orientation of the paper in the feed tray, rotation of 90 degrees
may be unavailable.
2
Image position adjustment
Adjusts the print position. The position can be adjusted in the vertical and horizontal directions from −20mm to 20mm (-13/16"
to +13/16") in 0.5mm (0.02") increments. For duplex printing, the position can be adjusted on the front and back sides respectively.
2-21
Image quality
Sets the image quality (resolution). Standard (300dpi x 300dpi) or Fine (300dpi x 600dpi) can be selected. The initial setting is
[Standard (300dpi x 300dpi)].
Auto colour matching
Selects whether or not to use HC5000 Series original colour management (ComColor™Standard) for colour adjustment (conversion).
Normally, check this item (colour management is enabled).
If colour management is not required, clear the check mark. In this case, colour management depends on the setting of application
that is used for creating output data. Also if the check mark is cleared, [Maximum drops] can be set manually.
!
If [Maximum drops] is set to [Auto], the number of drops adequate for the paper type is automatically set. Normally, use this function with [Auto].
# Settings of Maximum drops
Auto
Adjusts automatically the colours.
1
2
3
4
5
6
7
Few
(5 is standard)
Many
When printing data created with CMYK, clear the check mark.
If the check mark is not cleared, when data created with CMYK in application software is printed, colour adjustment (conversion)
is performed and colours different from the created data are used for printing.
2-22
Options
Sets the method of job separation, print density, and clustering.
2
# Settings
Job separation
Sets the timing of separation paper insertion.
Print density
Sets the print density.
Clustering
Improves efficiency of printer processing by splitting or distributing jobs to other HC5000 Series on the network.
default
Returns the settings on the [Options] tab to the default settings.
Help
Displays Help.
Job separation
Inserts job separation paper between jobs and sets or pages when printing multiple jobs or copies.
• Set the feed tray used for job separation paper on the Operation Panel of the printer in advance.
"5.3 Separation Paper" of "HC5000 User's Manual for Printer Main Body" "p.2-36
• You can change the setting on the Opaeration Panel of the printer.
"4.6 Job Separation"of "HC5000 User's Manual for Printer Main Body" "p.2-22
• If an optional HC finisher is connected, you can use this function with the functions of the finisher: Z fold, Punching, Add cover.
# Settings
OFF (initial setting)
Job separation is not performed.
Every division
Inserts automatically separation paper each time a unit
of collated printing or non collated printing is complete.
Set collate or non collate at [Ejection mode] on the
[Main setting] tab. "Ejection mode""p.2-8
Between jobs
Job separation paper is automatically inserted between
jobs.
2-23
Print density
Adjusts the print density. The density can be adjusted among five levels from Level 1 (light) to Level 5 (Dark). A larger value
means darker printing. The initial setting is Level 3 (standard).
After proof copy, you can adjust the density on the Operation Panel of the printer.
"4.7 Print Density" of "HC5000 User's Manual for Printer Main Body" "p.2-23
Clustering
When printing a lot of jobs, copies or pages, you can improve the efficiency
of printer processing by splitting or distributing jobs to other HC5000 Series
on the network.
Click the [Details] button to display the [Clustering] window.
For a large data size, splitting of a job will give smoother printing.
If an optional HC Finisher is installed, when you use the clustering function, turn off the following functions on the [Finisher] tab.
• The setting of [Add cover]
• The setting of [Booklet]
• The setting of [Stapler]
# Settings
Job delegation
If multiple units of HC5000 Series are connected on the
network, jobs can be distributed to these printers.
If Job delegation is set to ON, when a new job is
received while a job is being processed, the new job is
sent for printing to a controller that has the highest priority is the order of the registered controller IP list.
The initial setting is [OFF].
Register the controllers using [Clustering] at [Controller setting] in [Administrator] of RISO Console PS7R.
Example of "Clustering" of "HC5000 User's Manual
for Console" ("p.2-16) is shown.
Job split
When processing a job with a lot of pages or a lot of copies, you can split the job into multiple jobs.
Application loaded to the printer per job will be reduced.
• Output-range-based
Set the page number that triggers job split at [Job split
limit].
• Print-volume-based
Set the number of copies that triggers job split at [Job
split limit].
The initial setting is [OFF].
Job split limit
Specifies the condition for job split. If the specified
number of pages or copies is exceeded, job split is activated.
2-24
2
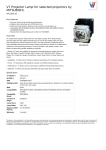
Example of Job split
An example in which Job split limit is set to "100 (page)" and a job of 240 pages is processed for printing is shown.
If Print range is set to "All," the job is not split and processed as a job of 240 pages.
If Print range is set to 1 - 240 page, the job is split into three jobs of 80 pages respectively.
If Print range is set to 1 - 300 page, the job is split into three jobs of 100 pages, 100 pages, and 40 pages.
2-25
Forms
A form registered in the printer can be selected for overlaying it on the output data for printing.
This function is useful for printing two separate originals (separate data) onto both sides of paper respectively.
Registration of form
• Create form data in advance and register it in the printer by selecting [Form] at [Output mode] on the [Main setting] tab. Registered form
file names are displayed in [Form list].
"Registration of Form""p.2-28
• Output data overlaid on a form cannot be registered in the storage.
• Multiple forms can be registered.
# Settings
Form print pattern
Sets whether or not to print a form onto the same face as output data.
Form data print face
Selects whether to print a form onto the front side or the
back side in Double side overlay.
# Form information displayed
Form list
File name of the forms registered in the printer are displayed.
Form preview
The selected form is previewed.
2-26
default
Returns the settings on the [Forms] tab to the default settings.
Help
Displays Help.
Form print pattern
Selects whether a form is printed onto the same face as output data (Single side overlay) or onto the reverse side (Double side
overlay).
# Settings
OFF
No form is printed.
Single side overlay
A form is printed onto the same face as the output data.
Double side overlay
A form is printed onto the reverse face of the output
data.
If this mode is selected, select also [Form data print
face].
2
Form data print face
If [Double side overlay] is selected at [Form print pattern], set whether to print the form data onto the front side or the back side
of paper. The initial setting is [Back].
2-27
Registration of form
Forms to be used must be created in a computer in advance and be registered in the printer.
• If multiple page data is registered as a form, all the pages are registered but only the first page is printed as form data. Remaining data
is not used for printing.
• If the paper size of form data is different from the actual paper size, the form is printed with reference to the lower left corner. (The
lower left corner of the form is printed at the lower left corner of the actual paper.)
1
2
Create form data using a computer.
Select [Print] from the [File] menu of
application.
The [Print] dialog box is displayed.
3
Check that "RISO HC5000" or "RISO
PS7R-HC5000" is selected as a printer
name.
4
Click the [Properties] button.
5
Select [Form] at [Output mode] in the
[Main setting] dialog box.
6
Click the [OK] button.
The [Print] dialog box appears again.
2-28
7
Click the [OK] button.
The data is sent to the printer and registered as a form.
Registered data can be selected in [Form list] on the
[Forms] tab.
How to Print a Form
1
2
Create output data to combine with a
form and select [Print] from the [File]
menu of the application.
7
Click the [OK] button.
The screen in step 1 appears again.
Check that "RISO HC5000" or "RISO
PS7R-HC5000" is selected as a printer
name and click the [Properties] button.
2
8
Click the [OK] button.
The output data is overlaid on the form and sent to the
printer.
3
Select [Direct print] at [Output mode]
on the [Main setting] tab.
4
Set the print conditions such as [Original image] and [Paper type].
5
Select [Form print pattern] on the
[Forms] tab.
• If multiple page data is registered as a form, all
the pages are registered but only the first page is
printed as form data. Remaining data will not be
used for printing.
• If the paper size of form data is different from the
actual paper size, the form is printed with reference to the lower left corner.
If you select [Double side overlay], select also [Form
data print face].
6
Click the form to print in [Form list] to
select.
The preview is displayed. Check the detail.
2-29
Environment
Sets the IP address assigned to this machine and allows the configuration of options connected to this machine to be checked.
On Windows 2000/XP, you can display this by clicking [Start], selecting [Printer and Faxes], and opening [Properties] of HC5000.
On Mac OS 9/X, the [Environment] tab is displayed on the printer driver setting screen.
# Settings
Through printer server
Sets whether or not printing is performed through a printer
server.
This item can be set only on Windows Me/2000/XP.
Controller IP address
Sets the IP address of the controller built in this machine.
• Windows 2000/XP: Normally, setting is not necessary.
Set this item when using this machine as a shared
printer.
• Mac OS 9/X: Be sure to set this item. Then, functions
such as form printing and output setting can be used.
Printer config.
The installation status and the types of options connected to
this machine are displayed. This item can be set manually.
Obtain info from printer
Obtains the configuration information on options from this
machine. The obtained information is displayed at [Printer
config.].
You can click this item when [Controller IP address] has
been set and normal communication with the printer is
available.
Make this setting default
Stores the current setting as the default setting.
This item is displayed only on Mac OS 9/ Mac OS X.
default
Returns the settings on the [Environment] tab to the default
settings.
2-30
Help
Displays Help.
Apply
The settings are reflected into the printer.
# Settings of Printer config.
Multi tray paper feeder
Sets whether or not the multi tray paper feeder is installed.
If [Not installed] is set, only the Standard Feed Tray can be
used.
Finisher/Basic unit (only if an optional HC Finisher
is installed)
Sets the installation status of the Finisher/Basic unit and the
type of the unit (2/4 punching holes or 2/3 punching holes).
Finisher/Booklet maker unit (only if an optional HC
Finisher is installed)
Sets [Finisher/Booklet maker unit] to [Installed].
2
Finisher/Folder unit (only if an optional HC Finisher is installed)
Sets whether or not the Z Folder unit of the Finisher is
installed.
Additional engine memory
Sets whether or not the printer memory is added and sets the
capacity of the additional memory if added.
Paper category
Sets whether the paper type to be used is displayed for the
Japanese market or the other areas.
A unit of length
Sets mm or inch.
2-31
About..
The version of the printer driver installed in the computer can be checked.
# Settings
Plug-in
Version of plug-in
Model name
Model name of the printer
PPD file name
Name of PPD file installed in the computer
2-32
Chapter3 Operation of Optional Finisher
Functions
If an optional HC Finisher is installed, the [Finisher] tab is displayed on the printer driver setting screen. This
chapter describes the settings of the Finisher functions.
For the names of parts, details of functions, method of removing jammed paper, and specifications, refer to "HC Finisher Maintenance Guide."
3-1
Finisher
Check that the [Finisher] tab is displayed on the printer driver setting screen. If the tab is not displayed, use [Printer config.] on the [Environment] tab to select the configuration of the Finisher that is connected to the printer and click the [Apply] button. The [Finisher] tab will
be displayed on the driver setting screen. "Environment" "p.2-30
This tab sets the method of adding covers, the punching/stapling positions, the method of creating booklets, etc.
# Settings
Add cover
Adds a front cover and/or a back cover to prints when outputting.
Booklet
Creates booklets by folding paper in two.
Stapler
Staples printed paper.
Punching
Punches holes in printed paper.
Output tray
Selects the tray to which prints are output.
Offset output
Outputs prints to the Stacking Tray at an offset position for
each set.
Paper fold
Outputs paper that has been folded into two or three or in a
Z shape.
default
Returns the settings on the [Finisher] tab to the default settings.
Help
Displays Help.
3-2
Add cover
Selects whether or not to add a cover. Select a cover to be added (front cover or back cover) and select the tray in which cover
sheets are loaded.
Details of Add cover
Place a checkmark and click the [Details] button. The [Details] screen is displayed. The following paper sizes can be used for covers: A3/A4/A4-R/B4/B5/B5-R/Ledger/Legal/Letter/Letter-R
3
# Paper that can be used for Add cover
• Paper size:
• Paper weight: For Cover Sheet Tray: 60g/m2 - 220g/m2 (16-lb bond to 58.7-lb bond)
For Interposer Tray: 60g/m2 - 157g/m2 (16-lb bond to 42-lb bond)
•
•
•
•
Up to 200 sheets can be loaded in the Cover Sheet Tray.
If [Booklet] is [ON], back covers cannot be added.
If [Separate books] is set in Details of [Booklet], either front covers or back covers cannot be added.
The paper size that can be loaded as covers is the same as the paper size for the body of document. When setting front covers of
a different size from the body of document, set the paper size of the tray (Cover Sheet Tray / Interposer Tray) to the size of [Output paper size] on the [Layout] tab of the printer driver. However, do not set [Auto].
"4.1/4.2/4.3 Feed Tray" of "HC5000 User's Manual for Printer Main Body" "p.2-18
"4.11 Cover Sheet Tray" of "HC5000 User's Manual for Printer Main Body" "p.2-29
• Irregular size paper cannot be used as a cover.
• When loading covers in the Interposer Tray, setting is required in advance.
"5.3 Separation Paper" of "HC5000 User's Manual for Printer Main Body" "p.2-36
3-3
# Settings
Put front cover
Adds a front cover before the first page of prints when
outputting paper.
Select front cover tray
Selects the tray in which paper for front covers is loaded.
You can select the Cover Sheet Tray of the Finisher or
the Interposer tray that has been set on the Operation
Panel of the printer.
"5.3 Separation Paper" of "HC5000 User's Manual for
Printer Main Body" "p.2-36
3-4
Put back cover
Adds a back cover after the last page of prints when outputting paper.
Select back cover tray
Selects the tray in which paper for back covers is loaded.
You can select the Cover Sheet Tray of the Finisher or
the Interposer tray that has been set on the Operation
Panel of the printer.
"5.3 Separation Paper" of "HC5000 User's Manual for
Printer Main Body" "p.2-36
Booklet
Creates booklets by printing continuous multiple pages with pagination and folding paper in two. Also the folding portion can be
stapled.
# Settings
OFF (Initial setting)
Booklets are not made. Each sheet is output as a sheet
from an original.
Fold and staple
Creates booklets by folding paper in two and binding at
the centre.
Fold
Creates booklets by folding paper in two.
3
If [Fold] or [Fold and staple] is selected, automatically [Duplex printing] is set to [Short edge binding] and [Pagination] is set to [Booklet] on the [Main setting] tab.
# Paper that can be used for Booklet
• Paper size:
• Paper weight: 60g/m2 - 90g/m2 (16-lb bond to 24-lb bond) (up to 220g/m2 [58.7-lb bond] for cover sheet and up to
105g/m2 [28-lb bond] for Fold)
# Maximum stapling capacity
The capacity is 60 pages (15 sheets) in total including covers.
3-5
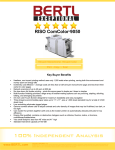
Details of Booklet
If you select an item other than [OFF] at [Booklet] and click the [Details] button, the [Details] screen is displayed.
# Settings
Separate books
When making a booklet of 16 sheets (61 pages) or more,
the Separate books setting is required.
If [Auto] is selected, for Fold and staple, a booklet is
output every 60 pages (15 sheets).
For only Fold, a booklet is output every 5 sheets (20
pages). If [Setting of number of sheets] is selected, click
or
to set the number of sheets that form a booklet.
For "Fold and staple", set the number from 1 to 15 sheets
(60 pages). For "Fold", set the number from 1 to 5 sheets
(20 pages).
The initial setting is [OFF].
• If you perform printing for a document of 16 sheets
(61 pages) or more with [Separate books] set to
[OFF], stapling is not performed and a booklet with
an incorrect page order and fold is created.
• When using [Separate books], you cannot use [Add
cover].
"Add cover" "p.3-3
• If [Auto] is set for a document with 26 sheets (104
pages), pages 1 to 60 (15 sheets) and pages 61 to
104 (11 sheets) are separated.
If you set 13 at [Setting of number of sheets], pages
1 to 52 (13 sheets) and pages 53 to 104 (13 sheets)
are separated.
Centre binding margin
Sets the width of the centre binding margin.
If you click [Put centre binding margin] to place a
checkmark, the binding margin width can be set from 0
mm to 50 mm (0" to 2") in 1 mm (0.04") increments.
If you place a checkmark at [Auto reducing], any image
that is not included in the image area because of the margin width will be automatically reduced so that the
image is included in the image area of the paper.
The initial setting is [OFF].
3-6
Print cover separately
Only the covers are printed separately. This function is
useful for printing the covers onto paper different from
paper for the body of a document.
If [Print cover only] is selected, only the pages for covers (beginning two pages and last two pages of originals)
will be printed. At this time, if you click [Save except
cover in archive] to place a checkmark, the pages other
than the covers are processed with RIP and stored into
[Archive] of [Job manager] of RISO Console PS7R. If
you load printed covers in the Cover Sheet Tray and
print the body of the document by recalling from the
archive, you can make booklets.
If you select [Print except cover], pages other than the
covers are printed as booklets.
The initial setting is [OFF].
If [Print cover only] is selected, prints will not be
folded in two.
Stapler
Staples printed paper at specified positions.
# Selectable stapling positions
• OFF (initial setting)
• Left 2 positions
• Left top 1 position
• Top 2 positions
•
•
•
•
Top left 1 position
Top right 1 position
Right 2 positions
Right top 1 position
3
This function can be used with [Duplex printing] and [Punching].
"Punching" "p.3-9
# Paper that can be used for stapling
• Paper size:
• Paper weight: 46g/m2 - 157g/m2 (12-lb bond to 42-lb bond) (up to 220g/m2 [58.7-lb bond] for cover sheet)
# Maximum number of sheets for stapling
• For A4, A4-R, B5-R, letter, and letter-R: 2 to 100 sheets
• For standard sizes other than those above: 2 to 65 sheets
• If the number of sheets exceeds the maximum number for stapling, printed sheets are output to the Stacking Tray without stapling.
• For paper shown below, the maximum number for stapling is 2 to 65 sheets.
- Paper with width in the paper ejection direction of 216 mm (81/2") or more
- Paper larger than the size of 297 mm (1111/16") long and 216 mm (81/2") wide
3-7
Details of Stapler/Punching
If you select an item other than [OFF] at [Stapler] and click the [Details] button, the [Details] screen is displayed.
# Settings
Binding margin
Sets the binding margin width.
If you click [Put binding margin] to place a checkmark,
the binding margin width can be set from 0 mm to 50
mm in 1 mm increments.
If you click [Auto reducing] to place a checkmark, any
image that is not included in the image area because of
the margin width will be automatically reduced so that
the image is included in the image area of the paper.
The initial setting is [OFF].
Punching hole
For punching, either 2 holes or 4 holes (3 holes) can be
selected.
3-8
Punching
Punches holes in printed paper.
If HC Finisher A is connected, 2-hole or 3-hole punching can be made. If HC Finisher B is connected, 2-hole or 4-hole punching
can be made.
# Selectable punching positions
• OFF (initial setting)
• Left
• Top
• Right
3
This function can be used with [Duplex printing] and [Stapler].
"Stapler" "p.3-7
# Paper that can be punched
Punching holes
Paper that can be punched
2 holes (initial setting)
3 holes
4 holes
• Paper weight: 46g/m2 - 157g/m2 (12-lb bond to 42-lb bond) (up to 220g/m2 [58.7-lb bond] for cover sheet)
Details of Stapler/Punching
If you select an item other than [OFF] at [Punching] and click the [Details] button, the [Details] screen is displayed.
"Details of Stapler/Punching" "p.3-8
3-9
Output Tray
Selects the tray to which prints are output.
# Settings
Auto (initial setting)
Outputs paper automatically to a proper tray according
to the setting of Finisher functions.
Normally, set [Auto].
Stacking Tray
Select this tray when printing more than 500 sheets
without using any Finisher functions. The paper size that
can be output to the Stacking Tray is 182 mm to 330mm
x 182 mm to 488 mm (73/16" to 13" x 73/16" to 193/16").
(for stapling: 203 mm to 297mm x 182 mm to 432 mm
[8" to 1111/16" x 73/16" to 17"])
If Paper fold or Booklet is set, the Stacking Tray cannot
be selected.
Offset Output
Outputs paper at an offset position for each set when outputting paper to the Stacking Tray.
[Offset output] is a function of the Stacking Tray. This function cannot be used with a function that does not use the Stacking Tray such
as the 3 fold and Booklet functions. The [Job Separation] function on the [Options] tab of the printer driver cannot be used with this
function either.
# Settings
OFF (initial setting)
Offset output is not performed.
# Paper that can be used for offset output
• Paper size:
• Paper weight: 46g/m2 - 157g/m2 (12-lb bond to 42-lb bond)
3-10
ON
Offset output is performed.
Paper Fold (only if an HC Z Folder Unit is connected)
Outputs paper that has been folded into two or three or in a Z shape.
# Settings
OFF (initial setting)
Paper fold is not performed.
Outer 3 fold
Paper is folded in three toward the outside.
Paper is output to the 3 fold tray.
Inner 3 fold
Paper is folded in three toward the inside.
Paper is output to the 3 fold tray.
Z fold
Paper is folded in a Z shape.
Paper is output to the Top Tray or the Stacking Tray.
2-fold
Paper is folded in two.
Paper is output to the Booklet tray.
3
3-11
# Paper that can be used for Paper fold
Paper fold
Paper that can be used
Outer 3 fold / inner 3 fold
Z fold
2-fold
• Paper weight: 60g/m2 - 90g/m2 (16-lb bond to 24-lb bond)
(up to 105g/m2 [28-lb bond] for 2-fold)
Details of Paper Fold
If you select an item other than [OFF] at [Paper fold] and click the [Details] button, the [Details] screen is displayed.
# Settings
Folding direction
Selects whether paper is folded with the print face (first
page in duplex printing) inside or outside.
This item can be set when [2-fold] or [3 fold] is selected.
The initial setting is [Print inside].
Binding direction
Selects whether paper is bound at the left side or the
right side. For left binding, the right half of paper is
folded in a Z shape. For right binding, the left half of
paper is folded in a Z shape.
This item can be set when [Z fold] is selected.
The initial setting is [Left binding].
3-12
3
3-13
3-14
Chapter4 Troubleshooting
This chapter describes measures against driver or utility installation failure and trouble in printing.
4-1
Troubleshooting for installing
Problem
Cause and Solution
If RISO IP Setting Tool cannot be
installed:
• Even if the CD-ROM is inserted into the computer, the Installer
does not start."
Depending on the model or setting of the computer, the Installer
may not automatically start.
• Max OS X is used.
Under Mac OS X, RISO IP Setting Tool cannot be used.
If RISO IP Setting Tool does not
operate normally:
• RISO IP Setting Tool is not installed properly.
Refer to the page shown below to install again RISO IP Setting
Tool.
• Windows"p.1-2
• Mac OS 9"p.1-10
• Even if RISO IP Setting Tool is started, printer information is not
displayed.
• Click the [Search] icon to update the displayed information.
• Ensure that the printer is turned on.
• Ensure that the printer is connected to the computer.
"Connection with Computer" "p.iv
If the printer driver cannot be
installed:
• The IP address of the printer is not set.
Refer to the page shown below to assign the IP address to the
printer.
• Windows"p.1-4
• Mac OS 9"p.1-12
• An incorrect IP address is specified. (Windows only)
The IP address that has been input when you install the printer
driver is not correct. Input the correct IP address.
"p.1-6
4-2
Other Trouble
Problem
Cause and Solution
Duplex printing cannot be performed.
"Duplex printing" is not set in the printer driver screen.
Set "Duplex printing" on the [Main setting] tab in the printer driver screen.
"Main setting""p.2-5
• Collated printing or non collated
printing cannot be performed.
• Page order is not normal.
• Preset number of copies is exceeded.
In the [Print] dialog box of application software, a checkmark is displayed at "Collate."
Clear the checkmark in the [Print] dialog box of application software and set "Ejection mode" on the [Main setting] tab in the printer driver screen.
"Ejection mode""p.2-8
A multiple number of copies (sheets) is
set but only one copy (sheet) can be
printed.
"Proof copy" is set.
Since "Proof copy" is set on the [Main setting] tab in the printer driver screen, printing stops after one copy. To continue printing, press the PRINT/ PAUSE Key on the
Operation Panel.
If proof copy is not required, clear the checkmark at "Pause after a proof.""p.2-8
The orientation of print is automatically
changed.
The orientation may be automatically changed depending on the application software. If [Special image setting] on the [Layout] tab in the printer driver screen is set
to "0" of image rotation angle, the orientation of printing specified by the application
software can be seen. From this printing result, specify the desired image rotation
angle. "p.2-21
A font other than specified is used for
printing.
A font that is not provided in the printer is used.
A font that is not provided in the printer is automatically replaced with a provided
font for printing.
A part of print image is missing.
The [Paper size] and [Paper type] settings in the printer driver screen do not match
those of the menu setting.
Select the same settings at [Paper size] and [Paper type] in the printer driver screen
and in the printer menu setting.
4
An improper enlargement/reduction ratio is specified.
The zoom setting on the [Layout] tab in the printer driver screen is not correct. Select
the correct ratio.
"Zoom""p.2-11
Characters and lines are serrated.
Place a checkmark at "Line smoothing" on the [Image processing] tab in the printer
driver screen. "p.2-19
The colours of the images such as photo
are different from those on the display.
The colour control method is different between the display and the printer.
Since colours are expressed with RGB on the display and with CMYK in the printer,
colour tones are different. Also the difference is generated from the performance of
the computer and the display.
Perform "Gamma control" on the [Image processing] tab in the printer driver screen
or adjust the display. "p.2-16
The printer driver setting does not fit the file format for photo.
Select "Auto colour matching" at [Special image setting] on the [Image processing]
tab in the printer driver screen according to the file format for photo. "p.2-22
4-3
4-4
Chapter5 Appendix
5-1
Font List
5-2
5
5-3
5-4
Index
Numerics
Every Division . . . . . . . . . . . . . . . . . . . . . . . . . . . . . 2-23
2-fold . . . . . . . . . . . . . . . . . . . . . . . . . . . . . . . . . . . . 3-11
F
A
Feed Tray 1. . . . . . . . . . . . . . . . . . . . . . . . . . . . . . . . 2-7
Feed Tray 2. . . . . . . . . . . . . . . . . . . . . . . . . . . . . . . . 2-7
Fine . . . . . . . . . . . . . . . . . . . . . . . . . . . . . . . . . . . . . 2-22
[Finisher] tab . . . . . . . . . . . . . . . . . . . . . . . . . . . . . . . 2-3
Finisher . . . . . . . . . . . . . . . . . . . . . . . . . . . . . . . 3-1, 3-2
Fold . . . . . . . . . . . . . . . . . . . . . . . . . . . . . . . . . 2-13, 3-5
Fold and staple . . . . . . . . . . . . . . . . . . . . . . . . . . . . . 3-5
Folding direction . . . . . . . . . . . . . . . . . . . . . . . . . . . 3-12
Font List . . . . . . . . . . . . . . . . . . . . . . . . . . . . . . . . . . 5-2
Form . . . . . . . . . . . . . . . . . . . . . . . . . . . . . . . . . . . . . 2-9
Form data print face . . . . . . . . . . . . . . . . . . . 2-26, 2-27
Form list . . . . . . . . . . . . . . . . . . . . . . . . . . . . . . . . . 2-26
Form preview . . . . . . . . . . . . . . . . . . . . . . . . . . . . . 2-26
Form print pattern . . . . . . . . . . . . . . . . . . . . . 2-26, 2-27
[Form] tab . . . . . . . . . . . . . . . . . . . . . . . . . . . . . . . . . 2-3
Forms . . . . . . . . . . . . . . . . . . . . . . . . . . . . . . . . . . . 2-26
[About..] tab . . . . . . . . . . . . . . . . . . . . . . . . . . . . . . . . 2-4
About.. . . . . . . . . . . . . . . . . . . . . . . . . . . . . . . . . . . . 2-32
Add cover . . . . . . . . . . . . . . . . . . . . . . . . . . . . . 3-2, 3-3
Adobe PS . . . . . . . . . . . . . . . . . . . . . . . . . . . . . . . . 1-14
[Advanced] tab . . . . . . . . . . . . . . . . . . . . . . . . . 2-3, 2-4
Archive . . . . . . . . . . . . . . . . . . . . . . . . . . . . . . . . . . . 2-9
ATM. . . . . . . . . . . . . . . . . . . . . . . . . . . . . . . . 1-10, 1-18
Auto colour matching. . . . . . . . . . . . . . . . . . . 2-20, 2-22
Auto tray selection. . . . . . . . . . . . . . . . . . . . . . . . . . . 2-7
B
Between Jobs . . . . . . . . . . . . . . . . . . . . . . . . . . . . . 2-23
Binding direction . . . . . . . . . . . . . . . . . . . . . . . . . . . 3-12
Binding margin . . . . . . . . . . . . . . . . . . . . . . . . . . . . . 3-8
Booklet . . . . . . . . . . . . . . . . . . . . . . . . . . . 2-13, 3-2, 3-5
C
Centre binding margin . . . . . . . . . . . . . . . . . . . . . . . . 3-6
Change output condition . . . . . . . . . . . . . . . . . . 2-5, 2-9
Clustering . . . . . . . . . . . . . . . . . . . . . . . . . . . 2-23, 2-24
Collate . . . . . . . . . . . . . . . . . . . . . . . . . . . . . . . . . . . . 2-8
Colour Management . . . . . . . . . . . . . . . . . . . . 2-6, 2-22
Colour mode . . . . . . . . . . . . . . . . . . . . . . . . . . . . . . . 2-5
Contrast. . . . . . . . . . . . . . . . . . . . . . . . . . . . . . . . . . 2-17
D
Density . . . . . . . . . . . . . . . . . . . . . . . . . . . . . . . . . . 2-17
Details of Add cover . . . . . . . . . . . . . . . . . . . . . . . . . 3-3
Details of Booklet . . . . . . . . . . . . . . . . . . . . . . . . . . . 3-6
Details of Paper Fold. . . . . . . . . . . . . . . . . . . . . . . . 3-12
Details of Stapler/Punching . . . . . . . . . . . . . . . . 3-8, 3-9
Direct print . . . . . . . . . . . . . . . . . . . . . . . . . . . . . . . . . 2-9
Dot screen . . . . . . . . . . . . . . . . . . . . . . . . . . . . . . . . 2-18
Dot screen setting . . . . . . . . . . . . . . . . . . . . . . . . . . 2-19
Double side overlay. . . . . . . . . . . . . . . . . . . . 2-26, 2-27
Duplex printing . . . . . . . . . . . . . . . . . . . . . . . . . 2-5, 2-6
E
Ejection mode . . . . . . . . . . . . . . . . . . . . . . . . . . 2-5, 2-8
[Environment] tab . . . . . . . . . . . . . . . . . . . . . . . . . . . 2-3
Environment . . . . . . . . . . . . . . . . . . . . . . . . . . . . . . 2-30
Error Diffusion . . . . . . . . . . . . . . . . . . . . . . . . . . . . . 2-18
5
G
Gamma control . . . . . . . . . . . . . . . . . . . . . . . . . . . . 2-16
Gamma Value . . . . . . . . . . . . . . . . . . . . . . . . 2-16, 2-17
H
Half Tone . . . . . . . . . . . . . . . . . . . . . . . . . . . . . . . . 2-18
How to Print a Form . . . . . . . . . . . . . . . . . . . . . . . . 2-29
I
Image position adjustment . . . . . . . . . . . . . . 2-20, 2-21
[Image processing] tab . . . . . . . . . . . . . . . . . . . . . . . 2-2
Image processing . . . . . . . . . . . . . . . . . . . . . . . . . . 2-16
Image quality. . . . . . . . . . . . . . . . . . . . . . . . . 2-20, 2-22
Image rotation . . . . . . . . . . . . . . . . . . . . . . . . 2-20, 2-21
Inner 3 fold . . . . . . . . . . . . . . . . . . . . . . . . . . . . . . . 3-11
Install. . . . . . . . . . . . . . . . . . . . . . . . . . . . . . . . 1-6, 1-15
IP Address . . . . . . . . . . . . . . . . . . . . . . . . . . . . . . . . . . v
J
Job delegation. . . . . . . . . . . . . . . . . . . . . . . . . . . . .
Job Separation . . . . . . . . . . . . . . . . . . . . . . . . . . . .
Job split. . . . . . . . . . . . . . . . . . . . . . . . . . . . . . . . . .
Job split limit . . . . . . . . . . . . . . . . . . . . . . . . . . . . . .
2-24
2-23
2-24
2-24
L
LAN cable . . . . . . . . . . . . . . . . . . . . . . . . . . . . . . . . . . iv
5-5
Landscape . . . . . . . . . . . . . . . . . . . . . . . . . . . . . . . 2-12
[Layout] tab . . . . . . . . . . . . . . . . . . . . . . . . . . . . . . . 2-2
Layout . . . . . . . . . . . . . . . . . . . . . . . . . . . . . . . . . . 2-10
Line smoothing. . . . . . . . . . . . . . . . . . . . . . . . . . . . 2-19
Line-based . . . . . . . . . . . . . . . . . . . . . . . . . . . . . . . . 2-6
Long edge binding . . . . . . . . . . . . . . . . . . . . . . . . . . 2-6
M
Mac OS 9 . . . . . . . . . . . . . . . . . . . . . . . . . . . . . . . . 1-11
Mac OS X. . . . . . . . . . . . . . . . . . . . . . . . . . . . . . . . 1-19
[Main setting] tab . . . . . . . . . . . . . . . . . . . . . . . . . . . 2-2
Main setting . . . . . . . . . . . . . . . . . . . . . . . . . . . . . . . 2-5
Model name . . . . . . . . . . . . . . . . . . . . . . . . . . . . . . 2-32
Multi-up (Multi-page) . . . . . . . . . . . . . . . . . . . . . . . 2-13
Multi-up (Single page) . . . . . . . . . . . . . . . . . . . . . . 2-13
Pause after a proof . . . . . . . . . . . . . . . . . . . . . . . . . . 2-5
Pause after a proof (Proof Copy). . . . . . . . . . . . . . . . 2-8
Photo-based . . . . . . . . . . . . . . . . . . . . . . . . . . . . . . . 2-6
Plug-in . . . . . . . . . . . . . . . . . . . . . . . . . . . . . . . . . . . 2-32
Portrait . . . . . . . . . . . . . . . . . . . . . . . . . . . . . . . . . . . 2-12
PPD file name . . . . . . . . . . . . . . . . . . . . . . . . . . . . . 2-32
Print cover separately . . . . . . . . . . . . . . . . . . . . . . . . 3-6
Print Density . . . . . . . . . . . . . . . . . . . . . . . . . 2-23, 2-24
Print Storage . . . . . . . . . . . . . . . . . . . . . . . . . . . . . . . 2-9
Printer Driver . . . . . . . . . . . . . . . . . . . . . . . . . . . . . . . 1-1
Printer Driver Operation. . . . . . . . . . . . . . . . . . . . . . . 2-1
Punching . . . . . . . . . . . . . . . . . . . . . . . . . . . . . . 3-2, 3-9
Punching hole . . . . . . . . . . . . . . . . . . . . . . . . . . . . . . 3-8
Put back cover . . . . . . . . . . . . . . . . . . . . . . . . . . . . . . 3-4
Put front cover . . . . . . . . . . . . . . . . . . . . . . . . . . . . . . 3-4
R
N
Network . . . . . . . . . . . . . . . . . . . . . . . . . . . . . . 1-4, 1-13
Non collate . . . . . . . . . . . . . . . . . . . . . . . . . . . . . . . . 2-8
Registration of form . . . . . . . . . . . . . . . . . . . . . . . . . 2-28
RISO IP Setting Tool . . . . . . . . . . . . . . . . . . . . 1-2, 1-11
S
O
Offset Output . . . . . . . . . . . . . . . . . . . . . . . . . . . . . 3-10
Offset output. . . . . . . . . . . . . . . . . . . . . . . . . . . . . . . 3-2
[Options] tab. . . . . . . . . . . . . . . . . . . . . . . . . . . . . . . 2-3
Options. . . . . . . . . . . . . . . . . . . . . . . . . . . . . . . . . . 2-23
Orientation . . . . . . . . . . . . . . . . . . . . . . . . . . . 2-10, 2-12
Original image . . . . . . . . . . . . . . . . . . . . . . . . . . 2-5, 2-6
Original size . . . . . . . . . . . . . . . . . . . . . . . . . . 2-10, 2-11
Outer 3 fold . . . . . . . . . . . . . . . . . . . . . . . . . . . . . . 3-11
Output Face . . . . . . . . . . . . . . . . . . . . . . . . . . . . . . 2-15
Output face. . . . . . . . . . . . . . . . . . . . . . . . . . . . . . . 2-10
Output mode . . . . . . . . . . . . . . . . . . . . . . . . . . . 2-5, 2-9
Output paper size. . . . . . . . . . . . . . . . . . . . . . 2-10, 2-11
Output setting. . . . . . . . . . . . . . . . . . . . . . . . . . . . . . 2-9
Output Tray . . . . . . . . . . . . . . . . . . . . . . . . . . . 3-2, 3-10
Screen frequency. . . . . . . . . . . . . . . . . . . . . . 2-16, 2-19
Screening. . . . . . . . . . . . . . . . . . . . . . . . . . . . 2-16, 2-18
Select back cover tray . . . . . . . . . . . . . . . . . . . . . . . . 3-4
Select front cover tray . . . . . . . . . . . . . . . . . . . . . . . . 3-4
Separate books . . . . . . . . . . . . . . . . . . . . . . . . . . . . . 3-6
Short edge binding. . . . . . . . . . . . . . . . . . . . . . . . . . . 2-6
Single side overlay. . . . . . . . . . . . . . . . . . . . . . . . . . 2-27
Special setting . . . . . . . . . . . . . . . . . . . . . . . . 2-16, 2-20
Stacking Tray. . . . . . . . . . . . . . . . . . . . . . . . . . . . . . 3-10
Standard . . . . . . . . . . . . . . . . . . . . . . . . . . . . . . . . . 2-22
Standard Feed Tray. . . . . . . . . . . . . . . . . . . . . . . . . . 2-7
Stapler . . . . . . . . . . . . . . . . . . . . . . . . . . . . . . . . 3-2, 3-7
Storage . . . . . . . . . . . . . . . . . . . . . . . . . . . . . . . . . . . 2-9
Storage folder name . . . . . . . . . . . . . . . . . . . . . . . . . 2-9
U
P
Page order . . . . . . . . . . . . . . . . . . . . . . . . . . . 2-10, 2-15
Pages per sheet . . . . . . . . . . . . . . . . . . . . . . . 2-10, 2-15
Pagination . . . . . . . . . . . . . . . . . . . . . . . . . . . 2-10, 2-13
Paper Feed Tray . . . . . . . . . . . . . . . . . . . . . . . . 2-5, 2-7
Paper Fold . . . . . . . . . . . . . . . . . . . . . . . . . . . 3-2, 3-11
Paper Type. . . . . . . . . . . . . . . . . . . . . . . . . . . . . 2-5, 2-7
Uninstall . . . . . . . . . . . . . . . . . . . . . . . . . . . . . . . . . . . 1-9
Z
Z fold . . . . . . . . . . . . . . . . . . . . . . . . . . . . . . . . . . . . 3-11
Zoom . . . . . . . . . . . . . . . . . . . . . . . . . . . . . . . 2-10, 2-11
033-03020-003
5-6
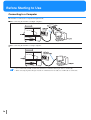

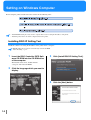
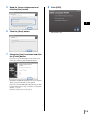
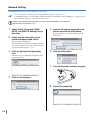


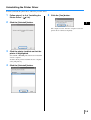
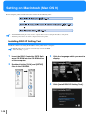
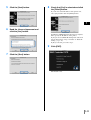

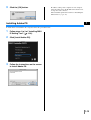
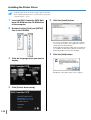
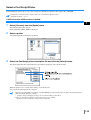
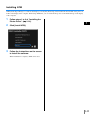
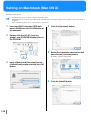
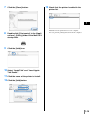


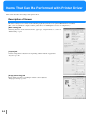
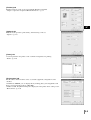
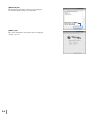

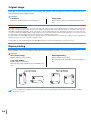
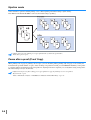
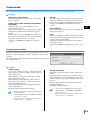
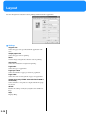
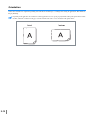
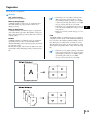
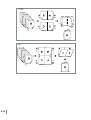
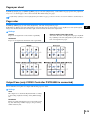
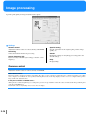
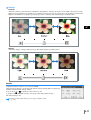
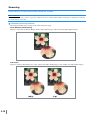
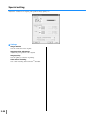
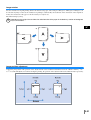
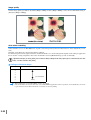
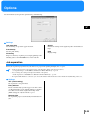
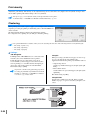
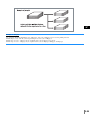
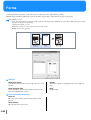
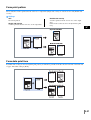
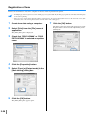
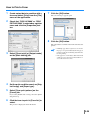
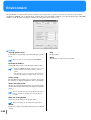
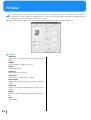
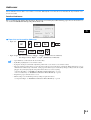
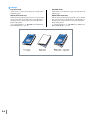
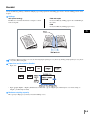
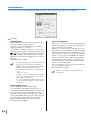
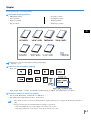
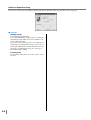
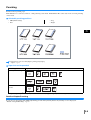
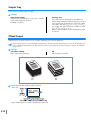
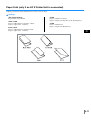
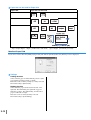
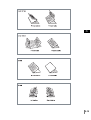


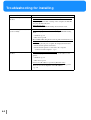
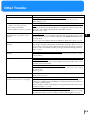

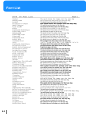
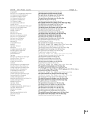


![1 Click the [OK] button.](http://vs1.manualzilla.com/store/data/005894494_1-d1f52ee6fd3b2146a5f252d3f1858c3b-150x150.png)