1
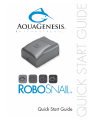
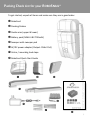
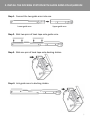
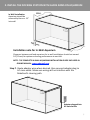
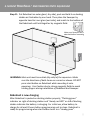
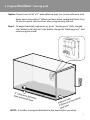
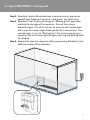
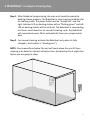
1 ROBOSNAIL® QUICK START GUIDE Congratula*ons on your purchase of the RoboSnail from AquaGenesis! This state-‐of-‐art product is capable of cleaning the front viewing glass of varying sized aquariums by itself. Regardless if your aquarium is constructed with a standard black-‐banded support brace, rimless, installed in open area, or in-‐wall, this product will work for you . This Quick Start Guide will help you install your RoboSnail and get it cleaning. For more informa*on about using your RoboSnail, refer to the RoboSnail User manual published on our web site at www.robosnail.com for details and video tutorials, troubleshoo*ng *ps etc. You will also need to know if this product is suited for your aquariums glass thickness. Please refer to the recommended opera*ng parameters of the RoboSnail for more details. Maximum glass pane thickness should not exceed 0.40” (10mm) glass thickness. Prior to ini*al use there are just a few simple steps you will go through: 1. Install the docking sta*on with guide arms on the aquarium. 2. Fully charge the baVery pack before use. 3. Program RoboSnail. 4. Start your RoboSnail to conduct a manual cleaning or simply wait for the 24-‐ hour count-‐down cycle to complete for ini*al automa*c cleaning. 2 Table of Contents 4 5 6 9 10 13 15 16 17 18 19 Packing Check List for your ROBOSNAIL® 1. GLASS PREPARATION FOR AQUARIUM 2. INSTALL THE DOCKING STATION WITH GUIDE ARMS ON AQUARIUM 3. POWER UP DOCKING STATION, INSTALL BATTERY FOR ROBOSNAIL® 4. MOUNT ROBOSNAIL® AND SWEEPER ONTO AQUARIUM 5. Program ROBOSNAIL® cleaning path 6. ROBOSNAIL® is ready for Cleaning Duty 7. Tips on Cleaning *res for ROBOSNAIL® for op*mum performance IMPORTANT: Safety Warnings Warranty Disclaimer 3 Packing Check List for your ROBOSNAIL® To get started, unpack all items and make sure they are in good order: ❶ RoboSnail ❷ Docking Sta*on ❸ Guide arms (upper & lower) ❹ BaVery pack (NiMH 4.8V 700mAh) ❺ Sweeper with sweeper pad ❻ AC/DC power adaptor (Output: 9Vdc 0.5A) ❼ Velcro / moun*ng hook tape ❽ RoboSnail Quick Start Guide ❶ ❷ ❺ ❸ ❹ ❻ ❼ ❽ 4 1. GLASS PREPARATION FOR AQUARIUM Step 1. Glass PreparaQon of Inner Surface (Wet side) Prepare the inside of main viewing glass that the RoboSnail will clean as follows: • Remove all types of animals that aVach themselves to the aquarium’s glass surfaces. These types of animals such as star fish, snails, algae ea*ng fishes, etc., can not be used with the RoboSnail. These types of animals may cause magne*c decoupling of the cleaner, damaging the main unit. • Remove and reposi*on all pumps, wires, rocks, decora*ons etc., that will impede the RoboSnail’s cleaning path. • Restore your inner glass surface to a spotless condi*on by cleaning the surface of all algae, build up, or mineral deposits. • Level out your substrate (gravel, rocks, sand), to op*mize the RoboSnail’s cleaning parameters. Step 2. Glass PreparaQon of Outer Surface (Dry side) Clean the outside of main viewing glass that the RoboSnail will drive on as follows: • Clean the glass surface of all moisture, greasy residues and dust to ensure proper trac*on of the main unit. OUTSIDE GLASS MUST BE DRY! • Remove and reposi*on all pumps or equipment that will impede the RoboSnail’s cleaning path. NOTE: Prepare the aquarium glass surface by thoroughly cleaning the glass with a glass cleaner, and a clean dry cloth. Ensure glass is completely dry, and free of any residues before RoboSnail is installa=on. 5 2. INSTALL THE DOCKING STATION WITH GUIDE ARMS ON AQUARIUM Step 1. Connect the two guide arms into one. Lower guide arm Upper guide arm Step 2. S*ck two pairs of hook tape onto guide arms. Step 3. S*ck one pair of hook tape onto docking sta*on. Step 4. Link guide arms to docking sta*on. 6 6 2. INSTALL THE DOCKING STATION WITH GUIDE ARMS ON AQUARIUM Step 5. Plug in DC plug of power adaptor to docking sta*on first. DC OUT 9V DC IN 9V NOTE: DO NOT plug adaptor to main outlet at this moment. Step 6. Remove protec*ve sheets from back of hook tape on guide arms and docking sta*on. Mount fully assembled docking sta*on firmly to upper right edge of aquarium ver*cally. Standard black-‐band type Aquarium Rimless type Aquarium 7 2. INSTALL THE DOCKING STATION WITH GUIDE ARMS ON AQUARIUM In-‐Wall InstallaQon: Aquarium should be recessed by 6mm or .25” into wall. WALL InstallaQon note for In-‐Wall Aquarium Clearance between wall and aquarium for in-‐wall installa*ons should not exceed 0.5”(12mm) for op*mum cleaning performance at most lel. NOTE: THE COMPLETE IN-‐WALL AQUARIUM INSTALLATION GUIDE INCLUDED IN ONLINE MANUAL, www.robosnail.com . Step 7. Route adaptor wire where desired, then connect adaptor plug to AC main outlet. Make sure wiring will not interfere with the RoboSnail’s cleaning path. Adaptor plugged into AC main source 8 3. POWER UP DOCKING STATION, INSTALL BATTERY FOR ROBOSNAIL® Step 8. Aler powering up the docking sta*on, the red LED indicator on lel will be on. Step 9. Install baVery into main drive unit as illustrated, then slide power switch to ON and close baVery door. Start buVon will then be red. POWER SWITCH Ini=al use: recommended 8 hours of charging prior to programming the unit. NOTE: Do not press start bu3on at this moment. 9 4. MOUNT ROBOSNAIL® AND SWEEPER ONTO AQUARIUM Step 10. Refer to following table, choose proper Glass thickness senng before moun*ng RoboSnail onto dry side of glass. Default seBng is mode 3 for 10mm thick aquarium glass. Mode 4 of seBng is reserved for future use. DO NOT press budon. Stock Aquarium Range: 0.25”(6mm) to 0.40”(10mm) glass thickness Seang 1 0.25”(6mm) 2 0.31”(8mm) 3 0.40”(`0mm) US Gallons Litres Inches ( L x D x H ) CenQmeters ( L x D x H ) 55 208.2 48 x 13 x 21 121.9 x 33.0 x 53.3 65 246.1 37 x 19 x 25 94.0 x 48.3 x 63.5 75 283.9 48 x 19 x 22 121.9 x 48.3 x 55.9 80 302.8 73 x 14 x 21 185.4 x 35.6 x 53.3 90 340.7 49 x 19 x 26 124.5 x 48.3 x 66.0 100 378.5 73 x 19 x 20 185.4 x 48.3 x 50.8 120 454.2 49 x 25 x 26 124.5 x 63.5 x 66.0 125 473.2 73 x 19 x 24 185.4 x 48.3 x 61.0 150 567.8 73 x 19 x 29 185.4 x 48.3 x 73.7 Senng are a guide. Use a ruler to measure glass thickness of your aquarium, or contact your aquarium manufacturer for details. Once you’ve determined the thickness of your aquarium glass, set the glass variance switch to match the thickness or approximate range of thickness. Maximum glass pane thickness should not exceed 0.40” (10mm) glass thickness. Note: Opera6ng in excess of defined parameters may cause inconsistent performance, or damage the unit. 10 4. MOUNT ROBOSNAIL® AND SWEEPER ONTO AQUARIUM Step 11. Put RoboSnail on outer glass ( dry side), park and hold it on docking sta*on as illustra*on by one hand. Then place the Sweeper by opposite hand to inner glass (wet side), and match to the boVom of the RoboSnail un*l held together by magne*c field. Make sure Sweeper Pad is aVached before moun*ng WARNING: Main unit must be outside (dry side) of the aquarium. Make sure the direc6ons of both items are correct as shown. DO NOT press start bu3on on RoboSnail while moun6ng it onto aquarium. Use Cau6on due to strong magne6c fields to avoid hur6ng fingers during installa6on of RoboSnail and Sweeper. RoboSnail is now charging Aler RoboSnail is parked on docking sta*on properly, “flashing green” indicator on right of docking sta*on and “steady red LED” on lel of docking sta*on indicates the baVery is charging. For ini*al use, allow baVery to charge for at least 8 hours before programming unit to clean. RoboSnail is ready for programming when start buVon turns to a “steady green”. 11 5. Program ROBOSNAIL® cleaning path OpQon: Prepare one roll of 1/2 “ wide adhesive tape. (as a visual reference tool) Apply tape horizontally 2” (50mm) at least above sand/gravel level if any for use as a quick reference tool when programming the unit. Step 1. To begin RoboSnail programming , press “steady green” (fully charged start buVon) and hold un*l start buVon changes to “flashing green” and enters program mode. NOTE: It is be3er to program RoboSnail a few hours before you sleep. 12 5. Program ROBOSNAIL® cleaning path Step 2. RoboSnail is now moving downward with start buVon “flashing green”, PRESS BUTTON once unit is close to upper edge of tape posi*on. Start buVon now changes to “steady green”. Unit recorded first baseline (tape) above sand level. NOTE: If there is an obstruc*on as men*oned, it may cause the unit to lose its magne*c grip and fall. This may damage the unit or result in personal injury! 13 5. Program ROBOSNAIL® cleaning path Step 3. RoboSnail rotates lel and switches to second column, and moves upward. Start buVon will remain a “solid green” during this turn. Step 4. RoboSnail’s start buVon will change to “flashing green” again aler reaching the top edge of the aquarium. The unit then moves downward again. This alerts the user to press the start buVon again when it reaches upper edge of tape posi*on for a second *me. Once pressed again, it turns to “flashing blue”, this means programing is complete. The unit ends programming by returning and docking itself for charging. Step 5. Remove the tape from aquarium aler programming RoboSnail. Clean adhesive residues off as necessary. 14 6. ROBOSNAIL® is ready for Cleaning Duty Step 1. Aler RoboSnail programming, the main unit should be parked to docking sta*on properly. The RoboSnail is now charging its baVery for its cleaning mode. The power buVon will be “steady red”, and the right indicator LED on docking sta*on will be “flashing green” and lel LED on docking sta*on will be solid red. The RoboSnail is now star*ng a 24-‐hour count-‐down for its next self-‐cleaning cycle. The RoboSnail will now ac*vate every 24hrs automa*cally from your programmed *me. Step 2. For manual cleaning, ac*vate the RoboSnail only when its fully charged. ( start buVon is “steady green”). NOTE: Once manually ac6vated, the unit will count-‐down the next 24-‐hour cleaning cycle based on the last ac6va6on 6me. Avoid doing this at night 6me before you are going to sleep. 15 7. Tips on Cleaning Qres for ROBOSNAIL® for opQmum performance 1. Regular cleaning of the *res on main drive unit will keep your RoboSnail at op*mum performance. a) When should you clean the *res? -‐ Once RoboSnail has a devia*on, or -‐ Every three months; b) How you can easily clean the *re surfaces. -‐ Unplug adaptor from main power outlet; -‐ Detach main drive unit with one hand while simultaneously holding sweeper with the opposite hand -‐ Keep main drive unit powered on as usual; -‐ Prepare one damp cloth for cleaning; -‐ Follow steps as illustrated below. Figure 1 Figure 2 Figure 3 Step 1: Hold Main Drive Unit with one hand as Figure 1. Step 2: Press buVon once as Figure 1, by opposite hand. buVon changes to “flashing blue”. Lel and right pairs of *res begin rota*ng in opposite direc*ons. Step 3: Keep holding Unit as Figure 2, by one hand, hold a damp cloth with opposite hand, press along each moving *res surface. Step 4: Orient Drive Unit as Figure 3, lel and right pairs of *res change direc*on of rota*on. While using a damp cloth press along each moving *res surface. Step 5: Repeat steps 3 and 4 un*l you feel *res are clean enough. Step 6: Repeat steps 3 and 4 with a dry cloth, and dry off *res completely. Step 7: Power reset Unit: (open baVery door, slide power switch to OFF, then ON, then close baVery door). NOTE: DO NOT press buVon again. 16 Step 8: Follow Quick Start Guide, install RoboSnail and Sweeper. IMPORTANT: Safety Warnings • The RoboSnail u*lizes very powerful magnets and can cause severe personal injury. • CAUTION: NEVER place either half of this device near magne*cally aVrac*ve surfaces or sensi*ve electronic devices. Magne*c sensi*ve devices and cards, such as hard disk drives, credit cards with magne*c tape are also included. Always keep these items away when close to this product. • Do Not Drop Your RoboSnail – The RoboSnail is a highly engineered robo*c device designed with sensi*ve electronic internal components that make the product small and efficient. As a result, the RoboSnail is fragile. All precau*ons must be taken to avoid dropping the outside drive unit. Aler a fall onto the floor, the outer unit side may be permanently damaged. Evidence of this will not be covered under warranty. • You must have adequate clearance between the inner sweeper (wet side) member and any décor such as rock, coral, etc., to avoid the inner member from breaking its magne*c coupling to the outside (dry side) control unit. Improper set up may cause the outer control unit (dry side) to fall and break voiding warranty. • Opera*on is subject to the following two condi*ons: (1) this device may not cause interference, and (2) this device must accept any interference including interference that may cause undesired opera*on of the device. • DANGER: To avoid possible electrical shock, special care should be taken since water is employed in the use of aquarium equipment. • Make sure an appliance mounted on a tank is securely installed before opera*ng it. Read and observe all the important no*ces on the appliance. • Do not aVempt repairs yourself, return the appliance to the manufacturer for service or discard the appliance. • Do not operate any appliance if it has a damaged cord or plug. • To avoid the possibility of the appliance plug or receptacle genng wet, posi*on aquarium stand to one side of a wall mounted receptacle to prevent water from dripping onto the receptacle or plug. The “drip loop” should be arranged by the user for each cord connec*ng an aquarium appliance to a receptacle. A “drip loop” is that part of the cord below the level of the receptacle, or the connector if an extension cord is used, to prevent water traveling along the cord and coming in contact with the receptacle. If the plug or receptacle does get wet, DON’T unplug the cord. Disconnect the fuse or circuit breaker that supplies power to the appliance, then unplug and examine for presence of water in the receptacle. • Always check dry side of glass, clean surface if it is greasy, dusty, condensed moisture due to high temperature difference between water in tank and environment high rela*ve humidity (R.H. in %). • This household product is for indoor use only. Do not install or store the appliance outdoor, or below freezing temperature. • This appliance is not intended for use by persons (including children) with significantly impaired physical or mental capabili*es, unless they have given supervision or instruc*ons concerning the use of the appliance by a person responsible for their safety. Children should always be supervised to ensure that they do not play with appliance. • Always unplug the appliance from a mains outlet and remove baVery backup when not in use or prior to rou*ne device cleaning , before punng on or taking off parts. It is important to keep this appliance clean. • Use both hands when manipula*ng this appliance. Wipe exposed surfaces carefully with a damp cloth to remove any dust or deposits that may collect over *me. Make sure all surfaces are dry before reconnec*ng the appliance. • Never yank cord to pull plug from mains outlet. Grasp the plug and pull to disconnect. • Close supervision is necessary when an appliance is used by or near children. • Do not use an appliance for other than intended use. The use of aVachments not recommended or sold by the appliance manufacturer may cause an unsafe condi*on. • If the use of an extension cord is necessary, an extension cable with proper electrical ra*ng should be used. Care should be taken to arrange the cable so that it will not be tripped over or pulled. • Use only the adaptor supplied with this unit to power the charging system. • Servicing: In order to assure proper electrical connec*on and polarity, replacement parts and servicing should be performed by a qualified electrician. 17 Warranty AquaGenesis Interna*onal warrants to the original purchaser only that the RoboSnail Automated Aquarium glass cleaner will be free from defects in material and workmanship under normal use for a period of (1) year from the date of original purchase if the product is installed and used properly and consistent with the User Manual. The RoboSnail consists of a wet side sweeper unit that will be fully submerged in the aquarium and a motor and drive Unit (dry side) that must not be exposed to water at any *me. The Aquagenesis Interna*onal warranty shall not apply: (i) to any damaged RoboSnail that has been subjected to accident, misuse, neglect, altera*on, acts of God, improper handling, improper transport, improper storage, improper use or applica*on, improper installa*on, improper tes*ng or unauthorized repair, (ii) to any RoboSnail where the motor and/or drive Unit or dockingsta*on have been exposed to water or (iii) to cosme*c problems or defects that result from normal wear and tear under ordinary use, and do not affect the performance or use of the product. The Aquagenesis Interna*onal Incorporated warranty applies only to a product that is manufactured by or for AquaGenesis Interna*onal and iden*fied by the Aquagenesis Interna*onal Incorprorated trademark, trade name or product iden*fica*on logo affixed to the product. If you no*ce a problem with your RoboSnail, do not aVempt to repair it yourself. Any aVempts at self repair shall void this limited warranty. AquaGenesis shall not be held liable for damage to any aquarium, aquarium life forms, or other personal objects due to improper use of the device. If the product develops a covered defect within the one-‐year period, AquaGenesis Interna*onal will, at its op*on, either repair or replace the RoboSnail without charge, provided that the RoboSnail is returned during the warranty period. Because the construc*on of aquariums varies from each manufacturer and the opera*ng condi*ons of each individual aquarist is different, there is a possibility that the RoboSnail may cause damage to your aquarium. Please contact your aquarium manufacturer to determine if your aquarium is properly built and recommended for the RoboSnail. If you no*ce any damage to your aquarium, including but not limited to crazing, cracking, bending, scratching, etc, immediately discon*nue the use of the RoboSnail. Aquagenesis will not be liable for any damage caused to your aquarium resul*ng from the use of the RoboSnail. To obtain warranty service or technical support, please contact the AquaGenesis Interna*onal customer service department at info@agiaqua*cs.com You will receive instruc*ons on how to return the product for repair or replacement. To take advantage of this Limited Warranty you will be required to supply an original point of purchase receipt. AQUAGENESIS INTERNATIONAL INCORPORTATED DISCLAIMS ALL OTHER WARRANTIES WHETHER ORAL OR WRITTEN, EXPRESS OR IMPLIED, TO THE FULLEST EXTENT ALLOWED BY APPLICABLE LAW. NO IMPLIED WARRANTY OF FITNESS FOR A PARTICULAR PURPOSE OR MERCHANTABILITY SHALL APPLY EXCEPT AS REQUIRED BY APPLICABLE LAW. AQUAGENESIS INTERNATIONAL DOES NOT AUTHORIZE ANY PERSON OR BUSINESS ENTITY, INCLUDING ITS AUTHORIZED DEALERS, TO CREATE FOR IT ANY OBLIGATIONS, LIABILITIES, OR OTHER WARRANTIES IN CONNECTION WITH THIS PRODUCT. ALL WARRANTIES ARE VOID IF THERE IS DAMAGE TO THE ROBOSNAIL AUTOMATED AQUARIUM GLASS CLEANER THAT IS NOT A RESULT OF A DEFECT IN THE MATERIALS OR WORKMANSHIP. THE SOLE AND EXCLUSIVE REMEDY FOR ALL CLAIMS THAT YOU MAY HAVE ARISING OUT OF OR IN CONNECTION WITH YOUR USE OF THIS PRODUCT, WHETHER MADE OR SUFFERED BY YOU OR ANOTHER PERSON AND WHETHER BASED IN CONTRACT OR TORT, SHALL BE REPAIR OR REPLACEMENT OF THE PRODUCT. IN NO EVENT WILL AQUAGENESIS INTERNATIONAL BE LIABLE TO YOU OR ANY OTHER PARTY FOR ANY DIRECT, INDIRECT, GENERAL, SPECIAL, INCIDENTAL, CONSEQUENTIAL, EXEMPLARY OR OTHER DAMAGES ARISING OUT OF THE USE OR INABILITY OF TO USE THE PRODUCT (INCLUDING, WITHOUT LIMITATION, DAMAGES FOR LOSS OF BUSINESS PROFITS, BUSINESS INTERRUPTION, LOSS OF INFORMATION OR ANY OTHER PECUNIARY LOSS, DAMAGE TO YOUR AQUARIUM OR ANY AQUARIUM INHABITANTS), OR FROM ANY BREACH OF WARRANTY, EVEN IF AQUAGENESIS INTERNATIONAL INCORPORATED HAS BEEN ADVISED OF THE POSSIBILITY OF SUCH DAMAGES. IN NO CASE SHALL AQUAGENESIS INTERNATIONAL’S LIABILITY EXCEED THE AMOUNT YOU PAID FOR THE PRODUCT. IF YOU DISAGREE WITH THESE TERMS AND CONDITIONS DO NOT USE THE ROBOSNAIL AUTOMATED AQUARIUM GLASS CLEANER. Some states do not allow the exclusion or limita*on of incidental or consequen*al damages, so the above exclusions may not apply to you. AquaGenesis Interna*onal’s warranty is governed by the laws of the State of California, excluding its conflict of laws principles and excluding the provisions of the United Na*ons Conven*on on Contracts for the Interna*onal Sale of Goods. This warranty gives you specific legal rights, and you may also have other rights, which vary from state to state. 18 Disclaimer The RoboSnail automated aquarium glass cleaner is a preventa*ve cleaning tool designed to help prevent the forma*on of stubborn varying types of algae build up. The RoboSnail is not designed for scrubbing of the aquariums surface to remove already established algae cultures and should not be used as such, RoboSnail may not be as effec*ve on older established aquariums as on new aquariums. Algae on old aquariums have the tendency to bond more closely to the porous consistency of the aquariums glass/acrylic surface. Aquariums with long *me established algae cultures, especially marine tanks, can be especially difficult to clean and may require extra maintenance. The aquarium surface should be cleaned and prepared as thoroughly as possible to ensure the best possible results for the RoboSnail. The RoboSnail alone may not be 100% effec*ve at preven*ng all algae from forming and may require the user the occasional manual maintenance. Certain animals that stay on the aquarium glass may not be combatable with the RoboSnail and may vary from user to user. Such animals for example such as star fish or large turbo snails may cause problems for the RoboSnail in comple*ng its cleaning func*on. It is recommended that such animals in the aquarium that may impede the RoboSnail performing during its cleaning func*ons be removed to prevent possible damage to the main unit that may result in the voiding of the product warranty. The RoboSnail is designed only to clean one side of aquarium glass at a *me and can not go around corners. This product is designed exclusively for glass-‐type aquariums, not suitable for acrylic aquariums. Results may vary by user due to the types of aquariums system, ligh*ng condi*ons, and water condi*ons that may affect the rate at which algae grows in the user’s aquarium. 19 Ver*cal version: R1.0 350 10th Avenue, Suite 1000 San Diego, California, 92101-‐7496 agiaqua*cs.com www.RoboSnail.com


![RW-7 User manual [PDF Download]](http://vs1.manualzilla.com/store/data/005917761_1-d2eed1cf01f7c88e93ba5e2aaf31cb4a-150x150.png)