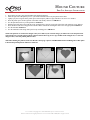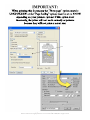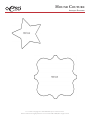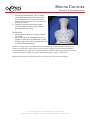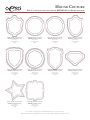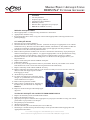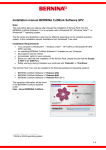
1
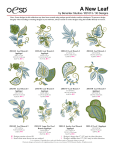
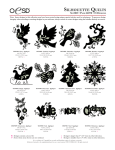
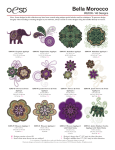
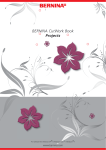
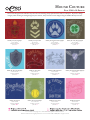
Hound Couture
Pack 12360 • 20 Designs
Note: Some designs in this collection may have been created using unique special stitches and/or techniques. To preserve design
integrity when rescaling or rotating designs in your software, always rescale or rotate designs using the handles directly on-screen.
NC058_48 Loyalty Applique
3.57 X 3.49 in.
90.68 X 88.65 mm
5,971 St. R
NC059_48 Corporal Paw
.93 X 2.03 in.
23.62 X 51.56 mm
1,846 St. S
NC060_48 Dogprint Patch Applique
2.06 X 2.05 in.
52.32 X 52.07 mm
1,900 St. R
NC061_48 Lucky Dog Applique
3.55 X 3.93 in.
90.17 X 99.82 mm
7,328 St. R
NC062_48 Salty Dog Applique
2.22 X 2.61 in.
56.39 X 66.29 mm
2,375 St. R
NC063_48 Yacht Club
2.05 X 2.29 in.
52.07 X 58.17 mm
2,362 St. R
NC064_48 Heart & Roses
3.04 X 4.52 in.
77.22 X 114.81 mm
5,044 St. R
NC065_48 Dogbone Shield Applique
4.76 X 4.44 in.
120.90 X 112.78 mm
5,772 St. zR
NC066_48 Dogball
3.88 X 2.30 in.
98.55 X 58.42 mm
5,069 St. zR
NC067_48 Tennis Applique
3.53 X 3.02 in.
89.66 X 76.71 mm
3,213 St. R
NC068_48 Swim Team
2.84 X 2.92 in.
72.14 X 74.17 mm
3,863 St. R
NC069_48 Princess
3.46 X 2.75 in.
87.88 X 69.85 mm
3,557 St. R
It is a violation of Copyright law to make and distribute copies of software or artwork.
Software is licensed to the original purchaser for use at one location. ©2011 OESD, LLC. All rights reserved.
Hound Couture
Pack 12360 • 20 Designs
Note: Some designs in this collection may have been created using unique special stitches and/or techniques. To preserve design
integrity when rescaling or rotating designs in your software, always rescale or rotate designs using the handles directly on-screen.
NC070_48 Love Hound Applique
2.82 X 3.54 in.
71.63 X 89.92 mm
3,345 St. R
NC071_48 Hound Couture Applique
3.59 X 4.36 in.
91.19 X 110.74 mm
7,976 St. R
NC072_48 Her Royal
3.45 X 3.51 in.
87.63 X 89.15 mm
3,947 St. R
NC073_48 Glam Hound Applique
3.88 X 2.74 in.
98.55 X 69.60 mm
2,198 St. R
NC074_48 Cuter Applique
3.82 X 3.85 in.
97.03 X 97.79 mm
4,588 St. R
NC075_48 Halloween Tricks
2.14 X 4.21 in.
54.36 X 106.93 mm
3,661 St. R
NC076_48 Attack Dog
3.54 X 3.13 in.
89.92 X 79.50 mm
4,755 St. R
NC077_48 Squirrel Toy Stitch n’ Turn
4.81 X 5.33 in.
122.17 X 135.38 mm
7,105 St. L
It is a violation of Copyright law to make and distribute copies of software or artwork.
Software is licensed to the original purchaser for use at one location. ©2011 OESD, LLC. All rights reserved.
Hound Couture
Pack 12360 • 20 Designs
Listings below indicate color sample, stitching order and suggested thread color number in Isacord, YLI Fine Metallic, Yenmet or YLI Variegated threads.
NC058_48 Loyalty Appliqué
n
n
n
n
n
n
1.Background Linework.................................................. 2123
2.Crown.......................................................................... 0703
3.Lettering....................................................................... 0702
4.Placement Stitch.......................................................... 1725
5.Yellow Tackdown.......................................................... 0703
6.Heart & Spade............................................................. 1911
NC059_48 Corporal Paw
n
1.Single Color Design..................................................... 0520
NC060_48 Dogprint Patch Appliqué
n
n
n
1.Placement Stitch.......................................................... 3910
2.Tackdown..................................................................... 0015
3.Paw.............................................................................. 3951
NC061_48 Lucky Dog Appliqué
n
n
n
n
n
1.Placement Stitch.......................................................... 5664
2.Tackdown..................................................................... 0015
3.Clover.......................................................................... 5513
4.Clover Outlines............................................................ 0015
5.Lettering & Linework.................................................... 0870
NC062_48 Salty Dog Appliqué
n
n
n
n
1.Placement Stitch.......................................................... 4230
2.Tackdown..................................................................... 0015
3.Anchor......................................................................... 3444
4.Lettering....................................................................... 0015
NC063_48 Yacht Club
n
n
n
NC064_48 Heart & Roses
n
1.Single Color Design..................................................... 3953
NC065_48 Dogbone Shield Appliqué
n
n
n
n
n
1.Blue Linework.............................................................. 3730
2.Wing Shading.............................................................. 3770
3.Wing Outlines.............................................................. 0015
4.Placement Stitch.......................................................... 3953
5.Tackdown & Bone........................................................ 0015
NC066_48 Dogball
n
n
n
1.STATE CHAMPS Lettering.......................................... 3730
2.DOGBALL Lettering..................................................... 3730
3.Swoosh & Outlines on Dogball.................................... 0015
NC067_48 Tennis Appliqué
n
n
n
1.Leaves......................................................................... 0015
2.Placement Stitch.......................................................... 5822
3.Tackdown..................................................................... 6133
NC068_48 Swim Team
n
n
n
1.Water........................................................................... 3730
2.Dog.............................................................................. 0015
3.Lettering....................................................................... 0101
NC069_48 Princess
n
1.Single Color Design..................................................... 2532
NC070_48 Love Hound Appliqué
1.YORKSHIRE Lettering................................................. 1430
2.Anchor & Banner......................................................... 0015
3.Black Lettering............................................................. 0020
n
n
n
n
1.Arrows.......................................................................... 0015
2.Placement Stitch.......................................................... 0138
3.Tackdown..................................................................... 3730
4.Heart & Letters............................................................. 0015
NC071_48 Hound Couture Appliqué
n
n
n
n
1.Placement Stitch.......................................................... 0152
2.Tackdown & Diamond.................................................. 0015
3.Lettering....................................................................... 0020
4.Linework...................................................................... 4174
NC072_48 Her Royal
n
n
1.Lettering....................................................................... 2723
2.Purple Linework........................................................... 2912
NC073_48 Glam Hound Appliqué
n
n
n
n
1.Placement Stitch.......................................................... 3211
2.Tackdown..................................................................... 0176
3.GLAM Lettering............................................................ 3211
4.HOUND Lettering......................................................... 7009
NC074_48 Cuter Appliqué
n
n
1.Placement Stitch.......................................................... 0713
2.Tackdown & Lettering.................................................. 0015
NC075_48 Halloween Tricks
n
n
1.Skull & Bones.............................................................. 0015
2.Lettering....................................................................... 0020
NC076_48 Attack Dog
n
n
1.Orange Letters............................................................. 1010
2.Yellow Letters.............................................................. 0704
NC077_48 Squirrel Toy Stitch n’ Turn
n
n
n
n
n
1.Placement Stitch.......................................................... 1141
2.Belly............................................................................. 1141
3.Eyes & Teeth................................................................ 0015
4.Body, Eyes, & Mouth................................................... 1876
5.Seam Stitch................................................................. 0941
It is a violation of Copyright law to make and distribute copies of software or artwork.
Software is licensed to the original purchaser for use at one location. ©2011 OESD, LLC. All rights reserved.
Hound Couture
Pre-Cut Appliqué Instructions
1.
2.
3.
4.
5.
6.
7.
8.
9.
Print out the necessary pages from the PDF of the appliquè pattern(s).
Mark the right side of the pattern pieces so you’ll know which direction to lay the pattern on the fabric.
Lightly spray the wrong side of the pattern pieces with temporary adhesive spray and allow it to set for a few minutes.
Place the pattern pieces on the right side of the fabric and carefuly cut them out. PHOTO 1
Sew the placement stitch on you hooped fabcric. PHOTO 2
With the paper still stuck to the right side of the appliqué fabric, spray the wrong side of the fabric with temporary spray adhesive.
Place the fabric inside the sewing placement stitch so that it matches the stitching line then remove the paper pattern. PHOTO 3
Sew the tackdown. PHOTO 4
Sew the remainder of the design and repeat for any remaining pieces. PHOTO 5
NOTE: The patterns are sized for the designs as they were made. If you resize the design, you will need to resize the pattern the
same amount. You can print out the pattern at the normal size then copy it on a copy machine at the changed size, i.e. resize the
designs to 80%, resize the printed pattern to 80%.
TIP: When Printing the patterns, make sure that the “Fit to page” option is UNCHECKED in the Print Dialog Box. If this option
is checked the printed patterns will not be actual size.
1
2
4
3
5
It is a violation of Copyright law to make and distribute copies of software or artwork.
Software is licensed to the original purchaser for use at one location. ©2011 OESD, LLC. All rights reserved.
It is a violation of Copyright law to make and distribute copies of software or artwork.
Software is licensed to the original purchaser for use at one location. ©2011 OESD, LLC. All rights reserved.
Hound Couture
Appliqué Patterns
It is a violation of Copyright law to make and distribute copies of software or artwork.
Software is licensed to the original purchaser for use at one location. ©2011 OESD, LLC. All rights reserved.
Hound Couture
Appliqué Patterns
It is a violation of Copyright law to make and distribute copies of software or artwork.
Software is licensed to the original purchaser for use at one location. ©2011 OESD, LLC. All rights reserved.
Hound Couture
Stitch n’ Turn Instructions
Instructions
Supplies:
1. Hoop a single layer of Mesh Cut-Away
• 2 pieces of fabric one inch larger than
stabilizer.
chosen design
2. Spray the stabilizer lightly with Temporary
• Mesh Cut-Away Stabilizer
Adhesive Spray.
• Wash-Away topping (if using fabric with
3. Stitch the first color, which is the
pile such as Minkee® or terrycloth)
“Placement Guide Stitch”. Use a thread
• Temporary Spray Adhesive
color that blends with your fabric choice.
• Embroidery Thread
4. Place a piece of fabric right side up onto
• Polyester bobbin thread
the Mesh Stabilizer, being sure to cover the
• Embroidery machine
“Placement Guide Stitch”. See Photo 1.
• Polyester stuffing
5. Note: if using fabric with pile, lightly spray
• Hand needle or Stitch Witchery® fusible
a piece of Wash-Away topping with
webbing
Temporary Adhesive Spray. Place the
topping sprayed side down onto the fabric.
6. Attach the hoop to the machine and select
the design of your choice to stitch. Embroider all but the last color of the design. See Photo 2.
Photo 1
Photo 2
7. Remove the hoop from the machine, but DO NOT remove the fabric from the hoop.
8. Clip all jump threads.
9. Gently tear away excess Wash-Away topping. (Do not wet to remove at this time).
10. Place another piece of fabric right side down
directly over the first piece. If desired, pin or
tape at corners to secure.
Photo 3
11. Reattach the hoop to the machine and stitch
the final color change (through both layers of
fabric). Use a thread color that blends with your
fabric color. For photography purposes we’ve
purposely used a contrasting thread.
12. Remove the hoop from the machine and the
fabric from the hoop.
13. Using embroidery scissors, carefully cut out the
stitch ‘n’ turn project close to the stitching line.
Cut around the stitches at the opening to create
a tab. See Photo 3.
14. Clip curves and corners as needed.
15. Turn the animal right side out. Use a chopstick
to turn out corners and curves.
It is a violation of Copyright law to make and distribute copies of software or artwork.
Software is licensed to the original purchaser for use at one location. ©2011 OESD, LLC. All rights reserved.
Hound Couture
Stitch n’ Turn Instructions
1. Stuff with polyester stuffing. Hint: To speed
up the stuffing process cut the bottom off of
a cone shaped cup such as the ones from a
water cooler and use it as a funnel to insert the
stuffing. See Photo 4.
2. Fold tabs in and slip stitch the slit closed
with hand needle or insert a piece of Stitch
Witchery® and fuse closed.
Photo 4
For Extra Fun:
•
•
Add definition stitching with a sewing machine
or by hand.
Stitch ribbon bows or embellishments on your
projects to dress them up. Please keep in mind
the age of the person to be using them then plan
(or omit) add-ons accordingly.
NOTE: Some designs may contain a Ribbon Placement Guide. This is an optional feature that allows you
to turn your designs into ornaments if you so wish. To create a hanging loop, after stitching the Ribbon
Placement Guide, create a loop out of 1/4” ribbon and place it within the guide with loop facing in and tails
of the ribbon facing out. Lightly spray ribbon with Temporary Adhesive Spray to hold in place.
NOTE: Design pictured is for instructional purposes and may not be included in this collection.
It is a violation of Copyright law to make and distribute copies of software or artwork.
Software is licensed to the original purchaser for use at one location. ©2011 OESD, LLC. All rights reserved.
Hound Couture
Pre-cut appliqué files for use with BERNINA© CutWork Accessory
NC058_48_CWA For use with the
BERNINA CutWork Accessory
2.31 X 2.70 in.
58.67 X 68.58 mm
1,787 St.
NC060_48_CWA For use with the
BERNINA CutWork Accessory
2.61 X 2.61 in.
66.29 X 66.29 mm
1,826 St.
NC061_48_CWA For use with the
BERNINA CutWork Accessory
2.56 X 2.56 in.
65.02 X 65.02 mm
1,758 St.
NC062_48_CWA For use with the
BERNINA CutWork Accessory
2.16 X 2.80 in.
54.86 X 71.12 mm
1,812 St.
NC065_48_CWA For use with the
BERNINA CutWork Accessory
1.89 X 2.24 in.
48.01 X 56.90 mm
1,376 St.
NC067_48_CWA For use with the
BERNINA CutWork Accessory
2.05 X 2.06 in.
52.07 X 52.32 mm
1,457 St.
NC070_48_CWA For use with the
BERNINA CutWork Accessory
2.74 X 3.38 in.
69.60 X 85.85 mm
2,312 St.
NC071_48_CWA For use with the
BERNINA CutWork Accessory
2.66 X 1.91 in.
67.56 X 48.51 mm
1,469 St.
NC073_48_CWA For use with the
BERNINA CutWork Accessory
3.50 X 3.68 in.
88.90 X 93.47 mm
2,734 St.
NC074_48_CWA For use with the
BERNINA CutWork Accessory
4.37 X 4.40 in.
111.00 X 111.76 mm
3,755 St.
It is a violation of Copyright law to make and distribute copies of software or artwork.
Software is licensed to the original purchaser for use at one location. ©2011 OESD, LLC. All rights reserved.
Hound Couture
Pre-cut appliqué files for use with BERNINA© CutWork Accessory
NOTE: Placement Stitch and Basting Stitch should match your background fabric.
NC058_48_CWA For use with the BERNINA
CutWork Accessory
NC065_48_CWA For use with the BERNINA
CutWork Accessory
NC071_48_CWA For use with the BERNINA
CutWork Accessory
NC060_48_CWA For use with the BERNINA
CutWork Accessory
NC067_48_CWA For use with the BERNINA
CutWork Accessory
NC073_48_CWA For use with the BERNINA
CutWork Accessory
NC061_48_CWA For use with the BERNINA
CutWork Accessory
NC070_48_CWA For use with the BERNINA
CutWork Accessory
NC074_48_CWA For use with the BERNINA
CutWork Accessory
n
n
n
n
n
n
n
n
n
n
n
n
n
n
n
n
n
n
1.Placement Stitch......................................................... 3600
2.Basting Stitch.............................................................. 1902
3.BERNINA CutWork Accessory 1................................ Cut 1
4.BERNINA CutWork Accessory 2................................ Cut 2
5.BERNINA CutWork Accessory 3................................ Cut 3
6.BERNINA CutWork Accessory 4................................ Cut 4
n
n
n
n
n
n
n
n
n
n
n
n
n
n
n
n
n
n
1.Placement Stitch......................................................... 3600
2.Basting Stitch.............................................................. 1902
3.BERNINA CutWork Accessory 1................................ Cut 1
4.BERNINA CutWork Accessory 2................................ Cut 2
5.BERNINA CutWork Accessory 3................................ Cut 3
6.BERNINA CutWork Accessory 4................................ Cut 4
n
n
n
n
n
n
n
n
n
n
n
n
n
n
n
n
n
n
1.Placement Stitch......................................................... 3600
2.Basting Stitch.............................................................. 1902
3.BERNINA CutWork Accessory 1................................ Cut 1
4.BERNINA CutWork Accessory 2................................ Cut 2
5.BERNINA CutWork Accessory 3................................ Cut 3
6.BERNINA CutWork Accessory 4................................ Cut 4
NC062_48_CWA For use with the BERNINA
CutWork Accessory
n
n
n
n
n
n
1.Placement Stitch......................................................... 3600
2.Basting Stitch.............................................................. 1902
3.BERNINA CutWork Accessory 1................................ Cut 1
4.BERNINA CutWork Accessory 2................................ Cut 2
5.BERNINA CutWork Accessory 3................................ Cut 3
6.BERNINA CutWork Accessory 4................................ Cut 4
It is a violation of Copyright law to make and distribute copies of software or artwork.
Software is licensed to the original purchaser for use at one location. ©2011 OESD, LLC. All rights reserved.
Making Precut Appliqué Using
BERNINA© Cutwork Accessory
•
•
•
•
•
•
1.
2.
3.
1.
2.
3.
4.
5.
6.
7.
8.
9.
10.
11.
12.
13.
14.
15.
1.
2.
3.
4.
5.
6.
7.
SUPPLIES
Cut-Away Stabilizer
Temporary Spray Adhesive
Appliqué Fuse & Fix Stabilizer
Embroidery Thread
Stabilizer that is appropriate for your project
BERNINA® CutWork Accessory
PREPARE APPLIQUE FABRIC
Starch appliqué fabric 2-3 times following manufacturer’s instructions.
Appliqué fabric should be crisp.
Iron Appliqué Fuse & Fix to the wrong side of the starched appliqué fabric following instructions on
product packaging.
CUT APPLIQUÉ PIECES
Hoop one layer of Cut-Away Stabilizer.
Send first CWA file to the embroidery machine. (CWA files are the pre-cut appliqué files to use with the
CutWork Accessory; these files will end in CWA01, CWA02, and CWA03 etc. The number of CWA files
available for each design will depend upon how many separate appliqués each design contains.)
Stitch the first color, this will be the placement stitch.
Remove the hoop from the machine but do not remove the stabilizer from the hoop. Spray the hooped
stabilizer with temporary spray adhesive. Lay prepared appliqué fabric over the placement stitch, being
sure to completely cover the stitching. Apply pressure to appliqué fabric to ensure it is adhered.
Stitch the second color, this will be the basting stitch. It is meant to baste the appliqué fabric to your
hooped stabilizer.
Replace normal stitch plate with the CutWork stitch plate.
Unthread the machine.
If necessary, turn off the upper thread control on your machine. Refer to your machine’s user manual.
Note that the most recent version of the 830 will perform this task automatically.
Replace embroidery needle with the CutWork Accessory.
Replace embroidery foot with foot #44 (If you do not have foot #44 you can leave foot #15 on the machine; foot #44 will simply keep the cut fabric
from flagging as much).
PHOTO 1
Attach the hoop to the machine.
To cut the first appliqué piece follow the “thread
changes” on your machine screen and turn the dial
on the CutWork tool as required.
Remove the hoop from the machine.
Gently remove cut appliqué piece, trimming any
thread that may have not been cut completely.
PHOTO 1
Repeat as needed for designs with multiple appliqué pieces.
TACkdOwn APPLIQUÉ And COmPLETE EmBROIdERy dESIgn
Replace the embroidery needle and rethread the machine.
Replace the embroidery foot #15.
Spray hoop sized piece of stabilizer that is appropriate for your project and adhere to wrong side of background fabric or project that is to be hooped.
Hoop fabric/project and stabilizer.
Attach hoop to machine.
Send the embroidery file to the machine (this is not a CWA file).
Stitch design as normal following the thread changes on the provided thread chart stopping after each
Appliqué Placement Stitch.
It is a violation of Copyright law to make and distribute copies of software or artwork.
Software is licensed to the original purchaser for use at one location. ©2011 OESD, LLC. All rights reserved.
Making Precut Appliqué Using
BERNINA© Cutwork Accessory
1.
2.
3.
4.
5.
After stitching an Appliqué Placement Stitch, take the precut
appliqué pieces required and peel off the cutaway backing
and the release paper revealing a sticky backing. PHOTO 2
Remove hoop from machine, but do not remove the fabric
from the hoop.
Adhere precut appliqué piece evenly over the Appliqué
Placement Stitch; use pressure to make sure pieces stick well.
PHOTO 3
Reattach hoop to machine.
Continue stitching design until all appliqué pieces are placed
and all stitching is complete. PHOTO 4
PHOTO 2
nOTE: design pictured is for instructional purposes and may
not be included in this collection.
PHOTO 3
PHOTO 4
It is a violation of Copyright law to make and distribute copies of software or artwork.
Software is licensed to the original purchaser for use at one location. ©2011 OESD, LLC. All rights reserved.