1
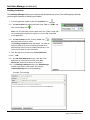
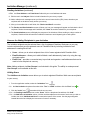
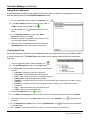
Miami’s Quick Start Guide for Using
Prezza Checkbox Web
Sending Invitations to a Survey Using the
Invitation Manager
The CHECKBOX® Invitation Manager
This guide will provide step-by-step directions to create, send, and track responses to your Checkbox
survey. These steps include the following tasks:
•
•
•
Create – Personalizing your e-mail invitation message and include a link to your survey.
Send – Selecting your list of recipients and sending your invitation via e-mail.
Track – Monitor the progress of your survey and send a reminder to those recipients who have not yet
completed the survey.
Invitation Manager
From the Invitation Manager you can create a new invitation, review the response to an existing
invitation, and send a reminder to those recipients that have not yet responded to your survey.
Controls Available for Each Invitation
Action
Description
The name of the survey for which this invitation is being sent.
Survey Name
The subject text included with the e-mail invitation.
Subject
# Sent
The total number of e-mail invitations successfully sent to the recipients.
Failed
The number of e-mail invitations that failed to be sent. Failed invitations can result from
invalid addresses and are not counted.
# Responded
The number of invitation recipients who have responded to the survey.
% Responded
The percentage of recipients successfully invited and has responded to the survey.
Details
Displays the Invitation Recipients screen, which displays the users and/or e-mail
addresses, total messages sent to each recipient, date last send, any error messages,
and if the invitation was successfully sent. (This screen will also show if the recipient has
‘opted out’ of future survey invitations if the ‘opt out’ option is included with the invitation.
Remind
Displays the Invitation Message screen and allows you to send a follow-up e-mail to those
recipients who have not yet taken the survey.
Invite
Allows you to add recipients to your e-mail invitation.
Delete
Remove an invitation to survey from the list.
Miami’s Survey Solutions http://survey.muohio.edu 1 Invitation Manager (continued)
Sending Invitations
The Invitation Manager allows you to send e-mail invitations to a survey. The following steps will walk
you through the process of sending an invitation.
1. From the application toolbar, select the “Invitations” icon (
).
2. In the New Invitation drop-down list select either “Text” or “HTML” and
then click the “Plus” icon (
).
Note: The Text option will provide a plain text e-mail. HTML e-mails offer
richer formatting but require the recipient to use an HTML compatible
e-mail application.
3. In the New Invitation screen, click the “Invite” icon (
)
associated with the survey name.
The Pending Invitations screen will appear. You have the
option to select the source from which you would like to
add recipients. See Sources for Adding Recipients to Your
Survey in this guide for more information.
4. Click the drop-down list and select “Email Addresses”.
5. Click “Add”.
6. In the Add Email Addresses screen, enter the e-mail
addresses for the recipients and then click “Add
Addresses” located at the bottom of the screen.
7. On the Pending Invitations screen, click “Edit Message”
located at the bottom of the screen. The following
Invitation Message screen will be displayed.
Example: Text message
2 Miami’s Survey Solutions http://survey.muohio.edu Invitation Manager (continued)
Sending Invitations (continued)
8. Edit the From Address: and From Name: fields with your e-mail address and name.
9. Edit the text in the Subject: field to include information for your survey request.
10. Add or edit the main message text as you like but be sure to leave the link (URL) intact; otherwise your
recipients will not be able to easily access your survey.
11. After you have edited the e-mail fields, click “Review and Send” to continue.
12. The Review and Send Invitation screen will show you how your message will appear and includes the list of
recipients. Review the message and if satisfied, click “Send” to send the invitation to your recipients.
13. The Send Invitations screen will display the progress of the invitations. When sending to a large number of
recipients, Checkbox Web will send the invitations in batches to avoid impacting the e-mail system.
Sources for Adding Recipients to your Invitation
The invitation recipients may be selected from a list of registered Checkbox Web users or you may
include recipients that are not registered users of Checkbox Web by including individual e-mail
addresses or creating Email Lists.
•
•
•
Users – allows you to select recipients from a list of users registered with Checkbox Web.
Email Addresses – allows you to add individual e-mail addresses by hand or by using the copy
and paste option.
Email Lists – provides a convenient way to pre-load and organize e-mail addresses that can be
used to invite recipients to a survey.
Note: Adding recipients via User Groups is not included in this guide. The ability to create personal
User Groups is not available at this time.
Adding Users
The Add Users to Invitation screen allows you to select registered Checkbox Web users as recipients
to your survey.
1. From the application toolbar, select the “Invitations” icon (
).
2. In the New Invitation drop-down list select either “Text” or “HTML” and then click the “Plus” icon (
3. Click the “Invite” icon (
).
) associated with the survey name.
4. On the Pending Invitations screen, select “Users” from the drop-down list and then click “Add”.
5. On the Add Users to Invitation screen, click the checkbox adjacent to the name of each user you wish to
include, then click “Add Selected Users” located at the bottom of the screen. Use the page navigation
located above the list to display the next screen of users if necessary.
Miami’s Survey Solutions http://survey.muohio.edu 3 Invitation Manager (continued)
Adding E-mail Addresses
E-mail addresses are added to the recipient list by entering them by hand or by copying them from a list
and then pasting them to the Add Email Addresses screen.
1. From the application toolbar, select the “Invitations” icon (
).
2. In the New Invitation drop-down list select either “Text” or
“HTML” and then click the “Plus” icon (
3. Click the “Invite” icon (
name.
).
) associated with the survey
4. On the Pending Invitations screen, select “Email
Addresses” and then click “Add”.
5. Manually enter each e-mail address in the text box or use
copy and paste to add the addresses.
6. When all of the e-mail addresses have been added, click
“Add Addresses” located at the bottom of the screen.
Creating Email Lists
Email Lists are simply collections of e-mail addresses that you create and use to invite recipients to take
a survey anonymously. The Email Lists screen allows you to manage existing Email Lists and create
new ones.
1. From the application toolbar, select the “Users” icon (
).
2. In the User Management screen, select “Email Lists”.
3. The Email Lists screen provides the following information and
controls:
•
•
•
•
•
•
•
•
List Name – display the name of the Email List.
Description – contains details about the Email List.
Users – total number of users that are members of this list.
Date Created – date this Email List was created.
View/Edit – navigates to the Edit List screen for the selected Email List allowing you to add or remove
addresses.
Properties – navigates to the Email List Properties screen, allowing you to edit the list name and
description.
Copy – creates a duplicate of the selected Email List.
Delete – deletes the selected Email List.
4. Click the “New Email List” icon (
).
5. On the Email List Properties screen, enter the list name, a description (optional), and then click “Submit”.
6. The system will return you to the Email Lists screen. Click on the “View/Edit” icon (
Email List.
7. On the Edit Email List: name screen, click the “Add Addresses” icon (
e-mail addresses.
) associated to the
) and enter the desired
8. Click “Submit”, located at the bottom of the screen, to save the changes to the Email List.
4 Miami’s Survey Solutions http://survey.muohio.edu Invitation Manager (continued)
Using Email Lists
Email lists provide a convenient way to pre-load and organize e-mail addresses to use to invite
respondents to complete a survey.
1. From the application toolbar, select the “Invitations” icon (
).
2. In the New Invitation drop-down list select either “Text” or “HTML” and then click the “Plus” icon
(
).
3. Click the “Invite” icon (
) associated with the survey name.
4. On the Pending Invitations screen, select “Email Lists” and then click “Add”.
5. Select the name of the email list and then click “Add Selected Lists” located at the bottom of the screen.
Resources for Information and Assistance
Visit the following Web sites for more information about using Prezza Checkbox Web.
• Prezza Technologies Web site at http://www.prezzatech.com for:
o Complete User Manual
o Demo nstrations
o Prezza's Knowledge Base
o Discu ssion Forums
o FAQs
• Survey Tools Web site at http://survey.muohio.edu.
• Office of Liberal Education and Assessment at 229 Culler Hall, 513-529-7135, for survey design
assistance.
• Statistical Consulting Center at 207 Bachelor, 513-529-5148, for assistance with data collection, analysis,
and interpretation.
• IT Help at http://ithelp.muohio.edu and search on ‘survey tools’.
If you need assistance, please contact the IT Services Support Desk at 513-529-7900 or
[email protected].
Miami’s Survey Solutions http://survey.muohio.edu 5