1
2
Table of Contents
Kiwi-106 Features..............................................................5
Kiwi 106 Flow Chart...........................................................6
Kiwi 106 Front Panel..........................................................7
Control Description...........................................................8
Key Transpose............................................................................................................8
Poly 1- Key Modes......................................................................................................9
Poly 2 - Hold...............................................................................................................9
Midi Channel...............................................................................................................9
Group A/B.................................................................................................................10
Bank 1-8....................................................................................................................10
Patch 1-8...................................................................................................................10
Range 16'-4'..............................................................................................................10
Wave Pulse/Saw.......................................................................................................10
LFO Rate Slider........................................................................................................11
Env Sliders................................................................................................................11
VCA Slider.................................................................................................................11
PWM Env Control.....................................................................................................11
All Other Sliders & Buttons.......................................................................................11
Kiwi 106 Menu System....................................................12
Page Menus..............................................................................................................12
Page 1 - Arp..............................................................................................................12
Page 2 - Sequence...................................................................................................12
Page 3 - Pattern........................................................................................................12
Juno 106 Menu System..................................................13
Page 4 - Sysex Dumps.............................................................................................13
Page 5 – Global/Patch Parameter Edit.....................................................................14
Midi In Channel.........................................................................................................14
Midi Out Channel......................................................................................................14
Midi Seq Out Channel..............................................................................................14
Master Clock Source................................................................................................14
Midi Soft Through...................................................................................................14
Midi Prog Change....................................................................................................14
Midi CC....................................................................................................................14
Midi Sysex................................................................................................................15
Midi Clock................................................................................................................15
www.kiwitechnics.com
Kiwi-106 Upgrade User Manual v200
3
Arp Clock Divide.......................................................................................................15
Seq Clock Divide......................................................................................................15
Pattern Clock Source................................................................................................15
Pattern Destination...................................................................................................15
Dynamics Mode........................................................................................................15
Factory Patch Restore..............................................................................................16
Groups......................................................................................................................17
Patch.........................................................................................................................17
Performance Control Section..........................................18
Pitch Bender.............................................................................................................18
LFO Trigger...............................................................................................................18
Portamento...............................................................................................................18
Juno-106 Upgrade Notes................................................19
Digital Oscillators......................................................................................................19
Factory Presets.........................................................................................................19
Clock Display............................................................................................................19
Page Display Mode..................................................................................................19
Midi Function Switch................................................................................................20
Midi Received...........................................................................................................20
Midi Panic.................................................................................................................20
Note Hold..................................................................................................................20
Edit Buffer Compare.................................................................................................20
LFO Sync..................................................................................................................20
Sequencer.......................................................................21
A) Writing / Editing....................................................................................................22
C) Playing.................................................................................................................24
Arpeggiator......................................................................25
Pattern Play.....................................................................26
Chord Mode....................................................................27
Setting up with External Devices.....................................28
Upgrade install................................................................29
HS-60 & 106S...........................................................................................................33
Optional LED Mod....................................................................................................33
Swap Back Board.....................................................................................................33
Adjustments for the Juno-106.........................................34
Midi Data.........................................................................38
www.kiwitechnics.com
Kiwi-106 Upgrade User Manual v200
4
Continuous Controllers............................................................................................39
Real Time Commands..............................................................................................41
NRPN Controllers.....................................................................................................42
Midi Sysex Support.........................................................43
Midi Sysex Data........................................................................................................44
www.kiwitechnics.com
Kiwi-106 Upgrade User Manual v200
5
Kiwi-106 Features
•
•
•
•
•
•
•
•
•
•
•
•
•
•
512 Patches can be stored and edited. It is also possible to temporarily edit any Patch
Patches are stored in Flash memory so no battery is required.
Bend Controls (DCO, VCF Bend, LFO Mod Level & Portamento) are stored with the Patch
MidiCC & Sysex support for all parameters and Midi Sysex support for Patch Dump & Load
Patch Editor Control of Parameters. Free PC/MAC editor is available from Kiwi-106.com
NRPN & Sysex variable parameter control supports 12 bit for 4096 parameter steps
Key Assign Modes are Poly I&II, Unison Legato & Staccato, Mono Legato & Staccato
Portamento in Unison, Arp & Chord modes
DCO Key Assign Detune available in all key modes except mono
Two independent envelope generators. Each ENV Mod can select from ENV 1 or 2 and has an Inverted or Normal modes
Two independent Low Frequency Oscillators with 6 waveforms each. LFO2 random2 wave can be clocked from the Internal
clock. Each LFO Mod can select from LFO 1 or 2. LFOs can be plus and minus base note or plus base note only
Aftertouch, Modulation Level and Dynamics via midi. Dynamics can optionally control the VCA and/or VCF. The Dynamics
have been modeled on the Juno-2 with both the VCF & VCA mod turned on by default for a more natural and expressive play.
This brings new life to every patch in the Kiwi-106.
Arp/Seq/Pattern Clocks can optionally display on the KeyT LED and LFO 1 and LFO 2 clocks can optionally display on the
Group lights
Key transpose allows transposition to any key with a range of plus 2 or minus 1 octaves. Sequencer key can be shifted while
playing
•
•
•
•
•
•
•
•
•
•
•
•
•
•
•
•
CHORD MODE
Any chord with up to 6 notes can be set and played from any key
ARPEGGIATOR
The Arpeggiator can be independently clocked from the Internal or External clocks, LFO2, Pattern output or midi clock. Clock
options are Half Note, Quarter Note, 1/8 Note, 1/8 Note Half Swing, 1/8 Note Full Swing, 1/8 Note Triplets, 1/16 Note, 1/16
Note Half Swing, 1/16 Note Full Swing, 1/16 Note Triplets, 1/32 Note, 1/32 Note Triplets, 1/64 Note.
The External clock can be optionally divided 48 PPQN, 24 PPQN or step (no divide)
Arp modes are Up, Down, Up and Down, Random, As Played, 0, 1 or 2 octaves
Arp can be Started, Stopped & Continued using Midi Commands
Appeggiator will Output Midi Data
SEQUENCER
8 separate 124 Max step Polyphonic sequences can be created and stored
Sequences can be edited
The Sequencer can be independently clocked from the Internal or External clocks, LFO2, Pattern output or midi clock. Clock
options are Half Note, Quarter Note, 1/8 Note, 1/8 Note Half Swing, 1/8 Note Full Swing, 1/8 Note Triplets, 1/16 Note, 1/16
Note Half Swing, 1/16 Note Full Swing, 1/16 Note Triplets, 1/32 Note, 1/32 Note Triplets, 1/64 Note.
The External clock can be optionally divided 48 PPQN, 24 PPQN or Step (no divide)
Sequencer will Output Midi Data
PATTERN GENERATOR
8 Pattern Generator patterns can be saved. The pattern can be any length between 2 and 16 steps
The Pattern Generator can be independently clocked from the Internal or External clocks, LFO2, Pattern output or midi clock.
Clock options are Half Note, Quarter Note, 1/8 Note, 1/8 Note Half Swing, 1/8 Note Full Swing, 1/8 Note Triplets, 1/16 Note,
1/16 Note Half Swing, 1/16 Note Full Swing, 1/16 Note Triplets, 1/32 Note, 1/32 Note Triplets, 1/64 Note.
The External clock can be optionally divided 48 PPQN, 24 PPQN or step (no divide)
Pattern Effect can be faded from no effect to full effect.
www.kiwitechnics.com
Kiwi-106 Upgrade User Manual v200
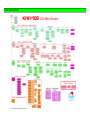
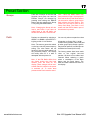
Kiwi 106 Flow Chart
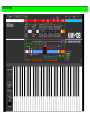
Kiwi 106 Front Panel
8
•
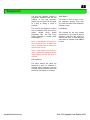
Control Description
The Control use on the Kiwi-106
Upgrade differs from the standard
Juno-106 in a number or ways. In
order to operate the extra features
the Kiwi-106 has been divided up
into 5 'Pages' with each page having
a different control area.
Pages are selected using the
MIDICH button and BANK buttons.
Press and Hold the MIDICH and
select the Page using the BANK 1-5
buttons.
Key Transpose
The Key Transpose Button in the
Kiwi-106 has a number of uses. It is
used to transpose the key, set the
Internal Clock Rate, set the Detune
amount, set the LFO1&2 Waveforms,
LFO Mode and Detune Mode.
Setting Key Transpose. While the
Key Transpose Button is pressed,
press the note you wish to transpose
to on the keyboard. Then release the
Key Transpose button. This action
will occur on Pages 1, 2 & 3. The
current transpose will show on the
display while the button is pressed
Page 1 – Normal Play mode. The LFO
& ENV controls will edit LFO1 and
ENV1. Arpeggiator Play & Chord Play
Page 2 – Sequence Play mode. The
LFO & ENV controls will edit LFO2 and
ENV2. Sequences can be played or
edited
Page 3 – Pattern Play Mode. The LFO
& ENV controls will edit LFO2 and
ENV2. Patterns can be played or
Edited
Page 4 – Sysex Dumps
Page 5 – Global Parameter Edits
LFO Wave Form. While the Key
Transpose Button is pressed in page
1, 2 or 3 the LFO1&2 Waveforms can
be set using the Bank & Patch buttons
as follows:
Bank 1 - LFO1 Sine
Bank 2 - LFO1 Triangle
Bank 3 - LFO1 Square
Bank 4 - LFO1 Saw
Bank 5 - LFO1 Rev Saw
Bank 6 - LFO1 Random
Bank 7 - LFO1 Mode (plus/normal)
Bank 8 - LFO1 Sync (cycles 1-17)
Patch 1 - LFO2 Sine
Patch 2 - LFO2 Triangle
Patch 3 - LFO2 Square
Patch 4 - LFO2 Saw
Patch 5 - LFO2 Rev Saw
Patch 6 - LFO2 Random
Patch 7 - LFO2 Mode
Patch 8 – LFO2 Sync (cycles 1-17)
Internal Clock Rate. While the Key
Transpose Button is pressed moving
the LFO Rate slider will set the
Internal Clock Rate. Once the Key
Transpose Button is released the
LFO Slider will revert to controlling
the LFO Rate. This action will occur
on Pages 1, 2 & 3.
The Key Transpose LED will flash at
the Internal Clock Rate while the
button is pressed and at the page
rate when the button is released if
the Clock Display is enabled. On
Page 1 the Key Transpose Light will
show the Arp Clock Rate, on page 2
the Seq Clock rate and on page 3
the Pattern Clock Rate.
www.kiwitechnics.com
Kiwi-106 Upgrade User Manual v200
9
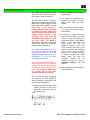
Control Description
Poly 1- Key Modes
The Kiwi-106 upgrade has six Key
Modes. These are selected by
pressing and holding down POLY I
and selecting the Key mode using
the BANK buttons 1-6
Unison Legato – All six voices are
assigned to the last note that is
played. The Envelope Attack stage is
only triggered on a new note if all
notes are lifted prior to the new note.
Bank 1
Bank 2
Bank 3
Bank 4
Bank 5
Bank 6
Unison Staccato – All six voices are
assigned to the last note that is
played. The Envelope Attack stage is
triggered for every new note that
sounds.
= Poly 1
= Poly 2
= Unison Legato
= Unison Staccato
= Mono Legato
= Mono Staccato
Mono Legato – Only voice 1 is used
in the Juno-106. The Envelope Attack
stage is only triggered on a new note
if all notes are lifted prior to the new
note.
Poly 1 - In this mode the 7th note
played will rob the oldest voice.
Voice allocation is cycled.
Poly 2 – In this mode the 7th note
played is ignored. Voice allocation is
cycled.
Mono Staccato – Only voice 1 is
used in the Juno-106. The Envelope
Attack stage is triggered for every
new note that sounds.
Poly 2 - Hold
The Poly 2 Button in the Kiwi-106
sets the Hold mode. It will toggle the
Hold Mode each time it is pressed
The Poly 2 LED is as follows
Off
- Hold Mode Off
On
- Hold Mode On
Flashing - Hold Pedal Pressed
Midi Channel
The Midi Channel Button (MIDICH) is
used in the Kiwi-106 to change the
Current Page. Press and hold the
MIDICH button and select the Page
1-5 using the BANK Buttons.
LED Display Page 2
First
'P2' = Page Two
2nd
'SE' = Seq Mode
3rd
' z' = Current Seq # (1-8)
LED Display Page 3
First
'P3' = Page Three
2nd
'PA' = Pattern Mode
3rd
' z' = Current Pattern # (1-8)
The MIDICH also acts as MIDI
PANIC. Pressing and releasing the
MIDICH button will stop all output
from the Kiwi-106.
The current Page is optionally
displayed on Page 1-3 and always
displayed on Pages 4-5 on the two
digit display. The Display will cycle
through the various items that are
relevant to the current Page.
LED Display Page 1
First
'P1' = Page One
2nd
'Gx' = Current Group (1-8)
3rd
'yz' = Bank & Patch (11-88)
www.kiwitechnics.com
LED Display Page 4
First
'P4' = Page Four
2nd
'du' = Dump Mode
3rd
' x' = Dump # (1-8)
LED Display Page 5
First
'P5' = Page Five
2nd
'gL' = Global Edit Mode
3rd
'xx' = Global Param # (1-15)
4th
'xx' = Global Parameter Value
Kiwi-106 Upgrade User Manual v200
10
Control Description
Group A/B
Page 1 - The Group Button is used
in the Kiwi-106 to change the Current
Group. Press and hold the GROUP
Button and select the Group using
the BANK Buttons 1-8. BANK1 will
select Group1 through to BANK 8
which will select Group 8.
Page 2-5 - The Group Button is not
used and is ignored
Bank 1-8
Page 1 - The Bank Buttons are used
to select the Bank portion of the
Patch. Each Patch is made up of a
Group (1-8), Bank (1-8) and a Patch
(1-8) making 64 Patches on any
Group. There are 8 Groups making a
total of 512 Patches (8 x 64).
Page 3 - The Bank Buttons are used
to toggle Pattern Steps 1-8 during
Pattern Edit.
Page 4 - The Bank Buttons are used
to select the Sysex Dump type to
send. Dumps are not sent until the
'WRITE' button is pushed.
Page 2 - The Banks Buttons are
used during Seq Edit as follows
Bank 1 – Insert Rest
Bank 2 – Insert Tie
Bank 3 – Step Backwards
Bank 4 – Step Forwards
Bank 5 – Set Seq Length
Bank 6 - Overdub
Bank 7 – Insert Step
Bank 8 – Delete Step
Patch 1-8
Page 5 - The Bank Buttons are used
to select the Global Parameter to edit.
Page 1 - The Patch Buttons are used
to select the Patch portion of the
Patch. Each Patch is made up of a
Group (1-8), Bank (1-8) and a Patch
(1-8) making 64 Patches on any
Group. There are 8 Groups making a
total of 512 Patches.
Page 3 - The Patch Buttons are used
to Select a Pattern # (1-8). The Patch
Buttons are used to toggle Pattern
Steps 9-16 during Pattern Edit.
Page 2 - The Patch Buttons are used
to Select a Sequence # (1-8).
Page 5 - The Bank Buttons are used
to select the Global Parameter to edit.
Page 4 - The patch Buttons are not
used.
Range 16'-4'
The Range buttons will select the
Octave of the current Patch and will
work in Pages 1, 2 & 3
Wave Pulse/Saw
The Waveform Buttons will select the
Waveform of the current patch and
will work in in Pages 1, 2 & 3
www.kiwitechnics.com
Kiwi-106 Upgrade User Manual v200
11
Control Description
LFO Rate Slider
The LFO Rate Slider has three
modes of operation.
Pages 1-3 - When the KEY
TRANSPOSE button is being held
down the LFO Rate Slider will edit
the Internal Clock Rate.
Page 1 – The LFO Slider will edit the
LFO1 Rate
Page 2&3 – The LFO Slider will edit
the LFO2 Rate
Page 4&5 – The LFO Rate Slider will
have no effect
Env Sliders
Page 1 – The ENV Sliders will edit
the ENV1 Stages
Page 2&3 – The ENV Sliders will edit
the ENV2 Stages
Page 4&5 – The ENV Sliders will have
no effect
VCA Slider
Page 1,2 – The VCA Slider will edit
the VCA level.
Page 3 – The VCA Slider will edit the
Pattern Mix.
Page 4 – The VCA Slider is not used
Page 5 – The VCA Slider will edit
Global Parameter values
PWM Env Control
The PWM hardware in the Juno-106
has a single control line for all six
voices. The result of this is, if the
PWM source is set to ENV then the
PWM on all the sounding voices will
retrigger for each new note played
.
All Other Sliders &
Buttons
Page 1,2&3 – All Sliders and Buttons
not mentioned already will behave
normally
Page 4&5 – All Sliders and Buttons
not mentioned already will have no
effect.
All sliders will display the value 0-99
for a short time whenever they are
moved. The actual internal range is
0-4096 so the display is for reference
only.
www.kiwitechnics.com
Kiwi-106 Upgrade User Manual v200
12
Kiwi 106 Menu System
The menu system in the Kiwi-106
Upgrade is complex. This is
unavoidable due to the number of
features and the limited number of
buttons available.
The parameters for editing can mostly
be accessed using the menu system.
Patch parameters are all saved with
the Patch and will be changed
whenever a Patch is loaded. Global
Parameters will remain unchanged on
Patch loads.
The external editor can control all
parameters in any 'Page' or mode the
synth is in and full details can be
found in the Editor User guide.
Some Parameters are available using
midi control or External Editor only.
Page Menus
Page 1 - Arp
Page 2 - Sequence
Page 3 - Pattern
www.kiwitechnics.com
The 106 has five 'Pages'. This is
necessary to cover all the available
options. The Page is changed by
pressing and holding the MIDICH
button and selecting the Page using
the BANK 1-5 Buttons.
The Page data can optionally display
on Page 1-3 and will always show on
pages 4-5. The digits will scroll the
different items for each page level.
Page 1 is normal play mode. The digit
display (if enabled) will show 'P1',
current Group number & current
Bank/Patch number and in a 2s loop.
If Display mode is disabled only the
current the Bank/Patch will display.
The current Group will only display
while the Group Button is pressed
while in this mode.
The SAVE, VERIFY & LOAD buttons
will control the Arp. This is detailed in
the Menu flow chart and the Arp
Section
Page 2 is Sequence mode. The digit
display will show 'P2', 'SE' & current
Seq number 1-8 and in a 2s loop if
enabled .
The SAVE, VERIFY, LOAD and BANK
buttons will control the Seq & Seq
Edit. This is detailed in the Sequence
Section
The Seq number can be 1-8
Display Example for Page 2
First Display 'P2' - Page 2
2nd Display 'SE' - Sequence
3rd Display ' 1' - Seq Number 1
Page 3 is Pattern mode. The digit
display will show 'P3', 'PA' & current
Pattern number 1-8 and in a 2s loop if
enabled .
The SAVE, VERIFY, LOAD and
BANK/PATCH buttons will control the
Pattern & Pattern Edit. This is detailed
in the Pattern Section
The Pattern number can be 1-8
Display Example for Page 3
First Display 'P3' - Page 3
2nd Display 'PA' - Pattern
3rd Display ' 2' - Pattern Number 2
The Group number can be 1-8. The
Bank/Patch number can be 11 to 88
Display Example for Page 1
First Display 'P1' - Page 1
2nd Display ' G5' - Group 5
3rd Display '24' - Bank 2/Patch 4
The Group, Bank & Patch numbers
can be 1-8
Kiwi-106 Upgrade User Manual v200
13
Juno 106 Menu System
Page 4 - Sysex
Dumps
The digit display will show 'P4', 'du'.
Note - Write Protect must be off to Load
Dumps
To start a midi dump press a PATCH
BUTTON (1-8) and then the WRITE
BUTTON. The dump will not begin to
send until the WRITE is pressed.
The output from these can be
recorded using midi software (e.g.
midiOX). These can be played into the
Kiwi-106 at any time to restore the
Patch, Sequence or Pattern back to
the same state that it was when the
recording was made.
Most SysEx dumps include the
number which the Patch, Sequence or
Pattern was stored under at the time of
the dump. The dump will always load
back to this same position. To load it
to a different memory position the
number can be edited in the SysEx
file. Details of file layouts can be found
in the Sysex Section at the end of the
manual.
IMPORTANT - All of the dumps
(except the edit buffer dump) Loading
and Saving will overwrite the working
buffers with the saved copy. Save any
edits you wish to keep before any
dumps in or out.
IMPORTANT – Except for sysex dump
4 (edit buffer), when a Patch,
Sequence or Pattern is dumped it is
the saved copy that is dumped and
not the edited version
NOTE - some of the output files are
large.
Dump 1 - Dump Current Patch
Dump 2- Dump All Patches *
Dump 3 - Dump Global Parameters
Dump 4 - Dump Edit Buffer
Dump 5 - Dump Current Sequence
Dump 6 - Dump All Sequences *
Dump 7 - Dump Current Pattern
Normal play is not possible in Page 4 or Dump 8 - Dump All Patterns
5 modes
*= Large file size
IMPORTANT – when playing a type 2
or 6 dump into the 106 it will need a
500mS delay between each sysex
message
www.kiwitechnics.com
Kiwi-106 Upgrade User Manual v200
14
Juno 106 Menu System
Page 5 –
Global/Patch
Parameter Edit
The digit display will show 'P5', 'gL',
Global Parameter number (1-15) &
Value.
Midi In Channel
The Midi In Channel is set using the
VCA Level Control
Range is '01'-'16' or 'On' (Omni)
The Midi Out Channel is set using the
VCA Level Control
Range is '01'-'16'
The Seq Midi Out Channel is set using
the VCA Level Control
Range is '01'-'16' or 'Of' (Off)
This sets the Master Clock Source
from the internal, external or midi
clocks
‘01’ = Internal
‘02' = Midi
‘03' = Ext Step
‘04’ = Ext 24 PPQN
‘05' = Ext 48 PPQN
The Midi Soft Through sets the way
the 106 handles Midi data.
'01'=
'02' =
'03' =
'04' =
The Midi Program change command
can be optionally disabled.
'OF'= Off
'On' = On
The Kiwi106 can be optionally disable
Midi CC input and output.
'01'=
'02' =
'03' =
Bank 1
Midi Out Channel
Bank 2
Midi Seq Out
Channel
Global Parameter Editing is done using
the VCA Level Slider
Global Parameters are as follows:*
Bank 1 (1) - Midi In Channel
Bank 2 (2) – Midi Out Channel
Bank 3 (3) – Seq Midi Out Ch
Bank 4 (4) – Master Clock Source
Bank 5 (5) – Not Used
Bank 6 (6) – Midi Soft Thru
Bank 7 (7) – Midi Prog Change Enable
Bank 8 (8) – Midi CC Enable
Patch 1 (9) – Midi Sysex Enable
Patch 2 (10) – Midi Clock Gen Enable
Patch 3 (11) – Arp Clock Divide*
Patch 4 (12) – Seq Clock Divide*
Patch 5 (13) – Pattern Clock Source
Patch 6 (14) – Pattern Destination
Patch 7 (15) – Dynamics Enable*
Patch 8 – Factory Patch Restore
*=Patch Parameter
Bank 3
Master Clock Source
Bank 4
Bank 5 is not used
Midi Soft Through
Bank 6
Midi Prog Change
Bank 7
Midi CC
Bank 8
www.kiwitechnics.com
Stop All Midi
Pass All Midi
Pass only Non-CC
Pass only CC that the 106
hasn't used
Disabled
Midi CC input Enabled
Midi CC input & Output Enabled
Kiwi-106 Upgrade User Manual v200
15
Juno 106 Menu System
Midi Sysex
Patch 1 – (Display 9)
Sysex Input
disabled.
can
be
optionally
'OF'= Off
'On' = On
Note – The sysex ID request will work
even if sysex is diabled
Midi Clock
The Kiwi106 can optionally output the
internally generated clock as a midi
clock command.
'OF'= Off
'On' = On
The Kiwi106 Arpeggiator Clock can be
Divided from the Master Clock Source.
'01'=Half Note (48/Step)
'02'=Quarter note (24/Step)
'03'=8th note (12/Step)
'04'=8th note, 1/2 swing (14,10/Step)
'05'=8th note, full swing (16,8/Step)
'06'=8th note triplets (8/Step)
'07'=16th note (6/Step)
'08'=16th note, 1/2 swing (7,5/Step)
'09'=16th note, full swing (8,4/Step)
'10'=16th note triplets (4/Step)
'11'=32nd note (3/Step)
'12'=32nd note triplets (2/Step)
'13'=64th note triplets (1/Step)
Seq Clock Divide
The Kiwi106 Sequence Clock can be
Divided from the Master Clock Source.
'01'=Half Note (48/Step)
'02'=Quarter note (24/Step)
'03'=8th note (12/Step)
'04'=8th note, 1/2 swing (14,10/Step)
'05'=8th note, full swing (16,8/Step)
'06'=8th note triplets (8/Step)
'07'=16th note (6/Step)
'08'=16th note, 1/2 swing (7,5/Step)
'09'=16th note, full swing (8,4/Step)
'10'=16th note triplets (4/Step)
'11'=32nd note (3/Step)
'12'=32nd note triplets (2/Step)
'13'=64th note triplets (1/Step)
Pattern Clock Source
The Kiwi106 Pattern Clock can be
from the Arpeggiator or Sequence
Clocks.
'01'=
'02' =
ARP Clock
SEQ Clock
The Pattern Destination can send the
pattern to the VCF Cutoff or the VCA
Level or Both
'01'=
'02' =
'03' =
VCF Cutoff
VCA Level
Both
The Midi Dynamics can be enabled or
disabled. If midi dynamics are
disabled notes will sound at the
internal level
'OF'=
'01' =
'02' =
'03' =
Off
Low Level
Mid Level
High Level
Patch 2 – (Display 10)
Arp Clock Divide
Patch 3 – (Display 11)
Patch 4 – (Display 12)
Patch 5 – (Display 13)
Pattern Destination
Patch 6 – (Display 14)
Dynamics Mode
Patch 7 – (Display 15)
www.kiwitechnics.com
Kiwi-106 Upgrade User Manual v200
16
Juno 106 Menu System
Factory Patch
Restore
Patch 8
There are two types
Restore on the Kiwi106
of
Factory
Type 1 Restore will restore the Kiwi106
Factory Patches on Groups 1 & 2 (128
in total).
While in Page 5 'gL' mode press
PATCH 8 followed by the WRITE
BUTTON.
The Kiwi106 will stop responding for
about 2 seconds.
Type 2 Restore will restore all the
Kiwi106 Factory Patches on Groups 1
- 8 (512 in total).
WARNING - THIS ACTION WILL
CLEAR ALL MEMORY AND ALL
GLOBAL PARAMETERS WITHOUT
CONFIRMATION.
To clear the entire Kiwi106 back to
original factory condition press the
MANUAL & WRITE buttons while
powering on the Kiwi106.
Note – This will not restore Groups 3-8 The Kiwi106 will stop responding for
or any Global parameters.
about 5 seconds.
www.kiwitechnics.com
Kiwi-106 Upgrade User Manual v200
17
Preset Section
Groups
There are 8 Groups in the Kiwi-106
Upgrade, each group can have 64
Patches. Groups are changed by
pressing and holding the GROUP
Button and then selecting the Group
1-8 by using the BANK buttons.
Note - Changing the Group will also
load a new Patch. If you have an
edited Patch in the edit buffer you
should save this first or it will be lost.
Patch
Patches are selected by selecting a
GROUP 1-8, BANK 1-8 and PATCH 18 giving a total of 512 Patches.
Note - The memory protection switch
on the Juno-106 will prevent memory
writing. The write button will not
function if the rear panel switch is in
the protected position. The Display
will briefly show 'Er' if a write is
attempted with the protect on.
Note - If the Edit Buffer differs from
the Saved version the right hand
decimal point will flash on the
display. These changes will be lost if
another Patch is loaded or the power
is switched off. To make them
permanent the Patch must be saved.
www.kiwitechnics.com
Note – When the WRITE button has
been pushed in Page 1 the display will
flash and the Group and Bank buttons
can be used to select a group and/or
Bank without the Patch Saving. This
means you can write a Patch to any
Group and Bank. The Patch is not
saved until the PATCH button part of
the selection is pressed.
You can only select one patch at a time
All patches on Group 1&2 (11 to 88)
contain factory presets (128 in total) and
all other groups (3-8) contain a generic
Patch and all patches in all Groups can
be Edited and saved (512 in total)
The factory presets have been made
close to the original Juno-106
patches. All these can be edited and
restored. When selecting a patch
select a combination of the Bank
button and the Patch button. The
Bank and Patch selected will show on
the display.
Kiwi-106 Upgrade User Manual v200
18
Performance Control Section
Pitch Bender
LFO Trigger
This allows you to change the pitch of
the DCO or the VCF Cutoff. The amount
of the Pitch Bend and VCF Cutoff mod
can be adjusted using the DCO and
VCF Sliders next to the bend lever.
Note - These Slider settings are
saved with the Patch. This was not
possible with the original Juno-106
The level of the DCO LFO Modulation
from the Bend Lever can be adjusted
using the LFO TRIGGER LEVEL slider
Note - This Slider setting is saved
with the Patch. This was not
possible with the original Juno-106
On all factory programs the LFO button
has been configured to a moderate
level of DCO LFO level on the DCO to
give a vibrato effect.
The Programmed setting can be
overwritten by moving the LFO
Slider. The new setting can be
saved with the Patch if desired.
The Programmed setting can be
overwritten by moving the DCO or
VCF Sliders. The new setting can be
saved with the Patch if desired.
Note – The LFO source from the bend
lever trigger does not include the LFO
Delay and is always present.
Portamento
Portamento is available only on Poly,
Unison, Arp and Chord Modes. The
Portamento On/Off and Rate are set on
the Panel next to the Bend Lever.
The Portamento setting can be saved
with
the
Patch.
Changing
the
Portamento On/Off or moving the Rate
Control will change the saved setting in
the edit buffer.
www.kiwitechnics.com
Note - This Slider setting is saved
with the Patch. This was not
possible with the original Juno-106
Note - The Portamento setting will
only be changed and overwritten in
the Patch while the Portamento
Switch is set to 'ON' due to the
internal hardware in the Juno-106.
Turning the Portamento Switch to
'OFF' is the same as setting the
Portamento Rate knob to Zero. If the
switch is off then the Portamento
Rate will be saved as zero when the
patch is written to memory.
Kiwi-106 Upgrade User Manual v200
19
Juno-106 Upgrade Notes
Digital Oscillators
The Juno-106 Synthesizer uses
programmable dividers from a single
master oscillator to generate the
pitch of the notes. While this does
create very a stable pitch it does
create some issues.
Because the dividers are being
reprogrammed every time the pitch
for that voice changes, the leading
edge of the DCO pulse is constantly
changing in relation to the other
voices.
This is a 'feature' of the Juno-106
hardware and cannot be altered.
This is especially noticeable when
playing in Unison as all six voices
are playing the same pitch but the
start point of the voice waves will
not be the same. The audible
result of this is that random notes
can sound 'thin' with much of the
bass portion missing at certain
start point combinations. Anything
that effects the pitch of a voice
(detune, pitch bending, lfo
amount, Portamento etc) will
change the DCO wave voice start
points and change the sound.
Master Clock
The Internal Master Clock is
generated within the Kiwi106. This
clock is then used to generate the
Arpeggiator & Sequencer clocks.
The Master clock can be from
several sources.
1) Internal. The rate is set by the LFO
Rate Slider while the KeyT button is
being pressed
2) Midi Clock
3) External. An External Clock can
be fed into the 'PATCH' input on
the rear of the Juno-106. This can
then be selected to drive the
Master Clock. This clock will
count each time the Patch Input
changes from 0v to 5-15v
( Positive pulse).
The External Clock can be further
divided by 24 or 48 to suit PPQN
Factory Presets
The 128 factory presets in Group
1&2 have been made close to the
original Juno-106 presets.
Note - These can be restored if
required.
Clock Display
The internal clock will display the
rate in BPM (Beats Per Minute) on
the display whenever it is changed.
Because the display is only two
digits the Red/Green Group lights
are also used as follows
The current Page Clock will show
on the KEY TRANSPOSE LED.
5-99 BPM
100-199 BPM
200-299 BPM
www.kiwitechnics.com
No Lights
Green Light
Red Light
Pages 1-3 - While the Key
Transpose button is held the
Internal Clock rate will display on
the LED
Page 1 – The Arpeggiator Clock
will Display
Page 2 – The Sequencer Clock
will Display
Page 3 – The Pattern Clock will
Display (Arp or Seq)
Page 4 & 5 – Off
Kiwi-106 Upgrade User Manual v200
20
Page Display Mode
The scrolling digit display can be
optionally disabled. When enabled
the display will continuously cycle
the Page number and other page
data. When disabled the Page data
will only scroll once whenever a
page control button is pressed
Midi Function Switch
This switch has no effect with the
Kiwitechnics Juno-106 Upgrade. Full
midi control is always available and
this switch is ignored.
Midi Received
Midi data received will flash the Left
decimal point of the Digit Display
light if it is recognized by the Kiwi106.
Midi Panic
The MIDICH button also acts as
Midi Panic and will cancel any
sounding notes including internal.
To stop all output from the Kiwi106 press and release MIDICH.
Note Hold
The Original Juno-106 has no Note
Hold except when using a hold
pedal. A Hold Function has been
added to the Kiwitechnics Kiwi106
Upgrade front panel and uses the
POLY 2 BUTTON. Pressing POLY 2
will toggle Hold on or off. The
POLY 2 LED will be lit when hold is
on.
Note - The POLY 2 BUTTON does
not change the Key Mode in the
Kiwitechnics Kiwi106 Upgrade
Whenever the edit buffer does not
match the saved patch showing on
the display the right decimal point
on the display will blink.
To retain these changes when the
patch is changed or the Juno-106
is powered off the patch must be
written to memory.
Edit Buffer Compare
www.kiwitechnics.com
The Page Display Mode can be
edited by pressing and holding
the POLY I button and pressing
the Patch 8 button. This setting is
Off by default.
The Poly2 light will flash when the
Hold Pedal is used
Kiwi-106 Upgrade User Manual v200
21
LFO Sync
LFO1&2 can be free running or
synced to the master clock. Each
LFO
sync
can
have
an
independent divide ratio.
As the LFO has to time the clock
and will take full two cycles to
correctly sync there will be an
initial period where the LFO is not
synced correctly. This is especially
noticeable with slow clock speeds
and slow divides
www.kiwitechnics.com
‘01' = Free Running
‘02' = Two Notes
‘03' = Dotted Whole Note
‘04' = Whole Note
‘05' = Dotted Half Note
‘06' = Half Note
‘07' = Dotted 1/4 Note
‘08' = 1/4 Note
‘09' = Dotted 1/8 Note
‘10' = 1/4 Note Triplets
‘11' = 1/8 Note
‘12' = 1/8 Note Triplets
‘13' = 1/16 Note
‘14' = 1/16 Note Triplets
‘15' = 1/32 Note
‘16' = 1/32 Note Triplets
‘17' = 1/64 Note
Kiwi-106 Upgrade User Manual v200
22
Sequencer
The Juno-106 Upgrade contains a
polyphonic sequencer that has the
capacity of 124 step automatic
playing. Up to 6 notes can be played
at a time so writing a chord is
possible.
SAVE Button
The clock for the Sequencer is taken
from the Master Clock and can be
further
divided
using
Global
Parameters Edit. The Seq Clock
Divide parameter is located under
Patch Button 4
LOAD Button
Note - If the Master clock source is
set to External Clock or Midi Clock
and no ext/midi clock is present the
sequence will not run.
This button is used to start or stop
the sequencer playing. Each time
you press this button the sequencer
will start or stop.
This followed by the seq number
(Patch button 1-8) is used to erase a
sequence. After the Seq number is
selected the erase is done when the
write button is pressed. Press VERIFY
to abort.
Note - If the master clock source is
midi or external the sequence will not
begin playing until the first clock is
received
PATCH Buttons
The patch buttons will select the
sequence to play. If a sequence is
selected during sequence play the
currently playing sequence will finish
before the new sequence is loaded.
www.kiwitechnics.com
Kiwi-106 Upgrade User Manual v200
23
A) Writing / Editing
The memory protect switch on the
rear of the Juno-106 must be set to
Off to write or erase a sequence
The only way to erase or blank a
sequence is by using the Seq Erase
Menu Option (While in Page 2, press
LOAD, Seq number, WRITE - see the
menu map). If you choose an
existing sequence when Seq Write
is pressed then any step(s) you
write will overwrite all notes in the
existing step(s) already in the
sequence unless you press the
OVERDUB button (Bank 6) while
you play notes. The BANK 3
(backwards) and BANK 4 (forwards)
buttons will allow non destructive
stepping within a sequence.
e.g. if the existing sequence is C, D,
E, F, G and you step to the third step
and play the chord C E G the
resulting sequence will now be C, D,
CEG(chord), F, G. You will have
overwritten the third step.
Note – When Sequence Edit Mode is
entered a generic Tone is loaded for
editing. The last used Patch will be
reloaded on exiting Sequence Edit
Mode. Any temporary edits made
to a Patch will be lost when
Sequence Edit Mode is entered.
2) Press the WRITE button to begin
Seq write/edit.
(3) By playing the keyboard and
using the Tie button and Rest
button, write steps one after
another.
Note - if more than 6 notes are used
in one step only the last 6 notes
used will play.
(4) If writing is complete press the
Write button followed by a Patch
button to Save the Sequence to
permanent memory or the VERIFY
Button to exit edit mode. The
SAVE button will start the
sequence playing on the next
clock received. If the Seq is not
written to memory the sequence
will be lost if the Juno-106 is
powered off or another sequence
is loaded. Pressing the SAVE
button again will stop the
sequence
playing
and
the
indicator will go out. (refer to
Sequencer Playing in the next
section)
(5) Return the Memory Protect Switch
to the Off Position.
You can write the pitch by playing
the keyboard (or midi keyboard),
and the rhythm by pressing the Tie
button and the Rest button.
(1) Find the shortest time value in the
phrase you wish to write. Then
divide the longer time values by
that shortest one.
(e.g)
www.kiwitechnics.com
Kiwi-106 Upgrade User Manual v200
24
Button use in detail
Bank 5 – Set Length
Bank 1 – Rest
When the Bank 1 button is pressed
while in edit mode a blank step will
be inserted at the current
sequence step. Note - this button
can only be used if no notes are
being pressed.
Bank 2 – Tie
When the Bank 2 button is pressed
while in edit mode and while notes
are being pressed a tie step will be
inserted at the current sequence
step. A tied step will start the note
in the sustain stage of the
envelope when it is played. Note –
A tie can only follow a sequence
step that contains note data.
Therefore it cannot be placed after
a rest or at the first step in a
sequence.
Bank 6 – Overdub
When the Bank 6 button is pressed
while in edit mode and notes are
being played the sequence step
notes already in the sequence
step will be combined with any
being played to a maximum of six
notes.
Bank 7 – Insert Step
When the Bank 3 button is pressed
while in edit mode the sequence
will step back one position if
possible and sound the step.
When the Bank 7 button is pressed
while in edit mode and notes are
being held the sequence step is
inserted at the current step that is
showing on the display. Note – if
the sequence is full (124 steps)
the last step will be lost when the
Bank 7 button is pressed.
Bank 4 – Step Forward
Bank 8 – Delete Step
Bank 3 – Step Back
When the Bank 4 button is pressed
while in edit mode the sequence
will step forward one position if
possible and sound the step. It is
possible to step one position past
the last step so new steps can be
added at the sequence end point
unless the sequence is full (124
steps).
www.kiwitechnics.com
When the Bank 5 button is pressed
while in edit mode the sequence
length will be set to the step
showing on the display. The step
showing will be the last step to
play and all steps after this will be
erased.
When the Bank 8 button is pressed
while in edit mode the sequence
step that is showing on the display
is deleted and all steps after this
point are moved up one position.
Kiwi-106 Upgrade User Manual v200
25
C) Playing
Load Sequence
A Sequence can be loaded in two
ways. A Sequence is loaded manually
by pressing a Patch Button 1-8 while
in Page 2. The Sequence that is stored
under the Patch button selected will
be loaded to memory
.
A Sequence can be assigned to a
Patch and can load automatically
when the Patch is loaded. To do this
place the Sequence number 1-8 in the
Load Sequence Field in the Patch
Parameter Editing (midi editing only)
or save the Patch with the sequence
running. Place a zero in this field if you
do not want a Sequence to load. The
last Sequence will stay in memory and
continue to play (if enabled) in this
case.
If you press the SAVE button the
indicator will light up and the data
written into the sequencer will be
played. The first note of the sequence
will only sound once a clock has been
received. This allows a seq to be
queued to start. When all the notes are
played the data will return to the
beginning and be played again from
the start. Pressing the SAVE button
once more (it's indicator will go out)
will stop playing immediately. The
tempo of the playing will be
determined by the clock source. If the
clock source is the Internal Clock then
the tempo will be set by the LFO Rate
Slider while the Key Transpose button
is being pressed. The Rate Knob will
have no effect if the clock source is
anything other than the Internal clock.
Playing notes while a sequence is
playing will set the Sequencer Key
Transpose. It is therefore a simple
matter to change the Sequencer key
up or down. The transpose range is
-1 octave to + 2 octaves
Note - If a new sequence or Patch is
loaded while a sequence is playing
the load of the Patch and Seq and
pattern will delay until the current
sequence reaches the end and is
about to loop back to the start. At this
point the Patch and Sequence (if auto
load enabled) and Pattern (if auto
load enabled) will then load and the
next note(s) to sound will be with the
new selection.
If the Sequencer is on (SAVE light on)
when a Patch is saved the Sequencer
will be switched on and the currently
selected sequence will begin to play
when the Tone is loaded. If the Seq is
off when a Patch is saved the Seq
state will be unaltered when that
Patch is loaded. Saving the Patch
with the sequence on will also load
the current playing sequence into the
Load Sequence parameter in the
Patch. The effect of this is that the
Sequence will load & begin to play
when the Patch is loaded.
* If you stop the Sequence part
way through and then restart it
the data will start from the
beginning.
* If you wish to only play the data
once, put some rests are the
end so it is easier to stop the
sequence in the correct place.
www.kiwitechnics.com
Kiwi-106 Upgrade User Manual v200
26
Arpeggiator
The KiwiTechnics Juno-106 Upgrade
has a built in Arpeggiator that can be
applied to any sound.
Arpeggiator Mode is entered by
pressing the SAVE Button while in
Page 1.
The SAVE button will light.
Note – The Arp settings are saved
with the Patch. i.e. if the Arp is on
when the Patch is saved it will be on
when the Patch is loaded
The clock for the Arpeggiator can be
divided from the Master Clock. The
Arp Clock Divider parameter is
located under Patch Button 3
The behavior or the Arpeggiator can
be set using the VERIFY & LOAD
buttons. The VERIFY will set the style
and will cycle through up only, down
only, up & down and random. The
LOAD button will cycle through the
range which can be 0, 1 or 2 octaves.
These are saved with the Patch.
Note - If the Master clock source is
set to the Ext Clock or Midi Clock the
Arp will not play if the clock is not
present.
www.kiwitechnics.com
Canceling Arpeggiator Mode.
Arpeggiator mode can be stopped by
pressing the SAVE button While in
Page 1. The SAVE button light will go
out.
Note - If the Arpeggiator notes held
are spread over more than 1 octave
and more than one octave is selected
in the Arp Range the notes played will
be as follows. All the first octave notes
held will play followed by the same
pattern moved up one or two octaves.
The result of this will be the first note
of the second pass can be lower than
the last note of the first pass. This can
sound odd if you have selected one
direction for the Arp Mode.
If the Arp is running when the PAGE is
changed to 2 or 3 it will continue to run.
This way an Arp can be applied to a
Seq output.
If the Arp is on (SAVE light on) when a
Patch is saved the Arp will be switched
on when the Tone is loaded. If the Arp is
off when a Patch is saved the Arp state
will be unaltered when that Patch is
loaded.
Kiwi-106 Upgrade User Manual v200
27
Pattern Play
The KiwiTechnics Juno-106 Upgrade has
a pattern system that can be applied to
any Patch. There are 8 independent
patterns which are stored under the
Patch buttons 1-8.
Pattern Play.
Pattern Play can be toggled on and off
by pressing the SAVE button while in
Page 3 Mode.
The Pattern Clock can be selected from
the Arpeggiator or Sequencer clocks.
Note - If any of the follow conditions are
present the Pattern will not run or sound.
1) If the Pattern Mix Level is set to full and
the first step is off, if the Pattern clock
source selected (Arp or Seq) is set to
External or midi Clock and no ext or midi
clock is present.
2) The Pattern will only sound if a pattern
destination (VCF or VCA) is enabled
3) The Pattern will only sound if the
Pattern Mix Level is not zero.
Loading and Playing a Pattern
A Pattern can be loaded in two ways. A
pattern is loaded manually by pressing a
Patch Button 1-8 while in Page 3 Mode.
The pattern that is stored under the
Patch button selected will be loaded to
memory. The pattern can be started and
stopped by pressing the SAVE button.
A pattern can be assigned to a Patch
and can load automatically when
the Patch is loaded. To do this place
the pattern number 1-8 in the Load
Pattern Field (midi editing only).
Place a zero in this field if you do not
want a pattern to load. The last
pattern will stay in memory and
continue to play (if enabled) in this
case.
If the Pattern is on (SAVE light on)
when a Patch is saved the Pattern
will be loaded and switched on when
the Patch is loaded. If the Pattern is
off when a Patch is saved the Pattern
state will be unaltered when that
Patch is loaded.
Edit Pattern
Edit mode is entered by pressing
The WRITE button while in Page 3 .
Note - The memory must be Write
Enabled to enter Edit mode
Exit Pattern Edit mode by pressing
the WRITE button followed by the
Patch number 1-8 to store the
pattern under that number or the
VERIFY button to abort editing
without storing the Pattern. If
aborted, the edited pattern will
remain in the temporary buffer and
continue to sound until it is
overwritten or the Juno-106 is
powered off.
To edit a pattern press the Bank &
Patch buttons to add or remove
sections of the pattern. Depending
on the length of the pattern up to 16
pattern steps can be toggled on or
off.
www.kiwitechnics.com
Pattern Display
During Edit mode only the pattern
will display on the LED display as
follows:
The step number will display 1 to
the length set and a 'u' if the step
is not sounding and a 'n' if the
step is sounding. For steps 1-8
the step number is on the left and
the step status on the right. For
steps 9-16 the step number is on
the right and the step status on
the left.
Pattern Length.
The pattern length can be
changed from 2-16. This is set by
pressing and releasing the LOAD
button while in edit mode
followed by a Bank or Patch
button. The Range is 2 (Bank 2)
to 16 (Patch 8).
Erasing a Pattern.
A pattern can be cleared in two
ways.
1) by setting all the Pattern Steps
to On ('n')
2) pressing the LOAD button
while not in Pattern Edit Mode
followed by the Pattern Number
(Patch button 1-8) followed by the
WRITE button.
Note - The memory must be Write
Enabled to store or erase a
Pattern
Kiwi-106 Upgrade User Manual v200
28
Chord Mode
A Chord is set by playing the Chord
and then pressing and releasing the
POLY1 Button while the keys of the
chord are being held. The chord that
is set will then play for each key
pressed as the base note.
www.kiwitechnics.com
As only one chord can be played
at a time the keys played have
last note priority.
Note - it is best to set the chord
using middle 'C' as the base note.
Changing a chord.
To change a chord play the new
chord and press and release the
POLY1 Button while the chord
keys are pressed.
Note – As the Poly I button is also
used to set key modes this must be
done with no note(s) pressed or a
chord will be set.
Canceling Chord Mode.
To cancel chord mode press and
release the POLY1 Button with no
notes pressed.
Kiwi-106 Upgrade User Manual v200
29
Setting up with External Devices
Midi Notes
Hold Pedal
Midi though should be used if
multiple units are being used on the
midi chain to reduce delays. While
every effort has been made to make
the midi as fast as is possible within
the KiwiTechnics Kiwi-106 upgrade
there will always be small delays
between the midi input and midi
output as the commands need to be
interpreted which cannot be done
until a full command arrives. Full
midi command details are at the end
of the manual.
Any pedal that shorts the tip to
ground when not pressed can be
used. It will need to go open circuit
when pressed to suit the Juno-106
hardware.
External Clock
An External Clock can be fed into the
'PATCH' input on the rear of the
Juno-106. This can then be selected
to drive the Master Clock. This clock
will count each time the Patch Input
changes from 0v to 5-15v ( Positive
pulse).
www.kiwitechnics.com
Kiwi-106 Upgrade User Manual v200
30
Upgrade install
Disclaimer.
This modification is at your own risk and Kiwitechnics will not be held liable for any damage done by not doing
this modification correctly.
If you are in any doubt at all or do not understand any part of this document then have this work done by a
professional.
www.kiwitechnics.com
Kiwi-106 Upgrade User Manual v200
31
UNPLUG THE JUNO-106!
There are dangerous voltages inside the unit and it must not be opened until the power plug is removed from
the power supply.
The KiwiTechnics Kiwi-106 Upgrade must be installed by a competent technician with the correct
tools or damage to your Juno-106 can occur. KiwiTechnics will not be responsible for damage
done to your precious Juno-106 if this upgrade is not fitted correctly.
The voice board cpu needs to be removed and replaced with a 64 pin socket and daughter board which is supplied with the KiwiTechnics Juno-106 Upgrade. These
instructions are supplied as a guide for your technician only and it is your responsibility to have this done professionally. This can take about 30mins depending on
your skill level.
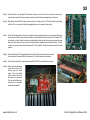
Step 1) Opening the Juno-106 - After removing the four screws located in the end panels the top can be opened.
Step 2) Removing the cpu & voice board. If the 106 is a 106S or HS-60 then the keyboard will also need to be removed to gain access to the cpu & voice boards.
This is done by removing the 5 large screws on the underside. Unplug all the cables from the cpu and voice boards. Remove the 10 screws holding both
boards into the 106. it is a good idea to mark the cpu board cables with a felt pen so that you get them back into the correct sockets. Several of the plugs
are similar and it is easy to get them swapped.
Step 3)
Unplug the cables marked with the purple arrows and the screws marked with the yellow arrows (10). Remove both the voice and the cpu boards.
www.kiwitechnics.com
Kiwi-106 Upgrade User Manual v200
32
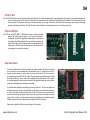
Step 4)
Desolder the Voice board CPU (IC29) and fit the supplied 64 pin Daughter Board.
It is very important that this step is done correctly.
On the top side of the voice board underneath the IC29 CPU are some fine tracks that will be damaged and difficult to repair if all the solder is not
removed correctly (see photo). All the solder must be removed from all the 64 holes and the pins free of the hole edges
before the CPU is lifted. All the CPU pins should be able to move freely in the holes which shows that they are not still soldered to the hole
sides. The best way to achieve this is with a good vacuum desoldering tool. A combination of a quality Solderwick and a hand vacuum can be used
but you will need to take care as these can cause damage to the board as they can jump and damage tracks as they are triggered. Copper is very
soft at 300+ degrees and is easily lifted from the surface especially on these older boards. If tracks are damaged they will need to be repaired
before proceeding.
www.kiwitechnics.com
Kiwi-106 Upgrade User Manual v200
33
Step 5) Carefully solder in the supplied 64 Pin Sockets. The way to do this is solder in the end pins of each row
only and then check that they are seated correctly and vertical before soldering the rest of the pins.
Step 6) Bend the two caps C92 & C93 away from the socket so that they are at 45°. C95 should also be bent away
a little bit. This is so they avoid hitting the daughter board as it is pressed in (see photo).
Step 7)
Fit the CPU daughter board. This is a very tight fit and will require some force to insert correctly. Make sure
all the pins are in all the holes and press in firmly. This will seat the board into the holes. Then with the 106
voice board on a static free firm surface and something firm directly under the cpu area you need to press
down very firmly using a cloth to protect your fingers until the daughter board is seated correctly. It is best
to press one end at a time and then the sides until it is fully inserted. The photo shows the board in the final
position.
Step 8)
Fit the KiwiTechnics CPU Upgrade Board into the 106. Refit the Voice board and reconnect
all the cables to both boards. Refit all the screws (10) into both boards to secure then
Step 9)
Connect the supplied 40 pin cable between the KIWI-106 CPU board and the Voice board.
Step 10) Older voice boards have an
eprom fitted into the IC37
location (near the board
edge). If the voice board
has an eprom fitted then
this needs to be removed.
This should be fitted into a
socket but if not it will also
need to be desoldered.
www.kiwitechnics.com
Kiwi-106 Upgrade User Manual v200
34
HS-60 & 106S
The HS-60 & 106S have the cpu & voice board farther apart than the 106. These are separated by a supporting leg for the keyboard. This keyboard support leg
is also in the way of the kiwi106 cable. This leg needs to be removed from the underside of the keyboard and the Kiwisix CPU board moved closer to
the voice board. The keyboard mounting for this mounting leg can no longer be used but there is sufficient mounting screws using the remaining
screws to hold the keyboard firmly. The kiwi106 cable can then be fitted as normal between the cpu board & the voice board.
Optional LED Mod
The LED's for the LOAD, VERIFY & SAVE buttons share a common dimming
resistor. This is fine if only one light is on at a time but is not ideal for
the upgrade. The Kiwi-106 upgrade uses these lights in combinations
to show Arp, Seq & Pattern Modes. This can be fixed by putting a link
across R24 on the far right of the front panel board as viewed with the
board in place. This link can be fitted on the rear of the board and it is
not necessary to remove the front panel.
Swap Back Board
The allows the Roland Juno-106 to be restored to original operation. When the voice board
cpu is removed it can be soldered into the swap back board. To restore the Juno-106 to
original operation remove the ribbon cable, the voice board from the 106, the voice board
cpu daughter board and Kiwi-106 CPU board. The voice board cpu daughter board is a tight
fit and can be difficult to remove. A lever like a midsized Hex Key with a piece of cloth under it
(to avoid damaging the voice board) can be helpful. Be gentle and ease one corner a little at
a time. Avoid damaging the surrounding components.
Fit the Swap Back daughter board with the original cpu fitted into it. This is a very tight fit and
will require some force to insert correctly. Make sure all the pins are in all the holes and press
in. This will seat the board into the holes. Then with the 106 voice board on a static free firm
surface and something firm directly under the cpu area you need to press down very firmly
using a cloth to protect your fingers until the swap back daughter board is seated correctly.
It is best to press one end at a time and then the sides until it is fully inserted.
Replace the original Juno106 cpu board and plug in all the cables
www.kiwitechnics.com
Kiwi-106 Upgrade User Manual v200
35
Adjustments for the Juno-106
THE JUNO-106 WILL BE ON WITH THE LID OPEN DURING THIS
PROCEDURE AND THERE ARE LETHAL VOLTAGES PRESENT!
LEAVE THIS TO A PROFESSIONAL IF YOU ARE AT ALL UNSURE.
The Roland Juno-106 can be adjusted while it is apart. To do the adjustments you will require an accurate digital voltage meter, an oscilloscope and a small
screwdriver. A suitable tuner for PC is APTuner from www.aptuner.com or the ClearTune App for smartphones.
1) Warm up the Juno-106
Leave the Synth running for at least 10 minutes to let the electronics stabilize. Center the Fine Tune Knob on the rear and set Bend Level to the center.
www.kiwitechnics.com
Kiwi-106 Upgrade User Manual v200
36
2) Check the Power Supply
Using voltage meter adjust the power supply. IMPORTANT – do not adjust the
voltages without the meter attached to the correct test point or damage may
occur to the synth.
1) Red Arrows. Connect the meter to the point R10 marked TP2 and adjust the
trim marked VR2 to get +5v ± 10mv
2) Purple Arrows. Connect the meter to the point D1 marked TP1 and adjust the
trim marked VR1 to get -15v ± 10mv
3) Green Arrow. Verify that there is +15v at D2. Adjusting VR1 (-15v) will also
effect this.
4) Blue Arrow. Check D3 for +5v. This is not adjustable and if it is wrong then
replace IC1 (LM7805 +5v Regulator)
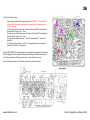
3) Enter TEST MODE. The next adjustments use a special test mode that is built into the
Kiwi-106 Upgrade. This is entered by Pressing and Holding the SAVE button while the
Juno-106 is powered on. The display will show '1_' when test mode is active.
Use this Drawing from the Juno-106 Service Notes to locate the test points
www.kiwitechnics.com
Kiwi-106 Upgrade User Manual v200
37
4) Connect the DVM to TP3 marked. Press and release the MIDICH button. This sets the output MUX to zero volts. Pressing any Bank Button will cancel this. Adjust
VR33 for 0v.
5) Connect the DVM to TP7 and adjust VR34 to read in the range +0.25v to +0.27v.
6) Press Bank 1 to cancel the output MUX override.
7) VCA OFFSET. Connect an oscilloscope to TP8. Press and Release BANK 1 to set the correct Patch
Sound. Using TP8 for Voice 1 through to TP13 for Voice 6 adjust the VR in the diagram to get minimum
thump as keys are pressed.
8) Press and Release BANK 3 to set the correct Patch Sound.
9) VCF RESONANCE. Using the oscilloscope on TP19 for Voice 1 through to TP14 for Voice 6 press and
hold C4 (middle C) and adjust the trimmer to get a 4.8v peak to peak for each voice.
VR #
CH #
26
1
21
2
16
3
11
4
6
5
1
6
10) VCA GAIN. Connect an oscilloscope to TP8. Using TP8 for Voice 1 through to TP13 for Voice 6 adjust the VR in the diagram to get 6v peak to peak as C4
(middle C) is pressed.
VR #
CH #
27
1
22
2
17
3
12
4
7
5
2
6
8) Press and Release BANK 4 to set the correct Patch Sound.
11) VCF FREQUENCY. Using the oscilloscope on TP8 for Voice 1 through to TP13 for Voice 6 press and hold C4 (middle C) and adjust the trimmer to get a 248Hz
(B3 pitch) for each voice. Each press of C4 will rotate the voice and the voice number that is sounding will display on the right digit. A suitable tuner for PC is
APTuner from www.aptuner.com or the ClearTune App for smartphones.
VR #
CH #
29
1
24
2
19
3
14
4
9
5
4
6
12) VCF WIDTH. Using a tuner attached to the output the oscilloscope on TP8 for Voice 1 through to TP13 for Voice 6 press and hold C6 and adjust the trimmer to
get a 992Hz (B5 pitch) for each voice.
VR #
CH #
28
1
23
2
www.kiwitechnics.com
18
3
13
4
8
5
3
6
Kiwi-106 Upgrade User Manual v200
38
Note. The tuning in 11 (VCF FREQ) and 12 (VCF WIDTH) interact so repeat both until result is ±10 cents on the tuner.
13) NOISE LEVEL. Press and Release BANK 6 to set the correct Patch Sound. Connect the Oscilloscope to TP8, play any key and adjust VR32 for an average of 4v
peak to peak on the output
14) PWM ADJUST. Press and Release BANK 5 to set the correct Patch Sound. Connect an oscilloscope to TP8. On one voice only adjust VR31 to get a 50% duty
cycle. Tolerance is 48% to 52%. Check this is correct for all voices. Move PWM control to 10 and check all outputs are within 93%-97%.
15) CHORUS BOARD ADJUSTMENTS. Use the service manual for Chorus adjustments.
Upgrade Label
The Kiwitechnics KIWI-106 Upgrade comes with one label for the outside of the Juno-106.
www.kiwitechnics.com
Kiwi-106 Upgrade User Manual v200
39
Midi Data
Function
Transmitted
Recognized
Notes
Basic Channel
1-16
1-16
If Omni selected the Kiwi106 will recognize any midi channel
Note Number
24(C1)-108(C8) 0-127
Notes that are received outside the Kiwi106 range of 24-108
are transposed to the nearest octave within range.
Mode
O
O
Voice Modes need to be changed using Midi Control or Sysex
commands
Velocity
Note On
X
X
X
X
X
X
Note Off
Aftertouch
Keys
Channels
Midi Note Velocity can be disabled using Global Dynamics
Variable. If disabled midi notes will use the Internal
Velocity Level.
X
X
Pitch Bender
O
O
Midi and internal bends are additive within the Kiwi106.
Control Change
O
O
Only if Midi CC option is Enabled. See Control Change Tables
for details
NOTE - If the Vyzex editor is running midiCC Control changes
will not be transmitted even if enabled
Program Change
O
0-127
If CC0=0 then CC32 & Program change select Patch 1-512. Each
CC32 number (0 - 3) accesses 128 Patches using Program Change
(0-127)
System Exclusive
O
O
Only if Midi Sysex option is Enabled - See Sysex Table for
details
System Real Time Clock
Commands
O
O
Will Transmit from Master Clock if Clock Output is enabled.
Input clocks are passed through to midi out unaltered and with
minimal delay. Midi Clocks are recognized within the Kiwi106
only if the clock source has been set to midi on the Master
clock source
Modulation
O
O
Midi and internal Modulation are additive within the Kiwi106
Notes
X=No
O=Yes
Supported Midi
Messages
Status
Second
Third
Notes
Note Off
$8n (128-143)
$kk
$yy
n
kk
=
=
yy
=
=
=
0-15 midi channel
note number (0-127) - Notes outside range 24-108 are
transposed to the nearest octave
Don't care (ignored)
Note On
$9n (144-159)
$kk
$yy
n
kk
Continuous Controllers
$bn (160-191)
$kk
$yy
n
= 0-15 midi channel
$kk & $yy
see CC table
Program Change
$cn (192-207)
0-127
Channel Aftertouch
$dn (208-223)
$kk
www.kiwitechnics.com
0-15 midi channel
note number (0-127)-outside 24-108 are transposed to
the nearest Octave
yy = 0=Note Off, 1-127 = Note Velocity. Notes are sent at
velocity set by Global Parameter
n
=
If CC0 =
for CC32 =
0-15 midi channel
0 then
0 for Patches 1-128
1 for Patches 129-256
2 for Patches 257-384
3 for Patches 385-512
---
Kiwi-106 Upgrade User Manual v200
40
Pitch Bend
$en (224-239)
$kk
$yy
n
=
kk =
yy =
Note -
0-15 midi channel
Least Significant 7 bits
Most Significant 7 bits
Midi pitch bend is mixed with internal bend
Internal hardware can only support 12 bits so the 2
LSB are dropped
Note $xx = hex number
www.kiwitechnics.com
Kiwi-106 Upgrade User Manual v200
41
Continuous Controllers
Continuous Controllers
Second
Third
Notes
Bank Select MSB
$00 (00)
$00-$01
0=Bank Selection, 1=Pattern Selection, 2=Seq Selection
Used in conjunction with CC32 Bank Select LSB
Modulation Wheel Level
$01 (01)
$00-$7f (0-127)
Breath Controller
$02 (02)
$00-$7f (0-127)
Not Supported
Portamento Time
$05 (05)
$00-$7f (0-127)
Sets Portamento Time
NRPN MSB
$06 (06)
$00-$7f (0-127)
Supported. See NRPN Detail Table
Overall Volume
$07 (07)
$00-$7f (0-127)
Sets VCA Level
DCO Range
$08 (08)
$yy
yy
=
$00-$1f (0-31)
$20-$3f (32-63)
$40-$7f (64-127)
16'
8'
4'
DCO Wave
$09 (09)
$yy
yy
=
$00-$1f
$20-$3f
$40-$5f
$60-$7f
Off
Ramp
Pulse
Ram+Pulse
DCO PWM Mod Amount
$0a (10)
$00-$64 (0-100)
Source is selected by DCO PWM Control
Note – Reduced Range
DCO PWM Control
$0b (11)
$yy
yy
=
$00-$0f
$10-$1f
$20-$2f
$30-$3f
$40-$4f
$50-$5f
$60-$7f
DCO LFO Mod Amount
$0c (12)
$00-$7f (0-127)
DCO LFO Source
$0d (13)
$yy
yy
=
$00-$3f (0-63)
$40-$7f (64-127)
DCO Envelope Mod Amount
$0e (14)
$00-$7f (0-127)
Polarity and Source is selected by DCO ENV Source *
DCO ENV Source
$0f (15)
$yy
yy
=
$00-$1f
$20-$3f
$40-$5f
$60-$7f
LFO Mode
$10 (16)
$yy
yy
=
$00-$1f (0-31)
$40-$7f (64-127)
LFO1&2 Normal *
LFO1&2 Plus *
LFO 1 Wave
$12 (18)
$yy
yy
=
$00-$0f
$10-$2f
$20-$3f
$40-$5f
$60-$6f
$70-$7f
(0-15)
(16-31)
(32-63)
(64-95)
(96-111)
(112-127)
Sine
Triangle
Saw
Rev Saw
Square
Random
LFO 1 Rate
$13 (19)
$00-$7f (0-127)
LFO 1 Delay
$14 (20)
$00-$7f (0-127)
LFO 2 Wave
$15 (21)
$yy
yy
=
$00-$0f
$10-$2f
$20-$3f
$40-$5f
$60-$6f
$70-$7f
(0-15)
(16-31)
(32-63)
(64-95)
(96-111)
(112-127)
Sine
Triangle
Saw
Rev Saw
Square
Random
LFO 2 Rate
$16 (22)
$00-$7f (0-127)
LFO 2 Delay
$17 (23)
$00-$7f (0-127)
www.kiwitechnics.com
(0-31)
(32-63)
(64-95)
(96-127)
(0-15)
(16-31)
(32-47)
(48-63)
(64-79)
(80-95)
(96-127)
(0-31)
(32-63)
(64-95)
(96-127)
Manual
LFO 1
LFO 2 *
ENV 1 Normal *
ENV 1 Inverted *
ENV 2 Normal *
ENV 2 Inverted *
LFO 1
LFO 2 *
ENV
ENV
ENV
ENV
1
1
2
2
Normal *
Inverted *
Normal *
Inverted *
Kiwi-106 Upgrade User Manual v200
42
Continuous Controllers
Continuous Controllers
Second
Third
Notes
LFO 1 Mode
$18 (24)
$yy
$yy =
$00-$07
$08-$0f
$10-$17
$18-$1f
$20-$27
$28-$2f
$30-$37
$38-$3f
$40-$47
$48-$4f
$50-$57
$58-$5f
$60-$67
$68-$6f
$70-$73
$74-$77
$78-$7f
(0-7)- Free Running
(8-15) - Sync Two Notes
(16-23) - Sync Dotted Whole Note
(24-31) - Sync Whole Note
(32-39) - Sync Dotted Half Note
(40-47) - Sync Half Note
(48-55) - Sync Dotted 1/4 Note
(56-63) - Sync 1/4 Note
(64-71) - Sync Dotted 1/8 Note
(72-79) - Sync 1/4 Note Triplets
(80-87) - Sync 1/8 Note
(88-95) - Sync 1/8 Note Triplets
(96-103) - Sync 1/16 Note
(104-111) - Sync 1/16 Note Triplets
(112-115) - Sync 1/32 Note
(116-119) - Sync 1/32 Note Triplets
(120-127) - Sync 1/64 Note
LFO 2 Mode
$19 (25)
$yy
$yy =
$00-$07
$08-$0f
$10-$17
$18-$1f
$20-$27
$28-$2f
$30-$37
$38-$3f
$40-$47
$48-$4f
$50-$57
$58-$5f
$60-$67
$68-$6f
$70-$73
$74-$77
$78-$7f
(0-7)- Free Running
(8-15) - Sync Two Notes
(16-23) - Sync Dotted Whole Note
(24-31) - Sync Whole Note
(32-39) - Sync Dotted Half Note
(40-47) - Sync Half Note
(48-55) - Sync Dotted 1/4 Note
(56-63) - Sync 1/4 Note
(64-71) - Sync Dotted 1/8 Note
(72-79) - Sync 1/4 Note Triplets
(80-87) - Sync 1/8 Note
(88-95) - Sync 1/8 Note Triplets
(96-103) - Sync 1/16 Note
(104-111) - Sync 1/16 Note Triplets
(112-115) - Sync 1/32 Note
(116-119) - Sync 1/32 Note Triplets
(120-127) - Sync 1/64 Note
Bank Select LSB
$20 (32)
$00-$7f (0-127)
Selects Bank sets for Program Select
$00 (0) for Patches 1-128
$01 (1) for Patches 129-256
$02 (2) for Patches 257-384
$03 (3) for Patches 385-512
Sub Level
$21 (33)
$00-$7f (0-127)
Noise Level
$22 (34)
$00-$7f (0-127)
NRPN LSB
$26 (38)
$00-$7f (0-127)
VCF Low Pass Cutoff
$29 (41)
$00-$7f (0-127)
VCF Low Pass Resonance
$2a (42)
$00-$7f (0-127)
VCF Pitch Follow
$2b (43)
$00-$7f (0-127)
High Pass Filter Cutoff
$2c (44)
$yy
VCF LFO Mod Amount
$2d (45)
$00-$7f (0-127)
VCF LFO Source
$2e (46)
VCF Envelope Mod Amount
VCF ENV Source
Supported. See NRPN Detail Table
yy
=
$00-$1f
$20-$3f
$40-$5f
$60-$7f
$yy
yy
=
$00-$3f (0-63)
$40-$7f (64-127)
$2f (47)
$00-$7f (0-127)
Polarity is selected by VCF ENV Source
$30 (48)
$yy
yy
ENV 1 Attack
$33 (51)
$00-$7f (0-127)
ENV 1 Decay
$34 (52)
$00-$7f (0-127)
ENV 1 Sustain
$35 (53)
$00-$7f (0-127)
www.kiwitechnics.com
=
$00-$1f
$20-$3f
$40-$5f
$60-$7f
(0-31)
(32-63)
(64-95)
(96-127)
(0-31)
(32-63)
(64-95)
(96-127)
HPF
HPF
HPF
HPF
Off
1
2
3
LFO 1 *
LFO 2 *
ENV
ENV
ENV
ENV
1
1
2
2
Normal
Inverted
Normal *
Inverted *
Kiwi-106 Upgrade User Manual v200
43
Continuous Controllers
Continuous Controllers
Second
Third
ENV 1 Release
$36 (54)
$00-$7f (0-127)
Load Sequence
$37 (55)
$00-$08 (0-8)
0
=
1-8 =
Do not load sequence *
Load Seq 1-8
All other numbers ignored
Load Pattern
$38 (56)
$00-$08 (0-8)
0
=
1-8 =
Do not load Pattern *
Load Pattern 1-8
All other numbers ignored
Chorus Off/I/II
$39 (57)
$yy
yy
=
$00-$3f (0-63)
$40-$5f (64-95)
$60-$7f (96-127)
Chorus Off
Chorus On I
Chorus On II
VCA LFO Mod Amount
$3b (59)
$00-$7f (0-127)
*
VCA LFO Source
$3c (60)
$yy
yy
=
$00-$3f (0-63)
$40-$7f (64-127)
LFO 1 *
LFO 2 *
VCA Mode
$3d (61)
$yy
yy
=
$00-$3f (0-31)
$40-$5f (32-63)
$60-$6f (96-111)
Gate
ENV 1
ENV 2 *
Midi Control
(Midi Start/Stop Enable)
Note: if a patch is saved
with ARP, SEQ and/or
Pattern running the midi
Start Enable will also be
saved for each section
running
$3e (62)
$yy
yy
=
$00-$0f
$10-$1f
$20-$2f
$30-$3f
$40-$4f
$50-$5f
$60-$6f
$70-$7f
All Off
ARP Enabled
SEQ Enabled
Pattern Enabled
ARP+SEQ Enabled
ARP+PATTERN Enabled
SEQ+PATTERN Enabled
ARP+SEQ+PATTERN Enabled
Hold Pedal
$40 (64)
$yy
yy
=
$00-$3f (0-63)
$40-$7f (64-127)
ENV 2 Attack
$41 (65)
$00-$7f (0-127)
ENV 2 Decay
$42 (66)
$00-$7f (0-127)
ENV 2 Sustain
$43 (67)
$00-$7f (0-127)
ENV 2 Release
$44 (68)
$00-$7f (0-127)
DCO Bend Amount
$45 (69)
$00-$7f (0-127)
VCF Bend Amount
$46 (70)
$00-$7f (0-127)
DCO LFO Mod Amount
$47 (71)
$00-$7f (0-127)
Internal Clock Rate
$48 (72)
$00-$7f (0-127)
NRPN Data Plus
$60 (96)
Supported. See NRPN Detail Table
NRPN Data Minus
$61 (97)
Supported. See NRPN Detail Table
NRPN Data LSB
$62 (98)
Supported. See NRPN Detail Table
NRPN Data MSB
$63 (99)
Supported. See NRPN Detail Table
RPN Data LSB
$64 (100)
Not Supported
RPN Data MSB
$65 (101)
Not Supported
After Touch Level *
$67 (103) $00-$7f (0-127)
*
Key Mode
$68 (104) $yy
yy
=
$00-$0f
$10-$1f
$20-$2f
$30-$3f
$40-$4f
$50-$7f
Key Assign Detune
$69 (105) $00-$7f (0-127)
Key Assign Detune Mode *
$6a (106) $yy
yy
=
$00-$3f (0-63)
$40-$7f (64-127)
Internal Velocity **
$6b (107) $01-$7f (1-127)
Sets Juno-106 internal Key velocity level
www.kiwitechnics.com
Notes
(0-15)
(16-31)
(32-47)
(48-63)
(64-79)
(80-95)
(96-111)
(112-127)
(0-15)
(16-31)
(32-47)
(48-63)
(64-79)
(80-127)
Off
On
Poly 1
Poly 2
Unison Legato
Unison Staccato
Mono Legato
Mono Staccato
Mono/Unison
Mono/Unison/Poly
Kiwi-106 Upgrade User Manual v200
44
Continuous Controllers
Continuous Controllers
Second
Arpeggiator Mode
$6c (108) $yy
Third
Notes
$yy =
$00-$1f(0-31)
$20-$3f(32-63)
$40-$4f(64-79)
$50-$5f(80-95)
$60-$7f (96-127)
Up
Down
Up & Down
Random
As Played
Arpeggiator Range
$6d (109) $yy
$yy =
$00-$1f(0-31)
$20-$3f(32-63)
$40-$7f(64-127)
0 Octave
1 Octave
2 Octaves
Pattern -> VCF Cutoff *
$71 (113) $yy
yy
=
$00-$3f (0-63)
$40-$7f (64-127)
Off
On
Pattern -> VCA Level *
$72 (114) $yy
yy
=
$00-$3f (0-63)
$40-$7f (64-127)
Off
On
Pattern Level **
$73 (115) $00-$7f (0-127)
All Sound off
$78 (120)
Stops all output immediately
All Notes off
* = Midi control Only
$7b (123)
Stops all output immediately
** = Global Parameter
Real Time Commands
Midi Clock
$f8 (248)
Midi Timing Clock
Start
$fa (250)
Start Arp/Sequence/Pattern Play
Stop
$fc (252)
Stop Arp/Sequence/Pattern Play
Continue
$fb (251)
Continue Arp/Sequence/Pattern Play
www.kiwitechnics.com
Kiwi-106 Upgrade User Manual v200
45
NRPN Controllers
NRPN MSB
$63 (99)
$60 (96)
Kiwitechnics ID. Any NRPN that does not have this number
as the MSB will be ignored
NRPN LSB
$62 (98)
$07-$3f (7-63)
See table
Note: the Kiwi106 supports 12 bit control only so the
two lowest bits are ignored
NRPN Data
$06 & $26 14 bits of data
(6 & 38)
$6 (6) is upper 7 bits and is optional
$26 (38) is lower 7 bits and is optional (only 5 bits
are used)
These are combined to make one 12 bit control
(6) 0xxxxxxx (38) 0yyyyyzz = 0000xxxx xxxyyyyy
NRPN Data Increment
$60 (96)
Will increment the current NRPN by one count
NRPN Data Decrement
$61 (97)
Will decrement the current NRPN by one count
Overall Volume
$07 (07)
0-4096
DCO PW/PWM Mod Amount
$0a (10)
0-4096
DCO LFO Mod Amount
$0c (12)
0-4096
DCO ENV Mod Amount
$0e (14)
0-4096
LFO1 Rate
$13 (19)
0-4096
LFO1 Delay
$14 (20)
0-4096
LFO2 Rate
$16 (22)
0-4096
LFO2 Delay
$17 (23)
0-4096
Sub Level
$21 (33)
0-4096
Noise Level
$22 (34)
0-4096
VCF Low Pass Cutoff
$29 (41)
0-4096
VCF Low Pass Resonance
$2a (42)
0-4096
VCF Key Track
$2b (43)
0-4096
VCF LFO Mod Amount
$2d (45)
0-4096
VCF Envelope Mod Amount
$2f (47)
0-4096
ENV 1 Attack
$33 (51)
0-4096
ENV 1 Decay
$34 (52)
0-4096
ENV 1 Sustain
$35 (53)
0-4096
ENV 1 Release
$36 (54)
0-4096
VCA LFO Mode Amount
$3b (59)
0-4096
ENV 2 Attack
$41 (65)
0-4096
ENV 2 Decay
$42 (66)
0-4096
ENV 2 Sustain
$43 (67)
0-4096
ENV 2 Release
$44 (68)
0-4096
DCO Bend Amount
$45 (69)
0-4096
VCF Bend Amount
$46 (70)
0-4096
DCO LFO Mod Amount
$47 (71)
0-4096
Key Assign Detune
$69 (105) 0-4096
Pattern Level
$73 (115) 0-4096
www.kiwitechnics.com
Sets VCA Level
Kiwi-106 Upgrade User Manual v200
46
Midi Sysex Support
Function
Transmitted
Recognized Notes
Basic ID
1-16
1-16
Load
O
O
Dump
O
O
Set using Device ID in Global Variable
Function
Device Enquiry
$F0 $7E <MIDI CHANNEL> $06 $01 $F7
Device Enquiry Response $F0
Sysex Start
$7F
Non Rel time reply
xx
Midi Channel (0-15)
$06
Enquiry Message
$02
Enquiry Reply
$00 $21 $16
Kiwitechnics Manufacture ID
$60
Kiwitechnics ID
$03
Product Family ID (Kiwi-106)
$00
Product ID
xx
Major Program Version Byte
xx
Minor Program Version Byte
xx
Major BootLoader Version Byte
xx
Minor BootLoader Version Byte
xx
Build Number
xx
Decide ID (Global Parameter #3)
$F7
End of Sysex
www.kiwitechnics.com
Kiwi-106 Upgrade User Manual v200
47
Midi Sysex Data
Notes
$nn = Hexadecimal Data - Decimal data is in Brackets e.g. $0a (10)
Sysex Header
$f0
Sysex Start
$00 $21 $16
Kiwitechnics Manufacturers ID
$60
Kiwitechnics ID
$03
Kiwitechnics Juno-106 ID
nn
Device ID ($00-$0f)
xx
Command ID (see table 1.0)
$01
=
Request Global Dump
$02
=
Transmit/Receive Global Dump
$03
=
Request Patch Edit Buffer Dump
$04
=
Transmit/Receive Patch Edit Buffer Dump
$05
=
Request Patch Dump
$06
=
Transmit/Receive Patch Dump
$07
=
Request Pattern Dump
$08
=
Transmit/Receive Pattern Dump
$09
=
Request Seq Dump
$0a
=
Transmit/Receive Seq Dump
$0b
=
Request Patch Name
$0c
=
Transmit/Receive Patch Name
$0d
=
Request Patch Parameter
$0e
=
Transmit/Receive Patch Parameter
$0f
=
Request Global Parameter
$10
=
Transmit/Receive Global Parameter
$11
=
Request Pattern Edit Buffer Dump
$12
=
Transmit/Receive Pattern Edit Buffer Dump
$13
=
Request Sequence Edit Buffer Dump
$14
=
Transmit/Receive Sequence Edit Buffer Dump
Data
Depending on command type (see table 1.0)
$f7
Sysex Footer
(Juno-106 Device ID 1-16)
WARNING! Sysex dumps have the ability to put non valid settings into memory and few checks are made for validity. If the Juno-106
becomes unusable due to non valid data you may need to do a full restore of the Juno-106 which will lose all saved memory.
www.kiwitechnics.com
Kiwi-106 Upgrade User Manual v200
48
Table 1.0 Command ID
Data Byte
Data Type
Byte details
7 ------- 0
Data Details
$01 (1) Request Global Dump
No Data
$02 (2) Transmit or Receive Global
Dump
$00 (0) = Midi Channel In
000yxxxx
xxxx =
y =
0-15 for midi channel 1-16
set for Omni
$01 (1) = Midi Channel Out
0000xxxx
xxxx =
0-15 for midi channel 1-16
$02 (2) = Seq Midi Channel Out
0000xxxx
xxxx =
0-15 for midi channel 1-16
$03 (3) = Device ID
0000xxxx
xxxx =
0-15 for ID 1-16
$04 (4) = Enable MidiCC
000000xx
xx =
$05 (5) = Enable Sysex
0000000x
Juno-106 transmits a $02 (2) command
48 data bytes
www.kiwitechnics.com
00=Off
01=CC Receive Enabled (Default)
02=CC Transmit Enabled
03=CC Receive & Transmit Enabled
Note – Mod Wheel CC will always send
NOTE - If the Vyzex editor is running midiCC Control
changes will not be transmitted even if enabled
x =
Off/On (set=On)
$06 (6) = Enable Program Change 000000xx
xx =
00=None
01=PC Receive Enabled (Default)
02=PC Transmit Enabled
03=PC Receive & Transmit Enabled
$07 (7) = Midi Soft Through
xx =
000000xx
00=Stop all
01=Pass all
10=Pass only nonCC
11=Stop only CC we have used
Note - Midi real time (>$F8) will always pass
Note - SysEx intended for the Juno-106 will not be
passed
Note – Active Sensing commands are suppressed within the
106 and not passed on
$08 (8) = Enable Midi Clock Gen 0000000x
x =
Off/On (set=On)
$09 (9) = Internal Velocity
0xxxxxxx
x =
Range $00-$7f (0-127)
$0a (10) = Master Clock Source
000000xx
xx=
$0b (11) = Not Used
00000000
000-Internal
001-Midi
010-Ext Step
011-Ext 24ppqn
100-Ext 48ppqn
Note – Master Clock will be divided according to the
Arp/Seq/LFO Clock Divide options
Kiwi-106 Upgrade User Manual v200
49
Table 1.0 Command ID
Data Byte
Data Type
Byte details
7 ------- 0
$0c (12) = Not Used
00000000
$0d (13) = Not Used
00000000
$0e (14) = Pattern Level Hi
000xxxxx
$0f (15) = Pattern Level Lo
0yyyyyyy
Hi & Lo are combined to make single 12 bit command.
000xxxxx + 0yyyyyyy = 0000xxxx xyyyyyyy
$10 (16) = Pattern Control
00000xyz
y =
z =
x =
$11 (17) = Int Clock Rate Hi
0000xxxx
$12 (18) = Int Clock Rate Lo
0000yyyy
This byte is sent as two nibbles which are combined to
make single 8 bit command.
0000xxxx + 0000yyyy = xxxxyyyy
Range is 0-255 for 5-300 BPM
$13 (19) = MW Level
0xxxxxxx
x = Range $00-$7f (0-127)
$14 (20) = AT Level
0xxxxxxx
x = Range $00-$7f (0-127)
$15 (21) = Key Trans Disable
0000000x
x = Disable Key Transpose (0=enable,1=disable)
$16 (22) = Display Mode
000000yz
z =
y =
$17 (23) = Memory Protect
0000000z
z =
Memory Protect - 0=Protected 1=Not Protected
Note – This is read only and can only be changed by the
Memory Protect Switch on the rear of the Juno-106
$18-$1f (24-31) = Nulls
$03 (3) Request Patch Edit Buffer
Dump
No Data
$04 (4) Transmit/Receive Patch Edit
Buffer Dump
2 x Null + 128 bytes data
Data Details
VCA Amount Destination - 0=Off 1=On
VCF Cutoff Destination - 0=Off 1=On
Clock Source – 0=Arp 1=Seq
Clock Display - 0=Off 1=On
Scrolling Display - 0=Off 1=On
Not currently Used
2 x null bytes sent followed by 128 bytes of data in the
following format
Null x 2 + 128 data bytes
$00-$13
www.kiwitechnics.com
(0-19) = Patch Name
Ascii Bytes
Patch Name
Kiwi-106 Upgrade User Manual v200
50
Table 1.0 Command ID
Data Byte
Data Type
Byte details
7 ------- 0
Data Details
$14 (20)=DCO Wave/Range
0000zyxx
xx =
y =
z =
$15 (21)=DCO Env Amount Hi
000xxxxx
$16 (22)=DCO Env Amount Lo
0yyyyyyy
$17 (23)=DCO LFO Amount Hi
000xxxxx
$18 (24)=DCO LFO Amount Lo
0yyyyyyy
DCO Range
00=16'
01=8'
10=4'
Saw On/Off (set=on)
Pulse On/Off (set=on)
Hi & Lo are combined to make single 12 bit command.
000xxxxx + 0yyyyyyy = 0000xxxx xyyyyyyy
Hi & Lo are combined to make single 12 bit command.
000xxxxx + 0yyyyyyy = 0000xxxx xyyyyyyy
$19 (25)=DCO Bend Mod Amount Hi 000xxxxx
$1a (26)=DCO Bend Mod Amount Lo 0yyyyyyy
Hi & Lo are combined to make single 12 bit command.
000xxxxx + 0yyyyyyy = 0000xxxx xyyyyyyy
$1b (27)=DCO Bend LFO Mod
Amount Hi
000xxxxx
$1c (28)=DCO Bend LFO Mod
Amount Lo
0yyyyyyy
$1d (29)=DCO PWM Amount Hi
000xxxxx
$1e (30)=DCO PWM Amount Lo
0yyyyyyy
Hi & Lo are combined to make single 12 bit command.
000xxxxx + 0yyyyyyy = 0000xxxx xyyyyyyy
$1f (31)=DCO Control
0000000u
0vwxxxyz
z =
y =
xxx =
Hi & Lo are combined to make single 12 bit command.
000xxxxx + 0yyyyyyy = 0000xxxx xyyyyyyy
w =
v =
u =
www.kiwitechnics.com
$20 (32)=Sub Level Hi
000xxxxx
$21 (33)=Sub Level Lo
0yyyyyyy
$22 (34)=Noise Level Hi
000xxxxx
$23 (35)=Noise Level Lo
0yyyyyyy
DCOENV(0=ENV1,1=ENV2)
DCOLFO(0=LFO1,1=LFO2)
PWM Source
000=Manual
001=LFO1
010=LFO2
011=ENV1
100=ENV2
DCO ENV(0=Norm,1=Inverted)
PWM ENV(0=Norm,1=Inverted)
LFO POL(0=Norm,1=Inverted)
Hi & Lo are combined to make single 12 bit command.
000xxxxx + 0yyyyyyy = 0000xxxx xyyyyyyy
Hi & Lo are combined to make single 12 bit command.
000xxxxx + 0yyyyyyy = 0000xxxx xyyyyyyy
Kiwi-106 Upgrade User Manual v200
51
Table 1.0 Command ID
Data Byte
Data Type
Byte details
7 ------- 0
Data Details
$24 (36)=HPF Level
000000xx
xx =
$25 (37)=VCF Cutoff Hi
000xxxxx
$26 (38)=VCF Cutoff Lo
0yyyyyyy
$27 (39)=VCF Resonance Hi
000xxxxx
$28 (40)=VCF Resonance Lo
0yyyyyyy
$29 (41)=VCF LFO Amount Hi
000xxxxx
$2a (42)=VCF LFO Amount Lo
0yyyyyyy
$2b (43)=VCF ENV Amount Hi
000xxxxx
$2c (44)=VCF ENV Amount Lo
0yyyyyyy
$2d (45)=VCF Key Amount Hi
000xxxxx
$2e (46)=VCF Key Amount Lo
0yyyyyyy
0-3
Hi & Lo are combined to make single 12 bit command.
000xxxxx + 0yyyyyyy = 0000xxxx xyyyyyyy
Hi & Lo are combined to make single 12 bit command.
000xxxxx + 0yyyyyyy = 0000xxxx xyyyyyyy
Hi & Lo are combined to make single 12 bit command.
000xxxxx + 0yyyyyyy = 0000xxxx xyyyyyyy
Hi & Lo are combined to make single 12 bit command.
000xxxxx + 0yyyyyyy = 0000xxxx xyyyyyyy
Hi & Lo are combined to make single 12 bit command.
000xxxxx + 0yyyyyyy = 0000xxxx xyyyyyyy
$2f (47)=VCF Bend Mod Amount Hi 000xxxxx
www.kiwitechnics.com
$30 (48)=VCF Bend Mod Amount Lo 0yyyyyyy
Hi & Lo are combined to make single 12 bit command.
000xxxxx + 0yyyyyyy = 0000xxxx xyyyyyyy
$31 (49)=VCF Control
0000wxyz
z
y
x
w
$32 (50)=Env 1 Attack Hi
000xxxxx
$33 (51)=Env 1 Attack Lo
0yyyyyyy
$34 (52)=Env 1 Decay Hi
000xxxxx
$35 (53)=Env 1 Decay Lo
0yyyyyyy
$36 (54)=Env 1 Sustain Hi
000xxxxx
$37 (55)=Env 1 Sustain Lo
0yyyyyyy
$38 (56)=Env 1 Release Hi
000xxxxx
$39 (57)=Env 1 Release Lo
0yyyyyyy
=
=
=
=
VCFEnv(0=Env1,1=ENV2)
VCFLFO(0=LFO1,1=LFO2)
Env(0=Norm,1=Inverted)
LFO(0=Norm,1=Inverted)
Hi & Lo are combined to make single 12 bit command.
000xxxxx + 0yyyyyyy = 0000xxxx xyyyyyyy
Hi & Lo are combined to make single 12 bit command.
000xxxxx + 0yyyyyyy = 0000xxxx xyyyyyyy
Hi & Lo are combined to make single 12 bit command.
000xxxxx + 0yyyyyyy = 0000xxxx xyyyyyyy
Hi & Lo are combined to make single 12 bit command.
000xxxxx + 0yyyyyyy = 0000xxxx xyyyyyyy
Kiwi-106 Upgrade User Manual v200
52
Table 1.0 Command ID
www.kiwitechnics.com
Data Byte
Data Type
Byte details
7 ------- 0
Data Details
$3a (58)=Env 2 Attack Hi
000xxxxx
$3b (59)=Env 2 Attack Lo
0yyyyyyy
$3c (60)=Env 2 Decay Hi
000xxxxx
$3d (61)=Env 2 Decay Lo
0yyyyyyy
$3e (62)=Env 2 Sustain Hi
000xxxxx
$3f (63)=Env 2 Sustain Lo
0yyyyyyy
$40 (64)=Env 2 Release Hi
000xxxxx
$41 (65)=Env 2 Release Lo
0yyyyyyy
$42 (66)=Env Control
Not used
$43 (67)=LFO 1 Wave
000000xxx
$44 (68)=LFO 1 Rate Hi
000xxxxx
$45 (69)=LFO 1 Rate Lo
0yyyyyyy
$46 (70)=LFO 1 Delay Hi
000xxxxx
$47 (71)=LFO 1 Delay Lo
0yyyyyyy
Hi & Lo are combined to make single 12 bit command.
000xxxxx + 0yyyyyyy = 0000xxxx xyyyyyyy
$48 (72)=LFO 2 Wave
000000xxx
xxx =
$49 (73)=LFO 2 Rate Hi
000xxxxx
$4a (74)=LFO 2 Rate Lo
0yyyyyyy
$4b (75)=LFO 2 Delay Hi
000xxxxx
$4c (76)=LFO 2 Delay Lo
0yyyyyyy
Hi & Lo are combined to make single 12 bit command.
000xxxxx + 0yyyyyyy = 0000xxxx xyyyyyyy
Hi & Lo are combined to make single 12 bit command.
000xxxxx + 0yyyyyyy = 0000xxxx xyyyyyyy
Hi & Lo are combined to make single 12 bit command.
000xxxxx + 0yyyyyyy = 0000xxxx xyyyyyyy
Hi & Lo are combined to make single 12 bit command.
000xxxxx + 0yyyyyyy = 0000xxxx xyyyyyyy
xxx =
000=Sine
001=Triangle
010=Square
011=Saw
100=Reverse Saw
101=Random
Hi & Lo are combined to make single 12 bit command.
000xxxxx + 0yyyyyyy = 0000xxxx xyyyyyyy
000=Sine
001=Triangle
010=Square
011=Saw
100=Reverse Saw
101=Random
Hi & Lo are combined to make single 12 bit command.
000xxxxx + 0yyyyyyy = 0000xxxx xyyyyyyy
Hi & Lo are combined to make single 12 bit command.
000xxxxx + 0yyyyyyy = 0000xxxx xyyyyyyy
Kiwi-106 Upgrade User Manual v200
53
Table 1.0 Command ID
www.kiwitechnics.com
Data Byte
Data Type
Byte details
7 ------- 0
Data Details
$4d (77) LFO1 Control
00xxxxxz
z =
xxxxx=
LFO1 Mode (0=Normal,1=Plus)
00000-Free Running
00001-Sync Two Notes (192 Clocks/Step)
00010-Sync Dotted Whole Note (144 Clocks/Step)
00011-Sync Whole Note (96 Clocks/Step)
00100-Sync Dotted Half Note (72 Clocks/Step)
00101-Sync Half Note (48 Clocks/Step)
00110-Sync Dotted 1/4 Note (36 Clocks/Step)
00111-Sync Quarter note (24 Clocks/Step)
01000-Sync Dotted 1/8 Note (18 Clocks/Step)
01001-Sync 1/4 Note Triplets (16 Clocks/Step)
01010-Sync 8th note (12 Clocks/Step)
01011-Sync 8th note triplets (8 Clocks/Step)
01100-Sync 16th note (6 Clocks/Step)
01101-Sync 16th note triplets (4 Clocks/Step)
01110-Sync 32nd note (3 Clocks/Step)
01111-Sync 32nd note triplets (2 Clocks/Step)
10000-Sync 64th note triplets (1 Clocks/Step)
Sync source is Master Clock
$4e (78)=Chorus Control
000000xx
xx =
00=off
01=Type 1
10=type 2
$4f (79)=VCA Level Hi
000xxxxx
$50 (80)=VCA Level Lo
0yyyyyyy
$51 (81)=VCA LFO Mod Amount Hi
000xxxxx
$52 (82)=VCA LFO Mod Amount Lo
0yyyyyyy
Hi & Lo are combined to make single 12 bit command.
000xxxxx + 0yyyyyyy = 0000xxxx xyyyyyyy
$53 (83)=VCA Control
000v0xyz
z
y
x
v
$54 (84)=Portamento Rate Hi
000xxxxx
$55 (85)=Portamento Rate Lo
0yyyyyyy
Hi & Lo are combined to make single 12 bit command.
000xxxxx + 0yyyyyyy = 0000xxxx xyyyyyyy
$56 (86)=Portamento Control
0000000x
x =
$58 (87)=Load Sequence
0000xxxx
Seq number to load (0-8) - 0 is do not load Seq
$57 (88)=Load Pattern
0000xxxx
Pattern number to load (0-8) - 0 is do not load Pattern
Hi & Lo are combined to make single 12 bit command.
000xxxxx + 0yyyyyyy = 0000xxxx xyyyyyyy
=
=
=
=
Gate (1=gate on - overrides bit y)
Env1/2 (0=Env1)
LFO1/2 (0=LFO1)
LFO(0=Norm,1=Inverted)
0=Off 1=On
Kiwi-106 Upgrade User Manual v200
54
Table 1.0 Command ID
Data Byte
Data Type
Byte details
7 ------- 0
Data Details
$59 (89)=Voice Mode
00000xxx
xxx =
0=Poly1 (7th note robs oldest)
1=Poly2 (7th note ignored)
2=Unison Legato
3=Unison Staccato
4=Mono Legato
5=Mono Staccato
$5a (90)=Voice Detune Amount Hi 000xxxxx
www.kiwitechnics.com
$5b (91)=Voice Detune Amount Lo 0yyyyyyy
Hi & Lo are combined to make single 12 bit command.
000xxxxx + 0yyyyyyy = 0000xxxx xyyyyyyy
$5c (92)=Detune Control
0000000x
x =
0=unison only,1=All modes except Mono
$5d (93)=Arp Control
00yyy0zz
zz =
yyy =
00=1Oct,01=2Oct,10=3Oct
000=Up,001=Dn,010=U/D,011=Rndm, 100=As Played
$5e (94)=AT Control
00000xyz
z =
y =
x =
DCO LFO (1=on)
VCF Cutoff (1=on)
VCA Level (1=on)
$5f (95)=MW Control
00000xyz
z =
y =
x =
DCO LFO (1=on)
VCF Cutoff (1=on)
VCA Level (1=on)
$60 (96)=Midi Control
0000wxyz
z
y
x
w
Arp Enable (1=Enabled)
Sequence Enable (1=Enabled)
Pattern Enable (1=Enabled)
Hold Enabled (1=Hold On)
$61 (97)=Patch Clock Tempo
0000xxxx
0000yyyy
If this is nonzero it will replace the internal Clock
speed with this value. If this value is zero the
internal clock will remain unchanged.
This byte is sent as two nibbles which are combined to
make single 8 bit command.
0000xxxx + 0000yyyy = xxxxyyyy
$63 (99) Arp Clock Divide
0000yyyy
yyyy=
=
=
=
=
0000-Half Note (48 Clocks/Step)
0001-Quarter note (24 Clocks/Step)
0010-8th note (12 Clocks/Step)
0011-8th note, half swing (14,10 Clocks/Step)
0100-8th note, full swing (16,8 Clocks/Step)
0101-8th note triplets (8 Clocks/Step)
0110-16th note (6 Clocks/Step)
0111-16th note, half swing (7,5 Clocks/Step)
1000-16th note, full swing (8,4 Clocks/Step)
1001-16th note triplets (4 Clocks/Step)
1010-32nd note (3 Clocks/Step)
1011-32nd note triplets (2 Clocks/Step)
1100-64th note triplets (1 Clocks/Step)
Clock source is Master Clock
Kiwi-106 Upgrade User Manual v200
55
Table 1.0 Command ID
Data Byte
Data Type
Byte details
7 ------- 0
Data Details
$64 (100) Seq Control
000vwxyz
z =
y =
x =
w =
v =
www.kiwitechnics.com
Reserved
KeyDownPlay (0=Seq always plays when enabled,
1=Seq only plays when enabled AND a Key is
being held down)
AutoTranspose (0=actual seq notes,1=transpose
last played)
AutoTransposeReset (0=continue seq in new
transpose, 1=reset seq to step 1 on new
transpose value)
Reserved
$65 (101) Seq Transpose
0-36
0-36 (-1 oct -> +2 Octs) - only used if SeqControl Bit
2 set
$66 (102) Dynamics Control
0000yyzz
zz =
yy =
VCF Cutoff Enable(0-3)
VCA Amount Enable(0-3) 0=off,1=30%,2=60%,3=100%
$67 (103) LFO2 Control
00xxxxxz
z =
xxxxx=
LFO2 Mode (0=Normal,1=Plus)
00000-Free Running
00001-Sync Two Notes (192 Clocks/Step)
00010-Sync Dotted Whole Note (144 Clocks/Step)
00011-Sync Whole Note (96 Clocks/Step)
00100-Sync Dotted Half Note (72 Clocks/Step)
00101-Sync Half Note (48 Clocks/Step)
00110-Sync Dotted 1/4 Note (36 Clocks/Step)
00111-Sync Quarter note (24 Clocks/Step)
01000-Sync Dotted 1/8 Note (18 Clocks/Step)
01001-Sync 1/4 Note Triplets (16 Clocks/Step)
01010-Sync 8th note (12 Clocks/Step)
01011-Sync 8th note triplets (8 Clocks/Step)
01100-Sync 16th note (6 Clocks/Step)
01101-Sync 16th note triplets (4 Clocks/Step)
01110-Sync 32nd note (3 Clocks/Step)
01111-Sync 32nd note triplets (2 Clocks/Step)
10000-Sync 64th note triplets (1 Clocks/Step)
Sync source is Master Clock
Kiwi-106 Upgrade User Manual v200
56
Table 1.0 Command ID
Data Byte
Data Type
Byte details
7 ------- 0
Data Details
$68 (104) Seq Clock Divide
0000yyyy
yyyy=
$69-$7f (105-127)
Not used
All set to $00
Bank Number
000000xx
xx =
WARNING! This command will overwrite the
current sounding Patch with the
Patch selected
Patch Number
0xxxxxxx
x =
0-127
Juno-106 transmits a $06 (6) command
$06 (6) Transmit/Receive Patch Dump
Bank Number
000000xx
xx =
WARNING! This command will overwrite the
current sounding Patch with the
Patch selected
Patch Number
0xxxxxxx
x =
0-127 for Patch 1-128
Juno-106 transmits data in the same format as the $04
Command
$07 (7) Request Pattern Dump
Pattern Number
0000xxxx
x =
0-7 for pattern 1-8
Juno-106 transmits a $08 (8) command
$05 (5) Request Patch Dump
Bank + Patch
bytes
Bank + Patch + 128 data
Pattern Number
0000-Half Note (48 Clocks/Step)
0001-Quarter note (24 Clocks/Step)
0010-8th note (12 Clocks/Step)
0011-8th note, half swing (14,10 Clocks/Step)
0100-8th note, full swing (16,8 Clocks/Step)
0101-8th note triplets (8 Clocks/Step)
0110-16th note (6 Clocks/Step)
0111-16th note, half swing (7,5 Clocks/Step)
1000-16th note, full swing (8,4 Clocks/Step)
1001-16th note triplets (4 Clocks/Step)
1010-32nd note (3 Clocks/Step)
1011-32nd note triplets (2 Clocks/Step)
1100-64th note triplets (1 Clocks/Step)
Clock source is Master Clock
0
1
2
3
0
1
2
3
for
for
for
for
for
for
for
for
Patches
Patches
Patches
Patches
Patches
Patches
Patches
Patches
1-128
129-256
257-384
385-512
1-128
129-256
257-384
385-512
WARNING! This command will overwrite the
current sounding Pattern with the
Pattern selected
www.kiwitechnics.com
Kiwi-106 Upgrade User Manual v200
57
Table 1.0 Command ID
Data Byte
Data Type
Byte details
7 ------- 0
Data Details
$08 (8) Transmit/Receive Pattern Dump
Pattern Number
0000xxxx
x =
$00-$13
Ascii Bytes
Pattern Name
$14 (20) = Pattern Byte 1
0000wxyz
w
x
y
z
=
=
=
=
Pattern
Pattern
Pattern
Pattern
Section
Section
Section
Section
16 (set=sounding)
15
14
13
$15 (21) = Pattern Byte 2
0000wxyz
w
x
y
z
=
=
=
=
Pattern
Pattern
Pattern
Pattern
Section
Section
Section
Section
12 (set=sounding)
11
10
9
$16 (22) = Pattern Byte 3
0000wxyz
w
x
y
z
=
=
=
=
Pattern
Pattern
Pattern
Pattern
Section
Section
Section
Section
8 (set=sounding)
7
6
5
$17 (23) = Pattern Byte 3
0000wxyz
w
x
y
z
=
=
=
=
Pattern
Pattern
Pattern
Pattern
Section
Section
Section
Section
4 (set=sounding)
3
2
1
$18-$1b (24-27)
Not Used
$1c (28) = Pattern Length
0000xxxx
xxxx =
Sequence Number
0000xxxx
x =
0-7 for Sequence 1-8
Juno-106 transmits a $0a (10) command
Sequence Number
0000xxxx
x =
$00-$13 (0-19) = Seq Name
20 Ascii Bytes
Sequence Name
$14 (20) = Seq Length
0xxxxxxx
x =
bytes
0-7 for pattern 1-8
Pattern Number + 29 data
WARNING! This command will overwrite the
current sounding Pattern with the
Pattern selected
$09 (9) Request Seq Dump
(0-19) = Pattern Name
Seq Number
1-15 (2-16)
WARNING! This command will overwrite the
current sounding Seq with the Seq
selected
$0a (10)Transmit / Receive Seq Dump
0-7 for Sequence 1-8
Seq Number + 1800 data bytes
WARNING! This command will overwrite the
current sounding Seq with the Seq
selected
www.kiwitechnics.com
0 = No Seq Recorded
1-124 = No of Seq Steps
Kiwi-106 Upgrade User Manual v200
58
Table 1.0 Command ID
Data Byte
Data Type
Byte details
7 ------- 0
$15-$2e (21-46) = Reserved
$2f-$67b (47-1659) = Seq Steps
26 bytes Reserved for future expansion
124 x 13 (1612)
Note 1 0xxxxxxx
Note 2 0xxxxxxx
Note 3 0xxxxxxx
Note 4 0xxxxxxx
Note 5 0xxxxxxx
Note 6 0xxxxxxx
Byte 7 00abcdef
Byte 8 0xxxxxxx
Byte 9 0xxxxxxx
Byte 10 0xxxxxxx
Byte 11 0xxxxxxx
Byte 12 0xxxxxxx
Byte 13 0xxxxxxx
$00-$13
(0-19) = Patch Name
0 Data Bytes
$0e (14) Transmit / Receive Edit Buffer
Patch Parameter
is 13 bytes
1-6 xxxxxxx = note number (32-96)
Bytes are $00 (0) if not used
7 a-f is tie bits 1-6 (set if tie set)
8-13 xxxxxxx = voice 1-6 Level (0-127)
Ascii Bytes
Patch Name
This command will only effect the edit buffer. The Patch
must be saved or the changes will be lost on patch
change or power off.
$00 (0) - Patch Parameter
Number
Data format the same as $04
Parameter Number is Data Posn
0xxxxxxx
x =
$00 (0) - Patch Parameter
Number
Data format the same as $04
0xxxxxxx
x =
$01 (1) - Parameter Value (Hi)
000xxxxx
Data format depends on Parameter
Data format the same as $04
Note – This byte is $00 for all non 12 bit parameters
$02 (2) - Parameter Value (Lo)
0yyyyyyy
Hi & Lo are combined to make single 12 bit command.
000xxxxx + 0yyyyyyy = 0000xxxx xyyyyyyy
20 data bytes
$0d (13) Request Edit Buffer Patch
Parameter
Step
Byte
Note
Byte
Byte
Juno-106 transmits a $0c (12) command
$0b (11) Request Patch Name
$0c (12)Transmit / Receive Patch
Name
Data Details
Data Offset
Use Data Position for Parameter Number
e.g. $25=VCFCutoffHi
Juno-106 transmits a $0e (14) command
Data Offset
Use Data Position for Parameter Number
e.g. $25=VCFCutoffHi
2 data bytes
www.kiwitechnics.com
Kiwi-106 Upgrade User Manual v200
59
Table 1.0 Command ID
Data Byte
Data Type
Byte details
7 ------- 0
Data Details
$0f (15) Request Global Parameter
$00 (0) - Global Parameter
Number
000xxxxx
x =
$00 (0) - Global Parameter
Number
000xxxxx
x =
$01 (1) - Parameter Value (Hi)
000xxxxx
Data format depends on Parameter
Data format the same as $04
Note – This byte is $00 for all non 12 bit parameters
$02 (2) - Parameter Value (Lo)
0yyyyyyy
Hi & Lo are combined to make single 12 bit command.
000xxxxx + 0yyyyyyy = 0000xxxx xyyyyyyy
No Data
Juno-106 transmits a $12 (18) command
0 Data Bytes
$10 (16) Transmit / Receive Global
Parameter
Data Offset
Use Data Position for Parameter Number
Data format the same as $02
e.g. $00 (0) = Midi Channel In
Note – reply will be 2 data bytes for all 12 bit returns
and 2 bytes with a leading $00 for all others
2 data bytes
$11 (17) Request Pattern Edit Buffer
Dump
$12 (18) Transmit/Receive Edit Pattern
Dump
Null + 29 bytes Data
Data Offset
Use Data Position for Parameter Number
Data format the same as $02
e.g. $00 (0) = Midi Channel In
Data Format is the same is $08 Command (with 0 Pattern
Number)
Null + 29 data bytes
No Data
$13 (19) Request Sequence Edit Buffer
Dump
$14 (20) Transmit/Receive Sequence
Edit Buffer Dump
892 bytes Data
Juno-106 transmits a $14 (20) command
Data Format is the same is $0a (10) Command (with 0
Sequence Number)
Null + 892 data bytes
$15 (21) Request Edit Buffer Seq Step
www.kiwitechnics.com
Sequence step
0xxxxxxx
x =
0-124
for Sequence step
Kiwi-106 Upgrade User Manual v200
60
$16 (22) Transmit / Receive Edit Buffer
Seq Step
Sequence step
0xxxxxxx
x =
0-124
for Sequence step
Seq Length
0xxxxxxx
x =
0 = No Seq Recorded
1-124 = No of Seq Steps
Seq Step
Note
Note
Note
Note
Note
Note
Byte
Byte
Byte
Byte
Byte
Byte
Byte
Step
Byte
Note
Byte
Byte
Seq Step + 14 data bytes
www.kiwitechnics.com
1 0xxxxxxx
2 0xxxxxxx
3 0xxxxxxx
4 0xxxxxxx
5 0xxxxxxx
6 0xxxxxxx
7 00abcdef
8 0xxxxxxx
9 0xxxxxxx
10 0xxxxxxx
11 0xxxxxxx
12 0xxxxxxx
13 0xxxxxxx
is 13 bytes
1-6 xxxxxxx = note number (32-96)
Bytes are $00 (0) if not used
7 a-f is tie bits 1-6 (set if tie set)
8-13 xxxxxxx = voice 1-6 Level (0-127)
Kiwi-106 Upgrade User Manual v200