1
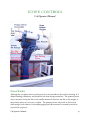
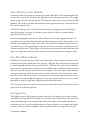
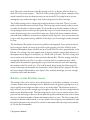
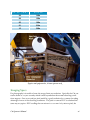
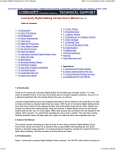
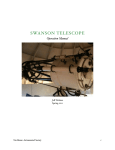
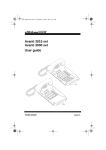
C16 OPERATOR'S MANUAL
Von Braun Astronomical Society
Final Draft
First Edition
January 2007
C16 Operator’s Manual
1
Preface
The Celestron C16 is still a fine antique instrument and worthy of learning how to operate.
The Operator’s Manual does not replace the need for hands on training. The amount of information is not easily grasped in a single session, and therefore the manual serves to augment the hands on training as a handy reference. The manual tries to meet the needs of a
variety of skill levels without going into too much detail.
C16 Operator’s Manual
2
TABLE OF CONTENTS
Safety
6
Equipment Safety
6
Personal Safety
6
Certification
7
Privileges
7
Process
7
Certification Session
7
Scope History & Design
8
History
8
Design
8
Preparation
10
Star Hops & Maps
10
Accessory Equipment
10
Public Show
11
Tips
11
Setup
12
Procedure
12
Checklist
12
Scope Controls
14
Focus Knobs
14
Handholds
15
RA Releases
15
Dec Release
15
Balance Weights
15
Motor Drive Switch
15
C16 Operator’s Manual
3
Slow Motion Control Paddle
16
Dec Slow Motion Knob
16
Setting circles
16
Relative versus Absolute moves
17
Tension Adjustments
18
Finder and Guide Scopes
19
Scopes
19
Alignment
19
Usage
20
Sky commander Controls
22
Startup Procedure
22
Finding Objects
22
Scope Optics and Specs
25
Focal Length and Power
25
Field of View
25
Imaging Specs
26
Observing Conditions
28
Limiting Magnitude
28
Seeing
28
Transparency
29
Dew
29
astrophotography
30
Intro
30
Prime Focus
30
Piggyback
31
Lunar observing
33
Aperture Mask
33
Filters
33
C16 Operator’s Manual
4
Lunar Lander
Shutdown
33
34
Procedure
34
Checklist
34
Bibliography
35
C16 Operator’s Manual
5
SAFETY
C16 Operator’s Manual
Equipment Safety
• Do No Harm. -- Antique optics can only be fixed by replacing the whole scope. Avoid
using sprays, and smoking. Both will damage optics. Do not attempt to clean the optics.
The only person authorized to clean the optics is the observatory director.
• Leave The Gorillas At Home. -- Although the telescope is large and massive, it does
not require brute strength to operate. If the scope resists moving, there is probably something wrong such as a latch not released, or the scope is out of balance, etc. Set screws on
the focuser drawtube should not be over tightened, since the brass threads can be easily
stripped. They only need to be snug enough to prevent slippage of the eyepiece or camera.
• Leave it Ready to Support the Shows. -- If you make changes to use special equipment, after your session please return the balance, focus, and other settings to normal eyepiece viewing. Shows usually start after dark, and it is difficult and time consuming to figure out and adjust the scope in the dark. The scope needs to be ready to use.
• Report Damage or Malfunctions to the Observatory Director. You may also want
to cc the Facilities Director depending on the nature of the problem.
• Do not open roof in windy conditions. - The roof is not cross braced and can be easily
damaged and moved by even moderate winds.
Personal Safety
• Do NOT point telescope at or near the sun. It can cause permanent eye damage.
• Buddy System -- Although sometimes one must work alone, VBAS prefers that adult
members use the buddy system whenever possible. VBAS requires that minors have adult
supervision.
• Emergency Planning -- Although there is a phone beside the eyepiece box and in the
Library, it is a good idea to bring a cell phone. For minor emergencies instead of 911 you
may want to call the Park Ranger Office since they can get there quickly: 534-3757. Additional phone numbers are listed by the phone.
C16 Operator’s Manual
6
CERTIFICATION
C16 Operator’s Manual
Privileges
Although the telescopes are for the VBAS members to use, certification is required to use
the telescopes for private observing sessions to help prevent unnecessary damage, and to
maintain the scopes ready to support the VBAS public and private shows. VBAS hopes that
certified telescope operators will help support public and private shows. The shows not only
help keep VBAS running, but they provide a tremendous service to the community. Folks
wishing to conduct research projects are also welcome, and VBAS would be grateful if you
would share your results with the membership via the newsletter or member’s meetings.
Process
The certification process is quite simple and can be completed in as short or long a time as
the student wishes. The process requires a minimum of three observing sessions. The first
session is accompanied by a lecture to cover the manual, followed by a hands on session. The
first session may be a group session, but the second observing session should be a one on
one session with the trainer, or another certified operator. Additional joint training sessions
should be scheduled until the student feels that they are ready for the certification session.
Until the student is certified they should not attempt to operate the telescope alone. For
beginners it is especially helpful to schedule sessions with several different certified operators in order to get exposure to doing things different ways. For students willing to support
public shows, assisting with several public shows is recommended.
Certification Session
When the student is ready they can schedule the certification observing session with the
trainer, or the Observatory Director. The certification observing session allows the student
to demonstrate that they can plan an observing session for 3 or 4 objects, set up and operate
the scope to find the objects both with and without the sky commander. The student should
also know some facts about each object, and the telescope. The public likes to ask questions.
C16 Operator’s Manual
7
SCOPE HI STORY & DESIGN
C16 Operator’s Manual
History
The C16 is now an antique. It was built in 1967 by a fledgling telescope company, Celestron.
The founder of Celestron, Tom Johnson, was an amateur telescope maker who figured out a
way to mass produce the corrector plates for Schmidt-Cassegrain Telescopes. The history of
Celestron and their telescopes has been documented in an electronic book by Robert
Piekiel called “CELESTRON The Early Years, A Guide to Vintage Celestron Telescopes“.
The C16 that VBAS operates is serial number 9, and was made for NASA as one of a pair
used for scouting possible Lunar Landing sites. When NASA retired the telescope they donated it UAH who made an agreement with VBAS to house and operate the telescope for
both the public and UAH students. The C16 has some additional features and options that
are not found on the modern Celestron and Meade scopes. In addition to the primary mirror focusing, the C16 has a bolt on 2” rack and pinion focuser to make it easier to fine focus.
In place of the 2” focuser a rich field eyepiece option can be bolted on. VBAS also has a one
of a kind Schmidt camera option that requires cut film, and removal of the corrector plate.
Since the mold for the C16 corrector plates has been destroyed, and there are no spares
readily available, great care must be taken with the scope optics. The only way to fix a broken corrector plate is to replace the whole scope.
Design
The C16 is a Schmidt-Cassegrain design which allows the overall scope length to be much
smaller than a plain Cassegrain telescope. By using a corrector plate lens to cancel out the
spherical aberrations, a fast (f/2) spherical mirror can be used for the primary mirror. In order to keep the size of the secondary mirror reasonable, the overall scope ends up being f/11
with a fairly long (4500 mm) focal length. This makes the C16 real good at planetary and lunar observing. The large aperture makes it a fairly decent deep sky telescope as well. The
slowness of the scope requires longer exposures, or the use of focal reducers for astrophotography. The maximum field of view with a 2” eyepiece is about 0.57 degrees, or a bit larger
than the moon. Mr. Piekiel’s CD also covers both the mechanical and optical designs of the
Vintage Celestron telescopes.
C16 Operator’s Manual
8
C16 Operator’s Manual
9
PREPARATION
C16 Operator’s Manual
Star Hops & Maps
To find objects with the C16 requires some additional navigational aides. Although the sky
commander will help speed things up, the operator still needs to be prepared and familiar
with the area of sky around the object. Huntsville’s light pollution does not make it any easier. Star hops from stars bright enough to be seen in the telrad, or other finder scopes is an
easy way to get into the right area quickly.
Maps of the area scaled for the finder scopes, which have a 2 degree field of view (FOV), and
additional maps scaled for the 1/2 deg FOV of the 55 mm eyepiece are helpful for homing in
on the object. Printer the finder scope maps inverted and flipped will make them easier to
compare to the inverted flipped image of the finder scope. Maps for use with the eyepiece
and diagonal only need to be flipped.
The maps can be used to find star patterns that fit within the FOV, that can be used as
pointers and guides to the object, or for making multiple hops to get an object. Learning
several ways to find an object can be useful under adverse observing conditions.
VBAS has quite a few star atlases in the Library, which come in handy for quick reference
during a session or for preparing for a session. Just about any of the commercially available
planetarium computer programs are extremely useful to prepare for a session.
Since the diagonal can be rotated to whatever angle is convenient for viewing, the direction
of North usually does not correspond with the current “top” of the FOV of the eyepiece. To
determine which way is North in the FOV simply slew the scope gently in Dec and see
which way the stars move in the eyepiece. Now you can orient your map to match your current eyepiece orientation.
Accessory Equipment
Although the basic equipment is provided by VBAS, additional accessories are useful.
Build your own handy observing kit from the following: red flashlights, cell phone, optics,
adapters, cables, binoculars, cameras, pens, paper, maps, drinks, Bug Repellent wipes, etc.
C16 Operator’s Manual
10
Public Show
Preparing for a public show requires selecting 3 to 4 objects (need some backups in case of
clouds) and making sure that you can find them manually in case the sky commander isn’t
working. Since the public likes to ask questions it is a good idea to have some fun facts
written down for each object. For some of the more common objects, there is a sheet of
interesting facts on a clipboard by the log book. It is a good idea to arrive early enough to
get setup and allow the scope to reach thermal stability. Do not leave the scope unattended
without locking up the observatory.
Tips
Use large bold fonts on maps and notes so that you can read them easily in dim light. Also,
choose colors carefully so that they show up in dim red light. Use plastic sheets to protect
paper from dew and humidity. Make rings that match the FOV of the finder and 55 mm
eyepiece so that you can determine relative size of objects on maps to what is visible in eyepiece. For example, if your finder map uses a one inch = two deg scale, a one inch diameter
ring would match the FOV of the finder scope.
When preparing to observe an astronomical event, a practice session is useful for making
sure all the equipment is working, and there are no missing parts or cables.
C16 Operator’s Manual
11
SETUP
C16 Operator’s Manual
Procedure
Arriving while it is still daylight will make it easier to make any adjustments to the scope.
Also, the sooner that you can vent the roof, the better chance the scope will have time to
reach thermal stability. Thermal currents make for blurry unstable images especially of
planets at high magnifications. The roof must be opened carefully to avoid hitting the six
inch guide scope (see picture). Do not open the roof in high or gusty winds, and close roof
if wind becomes gusty. If it has been raining, we have a squeegee for pushing the standing
water to the drains.
Until you have been through the setup procedure a few times, you will find the following
checklist useful to avoid forgetting any steps.
Checklist
1. Open up, inspect scope and area, and put locks in eyepiece box
2. Start the entry in the log book.
3. Remove pins and carefully roll back roof (watch out for the scope!). Place the South
pin in the hole near the SE corner to hold the roof open in case of a wind gust. Do not
operate in windy conditions, since can be damaged.
4. Make sure motor switch is in off (middle position) and plug in motor drive.
5. Put in diagonal and 55 mm eyepiece.
6. Remove lens cap(s).
7. Check scope balance by carefully releasing latches while holding scope.
8. Turn on motor drive.
9. Point scope at bright star East of Meridian and align telrad and/or finder scopes.
10. Option: align sky commander on same star.
11. Set up charts, maps, etc.
12. Acquire first object and record in log book.
C16 Operator’s Manual
12
C16 in proper stowed position for closing roof.
Note the position of the fork aligned with base.
C16 Operator’s Manual
13
SCOPE CONTROLS
C16 Operator’s Manual
Focus Knobs
Although the secondary mirror can be moved it is not intended to be used for focusing. It is
adjusted during collimation, and should be left alone during normal use. The primary mirror
can be moved to focus just like on the smaller modern Celestrons, but due to the weight of
the primary mirror it is not easy to adjust. The primary mirror only needs to be focused
when using a focal reducer for astrophotography, and then returned to normal position for
use with the eyepieces.
C16 Operator’s Manual
14
The 2 inch rack and pinion focuser is the fine focus control. Also, there is a draw tube with
a set screw to do coarse focus quickly. NOTE: do not over tighten the drawtube set screw
because it is mounted on soft brass and the threads will strip easily.
Handholds
The focuser is NOT a handhold. Do not use the focuser to move the scope. The rails for
the balance weights make good handholds. The base of the scope, and the fork make good
places to apply gentle pressure to nudge the scope. The Dec setting circle is not a good
handhold.
RA Releases
To disengage the motor so the scope can be moved manually the c16 has releases for each
axis: RA and DEC. The RA has two releases to make it convenient to reach one when operating. When stowing the scope lock both, since the scope moves in RA more easily. When
released, the scope will not track the object in that axis, and the slow motion controls will
not work in that axis. Once you have acquired the object lock the release to resume tracking. The RA moves more easily so you might want to move it first, lock it and then move
the DEC to sweep to the target. Operating the scope with both axis unlocked is difficult to
do with precision, but works fine for large moves.
Dec Release
The Dec release is a toggle switch located just behind the DEC setting circle on the top of
the axis. Flip it up to release the motor drive, and flip it down to resume tracking.
Balance Weights
There are two rods that hold multiple sliding weights. Each weight is held in place by a set
screw with a ______ allen head bolt. One should only need to adjust the balance when particularly heavy equipment is added or removed from the scope. For most purposes, the
weights should be moved in pairs so that their combined center of mass remains on the optical axis. Failure to do this will result in a different balance in different parts of the sky.
Motor Drive Switch
On the north side of the telescope mount is toggle switch. Flip it to the East to turn on the
drive motors at sidereal rate. Unplug the scope at the end of each session to prevent lightening damage.
C16 Operator’s Manual
15
Slow Motion Control Paddle
On the East side of the telescope mount is box with cable which can be detached and used
to move the scope in two speeds for fine adjustment and centering of an object. The toggle
switch changes between the two speeds. The other two switches are three position switches.
Middle is off, and up is one direction and down is the opposite direction. One switch is for
RA, and the other for Dec.
NOTE: If the scope does not move when the switch is engaged, one of three things is
most likely wrong: it is stuck, the releases are not locked, or the Dec control arm has
reached the end of its travel.
Sometimes bumping the switch a few times will unstick it. Try the opposite direction. If
scope does move in either direction make sure the releases are locked. Next check to see if
the rod is protruding on one side or the other of the fork (hole is beside the Dec slow motion knob). If the rod is protruding it is near the end of its travel, and you will have to run it
back the other direction. The purpose of the slow motion controls it make small moves not
large ones. Large moves will use up the travel faster, and will require more frequent resets.
Dec Slow Motion Knob
In addition to the slow motion control on the motor drive, the Declination axis has a manual slow motion knob, which serves two purposes. With the Dec latch locked the knob can
be turned by hand to slowly move the scope in Dec. With the Dec latch released the knob
can be used to reposition the control arm to the middle when it reaches the end of travel of
the lead screw, but using the slow motion drive is quicker. The end of the control arm lead
screw protrudes from a hole next the knob or on the other side of the fork when it is near
the end of travel. The screw is only so long and if you use the slow motion controls to move
in one direction long enough the tangent arm runs out of travel, and has to be reset toward
the middle so that you again have range of motion in both directions.
Tip: It is a good practice to check if the lead screw is near the end of its travel at the start of
each session to avoid interruptions.
Setting circles
The Right Ascension (RA) plane of rotation is parallel to the plane of the earth’s rotation,
and the RA axis is parallel to the Earth’s axis of rotation. Since the Earth revolves once in 24
hours, the RA setting circle is marked off in hours and minutes. The smallest division is 5
min on the scale so it is only a rough indication. Since 24 hours is one complete 360 degree
rotation, one hour of RA is 15 degrees, and one minute of RA is 0.25 degrees (15 arc minC16 Operator’s Manual
16
utes). Thus each 5 min division on the RA setting circle is 1.25 degrees, which is about 2 x
the FOV of the 55 mm eyepiece. The FOV of the 55 mm eyepiece is about 2 minutes of RA
which is useful for short star hops because you can use the FOV to judge how far you are
moving the scope without having to look at the setting circle for short star hops.
The C16 RA setting circle is a brass ring located at the base of the fork. There is a scribe
mark on the fork that moves with the scope. The brass ring can be rotated so that it can be
set either for absolute or relative readout. To use the RA as an absolute readout of the current pointing location of the scope first point the scope to a known reference star, and then
rotate the brass ring to the correct RA for that star. Some of the more common reference
stars and their coordinates are listed on a clipboard by the log book. Now you can move the
scope so that the pointer lines up with RA of the object you are looking for, and you should
be close.
The Declination (Dec) plane of rotation is parallel to the longitude. If you rotate down you
look at one pole and if you rotate up you look at the opposite pole. Since VBAS is in the
Northern Hemisphere, down is South, and up is North. The Dec axis is perpendicular to the
RA axis. Dec setting circle uses angular units of degrees, minutes, and seconds with zero at
the equator and 90 degrees at each pole ( +90 North, and -90 South). The Dec setting circle
uses a vernier scale and can be set more precisely than the RA. The Dec setting circle does
not slip like the RA circle. Due to a variety of reasons the Dec readout may have a shift
which can be determined by pointing the scope at a known reference star and comparing
the readout to the Dec of the star. If it is off by much, please notify the Observatory Director so that they can determine the actual cause, and to adjust the Dec properly. For absolute moves simply add the shift to your object’s Dec, and that should get you close enough
to find the object with the finders.
Relative versus Absolute moves
The setting circles can be used to move the telescope to an absolute coordinate, or to move
a relative amount from an existing location. Relative moves are good for getting close to an
object quickly from a bright star that is easy to see in the telrad. The divisions on the setting circles are not accurate enough to get you right on the object, but close enough that the
finder scopes should be useful. The RA setting circle is easy to use for relative moves. Simply rotate the brass ring so that zero RA is under the pointer, and then use the scale to move
the scope the desired number of hours and minutes relative to zero. The Dec setting circle
is always in absolute readout mode, so to do a relative move requires some arithmetic to add
the relative amount to the current Dec readout to determine what the new position should
be. Try the Sky Commander.
C16 Operator’s Manual
17
Tension Adjustments
If the RA or DEC seems to be too loose or too tight, it could be just a worn spot on the
drive gear, or it could need some slight adjustment to get the proper meshing of the gears.
If you suspect a problem with the tracking rate, please ask the Observatory Director take a
look at it.
C16 Operator’s Manual
18
FINDER AND GUIDE SCOPES
C16 Operator’s Manual
Scopes
Since the c16 has a narrow 1/2 degree field of view, it is equipped with several tools for finding objects.
• telrad: 4 deg FOV for the outer ring, middle ring is about 2 deg, center ring is 1/2 degree
• 6x30 mm and 10 x 40 mm finder scope: approx. 2 deg FOV
• 6” guide scope: for accurate tracking during astrophotography
• piggyback mount: (optional equipment such as a wide field camera or scope can be
mounted using a 1/4” x 20 tpi bolt same as most tripods.)
Alignment
C16 Operator’s Manual
19
Each of the finder scopes must be aligned with the main scope to be useful. The telrad is
quite easy and will have to be tweaked the most often as you move the scope from one part
of the sky to another. Gravity tends to shift things around as you move the scope.
The telrad uses 3 screws to adjust the mirror that reflects the image of the bullseye onto the
view window. Since these are alignment screws and not hold down screws, a gentle touch is
needed. To tighten one screw, first loosen one or both of the other screws a small amount so
that the mirror can move when you tighten the other screw. Once the mirror is aligned,
gently tighten all three screws so that they all are in contact with the mirror to help keep
the mirror steady as you move the scope across the sky. Do not over tighten (leave the gorillas at home). The inner ring is a 1/2 deg circle and matches the 55 mm eyepiece nicely.
Once aligned an object inside the bullseye should also be visible in the eyepiece. So the telrad does not have to be perfectly aligned to still be useful.
6x30 and 10x40 finder scopes both use a two ring mount with three alignment screws on
each ring. Coarse alignment is done by visually aligning the finder scope with the main telescope. To fine tune the alignment you only need to adjust the bolts on either the front or
rear ring, and not both. To push the finder you need to loosen one or two bolts on the other
side first, and then tighten the third bolt. Some folks use two hands to loosen one bolt while
tightening another to keep the finder scope held firmly. The finder scopes can be rotated if
you wish to align the cross hairs with the RA and Dec axes.
6” guide scope has two adjustment bolts, one for Dec and one for RA so it can be deliberately aimed off center to track on a nearby bright star. Using the paddle slow motion controls you can correct minor errors in the motor drive system by keeping the guide scope’s
cross hairs on the guide star while you use the main scope to photograph an object nearby.
Usage
The telrad is battery operated and the switch is on the side. Rotate it up to turn it on and to
control the brightness of the rings. Turn it off after each use to conserve the battery. Leaving the telrad on between sessions will kill the battery. The telrad has two modes of operation: pulse and continuous, which are controlled by knob near the front of the telrad. The
telrad is used like a heads up display in an aircraft. An image of a 3 concentric red rings
forming a bullseye is projected onto the window of the telrad. In order to see to see the
rings your eye must be in alignment with optical axis of the telrad since that is where it is
pointing. If you can’t see the rings move your head from side to side and up and down until
your eye is sighting through the telrad window like a gun sight. The telrad window can fog
up with dew obscuring the view.
C16 Operator’s Manual
20
The finder scopes are simply small refractor telescopes, and therefore the image is inverted
and flipped. To make it easier on yourself you might want to print your maps for the finder
scope inverted and flipped, but with practice you can do the inverted flip mentally. The
finder scopes do a better job of collecting light than the telrad so you can see more stars, but
over a smaller area of sky than the telrad.
Tip: Due to the light pollution (sky glow) include only the LM 7 and brighter in your finder
maps. Although dimmer stars can be seen depending on conditions, for finding purposes
the brighter stars are more useful to star hop. Make a separate map for your eyepiece views
at a larger scale and with dimmer stars.
The 6” guide scope isn’t really intended to be used as a finder scope. It has a longer focal
length and narrower field of view to better match the main scope so that it can be used for
tracking and guiding. The eyepiece is a standard 1 1/4 inch so that any of the commercially
available lighted reticle eyepieces can be used with it.
C16 Operator’s Manual
21
S KY COMMANDER CONTROLS
C16 Operator’s Manual
Startup Procedure
NOTE: The complete Sky Commander manual is located in the Library in a 3-ring binder.
The keypad control box is kept in the eyepiece box along with an RJ45 cable to connect to
the encoders. The encoder wires have been run from the telescope over to the eyepiece box
just below the phone. Once you connect the encoders to the control box, the power can be
turned on by a switch on the side of the control box. The LCD panel should light up with a
message to set the current date (plus one day to find planets accurately).
NOTE: Left/right arrows allow you to move the cursor to the position that you want to
change, and the up/down arrows allow you to change the value of that position. The Enter
key accepts the date once you’ve made all of your changes.
Next you will be asked if you want to do a 1 or 2 star alignment. Press the up arrow to select
the 1 star alignment option. You need to know the name of one of the bright alignment
stars that is currently up to the East of the Meridian. As part of your observing session prep
work you should learn some of the bright stars that will be up to the East of the Meridian.
Use the up/down arrow to scroll through the list of alignment stars. When the one you
want pops up do not hit enter. First align the scope on the star, and then press enter.
Make sure the motor drive is on and the RA and Dec latches are locked.
If you press up arrow, an asterisk (*) will appear by the coordinate they will change from absolute coordinate to relative coordinates. When asterisk is off the coordinates go back to
absolute. Relative coordinates are from the current position of the telescope to the desired
object. The current catalog, object number, and constellation are shown on the second line,
and the cursor should be in the “home” position between the catalog and the object number.
If you move the scope so that the relative position goes to zero in both RA and Dec, the
scope should now be pointing at the object.
Finding Objects
To choose a different object than the default, you need to move the cursor to the catalog
name and push the up/down arrows to scroll through the list of catalogs. There are 9000
objects in the database divided into ten catalogs plus a catalog for planets, a catalog for storing your favorites so you don’t have to scroll the database, and a special catalog for entering
C16 Operator’s Manual
22
your own coordinates for special objects such as comets, or something that is not in the
9000 object database. The catalogs are:
Mes: Messier
NGC: New General Catalog
IC: 1st and 2nd Index Catalogs
Brd: Barnard -- dark nebula
Brk: Berkeley -- Open Clusters
Clr: Collinder -- Open Clusters
Mel: Melotte -- Open Clusters
Trm: Trumpler -- Open Clusters
UGC: Uppsala General Catalog
DBL: Double Stars
S: Special for entry of RA and DEC coordinates
PLN: planets
Once you have changed to the correct catalog, use the left/right arrow keys to move the cursor to the index number, and then use the up/down arrows to scroll through the list. When
you get to the right object index press enter to load the object coordinates from the database. Also, it will update to tell you which constellation the object is in. Now with asterisk
displayed the coordinates tell you how much the scope needs to be moved from its current
location to get to the object. Simply move the scope until the readouts zero out.
NOTE: The down button provides additional info about the currently selected object.
NOTE: With the cursor in the home position, pressing enter allows you the option to add
the current object to the User List of favorites.
The Menu button allows you to access several other key features. We will only discuss three
of them, since the rest do not need to be changed for normal operations. See the full manual
in the library for complete details. Menu allows you to access the user list catalog mode, the
search ID mode, and the object realignment function. The first two change to a different
mode and you have to use the menu button to get back to normal mode.
C16 Operator’s Manual
23
UserList catalog mode allows you to scroll through a subset of up to 120 user selected favorites. Press the menu key and then use the up/down arrows to scroll to the User List. Press
the left arrow to turn it ON, and then press menu to return to operation in User mode ( a U
appears in upper left corner of display). Now only the objects in the User list will be shown.
This would be one way to program objects ahead of time for a session, so that during the
session you don’t have to keep folks waiting while you scroll to the next object. While in this
mode you can also remove an object from the favorites list. To turn user list mode off, press
menu, down arrow to scroll to User list, right arrow to turn it off, and menu to return to
normal operation.
Another way to store a short list of objects for an observing session is to use the Special
catalog to store RA and DEC for the objects you want to view during your session. The
down side to the special catalog is that you can’t enter a name for the object you have to
keep up with that based on the RA and DEC info. For a few objects it may be easier.
Search & ID mode allows you to use the sky commander to help you identify the object the
scope is currently looking at. It shows the ID of the closest object within a 1/2 deg of the
current encoder readings. If there is more than one object nearby you could be misled.
Search and ID mode is turned on and off similar to user list mode.
The realignment function is useful when the scope is pointed at an object in the database
and the alignment isn’t too good. Press the menu button and down arrow to scroll to the
realign on Object menu. Adjust the scope to center the object, and then press enter. OK is
displayed and the unit returns to normal operation. The accuracy should be improved for
the general area of the sky, but when the scope is moved to a different area of sky, it may be
necessary to repeat the realign on object.
C16 Operator’s Manual
24
SCOPE OPTICS AND SPECS
C16 Operator’s Manual
Focal Length and Power
The C16 focal length is based on the combined focal length of the primary and secondary.
The primary is an F/2 spherical mirror, and the secondary is convex so that the total effective focal length is F/11, or 4500 mm. At F/11, older style eyepieces work as well as newer
designs.
Power is based on the combination of the eyepiece and the telescope, and is simply the ratio
of the focal lengths. For the C16 the lowest power is about 80x with the 55 mm eyepiece
(4500 mm / 55 mm = 81.8x). The max is about 300x with the 15 mm eyepiece. Although using
barlows or shorter focal length eyepieces supports higher powers up to 900x, the seeing
usually limits the practical power to about 300x.
Field of View
The C16 has a narrow Field of View (FOV) due to its long focal length. As you use smaller
focal length eyepieces to increase the power, you also increase the apparent focal length,
which results in an even narrower FOV. The widest FOV with 2 inch dia eyepieces is about
half a degree with the 55 mm eyepiece, which allows one to see almost the entire full moon,
and it also matches the inner bullseye ring of the telrad. Strictly speaking, true (sky) Field of
View is calculated based on the diameter of the eyepiece field stop, s, and the instrument
focal length, l, in mm: FOV=arctan(s/l). A shorter focal length eyepiece with the same size
field stop will show the same amount of the sky, but will have more power and a larger apparent FOV. The widest FOV for 1 1/4 inch eyepieces with essentially no field stop is about
0.38 degrees (arctan(30/4500). The eyepieces currently in the eyepiece box have significantly smaller FOV at the higher powers due to the smaller field stops used in their designs.
The following table lists the Power for the eyepieces in the box.
EP FL (MM)
POWER
55
81x
48
93x
40
112x
C16 Operator’s Manual
25
EP FL (MM)
POWER
32
140x
28
160x
25
180x
21
214x
15
300x
Eyepiece and equipment box, & lunar aperture mask
Imaging Specs
For photography it is useful to know the scopes limits on resolution. Optically the C16 can
resolve down to 0.25 arc seconds, which is well beyond what the normal observing conditions support. One arc second per pixel would be a good resolution for a camera for taking
advantage of most of the observing conditions. The pixel or camera FOV is calculated the
same way as eyepiece FOV recalling that on micron is 0.001 mm. A 6.5 micron pixel, the
C16 Operator’s Manual
26
size in most digital SLR cameras, has a width of 0.0065 mm yielding a FOV of 0.29 arc seconds at prime focus (4500 mm).
The scope can resolve 180 lines/mm when fully collimated.
The useful limit for magnitude is 15.6, and the airy disc brilliance factor at 160x power is
430.
The C16 unvignetted image size is a 3.5 inch circle without the focuser in place.
C16 Operator’s Manual
27
OBSERVING CONDITIONS
C16 Operator’s Manual
Often times the ultimate quality of the image is not controlled by the optical instrument,
but by the environment. Astronomers have identified several ways to indicate the quality of
the observing conditions. The methods listed here are subjective. Additional methods are
available on the internet and in books. Unless you are conducting research only a rough approximation is necessary for the C16 log book.
Limiting Magnitude
The total impact of all of the factors (light pollution, seeing, transparency, etc.) affecting observing limits the magnitude of the dimmest star that can be seen with the naked eye. Thus
the limiting Magnitude is an overall indicator of the quality of the observing conditions. Unfortunately it varies greatly from horizon to zenith due to light pollution primarily. To get a
rough value for LM one can take note of the values of dim (Mag 3 to 5) stars near the object
being observed. Although the actual LM may be better, you know the LM is at least as good
as the dimmest star in the area. Since humidity reflects light pollution, it takes a dry clear
sky to get LM 5 at the observatory. A more formal and accurate method involves counting
stars in specific areas of several constellations, and is more useful when conducting official
meteor counting observing sessions.
Seeing
The overall stability of the atmosphere affects the stability of the image. When the atmosphere is turbulent it causes fluctuations in the index of refraction, which distort the image.
Poor seeing limits the useful power of a telescope long before the optical limit. The C16
usually starts to loose focus around 300x due to seeing, but it should be able to reach anywhere from 600 to 900x under ideal conditions. Thermal gradients on the ground near the
scope (including body heat on cold nights) will cause the index of refraction to flux. Large
primary mirrors are large thermal masses and take a long time to reach the same temperature as the outside air. The delta in temperature can create thermal currents inside the
scope, which will result in blurry unstable images.
C16 Operator’s Manual
28
Transparency
In addition to ordinary clouds there are also upper atmospheric thin clouds, which can form
a thin haze like layer. Just perfect to reflect all of the light from those improperly designed
light fixtures. Transparency has an impact on both limiting magnitude and visibility.
Dew
When the scope cools off below the dew point water will condense onto the corrector plate.
It degrades the image until you can’t see through it like a haze or cloud layer. There is a hair
dryer in the eyepiece box, which can be used to gently warm the corrector plate and the dew
will magically evaporate. No need for high heat. Gentle does the trick, but a little slower.
Again, the corrector plate is not repairable, and the whole scope is scrap without it.
If there is dew on the corrector plate at the end of the session, use the hair dryer to evaporate it before putting the lens cap on.
C16 Operator’s Manual
29
ASTROPHOTOGRAPHY
C16 Operator’s Manual
Intro
Although astrophotography is too broad a subject to fully cover in this manual, the basic
method for using the VBAS stellacam II will be covered so that the operators can potentially use it to do shows, or for their own observations.
There are three basic methods for attaching a camera to a telescope and focus it: Prime,
Eyepiece Projection, and Afocal. Prime focus will be discussed in detail, but the other two
methods will be briefly described first.
Eyepiece Projection focus requires a camera without a lens. Instead of a lens an eyepiece is
used to project the image onto the camera sensor or film. This of course requires an adapter
to mount the camera on the eyepiece, and some adjustment to change the projection distance to allow the image size to be adjusted. Eyepiece projection can either increase or decrease the FOV (apparent power) depending on the spacing (projection distance) between
the eyepiece and the sensor or film. Increasing the FOV will make objects such as planets
seem smaller, but will decrease the exposure time. Decreasing the FOV with a longer projection distance will make the objects fill up more of the sensor, but will require a proportional increase in exposure time.
Afocal focus requires a camera with a lens set to infinity focus. Although you can hand hold
a camera up to an eyepiece and take a picture, it is rather difficult to get it aligned with the
optical axis. Instead there are several adapters or mounts available to mount the camera to
scope aligned with the eyepiece.
NOTE: Putting a full size camera on either a projection or afocal adapter will change the
scope balance. To protect the motor drive and to get accurate tracking rate, you will need to
adjust the scope balance, and then put it back for normal eyepiece use when done with the
astrophotography session. Changing the balance is not necessary for small cameras if they
are about the same weight as a large eyepiece.
Prime Focus
Prime Focus method turns the telescope into the camera lens. The camera replaces the eyepiece and therefore only needs an adapter to mount in either a 2 inch or 1 1/4 inch eyepiece
holder. The stellacam II uses a 1 1/4 inch adapter. The stellacam II is also as light as an eye-
C16 Operator’s Manual
30
piece, and therefore the scope does not need to be rebalanced. The C16 gives the stellacam
II a 4500mm focal length lens.
One problem with the stellacam II is that it has a fairly small chip (6 mm X 4.7 mm) which
does not capture the full image circle of the telescope, and therefore the FOV is quite small,
or more accurately the sky coverage is quite small: about 3.6 X 4.6 arc minutes on the CCD
chip. The image scale (arcseconds/pixel) is based on the pixel size and the focal length of
the scope. The Stellacam II and C16 combo provides roughly about 0.5 arcseconds per
pixel.
The stellacam II outputs a monochrome analog video signal, which can be displayed on a
monitor, or projected on the wall with a video projector. Also there are capture devices that
will capture it directly into a computer, but be sure to get one that can capture a full resolution (720x480) signal. One can however still find a few DV camcorders that will record an
input signal, and then via firewire the images can be transferred to a computer. JVC GRDF550U is one of the few models that still have the analog composite video in feature, but
it isn’t convenient to use. Older models of the Sony Digital 8 cameras work well, but some
of the newer models may have dropped the composite video in capability in favor of doing
dubs from camera to camera digitally with firewire.
The exposure of the stellacam II is adjustable from regular video rate to one image update
every 8 seconds. Between updates it just displays the previous image so that the monitor
still thinks it is a normal video signal. The combination of long exposure, the C16 aperture,
and the sensitivity of the CCD chip allows for some mighty dim objects to be imaged.
Another problem with the stellacam II is hot pixels. Heat in CCD’s cause noise and some
pixels are impacted to the point that they seem to be on all the time. Hot pixels look like
stars, but they don’t move when the scope moves.
Piggyback
One additional method of mounting a camera is piggyback which does not use the telescope
optics, but it does use the polar alignment and tracking of the telescope mount. Piggyback
method allows for taking wide field of view images. The C16 has a piggyback mounting
bracket which works pretty much like a tripod mount. In piggyback mode you could photograph a large area of sky while using the main scope as a guide scope to keep tracking errors
down.
C16 Operator’s Manual
31
C16 Operator’s Manual
32
LUNAR OBSERVING
C16 Operator’s Manual
Aperture Mask
The white disk with a hole in it shown in the picture of the eyepiece box is called an aperture mask. When viewing a bright object such as the moon, especially a full moon, the C16
gathers too much light for the human eye. The aperture mask reduces the aperture from 16
inches to about 6 inches. During public shows reducing the aperture will eliminate eye
strain without loosing any detail. Depending on the quality of the mirror reducing the aperture can also increase the sharpness because less of the mirror is used reducing the overall
error due to imperfections.
Note: Care should be taken installing and removing the aperture mask since the irreparable
corrector plate is exposed.
Filters
Filters and Polarizers can be used in addition to, or in lieu of the aperture mask. There are
neutral density, or lunar filters in the eyepiece box. They only fit the 1 1/4 inch eyepieces and
just screw into the base of the eyepiece. There are different levels of opaqueness available,
and the filters are stackable.
Lunar Lander
Ok, this is just a game, but kids of all ages like it. Put a short focal length eyepiece in the
scope so it doesn’t blind you, and use the hand box to “fly the moon”.
C16 Operator’s Manual
33
SHUTDOWN
C16 Operator’s Manual
Procedure
The primary things to remember are to power things off, avoid hitting the scope with the
roof, and clean up and secure the area so that the scope is ready to use to support the next
show.
Although some things can be done out of sequence, you should lock down the scope prior to
removing the eyepiece and diagonal, and before putting on the lens cap. The sequence
keeps the scope balanced until you lock it down. When the scope is unbalanced it will move
as soon the lock is released. It is a good idea to keep a hand on the scope when releasing the
lock.
Until you have been through the shutdown procedure a few times, you will find the following checklist useful to avoid forgetting any steps.
Checklist
1. Close out the log book.
2. Turn off the motor drive and unplug it.
3. Turn off telrad.
4. Turn off and stow away the sky commander control box if used.
5. If necessary, rebalance scope for use with eyepiece and diagonal.
6. Lock down scope in horizontal position. (tip: use the forks to make sure RA is perpendicular to floor and then level scope in Dec)
7. Put away diagonal and eyepiece.
8. Cover focus tube and put on lens cap(s)
9. Carefully close the roll off roof (watch out for the scope!)
10. Replace hold down pins in roof.
11. Clean up charts, maps, etc., and inspect area (Make it equal or better than you found it).
12. Lock up the eyepiece box and main door.
C16 Operator’s Manual
34
B I B LIOGRAPHY
Piekiel, Robert. "Celestron, the Early Years - A Guide to Vintage Celestron
Telescopes" 2004. ISBN 0-9746391-0-9 (DVD-ROM e-book) ISBN 09746391-2-5 (CD-ROM e-book) Self - Published by Robert Piekiel, PO Box
64, Marcellus, NY 13108, USA. [email protected]. (Direct all order inquiries to this name and address).
Sky Engineering, “Sky Commander User’s Manual”,
http://www.skyeng.com, [email protected], (954) 345-8726 call
7pm-930pm EST,4630 N. University Drive, PMB329, Coral
Springs, FL 33067.
C16 Operator’s Manual
35