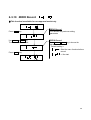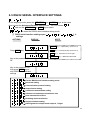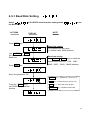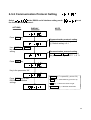
1
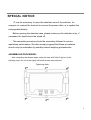
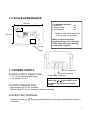
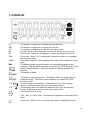
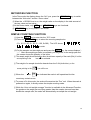
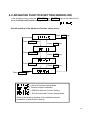
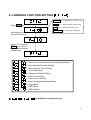
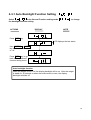
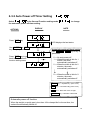
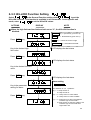
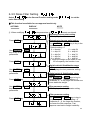
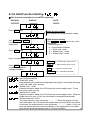
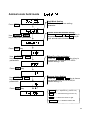
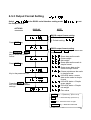
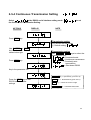
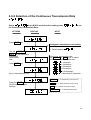
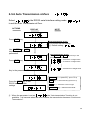
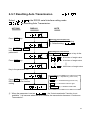
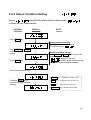
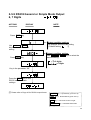
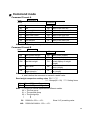
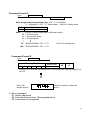
A Higher Level of Precision… A Higher Level of Performance Intell-Weigh ™ Washdown Weighing Indicator NTEP Approved 10,000 Divisions, COC # 07-110 User Operation Manual January 2008 © Intelligent Weighing Technology, Inc. 2008. All rights reserved Worldwide. The information contained herein is supplied without liability for errors or as authorised by contract or other restriction on reproduction and use embodied. the property of Intelligent Weighing Technology and is omissions. No part may be reproduced or used except written permission. The copyright and the foregoing extend to all media in which the information may be 2 Table of Contents SPECIAL NOTICE ………………………………………… 5 BEFORE USING THE SCALE …………………………….. 6 INSTRUCTION FOR USE …………………………………. 6 PREPARING TO USE THE SCALE ……………………………………… 7 CHAPTER 1 INTRODUCTION .................................................................... 8 1-1 FEATURES AND SPECIFICATION ....................................................... 8 1-2 SCALE APPEARANCE......................................................................... 9 1-3 POWER SUPPLY .................................................................................. 9 POWER SUPPLY SELECTION................................................................ 9 POWER CONSUMPTION ........................................................................9 LOW BATTERY WARNING ......................................................................9 1-4 DISPLAY ............................................................................................. 10 1-5 KEYBOARD FUNCTION..................................................................... 11 1-6 OPERATING THE SCALE .................................................................. 12 CHAPTER 2 ADVANCED FUNCTIONS .................................................... 14 2-1 ADVANCED FUNCTION SETTING TABLE 15 2-2 ADVANCED FUNCTION SETTING WORKFLOW .............................. 16 2-3 GENERAL FUNCTION SETTING ................................. 17 2-3-1 Auto Backlight Function Setting .............................. 18 2-3-2 Auto Power-off Timer Setting .................................. 19 2-3-3 Hi/Lo/OK Function Setting ....................................... 20 2-3-4 Restore to the Default Setting ................................. 21 2-3-5 Noise Filter Setting .................................................. 22 2-3-6 Hold Function Setting ............................................. 23 2-3-7 Auto Unit Weight Averaging Setting ...................... 25 2-3-8 Target Band ........................................................ 26 2-3-9 ZERO Band ........................................................ 27 2-3-10 ZERO Record .................................................. 28 2-4 WEIGHT CALIBRATION ................................................... 29 2-5 RS232 SERIAL INTERFACE SETTINGS ..................... 30 2-5-1 Baud Rate Setting .................................................. 31 2-5-2 Communication Protocol Setting ............................. 32 2-5-3 Output Format Setting ............................................. 33 3 2-5-4 Continuous Transmission Setting ........................... 34 2-5-5 Selection of the Continuous Transmission Rate ......................................................................................... 35 2-5-6 Auto Transmission at Zero ...................................... 36 2-5-7 Resetting Auto Transmission .................................. 37 2-5-8 Output Condition Setting ......................................... 38 2-5-9 RS232 General or Simple Mode Output 6, 7 Digits 39 APPENDIX 1 7 SEGMENT DISPLAY CHARACTERS ............................. 44 APPENDIX 2 ASCII CODE TABLE ........................................................... 45 4 SPECIAL NOTICE IT may be necessary to open the stainless case of the indicator, for example, to connect the load cell or connect the power cable, or to replace the rechargeable battery. Before opening the stainless case, please make sure the indicator is dry, if necessary the liquid should be wiped off. This assembly procedure should be accurately followed to ensure washdown performance. We also strongly suggest that these procedures should only be undertaken by suitably trained weighing professionals. ASSEMBLING PROCEDURE: After completing the desired steps, screw the case with 9 lbft/12 kgf-cm in the following order. Do not screw tightly before all screws are positioned. Tightening Order 5 BEFORE USING THE SCALE Thank you for purchasing an Intelligent Weighing Technology Electronic Digital Indicator. In order to use the indicator properly, please read this User Manual carefully before use. If you have a problem concerning the indicator, please contact your supplier. INSTRUCTION FOR USE 1) Please keep the indicator in a cool place. Do not store it at high temperature. 2) Avoid objects impacting with the indicator. Do not drop loads onto the scale or subject the weigh pan to any strong shock loads. 3) The load placed on the weigh pan must not exceed the maximum weighing capacity of the scale. 4) If the indicator is not going to be used for some time, please clean it and store it in a plastic bag in dry conditions. A desiccant sachet may be included to prevent any moisture build up. 5) The indicator is IP67 washdown design. Only cables with 3 to 5.5 mm diameter should be used or it will affect the washdown capabilities of this unit. 6 PREPARING TO USE THE SCALE 1. Locate the scale on a firm level surface free from vibration for accurate weight readings. 2. Adjust the four levelling feet (if fitted) to set the scale pan level. 3. Avoid operating the scale in direct sunlight or drafts of any kind. 4. If possible avoid connecting the scale to ac power outlet sockets which are adjacent to other appliances to minimise the possibility of interference affecting the performance of the scale. 5. Remove any weight that might be on the weigh pan before the scale is switched on and avoid leaving weight on the pan for long periods of time 6. All goods weighed should be placed in the centre of the weigh pan for accurate weighing. The overall dimensions of the goods being weighed should not exceed the dimension of the weigh pan. 7. Once the scale has been powered on, it will go through an LCD display test and it is ready for use when the display shows zero. 8. The scale requires 15~20 minutes warm up before operation to ensure best accuracy. 9. Please note when the symbol keeps flashing on the screen, the batteries need to be recharged. 7 CHAPTER 1 INTRODUCTION 1-1 FEATURES AND SPECIFICATION Features: NEMA 4X / IP 67 washdown design. (Only the cables with ψ3~ψ5.5mm diameter should be used or will affect the washdown design) Up to 10,000 division NTEP or 1/20,000 displayed resolution non NTEP (Internal 1/300,000) Large LCD display with LED backlight Kilogram (kg) and pound (lb) weighing modes as well as other minor units Auto calibration; Tare; Auto-zero tracking; Simple counting; Gross/Net indication Hold function; Check mode Lo/Hi/OK; Unit weight average function Adjustable gravity value Low power indication Built-in RS-232 or Serial Printer Output Specifications: Analogue Input and A/D Conversion: Input Sensitivity 0.3V/d (Min.) Input Signal Range: -1mV~+14mV Input Zero Range: -1mV~+5mV Load Cell Excitation: 5V DC 5% 100mA Load Cell Drive Capacity: up to 4 load cells at 350/load cell Non-linearity: 0.01% of full scale A/D Resolution: 500,000 counts (Max.) 8 1-2 SCALE APPEARANCE 256 mm The package includes: 1.Indicator 1 off 2.Power Cable 1 off 3.User Manual 1 off * Platform is an option depending on the model you purchase. 170 mm 90 mm When you first unseal the product package if you find any of the items above are missing, contact your supplier. Deep 1-3 POWER SUPPLY POWER SUPPLY SELECTION 1. 6V / 4.5Ah Rechargeable battery 2. AC adaptor DC 9V POWER CONSUMPTION RS-232 connector Load cell connector Power cable connector (For RS-232 and load cell, only the cables with ψ3~ψ5.5mm caliber could be used or will affect the washdown design) Approximately DC 55 mA (Indicator) Approximately DC 75 mA (Indicator + Display backlight) LOW BATTERY WARNING Please note when the ( recharged. ) symbol keeps flashing on the display, the batteries should be 9 1-4 DISPLAY HI OK LO kg lb Pcs : : : : : : 0 Net 1 STABLE 2 GROSS 3 Pcs 4 . . . . . . . . . . 5 Hold 6 7 Oz The weight on weigh pan is greater than the high limit The weight on weigh pan is equal to the OK limit The weight on weigh pan is lower than the check value kg units. When “kg” is displayed, it means the weight shown is in kg Pound units. When “lb” is displayed, it means the weight shown is lb Piece units. When “Pcs” is displayed, it means the scale is in “sampling and counting” mode : Zero status indication, when displayed the scale is at the centre of its zero band : The display shows the goods weight, not including the weight of any container. This Net status indication is on when the TARE function is used : Battery status indication. When this symbol is flashing recharge the batteries. : The weight is stable. : The scale is in the gross mode. The display shows the goods and any container weight. This Gross status indication is on when the TARE function is used. : The unit weight is not sufficient. When the icon is on, the counting function is operational but the count may contain errors. : The sampling size is not sufficient When the icon is on, the counting function is operational but the count may contain errors. : The Hold function is in use. : “GN”, “dwt”, or “carat” units. The actual unit depends on the model of the scale. : Ounce unit. When “oz” is on, it means the scale is weighing in ounces 10 1-5 KEYBOARD FUNCTION ON/ZERO KEY This key possesses two functions: Power On and Zero function. OFF KEY When the scale is switched on, press the OFF key, the scale will switch off. TARE KEY The tare function will not operate during the following conditions: (1) When the scale powers on if the weight is negative and after a container is placed on the weigh pan if the weight is still below zero. (2) The tare value is over the full scale capacity. UNITS KEY Press the UNITS key to switch weight units; the icons will indicate the active units. NET/GROSS KEY In the Tare mode, the screen displays the “TARE” icon; press the NET/GROSS key to switch between the “Net value” and the “Gross value”. 11 1-6 OPERATING THE SCALE POWER ON When the scale is off, press the ON/ZERO key, the scale will switch on. POWER OFF When the scale is on, press the OFF key, the scale will switch off. ZERO When the weigh pan is empty (free of load) and the display is not showing zero, press the ON/ZERO key to zero the scale. At zero, the “ 0” indication is on. When the weight value is within the zero range, the zero function operates to zero the scale or cancel the tare function. Zero range: The OIML & NTEP models have a zero range of 2% of Full Scale. The Sri Lanka model has a zero range of 4% of Full Scale. SWITCHING UNITS Press the UNITS key to switch weight units, the icons or arrows will indicate the active units as appropriate. The units available are dependent on the exact scale model. After power off, the scale will memorize the active units. When the scale is powered on again, it displays the previously active units. TARE FUNCTION (1) Put a container on the weigh pan and after the weight is stable, press the TARE key to zero the weight of the container. The screen displays the “Net” icon. (2) Put the goods in the container, the screen displays the net weight value of the goods. (3) Remove the full container; the screen displays the negative weight value of the container. At this time pressing the TARE key again will cancel the tare and the scale reverts back to zero. The “Net” icon is switched off. The tare function can be operated continually to the full weighing capacity of the scale. Continual tare operation is adding or removing tare objects on weigh pan and pressing the TARE key each time. 12 NET/GROSS FUNCTION In the Tare mode, the display shows the “Net” icon, press the NET/GROSS key to switch between the “Net value” and the “Gross value”. When the GROSS icon is on, the weight value on the display is the total amount of the tare value and net value. At the Gross status, only OFF and NET/GROSS keys are functional. NET/GROSS key is only used in Tare mode. SIMPLE COUNTING FUNCTION (1) Use the UNITS key to enter into the “PCS” mode (2) Press the NET/GROSS key to select the counting sample size (S = 10, S = 20, S = 50, S = 100, S=200). The LCD shows , , , , in order . (3) Put the samples on the weigh pan and press the UNITS key, the screen displays “-----”. After the sampling process is complete, put the goods on the weigh pan and the screen shows the quantity of the items. The sample weight should be heavier then the minimum capacity of the scale (20d), If not the arrow pointing to the icon will be activated. . . . . . . . . . . The weight of a sample should be heavier than the 0.2d (d=division), or the arrow pointing to the When the . . . . . . . . . . or Pcs Pcs icon will be on. are indicated the scale is still operational but the count may contain errors. To power off in this mode, the scale will memorize the “Pcs” unit. When the scale is powered on again, it directly enters the simple counting mode. While the “Auto unit weight average” function is available in the Advanced Function, the goods on the weigh pan are 5pcs greater than the sample size and less than double the sample size, the scale will automatically re-sample the unit weight. 13 CHAPTER 2 ADVANCED FUNCTIONS 2-1 ADVANCED FUNCTION SETTING TABLE Below is an overview of the advanced functions. For detailed settings refer to the following sections. DISPLAY LEVEL 1 FUNCTION DISPLAY LEVEL 2 FUNCTIONS Exit the ADVANCED FUNCTION Setting Mode --- --- General Function Setting Mode Return to the ADVANCED FUNCTION setting menu Auto backlight function setting Auto power-off timer setting Hi/Lo/OK function setting Restore to the default setting Noise filter setting Hold function setting Auto unit weight averaging setting Target Band ZERO Band ZERO Record External Weight Calibration RS232 Bi-direction Function Setting --- --Exit the RS232 serial interface setting mode 14 Baud rate setting Communication protocol setting Output format setting Continuous transmission setting Selection of continuous transmission rate Auto transmission at Zero Resetting auto transmission Output condition setting RS232 General or Simple Mode Output 6, 7 Digits 15 2-2 ADVANCED FUNCTION SETTING WORKFLOW In the weighing mode, press the NET/GROSS and ON/ZERO keys at the same time to enter the Advanced Function setting mode. The LCD shows . Overall workflow of the Advanced Function setting mode: Press UNITS key Press ON/ZERO key Press UNITS key Press ON/ZERO key Press UNITS key Press ON/ZERO key Press UNITS key Press ON/ZERO key General Function Setting Mode External Weight Calibration RS232 Bi-direction Function Setting Exit the Advanced Function Setting Mode Refer to the following sections for the detailed operation procedures of each function setting. 16 2-3 GENERAL FUNCTION SETTING ON/ZERO key Upward key (from 0 to 9) UNITS key Downward key (from 9 to 0) Press TARE key TARE key Move the cursor to right NET/GROSS key Move the cursor to left. Use the keys to select the desired function Key in “00” and press TARE key to return to the Advanced function setting menu Return to the Advanced Function Setting Mode Menu Auto Backlight Function Settings Auto Power-off Timer Settings Hi/Lo/OK Settings Restore the Default Settings Noise Filter Settings Hold Function Settings Auto Unit Weight Averaging Setting Target Band ZERO Band ZERO Record 、 for Philippine non-approval only 17 2-3-1 Auto Backlight Function Setting Select in the General Function setting mode the backlight function setting. ACTIONS DISPLAY to change NOTE Press TARE key LCD displays the last status Use ON/ZERO or UNITS key to select function “on” or “off Press TARE key to go back to the Advanced function setting menu Auto backlight function When the weight is over 10d, the display backlight will be on. After the weight is stable for 10 seconds or when the scale returns to zero, the display backlight switches off. 18 2-3-2 Auto Power-off Timer Setting Select in the General Function setting mode the automatic power-off timer setting. ACTIONS DISPLAY to change NOTE Press TARE key LCD displays the last status Use ON/ZERO or UNITS key to key in parameter Press TARE key to go back to the Advanced function setting menu Automatic power-off timer setting Use ON/ZERO or UNITS key to key in parameter 0 No auto power-off 1 When the scale is idle for 1 minute, the scale automatically switches off 2 When the scale is idle for 2 minutes, the scale automatically switches off 9 When the scale is idle for 9 minutes, the scale automatically switches off ON/ZERO key Upward key (from 0 to 9) UNITS key Downward key (from 9 to 0) TARE key Move the cursor to right NET/GROSS key Move the cursor to left. Automatic power-off function When the weight on weigh pan is less than 10d or keeps idle for the set time, the scale will automatically switch off. 19 2-3-3 Hi/Lo/OK Function Setting Select in the General Function setting mode to set the Hi/Lo/OK function. This function is available in all unit modes. In one specific unit mode, enter to set the Hi/Lo/OK values. ACTIONS DISPLAY NOTE When the high limit and low limit are both set as “0”, the Hi/Lo/OK function is disabled. ON/ZERO key Upward key (from 0 to 9) UNITS key Downward key (from 9 to 0) Press TARE key TARE key Move the cursor to right lb NET/GROSS key Move the cursor to left. . LCD displays the last status Key in the desired high limit value lb . Press TARE key lb LCD displays the last status . Key in the desired low limit value lb . Press TARE key LCD displays the last status Alarm setting Key in the parameter setting for alarm (a) (b) (c) The definition of a, b, c positions: (a) 1 = beep sound on 0 = beep sound off Press TARE key (b) 1 = beep sound on when stable 0 = beep sound on when unstable (c) 1 = beep sound on when the weight is between high and low limits 0 = beep sound on when the weight is not between high and low limits and higher than 10d 20 2-3-4 Restore to the Default Setting This function is available for non-approval model only Select the default setting. in the General Function setting mode ACTIONS DISPLAY to restore to NOTE ON/ZERO key Upward key (from 0 to 9) UNITS key Downward key (from 9 to 0) Press TARE key TARE key Move the cursor to right NET/GROSS key Move the cursor to left. Use ON/ZERO or UNITS keys to select “return” or “format” Return (Cancel the restoration) Restore to the default Press TARE key setting The default setting includes the following: 1) External weight calibration 2) HI/LO/OK setting value 3) Noise filter setting (External) 4) Sampling setting for the counting function 21 2-3-5 Noise Filter Setting Select noise filter setting. in the General Function setting mode to set the This function is available for non-approval model only ACTIONS When modifying Press TARE key Use ON/ZERO or UNITS key to key in the parameters Press TARE key Use ON/ZERO or UNITS key to key in the parameters Press TARE key Use ON/ZERO or UNITS key to key in the parameters DISPLAY NOTE , the parameters of remain un-altered. Returning to zero point setting LCD displays the last status Returning to the zero point setting Use ON/ZERO or UNITS key to key in the parameters or zero point Default setting = 0 0 No skip 5 skip 5d 1 skip 1d 6 skip 6d 2 skip 2d 7 skip 7d 3 skip 3d 8 skip 8d 4 skip 4d 9 skip 9d When the weight on the scale is over 1/3 full capacity, the function is on. Digital switch & Stabilization range setting LCD displays the last parameter setting Digital switch & Stabilization range setting Use ON/ZERO or UNITS keys to key in the parameters. Default setting = 0 Parameter 0 ~ 9, the larger the number the more stable the weight. Filter parameter setting LCD displays the last parameter setting Filter parameter setting Press TARE key Use ON/ZERO or UNITS keys to key in the parameters. Default setting = 5 Parameter 0 ~ 9, the larger the number, the faster the filter response. Fast response can lead to weight instability. 22 2-3-6 Hold Function Setting This function is available for non-NTEP model only ACTIONS Press TARE key Use ON/ZERO or UNITS key to key in the parameters Press TARE key DISPLAY NOTE Hold function setting LCD displays the last parameter setting Hold function setting Use ON/ZERO or UNITS keys to key in the parameters Default setting = 0 0 Hold function disabled 1 “Peak hold” mode 2 “Stable hold 1” mode 3 “Stable hold 2” mode Key in the parameter “00” ON/ZERO key Upward key (from 0 to 9) Press TARE key to complete the general setting procedures UNITS key Downward key (from 9 to 0) TARE key Move the cursor to right NET/GROSS key Move the cursor to left. = Hold function disabled = “Peak hold” mode Keep displaying the maximum weight when the weight is continually changing to exit this mode, press any key. = “Stable hold 1” mode When the weight is stable, the LCD shows the current weight value. To exit this mode, press any key. = “Stable hold 2” mode When the weight is stable, the LCD shows the current weight value. When the weight returns to zero (<10d), the hold mode is cancelled automatically. = “Animal scale hold” mode The scale returns to zero and shows “ - - - - - - ”. When the animal is on the scale and stable, the LCD shows the weight value and hold. When the animal is removed, the scale returns to zero and shows “ - - - - - - ”, (value < 10e), the scale will cancel the hold mode automatically. If the weight value is unstable, the scale will show the average value in 10 secs and hold it. 23 Animal scale hold mode Hold Mode Setting LCD shows the previous setting parameter Press TARE key Animal Scale Hold Mode Setting Please use ON/ZERO or UNITS key to key in the parameter 4 and press TARE key to enter animal scale function setting Use ON/ZERO or UNITS key to key in the parameters Press TARE key % Allow Error Range Setting Please use ON/ZERO or UNITS key to key in the parameter and between 1%~100% Default setting = 10% Use ON/ZERO or UNITS key to key in the parameters % Press TARE key Use ON/ZERO or UNITS key to key in the parameters Average items Setting Please use ON/ZERO or UNITS key to choose one parameter from 1,2,4,8,16,32,64 Default setting = 8 Press TARE key ON/ZERO key Upward key (from 0 to 9) UNITS key Downward key (from 9 to 0) TARE key Move the cursor to right NET/GROSS key Move the cursor to left. 24 2-3-7 Auto Unit Weight Averaging Setting This function is designed for calculating the precise unit weight when sampling in few quantity. This function works under below 2 conditions simultaneously: 1. weight of adding goods must be 5pcs greater than existing unit weight 2. weight of adding goods must be less than existing total weight Press TARE key Use ON/ZERO or UNITS key to key in the parameters Press TARE key Auto unit weight averaging setting LCD displays the last parameter setting Auto unit weight averaging setting Use ON/ZERO or UNITS keys to key in the parameters Default setting = 0 0 Auto unit weight averaging 1 Non auto unit weight averaging Key in the parameter “00” Press TARE key to complete the general setting procedures ON/ZERO key Upward key (from 0 to 9) UNITS key Downward key (from 9 to 0) TARE key Move the cursor to right NET/GROSS key Move the cursor to left. 25 2-3-8 Target Band (This Function is available for Philippines non-approved model only) Press MODE key Display 1 sec . Use ON/Z/T or M+ key to key in the parameter . Press MODE key ON/ZERO key Upward key (from 0 to 9) UNITS key Downward key (from 9 to 0) TARE key Move the cursor to right NET/GROSS key Move the cursor to left. 26 2-3-9 ZERO Band (This Function is available for Philippine non-approved model only) When the weight value is less than this setting value, accumulation function is not available. On the hold status and remove the body, if the weight value is less than this setting value, the scale can cancel the hold status automatically, and can proceed the next accumulation. Press MODE key Display 1 sec . Use ON/Z/T or M+ key to key in the parameter . Press MODE key Key in the parameter“00” ON/ZERO key Upward key (from 0 to 9) UNITS key Downward key (from 9 to 0) TARE key Move the cursor to right Press MODE key Finish the normal function setting procedure NET/GROSS key Move the cursor to left. 27 2-3-10 ZERO Record This function is available for non-approval model only Press TARE key Use ON/ZERO or UNITS key To choose the parameter Press TARE key ZERO Record LCD shows the previous setting parameter ZERO Record Use ON/ZERO or UNITS key to choose the parameter Default setting = Start the zero function before record No start 28 2-4 WEIGHT CALIBRATION Please refer to Dealer Set-Up. Weight calibration is not available on the NTEP version. 29 2-5 RS232 SERIAL INTERFACE SETTINGS In the weighing mode, press the NET/GROSS and ON/ZERO keys at the same time to enter the Advanced Function setting mode. The LCD shows and use the NET/GROSS or UNITS key to select to enter the RS232 serial interface setting mode. RS232 serial interface settings span settings. ACTIONS ~ DISPLAY ,9 NOTE ON/ZERO key Upward key (from 0 to 9) Press TARE key UNITS key Downward key (from 9 to 0) TARE key Move the cursor to right NET/GROSS key Move the cursor to left. Key in the parameter 00 ~ 08 Key in the parameter “00”, then press TARE key to exit RS232 serial interface settings Exit the RS232 serial interface setting mode Baud rate setting Communication protocol setting Output format setting Continuous transmission setting Selection of continuous transmission rate Auto transmission at Zero Resetting auto transmission Output condition setting RS232 general or simple mode output 6, 7 digits 30 2-5-1 Baud Rate Setting Select the Baud Rate. ACTIONS in the RS232 serial interface setting mode DISPLAY to set NOTE Press TARE key Baud rate setting LCD displays the last value Default value: 9600 (bits/sec) Use ON/ZERO or UNITS key to select the desired Baud rate Press TARE key Baud rate setting Use ON/ZERO or UNITS keys to select the desired Baud rate 600、1200、2400、 4800、9600、19200、38400 (bits/sec) Key in the parameter “00” ON/ZERO key Upward key (from 0 to 9) UNITS key Downward key (from 9 to 0) Press the TARE key to exit RS232 serial interface settings TARE key Move the cursor to right NET/GROSS key Move the cursor to left. 31 2-5-2 Communication Protocol Setting Select in the RS232 serial interface setting mode the Communication Protocol. ACTIONS DISPLAY to set NOTE Press TARE key Communication protocol setting LCD shows the last setting value. Default setting: n 8 1 Use ON/ZERO or UNITS key to select the protocol setting Communication protocol setting Use ON/ZERO or UNITS keys to select the protocol setting: n 8 1, E 7 1, O 7 1 Press TARE key Key in the parameter “00” ON/ZERO key Upward key (from 0 to 9) Press TARE key to exit RS232 serial interface settings UNITS key Downward key (from 9 to 0) TARE key Move the cursor to right NET/GROSS key Move the cursor to left. 32 2-5-3 Output Format Setting Select the Output Format. in the RS232 serial interface setting mode ACTIONS DISPLAY to set NOTE RS232 output format setting LCD shows the last setting. Default setting: Press TARE key Use ON/ZERO or UNITS key to select the output format Press TARE key Key in the parameter “00” Press the TARE key to exit RS232 serial interface settings RS232 output format setting Use ON/ZERO or UNITS keys to select the output format: = Same data as the scale = Gross weight = Net weight = Same data as the scale in simple format = Same gross data as the scale in simple format = Same net data as the scale in simple format = Hi/Lo/OK status + same data as the scale in simple format = Hi/Lo/OK status + Simple gross weight = Hi/Lo/OK status + Simple net weight = Tare value ON/ZERO key Upward key (from 0 to 9) UNITS key Downward key (from 9 to 0) TARE key Move the cursor to right NET/GROSS key Move the cursor to left. 33 2-5-4 Continuous Transmission Setting Select in the RS232 serial interface setting mode the Continuous Transmission Setting. ACTIONS DISPLAY to set NOTE Press TARE key Transmission setting LCD shows the last setting Default setting: Use ON/ZERO or UNITS keys to select the transmission type Press TARE key Transmission setting Use ON/ZERO or UNITS keys to select the transmission type: = Command mode = Continuous transmission = Constantly auto transmission = Shut down RS232 Key in the parameter “00” ON/ZERO key Upward key (from 0 to 9) Press the TARE key to exit RS232 serial interface settings UNITS key Downward key (from 9 to 0) TARE key Move the cursor to right NET/GROSS key Move the cursor to left. 34 2-5-5 Selection of the Continuous Transmission Rate Select in the RS232 serial interface setting mode the Continuous Transmission Rate. ACTIONS DISPLAY to set NOTE Press TARE key Continuous transmission rate setting The LCD shows the last setting. Default setting: Use the ON/ZERO or UNITS keys to select the continuous transmission rate Press TARE key Key in the parameter “00” Continuous transmission rate Use ON/ZERO or UNITS keys to select the continuous transmission rate: = 1 time/sec = 2 times/sec = 4 times/sec = 8 times/sec = 16 times/sec = More than16 times/sec ON/ZERO key Upward key (from 0 to 9) Press the TARE key to exit RS232 serial interface settings UNITS key Downward key (from 9 to 0) TARE key Move the cursor to right NET/GROSS key Move the cursor to left. 35 2-5-6 Auto Transmission at Zero Select in the RS232 serial interface setting mode to set the Auto Transmission at Zero. ACTIONS DISPLAY NOTE Press TARE key Auto transmission at zero LCD shows the last setting Default setting: Use ON/ZERO or UNITS keys to key in the desired parameters Press TARE key Auto transmission at zero Use ON/ZERO or UNITS keys to key in the desired parameters: = 00 division of weight value = 01 division of weight value = 99 divisions of weight value Key in the parameter “00” ON/ZERO key Upward key (from 0 to 9) Press the TARE key to exit RS232 serial interface settings UNITS key Downward key (from 9 to 0) TARE key Move the cursor to right NET/GROSS key Move the cursor to left. When the parameter is set as , the “Auto transmission” function is not available. It is because when the zero is stable, the transmission becomes “Continuous Transmission”. 36 2-5-7 Resetting Auto Transmission Select in the RS232 serial interface setting mode to Resetting Auto Transmission. ACTIONS Press TARE key DISPLAY NOTE Resetting auto transmission The LCD shows the last setting Default setting: Use ON/ZERO or UNITS keys to key in the desired parameters Press TARE key Resetting auto transmission Use ON/ZERO or UNITS keys to key in the desired parameters: = 00 division of weight value = 01 division of weight value = 99 divisions of weight value Key in the parameter “00” ON/ZERO key Upward key (from 0 to 9) Press TARE key to exit RS232 bi-direction function setting UNITS key Downward key (from 9 to 0) TARE key Move the cursor to right NET/GROSS key Move the cursor to left. When the parameter is set as , the “Auto transmission” function is not available. It is because when the zero is stable, the transmission becomes “Continuous Transmission”. 37 2-5-8 Output Condition Setting Select in the RS232 serial interface setting mode to Reset of Auto Transmission. ACTIONS DISPLAY NOTE Press TARE key Output condition setting The LCD shows the last setting. Default setting: Use ON/ZERO or UNITS keys to select the desired setting Press TARE key Output condition setting Use ON/ZERO or UNITS keys to select the desired setting: = Output all the time = Stable weight output only (No output when under/overload or unstable) Key in the parameter “00” ON/ZERO key Upward key (from 0 to 9) Press the TARE key to exit RS232 serial interface settings UNITS key Downward key (from 9 to 0) TARE key Move the cursor to right NET/GROSS key Move the cursor to left. 38 2-5-9 RS232 General or Simple Mode Output 6, 7 Digits ACTIONS DISPLAY NOTE Press TARE key Use ON/ZERO or UNITS keys to select the desired setting Press TARE key Output condition settings The displays show the last setting Default setting Output condition settings Use ON/ZERO or UNITS keys to select the desired setting: = 6 digits = 7digits Key in the parameter “00” Press the TARE key to exit RS232 serial interface settings Please refer to Page 40 for RS232 output format ON/ZERO key Upward key (from 0 to 9) UNITS key Downward key (from 9 to 0) TARE key Move the cursor to right NET/GROSS key Move the cursor to left. 39 Command mode Command Format A Host Slave Command Command MZ Zero SO Command mode MT Tare UA Switch to the first unit MG Gross weight UB Switch to the second unit MN Net weight UC Switch to the third unit CT Clear TARE value UD Switch to the forth unit SC Continuous transmission UE Switch to the fifth unit SA Auto transmit UF Switch to the sixth unit % Stop continuous transmission and enter the command mode Note: UA ~ UF settings are dependent the model of the scale Command Format B Host Slave RW RG Command Data Read current weight Read Gross weight RH RI Read Gross (simple) Read Net (simple) Read comparison situation + RN Read Net weight RJ current display of weight (simple) Read comparison situation + RT Read TARE RK Gross (simple) Read current display of Read comparison situation + RB RL weight (simple) Net (simple) Note: a. add % before the command to read continuously b. add # before the command to transmit a stable value Read weight comparison setting value RS : Groups(00 ~ 09) : Setting Items HI LO Show “HI” presetting value Show “LO” presetting value Note: (Group) is various depended on different models 00 The first group 01 The second group 02 The third group EX: ANS: RS02LO<CR><LF> Show “LO” presetting value RS02LOXXXXXX<CR><LF> 40 Command Format C Host Slave Command+ Data Command+ Data Write weight comparison setting value WSXXXXXX : Groups (00 ~ 09) : Setting Items XXXXXX: Setting Value HI Write “HI” setting value LO Write “LO” setting value Note: (Group) is various depended on different models 00 The first group 01 The second group 02 The third group EX: WS00HI001000<CR><LF> ANS: WS00HI001000<CR><LF> Write “HI” setting value Command Format D Host Slave Data Position of decimal point Value (e.g. Price) 1 2 3 4 5 6 CR LF 1 When the PW receives this data format, it will transfer the data and display it on its LCD. Note: The weight value is ˙ function is effective, when the over 0. Error messages: E1: Wrong command E2: Command format error (Wrong parameters) E3: Command not recognised 41 Output data format A. 7 digits (Exclude 1 digit decimal point) Weight format Gross Net Tare Plus OL Minus OL Unstable S S S O O U T T T L L S , , , , , , G N T G G G S T R S S S , , , , , , + 0 1 2 3 + 1 . 2 3 + 0 1 2 . + SP SP SP SP - SP SP SP SP + 0 1 2 3 4 5 6 7 SP SP . 4 5 6 t l 3 4 5 6 SP SP SP SP SP SP SP SP SP SP SP SP SP SP 4 . 5 6 SP SP o z . g k g CR LF SP SP SP SP l b Simple format G/N G/N G/N Plus OL Minus OL + 1 . + 0 1 + 0 1 + SP SP - SP SP 2 2 2 SP SP 3 3 . SP SP . 4 3 SP SP 4 5 4 SP SP 5 . 5 SP SP 6 6 6 CR LF SP SP Comparison status + Simple format Byte0 Byte1 Byte2 +/1 . 2 3 Byte0 : HI 30H/31H ; Byte1 : OK 30H/31H ; Byte2 : LO 30H/31H ; . 4 5 6 CR LF B. 6 digits (Exclude 1 digit decimal point) Weight format Gross Net Tare Plus OL Minus OL Unstable S S S O O U T T T L L S , , , , , , G N T G G G S T R S S S , , , , , , + 1 2 3 4 5 6 7 + . 2 3 . 4 5 6 + 1 2 . 3 4 5 6 + SP SP SP SP SP SP SP - SP SP SP SP SP SP SP + 1 2 3 4 . 5 6 3 3 . SP SP . 4 5 4 5 . 3 4 5 SP SP SP SP SP SP SP SP o z t l . g SP SP k g CR LF SP SP SP SP SP SP SP SP SP SP l b Simple format G/N G/N G/N Plus OL Minus OL + . 2 + 1 2 + 1 2 + SP SP - SP SP 6 6 6 CR LF SP SP Comparison status + Simple format Byte0 Byte1 Byte2 +/Byte0 : HI 30H/31H; . 2 3 Byte1 : OK 30H/31H . 4 5 6 CR LF Byte2 : LO 30H/31H 42 Serial Data Transfer/Receive Format LSB MSB n,8,1 S 8-bit data STOP e,7,1 S 7-bit data P STOP o,7,1 S 7-bit data P STOP 1 0 1 0 1 0 Note: S : Start bit STOP: Stop bit P : Parity bit 43 APPENDIX 1 7 SEGMENT DISPLAY CHARACTERS Digit 7 segments letter Alphabet 7 segments letter Alphabet 0 A N 1 B O 2 C P 3 D Q 4 E R 5 F S 6 G T 7 H U 8 I V 9 J W K X L Y M Z 7 segments letter 44 APPENDIX 2 ASCII CODE TABLE Symbol A B C D E F G H I J K L M N O P Q R S T U V W X Y Z ASC II Code 41H 42H 43H 44H 45H 46H 47H 48H 49H 4AH 4BH 4CH 4DH 4EH 4FH 50H 51H 52H 53H 54H 55H 56H 57H 58H 59H 5AH Symbol a b c d e f g h i j k l m n o p q r s t u v w x y z ASC II Code 61H 62H 63H 64H 65H 66H 67H 68H 69H 6AH 6BH 6CH 6DH 6EH 6FH 70H 71H 72H 73H 74H 75H 76H 77H 78H 79H 7AH Symbol 0 1 2 3 4 5 6 7 8 9 ASC II Code 30H 31H 32H 33H 34H 35H 36H 37H 38H 39H 0DH 45 Intelligent Weighing Technology has more than 50 years experience in the weighing industry, both in the USA and worldwide. With contacts in over 50 countries including the USA, we provide you with the weighing equipment you need. When you invest in weighing equipment from Intelligent Weighing Technology, you’re really buying peace of mind. Quality - Scales and balances solidly built from the ground up with superior engineering and components for exacting results. Value - From bench scales to analytical balances, weighing equipment priced for real-world business applications, with superior service and support. Experience - Expert advice to help you choose just the right product for your application. Quality + Value + Experience…it adds up to the Intelligent Investment. Intelligent Weighing Technology, Inc. www.intelligentwt.com 46