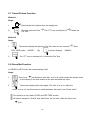
1
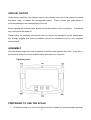
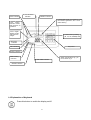
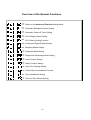
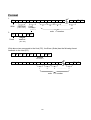
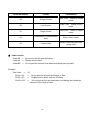
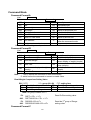
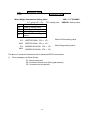
A Higher Level of Precision… A Higher Level of Performance Intell-Check Indicator Nema 4X Washdown Checkweighing User Operation Manual May 2006 © Intelligent Weighing Technology, Inc. All rights reserved worldwide. The information contained herein is the property of Intelligent Weighing Technology, Inc. and is supplied without liability for errors or omissions. No part may be reproduced or used except as authorized by contract or other written permission. The copyright and the foregoing restriction on reproduction and use extend to all media in which the information may be embodies. 1 TABLE OF CONTENTS BEFORE USING THE SCALE……………………………………………………………….……4 SAFETY AND GENERAL INFORMATION........................................................................... 4 SPECIAL NOTICE................................................................................................................. 5 PREPARING TO USE THE SCALE …………………………………………………………5 CHAPTER 1 INTRODUCTION.............................................................................................. 7 1-1 Features........................................................................................................................... 7 1-2 Specifications ...................................................................................................................7 1-3 Scale Appearance............................................................................................................ 7 1-4 Power Supply...................................................................................................................8 1-5 Explanation of Display...................................................................................................... 8 1-6 Explanation of Keyboard.................................................................................................. 9 CHAPTER 2 BASIC OPERATION FUNCTIONS ............................................................. 12 2-1 Simple Weight Mode ...................................................................................................... 14 2-2 Limit Weight Mode .........................................................................................................14 2-3 Target Weight Mode.......................................................................................................16 2-4 Tare Function .................................................................................................................18 2-5 Cancel Tare Function .....................................................................................................19 2-6 Pre Tare Function...........................................................................................................19 2-7 Cancel Pretare Function ................................................................................................20 2-8 Gross/Net Function ........................................................................................................20 2-9 Memory Store and Recall Functions .............................................................................. 21 CHAPTER 3 ADVANCED FUNCTIONS ............................................................................. 22 3-1 General Function Setting.…………………………...……. ……...….…23 3-1-1 Automatic Backlight Function Setting…………... …... ……....25 3-1-2 Automatic Power-off Timer Setting……………... …………. ...26 3-1-3 HI / LO Weight Check Setting…………………... ………........27 3-1-4 HI / LO Alarm Setting Function………………….. ………........28 3-1-5 Analog and Digital Display Setting…………….... ……......…..29 3-1-6 Weighing Speed Setting…………………………. ……..……...30 3-1-7 Operation Mode Setting………………………….. …...……….31 3-1-8 Weight and Percentage Mode Setting………….. ………...….32 3-1-9 Lock Function Setting…………………………….. …………....33 3-1-10 Relay Setting……………………………………. ……….…….34 3-1-11 Auto Zero Tracking………………………….….. ………….….35 3-1-12 Printer Key Accumulation Function…………… ……..………36 3-1-13 Tare Cancellation Setting………………………. …..……..…..37 3-1-14 Previous Zero Record Setting………………….. ……...….…38 3-2 Weight Calibration…………………………………….……. ………...….39 2 3-2-1 Weight Calibration…………………………………. …….….….40 3-2-2 Restore to the Default Setting………………….… …….…....41 3-3 RS232 Bi-direction Function Setting……………..…….... ………...…42 3-3-1 Baud Rate Setting………………………………….. …….….…44 3-3-2 Communication Protocol Setting…………………. ….…….…45 3-3-3 Output Format Setting…………………………….. …..…….…46 3-3-4 Continuous Transmission Setting………………... ……..…....47 3-3-5 Selection of the Continuous Transmission Rate.. ……….……48 3-3-6 Output Condition Setting………………………….. ………......49 3-3-7 Auto Transmission at Zero………………………… …......50 3-3-8 Reset of Auto Transmission………………………. ………......51 3-3-9 Condition of Manually Printing………………….… …….….....52 3-3-10 Real Time Clock (Hour)…………………………… ……..…...53 3-3-11 Real Time Clock (Date)………………………… ... ……….....54 3-3-12 RS232 Serial Interface Setting Mode…………… ……….....55 Appendix 1 RS232 Serial Interface................................................................................ 56 Appendix 2 Button Code ................................................................................................ 64 Appendix 3 7 Segment Display Characters.................................................................. 64 3 BEFORE USING THE SCALE Thank you for purchasing an Intell-Check Electronic Digital Weighing Indicator. In order to use the indicator properly, please read this User Manual carefully before use. If you have a problem concerning the indicator, please contact your supplier. SAFETY AND GENERAL INFORMATION 1. Please keep the indicator in a cool place. Do not store it at high temperature. 2. Please keep it clean and avoid contamination and damage. 3. Avoid objects impacting with the indicator. Do not drop loads onto the scale or subject the weigh pan to any shock loads. 4. The load placed on the weigh pan must not exceed the maximum weighing capacity of the scale. 3. The indicator is designed for IP 67 / Nema 4X waterproof rating. Only the cables with Φ3~Φ5.5mm diameter should be used or the waterproof rating will be affected. 6. For long periods of storage, clean and wrap the scale in a bag. A desiccant sachet may be included to prevent any moisture build-up. 7. To avoid current leakage, please do not subject the batteries to excessive heat or attempt to open the batteries. 4 SPECIAL NOTICE Under certain conditions, the stainless case of the indicator may need to be opened to connect the power cable, or replace the rechargeable battery. Please contact your scale dealer to avoid any damage to the waterproofing of the unit. Before opening the stainless case, please ensure the indicator is free of moisture. If necessary, any liquid should be wiped off. Please follow the assembly instructions below to assure the waterproof correct performance. We strongly suggest that these procedures should be undertaken only by your supplier’s technical staff. ASSEMBLY After the desired steps have been completed, screw the case together with 9 lbft / 12 kgf-cm in the following order. Do not screw tightly before all screws are in position. Tightening order: PREPARING TO USE THE SCALE 1. Position the scale on a firm level surface free from vibration for accurate weight readings. 5 2. Avoid operating the scale in direct sunlight or drafts of any kind. 3. If possible, avoid connecting the scale to AC power outlet sockets which are adjacent to other appliances to minimize the possibility of interference affecting the performance of the scale. 4. Remove any weight that might be on the weigh pan before the scale is switched on and avoid leaving weight on the pan for long periods of time. 5. All goods weighed should be placed in the center of the weigh pan for accurate weighing. The overall dimensions of the goods being weighed should not exceed the dimension of the weigh pan. 6. Once the scale has been powered on, it will go through the LCD display test and it is ready for use when the display shows zero. 7. The scale requires 15~20 minutes warm up before operation to ensure best accuracy. 8. Please note when the symbol keeps flashing on the screen, the batteries need to be recharged. Failure to charge the battery may cause failure of the battery. 6 CHAPTER 1 INTRODUCTION 1-1 Features IP 67 waterproof / Nema 4X: moisture-proof, mist-proof, waterproof and dustproof Adjustable weighing speed: three weighing speed modes (fast, moderate, and slow) provided Selectable units modes: Kilogram (kg), gram (g), pound (lb), and ounce (oz) weighing modes HI, OK, LO indication: Large LCD display with HI, OK, LO indication and signals for Relay output with max. current 7A, max. voltage 265Vac, 30Vdc High resolution: the maximum external resolution is 1/30000, and the internal is 1/300000. (Input voltage should be over 6mV) Functions: 10 preset setting, Percentage display, Simple/Limit/Target operation modes, Pre-tare function, Net/Gross switch function, Auto backlight, RTC setting and Auto power-off timer etc. Others: Auto calibration, Auto zero tracking, Low battery indication, Adjustable gravity value, and Linearity adjustment. Connectivity: Built-in bi-directional RS-232 interface 1-2 Specifications Analog Input and A/D Conversion: Input Sensitivity 0.18V/d or more Input Signal Range: -2mV~+16mV Input Zero Range: -1mV~+5mV Load Cell Excitation: 5V DC Load Cell Drive Capacity: up to 4 load cells at 350/load cell Non-linearity: 0.01% of full scale A/D Resolution: 1,000,000 counts (Max.) 1-3 Scale Appearance 256 mm 7 The package includes: 1. Indicator 1 off 2. Power Cable 1 off 3. User Manual 1 off 4. Cable Gland Kit 170 mm 90 mm 1-4 Power Supply RS-232 connector Load cell connector Power cable connector Power Supply Selection 1. 6V / 4.5Ah Rechargeable battery 2. AC adaptor DC 9V (For RS-232 and load cell, only cables with ψ3~ψ5.5mm diameter should be used or it will affect the waterproof design) Power Consumption Approximately DC 19 mA (Indicator) Approximately DC 38 mA (Indicator + Display backlight) Approximately DC 70~80 mA (Indicator + Display backlight + Relay) Low Battery Warning Please note when the recharged. symbol keeps flashing on the display, the batteries should be 1-5 Explanation of Display 8 LIMIT indication HI, LO, OK status indication TARGET indication In the Simple mode, if the weight is over the maximum graduation, the “+” zone will be flashing. LCD1: Analog indication column with maximum 50 graduation LCD2:Digital Display column with maximum 6 digits Current memory reading (HI, LO, OK, RANGE) data Zero point indication Key board NET indication Battery indication Stable reading indication PRE TARE indication GROSS indication 1-6 Explanation of Keyboard Press this button to switch the display on/off. 9 Weigh unit indication: kg, g, lb, lb-oz, Taiwan -kg, % Press this button to obtain a zero reading, when the weigh pan is empty (free of load) and the display is not showing zero. When the weight value is within the zero range, the zero function operates to zero the scale or cancel the tare function. Press this button to clear memory and delete application data. Press this button to perform action. Digit: 9 Press this button to switch between the “Net value” and the “Gross value”. Digit: 6 Press this button to deduct the weight of container via entering the known value, so that the scale readout shows the net weight of samples. Digit: 3 Press this button to deduct the weight of container, so that the scale readout shows the net weight of samples. Press this button to recall memory. 10 Digit 8 Press this button to output the displayed values to via the built-in interface to a Printer or a computer. Digit 5 In Target mode, press this button to preset the allowable “Range” value. Digit 2 In Limit mode, press this button to input “LOW ” value, so that the weighing result cannot be smaller than this value. Press this button to store HI, LO, OK and Range settings or exit the setting mode. Digit 7 Press this button to switch among Simple weight mode, Limit weight mode and Target weight mode. Digit 4 In Target mode, press this button to input value which meets the “OK” requirement. Digit 1 In Limit mode, press this button to input “HI” value, so that the weighing result cannot be greater than this value. Digit 0 Press this button to switch the weight unit, the icons or arrows will indicate the active units as appropriate. The units available are dependent on the exact scale model. After power off, the scale will memorize the active units. When the scale is powered on again, it displays the previously active unit. 11 CHAPTER 2 BASIC OPERATING FUNCTIONS Intell-Check has three weight modes: Simple, Limit and Target, press to switch. Simple weight mode In this mode, the weight value can be displayed by means of analog and digit. For example, when a object weights 20 lb, the LCD2 shows the digits 20 and LCD1 has slight changes on its graduation. Limit weight mode This is a weight check mode, press “HI” and “LO” buttons to input high and low limit value, LCD1 displays if the weight on weight pan is greater than the high limit, lower than the check value or equal to the OK range. When it meets the OK range, the OK zone will blink. For example, High limit = 20, Low limit = 18, then OK range is between 18 and 20. Target weight mode Use this mode to set a “Target” weight and an allowable range. When the weight is within the range, it means the weight meets the target requirement. For example, pour liquid into a container, press “OK” button to set target as 30 and press “Range” button to set an allowable range as +2, when the weight reaches the range between 28~32,the OK zone on LCD1 will blink. 12 Simple Weight Mode Limit Weight Mode Target weight mode 13 2-1 Simple Weight Mode Steps: 1. Turn on the scale Scale starts to count down, LCD2 displays ”------“ reverting to Zero, LCD2 displays “000000”. 2. If needed, 3. after select the weight unit. Zero the scale, if the scale is not at zero. 4. Put object on the weight pan object’s weight bottom of LCD2. LCD1 (analog) and LCD2 (Digit) display the After the weight is steady, the STABLE icon appears at the left hand 2-2 Limit Weight Mode Steps: 1. Press “MODE” button, select Limit Mode, the Limit icon is switched on. If the scale is not at zero, press “ZERO” button to obtain a zero reading. 2. Press “HI” button, the screen displays the previous setting of High value. . kg The previous setting is 30 kg. 14 3. Use “0”~”9” buttons to input the high value. After inputting one digit, the cursor will move to right. Press “ENTER” button when finishing. ( For example 30kg, press 0030 ) to When input incorrectly, press “C” button to clear. 4. Press “LO” button, the screen displays the previous setting of Low value. . kg The previous setting is 28 kg. 5. Use “0”~”9” buttons to input the low value, see step 3. Remember to set “High value” earlier than “Low value”. 6. Put object on the weight pan, the screen displays HI/OK/LO status. If the weight is between the high and low limit, the “OK” zone will blink. If the weight is over the high limit, the “+” zone will blink. If the weight is under the low limit, the “-” zone will blink. 15 2-3 Target Weight Mode Steps: 1. Press “MODE” button, select Target Mode, the Target icon is switched on. Press ZERO button to zero the scale, if the scale is not at zero. 2. Set the target weight (There are two methods) Method 1: input value via keyboard (1) Press “OK” button, the screen displays the previous setting. . kg The previous setting is 30 kg. (2) Use 0~9 buttons to input the target value. After keying one digit, the cursor will move to right. Press “ENTER” button when finished. to Method 2: input value via Sampling weight (1) Press “OK” button, the screen displays the previous setting. . kg The previous setting is 30 kg. 16 (2) Put the sample on the weight pan, press “ENTER” button. The screen displays ”------“. After the weight is steady, the sampling is complete. 20 kg . kg kg The previous setting is 20 kg. 3. Set the Range Value (1) Press “RANGE” button,the screen displays the previous setting. kg . The previous setting is 2 kg. (2) Use “0”~”9” buttons to input the target value. After keying one digit, the cursor will move to right. Press “ENTER” button when finishing. to 4. Put a container on the weight pan, the screen displays the container’s weight. 2 kg . kg The weight of container is 2 kg. 5. Press TARE button, the screen displays ”------“. The “Net” icon is on, after the weight reverts to zero. kg 17 Net . kg 6. Put objects into the container, observe the changes of graduation on LCD1. When the weight reaches the OK section, stop adding the objects and LCD2 displays the weight at OK status. The Range value can be shown as percentage. See “3-1-8 Weight and Percentage Mode Setting” for details. 2-4 Tare Function Steps: 1. When the weight pan is free of load and the display is not showing zero, to zero the scale. 2. Put a container on the weight pan LCD2 displays the weight of container After the weight is steady, the STABLE icon will blink. 3. To zero the weight of container, the screen displays the “Net” icon. 4. Put the goods in the container, the screen displays the net weight value of the goods. The tare function can be operated continually to the full weighing capacity of the scale. Continual tare operation is adding or removing tare objects on weigh pan and press “TARE” button each time. 18 2-5 Cancel Tare Function Steps: 1. Move the full container from the weight pan. 2. Zero the scale and Tare or Clear Tare The “Net” icon is switched off. The “Net” icon is switched off. 2-6 Pre Tare Function Steps: 1. Zero the scale, if needed. 2. The screen displays the previous Pre Tare value for two seconds PRE TARE mode 00000P . 3. Use “0” ~ “9” buttons to input the known weight of container, after that 4. The PT 5. Enter . icon on LCD2 will blink, which means the setting is finished. Put the container on weight pan zero weight of goods The screen displays the weight is Put the goods into the container PT icon is on 19 The screen displays the LCD2 displays the Net value of goods. 2-7 Cancel Pretare Function Method 1 Steps: 1. Remove the full container from the weight pan 2. Zero the scale and Tare Pre Tare. The “PT” icon is switched off Cancel the Method 2 Steps: 1. The screen displays the previous Pre Tare value for two seconds PRE TARE mode 00000P Enter The screen displays 00000P The “PT” icon is switched off Cancel the Pre Tare. 2. 2-8 Gross/Net Function In GROSS or NET mode, the screen displays “Net”: Steps: 1. 2. Gross icon is switched on and “Net” icon is off, which means the weight value on the display is the total amount of the tare value and net value. The screen displays Net value again. The “Net” icon is on, while the “Gross” icon is off. Use this button to switch between “Net value” and “Gross value”. This function is only used in TARE and PRE TARE modes. All buttons except for “On/Off” and “Net/Gross” do not work, while the Gross icon is on. 20 2-9 Memory Store and Recall Functions Store When the settings of High, Low, OK and Range are finished, displays “MEM S”, input any digit from “0”~”9”, such as “2” LCD2 When finishing, “M2” appears at the center of LCD1. Recall LCD2 displays “MEM R”, input any digit from “0”~”9”, such as “2” When finishing, “M2” appears at the center of LCD1. This indicator can store 10 data (from 0 to 9). 21 CHAPTER 3 ADVANCED FUNCTIONS In the weighing mode, press the TARE Advanced Function setting mode. and ZERO buttons at the same time to enter the The LCD shows and use MR select the setting mode. Overall workflow of the Advanced Function setting mode: Press MR button Press MR button Press MR button Press MR button General Function Setting Mode External Weight Calibration RS232 Bi-direction Function Setting Exit the Advanced Function Setting Mode Refer to the following sections for the detailed operation procedures of each function setting. 22 to 3-1 General Function Setting There are 14 functions in the General Function setting mode from to . Press Enter button Refer to the following overview of General Functions Key in parameter from 00 to 14 To exit the general function setting, key in “00” and press Enter button. C button clear parameter Enter button perform action 23 Overview of the General Functions Return to the Advanced Function Setting Mode Automatic Backlight Function Setting Automatic Power-off Timer Setting HI,LO Weight Check Setting HI,LO Alarm Setting Function Analog and Digital Display Setting Weighing Speed Setting Operation Mode Setting Weight and Percentage Mode Setting Lock Function Setting Relay Function Setting Auto Zero Tracking Setting Printer Key Accumulations Function Tare Cancellation Setting Previous Zero Record Setting 24 3-1-1 Automatic Backlight Function Setting Select in the General Function setting mode change the backlight function setting. to Press Enter button Parameter setting: 01 Turn on automatic backlight 00 Turn off automatic backlight Key in parameter from 00 to 01 Factory default setting: 01 Press Enter button To exit the general function setting, key in “00” and press Enter button. C button clear parameter Enter button perform action Automatic backlight function When the weight is over 10e, the display backlight will be on. After the weight is stable for 10 seconds or when the scale returns to zero, the display backlight switches off. 25 3-1-2 Automatic Power-off Timer Setting Select in the General Function setting mode change the automatic Power-off timer function setting. to Press Enter button Parameter setting: 00 No auto power-off 01 When the scale is idle for 1 minute, the scale automatically switches off. 02 When the scale is idle for 2 minute, the scale automatically switches off. Key in parameter from 00 to 60 Press Enter button 60 When the scale is idle for 60 minute, the scale automatically switches off. To exit the general function setting, key in “00” and press Enter button. Factory default setting: 00 C button clear parameter Enter button perform action Automatic power-off function When the weight on weigh pan is less than 10e or stays idle for the set time, the scale will automatically switch off. 26 3-1-3 HI / LO Weight Check Setting Select in the General Function setting mode HI/ LO weight check function. to set the Press Enter button Parameter setting: 00 Check the weight whatever it is stable or not 01 Check the weight when it is stable 02 Whatever it is stable or not, check the weight when the weight is over 10e. 03 Check the weight when it is stable and over 10 e. 04 Do not check Key in parameter from 00 to 04 Press Enter button Factory default setting: 00 To exit the general function setting, key in “00” and press Enter button. C button clear parameter Enter button perform action 27 3-1-4 HI / LO Alarm Setting Function Select HI/ LO Alarm function. in the General Function setting mode to set the Parameter setting: 00 No Alarm 01 The Beeper sounds intermittently at Low status 02 The Beeper sounds intermittently at OK status 03 The Beeper sounds intermittently at Low and OK status 04 The Beeper sounds intermittently at High status 05 The Beeper sounds intermittently at High and Low status 06 The Beeper sounds intermittently at High and OK status 07 The Beeper sounds intermittently at High, Low and OK status 08 No Alarm 09 The Beeper sounds continually at Low status 10 The Beeper sounds continually at OK status 11 The Beeper sounds continually at Low and OK status 12 The Beeper sounds continually at High status 13 The Beeper sounds continually at High and Low status 14 The Beeper sounds continually at High and OK status 15 The Beeper sounds continually at High, Low and OK status Press Enter button Key in parameter from 00 to 15 Press Enter button To exit the general function setting, key in “00” and press Enter button. C button clear parameter Often used setting are “02”, “05”. Factory default setting: 00 Enter button perform action 28 3-1-5 Analog and Digital Display Setting Select in the General Function setting mode change the Analog and digital display function setting. to Press Enter button Parameter setting: 00 Both Analog and Digital do not display 01 Only display Digital 02 Only display Analog 03 Both Analog and digital display Key in parameter from 00 to 03 Press Enter button “01” not suggest Factory default setting: 03 To exit the general function setting, key in “00” and press Enter button. C button clear parameter Enter button perform action 29 3-1-6 Weighing Speed Setting Select in the General Function setting mode weighing speed function. Press Enter button Parameter setting: 00 Slow reaction 01 Moderate reaction 02 Fast reaction Key in parameter from 00 to 02 Factory default setting: 01 Press Enter button C button clear parameter To exit the general function setting, key in “00” and press Enter button. Enter button perform action 30 to set the 3-1-7 Operation Mode Setting Select in the General Function setting mode change the operation mode function setting. to Press Enter button Parameter setting: 00 Enter “Simple Mode” after turn on 01 Enter “Limit Mode” after turn on 02 Enter “Target Mode” after turn on 03 Use previous setting mode after turn on Key in parameter from 00 to 03 Press Enter button Factory default setting: 03 To exit the general function setting, key in “00” and press Enter button. C button clear parameter Enter button perform action 31 3-1-8 Weight and Percentage Mode Setting Select in the General Function setting mode change the weight and percentage mode setting. Press Enter button Parameter setting: 00 Display in weight mode 01 Display in percentage mode (Target mode only) Key in parameter from 00 to 01 Factory default setting: 00 Press Enter button C button clear parameter To exit the general function setting, key in “00” and press Enter button. Enter button perform action 32 to 3-1-9 Lock Function Setting Select in the General Function setting mode change the Lock function setting. to Press Enter button Key in parameter from 00 to 01 Parameter setting: 00 All buttons act normally 01 Only ON/OFF ZERO are active. Press Enter button Factory default setting: 00 To exit the general function setting, key in “00” and press Enter button. C button clear parameter Enter button perform action 33 TARE 3-1-10 Relay Setting Select in the General Function setting mode change the relay function setting. Press Enter button Parameter setting: 00 Default open 01 Default short Key in parameter from 00 to 01 Factory default setting: 00 Press Enter button C button clear parameter Enter button perform action To exit the general function setting, key in “00” and press Enter button. 34 to 3-1-11 Auto Zero Tracking Select zero tracking. in the General Function setting mode Only for none-approved model Press Enter button Parameter setting: 00 1/4e 01 1/2e 02 1e 03 2e 04 4e Key in parameter from 00 to 04 Factory default setting: 00 Press Enter button To exit the general function setting, key in “00” and press Enter button. C button clear parameter Enter button perform action 35 to set auto 3-1-12 Printer Key Accumulation Function Select in the General Function setting mode printer key accumulation function. to set This function can be active only when the parameter in is set as “11”. Press Enter button Key in parameter from 00 to 01 Parameter setting: 00 Turn on the accumulation function 01 Turn off the accumulation function Factory default setting: 00 Press Enter button To exit the general function setting, key in “00” and press Enter button. C button clear parameter Enter button perform action When this function is active, the Enter accumulations. 36 button becomes C button and has up to 99 3-1-13 Tare Cancellation Setting Select in the General Function setting mode key accumulation function. to set printer Press Enter button Parameter setting: 00 Use TARE button to call off setting 01 TARE value cancel automatically by moving objects from the weight pan Key in parameter from 00 to 01 Factory default setting: 00 Press Enter button C button clear parameter To exit the general function setting, key in “00” and press Enter button. Enter button perform action 37 3-1-14 Previous Zero Record Setting Available in not-approved model only Press Enter button Parameter setting: 00 To abort previous zero recording 01 To activate previous zero recording Enter the parameters “00”, “01” by the numerical key Factory default setting: 00 C button clear parameter Press Enter button Enter button perform action 38 3-2 Weight Calibration There are 2 functions in the Weight Calibration setting mode from to . The function is disabled when the parameter in approval model). is set as “01” or “03” (for Press Enter button Key in parameter from 00 ~ 02 To exit the weight calibration, key in “00” and press Enter button. C button clear parameter Enter button perform action Exit the Weight Calibration Mode Weight Calibration Restore to the Default Setting 39 3-2-1 Weight Calibration Select calibration. in the General Function setting mode to set weight The LCD displays the calibration weight value (the maximum capacity of 1st unit) and the unit. The digit on the left side keeps flashing. Revise the calibration weight value if needed. Press Enter button kg Put the platter on the scale and ensure there is free of load. Then press Enter button. The scale is calculating the internal value of the zero point. After stabilization, the LCD shows the calibration weight value. . Press MR button to calculate the internal value of zero point. kg About 2 seconds later kg . Press MR button to quit SPAN calculating mode Place the displayed weight on the weigh pan and press Enter button. The scale calculates the full capacity internal value and after stabilization, the buzzer beeps 3 times. Remove the weight from the weigh pan and the procedure is completed. About 2 seconds later To exit the weight calibration, key in “00” and press Enter button. C button clear parameter Enter button perform action Weight calibration conditions: The calibration procedure will not be carried out if the difference between the internal and external ratio of external calibration weight is > 3 of that of initial factory calibration. The internal and external ratio of the initial factory calibration -3 < The internal and external ratio of external weight calibration < The internal and external ratio of the initial factory calibration +3 40 3-2-2 Restore to the Default Setting Select default setting. in the General Function setting mode to restore the Press Enter button Parameter setting: 00 Exit the setting 01 Restore to the factory default setting Key in parameter from 00 to 01 Press Enter button C button clear parameter To exit the weight calibration, key in “00” and press Enter button. Enter button perform action 41 3-3 RS232 Bi-direction Function Setting There are 12 functions in the Bi-direction function setting mode from to . Press Enter button Key in parameter from 00 to 12 Refer to the following overview of RS232 Bi-direction Setting To exit RS232 Bi-direction setting mode, key in “00” and press Enter button. C button clear parameter Enter button perform action 42 Overview of RS232 Bi-direction Setting Exit the RS232 Bi-direction Setting Mode Baud Rate Setting Communication Protocol Setting Output Format Setting Continuous Transmission Setting Selection of Continuous Transmission Rate Output Condition Setting Auto Transmission at Zero Reset of Auto Transmission Condition of Manually Printing Real Time Clock Setting (Hour) Real Time Clock Setting (Date) RS232 Serial Interface Setting Mode 43 3-3-1 Baud Rate Setting Select in the RS232 Bi-direction setting mode to set the Baud Rate. Press Enter button LCD displays the last value. Factory default value: 9600 (bits/sec) Key in parameter from 00 to 06 Parameter setting: 00 600 (bits/sec) 01 1200 (bits/sec) 02 2400 (bits/sec) 03 4800 (bits/sec) 04 9600 (bits/sec) 05 19200 (bits/sec) 06 38400 (bits/sec) Press Enter button To exit the RS232 Bi-direction setting, key in “00” and press Enter button. C button clear parameter Enter button perform action 44 3-3-2 Communication Protocol Setting Select in the RS232 Bi-direction setting mode to set the communication protocol. Press Enter button LCD displays the previous value. Factory default setting: N81 Key in parameter from 00 to 02 Parameter setting: 00 N 8 1 (none parity check, 8 data bits, 1 stop bit) 01 E 7 1 (even parity check, 7 data bits, 1 stop bit) Press Enter button 02 O 7 1 (odd parity check, 7 data bits, 1 stop bit) To exit the RS232 Bi-direction setting, key in “00” and press Enter button. C button clear parameter Enter button perform action Relevant information please see Appendix 1 45 3-3-3 Output Format Setting Select in the RS232 Bi-direction setting mode to set the output format. LCD shows the last setting. Factory default setting: 00 Press Enter button Parameter setting: 00 Same data as the scale in general format 01 Gross weight in general format 02 Net weight in general format 03 Same data as the scale in simple format 04 Gross data in simple format 05 Net data in simple format 06 Hi/Lo/OK status + Same data as the scale in simple format 07 Hi/Lo/OK status + Simple gross weight in simple format 08 Hi/Lo/OK status + Simple net weight in simple format 09 Tare value in general format 10 PreTare value in general format 11 RS232 serial format Key in parameter from 00 to 11 Press Enter button To exit the RS232 Bi-direction setting, key in “00” and press Enter button. Enter to connect RS232 serial format by key in “11”. Relevant information please see Appendix 1 C button clear parameter Enter button perform action 46 3-3-4 Continuous Transmission Setting Select in the RS232 Bi-direction setting mode to set the continuous transmission. Press Enter button LCD shows the last setting. Factory default setting: 00 Key in parameter from 00 to 04 Parameter setting: 00 Command mode 01 Continuous transmission mode 02 Auto transmission mode 03 Manually printing format mode 04 Shut down RS232 Press Enter button To exit the RS232 Bi-direction setting, key in “00” and press Enter button. C button clear parameter Enter button perform action Relevant information please see Appendix 1 47 3-3-5 Selection of the Continuous Transmission Rate Select in the RS232 Bi-direction setting mode to set the continuous transmission rate. Press Enter button LCD shows the last setting. Factory default setting: 4 record/sec Key in parameter from 00 to 05 Parameter setting: 00 1 times/sec 01 2 times /sec 02 4 times /sec 03 8 times /sec 04 16 times /sec 05 More than 16 times/sec Press Enter button To exit the RS232 Bi-direction setting, key in “00” and press Enter button. C button clear parameter Enter button perform action 48 3-3-6 Output Condition Setting Select in the RS232 Bi-direction setting mode to set the output condition. Press Enter button LCD shows the last setting. Factory default setting: 00 Key in parameter from 00 to 01 Parameter setting: 00 Output all the time 01 Stable weight output only (No output when under/overload or unstable) Press Enter button To exit the RS232 Bi-direction setting, key in “00” and press Enter button. C button clear parameter Enter button perform action 49 3-3-7 Auto Transmission at Zero Select in the RS232 Bi-direction setting mode to set the auto transmission at zero. Press Enter button LCD shows the last setting. Default setting: 05 05e Key in parameter from 00 to 99 Parameter setting: 00 00 e 01 01 e 02 02 e Press Enter button 99 99 e To exit the RS232 Bi-direction setting, key in “00” and press Enter button. C button clear parameter Enter button perform action 50 3-3-8 Reset of Auto Transmission Select in the RS232 Bi-direction setting mode to reset the auto transmission. Press Enter button LCD shows the last setting. Default setting: 00 00e Key in parameter from 00 to 99 Parameter setting: 00 00 e 01 01 e 02 02 e Press Enter button 99 99 e C button clear parameter To exit the RS232 Bi-direction setting, key in “00” and press Enter button. Enter button perform action 51 3-3-9 Condition of Manually Printing Select in the RS232 Bi-direction setting mode to set the condition of manually printing. Press Enter button LCD shows the last setting. Factory default setting: 00 Key in parameter from 00 to 01 Parameter setting: 00 Transmit immediately 01 Transmit when stable Press Enter button C button clear parameter Enter button perform action To exit the RS232 Bi-direction setting, key in “00” and press Enter button. 52 3-3-10 Real Time Clock (Hour) Select in the RS232 Bi-direction setting mode to set the real time clock for time. Press Enter button LCD shows the current time (24 hours) Use”0”~”9” buttons to key in ”hour”, “minute” and “second”. MR button move the flashing letter to left Enter button perform action Press Enter button To exit the RS232 Bi-direction setting, key in “00” and press Enter button. 53 3-3-11 Real Time Clock (Date) Select in the RS232 Bi-direction setting mode to set the real time clock for date. Press Enter button LCD shows the current date (A.D.) Use”0”~”9” buttons to key in ”yy”, “mm” and “dd”. MR button move the flashing letter to left Enter button perform action Press Enter button To exit the RS232 Bi-direction setting, key in “00” and press Enter button. 54 3-3-12 RS232 Serial Interface Setting Mode Select in the RS232 Bi-direction setting mode to set the RS232 serial interface. Press Enter button Host: PC Slave: Scale Start to receive Press Enter button Enter button perform action To exit the RS232 Bi-direction setting, key in “00” and press Enter button. More information please see Appendix 1 55 Appendix 1 RS232 Serial Interface RS232 Command format: (1) The Host (PC) writes the data to the EEPROM of Slave (Scale). (2) The Host (PC) reads the data in the EEPROM of Slave (Scale), and the Slave (Scale) has the data feedback to the host (PC). Content planning 1. W , , EEPROM ( 00 ~ 58 ) Write , CR LF 1 Length of storage ( ≤15 ) 2 3 ASCII code n 2. R , Read ………………. n = length of storage CR LF EEPROM ( 00 ~ 58 ) Write above two commands to the Host (PC), the Slave (Scale) has the following format feedback to the Host (PC). L e n g t h : CR LF Length of storage A S C I I : CR LF 1 2 3 Store ASCII code S y m b o l First EEPROM address n = length of storage : n 1 n Code ……… … n 2 Store ASCII symbol Item 56 3 CR LF ………………. n = length of storage Final EEPROM address 00 01 02 03 04 05 06 07 08 09 10 11 12 13 14 15 16 17 18 19 20 21 22 23 24 25 26 27 28 29 30 31 00 02 04 06 08 10 12 14 16 18 25 27 29 34 38 40 42 44 45 46 47 48 49 50 51 52 53 54 55 56 57 58 Gross Net Tare Pre Tare Target Weight Range High Limit Low Limit Percent (%) EEPROM address 19 20 21 22 23 Weight units First unit EEPROM address Second unit EEPROM address Third unit EEPROM address Forth unit EEPROM address Fifth unit EEROM address Time Date EEPROM address 30 31 32 EEPROM address 35 36 Lo、Ok、Hi status 01 03 05 07 09 11 13 15 17 24 26 28 33 Lo EEPROM address Ok EEPROM address Hi EEPROM address Stable (Unstable) sign Stable sigh EEPROM address Unstable sign EEPROM address Accumulations quantity Accumulations total weight Check the x weight User’s definition 1 User’s definition 2 User’s definition 3 User’s definition 4 User’s definition 5 User’s definition 6 User’s definition 7 User’s definition 8 User’s definition 9 User’s definition 10 User’s definition 11 User’s definition 12 User’s definition 13 User’s definition 14 User’s definition 15 57 37 39 41 43 Format 1. W , Write , EEPROM ( 59 ~ 63 ) , CR LF 1 Code numbers ( < 15 ) 2 , …………… …. n code n =number 2. R 3 CR LF EEPROM ( 59 ~ 63 ) Read Write above two commands to the Host (PC), the Slave (Scale) has the following format feedback to the Host (PC). L e n g t h : CR LF Code numbers I t e m : CR LF 1 2 3 ………………. code n = number 58 n EEPROM address Format Transmission 59 Simple Format 60 Limit Format Press “Print” button in Limit mode 61 Target Format Press “Print” button in Target mode 62 Transmission of accumulation clear Press “Enter” button 63 Control code Transmit one time when turn on the scale Press “Print” button in Simple mode Code function Code+80 Do not print the first and final letters Code+40 Display zero by blank Code+B0 Do not print the first and final letters and display zero by blank Example: Tare Code 03 03+80 = 83 Do not print the first and final letters of Tare 03+40 = 43 Display zero by blank, such as 000.00kg 03+B0 = B3 Do not print the first and final letters, and display zero when the content of Tare value is blank. 59 Command Mode Command Format A Host Slave Command Command MZ MT MG MN MM CT CP Zero Tare Gross weight Net weight Switch operation mode Clear Tare value Clear Pre Tare value SA Auto transmit SM SO UA UB UC UD UE Manually transmit Command mode Switch to the first unit Switch to the second unit Switch to the third unit Switch to the forth unit Switch to the fifth unit Stop continuous transmission and enter the command mode % SC Continuous transmission Note : UA ~ UE settings are dependent on the model of the scale Command Format B Host Slave Command Data RW RG Read current weight Read Gross weight RH RI RN Read Net weight RJ RT Read Tare RK Read Gross (simple) Read Net (simple) Read comparison situation + current display of weight (simple) Read comparison situation + Gross (simple) Read comparison situation + Net (simple) Read current display of weight RL (simple) RE Read Pre Tare 1 add % before the command to read continuously Note : ◇ 2 add # before the command to transmit a stable value ◇ RB Read Weight Comparison Setting Value RS LO HI OK : group (00~09) Read LO setting value Read HI setting value Read Target setting value RG PT : setting item Read Range setting value Read PreTare setting value Note: No group number for PT. EX: ANS: EX: ANS: RSPT<CR><LF> Read PreTare setting value RSPTXXXXXX<CR><LF> RS03RG<CR><LF> RS03RGXXXXXX<CR><LF> Read the 3rd group of Range setting value Command Format C 60 Host Slave Command+ Data Command+ Data Write Weight Comparison Setting Value : group (00 ~ 09) : setting item LO HI OK RG PT WSXXXXXX XXXXXX: Setting value Write LO setting value Write HI setting value Write Target setting value Write Range setting value Write PreTare setting value EX: WSPTXXXXXX<CR><LF> ANS: WSPTXXXXXX<CR><LF> EX: WS03RG XXXXXX<CR><LF> ANS: WS03RG XXXXXX<CR><LF> Write PreTare setting value Write Range setting value The above 3 command formats are all bi-directional RS232 commands. Error messages on Slave (Scale): E1: Wrong command E2: Command format error (Wrong parameters) E3: Command not recognized 61 Output Data Format Weight format Gross Net Tare Plus OL Minus OL Unstable Pre Tare S S S O O U S T T T L L S T , , , , , , , G N T G G G P S T R S S S T , , , , , , , + 0 1 2 3 4 5 + 1 . 2 3 . 4 + 0 1 2 . 3 4 + SP SP SP SP SP SP - SP SP SP SP SP SP + 0 1 2 3 4 . + 0 1 2 3 4 5 2 2 2 SP SP 3 3 . SP SP 4 . 3 SP SP 5 4 4 SP SP 6 7 SP SP o 5 6 t l . 5 6 SP SP k SP SP SP SP SP SP SP SP SP SP 5 6 SP SP l 6 7 SP SP SP z g g SP CR LF SP b g 4 CR Simple format Gross Net Tare Plus OL Minus OL + 0 1 + 1 . + 0 1 + SP SP - SP SP 6 5 5 SP SP 7 6 6 CR LF SP SP Comparison status + Simple format Byte0 Byte1 Byte2 +/Byte0 : HI Byte1 : OK Byte2 : LO 1 . 2 30H/31H 30H/31H 30H/31H 62 3 . 5 6 LF Serial Data Transfer/Receive Format LSB n,8,1 S MSB 8-bit data 1 STOP 0 1 e,7,1 S 7-bit data P STOP 0 1 o,7,1 S 7-bit data P STOP 0 Notes: S : Start bit STOP: Stop bit P : Parity bit 63 Appendix 2 Button Code MODE PRINT OK RANGE NET GROSS ON OFF 08 07 06 ON/OFF PRETARE ZERO 18 17 16 15 HI LO TARE C 38 37 36 35 UNITS MS MR ENTER 28 Exit the mode 26 25 Appendix 3 Digit 7 Segment Display Characters 7 segments letter Alphabet 64 7 segments letter Alphabet 7 segments letter 0 A N 1 B O 2 C P 3 D Q 4 E R 5 F S 6 G T 7 H U 8 I V 9 J W K X L Y M Z 65 Intelligent Weighing Technology has more than 50 years experience in the weighing industry, both in the USA and worldwide. With contacts in over 50 countries including the USA, we provide you with the weighing equipment you need. When you invest in weighing equipment from Intelligent Weighing Technology, you’re really buying peace of mind. Quality - Scales and balances solidly built from the ground up with superior engineering and components for exacting results. Value - From bench scales to analytical balances, weighing equipment priced for real-world business applications, with superior service and support. Experience - Expert advice to help you choose just the right product for your application. A Higher Level of Precision…A Higher Level of Performance. Intelligent Weighing Technology, Inc. www.intelligentwt.com 66