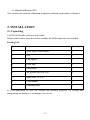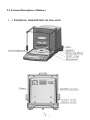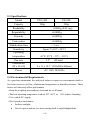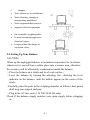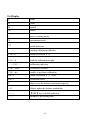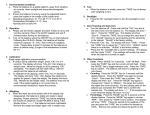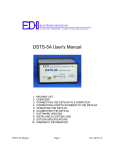
1
A Higher Level of Precision…
A Higher Level of Performance
Intell-Lab PX Series Analytical Balance
Model PXC-200, PX-200
User Operation Manual
CONTENTS
1.INTRODUCTION................................................................................1
2.INSTALLATION..................................................................................2
2-1 Unpacking.......................................................................................2
2-2 External Description of Balance...................................................3
2-3 Specifications..................................................................................4
2-4 Environmental Requirements.......................................................4
2-5 Setting Up Your Balance...............................................................5
2-6 Display.............................................................................................6
3.CALIBRATION.................................................................................7
3-1 Full Auto-Calibration....................................................................7
3-2 Part Auto-Calibration...................................................................7
3-3 Manual Calibration.......................................................................8
4. PARAMETER SETTING...................................................................9
4-1 Backlight .............................................................9
4-2 Add on internal calibrating weight..............................................9
4-3 Parameter setting...........................................................................9
4-4 Parameter.......................................................................................9
4-5 Command control........................................................................10
5. WEIGHING........................................................................................11
5-1 Normal Weighing.........................................................................11
5-2 Weighing In..................................................................................12
5-3 Piece Counting.............................................................................12
5-4 Percentage Weighing...................................................................13
6. RS-232 INTERFACE.........................................................................13
6-1 Transmission Format...................................................................13
6-2 Data Output Mode.......................................................................14
6-3 Data Output Format....................................................................14
6-4 Stable Output or Unstable Output.............................................14
6-5 Connection between Balance and External Device.................14
7. CARE AND MAINTAINANCE........................................................15
7-1 Cleaning........................................................................................15
8. TROUBLE SHOOTING...................................................................16
Intelligent Weighing Technology has more than 50 years experience in the weighing industry,
both in the USA and worldwide. With contacts in over 50 countries including the USA, we
provide you with the weighing equipment you need.
When you invest in weighing equipment from Intelligent Weighing Technology, you’re really buying
peace of mind.
Quality - Scales and balances solidly built from the ground up with superior engineering and
components for exacting results.
Value - From bench scales to analytical balances, weighing equipment priced for real-world business
applications, with superior service and support.
Experience - Expert advice to help you choose just the right product for your application.
Quality + Value + Experience…it adds up to the Intelligent Investment.
Intelligent Weighing Technology, Inc.
www.intelligentwt.com
© Intelligent Weighing Technology, Inc.
All rights reserved worldwide.
The information contained herein is the property of Intelligent Weighing Technology, Inc. and is supplied without liability for errors or
omissions.
No part may be reproduced or used
accept as authorized by contract or other written permission.
the foregoing restriction on reproduction and use extend to all media in which the information may be embodies.
The copyright and
1. INTRODUCTION
This manual is used for Models PXC-200 and PX-200 Electronic Analytical
Balances.
To insure proper operation on the balance, please read this manual completely
before you start to use your balance.
Analytical balances are the latest products of years of research, design, development
and infield testing. Every balance incorporates the Thermal Separation
Technology™, advanced electromagnetic force sensor technology, and superior
software technology. They offer the following features:
·Easy to operate and read results from a clear large LCD with a white backlit
display;
·Rapid weighing speed is 10 times faster than mechanical balances;
·Able to tare up to the maximum capacity of the balance;
·Multiple weighing modes can be selected;
1) Normal weighing;
2) Piece counting;
3) Percentage weighing;
·Multiple weighing units conversion such as gram, pound, ounce and carat as
standard units along with counting and percentage modes.
·A standard RS-232 interface for connecting peripheral devices such as computer or
printer;
·Easy to calibrate the balance in three ways:
1). Auto-calibration
Auto calibration. PXC-200 only. The balance will be calibrated automatically via a
build-in calibration weight when time or temperature exceeds the limit;
2). One touch calibration
The balance will be calibrated automatically via a built-in weight just by pressing
CAL key; PXC-200 only
·1·
3). Manual calibration (PX)
You can also use external calibration weights to calibrate your balance if needed.
2. INSTALLATION
2-1 Unpacking
CAUTION: Handle with care at all times!
Remove the balance from the carton carefully the following items are included:
Packing List
No.
Item
Quantity
1
Main body of the balance
1
2
Pan
1
3
Pan support
1
4
Draft ring
1
5
Dust guard
1
6
AC power cord 120 VAC
1
7
Spare fuse(0.5 A)
1
8
User manual
1
9
Cleaning cloth
1
It is recommended to save the cartons and packing materials for storing and
transporting the balance or returning it for service.
·2·
2-2 External Description of Balance
·3·
2-3 Specifications
Model
PXC-200
PX-200
Capacity
200g
200g
Readability
0.0001g (0.01 mg)
Repeatability
±0.0002g
Linearity
±0.0002g
Four-corner
±0.0002g
Stabilization time
Sensitivity
Operating
temperature
~ 5 sec.
2ppm/℃(10℃--30℃)
41°F- 85°F (5℃—30℃)
Pan size
Dimensions
(W x H x D)
3.5”
(90 mm)
8 x 11 x 18.1” (205x280x460mm)
Power
AC 110V 50/60 Hz
2-4 Environmental Requirements
As a precision instrument, the analytical balance requires an environment which is
free from excessive air flow, vibration and temperature or humidity extremes. These
factors will adversely affect performance.
·Keep the weighing area ambient, clean and dry at all times;
·The best operating temperature is about 20℃/68℉ at 50% relative humidity;
·Use a stable AC supply;
·Don’t position the balance:
•
In direct sunlight;
•
Next to open windows or a door causing draft or rapid temperature
·4·
•
changes;
•
Near a heater or air conditioner;
•
Near vibrating, rotating or
reciprocating machinery;
•
Near equipment that creates a
•
magnetic field or equipment
•
On a unstable weighing table;
•
In areas containing aggressive
chemical vapors;
•
In areas where the danger of
explosion exists.
2-5 Setting Up Your Balance
CAUTION:
Warm up the unplugged balance at an indoor temperature for two hours
whenever it is moved from a colder place into a warmer area, otherwise
the accuracy will be affected by condensation inside the balance.
·Place the balance on a stable and level work surface;
·Level the balance by turning the adjusting feet, checking the level
indicator on the balance, until the bubble appears in the center of the
circle;
·Carefully place the parts in the weighing chamber as follows: dust guard,
draft ring, pan support and pan;
·Plug in the AC line cord. (110 Volt 50/60 Hz only)
Check if the balance supply matches your main supply before plugging
in.
·5·
2-6 Display
g
gram
ct
carat
lb
pound
oz
ounce
∴
piece counting mode
%
percentage mode
○
stable indicator
—
waiting calibration indicator
CAL--0
when calibration is “0”
CAL—F
load the calibration weight
――CAL――
calibrating indicator
CAL—End
calibration is ended
CAL—no
unable to perform calibration
Err--0
when calibration is “0” error
Err--1
calibration error
E
object over the balance maximum capacity
-E
Object under the balance readability
--------
【SET】key available indicator
……..
balance is processing data
·6·
3. CALIBRATION
CAUTION: THIS IS A SENSITIVE INSTRUMENT PLEASE
TREAT IT CAREFULLY!
Why do we need to calibrate the balance?
Our electronic analytical balance is designed on the equilibrium principle
of electronic magnetic force. Among the various factors that may affect
the accuracy of balance, is gravity. The quotient of Gravity changes
around the world and therefore, calibration at the operational site is most
important. It is also good practice to calibrate after moving a balance from
one area to another. Use the standard calibration weight (200.0000g ) to calibrate
(PX-200 or the internal calibration process (PXC-200).
There are three ways to calibrate the analytical balance.
3-1 Manual Calibration (for PX-200)
(1). Remove objects from the pan, press [TARE] key, 0.0000g will be displayed
(2). Press [CAL] key, “ CAL--0”will be displayed, after about 3 seconds,
“CAL—F” will be displayed
(3) Put 200g(Level F1)external weight on the center of the pan, then close the
door of weighing chamber
(4). Press [TARE] key, “200.0000 g” will be displayed after “――CAL――”
flashing about 5 to 10 seconds;.
(4) If the difference between displayed value and the real value of external weight
is more than ±1, the user needs to calibrate again until the difference is less
than ±1.
3.2
Part Auto-Calibration (for PXC-200)
According to parameter setting and parameter setting table, set C1 to C1—0. When
you need to calibrate, press [CAL] key, the balance will start calibration.
NOTE: when there is an object on the pan or internal weight is on the internal
·7·
weighing system, calibration cannot take place, information will be
displayed to show you that you need to calibrate; when the object is
removed from the pan, In addition, the user can press [CAL] key again
to cancel the calibration. In this mode, the unit will not calibrate with
changes in temperature or time.
According to parameter setting and parameter setting table, set C1 to C1—1, when
“C1—1” is displayed, press [CAL] key, the value of internal weight will be
displayed, press [MODE] key to increase the value, press [PRINT] key to decrease
the value, by pressing [MODE] key or [PRINT] key change this value into
200.0000 or the value of the external weight, then press [TARE] key to go back to C
parameter setting status, press [TARE] key again to save the value in balance’s
internal memory. When the user does not want to use manual calibration, the value
200.0000 or other value need to be changed back to factory setting. NOTE! THIS
SETTING SHOULD BE USED WITH THE UTMOST CARE AS CHANGING
THIS VALUE WILL CHANGE THE READING OF THE BALANCE.
3.3
Full Auto-Calibration (for PXC-200)
According to the parameter setting table, set C1 to C1 — 0. Under full
auto-calibration status, according to the changes of time and temperature the system
will calibrate automatically.
NOTE: when there is an object on the pan, calibration cannot take place,
information will be displayed to show you that you need to calibrate;
when the object is removed from the pan.
4. PARAMETER SETTING
4.1
Backlight Setting
When the balance is on, press [SET] key twice to switch on backlight; if the light is
already on, then after pressing [SET] key twice will turn the light off.
4.2
Weighing Units and Weighing Modes Convention
When the balance is on, press [MODE] key repeatedly, it displays the weighing
units ‘g’, ‘ct’, ‘lb’, ‘oz’ and the weighing modes ‘piece counting’ and ‘percentage
·8·
weighing’ in turn.
4.3
Parameter setting
When the balance is on, press [SET] key, then press [PRINT] key, “Cx—y”will be
displayed, x’s values are 1-8, press [PRINT] key to view Cx’s value; y is the value
set by Cx, press [MODE] key to change the value of y, after the setting is done,
press [TARE] key, “. . . . . . ”will be displayed. After about 2 seconds, the balance
will save and upgrade the setting and then the balance is ready to be used.
4.4
Parameter
Cx
C1:
Calibration mode
C2:
Set the basic number
of samples for Piece
counting
C3: Zero Tracking
“0” point minimum
display value
C4:
Serial baud rate
*C5:
Data
mode
C6:
Key tone
output/print
Cx—y
*C1—0
C1—1
*C2—0
C2—1
C2—2
C2—3
Meaning
Auto-calibration with the built-in weight
Manual calibration with external weight
10
20
50
100
C2—4
1000
C3—0
C3—1
C3—2
C3—3
C3—4
*C3—5
C3—6
*C4—0
C4—1
C4—2
C4—3
C5—0
C5—1
*C5—2
No “0” point tracking status
1d
2d
3d
4d
5d
Not for user
2400bps
1200bps
4800bps
9600bps
On zero stable
On stable
On command
C5—3
Continuous
*C6—0
C6—1
No
Yes
·9·
(restart the balance by pressing
[ON/OFF] key after setting)
C7:
Anti-interference
Filtering
C7—0
*C7—1
C7—2
C7—3
*C8—0
C8—1
C8:With
power
screen will display
*is factory default setting
Weak
Medium
Strong
Yes
No
(restart the balance
re-plugging after setting)
by
●On zero stable output: when 0.0000g is displayed, put object on the pan, after
the value is stable, there will be a group of data
transferred to an external device via the RS232 port
●On stable output: after the weight is stable, there will be a group of stable data
transferred
●On command output: [PRINT] key, command P < CR > < LF > data
transferred through serial port, after the balance
receiving command once, the current weighing data
will be transferred
●Continuous output: the balance transfers weighing data every 0.3 second
4.5 Command Control
After the balance receiving the command, the command will be sent to external
device, to inform external device that the balance will respond; if the command is
wrong, “Err”will be sent to external device, it means that the balance has received
an invalid command, valid commands are:
① O <CR> <LF> ON/OFF command is as the same as ON/OFF key on the
balance(4F 0D 0A);
② T <CR> <LF> TARE command is as the same as [TARE] key on the
balance(54 0D 0A)
;
③ C <CR> <LF> CAL command is as the same as [CAL] key on the
balance〈43 0D 0A〉
;
④ M <CR> <LF> MODE command is as the same as [MODE] key on the
balance(4D 0D 0A);
⑤ P <CR> <LF> PRINT command is as the same as [PRINT] key on the
·10·
balance(50 0D 0A)
;
<CR>:ENTER(0D)
<LF>:LINEFEED(0A)
5. WEIGHING
5.1
Normal Weighing
(1). Plug in and pre-warm your balance at least 1 hour before weighing.
(2). Ensure the pan is empty, press [ON/OFF]key, 0.0000g will be displayed;
after the auto calibration (PXC 200 model), 0.0000g will be displayed.
For PX 200 model, press the [CAL] key and carefully apply the
calibration weight provided.
(3). If you require to use other unit (ct, lb), or other weighing method, press
[MODE] key to change displayed data to another unit or other weighing
method.
(4) Open the door of weighing chamber, put the object on the centre of the pan,
then close the door of weighing chamber, after the data is stable, record the
data.
(5). Open the door of weighing chamber take the object out, carry on weighing;
if you do not want to use the balance, close the door of weighing chamber
to avoid dust getting inside the balance and to keep the air inside the
balance chamber stable.
5.2
Weighing In a Container
(1). Put the container on the pan.
(2). Wait “O”—stable indicator displayed, then press [TARE] key to tare,
0.0000g will be displayed.
(3). Put the object in the container.
(4). Wait “O”—stable indicator displayed, then read the weight of object
5.3
Piece Counting
·11·
(1). Select a reference number of the samples according to PARAMETER
SETTING (50 for example), and set the parameter setting to C2
parameter).
(2). press [TARE] key to tare, 0.0000g will be displayed after the balance is
stable.
(3). Press [MODE] key to change the balance into piece counting status.
(4). Put the sample on the centre of the pan, then close the door of the
weighing chamber. (If using a container, tare off the container first)
(5). Press [CAL] key, the balance will record the sample according to C2
parameter setting. (50 for example)
(6). After recording the sample, the balance will display the number in the
sample according to C2 parameter setting, remove the sample, wait until
the stable “O” is displayed, you may start the piece counting operation.
NOTE: The sample unit weight value should not be less than
readability value.
5.4
Percentage Weighing
(1). Press [TARE] key, 0.0000g will be displayed after the balance is stable.
(2). Press [MODE] key to change the balance into Percentage weighing status
(3). Put the object on the centre of the pan, then close the door of weighing
chamber.
(4). Press [CAL] key, the system records this sample as the object of reference
(100.00%--basic value)
(5). After selecting the sample, 100.00% will be displayed. Remove the sample,
wait until stable “O” displayed, you can now start the percentage weighing
operation
NOTE: The sample value should not be less than readability value.
6. RS-232 INTERFACE
6.1
Transmission Form: asynchronous transmission
Baud rate: 1200, 2400, 4800, 9600
·12·
Start bit: 1
Stop bit: 1
Data bit: 8
Parity: none
6.2
Data Output Mode
See parameter setting table C5’s information
6.3
Data Output Format:
FXXXX.XXXXKKK<CR> <LF>
F:sign bit “+” or “-”
X:0—9 weighing data
.:decimal point
K:reservation three sign of weighing unit, right align, if there is not three sign
space will fill in the chamber
<CR>:ENTER
<LF>:LINE FEED
For example, if the value is +10.0000g, after the transmission it will be +0010.0000
g<CR><LF>
6.4
Stable Output or Unstable Output
When it is unstable output, KKK are space; When it is stable output, there will be
information sent out.
6.5
Connection of Balance and External Device
balance
computer
9 pins
9 pins
2 ——— 2
3 ——— 3
5 ——— 5
balance
series interface printer
9 pins
25 pins
2 ————— 2
3 ————— 3
5 ————— 7
NOTE: the length of data line should not be more than 48 ft (15 meters).
7. CARE AND MAINTENANCE
·13·
·Do not use sharp or rough objects (such as a pen or knife etc.) to touch the
keyboard; use your fingers only;
·Do not let any object fall on the pan, the weighing system will be damaged;
·Do not expose the balance to high temperature or to dusty environment;
·Do not disassemble the balance without permission, this will void the warranty.
Also, the balance is supplied with 120 VAC power. DO NOT REMOVE ANY
HOUSING WITHOUT DISCONNECTING FROM THE POWER SUPPLY;
·It is better to cover the balance with the supplied dust cover after use;
·Keep the balance clean and dry.
7-1 Cleaning
(1). Unplug the AC adapter before cleaning;
(2). Do not use any aggressive cleaning agent;
(3). Use a damp, soft, lint free cloth with some mild detergent such as soap;
(4). Make sure no liquid enters into the balance;
(5). After cleaning, wipe down the balance with a piece of lint free, soft, dry cloth.
8. TROUBLE SHOOTING
Problem
Display
blank
·
·
is ·
Possible Cause
Solution
· Plug in the AC/DC adapter
No power
· Replace the fuse, but you should
The fuse is blown
There is a problem with the find out why the fuse blew!!
· Call a qualified electrician
120 VAC supply
·14·
· Improve working conditions by
avoiding vibration or drafts and
· Bad working environment
make sure the balance is on a
· The door of the chamber
stable surface
does not close properly
· Close the door properly
·
There is interference·
Remove the object and reseat the
between the pan, pan
pan assembly to ensure no
Displayed
support or dust guard and
interference
the balance housing
value
is
Connect an external AC main
· Unstable power supply
unstable
stabilizer
Only weigh less than the capacity on
The pan is overloaded
the front of the balance
· The object weighed is
unstable (evaporation or
Material which decreases or
absorption of moisture)
increases in weight will never give
stable results
·
·
There is a
The balance is not calibrated
Calibrate the balance
large error· The display is not tared
· Press TARE key to zero the
between the
before weighing
actual value· The balance is not properly
display
·
and
leveled
Level the balance by turning the
displayed
value
adjusting feet
·15·