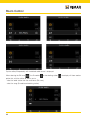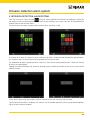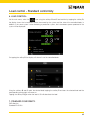
1
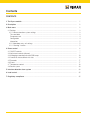
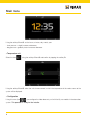
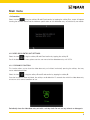
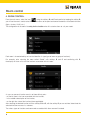
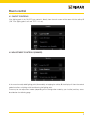
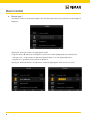
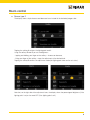
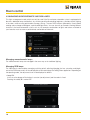
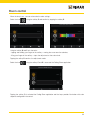
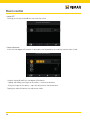
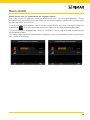
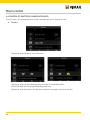
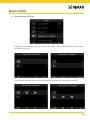
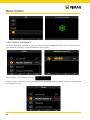
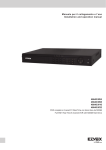
User instructions By-me automation module for video door entry unit. Contents CONTENTS 1. The By-me module………………………………………………………………………………………………… 1 2. Description………………………………………………………………………………………………………… 2 3. Main menu………………………………………………………………………………………………………… 3.1 Settings………………………………………………………………………………………………………… 3.1.1 Home automation system settings………………………………………………………………………… Time and date …………………………………………………………………………………………………… Temperature unit ………………………………………………………………………………………………… Configuration …………………………………………………………………………………………………… Information ……………………………………………………………………………………………………… 3.1.2 Video door entry unit settings ……………………………………………………………………………… 3.1.3 "Cleaning" function…………………………………………………………………………………………… 2 3 3 3 4 4 5 5 5 4. Room control……………………………………………………………………………………………………… 4.1 ON/OFF controls……………………………………………………………………………………………… 4.2 Adjustment controls (dimmer)………………………………………………………………………………… 4.3 Managing monochromatic and RGB lamps………………………………………………………………… 4.4 Control of shutters/blinds with slats………………………………………………………………………… 4.5 Scenarios……………………………………………………………………………………………………… 4.6 Events…………………………………………………………………………………………………………… 4.7 Temperature control…………………………………………………………………………………………… 4.8 Sound system………………………………………………………………………………………………… 6 7 7 10 14 17 17 18 30 5. Intrusion detection alarm system……………………………………………………………………………… 33 6. Load control……………………………………………………………………………………………………… 35 7. Regulatory compliance…………………………………………………………………………………………… 35 The By-me module 1. THE BY-ME MODULE The module 01965 is a device that the installer integrates in the video door entry unit 19558 so as to be able to control not only the video door entry unit system but also all the functions of the By-me automation system. The following figure, which illustrates the video door entry unit 19558 complete with the By-me module 01965, highlights the softkeys (touch buttons) that are used to perform all the operations for home automation system control and management. A D B C 1 Description - Main menu 2. DESCRIPTION In a system where both the By-me automation system and the Due Fili (Two-Wire) video door entry system are installed with video door entry unit 19558, module 01965 expands the functions of the video door entry unit while allowing control of lights, blinds, HVAC, sound system, scenarios, automated functions ( events) and load control. If the intrusion detection alarm system is also installed, the video door entry unit allows you to control the plant with similar modes and features to those of a digital keypad. 3. MAIN MENU The main menu for managing the home automation system, that is displayed when module 01965 is connected to the video door entry unit 19558, shows the following three icons: - Load Control (if installed in the system). - Automation. - Intrusion detection alarm system (if installed in the system). On the bottom bar of the main menu there are four icons associated with the corresponding four softkeys of the video door entry unit, in particular: ● icon (softkey A): access to the Settings menu ● icon (softkey B): move to the left among the functions ● icon (softkey C): move to the right among the functions ● icon (softkey D): icon for access to the submenu of the selected function The following menus will also show the icon preceding menu. 2 associated with the softkey A that will allow you to view the Main menu 3.1 SETTINGS. Tapping the softkey A displays the Settings menu. From this menu you can make all the settings related to the home automation system (icon video door entry system (icon ); lastly, selecting the icon ) and to the will activate the "Cleaning" function that is useful in order to safely clean the video door entry unit. 3.1.1 HOME AUTOMATION SYSTEM SETTINGS Select the icon (icon ). using the softkeys B and C (icons and ) and confirm by tapping the softkey D • Time and Date Select the icon using the softkeys B and C and confirm by tapping the softkey D. 3 Main menu Using the softkeys B and C set the hours, minutes, day, month, year: - short pressure = single increase or decrease; - long pressure = gradually faster increase or decrease. •Temperature unit Select the icon using the softkeys B and C and confirm by tapping the softkey D. Using the softkeys B and C select the unit of measurement in which the temperature of the various rooms of the system will be displayed. • Configuration Using this menu (icon ) you configure the video door entry unit with the By-me module in the automation system. This operation is solely for the installer. 4 Main menu • Information Select the icon using the softkeys B and C and confirm by tapping the softkey D; a screen will appear showing the software release and the hardware specifications of the video door entry unit and the By-me module. 3.1.2 VIDEO DOOR ENTRY UNIT SETTINGS. Select the icon using the softkeys B and C and confirm by tapping the softkey D. For all the details on this menu, please see the user manual of the video door entry unit 19558. 3.1.3 "CLEANING" FUNCTION. This function allows you to clean the video door entry unit without involuntarily pressing the softkeys that may cause undesired operation. Select the icon using the softkeys B and C and confirm by tapping the softkey D. Once the function has been activated, the softkeys are disabled for 15 seconds after which the video door entry unit returns to its normal conditions of use. Periodically clean the video door entry unit with a soft dry cloth. Do not use any solvents or detergents. 5 Room control 4. ROOM CONTROL. From the main menu, select the icon using the softkeys B and C and confirm by tapping the softkey D; you will see the menu used to select the different rooms of the plant and control the devices associated with them (lights, shutters, HVAC, etc.). The configuration of the rooms is solely for the installer who will customize them to suit your needs. Each room is characterized by an icon that identifies its type (type of room or group of functions). For example, after selecting the room called “Studio” with softkeys B and C and confirming with D, the display will show a list of all the functions associated with this room. As you can see each function consists of three distinct parts: - on the left there is the icon associated with the function; - in the middle a description of the function; - on the right the state of the function (where applicable). After selecting the desired function with the softkeys B and C, with the softkey D you can activate / deactivate the selected function or access its submenu. The various types of functions and commands associated with them are now illustrated. 6 Room control 4.1 ON/OFF CONTROLS If the lighting point is the ON-OFF type, control is directly from the main screen of the room with the softkey D (“ON” if the lighting point is off and "OFF" if it is on). 4.2 ADJUSTMENT CONTROLS (DIMMER) In the case of an adjustable lighting point (dimmerable), on tapping the softkey D, the display will show the control mode that allows switching on/off and dimming the lighting point. There may be two adjustment modes (depending on the configuration made by your installer) and they are as described on the following page. 7 Room control Dimmer type 1 The display shows an incremental progress bar that during the adjustment indicates the percentage of brightness. Tapping the softkey A switches the lighting point on/off. Using the softkeys B and C set the brightness whose level will be highlighted by the horizontal bar: - short pressure = single increase or decrease (approximately 5% of the original brightness); - long pressure = gradually faster increase or decrease. Tapping the softkey D confirms the adjustment made (the lighting point takes on the set status). 8 Room control Dimmer type 2 The display shows simple increase and decrease icons instead of the horizontal progress bar. Tapping the softkey A switches the lighting point on/off. Using the softkeys B and C you set the brightness: - tapping and holding your finger on the softkey = increase or decrease; - lifting your finger off the softkey = stops the adjustment at the desired level. Tapping the softkey D confirms the adjustment made (the lighting point takes on the set status). Note that, on the right side of the adjustment icons, the display shows the percentage of brightness (if the lighting point is on) or the word OFF (if the lighting point is off). 9 Room control 4.3 MANAGING MONOCHROMATIC AND RGB LAMPS. This lights management mode, which can only be used if the By-me home automation system is equipped with dimmers, dedicated lamps and ballasts, by switching on/off and controlling brightness, provides efficient lighting in the rooms while ensuring optimization of energy savings. The new RGB functions (patented by Vimar) enable creating colour changes and elegant, sophisticated light effects. You can also call up scenarios involving different functions in the home automation system such as, forì example, combinations of lights and colours matched to your favourite music to create a personalized, comfortable environment. Studio Luce On Off Luce dimmer 55% Tapparelle Dimmer RGB Salotto 123.3° Termostato studio Managing monochromatic lamps The monochromatic lamps are managed in the same way as for traditional lighting. Managing RGB lamps The video touch screen enables managing switching on/off, adjusting/changing the hue, saturation, and brightnessof the RGB lamps and it will also be possible to activate/change the Fading-Show application. Depending on the operating mode, the adjustment icon will be displayed as follows: • Lamp ON. In this case the degree of illumination is constant (no adjustment) and the colour is fixed. Touching the softkey D is carried OFF. Dimmer RGB Salotto 55% Dimmer RGB Salotto 10 55% 55% Room control Dimmer RGB Salotto Dimmer RGB Salotto 55% . When the lamp is on , you can also make the color settings Select the icon using the softkey C and confirm by tapping the softkey D. Dimmer RGB Salotto 55% Dimmer RGB Salotto Dimmer RGB Salotto 55% 55% 55% Dimmer RGB Salotto Dimmer RGB Salotto 55% Dimmer RGB Salotto 55% Using the softkey B and sets the color : Dimmer RGBCSalotto Dimmer RGB Salotto - tapping and holding your finger on the softkey = moving the cursor over the color bar; 55% - lifting your finger off the softkey = stops the adjustment at the colour level. 55% made. Tapping the softkey D confirms the adjustment Select the icon 55% Dimmer RGB Salotto using the softkey C and D is accessed the Fading-Show application. Dimmer RGB Salotto 55% 55% Dimmer RGB Salotto 55% Tapping the softkey D is activated the Fading-Show application and the lamp provides illumination with color sequence configured in the central. 11 Dimmer RGB Salotto 55% 55% Room control • Lamp OFF. Touching the soft keys A and D then you make the switch. Dimmer RGB Salotto Dimmer RGB Salotto • Lamp adjustment. Dimmer RGB Salotto In this case the degree of illumination is adjustable ( level displayed by the scroll bar), and the color is fixed. Dimmer RGB Salotto 55% 55% Using the softkey B and C sets the degree of illumination : - tapping and holding your finger on the softkey = increase or decrease; - lifting your finger off the softkey = stops the adjustment at the desired level. Tapping the softkey D confirms the adjustment made. 12 Room control Dimmer feature when it is combined with the "Brightness Sensor" If the system is fitted with a brightness sensor combined with art. 01467, you can keep the brightness in a room automatically constant according to the value read by the sensor and a brightness setpoint that is set automatically with each adjustment on the dimmer. The function of keeping the brightness constant can be switched on/off at any time by touching the softkey corresponding to ; in this case the controls become the same as for any other dimmered lighting point. This function then allows obtaining energy savings as natural light is used, as long as possible, instead of artificial light for lighting the room. On the touchscreen, the dimmer combined with the brightness sensor can be added to any room screen and the view is similar to the following: 13 Room control 4.4 CONTROL OF SHUTTERS / BLINDS WITH SLATS Using this menu, you can open/close the shutters and blinds and set the angle of the slats. Shutters Tapping the softkey D displays the control menu. Tapping the softkey A stops opening/closing the shutter in the desired position. Softkeys B and C activate closing and opening respectively. Tapping the softkey D confirms the adjustment made (the shutter goes into the set position). 14 Room control Venetian blinds with slats Tapping the softkey D displays the menu that lets you choose whether to open/close the blinds or adjust the position of the slats. Use the softkeys B and C to select the desired function and confirm by touching the softkey D. 15 Room control Tapping the softkey A stops opening/closing the Venetian blind or slats Softkeys B and C activate closing and opening respectively. Tapping the softkey D confirms the adjustment made (the blind and slats go into the set position). 16 Room control 4.5 SCENARIOS. If you want to activate a scenario in a room, select it using the softkeys B and C and tap the softkey D. The icon identifying the activated scenario will illuminate for approximately 10 seconds. 4.6 EVENTS. If you want to enable/disable an event associated with a room, select it using the softkeys B and C and tap the softkey D to enable/disable it. The icon associated with the softkey D will be be activated. if the event is already active and will be if the event is to The icon identifying the event will be illuminated when the event is active and will be turned off when it is not. 17 Room control 4.7 TEMPERATURE CONTROL. If there is an HVAC zone in a room, the menu can display the measured temperature, modify the type of operation, the set temperature and the speed (from 1 to 3) of the fan coil. As you can see the HVAC zone is composed of three distinct parts: - the measured temperature is shown on the left; - a description of the zone in the middle; - the operating mode on the right. Tapping the softkey D displays a list of the menus used to control the selected HVAC zone. N.B. Regardless of the initial operating mode, each menu in the list has a different order for displaying the screens. At the graphical user interface level, the thermostat and the temperature probe behave in a similar way; it will then display: • Current temperature. • Temperature measured by the external sensor connected to the thermostat input (if fitted). • Relative humidity, measured by the electronic humidity sensor (if fitted). • Speed of fan coil 18 (if fitted). Room control • Current setpoint. • Output status (on, off and, when present, with boost) . • Alarm symbol of an external probe used as a screed alarm in an underfloor system . • Manually setting the temperature Using the softkeys B and C select and confirm by tapping the softkey D. Using the softkeys B and C set the temperature: - short pressure = single increase or decrease; - long pressure = gradually faster increase or decrease. Tap the softkey D to confirm your setting. CAUTION: If the current operating mode is AUTO, the thermostat switches to TIMED MANUAL mode and you need to set the duration of this mode. 19 Room control Using the softkeys B and C set the time interval at the end of which the thermostat will return to the previous operating mode. - short pressure = single increase or decrease; - long pressure = gradually faster increase or decrease. Tap the softkey D to confirm your setting. If the thermostat is in any of the other operating modes, no confirmation will be displayed after setting the new temperature value. • Setting the fan coil speed (where applicable) Using the softkeys B and C select and confirm by tapping the softkey D. Using the softkeys B and C set the speed: - short pressure = single increase or decrease; - long pressure = gradually faster increase or decrease. It is also possible to turn off the fan coil by selecting OFF or to set it on AUTO mode (in this case the speed is defined according to the difference between the read temperature and the set temperature). Tap the softkey D to confirm your setting. 20 Room control • Setting the operating mode. Using softkeys B and C select . Tapping the softkey D displays the menu that allows you to select the operating mode of the HVAC zone. AUTO Using the softkeys B and C select and confirm by tapping the softkey D. This menu lets you change the HVAC programmes for automatically controlling the heating and airconditioning previously configured on the control panel. It will then be possible, for each day of the week, to set the value of the temperature levels T1, T2 and T3 where, in the heating and air-conditioning programmes, the values of these levels are always differentiable. 21 Room control • The screen below shows the programme for the first day to set; to display the next or previous one tap the softkeys B and C respectively. • Once you reach the day of the week for which you want to change the programme, tap the softkey D to activate edit mode; in this mode you can move among the hours of the day in 20-minute intervals, change the setpoint (T1-T2-T3), copy the set values to the next interval and confirm the changes. 22 Room control • After tapping the softkey D to confirm the setting, the display will show the screen used to copy the daily programme you have just changed onto one or more of the remaining days of the week or end the editing stage. • Selecting the T2 and T3. icon displays the screen used to change the value of the temperature levels T1, • All the above operations are performed using the softkeys A, B, C and D. 23 Room control Manual On selecting this mode, with the main menu of the HVAC zone you can set the desired temperature and the speed of any fan coils. Using the softkeys B and C select and confirm by tapping the softkey D. Timed manual On setting this mode, the thermostat will work in Manual mode for a certain period of time after which it will revert to the previous operating mode. Using the softkeys B and C select and confirm by tapping the softkey D. Using the softkeys B and C set the time interval at the end of which the thermostat will return to the previous operating mode. - short pressure = single increase or decrease; - long pressure = gradually faster increase or decrease. Tap the softkey D to confirm your setting. 24 Room control Using the main menu of the HVAC zone you can set the desired temperature and the speed of any fan coils. Reduction This mode is useful when you are away from home for a long time or for setting the manual temperature typically used at night (e.g. 15°C in winter). Using the softkeys B and C select and confirm by tapping the softkey D. Using the main menu of the HVAC zone you can set the desired temperature and the speed of any fan coils. 25 Room control Timed reduction Using the softkeys B and C select and confirm by tapping the softkey D. Using the softkeys B and C set the duration of time in which the thermostat will work on reduction and at the end of which it will revert to the previous operating mode . - short pressure = single increase or decrease; - long pressure = gradually faster increase or decrease. Tap the softkey D to confirm your setting. Using the main menu of the HVAC zone you can set the desired temperature and the speed of any fan coils. 26 Room control OFF Using the softkeys B and C select and confirm by tapping the softkey D. Timed OFF Using the softkeys B and C select and confirm by tapping the softkey D. Using the softkeys B and C set the interval of time in which the thermostat will be off and at the end of which it will revert to the previous operating mode. - short pressure = single increase or decrease; - long pressure = gradually faster increase or decrease. Tap the softkey D to confirm your setting. Antifreeze This mode, which can only be used on heating, permits setting a minimum temperature level so as to avoid damage to the pipes or to prevent the temperature from falling under a safety level. Using the softkeys B and C select and confirm by tapping the softkey D. 27 Room Control •THER TYPES OF ADJUSTMENTS The By-me automation module 01965 lets you make other types of proportional adjustments that are not necessarily related to the lighting; a viewing example can be as follows: If the actuator is OFF, the display will show: . If there is a fault on the output that you are adjusting, the associated control will display a specific warning instead of the adjustment value: 28 Room Control If the system includes the device with 3 analogue inputs 01467 which is connected to a dedicated sensor, the room control screens may display one or more instantaneous values of different variables measured by the sensor. The variables that can be viewed, which can be brightness, wind speed, barometric pressure, relative humidity, air quality, air flow, voltage, electric current, power, amount of rainfall and temperature, are shown as follows: If the displayed variable is relative humidity and when envisaged by the system, you can set a setpoint on exceeding which a special alarm will be displayed, and activated when needed. On the previous screen, notice that the ON/OFF output status indicator linked to it may be absent if the humidity control is disabled on the setpoint adjustment screen. Touching the softkey corresponding to displays the screen for setpoint adjustment (minimum value 20% - maximum value 80%) and for switching the output control on/off: 29 Room Control 4.8 SOUND SYSTEM. If there is a Sound system zone in a room, this menu allows you to control the audio signal and the corresponding sound sources. As you can see the audio zone is composed of three distinct parts: - the icon associated with the sound system is displayed on the left (lit if the system is ON, off if it is OFF ); - the name of the zone in the middle; - the icon for the type of audio source you are using on the right. If the audio zone is OFF, tapping the softkey D displays the screen used to activate the zone. If the audio zone is ON, tapping the softkey D directly displays a list of the zone controls. 30 Room Control Tapping the softkey D activates the zone and displays all the available audio control functions. • Adjusting the audio volume. Using softkeys B and C select . Using the softkeys B and C set the volume whose level will be highlighted by the horizontal bar and by the numerical percentage shown on the right: - short pressure = single increase or decrease; - long pressure = gradually faster increase or decrease. Tap the softkey D to confirm your setting. • Selecting the audio source. Using softkeys B and C select . The icon indicates the possibility of sequentially selecting the available audio sources while the icon of the selected source is shown on the right. 31 Room Control Tap the softkey D repeatedly until the desired audio source is displayed. When selecting the FM tuner , the IR module or the docking station option that, with the softkey D, allows you to: - select the radio station from the saved ones (FM tuner); - select the song (IR module and docking station). 32 , the display will show another Intrusion detection alarm system 5. INTRUSION DETECTION ALARM SYSTEM. From the main menu, select the icon using the softkeys B and C and confirm by tapping the softkey D; the display will show a representation and the status of any partitions, the system status (on, off, partitioned) and whether there are one or more alarms. The active zones are shown in green while the alarm zones are shown in red. In the event of an alarm, the alarms list (up to a maximum of three) is displayed under the partitions grid and identifies the alarm zone, the time and the icon associated with the type of alarm. For more details on alarms please refer to the "Alarms list" menu on the control panel (see par. 7 of the user manual of the By-me control panel). Tapping the softkey D displays the screen for entering the password that provides access to the system on/off/ partition controls. Using softkeys B (to enter the number) and C (to move on to the next one) enter the password. Tap the softkey D to confirm; the display will show a list of the available partitions (which may be different depending on the password you entered). 33 Intrusion detection alarm system Icons and are associated with the control for switching the entire system on and off. Scrolling through the list using the softkeys B and C pre-activates or pre-deactivates the desired partitions; to confirm the changes and then the system status change tap the softkey D. 34 Load control - Standard conformity 6. LOAD CONTROL. Via the main menu, select the icon using the softkeys B and C and confirm by tapping the softkey D; the display shows the instantaneous power consumed by the system and the state of the controlled loads; in addition, if the same system is also monitoring a production system, the instantaneous power produced in the system will be displayed. On tapping the softkey D the display will show a list of the controlled loads. Using the softkeys B and C select the desired load; tapping the softkey D activates the selected load and the corresponding warning light will come on. Tapping the softkey D again when the load is ON will deactivate the load. 7. STANDARD CONFORMITY. EMC directive. Standard EN 50428 35 Viale Vicenza, 14 - 36063 Marostica VI - Italy Tel. +39 0424 488 600 - Fax (Italia) +39 0424 488 188 Fax (Export) +39 0424 488 709 www.vimar.com 01965 EN 03 1503 VIMAR - Marostica - Italy