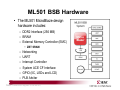
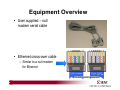
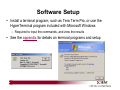
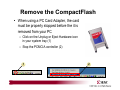
1
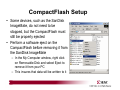
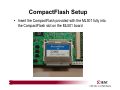
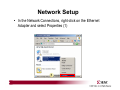
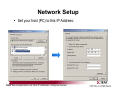
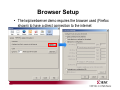
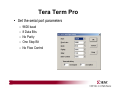
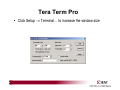
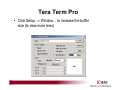
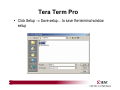
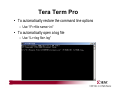
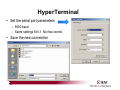
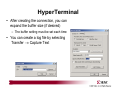
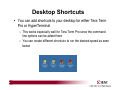
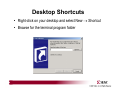
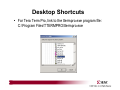
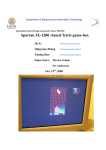
ML501 Overview and Setup
Overview of the Hardware Designs and Software Applications
How to set up the equipment, software, CompactFlash,
network, and terminal programs
May 2008
ML501 Overview
•
•
•
•
•
•
•
ML501 Overview
Equipment Overview
Equipment Setup
Software Setup
CompactFlash Setup
Network Setup
Appendix
ML501 Overview
• The ML501 embedded development platform provides several
reference designs and a versatile hardware platform for rapid
prototyping and system verification
• Hardware Designs
–
–
–
–
ml501_bsb_design
ml501_bsb_std_ip
ml501_bsb_std_ip_usb
ml501_std_ip_pcores
• Software Applications
– Standalone non-OS applications
ML501 BSB Hardware
• The ML501 MicroBlaze design
hardware includes:
– DDR2 Interface (256 MB)
– BRAM
– External Memory Controller (EMC)
• ZBT SRAM
–
–
–
–
–
–
Networking
UART
Interrupt Controller
System ACE CF Interface
GPIO (IIC, LEDs and LCD)
PLB Arbiter
Note: Presentation applies to the ML501
Also Available From
Xilinx
• These items are not included with the
ML501, but are available for purchase
from Xilinx:
– Xilinx Integrated Software Environment
(ISE)
– Xilinx Platform Studio (XPS)
– Parallel Cable IV (PC4) JTAG cable
• These items are required to run the
ML501 presentations
ML501Details
• The ML501 Board
– Zoom in for a better view (up to 400%)
• Features the Xilinx Virtex™-5 XC5VLX50 FPGA
ML501Details
Equipment Overview
• SiliconDrive™ 32 MB CompactFlash™
– Comes preloaded with hardware and software demonstration
systems for ML501
Equipment Overview
• SanDisk ImageMate™ (optional)
– Provides a USB interface for
programming CompactFlash cards
– See www.sandisk.com for more information
• SanDisk PC Card adapter (optional)
– Used in a laptop PCMCIA slot to
program CompactFlash cards
Equipment Overview
• DVI monitor
or
• DVI to VGA adapter
– To connect from the ML501 DVI
port to a standard VGA monitor
– http://www.belkin.com
• Pancake Fan (optional)
– Recommended for
cooling the Virtex-5 device
on the ML501 board
Equipment Setup
• Set Front DIP Switches to 00010101 (1)
1
Equipment Overview
• User supplied – null
modem serial cable
• Ethernet cross-over cable
– Similar to a null-modem
for Ethernet
Equipment Setup
• Connect Ethernet, DVI, and a USB Keyboard to ML501
Software Setup
• Install a terminal program, such as Tera Term Pro, or use the
HyperTerminal program included with Microsoft Windows
– Required to input the commands, and view the results
• See the appendix for details on terminal programs and setup
Remove the CompactFlash
• When using a PC Card Adapter, the card
must be properly stopped before the it is
removed from your PC
– Click on the Unplug or Eject Hardware icon
in your system tray (1)
– Stop the PCMCIA controller (2)
1
2
CompactFlash Setup
• Some devices, such as the SanDisk
ImageMate, do not need to be
stopped, but the CompactFlash must
still be properly ejected
• Perform a software eject on the
CompactFlash before removing it from
the SanDisk ImageMate
– In the My Computer window, right click
on Removable Disk and select Eject to
remove it from your PC
– This insures that data will be written to it
CompactFlash Setup
• Insert the CompactFlash provided with the ML501 fully into
the CompactFlash slot on the ML501 board
Network Setup
• Click Start → Settings → <Right Click> Network
Connections → Open
Right Click Here
Network Setup
• In the Network Connections, right-click on the Ethernet
Adapter and select Properties (1)
1
Network Setup
• Set your host (PC) to this IP Address:
Note: Some presentations use other IP addresses; change as directed
Network Setup
• Click Configure (1)
– Set the Media Type to Auto for 1 Gbps
1
Note: ML501 QuickStart uses 100Mb Full
Browser Setup
• The lwip/webserver demo requires the browser used (Firefox
shown) to have a direct connection to the internet
Appendix
• Terminal Programs
– Tera Term
– Hyperterminal
• Creating Desktop Shortcuts
Terminal Programs
• Terminal programs are used to communicate with the
processor
• Terminal programs in this setup use a serial interface
• Two free programs are available
– Tera Term Pro (recommended)
• More flexible than HyperTerminal
• See http://hp.vector.co.jp/authors/VA002416/teraterm.html
– HyperTerminal (comes with Windows)
Tera Term Pro
• Default startup mode
• Select the serial port that you
connected your cable to
Tera Term Pro
• Set the serial port parameters
–
–
–
–
–
9600 baud
8 Data Bits
No Parity
One Stop Bit
No Flow Control
Tera Term Pro
• Click Setup → Terminal… to increase the window size
Tera Term Pro
• Click Setup → Window… to increase the buffer
size (to view more lines)
Tera Term Pro
• Click Setup → Save setup… to save the terminal window
setup
Tera Term Pro
• To automatically restore the command line options
– Use “/F=<file name>.ini”
• To automatically open a log file
– Use “/L=<log file>.log”
HyperTerminal
• Upon starting, you are prompted to create a new connection
HyperTerminal
• Set the serial port parameters
– 9600 baud
– Same settings 8-N-1, No flow control
• Save the new connection
HyperTerminal
• Your new connection will appear in the start menu
Start → Accessories → Communications → HyperTerminal → <name>
HyperTerminal
• After creating the connection, you can
expand the buffer size (if desired)
– The buffer setting must be set each time
• You can create a log file by selecting
Transfer → Capture Text
Desktop Shortcuts
• You can add shortcuts to your desktop for either Tera Term
Pro or HyperTerminal
– This works especially well for Tera Term Pro since the command
line options can be added here
– You can create different shortcuts to run the desired speed as seen
below
Desktop Shortcuts
• Right-click on your desktop and select New → Shortcut
• Browse for the terminal program folder
Desktop Shortcuts
• For Tera Term Pro, link to the ttermpro.exe program file:
C:\Program Files\TTERMPRO\ttermpro.exe
Desktop Shortcuts
• Name the Tera Term Pro shortcut
• Add the command line options
• Click OK
Desktop Shortcuts
• For HyperTerminal, locate the .ht files
C:\Documents and Settings\<user name>\Start Menu\Programs
\Accessories\Communications\HyperTerminal
Desktop Shortcuts
• Name the HyperTerminal shortcut
• Click Finish
– There are no command line options
Documentation
• Virtex-5
– Silicon Devices
http://www.xilinx.com/products/silicon_solutions
– Virtex-5 Multi-Platform FPGA
http://www.xilinx.com/products/silicon_solutions/fpgas/virtex/virtex5
– Virtex-5 Family Overview: LX, LXT, SXT, and FXT Platforms
http://www.xilinx.com/support/documentation/data_sheets/ds100.pdf
– Virtex-5 FPGA DC and Switching Characteristics Data Sheet
http://www.xilinx.com/support/documentation/data_sheets/ds202.pdf
Documentation
• Virtex-5
– Virtex-5 FPGA User Guide
http://www.xilinx.com/support/documentation/user_guides/ug190.pdf
– Virtex-5 FPGA Configuration User Guide
http://www.xilinx.com/support/documentation/user_guides/ug191.pdf
– Virtex-5 System Monitor User Guide
http://www.xilinx.com/support/documentation/user_guides/ug192.pdf
– Virtex-5 Packaging and Pinout Specification
http://www.xilinx.com/support/documentation/user_guides/ug195.pdf
Documentation
• Design Resources
– ISE Development Tools and IP
http://www.xilinx.com/ise
– Integrated Software Environment (ISE) Foundation Resources
http://www.xilinx.com/ise/logic_design_prod/foundation.htm
– ISE Manuals
http://www.xilinx.com/support/software_manuals.htm
– ISE Development System Reference Guide
http://toolbox.xilinx.com/docsan/xilinx10/books/docs/dev/dev.pdf
– ISE Development System Libraries Guide
http://toolbox.xilinx.com/docsan/xilinx10/books/docs/virtex5_hdl/virtex5_hdl.pdf
Documentation
• Additional Design Resources
– Customer Support
http://www.xilinx.com/support
– Xilinx Design Services:
http://www.xilinx.com/xds
– Titanium Dedicated Engineering:
http://www.xilinx.com/titanium
– Education Services:
http://www.xilinx.com/education
– Xilinx On Board (Board and kit locator):
http://www.xilinx.com/xob
Documentation
• Platform Studio
– Embedded Development Kit (EDK) Resources
http://www.xilinx.com/edk
– Embedded System Tools Reference Manual
http://www.xilinx.com/support/documentation/sw_manuals/edk10_est_rm.pdf
– EDK Concepts, Tools, and Techniques
http://www.xilinx.com/ise/embedded/edk92i_docs/edk_ctt.pdf
Documentation
• MicroBlaze
– MicroBlaze Processor
http://www.xilinx.com/microblaze
– MicroBlaze Processor Reference Guide – UG081
http://www.xilinx.com/support/documentation/sw_manuals/mb_ref_guide.pdf
Documentation
• ChipScope Pro
– ChipScope Pro 10.1i Serial IO Toolkit User Manual
http://www.xilinx.com/ise/verification/chipscope_pro_siotk_10_1_ug213.pdf
– ChipScope Pro 10.1i ChipScope Pro Software and Cores User Guide
http://www.xilinx.com/ise/verification/chipscope_pro_sw_cores_10_1_ug029.pdf
Documentation
• Memory Solutions
– Demos on Demand – Memory Interface Solutions with Xilinx FPGAs
http://www.demosondemand.com/clients/xilinx/001/page_new2/index.asp#35
– Xilinx Memory Corner
http://www.xilinx.com/products/design_resources/mem_corner
– Additional Memory Resources
http://www.xilinx.com/support/software/memory/protected/index.htm
– Xilinx Memory Interface Generator (MIG) 2.1 User Guide
http://www.xilinx.com/support/software/memory/protected/ug086.pdf
– Memory Interfaces Made Easy with Xilinx FPGAs and the
Memory Interface Generator
http://www.xilinx.com/support/documentation/white_papers/wp260.pdf
Documentation
• Ethernet
– Virtex-5 Embedded Tri-Mode Ethernet MAC Wrapper Data Sheet
http://www.xilinx.com/support/documentation/ip_documentation/
v5_emac_ds550.pdf
– Virtex-5 Embedded Tri-Mode Ethernet MAC Wrapper Getting Started Guide
http://www.xilinx.com/support/documentation/ip_documentation/
v5_emac_gsg340.pdf
– Virtex-5 Tri-Mode Ethernet Media Access Controller User Guide
http://www.xilinx.com/support/documentation/user_guides/ug194.pdf
– LightWeight IP (lwIP) Application Examples – XAPP1026
http://www.xilinx.com/support/documentation/application_notes/xapp1026.pdf
Documentation
• PLB v4.6 IP
– Processor Local Bus (PLB) v4.6 Data Sheet – DS531
http://www.xilinx.com/support/documentation/ip_documentation/plb_v46.pdf
– Multi-Port Memory Controller (MPMC) – DS643
http://www.xilinx.com/support/documentation/ip_documentation/mpmc.pdf
– XPS Multi-CHannel External Memory Controller (XPS MCH EMC) – DS575
http://www.xilinx.com/support/documentation/ip_documentation/
xps_mch_emc.pdf
– XPS LocalLink TEMAC – DS537
http://www.xilinx.com/support/documentation/ip_documentation/xps_ll_temac.pdf
– XPS LocalLink FIFO – DS568
http://www.xilinx.com/support/documentation/ip_documentation/xps_ll_fifo.pdf
Documentation
• PLB v4.6 IP
– XPS IIC Bus Interface – DS606
http://www.xilinx.com/support/documentation/ip_documentation/xps_iic.pdf
– XPS SYSACE (System ACE) Interface Controller – DS583
http://www.xilinx.com/support/documentation/ip_documentation/xps_sysace.pdf
– XPS Timer/Counter – DS573
http://www.xilinx.com/support/documentation/ip_documentation/xps_timer.pdf
– XPS Interrupt Controller – DS572
http://www.xilinx.com/support/documentation/ip_documentation/xps_intc.pdf
– Using and Creating Interrupt-Based Systems Application Note
http://www.xilinx.com/support/documentation/application_notes/xapp778.pdf
Documentation
• PLB v4.6 IP
– XPS General Purpose Input/Output (GPIO) – DS569
http://www.xilinx.com/support/documentation/ip_documentation/xps_gpio.pdf
– XPS External Peripheral Controller (EPC) – DS581
http://www.xilinx.com/support/documentation/ip_documentation/xps_epc.pdf
– XPS 16550 UART – DS577
http://www.xilinx.com/support/documentation/ip_documentation/
xps_uart16550.pdf
– PLBV46 to DCR Bridge Data Sheet – DS578
http://www.xilinx.com/support/documentation/ip_documentation/
plbv46_dcr_bridge.pdf
Documentation
• IP
– Local Memory Bus Data Sheet – DS445
http://www.xilinx.com/support/documentation/ip_documentation/lmb_v10.pdf
– Block RAM Block Data Sheet – DS444
http://www.xilinx.com/support/documentation/ip_documentation/bram_block.pdf
– Microprocessor Debug Module Data Sheet – DS641
http://www.xilinx.com/support/documentation/ip_documentation/mdm.pdf
– LMB Block RAM Interface Controller Data Sheet – DS452
http://www.xilinx.com/support/documentation/ip_documentation/
lmb_bram_if_cntlr.pdf
– Device Control Register Bus (DCR) v2.9 Data Sheet – DS406
http://www.xilinx.com/support/documentation/ip_documentation/dcr_v29.pdf
Documentation
• IP
– JTAGPPC Controller Data Sheet – DS298
http://www.xilinx.com/support/documentation/ip_documentation/jtagppc_cntlr.pdf
– Processor System Reset Module Data Sheet – DS402
http://www.xilinx.com/support/documentation/ip_documentation/
proc_sys_reset.pdf
– Clock Generator v2.0 Data Sheet – DS614
http://www.xilinx.com/support/documentation/ip_documentation/
clock_generator.pdf
– Util Bus Split Operation Data Sheet – DS484
http://www.xilinx.com/support/documentation/ip_documentation/
util_bus_split.pdf
Documentation
• ML501
– ML501 Overview
http://www.xilinx.com/ml501
– ML501 Evaluation Platform User Guide – UG226
http://www.xilinx.com/support/documentation/boards_and_kits/ug226.pdf
– ML501 Reference Design User Guide – UG227
http://www.xilinx.com/support/documentation/boards_and_kits/ug227.pdf
– ML501 Getting Started Tutorial – UG228
http://www.xilinx.com/support/documentation/boards_and_kits/ug228.pdf
Documentation
• ML501
– ML501 Schematics
http://www.xilinx.com/support/documentation/boards_and_kits/
ml501_20061010_bw.pdf
– ML501 Bill of Material
http://www.xilinx.com/support/documentation/boards_and_kits/
ml505_501_bom.xls