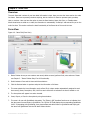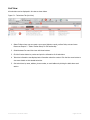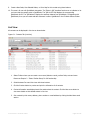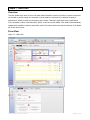
1
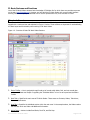
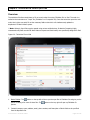
User Manual For Revised January 2, 2013 950 Boardwalk, Suite 205, San Marcos, CA 92078 • (760) 510-1200 • www.productivecomputing.com © Copyright 2013 Productive Computing, Inc. END USER LICENSE AGREEMENT (EULA) This software product is protected by copyright laws and international copyright treaties, as well as other intellectual property laws and treaties. This software product is licensed, not sold. LICENSE AGREEMENT AND DISCLAIMER: PLEASE READ ALL TERMS AND CONDITIONS OF THE LICENSE AGREEMENT BEFORE CONTINUING. USING OUR SOFTWARE INDICATES YOUR ACCEPTANCE OF THIS AGREEMENT. IF YOU DO NOT AGREE TO THE TERMS AND CONDITIONS, YOU MAY NOT INSTALL OR USE THE SOFTWARE PRODUCT. PRODUCTIVE COMPUTING MAKES NO OTHER WARRANTY, EXPRESS OR IMPLIED, INCLUDING WITHOUT LIMITATION, ANY IMPLIED WARRANTIES OF MERCHANTABILITY OR FITNESS FOR A PARTICULAR PURPOSE. Disclaimer of Damages: Productive Computing has made every effort possible to ensure that the FM Work Orders is free of any bugs or errors, however in no way is the FM Work Orders to be considered error or bug free. You assume all responsibility for any damages or lost data that may result from any errors or bugs in the FM Work Orders. IN NO EVENT WILL PRODUCTIVE COMPUTING BE LIABLE TO YOU FOR ANY GENERAL, SPECIAL, INDIRECT, CONSEQUENTIAL, INCIDENTAL OR OTHER DAMAGES ARISING OUT OF THIS LICENSE. In no case shall Productive Computing’s liability exceed the purchase price for the software or services. Data Loss/Backup Responsibility/Release of Liability: It is understood that during the normal course of software usage, computer systems can crash, remote connections can be disconnected, data/database systems can be corrupted and data loss can occur. It is also understood that the best way to fully or partially recover from such a data loss event is to setup and maintain regular backups of all data/database systems. As the user of the FM Work Orders, you are responsible for setting up and maintaining regular backups of your data/database systems. Should you experience a data loss, you shall in no way hold Productive Computing, Inc. monetarily or otherwise liable for lost data, the cost of any data recovery services or for the future losses in revenue the data loss event may cause you. We advise that, at a minimum, you perform daily backups and conduct weekly monitoring of your data backups. It is your responsibility to ensure that the consistency and quality of the backups is being maintained throughout the life history of the data/database system. Trademark Notices: FileMaker is a registered trademark of FileMaker, Inc., registered in the U.S. and other countries. The file folder logo is a trademark of FileMaker, Inc. Mac and the Mac logo are trademarks of Apple Inc., registered in the U.S. and other countries. Microsoft, Windows, and the Windows Vista logo are registered trademarks of the Microsoft Group of Companies in the U.S. and other countries. All other trademarks are the property of their respective owners. Description of Other Rights and Limitations: - Restrictions: You may not reverse engineer, decompile, modify or disassemble this software product. This software product is licensed as a single product. Its component parts may not be separated for use. You may not sell, distribute, rent, lease or lend this software product to any other party. - Software Transfer: You may permanently transfer all of your rights under this EULA, as long as you no longer have any copies, transfer all of this software product, components, media, documentation (printed or otherwise) and the recipient agrees to all terms of this EULA. User Manual – FM Work Orders Page 2 of 36 Table of Contents I. INTRODUCTION!....................................................................................................................................5 Purpose:.....................................................................................................................................................5 FM Work Orders Access:...........................................................................................................................5 FileMaker Pro Software (Required):...........................................................................................................5 II. BASIC FEATURES AND FUNCTIONS!.......................................................................................................6 Chapter 1- Overview.......................................................................................................................................6 Chapter 2 - FileMaker Basics .........................................................................................................................7 Modes ........................................................................................................................................................7 Status Toolbar Setup.................................................................................................................................8 Finding......................................................................................................................................................10 Chapter 3 - Preferences Area........................................................................................................................11 General.....................................................................................................................................................11 Users ........................................................................................................................................................12 Terms, Notes, Disclaimer.........................................................................................................................13 Company Info...........................................................................................................................................14 FM Books Connector...............................................................................................................................15 Print Layouts ............................................................................................................................................15 Chapter 4 - Items Area..................................................................................................................................17 Overview..................................................................................................................................................17 Form View................................................................................................................................................17 List View...................................................................................................................................................18 Chapter 5 - Technicians Area........................................................................................................................19 Overview..................................................................................................................................................19 Form View................................................................................................................................................19 List View...................................................................................................................................................20 Chapter 6 - Contacts Area............................................................................................................................21 Overview..................................................................................................................................................21 Form View................................................................................................................................................21 List View...................................................................................................................................................22 Chapter 7- Orders Area.................................................................................................................................23 Overview..................................................................................................................................................23 Form View................................................................................................................................................23 Chapter 8 - Technician File used on your iPad..............................................................................................25 Overview..................................................................................................................................................25 Chapter 9 - Workflow....................................................................................................................................27 Chapter 10 - QuickBooks Integration...........................................................................................................28 Overview..................................................................................................................................................28 FM Books Connector Installation and Registration.................................................................................28 First Time Connection to the QuickBooks File.........................................................................................29 General.....................................................................................................................................................30 Customers ...............................................................................................................................................31 User Manual – FM Work Orders Page 3 of 36 Items ........................................................................................................................................................32 Invoices ....................................................................................................................................................33 Taxes ........................................................................................................................................................34 Chapter 11 - Troubleshooting and Support...................................................................................................35 Troubleshooting Tips................................................................................................................................35 Re-open the Current Window..................................................................................................................35 Restart FileMaker and Re-open the FM Work Orders .............................................................................35 Restart your Computer.............................................................................................................................35 III. CONTACT US !..................................................................................................................................36 User Manual – FM Work Orders Page 4 of 36 I. Introduction Purpose: The FM Work Orders solution allows technicians and dispatchers to easily exchange electronic work orders using the ‘FileMaker Go’ app for Apple® iPad. The dispatcher’s FM Work Orders system will automatically update as the technician adds information onsite, thus keeping orders up to date and accurate. This paperless solution eliminates illegible hand writing, data entry mistakes and missing paperwork, thus increasing productivity and performance in your business! The purpose of the User Manual is to provide you with the “out of the box” set up and features of the FM Work Orders solution. FM Work Orders can be used "as is" or can be customized to fit your specific needs. Productive Computing provides customization services for a fee. If you would like to inquire about these services, please contact our Sales Department at [email protected] FM Work Orders Access: The FM Work Orders database is hosted on a centralized server “in the cloud.” Users are able to remotely access their database through the web. Currently supported internet browsers include: • Internet Explorer on Windows • Safari on Macintosh After making your FM Work Orders purchase, Productive Computing will provide you with the following: • Link to your database • Username & password specific to your organization. Initial username/password credentials are assigned. Productive Computing’s Software as a Service (SaaS) subscription plan for FM Work Orders allows one user for $25 per month. For example, one user is one dispatcher. Additional users, such as technicians, may be added for their appropriate fees. FileMaker Pro Software (Required): FileMaker Pro 12 is required in order to gain access to FM Work Orders on Mac or PC. If you need FileMaker Pro 12, please explore the following options: • Download a trial version • Purchase FileMaker Pro through Productive Computing at regular price • Subscribe to FileMaker Pro for $15/month/user (requires at least 1 year of Software as a Service commitment) For all FileMaker Pro inquiries please contact [email protected] for pricing and options. The ‘FileMaker Go’ app is required on all technicians’ iPads and is available in the iTunes App Store. An internet connection is also needed in order to successfully connect to the remote file. User Manual – FM Work Orders Page 5 of 36 II. Basic Features and Functions Use of the FM Work Orders assumes basic knowledge of FileMaker Pro for which there are countless resources on the web (www.filemaker.com). However, we have built the FM Work Orders with a user friendly interface allowing new users to quickly understand how to use this product after only a few minutes of review. Chapter 1- Overview Most areas in FM Work Orders have the sections outlined below. For clarity each section has been outlined, tagged with a numbered star and explained in Figure 1.0 below. These sections are important for understanding the basic layout and functionality when working in FM Work Orders. Figure 1.0 - Overview of Basic FM Work Orders Sections 1. Status ToolBar = Use to navigate through found set of records, add, delete, find, and sort records plus much more. Please see Chapter 2 regarding the “FileMaker Basics” on how to set up and use the Status ToolBar. 2. Main Tabs = Specifies the main area of FM Work Orders. These areas are Contacts, Orders, Technicians, Items and Preferences. 3. Area Tabs = Specifies the individual section within the main area. In the example above, the Orders section has two tabs which are Order and Additional Information. 4. Action Items = Actions include Send Order, Print File, and Get Map. User Manual – FM Work Orders Page 6 of 36 Chapter 2 - FileMaker Basics Since FileMaker is the application on which the FM Work Orders was built, it would be wise to first understand some basic FileMaker functionality to allow you to work more efficiently. You may also want to come back and reference this chapter after you have the FM Work Orders open. Modes FileMaker has four different modes which are: Browse Mode, Find Mode, Layout Mode, and Preview Mode. Select your mode depending on what work needs to be done. You can switch modes from the View option at the top, from the pop-up menu in the lower left corner, or by using keyboard shortcuts as shown in Figure 2.0 below. Figure 2.0 - FileMaker Modes • Browse Mode = Most of your work will be done here (i.e. data entry, add, edit, delete, sort, omit, etc.) • Find Mode = Search for ANY records that match your criteria known as the “found set” of records. • Layout Mode = Design and edit layouts. Typically used by a developer rather than a user and not available in this locked solution. • Preview Mode = View data before you print. User Manual – FM Work Orders Page 7 of 36 Status Toolbar Setup The Status Toolbar plays a vital role in using FM Work Orders. In order to optimize your FM Work Orders experience we recommend customizing your Status Toolbar. In order to customize your Status Toolbar please select View > Customize Status Toolbar... from the menu bar at the top as shown in Figure 2.1. You can also right click on the actual Status Toolbar and select the “Customize...” or “Customize Toolbar...” depending on your operating system as shown in Figure 2.2. Figure 2.1 - Accessing Status Toolbar from menu bar at the top Figure 2.2 - Accessing the Status Toolbar by right-clicking on a Windows or Mac machine This will open up the customize window to provide you with various options to add a command to your Status Toolbar. Although the Status Toolbar and the customize window look a little bit different on a Windows and Mac machine, the functionality of just dragging what you want from the customize window onto the Status Toolbar or what you do not want off the Status Toolbar is similar on both platforms. The customize window on both platforms is shown in Figure 2.3 and in Figure 2.4. User Manual – FM Work Orders Page 8 of 36 Figure 2.3 - Customize Window on a Windows machine Figure 2.4 - Customize Window on a Mac machine The Status Toolbar on both platforms allows you to add, remove and re-arrange the items based on your needs and also adjust the icon and text size. You may want to explore the various items in the Status Toolbar in order to work more productively and have a pleasurable FM Work Orders experience. **TIP: When starting out we recommend at least having the Record Total, Show All, New Record, Delete Record, Find, and Sort items on the Status Toolbar as shown in Figure 2.2 above. After you become more acquainted with all the functionalities of FileMaker, then you may add or remove more items from your Status Toolbar based on your work flow and preferences. ** User Manual – FM Work Orders Page 9 of 36 Finding FileMaker’s Find Mode is a useful and powerful tool. As outlined above in Figure 2.0 above there are various ways to enter Find Mode. Once in find mode, you can find based off of ANY search criteria known as the found set of records. There are many finds available and here we will show a few. For a complete list please reference FileMaker’s help menu or visit www.filemaker.com 1. For searching text fields FileMaker looks for any word that begins with or matches the word entered. For example, a find on the name "Chris" would also find the name "Christopher." For searching exact text, use an equals sign (=) followed by the text. Example: =Chris would only return those with the name "Chris"; it would not return "Christopher." For searching text fields if you enter more than one word, FileMaker finds both words in any order. 2. Search for all records that have an empty field by entering = (an equals sign) in the appropriate field. This is one of our favorites especially for clean up! 3. To specify a range, type in three periods. Example: to find all records created between 12/1/2012 and 12/15/2012, type in "12/1/2012...12/15/2012" in the creation date field. In addition to find all records where the last name begins with the letters A through C, type in "A...C" in the last name field. 4. To find items greater than or less than a certain value, use the "<" and ">" signs. 5. Omitting records: check the box labeled "Omit" under the Book icon and then type in the criteria that you want to omit in the appropriate field. For example, to omit records belonging to those living in Rhode Island, enter a find request, check "Omit", enter "RI" in the state field and then click "Find." FileMaker finds can be quite detailed and elaborate as you can typically find anything you desire. The time will come when you will want to expand and learn more about the secret life of find mode. There are many great tutorials available online and we hope this just gets you started with the possibilities. TIP: The found set of records can be identified in the upper left hand corner of the Status Toolbar as shown in Figure 2.5. Let’s explore this a little further in Figure 2.5. Figure 2.5 - Records Displayed on Status Toolbar 1. Go to the next or previous record. 2. Type a number to go to a different record. 3. Slide forward or backward to go to a different record. 4. Displays the total number in the found set. In the example above there are 34 records in the found set out of a total of 306 records. 5. Click to show only those records that are not in the current found set. User Manual – FM Work Orders Page 10 of 36 Chapter 3 - Preferences Area Now that you are more familiar with working in FileMaker, let’s explore these different types of preferences in FM Work Orders, which are “General,” “Terms, Notes, Disclaimers,” “Company Info,” “FM Books Connector,” and “Taxes.” These Preferences store system wide preferences and options for emailing the field technicians. These Preferences can be found by selecting the Preferences tab. These Preferences apply to FM Work Orders as a whole and are not user specific. Please note before you begin working on FM Work Orders, you should set up these Preferences. General The General tab provides you with the general area to specify miscellaneous information as shown below. Figure 3.0 – Preferences > General Tab 1. Dispatcher’s Email: This is the email address of the dispatcher. This email address will be used when the dispatcher sends orders to technicians and when technicians send files back. 2. Tax: Select this checkbox in order to always apply tax on the entire order. Changing this checkbox will not affect orders already created, it will only affect new orders created after the change has been made. 3. Default Layout: Select which default layout to open by default when the solution first opens. 4. Require Technician Signature: Select the box to require a technician signature. If this box is checked then a place for the technician signature will appear in the lower left hand corner of a work order. 5. Reset to factory settings: Reset FM Work Orders back to factory settings with sample data. Use with caution. 6. Clear all data: Clear out all records in FM Work Orders to begin a fresh copy. Use with caution. User Manual – FM Work Orders Page 11 of 36 Users The “Users” tab allows you to manage login credentials to gain FM Work Orders access. This tab allows you to add an unlimited number of users ONLY for login purposes. Here you may also register iPad devices, thus allowing technicians easy access into the system. Please be aware that these user credentials are different from the user SaaS Licenses purchased from Productive Computing. Your number of purchased SaaS Licenses reflects how many people may concurrently utilize FM Work Orders at a time. For instance, if you purchased 4 SaaS licenses, then you may have 4 users (at most) simultaneously log into the FM Work Orders system. Figure 3.1 – Preferences > Users Tab 1. Add Account: Add an additional user account for login purposes. 2. Active Check Box: Specify if the user account is active. 3. Register Device: Once logged into FM Work Orders on an iPad, then you may register a device with this button. A registered iPad will not require login credentials to access the system. The “Registered Device ID” field will populate with a unique ID. 4. Unregister Device: Unregister an iPad. Unregistered iPads will require login credentials to access the FM Work Orders system. User Manual – FM Work Orders Page 12 of 36 Terms, Notes, Disclaimer The “Terms, Notes, Disclaimer” tab provides you with an area to specify text that will be shown on print layouts and the terms and conditions that will be displayed on the technician file. Figure 3.2 – Preferences > Terms, Notes, Disclaimer Tab 1. Terms & Conditions: Specify the Terms & Conditions to be linked to a work order. 2. Optional Notes: Specify optional notes that will appear on the order print layouts. 3. Disclaimer: Specify disclaimer text that will appear on the order print layouts. User Manual – FM Work Orders Page 13 of 36 Company Info The “Company Info” tab provides you with an area to specify company information which will be displayed throughout FM Work Orders. Figure 3.3 – Preferences > Company Info Tab 1. Company Logo: Displays the current company logo that will be displayed on the top right corner of every layout in the dispatcher file and print layouts. 2. Buttons used to Insert, Export, or Clear the company logo. 3. Specify the License # for the company. The “License #” label can also be changed to display anything else the company wishes it to be. For example: 4. Information: Specify the company information such as address, phone number, fax number, email, etc. User Manual – FM Work Orders Page 14 of 36 FM Books Connector The “FM Books Connector” tab is only used if integrating with QuickBooks using the FM Books Connector plugin. This tab allows you to install and register the FM Books Connector, as well as make your initial QuickBooks connection. Figure 3.4 – Preferences > FM Books Connector Tab 1. Install: Installs the FM Books Connector plug-in into FileMaker. As shown you may view the version of the plug-in installed and the operating mode it is running in. 2. Register: Registers FM Books Connector according to the License ID entered. Once successfully registered you will be running in “LIVE” mode. If running in “LIVE” mode, then you do not need to register again. 3. License ID: Enter your License ID provided by Productive Computing. A demo license is entered here by default. 4. Connect: Performs the initial connection to QuickBooks. Ensure you have a QuickBooks file open prior to connecting. Refer to Chapter 10 - “QuickBooks Integration” for further details. Print Layouts These are sample print layouts of how a printed work order and contacts report will appear. User Manual – FM Work Orders Page 15 of 36 Figure 3.4 – Work Order (Left) and Contacts Report (Right) 1. Company logo set on Preferences tab. 2. Company information set on Preferences tab. 3. License # information set on Preferences tab. 4. Optional Notes set on Preferences tab. 5. Disclaimer set on Preferences tab. User Manual – FM Work Orders Page 16 of 36 Chapter 4 - Items Area Overview The main Items tab is where all your item detail information is kept. Here you store the items used on the order line items. Items can represent just about anything, but the intent is for them to represent parts, products, labor, or services. Here you have the option to store the Item Number, Name, Unit Price, or Taxable status. When these items are used on an order, the information is automatically “looked up” and entered for you on the order line item. This section outlines the basic functionality of the Items tab in Form and List view. Form View Figure 4.0 - Items Tab (Form View) 1. Status Toolbar where you can create a new record, delete a record, perform finds, sorts and more. Please see Chapter 2 - “Status Toolbar Setup” for full functionality. 2. Switch between Form and List views with these buttons. 3. Click the Preview button to preview and print the information of all items. 4. This area contains the item information such as Item ID (a unique number automatically assigned to each item record), Name, Description, SKU, Unit Price and a check box to indicate if the item is taxable or not. 5. The item picture will appear here when inserted. 6. Insert, Export, or Clear the item photo by using these buttons. 7. This area is for use with QuickBooks integration. The “Exists in QB” checkbox functions as an indicator that the item came from and exists in QuickBooks. The “QB List ID” field displays the corresponding QuickBooks list ID. If integrating with QuickBooks, then please create and edit all items in QuickBooks and simply pull the items from QuickBooks into the FM Work Orders solution. User Manual – FM Work Orders Page 17 of 36 List View All items can be displayed in list view as shown below. Figure 4.1 - Items Tab (List View) 1. Status Toolbar where you can create a new record, delete a record, perform finds, sorts and more. Please see Chapter 2 - “Status Toolbar Setup” for full functionality. 2. Switch between Form and List views with these buttons. 3. Click the Preview button to preview and print the information of all items. 4. Item information area displays basic information about the item. Click the blue arrow button to view more details on those related items. 5. Sort items by their SKU, Item name, Unit Price, or Taxable status by clicking the label title above each section. User Manual – FM Work Orders Page 18 of 36 Chapter 5 - Technicians Area Overview The main Technicians tab is where all your technician detail information is stored. A technician is anyone out in the field that will be filling in an order sent by a dispatcher. This section outlines the basic functionality of the Technicians tab in form and list view. Form View Figure 5.0 - Technicians Tab (Form View) 1. Status Toolbar where you can create a new record, delete a record, perform finds, sorts and more. Please see Chapter 2 - “Status Toolbar Setup” for full functionality. 2. Switch between Form and List views with these buttons. 3. Click the Preview button to preview and print the information of all technicians. 4. Unique Technician ID number assigned to each technician record. Enter technician name in this area. 5. Enter technician address, phone number, and email. The system uses this technician email address when you click the “Send Order” button on the Orders tab. 6. The technician picture will appear here when inserted. 7. Insert, Export, or Clear the technician photo using these buttons. 8. View this technician’s related orders. User Manual – FM Work Orders Page 19 of 36 List View All technicians can be displayed in list view as shown below. Figure 5.1 - Technicians Tab (List View) 1. Status Toolbar where you can create a new record, delete a record, perform finds, sorts and more. Please see Chapter 2 - “Status Toolbar Setup” for full functionality. 2. Switch between Form and List views with these buttons. 3. Click the Preview button to preview and print the information of all technicians. 4. Technician information area displays basic information about the contact. Click the blue arrow button to view more details on that related technician. 5. Sort technicians by name, address, phone number, or email address by clicking the label above each section. User Manual – FM Work Orders Page 20 of 36 Chapter 6 - Contacts Area Overview The main Contacts tab is where all your contact detail information is stored. A contact is a customer or prospect that is stored in the system and can be used to relate to an order. This section outlines the basic functionality. Form View Figure 6.0 - Contacts Tab (Form View) 1. Status Toolbar where you can create a new record, delete a record, perform finds, sorts and more. Please see Chapter 2 - “Status Toolbar Setup” for full functionality. 2. Switch between Form and List views with these buttons. 3. Click the Preview button to preview and print the information of all contacts. 4. Unique Contact ID number automatically assigned to each contact record. Enter company name and contact name in this area. The “QB Cust. Name” is only required if integrating with QuickBooks. 5. Enter contact address, phone number, email, and website in this area. 6. When an email address is entered a mail icon will pop up beside the field. Clicking that icon will open up a blank email document to be completed and sent to that contact. Similarly a globe will pop up beside the website field. Clicking the globe icon will redirect the user to that website through a default web browser. 7. Enter extra notes for a contact in this area. 8. Insert, Export, or Clear the contact photo using these buttons. User Manual – FM Work Orders Page 21 of 36 9. Create a New Order, View Related Orders, or Get a Map for this contact using these buttons. 10. This area is for use with QuickBooks integration. The “Exists in QB” checkbox functions as an indicator to let you know that the contact exists in QuickBooks. The “QB List ID” field displays the corresponding QuickBooks list ID. The “QB Balance” displays the customer balance from QuickBooks. If integrating with QuickBooks, then you can create and edit customers in either QuickBooks or the FM Work Orders solution. List View All contacts can be displayed in list view as shown below. Figure 6.1 - Contacts Tab (List View) 1. Status Toolbar where you can create a new record, delete a record, perform finds, sorts and more. Please see Chapter 2 - “Status Toolbar Setup” for full functionality. 2. Switch between Form and List views with these buttons. 3. Click the Preview button to preview and print the information of all contacts. 4. Contact information area displays basic information about the contact. Click the blue arrow button to view more details on that related contact in list view. 5. Sort contacts by their name, address, phone number or email address by clicking the label above each section. User Manual – FM Work Orders Page 22 of 36 Chapter 7- Orders Area Overview The main Orders tab is where all your work order detail information is stored. An Order is a generic record that can be used to provide a quote to a customer or can be used as a work order for a customer request (or appointment). Within the order you associate a given Contact, Technician, Appointment Date, Appointment Time, Description of Work, Technician Notes, Status, as well as the order details. Work Orders are automatically updated when modified on iPads by technicians onsite. This section outlines the basic functionality of the Orders tab in form and list view. Form View Figure 7.0 - Orders Tab User Manual – FM Work Orders Page 23 of 36 1. Status Toolbar where you can create a new record, delete a record, perform finds, sorts and more. Please see Chapter 2 - “Status Toolbar Setup” for full functionality. 2. Switch between Form and List views with these buttons. 3. Click the Preview button to preview and print the order information. 4. Order tab contains information about the work order. 5. Select the contact in this area via a drop down list. The address, email, and contact phone number will be pre-filled based on the contact information. Click on the blue arrow button to go to the related contact. 6. Select the appointment date and appointment time in this area. This also contains information about the Proposal Date, Order number, and Status of the work order. 7. Select the technician for the work order. The technician phone number will be pre-filled based on the contact information. Technicians may enter information in the Technician Notes area while onsite. The Technician Notes field is not modifiable by a dispatcher. 8. Enter the Description of Work in this section. Dispatchers may enter notes here intended for the technician. This area is not modifiable by a technician. 9. Choose the item under the item column and enter the quantity and taxable information for that item. You can always edit the line item values as needed; however, the item name, description, unit price, extended price, and taxable status will be pre-filled based on the item chosen and quantity specified. Click on the red X button to delete a line item. Subtotal, Tax, and Total below are calculated based on the item information. 10. Check the “Taxable” box to apply tax to the invoice and select the tax rate you would like to apply. Tax rates are managed in the Preferences area. Please note only one tax rate can be applied to one invoice at a time. 11. Subtotal, Tax, and Total are automatically calculated based on the line items and taxable status. 12. Send Order, Print File, or Get a Map of the location using these buttons. 13. Additional Information tab contains QuickBooks and Signature details for the work order. 14. This area is for use with QuickBooks integration. The “Exists in QB” checkbox functions as an indicator that the invoice exists in QuickBooks. The “QB List ID” field displays the corresponding QuickBooks list ID. The “QB Balance” displays the customer balance from QuickBooks. If integrating with QuickBooks, then you can create and edit customers in either QuickBooks or the FM Work Orders solution. 15. This area contains Contract Signatures by the Technician and Customer, as well as date/time stamps reflecting when it was signed. User Manual – FM Work Orders Page 24 of 36 Chapter 8 - Technician File used on your iPad Overview The technician file allows technicians to fill out a work order form using ‘FileMaker Go’ on iPad. The order is emailed to the technician as a “.fmpsl” file (FileMaker Pro 12 snapshot link). Once the technician opens the work order, then he/she can easily fill out the necessary fields onsite which will simultaneously update the dispatcher’s FM Work Orders system. **Note: Although .fmpsl files may be opened using various mobile devices, Productive Computing highly recommends only iPad use with FM Work Orders as layouts and functionality were specifically designed for iPad. Figure 8.0 - Technician File on iPad 1. Status Toolbar: The button on the top left will show you the open files in FileMaker Go and give you the option of closing all or some of those files. The options. button on the top right will open up FileMaker Go 2. Contact’s company name, address, email, phone number, and Description of Work fields are be pre-filled from the dispatcher file. User Manual – FM Work Orders Page 25 of 36 3. The appointment date and appointment time is pre-filled from the dispatcher file. This also contains information about the proposal date, order number and the status of the work order. This area cannot be edited. 4. The technician name and phone number is pre-filled from the dispatcher file. Technician Notes may be added the by technician while onsite. 5. Choose the item under the item column and enter the quantity and taxable information for that item. You can always edit the line item values as needed; however, the item name, description, unit price, extended price and taxable status will be pre-filled based on the item chosen and quantity specified. Click on the red X button to delete a line item. Subtotal, Tax, and Total below are calculated based on the item information. 6. Click “Sign Here” next to the technician or customer signature and select “Signature” to capture a digital signature on iPad. Technician signature option will not appear when the “Require Technician Signature” is unchecked in the “Preferences.” This preference should be configured by the dispatcher BEFORE sending file to the technician. Please be aware of the options in “Preferences” that affect iPad signature input such as “Require Technician Signature” and “Terms, Notes, Disclaimer.” 7. Get a Map of the contact location or e-mail a receipt to the customer with these buttons. 8. Subtotal, Tax, and Total are calculated based on the item information. User Manual – FM Work Orders Page 26 of 36 Chapter 9 - Workflow Now that you understand the basic functionality of the various layouts, tabs, buttons and fields, let’s have a closer look at the anticipated work flow in FM Work Orders. 1. 2. 3. 4. 5. 6. 7. 8. 9. Set up Preferences. Next enter your Technicians and Items. Afterwards enter your Contacts. Now you can enter an Order, any order details, add items to the order, and associate the order with a contact and technician. Click the “Send Order” button which will send the file to the technician via e-mail, and flag the order with a date and time that it was sent. The technician will receive the file as an attachment in his/her e-mail. The file will open on his/her iPad in the ‘FileMaker Go’ app. The technician can get a map, fill out the order, capture signatures, and e-mail a receipt to the customer. The dispatcher’s FM Work Orders system will automatically update as the technician adds information onsite, thus keeping orders up to date and accurate. **There are many other options not mentioned here such as integration with QuickBooks that can be done at any time during this workflow. Please make sure you download a demo and review all video tutorials so you can experience the full functionality of the FM Work Orders solution! ** User Manual – FM Work Orders Page 27 of 36 Chapter 10 - QuickBooks Integration Overview If using Intuit QuickBooks for Windows, then you may want to strongly consider using the QuickBooks integration features. Integration with QuickBooks can be extremely powerful as one of the primary goals is to avoid double entry and increase accuracy between FileMaker and QuickBooks. Increasing accuracy and efficiency by avoiding double data entry is what most organizations strive for and is the purpose for creating QuickBooks integration. QuickBooks integration requires installing and registering the FM Books Connector, which is a complimentary plug-in with FM Work Orders. The plug-in is licensed, installed, and registered on each client machine. You do not need to learn how to “program” in order to use the “out of box” features discussed in this chapter, rather you simply need to install and register the FM Books Connector and read the usage instructions below. FM Work Orders communicates with the following QuickBooks areas “out of the box”: v Contacts v Invoices v Items v Sales Taxes Please read this entire chapter for a detailed description of the exact “out of box” functionality pertaining to each QuickBooks area. FM Books Connector Installation and Registration 1. Open FM Work Orders and navigate to Preferences > FM Books Connector tab. Enter your License ID, which is provided by Productive Computing, and select the “Register” button. 2. Once successfully registered you will be running in “LIVE” mode as shown in Figure 10.0. If running in “LIVE” mode, then you will not need to register again. Figure 10.0 - FM Books Connector Registration User Manual – FM Work Orders Page 28 of 36 First Time Connection to the QuickBooks File Once you have successfully installed and registered the plug-in, then you are ready to make the Initial Connection to the QuickBooks file. This connection only needs to be made one time per QuickBooks file and can be made by following these steps. 1. Open your QuickBooks file in single user mode as the ADMIN. After you successfully make this first time connection, then you can re-open the QuickBooks file in multi-user mode as any desired QuickBooks user. 2. Navigate to the Preferences > FM Books Connector tab and select the “Initial QuickBooks Connection” button as shown in Figure 10.0 above. 3. QuickBooks will then be flashing with a screen shown in Figure 10.1. Please select the fourth radio button down to “always” allow access even if QuickBooks is not running, and select the admin user if a drop down list appears with user names. Then select the check box below to allow the plug-in full access and select the “Continue” button. Figure 10.1 - QuickBooks Application Certificate 4. Select “Yes” and/or “Done” (if prompted) to allow and finish the access confirmation. Please note that while this screen appears, if you should click on FileMaker, FileMaker may stop responding. This is caused when the plug-in is waiting for user input from the QuickBooks connection dialog box. This isolated situation is due to a FileMaker limitation when a plug-in waits for user input from a 3rd party application. If this occurs, force quit FileMaker and repeat the steps above. This connection and access authentication must be done one time per QuickBooks file. In QuickBooks you can always navigate to Edit > Preferences > Integrated Applications > Company Preferences to change the plug-in access properties or check to see if the connection has already been established. We are now ready to begin exchanging data with QuickBooks! User Manual – FM Work Orders Page 29 of 36 General The possibilities of QuickBooks integration are endless. We have included the basic functionality as a solid starting point for you to begin integrating the FM Work Orders solution with QuickBooks. You can also customize the FM Work Orders solution to include additional functionality with QuickBooks. First let’s explore the “out of box” QuickBooks integration functionality available in the FM Work Orders solution. FM Work Orders has the following “out of box” functionality: - Pull Customers from QuickBooks into FM Work Orders - Pull Customer Balances from QuickBooks into FM Work Orders - Push a Customer from FM Work Orders to QuickBooks - View a Customer from FM Work Orders in QuickBooks - Pull Items from QuickBooks into FM Work Orders - View an Item from FM Work Orders in QuickBooks - Pull Invoice Balances from QuickBooks into FM Work Orders - Push an Invoice from FM Work Orders to QuickBooks - View an Invoice from FM Work Orders in QuickBooks - Pull Taxes from QuickBooks to FM Work Orders Please note that we are not deleting anything from either QuickBooks or FileMaker. Functionality NOT included in the “out of the box” feature set includes pushing items from FileMaker into QuickBooks, pulling invoices from QuickBooks into FileMaker, accepting payments, pushing payments, pulling payments or anything related to payments. Certain aspects, such as taxes, are unidirectional. This means that information is ONLY pulled from QuickBooks into FM Work Orders. Therefore it is recommended to not have taxes in your FM Work Orders solution that do not exist in QuickBooks. Additional functionality may be customized in your FM Work Orders solution. Please fill out a customization request at www.ProductiveComputing.com/rfq We look forward to hearing from you to create the perfect QuickBooks integration to accommodate your needs! TIPS: **The QuickBooks integration actions are available via custom menus found at the top menu bar of your Windows machine. If you are on a Mac, these custom menu options will not be visible as the QuickBooks integration is currently only available on Windows.** **The currently opened QuickBooks file will be the file used to exchange data with the FM Work Orders solution. Before we begin to utilize the QuickBooks integration please note that you must open and log into your QuickBooks file in order to successfully exchange data between FM Work Orders and QuickBooks.** User Manual – FM Work Orders Page 30 of 36 Customers You can now Pull Customers from QuickBooks into FM Work Orders, Pull Customer Balances from QuickBooks into FM Work Orders, Push a Customer from FM Work Orders to QuickBooks and View a Customer in QuickBooks from FM Work Orders. This is possible by navigating to the Contacts tab and selecting the QB drop-down options from the top menu bar as shown in Figure 10.2. Let’s explore the functionality of these options. Figure 10.2 - Contacts’ QB Drop-down Menu Pull Customers from QuickBooks into FM Work Orders When you select the “Pull Customers” option all active customers from your currently opened QuickBooks file will be brought into the FM Work Orders solution. The QuickBooks customer name will be stored in a separate “QB Cust. Name” field on the contact record in the FM Work Orders. Jobs are pulled in as a separate contact record and the job name is stored in the “QB Cust. Name” field. Multiple pulls are supported by overwriting existing contacts in FM Work Orders and adding new customers. Deleting during the QuickBooks integration process either in FM Work Orders or QuickBooks is not supported in any capacity. In order to delete a customer it will have to be done manually in both QuickBooks and in FM Work Orders. Pull Customer Balances from QuickBooks into FM Work Orders When you select the “Pull Customer Balances” option, you will be presented with a dialog to update the balance information for the single contact record and/or for all contacts in the found set. This routine obtains the current customer balance from QuickBooks, places the balance in the “QB Balance” field on the the customer record and enters the date/time stamp of the last customer balance update as shown in Figure 10.3. Figure 10.3 - QuickBooks information related to a Customer Push a Customer from FM Work Orders to QuickBooks When you select the “Push Customer” option, then the current customer will be pushed to QuickBooks. If the customer does not exist in QuickBooks, then a new customer will be created. If the customer exists in QuickBooks, then the customer information will be updated. User Manual – FM Work Orders Page 31 of 36 View a Customer from FM Work Orders in QuickBooks When you select the “View in QuickBooks” option, then the corresponding customer in QuickBooks will be brought to the forefront saving you valuable time from having to search QuickBooks for the desired customer. Items You can now Pull Items from QuickBooks into FM Work Orders and View an item from FM Work Orders in QuickBooks. This is possible by navigating to the Items tab and selecting the QB > Pull Items or QB > View in QuickBooks options from the top menu bar as shown in Figure 10.4 below. Let’s explore the functionality of these options. Figure 10.4 - Items’ QB Drop-down Menu Pull Items from QuickBooks into FM Work Orders When you select the “Pull Items” option, then all inventory, non-inventory, and service items are pulled from QuickBooks into the FM Work Orders solution. Items should always be added and edited in QuickBooks as “out of the box” you do not have the ability to push items from FM Work Orders to QuickBooks. Once you pull items into FM Work Orders, then the “Exists in QB” check box will be checked indicating that this item came from QuickBooks and the “QB List ID” will be automatically populated as shown in Figure 10.5. These two fields are read only for your protection. Figure 10.5 - QuickBooks information related to an Item Please note that in order to add invoices to QuickBooks EACH line item must be an official QuickBooks item. Therefore it is necessary to pull ALL items from QuickBooks into the FM Work Orders and always maintain your items in QuickBooks. Deleting during the QuickBooks integration process either in FM Work Orders or QuickBooks is not supported in any capacity. In order to delete an item it will have to be done manually in both QuickBooks and in FM Work Orders. View an item from FM Work Orders in QuickBooks When you select the “View in QuickBooks” option, then the corresponding item in QuickBooks will be brought to the forefront saving you valuable time from having to search QuickBooks for the desired item. Additional functionality with various item types and pushing can always be customized and added to the FM Work Orders solution. Please contact our sales team for further information at [email protected] User Manual – FM Work Orders Page 32 of 36 Invoices You can now Pull Invoice Balances from QuickBooks into FM Work Orders, Push an Invoice from FM Work Orders to QuickBooks and View an Invoice from FM Work Orders in QuickBooks. (Please note that “orders” in FM Work Orders are pushed to QuickBooks as an “invoice”). This is possible by navigating to the Contacts tab and selecting QB > Pull Invoice Balances, QB > Push Invoice, or QB > View in QuickBooks options from the top menu bar as shown in Figure 10.6 below. Let’s explore the functionality of these options. Figure 10.6 - Pull Invoice Balances, Push Invoice and View in QuickBooks menu bar options Pull Invoice Balances from QuickBooks into FM Work Orders When you select the “Pull Invoice Balances” option, then you will be presented with a dialog to update the balance information for the single invoice record or for all invoices in the found set. This routine obtains the current invoice balance from QuickBooks, places the balance in the “QB Balance” field on the the invoice record and enters the data time stamp of the last invoice balance update as shown in Figure 10.7. Figure 10.7 - QuickBooks information related to the invoice record Push an Invoice from FM Work Orders to QuickBooks When you select the “Push Invoice” option, then the current order will be pushed to QuickBooks as an invoice and will be linked to the existing QuickBooks customer. The following should be noted about this push routine: -‐ If the invoice does not exist in QuickBooks, then a new invoice will be created. -‐ If the invoice exists in QuickBooks, then the invoice information will be updated. -‐ Line items in the order will be converted to line items in the invoice, so please ensure that all items always come from QuickBooks. -‐ Only one invoice can be created from a single order. We do not support multiple invoices for the same order. -‐ Payments are not supported “out of the box” and may be customized and added to your FM Work Orders solution. -‐ Deleting during the QuickBooks integration process either in FM Work Orders or QuickBooks is not supported in any capacity. In order to delete an invoice it will have to be done manually in both QuickBooks and in FM Work Orders. -‐ In order to push an invoice into QuickBooks, then the invoice must be associated with an existing QuickBooks customer. If the customer does not exist in QuickBooks, then the customer will be added to QuickBooks. -‐ The order number in FM Work Orders solution will be pushed as the invoice number in QuickBooks. User Manual – FM Work Orders Page 33 of 36 View an Invoice from FM Work Orders in QuickBooks When you select the “View in QuickBooks” option, then the corresponding invoice in QuickBooks will be brought to the forefront saving you valuable time from having to search QuickBooks for the desired invoice. Taxes You can now Pull Taxes from QuickBooks into FM Work Orders. This is possible by navigating to the Preferences > Taxes tab and selecting the QB > Pull Taxes from the top QB drop-down menu as shown in Figure 10.8 below. Figure 10.8 - Pull Taxes When integrating with QuickBooks, then taxes MUST be maintained in QuickBooks and pulled into FM Work Orders. Let’s explore the functionality of these options in Figure 10.9. Figure 10.9 - Taxes tab 1. Click green “plus” button to add a new tax rate. (Do NOT use this option if integrating with QuickBooks). 2. Name of tax rate. 3. Description of tax rate. 4. Tax rate percentage. 5. If tax rate exists (or came from) QuickBooks then this box will be checked. 6. Select one tax rate to be the default rate used on all invoices. 7. Select the red “X” button to delete a tax rate from FM Work Orders. User Manual – FM Work Orders Page 34 of 36 Chapter 11 - Troubleshooting and Support Troubleshooting Tips There may be situations where the FM Work Orders, FileMaker Pro, FileMaker Go, or your computer experience a disruption in normal operation. If FM Work Orders does not appear to be functioning normally (especially if you are performing an operation that has previously succeeded), then you can try the following steps to resolve the problem. Re-open the Current Window 1. If the window in which the problem occurred is other than the main window, then close that window, and re-open it. There may occasions when the window has not refreshed properly and is not displaying the upto-date data. If the problem persists, or you cannot close the window, then continue with the following procedures. Restart FileMaker and Re-open the FM Work Orders 2. Close FM Work Orders and FileMaker completely. 3. Re-open FM Work Orders the way you normally do on your computer, and login normally. This will automatically re-start the FileMaker Pro application. If the problem persists, or you cannot re-open FM Work Orders, then try the next procedure. Restart your Computer 4. Close all applications and restart your computer. 5. Re-open FM Work Orders the way you normally do on your computer, and login normally. This will automatically re-start the FileMaker Pro application. If the problem persists and FM Work Orders is not operating normally, then please contact us. If we can determine that you have encountered a bug in the program, then you will not be charged for the technical support contact. We are interested in maintaining the highest possible quality and reliability for FM Work Orders, and therefore we encourage you to let us know when you encounter unexplained problems. User Manual – FM Work Orders Page 35 of 36 III. Contact Us If you would like additional support with FM Work Orders, then please explore the avenues listed below or contact us directly. Phone: (760) 510-1200 Email: [email protected] Forum: www.productivecomputing.com/forum Videos: www.productivecomputing.com/video Customization Requests: [email protected] Please note that if you would like assistance with adding customizations to FM Work Orders, then the set up is billable at our standard hourly rate. We bill on a time and materials basis billing only for the time in minutes it takes to assist you. However, we will be happy to provide you with a free estimate if you fill out a Request For Quote (RFQ) at www.productivecomputing.com/rfq. We are ready to assist and look forward to hearing from you! User Manual – FM Work Orders Page 36 of 36