1
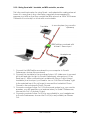
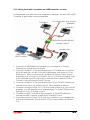
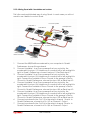
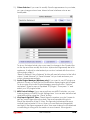
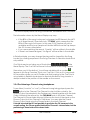
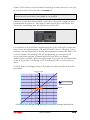
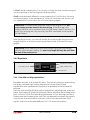
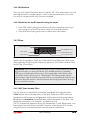
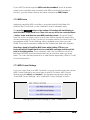
©
User’s Manual
Version 2.10
1/36
This software, the accompanying Timecode Vinyl discs and this manual
© 2006 - 2008 Schaack Audio Technologies (http://www.schaack-audio.com)
ASIO is a trademark and software of Steinberg Media Technologies GmbH.
VST Plug-In Technology by Steinberg.
Mixmeister BPM Analyzer is a product of http://www.mixmeister.com .
This software uses ID3Lib (slightly modified 3.8.3 source code)
(http://id3lib.sourceforge.net) licensed under the GNU Library General Public
License (LGPL V2). See Quad2’s About Box and file “ID3LIB-3.8.3 modded
Distribution (OS X and Windows).zip” for more information.
Uses Silk Icons by Mark James (http://www.famfamfam.com/lab/icons/silk/)
licensed under the Creative Commons Attribution 2.5 license.
All other mentioned products are trademarks of their respective owners.
Thanks to (in chronological order):
Mike Bintz
Philippe Schirrer
Dr. Dub
Steve Bidinger
Louis Botella
Matt Crosby
Max Jacoby
Ed Holmes
Jo Kayser
Philippe Ackermann
Denis Illenseer
Claude Kass
Andy Dope
User’s Manual
2/36
Table of contents
1. Introduction ..............................................................................................................................................4
2. Quick start .................................................................................................................................................4
2.1 System requirements ........................................................................................................................5
2.1.1 Minimal system requirements..................................................................................................5
2.1.2 Recommended system............................................................................................................5
2.2 Installing Quad and running it for the first time ...........................................................................6
2.3 Connecting the turntables to the soundcard.............................................................................8
2.3.1 How to connect ........................................................................................................................8
2.3.2 Connection examples .............................................................................................................8
2.4 How Quad is organized – All features at a glance ..................................................................13
2.5 Browser / Playing a song ...............................................................................................................14
2.6 Previewing a song ..........................................................................................................................14
2.7 Read the reference........................................................................................................................15
3. Reference ...............................................................................................................................................15
3.1 Preferences ......................................................................................................................................15
3.1.1 Audio Card Configuration ....................................................................................................16
3.1.2 General Settings ......................................................................................................................16
3.2 Playing and scratching songs ......................................................................................................18
3.2.1 Selecting the Input Deck .......................................................................................................18
3.2.2 Playing/pausing a song .........................................................................................................18
3.2.3 Wave Display/Cue Points ......................................................................................................18
3.2.4 Pre-listening a Channel using headphones .......................................................................19
3.2.5 Absolute Mode vs. Relative Mode ......................................................................................20
3.2.6 Setting the play position ........................................................................................................21
3.2.7 Controlling more than one Channel by one same Input Deck.....................................21
3.2.8 Perfect tempo-matching using SYNC .................................................................................22
3.2.9 Virtual Zero Lock Range .........................................................................................................22
3.2.10 Playing real (non-timecode) vinyl records through Quad............................................24
3.2.11 Watch the Level Meters!......................................................................................................24
3.3 Managing songs .............................................................................................................................25
3.3.1 Finding songs............................................................................................................................25
3.3.2 Editing ID3/OGG tags.............................................................................................................25
3.3.3 Alphabetically sorting songs in the Browser.......................................................................25
3.3.4 Cases & Current Playlist .........................................................................................................26
3.4 Cueing, Equalizing, Filtering ..........................................................................................................26
3.4.1 Loop Sampler...........................................................................................................................26
3.4.2 Equalizers ..................................................................................................................................27
3.4.3 Filters ..........................................................................................................................................28
3.5 FX: Effects for the mix .....................................................................................................................29
3.5.2 How to use FX...........................................................................................................................29
3.5.2 FX Types.....................................................................................................................................30
3.6 Crossfader ........................................................................................................................................32
3.7 MIDI....................................................................................................................................................32
3.7.1 Selecting the MIDI Input in Quad’s Preferences ...............................................................32
3.7.2 MIDI Learn.................................................................................................................................33
3.7.3 MIDI Control Settings...............................................................................................................33
3.8 Recording your mix.........................................................................................................................34
4. Appendix.................................................................................................................................................35
4.1 Keyboard Shortcuts ........................................................................................................................35
4.2 Mouse Button Functions.................................................................................................................35
4.3 Quad Timecode Vinyl Discs ..........................................................................................................36
User’s Manual
3/36
1. Introduction
Thank you for purchasing Quad! Please take the time to completely read this
manual in order not to miss out on the more or less “hidden” features Quad
has to offer.
Before we begin, let’s take a quick look at the main features of Quad:
•
•
•
•
•
•
•
•
•
•
•
•
Intelligent, error-insensitive proprietary vinyl-tracking algorithm with
highly accurate scratch movement response
Ultra-precise BPM matching (called “syncing”) lets you play 4 tracks
simultaneously (BPM must be present as tag in MP3/OGG) (*)
4 lightweight timecode discs included, ideal for scratching
Up to 4 turntables may be connected
Up to 4 tracks may play simultaneously and may be controlled using 1
or up to 4 turntables
Internal look-ahead limiters which avoid output distortions
High-quality filters and equalizers with kill switches
5 Loop Samplers - one for each Channel, and one on the Main
Channel
Full MIDI Control with any commercial MIDI Controller
Integrated BPM-synchronized FX (Flanger, Chorus, Delay, …)
Customizable interface
VST Plugins integration (Windows only)
(*) Please note: To fully exploit Quad’s features, all of your MP3s/OGGs
should contain “BPM” tags. If the MP3s/OGGs BPM value is not stored as
tag within the MP3/OGG, Quad will not be able to automatically sync
(tempo-match) this MP3/OGG to another MP3/OGG. Nor WAVs nor AIFFs
are syncable. A very good free tool for MP3 BPM detection and inserting
the BPM as ID3 frames is “Mixmeister BPM Analyzer”.
Free download at http://www.mixmeister.com/download_freestuff.html .
2. Quick start
First time users: Please read this chapter carefully. It contains primary
instructions needed for:
•
•
•
Installing the Quad software
Connecting turntables to the computer via your soundcard
Playing & scratching tunes
User’s Manual
4/36
2.1 System requirements
2.1.1 Minimal system requirements
For running Quad, all of the following system requirements must be met:
PC:
•
•
•
•
•
Pentium IV 1GHz PC with 512 MB RAM and at least 1 GB of free disk
space
Windows XP or Vista
ASIO-compatible soundcard with at least 1 (stereo) Line or Phono Input
and 2 (stereo) Line Outputs
1 turntable
Adobe Acrobat Reader 5 or better (to read this manual)
Mac:
•
•
•
•
Macbook or G5 or better
OS X 10.4.10 or later
soundcard with at least 1 (stereo) Line or Phono Input and 2 (stereo)
Line Outputs
1 turntable
2.1.2 Recommended system
The recommended system for running Quad looks as follows:
PC:
•
•
•
•
•
•
1.7 GHz PC with 512 MB RAM and 4GB of free hard disk space (the disk
space is needed for saving the mixes – see “Recording your mix”)
Windows XP or Vista
ASIO-compatible soundcard with 2 (stereo) Line or Phono Inputs and 2
(stereo) Line Outputs
2 ore more turntables
A BPM Analyzer Tool (such as Mixmeister BPM Analyzer)
Adobe Acrobat Reader 5 or better (to read this manual)
Mac:
•
•
•
•
MacBook Pro
OS X 10.4.11 or better
soundcard with 2 (stereo) Line or Phono Inputs and 2 (stereo) Line
Outputs
2 or more turntables
User’s Manual
5/36
2.2 Installing Quad and running it for the first time
Execute QuadSetup.exe (PC) or Quad.mpkg (Mac) and follow the
instructions. The Quad Setup will guide you through the installation of Quad.
Make sure there are at least 50MB of free hard disk space.
Please note: Avoid running virus-scanners and other startup-applications or
regular applications while running Quad. They may interfere with the
system for a short time and create “clicks” or “pops” during the mix. The
best way to avoid any problems at all is to create a new User Account
and to run Quad (without any other applications) in this User Account. Also
make sure to turn off/disconnect extra devices such as Wireless Adapters
while mixing. Windows Users: Set Power Options “Power Schemes” to
“Always On” (this is good for any audio software, not only Quad).
After installation, start Quad.
In Quad’s Browser, right-click (Mac: CTRL+left mouse button)
and
specify the folder where your MP3’s are located. It’s a good idea to let Quad
scan all the files before proceeding. This way, they will all be stored in the
database.
Click on “Preferences” button on the bottom. The following window will show
up:
1) Specify your soundcard here!
2) Select number of Channels!
3) Uncheck (deactivate)
DEMO Mode if you
purchased Quad Timecode
Vinyl discs!
5) Specify Deck Inputs here!
6) Specify Channel Outputs here!
4) Specify Main Output here!
The Preferences window
User’s Manual
6/36
In the Preferences make sure to specify the following:
1) Your audio device (PC: Only soundcards with ASIO drivers are allowed).
2) Select the number of Channels you want to use simultaneously.
3) Demo Mode: Uncheck (deactivate) DEMO Mode if you bought Quad
Timecode vinyl discs, otherwise let it checked (activated). The Demo
Mode can only be turned off after putting Quad.lic into the same folder as
Quad.exe (Windows) or Quad.app (Mac).
4) Main Output: Choose your Main Output here, this will in most cases be the
first stereo line output of your soundcard.
5) (only important if you purchased Quad Timecode Vinyl discs) Deck Input 1
to 4: Specify your soundcard’s Line or Phono Inputs here. The decks should
be connected to these inputs (see 2.3.2 for more information).
6) You may also already specify individual Channel Outputs for each one of
Quad’s Channels if you own an external mixer.
If you do not own any Quad Timecode Vinyl discs, please skip to chapter 2.4
now!
User’s Manual
7/36
2.3 Connecting the turntables to the soundcard
2.3.1 How to connect
If your USB/Firewire soundcard is not connected, connect it and wait a
few seconds before launching Quad.
• Connect each turntable’s stereo Phono Out to a corresponding stereo
In of the soundcard. Make sure that the left Phono Out of the turntable
is connected to the left In of the soundcard and that the right Phono
Out of the turntable is connected to the right In of the soundcard! Also
connect each turntable’s Phono Ground to the soundcard’s Ground.
When connecting Phono Out to Line Input you’ll have to turn on the
“Soft Phono Preamp” for that turntable in the Preferences.
• Make sure there is no dust or dirt on the needles. Dust/dirt on the
needles may distort the timecode signal so much that it may not be
decodable anymore. Also avoid scrapes or scratches on the discs.
• If you own a mixer and do the channel mixing on the mixer, specify
NONE as Main Output and NONE as Phones Output. Also specify which
channel goes to what output, using Chan. Output 1 to 4.
•
Please note: Make sure the weight, anti-skating and height of your
turntable arm are well adjusted to the cartridge, so you won’t wear off the
timecode discs unnecessarily. It is important to keep the Timecode Vinyl
discs in good condition.
2.3.2 Connection examples
Quad may be used in many ways: You may use it with or without a mixer and
use Quad’s internal filters, equalizers and FX to alter the sound, or you may just
use it as a “conventional” scratch system replacement by just playing
between 2 and 4 MP3s/WAVs without processing them and route each of
those to a different external mixer channel. It is up to you what features of
Quad you like to use and what features you may like to replace by external
equipment.
The next 4 pages contain connection examples for different setups:
•
•
•
•
The first setup is the simplest one. It is especially suited for home-studios.
The second setup is a more advanced setup that may be used for
home-studios or playing in clubs.
The third setup is most likely to be used in clubs. It corresponds more or
less to a conventional scratch system replacement.
The last setup contains 4 turntables connected via Phono preamps. It is
the most advanced way of using Quad.
User’s Manual
8/36
2.3.2.1 Using Quad with 1 turntable, no MIDI controller, no mixer
This is the most basic setup for using Quad – well adapted for making mixes at
home. It is, more than in any other setup, especially recommended to
prepare your MP3s so that they contain the BPM amount as “BPM” ID3 frames.
Otherwise it is not really fun to mix with one turntable.
to sound system (e.g. monitor
speakers)
Turntable
3
2
USB/FireWire soundcard with
at least 1 Stereo Input
1
4
Headphones
PC/Mac
1. Connect the USB/FireWire soundcard to your computer. In Quad’s
Preferences, choose this soundcard.
2. Connect the turntable to the soundcard’s Input 1/2. Make sure to connect
left to left and right to right. In Quad’s Preferences, choose Input 1/2 as
Deck Input 1. When connecting a turntable with Phono Output (=most
turntables) to a Line Input, you need to turn on “Soft Phono Preamp” right
to the selected Input. Do not forget to connect the turntable’s Phono
Ground to the soundcard’s Phono Ground.
3. Connect soundcard’s Line Out 1/2 to the sound system (e.g. your monitor
speakers, your HiFi amplifier or an external mixer). In Quad’s Preferences,
choose Line Out 1/2 as Main Output.
4. Connect soundcard’s Line Out 3/4 (or any suitable) to your headphones.
In Quad’s Preferences, choose Line Out 3/4 (or any suitable) as Phones
Out.
User’s Manual
9/36
2.3.2.2 Using Quad with 2 turntables and a MIDI controller, no mixer
In this example, we add one more turntable to the setup. We also add a MIDI
Controller to give better control possibilities.
to sound system (e.g. monitor
speakers)
Turntable 1
Turntable 2
4
2
3
USB/FireWire soundcard with
at least 2 Inputs
USB/FireWire
MIDI Controller
6
5
Headphones
1
PC/Mac
1. Connect the USB/FireWire soundcard to your computer. In Quad’s
Preferences, choose this soundcard.
2. Connect turntable 1 to the soundcard’s Input 1/2. Make sure to connect
left to left and right to right. In Quad’s Preferences, choose Input 1/2 as
Deck Input 1. When connecting a turntable with Phono Output (=most
turntables) to a Line Input, you need to turn on “Soft Phono Preamp” right
to the selected Input. Do not forget to connect the turntable’s Phono
Ground to the soundcard’s Phono Ground.
3. Connect turntable 2 to the soundcard’s Input 3/4. In Quad’s Preferences,
choose Phono Input 3/4 as Deck Input 2. Same remarks as above.
4. Connect soundcard’s Line Out 1/2 to the sound system (e.g. your monitor
speakers, your HiFi amplifier or an external mixer). In Quad’s Preferences,
choose Line Out 1/2 as Main Output.
5. Connect the MIDI Controller to the computer. In Quad’s Preferences
choose the MIDI Controller as MIDI Input and MIDI Output.
6. Connect soundcard’s Line Out 3/4 (or any suitable) to your headphones.
In Quad’s Preferences, choose Line Out 3/4 (or any suitable) as Phones
Out.
User’s Manual
10/36
2.3.2.3 Using Quad with 2 turntables, a mixer and a MIDI controller
This is probably the best way to use Quad in the club. The DJ brings his laptop,
his soundcard and his MIDI controller, connects the soundcard to the club’s
mixer and connects the club’s turntables to his soundcard.
to sound system (e.g. monitor
speakers)
Turntable 1
8
7
Turntable 2
2
4
5
Mixer
Headphones
3
USB/FireWire soundcard with
at least 2 Inputs
USB/FireWire
MIDI Controller
6
1
PC/Mac
1. Connect the USB/FireWire soundcard to your computer. In Quad’s
Preferences, choose this soundcard.
2. Connect turntable 1 to the soundcard’s Input 1/2. Make sure to connect
left to left and right to right. In Quad’s Preferences, choose Input 1/2 as
Deck Input 1. When connecting a turntable with Phono Output (=most
turntables) to a Line Input, you need to turn on “Soft Phono Preamp” right
to the selected Input. Do not forget to connect the turntable’s Phono
Ground to the soundcard’s Phono Ground.
3. Connect turntable 2 to the soundcard’s Phono Input 3/4. In Quad’s
Preferences, choose Phono Input 3/4 as Deck Input 2. Same remarks as
above.
4. Connect soundcard’s Line Out 1/2 to the mixer’s channel 1 Line In. In
Quad’s Preferences, choose Line Out 1/2 as Channel 1 Output.
5. Connect soundcard’s Line Out 3/4 to the mixer’s channel 1 Line In. In
Quad’s Preferences, choose Line Out 3/4 as Channel 2 Output.
6. Connect the MIDI Controller to the computer. In Quad’s Preferences
choose the MIDI Controller as MIDI Input and MIDI Output.
7. Connect the headphones to the mixer’s headphones output.
8. Connect the mixer’s Main Out to the sound system.
User’s Manual
11/36
2.3.2.4 Using Quad with 4 turntables and a mixer
This is the most sophisticated way of using Quad - in most cases you will not
need to use 4 decks to control Quad.
Turntable 1
to sound system
Headphones
12
Turntable 2
11
Turntable 3
3
678
9
2
Turntable 4
4
USB/FireWire soundcard
with 4 stereo In’s
& 4 stereo Out’s
5
10
USB/FireWire
MIDI Controller
1
PC/Laptop
1.
2.
3.
4.
5.
6.
7.
Connect the USB/FireWire soundcard to your computer. In Quad’s
Preferences, choose this soundcard.
Connect turntable 1 to a Phono preamp that you route into the
soundcard’s Line Input 1/2. Make sure to connect left to left and right to
right. In Quad’s Preferences, choose Line Input 1/2 as Deck Input 1.
Connect turntable 2 to a Phono preamp that you route into the
soundcard’s Line Input 3/4. Make sure to connect left to left and right to
right. Connect the turntable’s Phono Ground to the preamp’s Phono
Ground. In Quad’s Preferences, choose Line Input 3/4 as Deck Input 2.
Connect turntable 3 to a Phono preamp that you route into the
soundcard’s Line Input 5/6. Make sure to connect left to left and right to
right. Connect the turntable’s Phono Ground to the preamp’s Phono
Ground. In Quad’s Preferences, choose Line Input 5/6 as Deck Input 3.
Connect turntable 4 to a Phono preamp that you route into the
soundcard’s Line Input 7/8. Make sure to connect left to left and right to
right. Connect the turntable’s Phono Ground to the preamp’s Phono
Ground. In Quad’s Preferences, choose Line Input 7/8 as Deck Input 4.
Connect soundcard’s Line Out 1/2 to the mixer’s channel 1 Line In. In
Quad’s Preferences, choose Line Out 1/2 as Channel 1 Output.
Connect soundcard’s Line Out 3/4 to the mixer’s channel 2 Line In. In
Quad’s Preferences, choose Line Out 3/4 as Channel 2 Output.
User’s Manual
12/36
8.
Connect soundcard’s Line Out 5/6 to the mixer’s channel 3 Line In. In
Quad’s Preferences, choose Line Out 5/6 as Channel 3 Output.
9. Connect soundcard’s Line Out 7/8 to the mixer’s channel 4 Line In. In
Quad’s Preferences, choose Line Out 7/8 as Channel 4 Output.
10. Connect the MIDI Controller to the computer. In Quad’s Preferences
choose the MIDI Controller as MIDI Input and MIDI Output.
11. Connect the headphones to the mixer’s headphones output.
12. Connect the mixer’s Main Out to the sound system.
2.4 How Quad is organized – All features at a glance
Quad has most of its features assembled on one user-configurable screen. We
invested a great amount of time in making the features as accessible as
possible. Please take a look at the following picture to familiarize with the
main concepts of Quad:
8
4
1
2
5
3
6
Quad running at a screen resolution of 1280x800 with default Quad wallpaper
1) One of Quad’s (up to 4) Channels (the other Channel is surrounded by
white dashed lines): A Channel is capable of playing a MP3/WAV,
equalizing, filtering and even cueing (looping). In the uppermost part you
see the Wave Display viewing the actual song’s playing waveform (Wave
Tracker) and also its whole waveform as overview (Song Overview). You
may zoom in and out in the Wave Tracker by pressing left or right mouse
buttons while the cursor is over it. The amount of Channels to be used is
selected in Quad’s Preferences.
2) Crossfader: It is used to mix/crossfade between two selectable Channels.
User’s Manual
13/36
3) Browser: Browse your tracks and organize them in Cases. The left part of
the Browser shows the folders & cases as tree structure. The right part of the
Browser shows the tracks with their information (tags & quality).
4) Main Channel: Especially useful if you have no external mixer and use your
PC as a mixer: All 4 channels are mixed together and routed to the Main
Channel. It contains the same EQ and filtering features as the 4 other
Channels.
5) Quad’s FX section: Used for applying FX. Contains BPM display.
6) Preview Player: Allows prelistening of tracks on a selected soundcard
output.
2.5 Browser / Playing a song
- If you did not already specify a folder where your MP3s are located, please
right-click (Mac: CTRL+left mouse button)
and specify the folder
where your songs are located.
Quad’s Browser: Drag a song onto the Wave Display to load it!
- Select a song in the Browser by clicking on it and dragging it to any of the 4
Channels’ Wave Displays. You may also navigate through the songs using the
arrow keys of your keyboard and pressing L to load the song (a window will
show up, asking you to press 1, 2, 3 or 4 to select the Channel to load the
song onto). The TAB key is used to move between the 2 sections of the
Browser and the Search Box.
Already played (or more exactly: loaded) songs are shown in red colour,
songs that have been put into a case and not already loaded are shown in
yellow/beige colour.
2.6 Previewing a song
Quad’s Preview Player
User’s Manual
14/36
Sometimes it is useful to preview (pre-listen) a song on the Phones Output
without needing to load it on a Channel first. To preview a song, double-click
it. The song will then start playing in the Preview Player.
You may stop (pause) the song again by pressing the
button in the Preview
Player. To continue playing, press that button again.
You may press
or
for fast rewind or fast forward. You may also jump
around in the song by clicking anywhere in the Preview Player’s box showing
the title and the play position.
2.7 Read the reference
You have now reached the end of the Quick Start guide. We hope you
enjoyed it! You should have been able to successfully play/scratch a song by
now. We suggest you to fiddle around a little bit with the EQs, filters, Loop
Samplers and FX to get accustomed to Quad’s interface. After that, you
should read chapter 3 (Reference) carefully to fully understand all features of
Quad.
3. Reference
3.1 Preferences
Before using Quad, it is important to configure your system in the Preferences
window. Quad’s Preferences window contains all options that are not
selectable while playing.
7
1
8
9
10
2
11
12
3
12
13
14
15
16
4
5
17
13
18
21
6
User’s Manual
15/36
3.1.1 Audio Card Configuration
This is the section where you define all Audio/MIDI Inputs & Outputs. Please
make sure that these are well adjusted to avoid any problems! As a rule of
thumb, unused outputs should always be set to NONE.
1)
2)
3)
4)
5)
6)
Audio Device: Select your ASIO/CoreAudio Driver here. You may also
specify Buffer Size (shorter = better scratch response) and sample rate
(best settings for sample rate = 44100 Hz). You may press the “Test Tone”
button to hear a test tone on the soundcard outputs.
MIDI: Select your MIDI Input Devices and your MIDI Output Device for
MIDI Controller feedback.
Deck Inputs: Select your Deck Inputs here. Each deck is connected to
one stereo input. On the right you can turn off “Soft Phono Preamp”. Do
this if you connect a regular turntable with Phono Outputs to a
soundcard that has Line Inputs.
Channel Outputs: Select your Channel Outputs here. It is possible to route
more than 1 Channel to the same soundcard output, but if the sum of
the signals exceeds 0 dB, Quad’s internal look-ahead limiters will activate
to prevent audible distortions.
Phones Output: selects the headphones stereo output.
Main Output: selects the Main Channel’s stereo output.
Please note: Please check twice if you do not use the same stereo output
for individual Channels, Phones Output or Main Output unwillingly. If you
do not need Phones Output or Main Output (e.g. if you use an external
mixer, like in a traditional DJ setup), simply set Phones Output or Main
Output to “NONE”.
3.1.2 General Settings
7)
Channel Selector: Specify the amount of Channels you want to use in
Quad. Each Channel can play one MP3. So if you want to play 4 MP3s
simultaneously, you must select 4. For a traditional 2-deck setup with 2
decks and one mixer, select 2.
8) Demo Mode: uncheck this option if you bought Quad Timecode Vinyls,
and want to use Quad as a full version and no longer as a demo version.
9) Reset Filters and EQs on Channel after loading: If checked, the filters and
equalizers are reset to a state where the signal is unprocessed when
played.
10) Warn before loading new Song if already playing: If checked, Quad will
warn you if you try to load a new Song on a Channel already playing
another Song.
User’s Manual
16/36
11) Colour Selector: If you want to modify Quad’s appearance to your taste,
you can change colours here. Almost all user interface colours are
modifyable.
To do so, first select what colour you want to change in the Combo Box
on the top and then modify the colour. Alpha should generally be let to
maximum. It adjusts to what extend your colour is mixed with the colour
of the pixels under it.
“Reset to Default Colour Scheme” button will reset all colours to the initial
values. “Load Scheme” & “Save Scheme” let you load and save your
colour schemes respectively.
12) Audio Plugins Manager (Windows only): If you want to use VST plugins as
effects in Quad, you must first tell Quad where these plugins are located.
To do so open the Audio Plugins Manager, press the button “Options”
and select “Scan for new or updated VST plugins”. Then press “+” and
select your VST plugins folder.
13) MIDI Control Settings: If you use more than one MIDI Controller, you can
load and save your MIDI Control Settings here. You can also clear the last
used MIDI settings using the “Clear” button.
14) Vinyl Inputs Signal XY View: Check these if somehow you don’t seem to
get any control signal from the deck. The most important thing is to
check the direction of the XY View. The figure should always be more
vertical than horizontal. If it is not, then you most likely exchanged left
and right. If the figure represents a line, then one channel is not attached
or something is wrong with the cable on one channel. If the signal is
User’s Manual
17/36
jumping around very much, you have many shockwaves coming to the
deck or the ground cable is perhaps not well attached to the mixer or
soundcard.
3.2 Playing and scratching songs
3.2.1 Selecting the Input Deck
Select Input Deck
1 to 4 here!
You need to specify for each Channel by what deck (turntable) it is
controlled (i.e. its song should be scratched) – this is its “Input Deck”. To what
soundcard input the Input Deck corresponds is defined in the Preferences.
You may use one and the same Input Deck for more than one Channel. In this
will play a role, too. Please see 3.2.7 for
case, the Control button
more information on controlling more than one Channel with one Input Deck.
3.2.2 Playing/pausing a song
Press this button to
play/pause the
song.
Quad will only allow playing/scratching the song if the Play/Pause button is
set to “Play”. Click it once to play, click it once more to pause.
3.2.3 Wave Display/Cue Points
Each of the 4 Channels contains a “Wave Display”. The Wave Display shows
two waveforms: The “Wave Tracker” (playing song waveform at time position)
and the “Song Overview” (waveform of whole song). The Wave Display also
gives information such as pitch, play position, BPM, song filename.
You can press on the time to switch between played time and remaining
time.
User’s Manual
18/36
WAVE TRACKER
Song filename
Cue Point
SONG OVERVIEW
Pitch
Song Locator
Play position (time)
BPM
The Wave Display shows the song’s waveforms, information and Cue Points
The information shown by the Wave Display may vary:
•
•
•
If the BPM of the song is unknown (not present as ID3 frame in the MP3
or of illegal format), Quad will show “??? BPM” which means that the
BPM of the song is not known. In this case, SYNC feature will not be
available and the Loop Sampler will obtain its BPM from the Tap tempo.
See 3.5 for more information.
If you are scratching the record, “Scratch” will be written in the middle.
If there is no timecode signal, “No Signal” will be written in the middle.
In Relative Mode, you may change the play position (reposition the Song
Locator) by clicking anywhere in the Song Overview. In Absolute Mode this is
not possible.
in the
Cue Points may be set using one of the buttons
Wave Display. The Cue Point will be set to the position of the Song Locator
(time when you hit the button). You will see a bubble with a number
appear in the Song Overview. This is your Cue Point. Click on it to jump back
to the position where you set it. Please note that jumping to the Cue Point is
only possible in Relative Mode since in Absolute Mode the Song Locator is
always locked to the position of the needle on the record.
3.2.4 Pre-listening a Channel using headphones
To pre-listen (“monitor” or “cue”) a Channel’s song being played, press the
button in the Channel. The Channel’s output will be routed to the
Phones Output (as selected in the Preferences), mixed together with the Main
Output following the ratio set by the CUE/MAIN knob in the Main Channel.
The Channel’s volume fader does not influence the level of the signal on the
Phones Output, but the Channel’s GAIN does. You may alter the overall
Phones Output Level using the Phones fader in the Main Channel.
It should be noted that it is not possible to pre-listen the FX, because in the
overall routing, the FX are applied behind the Channel’s volume fader, but the
prelistening is done before the volume fader.
User’s Manual
19/36
Adjust the
Phones
Output level
using the
Phones
Volume fader!
Adjust the ratio
between “cued”
signal and Main
Output using the
CUE/MAIN knob!
3.2.5 Absolute Mode vs. Relative Mode
In Absolute Mode Quad behaves like the Timecode Vinyl disc would be a real
vinyl record: Lifting off the turntable’s arm and placing the needle to a new
position changes the play position in the song. Absolute Mode is especially
suited for “normal” mixing of tunes. Exceptionally short-time needle lift-offs,
mostly due to physical shocks, dust on the discs or damaged discs, are not
considered as wanted needle lift-offs and Quad will continue playing at the
actual song position.
Press this button to
switch between
Absolute Mode and
Relative Mode!
In Relative Mode, lifting the needle and repositioning it anywhere on the vinyl
does not change the play position – Quad continues to play exactly at the
position where you last lifted the needle off the record, thus you cannot
“jump” in the tune by moving the needle across the disc – you can merely
play, rewind, fast forward or scratch the tune using the turntable. To
nevertheless jump to a different play position, you may either press the
button (to jump to the track’s beginning) or click onto the Song Overview in
the Channel to reposition the Song Locator (see 3.2.6 for more information).
Relative Mode is especially suited for scratching since you won’t have to use
the same position on the vinyl again and again to scratch the same passage
in a given tune. If you often scratch, it is strongly advised to use Relative Mode
and to always use the same Timecode Vinyl disc for scratching (so only this
Timecode Vinyl disc will “suffer”).
It is also highly advised to use Relative Mode if more than one Channel are
controlled by one same Input Deck (see 3.2.7 for more information), to avoid
any unwanted jumps or skips when changing from one of these Channels to
another.
User’s Manual
20/36
3.2.6 Setting the play position
As previously seen, in Absolute Mode the play position is given by the position
of the needle on the timecode disc. In Absolute Mode, the needle’s position
on the Timecode Vinyl disc is the one and only play position reference for the
song.
In Relative Mode, you may modify the play position by:
•
•
•
•
button
Pressing the
Forward/backward spinning of the Timecode Vinyl disc
Clicking into the Song Overview to reposition the Song Locator
Clicking one of the 4 Cue Points
in the Song Overview
In Relative Mode, click anywhere in the
Song Overview or click one of the Cue
Points to modify the play position.
3.2.7 Controlling more than one Channel by one same Input Deck
Quad allows controlling (playing and scratching) up to 4 Channels by one
single input deck – this makes it possible to mix up to 4 songs using only one
turntable. You may also control 2 Channels using Input Deck 1 and two other
Channels using Input Deck 2. What Channel is controlled by what Input Deck
is up to you (see 3.2.1), but as soon as one Input Deck is assigned to more
than one Channel, the
button will play the role of a selector:
Since one Input Deck can only control (apply its Vinyl Tracking) to one
Channel at once, you will have to specify what Channel the Input Deck
should control. This is done using the CONTROL button. When the CONTROL
button is pressed on a Channel whose Input Deck is shared among more
Channels, the CONTROL button will become highlighted on that Channel and
the Input Deck will from now on control the song on the selected Channel.
All other Channels using the same Input Deck will from this moment on
continue playing their songs at the average speed (see next chapter) they
were playing at before the CONTROL button was clicked on the new
Channel.
Please note: It is advised to use Relative Mode for Channels that share one Input
Deck. In Absolute Mode, the MP3 play position will always jump to the position of
the needle on the Timecode Vinyl disc when a Channel’s CONTROL button is
activated. This may lead to unwanted jumps in time when the control is switched
from one Channel back to the previously controlled Channel.
User’s Manual
21/36
3.2.8 Perfect tempo-matching using SYNC
This is one of Quad’s most powerful features. Using the SYNC feature perfect
tempo-matching (called “syncing”) of up to 4 tracks becomes effortless as
never before.
Perfect syncing becomes possible (only for MP3 & OGG) as soon as:
-
The MP3/OGG contains the exact BPM (beats per minute) amount in
the as tag (see “Please note” in 1. Introduction for more information).
The BPM do not vary during the entire songs (this is true for most dance
tracks).
To sync one track to another:
1) Load and play a first MP3/OGG that contains the BPM amount as tag
on one Channel. Make sure the BPM Sync Clock
is now
highlighted on this Channel (Quad does this for you by always
activating
on the Channel you loaded the last track onto). The
Channel having the BPM Sync Clock activated provides the BPM for the
next (to- be-synced) song. You may vary the pitch (and thus the BPM)
of this song before continuing to point 2), but before you load a track
onto the next Channel, wait that the BPM indicator in the Wave Display
has become stable. Otherwise, the SYNC will not work when using 2 or
more decks.
2) On the next Channel, make sure the
button is activated before
loading the new MP3/OGG on this Channel (this MP3/OGG must also
contain the exact BPM amount as tag).
3) Set the pitch to 0 on your turntable: if SYNC is on, when the pitch is set to
0, the new song will be perfectly tempo-matched to the Channel
where the BPM Sync Clock was highlighted before loading.
4) While the turntable is playing, beat-match the 2 playing songs, without
touching the pitch of the turntable.
5) You can mix one or 2 more songs following the same rules as stated in
2) and 3).
Please note: When using 2 or more turntables with SYNC, always wait until the
BPM indicator is stable (does not change anymore) in the Wave Display of the
last played track before loading a new track. This should take approximately 10
seconds. So, as a rule of thumb, always wait 10 seconds after touching the Vinyl
or Pitch on your turntable before loading a new track onto the next Channel
when using SYNC. This is because Quad uses the average speed of the last
played track as tempo-reference and this takes approx. 10 seconds.
3.2.9 Virtual Zero Lock Range
Keeping the turntable pitch at exactly 0% is, strictly speaking, impossible with
any existing turntable – the “real” pitch may be -0,001% , +0,001%, but never
be exactly 0%. This pitch tolerance is not acceptable when it comes to using
User’s Manual
22/36
Quad’s SYNC feature, since the tempo matching, as seen previously, can only
be truly accurate if the pitch stays at exactly 0%.
Please note: If you use the SYNC (tempo matching) feature in Quad, make
sure to set the Virtual Zero Lock Range to 1% or more.
Therefore, Quad offers the possibility to decide in what pitch range the pitch
is considered as exactly 0 – this range is called Virtual Zero Lock Range. The
Virtual Zero Lock Range may be adjusted from 0% to 2%.
The Virtual Zero Lock Range knob is located in the Main Channel
If, for instance, the Virtual Zero Lock Range is set to 2%, Quad will consider any
pitch on the turntable between -2% and +2% as 0%. Above +2% pitch on the
turntable, the resulting pitch (in Quad) will progressively exceed 0%. Below -2%
on the turntable, the resulting pitch will progressively go down below 0%.
As you may have noticed, incrementing the Virtual Zero Lock Range
diminishes the turntable’s effective pitch range. That’s why it is recommended
to use a Virtual Zero Lock Range of 1%. The setting of 2% is in most cases not
useful.
A Virtual Zero Lock Range setting of 0% means no altering whatsoever of the
input pitch.
Resulting Pitch (in Quad)
10%
8%
6%
Virtual Zero Lock Range = 0%
4%
Virtual Zero Lock Range = 2%
2%
-10%
-8%
-6%
-4%
-2%
0%
0%
2%
4%
6%
8%
Turntable Pitch
10%
-2%
-4%
-6%
-8%
-10%
Virtual Zero Lock Range at 0% (blue line) and at 2% (orange dashed line)
User’s Manual
23/36
The Virtual Zero Lock Range feature has one more advantage: If you own an
old turntable with some “resting point” at pitch 0, you may have noticed that
in this case it is really difficult to adjust the pitch around 0. If you use a Virtual
Zero Lock Range of 1%, this “resting point” will not prevent proper mixing
anymore, as the pitch will only leave 0% from -1% / +1% on.
Please note: Virtual Zero Lock Range is not applied when scratching, as this
would slightly alter the scratch feeling. Quad automatically recognizes
when the DJ is scratching and turns off Virtual Zero Lock Range internally
as long as the DJ keeps scratching.
3.2.10 Playing real (non-timecode) vinyl records through Quad
It is possible to use Quad to play real vinyl records (or any other audio sources,
like CD Players). The advantage of playing records through Quad is that they
may be processed through the filters and equalizers.
Activate the THRU
button to hear the
record playing on
the selected Input
Deck.
When using the THRU feature, the Loop Sampler’s BPM reference is the FX
section’s displayed BPM value.
3.2.11 Watch the Level Meters!
When the Level Meters become red, the signal is too hot!
It is important to watch the Level Meters while playing. All Channels, including
the Main Channel have Level Meters. As a rule of thumb, any Level Meter’s
display should not become red – if it does, the 0dB limit is surpassed and
Quad’s internal look-ahead limiters will start working. Although the look-ahead
limiters keep the sound audibly undistorted up to a certain extent, they will
not avoid distortions if the signal’s level becomes far hotter than 0dB.
Especially increasing the EQ Low Gain leads to very hot signals.
That said, some techno deejays like the sound of look-ahead limiting and
deliberately push the signal to obtain a certain pumping effect in the mix.
User’s Manual
24/36
3.3 Managing songs
3.3.1 Finding songs
If you got thousands of songs, searching them “by hand” takes too much
time. For fast work, it is recommended to use Quad’s Find feature to find a
song using any search text. Please note that the text input is case-insensitive.
Quad’s Find feature saves you precious mixing time
To find a song:
•
•
•
•
•
•
•
Click onto the Browser
Drag the column that contains the text to be found to the first position
(for instance if you search in the artists, drag “Artist” column into first
place). Quad always searches in the column that comes first.
Press F on your keyboard or click into the search text box.
Enter any text fragment and press Enter or click FIND button.
If the previously entered text fragment was found it will be highlighted.
To search the next match, press Enter again or click NEXT button.
Press L to load song.
The search is restricted to the current directory or case (or, to formulate it
otherwise: to the files currently listed). If you want to search the whole
database, first click
to show the files of the whole database, then start
searching.
The files will only be found if they have already been scanned. That’s why it
makes sense to scan all files after specifying the Song Folder.
3.3.2 Editing ID3/OGG tags
To change one of the following tags (only works for MP3 & OGG at the
moment)
Artist, Song, Album, Label, BPM, Year, Genre
right-click a cell in the Browser. A window will appear, prompting you to enter
a new value.
3.3.3 Alphabetically sorting songs in the Browser
Songs are automatically alphabetically sorted following the displayed
columns. For example, if the first column is Label, the second column is Album
and the third column is Song, then the songs are listed by alphabetically
sorting Album, then Label and then Song. Try out to see how it works by
User’s Manual
25/36
moving some columns: Just click on one column, hold it clicked and move it
to another position. See below how to sort Cases.
3.3.4 Cases & Current Playlist
A “Case” is a collection of user-selected tracks – just like a DJ case where
some favorite vinyl discs are put into.
•
•
•
•
•
•
To create a new Case, right-click
and select “Add
Case”, then enter the new Case’s name and press ENTER.
To add some tunes to the Case, just drag’n’drop them into the
previously created Case.
To rename a case, right-click the previously created case and select
“Rename Case” from the Pop-Up Menu.
To delete a Case, right-click the previously created Case and select
“Delete Case” from the Pop-Up Menu.
To copy the contents of a Case to the clipboard for use in other
applications, right-click the Case and select “Copy to Clipboard”. You
can afterwards paste the contents as text in Notepad, Word or any
other text-application. This is especially useful for the Current Playlist
which contains the tunes you played since the last start of Quad.
To sort a Case, move the columns in the order you want to sort, then
double-click any column on its top (on the column header).
You can move entries up in the Cases using CTRL+Arrow up/Arrow down.
You can delete entries with DEL key or Backspace key.
The Current Playlist shows the tracks you have played since the last start of
Quad. You can apply the same operations to it as you can apply to Cases
(except not adding tunes by drag’n’drop).
3.4 Cueing, Equalizing, Filtering
3.4.1 Loop Sampler
Cue 1 (Loop Start / Stop)
Loop Length Adjust
Loop Length Selector
Cue 2 (Loop Start / Stop)
The Loop Sampler allows looping (cueing) in the song. To start a loop, first
select the Loop Length using the Loop Length Selector. This will set the Loop
Length to the specified Bar Length (for instance 2/1 = 2 Bars, 3/4 = 0.75 Bars).
To start the Loop, press the Cue 1 Button or Cue 2 Button at the desired
moment while the song is playing.
User’s Manual
26/36
In Cue 1 mode, releasing the Cue 1 button will stop the loop and the song will
continue playing at the next logical half-bar position.
Cue 2 mode behaves differently: when pressing the Cue 2 button, the song
continues playing “in the background” while you hear the loop. As soon as
you release the Cue 2 button, you will hear the song again.
Please note: To obtain really accurate loops for MP3s and OGGs, the
song’s tempo must be stored in the tune as tag. If the BPM tag is not
present, the BPM will be obtained from the Tap-Tempo (see FX section). For
Audio Thru (playing real vinyl records), the BPM is assumed to be equal to
the Tap-Tempo.
After starting the loop, you may still modify the Loop Length using the Loop
Length Selector or using the Loop Length Adjust knob to shorten the Loop
Length.
Please note: When selecting a new Loop Length using the Loop Length
Selector while already looping, the new Loop Length will only be used from
the start of the next beat on.
3.4.2 Equalizers
Parametric Mid band
Low (Bass) Gain
High (Treble) Gain
Kill Switches
3.4.2.1 Low, Mid and High equalization
Equalizers are part of all normal DJ Mixer. They allow boosting or attenuating
low (bass), mid and high (treble) frequencies. Quad offers 3-band
equalization with a parametric (frequency-adjustable) mid band and Kill
switches.
The Low, Mid and High EQ knobs allow respectively adjusting bass, mids and
treble. The Freq knob (near the Mid knob) allows adjusting the Mid frequency
from 100 Hz to 10 kHz. The operating frequencies of Low and High are fixed.
Please note that increasing the Low Gain considerably increases the signal’s
output level and may lead to activation of the look-ahead limiters if the
signal’s output level exceeds 0dB (see 3.2.11 for more information).
User’s Manual
27/36
3.4.2.2 Kill Switches
The Low, Mid, High Kill Switches allow to rapidly “kill” (fully attenuate) Low, Mid
and High frequency ranges rapidly – more or less the same as if you would
turn any of the gain knobs fully counter-clockwise.
3.4.2.3 Useful tips for fast EQ operation using the mouse
•
•
Press CTRL while holding the left mouse button pressed and turning or
not turning any of the EQ knobs to reset it at its middle position
Press Shift while turning any knob to adjust more accurately.
3.4.3 Filters
Cutoff Frequency
SVF Highpass Mix
Filter Type
SVF Bandpass Mix
SVF Lowpass Mix
Resonance
Apart from its equalizers, Quad also offers two kinds of filters that allow even
more radically influencing the frequency spectrum: SVF (State Variable Filter)
and X-Filter (Cross Filter).
Please note: While manipulating/turning the Freq (Cutoff Frequency) knob
using the mouse, you may set it back to its middle position by pressing
CTRL on your keyboard while turning. This is especially useful when using
the X-Filter, since it allows you to “deactivate” the filtering really fast by
while turning. One more trick is to press Shift on your keyboard while turning
the knob using the mouse. This will enhance the turning accuracy as long
as you hold the Shift key.
3.4.3.1 SVF (State Variable Filter)
The SVF Filter is a combination of lowpass, bandpass and highpass filters.
Cutoff adjusts the cutoff frequency of the filter (lowpass cutoff frequency,
bandpass cutoff frequency & highpass cutoff frequency at the same time).
Q adjusts the resonance (sometimes also called emphasis) of the filter. The
higher the resonance, the “sharper” the filtered sound.
The SVF is especially powerful when its 5 parameters (Cutoff, Resonance, Low,
Band, High) are controlled via a MIDI-Controller. Adjusting the SVF’s knobs
using the mouse is somewhat time-consuming and unpractical.
User’s Manual
28/36
3.4.3.2 X-Filter
The X-Filter allows a seamless transition from lowpass to highpass using one
single cutoff knob: The first (left) half adjustment range of the knob controls a
lowpass whereas the second (right) half controls a highpass. The transition
from lowpass to highpass is flawless. If the cutoff knob is set to the very middle,
the X-Filter lets all frequencies pass, i.e. behaves like it is not activated.
The X-Filter is especially well suited for mouse-only setups with no MIDI
Controller, since you may alter its main characteristics by just turning the
Cutoff.
3.4.3.3 Useful tips for fast filter operation using the mouse
•
•
When using the X-Filter and manipulating the cutoff knob, press CTRL
while turning to come back to the middle.
Press Shift while turning any knob to adjust more accurately.
3.5 FX: Effects for the mix
3.5.2 How to use FX
1
2
3
4
5
6
7
9
10
8
Quad’s FX section
1) FX button: Click to activate FX, click again to turn off FX. You may also
press X on your keyboard to activate/deactivate FX.
2) FX Type: Selects the effect type you want to apply to the incoming signal.
If [Plugins Only] is selected, no other FX than the VST plugins will be used
(see below).
3) Mix: Changes the relation of wet (FX-processed) and dry (unprocessed)
signal.
4) Depth: Changes the depth/influence of the selected effect. What effect
parameter is influenced depends on the effect itself. See 3.5.2 for details.
User’s Manual
29/36
5) VST Plugins (Windows only): You can insert two VST plugins here. Right-click
any of the 3 buttons under the plugin to select an automation destination
for any of the 3 buttons. This buttons can be controlled via MIDI and so you
can effectively control automation parameters of the plugins. The plugins
will influence the signal together with the selected FX Type, unless [Plugins
only] is selected as FX Type.
6) FX Channel: Selects the Channel to apply FX to. This may be one of the 4
Channels or the Main Channel.
7) FX Speed: Selects the modulation speed (expressed in bars) of the
selected effect. FX Speed has no influence on the Reverb effect.
8) BPM display: Shows “Clock” or “Tap” BPM amount. Shows “Clock” BPM if
“Clock” is selected, shows “Tap” BPM if “Tap” is selected.
9) FX Clock Source: If “Clock” is selected, the FX section will obtain its BPM
from the Channel having the BPM Sync Clock activated, thus “Clock”
should always be selected if your MP3s/OGGs contain ID3 “BPM” frames. If
“Tap” is selected, you will have to “tap” the tempo using the left CTRL key
on your keyboard. Tapping the tempo is done by accurately hitting the
Space key on each beat (normally kick drum), that is 4 times per bar.
Please note: The Loop Samplers always use the BPM indicated by the FX
section as tempo reference for cueing. It is important to tap the tempo
really accurately if you want to use the Loop Samplers with Clock Source
set to “Tap”.
3.5.2 FX Types
Quad offers the following (mostly BPM-synchronized) FX:
•
•
•
•
•
•
•
•
Chorus
Flanger
Delay
LFO Filter
Phaser
Reverb (the only one not being BPM-synchronized)
Pan
Tremolo
3.5.2.1 Flanger
The Flanger effect is obtained by mixing the original signal with a slightly
delayed version of the original signal while the delay time is slowly changed
back and forward. The Depth knob controls the depth of the Flanger effect.
User’s Manual
30/36
3.5.2.2 Phaser
The Phaser sounds slightly similar to the Flanger effect, although it is based on
phase-distortion obtained by running the original signal through filters and
mixing this signal back with the original signal. The Depth knob controls the
depth of the Phaser effect.
3.5.2.3 Echo
The Echo effect repeats the incoming signal rhythmically several times, like a
fading echo. The Depth knob modifies the echo time: if set to middle position,
the echo time will be equal to the selected FX speed, the left half will shorten
the echo time whereas the right half will increase the echo time.
3.5.2.4 Delay
The Delay effect repeats the incoming signal rhythmically one time. The
Depth knob modifies the delay time: if set to middle position, the delay time
will be equal to the selected FX speed, the left half will shorten the delay time
whereas the right half will increase the delay time.
3.5.2.5 LFO Filter
The LFO Filter lowpass-filters the incoming signal by varying the cutoff
rhythmically. The Depth knob controls the filtering depth.
3.5.2.6 Tremolo
The Tremolo varies the level of the incoming signal rhythmically. The Depth
knob controls the speed of the level variation: if set to middle position, the
speed will be equal to the selected FX speed, the left half will shorten the
speed whereas the right half will increase the speed.
3.5.2.7 Pan
The Pan effect moves the audio signal from left to right and right to left in a
rhythmic fashion. The Depth knob controls the speed of this movement: if set
to middle position, the speed will be equal to the selected FX speed, the left
half will shorten the speed whereas the right half will increase the speed.
3.5.2.8 Reverb
The Reverb effect sounds like a more or less big room. The Depth knob
influences the size of this virtual room.
User’s Manual
31/36
3.6 Crossfader
Left Crossfader
source Channel
Crossfader Pan
Right Crossfader
source Channel
Crossfader Curve
(slow, mid, fast)
Quad’s Crossfader allows crossfading between 2 selected channels using 3
different curves.
To apply crossfading to 2 different channels, do the following:
•
•
•
•
Select left Crossfader source Channel (1, 2, 3, 4 or THRU for no influence).
Select right Crossfader Channel (1, 2, 3, 4 or THRU for no influence).
Select Crossfader Curve (slow, mid, fast) : slow and mid are good for
mixing, fast is especially suited for scratching but not so good for mixing.
Use the Crossfader Pan (in the middle) to crossfade between the left and
right Crossfader source Channels.
3.7 MIDI
3.7.1 Selecting the MIDI Input in Quad’s Preferences
Today's market offers a broad range of MIDI controllers that can all be used to
control Quad's knobs, faders and buttons. Before using one or more MIDI
controllers, you must select your active MIDI controller(s) as MIDI Input(s) in the
Preferences window:
Selecting the MIDI Input/Output in the Preferences
After selecting the MIDI Input(s), the MIDI Input Indicator on the bottom in the
main window should light up when you turn knobs on your MIDI controller(s).
MIDI Input indicator
The MIDI Input indicator should lighten up when you turn one of the MIDI
controller’s knobs.
User’s Manual
32/36
If your MIDI Controller supports MIDI controller feedback (such as endless
rotary knob controllers and controllers with LEDs to indicate the state of
buttons), you should also specify the same controller as MIDI Output.
3.7.2 MIDI Learn
Assigning a specific MIDI controller to a certain knob/button/fader (for
instance the Cutoff knob, or the Channel's Level) is extremely easy:
First press the
button on the bottom. This button will start blinking to
show that MIDI Learn mode is on. Then click on any left to be controlled knob
/ button/ fader and then turn your MIDI controller's knob - Quad will "learn"
from this action and from now on the chosen MIDI controller will control the
chosen parameter in Quad. Continue in the same fashion for other knobs. The
programmed MIDI Control Settings will be available every time you start
Quad. They may be saved or loaded in the Preferences (see next chapter).
Selecting a knob in Quad2 for MIDI Learn while holding CTRL on your
keyboard will tell Quad2 that the to-be-used MIDI message should reset this
knob to its initial position. This is extremely useful for controllers such as the
Behringer BCR2000 that have knobs that act as a buttons when you press
them : You can use the press-action to reset knobs (especially X-Filter’s Cutoff)
to the initial position.
3.7.3 MIDI Control Settings
If you own more than one MIDI Controller, you may load and save the actual
MIDI Control Settings to use more than one MIDI Controller. MIDI Control
Settings may be saved and loaded in the Preferences window using the
“Save MIDI Control Settings” and “Load MIDI Control Settings” buttons.
Managing MIDI control Settings in Quad’s Preferences
User’s Manual
33/36
The “Clear MIDI Control Settings” button allows resetting the whole MIDI
Control Settings, effectively erasing Quad's entire MIDI Learn memory (but of
course not the MIDI Control Settings you saved on the disk).
3.8 Recording your mix
The Record button
You may record Quad’s Main Output or any input from the soundcard as
.WAV file (16Bit or 32Bit Stereo @ playing sampling rate) while mixing.
To start recording, press the REC button. The following window will appear:
Quad will ask you for the record source and the quality of the to-be-saved
.WAV file. The record source is where the signal comes from. If you mix
internally, choose “Internal (Main Output)”, otherwise choose any of your
soundcard inputs where the Main Output or Booth/Monitor output of your
mixer is connected to.
In most situations it is advised to use 16Bit quality, because your mix then can
be longer (6h 40min instead of 3h 20min for 32Bit) and will take up only half
the space on the hard disk.
Quad will ask for the filename, location to save the .WAV file at. Thereafter,
the REC button will become red to indicate that Quad is ready to record the
mix. The recording itself will begin as soon as the Main Output’s signal level
exceeds -40dB (peak).
To stop the recording process, just press the RECORD button once more.
Please note: Please make sure that there is enough disk space left to save
the mix. At a sampling rate of 44.1 kHz, 1 GB of Disk Space equals to
approximately 100 Minutes of music when stored as 16 Bit Stereo .WAV file.
Make sure you always have at least 4-5 GB of free hard disk space on your
computer when recording mixes.
User’s Manual
34/36
4. Appendix
4.1 Keyboard Shortcuts
Working with a mouse may be nice in most situations, but while mixing it may
be preferable to use keyboard shortcuts for fast control of the most important
features. Here’s a list of Quad’s keyboard shortcuts:
Tab
Space
L
F
Enter
X
Right Arrow
All Arrow Keys
CTRL+Arrow Up
CTRL+Arrow Down
Page Up
Page Down
CTRL
Shift
Move between Find Box & Browser windows
Tap Tempo
Load selected MP3 (Quad will ask you for Channel to
load onto)
Enter Search Box
In Search Box: Find Next
FX On/Off
In Browser directory structure : Open Folder
Navigate in Browser
In Case or Current Playlist: Move entry up
In Case or Current Playlist: Move entry down
In Browser (songs): Fast up
In Browser (songs): Fast down
While turning knobs/sliders: reset to initial position
While turning knobs/sliders: increase precision
4.2 Mouse Button Functions
Left mouse button
CTRL
Left mouse button + Shift
Double click (In Browser)
Normal, Windows-like function
Enter MIDI Learn Mode
On knobs & sliders: manipulate
knobs/faders more accurately
On song: load song onto Preview Player
Cases & Current Playlist column headers:
Sort as columns
User’s Manual
35/36
4.3 Quad Timecode Vinyl Discs
Quad comes with 4 Timecode Vinyl discs. The A-Side is 33 rpm and contains
16 minutes of timecode, the B-Side is 45 rpm and contains 11 minutes of
timecode (each minute of timecode is represented by a mark on the disc).
33 rpm is better for scratching, whereas 45 rpm is better for mixing (it is easier
to mix at 45 rpm than at 33 rpm).
When your tune is playing and the needle comes to the end of the disc –
don’t panic - Quad will continue playing the tune as long as the needle stays
on the disc in the endless track. However, further pitch variations or scratching
are not recognized if the needle is in the endless track.
Although Quad is more or less insensitive to scratches/scrapes on the Vinyls,
you should handle your Vinyls with care. Try to keep them as dust free as
possible and do not expose them to the sun or heat.
User’s Manual
36/36