1
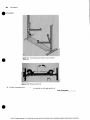
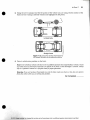
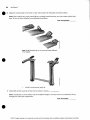
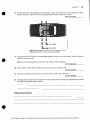
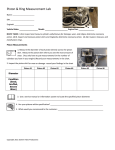
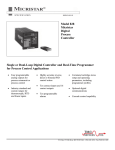
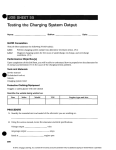
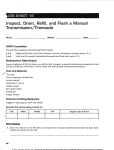
•
JOB SHEET 7
Using a Vehicle Hoist
Name: --------------------------- Station: ---------------------
Date: ________
NATEF Correlation
This Job Sheet addresses the following NATEF task(s):
N/A
Performance Objective(s)
Upon completion of this Job Sheet, you will be able to use a vehicle hoist to raise a vehicle in the air safely
and correctly.
Tools and Materials
Service manual
Vehicle
•
Hoist
Protective Clothing/Equipment
Goggles or safety glasses with side shields
Describe the vehicle being worked on:
Year
Make
Model
VIN
Engine type and size
PROCEDURE
1. Describe the type of hoist(s) that are located in the shop you are in .
•
28
© 2012, Cengage Learning, Inc. Licensed for one-time use by the purchaser only; no additional copying or retransmission is permitted.
Job Sheet 7
•
2. Describe the type of hoist you are going to be using.
(a)
,
•
Figure 11.1 (a) Single-post frame-contact lift. (b) Two-post
frame-contact lift.
•
(Continued)
© 2012, Cengage Learning, Inc. Licensed for one-time use by the purchaser only; no additional copying or retransm ission is permitted .
29
30
•
•
Job Sheet 7
(Concluded)
Figure 11.1 (continued) (c) Surface mount framecontact lift.
,
n
Figure 11.2 Wheel-contact lift.
~
--------' "'
0
3. Use the controls of the hoist without a vehicle on it to get used to it.
Task Completed _ _ __
•
© 2012, Cengage Learning, Inc. Licensed for one-time use by the purchaser only; no additional copying or retransmission is permitted.
Job Sheet 7
•
31
4. Using the service man ual, find the lift points of the vehicle you are u sing. Draw an outline of the
frame (or body if using a un ib od y veh icle) and highlight the lift points.
Unitized body
Straight frame
•
Figure 11.3 Check the service information for
the correct lift points for a particular vehicle .
5. Drive the vehicle into position on th e hoist.
N ote: Shorter wheelbase vehicles will have to be in a different position than longer wheelbase vehicles. Trucks
and vehicles that are front heavy will need to be placed on the hoist so that their weigh t is centered. Always
refer to the operator's manual or a lift point chart for proper placement.
Warning: If you are having a friend guide you onto the hoist, make sure that he or she does not stand in
front of the vehicle while you are driving into position.
Task Completed _ _ __
•
© 2012, Cengage Learning, Inc. Licensed for one-time use by the purchaser only; no additional copying or retransmission is permitted.
32
•
Job Sheet 7
6. Align the contact pads of the hoist so they will contact the lift points described earlier.
Note: Some vehicles have plastic ground effects or running boards that may come into contact with the hoist
arms. Be sure to check this before you accidentally break them.
Task Completed _ _ __
Figure 11.4 Adapters flip up to accommodate different
frame heights .
•
Figure 11.7 A rocker panel (pad) lift.
7. Slowly lift the hoist until all of the tires are about 6 inches off the ground.
Note: The lift points on some vehicles may be at different heights. You may need to accommodate for this by
changing the contact pad configuration.
Task Completed _ _ __
•
© 2012, Cengage Learning , Inc. Licensed for one-time use by the purchaser only; no additional copying or retransmission is permitted.
Job Sheet 7
•
33
8. Gently shake the car by pushing on the bumper. Listen and watch the contact pads. The vehicle
should not rock or make noises when doing this if the center of gravity is correct.
Task Completed _ _ __
I I
I L
.L -
C.G.-RWD
e.G.-FWD
Figure 11.18 Center of g ravity (C.G.) positions for frontwheel drive (FWD) and rear-wheel drive (RWD).
•
9. Continue to raise the vehicle to a comfortable height so that you can walk under it. Rest the vehicle's
weight on the hoist locks .
Note: Recheck the pad placem ent at this time. You will get a better viewpoint.
Task Completed _ _ __
10. Lift the vehicle off the locks, release the locks, and lower the vehicle down.
Task Completed _ _ __
11. Once on the ground, move the arms out of the way and drive the vehicle out.
Task Completed _ _ __
12. Given the type of hoist you were assigned to use for this exercise, what types of repair jobs would be
most efficient using this type of hoist?
Problems Encountered
•
© 2012, Cengage Learning, Inc. Licensed for one-time use by the purchaser only; no additional copying or retransmission is permitted.
34
Job Sheet 7
.INSTRUCTOR EVALUATION
D 4
D 3
D 2
D 1
D 0
Mastered Task
Able to Perform Task Independently; Some Additional Training Suggested
Able to Perform Task with Close Supervision; Requires Additional Training
Unable to Perform Task
Not Attempted
Comments
InstructorName: ------------------------------------------------ Date: ______________
Instructor Signature: ------------------------------------------------------------------
•
•
© 2012, Cengage Learning, Inc. Licensed for one-time use by the purchaser only; no additional copying or retransmission is permitted.