1
IMI CORNELIUS INC. One Cornelius Place Anoka, MN. 55303–6234 Telephone (800) 238–3600 Facsimile (612) 422–3232 Installation Instructions CONVERTIBLE Post-Mix Dispenser INSTALLATION AND SERVICE MANUAL WITH ILLUSTRATED PARTS BREAKDOWN PREPARED EXPRESSLY FOR Manual Part No. 0575 January 1991 Revised October 6, 1992 THIS DOCUMENT CONTAINS IMPORTANT INFORMATION This Installation Manual must be read and understood before starting to install or operate this equipment. IMI CORNELIUS INC; 1992 Printed in U.S.A. TABLE OF CONTENTS PAGE GENERAL DESCRIPTION . . . . . . . . . . . . . . . . . 1 READ THIS SECTION FIRST . . . . . . . . . . . . 1 GENERAL DESCRIPTION . . . . . . . . . . . . . . . 1 UNIT DESCRIPTION . . . . . . . . . . . . . . . . . . . . 1 INSTALLATION KITS . . . . . . . . . . . . . . . . . . . . 2 PLAIN WATER CONVERSION KIT P/N 0106. . . . . . . . . . . . . . . . . . . . . . . . . . . . . 2 ICE TEA KIT P/N 1347. . . . . . . . . . . . . . . . . 2 LEG KIT P/N 1294. . . . . . . . . . . . . . . . . . . . . 2 THEORY OF OPERATION . . . . . . . . . . . . . . . 3 INSTALLATION . . . . . . . . . . . . . . . . . . . . . . . . . . . 6 RECEIVING . . . . . . . . . . . . . . . . . . . . . . . . . . . . 6 UNPACKING AND INSPECTION . . . . . . . . . . 6 LOCATION SELECTION . . . . . . . . . . . . . . . . . 6 INSTALLATION . . . . . . . . . . . . . . . . . . . . . . . . . 7 PAGE CHANGE SYRUP TANK . . . . . . . . . . . . . . . BAG–IN–BOX SYRUP CONTAINER . . . . WASH NOZZLE . . . . . . . . . . . . . . . . . . . . . . WASH CUP REST AND DRIP TRAY . . . . CLEAN UNIT EXTERIOR . . . . . . . . . . . . . . SERVICE AND MAINTENANCE . . . . . . . . . . . . APPLICABLE CAUTIONS AND NOTES . . . . 22 MAINTENANCE SCHEDULE . . . . . . . . . . . . . 22 RESPONSIBILITY KEY: . . . . . . . . . . . . . . . 22 DAILY . . . . . . . . . . . . . . . . . . . . . . . . . . . . . . . 22 WEEKLY . . . . . . . . . . . . . . . . . . . . . . . . . . . . . 22 MONTHLY . . . . . . . . . . . . . . . . . . . . . . . . . . . 22 SIX MONTHS . . . . . . . . . . . . . . . . . . . . . . . . 22 YEARLY . . . . . . . . . . . . . . . . . . . . . . . . . . . . . 22 WHEN OCCURRING . . . . . . . . . . . . . . . . . . 22 CHECK SYRUP–TO–WATER . . . . . . . . . . . . . 22 SANITIZE SYSTEM . . . . . . . . . . . . . . . . . . . . . 22 CLEAN REFRIGERATION SYSTEM . . . . . . . 23 DUAL LIQUID CHECK VALVE ASSEMBLY MAINTENANCE . . . . . . . . . . . . . . . . . . . . . . . . . . . . . 24 CO2 GAS CHECK VALVE ASSEMBLY MAINTENANCE . . . . . . . . . . . . . . . . . . . . . . . . . . . . . . . . 25 TROUBLESHOOTING . . . . . . . . . . . . . . . . . . . . . 27 FILLING WATER TANK AND STARTING REFRIGERATION SYSTEM. . . . . . . . . . . . . . . 7 CONVERSION OPTION . . . . . . . . . . . . . . . 7 COUNTERTOP HOLE LOCATION . . . . . . 7 SEALING UNIT BASE TO COUNTERTOP. 9 MAKING WATER, CO2, SYRUP, AND ELECTRICAL CONNECTIONS. . . . . . . . . . . . . . . . . . . . 9 CONNECT WATER: . . . . . . . . . . . . . . . . . . . 9 CONNECT CO2 . . . . . . . . . . . . . . . . . . . . . . 9 CONNECT SYRUP LINES . . . . . . . . . . . . . 11 CONNECT SYRUP LINES TO SYRUP SOURCES . . . . . . . . . . . . . . . . . . . . . . . . . . . 11 MAKE ELECTRICAL CONNECTIONS . . . 11 PREPARATION FOR OPERATION . . . . . . 11 PLAIN WATER AND STILL DRINKS . . . . . 11 PURGING THE CARBONATOR SYSTEM 14 PURGING THE SYRUP SYSTEMS . . . . . 14 GENERAL INFORMATION . . . . . . . . . . . . . . . 27 APPLICABLE WARNINGS AND NOTES . 27 UNIT ELECTRICAL DIAGRAM . . . . . . . . . 27 WATER–TO–SYRUP RATIO IS INCORRECT 30 CARBONATION TOO LOW IN DISPENSED PRODUCT . . . . . . . . . . . . . . . . . . . . . . . . . . . . . 30 DISPENSED PRODUCT IS CLEAR BUT FOAMS IN CUP OR GLASS . . . . . . . . . . . . . . . . . . . . . 30 DISPENSED PRODUCT FOAMS AS IT LEAVES NOZZLE. . . . . . . . . . . . . . . . . . . . . . . . . . . . . . . 30 NO PRODUCT DISPENSED . . . . . . . . . . . . . 31 ONLY CARBONATED WATER IS DISPENSED . . . . . . . . . . . . . . . . . . . . . . . . . . . 31 CARBONATOR TANK NOT FILLING PROPERLY . . . . . . . . . . . . . . . . . . . . . . . . . . . . 31 FREQUENT SHORT FILL CYCLES OF CARBONATOR TANK . . . . . . . . . . . . . . . . . . . . . . . . . . 32 ONLY SYRUP IS DISPENSED . . . . . . . . . . . . 32 COMPRESSOR DOES NOT OPERATE . . . 32 COMPRESSOR DOES NOT STOP AFTER ICE BANK IS FORMED. . . . . . . . . . . . . . . . . . . . . . 32 COMPRESSOR RUNS CONTINUOUSLY BUT DOES NOT FORM AN ICE BANK. . . . . . . . . 32 CONDENSER FAN NOT OPERATING . . . . . 33 AGITATOR MOTOR NOT OPERATING . . . . 33 ADJUSTING WATER–TO–SYRUP RATIO OF DISPENSED PRODUCT . . . . . . . . . . . . . . . 14 ADJUSTING CO2 PRESSURE . . . . . . . . . 15 BAG–IN–BOX CO2 SUPPLY . . . . . . . . . . . 15 SYRUP TANK CO2 SUPPLY . . . . . . . . . . . 15 OPERATORS INSTRUCTIONS . . . . . . . . . . . . . 18 PRODUCT DISPENSE SWITCH OPERATION . . . . . . . . . . . . . . . . . . . . . . . . . . . 18 CARBONATED DRINK . . . . . . . . . . . . . . . . 18 SODA (CARBONATED WATER) . . . . . . . . 18 PLAIN WATER (PLAIN WATER KIT INSTALLED) . . . . . . . . . . . . . . . . . . . . . . . . . 18 DAILY PRE–OPERATION CHECK . . . . . . . . 18 CHANGE CO2 CYLINDER . . . . . . . . . . . . . 18 19 20 21 21 21 22 i 0575 TABLE OF CONTENTS CONT’D PAGE PAGE SODA ONLY OF PLAIN WATER ONLY SWITCH DOES NOT OPERATE . . . . . . . . . . . . . . . . . . 33 ADDENDUM A . . . . . . . . . . . . . . . . . . . . . . . . . 41 SEALING UNIT BASE TO COUNTERTOP (USA) . . . . . . . . . . . . . . . . . . . . . . . . . . . . . . . . . 41 ADDENDUM B . . . . . . . . . . . . . . . . . . . . . . . . . 42 SANITIZING THE SYSTEM (USA) . . . . . . . . 42 SANITIZING THE BAG–IN–BOX SYRUP SYSTEMS . . . . . . . . . . . . . . . . . . . . . . . . . . . . . . . . . 42 SANITIZING THE SYRUP TANK SYSTEMS 43 FIGURE 12. RATIO MEASUREMENT DETAIL 17 FIGURE 13. SYRUP TANK . . . . . . . . . . . . . . . . . 19 FIGURE 14. LINE END FITTING FOR SYRUP TANK CONNECTION . . . . . . . . . . . . . . . . . . . . . . 20 FIGURE 15. CARBONATOR . . . . . . . . . . . . . . . . 24 FIGURE 16. DUAL LIQUID CHECK VALVE ASSEMBLY . . . . . . . . . . . . . . . . . . . . . . . . . . . . . . . . . . . . . 24 FIGURE 17. CO2 CHECK VALVE ASSEMBLY 26 FIGURE 18. INSTRUCTIONS FOR CRIMPING TUBE CLAMPS . . . . . . . . . . . . . . . . . . . . . . . . . . . 28 FIGURE 19. UNIT ELECTRICAL DIAGRAM . . 29 FIGURE 20. CONVERTIBLE PARTS BREAKDOWN . . . . . . . . . . . . . . . . . . . . . . . . . . . . 34 FIGURE 21. WATER INLET LINE ASS’Y . . . . . 36 FIGURE 22. SOLENOID VALVE ASSEMBLY . 37 FIGURE 23. DUAL CHECK VALVE ASSEMBLY 37 FIGURE 24. CARBONATOR TANK ASSEMBLY 38 FIGURE 25. EVAPORATOR COIL ASSEMBLY 38 FIGURE 26. WATER TANK ASSEMBLY . . . . . . 38 FIGURE 27. VALVE HOUSING ASSEMBLY . . 39 FIGURE 28. MANIFOLD ASSEMBLY . . . . . . . . 39 FIGURE 29. COIL ASSEMBLY . . . . . . . . . . . . . . 39 FIGURE 30. CONTROL BOX ASSEMBLY . . . . 40 FIGURE 31. MANUAL OPERATION OF DISPENSING VALVES . . . . . . . . . . . . . . . . . . . . . . . . . . . . . 42 LIST OF FIGURES FIGURE 1. CONVERTIBLE POST-MIX DISPENSER 1 FIGURE 2. UNIT WITH BAG-IN-BOX SYRUP SOURCE - FLOW DIAGRAM . . . . . . . . . . . . . . . 4 FIGURE 3. UNIT WITH SYRUP TANKS - FLOW DIAGRAM . . . . . . . . . . . . . . . . . . . . . . . . . . . . . . . . 5 FIGURE 4. NARROW AND SHALLOW DEPTH CONFIGURATIONS . . . . . . . . . . . . . . . . . . . . . . . 8 FIGURE 5. CONVERSION DETAIL . . . . . . . . . . 8 FIGURE 6. COUNTERTOP HOLE LOCATION 10 FIGURE 7. BAG–IN–BOX CO2 SUPPLY . . . . . 12 FIGURE 8. SYRUP TANK CO2 SUPPLY . . . . . 13 FIGURE 9. COVER DECAL (PRODUCT SELECTION PANEL DETAIL . . . . . . . . . . . . . . . . . . . . . . 16 FIGURE 10. BAG–IN–BOX PUMP DETAIL . . . 16 FIGURE 11. SYRUP LINE CONNECTION TO SYRUP PUMP . . . . . . . . . . . . . . . . . . . . . . . . . . . . . . . . 17 0575 LIST OF TABLES TABLE 1. DESIGN DATA . . . . . . . . . . . . . . . . . ii 1 GENERAL DESCRIPTION READ THIS SECTION FIRST IMPORTANT: This manual is a guide for installing, operating, and maintaining the Convertible Post–Mix Dispenser. Refer to the table of contents for page location of detailed information on questions that arise during installation, operation, service and maintenance, or troubleshooting of this dispenser. GENERAL DESCRIPTION This section gives the description, theory of operation, and design data for the Four–Flavor Convertible Post–Mix Dispenser with built–in cold carbonator, hereinafter referred to as the Unit. FIGURE 1. CONVERTIBLE POST-MIX DISPENSER Coca-Cola and Coke are registered trademarks of the coca-Cola Company Physical Characteristics and Requirements UNIT DESCRIPTION Overall dimensions: Width (see Figure 1) Height The Unit is compact and may be island–mounted or installed on a front or rear counter. Further, it is designed so that it can be readily adapted to available counter space (narrow front, or shallow depth). A full description of installation options is given in the Installation Section. The refrigeration Unit is a ‘‘lift out’’ type which is easily removed for service and maintenance. Syrup–to–water ratios in the dispensed product are readily adjustable. The Unit is configured for use with either bag–in–box (BIB) syrup containers or for use with pressurized syrup tanks. Units configured for use with bag–in–box syrup containers have internal syrup pumps and require one applied CO2 pressure. Units using pressurized syrup tanks do not have internal syrup pumps and require two separate applied CO2 pressures. Legs and hardware are provided for those Units to be installed outside of the USA. Volts 115 115 115 115 HZ 60 60 60 60 weights Shipping (one carton) Dry Weight (approx.) Ice Bank Weight (approx.) Refrigeration Assembly Water Tank Capacity (without ice bank) 77 lb. (35 Kg) 72 lb. (32.5 Kg) 8 lb (3.6 Kg) 36 lb. (16.3 Kg) 4.6 gallons (17 liters) Countertop Dispensing Capacity: 75 degree ambient (23.9 degrees C): fifty 12 oz. drinks dispensed at or below 40 degrees F. (4.4 degrees C) with syrup and water inlet temperatures at 75 degrees F. (23.9 degrees C). 90 degree ambient (32.2 degrees C): twenty five 12–oz. drinks dispensed at or below 40 degrees F (4.4 degrees C) with syrup and water inlet temperature at 90 degrees F (32.2 degrees C). Table 1. Design Data Identification Part No. 0080 0088 1275* 1276* Depth 12–1/2 in. (31.75 cm) 17–7/8 in. (45.4 cm) 23–1/4 In. (59 cm) Pumps Yes No Yes No Refrigeration: Compressor Horsepower with evaporator coil at 20 degrees F. (1/8 HP) 1120 BTU NOTE: * U.S.A. only 1 0575 Refrigerant R12 Syrup Tank Installation Kit P/N 0103 (US).Provides necessary parts to connect syrup, CO2 and water to a Unit without internal syrup pumps. 5.5 oz. Ambient Operating Temperature 40 degrees F (4.4 degrees C) to 90 degrees F (32 degrees C) Electrical Requirements 115VAC, 60HZ Inlet Water Requirements: Minimum Flow Pressure (1.8 Kg/cm2; 1.7 BAR) Maximum Static Pressure (2.8 Kg/cm2; 2.8 BAR) Syrup Tank Installation Kit P/N 0105 (metric). Provides necessary parts to connect syrup, CO2 and water to Unit without internal syrup pumps. 5.6 Amps Water Pressure Regulator Kit P/N 0107.Regulates water pressure on water inlet supply line. Pressure is factory–preset to 30 PSIG. 25 PSIG NOTE: The water pressure regulator is required in locations where the water pressure exceeds 40 PSIG (2.8 Kg/cm2; 2.8 BAR). Ideal water pressure ranges from 25 to 40 PSIG. 40 PSIG CAUTION: If water source exceeds 40 PSIG (2.81 Kg/cm2), a water regulator kit must be used to avoid improper Unit performance or damage. Refer to kit list for part number. PLAIN WATER CONVERSION KIT P/N 0106. The plain water conversion kit, when installed, allows plain water only to be dispensed and the Unit may be set up to also dispense a combination of carbonated and still (non–carbonated drinks). NOTE: Water pressure must be less than the CO2 pressure and must be within the maximum and minimum limits. ICE TEA KIT P/N 1347. The ice tea kit contains the parts required to convert syrup system No. 4 to provide an ice tea drink. CO2 Requirements: Bag–in–Box Units Maximum Pressure 80 PSIG (5.6 Kg/cm2;5.5 BAR) Minimum Pressure 70 PSIG (4.9 Kg/cm2; 4.8 BAR) LEG KIT P/N 1294. The leg kit, when installed, raises the Unit four inches above the countertop. Such an installation relieves U.S. users from the NSF requirement to seal the Unit to the countertop. Syrup Tank Units Carbonator Maximum Pressure 80 PSIG (5.6 Kg/cm2; 5.5 BAR) Minimum Pressure 70 PSIG (5.2 Kg/cm2; 4.8 BAR) DECAL KITS The following decal kits are available: Syrup Tanks Recommended Pressure Sugar: 40 PSIG (2.8 kg/cm2; 2.8 Bar) Diet: 6–12 PSIG (0.42 – 0.85 Kg/cm2; 0.4 0.83 BAR) INSTALLATION KITS The following kits are separately available for the Convertible Post–Mix Dispenser. Bag–in–Box Installation Kit P/N 0102 (USA).Provides the necessary parts to connect syrup, CO2 and water to a Unit having internal syrup pumps. Bag–in–Box Installation Kit P/N 0104 (metric).Provides the necessary parts to connect syrup, CO2 and water to a Unit having internal syrup pumps. 0575 2 Kit Part Number Applicable To 0110 United States of America 0111 Australia 0112 China 0113 France 0114 Germany 0115 Italy 0116 Japan 0117 Mexico 0118 Philippines 0119 Taiwan 0120 United Kingdom 0795 Spain 0796 Korea 0797 Holland 0798 Argentina THEORY OF OPERATION Units with Syrup Tanks Design Note: All Units delivered from the manufacturer are configured to dispense carbonated drinks and carbonated water. Any Unit may have an optional installation plain water kit field–installed which allows dispensing of plain water or dispensing of ‘‘still’’ (non–carbonated) drinks. Refer to list of kits for part numbers. (see Figure 3) Units with Bag–in–Box Syrup Supply (see Figure 2) Regulated CO2 gas from a cylinder provides pressurization through a manifold to the syrup pumps and to a carbonator, both within the Unit. Plain water, pumped under pressure by the carbonator pump into the carbonator tank absorbs the gas and is thereby carbonated. When a drink dispense switch or soda (carbonated water) only switch is pressed, the carbonated water solenoid valve is opened and CO2 pressure within the carbonator drives carbonated water from the carbonator through carbonated water cooling coils in the water tank, then through a carbonated water flow control to the dispensing nozzle. When a drink–dispense switch is pressed, a related syrup solenoid valve is also opened,allowing the syrup pump to start, forcing syrup through the syrup cooling coil in the water tank, the adjustable syrup flow control, the solenoid valve and on to the dispensing nozzle. Syrup and carbonated water meet simultaneously at the dispensing nozzle to produce a carbonated drink flowing from the nozzle. Units with a plain water kit can also dispense only plain water. Units may also be configured to dispensed up to four still (non–carbonated) drinks. 3 Regulated CO2 provides pressurization for the syrup tanks and gas to the carbonator within the Unit. Plain water, pumped under pressure by the carbonator pump into the carbonator tank absorbs the gas and is thereby carbonated. When a drink dispense switch or soda (carbonated water) only switch is pressed, the carbonated water solenoid valve is opened and CO2 pressure within the carbonator drives carbonated water from the carbonator through carbonated water cooling coils in the water tank, then through a carbonated water flow control to the dispensing nozzle. When a drink–dispense switch is pressed, CO2 pressure exerted on the syrup tank contents drives syrup from the syrup tank, through an individual syrup cooling coil in the water tank, then through an adjustable syrup flow control to the dispensing nozzle. Syrup and carbonated water meet simultaneously at the dispensing nozzle to create a carbonated drink flowing from the nozzle. Units equipped with a plain water kit can also dispense plain water. Units also may be converted to dispense up to four still (non–carbonated) drink types. 0575 CO2 CHECK VALVE * USED ON UNITS 1275 AND 1276 CARBONATOR * * DUAL CHECK VALVE WATER PUMP * STRAINER PLAIN WATER KIT (OPTIONAL) PLAIN WATER COIL PLAIN WATER DISPENSING VALVE WATER SOURCE * WATER PRESSURE REGULATOR CO2 WATER COIL PRIMARY REGULATOR 70-80 PSI DISPENSING NOZZLE SOLENOID VALVE FLOW CONTROL SYRUP COIL (4) REFRIGERATED WATER BATH CHECK VALVE SYRUP PUMP (4) CO2 MANIFOLD CO2 CYLINDER BAG-IN-BOX (4) LINE LEGEND CO2 PLAIN WATER CARB WATER SYRUP 0575 FIGURE 2. UNIT WITH BAG-IN-BOX SYRUP SOURCE - FLOW DIAGRAM 4 CO2 CHECK VALVE * USED ON UNITS 1275 AND 1276 CARBONATOR * * DUAL CHECK VALVE WATER PUMP * STRAINER PLAIN WATER COIL PLAIN WATER KIT (OPTIONAL) PLAIN WATER DISPENSING VALVE WATER SOURCE * WATER PRESSURE REGULATOR CARBONATOR PRESSURE REGULATOR (70-80 psig) CO2 WATER COIL SYRUP COIL (4) SYRUP TANK PRESSURE REGULATOR (40 psig) DISPENSING NOZZLE SOLENOID VALVE FLOW CONTROL REFRIGERATED WATER BATH CHECK VALVE CO2 CYLINDER SYRUP TANKS (4) LINE LEGEND CO2 PLAIN WATER CARB WATER SYRUP FIGURE 3. UNIT WITH SYRUP TANKS - FLOW DIAGRAM 5 0575 INSTALLATION This section provides instructions for receiving, unpacking and inspection, location selection, installation, and preparation for operation. 0581 Legs 6 6 6 6 0582 Screws 6 6 6 6 0639 Abbreviated Installation Manual 1 1 1 1 0566 Syrup Inlet Tube Ass’y – – 4 – 1062 Bag Seal 9x12 W/Backing 1 1 1 1 1331 Tube Cut 500 Vin x72’’ – – 1 1 2143 Plug 1 – 1 – 180025-000 O-Ring 4 – – – 310461-000 Thread Rolling Screw 2 2 2 2 RECEIVING Each Unit is completely tested under operating conditions and thoroughly inspected before shipment. At time of shipment, the carrier accepts the Unit and any claim for damage in transit must be made with the carrier. Upon receiving Unit from the delivering carrier, carefully inspect the carton for visible indication of damage. Any damage or irregularities should be noted at this time (not later than 15 days from date of delivery) and immediately reported to the delivering carrier. Request a written inspection from the carrier’s claims inspector to substantiate claim. File claim with the delivering carrier not with IMI Cornelius Inc. LOCATION SELECTION UNPACKING AND INSPECTION The Unit may be island–mounted or installed on a front or rear counter provided that the following requirements are satisfied. UNPACK A UNIT AS FOLLOWS: 1. Cut two bands. 2. Lift carton wrap off Unit. WARNING: All electrical wiring must conform to national and local electrical codes. 3. Remove top foam packaging. Retain installation manual, decal kit and electric plug (if applicable). 1. Locate Unit near a grounded electrical outlet having a dedicated circuit fused at 15 amps (slow–blow) for 115VAC units. Alternate protection using an equivalent HACR (US) circuit breaker may be used. CAUTION: Unit must be lifted by its base. To avoid damage, do not lift using valve housing or pump wrap. 4. Lift Unit off base foam packaging. CAUTION: Condenser coil cooling air is drawn into and discharged from the top of the Unit. Failure to provide sufficient clearance over the top of the Unit may cause the compressor to overheat and fail. A minimum of 14 in. (35 cm) clearance is required over the top of the Unit. 5. Carefully inspect Unit for evidence of damage. If evidence of damage is found, notify delivering carrier and file a claim against the carrier. 6. Remove loose–shipped parts from carton. Check contents per Table 2–1. TABLE 1 LOOSE–SHIPPED PARTS Part No. Part Description 2. Locate Unit so that a minimum of 14 inches (35 cm) clearance exists over the top of the Unit. Model No. / Qty 0080 0088 1275 1276 2175 Drip Tray 1 1 1 1 0071 Cup Rest 1 1 1 1 XXXX Decal Kit (as ordered by customer) 1 1 1 1 Flavor Kit – 0110 0575 – 1 IMPORTANT: Bag–in–Box Units are provided with 8 ft. (2.4 M) syrup lines. The difference in height between the Unit and the bag–in–box syrup containers must not exceed 8–ft. (2.4 M). 3. Locate Unit close to a water inlet supply line with pressure and flow as given in the listing of Physical Characteristics and Requirements. 1 6 8. Remove any shipping materials from refrigeration compartment. INSTALLATION NOTE: The following text gives the steps to fill the water tank and start the refrigeration system. Note: cool down may require two or more hours. However, if a countertop installation is to be made which requires locating a hole in the countertop, or if the base of the Unit is to be sealed to the countertop (USA), (procedures per Addendum A) should be completed before the Unit is filled with water. 9. Connect the Unit power plug to a grounded electrical outlet having correct voltage and amperage rating. Compressor, condenser fan motor and agitator motor will start. When a full ice bank is formed, compressor and condenser fan motor will stop, but agitator motor will continue to run. As the ice bank forms, excess water will run out through the overflow tube into the drip tray. FILLING WATER TANK AND STARTING REFRIGERATION SYSTEM. CONVERSION OPTION The Unit is readily configured from the standard narrow front configuration to a shallow depth configuration as shown in Figure 4. If this option is required, proceed as follows, referring to Figure 5. This option consists simply of interchanging the positions of the logo panel and the dispense switch module, no additional parts are required. 1. Remove screw in large (top) cover, and remove the large cover. CAUTION: The carbonator water pump motor must be electrically disconnected to avoid damage to the pump by running dry. 1. Remove small (tower) by lifting cover up and off Unit. 2. Disconnect water pump electrical connector at the control box located in the refrigeration compartment. Plastic locks both top and bottom must be released before connector can be unplugged. 2. Remove two screws securing top of logo panel to the tower. 3. Lift logo panel up out of the tower. 4. Remove two screws securing top of dispense switch module to the tower. 3. Remove plastic plug from the water tank fill–hole centered in front of the condenser coil. CAUTION: Use care in handling the dispense switch module and its attaching electrical conductors. 4. Install drip tray first, followed by the cup rest which is placed on the drip tray. 5. Place funnel in water fill hole. 5. Carefully separate dispense switch module from its position in the tower. NOTE: The water tank must be completely filled before applying electrical power to the Unit to ensure correct operation of the refrigeration Unit. The refrigeration system will not operate without water in the water tank. The presence of water must be detected by electronic ice bank control probes within the water tank. 6. Install dispense switch module in the tower opening from which the logo panel was removed. 7. Secure top of the switch module with two screws. 6. Fill water tank with approximately 4–1/2 gallons (17 liters) of water until water flows out of the tank overflow tube into the drip tray. 8. Install logo panel in the tower opening from which the dispense switch was removed. 9. Secure top of logo panel with two screws. 7. Remove funnel and replace plastic plug in the water fill hole. COUNTERTOP HOLE LOCATION This procedure is used when water, syrup, CO2 and electrical connections are to be run through the countertop to the Unit. To locate and make a cutout in the countertop proceed as follows: CAUTION: Unit must be electrically grounded to avoid possible fatal electrical shock or serious injury to the operator. The power cord is provided with a three–prong grounded plug. If a three–hole (grounded) electrical outlet is not available, use an approved method to ground the Unit. 1. Place the Unit in operating position on the countertop. 2. Using a pencil or masking tape, mark three corners of the tower as shown in Figure 6 . 7 0575 STANDARD NARROW FRONT SHALLOW DEPTH FIGURE 4. NARROW AND SHALLOW DEPTH CONFIGURATIONS SMALL (TOWER) COVER COOLING UNIT TOWER PUMP WRAP CROSS-HEAD SCREW (2) CROSS-HEAD SCREW (2) DISPENSE SWITCH MODULE LOGO PANEL DISPENSING HEAD FIGURE 5. CONVERSION DETAIL 0575 8 3. Move the Unit to one side. 5. Remove small cover from the Unit. 4. Using the three marks as a guide, mark the center of a three–inch (7.5 cm) diameter hole on the countertop. 6. Remove two screws at the top left rear of the bulkhead panel and lift the pump wrap from the Unit. 5. Cut a hole in the countertop at the location marked in previous step. 7. Route water supply tubing through hole in countertop and through hole in bulkhead panel and connect to carbonator pump inlet using a flare seal washer. Use a back up wrench to avoid damaging the carbonator pump. 6. Move the Unit into position over the hole. SEALING UNIT BASE TO COUNTERTOP. 8. Route the water tank drain line (NSF requirement for USA installations) down through the countertop hole. Note that the end is plugged. Refer to Addendum A for procedure required by the NSF International (NSF) for Units installed in the USA only. NOTE: All connections must be made before the Unit is sealed to the countertop. 9. Turn on the water supply and check for leaks. MAKING WATER, CO2, SYRUP, AND ELECTRICAL CONNECTIONS. 10. If a pressure regulator other than one supplied with the Unit is installed, set it to 30 PSIG (2.112 Kg/Cm2). CONNECT WATER: CONNECT CO2 Make water connections as follows: Connect CO2 supply as follows: CAUTION: If water source exceeds 40 psig (2.8 KG/Cm2) a water pressure regulator kit must be used to ensure correct Unit operation. Refer to Installation Kits paragraph for part number. WARNING: Always secure the CO2 cylinder with a safety chain to prevent it from falling over. A broken valve may allow the cylinder to act as a projectile, causing serious injury or property damage. CAUTION: Do not use a saw to cut tubing, use a tubing cutter or knife to avoid contamination of tubing with particles of material. 1. Place CO2 cylinder in service location and secure it with a safety chain. 2. Connect CO2 pressure regulator assembly to CO2 cylinder. Use a new coupling washer if the regulator coupling does not have a built–in O–ring seal. (see Figures 7 and 8). CAUTION: Water pipe connections and fixtures directly connected to a potable water supply shall be sized, installed and maintained according to federal, state, and local laws. CAUTION: Do not apply CO2 pressure to the line at this time. 1. Connect tubing to water source, but do not connect to Unit at this time. Allow three feet (92 cm) extra tubing length below the countertop for servicing the Unit. 3. Using approved 0.265 I.D. tubing, and fittings from the installation kit, connect the tubing assembly to the regulator using a flare seal washer. Use a back up wrench to prevent damage to the regulator assembly. 2. Check water pressure. If water pressure is greater than 40 psig (2.8 Kg/Cm2), install a water pressure regulator. 3. Flush water supply line thoroughly by running four gallons (15 liters) of water to drain. 4. Route CO2 tubing up through the hole in the countertop, leaving three feet (92 cm) of extra tubing below the countertop for servicing the Unit. 4. Remove one screw, and remove large cover from the Unit. 5. Route the tubing through the tower (pump wrap) and the Unit bulkhead panel. 9 0575 CROSS-HEAD SCREW (2) PUMP WRAP 3 HOLE LOCATION 2 1 COUNTER TOP MARK COUNTER AT CORNERS OF PUMP WRAP FIGURE 6. COUNTERTOP HOLE LOCATION 0575 10 6. In the bag–in–box Unit, connect the CO2 line to the CO2 manifold located below the syrup pumps. (see Figure 9 & 10). In Units with syrup tanks, route the CO2 line through the bulkhead panel and connect the line–end connector to the CO2 inlet on the carbonator tank check valve using a flare seal washer. 7. In Units with syrup tanks, connect secondary regulator CO2 pressure lines to each syrup tank. WARNING: CO2 Displaces Oxygen. Strict Attention must be observed in the prevention of CO2 (carbon dioxide) gas leaks in the entire CO2 and soft drink system. If a CO2 gas leak is suspected, particularly in a small area, immediately ventilate the contaminated area before attempting to repair the leak. Personnel exposed to high concentration of CO2 gas will experience tremors which are followed rapidly by loss of consciousness and suffocation. CONNECT SYRUP LINES Connect syrup lines within the Unit as follows: IMPORTANT: All syrup systems must be sanitized before Unit is put into operation. 1. Sanitize all syrup systems after connecting syrup lines following instructions below. Refer to Addendum B for sanitizing procedure. NOTE: Refer to Figure 9 for location and identification of the dispense switches. NOTE: Coca–Cola should always be in position No. 1 on the switch panel, as this position has a longer cooling coil than the other three positions. 2. Route one syrup line for each product up through the hole in the countertop. 3. Refer to the decal on inside of the large (top) cover for location of product decals and identification of syrup connections. (see Figure 9). 4. Apply product decals from the kit to dispense switches to correspond to the product dispensed. NOTE: Lubricate O–rings before installation using food–grade non–petroleum base lubricant, e.g., Dow–Corning 111 or equivalent. 11 5. On bag–in–box Units, refer to Figures 10, and 11. Lubricate O–rings and connect each syrup line to that syrup pump corresponding to the dispense switch to be used, by inserting line end fittings into inlet on top of the pump, and securing there to the pump by tightening a modified (notched) phillips hold–down screw against the collar on the line end fitting. 6. On tank Units, connect each line to a numbered syrup cooling–coil line end within the pump wrap, using stepless clamps. CONNECT SYRUP LINES TO SYRUP SOURCES Connect syrup lines to syrup sources for bag–in–box or tank Units as described in Operator’s Instructions. CAUTION: Do not plug into power outlet at this time. MAKE ELECTRICAL CONNECTIONS Route Unit power cord down through the pump wrap area and countertop hole, and bring it out near the power outlet, but do not plug it in at this time. (If power cord plug is loose–shipped with Unit, install it on power cord end in compliance with applicable codes and regulations). PREPARATION FOR OPERATION This subsection provides information needed to set up the product selection panel, purge the carbonator system, start up the Unit, and adjust the water–to–syrup ratio. PLAIN WATER AND STILL DRINKS All Units as shipped will dispense only carbonated drinks. Units that are equipped with the plain water kit can dispense plain water, and may also be set to dispense from zero to four ‘‘still’’ (non–carbonated) drinks by use of drink selection switches 1 through 4 as described in the following procedure. 1. Remove two cross–head screws from the top of the dispense switch module (see Figure 5). 2. Lift dispense module carefully up and out for access to circuit board. NOTE: On the rear of the dispense panel circuit board are four plug–in selectors labelled with numbers and flavors corresponding to the numbering on the front of the dispense panel. Each selector has two positions, ‘‘soda’’ and ‘‘water’’, as shown in Figure 9. 3. To convert flavors 1, 2, 3, or 4 to dispense plain water, pull the applicable plug–in selector from its circuit board pins and shift it to the left, one pin, and reinstall it on these pins. 0575 LINE PRESSURE GAGE (70–80 PSI) CO2 CYLINDER SHUT–OFF VALVE COUPLING NUT REGULATOR CYLINDER PRESSURE GAGE (1800–PSI) (600–PSI) CHANGE CO2 CYLINDER LINE PRESSURE ADJUSTING SCREW LOCK NUT REGULATED CO2 TO UNIT SYRUP PUMPS AND CARBONATOR CO2 CYLINDER FIGURE 7. BAG–IN–BOX CO2 SUPPLY 0575 12 SYRUP TANK PRESSURE GAGE (40 PSI) CARBONATOR PRESSURE GAGE (70–80 PSI) CARBONATOR PRESSURE REGULATOR COUPLING NUT CYLINDER PRESSURE GAGE (1800–PSI) SYRUP TANK PRESSURE REGULATOR REGULATED CO2 TO SYRUP TANKS REGULATED CO2 TO CARBONATOR FIGURE 8. SYRUP TANK CO2 SUPPLY 13 CO2 CYLINDER 0575 NOTE: The water pump is equipped with a timer which will allow it to run continuously a maximum of five minutes, after which the motor will stop. The timer can be reset by momentarily removing electrical power to the Unit. The pump motor will then operate as needed. NOTE: The selection switch to disable the soda only and plain water only button work the same as the selectors for buttons 1 thru 4. The selection switch can be located one of two places, the upper left corner or the lower left corner. (see Figure 9). Units are shipped with the switch in the on position which will enable the soda only (S) or plain water only (W) button to operate. When requested they are set in the off position which will disable the soda only and plain water only buttons, making them inoperative. 11. At the Unit, press the ‘‘soda’’ or S selector intermittently until the carbonator has cycles at least three times. Soda water should be clear and well carbonated. 12. At the pressure regulator, loosen the locking nut on the pressure adjusting screw and turn the screw clockwise to provide a pressure between 70 PSIG (4.9 Kg/Cm; 4.8 BAR) and 80 PSIG (5.6 Kg/CM; 5.5 BAR). Tighten the locking nut. 4. Install dispense switch module in the Unit and secure it with two cross–head screws. PURGING THE CARBONATOR SYSTEM PURGING THE SYRUP SYSTEMS 1. Disconnect electrical power from the Unit. 1. Place a cup under the nozzle. 2. Turn on water to the Unit. 2. Manually open each syrup valve in turn and observe syrup flow. Purging is completed when all air is removed from the system. If syrup continues to show air bubbles, check tightness of line connections. See Figure 31 for manual operation of dispensing valves. 3. Flood the system with water to drive out air as follows: A. Lift the relief valve on the carbonator until water flows out of the valve. B. Manually open the S (soda) dispensing valve until water flows freely from the nozzle with no indication of air. ADJUSTING WATER–TO–SYRUP RATIO OF DISPENSED PRODUCT The water–to–syrup ratio is measured by use of a ratio cup (see Figure 12) having two chambers into which the soda and a selected syrup are dispensed. The ratio, if incorrect, is adjusted by turning the related syrup flow regulator adjusting screw located on top of each syrup dispense solenoid valve. 4. At the CO2 cylinder pressure regulator, loosen the locking nut on the pressure adjusting screw, and turn the pressure adjusting screw fully CCW. NOTE: Allow the refrigeration Unit to operate for at least an hour before making this adjustment. The drink temperature should be no higher than 40 degrees F (4.4 degrees C). 5. Open CO2 cylinder valve slowly. 6. Turn the pressure regulator pressure adjusting screw slowly CW to provide a pressure of 50 psig (3.5 Kg/Cm2; 3.44 BAR) priming pressure. 1. Remove the small cover over the dispensing nozzle and solenoids. 7. Tighten the locking nut. 2. At the top of the dispensing nozzle, grasp the upright plastic extension on the water tube, and pull the water tube from the center of the nozzle (position A in Figure 12) then insert the water tube into the molded tube (position B) in front of the dispensing nozzle. 8. Open the S (soda) dispensing valve manually to drive all water from the carbonator and CO2 water coil. 9. Connect the water pump electrical connector to the control box connector. 10. Apply electrical power to the Unit. 3. Hold the ratio cup under the dispensing nozzle so that the large chamber of the ratio cup is under the molded tube, and the smaller chamber is under the dispensing nozzle. NOTE: The electronic control incorporates a time delay for compressor start. On initial start up, or whenever power is interrupted, compressor may not start for 5 minutes. 4. Starting with the most viscous syrup, (orange), press the selection switch to draw a drink into the two parts of the ratio cup, until the ratio cup is at least two–thirds full. 0575 14 1. At the pressure regulator, use a small wrench to loosen locking nut on the pressure adjusting screw by turning it in a counterclockwise direction. 5. Place the ratio cup on a level surface, and observe that the soda and syrup levels are at the same level. If not, use a screwdriver to adjust the syrup flow regulator adjusting screw by 1/4 turn at a time. Clockwise rotation of the screw will increase the syrup flow, and counterclockwise rotation of the screw will decrease the syrup flow. Check the adjustment by drawing a drink. Repeat steps 4 and 5. 2. Using a screwdriver, slowly turn the line pressure adjusting screw clockwise to increase line pressure. Counterclockwise rotation will lower line pressure. NOTE: If the most viscous syrup cannot be set by adjusting the syrup flow regulator, increase the CO2 pressure by 5 PSIG (0.35 Kg/Cm2; 0.34 BAR), and repeat the adjustment. After the most viscous syrup ratio is set, do not change the CO2 pressure. For bag–in–box installations, do not adjust regulator higher than 80 PSIG. (5.6 Kg/Cm2; 5.5 BAR). 3. Tighten locking nut by turning it clockwise. SYRUP TANK CO2 SUPPLY WARNING: Wear protective eyewear to avoid injury from gas–driven particles. If line pressure to the syrup tanks shown on the syrup tank pressure gage (see Figure 8) falls below 40 PSIG (2.8 Kg/Cm2; 2.85 BAR), and the cylinder pressure gage pointer is outside the CHANGE CO2 CYLINDER zone, adjust the syrup tank pressure regulator. 6. Adjust the ratios for the remaining selections following the same procedure. 7. At the top of the dispensing nozzle, grasp the upright plastic extension on the water tube and lift the water tube from the molded tube and insert it into the center of the nozzle. If line pressure to the carbonator shown on the carbonator gage (see Figure 8) falls below 70 PSIG (4.9 Kg/cm2: 4.8 BAR), and the cylinder pressure gage pointer is outside the CHANGE CO2 CYLINDER zone, adjust the carbonator pressure regulator as follows: 8. Replace the small cover. ADJUSTING CO2 PRESSURE BAG–IN–BOX CO2 SUPPLY 1. At the pressure regulator, use a small wrench to loosen the locking nut on the pressure adjusting screw by turning it in a counterclockwise direction. WARNING: Wear protective eyewear to avoid injury from gas–driven particles. If line pressure shown on the line pressure gage (see Figure 7 falls below 70 PSIG (4.9 Kg/Cm2; 4.8 BAR), and the cylinder pressure gage pointer is outside the CHANGE CO2 CYLINDER zone, adjust the line pressure as follows: 15 2. Using a screwdriver, slowly turn the line pressure adjusting screw clockwise to increase line pressure. Counterclockwise rotation will lower line pressure. 3. Tighten locking nut by turning it clockwise. 0575 DISPENSING VALVES SYR 1 SYR 2 ALTN POSN BYPASS JUMPERS SYR 4 SYR 3 COKE OPT PLN WTR SYRUP PUMP S3 S1 S2 SODA WTR SYRUP PUMP S2 S3 AQUARIUS ALTN POSN BYPASS JUMPERS S4 SYRUP LINES SYRUP PUMP S4 AQU COKE SYRUP PUMP S1 COKE PUSH BUTTON LAYOUT ALL FLAVORS CAN BE CONVERTED TO PLAIN WATER 10 PIN RT ANGLE HEADER AMP #1-640453-0 FIGURE 9. COVER DECAL (PRODUCT SELECTION PANEL DETAIL INSERT PLUG (P/N 2143) IN CO2 LINES IF SYRUP PUMP NO. 2 OR NO. 3 ARE NOT TO BE USED EXAMPLE: SYRUP PUMP NO. 2 CONNECTS TO DISPENSING VALVE NO. 2 THROUGH SYRUP COOLING COIL NO. 2 SYRUP PUMP SYRUP PUMP S3 S1 S2 S2 S4 S3 SYRUP COOLING COILS-LINE ENDS SYRUP PUMP SYRUP PUMP S4 AQU S1 COKE FRONT VIEW BAG-IN-BOX SYRUP PUMP CORRESPONDENCE TO DISPENSING VALVE CO2 MANIFOLD SUPPLIES CO2 GAS TO ALL 4 PUMPS AND TO CARBONATOR CO2 INLET FITTING FOR UNITS WITH BAG-IN-BOX B. BAG-IN-BOX PUMP DETAIL FIGURE 10. BAG–IN–BOX PUMP DETAIL 0575 16 END FITTING COLLAR O-RING SYRUP LINE SYRUP INLET HOLD-DOWN SCREW FIGURE 11. SYRUP LINE CONNECTION TO SYRUP PUMP LIFT HERE CAP POSITION A WATER TUBE POSITION B MOLDED TUBE MIXING HEAD VALVE HOUSING ASSEMBLY RATIO CUP SYRUP CARBONATED WATER FIGURE 12. RATIO MEASUREMENT DETAIL 17 0575 OPERATORS INSTRUCTIONS This section describes the Unit’s operating controls, and daily pre–operation checks and maintenance procedures to be performed on the Unit and system by the operator. DAILY PRE–OPERATION CHECK Each day, before dispensing products, the operator should check the CO2 pressure in the connected cylinder, check that there is sufficient syrup, wash the Unit nozzle, the cup rest, and the drip tray. Instructions to accomplish each task follow. WARNING: Disconnect electrical power to Unit to prevent personal injury before attempting any internal maintenance. Only qualified personnel should service internal components of this Unit. CHANGE CO2 CYLINDER When the CO2 cylinder pressure drops, causing the cylinder pressure gage pointer to indicate in the change CO2 cylinder area, the CO2 cylinder must be changed (see Figures 7 and 8). To change the cylinder, proceed as follows: CAUTION: Protect the Unit from freezing conditions. Water freezing in the system will cause serious damage. Maintenance personnel can drain the system if freezing conditions are expected. 1. Turn cylinder shut off valve clockwise until it seats firmly. 2. Using a wrench, slowly loosen the coupling nut (allow trapped gas to escape). CAUTION: When the coupling is separated, be sure that the gasket remains inside the coupling nut. WARNING: CO2 Displaces Oxygen. Strict Attention must be observed in the prevention of CO2 (carbon dioxide) gas leaks in the entire CO2 and soft drink system. If a CO2 gas leak is suspected, particularly in a small area, immediately ventilate the contaminated area before attempting to repair the leak. Personnel exposed to high concentration of CO2 gas will experience tremors which are followed rapidly by loss of consciousness and suffocation. 3. Support the regulator and gages and continue to turn the coupling nut until regulator and nut separate from the tank fitting. 4. Look inside the coupling nut to be sure that the gasket remains inside. WARNING: Always secure the CO2 cylinder with a safety chain to prevent it from falling over. A broken valve may allow the cylinder to act as a projectile, causing serious injury or property damage. PRODUCT DISPENSE SWITCH OPERATION CARBONATED DRINK 5. Install cover on empty cylinder. To dispense a carbonated drink, place a cup under the dispensing nozzle and press the desired dispense switch, holding it pressed until cup is filled. 6. Unchain the empty CO2 cylinder and carefully set it aside. SODA (CARBONATED WATER) 7. Secure the full cylinder with the chain, and remove cover from cylinder. To dispense soda (carbonated water), place a cup under the dispensing nozzle and press S (soda) dispense switch, holding it pressed until cup is filled. 8. Install regulator on a full CO2 cylinder using the coupling nut. Be sure that the gasket remains inside. Tighten using a wrench. PLAIN WATER (PLAIN WATER KIT INSTALLED) 9. Open cylinder shutoff valve. Listen for leakage and observe both gages. If a leak is heard, close cylinder shutoff valve, tighten the coupling nut, then open the cylinder valve. To dispense plain water, place a cup under the dispensing nozzle and press W (water) dispense switch, holding it pressed until cup is filled. 0575 18 3. Move the empty tank aside and place a full tank in position. CHANGE SYRUP TANK A syrup tank should be changed when gas is dispensed through the nozzle and no syrup is dispensed. Fittings on the tanks and mating fittings on the ends of the CO2 and syrup lines are of the ‘‘quick disconnect type’’, which close off gas and liquid flow when disconnected (see Figures 13 and 14). To change a syrup tank, proceed as follows: 4. Remove protective caps from the syrup (3 pin) and the CO2 (2 pin) connectors on the syrup tank. 5. Dip tank connectors in warm water to clean them. 1. At the tank, press down on the collar of the syrup line–end fitting while turning it counterclockwise to release it. 6. Place collar of syrup line end–fitting over the 3 pin connector on the syrup tank, press down on the collar and turn it clockwise to lock. 2. Press down on the collar of the CO2 line end–fitting while turning it counterclockwise to release it. 7. Place collar of CO2 line end–fitting over the 2 pin connector on the syrup tank, press down on the collar and turn it clockwise to lock. HANDLE SYRUP CONNECTION 3–PIN TOP VIEW CO2 CONNECTION 2–PIN SYRUP TANK SIDE VIEW FIGURE 13. SYRUP TANK 19 0575 COLLAR FIGURE 14. LINE END FITTING FOR SYRUP TANK CONNECTION BAG–IN–BOX SYRUP CONTAINER Change a Bag–in–Box syrup container when no syrup is dispensed. The amount of syrup remaining in a bag–in–box container can be estimated by lifting the container. A full 5 gallon (19 liters) container weighs approximately 1/2 lb. (0.23 Kg). To change a container, proceed as follows: 3. Pull the bag connector from the box; unscrew and remove the dust cap. WARNING: Use CO2 operated pumps only in a well ventilated area. 4. Dip the red syrup line–end connector in warm water to clean it. 1. At the bag–in–box container, unscrew the red line–end connector from the bag connector of the empty box. The line end connector is of the quick–disconnect type which eliminates syrup flow from the line. CAUTION: Do not puncture box or internal bag 5. While holding the bag connector, screw the red syrup line end–connector onto the bag connector. Turn the end–connector clockwise until it is fully seated (about 4–1/2 turns). 2. Open the flap on a new box by rapping sharply with palm of hand. Do not use a sharp instrument to open. 0575 NOTE: The bag–in–box container, once connected, can be placed in any convenient position. 20 2. Wash the nozzle in warm water (no detergent) and dry it. 3. Reinstall the nozzle on the Unit with a clockwise turn. WASH CUP REST AND DRIP TRAY 1. Lift the cup rest and drip tray from the Unit. 2. Empty drip tray. 3. Wash both cup rest and drip tray using a mild detergent. 6. At the dispenser, draw product until a good flow of syrup is obtained. 4. Dry both items and reinstall on Unit. WASH NOZZLE NOTE: Do not use detergent as it may cause foaming and give the product an off–flavor. CLEAN UNIT EXTERIOR Clean the Unit exterior using a cloth with mild detergent. Rinse with cloth moistened in plain water. Do not use harsh abrasives. 1. Remove the nozzle from the Unit by turning it 1/8 turn counterclockwise. 21 0575 SERVICE AND MAINTENANCE RESPONSIBILITY KEY: APPLICABLE CAUTIONS AND NOTES O – Operator M – Maintenance Technician WARNING: Wear protective eye wear to avoid injury from gas–driven particles. DAILY O – Empty drip tray, wash drip tray, cup rest, and nozzle O – Clean exterior of Unit CAUTION: Before shipping, storing, or relocating this Unit, the syrup systems must be sanitized and all sanitizing solution must be purged from the syrup systems. All water must also be purged from the plain and carbonated water systems. A freezing ambient environment will cause residual water in the Unit to freeze resulting in damage to internal components. O – Change CO2 cylinder if required O – Change syrup tank or bag–in–box syrup container if required WEEKLY O – Taste each product for off–taste Refer to Addendum B for sanitizing instructions (US). MONTHLY M – Check syrup–to–water ratio SIX MONTHS CAUTION: In cold weather, Unit must be protected from freezing. Water freezing in the system will expand, causing damage to internal components. M – Sanitize system YEARLY NOTE: The water pump is equipped with a timer which will allow it to run continuously a maximum of five minutes, after which the motor will stop. The timer can be reset by momentarily removing electrical power to the Unit. NOTE: If a ‘‘gurgle’’ is heard from the Unit, it indicates a low water level in the water tank. To add water, proceed as follows: M – Lift out refrigeration system and clean condenser and coils M – Clean and fill water tank M – Inspect liquid and CO2 check valves and replace ball seats WHEN OCCURRING M – Adjust CO2 pressure M – Sanitize for flavor change 1. Disconnect electrical power from the Unit. 2. Remove screw in top of large cover and remove cover. 3. Add water as described in Section II under the heading, ‘‘Filling Tank and Starting Refrigeration System’’. M – Add water to water tank if ‘‘gurgle’’ is heard M – Relocate or ship Unit to new location M – Inspect liquid check valve after any water disruption (plumbing work, earthquake, etc.) CHECK SYRUP–TO–WATER 4. Replace large cover and screw. The syrup–to–water ratio should be checked monthly. The procedure is given in Installation section. 5. Apply electrical power to the Unit. MAINTENANCE SCHEDULE SANITIZE SYSTEM The following maintenance schedule lists items to be performed by either an operator or a qualified maintenance technician in order to keep the system in good operating condition. 0575 22 The system must be sanitized at six month intervals, when changing flavors, or if Units is to be relocated. The procedure is given in Addendum B. NOTE: Detergent solution must not be introduced into the carbonator. CAUTION: Do Not use any sharp object to remove ice from cooling coils. A puncture will permanently disable the refrigeration assembly CLEAN REFRIGERATION SYSTEM The refrigeration system and the water tank should be cleaned each year. Effort involves disconnecting electrical connections, removing screws and lifting the refrigeration system clear of the Unit, exposing the condenser and the water tank. 12. Use a fiber brush and water to carefully clean mineral deposits from cooling coils and agitator motor shaft. 13. Place a 5–gallon (19 liter) container under the plugged water tank drain line. To clean, proceed as follows: 1. Disconnect electrical power from the Unit, and allow ice bank to partially melt. 14. Remove the plug from the water tank drain line, and drain water into the container. 2. Remove small (tower) cover from Unit. 15. Wash inside of water tank with plain water and wipe dry with a lint-less cloth. 3. Remove one screw from large cover and remove cover. 16. Using the plastic refrigeration deck handle, carefully lower the lift out refrigeration system into place in the Unit. 4. Within Unit, disconnect refrigeration power cord from main power cord by separating connector. 17. Using a magnetic screwdriver, install three screws in the platform to fasten the system to the Unit. 5. Disconnect carbonator tank level control probe electrical connector from standing connector on the control box in right rear corner of Unit. 18. Connect dispensing switch module 24VAC power connector to standing connector on the transformer. 6. Disconnect carbonator water pump power connector from standing connector on the transformer. 19. Connect carbonator water pump power connector to the standing connector on the control box. 7. Disconnect dispensing switch module 24VAC power connector from standing connector on the transformer. 20. Connect carbonator tank level control probe electrical connector to the standing connector on the control box. 8. Using a magnetic screwdriver, remove three screws from the refrigeration Unit platform. Two screws are along the left side and a third is centered along the right side of the platform. 21. Within the Unit, connect refrigeration assembly electrical power cord to connector of main power cord. NOTE: When removed, the lift–out refrigeration system should be rested on its cooling coils. 22. Place small cover on Unit. 23. Install plug in the end of the water tank drain line. NOTE: If refrigeration system does not easily lift out, wait 15–20 minutes for ice to melt. Do not force. 24. Using a funnel, fill the water tank with approximately 4–1/2 gallons of water (17 liters) until water flows out of the tank overflow tube into the drip tray. 9. Using the plastic refrigeration deck handle, lift the refrigeration assembly from the Unit and place it on a flat surface in a basin, resting it on its bottom coils. Note that a partial ice bank will remain on coils. 25. Place large cover on the Unit and secure it with the removed screw. 10. Allow ice bank to melt from the cooling coils. Hot water may be used to hasten this operation. 26. Connect the Unit to electrical power. Compressor, condenser fan motor and agitator motor will start, and an ice bank will form in the water tank. As the ice bank forms, excess water runs out through the overflow tube into the drip tray. 11. Clean the condenser coil using a hand vacuum cleaner and a soft brush. Low pressure air may be used. Be careful of the cooling fins. 23 0575 DUAL LIQUID CHECK VALVE ASSEMBLY MAINTENANCE DUAL CHECK VALVE ASS’Y CO2 GAS CHECK VALVE ASS’Y WARNING: The dual liquid check valve assembly must be inspected and serviced at least once a year under normal circumstances, and after any water service disruption as may be caused by plumbing work or earthquake which might cause erratic flow of water through the system. A defective valve could allow CO2 gas to back-flow into the water system and create a health hazard. CO2 RELIEF VALVE RING WARNING: Wear protective eye wear to avoid injury from gas–driven particles. CARBONATOR TANK The dual liquid check valve assembly requires yearly maintenance, and an internal inspection following disruption of water service. Perform servicing as follows: FIGURE 15. CARBONATOR 1. Disconnect electrical power from the Unit. HOUSING ÉÉ ÉÉ 2. At CO2 cylinder, close the cylinder shut off valve. 3. At the plain water inlet to the Unit, shut off the water. O–RING SLEEVE BALL SPRING O–RING 4. Remove one screw from the large cover, and remove the cover from the Unit. BODY 5. At the carbonator, pull up on the relief valve ring to release CO2. 6. At the top of the dual check valve (see Figure 15) use two wrenches to disconnect the inlet water line from the assembly. SLEEVE BALL SPRING O–RING 7. Remove foam insulating tube from the dual check valve. RETAINER 8. Using a wrench on the retainer (see Figure 16) closest to the carbonator tank, loosen and remove the dual check valve assembly from the welded–in carbonator fitting. 0575 ÉÉ ÉÉ O–RING 24 FIGURE 16. DUAL LIQUID CHECK VALVE ASSEMBLY 9. Disassemble each check valve as shown in Figure 16. 10. Wipe each part with clean lint–free cloth. WARNING: Wear protective eye wear to avoid injury from gas–driven particles. 11. Using a hand lens, inspect each part for burrs, nicks, corrosion, or other indications of deterioration. The CO2 check valve, located on the top of the carbonator (see Figure 15), must be internally inspected at least once a year, and any defective parts replaced. The ball seat (quad ring) must be replaced at each servicing. Note that the valve body (see Figure 15) is welded to the carbonator tank. To service the CO2 gas check valve assembly, proceed as follows: IMPORTANT NOTE: Replace ball seat at each servicing. 12. Replace damaged parts and ball seat. 13. Reassemble each check valve. 14. CAUTION: In joining the two check valves together and in making installation on the carbonator, do not overtighten, use torque wrench to avoid damage to plastic seals. 1. Disconnect electrical power from the Unit. 15. Assemble check valves together. Tighten to 35 lb–in (3.95 newton–mtr). Do not overtighten. 3. At the plain water inlet to the Unit, shut off the water. 2. At CO2 cylinder, close the cylinder shut off valve. 4. Remove one screw from the large cover and remove the cover from the Unit. 16. Install the dual check valve on the carbonator tank, tightening to 35 lb–in. 5. At the carbonator, pull up on the relief valve to release CO2. 17. Install foam insulating tube over the check valve assembly. 6. Using two wrenches, disconnect the CO2 inlet line from the top of the gas check valve assembly. 18. Using two wrenches, connect the inlet water line to the top of the check valve assembly. NOTE: Ball seat will remain in the body when the housing is removed. 19. At the CO2 cylinder, open the cylinder shut off valve. 7. Carefully remove the housing from the top of the welded–in body. 20. At the plain water inlet to the Unit, turn on the water. 8. Using a pencil point, remove the the ball seat (quad ring) from the body. 21. At the carbonator, pull up on the CO2 relief valve ring to purge air from the carbonator. 9. Remove the ball, spring, and retainer from the body. 22. Apply electrical power to the Unit. 10. Wipe each part with clean lint–free cloth. 23. Place a cup under the nozzle, then cycle the carbonator by pressing the soda selector. 11. Using a hand lens, inspect each part for burrs, nicks, corrosion, or other indications of deterioration. 24. Check product for carbonation, check connections for water or gas leaks. IMPORTANT NOTE: Replace ball seat (quad ring) Part Number 183294 at each servicing. 25. Place large cover on the Unit and secure it with a screw. 12. Replace damaged parts and ball seat (quad ring). CO2 GAS CHECK VALVE ASSEMBLY MAINTENANCE 13. Reassemble CO2 gas check valve as follows: WARNING: The CO2 gas check valve assembly must be internally inspected and serviced at least once each year under normal conditions. 25 A. Place the spring over the retainer, and drop the two into the valve body. B. Balance the ball atop the spring. C. Using a new ball seat (quad ring) Part No. 183294, assemble the spring, ball and the ball seat into the body. 0575 14. Screw the Housing over the body and tighten to 35 lb–in (3.95 newton–mtr). 22. Replace large cover and secure it with one screw. 15. Using two wrenches, connect the CO2 line to the top of the CO2 gas check valve assembly. HOUSING 16. At the CO2 cylinder, open the cylinder shut off valve. QUAD RING 17. At the plain water inlet to the Unit, turn on the water. BALL 18. AT the carbonator, pull up on the CO2 relief valve ring to purge air from the carbonator. SPRING 19. Apply electrical power to the Unit. RETAINER 20. Place a cup under the nozzle, then cycle the carbonator by pressing the soda selector. BODY 21. Check product for carbonation, check connections for water or gas leaks. 0575 FIGURE 17. CO2 CHECK VALVE ASSEMBLY 26 TROUBLESHOOTING 3. At the Unit, draw soda from the dispenser. Check the line pressure gage for zero pressure indication. GENERAL INFORMATION General information consists of applicable warnings and notes of direct concern to the repair person, followed by the Unit electrical diagram, and instructions for crimping tube clamps. 4. Draw syrup from the dispenser to bleed off syrup pressure. NOTE: If repairs are to be made to the syrup system of a syrup tank system, perform the following steps: APPLICABLE WARNINGS AND NOTES WARNING: Disconnect electrical power from the Unit before removing the large cover to prevent personal 1. Disconnect electrical power from the Unit. injury. 2. At the CO2 cylinder, turn the shut off valve clockwise to turn off gas. 3. At the CO2 regulator, use two wrenches to ‘‘crack’’ the outlet fitting of the regulator to relieve gas pressure. Check the regulator pressure gage for zero pressure indication. WARNING: Wear protective eyewear to avoid injury from gas–driven particles. An alternate method is as follows: WARNING: Internal components of the Unit are to serviced only by trained personnel. NOTE: If repairs are to be made to the carbonated water system, perform the following steps: A. Disconnect syrup lines from the syrup tank. B. At the Unit, draw syrup from the dispenser to bleed off syrup pressure. UNIT ELECTRICAL DIAGRAM (see Figure 19). NOTE: The printed circuit board can be removed from the control box as follows: 1. Disconnect electrical power from the Unit. 2. At the CO2 cylinder, turn the shut off valve fully clockwise to turn off gas. 1. Release and remove the cover. 3. At Unit, remove screw and remove large cover. 4. At the carbonator tank, lift ring to open valve and bleed off CO2. NOTE: If repairs are to be made to the syrup system of a bag–in–box Unit, perform the following steps: 2. Insert a small screwdriver into the oval hole in the top of the printed circuit board, and rest the screwdriver shank on the top inside edge of the control box and gently lever the board upward from its contacts. Instructions for Crimping Tube Clamps (see Figure 18). 1. Disconnect electrical power from the Unit. Troubleshooting Table 2. At the CO2 cylinder, turn the shut off valve fully clockwise to turn off gas. Table 5–1 lists the most common problems, possible causes, and remedies. 27 0575 FIGURE 18. INSTRUCTIONS FOR CRIMPING TUBE CLAMPS 0575 28 29 0564 REV: D FIGURE 19. UNIT ELECTRICAL DIAGRAM 0575 TROUBLESHOOTING IMPORTANT: Only qualified personnel should service internal components or electrical wiring. WARNING: If repairs are to be made to carbonated water system, disconnect electrical power to Cooling Unit, shut off plain water and CO2 supplies, and relieve the carbonated water system pressure before proceeding. If repairs are to be made to syrup system, remove quick disconnects from applicable syrup tank, then relieve the system pressure before proceeding. If repairs are to be made to CO2 system, stop dispensing, shut off CO2 supply, then relieve the system pressure before proceeding. If repairs are to be made to an existing Remote Condensing unit, disconnect the power to the condensing unit before proceeding Trouble WATER–TO–SYRUP RATIO IS INCORRECT Probable Cause Remedy A. Syrup regulator not properly adjusted. A. Adjust ratio. Refer to Installation Section. B. Tank system: CO2 pressure to tank low. B. Adjust CO2 pressure. Refer to Operators Section. C. No syrup supply. C. Replenish syrup supply. D. Syrup tank, or BIB syrup connections not tight. D. Check connections at syrup supply. E. Dispensing valve, flow regulator, tank, or BIB connections restricted. E. Sanitize system. Refer to Addendum B. F. Dirty or inoperative syrup flow regulator. F. Disassemble and clean. Do not intermix parts. A. Cylinder CO2 pressure regulator out of adjustment. A. Adjust cylinder CO2 pressure regulator. B. CO2 cylinder is low or empty. B. Replace CO2 cylinder. C. Air in carbonator tank. C. At Unit carbonator, lift relief valve to vent air. D. Water, oil, or dirt in CO2 supply. D. Remove contaminated CO2 cylinder. Flush CO2 lines. Install a new CO2 cylinder and blow contaminants out of regulator(s). DISPENSED PRODUCT IS CLEAR BUT FOAMS IN CUP OR GLASS A. Oil film or soap residue in cup or glass. A. Rinse cups and glasses well after washing. DISPENSED PRODUCT FOAMS AS IT LEAVES NOZZLE. A. Capacity of refrigeration system is exceeded. A. Allow time for ice bank to re–form. Ice bank depleted. B. CO2 regulator pressure too high. B. At CO2 cylinder, reduce regulator pressure. If diet product, install diet secondary regulator. CARBONATION TOO LOW IN DISPENSED PRODUCT 30 Trouble NO PRODUCT DISPENSED ONLY CARBONATED WATER IS DISPENSED CARBONATOR TANK NOT FILLING PROPERLY Probable Cause Remedy C. In syrup tank Unit, syrup is over–carbonated as indicated by bubbles C. At syrup tanks, remove CO2 and syrup connections. Depress tank gas valve in syrup line to Unit. to relieve pressure. Shake tank vigorously and depress tank gas valve. Repeat as required to remove excess carbonation. D. Dispensing valve is restricted or dirty. D. 4A. Clean nozzle. 4B. Sanitize system. Refer to Addendum B. E. Dirty water supply. E. Flush Unit water lines and Unit carbonator. It may be necessary to disconnect lines to carbonator tank, remove, invert and flush tank. Install water filter or replace cartridge in existing filter. A. No electrical power to Unit. A. Apply electrical power. B. Disconnected wire at dispensing valve. B. Turn off electrical power and repair. C. Unit is frozen. C. Disconnect electrical power cord and allow Unit to thaw. D. Selector circuit board not connected to power. D. Connect circuit board to 24V transformer. E. Transformer is burned out. E. Check transformer and replace if necessary. A. Connections to syrup tanks or BIB loose. A. Check connections to syrup supply. B. No syrup. B. Replenish syrup supply. C. Syrup tank CO2 regulator out of adjustment. C. Adjust syrup tank CO2 regulator. D. Inoperable dispensing valve. D. Repair or replace dispensing valve. E. Syrup flow regulator out of adjustment. E. Adjust water–to–syrup ratio. Refer to installation Section. F. Lines restricted to syrup flow regulator. F. Check lines for sharp kinks. Sanitize syrup system, Refer to Addendum B. A. No water supply. A. Check water supply to Unit. B. Water pump on safety cutout. B. Reset water pump safety cutout by momentarily unplugging electrical power from the Unit. C. Faulty carbonator probe. C. Check probe plug on electrical control box. D. Pump is worn out. D. Replace pump and motor 31 Trouble FREQUENT SHORT FILL CYCLES OF CARBONATOR TANK Probable Cause Remedy A. Probe terminal disconnected or loose. A. Check and tighten all electrical connections to probe. B. Probe incorrectly wired. B. Verify correct wiring using wiring diagram. C. Faulty probe. C. Replace probe. D. Faulty logic circuit board. D. Replace logic circuit board. A. Water supply is turned off. A. Open water supply valve. B. At Unit, carbonator motor is disconnected. B. Check that carbonator motor is receiving power. C. Water pump safety system has C. removed power to the pump. Unplug electrical power to Unit momentarily. D. Unit is frozen. D. Disconnect electrical power cord and allow Unit to thaw. A. Ice bank is sufficient. A. Refrigeration not called for. B. No power to Unit. B. Check power into Unit and into compressor. C. Compressor overloaded. C. Check condenser for cleanliness. Compressor should start after two minutes. D. Line voltage too low. D. Measure line voltage. Line voltage must be at least 90 percent of rated voltage (103 VAC or 198 VAC) for compressor to start. E. Inoperative ice bank control board. E. Replace ice bank control board. F. Inoperative compressor. F. Replace compressor. G. Ice bank connector loose or not plugged in. G. Plug in connector on board. COMPRESSOR DOES NOT STOP AFTER ICE BANK IS FORMED. A. Ice bank probe or connections may be faulty. A. Check ice bank probe for proper operation. COMPRESSOR RUNS CONTINUOUSLY BUT DOES NOT FORM AN ICE BANK. A. Cooling capacity is exceeded by load. A. Reduce number of drinks served until ice bank forms. B. Unit is located in an excessively hot area, or air circulation through cooling. B. Relocate Unit or provide additional Check condenser for condenser is restricted. cleanliness, check condenser fan. Remove obstructions from top of Unit. C. Check for ice bank at bottom of evaporator in water tank. C. Ice bank at bottom of evaporator may indicate a refrigeration leak or insufficient charge. (repair/recharge). D. Dirty condenser coil. D. Clean condenser coil. E. Condenser fan not functioning. E. Check fan blade and motor. ONLY SYRUP IS DISPENSED COMPRESSOR DOES NOT OPERATE 32 Trouble CONDENSER FAN NOT OPERATING AGITATOR MOTOR NOT OPERATING SODA ONLY OF PLAIN WATER ONLY SWITCH DOES NOT OPERATE Probable Cause Remedy F. Agitator motor not running. F. Check agitator motor, replace if necessary. A. Fan blade obstructed. A. Remove obstruction, clean motor. B. Loosen set screw. B. Tighten set screw. C. Faulty electrical connection. C. Repair connections. D. Motor inoperative. D. Replace motor. A. Agitator propeller obstructed. A. Clear obstruction. B. Loose set screw. B. Tighten set screw. C. Faulty electrical connection. C. Repair connections. D. Motor inoperative. D. Replace motor. A. Jumper on back of touch switch panel is in OFF position. A. Move jumper to on position. 33 95. 96. 97. 99. 8. 81. 35. 81. 37. 34. 42. 105. 43. 79. 98. 38. 36. 46. 82. 44. 69. 8. 39. 47. 77. 50. 41. 40. 8. 48. 70. 58. 84. 45. 93. 49. 58. 55. 56. 51. 52. 8. 57. 53. 62. 71. 54. 63. 8. 8. 104. 58. 65. 59. 64. 60. 67. 66. 27. 8. 101. 1. 100. 68. 76. 61. 2. 22. 23. 25. 26. 103. 87. 74. 31. 76. 8. 30. 104. 88. 24. 8. 94. 74. 22. 83. 82. 21. 20. 14. 19. 75. 15. 12. 78. 17. 13. 80. 85. 28. 18. 6. 78. 9. 3. 25. 8. 16. 25. 29. 72. 6. 92. 10. 11. 7. 33. 6. 73. 78. 4. 5. 0575 89. 32. 102. 103. FIGURE 20. CONVERTIBLE PARTS BREAKDOWN 34 ITEM NO. PART NO. ITEM NO. PART NO. 0080 DESCRIPTION Convertible, 115V 60HZ with Pump 0088 Convertible, 115V 60HZ without Pump 36. 0049 Overload, Compressor 1275 Convertible, 115V 60HZ with Pump, USA 37. 1447 Relay Capacitor Start Compressors 38. 398034–400 Hitch Pin 1276 Convertible, 115V 60HZ without Pump, USA 39. 317781 Bushing, Split 40. 189723 Grommet 41. 0006 Compressor, 115V, 60Hz 42. 1314 Condenser Fan Motor, 115V, 60Hz, 3.1 Watt 1. 0019 Cover, Larger, Top 2. 0025 Cover, Small, Top 3. 0086 Wrap, Pump 35. 309742 DESCRIPTION Cover, Terminal 1180 Wrap, Pump, USA 43. 0005 Shroud, Condenser Coil 4. 0071 Rest Cup 44. 0013 Fan, 4–Blade, 6.5 inch Dia. 5. 0069 Drip Tray 45. 0001 Condenser Coil 6. 188652 Thread Rolling Screw, SL. Truss Hd., Stainless Steel, No. 8–32 by 3/8’’ long 46. 0066 Fan, 4–Blade, 2.25 inch Dia. 47. 0016 Agitator Motor, 115V, 8 Watt Plate, Agitator Motor 7. 0064 Panel, Splash 48. 0081 8. *310461 Thread Rolling Screw, Phil Pan Hd., No. 8–32 by 3/8’’ long 49. 0227 Blade, Agitator Motor 50. 314129–009 Transformer, 120V–24V 51. 187485 Fitting, 1/4–MPT by 6/16–20 52. 0008 Pump, 115V, 19–GPH 9. 0044 Latch, Wrap 10. 150065 O–Ring, 1.051 I.D. by .070 C.S. 11. 0007 Nozzle 12. 0893 Wire Harness 13. 0878 Panel and Decal Ass’y 14. 0011 Fitting, Carb. Water 55. 0041 Cover, Control Box 15. 1178 Body, Valve Mixing Head 56. 0077 P.C. Board 16. 0537 Solenoid Valve, Carb. Water (See Page 6–4) 57. 0879 Control Box Assembly (See Page 6–7) 58. *0010 Thread Rolling Screw, Phil Pan Hd., No. 10–14 by 5/8’’ long 53. 0039 Bracket, Water Pump 54. *312251 Thread Rolling Screw, Phil Pan Hd., No. 10–24 by 3/8’’ long 17. 0538 Solenoid Valve, Syrup (See Page 6–4) 18. 0551 Housing, Valve (See Page 6–6) 59. 0033 Platform, Carb. 19. 110677 O–Ring, .176 I.D. by .070 C.S. 60. 0034 Insulation, Platform, Carb. 20. *0012 Thread Rolling Screw, Phil Pan Hd., No. 8–32 by 3’’ long, with Pumps 61. 0521 Carb. Tank Assembly (See Page 6–5) 62. 1176 Platform, Refrigeration Manifold Ass’y with Pumps (See Page 6–6) 63. 1175 Insulation, Platform, Refrigeration 64. 0031 Rod, Support, Evaporator 65. 0037 Spacer, Coil 21. 0548 22. 0550 Screw, Half–Moon, with Pumps 23. 0073 Pump, Syrup, 80–psi, with Pumps 24. 0050 Service Cord 25. 317784 Thread Cutting Screw, Phil Truss Hd., Stainless Steel No. 8–18 by 1/2’’ long 26. 770452 Cap Nut, Stainless Steel, 7/16–20 27. 774005–020 Dual Check Valve Assembly (See Page 6–4) 28. 29. 66. 317665 Push–on Nut 67. 1468 Ice Bank Probe Ass’y 68. 1174 Evaporator Coil Assembly (See Page 6–5) 69. 1315 Heat Exchange Assembly 70. 1346 Dryer, Dual 71. 172128 Plug, 3/4 Panel, Bulkhead 0026 Coil, Syrup, Valve No. 1 with Pumps (See Page 6–6) 72. 0087 0765 Coil, Syrup, Valve No. 1 without Pumps (See Page 6–6) 73. 317691 Fitting, Plug, 1/4NPT 74. 317015 O–Ring .239 I.D. by .070 C.S. 0067 Retainer, Coil 75. 0065 Switch, Touch 1671 Coil Assembly Syrup Without Pumps Valves # 2, 3, & 4 (see Page 6–6) 76. 178025–100 Tapered Gasket, White 77. 0099 Wire Harness, 24V Coil Assembly Syrup With Pumps Valves # 2, 3, & 4 (see Page 6–6) 78. 690945 Tie Cable 79. 0124 Handle 1672 30. 0014 Coil, Plain Water (See Page 6–6) 31. 0027 Coil, Carb. Water (see Page 6–6) 32. 0596 Wrap, Water Bath 1181 Wrap, Water Bath, USA 33. 0051 Tank, Water (See Page 6–5) 34. 309741 Fastener, Compressor Cover 35 80. 0651 Tube, Syrup 81. *320289 Thread Rolling Screw, Phil Pan Hd., No. 6–32 by 1/4’’ long 82. *320240 Thread Rolling Screw, Phil Pan Hd., No. 8–32 by 1/2’’ long 83. 180025 O–Ring, .364 I.D. by .070 C.S. 0575 ITEM NO. 84. PART NO. 183061 DESCRIPTION Fitting, 1/4–NPT by 7/16–20 ITEM NO. 96. PART NO. 197164 End Cap 85. 0520 Retainer, Water Line 86. 0581 Foot (Not Shown) 97. 197383 Capacitor Clip 98. 1448 87. 0570 Fitting, CO Inlet Manifold, with Pump Mounting Bracket 99. *1488 Thread Rolling Screw, Fil Phil Hd No. 10–24. By 3/8’’ Long 88. 1077 Coil Retainer 89. 011117 Wire Clip 100. 151460 Thread Rolling Screw, Phil Pan Hd Stainless Steel, No. 6–32 By 1/2’’ Long 90. 1280 Tube Ass’y USA (Not Shown) 91. 1331 Tube Ass’y, USA (Not Shown) 101. 318036 Push–on Nut, .125 Stud 92. 186618 Machine Screw, Phil RD HD, Stainless Steel, No. 6–32 By 3/4’’ Long 102. 140117 Drain Tube, .375 I.D. By 24’’ Long 93. 393149 Slinger 103. 1734 Clamp, Cable 94. 770605 Fitting, Tee, 7/16–20 104. *343304 Washer, No. 10 95. 1446 Capacitor 105. *322967 Washer, No. 6 ITEM NO. PART NO. 1280 DESCRIPTION Tube Ass’y, Water Inlet 1. 176017 Swivel Nut, 7/16-20 2. 770104 Nipple, for .265 I.D. tube 3. 1560 Tube, .265 I.D. by 25” Long 4. 176000 Ferrule, for .500 O.D. Tube 5. 300200 Clamp, for .500 O.D. Tube 6. 0569 Regulator, Water Pressure DESCRIPTION 3. 5. 6. 5. 3. 4. 2. 1. NO TAG FIGURE 21. WATER INLET LINE ASS’Y 0575 36 9. 12. 7. 8. 11. 10. 15. 6. 16. 4. 5. 13. 7. 1. 2. 14. 17. 3. FIGURE 22. SOLENOID VALVE ASSEMBLY ITEM NO. 1. PART NO. ITEM NO. 8. DESCRIPTION 0537 Solenoid Valve Assembly, Carb.Water 0538 Solenoid Valve Assembly, Syrup 1320 Block, Valve PART NO. 310632–001 DESCRIPTION Adjusting Screw 9. 1318 Flow Control, top (Syrup) 10. 180025 O––Ring, .364 I.D. by .070 C.S. 11. 1545 Retainer, Housing 12. 1081 Thread Cutting Screw, SL Hex Hd., Stainless Steel, No. 8–18 by 1/2’’ long 13. 0024 Solenoid, 24V 14. *187188 Screw, Phil Pan Hd., No. 8–32 by 1/4’’ long 2. 1319 Body Valve 3. 0837 Sheet Metal Screw, Phil Pan Hd., No. 6–20 by 5/8’’ long 4. 0199 Piston, Syrup (Syrup) 310754–011 Piston, Water 317431 Cylinder, Flow Control (Syrup) 15. 317579 Arm, Solenoid 317431–011 Cylinder, Flow Control (Water) 16. 0854 Spring, Conical 6. 310482 Spring 17. 311355 Valve Inlet 7. 317816 O–Ring, .676 I.D. by .070 C.S. PART NO. 774005–020 DESCRIPTION Dual Check Ass’y 1. 774014 Body 2. 010 O–Ring 3. 774003 Sleeve 5. 1. 2. 3. 4. ÉÉ 5. 6. 7. 2. 3. 4. ITEM NO. 5. 6. 8. ÉÉ FIGURE 23. DUAL CHECK VALVE ASSEMBLY 37 4. 302 Ball, .312 Dia. 5. 990139–355 Spring 6. 011 O–Ring 7. 774002 Body 8. 774013 Retainer 0575 11. 12. 7. 13. ITEM NO. 14. 15. PART NO. DESCRIPTION 0521 Carb. Tank Assembly 1. 0035 Carb. Tank 2. 312926 Clamp, For .500 O.D. Tube 3. 1559 Tube, .265 I.D. by 2’’ long 4. 1305 Probe, Level Control 6. 3. 2. 5. 180024 O–Ring, .424 I.D. by .103 C.S. 5. 6. 1658 Wire Harness, Liquid Level 8. 7. 1116 Stem Assembly 4. 8. 0522 Insulation, Carb. 9. 343457 Hex Nut, Stainless Steel, No. 8–32 10. 398031–001 Washer, Stainless Steel No. 8 11. 183309 Adapter 12. 183294 Quad Ring, .145 I.D. by .070 C.S. 13. 183296 Ball, .187 Dia. 14. 183297 Spring 15. 183298 Retainer 9. 10. 1. FIGURE 24. CARBONATOR TANK ASSEMBLY ITEM NO. 2. PART NO. 1174 DESCRIPTION Evaporator Coil Assembly 1. 1177 Evaporator Coil 2. 040132 Accumulator 1. FIGURE 25. EVAPORATOR COIL ASSEMBLY ITEM NO. 1. PART NO. 0051 0052 Tube 0710 Overflow Elbow 1. 0575 DESCRIPTION Water Tank Assembly FIGURE 26. WATER TANK ASSEMBLY 38 ITEM NO. 1. 2. PART NO. 0551 DESCRIPTION Valve Housing Assembly 1. 0062 Bottom, Housing 2. 0042 Wrap, Housing FIGURE 27. VALVE HOUSING ASSEMBLY ITEM NO. 6. 5. 4. 4. 1. 0070 Body, Manifold 2. 311527 Clamp, For .312 O.D. Tube 3. 174004 Tube, .156 I.D. by 31–1/2’’ long 3. 4. 176004 Ferrule, 31–Jaw, for .312 O.D. Tube 2. 5. 176017 Swivel Nut, 7/16–20 6. 770106 Nipple, for .156 I.D. Tube 7. 0075 Fitting, Barb, Elbow 8. 317015 O–Ring, .239 I.D. by .070 C.S. 2. 1. DESCRIPTION Manifold Assembly 8. 7. 3. PART NO. 0548 8. FIGURE 28. MANIFOLD ASSEMBLY 2. 2. 1. 1. 2. 2. 5. 4. 3. ITEM NO. PART NO. DESCRIPTION ITEM NO. 0026 Coil Assembly, Syrup, with Pumps Valve #1 0765 Coil Assembly, Syrup, without Pumps Valve #1 1671 Coil Assembly Syrup without Pumps Valves # 2, 3, & 4 1672 Coil Assembly Syrup with Pumps Valves # 2, 3, & 4 Coil Assembly, Plain Water 6. 0014 PART NO. 0027 DESCRIPTION Coil Assembly, Carb Water 1. **1560 Tube, .265 I.D. by 26’’ long (Syrup) 2. 176000 Ferrule, 47–Jaw, for .500 O.D. Tube 3. 0074 Fitting, Outlet (Syrup) 770104 Nipple, for .395 O.D. Tube (Plain Water) 4. 176017 Swivel Nut, 7/16–20, (Plain Water) 5. 770401 Fitting, Elbow, (Plain Water) 180025 O–Ring, .364 I.D. (Syrup with Pumps) FIGURE 29. COIL ASSEMBLY 39 0575 1. 5. 2. 4. 3. 6. ITEM NO. PART NO. 0879 DESCRIPTION Control Box Ass’y 1. 0072 2. 0706 3. 186564 Strain Relief ITEM NO. PART NO. 0068 Service Cord Control Box 5. 1487 Wire Harness Retainer, Board 6. 187254 Screw, Phil Truss Hd, No. 6 by 3/8’’ Long FIGURE 30. CONTROL BOX ASSEMBLY 0575 DESCRIPTION 4. 40 ADDENDUM A SEALING UNIT BASE TO COUNTERTOP (USA) To comply with the requirements of the NSF International, (NSF), the base of a Unit must be sealed to the countertop and all access holes to the inside of the Unit must be closed off with a mastic material. To seal a Unit to the countertop, proceed as follows: NOTE: When Unit is lowered into place, do not move it, or seal will be broken. 5. Lower Unit into exact operating position on the countertop. 6. Apply additional sealant around the Unit so that the sealant has a minimum radius of 1/2 Inch. 3. Carefully tilt the connected Unit up to expose the base. 7. If lines are connected to the Unit through a hole in the countertop, seal the lines and plug the remaining opening with mastic material such as Permagum, or equivalent. 4. Apply a silastic sealant eg. Dow Corning RTV 731 or equivalent on all base edges. 41 0575 ADDENDUM B SANITIZING THE SYSTEM (USA) IMPORTANT: Only trained personnel should perform sanitizing procedures. ARMATURE PRESS HERE WARNING: Wear protective eyewear to avoid injury. SOLENOID The syrup systems must be sanitized once every six months; whenever there is a flavor change, or an off– flavor is noted in the product. This is the ‘‘ambient’’ sanitizing procedure whereby syrup is first flushed from the system with water, then a detergent is introduced, followed by a second water flush. A sanitizer is next placed in the system and it is finally purged with syrup. NOTE: Detergent solution must not be introduced into the carbontor. FIGURE 31. MANUAL OPERATION OF DISPENSING VALVES SANITIZING THE BAG–IN–BOX SYRUP SYSTEMS 8. Remove the small cover from the top of the Unit. This is a procedure for sanitizing syrup systems of the Convertible Post–Mix Dispensers which have syrup pumps (P/N 0080, 0096, and 1275). 9. Manually open each syrup dispensing valve by pressing the armature of the solenoid forward to cause syrup and water to flow from the nozzle. (see Figure 31). 10. Hold each syrup solenoid dispensing valve open until only water is dispensed. SANITIZE THE BAG–IN–BOX SYSTEM AS FOLLOWS: 11. Remove the syrup line–end connectors from the water. 1. At the Unit, disconnect electrical power. 12. Fill the 5–gallon container with potable (drinking) water at room temperature (70 degrees to 100 degrees F) and add 3/4 ounce per gallon of water (6 ml Per liter) of Diversify DIVOFLOW 185, or equivalent detergent (to provide a sodium hydroxide solution*). 2. Disconnect the syrup line–end connectors from the bag–in–box containers. 3. Wash each line–end fitting in warm water to remove syrup accumulation. 13. Mix the contents of the container thoroughly. 4. Install a bag valve (cut from an empty bag–in–box container) on each syrup line–end connector. 14. Place the syrup line–end connectors (with bag valves installed) into the detergent. 15. Hold each dispensing valve open until the water is displaced by the detergent. 5. Fill a clean plastic 5–gallon container with potable (drinking) water. CAUTION: To avoid damage to metallic parts of the system, do not allow the detergent solution to remain in a syrup system longer than 15 minutes. 6. Place the line–end connectors (with installed bag valves) into the water. 7. Place a waste container under the dispensing nozzle. 0575 42 16. Allow the detergent to remain the syrup systems for at least 10 minutes, but no longer than 15 minutes. 30. Hold each dispensing valve open until the syrup purges the sanitizer from the lines, and only syrup is dispensed. 17. Remove the line–end connectors from the detergent. 31. Replace the small cover on top of the Unit. 18. Dispose of unused detergent in a sanitary sewer, not in a storm drain. Wash the container thoroughly. 33. Dispense and taste each product for off–flavor. 32. Connect electrical power to the Unit. 34. Dispose of the waste sanitizing solution in the sanitary sewer, (not in storm drain). Rinse both containers. 19. Fill the 5–gallon container with potable (drinking) water. Place the line–end connectors in the water. SANITIZING THE SYRUP TANK SYSTEMS 20. Hold each dispensing valve open until the detergent is displaced by the water. This is a procedure for sanitizing syrup systems of the Convertible Post–Mix Dispensers which have syrup tanks (P/N 0088, 0097, and 1276).Sanitize the syrup systems as follows: 21. Dispense a one–ounce sample of water from the nozzle. Test the sample using a drop of phenolphthalein indicator**. (This indicator becomes pink–colored in the presence of even small amounts of detergent) When the indicator remains clear, all detergent has been removed. 1. At the Unit, disconnect electrical power. 2. Remove the small cover from the top of the Unit. 3. Place a waste container under the dispensing nozzle. 22. Remove the line–end connectors from the water. 4. Disconnect the syrup line–end connectors from the syrup tanks. 23. Fill the 5–gallon container with 4 gallons (15.1 liters) of water at a temperature between 70 degrees F. to a maximum of 100 degrees F. 5. Wash each line–end fitting in warm water to remove syrup accumulation. 6. Fill a clean syrup tank with potable (drinking) water. Place a cover on the tank. 24. Add 1.0 oz. (29.57 ml) of H.B. Fuller Monarch C–S or equivalent sanitizer (to provide a 200 ppm 200 mg/liter active quaternary sanitizing solution) to the container. Mix thoroughly. 7. Apply CO2 pressure to the tank 8. Flush syrup from the lines as follows: 25. Place the syrup line–end connectors in the sanitizing solution. A. Connect one of the syrup line–end connectors to the syrup tank. 26. Hold each dispensing valve open until only the sanitizing solution is dispensed. B. Manually open the corresponding syrup system dispensing valve (by pressing the armature of the solenoid forward to cause syrup and water to flow from the nozzle, see Figure 31). C. Hold the dispensing valve open until only water is dispensed. D. Disconnect the syrup line–end connector from the syrup tank. E. Repeat steps a. through d. for the remaining syrup systems. 27. Allow the sanitizing solution to remain in the syrup systems from eight to ten minutes. CAUTION: To avoid damage to metallic parts of the system, do not allow the sanitizing solution to remain in the syrup systems longer than 15 minutes. 9. Remove CO2 pressure from the tank. 28. Remove syrup line–end connectors from the sanitizing solution and remove the bag valves from the line–end connectors. (Save the bag valve). 10. Fill the syrup tank with water at room temperature (70 degrees to 100 degrees F) and add 3/4 ounce per gallon of water (6 ml per liter) of Diversify DIVOFLOW 185 or equivalent detergent (to provide a sodium hydroxide solution). 29. Connect each syrup line–end connector to the pre–selected syrup source. 43 0575 11. Mix the contents of the syrup tank thoroughly. Place a cover on the tank. D. Dispense a one–ounce sample of water from the nozzle. Test the sample using a drop of phenolphthalein indicator**. (This indicator becomes pink–colored in the presence of even small amounts of detergent. Thus, when the indicator remains clear, all detergent has been removed). E. Disconnect the syrup line–end connector from the syrup tank. F. Repeat steps a. through e. for the remaining syrup systems. 12. Apply CO2 pressure to the tank. 13. Fill the syrup systems with detergent solution as follows: CAUTION: To avoid damage to metallic parts of the system, do not allow the detergent solution to remain in syrup systems longer than 15 minutes. 20. Remove CO2 pressure from the tank. A. Connect one of the syrup line–end connectors to the syrup tank. B. Manually open the corresponding syrup system dispensing valve (by pressing the armature of the solenoid forward to cause water and detergent to flow from the nozzle). 21. Fill the syrup tank with 4 gallons (15.1 liters) of water at a temperature between 70 degrees F to a maximum of 100 degrees F. 22. Add 1.0 oz. (29.57 ml) of H.B. Fuller Monarch C–S or equivalent sanitizer (to provide a 200 ppm 200 mg/liter active quaternary sanitizing solution) to the container. Mix thoroughly. C. Hold the dispensing valve open until only detergent is dispensed. D. Disconnect the syrup line–end connector from the syrup tank. A. Connect one of the syrup end–line connectors to the syrup tank. E. Repeat steps a. through d. for the remaining syrup systems. B. Manually open the corresponding syrup system dispensing valve (by pressing the armature of the solenoid forward to cause water and sanitizer to flow from the nozzle). C. Hold the syrup system dispensing valve open until only sanitizer is dispensed. D. Disconnect the syrup line–end connector from the syrup tank. E. Repeat steps a. through d. for the remaining syrup systems. 23. Apply CO2 pressure to the syrup tank. 24. Introduce sanitizer into syrup system as follows: 14. Allow the detergent to remain in the system for at least ten minutes, but no longer than 15 minutes. 15. Remove CO2 pressure from the syrup tank. 16. Rinse the syrup tank thoroughly with water. Dispose of unused detergent in a sanitary sewer, (not in a storm drain). 17. Fill the syrup tank with potable (drinking) water. Place a cover on the syrup tank. CAUTION: To avoid damage to metallic parts of the system, do not allow the sanitizing solution to remain in the syrup system longer than 15 minutes. 18. Apply CO2 pressure to the syrup tank. 19. Purge the detergent from the syrup systems as follows: A. B. C. 0575 Connect one of the syrup line–end connectors to the syrup tank. 25. Allow the sanitizing solution to remain in contact with the syrup systems from eight to ten minutes. Manually Open the corresponding syrup system dispensing valve (by pressing the armature of the solenoid forward to cause detergent and water to flow from the nozzle). 26. Connect each syrup line–end connector to a syrup tank of the pre–assigned flavor. 27. Manually open each syrup system dispensing valve to allow syrup to purge sanitizer from the syrup lines. Hold the dispensing valve open until only water is dispensed. 44 33. Replace the small cover on top of the Unit. 28. Hold each syrup system dispensing valve open until only syrup is dispensed. *Detergent to contain sodium hydroxide, be non–perfumed, and have low–sudsing and easily–rinsible characteristics. The sodium hydroxide should be between 2 percent and 10 percent in the concentrated detergent. 29. Connect electrical power to the Unit. 30. Taste each dispensed product for off–flavor. 31. Remove CO2 pressure from the syrup tank containing the sanitizer. **WARNING: Phenolphthalein must be kept away from children, it is a powerful laxative and may cause serious illness if taken internally. 32. Rinse the sanitizer from the syrup tank and from the waster container. Dispose of the waste sanitizing solution in the sanitary sewer (not in the storm drain). 45 0575 WARRANTY IMI Cornelius Inc. warrants that all equipment and parts are free from defects in material and workmanship under normal use and service. For a copy of the warranty applicable to your Cornelius, Remcor or Wilshire product, in your country, please write, fax or telephone the IMI Cornelius office nearest you. Please provide the equipment model number, serial number and the date of purchase. IMI Cornelius Offices AUSTRALIA D P.O. 210, D RIVERWOOD, D NSW 2210, AUSTRALIA D (61) 2 533 3122 D FAX (61) 2 534 2166 AUSTRIA D AM LANGEN FELDE 32 D A-1222 D VIENNA, AUSTRIA D (43) 1 233 520 D FAX (43) 1-2335-2930 BELGIUM D BOSKAPELLEI 122 D B-2930 BRAASCHAAT, BELGIUM D (32) 3 664 0552 D FAX (32) 3 665 2307 BRAZIL D RUA ITAOCARA 97 D TOMAS COELHO D RIO DE JANEIRO, BRAZIL D (55) 21 591 7150 D FAX (55) 21 593 1829 ENGLAND D TYTHING ROAD ALCESTER D WARWICKSHIRE, B49 6 EU, ENGLAND D (44) 789 763 101 D FAX (44) 789 763 644 FRANCE D 71 ROUTE DE ST. DENIS D F-95170 DEUIL LA BARRE D PARIS, FRANCE D (33) 1 34 28 6200 D FAX (33) 1 34 28 6201 GERMANY D CARL LEVERKUS STRASSE 15 D D-4018 LANGENFELD, GERMANY D (49) 2173 7930 D FAX (49) 2173 77 438 GREECE D 488 MESSOGION AVENUE D AGIA PARASKEVI D 153 42 D ATHENS, GREECE D (30) 1 600 1073 D FAX (30) 1 601 2491 HONG KONG D 1104 TAIKOTSUI CENTRE D 11-15 KOK CHEUNG ST D TAIKOKTSUE, HONG KONG D (852) 789 9882 D FAX (852) 391 6222 ITALY D VIA PELLIZZARI 11 D 1-20059 D VIMARCATE, ITALY D (39) 39 608 0817 D FAX (39) 39 608 0814 NEW ZEALAND D 20 LANSFORD CRES. D P.O. BOX 19-044 AVONDALE D AUCKLAND 7, NEW ZEALAND D (64) 9 8200 357 D FAX (64) 9 8200 361 SINGAPORE D 16 TUAS STREET D SINGAPORE 2263 D (65) 862 5542 D FAX (65) 862 5604 SPAIN D POLIGONO INDUSTRAIL D RIERA DEL FONOLLAR D E-08830 SANT BOI DE LLOBREGAT D BARCELONA, SPAIN D (34) 3 640 2839 D FAX (34) 3 654 3379 USA D ONE CORNELIUS PLACE D ANOKA, MINNESOTA D (612) 421-6120 D FAX (612) 422-3255 LD004 4/21/98 IMI CORNELIUS INC. 1998 46 3/23/98 Rev A P/N Here

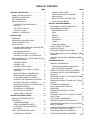
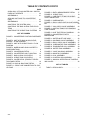
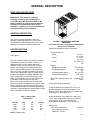

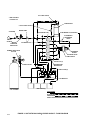
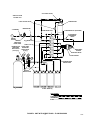


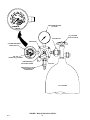
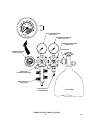

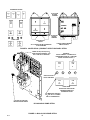

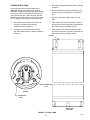
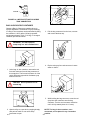
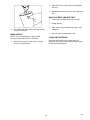


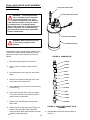
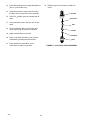
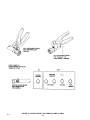
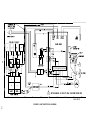

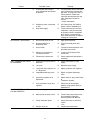
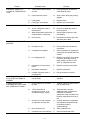


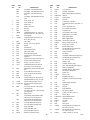
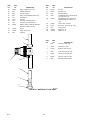
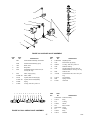
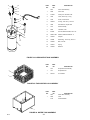

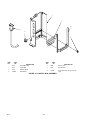

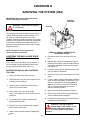

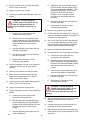
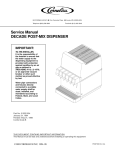
![Service Manual VA13 Carbonator [ 002818 ]](http://vs1.manualzilla.com/store/data/006013608_1-0f8f87056a0ab013b1dd01dac3912d47-150x150.png)