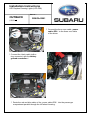
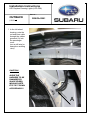
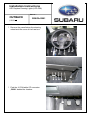
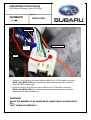
1
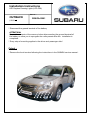
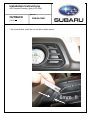
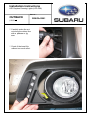
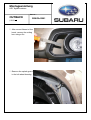
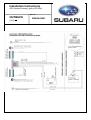
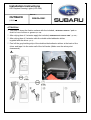
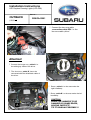
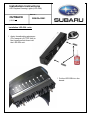
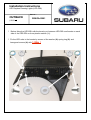
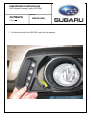
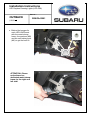
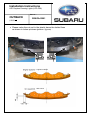
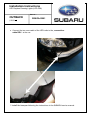
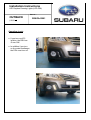
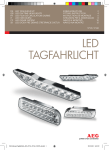
Installation Instructions
LED Daytime Running Lights (LED-DRL)
Part-no.:
OUTBACK
( 2013 )
! SENOAJ3001
• This kit includes the dedicated bezels.
• Before beginning work, check the kit content.
• The greatest care should be taken when carrying out work in order
to avoid damages!
06.05.2014 EBA23710.1!
1/23
Installation Instructions
LED Daytime Running Lights (LED-DRL)
Part-no.:
OUTBACK
( 2013 )
! SENOAJ3001
LIST OF PARTS:
Pos.
Description
Quanity
1
LED-stick
2
Information:
The type
approval of the vehicle will
not expire due to the modification.
2
Bezel left
1
SUBARU
SENOAJ3030
SENOAJ3011
3
Bezel right
1
SENOAJ3021
4
metal-clamp-frame left
1
SENOAJ3071
5
metal-clamp-frame right
1
SENOAJ3081
6
Driver
1
SENOSC3040
7
Connection cable-DRL (2100mm)
1
-
8
Connection cable-DRL (900mm)
1
-
9
Power cable-DRL
1
-
10
instruction
1
-
11
Cable tie
12
-
12
TÜV certificate included sticker
1
-
13
double sided adhesive sticker
1
-
14
3M Adhesion Promotor 4298
1
-
15
3M Surface Cleaner
1
-
16
Hexagonal screws M6x16
4
-
17
self-locking-nut (DIN9021) M6
4
-
18
washer 6,4 x 10
8
-
19
thread bolt M6 x 16
4
-
20
spring ring M6
4
-
21
plastic washer M6
4
-
INFORMATION
The type approval of the vehicle will not expire due to the modification.
PRECAUTIONS
• Secure all wires with cable ties and where touching sharp edges apply extra protection on sleves if
necessary.
• Be sure to tighten nuts and bolts with specified torque shown in service manual.
• The illustration in the installation procedures mainly depict the installation of the left side part. Install the
right side part in the same manner.
06.05.2014 EBA23710.1!
2/23
Installation Instructions
LED Daytime Running Lights (LED-DRL)
Part-no.:
OUTBACK
( 2013 )
! SENOAJ3001
• Disconnect the ground terminal of the battery.
ATTENTION:
! Record the contents of the memory before disconnecting the ground terminal of
the battery to allow you to reprogram the radio presets after the ! installation is
! completed.
• Every step of mounting applies to the driver and passenger side !
Cutout :
• Remove the front-bumber following the instructions in the SUBARU service manual .
06.05.2014 EBA23710.1!
3/23
Installation Instructions
LED Daytime Running Lights (LED-DRL)
Part-no.:
OUTBACK
( 2013 )
! SENOAJ3001
•!As shown below, mark the cut out with a white marker.
6mm !!
06.05.2014 EBA23710.1!
4/23
Installation Instructions
LED Daytime Running Lights (LED-DRL)
Part-no.:
OUTBACK
( 2013 )
! SENOAJ3001
• !Carefully make the cut! out along the dotted line
! with a padsaw or jig
! saw.
• !Check if the bezel fits
without too much effort.
06.05.2014 EBA23710.1!
5/23
Montageanleitung
LED Tagfahrleuchten
Part-no.:
OUTBACK
( 2013 )
! SENOAJ3001
•! After correct fitment of the
! bezel, remove the cutting
! burr using a file.
•! Remove the splash guard
! in the left wheel-housing.
06.05.2014 EBA23710.1!
6/23
Installation Instructions
LED Daytime Running Lights (LED-DRL)
Part-no.:
OUTBACK
( 2013 )
06.05.2014 EBA23710.1!
! SENOAJ3001
7/23
Installation Instructions
LED Daytime Running Lights (LED-DRL)
Part-no.:
OUTBACK
( 2013 )
! SENOAJ3001
Electrical connections:
•! Please use the electrical diagram on page 7 to make the electrical connections.
•! Driver needs to be fixed to the outer wall of the left fender in the engine
! compartment, following instructions on next page.
06.05.2014 EBA23710.1!
8/23
Installation Instructions
LED Daytime Running Lights (LED-DRL)
Part-no.:
OUTBACK
( 2013 )
! SENOAJ3001
ATTENTION!
• !You have to clean the fixation surface with the included „ 3M Surface Cleaner “ pad so
! that it is free of silicon or grease.(Pic A/B)
•! After drying time of 3 minutes apply the included„ 3M Adhesion Promotor 4298 “.(pic A/B) .
•! After drying time of 3 minutes stick the double sided adhesive sticker
! together with the driver .(pic A)
• !Peel off the grey backing strip of the double-sided adhesive sticker at the back of the
! driver and tape it to the outer wall of the left fender. (Make sure the wires point
! downwards)
A.
06.05.2014 EBA23710.1!
B.
9/23
Installation Instructions
LED Daytime Running Lights (LED-DRL)
Part-no.:
OUTBACK
( 2013 )
! SENOAJ3001
•! Connect the two-core cable !
! „connection-cable DRL“ to the
! two-core cable „driver“
!
! Attention!
!
•
!
Connect the longer one „cable A“ to
! ! the white/grey cable of the driver.!
!
•!
!
The short one „cable B“ has to be
! ! connected with the white/black cable of
! ! the driver.
•
!
Route „cable A“ to the area under the !
right headlamp.
•! Route „cable B“ to the area under the left
!
!
headlamp.
CAUTION !
AVOID THE HARNESS TO BE
DAMAGED BY SHARP EDGES,
MOVING PARTS ETC.
TIE IT DOWN ACCORDINGLY !
06.05.2014 EBA23710.1!
10/23
Installation Instructions
LED Daytime Running Lights (LED-DRL)
Part-no.:
OUTBACK
( 2013 )
! SENOAJ3001
•! Connect the three core cable „power
! cable -DRL“ to the three core cable
! of the driver.
•! Connect the black cable (with a
! ring connector) with the battery
! ground connection !
•! Route the red and blue cable of the „power cable-DRL“
into the passenger
! compartment parallel through the left wheel housing.
06.05.2014 EBA23710.1!
11/23
Installation Instructions
LED Daytime Running Lights (LED-DRL)
Part-no.:
OUTBACK
( 2013 )
! SENOAJ3001
•! In the left wheel
!
!
!
!
!
!
!
!
!
housing route the
red and blue cable
through the rubber
grommet (A) into
the !passenger
room.
(use a stiff wire for
example a welding
-wire)
CAUTION !
AVOID THE
HARNESS TO BE
DAMAGED BY
SHARP EDGES,
MOVING PARTS
ETC.TIE IT DOWN
ACCORDINGLY !
A
06.05.2014 EBA23710.1!
12/23
Installation Instructions
LED Daytime Running Lights (LED-DRL)
Part-no.:
OUTBACK
( 2013 )
! SENOAJ3001
•! Remove the panel below the steering
wheel and the cover of the fuse box .
•! Find the 15-PIN white OP-connector
! „B228“ behind the fusebox.
06.05.2014 EBA23710.1!
13/23
Installation Instructions
LED Daytime Running Lights (LED-DRL)
Part-no.:
OUTBACK
! SENOAJ3001
( 2013 )
violet
blue
green/yellow
red
•! Connect the red wire to the green/yellow cable of the 15-PIN white connector
! „B228“(plug B228 PIN3) by soldering and afterwards isolate the connection
! carefully with isolating tape.
• Connect the blue wire with the violet cable of the 15-PIN white connector
! „B228“(plug B228 PIN4) by soldering and afterwards isolate the connection
! carefully with isolating tape.(pic17)
CAUTION !
AVOID THE HARNESS TO BE DAMAGED BY SHARP EDGES, MOVING PARTS
ETC.
TIE IT DOWN ACCORDINGLY !
06.05.2014 EBA23710.1!
14/23
Installation Instructions
LED Daytime Running Lights (LED-DRL)
Part-no.:
OUTBACK
( 2013 )
! SENOAJ3001
Installation LED-DRL units
•! Apply threadlocking substance
! (For example LOCTITE 243) to
! the thread and bolt them into
! the LED-DRL unit.
•! Put the LED-DRL into the
! bezels.
06.05.2014 EBA23710.1!
15/23
Installation Instructions
LED Daytime Running Lights (LED-DRL)
Part-no.:
OUTBACK
( 2013 )
•!
!
! SENOAJ3001
Before fixing the LED-DRL with the bezels, put between LED-DRL and bezels on each
side of the LED-DRL unit one !plastic washer (1.) .
•! Fix the LED-units to the bezels by means of the washer (2.) spring ring (3.) and
! hexagonal screws (4.) with 1,5Nm
06.05.2014 EBA23710.1!
!
16/23
Installation Instructions
LED Daytime Running Lights (LED-DRL)
Part-no.:
OUTBACK
( 2013 )
•!
! SENOAJ3001
Put the bezels with the LED-DRL units into the bumper.!
06.05.2014 EBA23710.1!
17/23
Installation Instructions
LED Daytime Running Lights (LED-DRL)
Part-no.:
OUTBACK
( 2013 )
! SENOAJ3001
• Behind the bumper fix
!
!
!
!
!
each LED-UNIT/bezel
with the metal-clampframe, the washers (M6)
and the self-locking-nuts
(M6) to get the best fit.
1.
3.
2.
ATTENTION: Please
notice there is a
dedicated metal-clampframe for the right and
left side!
06.05.2014 EBA23710.1!
18/23
Installation Instructions
LED Daytime Running Lights (LED-DRL)
Part-no.:
OUTBACK
( 2013 )
! SENOAJ3001
• Please make the cut-out in the plastic beam the dotted lines
as shown in below pictures.(padsaw / jig saw) .
/ original condition
/ with cutout
06.05.2014 EBA23710.1!
19/23
Installation Instructions
LED Daytime Running Lights (LED-DRL)
Part-no.:
OUTBACK
( 2013 )
! SENOAJ3001
• !Connect the two core-cable of the LED-units to the „connection! cable DRL“ at the car.
• Install the bumper following the instructions in the SUBARU service manual.
06.05.2014 EBA23710.1!
20/23
Installation Instructions
LED Daytime Running Lights (LED-DRL)
Part-no.:
OUTBACK
( 2013 )
! SENOAJ3001
ATTENTION !
To meet ECE R48 regulations the position light-function of the LED-DRL units has
to be deactivated !
!
Please follow the steps below:
Programming mode for Position light ON/OFF
1) Ignition ON (the parking brake must be deactivated! )
2) Within 10 seconds, start switching the position light of the car ON and
OFF 4 times and stop with Position light OFF at fourth time.
3) Wait until LED-DRL flashes twice, then repeat 2)
4) Wait until LED-DRL flashes to show the actual mode like mentioned
below
This procedure changes the Position light mode from ON and OFF (OFF and
ON).
For confirmation the DRL will flash at the end of the procedure (after step 4)
like this:
DRL flashes twice DRL flashes four times
06.05.2014 EBA23710.1!
-> Position-light-function (PO) OFF
-> Position-light-function (PO) ON
21/23
Installation Instructions
LED Daytime Running Lights (LED-DRL)
Part-no.:
OUTBACK
( 2013 )
! SENOAJ3001
Operation check:
• ! If you turn on ACC
! ignition, the DRL has
! to turn ON !
• ! In addition if you turn
! on the main headlamps,
! the DRL must turn off.
!
!
06.05.2014 EBA23710.1!
22/23
Installation Instructions
LED Daytime Running Lights (LED-DRL)
Part-no.:
OUTBACK
( 2013 )
! SENOAJ3001
ATTENTION :
Fogging of the headlight lenses
Modern headlamps are ventilated to avoid corrosion.
This means that at certain weather conditions, condensation collects inside of the
lens. This should disappear shortly after the the LED-DRL are turned on.
Fogging of the lens is no reason for a complaint !
It´s not allowed to use high-pressure cleaner to clean the LEDDRL!
06.05.2014 EBA23710.1!
23/23