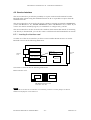
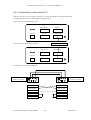
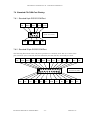
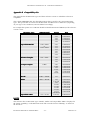
1
Connectivity
The evolution
Hirolink for Satchwell V 2.70
General Documentation
Service Manual
English
Code 275498 04/11/04 Release 1.07
Hirolink for Satchwell V 2.70 - General Documentation
CONTENTS
1.
INTRODUCTION ................................................................
................................................................................................
.........................................................................
......................................... 4
2.
OVERVIEW ................................................................
................................................................................................
...................................................................................
................................................... 5
3.
SERIAL
SERIAL COMMUNICATIONS BASICS
BASICS................................
SICS................................................................
.........................................................................
......................................... 6
3.1
3.2
THE BINARY FORMAT ....................................................................................................6
INTERFACE STANDARDS .................................................................................................7
3.2.1
3.2.2
3.3
3.4
4.
COMPATIBILITY ...........................................................................................................17
DATA-MAPPING ...........................................................................................................17
NETWORKING SYSTEMS ...............................................................................................18
SENDING ‘COMMANDS’................................................................................................21
INSTALLATION PROCEDURE
PROCEDURE ................................................................
..................................................................................
.................................................. 22
6.1
6.2
6.3
6.4
6.5
7.
ADDRESSING ................................................................................................................14
TABLES ........................................................................................................................14
DATA-TYPES ................................................................................................................15
COMMANDS ................................................................................................................16
HIROMATICHIROMATIC-SPECIFIC
SPECIFIC TOPICS ................................................................
................................................................................
................................................ 17
5.1
5.2
5.3
5.4
6.
THE UART..................................................................................................................10
DATA-TRANSMISSION ..................................................................................................12
THE SNPSNP-PROTOCOL ................................................................
................................................................................................
................................................................ 13
4.1
4.2
4.3
4.4
5.
THINGS TO DO BEFORE INSTALLATION .........................................................................22
PREPARING THE HIROMATICS ......................................................................................23
PREPARING THE HIROLINK...........................................................................................29
CONNECTING THE HIROLINK TO THE HIROMATICS......................................................33
CONNECTING THE HIROLINK TO THE SATCHWELL-NETWORK ......................................35
TESTING THE INSTALLATION
INSTALLATION ................................................................
................................................................................
................................................ 37
7.1
USING THE HIROLINK-LEDS ........................................................................................37
7.1.1
7.1.2
7.2
Green LED...........................................................................................................37
Red LED..............................................................................................................38
SERVICE-INTERFACE.....................................................................................................39
7.2.1
7.2.2
7.2.3
7.2.4
7.2.5
8.
EIA232 (RS232) Interface-Standard ......................................................................7
EIA485 (RS485) Interface-Standard ......................................................................8
Inserting the interface-card ..................................................................................39
Connecting the Hirolink with the PC...................................................................40
Connecting the Hirolink with a modem...............................................................41
Configuring the terminal-program.......................................................................41
Using the ‘Service-Interface’.................................................................................42
HARDWAREHARDWARE-REFERENCE
REFERENCE ................................................................
........................................................................................
........................................................ 45
8.1
8.2
8.3
HIROLINK ....................................................................................................................45
HIROLINK-INTERFACE-CARD-SOCKETS ........................................................................46
HIROLINK-INTERFACE-CARDS ......................................................................................47
8.3.1
8.3.2
8.4
HIROMATIC-INTERFACE-CARDS ...................................................................................48
8.4.1
8.4.2
8.5
Standard-RS422-Interface-Card...........................................................................48
Optocoupled-RS422-Interface-Card ....................................................................48
CONNECTION BETWEEN HIROLINK AND HIROMATICS ..................................................49
8.5.1
8.5.2
8.6
RS422/485-Interface-Card...................................................................................47
RS232-Interface-Card..........................................................................................47
RS422-Connection...............................................................................................49
RS485-Connection...............................................................................................50
STANDARD PC-COM-PORT-PINNING ..........................................................................51
8.6.1
Standard 9-pin RS232-COM-Port .......................................................................51
Document: Hirolink for Satchwell.DOC
-2-
Release 1.07
Hirolink for Satchwell V 2.70 - General Documentation
8.6.2
Standard 25-pin RS232-COM-Port .....................................................................51
APPENDIX A: HIROMATIC
HIROMATIC-TYPES ................................................................
.................................................................................
................................................. 52
APPENDIX B: COMPATIBILITY
COMPATIBILITYILITY-LIST................................
LIST ................................................................
..............................................................................
.............................................. 53
APPENDIX C: SOFTWARE
SOFTWARETWARE-CHANGES ................................................................
............................................................................
............................................ 54
1.
2.
3.
4.
5.
6.
7.
8.
CHANGES FROM V 2.60 TO V 2.61..................................................................................54
CHANGES FROM V 2.61 TO V 2.62..................................................................................54
CHANGES FROM V 2.62 TO V 2.63..................................................................................54
CHANGES FROM V 2.63 TO V 2.64..................................................................................54
CHANGES FROM V 2.64 TO V 2.65..................................................................................54
CHANGES FROM V 2.65 TO V 2.66..................................................................................55
CHANGES FROM V 2.66 TO V 2.67..................................................................................55
CHANGES FROM V 2.67 TO V 2.68..................................................................................55
APPENDIX D: DOCUMENTDOCUMENT-CHANGES................................
CHANGES................................................................
...........................................................................
........................................... 56
1.
2.
3.
4.
5.
CHANGES FROM V 1.00 TO V 1.01..................................................................................56
CHANGES FROM V 1.01 TO V 1.02..................................................................................56
CHANGES FROM V 1.02 TO V 1.03..................................................................................56
CHANGES FROM V 1.03 TO V 1.04..................................................................................56
CHANGES FROM V 1.04 TO V 1.05..................................................................................56
Document: Hirolink for Satchwell.DOC
-3-
Release 1.07
Hirolink for Satchwell V 2.70 - General Documentation
1. Introduction
This document contains a general description of the ‘Hirolink for Satchwell’. Its purpose is to give
you an overview of the functionality provided by this type of Hirolink.
It contains a short introduction to serial communications in general, a short description of the SNPprotocol, detailed installation-instructions and a testing guide.
This document does not contain any specific information about a certain type of air-conditioner, but
only information that applies to the Hirolink and the air-conditioners in general.
Detailed information about the data-points provided by each type of air-conditioner can be obtained
from the relevant documents. These document are called ‘Hirolink for Satchwell V X.XX - Items for
YYY-Units V Z.ZZ’, where ‘X.XX’ specifies the Hirolink-version, YYY specifies the air-conditioners
software-type and Z.ZZ specifies the software-version of the air-conditioners software.
Document: Hirolink for Satchwell.DOC
-4-
Release 1.07
Hirolink for Satchwell V 2.70 - General Documentation
2. Overview
In general a Hirolink provides the means to connect air-conditioners to other devices, which use a
different protocol than the air-conditioners themselves.
The term ‘protocol’ can be defined as the set of rules that a device has to respect when trying to
communicate with another device. In other words a protocol defines the language which is used to
speak to each other.
Basically the Hirolink is a protocol-converter or gateway, i.e. it is able to understand two different
protocols and can make the translation from one to the other and vice versa.
The ‘Hirolink for Satchwell’ in particular forms this gateway between the air-conditioners, which use
the Hironet-protocol and the Satchwell’s SNP-protocol and thus to Satchwell supervisingapplications like BAS2000 or Satchnet.
For a better understanding, see the following illustration:
The Hironet-protocol was defined by and is a proprietary protocol. To be able to communicate using
this protocol, the air-conditioner has to be equipped with a HIROMATIC-controller. Therefore the
air-conditioners will be referred to as ‘Hiromatics’ for the remainder of the document. Be aware that
a maximum of 32 Hiromatics can be connected to one Hirolink.
The SNP-protocol was defined by Satchwell Control Systems and is also a proprietary protocol. A
short description of this protocol is provided in chapter XXX.
NOTE: Hirolink for Satchwell supports1 only Units equipped with Humitemp sensor.
1
Temperature and humidity value are visible only with Humitemp sensor
Document: Hirolink for Satchwell.DOC
-5-
Release 1.07
Hirolink for Satchwell V 2.70 - General Documentation
Serial Communications Basics
This chapter should give you a short introduction in the way how electronic devices communicate
with each other. It is intended to give you a basic knowledge about this topic, but of course not all
aspects of serial communications can be covered in here. Therefore this chapter is focused on those
aspects that are relevant for using the Hirolink.
2.1 The Binary Format
As you probably already know, computers work exclusively with numbers. These numbers represent
the instructions and the parameters a program has to execute.
For example:
When a computer starts to execute a program, it knows that the first number it reads represents an
instruction. Let’s say it reads the number ‘130’ (these numbers are also called ‘code’) and let’s also
say that this code is the instruction to perform an addition of two arguments. Out of this
information, the computer knows that the next two codes it reads are the two arguments it should
add. So it reads these two codes and performs the addition. The result of this addition is then stored
internally and can be used for further instructions (Of course this is a very simplified way of
explaining how a computer works).
To be able to execute a program, the computer has to read its instructions from some ‘store-room’.
This ‘store-room’ has to hold the instructions and has to be able to transmit it to the computer. The
only efficient way to store these instructions was found to be the binary format.
Binary format means that each digit of a number has only 2 different states, ‘0’ and ‘1’. This is only a
different way of representing a number as for example in the decimal format, which is used in
everyday live. In the decimal system each digit has 10 different states, ‘0’ to ‘9’.
The following table shows how numbers in the decimal format are represented in the binary format:
Decimal format
0
1
2
3
4
5
6
7
8
9
10
Binary format
0
1
10
11
100
101
110
111
1000
1001
1010
Each digit of a binary number is called ‘bit’. ‘Bits’ are usually numbered starting from 0, which
means that the least significant (the most right in the table above) is usually called ‘Bit 0’, the next
one ‘Bit 1’ and so on.
Since computers use the binary format internally, it is also their ‘natural’ way of communicating with
each other. This means that if one computer wants to transmit information to another computer it is
using only ‘0s’ and ‘1s’.
Document: Hirolink for Satchwell.DOC
-6-
Release 1.07
Hirolink for Satchwell V 2.70 - General Documentation
2.2 Interface Standards
Electronic devices like the Hirolink usually communicate with other devices over a ‘serial’ line.
‘Serial’ means, that each bit of a number has to be transmitted one after the other.
‘Parallel’ on the other hand, means that each bit of a binary number is transmitted via its own line,
enabling the devices to transmit a complete binary number at once. In this case you would need as
many lines as the binary number has bits (e.g. 8). This kind of communication is often used between
PCs and printers, but for obvious reasons (too many cables) usually not in building-managementsystems.
To transmit information over a serial line, the device has to convert the bits into electrical signals.
Since there are unlimited ways of how to represent a ‘1’ or a ‘0’ using electrical signals, devices that
want to communicate with each other must use the same way of converting the bits into electrical
signals and vice versa. This common way of conversion is called ‘Interface Standard’.
On the level of digital controllers like the Hirolink usually one of the two following interface
standards is used:
2.2.1 EIA232 (RS232) Interface-Standard
This standard was called RS232 (Recommended Standard) at the time of definition, which was
more than 30 years ago. Since then it has been modified several times and was also renamed to
EIA232 (Electronic Industries Association), but the name RS232 is still commonly used.
This standard defines that a logical ‘0’ is represented by a voltage between +3V and +15V and a
logical ‘1’ by a voltage between -15V and -3V, as shown in the following illustrations:
Data Out
TX
RX
Data In
-15 V < TX < -3 V -> 1
3 V < TX < 15 V -> 0
U
15V
Logical 0
3V
t
-3V
Logical 1
-15V
Maximum distance: 15 m
Maximum transmission speed: 20 kBit/sec
No multidrop-functionality has been defined in this standard, which means that only two devices can
be connected with each other.
Document: Hirolink for Satchwell.DOC
-7-
Release 1.07
Hirolink for Satchwell V 2.70 - General Documentation
Usually you will find, that one device has both a transmitter and a receiver to enable a bi-directional
communication:
Device 2
Device 1
Data Out
Data In
TX
RX
RX
TX
Data In
Data Out
2.2.2 EIA485 (RS485) Interface-Standard
In the same way as for the EIA232-standard, also this one was called RS485 (Recommended
Standard) at the time of definition and also has been renamed to EIA485 (Electronic Industries
Association), but the name RS485 is still commonly used.
This standard uses a balanced (differential) transmission line in a multidrop configuration,
meaning that instead of an absolute voltage on one line, it uses the difference between the
voltages on two separated lines to represent ‘0s’ and ‘1s’ as shown in the following illustration:
T+
R+
Data Out
Data In
T-
Transmitter
enable
RT+ > T- -> 1
T+ < T- -> 0
If the voltage on T+ is higher than the voltage on T- by at least 0,2 V, the receiver detects a ‘1’.
On the other hand, if the voltage on T+ is lower than the voltage on T- by at least 0,2 V, the
receiver detects a ‘0’.
This kind of transmission increases the immunity against noise on the line, since distortions are
usually changing the signal voltage on both lines in the same direction. This doesn’t affect the
transmitted data on an EIA485 since the difference between the voltages is still the same. On the
other hand, the signal could be changed from ‘1’ to ‘0’ or vice versa on an EIA232.
Document: Hirolink for Satchwell.DOC
-8-
Release 1.07
Hirolink for Satchwell V 2.70 - General Documentation
U
U
EIA232
EIA485
15V
12V
Logical 0
Distortion
3V
t
-3V
Logical 1
-7V
-15V
In this standard the maximum transmission speed is a function of the distance between
transmitter and receiver:
Transmission speed
10 MBit/sec
100 kBit/sec
Cable length
12 m
1200 m
The ability to switch off the transmitter enables this standard to be used in a multidrop
configuration. This means that a maximum of 32 nodes (drivers and receivers) can be connected
to one transmission-line. As with the EIA232-standard you will usually find both a transmitter
and receiver in one device to enable a bi-directional communication as shown in the following
illustration:
Document: Hirolink for Satchwell.DOC
-9-
Release 1.07
Hirolink for Satchwell V 2.70 - General Documentation
Device 2
Device 1
TX+
TX+
Data Out
Transmitter
enable
Data Out
TX-
TX-
RX+
RX+
Data In
Data In
RX-
RX-
Device 4
Device 3
TX+
TX+
Data Out
Transmitter
enable
Transmitter
enable
Data Out
TX-
TX-
RX+
RX+
Data In
Transmitter
enable
Data In
RX-
RXmax. 32 devices
2.3 The UART
After having defined how a bit should be represented on a serial line, the next step to define is the
way to transmit a binary number. In a similar way as standards have been defined to represent single
bits on a serial line, also a standard to represent binary numbers has been found, although it is not a
‘standard’ in the usual sense. This means, that it hasn’t been defined by some organization like the
EIA or ISO and it hasn’t been written down in an official paper, but a company has once started
using this way of communication, others have copied it and over the years it has become a common
way of communicating. When something like this happens, the resulting standard is usually called
‘quasi standard’ or ‘industry standard’.
This has happened in computer communication with the so-called UART (Universal Asynchronous
Receiver and Transmitter). A UART is a chip, which has been developed with the IBM-PC in the
early 80’s and enabled the IBM-PC to communicate with other PCs directly or via modems. It
defined a way of transmitting and receiving binary numbers, which since then has become an
industry standard.
The UART defines, that a sequence of bits has to be transmitted in the following way:
1. Start-Bit:
Marks the start of a transmission. This bit is always logical ‘0’.
2. Data-Bits:
A sequence of bits, which represents the transmitted data.
Document: Hirolink for Satchwell.DOC
- 10 -
Release 1.07
Hirolink for Satchwell V 2.70 - General Documentation
3. Parity-Bit (Optional):
A parity-bit, which enables the receiver to check, if the transmitted data is correct. This bit is
optional.
4. Stop-Bit(s):
Marks the end of transmission. This bit is always logical ‘1’.
Some parameters (the so-called ‘communication-parameters’) have to be defined before two devices
can communicate with each other. These ‘communication-parameters’ are the following:
•
Baudrate:
Defines the speed of communication. The baudrate is the number of bits, that are transmitted per
second. For example 9600 Bd (Bd is the abbreviation for baudrate) means that each bit is put for
1/9600 s ( ≈ 104 µs) on the line. Commonly used baudrates are 1200 Bd, 2400 Bd, 4800 Bd,
9600 Bd and 19200 Bd. Higher and lower baudrates are also possible, but rarely used on lowlevel controllers like the Hirolink.
•
# of data-bits:
Defines the number of data-bits in each transmission, which represent the ‘real’ information. This
number can be set between 5 and 8, but usually only 7 or 8 bits are used. A sequence of 8 bits is
usually referred to as ‘Byte’, so in most cases you will hear that bytes are transmitted (if only 7
bits are transmitted, the 8th bit is usually set to 0 by the receiver internally).
•
Parity-bit:
If enabled, this bit is appended to the data-bits and enables the receiver to check the validity of
the received data-bits.
Usually it is set to ‘EVEN’ or ‘ODD’. ‘EVEN’ means, that the parity-bit has to be set in that way
that the total number (data-bits + parity-bit) of ‘1s’ in a transmission is even, while ‘ODD’ means
the opposite.
Another possibility, which is rarely used, is to set the parity-bit to a fixed state. This means that
the parity-bit has to be ‘1’ or ‘0’ in all transmissions. In this case it is called ‘SPACE’ (when
setting the parity to ‘1’) or ‘MARK’ (when setting the parity to ‘0’).
The parity-bit is optional and can be left out. In this case it is called ‘NONE’.
•
Stop-Bits:
This bit marks the end of transmission and can be set to different lengths (1, 1 ½ and 2 bits).
The following illustration shows how a typical transmission would look like on the line:
Transmission with 8-bit data-length, parity-bit and 1 stop-bit. The length of each of these bits is
defined by the baudrate. For example with a baudrate of 9600 Bd each bit-length would be
approximately 104 µs.
U (Data In)
Bit 0 Bit 1 Bit 2 Bit 3 Bit 4 Bit 5 Bit 6 Bit 7
t
Start-bit
8 data-bits
Parity-bit
Document: Hirolink for Satchwell.DOC
- 11 -
Stop-bit
Release 1.07
Hirolink for Satchwell V 2.70 - General Documentation
2.4 Data-Transmission
Having defined the way to transmit single bits and bytes, we are still quite a distance from
having established a conversation between two devices.
Until now the two (or more) devices are only able to exchange bytes of information. So they are
able to send or receive a stream of bytes, but they don’t know how to use the information they
receive. This means that a set of rules has to be defined, which has to be respected by all devices
that want to communicate with each other.
This set of rules is called ‘Protocol’ and defines how the information must be structured within a
transmission. For example it defines how a transmission is started and ended (also called the
‘Message Frame’), where the device-address can be found, where instructions are transmitted
and many more.
The ‘Protocol’ that is implemented in this Hirolink, is described in the next chapter.
Document: Hirolink for Satchwell.DOC
- 12 -
Release 1.07
Hirolink for Satchwell V 2.70 - General Documentation
3. The SNPSNP-Protocol
This chapter contains a short description of the main-features of the SNP-protocol, to provide a
better understanding of the integration of Hiromatics into a Satchwell-network, but. since this
protocol is proprietary no detailed information can be given here.
If you are interested in the basic principles a protocol implements, you should check out the
document ‘Hirolink for Modbus’, where you can find an overview of the Modbus-protocol. In the
case that you want to know exactly how the SNP-protocol works, you would have to ask Satchwell
to provide you a copy of the specifications.
The SNP-protocol works on a Master-Slave-basis. This means that there is only one device on the
network, which is allowed to send requests to other devices. This device is called ‘Master’.
All other devices on the network only respond to requests received from the master and will never
initiate a transmission by themselves. These devices are called ‘Slaves’.
Master
Slaves
Request to Slave #1
Response from Slave #1
Request to Slave #2
Response from Slave #2
The slave who should respond to a request is identified by an address, which is described in the next
chapter.
Document: Hirolink for Satchwell.DOC
- 13 -
Release 1.07
Hirolink for Satchwell V 2.70 - General Documentation
3.1 Addressing
As mentioned in the chapter above the master is sending requests to its slaves and is waiting for their
answer. To identify the slave that should respond, the request contains an ‘Address’.
Therefore each slave on the network must have an address and this address must be unique in the
whole network.
The master needs no address, because this device is the only one that issues requests, so any response
coming from the slaves automatically has to be the answer to a request sent by the master.
In the SNP-protocol one byte (a byte is a 8-bit numerical value, which can hold values from 0 - 255)
of each request is reserved for the address. The protocol defines that valid addresses have to use a
range between 1 and 63.
3.2 Tables
To access the data available in a controller, the SNP-protocol uses a ‘Table’-concept. In this context,
the term ‘Table’ stands for a collection of data-points, which can be accessed via requesting a defined
number of bytes starting at a defined offset from the start of a defined table. Each of these variables
(number of bytes, offset, table) has to be send to the slave in the request for data. For a better
understanding see the following illustration:
Table 0
Offset 0
Offset 1
Offset 2
Offset 3
...
Table 1
Offset 0
Offset 1
Offset 2
Offset 3
...
Table 2
Offset 0
Offset 1
Offset 2
Offset 3
...
Table 255
Offset 0
Offset 1
Offset 2
Offset 3
...
Offset 65535
Offset 65535
Offset 65535
Offset 65535
For example:
The master-device sends a request to one of its slaves, telling the slave to return the values of the 2
data-points, starting at offset 2 in table 1. This request would cause the slave to return the values of
the shaded fields in the illustration above.
The protocol defines a maximum number of 256 different tables, each of which can hold up to
65536 bytes of information. These are the absolute maximum numbers defined by the protocol,
which doesn’t mean that each controller must hold this amount of data.
From the protocols point of view the data contained in the tables is not organized in any way. This
means that each table only contains a stream of bytes, where each of these bytes has the same
Document: Hirolink for Satchwell.DOC
- 14 -
Release 1.07
Hirolink for Satchwell V 2.70 - General Documentation
priority. Thus the data contained in the tables can only be interpreted correctly, when the recipient of
the data knows at which location in which table a given data-point can be found. In other words, the
recipient needs some sort of mapping-table, informing him about the location and type of each datapoints he wants to access.
Some tables are reserved for a predefined use, which also implements that the mapping-table
mentioned above is predefined. For example table 4 contains the firmware of the controller, while
table 69 contains time- and date-information. Still most tables can be used to hold controller-specific
data-points.
3.3 Data-Types
To be able to easily interpret the data contained in the tables described above, a number of datatypes have been defined. A data-type defines the size of a data-point and how the bytes have to be
interpreted in order to eventually calculate the value for a data-point.
For example:
Data-Type ‘1 Byte’:
This data-type defines that the data-point consists of one, single byte, which hasn’t to be transformed
in any way.
Data-Type ‘Word’:
This data-type defines that the data-point consists of two bytes, which have to be transformed in the
following way:
Resulting Value = (Low order byte) + 256 * (High order byte)
The ‘Low order byte’ is the byte at the lower offset, while the ‘High order byte’ is the byte at the
higher offset.
Data-Type ‘EMC swapped integer’:
This data-type defines that the data-point consists of two bytes, which have to be transformed in the
following way:
Resulting Value = (High order byte) + 256 * (Low order byte)
The ‘Low order byte’ is the byte at the lower offset, while the ‘High order byte’ is the byte at the
higher offset.
Document: Hirolink for Satchwell.DOC
- 15 -
Release 1.07
Hirolink for Satchwell V 2.70 - General Documentation
3.4 Commands
When a slave receives a request from the master, it needs to know what kind of request it is, so that
it can decide what to do with the received information.
Similar to the address described above, the request also contains a so-called ‘Command’. By
evaluating this ‘Command’, the slave can find out how the rest of the request is built up and how to
interpret the request, i.e. by checking the ‘Command’ the slave can find out exactly what the master
expects him to do.
In the SNP-protocol one byte (a byte is a numerical value, which can hold values from 0 - 255) of
each request is reserved for the ‘Command’.
The following lists the commands that are supported by the Hirolink:
Command
Satchwell-Denotation
‘I’ = 49h Write command
‘A’ = 41h Write global values*
‘J’ = 4Ah
Read command
Comment
Writes new data to a table
Writes new data to all devices that belong to a
specified group
Reads data from a table
*)
This command can only be used, when the Hirolink works in a non-transparent mode. In this mode
the Hirolink behaves like Satchwell’s ‘Touchscreen’-devices. This non-transparent mode has not yet
been tested by Satchwell, thus it shouldn`t be used.
Document: Hirolink for Satchwell.DOC
- 16 -
Release 1.07
Hirolink for Satchwell V 2.70 - General Documentation
4. HiromaticHiromatic-Specific Topics
This chapter contains topics that must be respected when integrating Hiromatics into a
Satchwell-network.
4.1 Compatibility
Enforced by the characteristics of the Hironet-protocol, the Hirolink has to hold a table, which
describes the way how to communicate with a given type of Hiromatic and also which datapoints have to be mapped to which table-offsets on the Satchwell-side of the network.
Therefore the Hirolink is NOT compatible with all types of Hiromatics and also NOT with all
versions of a given type, since also the amount of available data-points can change from one
version of a Hiromatic-type to the next.
For this reason a compatibility-list is provided in appendix Appendix B: of this document and
also in the documents containing the available data-points for each Hiromatic-type. Those
documents are called ‘Hirolink for Satchwell V X.XX - Items for YYY-Units V Z.ZZ, where
X.XX stands for the Hirolink-software-version, YYY for the Hiromatic-type and Z.ZZ for the
software-version of this Hiromatic-type.
So make sure that the Hiromatics you want to integrate into the Satchwell-network are
compatible with this version of the Hirolink.
4.2 Data-mapping
As mentioned in chapter 3.2 ‘Tables’, the SNP-protocol uses a ‘Tables’ to access data provided
by a controller.
It has been agreed between our company and Satchwell that each Hiromatic-type is assigned a
table-number through which the data-points provided by that Hiromatic can be accessed.
This table-number can be found in appendix Appendix A: ‘Hiromatic-Types’ of this document
as well as in the documents containing the available data-points for each Hiromatic-type.
Furthermore the Hirolink supports the following predefined tables for each connected
Hiromatic:
•
•
•
•
•
Table 4: Firmware Identifier
Table 69: Time
Table 71: Group Addresses
Table 73: Unit Identifier
Table 74: Serial Link Parameters (Read only)
Document: Hirolink for Satchwell.DOC
- 17 -
Release 1.07
Hirolink for Satchwell V 2.70 - General Documentation
4.3 Networking Systems
In general there are 3 types of controllers that can be used in an air-conditioner equipped with a
Hiromatic:
• Module:
This is the simplest form of controller, which only consists of expansion boards that are
plugged into the back of the Hiromatic. These ‘Modules’ provide the I/Os for controlling the
components and ‘upgrade’ the Hiromatic to perform also the regulation-functions.
• Macroface:
This kind of controller is connected to the Hiromatic via the so-called ‘Hirobus’ through
which they communicate. Depending on the Hiromatic-type a Macroface either works alone
or can be connected with other Macrofaces to form a system. The maximum number of
Macrofaces that can work with each other depends on the Hiromatic-type.
• Microface:
This kind of controller is a smaller version of the ‘Macroface’ and is also connected to the
Hiromatic via the ‘Hirobus’. All Hiromatic-types using a Microface can be connected with
other Microfaces to form a system. The maximum number of Microfaces that can work with
each other is 16.
See appendix Appendix A: for a complete list of Hiromatic-types, controller-types and the
maximum number of connectable controllers.
As described above some Hiromatic-types are operating in a networking-mode. This means that
a variable number of air-conditioners can be connected with each other to form a system. Note
that mixed installations are not possible, i.e. you can not mix ‘Macrofaces’ and ‘Microfaces’.
Within a networking-system data is exchanged, which informs the single controllers about
certain alarm-conditions, average temperatures, system-wide setpoints and so on.
To enable the communication with the Hirolink, one Hiromatic has to be connected, which
transfers the data from the single controllers and its own to the Hirolink. A address has to be
assigned to the Hiromatic, under which it is accessible from the Hirolink and as a consequence
from the Satchwell-network.
Therefore all values and parameters from the complete system the Hiromatic is connected to,
are mapped into the table of one single slave as if those values would come from one single
device.
For a better understanding, see the illustration below:
Document: Hirolink for Satchwell.DOC
- 18 -
Release 1.07
Hirolink for Satchwell V 2.70 - General Documentation
Hirolink
Hiromatic #1
HM-value 1
HM-value 2
HM-value 3
Table of Slave #1
Macroface #1
MF-value 1
MF-value 2
MF-value 3
Macroface #2
MF-value 1
MF-value 2
MF-value 3
HM-value 1
System-value 2
MF-value 1 from Macroface #1
MF-value 1 from Macroface #2
…
…
MF-value 1 from Macroface #8
System-value 1
System-value 2
System-value 3
Macroface #8
MF-value 1
MF-value 2
MF-value 3
Hiromatic #5
HM-value 1
HM-value 2
HM-value 3
Table of Slave #5
HM-value 1
System-value 2
MIC-value 1 from Microface #1
MIC-value 1 from Microface #2
…
…
MIC-value 1 from Microface #16
Microface #1
MIC-value 1
MIC-value 2
MIC-value 3
Microface #2
MIC-value 1
MIC-value 2
MIC-value 3
System-value 1
System-value 2
System-value 3
Microface #16
MIC-value 1
MIC-value 2
MIC-value 3
Document: Hirolink for Satchwell.DOC
- 19 -
Release 1.07
Hirolink for Satchwell V 2.70 - General Documentation
As the illustration shows, there are 3 different types of values that are received from the
Hiromatic and made accessible to the Satchwell-network:
• HM-Values:
These values are only existing in the Hiromatic and therefore only exist once in the system
(e.g. Time and Date).
• System-Values:
These values are maintained by a Macroface or a Microface, but are valid for the whole
system (e.g. Shared Temperature, System Status). Therefore they also only exist once.
• MF-Values, MIC-Values:
These values are existing in each Macroface or Microface and therefore the same value exists
as often as the maximum number of connectable controllers defines.
In the list of available data-points (also called ‘Item-Lists’ in this document) accessible to the
Satchwell-network, those values are simply repeated as many times as controllers can be
connected. These values are marked with the text ‘MF 1 - X’ or ‘MIC 1 - X’ in the item-lists
of the Hiromatic-type, where ‘X’ stands for the maximum number of connectable
controllers).
NOTE:
The item-lists don’t change, if less than the maximum number of controllers are connected.
This means that in any case the controller-values are repeated as many times as controllers
can be connected, but if less controllers are connected, the values provided for those
controllers that are not connected are not valid.
Document: Hirolink for Satchwell.DOC
- 20 -
Release 1.07
Hirolink for Satchwell V 2.70 - General Documentation
4.4 Sending ‘Commands’
In the item-lists provided for each Hiromatic-type, you will find data-points marked with the
appendix ‘Command’. These items perform functions like switching the air-conditioner on or off
and have to be treated in a special way:
These items must only be set to their ‘On-State’ once and must either not be written again or
must at least be set back to their ‘Off-State’. In other words, these commands should be treated
like ‘One shots’ or like a push-button as shown in the following illustration:
For example: Data-point activating ‘System On’
Value
On (1)
Off (0)
Time
It is very important that these items are not permanently set to their ‘On-State’, also not in
intervals of e.g. 1 minute.
Furthermore those items don’t provide valid information when read. They will always return
‘Off’ when read, except for the first read after they have been set to ‘On’. This is done in order
to confirm the successful writing to the BMS.
The reason for this special treatment is actually only the digital output activating the ‘System
On’-command, but it should be adopted as a general rule for all commands (since it for example
doesn’t make much sense to permanently set the ‘Alarm Reset’-command).
When performing the ‘System On’-command, the Hiromatic and the Macrofaces or Microfaces
perform some initialization-routines, which for example completely close the chilled-water
valves or reset a timer that prevents the regulation to activate any component for the next 2
minutes and other things. Each time the unit receives the ‘System On’-command this
initialization-routines are repeated. Therefore the regulation would never start to do its job, if
the ‘System On’-command is sent permanently or also in some interval.
The behavior described above doesn’t apply to all Hiromatic-types, but to avoid problems this
treatment should be adopted as a general rule for all coils marked with ‘Command’.
Document: Hirolink for Satchwell.DOC
- 21 -
Release 1.07
Hirolink for Satchwell V 2.70 - General Documentation
5. Installation Procedure
This chapter contains step-by-step instructions on how to prepare the Hiromatics, how to prepare
the Hirolink, how to connect the Hiromatics and how to connect the Satchwell-network.
5.1 Things to do before installation
Before you even order the Hirolink, you should run through the following check-list and be able to
answer all questions listed there to make sure that no bad surprises happen, when you want to put
the Hirolink into operation:
•
How many Hiromatics will be connected to the Hirolink ?
Be sure that no more than 32 Hiromatics will be connected to one Hirolink. If the number of
Hiromatics in your installation exceeds this number, you have to use a second or more Hirolinks.
•
What’s the location of the Hiromatics ?
Be sure that the total length of the cable connecting the Hiromatics with the Hirolink doesn’t
exceed 1500 m. Also in this case you will need another Hirolink, if the needed cable-length
exceeds this number.
•
Are the software-versions used in the Hiromatics supported by the Hirolink ?
A compatibility-list is provided in appendix Appendix B: in this document, which lists all
Hiromatic-software-versions that are currently supported by the Hirolink.
Compare this list with the software-versions used in your installation, to make sure that the
Hirolink is able to communicate with all Hiromatics you want to connect.
•
Plan your installation
Draw a map of your installation, which shows the location of all Hiromatics you want to
connect.
Assign identification-numbers to all Hiromatics you want to connect to the Hirolink(s). Each
Hiromatic must receive a identification-number, which is unique within the network of
Hiromatics that is connected to one single Hirolink. This means that you can use each
identification-numbers between 1 and 32 once for each Hirolink in your installation.
Document: Hirolink for Satchwell.DOC
- 22 -
Release 1.07
Hirolink for Satchwell V 2.70 - General Documentation
5.2 Preparing the Hiromatics
To prepare the Hiromatics for a connection to the Hirolink, carry out the following steps:
Step 1: Write down the software-information
After switching on the Hiromatic, it will show the software-type, version and date for a few seconds.
This information varies depending on the software-type, but in general you will see something like
the following:
HIROMATIC COMPACT
DIRECT EXP.
2.62 25.11.1996
Note this information and keep it for later use.
Step 2: Check the Hironet-settings
The location of the Hironet-settings varies depending on the software-type, but in general they can be
found on the second page of the ‘SYSTEM SETUP’-menu.
These settings define the Identification-number and the baudrate and in some cases also the protocol
and the communication-mode. Each of these settings is described in the following:
Identification-number:
The identification-number set on the Hiromatic defines the Satchwell-Slave-ID, which has to be used
to request data from the Hiromatic. As mentioned in the description of the protocol, this Slave-ID
must be unique. Therefore it is very important that each Hiromatic receives a different identificationnumber.
IMPORTANT:
A maximum of 32 Hiromatics can be connected to one Hirolink and also the
identification-number MUST NOT exceed 32. Therefore never set a
identification-number to a value higher than 32.
After setting the identification-number, note it together with the software-information described in
step 1. It is good advise to also note the position of the Hiromatic within the building.
Baudrate:
The baudrate defines the communication-speed, with which the Hiromatic communicates with the
Hirolink and MUST be set to 20833 Bd.
It is important to know that all software-types are prepared for use with 2 types of crystals (12 MHz
and 11,0592 MHz). Depending on the used crystal the Hiromatic will display different baudrates,
since the baudrate also changes in reality.
The difficulty regarding this matter is, that not all software-types display the baudrate in the same
way. Most software-types will show ‘20833 Bd’, but some show ’19.2 k’. Please check the list at the
end of this section for information on which value is displayed for each crystal-type.
Document: Hirolink for Satchwell.DOC
- 23 -
Release 1.07
Hirolink for Satchwell V 2.70 - General Documentation
If you try to set the baudrate and the value for the 11,0592 MHz-crystal is displayed, there are 2
possibilities:
1. You have a Hiromatic of hardware-version 3.5, which is equipped with both crystals and a jumper
for selection. The following illustration shows the position of this jumper:
Hiromatic Back
PHILIPS
80C552
11.0592 MHzcrystal
Jumper for
crystal-selection
12 MHzcrystal
123
Hironetinterface-card
Hirobusconnectors
Jumper on 1 - 2: 12 MHz-crystal
Jumper on 2 - 3: 11,0592 MHz-crystal
In that case you must change the jumper to the 12 MHz-position.
2. By mistake you have received a Hiromatic previous to hardware-version 3.5, which is equipped
with only one crystal and this one is a 11,0592 MHz-crystal. In that case the Hiromatic must be
replaced with one equipped with a 12 MHz-crystal.
Document: Hirolink for Satchwell.DOC
- 24 -
Release 1.07
Hirolink for Satchwell V 2.70 - General Documentation
Protocol:
Some software-types provide a parameter called ‘PROTOCOL’. If the Hiromatic displays this line
the parameter must be set to ‘HIROSS’. Please check the list at the end of this section for information
on which software-types provide this parameter.
Communication-Mode:
Some software-types provide a parameter called ‘COMMUNICATION ENABLED’ (on some types
also called ‘SER. COMM. ENABLED’ or ‘TRANSMISSION ENABLED’). This parameter enables or
disables the ability to change parameter via the Hironet. In general this parameter will be set to ‘YES’
to enable the BMS to change values in the Hiromatic. If the BMS only wants to read values from the
Hiromatics, this parameter can be set to 'SERVICE’ (sometimes also displayed as ‘NO’). Please check
the list at the end of this section for information on which software-types provide this parameter.
These steps must be carried out on each Hiromatic that will be connected to the Hirolink.
The following list provides the information mentioned above:
Type
Displayed
baudrate
with 12
MHz-- crystal
MHz
Displayed
baudrate
with 11,0592
MHz crystal
Parameter
‘PROTCOL’
displayed
Parameter
‘COMM.
ENABLED’
displayed
CAM
Compact Custom
20833 Bd
208
19200 Bd
192
No
Yes
No
Yes
Dryer
No
No
No
No
Energy Partner
Energy Partner
Small
CPU Chiller
Advanced Graphic
Compact Graphic
Superchiller/Hichill
20833 Bd
20833 Bd
19200 Bd
19200 Bd
No
No
No
No
20833 Bd
20833 Bd
20833 Bd
19.2 k
19200 Bd
19200 Bd
19200 Bd
19200 Bd
No
Yes
Yes
No
No
Yes
Yes
No
SIP
208
192
Yes
Yes
Telecool Compact
Hiflex
20833 Bd
20833 Bd
19200 Bd
19200 Bd
Yes
No
Yes
Yes
Remarks
Set the crystal-type
manually in menu
‘QUARZ’
All parameter are
fixed
Parameters
available in menu
‘HV SETTINGS’
Set the crystal-type
manually in menu
‘QUARZ’
The software-types ‘Compact Custom’ and ‘SIP’ run in a Hiromatic Compact Custom, which is not
equipped with a clock. Therefore the Hiromatic has no possibility to detect the type of crystal and
you have to set it manually.
Document: Hirolink for Satchwell.DOC
- 25 -
Release 1.07
Hirolink for Satchwell V 2.70 - General Documentation
Step 3: Insert the interface-card
Be sure that a RS422-interface-card is mounted on the Hiromatic. Two versions of this interface-card
are available as shown in the illustrations below:
Standard RS422-interface-card:
Code No. 482 992
Opto-coupled RS422-interface-card:
Code No. 275 631
For a detailed description of the interface-cards and their pinning see chapter 7 ‘HardwareReference’.
Step 4: Connect the Hiromatics with each other
In general there are 2 possibilities to connect the Hiromatics with each other.
RS422-network-type:
This network-type is easier to install and therefore commonly used. You have to use a 4-wire cable,
where the connection is done in a 1-to-1 manner. This means that each pin on one interface-card has
to be connected to the same pin on the next interface-card.
When ‘Standard RS422-interface-cards’ are used the pins 1 to 4 have to be connected as shown in
the following illustration:
To Hirolink
Hiromatic 1
Hiromatic 2
Hiromatic 3
To next Hiromatic
Document: Hirolink for Satchwell.DOC
- 26 -
Release 1.07
Hirolink for Satchwell V 2.70 - General Documentation
It is NOT important in which order the Hiromatics are connected, i.e. for example Hiromatic 10 can
be the first physically connected Hiromatic, followed by Hiromatic 1 and so on.
For a detailed description of the interface-cards and their pinning see chapter 7 ‘HardwareReference’.
When ‘Opto-coupled RS422-interface-cards’ are used, you only have to mount appropriate 4-pinmodular-jacks on the cable and plug the connector in as shown in the following illustration:
To Hirolink
To next Hiromatic
Hiromatic 1
Hiromatic 2
Hiromatic 3
Again it is NOT important in which order the Hiromatics are connected. Also it is NOT important
which of the two plugs is used for either direction.
For a detailed description of the interface-cards and their pinning see chapter 7 ‘HardwareReference’.
Document: Hirolink for Satchwell.DOC
- 27 -
Release 1.07
Hirolink for Satchwell V 2.70 - General Documentation
When you have both types of RS422-interface-cards, connect them as shown in the following
illustration:
Connector male
Front view
lockpin on rear
For a detailed description of the interface-cards and their pinning see chapter 7 ‘HardwareReference’.
RS485-network-type:
The other possibility to connect the Hiromatics is a RS485-network-type. The advantage that you
can gain with this network-type is that you only need a 2-wire-connection between the Hiromatics,
but you have to manually shortcut two pins on each RS422-interface-card.
Since it is a lot of extra work and many mistakes can happen when shortcutting the pins, it is more
advisable to use the RS422-network-type. Still if you would like to use the RS485-network-type,
check chapter 7 ‘Hardware-Reference’ for detailed information on which pins you have to shortcut.
Document: Hirolink for Satchwell.DOC
- 28 -
Release 1.07
Hirolink for Satchwell V 2.70 - General Documentation
5.3 Preparing the Hirolink
To be able to prepare the Hirolink in a proper way, you have to be sure of the following things:
•
How many Hiromatics will be connected to the Hirolink ?
As mentioned above a maximum of 32 Hiromatics can be connected to one Hirolink. It is likely,
that the communication doesn’t work at all, when this number is exceeded.
•
What are the identification-numbers and software-versions of the connected Hiromatics ?
Be sure to have noted the software-version and the identification-numbers together with the
location of the connected Hiromatics as described in chapter 5.1.
Check, if the software-versions running in the Hiromatics are supported by the Hirolink using the
compatibility-list provided in appendix A in this document.
Also make sure that no Hiromatic has a identification-number higher than 32.
•
Which communication-parameters are used on the Satchwell-network ?
Ask the operator of the Satchwell -network for the communication-parameters used on the
Satchwell -network. This information must include the following parameters:
Baudrate:
Possible values are 110, 150, 300, 600, 1200, 2400, 4800, 9600 and 19200 Baud.
Satchwell-network-type:
Possible values are RS232 and RS485.
With this information available, you can start to prepare the Hirolink for operation according to the
following steps:
Step 1: Insert the interface-cards
To enable the communication with the Hiromatics a RS422/RS485-interface-card has to be inserted,
where no further settings are necessary.
To enable the communication with the Satchwell-network, the kind of interface-card to be inserted
depends on the Satchwell-network-type. You have to insert a interface-card of type RS232 for a
RS232-network-type or a interface-card of type RS422/RS485 for a RS485-network-type.
The reason for inserting a RS422/RS485- interface-card for a RS485-network, is that the only
difference between a RS422 and RS485 is that on a RS422-network the receiving and transmitting
lines are separated, while on a RS485-network receptions and transmissions are sent over the same
lines. Therefore you only have to shortcut the receiving and transmitting lines on the Hirolinkconnector, to make the RS422/RS485-interface-card work on a RS485-network.
Document: Hirolink for Satchwell.DOC
- 29 -
Release 1.07
Hirolink for Satchwell V 2.70 - General Documentation
The following illustration shows the sockets, where of the interface-card have to be inserted:
Module for Hiromaticconnection
RS422/485-Module
Hirolink
Front
RS422/485- or
RS232Module
Module for Satchwellconnection
16C552
Hirolink
Back
80C552
The interface-cards themselves look like the following illustrations:
RS232-interface-card:
MAX222
MAX222
HL RS232-interface-card
Code No. 275 701
NOTE:
Remove all jumpers that might be set on the RS232-interface-card.
RS422/RS485-interface-card:
PC9
D10
PC9
D10
HL RS422/RS485-interface-card
Code No. 275 700
Document: Hirolink for Satchwell.DOC
- 30 -
Release 1.07
Hirolink for Satchwell V 2.70 - General Documentation
Step 2: Set the communication-parameters for the Satchwell-network
As the final step you have to configure the communication-parameters inside the Hirolink according
to the information you received from the operator of the Satchwell-network. The following
parameters have to be set:
- Baudrate
- Satchwell-network-type (RS232 or RS485)
See the following illustration for information on where to set which parameter:
Hirolink
Back
Hirolink
Front
16C552
80C552
Jumper-Block 1
Jumper-Block 2
Jumper Block 1:
All jumpers
jumpers MUST be removed from that jumperjumper-block.
These jumpers can only be used, when the Hirolink works in a non-transparent mode. In this mode
the Hirolink behaves like Satchwell’s ‘Touchscreen’-devices. This non-transparent mode has not yet
been tested by Satchwell, thus it shouldn`t be used.
Document: Hirolink for Satchwell.DOC
- 31 -
Release 1.07
Hirolink for Satchwell V 2.70 - General Documentation
Jumper Block 2:
Interface type
Baudrate 3
Baudrate 2
Baudrate 1
Baudrate 0
Jumper
Interface type
SET
RS485
NOT SET
RS232
Setting of baudrate:
Baudrate-Jumper
3
1
1
1
1
1
1
1
1
0
2
1
1
1
1
0
0
0
0
1
1
1
1
0
0
1
1
0
0
1
0
1
0
1
0
1
0
1
0
1
Baudrate
110 Baud
150 Baud
300 Baud
600 Baud
1200 Baud
2400 Baud
4800 Baud
9600 Baud
19200 Baud
1..Jumper set
0..Jumper not set
Document: Hirolink for Satchwell.DOC
- 32 -
Release 1.07
Hirolink for Satchwell V 2.70 - General Documentation
5.4 Connecting the Hirolink to the Hiromatics
To connect the Hirolink to the Hiromatics you have to connect the cable coming from the
Hiromatics (see chapter 5.2 ‘Preparing the Hiromatics’) to one of the connectors on the Hirolinkfront-panel. The layout of the Hirolink’s front-panel has been changed some time ago, but there are
still both versions around:
Previous layout of Hirolink-front-panel:
bms 2/bms 3
bms 1
hironet
hirovisor/modem
hirolink
hirobus
Current layout of Hirolink-front-panel:
Connect Hiromatics here
connector 1
connector 2
connector 3
connector 4
hirolink
hirobus
In both cases the same connector is used. On the previous layout this connector was named ‘hironet’,
on the current layout this connector is named ‘connector 3’.
Depending on the way in which the Hiromatics were connected to each other (see chapter 5.2
‘Preparing the Hiromatics’), the connection to the Hirolink has to be done in one of the following
ways:
Document: Hirolink for Satchwell.DOC
- 33 -
Release 1.07
Hirolink for Satchwell V 2.70 - General Documentation
RS422-network-type:
The following illustration shows the connection between Hirolink and Hiromatics, when ‘Standard
RS422/485-interface-cards’ are used:
Hiromatic-interface-card
Hirolink-connector
(front view, male)
Cable coming from the
other Hiromatics
For a detailed description of the interface-cards and their pinning see chapter 7 ‘HardwareReference’.
The following illustration shows the connection between Hirolink and Hiromatics, when ‘Optocoupled RS422/485-interface-cards’ are used:
Hiromatic-interface-card
Connector male
Front view
lockpin on rear
Hirolink-connector
(front view, male)
Cable coming from the
other Hiromatics
For a detailed description of the interface-cards and their pinning see chapter 7 ‘HardwareReference’.
RS485-network-type:
If you have used a RS485-network-type to connect the Hiromatics with each other, you also have to
shortcut two pins at the Hirolink. See chapter 7 ‘Hardware-Reference’ for detailed information on
which pins you have to shortcut.
For instructions on how to test the connection to the Hiromatics, see chapter 6.
Document: Hirolink for Satchwell.DOC
- 34 -
Release 1.07
Hirolink for Satchwell V 2.70 - General Documentation
5.5 Connecting the Hirolink to the Satchwell-network
To connect the Hirolink to the Satchwell-network you have to connect the cable coming from the
Satchwell-network to one of the connectors on the Hirolink-front-panel. The layout of the Hirolink’s
front-panel has been changed some time ago, but there are still both versions around:
Previous layout of Hirolink-front-panel:
bms 2/bms 3
bms 1
hironet
hirovisor/modem
hirolink
hirobus
Connect Satchwell-network
here
Current layout of Hirolink-front-panel:
connector 1
connector 2
connector 3
connector 4
hirolink
hirobus
In both cases the same connector is used. On the previous layout this connector was named
‘bms2/bms3’, on the current layout this connector is named ‘connector 1’.
The type of connection to be made, depends on the type on Satchwell-network, which can be either a
RS232- or a RS485-network.
This information has to be received from the operator of the Satchwell-network and the Hirolink has
to be prepared accordingly by inserting either a RS232- or RS422/RS485-interface-card.
Depending on the Satchwell-network-type, the connection to the Hirolink has to be done in one of
the following ways:
Document: Hirolink for Satchwell.DOC
- 35 -
Release 1.07
Hirolink for Satchwell V 2.70 - General Documentation
RS232-network-type:
Connect with ModbusGND-line
Connect with ModbusRX-line
Connect with ModbusTX-line
Hirolink-connector 1
(front view, male)
Connect with ModbusCTS-line
Shortcut, when no
handshake
Connect with ModbusRTS-line
In some cases no handshake-lines are used on the Satchwell-network (information about that also
has to come from the operator of the Satchwell-network). In that case the two lines usually used for
handshaking, have to be shortcut on the Hirolink as shown in the illustration.
For a detailed description of the connector-pinning see chapter 7 ‘Hardware-Reference’.
RS485-network-type:
Shortcut pins 2 and 3
Connect with ModbusTX/RX + -line
Connect with ModbusTX/RX - -line
Hirolink-connector 1
(front view, male)
Shortcut pins 1 and 4
For a detailed description of the connector-pinning see chapter 7 ‘Hardware-Reference’.
For instructions on how to test the connection to the Satchwell-network, check chapter 6 ‘Testing the
Installation’.
Document: Hirolink for Satchwell.DOC
- 36 -
Release 1.07
Hirolink for Satchwell V 2.70 - General Documentation
6. Testing the Installation
6.1 Using the Hirolink-LEDs
The simplest form of testing the installation is to check the LEDs (Light Emitting Diode)
mounted on the front-panel of the Hirolink:
connector 1
connector 2
connector 3
connector 4
hirolink
hirobus
LEDs
Although not visible on first sight, this LED is capable of showing two colors, GREEN and
RED. Be aware that depending on your viewpoint, sometimes one LED is hard to see, if the
other one is already switched on.
6.1.1 Green LED
The green LED is switched on by the Hirolink, as soon as it establishes a connection with at
least 1 Hiromatic on the Hironet.
This LED can only be used to make the first basic test of the connection. It assures you only that
the connection to the physically first Hiromatic on the Hironet is working. It doesn’t provide
information, if all Hiromatics that should be connected have really been found.
The LED must stay switched on permanently. If it goes off after a certain time and is switched
back on after a while, goes off again and so on, this means that you either have an addressconflict (2 or more Hiromatics with the same address) on the Hironet or that you have a
Hiromatic connected that is not compatible.
If the Hirolink is not receiving any requests from the Satchwell-network, the green LED will
flicker in an interval of 30s. This happens because the Hirolink reinitializes its drivers, if it
doesn’t receive anything from the Satchwell-network. This flickering of the LED can clearly be
distinguished from the switching described in the paragraph above.
Document: Hirolink for Satchwell.DOC
- 37 -
Release 1.07
Hirolink for Satchwell V 2.70 - General Documentation
6.1.2 Red LED
The red LED is switched on by the Hirolink, as soon as it has received a valid transmission from
the Satchwell-Network. It will be switched off again after 2 seconds.
This LED can be used to test the connection between the Hirolink and the Satchwell-network. If it
comes on this means that the Hirolink was able to correctly receive and decode the transmission.
From the hardware point-of-view this is a pretty good test for the connection to the Satchwellnetwork, but it doesn’t mean that everything is working. What it confirms is that the
communication-parameter-settings are correct and that at least the receiving line of the Hirolink was
connected in the right way.
What it doesn’t say for example is which data was requested or written to. This means that the
request was probably not reading (or writing) the data-points that should be displayed somewhere
on the Satchwell-network.
Also it doesn’t say that the request was made for the correct slave-address. This means that it could
be that the data-point was requested from a different Hiromatic than intended.
And finally it doesn’t confirm that the answer sent by the Hirolink was correctly received by the
Satchwell-master. But if that’s the case then probably only the transmitting line or the handshakelines of the Hirolink were not connected in a correct way.
Document: Hirolink for Satchwell.DOC
- 38 -
Release 1.07
Hirolink for Satchwell V 2.70 - General Documentation
6.2 Service-Interface
The ‘Service-Interface’ provides the possibility to request connection-information from the
Hirolink either without using the Satchwell-network at all or in parallel to requests from the
Satchwell-network.
The ‘Service-Interface’ can be used with any PC running a terminal program like ‘TERMINAL’
(comes with Windows 3.11), ‘HYPER TERMINAL’ (comes with Windows 95) or others. If you
want to use another terminal-program you would have to configure it by yourself.
The ‘Service-Interface’ can also be used with a modem, which means that instead of connecting
a PC directly to the Hirolink, you can also connect a modem and call the Hirolink from remote.
6.2.1 Inserting the interface-card
To make use of the service-interface you have to insert another RS232-interface-card in the
Hirolink as shown in the following illustration:
Module for
‘Service-interface’
Hirolink
Front
Hirolink
Back
RS232Module
16C552
80C552
The interface-card looks like the following illustrations:
RS232-interface-card:
MAX222
MAX222
HL RS232-interface-card
Code No. 275 701
NOTE:
If you want to use the service-interface via a modem, you have to set the jumpers as shown.
Otherwise all jumpers can be removed.
Document: Hirolink for Satchwell.DOC
- 39 -
Release 1.07
Hirolink for Satchwell V 2.70 - General Documentation
6.2.2 Connecting the Hirolink with the PC
After the interface-card is inserted, you have to connect the Hirolink to the PC running the
terminal-program as shown in the following illustrations:
Previous layout of Hirolink-front-panel:
bms 2/bms 3
bms 1
hironet
hirovisor/modem
hirolink
hirobus
Connect PC here
Current layout of Hirolink-front-panel:
connector 1
connector 2
connector 3
connector 4
hirolink
hirobus
Connection to a 9-pin PC-connector:
Hirolink-connector 4
(front view, male)
PC-connector
(front view, male)
Pin 2: RX
Pin 2: RX
Pin 3: TX
Pin 3: TX
Pin 5: GND
Pin 5: GND
Pin 7: RTS
Pin 7: RTS
Pin 8: CTS
Pin 8: CTS
Document: Hirolink for Satchwell.DOC
- 40 -
Release 1.07
Hirolink for Satchwell V 2.70 - General Documentation
Connection to a 25-pin PC-connector:
PC-connector
(front view, male)
Hirolink-connector 4
(front view, male)
Pin 2: TX
Pin 2: RX
Pin 3: RX
Pin 3: TX
Pin 4: RTS
Pin 5: GND
Pin 5: CTS
Pin 7: RTS
Pin 7: GND
Pin 8: CTS
6.2.3 Connecting the Hirolink with a modem
If you want to connect a modem instead of a PC, use the cable that comes with the modem and
connect it to the same Hirolink-connector that is used when connecting a PC.
One important issue when a connecting a modem is, that you have to pre-configure the modem
in such a way, that it only sends the string ‘CONNECT’, when a communication with another
modem has been established. This configuration has to be stored in the modem. Since the
necessary commands to achieve this behavior vary depending on the type of modem, no exact
instructions can be given here and you should check your modem’s manual.
6.2.4 Configuring the terminal-program
As mentioned above you you have to configure your terminal-program using the following
communication-parameters fixing the following values:
•
•
•
•
•
9600 Bd
8-bit word-length
No parity
1 Stop-bit
All transmissions must be ended with a <CR><LF>-pair.
Document: Hirolink for Satchwell.DOC
- 41 -
Release 1.07
Hirolink for Satchwell V 2.70 - General Documentation
6.2.5 Using the ‘Service-Interface’
After you have connected the Hirolink to the PC, you have to switch the Hirolink off and on
once. After that you will see the following string appear on the PC:
ATE0X0
This string will appear 6 times and shows that the Hirolink is trying to find a connected modem.
If a modem is connected the modem will respond to this transmission. The Hirolink will
initialize the modem and wait for incoming calls. Note that the Hirolink will not actively call
someone, but will only wait for incoming calls.
As mentioned this string will appear 6 times when a PC is connected and will then be followed
by the following string:
NO MODEM CONNECTED
After that the service-interface is ready for operation. The available command described in the
following paragraphs can be used in exactly the same way if a modem is connected. The only
difference is that you have to call the Hirolink before you can perform any commands.
Pressing <ENTER> will return the Hirolinks type and version. For example:
HLI for Satchwell, V 2.64
In general each command you can send to the Hirolink starts with ‘Q’ or ‘q’ (the commands are
not case-sensitive) and one or more characters identifying the command. The following
commands are available:
• ‘Q?’ .. Display Help:
This command returns a short description of the available commands.
• ‘QO’ .. Overview:
This command returns an overview of the connection-status, in the following format:
Overview
Requests: 00000
Errors: 00000
Connected HMs: 00
Addresses:
Problem HMs:
‘Requests’ displays the number of requests that have been received from the Satchwellnetwork.
‘Errors’ displays the number of requests that have been received from the Satchwell-network,
where the checksum was not correct.
‘Connected HMs’ displays the number of connected Hiromatics.
‘Addresses’ displays the IDs of the connected Hiromatics.
‘Problem HMs’ displays the IDs of connected Hiromatics, where some problem has been
detected. A more detailed description of the problem can be read using the ‘Unit-Info’command.
Document: Hirolink for Satchwell.DOC
- 42 -
Release 1.07
Hirolink for Satchwell V 2.70 - General Documentation
• ‘QUX’ .. Unit-Info
This command returns information about the connection-status of a specific Hiromatic. ‘X’
has to be replaced with the Hiromatic-ID of which the information is requested. The
returned information has the following format:
Information for Unit X
Version-String: XXXXXXXXX
Version: XXX
Type: XXX
Problem: XXX
‘Version-String’ displays the 9-digit Hiromatic-software-version, that has been received by
the Hirolink, i.e. WXG141141.
‘Version’ displays the version of the mapping-table, that the Hirolink is using for mapping
the Hiromatic-data to the Satchwell-network.
‘Type’ displays the type of the mapping-table, that the Hirolink is using for mapping the
Hiromatic-data to the Satchwell-network.
‘Problem’ displays the kind of problem the Hirolink has detected, when communicating with
this Hiromatic. This can be one of the following:
‘Invalid type’:
The Hirolink is not compatible with this Hiromatic-software-type.
‘Invalid version’:
The Hirolink is not compatible with this version of this Hiromatic-software-type.
‘Out of memory’:
The Hirolink is out of memory, i.e. too many Hiromatics have been connected to the
Hirolink.
‘Invalid table’:
The mapping-table used by the Hirolink is not matching the data received from the
Hiromatic.
• ‘QBX Y’ .. Read HM-Block
This command returns a block of data received by a Hiromatic. ‘X’ has to be replaced with
the Hiromatic-ID and ‘Y’ has to be replaced with the block-ID. The interpretation of the
data returned by this command requires exact knowledge of the Hiromatic-software.
Therefore this command should only be used by expert techincians.
• ‘QYX Y Z’ .. Read HM-Byte
This command returns a single byte of data received by a Hiromatic. ‘X’ has to be replaced
with the Hiromatic-ID and ‘Y’ has to be replaced with the block-ID and ‘Z’ has to be
replaced with the block-offset. The interpretation of the data returned by this command
requires exact knowledge of the Hiromatic-software. Therefore this command should only be
used by expert techincians..
• ‘QME X’ .. Monitor Errors
After issuing this command the Hirolink enters a monitoring-mode. As soon as an error
occurs during the processing of a transmission received from a Hiromatic, the Hirolink will
send this transmission to the terminal-program. ‘X’ has to be replaced with the HiromaticID. If no Hiromatic-ID is specified, the Hirolink monitors errors for all connected
Hiromatics. The monitoring-mode can be exited by pressing <ENTER>.
The interpretation of the data returned by this command requires exact knowledge of the
Hiromatic-software. Therefore this command should only be used by expert techincians..
• ‘QR’ .. Reset Counters
Resets the requests- and error-counter (see ‘Overview’-command) as well as the ‘Problems’array. Resetting the ‘Problems’-array enables the Hirolink to retry the communication with
Document: Hirolink for Satchwell.DOC
- 43 -
Release 1.07
Hirolink for Satchwell V 2.70 - General Documentation
the Hiromatics.
Document: Hirolink for Satchwell.DOC
- 44 -
Release 1.07
Hirolink for Satchwell V 2.70 - General Documentation
7. HardwareHardware-Reference
The following chapter contains detailed descriptions of the needed hardware-components, like the
Hirolink, the various interface-cards, the cable connections and so on.
7.1 Hirolink
As mentioned before, there are two different layouts of the Hirolink-front-panel as shown in the
following illustrations:
Previous layout of Hirolink-front-panel:
bms 2/bms 3
bms 1
hironet
hirovisor/modem
hirolink
hirobus
Current layout of Hirolink-front-panel:
connector 1
connector 2
connector 3
connector 4
hirolink
hirobus
Layout of Hirolink-back-panel:
line
on / off
supply
Connect Hirolink-Power-Supply
Code-No: 275 910
analog 0...10V / digital
digital
1 2 3 4 5 6 7 8 0 1 2 3 4 5 6 7 8 0
Hirolink: Code-No: 275 140
Size: 157 x 62 x 260 mm (w x h x d)
Supply voltage: 10 - 20 V AC or DC
Document: Hirolink for Satchwell.DOC
- 45 -
Release 1.07
Hirolink for Satchwell V 2.70 - General Documentation
7.2 Hirolink-Interface-Card-Sockets
The Hirolink provides 4 different sockets to insert interface-cards. The interface-card provides
the connection between the connector on the outside of the Hirolink and the internal hardware.
The following illustration shows which socket connects to which connector on the outside of the
Hirolink. This connection-scheme is valid for both layouts of the Hirolink front-panel:
Connector 3
Hirolink
Front
Hirolink
Back
Connector 1
Connector 4
16C552
80C552
Connector 2
connector 1
connector 2
connector 3
connector 4
hirolink
hirobus
Document: Hirolink for Satchwell.DOC
- 46 -
Release 1.07
Hirolink for Satchwell V 2.70 - General Documentation
7.3 Hirolink-Interface-Cards
7.3.1 RS422/485-Interface-Card
PC9
D10
PC9
D10
Code No. 275 700
Inserting a RS422/485-interface-card into one of the sockets in the Hirolink results in the following
pinning on the corresponding connector:
Pin 1:
TX-
Pin 2:
TX+
Pin 3:
RX+
Pin 4:
RX+
Pin 5:
NC
Hirolink-connector
(front view, male)
Pin 6:
NC
Pin 7:
NC
Pin 8:
NC
Pin 9:
NC
7.3.2 RS232-Interface-Card
MAX222
MAX222
Code No. 275 701
Inserting a RS232-interface-card into one of the sockets in the Hirolink results in the following
pinning on the corresponding connector:
Pin 1:
NC
Pin 2:
RXD
Pin 3:
TXD
Pin 4:
NC
Pin 5:
GND
Hirolink-connector
(front view, male)
Pin 6:
NC
Pin 7:
RTS
Pin 8:
CTS
Document: Hirolink for Satchwell.DOC
Pin 9:
NC
- 47 -
Release 1.07
Hirolink for Satchwell V 2.70 - General Documentation
7.4 Hiromatic-Interface-Cards
7.4.1 Standard-RS422-Interface-Card
Code No. 482 992
Connector-pinning:
Pin 1:
RX-
Pin 2:
RX+
Pin 3:
TX-
Pin 4:
TX+
Pin 5:
NC
Hiromatic-connector
(front view, female)
Pin 6:
NC
Pin 7:
NC
Pin 8:
NC
Pin 9:
NC
7.4.2 Optocoupled-RS422-Interface-Card
Code No. 275 631
Connector-pinning:
Hiromatic-connector
(front view, female)
Pin 1:
RX-
Pin 2:
RX+
Pin 3:
TX-
Pin 4:
TX+
Document: Hirolink for Satchwell.DOC
- 48 -
Release 1.07
Hirolink for Satchwell V 2.70 - General Documentation
7.5 Connection between Hirolink and Hiromatics
7.5.1 RS422-Connection
RS422-connection using ‘Standard RS422-interface-cards’:
1 2 3 4
Hirolink-connector
(front view, male)
1 TX2 TX+
3 RX+
4 RX-
1 2 3 4
1 2 3 4
Hiromatic-connector
Standard RS422interface-card
(front view, female)
Hiromatic-connector
Standard RS422interface-card
(front view, female)
1 RX2 RX+
3 TX4 TX+
1 RX2 RX+
3 TX4 TX+
RS422-connection using ‘Opto-coupled RS422-interface-cards’:
1 2 3 4
Hiromatic-connector
Opto-coupled RS422interface-card
(front view, female)
Hirolink-connector
(front view, male)
1 TX2 TX+
3 RX+
4 RX-
Document: Hirolink for Satchwell.DOC
1 RX2 RX+
3 TX4 TX+
- 49 -
1 RX2 RX+
3 TX4 TX+
Release 1.07
Hirolink for Satchwell V 2.70 - General Documentation
7.5.2 RS485-Connection
RS485-connection using ‘Standard RS422-interface-cards’:
1 2 3 4
Hirolink-connector
(front view, male)
1 2 3 4
1 2 3 4
Hiromatic-connector
Standard RS422interface-card
(front view, female)
Hiromatic-connector
Standard RS422interface-card
(front view, female)
1/4 TX/RX-
1/3 TX/RX-
1/3 TX/RX-
2/3 TX/RX+
2/4 TX/RX+
2/4 TX/RX+
RS485-connection using ‘Opto-coupled RS422-interface-cards’:
1 2 3 4
Hiromatic-connector
Opto-coupled RS422interface-card
(front view, female)
Hirolink-connector
(front view, male)
1/4 TX/RX-
1/3 TX/RX-
1/3 TX/RX-
2/3 TX/RX+
2/4 TX/RX+
2/4 TX/RX+
Document: Hirolink for Satchwell.DOC
- 50 -
Release 1.07
Hirolink for Satchwell V 2.70 - General Documentation
7.6 Standard PC-COM-Port-Pinning
7.6.1 Standard 9-pin RS232-COM-Port
Pin 1:
CD
Pin 2:
RXD
Pin 3:
TXD
Pin 4:
DTR
Pin 5:
GND
PC-connector
(front view, male)
Pin 6:
DSR
Pin 7:
RTS
Pin 8:
CTS
Pin 9:
RI
7.6.2 Standard 25-pin RS232-COM-Port
The following illustration names only those pins that are commonly used. The use of most of the
pins named NC (Not connected) has been defined by the EIA, but they are usually not used:
Pin 1: Pin 2: Pin 3: Pin 4: Pin 5: Pin 6: Pin 7: Pin 8: Pin 9: Pin 10: Pin 11: Pin 12: Pin 13:
NC
NC
NC
NC
NC
TXD RXD RTS
CTS DSR GND CD
NC
PC-connector
(front view, male)
Pin 14: Pin 15: Pin 16: Pin 17: Pin 18: Pin 19: Pin 20: Pin 21: Pin 22: Pin 23: Pin 24: Pin 25:
NC
NC
NC
NC
Document: Hirolink for Satchwell.DOC
NC
NC
- 51 -
DTR
NC
RI
NC
NC
NC
Release 1.07
Hirolink for Satchwell V 2.70 - General Documentation
Hiromatic--Types
Appendix A: Hiromatic
This appendix lists all Hiromatic-types and defines which controllers they work with, if they can
work in a network and if so, the maximum number of controllers that can work together. The
column ‘Table Number’ holds the table-number under which the data-points of this Hiromatic-type
can be accessed:
HiromaticHiromatic-Type
Controller
NetworkingNetworkingSystem
Maximum
number
of controllers
TableTable-Number
CAM
Superchiller/Hichill
Advanced Graphic
Compact Graphic
Hiwall
Hiflex
Superchiller 2000
Macroface
Macroface
Macroface
Modules
Microface
Microface
Microface
YES
YES
NO
NO
YES
YES
YES
16
8
16
16
16
47
45
41
40
48
46
49
Document: Hirolink for Satchwell.DOC
- 52 -
Release 1.07
Hirolink for Satchwell V 2.70 - General Documentation
Compatibility--List
Appendix B: Compatibility
This appendix lists all Hiromatic-types and their software-versions to which this software is
compatible.
This column ‘EPROM-Label’ lists the abbreviations that are used for the various Hiromatictypes. The eproms that are inserted in the Hiromatic and Macroface or Microface (depending
on your type of air-conditioner) must be labeled accordingly.
For example the eproms in a CAM-unit should be labeled GIC264 and MIC264, if the softwareversion is 2.64.
EPROMEPROM-Label
Version
Date
CAM
HiromaticHiromatic-Type
GIC + MIC
2.60
2.61
2.62
2.63
2.64
09/05/1997
16/07/1997
16/08/1997
16/10/1997
31/10/1997
Superchiller/Hichill
GSB + MSB
or
GSH + MSH
2.50
2.51
2.52
2.55
2.56
2.57
2.58
10/08/1995
21/10/1995
20/11/1995
21/03/1996
25/06/1996
18/02/1997
07/03/1997
Advanced Graphic
GTF + MTF
2.60
2.61
2.62
01/04/1996
25/06/1996
28/10/1996
Compact Graphic
GWX
2.60
2.60E
2.61
2.61E
2.62
2.62PC
01/04/1996
12/06/1996
25/06/1996
25/06/1996
25/11/1996
06/12/1996
Hiwall
HWG + HWM
1.21
09/09/1997
Hiflex
WXG + WXM
1.39
1.41.002
1.42
1.51.03
1.51.04
1.51.09
1.51.10
1.51.11
1.60.XXX
1.01.007
27/05/1997
28/07/1997
07/19/1997
13/01/1998
13/01/1998
11/03/1998
01/04/1998
03/05/1998
Superchiller 2000
SCG + SCM
21/09/1999?
NOTE
The software-date on Hiromatic-types ‘Hiwall’, ‘Hiflex’ and ‘Superchiller 2000’ is displayed in
the format ‘mm/dd/yy’ on the Hiromatic itself and not in the format ‘dd/mm/yy’ as written in
the list above.
Document: Hirolink for Satchwell.DOC
- 53 -
Release 1.07
Hirolink for Satchwell V 2.70 - General Documentation
Software--Changes
Appendix C: Software
This appendix contains all changes that have been applied to this software up to the current
version:
1. Changes from V 2.60 to V 2.61
-
Unit-Type Hiflex 1.31 deleted
Unit-Type Hiflex 1.35 added
Various item-table updates
Alarm-mapping implemented
Service-Interface implemented
2. Changes from V 2.61 to V 2.62
-
Unit-Type CAM V 2.60+ implemented
3. Changes from V 2.62 to V 2.63
-
Unit-Type Hiwall V 1.21 implemented
Unit-Type Hiflex V 1.41 added
4. Changes from V 2.63 to V 2.64
-
Correction of the alarm-handling in combination with Kernel-applications (Hiflex, Hiwall).
Improvement of the communication with the Hiromatics.
The transmission of the data-points ‘Single Inlet Temperature MF 1-8’ of Hiromatic-type
‘Superchiller/Hichill’ was corrected.
5. Changes from V 2.64 to V 2.65
-
-
-
-
No checksum-check when only ACK or NAK is received:
The HL was calculating the checksum also when only a ACK or NAK (when more than 16
bytes are requested) was received although no checksum is transmitted. Therefore only the
first answer to a request for more than 16 bytes was correct.
Table ‘Serial Parameters’:
The table containing the ‘Serial Parameters’ was transmitted as WORD-values to be able to
transmit those values in the correct format (High-byte first). Therefore it was not possible to
request only 1 byte from that table. This behavior has been changed, so that single bytes can
be requested and the format is correct.
Requesting table-offsets that are not defined:
When requesting a table-offset which is not defined anymore, the HL returns 0, instead of a
random-value.
Extensions:
- Implementation of Hiflex V 1.52:
The current version of Hiflex has been implemented, but since this will not be the final
version it will not be documented at this time.
Document: Hirolink for Satchwell.DOC
- 54 -
Release 1.07
Hirolink for Satchwell V 2.70 - General Documentation
6. Changes from V 2.65 to V 2.66
-
Bug when building up a communication with a new unit:
The routine, which initializes internal variables when a new unit is found, didn’t switch off
the interrupts before changing the XDATA-access from I/O- to RAM-access. Thus the
application could crash when a SNP-transmission was received while the Hirolink was
initializing a new unit and XDATA-access was switched RAM-access.
The same mistake was also present at two locations in the service-interface-procedures.
7. Changes from V 2.66 to V 2.67
-
Implementation of Hiflex V 1.60.
8. Changes from V 2.67 to V 2.68
-
Implementation of Superchiller 2000 V 1.01.
9. Changes from V 2.68 to V 2.70
-
Implementation of Alarms into WXG and SCG
Document: Hirolink for Satchwell.DOC
- 55 -
Release 1.07
Hirolink for Satchwell V 2.70 - General Documentation
Document--Changes
Appendix D: Document
This appendix contains all changes that have been applied to this document up to the current
version:
1. Changes from V 1.00 to V 1.01
The following chapters were included or updated in this version of the document:
-
Chapter 1: Introduction (new)
Chapter 2: Overview (updated from chapter ‘Introduction’)
Chapter 3: Serial Communication Basics (new)
Chapter 4: The SNP-Protocol (updated from chapter ‘SNP-Protocol-Implementation’)
Chapter 5: Installation Procedure (new)
Chapter 6: Testing the Installation (new)
Chapter 7: Hardware Reference (updated from ‘Hardware Description’)
Appendix A: Hiromatic-Types
Appendix C: Section 4 ‘Changes from V 2.63 to V 2.64’
2. Changes from V 1.01 to V 1.02
The following chapters were included or updated in this version of the document:
-
Appendix B: ‘Compatibility-List’
Appendix C:5 ‘Changes from V 2.64 to V 2.65’
3. Changes from V 1.02 to V 1.03
The following chapters were included or updated in this version of the document:
-
Appendix C:6 ‘Changes from V 2.65 to V 2.66’
4. Changes from V 1.03 to V 1.04
The following chapters were included or updated in this version of the document:
-
Appendix B: ‘Compatibility-List’
Appendix C:7 ‘Changes from V 2.66 to V 2.67’
5. Changes from V 1.04 to V 1.05
The following chapters were included or updated in this version of the document:
-
Appendix A: ‘Hiromatic-Types’
Appendix B: ‘Compatibility-List’
Appendix C:8 ‘Changes from V 2.67 to V 2.68’
6. Changes from V 2.68 to V 2.70
-
Implementation of Alarms into WXG and SCG
Document: Hirolink for Satchwell.DOC
- 56 -
Release 1.07
Connectivity
The evolution
Hirolink for Satchwell
Items for CAMCAM-Units V 2.60+
Service Manual
English
Code 275498 Release 1.04E
Hirolink for Satchwell - Items for CAM-Units V 2.60+
CONTENTS
1.
INTRODUCTION ................................................................
................................................................................................
.......................................................................
....................................... 59
2.
COMPATIBILITYCOMPATIBILITY-LIST
LIST ................................................................
...............................................................................................
............................................................... 59
3.
ITEMS FOR HIROMATIC
HIROMATICIC-TYPE CAM ................................................................
......................................................................
...................................... 60
APPENDIX A: DOCUMENTDOCUMENT-CHANGES ................................................................
...........................................................................
........................................... 66
1.
2.
3.
4.
CHANGES FROM V 1.00 TO V 1.01..................................................................................66
CHANGES FROM V 1.01 TO V 1.02..................................................................................66
CHANGES FROM V 1.02 TO V 1.03..................................................................................66
CHANGES FROM V 1.03 TO V 1.04..................................................................................66
Document: Hirolink for Satchwell.DOC
- 58 -
Release 1.04 E
Hirolink for Satchwell - Items for CAM-Units V 2.60+
1. Introduction
This document contains a description of all data-points that are available via the ‘Hirolink for
Satchwell’ from this type of air-conditioner.
IMPORTANT:
It is vital to the correct integration of the Hirolink into a Modbus-network, that you have read and
understood the topics described in the document ‘Hirolink for Satchwell V X.XX - General
Documentation’ (X.XX is a placeholder for the current version of the Hirolink). So, if you haven’t
read this document until now, read it first.
2. CompatibilityCompatibility-List
Before connecting a Hiromatic to the Satchwell-Hirolink you must check, if the Hiromaticsoftware-version is compatible with this version of the Hirolink.
You can do this by checking the labels on the eproms, which are inserted into the Hiromatic and
the Macroface. The eprom inserted in the Hiromatic must be called GIC + Version-Number (e.g.
GIC260) and the one inserted in the Macroface must be called MIC + Version-Number (e.g.
MIC260).
To make sure that the label on the eproms is correct, you should also check the versioninformation, that the Hiromatic displays shortly after start-up. This information should look
similar to the following illustration:
Logo
INCAS CW
2.60 09/05/97
Software-Version
and
Software-Date
The important information in this window is only the software-version and the software-date.
Make sure that the software-version installed in your installation matches one of the compatible
versions listed below:
Version
Date
2.60
2.61
2.62
2.63
2.64
09/05/97
16/07/97
16/08/97
16/10/97
31/10/97
Document: Hirolink for Satchwell.DOC
- 59 -
Release 1.04 E
Hirolink for Satchwell - Items for CAM-Units V 2.60+
3. Items for HiromaticHiromatic-Type CAM
This Hirolink can be compatible with more than one version of this Hiromatic-type and it is
possible that there have been extensions in the number of available items from one version to
the next.
Therefore the column ‘SW-Version’ contained in the following lists provides information about
the availability of each item depending on the Hiromatic-software-version. For example a entry
like ‘2.60+’ means, that this item is available from Hiromatics with software-version 2.60 and
higher.
The following tables have been implemented according to the ‘DP574/DP576 IAC SERIES
SOFT CONTROLLERS SERIAL LINK AND PROTOCOL SPECIFICATIONS’.
Table 4 (Firmware Identifier):
The ‘Firmware Identifier’ for this unit-type is ‘CAM250’.
Table 69 (Time)
Table 71 (Group Addresses)
Table 73 (Unit Identifier):
The default value for the ‘Unit Identifier’ is ‘CAM250:D1’.
Table 74 (Serial Link Parameters):
This table is implemented as ‘Read Only’.
Document: Hirolink for Satchwell.DOC
- 60 -
Release 1.04 E
Hirolink for Satchwell - Items for CAM-Units V 2.60+
Table 47:
This table contains all available data-points provided by the CAM-Hiromatic-type according to
the following list.
This Hirolink can be compatible with more than one version of this Hiromatic-type and it is
possible that there have been extensions in the number of available items from one version to
the next.
Therefore the column ‘SW-Version’ contained in the following lists provides information about
the availability of each item depending on the Hiromatic-software-version. For example a entry
like ‘2.60+’ means, that this item is available from Hiromatics with software-version 2.60 and
higher.
Offset #
0
1 - 16
17 - 32
33 - 48
49 - 64
65 - 80
81 - 96
97 - 128
129 - 160
161
162, 163
164, 165
166, 167
Usage
System Commands (Command)
System Status (MF 1 - 16)
Alarm Status (MF 1 - 16)
Cooling Ramp (MF 1 - 16)
Heating Ramp (MF 1 - 16)
Digital Outputs 1 (MF 1 - 16)
Digital Outputs 2 (MF 1 - 16)
Average Room Temperature (MF 1 - 16)
Supply Air Temperature (MF 1 - 16)
MF-ID for xTU-Temperatures
xTU 1 Setpoint
xTU 1 Temperature 1
xTU 1 Temperature 2
Document: Hirolink for Satchwell.DOC
Type; Unit
Single bits; see description below
1 Byte; see description below
Single bits; see description below
1 Byte; [%]
1 Byte; [%]
Single bits; see description below
Single bits; see description below
EMC swapped integer; [1/10 °C]
EMC swapped integer; [1/10 °C]
1 Byte; see description below
EMC swapped integer; [1/10 °C]
EMC swapped integer; [1/10 °C]
EMC swapped integer; [1/10 °C]
- 61 -
SW-Version
2.60+
2.60+
2.60+
2.60+
2.60+
2.60+
2.60+
2.60+
2.60+
2.60+
2.60+
2.60+
2.60+
Release 1.04 E
Hirolink for Satchwell - Items for CAM-Units V 2.60+
The items ‘xTU Setpoint’, ‘xTU Temperature 1’ and ‘xTU Temperature 2’ are repeated for each
possible xTU (max. 31):
Offset 168 - 173: xTU 2
Offset 174 - 179: xTU 3
Offset 180 - 185: xTU 4
Offset 186 - 191: xTU 5
Offset 192 - 197: xTU 6
Offset 198 - 203: xTU 7
Offset 204 - 209: xTU 8
Offset 210 - 215: xTU 9
Offset 216 - 221: xTU 10
Offset 222 - 227: xTU 11
Offset 228 - 233: xTU 12
Offset 234 - 239: xTU 13
Offset 240 - 245: xTU 14
Offset 246 - 251: xTU 15
Offset 252 - 257: xTU 16
Offset 258 - 263: xTU 17
Offset 264 - 269: xTU 18
Offset 270 - 275: xTU 19
Offset 276 - 281: xTU 20
Offset 282 - 287: xTU 21
Offset 288 - 293: xTU 22
Offset 294 - 299: xTU 23
Offset 300 - 305: xTU 24
Offset 306 - 311: xTU 25
Offset 312 - 317: xTU 26
Offset 318 - 323: xTU 27
Offset 324 - 329: xTU 28
Offset 330 - 335: xTU 29
Offset 336 - 341: xTU 30
Offset 342 - 347: xTU 31
Offset #
348 - 363
364 - 395
Usage
Single System Commands (MF 1 - 16)
(Command)
Zone Setpoint (MF 1 - 16)
396 - 411
412 - 427
Room Humidity Setpoint (MF 1 - 16)
Humidifier Production Rate (MF 1 - 16)
428 - 443
444 - 459
460 - 475
476 - 491
492 - 523
524
525
526
527, 528
529, 530
531, 532
533, 534
535, 536
Fan Speed (MF 1 - 16)
xTUs Connected (MF 1 - 16)
xTUs Ignored Unit (MF 1 - 16)
xTU Setpoint Range (MF 1 - 16)
Supply Air Setpoint (MF 1 - 16)
RAM Error - Alarm
Master Controllerboard Error - Alarm
No Master Controllerboard - Alarm
Parameter Correction - (MF-Alarm)
El. Heaters Overheated - (MF-Alarm)
Loss of Airflow - (MF-Alarm)
Clogged Filters - (MF-Alarm)
Smoke/Fire Detection - (MF-Alarm)
Document: Hirolink for Satchwell.DOC
Type; Unit; Range
Single bits; see description below
SW-Version
2.60+
EMC swapped integer; [1/10 °C];
Depends on the ‘Zone Setpoint Range’
1 Byte; [%RH]; 35 - 75
1 Byte; 0 -> No, 1 -> 30%,
2 -> 40%, 3 -> 50%,
4 -> 60 %, 5 -> 70 %,
6 -> 80 %, 7 -> 90 %,
8 -> 100%
1 Byte; 0 -> Low, 1 -> Normal, 2 -> High
1 Byte; []; 0 - 31
1 Byte; []; 0 - 31
1 Byte; [K]; 0 - 10
EMC swapped integer; [1/10 °C]; 0 - 500
1 Byte; 0 -> Not Active, 1 -> Active
1 Byte; 0 -> Not Active, 1 -> Active
1 Byte; 0 -> Not Active, 1 -> Active
Single bits; see description below
Single bits; see description below
Single bits; see description below
Single bits; see description below
Single bits; see description below
- 62 -
Release 1.04 E
2.60+
2.60+
2.60+
2.60+
2.60+
2.60+
2.60+
2.60+
2.60+
2.60+
2.60+
2.60+
2.60+
2.60+
2.60+
2.60+
Hirolink for Satchwell - Items for CAM-Units V 2.60+
537, 538
539, 540
541, 542
543, 544
545, 546
547, 548
549, 550
551, 552
553, 554
555, 556
557, 558
559, 560
561, 562
563, 564
565, 566
567, 568
569, 570
571, 572
573, 574
575, 576
Water Leakage Detection - (MF-Alarm)
User Input #1 Triggered - (MF-Alarm)
User Input #2 Triggered - (MF-Alarm)
Humidifier Failure - (MF-Alarm)
Return Air Sensor Failure - (MF-Alarm)
Supply Air Sensor Failure - (MF-Alarm)
High Room Temperature - (MF-Alarm)
Low Room Temperature - (MF-Alarm)
High Room Humidity - (MF-Alarm)
Low Room Humidity - (MF-Alarm)
High Supply Air Temperature (MF-Alarm)
Low Supply Air Temperature (MF-Alarm)
Room Sensor Failure - (MF-Alarm)
Water Leakage Detection (Sensor 1 - 5) (MF-Alarm)
EEPROM-Error - (MF-Alarm)
Interface Board Error - (MF-Alarm)
Water Presence Sensor Failure (MF-Alarm)
Differential Pressure Sensor Failure (MF-Alarm)
Outdoor Temperature Sensor Failure(MF-Alarm)
Wrong Hardware - (MF-Alarm)
Single bits; see description below
Single bits; see description below
Single bits; see description below
Single bits; see description below
Single bits; see description below
Single bits; see description below
Single bits; see description below
Single bits; see description below
Single bits; see description below
Single bits; see description below
Single bits; see description below
2.60+
2.60+
2.60+
2.60+
2.60+
2.60+
2.60+
2.60+
2.60+
2.60+
2.60+
Single bits; see description below
2.60+
Single bits; see description below
Single bits; see description below
2.60+
2.60+
Single bits; see description below
Single bits; see description below
Single bits; see description below
2.60+
2.60+
2.60+
Single bits; see description below
2.60+
Single bits; see description below
2.60+
Single bits; see description below
2.60+
‘System Commands’ (Offset #0) and ‘Single System Commands’ (Offset #348 #363):
IMPORTANT:
See the document ‘Hirolink for Satchwell V X.XX’ for a detailed description on how to use
these commands.
The bits of the ‘System Commands’-item are used in the following way:
Bit #0: Set system off on all units
Bit #1: Set system on on all units
Bit #2: Not used
Bit #3: Not used
Bit #4: Set alarm-acknowledge
Bit #5: Set alarm-reset
Bit #6: Set standard-settings on all units
Bit #7: Not used
The bits of the ‘Single System Commands’-item are used in the following way:
Bit #0: Set system off on this unit
Bit #1: Set system on on this unit
Bit #2: Not used
Bit #3: Not used
Bit #4: Not used
Bit #5: Not used
Bit #6: Set standard-settings on this unit
Bit #7: Not used
Document: Hirolink for Satchwell.DOC
- 63 -
Release 1.04 E
Hirolink for Satchwell - Items for CAM-Units V 2.60+
‘System‘System-Status’ (Offset #1 - #16)
This item represents the current system-status of a single MF according to the following list:
0..System Off
1..System On
2..Manual
3..Unit Off
4..Unit On
5..Standby
‘Alarm‘Alarm-Status’ (Offset #17 - #32)
This item represents the current alarm-status of a single MF according to the following list:
Bit 0..Alarm Active
Bit 1..Warning Active
Bit 2..Acknowledge Active
Bit 3..Manual Drain Active
Bit 4..Standard Settings Active
Bit 5..Not used
Bit 6..Not used
Bit 7..Not used
‘Digital Outputs
Outputs 1’ (Offset #65 - #80)
Bit 0..Fan 1
Bit 1..Fan 2
Bit 2..Fan 3
Bit 3..Open CW-Valve
Bit 4..Close CW-Valve
Bit 5..Open HW-Valve
Bit 6..Close HW-Valve
Bit 7..Dehumidification
‘Digital Outputs 2’ (Offset #81 - #96)
Bit 0..Not used
Bit 1..Hot Water Heating
Bit 2..Electrical Heater 1
Bit 3..Electrical Heater 2
Bit 4..Humdifier Boiler
Bit 5..Humdifier Feed
Bit 6..Humdifier Drain
Bit 7..Not used
‘MF‘MF-ID for xTUxTU-Temperatures’ (Offset #161)
Since the xTU-Setpoint and - Temperatures can only be read from one MF at a time, this item
has to be set to the MF-ID from which the xTU-values should be read.
Document: Hirolink for Satchwell.DOC
- 64 -
Release 1.04 E
Hirolink for Satchwell - Items for CAM-Units V 2.60+
‘MF‘MF-Alarms’ (Offset #527 - #576):
These items represent the status of a certain alarm from all MFs, where each bit in represents the
alarm-state for one MF:
Bit #0..Alarm State for Unit #1
Bit #1..Alarm State for Unit #2
Bit #2..Alarm State for Unit #3
..
..
Bit #15..Alarm State for Unit #16
The same principle applies to all alarms that are reported from the Macrofaces.
‘User Input #1/#2 Triggered
Triggered - (MF(MF-Alarm)’ (Offset #539, 540 and Offset
#541, 542)
These items are a combination of the ‘User Input Triggered’-Warning and Alarm.
‘Humidifier Failure - (MF(MF-Alarm)’ (Offset #543, 544)
This item is a combination of the following alarms:
Humidifier Failure
Humidifier Short Circuit
Humidifier High Circuit
Humidifier Mains Failure
Humidifier No Water
Humidifier Cylinder Worn
‘Room Sensor Failure - (MF(MF-Alarm)’ (Offset #561, 562)
This item is a combination of the alarms ‘Room Sensor 1 - 4 Failure’.
‘Water Leakage Detection (Sensor 1 - 5) (MF(MF-Alarm)’ (Offset #569, 570)
This item is a combination of the alarms ‘Water Leakage Detection Sensor 1 - 5’.
Document: Hirolink for Satchwell.DOC
- 65 -
Release 1.04 E
Hirolink for Satchwell - Items for CAM-Units V 2.60+
Document--Changes
Appendix A: Document
This appendix contains all changes that have been applied to this document up to the current
version:
1. Changes from V 1.00 to V 1.01
The following chapters have been added to this version of this document:
-
Chapter 1: Introduction
The following chapters have been removed from this version of this document:
-
Chapter 2: Networking Systems (moved to the document ‘Hirolink for Satchwell, V X.XX)
2. Changes from V 1.01 to V 1.02
-
The Hirolink version-number was updated from V 2.65 to V 2.66.
3. Changes from V 1.02 to V 1.03
-
The Hirolink version-number was updated from V 2.66 to V 2.67.
4. Changes from V 1.03 to V 1.04
-
The Hirolink version-number was updated from V 2.67 to V 2.68.
Document: Hirolink for Satchwell.DOC
- 66 -
Release 1.04 E
Connectivity
The evolution
Hirolink for Satchwell
Items for Superchiller/HichillSuperchiller/Hichill-Units V 2.50+
Service Manual
English
Code 275498 Release 1.06
Hirolink for Satchwell - Items for Superchiller/Hichill-Units V 2.50+
CONTENTS
1.
INTRODUCTION ................................................................
................................................................................................
.......................................................................
....................................... 69
2.
COMPATIBILITYCOMPATIBILITY-LIST
LIST ................................................................
...............................................................................................
............................................................... 69
3.
ITEMS FOR HIROMATIC
HIROMATICIC-TYPE SUPERCHILLER/HICHILL
SUPERCHILLER/HICHILL ....................................
.................................... 70
APPENDIX A: DOCUMENTDOCUMENT-CHANGES ................................................................
...........................................................................
........................................... 78
1.
2.
3.
4.
CHANGES FROM V 1.00 TO V 1.01..................................................................................78
CHANGES FROM V 1.01 TO V 1.02..................................................................................78
CHANGES FROM V 1.02 TO V 1.03..................................................................................78
CHANGES FROM V 1.03 TO V 1.04..................................................................................78
Document: Hirolink for Satchwell.DOC
- 68 -
Release 1.06
Hirolink for Satchwell - Items for Superchiller/Hichill-Units V 2.50+
1. Introduction
This document contains a description of all data-points that are available via the ‘Hirolink for
Satchwell’ from this type of air-conditioner.
IMPORTANT:
It is vital to the correct integration of the Hirolink into a Modbus-network, that you have read and
understood the topics described in the document ‘Hirolink for Satchwell V X.XX - General
Documentation’ (X.XX is a placeholder for the current version of the Hirolink). So, if you haven’t
read this document until now, read it first.
2. CompatibilityCompatibility-List
Before connecting a Hiromatic to the Satchwell-Hirolink you must check, if the Hiromaticsoftware-version is compatible with this version of the Hirolink.
You can do this by checking the labels on the eproms, which are inserted into the Hiromatic and
the Macroface. The eprom inserted in the Hiromatic must be called GSH (or GSB) + VersionNumber (e.g. GSH256 or GSB256) and the one inserted in the Macroface must be called MSH
(or MSB) + Version-Number (e.g. MSH256 or MSB256).
To make sure that the label on the eproms is correct, you should also check the versioninformation, that the Hiromatic displays shortly after start-up. This information should look
similar to the following illustration:
Logo
SUPERCHILLER/HICHILL
2.56 25/06/96
Software-Version
and
Software-Date
The important information in this window is only the software-version and the software-date.
Make sure that the software-version installed in your installation matches one of the compatible
versions listed below:
Version
Date
2.50
2.51
2.52
2.55
2.56
2.57
2.58
10/08/95
21/10/95
20/11/95
21/03/96
25/06/96
18/02/97
07/03/97
Document: Hirolink for Satchwell.DOC
- 69 -
Release 1.06
Hirolink for Satchwell - Items for Superchiller/Hichill-Units V 2.50+
3. Items for HiromaticHiromatic-Type Superchiller/Hichill
This Hirolink can be compatible with more than one version of this Hiromatic-type and it is
possible that there have been extensions in the number of available items from one version to
the next.
Therefore the column ‘SW-Version’ contained in the following lists provides information about
the availability of each item depending on the Hiromatic-software-version. For example a entry
like ‘2.50+’ means, that this item is available from Hiromatics with software-version 2.50 and
higher.
The following tables have been implemented according to the ‘DP574/DP576 IAC SERIES
SOFT CONTROLLERS SERIAL LINK AND PROTOCOL SPECIFICATIONS’.
Table 4 (Firmware Identifier):
The ‘Firmware Identifier’ for this unit-type is ‘GSB250’.
Table 69 (Time)
Table 71 (Group Addresses)
Table 73 (Unit Identifier):
The default value for the ‘Unit Identifier’ is ‘GSB250:D1’.
Table 74 (Serial Link Parameters):
This table is implemented as ‘Read Only’.
Document: Hirolink for Satchwell.DOC
- 70 -
Release 1.06
Hirolink for Satchwell - Items for Superchiller/Hichill-Units V 2.50+
Table 45:
This table contains all available data-points provided by the Superchiller/Hichill-Hiromatic-type
according to the following list.
This Hirolink can be compatible with more than one version of this Hiromatic-type and it is
possible that there have been extensions in the number of available items from one version to
the next.
Therefore the column ‘SW-Version’ contained in the following lists provides information about
the availability of each item depending on the Hiromatic-software-version. For example a entry
like ‘2.50+’ means, that this item is available from Hiromatics with software-version 2.50 and
higher.
Offset #
0
1
2
3
4
5
6
7
8
9
10
11
12,13
14,15
16,17
18,19
20,21
22,23
24
25
26
27
28
29
30
31
32
33
34
35
36
37
38
39
40
41
42
43
44
Usage
System Commands
System Status
Single Status MF 1
Single Status MF 2
Single Status MF 3
Single Status MF 4
Single Status MF 5
Single Status MF 6
Single Status MF 7
Single Status MF 8
System Status 1
System Status 2
System Inlet Temperature
System Outlet Temperature
System Ambient Temperature
Current System Setpoint
Mixture Inlet Temperature At 100%
Mixture Inlet Temperature At 0%
Number Of Sub-Units
High Pressure Compressor 1 Warning/Alarm
High Pressure Compressor 2 Warning/Alarm
High Pressure Compressor 3 Warning/Alarm
High Pressure Compressor 4 Warning/Alarm
Low Pressure Compressor 1 Alarm
Low Pressure Compressor 2 Alarm
Low Pressure Compressor 3 Alarm
Low Pressure Compressor 4 Alarm
Motor Protection Compressor 1 Alarm
Motor Protection Compressor 2 Alarm
Oil Difference Pressure Compressor 1 Alarm
Oil Difference Pressure Compressor 1 Alarm
Fans Motor Protection 1 Alarm
Fans Motor Protection 2 Alarm
Fans Motor Protection 3 Alarm
Fans Motor Protection 4 Alarm
Mixture Flow Switch Alarm
Mixture Flow Switch Pump 1 Warning
Mixture Flow Switch Pump 2 Warning
User Input #1 Warning/Alarm
Document: Hirolink for Satchwell.DOC
- 71 -
Type; Unit
Single bits; see description below
1 Byte; see description below
1 Byte; see description below
1 Byte; see description below
1 Byte; see description below
1 Byte; see description below
1 Byte; see description below
1 Byte; see description below
1 Byte; see description below
1 Byte; see description below
Single bits; see description below
Single bits; see description below
EMC swapped integer; [1/10 °C]
EMC swapped integer; [1/10 °C]
EMC swapped integer; [1/10 °C]
EMC swapped integer; [1/10 °C]
EMC swapped integer; [1/10 °C];
-5.0 - 25.0 °C
EMC swapped integer; [1/10 °C];
-5.0 - 25.0 °C
1 Byte;
Single bits; see description below
Single bits; see description below
Single bits; see description below
Single bits; see description below
Single bits; see description below
Single bits; see description below
Single bits; see description below
Single bits; see description below
Single bits; see description below
Single bits; see description below
Single bits; see description below
Single bits; see description below
Single bits; see description below
Single bits; see description below
Single bits; see description below
Single bits; see description below
Single bits; see description below
Single bits; see description below
Single bits; see description below
Single bits; see description below
SW-Version
2.50+
2.50+
2.50+
2.50+
2.50+
2.50+
2.50+
2.50+
2.50+
2.50+
2.50+
2.50+
2.50+
2.50+
2.50+
2.50+
2.50+
2.50+
2.50+
2.50+
2.50+
2.50+
2.50+
2.50+
2.50+
2.50+
2.50+
2.50+
2.50+
2.50+
2.50+
2.50+
2.50+
2.50+
2.50+
2.50+
2.50+
2.50+
2.50+
Release 1.06
Hirolink for Satchwell - Items for Superchiller/Hichill-Units V 2.50+
45
46
47,48
49,50
51,52
53
54
55
56
57
58
59
User Input #2 Warning/Alarm
Single System Commands MF 1
Single Inlet Temperature MF 1
Single Outlet Temperature MF 1
Single Ambient Temperature MF 1
Single Status 1 MF 1
Single Status 2 MF 1
Single Status 3 MF 1
Digital Outputs Low MF 1
Digital Outputs High MF 1
Digital Inputs Low MF 1
Digital Inputs High MF 1
Single bits; see description below
Single bits; see description below
EMC swapped integer; [1/10 °C]
EMC swapped integer; [1/10 °C]
EMC swapped integer; [1/10 °C]
Single bits; see description below
Single bits; see description below
Single bits; see description below
Single bits; see description below
Single bits; see description below
Single bits; see description below
Single bits; see description below
2.50+
2.50+
2.50+
2.50+
2.50+
2.50+
2.50+
2.50+
2.50+
2.50+
2.50+
2.50+
The items from offset #46 to #59 are repeated for each possible MF in the system:
MF 2:
MF 3:
MF 4:
MF 5:
MF 6:
MF 7:
MF 8:
Offset # 60 -73
Offset # 74 - 87
Offset # 88 - 101
Offset # 102 - 115
Offset # 116 - 129
Offset # 130 - 143
Offset # 144 - 157
‘System Commands’ (Offset #0) and ‘Single System Commands’ (Offset #46
and following)
IMPORTANT:
See the document ‘Hirolink for Satchwell V X.XX’ for a detailed description on how to use
these commands.
The bits of the ‘System Commands’-item are used in the following way:
Bit #0: Set system off
Bit #1: Set system on
Bit #2: Not used
Bit #3: Not used
Bit #4: Set alarm-acknowledge
Bit #5: Set alarm-reset
Bit #6: Set standard-settings
Bit #7: Not used
The bits of the ‘Single System Commands’-item are used in the following way:
Bit #0: Set system off
Bit #1: Set system on
Bit #2 - #7: Not used
‘System Status’ (Offset #1) and ‘Single Status’ (Offset #2#2- #9)
These items hold a value, which represents the current state of the whole system (System-Status)
or the single Macrofaces (Single-Status) respectively.
NOTE:
Bit #7 doesn’t contain valid information and should be masked out, i.e. you either set bit #7 to 0
before checking the value or you subtract 128, when the value is higher equal or higher than
that.
The values correspond to the following states:
Document: Hirolink for Satchwell.DOC
- 72 -
Release 1.06
Hirolink for Satchwell - Items for Superchiller/Hichill-Units V 2.50+
1..System Off
2..System On
3..System On P1
4..System On P2
5..Remote Off
6..Remote On
7..Remote On P1
8..Remote On P2
9..Manual On
10..Manual On P1
11..Manual On P2
12..Maint
13..Alarm Off
14..Alarm On
15..Alarm On P1
16..Alarm On P2
17..Warning Off
18..Warning On
19..Warning On P1
20..Warning On P2
21..Stand By Off
22..Stand By On
23..Stand By On P1
24..Stand By On P2
25..Stand Alone Off
26..Stand Alone On
27..Stand Alone On P1
28..Stand Alone On P2
29..Antifreeze On
30..Antifreeze On P1
31..Anitfreeze On P2
32..Defect
‘System Status 1’ (Offset #10)
This item is used bit-wise according to the following list:
Bit #0: System On
Bit #1: Manual On
Bit #2: Not Used
Bit #3: System Remote Enable
Bit #4: Remote On
Bit #5: Freecooling On
Bit #6: Pumpdown After System Off
Bit #7: Antifreeze Operation
‘System Status 2’ (Offset #11)
This item is used bit-wise according to the following list:
Bit #0: Alarm Active
Bit #1: Warning Active
Bit #2: Not used
Bit #3: Alarm Acknowledged
Bit #4 - #7: Not Used
‘High Pressure Compressor 1 - 4 Warning/Alarm’ (Offset #25 - #28)
Document: Hirolink for Satchwell.DOC
- 73 -
Release 1.06
Hirolink for Satchwell - Items for Superchiller/Hichill-Units V 2.50+
This item represents the status of the ‘High Pressure Compressor 1 Alarm’ from all units, where
each bit represents the alarm-state for one MF:
Bit #0..High pressure compressor alarm state for unit #1
Bit #1..High pressure compressor alarm state for unit #2
Bit #2..High pressure compressor alarm state for unit #3
..
..
Bit #7..High pressure compressor alarm state for unit #8
The items for Compressor 3 and 4 are only available if the compressor-logic (available in the
‘SYSTEM CONFIGURATION (1)’-menu on the Service-Hiromatic) is switched to
‘FULLHERMETIC’.
‘Low Pressure Compressor 1 - 4 Alarm’ (Offset #29 - #32)
See the description for the ‘High Pressure Compressor 1 - 4 Warning/Alarm’-Item.
The items for Compressor 3 and 4 are only available if the compressor-logic (available in the
‘SYSTEM CONFIGURATION (1)’-menu on the Service-Hiromatic) is switched to
‘FULLHERMETIC’.
‘Motor Protection Compressor 1 - 2 Alarm’ (Offset #33 - #34)
See the description for the ‘High Pressure Compressor 1 - 4 Warning/Alarm’-Item.
These items are only available if the compressor-logic (available in the ‘SYSTEM
CONFIGURATION (1)’-menu on the Service-Hiromatic) is switched to ‘SEMIHERMETIC’.
‘Oil Difference Pressure Compressor 1 - 2 Alarm’ (Offset #35 - #36)
See the description for the ‘High Pressure Compressor 1 - 4 Warning/Alarm’-Item.
These items are only available if the compressor-logic (available in the ‘SYSTEM
CONFIGURATION (1)’-menu on the Service-Hiromatic) is switched to ‘SEMIHERMETIC’.
‘Fans Motor Protection 1 - 4 Alarm’ (Offset #37 - #40)
See the description for the ‘High Pressure Compressor 1 - 4 Warning/Alarm’-Item.
‘Mixture Flow Switch Alarm’ (Offset #41)
See the description for the ‘High Pressure Compressor 1 - 4 Warning/Alarm’-Item.
‘Mixture Flow Switch Pump 1 Warning’ (Offset #42)
See the description for the ‘High Pressure Compressor 1 - 4 Warning/Alarm’-Item.
‘Mixture Flow Switch Pump 2 Warning’ (Offset #43)
See the description for the ‘High Pressure Compressor 1 - 4 Warning/Alarm’-Item.
‘User Input #1 Warning/Alarm’ (Offset #44)
See the description for the ‘High Pressure Compressor 1 - 4 Warning/Alarm’-Item.
‘User Input #2 Warning/Alarm’ (Offset #45)
Document: Hirolink for Satchwell.DOC
- 74 -
Release 1.06
Hirolink for Satchwell - Items for Superchiller/Hichill-Units V 2.50+
See the description for the ‘High Pressure Compressor 1 - 4 Warning/Alarm’-Item.
This item is only available if the compressor-logic (available in the ‘SYSTEM
CONFIGURATION (1)’-menu on the Service-Hiromatic) is switched to ‘SEMIHERMETIC’.
‘Single Status 1’ (Offset #53 and following)
This item is used bit-wise according to the following list:
Bit #0: System On
Bit #1: Manual On
Bit #2: Stand By
Bit #3: Single Remote Enable
Bit #4: Remote On
Bit #5: Freecooling On
Bit #6: Alarm System Off
Bit #7: Alarm Off
‘Single Status 2’ (Offset #54 and following)
This item is used bit-wise according to the following list:
Bit #0: Alarm Active
Bit #1: Warning Active
Bit #2: Stand Alone
Bit #3: Defect
Bit #4: Pump 1 Active
Bit #5: 0 -> Semihermetic / 1 -> Fullhermetic
Bit #6: Pump s Active
Bit #7: Maintenance
‘Single Status 3’ (Offset #55 and following)
This item is used bit-wise according to the following list:
Bit #0: Pumpdown After System Off
Bit #1: Antifreeze Operation
Bit #2 - #7: Not used
‘Digital Outputs Low’ (Offset #56 and following)
The contents of this item depends on the selected compressor-logic (available in the ‘SYSTEM
CONFIGURATION (1)’-menu on the Service-Hiromatic):
Fullhermetic:
Semihermetic
Bit #0: Pump 1
Bit #1: Pump 2
Bit #2: Fan Speed 1
Bit #3: Fan Speed 2
Bit #4: Fan Speed 3
Bit #5: Fan Speed 4
Bit #6: Freecooling Valve
Bit #7: Compressor 1
Bit #0: Pump 1
Bit #1: Pump 2
Bit #2: Fan Speed 1
Bit #3: Fan Speed 2
Bit #4: Fan Speed 3
Bit #5: Fan Speed 4
Bit #6: Freecooling Valve
Bit #7: Compressor 1 Power Valve 1
‘Digital Outputs High’ (Offset #57 and following)
Document: Hirolink for Satchwell.DOC
- 75 -
Release 1.06
Hirolink for Satchwell - Items for Superchiller/Hichill-Units V 2.50+
The contents of this item depends on the selected compressor-logic (available in the ‘SYSTEM
CONFIGURATION (1)’-menu on the Service-Hiromatic):
Fullhermetic:
Bit #0: Compressor 2
Bit #1: Compressor 3
Bit #2: Compressor 4
Bit #3: Pumpdown Compressor 1
Bit #4: Pumpdown Compressor 2
Bit #5: Pumpdown Compressor 3
Bit #6: Pumpdown Compressor 4
Bit #7: Not used
Semihermetic:
Bit #0: Compressor 1 Power Valve 2
Bit #1: Compressor 1
Bit #2: Compressor 2 Power Valve 1
Bit #3: Compressor 2 Power Valve 2
Bit #4: Compressor 2
Bit #5: Pumpdown Compressor 1
Bit #6: Pumpdown Compressor 2
Bit #7: Not used
‘Digital Outputs Low’ (Offset #58 and following)
The contents of this item depends on the selected compressor-logic (available in the ‘SYSTEM
CONFIGURATION (1)’-menu on the Service-Hiromatic):
Fullhermetic:
Semihermetic:
Bit #0: Remote
Bit #1: High Pressure Compressor 1
Bit #2: Low Pressure Compressor 1
Bit #3: High Pressure Compressor 2
Bit #4: Low Pressure Compressor 2
Bit #5: High Pressure Compressor 3
Bit #6: Low Pressure Compressor 3
Bit #7: High Pressure Compressor 4
Bit #0: Remote
Bit #1: High Pressure Compressor 1
Bit #2: Low Pressure Compressor 1
Bit #3: Oil Pressure Compressor 1
Bit #4: Motor Protection Compressor 1
Bit #5: High Pressure Compressor 2
Bit #6: Low Pressure Compressor 2
Bit #7: Oil Pressure Compressor 2
Document: Hirolink for Satchwell.DOC
- 76 -
Release 1.06
Hirolink for Satchwell - Items for Superchiller/Hichill-Units V 2.50+
‘Digital Inputs High’ (Offset #59 and following)
The contents of this item depends on the selected compressor-logic (available in the ‘SYSTEM
CONFIGURATION (1)’-menu on the Service-Hiromatic):
Fullhermetic:
Semihermetic:
Bit #0: Low Pressure Compressor 4
Bit #1: Fans Motor Protection 1
Bit #2: Fans Motor Protection 2
Bit #3: Fans Motor Protection 3
Bit #4: Fans Motor Protection 4
Bit #5: User Input #1
Bit #6: Second Setpoint
Bit #7: Flow Status
Bit #0: Motor Protection Compressor 2
Bit #1: Antifreeze Thermostat
Bit #2: Fans Motor Protection 1
Bit #3: Fans Motor Protection 2
Bit #4: User Input #1
Bit #5: User Input #2
Bit #6: Second Setpoint
Bit #7: Flow Status
Document: Hirolink for Satchwell.DOC
- 77 -
Release 1.06
Hirolink for Satchwell - Items for Superchiller/Hichill-Units V 2.50+
Document--Changes
Appendix A: Document
This appendix contains all changes that have been applied to this document up to the current
version:
1. Changes from V 1.00 to V 1.01
The following chapters have been added to this version of this document:
-
Chapter 1: Introduction
The following chapters have been removed from this version of this document:
-
Chapter 2: Networking Systems (moved to the document ‘Hirolink for Satchwell, V X.XX)
2. Changes from V 1.01 to V 1.02
-
The Hirolink version-number was updated from V 2.65 to V 2.66.
3. Changes from V 1.02 to V 1.03
-
The Hirolink version-number was updated from V 2.66 to V 2.67.
4. Changes from V 1.03 to V 1.04
-
The Hirolink version-number was updated from V 2.67 to V 2.68.
Document: Hirolink for Satchwell.DOC
- 78 -
Release 1.06
Connectivity
The evolution
Hirolink for Satchwell
Items for Advanced GraphicGraphic-Units V 2.60+
Service Manual
English
Code 275498 Release 1.06
Hirolink for Satchwell - Items for Advanced Graphic-Units V 2.60+
CONTENTS
1.
INTRODUCTION ................................................................
................................................................................................
.......................................................................
....................................... 81
2.
COMPATIBILITYCOMPATIBILITY-LIST
LIST ................................................................
...............................................................................................
............................................................... 81
3.
ITEMS FOR HIROMATIC
HIROMATICIC-TYPE ADVANCED GRAPHIC
GRAPHIC .........................................
......................................... 82
APPENDIX
APPENDIX A: DOCUMENTDOCUMENT-CHANGES
CHANGES ................................................................
...........................................................................
........................................... 87
1.
2.
3.
4.
CHANGES FROM V 1.00 TO V 1.01..................................................................................87
CHANGES FROM V 1.01 TO V 1.02..................................................................................87
CHANGES FROM V 1.02 TO V 1.03..................................................................................87
CHANGES FROM V 1.03 TO V 1.04..................................................................................87
Document: Hirolink for Satchwell.DOC
- 80 -
Release 1.04 E
Hirolink for Satchwell - Items for Advanced Graphic-Units V 2.60+
1. Introduction
This document contains a description of all data-points that are available via the ‘Hirolink for
Satchwell’ from this type of air-conditioner.
IMPORTANT:
It is vital to the correct integration of the Hirolink into a Modbus-network, that you have read and
understood the topics described in the document ‘Hirolink for Satchwell V X.XX - General
Documentation’ (X.XX is a placeholder for the current version of the Hirolink). So, if you haven’t
read this document until now, read it first.
2. CompatibilityCompatibility-List
Before connecting a Hiromatic to the Satchwell-Hirolink you must check, if the Hiromaticsoftware-version is compatible with this version of the Hirolink.
You can do this by checking the labels on the eproms, which are inserted into the Hiromatic and
the Macroface. The eprom inserted in the Hiromatic must be called GTF + Version-Number
(e.g. GTF262) and the one inserted in the Microface must be called MTF + Version-Number
(e.g. MTF262).
To make sure that the label on the eproms is correct, you should also check the versioninformation, that the Hiromatic displays shortly after start-up. This information should look
similar to the following illustration:
Logo
HIROMATIC ADVANCED
DIRECT EXP.
2.62 28/10/96
Software-Version
and
Software-Date
The important information in this window is only the software-version and the software-date.
Make sure that the software-version installed in your installation matches one of the compatible
versions listed below:
Version
Date
2.60
2.61
2.62
01/04/1996
25/06/1996
28/10/1996
Document: Hirolink for Satchwell.DOC
- 81 -
Release 1.04 E
Hirolink for Satchwell - Items for Advanced Graphic-Units V 2.60+
3. Items for HiromaticHiromatic-Type Advanced Graphic
This Hirolink can be compatible with more than one version of this Hiromatic-type and it is
possible that there have been extensions in the number of available items from one version to
the next.
Therefore the column ‘SW-Version’ contained in the following lists provides information about
the availability of each item depending on the Hiromatic-software-version. For example a entry
like ‘2.60+’ means, that this item is available from Hiromatics with software-version 2.60 and
higher.
The following tables have been implemented according to the ‘DP574/DP576 IAC SERIES
SOFT CONTROLLERS SERIAL LINK AND PROTOCOL SPECIFICATIONS’.
Table 4 (Firmware Identifier):
The ‘Firmware Identifier’ for this unit-type is ‘GTF250’.
Table 69 (Time)
Table 71 (Group Addresses)
Table 73 (Unit Identifier):
The default value for the ‘Unit Identifier’ is ‘GTF250:D1’.
Table 74 (Serial Link Parameters):
This table is implemented as ‘Read Only’.
Document: Hirolink for Satchwell.DOC
- 82 -
Release 1.04 E
Hirolink for Satchwell - Items for Advanced Graphic-Units V 2.60+
Table 41:
This table contains all available data-points provided by the Advanced Graphic-Hiromatic-type
according to the following list.
This Hirolink can be compatible with more than one version of this Hiromatic-type and it is
possible that there have been extensions in the number of available items from one version to
the next.
Therefore the column ‘SW-Version’ contained in the following lists provides information about
the availability of each item depending on the Hiromatic-software-version. For example a entry
like ‘2.60+’ means, that this item is available from Hiromatics with software-version 2.60 and
higher.
Offset #
0
1
2
3
4
5,6
7,8
Usage
System commands
System status
Alarm status
Digital Outputs Low
Digital Outputs High
Room Temperature
Room Temperature Setpoint
9,10
11,12
Room Humidity
Room Humidity Setpoint
13,14
15,16
17,18
19,20
21
22
23
24
25
26
27
28
29
30
31
32
Hirosensor 1,1
Hirosensor 1,2
Hirosensor 2,1
Hirosensor 2,2
High Pressure Compressor 1
Low Pressure Compressor 1
El. Protection Compressor 1
High Pressure Compressor 2
Low Pressure Compressor 2
El. Protection Compressor 2
Loss Of Airflow Warning/Alarm
Clogged Filters
Heaters Overheated
Smoke/Fire Alarm
Water Leakage Detected
Humidifier Alarms
33
34
User Input #1 Warning/Alarm
User Input #2 Warning/Alarm
Document: Hirolink for Satchwell.DOC
Type; Unit
Single bits; see description below
1 Byte; see description below
Single bits; see description below
Single bits; see description below
Single bits; see description below
EMC swapped integer; [1/10 °C]
EMC swapped integer; [1/10 °C];
17.5 - 30.0 °C
EMC swapped integer; [1/10 %RH];
EMC swapped integer; [1/10 %RH];
35.0 - 75.0 %RH
EMC swapped integer; [1/10 °C]
EMC swapped integer; [1/10 °C]
EMC swapped integer; [1/10 °C]
EMC swapped integer; [1/10 °C]
1 Byte; 0 -> inactive, 1 -> active
1 Byte; 0 -> inactive, 1 -> active
1 Byte; 0 -> inactive, 1 -> active
1 Byte; 0 -> inactive, 1 -> active
1 Byte; 0 -> inactive, 1 -> active
1 Byte; 0 -> inactive, 1 -> active
1 Byte; 0 -> inactive, 1 -> active
1 Byte; 0 -> inactive, 1 -> active
1 Byte; 0 -> inactive, 1 -> active
1 Byte; 0 -> inactive, 1 -> active
1 Byte; 0 -> inactive, 1 -> active
1 Byte; 0 -> inactive, 1 -> active;
See description below
1 Byte; 0 -> inactive, 1 -> active
1 Byte; 0 -> inactive, 1 -> active
- 83 -
SW-Version
2.60+
2.60+
2.60+
2.60+
2.60+
2.60+
2.60+
2.60+
2.60+
2.60+
2.60+
2.60+
2.60+
2.60+
2.60+
2.60+
2.60+
2.60+
2.60+
2.60+
2.60+
2.60+
2.60+
2.60+
2.60+
2.60+
2.60+
Release 1.04 E
Hirolink for Satchwell - Items for Advanced Graphic-Units V 2.60+
‘System Commands’ (Offset #0)
IMPORTANT:
See the document ‘Hirolink for Satchwell V X.XX’ for a detailed description on how to use
these commands.
The bits of this item are used in the following way:
Bit #0: Set system off
Bit #1: Set system on
Bit #2: Set manual on
Bit #3: Set manual drain
Bit #4: Set alarm-acknowledge
Bit #5: Set alarm-reset
Bit #6: Set standard-settings
Bit #7: Not used
‘System Status’ (Offset #1)
The value of this item represents the current unit-status according to the following list:
0..System off
1..System on
2..Manual on
3..Remote off
4..Remote on
5..Sleep mode on
‘Alarm Status’
(Offset #2)
This item is used bit-wise according to the following list:
Bit #0: Alarm active
Bit #1: Warning active
Bit #2: Alarm-acknowledge active
Bit #3: Manual-drain active
Bit #4: Standard-settings active
Bit #5 - #7: Not used
‘Digital Outputs Low’ (Offset #3)
The contents of this item depends on the selected cooling-configuration (available in the
‘OPTIONAL DEVICES’-menu on the Hiromatic):
Cooling Configurations:
DIRECT EXPANSION (displayed as ‘DIRECT EXP.’)
DIRECT EXPANSION ALARM (displayed as ‘DE + AL.’):
Bit #0: Fans
Bit #1: Dehumidifier
Bit #2: Compressor 1
Bit #3: 2nd Speed Compressor 1
Bit #4: Pumpdown Compressor 1
Bit #5: Compressor 2
Bit #6: 2nd Speed Compressor 2
Bit #7: Pumpdown Compressor 2
Cooling Configurations:
DUALFLUID (displayed as ‘DUALFLUID’)
Document: Hirolink for Satchwell.DOC
- 84 -
Release 1.04 E
Hirolink for Satchwell - Items for Advanced Graphic-Units V 2.60+
DUALFLUID ALARM (displayed as ‘DF + AL.’):
Bit #0: Fans
Bit #1: Dehumidifier
Bit #2: Compressor 1
Bit #3: Pumpdown Compressor 1
Bit #4: Open Valve 1
Bit #5: Compressor 2
Bit #6: Pumpdown Compressor 2
Bit #7: Close Valve 1
Cooling Configurations:
FREECOOLING (displayed as ‘FREECOOL.’)
FREECOOLING ALARM (displayed as ‘FC + AL.’):
Bit #0: Fans
Bit #1: Dehumidifier
Bit #2: Compressor 1
Bit #3: Open Valve 1
Bit #4: Close Valve 1
Bit #5: Compressor 2
Bit #6: Open Valve 2
Bit #7: Close Valve 2
Cooling Configurations:
CHILLED WATER (displayed as ‘CHILLED W.’)
CHILLED WATER ALARM (displayed as ‘CW + AL.’)
CHILLED WATER + SUPER SAVER (displayed as ‘CW + SS’)
CHILLED WATER + SUPER SAVER ALARM
(displayed as ‘SUPS + AL.’):
Bit #0: Fans
Bit #1: Dehumidifier
Bit #2: Open Valve 1
Bit #3: Close Valve 1
Bit #4: ON over 5% Valve-Position, OFF at 0% Valve-Position
Bit #5: ON over 35% Valve-Position, OFF under 30% Valve-Position
Bit #6: ON over 65% Valve-Position, OFF under 60% Valve-Position
Bit #7: ON over 95% Valve-Position, OFF under 90% Valve-Position
‘Digital Outputs High’ (Offset #4)
This item is used bit-wise according to the following list:
Bit #0: Freecooling
Bit #1: Electrical Heater 1
Bit #2: Electrical Heater 2
Bit #3: Electrical Heater 3
Bit #4: Humidifier Boiler
Bit #5: Humidifier Feed
Bit #6: Humidifier Drain
Bit #7: Warning Output (Reversed)
‘Humidifier Alarms’ (Offset #32)
This item is a combination of the following Hiromatic-alarms:
Humidifier Failure
Humidifier Short Circuit
Humidifier High Current
Document: Hirolink for Satchwell.DOC
- 85 -
Release 1.04 E
Hirolink for Satchwell - Items for Advanced Graphic-Units V 2.60+
Humidifier Mains Failure
Humidifier Without Water
Humidifier Cylinder Warning
Document: Hirolink for Satchwell.DOC
- 86 -
Release 1.04 E
Hirolink for Satchwell - Items for Advanced Graphic-Units V 2.60+
Document--Changes
Appendix A: Document
This appendix contains all changes that have been applied to this document up to the current
version:
1. Changes from V 1.00 to V 1.01
The following chapters have been added to this version of this document:
-
Chapter 1: Introduction
2. Changes from V 1.01 to V 1.02
-
The Hirolink version-number was updated from V 2.65 to V 2.66.
3. Changes from V 1.02 to V 1.03
-
The Hirolink version-number was updated from V 2.66 to V 2.67.
4. Changes from V 1.03 to V 1.04
-
The Hirolink version-number was updated from V 2.67 to V 2.68.
Document: Hirolink for Satchwell.DOC
- 87 -
Release 1.04 E
Connectivity
The evolution
Hirolink for Satchwell
Items for Compact GraphicGraphic-Units V 2.60+
Service Manual
English
Code 275498 Release 1.04E
Hirolink for Satchwell - Items for Compact Graphic-Units V 2.60+
CONTENTS
1.
INTRODUCTION ................................................................
................................................................................................
.......................................................................
....................................... 90
2.
COMPATIBILITYCOMPATIBILITY-LIST
LIST ................................................................
...............................................................................................
............................................................... 90
3.
ITEMS FOR HIROMATIC
HIROMATICIC-TYPE COMPACT GRAPHIC
GRAPHIC ...........................................
........................................... 91
APPENDIX A: DOCUMENTDOCUMENT-CHANGES ................................................................
...........................................................................
........................................... 95
1.
2.
3.
4.
CHANGES FROM V 1.00 TO V 1.01..................................................................................95
CHANGES FROM V 1.01 TO V 1.02..................................................................................95
CHANGES FROM V 1.02 TO V 1.03..................................................................................95
CHANGES FROM V 1.03 TO V 1.04..................................................................................95
Document: Hirolink for Satchwell.DOC
- 89 -
Release 1.04 E
Hirolink for Satchwell - Items for Compact Graphic-Units V 2.60+
1. Introduction
This document contains a description of all data-points that are available via the ‘Hirolink for
Satchwell’ from this type of air-conditioner.
IMPORTANT:
It is vital to the correct integration of the Hirolink into a Modbus-network, that you have read and
understood the topics described in the document ‘Hirolink for Satchwell V X.XX - General
Documentation’ (X.XX is a placeholder for the current version of the Hirolink). So, if you haven’t
read this document until now, read it first.
2. CompatibilityCompatibility-List
Before connecting a Hiromatic to the Modbus-Hirolink you must check, if the Hiromaticsoftware-version is compatible with this version of the Hirolink.
You can do this by checking the labels on the eprom, which is inserted into the Hiromatic. This
eprom must be called GWX + Version-Number (e.g. GWX262).
To make sure that the label on the eproms is correct, you should also check the versioninformation, that the Hiromatic displays shortly after start-up. This information should look
similar to the following illustration:
Logo
HIROMATIC COMPACT
DIRECT EXP.
2.62 15/11/96
Software-Version
and
Software-Date
The important information in this window is only the software-version and the software-date.
Make sure that the software-version installed in your installation matches one of the compatible
versions listed below:
Version
Date
2.60
2.60E
2.61
2.61E
2.62
2.62PC
01/04/1996
12/06/1996
25/06/1996
25/06/1996
25/11/1996
06/12/1996
Document: Hirolink for Satchwell.DOC
- 90 -
Release 1.04 E
Hirolink for Satchwell - Items for Compact Graphic-Units V 2.60+
3. Items for HiromaticHiromatic-Type Compact Graphic
This Hirolink can be compatible with more than one version of this Hiromatic-type and it is
possible that there have been extensions in the number of available items from one version to
the next.
Therefore the column ‘SW-Version’ contained in the following lists provides information about
the availability of each item depending on the Hiromatic-software-version. For example a entry
like ‘2.60+’ means, that this item is available from Hiromatics with software-version 2.60 and
higher.
The following tables have been implemented according to the ‘DP574/DP576 IAC SERIES
SOFT CONTROLLERS SERIAL LINK AND PROTOCOL SPECIFICATIONS’.
Table 4 (Firmware Identifier):
The ‘Firmware Identifier’ for this unit-type is ‘GWX260’.
Table 69 (Time)
Table 71 (Group Addresses)
Table 73 (Unit Identifier):
The default value for the ‘Unit Identifier’ is ‘GWX260:D1’.
Table 74 (Serial Link Parameters):
This table is implemented as ‘Read Only’.
Document: Hirolink for Satchwell.DOC
- 91 -
Release 1.04 E
Hirolink for Satchwell - Items for Compact Graphic-Units V 2.60+
Table 40:
This table contains all available data-points provided by the Compact Graphic-Hiromatic-type
according to the following list.
This Hirolink can be compatible with more than one version of this Hiromatic-type and it is
possible that there have been extensions in the number of available items from one version to
the next.
Therefore the column ‘SW-Version’ contained in the following lists provides information about
the availability of each item depending on the Hiromatic-software-version. For example a entry
like ‘2.60+’ means, that this item is available from Hiromatics with software-version 2.60 and
higher.
Offset #
0
1
2
3
4
5,6
7,8
Usage
System commands
System status
Alarm status
Digital Outputs Low
Digital Outputs High
Room Temperature
Room Temperature Setpoint
9,10
11,12
Room Humidity
Room Humidity Setpoint
13,14
15,16
17,18
19,20
21
22
23
24
25
26
27
Hirosensor 1,1
Hirosensor 1,2
Hirosensor 2,1
Hirosensor 2,2
High Pressure Compressor
Low Pressure Compressor
Loss Of Airflow
Warning/Alarm
Clogged Filters
Heaters Overheated
Water Leakage Detected
Humidifier Alarms
28
User Input #1 Warning/Alarm
Type; Unit; Range
Single bits; see description below
1 Byte; see description below
Single bits; see description below
Single bits; see description below
Single bits; see description below
EMC swapped integer; [1/10 °C]
EMC swapped integer; [1/10 °C];
15.0 - 50.0 °C
EMC swapped integer; [1/10 %RH]
EMC swapped integer; [1/10 %RH];
20.0 - 80.0 %RH
EMC swapped integer; [1/10 °C]
EMC swapped integer; [1/10 °C]
EMC swapped integer; [1/10 °C]
EMC swapped integer; [1/10 °C]
1 Byte; 0 -> inactive, 1 -> active
1 Byte; 0 -> inactive, 1 -> active
1 Byte; 0 -> inactive, 1 -> active
1 Byte; 0 -> inactive, 1 -> active
1 Byte; 0 -> inactive, 1 -> active
1 Byte; 0 -> inactive, 1 -> active
1 Byte; 0 -> inactive, 1 -> active;
See description below
1 Byte; 0 -> inactive, 1 -> active
SW-Version
2.60+
2.60+
2.60+
2.60+
2.60+
2.60+
2.60+
2.60+
2.60+
2.60+
2.60+
2.60+
2.60+
2.60+
2.60+
2.60+
2.60+
2.60+
2.60+
2.60+
2.60+
System Commands (Offset #0)
IMPORTANT:
See the document ‘Hirolink for Satchwell V X.XX’ for a detailed description on how to use
these commands.
The bits of this item are used in the following way:
Bit #0: Set system off
Bit #1: Set system on
Bit #2: Set manual on
Bit #3: Set manual drain
Bit #4: Set alarm-acknowledge
Bit #5: Set alarm-reset
Bit #6: Set standard-settings
Document: Hirolink for Satchwell.DOC
- 92 -
Release 1.04 E
Hirolink for Satchwell - Items for Compact Graphic-Units V 2.60+
Bit #7: Not used
‘System Status’ (Offset #1)
The value of this item represents the current unit-status according to the following list:
0..System off
1..System on
2..Manual on
3..Remote off
4..Remote on
5..Sleep mode on
‘Alarm Status’ (Offset #2)
This item is used bit-wise according to the following list:
Bit #0: Alarm active
Bit #1: Warning active
Bit #2: Alarm-acknowledge active
Bit #3: Manual-drain active
Bit #4: Standard-settings active
Bit #5 - #7: Not used
Document: Hirolink for Satchwell.DOC
- 93 -
Release 1.04 E
Hirolink for Satchwell - Items for Compact Graphic-Units V 2.60+
‘Digital Outputs Low’ (Offset #3)
The contents of this item depends on the selected cooling-configuration (available in the
‘OPTIONAL DEVICES’-menu on the Hiromatic):
Cooling Configurations:
DIRECT EXPANSION (displayed as ‘DIRECT EXP.’)
DIRECT EXPANSION ALARM (displayed as ‘DIR.EXP.AL.’)
Bit #0: Fans
Bit #1: Compressor
Bit #2: Pump Down
Bit #3: Electrical Heater 1
Bit #4: Humidifier Boiler
Bit #5: Humidifier Feed
Bit #6: Humidifier Drain
Bit #7: Dehumidifier
Cooling Configurations:
CHILLED WATER (displayed as ‘CHILLED W.’)
CHILLED WATER + SUPER SAVER (displayed as ‘CW + SS’)
CHILLED WATER ALARM (displayed as ‘CHIL.WA.AL.’)
CHILLED WATER REVERSE (displayed as ‘CHIL.WA.RE.’)
Bit #0: Fans
Bit #1: Open Valve
Bit #2: Close Valve
Bit #3: Electrical Heater 1
Bit #4: Humidifier Boiler
Bit #5: Humidifier Feed
Bit #6: Humidifier Drain
Bit #7: Dehumidifier
‘Digital Outputs High’ (Offset #4)
This item is used bit-wise according to the following list:
Bit #0: Electrical Heater 2
Bit #1 - #7: Not used
‘Humidifier Alarms’ (Offset #27)
This item is a combination of the following Hiromatic-alarms:
Humidifier Failure
Humidifier Short Circuit
Humidifier High Current
Humidifier Mains Failure
Humidifier Without Water
Humidifier Cylinder Warning
Document: Hirolink for Satchwell.DOC
- 94 -
Release 1.04 E
Hirolink for Satchwell - Items for Compact Graphic-Units V 2.60+
Document--Changes
Appendix A: Document
This appendix contains all changes that have been applied to this document up to the current
version:
1. Changes from V 1.00 to V 1.01
The following chapters have been added to this version of this document:
-
Chapter 1: Introduction
2. Changes from V 1.01 to V 1.02
-
The Hirolink version-number was updated from V 2.65 to V 2.66.
3. Changes from V 1.02 to V 1.03
-
The Hirolink version-number was updated from V 2.66 to V 2.67.
4. Changes from V 1.03 to V 1.04
-
The Hirolink version-number was updated from V 2.67 to V 2.68.
Document: Hirolink for Satchwell.DOC
- 95 -
Release 1.04 E
Connectivity
Connectivity
The evolution
Hirolink for Satchwell V 2.69
Items for HiwallHiwall-Units V 1.21
Service Manual
Manual
English
Code 275498 Release 1.05E
Hirolink for Satchwell - Items for Hiwall-Units V 1.21
CONTENTS
1.
INTRODUCTION
INTRODUCTION ................................................................
................................................................................................
.......................................................................
....................................... 98
2.
COMPATIBILITYCOMPATIBILITY-LIST ................................................................
...............................................................................................
............................................................... 98
3.
ITEMS FOR HIROMATICHIROMATIC-TYPE HIWALL................................
HIWALL................................................................
.................................................................
................................. 99
APPENDIX A: DOCUMENTDOCUMENT-CHANGES................................
CHANGES................................................................
.........................................................................
......................................... 104
1.
2.
3.
4.
5.
CHANGES FROM V 1.00 TO V 1.01................................................................................104
CHANGES FROM V 1.01 TO V 1.02................................................................................104
CHANGES FROM V 1.02 TO V 1.03................................................................................104
CHANGES FROM V 1.03 TO V 1.04................................................................................104
CHANGES FROM V 1.04 TO V 1.05................................................................................104
Document: Hirolink for Satchwell.DOC
- 97 -
Release 1.04 E
Hirolink for Satchwell - Items for Hiwall-Units V 1.21
1. Introduction
This document contains a description of all data-points that are available via the ‘Hirolink for
Satchwell’ from this type of air-conditioner.
IMPORTANT:
It is vital to the correct integration of the Hirolink into a Modbus-network, that you have read and
understood the topics described in the document ‘Hirolink for Satchwell V X.XX - General
Documentation’ (X.XX is a placeholder for the current version of the Hirolink). So, if you haven’t
read this document until now, read it first.
2. CompatibilityCompatibility-List
Before connecting a Hiromatic to the Satchwell-Hirolink you must check, if the Hiromaticsoftware-version is compatible with this version of the Hirolink.
You can do this by checking the labels on the eproms, which are inserted into the Hiromatic and
the Microface. The eprom inserted in the Hiromatic must be called HWG + Version-Number
(e.g. HWG121) and the one inserted in the Microface must be called HWM + Version-Number
(e.g. HWM121).
To make sure that the label on the eproms is correct, you should also check the versioninformation, that the Hiromatic displays shortly after start-up. This information should look
similar to the following illustration:
Software-Version
HWG 1.21
09/09/97
11:09:10
Kernel: V 1.62.001
Software-Date
Memory: XXXXX
Heap:
XXXXX
Stack:
XXXXX
X-Stack: XXXXX
EEPROM: XXXXX
Contrast:XXXXX
Quarz:
The important information in this window is only the software-version and the software-date
(note that the date-format is mm/dd/yy). Make sure that the software-version installed in your
installation matches one of the compatible versions listed below:
Version
Date
1.21
09/09/97 11:09:10
Document: Hirolink for Satchwell.DOC
- 98 -
Release 1.04 E
Hirolink for Satchwell - Items for Hiwall-Units V 1.21
3. Items for HiromaticHiromatic-Type Hiwall
This Hirolink can be compatible with more than one version of this Hiromatic-type and it is
possible that there have been extensions in the number of available items from one version to
the next.
Therefore the column ‘SW-Version’ contained in the following lists provides information about
the availability of each item depending on the Hiromatic-software-version. For example a entry
like ‘1.21+’ means, that this item is available from Hiromatics with software-version 1.21 and
higher.
The following tables have been implemented according to the ‘DP574/DP576 IAC SERIES
SOFT CONTROLLERS SERIAL LINK AND PROTOCOL SPECIFICATIONS’.
Table 4 (Firmware Identifier):
The ‘Firmware Identifier’ for this unit-type is ‘HWG121’.
Table 69 (Time):
This table is not available for this unit-type.
Table 71 (Group Addresses)
Table 73 (Unit Identifier):
The default value for the ‘Unit Identifier’ is ‘HWG121:D1’.
Table 74 (Serial Link Parameters):
This table is implemented as ‘Read Only’.
Document: Hirolink for Satchwell.DOC
- 99 -
Release 1.04 E
Hirolink for Satchwell - Items for Hiwall-Units V 1.21
Table 48:
This table contains all available data-points provided by the Hiwall-Hiromatic-type according
to the following list.
This Hirolink can be compatible with more than one version of this Hiromatic-type and it is
possible that there have been extensions in the number of available items from one version to
the next.
Therefore the column ‘SW-Version’ contained in the following lists provides information about
the availability of each item depending on the Hiromatic-software-version. For example a entry
like ‘1.21+’ means, that this item is available from Hiromatics with software-version 1.21 and
higher.
Offset #
0
1
2
3,4
5,6
7
8
9,10
11,12
13,14
15,16
17,18
19,20
21,22
23,24
25
26
27
28,29
30,31
32,33
34
35
36
37
38,39
40,41
Usage
System On/Off
System Status
Alarm Status
System Room Temperature
System Room Humidity
Not used
Hiromatic Alarm-Status
High Pressure Compressor Alarm
Low Pressure Compressor Alarm
Fan Failure Warning/Alarm
Clogged Filters Warning
Water Leakage Detected Warning/Alarm
Heaters Overheated Alarm
User Input #1 Warning/Alarm
Humidifier Alarms
Single Unit On/Off MIC 1
Single Status MIC 1
Single Alarm-Status MIC 1
Single Room Temperature MIC 1
Single Room Temperature Setpoint MIC 1
Single Room Humidity MIC 1
Single Room Humidity Setpoint MIC 1
Status Fan MIC 1
Status Compressor MIC 1
Not used
Hirosensor 1,1 MIC 1
Hirosensor 1,2 MIC 1
Type; Unit; Range
1 Byte; 0 -> System off, 1 -> System on
1 Byte; see description below
1 Byte; see description below
EMC swapped integer; [1/10 °C]
EMC swapped integer; [1/10 %RH]
1 Byte; see description below
Single bits; see description below
Single bits; see description below
Single bits; see description below
Single bits; see description below
Single bits; see description below
Single bits; see description below
Single bits; see description below
Single bits; see description below
1 Byte; 0 -> System off, 1 -> System on
1 Byte; see description below
1 Byte; see description below
EMC swapped integer; [1/10 °C]
EMC swapped integer; [1/10 °C];
5.0 - 40.0 °C
EMC swapped integer; [1/10 %RH]
1 Byte; [% RH]; 19 -> No, 20 - 80 %RH
1 Byte; 0 -> Off; 1 -> On
1 Byte; 0 -> Off; 1 -> On
SW-Version
1.21+
1.21+
1.21+
1.21+
1.21+
1.21+
1.21+
1.21+
1.21+
1.21+
1.21+
1.21+
1.21+
1.21+
1.21+
1.21+
1.21+
1.21+
1.21+
1.21+
EMC swapped integer; [1/10 °C]
EMC swapped integer; [1/10 °C]
The items from offset #25 to #41 are repeated for each possible MIC in the system (max. 16):
MIC 2:
MIC 3:
MIC 4:
MIC 5:
MIC 6:
MIC 7:
MIC 8:
MIC 9:
MIC 10:
MIC 11:
MIC 12:
Offset # 42 - 58
Offset # 59 - 75
Offset # 76 - 92
Offset # 93 - 109
Offset # 110 - 126
Offset # 127 - 143
Offset # 144 - 160
Offset # 161 - 177
Offset # 178 - 194
Offset # 195 - 211
Offset # 212 - 228
Document: Hirolink for Satchwell.DOC
- 100 -
Release 1.04 E
1.21+
1.21+
1.21+
1.21+
1.21+
1.21+
1.21+
Hirolink for Satchwell - Items for Hiwall-Units V 1.21
MIC 13:
MIC 14:
MIC 15:
MIC 16:
297 —
312
Offset # 229 - 245
Offset # 246 - 262
Offset # 263 - 279
Offset # 280 - 296
Unit disconnected (MIC 1 — 16)
1 Byte; 0 -> No, 1 -> Yes
1.21+
‘System status’ (Offset #1) and ‘Single Status’
Status’ (Offset #26 and following)
The value of this item represents the current system-status according to the following list:
0..Alarm Off
1..Manual
2..Local Off
3..System Off
4..Standby Off Alarm
5..Standby Off
6..Sleep Off
7..System On
8..Warning On
9..Alarm On
10..Sleep On
‘Alarm status’ (Offset #2)
This item holds a value, which represents the current alarm-state of the whole system. This
alarm-state is calculated from the single alarm-states of each Microface and holds the highest of
those alarm-states. The single alarm-states can be read using the ‘Single Alarm-Status’-items.
The values correspond to the following states:
0 .. No alarm present
1 .. Message acknowledged (inactive)
3 .. Message acknowledged (active)
5 .. Message not acknowledged (inactive)
7 .. Message not acknowledged (active)
9 .. Warning acknowledged (inactive)
11 .. Warning acknowledged (active)
13 .. Warning not acknowledged (inactive)
15 .. Warning not acknowledged (active)
17 .. Alarm acknowledged (inactive)
19 .. Alarm acknowledged (active)
21 .. Alarm not acknowledged (inactive)
23 .. Alarm not acknowledged (active)
25 .. Alarm and warning acknowledged (inactive)
27 .. Alarm and warning acknowledged (active)
29 .. Alarm and warning not acknowledged (inactive)
31 .. Alarm and warning not acknowledged (active)
The terms ‘acknowledged’ and ‘not acknowledged’ define, if the reset-push-button on the
Hiromatic has been pressed once in order to silence the buzzer or if the command ‘Alarm
Acknowledge’ has been performed.
The terms ‘active’ and ‘inactive’ define, if the alarm, warning or message is still active, which
means that after performing a alarm-reset (either by sending the appropriate command via the
Document: Hirolink for Satchwell.DOC
- 101 -
Release 1.04 E
Hirolink for Satchwell - Items for Hiwall-Units V 1.21
Satchwell-network or by pressing the reset-push-button on the Hiromatic a second time) the
alarm or warning will be reported again.
‘Hiromatic Alarm Status’ (Offset #8) ‘Single Alarm Status’ (Offset #27 and
following)
This item holds a value which represents the current alarm-state of the Hiromatic or a single
Microface respectively.
It can be written to in order to perform either a ‘Alarm Acknowledge’- or a ‘Alarm Reset’command on the Hiromatic or a single Microface:
2 .. Alarm Reset:
This command will reset all alarms, warnings and messages currently present on
a Microface. As a consequence alarms, warnings and messages that are inactive
will disappear, will active alarms, warnings and messages will be reported
again.
4 .. Alarm Acknowledge:
This command will acknowledge all alarms, warnings and messages present on
a Microface. As a consequence alarms, warnings and messages that were in an
unacknowledged state will be acknowledged after the command.
When read, the item will hold the same values as described above (see ‘Alarm Status’).
NOTE:
Although you can read the alarm-state of the whole system (see ‘Alarm Status’), it is not possible
to issue a ‘Alarm Acknowledge’- or ‘Alarm Reset’-command for the whole system. Instead you
have to issue these commands for each Microface and the Hiromatic separately.
‘High pressure
pressure compressor alarm’ (Offset #9 and #10)
This item represents the status of the ‘High pressure compressor alarm’ from all units, where
each bit in this item represents this alarm-state for one unit:
Bit #0..High pressure compressor alarm state for unit #1
Bit #1..High pressure compressor alarm state for unit #2
Bit #2..High pressure compressor alarm state for unit #3
..
..
Bit #15..High pressure compressor alarm state for unit #16
‘Low pressure compressor alarm’ (Offset #11 and #12)
See the description for the ‘High pressure compressor alarm’-Item.
‘Fan failure warning/alarm’ (Offset #13 and #14)
See the description for the ‘High pressure compressor alarm’-Item.
‘Clogged filters warning’ (Offset #15 and #16)
See the description for the ‘High pressure compressor alarm’-Item.
‘Water leakage detected warning/alarm’ (Offset #17 and #18)
Document: Hirolink for Satchwell.DOC
- 102 -
Release 1.04 E
Hirolink for Satchwell - Items for Hiwall-Units V 1.21
See the description for the ‘High pressure compressor alarm’-Item.
‘Heaters overheated alarm’ (Offset #19 and #20)
See the description for the ‘High pressure compressor alarm’-Item.
‘User input #1 warning/alarm’ (Offset #21 and #22)
See the description for the ‘High pressure compressor alarm’-Item.
‘Humidifier Alarms’ (Offset #23 and #24):
See the description for the ‘High pressure compressor alarm’-Item.
This item is a combination of the following Hiromatic-alarms:
Humidifier Failure
Humidifier High Current
Humidifier Mains Failure
Humidifier Without Water
Humidifier Cylinder Warning
Document: Hirolink for Satchwell.DOC
- 103 -
Release 1.04 E
Hirolink for Satchwell - Items for Hiwall-Units V 1.21
Document--Changes
Appendix A: Document
This appendix contains all changes that have been applied to this document up to the current
version:
1. Changes from V 1.00 to V 1.01
The following chapters have been added to this version of this document:
-
Chapter 1: Introduction
The following chapters have been removed from this version of this document:
-
Chapter 2: Networking Systems (moved to the document ‘Hirolink for Satchwell, V X.XX)
2. Changes from V 1.01 to V 1.02
-
The Hirolink version-number was updated from V 2.65 to V 2.66.
3. Changes from V 1.02 to V 1.03
-
The Hirolink version-number was updated from V 2.66 to V 2.67.
4. Changes from V 1.03 to V 1.04
-
The Hirolink version-number was updated from V 2.67 to V 2.68.
5. Changes from V 1.04 to V 1.05
-
The items at offsets #297 to #312 were added to table 46.
The Hirolink version-number was updated from V 2.68 to V 2.69.
Document: Hirolink for Satchwell.DOC
- 104 -
Release 1.04 E
Connectivity
The evolution
Hirolink for Satchwell V 2.69
Items for Superchiller 20002000-Units V 1.01+
Service Manual
English
Code 275498 Release 1.02E
Hirolink for Satchwell - Items for Superchiller 2000-Units V 1.01+
CONTENTS
1.
INTRODUCTION ................................................................
................................................................................................
.....................................................................
..................................... 107
2.
COMPATIBILITY
COMPATIBILITYBILITY-LIST ................................................................
.............................................................................................
............................................................. 107
3.
ITEMS FOR HIROMATICHIROMATIC-TYPE SUPERCHILLER 2000
2000 .........................................
......................................... 108
APPENDIX A: DOCUMENTDOCUMENT-CHANGES................................
CHANGES................................................................
.........................................................................
......................................... 114
1.
2.
CHANGES FROM V 1.00 TO V 1.01................................................................................114
CHANGES FROM V 1.01 TO V 1.02................................................................................114
Document: Hirolink for Satchwell.DOC
- 106 -
Release 1.01 E
Hirolink for Satchwell - Items for Superchiller 2000-Units V 1.01+
1. Introduction
This document contains a description of all data-points that are available via the ‘Hirolink for
Satchwell’ from this type of air-conditioner.
IMPORTANT:
It is vital to the correct integration of the Hirolink into a Modbus-network, that you have read and
understood the topics described in the document ‘Hirolink for Satchwell V X.XX - General
Documentation’ (X.XX is a placeholder for the current version of the Hirolink). So, if you haven’t
read this document until now, read it first.
2. CompatibilityCompatibility-List
Before connecting a Hiromatic to the Satchwell-Hirolink you must check, if the Hiromaticsoftware-version is compatible with this version of the Hirolink.
You can do this by checking the labels on the eproms, which are inserted into the Hiromatic and
the Microface. The eprom inserted in the Hiromatic must be called SCG + Version-Number (e.g.
SCG101) and the one inserted in the Microface must be called SCM + Version-Number (e.g.
SCM101).
To make sure that the label on the eproms is correct, you should also check the versioninformation, that the Hiromatic displays shortly after start-up. This information should look
similar to the following illustration:
Software-Version
SCG 1.01
05/27/97
Software-Date
16:24:45
Kernel: V 1.62.001
Memory: XXXXX
Heap:
XXXXX
Stack:
XXXXX
X-Stack: XXXXX
EEPROM: XXXXX
Contrast:XXXXX
Quarz:
The important information in this window is only the software-version and the software-date
(note that the date-format is mm/dd/yy). Make sure that the software-version installed in your
installation matches one of the compatible versions listed below:
Version
Version
Date
1.01.007
21/09/1999
Document: Hirolink for Satchwell.DOC
- 107 -
Release 1.01 E
Hirolink for Satchwell - Items for Superchiller 2000-Units V 1.01+
3. Items for HiromaticHiromatic-Type Superchiller 2000
This Hirolink can be compatible with more than one version of this Hiromatic-type and it is
possible that there have been extensions in the number of available items from one version to
the next.
Therefore the column ‘SW-Version’ contained in the following lists provides information about
the availability of each item depending on the Hiromatic-software-version. For example a entry
like ‘1.01+’ means, that this item is available from Hiromatics with software-version 1.01 and
higher.
The following tables have been implemented according to the ‘DP574/DP576 IAC SERIES
SOFT CONTROLLERS SERIAL LINK AND PROTOCOL SPECIFICATIONS’.
Table 4 (Firmware Identifier):
The ‘Firmware Identifier’ for this unit-type is ‘SCG101’.
Table 69 (Time)
Table 71 (Group Addresses)
Table 73 (Unit Identifier):
The default value for the ‘Unit Identifier’ is ‘SCG101:D1’.
Table 74 (Serial Link Parameters):
This table is implemented as ‘Read Only’.
Document: Hirolink for Satchwell.DOC
- 108 -
Release 1.01 E
Hirolink for Satchwell - Items for Superchiller 2000-Units V 1.01+
Table 49:
This table contains all available data-points provided by the Superchiller 2000-Hiromatic-type
according to the following list.
This Hirolink can be compatible with more than one version of this Hiromatic-type and it is
possible that there have been extensions in the number of available items from one version to
the next.
Therefore the column ‘SW-Version’ contained in the following lists provides information about
the availability of each item depending on the Hiromatic-software-version. For example a entry
like ‘1.01+’ means, that this item is available from Hiromatics with software-version 1.01 and
higher.
Offset #
0
1
2,3
4,5
6,7
8,9
10,11
12,15
16
HM
Parameter
-
Usage
Type; Unit; Range
17
18
19
20
21
061
062
132
Hiromatic alarm status
Number of connected units
Teamwork enabled
Not used
Rotation frequency
22
23
24
25
26,27
28,29
30,31
32,33
34,35
36,37
38,39
40,41
42,43
134
134
131
-
44,45
-
46,47
48,49
50,51
52,53
54,55
56,57
-
Rotation hour
Rotation minute
Not used
Number of standby units
High pressure compressor 1 alarm
High pressure compressor 2 alarm
Low pressure compressor 1 alarm
Low pressure compressor 2 alarm
Th. Protection compressor 1 alarm
Th. Protection compressor 2 alarm
Oil pressure compressor 1 alarm
Oil pressure compressor 2 alarm
High pressure / Th. protection compressor 1
alarm
High pressure / Th. protection compressor 2
alarm
Flow switch warning/alarm
Condenser 1 fan failure warning/alarm
Condenser 2 fan failure warning/alarm
Low pressure condenser 1 alarm
Low pressure condenser 2 alarm
Water pressure warning/alarm
System Status
Alarm Status
Actual temperature setpoint
Shared PTC inlet temperature
Shared PTC outlet temperature
Shared PTC ambient temperature
Shared PTC evaporator inlet temperature
Not used
System On/Off
Document: Hirolink for Satchwell.DOC
- 109 -
1 Byte; see description below
1 Byte; see description below
EMC swapped integer; [1/10 °C]
EMC swapped integer; [1/10 °C]
EMC swapped integer; [1/10 °C]
EMC swapped integer; [1/10 °C]
EMC swapped integer; [1/10 °C]
1 Byte; 0 -> System off,
1 -> System on
1 Byte; see description below
1 Byte; 1-16
1 Byte; 0 -> No, 1 -> Yes
1 Byte; 0 -> No, 1 -> Daily
2 -> MO, 3 -> TU, 4 -> WE
5 -> TH, 6 -> FR, 7 -> SA
8 -> SU
1 Byte; [h]; 0 — 23
1 Byte; [min]; 0 — 59
SWVersion
1.01+
1.01+
1.01+
1.01+
1.01+
1.01+
1.01+
1.01+
1.01+
1.01+
1.01+
1.01+
1 Byte; 0 — 16
Single bits; see description below
Single bits; see description below
Single bits; see description below
Single bits; see description below
Single bits; see description below
Single bits; see description below
Single bits; see description below
Single bits; see description below
Single bits; see description below
1.01+
1.01+
1.01+
1.01+
1.01+
1.01+
1.01+
1.01+
1.01+
1.01+
1.01+
1.01+
1.01+
Single bits; see description below
1.01+
Single bits; see description below
Single bits; see description below
Single bits; see description below
Single bits; see description below
Single bits; see description below
Single bits; see description below
1.01+
1.01+
1.01+
1.01+
1.01+
1.01+
Release 1.01 E
Hirolink for Satchwell - Items for Superchiller 2000-Units V 1.01+
58,59
60,61
62,63
64,65
66,67
68,69
70,71
72,73
74-83
84
-
Freeze alarm
Not used
PTC inlet temperature MIC 1
PTC outlet temperature MIC 1
PTC outlet 1 temperature MIC 1
PTC outlet 2 temperature MIC 1
PTC ambient temperature MIC 1
PTC evaporator inlet temperature MIC 1
Not used
Single unit On/Off MIC 1
85
86
87-88
89,90
021
Single status MIC 1
Single alarm status MIC 1
Not used
Outlet temperature setpoint 1 MIC 1
91
92,93
022
023
Outlet temperature setpoint 2 MIC 1
Brine setpoint MIC 1
94-96
-
Single bits; see description below
1.01+
EMC swapped integer; [1/10 °C]
EMC swapped integer; [1/10 °C]
EMC swapped integer; [1/10 °C]
EMC swapped integer; [1/10 °C]
EMC swapped integer; [1/10 °C]
EMC swapped integer; [1/10 °C]
1.01+
1.01+
1.01+
1.01+
1.01+
1.01+
1.01+
1.01+
1 Byte; 0 -> System off,
1 -> System on
1 Byte; see description below
1 Byte; see description below
EMC swapped integer; [1/10 °C]; 50
- 170
1 Byte; [°C]; 4 -> No, 5 - 20
EMC swapped integer; [°C];
-11 -> No, 10 - 25
Not used
1.01+
1.01+
1.01+
1.01+
1.01+
1.01+
1.01+
The items from offset #62 to #96 are repeated for each possible MIC in the system (max. 16):
MIC 2:
MIC 3:
MIC 4:
MIC 5:
MIC 6:
MIC 7:
MIC 8:
MIC 9:
MIC 10:
MIC 11:
MIC 12:
MIC 13:
MIC 14:
MIC 15:
MIC 16:
622-637
Offset #97 - #131
Offset #132 - #166
Offset #167 - #201
Offset #202 -#236
Offset #237 - #271
Offset #272 - #306
Offset #307 - #341
Offset #342 - #376
Offset #377 - #411
Offset #412 - #446
Offset #447 - #481
Offset #482 - #516
Offset #517 - #551
Offset #552 - #586
Offset #587 - #621
-
Unit disconnected (MIC 1 — 16)
Document: Hirolink for Satchwell.DOC
- 110 -
1 Byte; 0 -> No, 1 -> Yes
Release 1.01 E
1.01+
Hirolink for Satchwell - Items for Superchiller 2000-Units V 1.01+
‘System status’ (Offset #0) and ‘Single Status’ (Offset #85 and following)
The value of this item represents the current unit-status according to the following list:
0..Alarm Off
1..Manual
2..Local Off
3..System Off
4..Standby Off Alarm
5..Standby Off
6..Sleep Off
7..System On
8..Warning On
9..Alarm On
10..Sleep On
‘Alarm status’ (Offset #1)
This item holds a value, which represents the current alarm-state of the whole system. This
alarm-state is calculated from the single alarm-states of each Microface and holds the highest of
those alarm-states. The single alarm-states can be read using the ‘Single Alarm-Status’-items.
The values correspond to the following states:
0 .. No alarm present
1 .. Message acknowledged (inactive)
3 .. Message acknowledged (active)
5 .. Message not acknowledged (inactive)
7 .. Message not acknowledged (active)
9 .. Warning acknowledged (inactive)
11 .. Warning acknowledged (active)
13 .. Warning not acknowledged (inactive)
15 .. Warning not acknowledged (active)
17 .. Alarm acknowledged (inactive)
19 .. Alarm acknowledged (active)
21 .. Alarm not acknowledged (inactive)
23 .. Alarm not acknowledged (active)
25 .. Alarm and warning acknowledged (inactive)
27 .. Alarm and warning acknowledged (active)
29 .. Alarm and warning not acknowledged (inactive)
31 .. Alarm and warning not acknowledged (active)
The terms ‘acknowledged’ and ‘not acknowledged’ define, if the reset-push-button on the
Hiromatic has been pressed once in order to silence the buzzer or if the command ‘Alarm
Acknowledge’ has been performed.
The terms ‘active’ and ‘inactive’ define, if the alarm, warning or message is still active, which
means that after performing a alarm-reset (either by sending the appropriate command via the
Satchwell-network or by pressing the reset-push-button on the Hiromatic a second time) the
alarm or warning will be reported again.
Document: Hirolink for Satchwell.DOC
- 111 -
Release 1.01 E
Hirolink for Satchwell - Items for Superchiller 2000-Units V 1.01+
‘Hiromatic Alarm Status’ (Offset #17) and ‘Single Alarm Status’ (Offset #86
and following)
This item holds a value which represents the current alarm-state of the Hiromatic or a single
Microface respectively.
It can be written to in order to perform either a ‘Alarm Acknowledge’- or a ‘Alarm Reset’command on the Hiromatic or a single Microface:
2 .. Alarm Reset:
This command will reset all alarms, warnings and messages currently present on
a Microface. As a consequence alarms, warnings and messages that are inactive
will disappear, will active alarms, warnings and messages will be reported
again.
4 .. Alarm Acknowledge:
This command will acknowledge all alarms, warnings and messages present on
a Microface. As a consequence alarms, warnings and messages that were in an
unacknowledged state will be acknowledged after the command.
When read, the item will hold the same values as described above (see ‘Alarm Status’).
NOTE:
Although you can read the alarm-state of the whole system (see ‘Alarm Status’), it is not possible
to issue a ‘Alarm Acknowledge’- or ‘Alarm Reset’-command for the whole system. Instead you
have to issue these commands for each Microface and the Hiromatic separately.
‘High pressure compressor 1 alarm’ (Offset #26 and #27)
This item represents the status of the ‘High pressure compressor alarm’ from all units, where
each bit in this item represents this alarm-state for one unit:
Bit #0..High pressure compressor 1 alarm state for unit #1
Bit #1..High pressure compressor 1 alarm state for unit #2
Bit #2..High pressure compressor 1 alarm state for unit #3
..
..
Bit #15..High pressure compressor 1 alarm state for unit #16
‘High pressure compressor 2 alarm’ (Offset #28 and #29)
See the description for the ‘High pressure compressor 1 alarm’-Item.
‘Low pressure compressor 1 alarm’ (Offset #30 and #31)
See the description for the ‘High pressure compressor 1 alarm’-Item.
‘Low pressure compressor 2 alarm’ (Offset #32 and #33)
See the description for the ‘High pressure compressor 1 alarm’-Item.
‘Thermal protection compressor 1 alarm’ (Offset #34 and #35)
See the description for the ‘High pressure compressor 1 alarm’-Item.
Document: Hirolink for Satchwell.DOC
- 112 -
Release 1.01 E
Hirolink for Satchwell - Items for Superchiller 2000-Units V 1.01+
‘Thermal protection compressor 2 alarm’ (Offset #36 and #37)
See the description for the ‘High pressure compressor 1 alarm’-Item.
‘Oil pressure compressor 1 alarm’ (Offset #38 and #39)
See the description for the ‘High pressure compressor 1 alarm’-Item.
‘Oil pressure compressor 2 alarm’ (Offset #40 and #41)
See the description for the ‘High pressure compressor 1 alarm’-Item.
‘High pressure / Thermal protection compressor 1 alarm’ (Offset #42 and
#43)
See the description for the ‘High pressure compressor 1 alarm’-Item.
‘High pressure / Thermal protection compressor 2 alarm’ (Offset #44 and
#45)
See the description for the ‘High pressure compressor 1 alarm’-Item.
‘Flow switch warning/alarm’ (Offset #46 and #47)
See the description for the ‘High pressure compressor 1 alarm’-Item.
‘Condenser 1 fan failure warning/alarm’ (Offset #48 and #49)
See the description for the ‘High pressure compressor 1 alarm’-Item.
‘Condenser 2 fan failure warning/alarm’ (Offset #50 and #51)
See the description for the ‘High pressure compressor 1 alarm’-Item.
‘Low pressure condenser 1 alarm’ (Offset #52 and #53)
See the description for the ‘High pressure compressor 1 alarm’-Item.
‘Low pressure condenser 2 alarm’ (Offset #54 and #55)
See the description for the ‘High pressure compressor 1 alarm’-Item.
‘Water pressure warning/alarm’ (Offset #56 and #57)
See the description for the ‘High pressure compressor 1 alarm’-Item.
‘Freeze alarm’ (Offset #58 and #59)
See the description for the ‘High pressure compressor 1 alarm’-Item.
This item is a combination of the following Hiromatic-alarms:
Freeze alarm (auto reset)
Freeze alarm (manual reset)
Document: Hirolink for Satchwell.DOC
- 113 -
Release 1.01 E
Hirolink for Satchwell - Items for Superchiller 2000-Units V 1.01+
Document--Changes
Appendix A: Document
This appendix contains all changes that have been applied to this document up to the current
version:
1. Changes from V 1.00 to V 1.01
The following datapoints in table 49 where changed or corrected:
-
Offset #12,#13 'Shared inlet PI deviation’ was removed.
Offset #14,#15 'Shared evaporator PI deviation’ was removed.
Offset #20 'Cascade enabled' was removed.
Offset #21 'Rotation enabled' was changed to 'Rotation frequency'.
Offset #24 'Microface rotation enabled' was removed.
Offset #58,#59 'Freeze alarm compressor 1’ was changed to 'Freeze alarm’.
Offset #60,#61 'Freeze alarm compressor 2’ was removed.
Offset #74, #75 'PI deviation MIC 1' (including the subsequent datapoints for all other
possible Microfaces) was removed.
Offset #76, #77 'Hirosenor 1 temperature 1 MIC 1' (including the subsequent datapoints
for all other possible Microfaces) was removed.
Offset #78, #79 'Hirosenor 1 temperature 2 MIC 1' (including the subsequent datapoints
for all other possible Microfaces) was removed.
Offset #80, #81 'Hirosenor 2 temperature 1 MIC 1' (including the subsequent datapoints
for all other possible Microfaces) was removed.
Offset #82, #83 'Hirosenor 2 temperature 2 MIC 1' (including the subsequent datapoints
for all other possible Microfaces) was removed.
Offset #87 'Outlet temperature setpoint MIC 1' (including the subsequent datapoints for all
other possible Microfaces) was removed.
Offset #88 'Outlet temperature setpoint in timer mode MIC 1' (including the subsequent
datapoints for all other possible Microfaces) was removed.
Offset #94,#95 'Temperature proportional band MIC 1' (including the subsequent
datapoints for all other possible Microfaces) was removed.
Offset #96 'Temperature integral factor MIC 1' (including the subsequent datapoints for all
other possible Microfaces) was removed.
A new column holding the relevant Hiromatic-parameter-numbers was included.
2. Changes from V 1.01 to V 1.02
- The items at offsets #622 to #637 were added to table 46.
- The Hirolink version-number was updated from V 2.68 to V 2.69.
Document: Hirolink for Satchwell.DOC
- 114 -
Release 1.01 E
Connectivity
The evolution
Hirolink for Satchwell V 2.70
Items for HiflexHiflex-Units V 1.39+
Service Manual
English
Code 275498 Release 1.06
Hirolink for Satchwell - Items for Hiromatic for Microface Units V 1.39+
CONTENTS
1.
INTRODUCTION ................................................................
................................................................................................
.....................................................................
..................................... 117
2.
COMPATIBILITYCOMPATIBILITY-LIST ................................................................
.............................................................................................
............................................................. 117
3.
ITEMS FOR HIROMATICHIROMATIC-TYPE HIFLEX ................................................................
................................................................ 118
APPENDIX A: DOCUMENTDOCUMENT-CHANGES................................
CHANGES................................................................
.........................................................................
......................................... 124
1.
2.
3.
4.
5.
CHANGES FROM V 1.00 TO V 1.01................................................................................124
CHANGES FROM V 1.01 TO V 1.02................................................................................124
CHANGES FROM V 1.02 TO V 1.03................................................................................124
CHANGES FROM V 1.03 TO V 1.04................................................................................124
CHANGES FROM V 1.04 TO V 1.06................................................................................124
Document: Hirolink for Satchwell.DOC
- 116 -
Release 1.06
Hirolink for Satchwell - Items for Hiromatic for Microface Units V 1.39+
1. Introduction
This document contains a description of all data-points that are available via the ‘Hirolink for
Satchwell’ from this type of air-conditioner.
IMPORTANT:
It is vital to the correct integration of the Hirolink into a Modbus-network, that you have read and
understood the topics described in the document ‘Hirolink for Satchwell V X.XX - General
Documentation’ (X.XX is a placeholder for the current version of the Hirolink). So, if you haven’t
read this document until now, read it first.
2. CompatibilityCompatibility-List
Before connecting a Hiromatic to the Satchwell-Hirolink you must check, if the Hiromaticsoftware-version is compatible with this version of the Hirolink.
You can do this by checking the labels on the eproms, which are inserted into the Hiromatic and
the Microface. The eprom inserted in the Hiromatic must be called WXG + Version-Number
(e.g. WXG139) and the one inserted in the Microface must be called WXM + Version-Number
(e.g. WXM139).
To make sure that the label on the eproms is correct, you should also check the versioninformation, that the Hiromatic displays shortly after start-up. This information should look
similar to the following illustration:
Software-Version
WXG 1.39
05/27/97
Software-Date
16:24:45
Kernel: V 1.62.001
Memory: XXXXX
Heap:
XXXXX
Stack:
XXXXX
X-Stack: XXXXX
EEPROM: XXXXX
Contrast:XXXXX
Quarz:
The important information in this window is only the software-version and the software-date
(note that the date-format is mm/dd/yy). Make sure that the software-version installed in your
installation matches one of the compatible versions listed below:
Version
Date
1.39
1.41.002
1.42
1.51.03
1.51.04
1.51.09
1.51.10
1.51.11
1.60
27/05/1997
28/07/1997
07/19/1997
13/01/1998
13/01/1998
11/03/1998
01/04/1998
03/05/1998
?
Document: Hirolink for Satchwell.DOC
- 117 -
Release 1.06
Hirolink for Satchwell - Items for Hiromatic for Microface Units V 1.39+
3. Items for HiromaticHiromatic-Type Hiflex
This Hirolink can be compatible with more than one version of this Hiromatic-type and it is
possible that there have been extensions in the number of available items from one version to
the next.
Therefore the column ‘SW-Version’ contained in the following lists provides information about
the availability of each item depending on the Hiromatic-software-version. For example a entry
like ‘1.39+’ means, that this item is available from Hiromatics with software-version 1.39 and
higher.
The following tables have been implemented according to the ‘DP574/DP576 IAC SERIES
SOFT CONTROLLERS SERIAL LINK AND PROTOCOL SPECIFICATIONS’.
Table 4 (Firmware Identifier):
The ‘Firmware Identifier’ for this unit-type depends on the software-version. It is ‘WXG135’ for
version from 1.35 to 1.39, ‘WXG141’ for versions 1.41 to 1.51 and ‘WXG160’ for versions
1.60 and higher.
Table 69 (Time)
Table 71 (Group Addresses)
Table 73 (Unit Identifier):
The default value for the ‘Unit Identifier’ depends on the software-version. It is ‘WXG135:D1’
for version from 1.35 to 1.39, ‘WXG141:D1’ for versions 1.41 to 1.51 and ‘WXG160:D1’ for
versions 1.60 and higher.
Table 74 (Serial Link Parameters):
This table is implemented as ‘Read Only’.
Document: Hirolink for Satchwell.DOC
- 118 -
Release 1.06
Hirolink for Satchwell - Items for Hiromatic for Microface Units V 1.39+
Table 46:
This table contains all available data-points provided by the Hiflex-Hiromatic-type according to
the following list.
This Hirolink can be compatible with more than one version of this Hiromatic-type and it is
possible that there have been extensions in the number of available items from one version to
the next.
Therefore the column ‘SW-Version’ contained in the following lists provides information about
the availability of each item depending on the Hiromatic-software-version. For example a entry
like ‘1.39+’ means, that this item is available from Hiromatics with software-version 1.39 and
higher.
Offset #
0
1
2
3,4
5,6
Usage
System On/Off
System Status
Alarm Status
System Room Temperature
System Room Humidity
7
8
9,10
11,12
13,14
15,16
17,18
19,20
21,22
23,24
25
Number of connected units
Hiromatic Alarm-Status
High Pressure Compressor 1 Alarm
Low Pressure Compressor 1 Alarm
Fan Failure Warning/Alarm
Clogged Filters Warning
Water Leakage Detected Warning/Alarm
Heaters Overheated Alarm
User Input #1 Warning/Alarm
Humidifier Alarms
Single Unit On/Off MIC 1
26
27
28,29
30,31
Single Status MIC 1
Single Alarm-Status MIC 1
Single Room Temperature MIC 1
Single Room Temperature Setpoint MIC 1
32,33
Single Room Humidity MIC 1
34
35
36
37
38,39
40,41
Single Room Humidity Setpoint MIC 1
Status Fan MIC 1
Status Compressor 1 MIC 1
Status Humidifier MIC 1
Hirosensor 1,1 MIC 1
Hirosensor 1,2 MIC 1
Document: Hirolink for Satchwell.DOC
- 119 -
Type; Unit; Range
1 Byte; 0 -> System off,
1 -> System on
1 Byte; see description below
1 Byte; see description below
EMC swapped integer; [1/10 °C]
EMC swapped integer;
[1/10 %RH]
1 Byte
1 Byte; see description below
Single bits; see description below
Single bits; see description below
Single bits; see description below
Single bits; see description below
Single bits; see description below
Single bits; see description below
Single bits; see description below
Single bits; see description below
1 Byte; 0 -> System off,
1 -> System on
1 Byte; see description below
1 Byte; see description below
EMC swapped integer; [1/10 °C]
EMC swapped integer; [1/10 °C];
5.0 - 40.0 °C
EMC swapped integer;
[1/10 %RH]
1 Byte; [% RH];
19 -> No, 20 - 80 %RH
1 Byte; 0 -> Off; 1 -> On
1 Byte; 0 -> Off; 1 -> On
1 Byte; 0 -> Off; 1 -> On
EMC swapped integer; [1/10 °C]
EMC swapped integer; [1/10 °C]
SW-Version
1.39+
1.39+
1.39+
1.39+
1.39+
1.39+
1.39+
1.39+
1.39+
1.39+
1.39+
1.39+
1.39+
1.39+
1.39+
1.39+
1.39+
1.39+
1.39+
1.39+
1.39+
1.39+
1.39+
1.39+
1.39+
1.39+
1.39+
Release 1.06
Hirolink for Satchwell - Items for Hiromatic for Microface Units V 1.39+
The items from offset #25 to #41 are repeated for each possible MIC in the system (max. 16):
MIC 2:
MIC 3:
MIC 4:
MIC 5:
MIC 6:
MIC 7:
MIC 8:
MIC 9:
MIC 10:
MIC 11:
MIC 12:
MIC 13:
MIC 14:
MIC 15:
MIC 16:
297,298
299,300
301 - 316
317, 318
319, 320
321, 322
323 —
338
Offset # 42 - 58
Offset # 59 - 75
Offset # 76 - 92
Offset # 93 - 109
Offset # 110 - 126
Offset # 127 - 143
Offset # 144 - 160
Offset # 161 - 177
Offset # 178 - 194
Offset # 195 - 211
Offset # 212 - 228
Offset # 229 - 245
Offset # 246 - 262
Offset # 263 - 279
Offset # 280 - 296
High Pressure Compressor 2 Alarm
Low Pressure Compressor 2 Alarm
Status Compressor 2 (MIC 1 - 16)
Compressor 1 Motor Protection Alarm
Compressor 2 Motor Protection Alarm
Fire Alarm
Unit disconnected (MIC 1 — 16)
Single bits; see description below
Single bits; see description below
1 Byte; 0 -> Off; 1 -> On
Single bits; see description below
Single bits; see description below
Single bits; see description below
1 Byte; 0 -> No, 1 -> Yes
1.41+
1.41+
1.41+
1.52+
1.52+
1.52+
1.41+
‘System status’ (Offset #1) and ‘Single Status’ (Offset #26 and following)
The value of this item represents the current unit-status according to the following list:
0..Alarm Off
1..Manual
2..Local Off
3..System Off
4..Standby Off Alarm
5..Standby Off
6..Sleep Off
7..System On
8..Warning On
9..Alarm On
10..Sleep On
‘Alarm status’ (Offset #2)
This item holds a value, which represents the current alarm-state of the whole system. This
alarm-state is calculated from the single alarm-states of each Microface and holds the highest of
those alarm-states. The single alarm-states can be read using the ‘Single Alarm-Status’-items.
The values correspond to the following states:
0 .. No alarm present
1 .. Message acknowledged (inactive)
3 .. Message acknowledged (active)
5 .. Message not acknowledged (inactive)
7 .. Message not acknowledged (active)
9 .. Warning acknowledged (inactive)
Document: Hirolink for Satchwell.DOC
- 120 -
Release 1.06
Hirolink for Satchwell - Items for Hiromatic for Microface Units V 1.39+
11 .. Warning acknowledged (active)
13 .. Warning not acknowledged (inactive)
15 .. Warning not acknowledged (active)
17 .. Alarm acknowledged (inactive)
19 .. Alarm acknowledged (active)
21 .. Alarm not acknowledged (inactive)
23 .. Alarm not acknowledged (active)
25 .. Alarm and warning acknowledged (inactive)
27 .. Alarm and warning acknowledged (active)
29 .. Alarm and warning not acknowledged (inactive)
31 .. Alarm and warning not acknowledged (active)
The terms ‘acknowledged’ and ‘not acknowledged’ define, if the reset-push-button on the
Hiromatic has been pressed once in order to silence the buzzer or if the command ‘Alarm
Acknowledge’ has been performed.
The terms ‘active’ and ‘inactive’ define, if the alarm, warning or message is still active, which
means that after performing a alarm-reset (either by sending the appropriate command via the
Satchwell-network or by pressing the reset-push-button on the Hiromatic a second time) the
alarm or warning will be reported again.
(Offset
fset #27
‘Hiromatic Alarm Status’ (Offset #8) and ‘Single Alarm Status’ (Of
and following)
This item holds a value which represents the current alarm-state of the Hiromatic or a single
Microface respectively.
It can be written to in order to perform either a ‘Alarm Acknowledge’- or a ‘Alarm Reset’command on the Hiromatic or a single Microface:
2 .. Alarm Reset:
This command will reset all alarms, warnings and messages currently present on
a Microface. As a consequence alarms, warnings and messages that are inactive
will disappear, will active alarms, warnings and messages will be reported
again.
4 .. Alarm Acknowledge:
This command will acknowledge all alarms, warnings and messages present on
a Microface. As a consequence alarms, warnings and messages that were in an
unacknowledged state will be acknowledged after the command.
When read, the item will hold the same values as described above (see ‘Alarm Status’).
NOTE:
Although you can read the alarm-state of the whole system (see ‘Alarm Status’), it is not possible
to issue a ‘Alarm Acknowledge’- or ‘Alarm Reset’-command for the whole system. Instead you
have to issue these commands for each Microface and the Hiromatic separately.
‘High pressure compressor 1 alarm’ (Offset #9 and #10)
This item represents the status of the ‘High pressure compressor alarm’ from all units, where
each bit in this item represents this alarm-state for one unit:
Bit #0..High pressure compressor 1 alarm state for unit #1
Bit #1..High pressure compressor 1 alarm state for unit #2
Bit #2..High pressure compressor 1 alarm state for unit #3
Document: Hirolink for Satchwell.DOC
- 121 -
Release 1.06
Hirolink for Satchwell - Items for Hiromatic for Microface Units V 1.39+
..
..
Bit #15..High pressure compressor 1 alarm state for unit #16
‘Low pressure compressor 1 alarm’ (Offset #11 and #12)
See the description for the ‘High pressure compressor 1 alarm’-Item.
‘Fan failure warning/alarm’ (Offset #13 and #14)
See the description for the ‘High pressure compressor 1 alarm’-Item.
‘Clogged filters warning’ (Offset #15 and #16)
See the description for the ‘High pressure compressor 1 alarm’-Item.
‘Water leakage detected warning/alarm’ (Offset #17 and #18)
See the description for the ‘High pressure compressor 1 alarm’-Item.
‘Heaters overheated alarm’ (Offset #19 and #20)
See the description for the ‘High pressure compressor 1 alarm’-Item.
‘User input #1 warning/alarm’ (Offset #21 and #22)
See the description for the ‘High pressure compressor 1 alarm’-Item.
‘Humidifier Alarms’ (Offset #23 and #24):
See the description for the ‘High pressure compressor 1 alarm’-Item.
This item is a combination of the following Hiromatic-alarms:
Humidifier Failure
Humidifier High Current
Humidifier Mains Failure
Humidifier Without Water
Humidifier Cylinder Warning
‘High pressure compressor 2 alarm’ (Offset #297 and #298)
See the description for the ‘High pressure compressor 1 alarm’-Item.
‘Low pressure compressor 2 alarm’ (Offset
(Offset #299 and #300)
See the description for the ‘High pressure compressor 1 alarm’-Item.
‘Compressor 1 motor protection alarm’ (Offset #317 and #318)
See the description for the ‘High pressure compressor 1 alarm’-Item.
‘Compressor 2 motor protection alarm’
alarm’ (Offset #319 and #320)
See the description for the ‘High pressure compressor 1 alarm’-Item.
Document: Hirolink for Satchwell.DOC
- 122 -
Release 1.06
Hirolink for Satchwell - Items for Hiromatic for Microface Units V 1.39+
‘Fire alarm’ (Offset #321 and #322)
See the description for the ‘High pressure compressor 1 alarm’-Item.
Document: Hirolink for Satchwell.DOC
- 123 -
Release 1.06
Hirolink for Satchwell - Items for Hiromatic for Microface Units V 1.39+
Document--Changes
Appendix A: Document
This appendix contains all changes that have been applied to this document up to the current
version:
1. Changes from V 1.00 to V 1.01
The following chapters have been added to this version of this document:
- Chapter 1: Introduction
The following chapters have been removed from this version of this document:
- Chapter 2: Networking Systems (moved to the document ‘Hirolink for Satchwell, V X.XX)
2. Changes from V 1.01 to V 1.02
- The Hirolink version-number was updated from V 2.65 to V 2.66.
3. Changes from V 1.02 to V 1.03
- The compatibility-list and other relevant descriptions were extended with Hiflex V 1.60.
- The Hirolink version-number was updated from V 2.66 to V 2.67.
4. Changes from V 1.03 to V 1.04
- The Hirolink version-number was updated from V 2.67 to V 2.68.
5. Changes from V 1.04 to V 1.05
- The items at offsets #317 to #338 were added to table 46.
- The Hirolink version-number was updated from V 2.68 to V 2.69.
Document--Changes
Appendix B: Document
This appendix contains all changes that have been applied to this document up to the current
version:
1. Changes from V 1.00 to V 1.01
The following chapters have been added to this version of this document:
- Chapter 1: Introduction
The following chapters have been removed from this version of this document:
- Chapter 2: Networking Systems (moved to the document ‘Hirolink for Satchwell, V X.XX)
Document: Hirolink for Satchwell.DOC
- 124 -
Release 1.06
Hirolink for Satchwell - Items for Hiromatic for Microface Units V 1.39+
2. Changes from V 1.01 to V 1.02
- The Hirolink version-number was updated from V 2.65 to V 2.66.
3. Changes from V 1.02 to V 1.03
- The compatibility-list and other relevant descriptions were extended with Hiflex V 1.60.
- The Hirolink version-number was updated from V 2.66 to V 2.67.
4. Changes from V 1.03 to V 1.04
- The Hirolink version-number was updated from V 2.67 to V 2.68.
5. Changes from V 1.04 to V 1.06
- The items at offsets #323 to #338 were added to table 46.
- The Hirolink version-number was updated from V 2.68 to V 2.70.
Document: Hirolink for Satchwell.DOC
- 125 -
Release 1.06