1
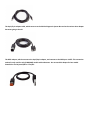
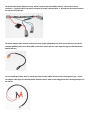
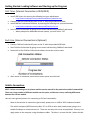
Thank you for purchasing Candoopro! Please read the following information before using the system for the first time. If you have any questions about the use of the system, please contact us at [email protected], or visit our Forum at http://forums.candoopro.com/. Quick Start Guide – Ski Doo Snowmobiles Hardware and Harness Guide; what’s included: The Candoopro system setup for Ski Doo Snowmobiles includes the following parts: The Vehicle Diagnostic System Box, which connects to your PC and the sled: The USB Cable, which connects the Vehicle Diagnostic System Box to the PC: The 9pin/6pin adapter cable, which connects to the Vehicle Diagnostic System Box and to the various other adapter harnesses going to the ski: The DESS adapter, which connects to the 9pin/6pin adapter, and connects to the DESS post. NOTE: This connection method is only used for early (19982002) models with carburetors. Do not used this adapter for later model PowerTek or fuel injected (SDI or ETec)skis . The Ski Doo Main Power Adapter Harness, which is used on most later (2003+) models. This harness has two functions; 1. Applies power to the vehicle computer to enable communication. 2. Provides the connection between the vehicle and Candoopro. The 9Volt Adapter Cable, which is used on most early models (19982002) to provide power directly to the vehicle computer (MPEM), and used on later (2003+) carburetor models with the 6pin diagnostic plug and the Main Power Adapter Harness. The 12Volt Adapter Cable, which is used on most later models (2003+) that have the 6pin diagnostic plug. The 12 volt adapter cable plugs into the Main Power Adapter Harness, which is then plugged into the 6pin diagnostic port on the vehicle. Getting Started Loading Software and Starting up the Program: First Time: (Internet Connection is REQUIRED) � � � � Install USB Drivers, by entering the following into your web browser o http://www.candoopro.com/candooinstall/driver/usbdriver.exe Connect CANDoo Professional System to the PC with the provided USB Cable Install CANDoo Professional Software, by entering the following into your web browser o http://www.candoopro.com/candooinstall/CanDooPro.msi Start CANDoo Professional by going to start menu and launching CANDoo Professional o When prompted to download the new update, you must select “YES” Each Use: (Internet Connection is Optional) � � � Connect CANDoo Professional System to the PC with the provided USB Cable Start CANDoo Professional by going to start menu and launching CANDoo Professional Bottom left of the CANDoo Professional software shows the current status � o After vehicle is connected, select Vehicle menu option and click read Vehicle Connection: NOTE: Before connecting to a ski, please read the service manual for the particular model of snowmobile! There are a huge number of different models over the years, and there are many confusing differences between the various models. Here are some general pointers for connecting to Ski Doo Snowmobiles. Most of the variation in connections (particularly power) was on 1998 to 2002 carbureted models. The vehicle computer (MPEM on early sleds, ECU or ECM on later sleds) needs power going to it to enable Candoopro to communicate to it. There are two ways this can be accomplished. One way is to apply power to the computer, using the adapter cables. The other is to start the sled. (when the sled is running, the computer is naturally powered up, either by the magneto on early sleds, or the battery/charging system and relay on later models). Most technicians prefer to apply power to the vehicle computer while the sled is not running. On most early sleds, the external power is applied by using the 9volt Adapter Cable, plugged directly into the MPEM. (A very small number of sleds need special adapters, included in the kits for the appropriate years. Refer to service manuals for these applications) In 2003, BRP simplified connecting to Ski Doos, by putting a 6pin diagnostic connector on the right side of the sled on most models (most carbureted models, and all fuel injected models) On these later sleds, the external power is applied by plugging the Main Power Adapter harness into the 6pin diagnostic connector on the sled. The 12 Volt adapter cable or 9volt adapter cable is then plugged into the matching connector on the Main Power Adapter to apply external power. (refer to the service manual for the appropriate power) If the sled has a battery, and is electric start, most operations for diagnostics and programming keys, etc, can be done without applying external power as the harness acts as a jumper for powering up the sled. If the Main Power Adapter Harness is used, you do not need to apply external power to the ski while the ski is running. Typical Connections: (refer to Service Manual for the model you are working on for exact details) Early (19982002) Carbureted models Connect the USB cable to the PC and the Candoopro Vehicle Diagnostic System box, and startup Candoopro application. Connect the 9pin/6pin adapter cable to the Candoopro Vehicle Diagnostic System box. Connect the DESS Adapter Cable to the 9pin/6pin adapter cable. Look at the MPEM; if it has a triangularshaped connector with 3pins on one end, disconnect this connector from the MPEM, and plug the 9Volt adapter cable into the MPEM. Attach a fresh 9volt battery to the 9volt Adapter cable. If the MPEM does not have the triangular shaped connector, then you should simply start the sled and run it at idle. Remove the DESS tether from the post, and grasp the aluminum end of the DESS adapter cable, and slide it onto the DESS post of the sled. View the CANdoopro application; the small vehicle icon should turn green, and “DESS Detected” should appear on the lower bar. In the Vehicle Tab, select “Read Vehicle” Once the information is read, you are ready to start your diagnosis and change settings. When you make changes, you must write the changes to the sled with the “Write Vehicle” command in the Vehicle tab Late models (2003+) with 6pin Diagnostic connector Connect the USB cable to the PC and the Candoopro Vehicle Diagnostic System box, and startup Candoopro application. Connect the 9pin/6pin adapter cable to the Candoopro Vehicle Diagnostic System box. Locate the 6pin Diagnostic port connector. It is typically on the right side of the sled in front. It is inserted into a protective cover, facing down. You need to pull it out of this protective cover by pushing the tab inward and pulling it out, usually upward. On some sleds, this connector is very difficult to remove as other harnesses are in the way. You may need to cut a tiewrap of an adjacent harness to get clearance to disconnect the connector. Connect the Main Power Adapter Harness to the 6pin diagnostic port connector. Connect the 6pin end of the 9pin/6pin cable from the Candoo box to the mating 6pin end of the Main Power Adapter Harness. View the CANdoopro application; if the the small vehicle icon should turns green, and “CAN Detected” appears on the lower bar, then you are ready to start a diagnostic session. If the vehicle indicator stays red, then you will need to apply external power. If the sled is a carbureted engine sled, then use the 9volt adapter cable with a fresh battery. If the sled is fuel injected, or PowerTEK, use the 12Volt adapter cable, and attach the clips to the vehicle battery or an external battery. NOTE: be sure to attach the RED clip to the Positive + terminal of the battery, and the BLACK clip to the Negative – terminal! Reversing these will cause damage! You should now see the vehicle icon turn green and be ready to start the session. Note: if the vehicle is a later fuel injected model, in order to use the Activate features, you must have external power applied with the 12 Volt Cable. In the Vehicle Tab, select “Read Vehicle” Once the information is read, you are ready to start your diagnosis and change settings. When you make changes, you must write the changes to the sled with the “Write Vehicle” command in the Vehicle tab. Note that with the SDI models, you must remove the DESS key from the post to finish the writing operation. Candoopro will prompt you for this. Faq’s: � � � CANDoo Professional checks for updates on startup, if there is an active internet connection. If you are using wireless and get out of range, it can cause CANDoo Professional to freeze up while trying to connect to the website on startup. We suggest disabling the wireless on your laptop if you are moving out of wireless range. Make sure you have a fully charged battery, failure to do so can cause data corruption!