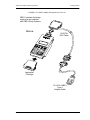
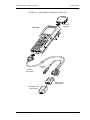
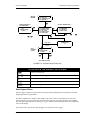
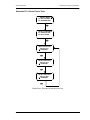
1
General Motors Body Systems Application 1988 - 2004 ® ® Vetronix Corporation Copyright © 2007 Manual P/N 08002833 Rev. B ® Tech 1 , Tech 1A , and Mastertech are registered trademarks of Vetronix Corporation Printed in USA 05/07 This entire document and all information contained herein are proprietary, confidential, and exclusive trade secret property of Vetronix Corporation, and shall not be reproduced, duplicated, or copied in whole or in part, or made available to any person, firm, or corporation without the prior written permission of Vetronix Corporation. Some Things You Should Know WARNING! Exhaust Gas When performing any checks with the engine running in an enclosed space such as a garage, be sure there is proper ventilation. Never inhale exhaust gases; they contain carbon monoxide, a colorless, odorless, extremely dangerous gas which can cause unconsciousness or death. WARNING! Avoiding Injury Always set the parking brake securely and block the drive wheels before performing any checks or repairs on the vehicle. Important—Please Read The Tech 1, Tech 1A, and MTS 3100 are designed for use by trained service personnel only. They have been developed for the sole purpose of diagnosing and repairing automotive electronic systems. With the help of the tester, the information presented in this manual and the appropriate automotive service manual, qualified personnel should be able to diagnose and repair electronic control systems. Disclaimer Every attempt has been made to provide complete and accurate technical information based on factory service information available at the time of publication. However, the right is reserved to make changes at any time without notice. FCC Compliance This equipment has been tested and found to comply with the limits for a Class A digital device, pursuant to Part 15 of the FCC Rules. These limits are designed to provide reasonable protection against harmful interference when the equipment is operated in a commercial environment. This equipment generates, uses, and can radiate radio frequency energy and, if not installed and used in accordance with the instruction manual, may cause harmful interference to radio communications. Operation of this equipment in a residential area is likely to cause harmful interference in which case the user will be required to correct the interference at his own expense. Using This Application with the MTS 3100 The MTS 3100 diagnoses OBD systems in a similar manner as the Tech 1/Tech 1A but with the addition of data display enhancements. All tester adapters required to perform OBD system diagnostics are described in this operator's manual. Be sure to read the vehicle coverage tables for proper adapter configuration before connecting to the vehicle's diagnostic data link connector. When used alone in the MTS 3100, the operation of the cartridge and the vehicle identification screens, test menus, and data screens are as described in this manual. When this application is used with the MTS 3100 in conjunction with a program card, vehicle identification screens, test menus, diagnostic trouble codes, and diagnostic data parameters can be viewed in full-screen Enhanced Mode displays. Refer to the Enhanced Mode operating instructions in the program card operator's manual for further detail. A Note about Tech 1 and Tech 1A Testers The Tech 1 was originally introduced as an OEM scan tool in 1984. The Tech 1 Series A (Tech 1A) was released in 1989 and is an updated version of the Tech 1. After 19 years of successful distribution Vetronix decided to retire the Tech 1 and Tech 1 A in 2003. This further established the MTS 3100’s foothold in the automotive service industry. Please note that while every attempt has been made to ensure the cartridge based software applications work on the Tech 1 and Tech 1A testers, Vetronix strongly recommends that Tech 1 and Tech 1A owners update to the MTS 3100 tester. Tech 1 and Tech 1A owners now qualify for special discounts on any MTS 3100 tester purchase. Please contact our customer support department for program details: 800-321-4889 Ext 4. Important—Please Read When you are using this manual to diagnose a vehicle, take the time to determine the type of tester that you are working with and be sure you are using the correct cables and adapters. Doing so may prevent misuse of application cartridges and incorrect vehicle diagnosis. Refer to Chapter 4 for complete information on the correct cables and adapters to use depending on which tester you have and the vehicle you are diagnosing. Using This Manual Reading through this manual before putting your MTS 3100 to work introduces you to all of its capabilities and tells you how to use them immediately. The application software is designed to reduce time-consuming reference to manuals as much as possible. Once you are familiar with the software and its operation, you'll be able to spend more time diagnosing and less time reading. Later, if questions arise, a quick glance at the flow chart for the test you are performing is probably all you need. The flow charts in this manual consist of screen displays enclosed in boxes. The displays are arranged in the order in which they appear while using the software. Keys on the tester keypad are shown in the manual as white letters in small black boxes. At the end of each test mode description, there is a list of the active tester keys and their functions in that particular test. Note that if you are using the MTS 3100, the display looks different for vehicle selection and data list software. Otherwise, the diagnostic routines are the same Tech 1/1A displays as those shown in this manual. Refer to the MTS 3100 Operator's Manual for examples of MTS 3100 displays. Most display screens require input from you, such as y, n, or x. To respond when the tester asks for information, just press the appropriate key on the tester keypad. Although there are exceptions, pressing x generally takes you back to the previous screen or to the beginning of a process. Please read Chapter 2 before beginning diagnostics for the first time. Manual Title Page 5 Table of Contents 1. GM BODY APPLICATION DESCRIPTION . . . . . . . . . . . . . . . . . . . SUPPORTED BODY SYSTEMS OPERATING MODES 2. ............................................. 1 ...................................................... 2 OPERATING PRECAUTIONS. . . . . . . . . . . . . . . . . . . . . . . . . . . . . . INTRODUCTION ........................................................... PRECAUTIONS FOR ALL APPLICATIONS 4 .................................. 4 4 ............................. VEHICLE COVERAGE . . . . . . . . . . . . . . . . . . . . . . . . . . . . . . . . . . . VEHICLE COVERAGE 1988 Vehicle Coverage 1989 Vehicle Coverage 1990 Vehicle Coverage 1991 Vehicle Coverage 1992 Vehicle Coverage 1993 Vehicle Coverage 1994 Vehicle Coverage 1995 Vehicle Coverage 1996 Vehicle Coverage 1997 Vehicle Coverage 1998 Vehicle Coverage 1999 Vehicle Coverage 2000 Vehicle Coverage 2001 Vehicle Coverage 2002 Vehicle Coverage 2003 Vehicle Coverage 2004 Vehicle Coverage 4. 4 Protect Against Reverse Polarity . . . . . . . . . . . . . . . . . . . . . . . . . . . . . . . . . . . . . . . . . . . . . Protect Against Voltage Spikes . . . . . . . . . . . . . . . . . . . . . . . . . . . . . . . . . . . . . . . . . . . . . . . Install/Remove Cartridges with Tester OFF . . . . . . . . . . . . . . . . . . . . . . . . . . . . . . . . . . . . Apply Parking Brake . . . . . . . . . . . . . . . . . . . . . . . . . . . . . . . . . . . . . . . . . . . . . . . . . . . . . . Protect Snapshot Data . . . . . . . . . . . . . . . . . . . . . . . . . . . . . . . . . . . . . . . . . . . . . . . . . . . . . PRECAUTIONS FOR GM BODY APPLICATION 3. 1 5 5 5 5 6 7 ..................................................... 7 ..................................................... ..................................................... ..................................................... ..................................................... ..................................................... ..................................................... ..................................................... ..................................................... ..................................................... ..................................................... ..................................................... ..................................................... ..................................................... ..................................................... ..................................................... ..................................................... ..................................................... 7 GETTING STARTED . . . . . . . . . . . . . . . . . . . . . . . . . . . . . . . . . . . . . SETTING UP THE TESTER 9 10 12 15 17 20 23 26 29 32 35 38 41 44 47 50 53 ................................................. 54 MTS 3100 . . . . . . . . . . . . . . . . . . . . . . . . . . . . . . . . . . . . . . . . . . . . . . . . . . . . . . . . . . . . . . . Tech 1A . . . . . . . . . . . . . . . . . . . . . . . . . . . . . . . . . . . . . . . . . . . . . . . . . . . . . . . . . . . . . . . . . Tech 1 . . . . . . . . . . . . . . . . . . . . . . . . . . . . . . . . . . . . . . . . . . . . . . . . . . . . . . . . . . . . . . . . . . 54 GM Body Systems Application 1988-2004 55 56 TOC-i POWERING UP THE TESTER ............................................... SELECTING THE APPLICATION ........................................... PERFORM VEHICLE AND/OR SYSTEM SELECTION ........................ 58 58 Tester/Cable/Adapter Illustrations Tester Function Keys 59 60 ..................... 61 ............................................ 66 USING THE TESTER KEYPAD AND MENUS ................................ 86 ...................................................... 86 VEHICLE IDENTIFICATION NUMBER (VIN) ............................... SELECTING AND OPERATING TEST MODES . . . . . . . . . . . . . . . . TEST MODES SUMMARY .................................................. SELECTING THE SYSTEM AND TEST MODE COMMON TEST MODES ............................... 87 88 88 91 ................................................... 91 Mode F0: DATA LIST . . . . . . . . . . . . . . . . . . . . . . . . . . . . . . . . . . . . . . . . . . . . . . . . . . . . . . Mode F1: SDL MONITOR . . . . . . . . . . . . . . . . . . . . . . . . . . . . . . . . . . . . . . . . . . . . . . . . . . Mode F2: DTC(S) . . . . . . . . . . . . . . . . . . . . . . . . . . . . . . . . . . . . . . . . . . . . . . . . . . . . . . . . . Mode F3: SNAPSHOT . . . . . . . . . . . . . . . . . . . . . . . . . . . . . . . . . . . . . . . . . . . . . . . . . . . . . Mode F8: INFORMATION . . . . . . . . . . . . . . . . . . . . . . . . . . . . . . . . . . . . . . . . . . . . . . . . . . 92 SYSTEM TEST MODES 6. 57 Selecting the Model Year . . . . . . . . . . . . . . . . . . . . . . . . . . . . . . . . . . . . . . . . . . . . . . . . . . . Selecting the Vehicle Using the VIN . . . . . . . . . . . . . . . . . . . . . . . . . . . . . . . . . . . . . . . . . . . Selecting the Vehicle Make . . . . . . . . . . . . . . . . . . . . . . . . . . . . . . . . . . . . . . . . . . . . . . . . . . ADAPTER AND ADAPTER CABLE CONFIGURATIONS 5. 56 94 97 100 108 ..................................................... 110 Air Conditioning Module (ACM) . . . . . . . . . . . . . . . . . . . . . . . . . . . . . . . . . . . . . . . . . . . . . Central Control Module (CCM) . . . . . . . . . . . . . . . . . . . . . . . . . . . . . . . . . . . . . . . . . . . . . . Body Control Module (BCM) . . . . . . . . . . . . . . . . . . . . . . . . . . . . . . . . . . . . . . . . . . . . . . . . Instrument Panel Cluster (IPC) . . . . . . . . . . . . . . . . . . . . . . . . . . . . . . . . . . . . . . . . . . . . . . Low Tire Pressure Warning System (LTPWS) . . . . . . . . . . . . . . . . . . . . . . . . . . . . . . . . . . . Remote Accessory Control (RAC) . . . . . . . . . . . . . . . . . . . . . . . . . . . . . . . . . . . . . . . . . . . . Driver Information Center (DIC) . . . . . . . . . . . . . . . . . . . . . . . . . . . . . . . . . . . . . . . . . . . . . Engine Oil Life Monitor (EOLM) . . . . . . . . . . . . . . . . . . . . . . . . . . . . . . . . . . . . . . . . . . . . . Heating, Ventilation, and Air Conditioning (HVAC) . . . . . . . . . . . . . . . . . . . . . . . . . . . . . . Remote Function Actuator (RFA) . . . . . . . . . . . . . . . . . . . . . . . . . . . . . . . . . . . . . . . . . . . . . Supplemental Inflatable Restraint (SIR) . . . . . . . . . . . . . . . . . . . . . . . . . . . . . . . . . . . . . . . . SIR Synchronization Test . . . . . . . . . . . . . . . . . . . . . . . . . . . . . . . . . . . . . . . . . . . . . . . . . . . Entertainment & Comfort Bus (E&C) . . . . . . . . . . . . . . . . . . . . . . . . . . . . . . . . . . . . . . . . . E&C Function Tests by Model Year . . . . . . . . . . . . . . . . . . . . . . . . . . . . . . . . . . . . . . . . . . . E&C Test Modes . . . . . . . . . . . . . . . . . . . . . . . . . . . . . . . . . . . . . . . . . . . . . . . . . . . . . . . . . . Finishing Up . . . . . . . . . . . . . . . . . . . . . . . . . . . . . . . . . . . . . . . . . . . . . . . . . . . . . . . . . . . . . 110 111 112 115 117 120 124 125 129 132 133 138 143 144 153 170 FINISHING UP . . . . . . . . . . . . . . . . . . . . . . . . . . . . . . . . . . . . . . . . 171 A. IF YOU’RE HAVING A PROBLEM . . . . . . . . . . . . . . . . . . . . . . . . . 172 Blank Screen . . . . . . . . . . . . . . . . . . . . . . . . . . . . . . . . . . . . . . . . . . . . . . . . . . . . . . . . . . . . . Screen Displays Solid Bars . . . . . . . . . . . . . . . . . . . . . . . . . . . . . . . . . . . . . . . . . . . . . . . . . Master Cartridge Missing or Malfunctioning . . . . . . . . . . . . . . . . . . . . . . . . . . . . . . . . . . . GM Body Systems Application 1988-2004 172 173 173 TOC-ii Wrong Display After Power is Applied . . . . . . . . . . . . . . . . . . . . . . . . . . . . . . . . . . . . . . . . Data Not Being Received . . . . . . . . . . . . . . . . . . . . . . . . . . . . . . . . . . . . . . . . . . . . . . . . . . . Intermittent Communications . . . . . . . . . . . . . . . . . . . . . . . . . . . . . . . . . . . . . . . . . . . . . . . . Data Not Received from IPC or SIR . . . . . . . . . . . . . . . . . . . . . . . . . . . . . . . . . . . . . . . . . . . E&C Components Messages (1) . . . . . . . . . . . . . . . . . . . . . . . . . . . . . . . . . . . . . . . . . . . . . . E&C Components Messages (2) . . . . . . . . . . . . . . . . . . . . . . . . . . . . . . . . . . . . . . . . . . . . . . E&C Components Messages (3) . . . . . . . . . . . . . . . . . . . . . . . . . . . . . . . . . . . . . . . . . . . . . . REPAIR SERVICE 174 174 175 176 176 177 178 .......................................................... 178 B. DATA LIST PARAMETERS . . . . . . . . . . . . . . . . . . . . . . . . . . . . . . . 179 PARAMETERS LISTED ALPHABETICALLY ................................ 180 Parameters (Numeric) . . . . . . . . . . . . . . . . . . . . . . . . . . . . . . . . . . . . . . . . . . . . . . . . . . . . . Parameters (A) . . . . . . . . . . . . . . . . . . . . . . . . . . . . . . . . . . . . . . . . . . . . . . . . . . . . . . . . . . . Parameters (B) . . . . . . . . . . . . . . . . . . . . . . . . . . . . . . . . . . . . . . . . . . . . . . . . . . . . . . . . . . . Parameters (C) . . . . . . . . . . . . . . . . . . . . . . . . . . . . . . . . . . . . . . . . . . . . . . . . . . . . . . . . . . . Parameters (D) . . . . . . . . . . . . . . . . . . . . . . . . . . . . . . . . . . . . . . . . . . . . . . . . . . . . . . . . . . . Parameters (E) . . . . . . . . . . . . . . . . . . . . . . . . . . . . . . . . . . . . . . . . . . . . . . . . . . . . . . . . . . . Parameters (F) . . . . . . . . . . . . . . . . . . . . . . . . . . . . . . . . . . . . . . . . . . . . . . . . . . . . . . . . . . . Parameters (G-H) . . . . . . . . . . . . . . . . . . . . . . . . . . . . . . . . . . . . . . . . . . . . . . . . . . . . . . . . . Parameters (I-J) . . . . . . . . . . . . . . . . . . . . . . . . . . . . . . . . . . . . . . . . . . . . . . . . . . . . . . . . . . Parameters (K-L) . . . . . . . . . . . . . . . . . . . . . . . . . . . . . . . . . . . . . . . . . . . . . . . . . . . . . . . . . Parameters (M-O) . . . . . . . . . . . . . . . . . . . . . . . . . . . . . . . . . . . . . . . . . . . . . . . . . . . . . . . . Parameters (P) . . . . . . . . . . . . . . . . . . . . . . . . . . . . . . . . . . . . . . . . . . . . . . . . . . . . . . . . . . . Parameters (Q-R) . . . . . . . . . . . . . . . . . . . . . . . . . . . . . . . . . . . . . . . . . . . . . . . . . . . . . . . . . Parameters (S) . . . . . . . . . . . . . . . . . . . . . . . . . . . . . . . . . . . . . . . . . . . . . . . . . . . . . . . . . . . Parameters (T) . . . . . . . . . . . . . . . . . . . . . . . . . . . . . . . . . . . . . . . . . . . . . . . . . . . . . . . . . . . Parameters (U-Y) . . . . . . . . . . . . . . . . . . . . . . . . . . . . . . . . . . . . . . . . . . . . . . . . . . . . . . . . . 180 181 187 188 193 202 203 206 210 214 219 223 229 236 240 245 E&C BUS MONITOR MESSAGES ........................................... 248 E&C BUS CONTROL MESSAGES ........................................... 251 C. GLOSSARY AND ABBREVIATIONS . . . . . . . . . . . . . . . . . . . . . . . . 254 INDEX ........................................................................................... GM Body Systems Application 1988-2004 Index-262 TOC-iii 1. GM BODY APPLICATION DESCRIPTION The GM Body Systems application is used to diagnose vehicle body electronic systems. The GM Body Systems application allows you to monitor data and control body system actuators/motors by communicating with the body system computers via the vehicle’s data link connector (DLC). SUPPORTED BODY SYSTEMS The GM Body Systems applications program can perform diagnostics on the following systems connected to the Serial Data Link and Entertainment & Comfort Bus: • Supplemental Inflatable Restraint (SIR) • Body Computer Module (BCM) • Instrument Panel Cluster (IPC) • Engine Oil Life Monitor (EOLM) • Remote Accessory Control (RAC) • Driver Information Center (DIC) • Heating, Ventilation, Air Conditioning (HVAC) • Computer Control Module (CCM) • Low Tire Pressure Warning System (LTPWS) • Entertainment and Comfort (E&C) • Remote Function Actuator (RFA) • Central Control Module (CCP) • Platform Zone Module (PZM) • Integrated Radio Chassis (IRC) • Heater and A/C Programmer (ACM) GM Body Systems Application 1988-2004 Page 1 Operating Modes 1. GM Body Application Description • Memory Seat Module (MSM) • Cellular Mobile Phone (PHN) • Cathode Ray Tube Controllers (CRTC) • Electronic Climate Control Panel (ECCP) There are significant differences in the diagnostic procedures for testing each of the above listed body systems. Be certain that you are following the correct operating procedures for the vehicle and body systems you are testing. The Vehicle Application Charts list the body systems available for each vehicle. See Vehicle Coverage on page 7. OPERATING MODES The following test modes are available for testing GM Body Systems (with OBD): • SDL Test Modes • E&C Test Modes SDL Test Modes Key F0: Name Data List See Mode F0: DATA LIST on Description Displays diagnostic parameters page 92. F1: SDL Monitor See Mode F1: SDL Passively monitors data which is transmitted between the different body systems. MONITOR on page 94. F2: DTCs See Mode F2: DTC(S) on page 97. F3: Snapshot See Mode F3: SNAPSHOT on page 100. Displays DTCs that have been stored by the body system computers, along with a description of the DTC. DTCs can be cleared or kept in memory for later review. Records data before and after the occurrence of an intermittent fault condition. Trigger conditions are user selectable and include trigger on body computer fault codes, or on a manual key press. Any part of the sample time can be displayed in data list format with a time/ sample stamp. F4: Special System Tests and Control Functions Bi-directional identification control system outputs trace signals for troubleshooting. You can also conduct system-specific tests such as transferring engine oil life data from one EOLM to another, and programming new RAC key-tag signals. F5: VIN and Option Control See Mode F5: VIN and Option Read the vehicle identification number (VIN) and display which options are installed on the vehicle. Content on page 114. F8: Information GM Body Systems Application 1988-2004 Display vehicle information, such as ECU identification information (serial number, make date, etc.) and vehicle information, such as VIN. Page 2 Operating Modes 1. GM Body Application Description E&C Test Modes Key F0: Name E&C Monitor See Entertainment & Comfort Description Monitors transmissions on the E&C bus. Bus (E&C) on page 143. F1: Component Identification See Mode F1: Identify on Displays which components are connected to the E&C bus. Identifies E&C bus faults. page 157. F3 Snapshot See Mode F3: Snapshot on Captures and stores E&C messages. page 159. F4: Control Test See Mode F4: E&C Control Transmits E&C messages on the bus. on page 162. F5: Speaker Test See Mode F5: Speaker Test Routes the audio signal to user selected speakers. on page 169. GM Body Systems Application 1988-2004 Page 3 2. OPERATING PRECAUTIONS INTRODUCTION This chapter explains precautions that are very important when using Vetronix testers and application software with a vehicle. Failure to observe these precautions could affect the operation of the tester, the accuracy of data and tests, and at times your safety. Read all of this chapter before you operate the tester and application software (cartridges). Safeguards have been built into the tester to protect you, the vehicle, and the tester from any hazards. Misuse or improper securing of the vehicle could lead to unsafe conditions. PRECAUTIONS FOR ALL APPLICATIONS PROTECT AGAINST REVERSE POLARITY CAUTION! CAUTION If power is applied to the tester and the Tech 1A or Tech 1 display remains blank or the green LED on the MTS 3100 does not illuminate when turned off, reverse polarity in the cigarette lighter may be present. Damage to the tester could occur. DO NOT connect the ALDL/DLC cable to the vehicle. Verify that the center contact of the vehicle’s cigarette lighter has +12 volts and that the outer contact is grounded. GM Body Systems Application 1988-2004 Page 4 Precautions for All Applications 2. Operating Precautions PROTECT AGAINST VOLTAGE SPIKES CAUTION! CAUTION Due to the possibility of voltage spikes that could damage the vehicle or tester, do not connect or disconnect the tester while the ignition key is ON or while the engine is running. INSTALL/REMOVE CARTRIDGES WITH TESTER OFF Do not install or remove application or auxiliary cartridges while power is applied to the tester. To change or add a cartridge, do the following: 1. Turn the ignition OFF. CAUTION! CAUTION 2. Disconnect the tester power source—either the cigarette lighter power plug or the ALDL/DLC Cable—from the vehicle. 3. For the MTS 3100, press p, x to turn the tester OFF. 4. Change or install the cartridge(s). 5. Reconnect the tester power source—either the cigarette lighter power plug or the ALDL/DLC Cable. 6. Turn the ignition ON. APPLY PARKING BRAKE WARNING! OBD CONTROLS MODE OPERATION Use care when performing these tests. If used incorrectly, these test can result in personal injury or damage to the ECM, TCM, PCM, VCM, ATC, or AFECU or vehicle. ALWAYS PUT THE PARKING BRAKE ON, AND BLOCK THE WHEELS WHEN USING THIS TEST MODE. PROTECT SNAPSHOT DATA CAUTION! CAUTION Snapshot data is retained in tester memory for up to 24 hours, even if the tester is disconnected from the vehicle. If you remove or change master cartridges, or power up the tester without a master cartridge or with a different master cartridge, you lose the snapshot data. GM Body Systems Application 1988-2004 Page 5 Precautions for GM Body Application 2. Operating Precautions PRECAUTIONS FOR GM BODY APPLICATION CHECK TESTER INDUCED DTCs CAUTION! CAUTION Under some conditions the tester can cause trouble codes to be set. Generally these codes are associated with the serial data link. It is important to determine if the trouble codes are set by the tester or are due to a true malfunction in the vehicle. Check for trouble codes at the start and at the end of testing. If there are codes set at the end of testing—but not at the start—you may assume that they are caused by the tester and should be cleared and ignored. E, K, V, or Y Body vehicles can use onboard diagnostics or the GM Body System application to check ECM, BCM, or CCM codes. GM Body Systems Application 1988-2004 Page 6 3. VEHICLE COVERAGE Use this section to assist you in operating your Vetronix tester and application software. It covers everything needed to get your tester connected to the vehicle and begin performing the system diagnostic functions. It is suggested that you read this manual completely before operating the tester and the application software. VEHICLE COVERAGE GM vehicles and models that can be tested with the GM Body Systems Application are listed in the Vehicle Application Charts on the following pages. Remember that in most cases BCM, IPC, RAC, DIC, HVAC, E&C, and other Body systems are options and might not be installed on the vehicle you are testing. Refer to the following charts for vehicle, body systems, and adapter configurations needed to connect the tester to the appropriate vehicle. 1988 VEHICLE COVERAGE 1988 Buick Passenger Cars MODEL BODY VIN 4TH DIGIT SYSTEM DATA LINK ADAPTER CONFIG Reatta E E&C, BCM UART GM Skylark Custom, Skylark Limited N E&C UART GM Regal W E&C, IPC UART GM GM Body Systems Application 1988-2004 Page 7 Vehicle Coverage 3. Vehicle Coverage 1988 Cadillac Passenger Cars MODEL BODY VIN 4TH DIGIT SYSTEM DATA LINK ADAPTER CONFIG Eldorado E BCM UART GM Seville K BCM UART GM 1988 Oldsmobile Passenger Cars BODY VIN 4TH DIGIT SYSTEM DATA LINK ADAPTER CONFIG Delta 88 Int’l, Royale Delta, 88 Royale Brougham E E&C, BCM UART GM Cutlass Supreme W E&C, IPC UART GM MODEL 1988 Pontiac Passenger Cars MODEL BODY VIN 4TH DIGIT SYSTEM DATA LINK ADAPTER CONFIG W E&C, IPC UART GM Grand Prix, Grand Prix LE, Grand Prix SE 1988 Light Duty Trucks MAKE MODEL BODY VIN 5TH DIGIT BODY DATA LINK ADAPTER CONFIG Chevrolet, GMC All Models C/K E&C UART GM GM Body Systems Application 1988-2004 Page 8 Vehicle Coverage 3. Vehicle Coverage 1989 VEHICLE COVERAGE 1989 Buick Passenger Cars BODY VIN 4TH DIGIT SYSTEM DATA LINK ADAPTER CONFIG Electra Limited, Electra Park Ave C E&C UART GM Reatta, Riviera E E&C, BCM UART GM Skylark N E&C UART GM Regal W E&C, IPC UART GM DATA LINK ADAPTER CONFIG MODEL 1989 Cadillac Passenger Cars MODEL BODY VIN 4TH DIGIT SYSTEM Deville, Fleetwood, Fleetwood 60 Special C SIR DERM UART GM Eldorado E BCM UART GM Seville K BCM UART GM Allante V E&C UART GM 1989 Oldsmobile Passenger Cars MODEL BODY VIN 4TH DIGIT SYSTEM DATA LINK ADAPTER CONFIG Regency C E&C UART GM Toronado E E&C, BCM UART GM Cutlass Supreme W E&C, IPC UART GM GM Body Systems Application 1988-2004 Page 9 Vehicle Coverage 3. Vehicle Coverage 1989 Pontiac Passenger Cars MODEL BODY VIN 4TH DIGIT SYSTEM DATA LINK ADAPTER CONFIG Bonneville H E&C UART GM Sunbird J E&C UART GM Grand Prix W E&C, IPC UART GM 1989 Light Duty Trucks MAKE MODEL BODY 5TH DIGIT Chevrolet, GMC All Models C/K SYSTEM DATA LINK ADAPTER CONFIG E&C UART GM 1990 VEHICLE COVERAGE 1990 Buick Passenger Cars MODEL BODY VIN 4TH DIGIT SYSTEM DATA LINK ADAPTER CONFIG Electra C E&C UART GM Reatta, Riviera E SIR, BCM UART GM Le Sabre H E&C UART GM Skylark N E&C UART GM Regal W IPC UART GM GM Body Systems Application 1988-2004 Page 10 Vehicle Coverage 3. Vehicle Coverage 1990 Cadillac Passenger Cars BODY VIN 4TH DIGIT SYSTEM DATA LINK ADAPTER CONFIG Fleetwood, Fleetwood 60 Special C SIR, BCM UART GM Brougham D E&C UART GM Eldorado E SIR, BCM UART GM Seville K SIR, E&C, BCM UART GM Allante V E&C UART GM MODEL 1990 Chevrolet Passenger Cars MODEL BODY VIN 4TH DIGIT SYSTEM DATA LINK ADAPTER CONFIG Camaro F SIR UART GM Corvette Y SIR, E&C, CCM UART GM-S 1990 Geo Passenger Cars MODEL BODY VIN 4TH DIGIT SYSTEM DATA LINK ADAPTER CONFIG Metro, Sprint M SIR UART GM Storm R SIR UART GM-D 1990 Oldsmobile Passenger Cars MODEL BODY VIN 4TH DIGIT SYSTEM DATA LINK ADAPTER CONFIG 98 Regency C E&C UART GM Toronado E SIR, E&C, BCM UART GM Cutlass Supreme W IPC UART GM GM Body Systems Application 1988-2004 Page 11 Vehicle Coverage 3. Vehicle Coverage 1990 Pontiac Passenger Cars MODEL BODY VIN 4TH DIGIT SYSTEM DATA LINK ADAPTER CONFIG 6000 A E&C UART GM Firebird F SIR UART GM Bonneville H E&C UART GM Cutlass J E&C UART GM Grand Prix W E&C, IPC UART GM 1990 Light Duty Trucks, MPV MAKE MODEL BODY VIN 5TH DIGIT SYSTEM DATA LINK ADAPTER CONFIG Chevrolet, GMC All Models C/K E&C UART GM 1991 VEHICLE COVERAGE 1991 Buick Passenger Cars MODEL BODY VIN 4TH DIGIT SYSTEM DATA LINK ADAPTER CONFIG Roadmaster B SIR UART GM Electra C SIR, E&C, RAC, EOLM UART GM Reatta, Riviera E SIR, E&C, BCM UART GM Le Sabre H E&C UART GM Skylark N E&C UART GM Regal W E&C, IPC UART GM GM Body Systems Application 1988-2004 Page 12 Vehicle Coverage 3. Vehicle Coverage 1991 Cadillac Passenger Cars MODEL BODY VIN 4TH DIGIT SYSTEM DATA LINK ADAPTER CONFIG Deville, Fleetwood C SIR, E&C, BCM UART GM Brougham D E&C UART GM Eldorado E SIR, E&C, BCM UART GM Seville K SIR, E&C, BCM UART GM Allante V SIR, E&C UART GM 1991 Chevrolet Passenger Cars MODEL BODY VIN 4TH DIGIT SYSTEM DATA LINK ADAPTER CONFIG Caprice B SIR UART GM Cavalier F SIR, E&C UART GM Corsica, Beretta L SIR,E&C UART GM-S Corvette Y SIR, E&C, CCM, LTPWS UART GM 1991 Geo Passenger Cars MODEL BODY VIN 4TH DIGIT SYSTEM DATA LINK ADAPTER CONFIG Metro, Sprint M SIR UART GM Storm R SIR UART GM-D GM Body Systems Application 1988-2004 Page 13 Vehicle Coverage 3. Vehicle Coverage 1991 Oldsmobile Passenger Cars MODEL BODY VIN 4TH DIGIT SYSTEM DATA LINK ADAPTER CONFIG Custom Cruiser B SIR UART GM Ninety-Eight, Touring Sedan C SIR, E&C, RAC, DIC UART GM Toronado E SIR, E&C, BCM UART GM Eighty Eight H E&C UART GM Achieva N E&C UART GM Cutlass N E&C UART GM Cutlass Supreme W E&C UART GM 1991 Pontiac Passenger Cars MODEL BODY VIN 4TH DIGIT SYSTEM DATA LINK ADAPTER CONFIG Firebird F SIR UART GM Bonneville H E&C UART GM Sunbird J E&C UART GM Grand Am N E&C UART GM Grand Prix W E&C, IPC UART GM 1991 Light Duty Trucks, MPV MAKE MODEL BODY VIN 5TH DIGIT SYSTEM DATA LINK ADAPTER CONFIG Chevrolet, GMC All Models C/K E&C UART GM GM Body Systems Application 1988-2004 Page 14 Vehicle Coverage 3. Vehicle Coverage 1992 VEHICLE COVERAGE 1992 Buick Passenger Cars MODEL BODY VIN 4TH DIGIT SYSTEM DATA LINK ADAPTER CONFIG Century A E&C UART GM Roadmaster B SIR UART GM Electra C SIR, E&C, RAC, HVAC, EOLM UART GM Reatta E E&C, BCM UART GM Riviera E SIR, E&C, BCM UART GM Le Sabre H SIR, E&C, RAC, HVAC, EOLM UART GM Skylark N E&C UART GM Regal W E&C UART GM 1992 Cadillac Passenger Cars MODEL BODY VIN 4TH DIGIT SYSTEM DATA LINK ADAPTER CONFIG Deville, Fleetwood C SIR, E&C, BCM UART GM Brougham D E&C UART GM Eldorado E SIR, E&C, IPC UART GM Seville K SIR, E&C, IPC UART GM Allante V SIR, E&C UART GM 1992 Chevrolet Passenger Cars MODEL BODY VIN 4TH DIGIT SYSTEM DATA LINK ADAPTER CONFIG Caprice B SIR UART GM Camaro F SIR, E&C UART GM Cavalier J E&C UART GM Beretta, Corsica L SIR, E&C UART GM GM Body Systems Application 1988-2004 Page 15 Vehicle Coverage 3. Vehicle Coverage 1992 Chevrolet Passenger Cars (Continued) Lumina W E&C UART GM Corvette Y SIR, E&C, CCM, LTPWS UART GM 1992 Geo Passenger Cars MODEL BODY VIN 4TH DIGIT SYSTEM DATA LINK ADAPTER CONFIG Sprint M SIR UART GM Storm R SIR UART GM-D 1992 Oldsmobile Passenger Cars MODEL BODY VIN 4TH DIGIT SYSTEM DATA LINK ADAPTER CONFIG Custom Cruiser B SIR UART GM Ninety-Eight C SIR, E&C, DIC, HVAC, RAC UART GM Toronado E SIR, E&C, BCM UART GM Eighty Eight H SIR, E&C, DIC, HVAC, RAC UART GM Achieva, Cutlass Calais N E&C UART GM Cutlass W E&C UART GM 1992 Pontiac Passenger Cars MODEL BODY VIN 4TH DIGIT SYSTEM DATA LINK ADAPTER CONFIG Firebird F SIR, E&C UART GM Bonneville H SIR, E&C, RAC, HVAC UART GM Tempest I SIR, E&C UART GM Sunbird J E&C UART GM Grand Am N E&C UART GM Grand Prix W E&C UART GM GM Body Systems Application 1988-2004 Page 16 Vehicle Coverage 3. Vehicle Coverage 1992 Saturn Passenger Cars MODEL BODY VIN 4TH DIGIT SYSTEM DATA LINK ADAPTER CONFIG SC, SL Z SIR UART GM 1992 Light Duty Trucks, MPV MAKE MODEL BODY VIN 5TH DIGIT SYSTEM DATA LINK ADAPTER CONFIG Chevrolet, GMC All Models C/K E&C UART GM 1993 VEHICLE COVERAGE 1993 Buick Passenger Cars MODEL BODY VIN 4TH DIGIT SYSTEM DATA LINK ADAPTER CONFIG Century A SIR, E&C UART GM Roadmaster B SIR, E&C UART GM Electra C SIR, E&C, RAC, EOLM, HVAC UART GM Reatta, Riviera E SIR, E&C, BCM UART GM Le Sabre H SIR, E&C, RAC, EOLM, HVAC UART GM Skylark N E&C UART GM Regal W E&C UART GM GM Body Systems Application 1988-2004 Page 17 Vehicle Coverage 3. Vehicle Coverage 1993 Cadillac Passenger Cars MODEL BODY VIN 4TH DIGIT SYSTEM DATA LINK ADAPTER CONFIG Deville C SIR, E&C, BCM UART GM Fleetwood C SIR, E&C, BCM, EOLM UART GM Brougham D SIR, E&C, CCM UART GM Eldorado E SIR, E&C, IPC UART GM Deville K SIR, E&C, IPC UART GM Allante V SIR, E&C UART GM 1993 Chevrolet Passenger Cars MODEL BODY VIN 4TH DIGIT SYSTEM DATA LINK ADAPTER CONFIG Caprice B SIR, E&C UART GM Camaro F SIR, E&C UART GM Beretta, Corsica L SIR, E&C UART GM Corvette Y SIR, E&C, CCM, LTPWS UART GM 1993 Geo Passenger Cars MODEL BODY VIN 4TH DIGIT SYSTEM DATA LINK ADAPTER CONFIG Metro M SIR UART GM Storm R SIR UART GM Prizm S SIR UART GM-P GM Body Systems Application 1988-2004 Page 18 Vehicle Coverage 3. Vehicle Coverage 1993 Oldsmobile Passenger Cars MODEL BODY VIN 4TH DIGIT SYSTEM DATA LINK ADAPTER CONFIG Cutlass A SIR UART GM Custom Cruiser B SIR, E&C UART GM Ninety-Eight C SIR, E&C, DIC, HVAC, RAC UART GM Royale H SIR, E&C, DIC, RAC, HVAC UART GM Cutlass Supreme, Ninety-Eight W E&C UART GM 1993 Pontiac Passenger Cars MODEL BODY VIN 4TH DIGIT SYSTEM DATA LINK ADAPTER CONFIG Firebird F SIR, E&C UART GM Bonneville H SIR, E&C, RAC, HVAC UART GM Sunbird J E&C UART GM Grand Prix W E&C UART GM 1993 Saturn Passenger Cars MODEL BODY VIN 4TH DIGIT SYSTEM DATA LINK ADAPTER CONFIG SC, SL, SW Z SIR UART GM GM Body Systems Application 1988-2004 Page 19 Vehicle Coverage 3. Vehicle Coverage 1993 Light Duty Trucks, Vans, MPVs MAKE MODEL BODY VIN 5TH DIGIT SYSTEM DATA LINK ADAPTER CONFIG Chevrolet, GMC All Models C/K E&C UART GM Chevrolet, GMC Astro Van, Safari, Safari XT L/M SIR UART GM Oldsmobile Silhouette U SIR, E&C UART GM Pontiac Transport U SIR, E&C UART GM 1994 VEHICLE COVERAGE 1994 Buick Passenger Cars MODEL BODY VIN 4TH DIGIT SYSTEM DATA LINK ADAPTER CONFIG Century A SIR, E&C UART GM Roadmaster B SIR, E&C, HVAC UART GM Park Avenue C SIR, E&C, RAC, EOLM, HVAC UART OBD II-C2/ GM-16 Le Sabre H SIR, E&C, RAC, EOLM, HVAC UART OBD II-C2/ GM-16 Skylark N SIR, E&C UART GM Regal W SIR, E&C UART GM DATA LINK ADAPTER CONFIG 1994 Cadillac Passenger Cars MODEL BODY VIN 4TH DIGIT Fleetwood D SIR, E&C, CCM, HVAC UART GM Eldorado E SIR, E&C, IPC UART GM Seville K SIR, E&C, IPC UART OBD II-C2/ GM-16 GM Body Systems Application 1988-2004 SYSTEM Page 20 Vehicle Coverage 3. Vehicle Coverage 1994 Chevrolet Passenger Cars MODEL BODY VIN 4TH DIGIT SYSTEM DATA LINK ADAPTER CONFIG Caprice B SIR, E&C UART GM Camaro F SIR, E&C UART OBD II-C2/ GM-16 Cavalier J SIR, E&C UART GM Beretta L SIR, E&C UART GM Lumina W SIR, E&C UART GM Corvette Y SIR, E&C, CCM, LTPWS UART OBD II-C2/ GM-16 1994 Geo Passenger Cars MODEL BODY VIN 4TH DIGIT SYSTEM DATA LINK ADAPTER CONFIG Prizm S SIR Flash Codes GM-P 1994 Oldsmobile Passenger Cars MODEL BODY VIN 4TH DIGIT SYSTEM DATA LINK ADAPTER CONFIG Cutlass Ciera A SIR UART GM Regency C SIR, E&C, RAC, EOLM, HVAC UART OBD II-C2/ GM-16 Royale H SIR, E&C, RAC, EOLM, HVAC UART OBD II-C2/ GM-16 Achieva N SIR, E&C UART GM Cutlass W SIR, E&C UART GM GM Body Systems Application 1988-2004 Page 21 Vehicle Coverage 3. Vehicle Coverage 1994 Pontiac Passenger Cars MODEL BODY VIN 4TH DIGIT SYSTEM DATA LINK ADAPTER CONFIG Firebird F SIR, E&C UART GM Bonneville H SIR, E&C, RAC, EOLM, HVAC UART OBD II-C2/ GM-16 Sunbird J SIR, E&C UART GM Grand Am N SIR, E&C UART GM Grand Prix W SIR, E&C UART GM 1994 Saturn Passenger Cars MODEL BODY VIN 4TH DIGIT SYSTEM DATA LINK ADAPTER CONFIG SC, SL, SW Z SIR UART GM 1994 Light Duty Trucks, Vans, MPVs MAKE MODEL BODY VIN 5TH DIGIT SYSTEM DATA LINK ADAPTER CONFIG Chevrolet, GMC All Models C/K SIR, E&C UART GM Chevrolet, GMC All Models L/M SIR, E&C UART GM Chevrolet, GMC All Models S/T E&C UART GM Chevrolet Pontiac Oldsmobile All Models U E&C UART GM GM Body Systems Application 1988-2004 Page 22 Vehicle Coverage 3. Vehicle Coverage 1995 VEHICLE COVERAGE 1995 Buick Passenger Cars MODEL BODY VIN 4TH DIGIT SYSTEM DATA LINK ADAPTER CONFIG Century A SIR, E&C UART GM Roadmaster B SIR, E&C, HVAC UART GM Park Avenue C SIR, E&C, RAC, HVAC UART OBD II-C2/ GM-16 Riviera G SIR, E&C, RAC, HVAC, IPC UART OBD II-C2/ GM-16 Le Sabre H SIR, E&C, RAC, HVAC UART OBD II-C2/ GM-16 Skylark N SIR, E&C UART GM Regal W SIR, E&C UART GM DATA LINK ADAPTER CONFIG 1995 Cadillac Passenger Cars MODEL BODY VIN 4TH DIGIT Fleetwood D SIR, E&C, CCM, HVAC, UART GM Eldorado E SIR, E&C, IPC UART GM Deville K SIR, E&C, IPC UART GM Seville K SIR, E&C, IPC UART GM GM Body Systems Application 1988-2004 SYSTEM Page 23 Vehicle Coverage 3. Vehicle Coverage 1995 Chevrolet Passenger Cars MODEL BODY VIN 4TH DIGIT SYSTEM DATA LINK ADAPTER CONFIG Caprice B SIR, E&C UART GM Camaro F SIR, E&C UART OBD II-C2/ GM-16 Cavalier J SIR, IPC, E&C UART OBD II-C2/ GM-16 Corsica L SIR, E&C UART GM Lumina Monte Carlo W SIR, E&C UART GM Corvette Y SIR, E&C, CCM, LTPWS UART OBD II-C2/ GM-16 1995 Geo Passenger Cars MODEL BODY VIN 4TH DIGIT SYSTEM DATA LINK ADAPTER CONFIG Metro M SIR UART OBD II-C2/ GM-16 Prizm S SIR UART GM-P 1995 Oldsmobile Passenger Cars MODEL BODY VIN 4TH DIGIT SYSTEM DATA LINK ADAPTER CONFIG Cutlass Ciera A SIR UART GM Regency C SIR, E&C, RAC, HVAC, UART OBD II-C2/ GM-16 Aurora G SIR, E&C, RAC, DIC, HVAC, IPC UART OBD II-C2/ GM-16 Eighty Eight H SIR, E&C, RAC, HVAC, UART OBD II-C2/ GM-16 Achieva N SIR, E&C UART OBD II-C2/ GM-16 Cutlass Supreme W SIR, E&C UART GM GM Body Systems Application 1988-2004 Page 24 Vehicle Coverage 3. Vehicle Coverage 1995 Pontiac Passenger Cars MODEL BODY VIN 4TH DIGIT SYSTEM DATA LINK ADAPTER CONFIG Firebird F SIR, E&C UART OBD II-C2/ GM-16 Bonneville H SIR, E&C, RAC, HVAC, UART GM Sunfire J SIR, E&C, IPC UART OBD II-C2/ GM-16 Grand Am N SIR, E&C UART GM Grand Prix W SIR, E&C UART GM 1995 Saturn Passenger Cars MODEL BODY VIN 4TH DIGIT SYSTEM DATA LINK ADAPTER CONFIG SC, SL, SW Z SIR UART OBD II-C2/ GM-16 1995 Light Duty Trucks, Vans, MPVs MAKE MODEL BODY VIN 5TH DIGIT SYSTEM DATA LINK ADAPTER CONFIG Chevrolet, GMC All Models C/K SIR, E&C UART GM Chevrolet, GMC All Models L/M SIR, E&C UART GM Chevrolet, GMC All Models S/T SIR, E&C UART OBD II-C2/ GM-16 Chevrolet, Pontiac, Oldsmobile All Models U E&C UART GM GM Body Systems Application 1988-2004 Page 25 Vehicle Coverage 3. Vehicle Coverage 1996 VEHICLE COVERAGE 1996 Buick Passenger Cars MODEL BODY VIN 4TH DIGIT SYSTEM DATA LINK ADAPTER CONFIG Century A SIR, E&C, UART OBD II-C2/ GM-16 Roadmaster B SIR, E&C, HVAC UART OBD II-C2/ GM-16 Park Avenue C SIR, E&C, IPC, HVAC UART OBD II-C2/ GM-16 RFA Class 2 OBD II-C2 SIR, E&C, HVAC, IPC UART OBD II-C2/ GM-16 RFA Class 2 OBD II-C2 SIR, E&C, HVAC UART OBD II-C2/ GM-16 RFA Class 2 OBD II-C2 Riviera Le Sabre G H Skylark N SIR, E&C, IPC UART OBD II-C2/ GM-16 Regal W SIR, E&C UART OBD II-C2/ GM-16 DATA LINK ADAPTER CONFIG 1996 Cadillac Passenger Cars MODEL BODY VIN 4TH DIGIT Fleetwood D SIR, E&C, CCM, HVAC UART OBD II-C2/ GM-16 Eldorado E RFA, CCP, IPC, PZM, IRC, ACM, MSM, PHN Class 2 OBD II-C2 SIR, E&C UART OBD II-C2/ GM-16 RFA, CCP, IPC, PZM, IRC, ACM, MSM, PHN Class 2 OBD II-C2 E&C UART OBD II-C2/ GM-16 Deville, Concours, Seville K GM Body Systems Application 1988-2004 SYSTEM Page 26 Vehicle Coverage 3. Vehicle Coverage 1996 Chevrolet Passenger Cars MODEL BODY VIN 4TH DIGIT SYSTEM DATA LINK ADAPTER CONFIG Caprice Classic, Impala B SIR, E&C UART OBD II-C2/ GM-16 Camaro F SIR, E&C UART OBD II-C2/ GM-16 Cavalier J SIR, E&C, IPC UART OBD II-C2/ GM-16 Beretta, Corsica L SIR, E&C UART OBD II-C2/ GM-16 Monte Carlo, Lumina W SIR, E&C UART OBD II-C2/ GM-16 Corvette Y SIR, E&C, CCM, LTPWS UART OBD II-C2/ GM-16 1996 Geo Passenger Cars MODEL BODY VIN 4TH DIGIT SYSTEM DATA LINK ADAPTER CONFIG Metro LSI M SIR UART OBD II-C2/ GM-16 Prizm LSI S SIR Flash Code GM-P 1996 Oldsmobile Passenger Cars MODEL BODY VIN 4TH DIGIT SYSTEM DATA LINK ADAPTER CONFIG Cutlass Ciera A SIR UART OBD II-C2/ GM-16 98 Regency C SIR, E&C, HVAC UART OBD II-C2/ GM-16 RFA Class 2 OBD II-C2 GM Body Systems Application 1988-2004 Page 27 Vehicle Coverage 3. Vehicle Coverage 1996 Oldsmobile Passenger Cars Aurora 88 Royale G SIR, E&C, DIC, HVAC, IPC UART OBD II-C2/ GM-16 RFA Class 2 OBD II-C2 SIR, E&C, HVAC UART OBD II-C2/ GM-16 RFA Class 2 OBD II-C2 H Achieva N SIR, E&C, IPC UART OBD II-C2/ GM-16 Cutlass Supreme W SIR, E&C, UART OBD II-C2/ GM-16 1996 Pontiac Passenger Cars MODEL BODY VIN 4TH DIGIT SYSTEM DATA LINK ADAPTER CONFIG Firebird F SIR, E&C UART OBD II-C2/ GM-16 Bonneville H SIR, E&C, HVAC, IPC UART OBD II-C2/ GM-16 RFA Class 2 OBD II-C2 Sunfire J SIR, E&C, IPC UART OBD II-C2/ GM-16 Grand Am N SIR, E&C, IPC UART OBD II-C2/ GM-16 Grand Prix W SIR, E&C UART OBD II-C2/ GM-16 1996 Saturn Passenger Cars MODEL BODY VIN 4TH DIGIT SYSTEM DATA LINK ADAPTER CONFIG SL, SC, SW Z SIR UART OBD II-C2/ GM-16 GM Body Systems Application 1988-2004 Page 28 Vehicle Coverage 3. Vehicle Coverage 1996 Light Duty Trucks, Vans, MPVs MAKE MODEL BODY VIN 5TH DIGIT SYSTEM DATA LINK ADAPTER CONFIG Chevrolet, GMC All Models C/K L/M SIR, E&C UART GM Chevrolet, GMC All Models S/T SIR, E&C UART OBD II-C2/ GM-16 Geo Tracker E/J SIR UART GM Chevrolet, Pontiac, Oldsmobile All Models U SIR UART GM 1997 VEHICLE COVERAGE 1997 Buick Passenger Cars MODEL BODY VIN 4TH DIGIT SYSTEM DATA LINK ADAPTER CONFIG Park Avenue C HVAC Class 2 OBD II-C2 SIR (SDM-RCL2) Riviera G SIR (SDM-RSD) UART OBD II-C2/ GM-16 Le Sabre H SIR (SDM-RSD) UART OBD II-C2/ GM-16 Skylark N SIR (SDM-RSD) UART OBD II-C2/ GM-16 Regal W Auto HVAC Class 2 OBD II-C2 SIR (SDM-RSD) UART OBD II-C2/ GM-16 1997 Cadillac Passenger Cars MODEL BODY VIN 4TH DIGIT SYSTEM DATA LINK ADAPTER CONFIG Eldorado E SIR (SDM-RCL2) Class 2 OBD II-C2 Deville K SIR (SDM-RCL2) Class 2 OBD II-C2 GM Body Systems Application 1988-2004 Page 29 Vehicle Coverage 3. Vehicle Coverage 1997 Chevrolet Passenger Cars MODEL BODY VIN 4TH DIGIT SYSTEM DATA LINK ADAPTER CONFIG Camaro F SIR (SDM-RSD) UART OBD II-C2/ GM-16 Cavalier J SIR (SDM-RSD) UART OBD II-C2/ GM-16 Malibu N SIR (SDM-RSD) UART OBD II-C2/ GM-16 Lumina, Monte Carlo W SIR (SDM-RSD) UART OBD II-C2/ GM-16 Corvette Y SIR (SDM-RSD) UART OBD II-C2/ GM-16 1997 Geo Passenger Cars MODEL BODY VIN 4TH DIGIT SYSTEM DATA LINK ADAPTER CONFIG Metro M SIR (SDM-I) UART OBD II-C2/ GM-16 Prizm LSI S SIR FLASH CODE GM-P 1997 Oldsmobile Passenger Cars MODEL BODY VIN 4TH DIGIT SYSTEM DATA LINK ADAPTER CONFIG Aurora G SIR (SDM-RSD) UART OBD II-C2/ GM-16 Eighty Eight, LSS, Regency H SIR (SDM-RSD) UART OBD II-C2/ GM-16 Achieva, Cutlass N SIR (SDM-RSD) UART OBD II-C2/ GM-16 Cutlass Supreme, Intrigue W SIR (SDM-B) UART OBD II-C2/ GM-16 GM Body Systems Application 1988-2004 Page 30 Vehicle Coverage 3. Vehicle Coverage 1997 Pontiac Passenger Cars BODY VIN 4TH DIGIT SYSTEM DATA LINK ADAPTER CONFIG Firebird, Trans Am F SIR (SDM-RSD) UART OBD II-C2/ GM-16 Bonneville H SIR (SDM-RSD) UART OBD II-C2/ GM-16 Sunfire J SIR (SDM-RSD) UART OBD II-C2/ GM-16 Grand Am N SIR (SDM-RSD) UART OBD II-C2/ GM-16 Grand Prix W SIR (SDM-RSD) UART OBD II-C2/ GM-16 MODEL 1997 Saturn Passenger Cars MODEL BODY VIN 4TH DIGIT SYSTEM DATA LINK ADAPTER CONFIG SL, SC, SW Z SIR (SDM-RSD) UART OBD II-C2/ GM-16 1997 Light Duty Trucks, Vans, MPVs MAKE MODEL BODY VIN 5TH DIGIT SYSTEM DATA LINK ADAPTER CONFIG Chevrolet, GMC All Models C/K (SUV) SIR (SDM-RSD) UART OBD II-C2/ GM-16 GM Body Systems Application 1988-2004 Page 31 Vehicle Coverage 3. Vehicle Coverage 1997 Light Duty Trucks, Vans, MPVs Geo Tracker E/J SIR (SDM-I) UART OBD II-C2/ GM-16 All Makes All Models G SIR (SDM-RSD) UART OBD II-C2/ GM-16 Chevrolet, Pontiac, Oldsmobile All Models U/X SIR (SDM-RSD) UART OBD II-C2/ GM-16 Chevrolet, GMC All Models M/L SIR (SDM-RSD) UART OBD II-C2/ GM-16 Chevrolet, Oldsmobile, GMC All Models S/T SIR (DDM 94) UART OBD II-C2/ GM-16 Chevrolet, GMC All Models C/K, S/T SIR (SDM-RS) UART OBD II-C2/ GM-16 1998 VEHICLE COVERAGE 1998 Buick Passenger Cars MODEL BODY VIN 4TH DIGIT SYSTEM DATA LINK ADAPTER CONFIG Park Avenue C HVAC Class 2 OBD II-C2 SIR (SDM-RCL2) Riviera G SIR (SDM-RCL2) UART OBD II-C2/ GM-16 Le Sabre H SIR (SDM-RCL2) UART OBD II-C2/ GM-16 Skylark N SIR (SDM-RCL2) UART OBD II-C2/ GM-16 Century, Regal W Auto HVAC Class 2 OBD II-C2 SIR (SDM-RCL2) UART OBD II-C2/ GM-16 GM Body Systems Application 1988-2004 Page 32 Vehicle Coverage 3. Vehicle Coverage 1998 Cadillac Passenger Cars MODEL BODY VIN 4TH DIGIT SYSTEM DATA LINK ADAPTER CONFIG Eldorado E SIR (SDM-RCL2) Class 2 OBD II-C2 Deville K SIR (SDM-RCL2) Class 2 OBD II-C2 1998 Chevrolet Passenger Cars MODEL BODY VIN 4TH DIGIT SYSTEM DATA LINK ADAPTER CONFIG Camaro F SIR (SDM-RSD) UART OBD II-C2/ GM-16 Cavalier J SIR (SDM-RSD) UART OBD II-C2/ GM-16 Metro M SIR (SDM-I) UART OBD II-C2/ GM-16 Malibu N SIR (SDM-RSD) UART OBD II-C2/ GM-16 Prizm LSI S SIR Flash Code GM-P Lumina, Monte Carlo W SIR (SDM-RSD) UART OBD II-C2/ GM-16 Corvette Y SIR (SDM-RSD) UART OBD II-C2/ GM-16 1998 Oldsmobile Passenger Cars MODEL BODY VIN 4TH DIGIT SYSTEM DATA LINK ADAPTER CONFIG Aurora G SIR (SDM-RSD) UART OBD II-C2/ GM-16 Eight-Eight, LSS, Regency H SIR (SDM-RSD) UART OBD II-C2/ GM-16 Achieva, Cutlass N SIR (SDM-RSD) UART OBD II-C2/ GM-16 Cutlass Supreme, Intrigue W SIR (SDM-RSD) UART OBD II-C2/ GM-16 GM Body Systems Application 1988-2004 Page 33 Vehicle Coverage 3. Vehicle Coverage 1998 Pontiac Passenger Cars BODY VIN 4TH DIGIT SYSTEM DATA LINK ADAPTER CONFIG Firebird, Trans Am F SIR (SDM-RSD) UART OBD II-C2/ GM-16 Bonneville H SIR (SDM-RSD) UART OBD II-C2/ GM-16 Sunfire J SIR (SDM-RSD) UART OBD II-C2/ GM-16 Grand Am N SIR (SDM-RSD) UART OBD II-C2/ GM-16 Grand Prix W SIR (SDM-RSD) UART OBD II-C2/ GM-16 MODEL 1998 Saturn Passenger Cars MODEL BODY VIN 4TH DIGIT SYSTEM DATA LINK ADAPTER CONFIG SL, SC, SW Z SIR (SDM-RSD) UART OBD II-C2/ GM-16 1998 Light Duty Trucks, Vans, MPVs MAKE MODEL BODY VIN 5TH DIGIT SYSTEM DATA LINK ADAPTER CONFIG Chevrolet, GMC All Models C/K, L/M, S/T SIR (SDM-RS) UART OBD II-C2/ GM-16 GM Body Systems Application 1988-2004 Page 34 Vehicle Coverage 3. Vehicle Coverage 1998 Light Duty Trucks, Vans, MPVs Geo Tracker E/J SIR (SDM-I) UART OBD II-C2/ GM-16 Chevrolet, GMC All Models G SIR (SDM-RSD) UART OBD II-C2/ GM-16 Chevrolet, Pontiac, Oldsmobile All Models U/X SIR (SDM-U) UART OBD II-C2/ GM-16 Chevrolet, GMC All Models C/K (SUV), M/L SIR (SDM-RSD) UART OBD II-C2/ GM-16 Chevrolet, Oldsmobile, GMC All Models S/T (SUV) SIR (SDM-RSD) UART OBD II-C2/ GM-16 Chevrolet, GMC Envoy, Utility (Blazer) S/T Auto HVAC, BCM Class 2 OBD II-C2 1999 VEHICLE COVERAGE 1999 Buick Passenger Cars MODEL BODY VIN 4TH DIGIT SYSTEM DATA LINK ADAPTER CONFIG Park Avenue C HVAC Class 2 OBD II-C2 SIR (SDM-RCL2) Riviera G SIR (SDM-RSD) UART OBD II-C2/ GM-16 Le Sabre H SIR (SDM-RSD) UART OBD II-C2/ GM-16 Century, Regal W Auto HVAC Class 2 OBD II OBD II-C SIR (SDM-G2) 1999 Cadillac Passenger Cars MODEL BODY VIN 4TH DIGIT SYSTEM DATA LINK ADAPTER CONFIG Eldorado E SDM-RCL2 Class 2 OBD II-C2 Deville/Seville K SIR (SDM-RCL2) Class 2 OBD II-C2 GM Body Systems Application 1988-2004 Page 35 Vehicle Coverage 3. Vehicle Coverage 1999 Chevrolet Passenger Cars MODEL BODY VIN 4TH DIGIT SYSTEM DATA LINK ADAPTER CONFIG Camaro F SIR (SDM-G2) Class 2 OBD II-C2 Cavalier J SIR (SDM-RSD) UART OBD II-C2/ GM-16 Metro M SIR (SDM-I) UART OBD II-C2/ GM-16 Malibu N SIR (SDM-RSD) UART OBD II-C2/ GM-16 Prizm S SIR Flash Code GM-P Lumina, Monte Carlo W SIR (SDM-RSD) UART OBD II-C2/ GM-16 Corvette Y SIR (SDM-G2) Class 2 OBD II-C2 1999 Oldsmobile Passenger Cars MODEL BODY VIN 4TH DIGIT SYSTEM DATA LINK ADAPTER CONFIG Aurora G SIR (SDM-RSD) UART OBD II-C2/ GM-16 LSS, Eighty Eight, Regency H SIR (SDM-RSD) UART OBD II-C2/ GM-16 Cutlass, Alero N SIR (SDM-RSD) UART OBD II-C2/ GM-16 Intrigue W SIR (SDM-RSD) UART OBD II-C2/ GM-16 GM Body Systems Application 1988-2004 Page 36 Vehicle Coverage 3. Vehicle Coverage 1999 Pontiac Passenger Cars MODEL BODY VIN 4TH DIGIT SYSTEM DATA LINK ADAPTER CONFIG Firebird, Trans Am F SIR (SDM-RSD) UART OBD II-C2/ GM-16 Bonneville H SIR (SDM-RSD) UART OBD II-C2/ GM-16 Sunfire J SIR (SDM-RSD) UART OBD II-C2/ GM-16 Grand Am N SIR (SDM-RSD) UART OBD II-C2/ GM-16 Grand Prix W SIR (SDM-G2) UART OBD II-C2/ GM-16 1999 Light Duty Trucks, Vans, MPVs MODEL BODY VIN 5TH DIGIT SIR SYSTEM DATA LINK ADAPTER CONFIG All Models C/K SIR (SDM-RSD) UART OBD II-C2/ GM-16 Chevrolet, GMC C/K (Redesign) SIR (SDM-RS) UART OBD II-C2/ GM-16 Express, Savana G SIR (SDM-RSD) UART OBD II-C2/ GM-16 Astro, Safari M/L SIR (SDM-RSD) UART OBD II-C2/ GM-16 Chevrolet, Oldsmobile, GMC S/T (SUV) SIR (SDM-RSD) UART OBD II-C2/ GM-16 Chevrolet, GMC S/T SIR (SDM-RS) UART OBD II-C2/ GM-16 Envoy, Utility (Blazer) S/T Auto HVAC, BCM Class 2 OBD II-C2 All Models U/X SIR (SDM-U) UART OBD II-C2/ GM-16 GM Body Systems Application 1988-2004 Page 37 Vehicle Coverage 3. Vehicle Coverage 2000 VEHICLE COVERAGE 2000 Buick Passenger Cars MODEL BODY VIN 4TH DIGIT SYSTEM DATA LINK ADAPTER CONFIG Park Avenue C HVAC Class 2 OBD II-C2 SIR (SDM-RCL2) Le Sabre H SIR (SDM-G4) Class 2 OBD II-C2 Century, Regal W Auto HVAC Class 2 OBD II-C2 SIR (SDM-G2/G3) 2000 Cadillac Passenger Cars MODEL BODY VIN 4TH DIGIT SYSTEM DATA LINK ADAPTER CONFIG Eldorado E SIR (SDM-RCL2) Class 2 OBD II-C2 Deville/Seville K SIR (SDM-G6) Class 2 OBD II-C2 2000 Chevrolet Passenger Cars MODEL BODY VIN 4TH DIGIT SYSTEM DATA LINK ADAPTER CONFIG Camaro E SIR (SDM-G2) Class 2 OBD II-C2 Cavalier J SIR (SDM-G2) Class 2 OBD II-C2 Metro M SIR (SDM-I) UART OBD II-C2/ GM-16 Malibu N SIR (SDM-G2) Class 2 OBD II-C2 Prizm S SIR (SDM) Flash Code GM-P Lumina W SIR (SDM-RSD) UART OBD II-C2/ GM-16 Monte Carlo, Impala W SDM-G2 Class 2 OBD II-C2 Corvette Y SIR (SDM-G2) Class 2 OBD II-C2 GM Body Systems Application 1988-2004 Page 38 Vehicle Coverage 3. Vehicle Coverage 2000 Oldsmobile Passenger Cars MODEL BODY VIN 4TH DIGIT SYSTEM DATA LINK ADAPTER CONFIG Alero N SIR (SDM-G2) Class 2 OBD II-C2 Intrigue W SIR (SDM-G2) Class 2 OBD II-C2 2000 Pontiac Passenger Cars MODEL BODY VIN 4TH DIGIT SYSTEM DATA LINK ADAPTER CONFIG Firebird, Formula F SIR (SDM-G2) Class 2 OBD II-C2 Bonneville H SIR (SDM-G4) Class 2 OBD II-C2 Sunfire J SIR (SDM-G2) Class 2 OBD II-C2 Grand Am N SIR (SDM-G2) Class 2 OBD II-C2 Grand Prix W SIR (SDM-G2/G4) Class 2 OBD II-C2 2000 Saturn Passenger Cars MODEL BODY VIN 4TH DIGIT SYSTEM DATA LINK ADAPTER CONFIG LS J SDM-G2 Class 2 OBD II-C2 SL, SC, SW Z SIR (SDM-RSD) Class 2 OBD II-C2 GM Body Systems Application 1988-2004 Page 39 Vehicle Coverage 3. Vehicle Coverage 2000 Light Duty Trucks, Vans, MPVs MODEL BODY VIN 5TH DIGIT SYSTEM DATA LINK ADAPTER CONFIG Truck C/K SIR (SDM-G2) Class 2 OBD II-C2 SUV C/K SIR (SDM-G4) Class 2 OBD II-C2 Truck/SUV C/K Auto HVAC, BCM Class 2 OBD II-C2 Express, Savana G SIR (SDM-RSD) UART OBD II-C2/ GM-16 Astro, Safari M/L SIR (SDM-G2), BCM Class 2 OBD II-C2 Truck/SUV S/T SIR (SDM-G2) Class 2 OBD II-C2 Truck/SUV S/T SIR (SDM-RS) Class 2 OBD II-C2 Truck/SUV S/T Auto HVAC, BCM Class 2 OBD II-C2 Truck/SUV C/K (Redesign) SIR (SDM-G2) Class 2 OBD II-C2 Chevrolet Venture U SIR (SDM-G6) Class 2 OBD II-C2 Pontiac Silhouette U SIR (SDM-G6) Class 2 OBD II-C2 Pontiac Montana U SIR (SDM-G6) Class 2 OBD II-C2 Truck C/K SIR (SDM-RSD) UART OBD II-C2/ GM-16 GM Body Systems Application 1988-2004 Page 40 Vehicle Coverage 3. Vehicle Coverage 2001 VEHICLE COVERAGE 2001 Buick Passenger Cars MODEL BODY VIN 4TH DIGIT SIR SYSTEM DATA LINK ADAPTER CONFIG Park Avenue C HVAC Class 2 OBD II-C2 SIR (SDM-RCL2) Le Sabre H SIR (SDM-G2/G3) Class 2 OBD II-C2 Century, Regal W Auto HVAC Class 2 OBD II-C2 SIR (SDM-G2/G3) 2001 Cadillac Passenger Cars MODEL BODY VIN 4TH DIGIT SIR SYSTEM DATA LINK ADAPTER CONFIG Eldorado E SIR (SDM-RCL2) Class 2 OBD II-C2 Deville/Seville K SIR (SDM-G6) Class 2 OBD II-C2 2001 Chevrolet Passenger Cars MODEL BODY VIN 4TH DIGIT SIR SYSTEM DATA LINK ADAPTER CONFIG Camaro F SIR (SDM-G2/3) Class 2 OBD II-C2 Cavalier J SIR (SDM-G2/8) Class 2 OBD II-C2 Metro M SIR (SDM-I) UART OBD II-C2/ GM-16 Malibu N SIR (SDM-G2/4) Class 2 OBD II-C2 Prizm S SIR (SDM) Flash Codes GM-P Lumina W SIR (SDM-RSD) UART OBD II-C2/ GM-16 Impala/Monte Carlo W SIR (SDM-G) Class 2 OBD II-C2 Corvette Y SIR (SDM-G2/3) Class 2 OBD II-C2 GM Body Systems Application 1988-2004 Page 41 Vehicle Coverage 3. Vehicle Coverage 2001 Oldsmobile Passenger Cars MODEL BODY VIN 4TH DIGIT SIR SYSTEM DATA LINK ADAPTER CONFIG Aurora G SIR (SDM-G6) Class 2 OBD II-C2 Alero N SIR (SDM-G2) Class 2 OBD II-C2 Intrigue W SIR (SDM-G2) Class 2 OBD II-C2 2001 Pontiac Passenger Cars MODEL BODY VIN 4TH DIGIT SIR SYSTEM DATA LINK ADAPTER CONFIG Firebird, Formula F SIR (SDM-G2/3) Class 2 OBD II-C2 Sunfire J SIR (SDM-G2/8) Class 2 OBD II-C2 Grand Am N SIR (SDM-G2/4) Class 2 OBD II-C2 Grand Prix W SIR (SDM-G2/3) Class 2 OBD II-C2 2001 Saturn Passenger Cars MODEL BODY VIN 4TH DIGIT SIR SYSTEM DATA LINK ADAPTER CONFIG LS J SIR (SDM-G2) Class 2 OBD II-C2 SL, SC, SW Z SIR (SDM-G2) Class 2 OBD II-C2 GM Body Systems Application 1988-2004 Page 42 Vehicle Coverage 3. Vehicle Coverage 2001 Cadillac, Chevrolet, GMC, Oldsmobile, Pontiac Trucks, Vans, MPVs MODEL BODY VIN 5TH DIGIT SYSTEM DATA LINK ADAPTER CONFIG Pontiac Aztek A/B SDM-DB SIR Class 2 OBD II-C2 Chevrolet, GMC, Cadillac C/K Auto HVAC, BCM Class 2 OBD II-C2 Chevrolet, GMC G SDM-G2 SIR Class 2 OBD II-C2 Chevrolet, GMC M/L SDM-G2 SIR, BCM Class 2 OBD II-C2 Chevrolet, GMC, Oldsmobile S/T Auto HVAC, BCM Class 2 OBD II-C2 Chevrolet Venture U/X SDM-G6 SIR Class 2 OBD II-C2 Oldsmobile Silhouette U/X SDM-G6 SIR Class 2 OBD II-C2 Pontiac Montana U/X SDM-G6 SIR Class 2 OBD II-C2 SIR (SDM-G2) SIR (SDM-G2) GM Body Systems Application 1988-2004 Page 43 Vehicle Coverage 3. Vehicle Coverage 2002 VEHICLE COVERAGE 2002 Buick Passenger Cars MODEL BODY VIN 4TH DIGIT SYSTEM DATA LINK ADAPTER CONFIG Park Avenue C HVAC Class 2 OBD II-C2 SIR (SDM-G4) Le Sabre H SIR (SDM-GT) Class 2 OBD II-C2 Century, Regal W Auto HVAC Class 2 OBD II-C2 SIR (SDM-G2, G4) 2002 Cadillac Passenger Cars MODEL BODY VIN 4TH DIGIT SYSTEM DATA LINK ADAPTER CONFIG Eldorado E SIR (SDM-RCL2) Class 2 OBD II-C2 DeVille K SIR (SDM-GF) Class 2 OBD II-C2 Seville K SIR (SDM-GF) Class 2 OBD II-C2 2002 Chevrolet Passenger Cars MODEL BODY VIN 4TH DIGIT SYSTEM DATA LINK ADAPTER CONFIG Camaro F SIR (SDM-G2) Class 2 OBD II-C2 Cavalier J SIR (SDM-G2) Class 2 OBD II-C2 Malibu N SIR (SDM-G2) Class 2 OBD II-C2 Prism S SIR (SDM) Flash Codes GM-P Impala W SIR (SDM-GT) Class 2 OBD II-C2 Monte Carlo W SIR (SDM-GT) Class 2 OBD II-C2 Corvette Y SIR (SDM-G2) Class 2 OBD II-C2 GM Body Systems Application 1988-2004 Page 44 Vehicle Coverage 3. Vehicle Coverage 2002 Oldsmobile Passenger Cars MODEL BODY VIN 4TH DIGIT SYSTEM DATA LINK ADAPTER CONFIG Alero N SIR (SDM-G2) Class 2 OBD II-C2 Aurora G SIR (SDM-GT) Class 2 OBD II-C2 Intrigue W SIR (SDM-G2, G4) Class 2 OBD II-C2 2002 Pontiac Passenger Cars MODEL BODY VIN 4TH DIGIT SYSTEM DATA LINK ADAPTER CONFIG Firebird F SIR (SDM-G2) Class 2 OBD II-C2 Formula F SIR (SDM-G2) Class 2 OBD II-C2 Bonneville H SIR (SDM-GT) Class 2 OBD II-C2 Sunfire J SIR (SDM-G2) Class 2 OBD II-C2 Grand Am N SIR (SDM-G2) Class 2 OBD II-C2 Grand Prix W SIR (SDM-G2, G4) Class 2 OBD II-C2 2002 Saturn Passenger Cars MODEL BODY VIN 4TH DIGIT SYSTEM DATA LINK ADAPTER CONFIG L Series J SIR (SDM-G) Class 2 OBD II-C2 S Series Z SIR (SDM-G2, G4) Class 2 OBD II-C2 GM Body Systems Application 1988-2004 Page 45 Vehicle Coverage 3. Vehicle Coverage 2002 Buick, Cadillac, Chevrolet, GMC, Oldsmobile, Pontiac Trucks, Vans, MPVs MODEL BODY VIN 5TH DIGIT SYSTEM DATA LINK ADAPTER CONFIG Buick Rendezvous A/B SIR (SDM-DG) Class 2 OBD II-C2 Pontiac Aztek A/B SIR (SDM-DG) Class 2 OBD II-C2 Chevrolet Avalanche C/K Auto HVAC, BCM Class 2 OBD II-C2 Class 2 OBD II-C2 Class 2 OBD II-C2 Class 2 OBD II-C2 Class 2 OBD II-C2 Class 2 OBD II-C2 Class 2 OBD II-C2 SIR (SDM-G2) Chevrolet Silverado C/K Auto HVAC, BCM SIR (SDM-G2) Chevrolet Suburban C/K Auto HVAC, BCM SIR (SDM-G2) Chevrolet Tahoe C/K Auto HVAC, BCM SIR (SDM-G2) GMC Sierra C/K Auto HVAC, BCM SIR (SDM-G2) GMC Yukon C/K Auto HVAC, BCM SIR (SDM-G2) Cadillac Escalade C/K Auto HVAC, BCM SIR (SDM-G2) Chevrolet Express G, H SIR (SDM-G2) Class 2 OBD II-C2 GMC Savana G, H SIR (SDM-G2) Class 2 OBD II-C2 Chevrolet Astro M/L SIR (SDM-G2), BCM Class 2 OBD II-C2 GMC Safari M/L SIR (SDM-G2), BCM Class 2 OBD II-C2 Chevrolet S-10 Pickup S/T SIR (SDM-G2), BCM Class 2 OBD II-C2 Chevrolet Blazer S/T SIR (SDM-G2), BCM Class 2 OBD II-C2 Oldsmobile Bravada S/T SIR (SDM-GT), BCM Class 2 OBD II-C2 GMC Envoy S/T SIR (SDM-GT), BCM Class 2 OBD II-C2 GM Body Systems Application 1988-2004 Page 46 Vehicle Coverage 3. Vehicle Coverage 2002 Buick, Cadillac, Chevrolet, GMC, Oldsmobile, Pontiac Trucks, Vans, MPVs (Continued) MODEL BODY VIN 5TH DIGIT DATA LINK ADAPTER CONFIG GMC Sonoma S/T SIR (SDM-G2), BCM Class 2 OBD II-C2 Chevrolet Trailblazer S/T SIR (SDM-GT), BCM Class 2 OBD II-C2 GMC Jimmy S/T SIR (SDM-G2), BCM Class 2 OBD II-C2 Chevrolet Venture U/V/X SIR (SDM-D) Class 2 OBD II-C2 Oldsmobile Silhouette U/V/X SIR (SDM-D) Class 2 OBD II-C2 Pontiac Montana U/V/X SIR (SDM-D) Class 2 OBD II-C2 SYSTEM 2003 VEHICLE COVERAGE 2003 Buick Passenger Cars MODEL BODY VIN 4TH DIGIT SYSTEM DATA LINK ADAPTER CONFIG Park Avenue, Ultra C SIR (SDM-G4) Class 2 OBD II-C2 Le Sabre H SIR (SDM-GT) Class 2 OBD II-C2 Century, Regal W SIR (SDM-G2, G4) Class 2 OBD II-C2 2003 Cadillac Passenger Cars MODEL BODY VIN 4TH DIGIT SYSTEM DATA LINK ADAPTER CONFIG CTS D SIR (SDM-GF) Class 2 OBD II-C2 DeVille, SLS, STS K SIR (SDM-GF) Class 2 OBD II-C2 GM Body Systems Application 1988-2004 Page 47 Vehicle Coverage 3. Vehicle Coverage 2003 Chevrolet Passenger Cars MODEL BODY VIN 4TH DIGIT SYSTEM DATA LINK ADAPTER CONFIG Cavalier J SIR (SDM-G2) Class 2 OBD II-C2 Malibu N SIR (SDM-G2) Class 2 OBD II-C2 Impala, Monte Carlo W SIR (SDM-GT) Class 2 OBD II-C2 Corvette Y SIR (SDM-G2) Class 2 OBD II-C2 2003 Oldsmobile Passenger Cars MODEL BODY VIN 4TH DIGIT SYSTEM DATA LINK ADAPTER CONFIG Aurora G SIR (SDM-GT) Class 2 OBD II-C2 Alero N SIR (SDM-G2) Class 2 OBD II-C2 2003 Pontiac Passenger Cars MODEL BODY VIN 4TH DIGIT SYSTEM DATA LINK ADAPTER CONFIG Sunfire J SIR (SDM-G2) Class 2 OBD II-C2 Bonneville H SIR (SDM-GT) Class 2 OBD II-C2 Grand Am N SIR (SDM-G2) Class 2 OBD II-C2 Grand Prix W SIR (SDM-D) Class 2 OBD II-C2 2003 Saturn Passenger Cars MODEL BODY VIN 4TH DIGIT SYSTEM DATA LINK ADAPTER CONFIG Ion A SIR (SDM-D) Class 2 OBD II-C2 L Series J SIR (SDM-G) Class 2 OBD II-C2 GM Body Systems Application 1988-2004 Page 48 Vehicle Coverage 3. Vehicle Coverage 2003 Buick, Cadillac, Chevrolet, GMC, Oldsmobile, Pontiac Trucks, Vans, MPVs MODEL BODY VIN 5TH DIGIT SYSTEM DATA LINK ADAPTER CONFIG Aztek, Rendezvous A/B SIR (SDM-D) Class 2 OBD II-C2 Avalanche, Escalade/EXT, Sierra, Silverado, Suburban, Tahoe, Yukon C/K SIR (SDM-D), BCM Class 2 OBD II-C2 Express, Savana G, H SIR (SDM-GF) Class 2 OBD II-C2 Astro, Safari L/M SIR (SDM-G2), BCM Class 2 OBD II-C2 S-10, Blazer, Sonoma, Jimmy S/T SIR (SDM-G2), BCM Class 2 OBD II-C2 Bravada, Envoy, Trailblazer S/T SIR (SDM-GT), BCM Class 2 OBD II-C2 Venture, Silhouette, Montana U/V/X SIR (SDM-D) Class 2 OBD II-C2 SERIES BODY VIN 5TH DIGIT SYSTEM DATA LINK ADAPTER CONFIG Hummer N Class 2 OBD II-C2 2003 Hummer SIR (SDM-GF), BCM 2003 Chevrolet/GMC Medium Duty Trucks SERIES BODY VIN 5TH DIGIT SYSTEM DATA LINK ADAPTER CONFIG D-C Series -- SIR Class 2 OBD II-C2 GM Body Systems Application 1988-2004 Page 49 Vehicle Coverage 3. Vehicle Coverage 2004 VEHICLE COVERAGE 2004 Buick Passenger Cars MODEL BODY VIN 4TH DIGIT SYSTEM DATA LINK ADAPTER CONFIG Park Avenue, Ultra C SIR (SDM-G) Class 2 OBD II-C2 Le Sabre H SIR (SDM-GT) Class 2 OBD II-C2 Century, Regal W SIR (SDM-G2, G4) Class 2 OBD II-C2 2004 Cadillac Passenger Cars MODEL BODY VIN 4TH DIGIT SYSTEM DATA LINK ADAPTER CONFIG CTS D SIR (SDM-D320) Class 2 OBD II-C2 DeVille, DHS, DTS, Seville, SLS and STS K SIR (SDM-GF) Class 2 OBD II-C2 XLR Y SIR (SDM-GF) Class 2 OBD II-C2 2004 Chevrolet Passenger Cars MODEL BODY VIN 4TH DIGIT SYSTEM DATA LINK ADAPTER CONFIG Cavalier J SIR (SDM-G2) Class 2 OBD II-C2 Classic N SIR (SDM-G2) Class 2 OBD II-C2 Impala, Monte Carlo W SIR (SDM-GT) Class 2 OBD II-C2 Corvette Y SIR (SDM-G) Class 2 OBD II-C2 2004 Oldsmobile Passenger Cars MODEL BODY VIN 4TH DIGIT SYSTEM DATA LINK ADAPTER CONFIG Alero N SIR (SDM-G2) Class 2 OBD II-C2 GM Body Systems Application 1988-2004 Page 50 Vehicle Coverage 3. Vehicle Coverage 2004 Pontiac Passenger Cars MODEL BODY VIN 4TH DIGIT SYSTEM DATA LINK ADAPTER CONFIG Bonneville H SIR (SDM-GT) Class 2 OBD II-C2 Sunfire J SIR (SDM-G2) Class 2 OBD II-C2 Grand Am N SIR (SDM-G2) Class 2 OBD II-C2 Grand Prix W SIR (SDM-D) Class 2 OBD II-C2 2004 Saturn Passenger Cars MODEL BODY VIN 4TH DIGIT SYSTEM DATA LINK ADAPTER CONFIG Ion A SIR (SDM-D) Class 2 OBD II-C2 L-Series J SIR (SDM-G) Class 2 OBD II-C2 SERIES BODY VIN 5TH DIGIT SYSTEM DATA LINK ADAPTER CONFIG Hummer N Class 2 OBD II-C2 2004 Hummer GM Body Systems Application 1988-2004 SIR (SDM-GF), BCM Page 51 Vehicle Coverage 3. Vehicle Coverage 2004 Buick, Cadillac, Chevrolet, GMC, Oldsmobile, Pontiac Trucks, Vans, MPVs DATA LINK ADAPTER CONFIG SIR (SDM-GF), BCM Class 2 OBD II-C2 C/K SIR (SDM-D), BCM Class 2 OBD II-C2 SRX E SIR (SDM-D320), BCM Class 2 OBD II-C2 Express, Savana G/H SIR (SDM-GF), BCM Class 2 OBD II-C2 Astro, Safari L/M SIR (SDM-G), BCM Class 2 OBD II-C2 Blazer, Bravada, Envoy, Jimmy, Ranier, S-10, Sonoma, Trailblazer S/T SIR (SDM-GF), BCM Class 2 OBD II-C2 Canyon, Colorado S/T SIR (SDM-GF) Class 2 OBD II-C2 Montana, Silhouette, Venture U/V/X SIR (SDM-D), BCM Class 2 OBD II-C2 MODEL BODY VIN 5TH DIGIT Aztec, Rendezvous A/B Escalade, Sierra, Silverado, Suburban, Tahoe SYSTEM 2004 Saturn SUVs MODEL BODY VIN 4TH DIGIT SYSTEM DATA LINK ADAPTER CONFIG VUE Z SIR (SDM-D) Class 2 OBD II-C2 2004 Chevrolet/GMC Medium Duty Trucks SERIES BODY VIN 5TH DIGIT SYSTEM DATA LINK ADAPTER CONFIG D-C Series -- SIR Class 2 OBD II-C2 C-T Series -- SIR Class 2 OBD II-C2 GM Body Systems Application 1988-2004 Page 52 4. GETTING STARTED This chapter provides information to assist you in operating your Vetronix tester and software application. In addition to helping you identify vehicles covered by the software, it shows you how to connect your tester to the vehicle and explains how to begin performing system diagnostic functions. It is suggested that you read this manual completely before operating the tester and the system software. GM Body Systems Application 1988-2004 Page 53 Setting Up the Tester 4. Getting Started SETTING UP THE TESTER MTS 3100 Before you operate the application software, do the following: 1. Make sure the vehicle ignition is OFF. 2. Connect the tester DLC (formerly called the ALDL) cable to the tester and tighten the screws. 3. Insert the cartridge into the slot at the top rear of the tester. . FIGURE 4-1. Insert a Cartridge into the MTS 3100 Application Cartridge or Mass Storage Cartridge (MSC) MTS 3100 4. Install the appropriate adapter to the tester DLC cable. Refer to Adapter and Adapter Cable Configurations on page 61 for information on selecting the correct adapters. 5. Locate the vehicle's DLC. Connect the DLC cable, or the adapter attached to the end of the DLC cable, to the vehicle. Continue to Powering Up the Tester on page 56. GM Body Systems Application 1988-2004 Page 54 Setting Up the Tester 4. Getting Started TECH 1A Before you operate the Tech 1A, do the following: 1. Make sure the vehicle ignition is OFF. 2. Connect the tester DLC (formerly called the ALDL) cable to the tester and tighten the screws. 3. Insert the application into the Master Cartridge slot on the bottom, rear of the tester. If the system being tested uses Class 2 data type, Alliance and aftermarket service centers using a Tech 1A tester must also insert the OBD II Interface Cartridge into the top slot of the Tech 1A. FIGURE 4-2. Insert a Cartridge into the Tech 1A Tech 1A Application Cartridge or Mass Storage Cartridge (MSC) 4. Install the appropriate adapter to the tester DLC cable. Refer to Adapter and Adapter Cable Configurations on page 61 for information on selecting the correct adapters. 5. Locate the vehicle's DLC. Connect the DLC cable, or the adapter attached to the end of the DLC cable, to the vehicle. Continue to Powering Up the Tester on page 56. GM Body Systems Application 1988-2004 Page 55 Powering Up the Tester 4. Getting Started TECH 1 Before you operate the Tech 1, do the following: 1. Make sure the vehicle ignition is OFF. 2. Connect the tester DLC (formerly called the ALDL) cable to the tester and tighten the screws. 3. Insert the application into the Master Cartridge slot on the bottom, rear of the tester. . FIGURE 4-3. Insert a Cartridge into the Tech 1 Tech 1 Application Cartridge or Mass Storage Cartridge (MSC) 4. Install the appropriate adapter to the tester DLC cable. Refer to Adapter and Adapter Cable Configurations on page 61 for information on selecting the correct adapters. 5. Locate the vehicle's DLC. Connect the DLC cable, or the adapter attached to the end of the DLC cable, to the vehicle. Continue to Powering Up the Tester on page 56. POWERING UP THE TESTER 1988-95 vehicles equipped with a 12-pin DLC require powering the tester via the DC Power Cable. Connect the DC Power Cable to the vehicle cigarette lighter or the optional Battery Adapter Cable which connects to the vehicle battery. When testing a 1995-to present vehicles equipped with a 16-pin DLC, the tester is powered through the DLC Cable (except when using a Tech 1 tester). Continue to Selecting the Application. GM Body Systems Application 1988-2004 Page 56 Selecting the Application 4. Getting Started SELECTING THE APPLICATION 1. Once the tester is powered, one of the following screens is displayed: Vetronix Corp. High Capacity 16MB MSC (c) 2004 vX.X [ENTER] Vetronix Corp. General Motors Diagnostics (c) 2004 vX.X 16MB Mass Storage Cartridge (MSC) General Motors Diagnostic Cartridge Press u or wait two seconds to proceed to the Applications menu screen. If the display is not correct, see Appendix A. The available software applications are displayed: APPLICATIONS GM P/T GM CHASSIS → GM BODY 2. Select the application. If your application is on a MSC, use the U and D keys to move the cursor (arrow) and press E. If the application is on a MAC, select the function key next to the desired application. The GM Body Systems title screen is displayed. GENERAL MOTORS BODY SYSTEMS 1988-2004 Vx.x [ENTER] 3. If the display is correct, turn the ignition ON and you are ready to proceed with selecting the vehicle model year. Continue to Selecting the Model Year on page 58. 4. If the display reads: MASTER CARTRIDGE IS MISSING OR MALFUNCTIONING This means that the tester is receiving power but the cartridge is not making good contact, or else the wrong DLC cable and/or adapter are installed. If this happens, do the following: • Remove and reinsert the cartridge making sure that the cartridge is properly seated. • Verify that the correct DLC cable is installed. • See Setting Up the Tester to determine if the vehicle you are testing requires a DLC cable adapter. If an adapter is required, verify that the correct one is installed. 5. If the display is blank, the tester is not receiving power. In this case, perform the following checks: • Disconnect and reconnect the tester DC power plug at the cigarette lighter socket. GM Body Systems Application 1988-2004 Page 57 Perform Vehicle and/or System Selection 4. Getting Started • Make sure that both the tester DC power plug and cigarette lighter socket have good, clean contacts. • Verify that 12V power is available at the center contact of the cigarette lighter socket and that the outside contact of the lighter socket is grounded. • Check the vehicle's cigarette lighter fuse. • Check the fuse in the cigarette lighter plug on the end of the tester DC power cable. If the display is still not correct, Appendix A lists possible causes for the malfunction and recommendations to remedy the problem. If the problem persists, perform the tester Self-test as described in the basic tester Operator's Manual. NOTE The tester Self-test does not operate with the GM Body Software Cartridge installed. ACTIVE KEYS E Confirm displayed information is correct. )-( Used to select a menu item. U,D Used to select a menu item. Stop automatic menu scroll. Manually scroll menu. X Return to previous display. PERFORM VEHICLE AND/OR SYSTEM SELECTION SELECTING THE MODEL YEAR 1. From the power-up menu, press E to enter the vehicle selection mode. 2. If the tester “remembers” the last vehicle you tested, it gives you the option of continuing with the testing of that vehicle. Enter the model year on the keypad to start testing of a new vehicle, or press y to continue testing the same vehicle. Generally, the tester “remembers” the previous vehicle under test if it has been less than 24 hours and you have not removed application cartridge from the tester. NOTE If you select a new vehicle, or the same vehicle as before but do not press y, any data saved from previous testing is erased. This includes Snapshot and Review Codes. GM Body Systems Application 1988-2004 Page 58 Perform Vehicle and/or System Selection 4. Getting Started 3. The model year selection screen defaults to the current year. The u or d arrow key scrolls through the available model years. NOTE Holding down the u or d arrow key results in fast scrolling. SELECT MODEL YEAR 2004 (4) U D [ENTER] Scrolling Arrows The brackets to the right of the model year represent the 10th VIN digit (year identifier) for easier model year identification. SELECT MODEL YEAR 2004 (4) U D [ENTER] Vehicle 10th VIN Digit Model Year identifier When the correct model year appears on the screen, press the E key to advance the software to the next vehicle selection screen. Quick keys are also available for entering the model year. From the SELECT MODEL YEAR screen, select the last two digits of the model year from the key pad to advance to the next vehicle selection screen (for example, pressing 9 and 2 selects 1992). Pressing x returns the software to the SELECT MODEL YEAR screen. SELECTING THE VEHICLE USING THE VIN 1. Select either F0: Passenger Car or F1: Light Truck. F0: Passenger Car: After selecting the passenger car, you are asked to select the 4th digit of the VIN code (the vehicle's body type). The tester displays all body VIN codes available for the year selected. Press Y or n to scroll through the list until the desired VIN code flashes. Press e to initialize communication. F1: Light Truck: After selecting light truck, you are asked to select the 5th digit on the VIN code (the vehicle's body type). The tester displays all body VIN codes available for the year selected. Press Y or n to scroll through the list until the desired VIN code flashes. Press e to initialize communication. 2. If the vehicle under test is different from the model selection screen that appears on the tester, select the vehicle model by pressing N until the correct vehicle model is displayed, then press Y to enter your current system and model configuration. NOTE Look at the tester display carefully, as the differences can be subtle. GM Body Systems Application 1988-2004 Page 59 Perform Vehicle and/or System Selection 4. Getting Started 3. Select the system by pressing the corresponding function key. When you have selected a system to test, the tester displays a menu of test modes available for your selected system. This is called the Test Selection menu. Different test modes are available for different models, so the Test Mode menu varies from vehicle to vehicle. 4. To select a different vehicle for testing, press X several times to take you backward through the selection process until your change can be made. Then complete the selection process for the new vehicle under test as previously described. You have successfully “informed” the tester of the current application and can begin testing by selecting the test you wish to perform. When you arrive at this point, go to Chapter 5. SELECTING THE VEHICLE MAKE When selecting various GM vehicles, the tester displays a Select Make menu. Press ! to select Chevrolet, @ to select Pontiac, # to select Oldsmobile, $ to select Buick, or ^ to select Cadillac. FIGURE 4-4. Example of Selecting a 1992 Cadillac C-Body Vehicle SELECT MODEL YEAR 2004 (4) [ENTER] Press 9 2 E or use u D to select correct model year. SELECT VEHICLE F0: C/K TRUCK F1: PASS. CAR ! FLASHING "A" SELECT 4TH DIGIT OF VIN CODE: ACDEFHJKMNPVWY n FLASHING "C" SELECT 4TH DIGIT OF VIN CODE: ACDEFHJKMNPVWY SELECT MAKE F3: OLDSMOBILE F4: BUICK F6: CADILLAC ^ SELECT SYSTEM F0: BCM F8: SIR F9: E & C y GM Body Systems Application 1988-2004 Page 60 Adapter and Adapter Cable Configurations 4. Getting Started ACTIVE KEYS ) - ( Select year. R, n Scroll to the right. l, y Scroll to the left. e Confirm displayed information is correct. Advance to next display. Select previously selected vehicle. x Return to previous display. ADAPTER AND ADAPTER CABLE CONFIGURATIONS This section describes the adapters and other hardware needed for use with the various vehicles covered in the GM Body Systems Application Software. The proper Data Link Connector (DLC) adapter, cable, and additional hardware (for Class 2 network communications) are needed to connect to the vehicles listed in the Vehicle Application Chart section at the beginning of this chapter. Read the following sections that describe how to select an adapter for use with the vehicle you are testing. Body Systems Adapters The following table lists the adapters needed for use with the GM Body Systems Application software. Refer to the remainder of this section for appropriate adapter selection and usage. GM Body Systems Application 1988-2004 Page 61 Adapter and Adapter Cable Configurations 4. Getting Started BODY SYSTEMS ADAPTERS NEEDED ADAPTER DESCRIPTION P/N GM 12/14-Pin DLC Adapter Used on most GM vehicle 12-pin DLCs prior to 1996 02001384 GM 12/12-Pin SIR/Dual UART Adapter Used on 1990 Y-body and 1991 L-body SIR systems. 02001039 16/14-Pin OBD II Adapter Cable Used for vehicles with the 16-pin DLC configuration from 1994 to the present 02001969 Controller Area Network VIM 16/24-Pin DLC Adapter Cable Used for vehicles with the 16-pin DLC configuration from 1994 to the present VIM 02003211 or F-00K-108-115 ILLUSTRATION Cable 02001744 16/12-Pin NonOBD DLC Adapter Used for vehicles with the 16-pin DLC configuration specifically designed to be used with GM 12/14-Pin DLC Adapter. Should be used in combination with E&C bus. 02001575 GM Geo Prizm SIR Adapter Used on 1990 to 2000 Geo Prizm for SIR diagnostics 02001190 Isuzu/Delco 3-Pin ADL Adapter Used on 1990 to 1993 Geo Storm SIR systems 02001032 GM Body Systems Application 1988-2004 Page 62 Adapter and Adapter Cable Configurations 4. Getting Started GM ECUs use two types of communication protocol: • UART (Universal Asynchronous Receive and Transmit) • Class 2 UART UART communication is used for all serial communication prior to OBD II (requirement for all automotive manufacturers to reduce emissions). The UART is a 5 volt line that toggles the voltage to ground at a fixed bit pulse width during communications. UART transmits data at the rate of 8192 bits per second (8192 bps). Some control modules on current production GM vehicles for Chassis and Body Systems communicate using the UART protocol. CLASS 2 CLASS 2 was introduced to meet the demanding requirements of sharing information from ECU to ECU on a vehicle network. The Class 2 data line transfers information by toggling the line from zero volts to 7 volts. Class 2 transmits data at the rate of 10.4 Kilobits per second (10.4 Kbps). Class 2 is used for serial communications on GM Powertrain and Transmission control modules starting in 1994 and continuing to the present. Class 2 communications supports some GM Chassis and Body Systems control modules and is increasing as new models are introduced. Because of this performance improvement, Vetronix diagnostic test tools are required to contain new hardware in order to use General Motors’ new and old data link(s). NOTE Applications with 16 pin SAE J1962 DLC (OBD II) provide power to the tester; therefore, the 12-volt power cable is not needed for supplying power to the MTS 3100. 16-Pin Data Link Connector (DLC) Along with the OBD II requirement came the definition of a new 16-pin data link connector (DLC). General Motors began using this data link connector (DLC) on its vehicles in 1994, even for those vehicles that were not OBD II compliant. A series of new 16-pin DLC adapter(s) were developed to connect all GM vehicles, whether they are OBD II compliant or not, to the Tech 1/1A and MTS 3100 testers. NOTE NOTE In all cases of determining which adapter or adapter combination to use, please reference the Body Adapter Usage Table on page 65. To purchase any Vetronix items mentioned in this manual, please call (800) 321-4VTX (USA) GM Body Systems Application 1988-2004 Page 63 Adapter and Adapter Cable Configurations 4. Getting Started Selecting the Correct Adapter First, look up the vehicle you are testing in the Vehicle Application Tables in Chapter 3. You need to know the VIN number that identifies the body of the vehicle you are working on. The 4th digit of the VIN identifies the body type for passenger cars and the 5th digit for light trucks (refer to Vehicle Identification Number (VIN) on page 87). Once you have located the vehicle in the Vehicle Application Tables look in the column marked Adapter Config and note the listing (see below). 1996 Chevrolet Passenger Cars (Example) BODY VIN 4TH DIGIT MODEL Cavalier J SYSTEM SIR, E&C, IPC DATA TYPE UART ADAPTER CONFIG OBD II/ OBD II-C/ GM-16 Next, look in the Body Adapter Usage Table on page 65 for the adapter configuration for the vehicle you are testing. For the example above, the 1996 Cavalier Adapter Configuration is OBD II, OBD II-C, or GM-16. The Body Adapter Usage Chart lists the adapters, cables, and other hardware needed to connect each Vetronix tester to the vehicle. For this example, assuming you are using the MTS 3100, the options are: OBD II-C configuration Controller Area Network VIM and DLC Adapter Cable GM-16 configuration GM 12/14-Pin DLC Adapter and 16/12-Pin Non-OBD II DLC Adapter Body Adapter Usage Chart (Example) SYSTEM 1995-2004 Systems with a 16-Pin DLC (Class 2 data) 1994-2001 Systems with a 16-Pin DLC (UART data) ADAPTER DESCRIPTION PART NO. FIG NO. ADAPTER CONFIG TESTER OBD II-C *MTS 3100 OBD II Compliant MTS 3100 Controller Area Network VIM 16/24-Pin DLC Adapter Cable 02002184 02003211 02001744 Figure 4-9 OBD II Tech 1A Tech 1A OBD II Interface Cartridge 16/14-Pin OBD II Type 3 Adapter Cable 02002178 02001969 Figure 4-10 OBD II VIM 16/24-Pin VIM DLC Adapter Cable 02001808 02001744 Figure 4-11 Tech 1 Tech 1 GM/RWAL/4WAL ALDL Cable Tech 1 14/12-Pin VIM Adapter OBD II VIM 16/24-Pin VIM DLC Adapter Cable 02001578 02001198 02001808 02001744 Figure 4-12 MTS 3100 GM 12/14-Pin DLC Adapter 16/12-Pin Non-OBD II Adapter 02001384 02001575 Figure 4-13 Tech 1A GM 12/14-Pin DLC Adapter 16/12-Pin Non-OBD II Adapter 02001384 02001575 Figure 4-14 Tech 1 16/12-Pin Non-OBD II DCL Adapter 02001575 Figure 4-15 GM-16 GM Body Systems Application 1988-2004 Page 64 Adapter and Adapter Cable Configurations 4. Getting Started For an illustration of the adapters and how to connect them to the tester, refer to the FIG NO. listing in the last column of the Body Adapter Usage Chart. Body Adapter Usage Table SYSTEM 1988-1995 Systems with a 12-Pin DLC ADAPTER CONFIG GM TESTER ADAPTER DESCRIPTION PART NO. FIG NO. MTS 3100 GM 12/14-Pin DLC Adapter 02001384 Figure 4-5 Tech 1A GM 12/14-Pin DLC Adapter 02001384 Figure 4-6 Tech 1a Tech 1 GM RWAL/4WAL ADL Cable 02001578 Figure 4-7 All 1994 and newer with 16-pin DLC (OBD II) OBD II-C2 MTS 3100 Controller Area Network VIM 16/24-Pin DLC Adapter Cable F-00K108-115 02001744 Figure 4-8 Body Systems with a 16-Pin DLC OBD II-Cb MTS 3100 Controller Area Network VIM 16/24-Pin DLC Adapter Cable 02003211 02001744 Figure 4-9 Tech 1A Tech 1A OBD II Interface Cartridge 16/14-Pin OBD II Type 3 Adapter Cable 02002178 02001969 Figure 4-10 OBD II VIM 16/24-Pin VIM DLC Adapter Cable 02001808 02001744 Figure 4-11 Tech 1 Tech 1 GM/RWAL/4WAL ALDL Cable Tech 1 14/12-Pin VIM Adapter OBD II VIM 16/24-Pin VIM DLC Adapter Cable 02001578 02001198 02001808 02001744 Figure 4-12 MTS 3100 GM 12/14-Pin DLC Adapter 16/12-Pin Non-OBD II Adapter 02001384 02001575 Figure 4-13 Tech 1A GM 12/14-Pin DLC Adapter 16/12-Pin Non-OBD II Adapter 02001384 02001575 Figure 4-14 Tech 1 16/12-Pin Non-OBD II DCL Adapter 02001575 Figure 4-15 MTS 3100 GM 12/14-Pin DLC Adapter GM 12/12-Pin SIR/Dual UART Adapter 02001384 02001039 Figure 4-16 Tech 1A GM 12/14-Pin DLC Adapter GM 12/12-Pin SIR/Dual UART Adapter 02001384 02001039 Figure 4-17 Tech 1 Tech 1 GM RWAL/4WAL ALDL Cable GM 12/12-Pin SIR/Dual UART Adapter 02001578 02001039 Figure 4-18 MTS 3100 GM 12/14-Pin DLC Adapter Geo Prizm SIR Adapter 02001384 02001190 Figure 4-19 Tech 1A GM 12/14-Pin DLC Adapter Geo Prizm SIR Adapter 02001384 02001190 Figure 4-20 a Tech 1 Tech 1 GM RWAL/4WAL ALDL Cable Geo Prizm SIR Adapter 02001578 02001190 Figure 4-21 MTS 3100 GM 12/14-Pin DLC Adapter Isuzu/Delco 3-Pin ALDL Adapter 02001384 02001032 Figure 4-22 Tech 1A GM 12/14-Pin DLC Adapter Isuzu/Delco 3-Pin ALDL Adapter 02001384 02001032 Figure 4-23 a Tech 1 Tech 1 GM RWAL/4WAL ALDL Cable Isuzu/Delco 3-Pin ALDL Adapter 02001578 02001032 Figure 4-24 OBD II 1994-2001 Systems with a 16-Pin DLC (UART data) 1990-1991 SIR Systems (1990 Y Body) (1991 L Body) 1990-1993 SIR System for Geo Prizm (1990-93 S Body) 1990-1993 SIR Systems for Geo Storm (1990-93 R Body) GM-16 GM-S GM-P GM-D b a. Tech 1 RWAL/4WAL ALDL cable can be used with all of the applications in place of the Tech 1 DLC cable. b. OBD II and OBD II-C are early adapter cable configurations utilized by the tester to communicate with systems connected to the OBD II DLC. If you have one of these configurations, please reference OBD II-C2 in the Adapter Config. column of the vehicle coverage tables for the vehicle you are diagnosing. GM Body Systems Application 1988-2004 Page 65 Adapter and Adapter Cable Configurations 4. Getting Started TESTER/CABLE/ADAPTER ILLUSTRATIONS FIGURE 4-5. GM Adapter Configuration for MTS 3100 Application Cartridge MTS 3100 14/26 Pin DLC Cable DC Power Cable GM 12/14-Pin DLC Adapter GM Body Systems Application 1988-2004 Page 66 Adapter and Adapter Cable Configurations 4. Getting Started FIGURE 4-6. GM Adapter Configuration for Tech 1A TECH 1A 14/26 Pin DLC Application Cartridge GM 12/14-Pin DLC Adapter DC Power Cable GM Body Systems Application 1988-2004 Page 67 Adapter and Adapter Cable Configurations 4. Getting Started FIGURE 4-7. GM Adapter Configuration for Tech 1 TECH 1 Tech 1 GM RWAL/4WAL ALDL Cable Application Cartridge GM Body Systems Application 1988-2004 DC Power Cable Page 68 Adapter and Adapter Cable Configurations 4. Getting Started FIGURE 4-8. OBD II-C2 Adapter Configuration for MTS 3100 Application Cartridge MTS 3100 (OBD II Compliant) DLC Cable Controller Area Network VIM (P/N F-00K-108-115) 16/24 Pin DLC Adapter Cable (P/N 02001744) GM Body Systems Application 1988-2004 Page 69 Adapter and Adapter Cable Configurations 4. Getting Started FIGURE 4-9. OBD II-C Adapter Configuration for MTS 3100 Application Cartridge MTS 3100 (OBD II Compliant) DLC Cable Controller Area Network VIM (P/N 02003211) 16//24 Pin DLC Adapter Cable GM Body Systems Application 1988-2004 Page 70 Adapter and Adapter Cable Configurations 4. Getting Started FIGURE 4-10. OBD II Adapter Configuration for Tech 1A OBD II Interface Cartridge required to test vehicles with OBD II Body Systems TECH 1A 14/26 Pin DLC Cable Application Cartridge 16/14 Pin OBD II Type 3 Adapter Cable GM Body Systems Application 1988-2004 Page 71 Adapter and Adapter Cable Configurations 4. Getting Started FIGURE 4-11. OBD II Adapter Configuration for Tech 1A TECH 1A 14/26 Pin DLC Cable Application Cartridge OBD II Vehicle Interface Module (VIM) 16/24 Pin VIM DLC Adapter Cable GM Body Systems Application 1988-2004 Page 72 Adapter and Adapter Cable Configurations 4. Getting Started FIGURE 4-12. OBD II Adapter Configuration for Tech 1 14/15 Pin DLC Cable TECH 1 Application Cartridge or MSC TECH 1 14/12 Pin VIM Adapter TECH 1 OBD II Vehicle Interface Module (VIM) 16/24 Pin VIM Adapter Cable GM Body Systems Application 1988-2004 Page 73 Adapter and Adapter Cable Configurations 4. Getting Started FIGURE 4-13. GM-16 Adapter Configuration for MTS 3100 Application Cartridge MTS 3100 14/26 Pin DLC Cable DC Power Cable GM 12/14/ Pin DLC Adapter 16/12 Pin Non-OBD II DLC Adapter GM Body Systems Application 1988-2004 NOTE: Switch should be on E&C Bus to communicate with the E&C system. Page 74 Adapter and Adapter Cable Configurations 4. Getting Started FIGURE 4-14. GM-16 Adapter Configuration for Tech 1A 14/26 Pin DLC Cable TECH 1A DC Power Cable Application Cartridge GM 12/14 Pin DLC Adapter GM 16/12 Pin Non-OBD II DLC Adapter GM Body Systems Application 1988-2004 NOTE: Switch should be on E&C Bus to communicate with E&C system. Page 75 Adapter and Adapter Cable Configurations 4. Getting Started FIGURE 4-15. GM-16 Adapter Configuration for Tech 1 TECH 1 Tech 1 GM RWAL/4WAL ALDL Cable Application Cartridge GM 16/12 Pin Non-OBD II DLC Adapter GM Body Systems Application 1988-2004 NOTE: Switch should be on E&C Bus to communicate with E&C system Page 76 Adapter and Adapter Cable Configurations 4. Getting Started FIGURE 4-16. GM-S Adapter Configuration for MTS 3100 Application Cartridge MTS 3100 DC Power Cable 14/26 Pin DLC Cable GM 12/14 Pin DLC Adapter GM 12/12 Pin SIR/Dual UART Adapter GM Body Systems Application 1988-2004 Page 77 Adapter and Adapter Cable Configurations 4. Getting Started FIGURE 4-17. GM-S Adapter Configuration for Tech 1A TECH 1A 14/26 Pin DLC Cable DC Power Cable Application Cartridge GM 12/14 Pin DLC Adapter GM 12/12 Pin SIR/Dual UART Adapter GM Body Systems Application 1988-2004 Page 78 Adapter and Adapter Cable Configurations 4. Getting Started FIGURE 4-18. GM-S Adapter Configuration for Tech 1 TECH 1 Tech 1 GM RWAL/4WAL ALDL Cable Application Cartridge GM 12/12 Pin SIR/Dual UART Adapter GM Body Systems Application 1988-2004 Page 79 Adapter and Adapter Cable Configurations 4. Getting Started FIGURE 4-19. GM-P Adapter Configuration for MTS 3100 Application Cartridge MTS 3100 14/26 Pin DLC Cable DC Power Cable GM 12/14 Pin DLC Adapter GM Geo Prizm SIR Adapter GM Body Systems Application 1988-2004 Page 80 Adapter and Adapter Cable Configurations 4. Getting Started FIGURE 4-20. GM-P Adapter Configuration for Tech 1A TECH 1A 14/26 Pin DLC Cable DC Power Cable Application Cartridge GM 12/14 Pin DLC Adapter GM Geo Prizm SIR Adapter GM Body Systems Application 1988-2004 Page 81 Adapter and Adapter Cable Configurations 4. Getting Started FIGURE 4-21. GM-P Adapter Configuration for Tech 1 TECH 1 Tech 1 GM RWAL/4WAL ALDL Cable Application Cartridge GM Geo Prizm SIR Adapter GM Body Systems Application 1988-2004 Page 82 Adapter and Adapter Cable Configurations 4. Getting Started FIGURE 4-22. GM-D Adapter Configuration for MTS 3100 Application Cartridge MTS 3100 DC Power Cable 14/26 Pin DLC Cable GM 12/14 Pin DLC Adapter Isuzu/Delco 3 pin ALDL Adapter GM Body Systems Application 1988-2004 Page 83 Adapter and Adapter Cable Configurations 4. Getting Started FIGURE 4-23. GM-D Adapter Configuration for Tech 1A 14/26 Pin DLC Cable TECH 1A DC Power Cable Application Cartridge GM 12/14 Pin DLC Adapter Isuzu/Delco 3 Pin ALDL Adapter GM Body Systems Application 1988-2004 Page 84 Adapter and Adapter Cable Configurations 4. Getting Started FIGURE 4-24. GM-D Adapter Configuration for Tech 1 TECH 1 Tech 1 GM RWAL/4WAL ALDL Cable Application Cartridge Isuzu/Delco 3 Pin ALDL Adapter GM Body Systems Application 1988-2004 Page 85 Using the Tester Keypad and Menus 4. Getting Started USING THE TESTER KEYPAD AND MENUS The operation of the tester software is simple, so once you’ve read through the manual to get a general idea of how it operates, you won’t have to refer to it very often. You simply sequence through the operation of the cartridge by pressing keys on the tester in response to messages displayed on the tester. In general, this sequencing is performed by pressing “Function Keys” to select items from menus displayed on the tester. Refer to the following table for a summary of the basic key functions. Each section in this manual contains a table indicating which keys are active for that mode of operation. TESTER FUNCTION KEYS General Tester Key Functions Y,N Answer the tester questions and scroll through data parameters. X Terminate operating modes and return to previous menu. U Scroll the menu display, or control a function ON. D Halt automatic menu scrolling, then scroll menu display, or control a function OFF. ) -( Select operating modes and command special functions. 0-9 Enter the vehicle year and model. Numeric keys also designate trouble codes while in Snapshot mode. ^ for 1 sec. If you are using a Tech 1, activate RS232C Cartridge menu (if installed). & Toggle between English/Metric. * Print data in Data List or Snapshot mode (if used with optional RS232C I/F Cartridge and printer). e Enter designated trouble code number. Confirm that action has been performed. GM Body Systems Application 1988-2004 Page 86 Vehicle Identification Number (VIN) 4. Getting Started VEHICLE IDENTIFICATION NUMBER (VIN) If you are in doubt about the vehicle you are testing, refer to the Vehicle Identification Number (VIN). Use the chart below to interpret the VIN. BODY/CHASSIS TYPE (5th DIGIT) for light duty trucks and APV’s TYPICAL VIN VIN CHARACTER 1 4 4C G 1 5 8 X L 7 1 6 0 7 9 3 1 2 3 4 5 6 7 8 9 10 11 12 13 14 15 16 17 VEHICLE MAKE BODY TYPE (3rd Digit) 1 = Chevrolet 2 = Pontiac 3 = Oldsmobile 4 = Buick 6 = Cadillac 7 = Canada (8th Digit) (4th Digit) 1988 to present Passenger Cars. ENGINE CODE (5th Digit) 1988 to present Light Duty Trucks MODEL YEAR (10t h Digit) J = 1988 K = 1989 L = 1991 M = 1991 N = 1992 P = 1993 R = 1994 S = 1995 T = 1996 V = 1997 W = 1998 X = 1999 Y = 2000 1 = 2001 2 = 2002 3 = 2003 4 = 2004 FIGURE 4-25. Body/Chassis Types GM Body Systems Application 1988-2004 Page 87 5. SELECTING AND OPERATING TEST MODES This chapter provides a detailed description of each test available in this application. Following the test descriptions, step-by-step instructions tell you how to quickly perform the test. A list of the active keys for each test is included at the end of each test mode. TEST MODES SUMMARY The following table gives you a quick summary of the test modes available within this application. Detailed descriptions of the test modes are given in the appropriate sections of this chapter. The tester only displays the test modes that are applicable to the vehicle being tester. GM Body Systems Application 1988-2004 Page 88 Test Modes Summary SYSTEM Common Test Modes 5. Selecting and Operating Test Modes MODE SUBMODE F0: Data List F0: Data F1: Input 1 F2: Input 3 F3: Outputs F4: Security Data Displays Air Bag Sensors and Input/Output data about the current condition of the SIR system. Examples include Ignition Voltage data, Warning Lamp Cycles, and Driver Seatbelt status. F2: DTCs F0: Current DTCs F1: History DTCs F2: Clear DTCs Displays Diagnostic Trouble Codes recorded by the ECU. The ability to Clear DTC information is also found in this mode. F3: Snapshot System Test Modes DESCRIPTION Gives you the ability to capture Data List information for later analysis. Trigger point and trigger type are selectable by the user. F4: OBD Controls F1: Reprogram BCM Provides the ability to reset memory values or write to vehicle memory. An example is Synchronizing the SDM with other modules on the Class 2 bus. F8: Information F3: ECU Info F4: Vehicle Info Displays helpful information about the vehicle or systems under test. This can consist of Calibration ID, Module ID, or VIN (Vehicle Identification Number). F0: Flash Codes Allows you to flash the system DTCs on the dashboard indicator lamp. F0: E&C Monitor Allows you to monitor transmission of data on the E&C bus to verify messages are transmitted in response to driver inputs. F1: Clear Codes Allows you to clear any system DTCs that may be present. F1: SDL Monitor Allows you to passively monitor data which is being transmitted between the vehicle's components during normal operation. F1: Reprogramming Allows you to reprogram various devices on the Class 2 communication bus following component replacement. F1: Identify E&C Components Identifies which E&C components are currently operational on the E&C bus and identifies possible E&C faults. F3: E&C Snapshot Allows you to capture a sequence of messages transmitted between components on the E&C bus. F4: E&C Controls Allows you to send messages to any of the E&C components and control the operation of that component. GM Body Systems Application 1988-2004 Page 89 Test Modes Summary SYSTEM System Test Modes (cont.) 5. Selecting and Operating Test Modes MODE SUBMODE DESCRIPTION F4: CCM Tests Allows you to check or correct several CCM circuits by isolating a function to control. Controls consist of telltale lamps, relays, and dimming control. F4: BCM Tests Allows you to perform a number of output controls such as mix door, A/C Clutch, chimes, relays, and lamps. F4: IPC Tests Allows testing of dimming, LEDs, telltales, chimes, and segment tests. F4: RAC Tests Allows you to test interior, exterior, and security lamps, as well as exercise relays associated with the RAC system. Functionality also consists of key tag programming and testing. F4: DIC Tests Allows you to control dimming, chime tests, segment check, reset tests, english/metric, and switch tests. F4: EOLM Tests Allows you to check the Engine Oil Life monitor system, transfer oil life data from one EOLM control module to another, and reset the oil life data to 20% or 100% remaining oil life. F4: HVAC Tests Allows control of single and dual temperature zone systems. Output controls consist of mix doors, solenoids, A/C clutch, rear defrost, blower PWM, and program number. F5: VIN and Option Content Allows reading of VIN and, if available, the vehicle's options. F5: Speaker Test Allows you to test each of the vehicle's speakers independently. GM Body Systems Application 1988-2004 Page 90 Selecting the System and Test Mode 5. Selecting and Operating Test Modes SELECTING THE SYSTEM AND TEST MODE The tester makes selecting systems and test modes easy by displaying a Select System menu and Test Mode menu. The menus show which key is used to select the system or test mode. In some cases all of the systems and test modes cannot be displayed on the tester screen at the same time, so the tester automatically sequences through all pages of the menu. You can stop the automatic scrolling by pressing the d key. The display can then be manually scrolled by pressing the u or d keys. To select a system or test mode, press the tester key to the left of the system or test mode listed on the menu. Regardless of which test modes are being displayed, any test mode can be selected from either menu page. Examples of a Select System menu and a Select Mode menu are shown below. SELECT SYSTEM ↑↓ F0: BCM F1: IPC F8: SIR SELECT MODE ↑↓ F0: DATA LIST F1: SDL MONITOR F2: TROUBLE CODE Once you've selected a system and test mode, operation begins. Detailed operating descriptions for each test mode are given in this section. ACTIVE KEYS 0-9 Used to select system and test mode. u Used to scroll the menu display. d Turns off the automatic menu scrolling, then used to scroll the menu display. COMMON TEST MODES The Common Test Mode section is designed to keep Common Tests that apply to most Body systems together in one section. The Common Tests all have the same active tester keys and menu layout for most Body systems. The following modes apply to the Common Test Mode section: • Data List (see Mode F0: DATA LIST) • SDL Monitor (see Mode F1: SDL MONITOR) • DTC(S) (see Mode F2: DTC(S)) • Snapshot (see Mode F3: SNAPSHOT) • Information (see Mode F8: INFORMATION) Additional information may be available for the Body system you are working on. Refer to the specific Body system outlined in the Selecting and Operating Test Modes section of this manual. GM Body Systems Application 1988-2004 Page 91 Common Test Modes 5. Selecting and Operating Test Modes MODE F0: DATA LIST The purpose of the Data List mode is to continuously monitor system data parameters. In order to maximize the information that can be seen at one time, the tester displays data parameters in pairs. The Body Systems cartridge contains pre-programmed data parameter pairs, or you can create your own pairs. See Create your Own Data Pairs on page 94. Appendix B of this manual contains descriptions of most data parameters. Not all data parameters are transmitted by every ECU; therefore, not all data parameters can be monitored for each vehicle system. To use Data List mode, do the following: 1. Select Data List from the Select Mode menu by pressing ). 2. Select the data parameters to be displayed by scrolling through the parameters with the Y and N keys. The data may be printed if the tester is connected to a compatible printer. An RS232C I/F Cartridge Kit (P/N 01001151) is required for Tech 1 testers. 3. To print the data, press *. While the data is being sent to the printer, the keyboard is disabled. Data can also be printed in a tabular format using the SCREEN PRINT feature. This function is enabled by pressing ^ for approximately 1 second until an RS232 Setup menu is displayed. Pressing ! then enables the SCREEN PRINT function. Refer to the tester Operator's Manual (MTS 3100 and Tech 1A testers) or the RS232C I/F Cartridge Operator's Manual (Tech 1 testers) for more detail. Operation of the Data List mode is summarized in Figure 5-1 on page 93. GM Body Systems Application 1988-2004 Page 92 Common Test Modes 5. Selecting and Operating Test Modes SELECT MODE F0: DATA LIST F1: SDL MONITOR F2: TROUBLE CODE ) BCM PROM I.D. xxxx VEHICLE SPEED 0 MPH y x n OIL PRESSURE 40 PSI OIL LEVEL OK y x n BRAKE FLUID LVL OK FOG LAMP SWITCH OFF y x nb MORE DATA PAIRS FIGURE 5-1. Example of Operating Mode F0: Data List ACTIVE KEYS ACTIVE KEYS y,N Scroll through the displayed data parameters. ) Mark top displayed parameter as fixed for creating your own data pairs. ! Mark bottom displayed parameter as fixed for creating your own data pairs. & Toggles between English and Metric values in some parameters. * Print the Data List parameters. x Return to Test Mode menu. GM Body Systems Application 1988-2004 Page 93 Common Test Modes 5. Selecting and Operating Test Modes Create your Own Data Pairs You can create data parameter pairs different from the pre-programmed pairs. Any two parameters which can be monitored for the VIN type you selected can be made into a pair. New data pairs are created simply by scrolling either the bottom or top display parameter, while the other display parameter is fixed. Pressing ) causes the top display parameter to be fixed, which is indicated with an asterisk (*) in the left column of the second line of the display, as shown in Figure A below. Pressing ! causes the bottom display parameter to be fixed, as shown in Figure B. To unfix the top parameter, press ! again. Press ) to unfix the lower parameter. The tester won't allow both top and bottom parameters to be fixed at the same time. As an example, let's say you wish to create a pair with OIL PRESSURE and VEHICLE SPEED. To do so, scroll through the pre-programmed pairs with the Y or N key until you find a pair with OIL PRESSURE. Fix Oil Pressure by pressing ) if OIL PRESSURE is the top parameter, ! if it is the bottom. Then scroll the other half of the display with either the Y or N key until Vehicle Speed is displayed. * FIXES TOP PARAMETER ) OIL PRESSURE * 60 PSI VEHICLE SPEED 0 MPH FIGURE A ! OIL PRESSURE 60 PSI VEHICLE SPEED * 0 MPH * FIXES BOTTOM PARAMETER FIGURE B MODE F1: SDL MONITOR The purpose of the SDL MONITOR mode is to passively monitor data which is being transmitted on the serial data link between the vehicle's components during normal operation. The operator can evaluate the data to see if it is correct, or at least reasonable, such as the data the IPC sends to the BCM, or data the ECM sends to the BCM. To use SDL Monitor mode, do the following: 1. After selecting the system to test, select SDL MONITOR from the Select Mode menu by pressing !. If you are testing a 1988-93 Oldsmobile E-Car, you are asked to select the type of display you wish to test. 2. Select the data link to be monitored from the Select SDL Mode menu. GM Body Systems Application 1988-2004 Page 94 Common Test Modes 5. Selecting and Operating Test Modes Which of the following you can choose depends on the model of the car you are testing. F0: ECM to BCM F3: ECCP to BCM1 F1: BCM to ECM F4: ECCP to BCM F2: BCM to IPC F4: BCM to ECCP F2: BCM1 to IPC F4: CRTC to BCM F2: IPC to BCM F5: BCM to HUAC F3: BCM to IPC F5: BCM to CTRC F3: BCM 2 to IPC F5: BCM to CCDIC When a link has been selected, Waiting for Data is displayed, then the first pair of data parameters is displayed. Press the Y or N key to scroll through all of the parameters available for the vehicle DLC message you selected. 3. If communications messages become intermittent or absent, the parameters start flashing on the display. In this case you should: • Verify that the ignition is in the ON position. • Exit and reenter selected monitor mode. • Check the connection to the DLC. • Verify parameters are still updating. Communication may be intermittent, but still useful. GM Body Systems Application 1988-2004 Page 95 Common Test Modes 5. Selecting and Operating Test Modes SELECT MODE F0: DATA LIST F1: SDL MONITOR F2: TROUBLE CODE ! DISPLAY TYPE? F0: BASE F1: UP WITH CRT 88-89 OLDS E-CAR ), ! DISPLAY TYPE? F0: ANLG CLUSTER F1: CRT & ANALOG CLUSTER F2: DIG. CLUSTER 90-93 OLDS E-CAR ), !, @ SELECT SDL MODE MENU F0: ECM TO BCM F1: BCM TO ECM F2: BCM TO IPC F2: BCM-1 TO IPC F2: IPC TO BCM F3: BCM TO IPC F3: BCM-2 TO IPC F3: ECCP TO BCM F4: ECCP TO BCM F4: BCM TO EECP F4: CRTC TO BCM F4: CCDIC TO BCM F5: BCM TO HVAC F5: BCM TO ECCP F5: BCM TO CRTC F5: BCM TO CCDIC FIGURE 5-2. SDL Monitor ACTIVE KEYS ACTIVE KEYS Y,N Scroll through displayed data parameters. U Scroll the menu displays. d Turn off automatic menu scrolling. )-@ Select Instrument Panel Display Type for 1988-98 Olds E-cars. )-% Select SDL Monitor links. ) Mark top displayed parameter as “fixed” for creating your own data pairs. ! Mark bottom displayed parameter as “fixed” for creating your own data pairs. & Toggle between English and metric. x Return to previous menu. GM Body Systems Application 1988-2004 Page 96 Common Test Modes 5. Selecting and Operating Test Modes MODE F2: DTC(S) Trouble codes or Diagnostic Trouble Codes (DTC) are set when an abnormal condition is detected by the system ECU. They are key to diagnosing many of the problems which can occur in the vehicle. You should refer to the GM service manual for additional information regarding trouble codes. Trouble codes can be displayed and cleared. Fix or examine the indicated problem, clear the code, then see if it resets immediately or after a few drive cycles. If F2: TROUBLE CODES/DTC is selected and there are no stored trouble codes for the system you are testing, the tester informs you that there are no trouble codes. When F2: TROUBLE CODES/DTC is selected and trouble codes have been indicated by the system ECU, the tester asks if you want to clear codes. If you do not wish to clear the codes, press the n key to return to the Select Mode menu. If you want to clear the codes, press the y key. The tester attempts to clear the trouble codes, then displays a message informing you that the codes were cleared or that the attempt to clear the codes failed. If the Code Clear Fail message is displayed, press x to return to the Select Mode menu, then press F2: TROUBLE CODES and try to clear the codes again. For 1993 and newer vehicles, trouble codes are referred to as Diagnostic Trouble Codes (DTC). You can use the TROUBLE CODE/DTC mode to display trouble codes which have been set by the vehicle. You can also use the TROUBLE CODE/DTC mode to clear the codes set by the System ECU after the codes have been displayed. If a current code problem still exists, the code are reset by the system. NOTE On 1990 E-Cars, Code B552 BCM Keep Alive Memory Failure is sometimes set by the tester when clearing codes. On 1991-93 C-Body Oldsmobile, the DIC may set a code 54 when the tester is testing the RAC. Therefore, you should check for trouble codes at the start and end of the testing. If there are codes set at the end of testing but not at the start, it is assumed that they are caused by the tester and should be ignored. To read Diagnostic Trouble Codes, do the following: 1. Select TROUBLE CODES/DTC mode by pressing @. If the vehicle fails to respond to the tester within 3 seconds, the tester displays the following: TROUBLE CODES TROUBLE CODES WAITING FOR DATA NO DATA AVAILABLE FROM BCM Indicates system being tested 2. Under these conditions you should: • Verify that the vehicle's ignition is in the ON position. • Check the connection to the DLC. • Reselect the system and retry. If this message persists, you should check for a shorted or open serial data link or a faulty System ECU. Once data has been received, the tester displays each code for 3 seconds. GM Body Systems Application 1988-2004 Page 97 Common Test Modes 5. Selecting and Operating Test Modes 3. If you want to freeze the display, press the d key. Pressing u causes the tester to sequence to the next code. The tester displays trouble codes followed by a brief description of the code. Certain body systems are capable of distinguishing between Current and History trouble codes. These systems display a C (current) or H (history) at the end of line two on the tester display. If a C or H is not displayed, the system being tested doesn't differentiate between current or history trouble codes. All codes are continually displayed until the X key is pressed. To clear Diagnostic Trouble Codes, do the following: 4. Press the X key. The tester prompts you to CLEAR CODES. 5. Press N to leave the TROUBLE CODE/DTC mode. If you press Y the tester prompts you with the following message: History Codes Will be Lost Continue?. 6. Press Y again to make the tester clear both current and history codes from the system you have selected. 7. If the Code Clear Fail message is displayed, re-enter the TROUBLE CODE/DTC mode and try to clear codes again. If it fails again, then you probably have an intermittent connection to the serial data link (SDL). It is also possible that the ECU is malfunctioning. ACTIVE KEYS Y,N Used to determine if codes are to be cleared. d Freeze the display of the latest trouble code. u Display the next trouble code. x Terminate trouble code scrolling. Terminate trouble code display. GM Body Systems Application 1988-2004 Page 98 Common Test Modes 5. Selecting and Operating Test Modes ACTIVE KEYS SELECT MODE F0: DATA LIST F2: TROUBLE CODE F3: SNAPSHOT @ TROUBLE CODES WAITING FOR DATA TROUBLE CODES TROUBLE CODES NO DATA RECEIVED FROM EOLM NO EOLM CODES TROUBLE CODES EOLM CODE 23 IGNITION MONITOR MALFUNCTION After 3 seconds the next code will be displayed. Freeze the display by pressing the D key. Press U to display the next code. x CLEAR CODES? After all codes have been displayed you can clear codes or return to the Select Mode menu. (YES/NO) y y n CODE CLEAR FAIL HISTORY CODES WILL BE LOST CONTINUE? y CODES CLEARED SELECT MODE F0: DATA LIST F2: TROUBLE CODE F3: SNAPSHOT FIGURE 5-3. Example of Reading and Clearing EOLM Trouble Codes GM Body Systems Application 1988-2004 Page 99 Common Test Modes 5. Selecting and Operating Test Modes MODE F3: SNAPSHOT The purpose of the SNAPSHOT test mode is to help you isolate an intermittent or transient problem by storing system data parameters before and/or after the problem occurs. When the tester is operating in SNAPSHOT mode, it continually stores information about data parameters and trouble codes. A time and position index for the stored information is also saved. The tester stores all of the Data List parameters and trouble codes for the vehicle selected. It can store from 56 to over 999 data samples, depending on the system being tested. Each snapshot erases the previously stored information and records all new information. BODY SYSTEMS THAT SUPPORT SNAPSHOT FUNCTION RFA CCP EOLM BCM IPC ACM HVAC PHN RAC CCM IRC E&C DIC SIR Trigger Condition The trigger condition defines the specific circumstances under which you want the trigger to occur. The possible trigger conditions are: • ANY CODE: If any trouble code is detected, it causes the trigger to occur. • SINGLE CODE: You can select a specific trouble code that causes the trigger to occur. • MANUAL TRIGGER: While operating the SNAPSHOT mode, you can always cause the trigger to occur by pressing the, E, X, or ( keys. Once the trigger occurs, the tester retains data according to which trigger point you have selected. Trigger Point If F9:TRIG. POINT is selected from the Snapshot Mode menu, a trigger point selection menu is displayed. Trigger Point allows you to specify which data to capture. This can be: • Data that occurs before the trigger • Data that occurs after the trigger • Data that occurs both before and after the trigger If no trigger point is selected, the center trigger point is used and a similar number of data samples before and after the trigger are saved. GM Body Systems Application 1988-2004 Page 100 Common Test Modes 5. Selecting and Operating Test Modes Viewing Captured Data You have the option of bypassing the Data Capture phase and displaying previously captured data. To do this, select F0:REPLAY DATA from the Snapshot menu. All data captured during SNAPSHOT is retained in the tester until it is overwritten by a new SNAPSHOT, or if the tester is unplugged from the cigarette lighter for more than 12 hours. If no data has been captured, or if data stored in the tester memory is not data from the vehicle currently being tested (i.e., it's from a previously tested vehicle), the tester displays the following message for four seconds (or until the X key is pressed): CAPTURED DATA NOT FROM SELECTED VEHICLE Printing Captured Data The Body Systems Cartridge has the capability to print the captured data, providing a hard copy of any selected data sample. NOTE If you are using a Tech 1, the tester RS232C I/F Cartridge Kit (P/N 01001151) is required to support the print function. The operation of SNAPSHOT mode is divided into three phases: • Set-Up Phase • Data Capture Phase • Data Display Phase To run Snapshot Set-Up Phase, do the following: 1. Select the SNAPSHOT mode from the Test Mode menu by pressing #. The trigger conditions and Replay Data options are displayed in a self-scrolling Snapshot Mode menu. 2. To select a trigger option, press the function key displayed to the left of the desired trigger condition. To replay previously captured data, press ). For some systems, you can choose to trigger on the trouble code that occurs or a specific system trouble code for the trigger condition as explained below. When current and history codes exist for a system, current codes are used to trigger. 3. To trigger on the first trouble code that occurs while taking a snapshot, press #. 4. To select the single code trigger, press $ to enter the code you want to use as a trigger. 5. When the tester screen displays SNAPSHOT MODE, ENTER “SYSTEM” CODE:, xx or ENTER DTC XXXX, use numeric keys 0 - 9 to enter the two, three, or four digit trouble code number that you have selected. 6. If the code is a three or four digit code preceded by the letter B or F, skip the letter and enter the numerical code only. The tester automatically enters the letter. GM Body Systems Application 1988-2004 Page 101 Common Test Modes 5. Selecting and Operating Test Modes 7. Press the E key. The tester continues to store data until the specified trouble code is detected, or until you press the X key. If the code you enter does not exist for the system being tested, an INVALID CODE message is displayed and the code has to be reentered. In addition to offering a trigger condition selection, you have the option of selecting a trigger point. If you select F9:TRIG. POINT from the Snapshot Mode menu, the following options are displayed: F0: BEGINNING, F1: CENTER, and F2: END. If a trigger position is not selected, the center position is automatically used. • F0: BEGINNING: The trigger is at the beginning of the captured data. After the trigger occurs, the tester continues to capture data until the memory is full, then the data is displayed. • F1: CENTER: If enough time has elapsed before and after the trigger point, a similar number of data samples that occurred before and after the trigger point is available for display. However, if the trigger occurs at or near the start of the Data Capture phase, there are fewer samples before the trigger point is available for display. Also, if the X key is pressed after the trigger occurs, but before the tester memory is full, fewer data samples captured after the trigger point are available for display. • F2: END: Data that occurred before the trigger is displayed. If the tester memory was not full when the trigger occurred, some data samples captured after the trigger point are also available for display. After the Data Capture phase, you can scroll through all of the stored data for display. In the Data Display phase, data parameters are displayed in a manner identical to that of the Data List mode. You can also specify the data sample you wish to display. Snapshot Set-Up Phase To select Trigger Condition or display previously captured data, do the following: 1. Press the function key to the left of the desired trigger condition. 2. To bypass the Data Capture phase and review previously captured data, press ): REPLAY DATA. GM Body Systems Application 1988-2004 Page 102 Common Test Modes 5. Selecting and Operating Test Modes SET-UP PHASE SELECT MODE F0: DATA LIST F2: TROUBLE CODE F3: SNAPSHOT # REPLAY PREVIOUSLY CAPTURED DATA BCM PROM I.D. xxxx VEHICLE SPEED 30 MPH ) 0 SELECT TRIGGER POINT SNAPSHOT OPTIONS F0: REPLAY DATA F1: MANUAL TRIG. F3: ANY CODE F4: SINGLE CODE F9: TRIG. POINT ( TRIGGER POINT AT F0: BEGINNING F1: CENTER or F2: END of data. ) ! ! @ $ # Code, then e DATA CAPTURE PHASE BCM PROM I.D. xxxx VEHICLE SPEED 30 MPH n SNAPSHOT OPTIONS ENTER CODE ??? W y More Data Parameters FIGURE 5-4. Snapshot Setup Phase Flow ACTIVE KEYS IN THE SNAPSHOT SET-UP PHASE X Return to test mode menu. !-$ Select trigger condition or trigger point. ) Select Replay Data. 0-9 Select specific diagnostic trouble codes. e Enter selected diagnostic trouble code. Data Capture Phase Once the trigger condition is specified, the tester begins storing data parameters and trouble codes while displaying the Data List parameters. The data is organized as a number of data samples. The value or state of each parameter as well as all trouble codes are saved for each sample when the trouble codes are in the same message as the snapshot data. The data display indicates the waiting for trigger condition with a flashing W in the lower right-hand corner of the display. If you don’t wish to wait for the selected trigger, you can always force a trigger. GM Body Systems Application 1988-2004 Page 103 Common Test Modes 5. Selecting and Operating Test Modes To force a trigger, do one of the following: • Press ( • Press X, or • Press E. ( IN CAR TEMP 24° C 76° F HVAC SET TEMP 22° C W F9 IN CAR TEMP 24° C 75° F HVAC SET TEMP 22° C T Waiting for Trigger SNAPSHOT TRIGGER OCCURED ON: MANUAL KEY PRESS Trigger Occurred On Trigger Occurs IN CAR TEMP 24° C 75° F HVAC SET TEMP 22° C 0 Display Data Phase FIGURE 5-5. Data Capture Phase Flow Once the trigger occurs, the tester continues to save data samples until its memory is full. The data display indicates that the trigger has occurred by replacing the flashing W with a fixed T. As soon as the memory is full, the data capture terminates automatically and the tester goes to the Data Display phase. After the data capture terminates, the tester briefly displays the cause of the trigger. You can also see this display by pressing # in the Data Display Phase. To terminate the Data Capture phase early, do the following: • Press X. The SNAPSHOT mode moves to the Data Display phase. ACTIVE KEYS IN THE SNAPSHOT DATA CAPTURE PHASE ( Manual trigger. e Manual trigger. x Manual trigger, or Display captured data if trigger has already occurred. Data Display Phase The Data Display phase is indicated with a number (initially zero) in the lower right hand corner of the display. To select the data parameters to be displayed, do the following: • Press the Y and N keys. GM Body Systems Application 1988-2004 Page 104 Common Test Modes 5. Selecting and Operating Test Modes To select the desired sample, do the following: • Press the u and d keys. An index is displayed in the lower right-hand corner of the tester display. Sample 0 corresponds to the trigger sample; sample -1 is the sample immediately preceding the trigger; sample +1 is immediately after the trigger, and so on. The index range may be less than the maximum number of samples if not enough time was allowed for data capture before or after the trigger. The index range also varies between systems, due to different message lengths. Take care that a lower parameter you are reading is not being overwritten by the sample date/time. To view an obstructed parameter, do the following: 1. Freeze a lower parameter which is not the desired parameter with !. 2. Then scroll with Y or N until the desired parameter is in the upper parameter location on the tester display. The Body Systems Cartridge allows you to advance directly to the first, last, or trigger sample with the press of a button, as shown in the following table. ACTIVE KEYS $ Display first (earliest) sample. % Display trigger sample (0). ^ Display last (most recent) sample. To toggle between the sample index and sample time while in the Data Display phase, do the following: • Press e. IN CAR TEMP 24°C 75°F HVAC SET TEMP 22°C +16 Sample Index e e IN CAR TEMP 23°C 74°F HVAC SET TEMP 22°C +3.4 Sample Time FIGURE 5-6. Toggling Between Sample Index and Sample Time The sample time display gives the time in seconds (relative to the trigger sample) at which the tester received the currently displayed sample. For example, a sample time of +3.4 means the sample was received 3.4 seconds after the trigger sample. A sample time of -2.6 seconds means the sample was received 2.6 seconds before the trigger. GM Body Systems Application 1988-2004 Page 105 Common Test Modes 5. Selecting and Operating Test Modes If you are using a Tech 1, the currently displayed Data List may be printed if the tester is equipped with an RS232C I/F Cartridge Kit (P/N 01001151) connected to a compatible printer. To print the data, do the following: • Press * . While the RS232C Cartridge is sending data to the printer, the tester keyboard is disabled. WARNING! Do not plug in the RS232C Cartridge with the tester on. To print the currently displayed data list from a Tech 1A or MTS 3100, do the following: 1. Connect to a compatible printer. 2. Press the * key. SNAPSHOT data can also be printed in a tabular format using the RS232C Cartridge's SCREEN PRINT feature. This is enabled (for Tech 1, the RS232 Cartridge must be installed). To print Snapshot data in tabular format, do the following: 1. Press ^ for approximately 1 second until an RS232 Setup menu is displayed. 2. Press ! to enable the SCREEN PRINT function. To return to the Trigger Select menu, do the following: • Press X to return to the Trigger Select menu. If you are finished with the SNAPSHOT mode, press X again to return to the Test Mode menu. ACTIVE KEYS IN SNAPSHOT DATA DISPLAY PHASE Y,N Scroll through displayed data parameters. U,N Scroll through selected samples. ),! Fix top or bottom display parameter respectively. @ Display diagnostic trouble codes for current sample. # Displays cause of trigger. $ Advance to first (earliest) sample. % Advance to trigger sample (sample 0). ^ Advance to last (most recent0 sample. & Toggle between English and Metric values. * Print current data sample (if equipped with RS232C I/F cartridge and printer). e Toggle between sample index and sample time display. x Return to trigger select. GM Body Systems Application 1988-2004 Page 106 Common Test Modes 5. Selecting and Operating Test Modes More Data Samples before the trigger U Data Sample that occured just before the trigger occured D IN CAR TEMP 24°C 76°F HVAC SET TEMP 22°C –1 U Trigger Position D U Y IN CAR TEMP 24°C 75°F HVAC SET TEMP 22°C 0 U Data Sample that occured just after the trigger occured More Data Samples N D IN CAR TEMP 23°C 74°F HVAC SET TEMP 22°C +1 U D SUNLOAD TEMP 29°C 85°F HVAC SET TEMP 32°C 0 U Y More Data Parameters N D More Data Samples D More Data Samples after the trigger FIGURE 5-7. Data Display Phase Class 2 Snapshot-Data Display Phase Snapshot data from a Class 2 system can be displayed before entering the Body Systems Application software. If a Snapshot is saved in memory, the tester displays the following screen, asking if you would like to replay the snapshot before entering the vehicle selection process. REPLAY SAVED SNAPSHOT DATA? (YES/NO) If you select NO, the tester continues and allow you to select the model year and body VIN. You can continue testing as normal; however, if you choose YES, the tester displays the saved snapshot: GM Body Systems Application 1988-2004 Page 107 Common Test Modes 5. Selecting and Operating Test Modes GENERAL MOTORS BODY SYSTEMS 1988-2004 vX.X [ENTER] e (If Snapshot is Saved) Replay saved Snapshot data? N (YES/NO) Select Model Year 2004 (4) Y Go to Regular vehicle selection and testing. SNAPSHOT TRIGGER OCCURED ON: MANUAL KEY PRESS 5 Seconds Go to first frame of Snapshot Dvr Frontal Loop Disabled Pas Frontal Loop Disabled x 0 FIGURE 5-8. Snapshot Class 2 Data Display Phase MODE F8: INFORMATION The purpose of the Information test mode is to supply additional information about the vehicle or system under test. Information test mode includes. • System Status • System Identification • Calibration Identification NOTE Not all Body Systems have the F8: Information option available. GM Body Systems Application 1988-2004 Page 108 Common Test Modes 5. Selecting and Operating Test Modes SELECT MODE: F8: INFORMATION * SELECT MODE F0: MODULE 1 F1: MODULE 2 ) Prom ID 1111 Calibration ID 2222 ! Base Part Number 33333333 Comp. Serial 8-11 DDDD FIGURE 5-9. Information Test Mode ACTIV ACTIVE KEYS * Select Information from the Select Mode menu. ),! Select the information type from the Select Datalist menu. y,n Scroll through the Datalist. x Return to the Select Datalist menu. GM Body Systems Application 1988-2004 Page 109 System Test Modes 5. Selecting and Operating Test Modes SYSTEM TEST MODES AIR CONDITIONING MODULE (ACM) The ACM provides the controls for temperature regulation. It controls an actuator that adjusts the air mix valve position to blend cold and warm air. The motor is reversible and moves a rotary shaft, which drives the air mix valve link. The motor also provides a position sensor signal to monitor the actual valve position. The ACM responds to operate the four vacuum solenoids that control vacuum to the various actuators which control the following: • Air inlet (re-circulation) valve • A/C Defrost valve • Up/Down valve In addition, the ACM controls the Park Brake release actuator. The PCM sends a Class 2 message to the ACM. This message is sent when the transmission is shifted out of Park or Neutral. The ACM tests allow you to check or correct several ACM circuits. Tests include those for components such as High/Low cooling fans, various solenoids, Park Brake release operation, and Upper/Lower motor operations. Mode F4: OBD Controls To run the ACM tests, do the following: 1. Select F4: OBD CONTROLS from the Select Mode menu. 2. From the Select Control menu, choose from the following test menus: F0: Solenoids F1: Misc tests F0: Recirc. Sol F0: Park brk rel F1: A/C def. Sol F1: Outside tmp F2: Air Up Sol F2:Upper motor F3: Air Dn Sol F3: Lower motor F4: Blower speed 3. When you press a test key, the corresponding ACM data is displayed. Use the U and D arrow keys to turn components On and Off 4. Press X to return to the Select Control menu. When you are finished with the ACM tests, press x again to return to the Select Mode menu. GM Body Systems Application 1988-2004 Page 110 System Test Modes 5. Selecting and Operating Test Modes CENTRAL CONTROL MODULE (CCM) The Central Control Module (CCM) Tests allow you to check or correct several CCM circuits by isolating a function to control. The types of functions controlled are telltale lamps, relays, and dimming control. All of the tests are operated the same way. Mode F4: CCM Tests (1990-93 Y-Body Chevrolet Corvette and 1993 D-Body Cadillac Fleetwood) Mode F4: OBD Controls (1994-96 Y-Body Corvette and 1994-1996 D-Body Cadillac Fleetwood) To run the Mode F4: CCM tests or F4: OBD Controls tests, do the following: 1. Select F4: CCM TESTS or F4: OBD Controls from the Select Mode Menu 2. Select the desired test. Example test menus are listed below: . F0: TT/LAMPS F2: CHIMES F1: CHANGE OIL F1: CHIME 1 F2: CHECK GAUGES F2: CHIME 2 F3: SEATBELT F4: SECURITY F5: OIL LEVEL F1: RELAYS F1 HORN F2 REAR DEFOG F3 COURTESY F3: DIMMING F1: GAUGES F2: SPEEDO F3: RADIO When the test key is pressed, the CCM data list is displayed with a three character abbreviation of the test selected at the end of line 2. The bottom right corner shows three different options: 1) the U and D arrows 2) “ON” or 3) “OFF”. The U and D arrows indicate the keys to use in controlling the selected test. There are only two states, activated or deactivated, except that when first selected, there is no overriding state selected yet. 3. Press X to return to the CCM Tests menu. 4. When you are finished with the CCM Tests, press X to return to the Select Mode menu. GM Body Systems Application 1988-2004 Page 111 System Test Modes 5. Selecting and Operating Test Modes ACTIVE KEYS )-% Select Test to perform. u,D Used to control lamp, relay or dimming control. x Return to Select Mode menu. Mode F5: VIN and Option Content The VIN and Option Content mode is available on certain CCM, BCM, and IPC systems. It reads the VIN and, if available, the vehicle's options, such as type of gasoline, destination country of the vehicle, features available, and other qualities of the vehicle that do not change. These parameters are stored in the EEPROM of the particular control system. To use VIN and Option Content Mode, do the following: 1. Press % to select the VIN & OPTION CONTENT mode from the Select Mode menu. Parameters containing information specific to the vehicle being tested are displayed. 2. Use the Y and N keys to scroll through the parameters. You can create your own data pairs as explained in the F0: DATA LIST section. 3. Press X to return to the Select Mode menu. BODY CONTROL MODULE (BCM) BCM tests are available for the 1988-93 Buick E-car, 1988-91 Cadillac E- and K-cars, 1988-93 Oldsmobile E-car, and 1990-93 Cadillac C-car vehicles. NOTE During BCM control key presses, NO DATA FROM BCM may be displayed briefly. Communication reestablishes automatically within a few seconds. Mode F4: BCM TESTS To run the BCM tests, do the following: 1. Select F4: BCM TESTS from the Select Mode menu. 2. Select the desired control function from the BCM Tests Selection menus below: GM Body Systems Application 1988-2004 Page 112 System Test Modes 5. Selecting and Operating Test Modes OLDSMOBILE BCM TESTS MENU F0: MIX DOOR MAXIMUM Step 3a F1: A/C CLUTCH Step 3a F2: CHIMES F1: CHIME 1 Step 3a F2: CHIME 2 Step 3a F3: FOG LAMPS Step 3a F4: COURTESY LAMP Step 3a F5: GENERATOR TERMINAL Step 3a BUICK BCM TEST MENUS F0: OUTPUTS F0: MIX DOOR MAXIMUM Step 3a F1: A/C CLUTCH Step 3a F2: CHIMES F1: CHIME 1 Step 3a F2: CHIME 2 Step 3a F3: LAMPS F0: HEAD LAMPS * Step 3a F1: HI/LO BEAMS Step 3a F2: TWILIT/PARK^ Step 3a F3: DRL RELAY Step 3a F4: FOG LAMPS Step 3a F5: COURTESY LAMP Step 3a F4: DAB RELAY Step 3a F5: GENERATOR I TERMINAL Step 3a F1: OVERRIDES Step 3a F0: BLOWER PULSE WIDTH MODULATION Step 3b F1: VACUUM FLORESCENT DIMMING Step 3c * Reatta only ^Riviera only 3. When the test is selected, the corresponding BCM data list parameter is displayed. A three-character abbreviation at the end of line 2 indicates the test selected. The Output Tests have only two states; activated or deactivated. The Override Tests have variable control. Press the u key to turn the output ON or increase the Override level, and press the d key to turn the output OFF or decrease the Override level. GM Body Systems Application 1988-2004 Page 113 System Test Modes 5. Selecting and Operating Test Modes ABBREVIATIONS FOR OUTPUTS AND OVERRIDES MXD = Mix Door Maximum A/C = A/C Clutch CH1 = Chime 1 CH2 = Chime 2 FLR = Fog Lamps Relay LMP = Courtesy Lamp GEN = Generator 1 Terminal HDL = Head Lamps H/L = HI/LO Beams TPL = Twilight/Park Lamps DRL = Daytime Running Lamps Relay DAB = Delayed Accessory Bus Relay BPW = Blower Pulse Width VFD = Vacuum Florescent Dimming a. The functions listed under “F0: OUTPUTS” are all two state functions, typically enabled and disabled, on and off, activated or deactivated. They are controlled by the u and d keys. The u key usually activates the function and the d key deactivates it. The state of the control is shown in the lower right corner as ON or OFF. When first entering the test, up and down arrows are displayed here. This indicates the keys to use, and also indicates controlling has not begun yet. b. The Blower PWM has eight control positions. One is Blower off, and the other are the seven vehicle blower speeds. Control begins with the setting on the medium blower speed. The u key increases blower speed, and the d key decreases blower speed with each keypress until the blower is turned off. The Data List parameter BLOWER COMMAND updates the new voltage control level of the blower with each control keypress. c. The Vacuum Florescent Dimming function increases or decreases brightness by 10% with each u or d keypress. The data list parameter VF DIMMING updates the percent brightness with each control keypress. 4. Press X to return to the BCM Tests menu. When you are finished with the BCM Tests, press X to return to the Select Mode menu. Mode F5: VIN and Option Content The VIN and Option Content mode is available on certain CCM, BCM, and IPC systems. It reads the VIN and, if available, the vehicle's options, such as type of gasoline, destination country of the vehicle, features available and other qualities of the vehicle that do not change. These parameters are stored in the EEPROM of the particular control system. Definitions for VIN and Option Content parameters are found in Appendix B To use VIN and Option Content Mode, do the following: 1. Press % to select the VIN & OPTION CONTENT mode from the Select Mode menu. Parameters containing information specific to the vehicle being tested are displayed. 2. Use the Y and N keys to scroll through the parameters. You can create your own data pairs as explained in Mode F0: DATA LIST. 3. Press X to return to the Select Mode menu. GM Body Systems Application 1988-2004 Page 114 System Test Modes 5. Selecting and Operating Test Modes INSTRUMENT PANEL CLUSTER (IPC) Instrument Panel Cluster (IPC) tests are available on 1988-91 Buick W-car, 1988-91 Oldsmobile W-car, 1988-91 Pontiac W-car, 1992-96 Cadillac E/K-car, 1995-96 Buick G-car, 1995-96 Chevrolet J-car, 1995-96 Oldsmobile G-car, 1995-96 Pontiac J-car, 1996 Buick N-car, 1996 Pontiac N-car, and 1996 Oldsmobile Ncar vehicles. The IPC has only one IPC Test, Vacuum Florescent Dimming. Mode F4: IPC Tests To perform the IPC Tests, do the following: 1. Select F4: IPC TESTS from the Select Mode menu. 2. To display the VF DIMMING parameter, press $. 3. Use the u key to increase the brightness by 10% or the d key to decrease the brightness by 10%. The tester displays the current percent of brightness with each keypress. 4. Press X to return to the IPC Tests menu. 5. When you are finished with the IPC Tests, press X to return to the Select Mode menu. Specific IPC System for 1994-1996 Oldsmobile C/H-Body Applications These vehicle applications may have one of two IP Cluster options, a Tach IP Cluster or VF Digital display cluster. The IPC TESTS differ for both of these levels of IP clusters. When the user selects the IPC from the Select System menu on either of these cluster options, each of the test modes (including F4: IPC Tests) are adjusted by the tester through an option content test when the IPC was selected. The DIC functions for the 1994 C/H vehicles are now an integral function of the IPC when the vehicle is equipped with a FV display cluster and are tested in the F4: IPC TESTS menu selection. The following IPC TEST selections are available for 1994-96 Oldsmobile C/H-body vehicles. GM Body Systems Application 1988-2004 Page 115 System Test Modes 5. Selecting and Operating Test Modes To run the IPC tests, do the following: 1. Select IPC TESTS from the Select Mode menu. 2. Select the desired control function from the IPC TEST selection menus below (see notes at the bottom of the following chart for more selection information). F0: IPC DIMMING F1: IPC INDICATORS F0: DIC LEDS* F0: DIC LEDS* F1: DATE F2: OIL F3: GAUGE F1: TELLTALES F1: HOT T/TALE F2: VOLTS T/TALE F3: TRAC CTRL OFF F4: SEATBELT F5: LOW WASHER** F6: TRAC CTRL ACT** F2: CHIMES F0: FAST CHIME F1: SLOW CHIME F3: SEGMENT TEST* F0: EVEN ROWS F1: EVEN COLUMNS F2: ODD ROWS F3: ODD COLUMNS F4: EVEN COLUMNS * These tests are available on DIC equipped vehicles only. ** These tests are not available on DIC equipped vehicles. GM Body Systems Application 1988-2004 Page 116 System Test Modes 5. Selecting and Operating Test Modes Mode F5: VIN and Option Content The VIN and Option Content mode is available on certain CCM, BCM, and IPC systems. It reads the VIN and, if available, the vehicle's options, such as type of gasoline, destination country of the vehicle, features available, and other qualities of the vehicle that do not change. These parameters are stored in the EEPROM of the particular control system. To use VIN and Option Content mode, do the following: 1. Press % to select the VIN & OPTION CONTENT mode from the Select Mode menu. Parameters containing information specific to the vehicle being tested are displayed. Use the Y and N keys to scroll through the parameters. You can create your own data pairs as explained in Section F0: DATA LIST. 2. Press X to return to the Select Mode menu. LOW TIRE PRESSURE WARNING SYSTEM (LTPWS) The Flash Codes test allows you to flash Low Tire Pressure Warning System (LTPWS) trouble codes on the dashboard LTPWS telltale lamp. The Clear Codes test allows you to clear any LTPWS trouble codes that are present. Refer to the LTPWS Service Manual, Section 3E, to interpret the codes. When you enter Mode F2 you see the Flash Codes described in this section. NOTE The F0:Flash Codes/F1: Clear Codes test is available for 1991-96 Y-Body vehicles only Mode F0: Flash Codes Mode F1: Clear Codes To run the tests, do the following: 1. Select the LTPWS from the 1991-1996 Y-Body Select System menu by pressing ! / % (depending on the vehicle year). You are prompted to Refer to the LTPWS diagnosis in the Service Manual. 2. Press d to continue. 3. When the Select Mode menu is displayed, press ) to read flashed codes, or ! to clear codes. You are prompted to Turn the ignition ON and press the E key. 4. Do not start the engine, just turn the ignition key to run. Waiting for ECM ignition is displayed until the tester has detected a message from the ECM to the BCM, indicating that the ignition is on. If you selected F0: FLASH CODES, the tester informs you that the codes flash on the Service LTPWS Lamp. 5. Press E to flash trouble codes on the LTPWS warning lamp. GM Body Systems Application 1988-2004 Page 117 System Test Modes 5. Selecting and Operating Test Modes The tester display informs you that Diagnostic Trouble Code 12 precedes any trouble codes stored. 6. If you selected F1: CLEAR CODES, the tester asks you to press Y to clear codes. 7. Press N if you do not want to clear any codes. While codes are being cleared, Clearing LTPWS DTC(s) flashes for 9 seconds. When code clearing is finished, the display is updated. 8. Press d to see the complete message. NOTE You must cycle the ignition OFF and ON before the LTPWS lamp turn off. It remains on, without flashing after clearing codes, to indicate that clearing codes has been completed. 9. Press X twice to return to the Select System menu. GM Body Systems Application 1988-2004 Page 118 System Test Modes 5. Selecting and Operating Test Modes SELECT SYSTEM: F0: CCM F9: E&C F1: LTPWS F8: SIR ! REFER TO LTPWS DIAGNOSIS IN SERV. MANUAL SECTION 3E SELECT MODE F0: FLASH CODES F1: CLEAR CODES ) TURN IGNITION “ON” THEN PRESS (ENTER) e ! TURN IGNITION “ON” THEN PRESS (ENTER) e WAITING FOR ECM IGNITION WAITING FOR ECM IGNITION SERV. LTPWS LAMP WILL FLASH DTC SEE SERV. MANUAL (ENTER) CLEAR DIAGNOSTIC TROUBLE CODES? (YES/NO) e CLEARING LTPWS DTC(S) Flashes for 6 Seconds SERV. LTPWS AND LOW TIRE LIGHTS WILL REMAIN ON TILL IGNITION IS CYCLED “OFF” AND “ON” CONFIRMING DTC CLEARED (EXIT) y DTC 12 WILL PRECEDE ANY CODE STORED (EXIT) FIGURE 5-10. LTPWS Codes GM Body Systems Application 1988-2004 Page 119 System Test Modes 5. Selecting and Operating Test Modes REMOTE ACCESSORY CONTROL (RAC) The Remote Accessory Control function allows you to test interior, exterior, and security lamps, as well as exercise relays associated with the RAC system. Also, the tester allows you to program a new key tag identification signal (also known as a Vehicle Access Code) for vehicles equipped with the RAC system. Vehicles equipped with the RAC system are: 1991-95 Buick C-cars, 1991-95 Oldsmobile C-cars, 1992-95 Pontiac H-bodies, 1995 Buick G-cars, 1994-95 Buick H-cars, 1994-95 Oldsmobile H-cars and 1995 Oldsmobile G-cars. NOTE The tester can only test RAC Levels 2 and 3. Mode F4: RAC Tests To run the Mode F4: RAC Tests, do the following: 1. Select F4: RAC TESTS from the Select Mode menu. 2. There are three types of RAC tests: Lamps and Relays (see step 3.), Programming RAC Key Tags (see step 4.), and Automatic Door Locks (see step 5.). After a RAC test has been performed, press X to return to the Select Test menu. 3. Lamps and Relays SELECT OUTPUT F0: LAMPS F1: RELAYS F2: AUTO DR LOCK If you choose F0: OUTPUTS, a Select Output menu is displayed. a. Press either ) to test lamps or ! to test lock relays for the doors and trunk, as well as relays for the horn and Retained Accessory Power (RAP). A menu of the lamps or relays available for testing is displayed. When the lamp or relay you wish to test has been selected, Data List pairs are displayed on the tester screen. At the end of line two an abbreviation indicating the lamp or relay chosen is displayed, and up and down arrows are displayed at the end of line four. Abbreviations for the lamps and relays are listed in the following table. ABBREVIATIONS FOR LAMPS AND RELAYS ILP* = Interior Lamps ULC = Unlock Door Relay ELP** = Exterior Lamps TRK = Trunk Relay STT = Security Telltale UDR* = Unlock Driver’s Door Relay HRN** = Horn RAP = Retained Accessory Power LOC = Lock Door Relay * Level III necessary for test ** Level III with Security System necessary for test GM Body Systems Application 1988-2004 Page 120 System Test Modes 5. Selecting and Operating Test Modes b. Use the u key to turn the lamp or relay ON or the d key to turn the lamp or relay OFF. The arrows at the end of line four are replaced by OFF or ON indicating the status of the lamp or relay. The lock relays only stay on for 300 milliseconds so you must press the u key each time you want to see the lock relays operate. The u and d keys turn the horn and RAP ON and OFF respectively. c. Use the Y and N keys to scroll through the Data List while testing the lamps and relays. The lamp or relay that you selected as well as its status remain on the tester screen while the Data List is scrolled. 4. Program RAC Key Tags To program RAC key tags, press ! from the RAC Tests menu. You are instructed to turn off the Level Three Theft Deterrent, if available, before pressing the Y key on the tester. a. On the new key tag, press any one of the buttons one time, then press the Y key on the tester. All buttons on the key tag are programmed by the single key press, so the other buttons do not need to be pressed. b. If an optional second key tag is to be programmed, press any button on the second key tag once, then press Y on the tester. If the vehicle does not allow a second keytag to be programmed, just press Y. c. Now lock and unlock the doors to test the operation of the key tags to be certain the programming was successful. Reprogram the key tag if necessary. 5. Automatic Door Locks (ADL) a. To test the Automatic Door Locks select F0: OUTPUTS, then select F2: AUTO DR LOCK from the Select Output menu. The status of the AUTO DR LOCK is initially LOCK ONLY. Pressing u changes the state to LOCK and UNLOCK. Pressing the d key returns the status to LOCK ONLY. The current status is indicated on line 2 of the tester display. 6. Key Tags (1994-95 Vehicles) a. To test the Key tag operation select F0: OUTPUTS then press F3: KEY TAG(S) from the Select Output menu. The tester screen displays TRANSMITTER 1 on line 1 and TRANSMITTER 2 on line 3. b. Momentarily press a button on a key tag, line 2 or 4 to indicate which of the key tags was used and which button on the tag was pressed (be sure to pause 2 to 3 seconds before pressing any other key tag buttons). This indication verifies the signal to the receiver. GM Body Systems Application 1988-2004 Page 121 System Test Modes 5. Selecting and Operating Test Modes SELECT TEST: F0: OUTPUTS F1: PROGRAM RAC KEY TAG(S) ) @ SELECT OUTPUT F0: LAMPS F1: RELAYS F2: AUTO DR LOCK ) AUTO DOOR LOCK LOCK ONLY = LOCK/UNLOCK = LOCK ONLY ! SELECT LAMP F0: INTERIOR F1: EXTERIOR F2: SECURITY SELECT RELAY F0: LOCK ALL F1: UNLOCK ALL F2: UNLOCK TRUNK ) DOOR HANDLE SW. ON ILP INT: EXT: LAMPS OFF ON Indicates lamp can be controlled Use Use to turn lamp ON to turn lamp OFF u DOOR HANDLE SW. ON ILP INT: EXT: LAMPS OFF ON ON 3 Seconds or u SELECT RELAY F3: UNLOCK DRIVR F4: HORN F5: RAP ) Indicates status of lamp. DOOR UNLOCK RLY OFF LOC HORN RELAY ON Indicates relay can be controlled Use Use to turn relay ON to turn relay OFF u DOOR UNLOCK RLY OFF LOC HORN RELAY ON ON Indicates status of relay. FIGURE 5-11. RAC Tests: Output Tests GM Body Systems Application 1988-2004 Page 122 System Test Modes 5. Selecting and Operating Test Modes SELECT MODE: F0: DATA LIST F3: SNAPSHOT F4: RAC TESTS $ SELECT TEST F0: OUTPUTS F1: PROGRAM RAC KEY TAG(S) ! TURN LEVEL THREE THEFT DETERRENT OFF, IF AVAILABLE THEN PRESS (YES) y PRESS A SINGLE BUTTON OF FIRST KEY TAG ONCE. THEN PRESS (YES) After 55 Seconds y RAC KEY TAG PROGRAM ABORTED AFTER 55 SECONDS (EXIT) AND RETRY x PRESS OPTIONAL SECOND KEY TAG BUTTON, THEN PRESS (YES) y TEST KEY TAG FUNCTIONS: LOCK AND UNLOCK. (EXIT) x FIGURE 5-12. RAC Tests: Program Key GM Body Systems Application 1988-2004 Page 123 System Test Modes 5. Selecting and Operating Test Modes DRIVER INFORMATION CENTER (DIC) The Driver Information Center (DIC) is available on 1991-93 C-body Buicks and Oldsmobiles, the 1992-93 H-body Oldsmobiles and 1995-96 G-car Oldsmobiles. The Driver Information Center supplies many conveniences to the driver from a keyboard modifiable display. The following special DIC test are available with the tester: Dimming Control, Keypress Beep, Chime Tests, Segment Check, Reset Tests, English/Metric Switch and Switch Tests. Mode F4: DIC TESTS To run the Mode F4: DIC Tests, do the following: 1. Select DIC TESTS from the Select Mode menu by pressing $. 2. Select one of the tests from the following menu: F1: KEY TEST See step 7. F0: DIMMING CONTROL See step 5. F1: KEYPRESS BEEP See step 6. F2: CHIME TESTS F0: SLOW CHIME See step 6. F1: FAST CHIME See step 6. F3: SEGMENT CHECK See step 6. F4: RESET TESTS F0: TRIP ODO See step 6. F1: OIL LIFE See step 6. F5: ENGLISH/METRIC TEST See step 4. F6: SWITCH TESTS See step 7. 3. After the test is performed, use the X key to stop the test and return to the last DIC Tests menu. Refer to the step number indicated in the previous table for specific instructions for each test. 4. The parameter associated with the system selected is displayed first. Scroll the parameters by pressing the Y and N keys. Press the u key to turn the test on and the d key to turn the test off. The three-character abbreviation at the end of line 2 indicates the test selected. ON or OFF at the end of line 4 indicates the commanded state. An example of the English/Metric Test display is shown in the following illustration. EXPORT STRAP DOMESTIC ENG ENG/MET SWITCH DEPRESSED ON GM Body Systems Application 1988-2004 Page 124 System Test Modes 5. Selecting and Operating Test Modes 5. Dimming Control shows the Percent Interior Light Level data list parameter while testing dimming. Control begins at 50%. The u key increases the light level 10% with each keypress. The d key decreases the light level 10% with each keypress. PARK LAMP INPUT OFF DIM INT. LIGHT LEVEL50% ↑↓ 6. This control method indicates the test name and the control keys to press. The present control state is indicated on line 2 of the tester display. The u key turns the control state on and the d key turns the control state off. KEYPRESS BEEP ON OVERRIDE ↑=ON ↓=OFF 7. The Switch Tests and Key Test decode the state of the DIC function keys. You just hold down the DIC keys, one at a time, and the tester display indicates which key is being depressed. If all keys are decoded correctly, the following keyboard keys are available: NONE, ECON/1, FUEL/2, RANGE/3, SPEED/4, OIL/5, GAGES/6, DEST/7, ETA/8, E/T/9, DT/TM/0, ENTER, and RESET. PRESS AND HOLD ANY DIC KEY NONE 8. Press X to return to the Select Test menu. ENGINE OIL LIFE MONITOR (EOLM) EOLM tests are available for 1991-94 Buick C-body, 1992-94 Buick H-body, 1994 Oldsmobile C-body, 1994 Oldsmobile H-body, and 1994 Pontiac H-body vehicles. The EOLM Tests function allows you to check the Engine Oil-Life Monitoring telltale system, transfer oillife data from one EOLM ECU to another, and reset the oil-life data to 20% or 100% remaining oil-life. Mode F4: EOLM Tests To run the Mode F4: EOLM tests, do the following: 1. Select !: EOLM from the Select System menu. 2. Select EOLM TESTS from the Select Mode menu by pressing $. GM Body Systems Application 1988-2004 Page 125 System Test Modes 5. Selecting and Operating Test Modes 3. Select the sub-test you wish to perform from the Select Tests menu. In the following list, the sub-test indicates the procedure to follow to perform the test. F0: OIL TELLTALE See step 4. F1: TRANSFER OIL-LIFE DATA See step 5. F2: RESET OIL MILEAGE 20% See step 6. F3: RESET OIL MILEAGE 100% See step 6. 4. Press ) to check the Oil Change Telltale Lamp operation. Use the u key to turn the oil change telltale lamps ON and the d key to turn the oil change telltale lamps OFF. 5. When F1: TRANSFER OIL-LIFE DATA is pressed, a sub-menu offers you a choice of getting old EOLM data or XFER (transfer) TO NEW. NOTE The TRANSFER OIL-LIFE DATA function is only used when replacing the EOLM computer. If you have determined that the computer must be replaced, follow the instructions below. a. Press ): GET OLD EOLM DATA to store engine oil-life data from the old computer. The tester asks you to press the Y key if you want to transfer the data from this EOLM ECU to a new EOLM ECU. b. Press Y to continue or X to return to the EOLM Tests menu. If you press the Y key, the data from the old EOLM ECU is displayed as REVS = $xxxx and MILEAGE = $yyyy. Record this value so you can be sure the tester still holds this value when you are ready to transfer it to a new EOLM ECU. $xxxx and $yyyy are numerical hexadecimal values that vary with oil-life. NOTE Once EOLM data has been transferred to the tester, using the tester without a cartridge installed or with a cartridge other than the GM Body Systems Cartridge invalidates the EOLM data. c. Install a new EOLM ECU, then press !: TRANSFER OIL-LIFE DATA to begin the transfer process. If the old EOLM ECU denies access to the old data by the tester, see the vehicle service manual. (YES): UPDATES OIL DATA TO: REVS= $XXXX <MILEAGE = $YYYY NO OIL TRANSFER DATA PRESENT (YES) = CONTINUE FIGURE 5-13. Updates and Oil Transfer screens. d. Press Y to update oil data. The tester informs you if the engine oil-life data transfer failed. A good transfer displays one of the messages below. GM Body Systems Application 1988-2004 Page 126 System Test Modes 5. Selecting and Operating Test Modes 20% OIL-LIFE REMAINING GOOD TRANSFER (EXIT) (EXIT) You can check the validity of the transfer data and the data put into the new EOLM by comparing oil revolutions in the EOLM Data List function to the REVS = $XXXX value in the Oil-Life Transfer tests. 6. The @ and # keys enable you to reset the data to 20% or 100% of engine oil-life remaining. After you press @ or #, the tester asks you to press the Y key if you want the oil-life remaining to be reset to the value displayed on the screen. Press Y to accept the new data or X to return to the Select Tests menu. The tester informs you if the reset was successful. 7. When you are finished, press X to return to the Select Mode menu. SELECT TEST RESET OIL LIFE F2: 20% F3: 100% @ (YES) : RESETS 20% OIL-LIFE REMAINING y # (YES) : RESETS 100% OIL-LIFE REMAINING y GOOD RESET 20% OIL-LIFE REMAINING (EXIT) GOOD RESET 100% OIL-LIFE REMAINING (EXIT) FIGURE 5-14. EOLM Reset Oil Life GM Body Systems Application 1988-2004 Page 127 System Test Modes 5. Selecting and Operating Test Modes SELECT TEST: F0: OIL TELLTALE F1: TRANSFER OIL LIFE DATA ! SELECT XFER STEP F0: GET OLD EOLM DATA F1: XFER TO NEW ) (YES) : USE DATA FROM THIS EOLM FOR TRANSFERRING TO A NEW EOLM ! (YES) : UPDATES OIL DATA TO: REVS = $XXXX MILEAGE = $YYYY y NO OIL TRANSFER DATA PRESENT (YES) = CONTINUE y TRANSFER DATA IS: REVS = $XXXX MILEAGE = $YYYY (EXIT) y GOOD TRANSFER 20% OIL-LIFE REMAINING (EXIT) (EXIT) ENGINE OIL-LIFE DATA TRANSFER FAILED. (EXIT) FIGURE 5-15. EOLM Transfer Oil-Life Data GM Body Systems Application 1988-2004 Page 128 System Test Modes 5. Selecting and Operating Test Modes HEATING, VENTILATION, AND AIR CONDITIONING (HVAC) Heating, Ventilation, and Air Conditioning (HVAC) tests are available for single and dual zone systems used in 1992-96 H-body, 1991-96 C-body, 1994-96 D-car, 1994-96 B-car, and 1995-96 G-car vehicles. The tests are identical for both vehicles, except that the single system has one mix door to control and the dual zone has two mix doors. Mode F4: HVAC Tests To run the Mode F4: HVAC tests, do the following: 1. Select F4: HVAC TESTS from the Select Mode menu. 2. Select the desired control function from the following HVAC TESTS selection menus: F0: OUTPUTS F0: MIX DOOR MAX F1: MIX DOOR 1 F2: MIX DOOR 2 F1: VACUUM SOLENOIDS F1: VACUUM SOLENOID 1 F2: VACUUM SOLENOID 2 F3: VACUUM SOLENOID 3 F4: VACUUM SOLENOID 4 F2: A/C CLUTCH F3: REAR DEFROST* F1: OVERRIDES FO: BLOWER PWM F1: PROGRAM NUMBER** F1: REAR DEFROST F2: AMB TEMP** * This test is located in the Outputs Selection menu for some vehicles and Overrides Selection menu for other applications. ** These tests are not available for all vehicle model years and/or body types. 3. When the test key is pressed the HVAC data list is displayed with a three character abbreviation of the selected test displayed at the end of line 2. The data list displays the data pair corresponding to the test in progress. The bottom right corner shows three different options: the UP and DOWN arrows, ON or OFF. The UP and DOWN arrows indicate that the test is ready to begin. Press the u key to turn the test ON and the d key to turn the test OFF. GM Body Systems Application 1988-2004 Page 129 System Test Modes 5. Selecting and Operating Test Modes The Output Tests have only two states–ACTIVATED or DEACTIVATED. The Override Tests have variable control, but can only be controlled ON or OFF by the tester. The Blower is turned ON to maximum with the u key and OFF with the d key. The Program Number is set to the hottest setting with the u key and coolest with the d key. ABBREVIATIONS FOR OUTPUTS AND OVERRIDES MD1 = Mix Door 1 MD2 = Mix Door 2 VS1 = Vacuum Solenoid 1 VS2 = Vacuum Solenoid 2 VS3 = Vacuum Solenoid 3 VS4 = Vacuum Solenoid 4 A/C = Air Conditioner Clutch RDF = Rear Defrost ARQ = Ambient Request BPW Blower Pulse Width Program Number AMB Ambient Temperature Update PGN 4. Press X to return to the HVAC Tests menu. When you are finished with the HVAC Tests, press X to return to the Select Mode menu. F4: OBD Controls While operating controls for HVAC system components, a data list is displayed so the user can monitor all parameters during the operation of a specific control. During most OBD controls, the entire data list is displayed, but a small number of selected controls may display only a screen showing the state of the controlled component. There are three possible states for a component while exercising OBD Controls: • NONE (N/A) – no command has been issued by the scan tool. This is the default state, and for most controls, it is also the state achieved by pressing x the first time before exiting the control. • ON – the scan tool turns the component ON or to its maximum limit via the HVAC control module. For example, this could be 100% for the blower motor or 255 (counts) for Mode Door. • OFF – the scan tool turns the component OFF or to its minimum limit via the HVAC control module. For example, this could be 0% for blower motor or 0 (counts) for Mode Door. GM Body Systems Application 1988-2004 Page 130 System Test Modes 5. Selecting and Operating Test Modes The following controls are available on 1997 through 2002 W-Body Buick passenger cars equipped with Auto HVAC. • • F0: Sol. Tests – Command selected solenoid ON and OFF. • F0: Sol 1 – Defog • F1: Sol 2 – Heater • F2: Sol 3 – Defr/Ht • F3: Sol 4 – Air In • F4: Sol 5 – A/C Mode F1:Misc. Tests • F0: Lft Mix Motor – Commands the motor to its maximum/hottest position (ON), or to its minimum/ coldest position (OFF). • F1: Rt Mix Motor – Commands the motor to its maximum/coldest position (ON), or to its minimum/ hottest position (OFF). • F2: Blower Motor – Turns the blower motor to full speed (ON), or OFF. • F3: Rear Defogger – Commands the Rear Defogger ON or OFF. The following controls are available on 1998-2001 S/T Light Trucks equipped with Auto HVAC. NOTE During Solenoid Tests, the blower motor is disabled. • • F0:Sol. Tests • F0: Solenoid 1 – Commands the HVAC ECU to energize (ON) or de-energize (OFF) the defroster solenoid. • F1: Solenoid 2 – Commands the HVAC ECU to energize (ON) or de-energize (OFF) the heater solenoid. • F2: Solenoid 3 – Commands the HVAC ECU to energize (ON) or de-energize (OFF) the solenoid. • F3: Solenoid 4 – Commands the HVAC ECU to energize (ON) or de-energize (OFF) the air inlet solenoid. • F4: Solenoid 5 – Commands the HVAC ECU to energize (ON) or de-energize (OFF) the A/C solenoid. F1:Misc. Tests • F0: Mix Motor – Commands the air temperature actuator towards its maximum/255 counts (ON) or to its minimum/0 counts (OFF). • F1: Blower Motor – Controls the blower motor to its maximum speed (ON) or OFF. • F2: A/C LED – Turns LED in A/C switch button ON or OFF. • F3: Rear Defogger – Commands the Rear Defogger ON or OFF. • F4: A/C Request – Issues a request to the PCM to turn the A/C ON or OFF. GM Body Systems Application 1988-2004 Page 131 System Test Modes 5. Selecting and Operating Test Modes The following controls are available on 2000-2002 C/K Light Trucks equipped with Auto HVAC. • • F0: Misc. Tests • F0: Inst OAT Updt – The outside air temperature raw input data is updated. • F1: Rear Defogger – Controls the Rear Defogger ON or OFF • F2: A/C Request – A/C is requested either ON or OFF. • F3: Recirc Mode – The Recirculation Mode light is turned ON or OFF, and the recirculation door is driven to the recirculation position. • F4: Outside Air – The Recirculation Mode light is turned ON or OFF, and the recirculation door is driven to the Outside Air position. F1: Mtr/Act Tests • F0: Air Inlet Dr – The Air Inlet Door is commanded to its minimum and maximum limits. • F1: Mix Door Pos – The temperature actuator is commanded to its minimum and maximum limits. • F2: Mix Motor – The temperature actuator is commanded to its minimum and maximum limits. • F3: Blower Motor – Commands the Blower motor to its minimum (OFF) and maximum (ON) speeds. • F4: Aux Blwr Mtr – Commands the Auxiliary Blower Motor to its minimum (OFF) and maximum (ON) speeds. • F5: Aux Mix Door – Commands the Auxiliary temperature actuator to its minimum and maximum limits. • F6: Aux Mode Door – Commands the door actuator to its minimum and maximum limits. REMOTE FUNCTION ACTUATOR (RFA) Use the Remote Function Actuator to program key fobs for remote door lock and trunk lock actuation. If two transmitters are used, both must be present to perform this operation. Always begin with Fob #1. Mode F4: OBD Controls To program key fobs, do the following: 1. Select F4: OBD Controls from the Select Mode menu. 2. Select F0: Program Key Fob(s) from the Select Control menu. 3. From the Program Key Fobs menu, select one of the following: F0: Key Fob #1 F1: Key Fob #2 F2: Both Fobs 4. When you press a test key, follow the instructions on the tester’s display. 5. Press x to return to the Select Control menu. When finished with the tests, press x again to return to the Select Mode menu. GM Body Systems Application 1988-2004 Page 132 System Test Modes 5. Selecting and Operating Test Modes SUPPLEMENTAL INFLATABLE RESTRAINT (SIR) The F0:Flash Codes/F1:Clear Codes test allows you to flash SIR trouble codes on the dashboard SIR telltale light. Any SIR trouble codes present can also be cleared. Refer to Service Manual to interpret the codes. NOTE This test is available for 1990 Y-Body vehicles only. Mode F0: Flash Codes (1990 Y-Body) Mode F1: Clear Codes (1990 Y-Body) To run Flash Codes and/or Clear Codes for 1990 Y-Body, do the following: 1. SIR is displayed when a 1990 Y-Body vehicle is selected from the Vehicle Selection menu. Press * to select the SIR tests. A Select Test menu with Flash Codes or Clear Codes is displayed. 2. Press ) to flash stored trouble codes on the SIR telltale light, or ! to clear the SIR codes. 3. Install the 12/12-Pin SIR/DUAL UART adapter (Vetronix P/N 02001039, GM P/N TA0065) onto the DLC cable. Plug the adapter into the DLC on the vehicle. 4. When the installation is complete, press E. The tester asks you to turn the ignition to the OFF position, then press the E key. A waiting message is now displayed for 3 seconds. 5. Turn the Ignition switch to the RUN position when the tester asks you to. If you selected F0: FLASH CODES, the trouble codes are now flashed on the SIR telltale lamp 6. Press X to return to the Select Test menu. If you wish to clear stored trouble codes at this time, select F1: CLEAR CODES, or press X twice to return to the Vehicle Selection menu. 7. If you selected F1: CLEAR CODES, the tester flashes a clearing codes message while the SIR codes are cleared. When the codes are cleared, the tester asks you to turn the ignition to OFF, then press the E key. A waiting message is displayed briefly. 8. You are now asked to verify that Code 12 is the only trouble code stored in the SIR memory. 9. Press the X key to return to the Select Test menu, then select ) to flash the codes on the SIR telltale lamp. When only code 12 is present, press X three times to return to the Vehicle Selection menu. GM Body Systems Application 1988-2004 Page 133 System Test Modes 5. Selecting and Operating Test Modes SELECT SYSTEM: F8: SIR ) SELECT TEST F0: FLASH CODES F1: CLEAR CODES ) ! INSTALL SIR/DUAL UART ADAPTER INSTALL SIR/DUAL UART ADAPTER (ENTER) = DONE (ENTER) = DONE e TURN IGNITION OFF THEN PRESS (ENTER) e CLEARING SIR CODES Flashes for 21 Seconds e TURN IGNITION OFF THEN PRESS (ENTER) TURN IGNITION OFF THEN PRESS (ENTER) e WAITING FOR ECM TIMEOUT WAITING FOR ECM TIMEOUT TURN IGNITION SWITCH TO “RUN” TURN IGNITION SWITCH TO “RUN” e WAITING FOR ECM TIMEOUT * * IMPORTANT * * VERIFY CODE 12 IS ONLY CODE STORED INFL. REST. LAMP WILL FLASH SIR TROUBLE CODES SEE SERV. MAN. FIGURE 5-16. SIR Codes (1990 Y-Body) GM Body Systems Application 1988-2004 Page 134 System Test Modes 5. Selecting and Operating Test Modes Mode F0: Flash Codes (1993-99 Geo Prizm) Mode F1: Clear Codes (1993-99 Geo Prizm) The F0: Flash Codes/F1: Clear Codes test is available for Geo Prizm vehicles only. The Geo Prizm SIR adapter (GM P/N 3000015, Vetronix P/N 02001190) is required to diagnose SIR systems on the Geo Prizm. The SIR system displays DTCs by flashing the AIR BAG indicator lamp, which is located in the Instrument Panel Cluster (IPC). Each DTC displayed consists of a number of flashes which represent the first digit of the DTC followed by a 2.5 second pause, then a number of flashes which represent the second digit of the DTC. Each DTC is flashed once before moving on to the next one. After all DTCs have been displayed, the entire sequence is repeated. To clear DTCs, do the following: 1. Turn the ignition OFF. 2. Select F1: Clear Codes from the Select Mode menu. 3. Turn the ignition ON and press e. To use Flash Codes and Clear Codes for 1993-1999 Geo Prizm, do the following: 1. Select the SIR from the Select System menu by pressing *. You are then prompted to Always do SIR diagnostic system check in Service Manual, Section 9J-A. 2. Press E to continue. 3. From the Select Mode menu press ) to flash codes or ! to clear codes from the SIR. 4. Install the Geo Prizm SIR adapter (Vetronix P/N 02001190) as prompted by the tester. NOTE The Geo Prizm diagnostic connector for the SIR system is under hood. 5. When you are prompted to Turn the ignition ON and press the enter key, do not start the engine; just turn the ignition key to run, then press E. 6. FLASH CODES: If you select F0: FLASH CODES, you are notified SIR warning lamp will flash DTC. See Service Manual. Press E to continue. Diagnostic Trouble Codes are flashed on the SIR warning lamp. If no codes are present, the warning lamp flashes every 250 ms (4 times per second). 7. Press X twice to return to the Select System menu. GM Body Systems Application 1988-2004 Page 135 System Test Modes 5. Selecting and Operating Test Modes SELECT SYSTEM: F8: SIR * ALWAYS DO SIR DIAG SYS. CHECK IN SRVC MANUAL SECTION 9J_A d INSTALL 93 PRISM SIR ADAPTER #3000015 d SELECT MODE F0: FLASH CODES F1: CLEAR CODES ) TURN IGNITION “ON” THEN PRESS (ENTER) ! TURN IGNITION “ON” THEN PRESS (ENTER) e e SIR WARNING LAMP WILL FLASH DTC SEE SERV. MANUAL (ENTER) CLEAR DIAGNOSTIC TROUBLE CODES? (YES/NO) y e IF NO DTC(S) STORED SIR WARN LAMP WILL FLASH AT 250 MSEC RATE CLEARING SIR DTC(S) Flashes for 9 Seconds AIR BAG WARNING LAMP WILL FLASH TO CONFIRM SIR DTC(S) CLEARED FIGURE 5-17. SIR Codes (1993-99 GEO Prizm) 8. CLEAR CODES: If you select F1: CLEAR CODES, you are asked to press Y to clear all SIR DTCs that are present. Press N if you do not want to clear the codes. 9. If you press Y, Clearing SIR DTC(s) flashes for 9 seconds while codes are being cleared. When code clearing is finished, the warning lamp flashes. GM Body Systems Application 1988-2004 Page 136 System Test Modes NOTE 5. Selecting and Operating Test Modes Do not press X before the warning lamp flashes or the codes do not get cleared. 10. Press X to return to the Select System menu. . ACTIVE KEYS ) Select Flash Codes. ! Select Clear Codes. d Continue test procedure. y Confirm that you wish to clear trouble codes. n Do not clear trouble codes. x Return to Select System menu. GM Body Systems Application 1988-2004 Page 137 System Test Modes 5. Selecting and Operating Test Modes SIR SYNCHRONIZATION TEST The Synchronization test is performed when replacing the SDM module or when replacing the BCM, DIM, or IPC module. Use the following chart to identify vehicles that support the Synchronization test. TARGET ECU BODY VIN BCM A/B Pontiac Aztec 2001-2004 A/B Buick Rendezvous 2001-2004 C Buick Park Avenue 1997-2004 J Chevrolet Cavalier 2000-2004 J Pontiac Sunfire 2000-2004 N Chevrolet Malibu 2000-2004 N Oldsmobile Alero 2000-2004 N Pontiac Grand Am 2000-2004 S Chevrolet SSR 2004 S/T Buick Ranier 2004 S/T Chevrolet TrailBlazer 2004 S/T Chevrolet Colorado 2004 S/T GMC Canyon 2004 S/T GMC Envoy 2004 S/T Oldsmobile Bravada 2004 W Buick Century 1999-2004 W Buick Regal 1999-2004 W Pontiac Grand Prix W Chevrolet Impala 2003-2004 W Chevrolet Monte Carlo 2003-2004 W Oldsmobile Intrigue 2000-2002 D Cadillac CTS 2003-2004 E Cadillac SRX 2004 G Oldsmobile Aurora 2001-2002 H Buick Le Sabre 2000-2004 H Pontiac Bonneville 2000-2004 K Cadillac Deville/Seville 2000-2004 K STS/SLS 2000-2004 DIM GM Body Systems Application 1988-2004 MAKE/MODEL YEAR 2004 Page 138 System Test Modes 5. Selecting and Operating Test Modes TARGET ECU BODY VIN IPC E Cadillac Eldorado 1997-2002 F Chevrolet Camaro 1999-2002 F Pontiac Firebird/Trans AM 1999-2002 K Cadillac DeVille/Seville 1997-1999 U/V/X Chevrolet Venture 2000-2004 U/V/X Oldsmobile Silhouette 2000-2004 U/V/X Pontiac Montana 2000-2004 MAKE/MODEL YEAR Medium Duty Trucks GM Body Systems Application 1988-2004 -- D-C Series 2003-2004 -- C-T Series 2003-2004 Page 139 System Test Modes 5. Selecting and Operating Test Modes Mode F1: Reprogramming the BCM and DIM ECUs The Body Control Module (BCM) ECU and the Dash Integration Module (DIM) ECU should be reprogrammed when one or more of the following condition(s) exist: • BCM electronic control unit replacement • DIM electronic control unit replacement • SDM electronic control unit replacement • DTC 1001/1155/1159/1160 Inflatable Restraint Sensing and Diagnostic Module Calibration Mis-Match stored During every ignition cycle, the BCM, DIM, and Power Control Module (PCM) send a keying message over the serial data line containing vehicle identification to the Sensing & Diagnostic Module (SDM). The SDM receives these messages and compares them to information stored in memory. The keying message from the BCM and DIM contains a partial vehicle identification number (VIN). The keying message from the PCM, BCM, and DIM must match the same information stored in the SDM or DTC(S) will be set. The following chart shows the conditions for setting DTC B 1001, B1155, B1159, and B1160: DTC CONDITION(S) B1001-Configuration Error Incorrect keying messages stored. B1155-Inflatable Restraint Sensing and Diagnostic Module Calibration Mis-Match Incorrect keying messages sent by the BCM or PCM. B1159-Inflatable Restraint Sensing and Diagnostic Module Calibration Mis-Match BCM Keying Message does not match information stored in SDM. B1160-Inflatable Restraint Sensing and Diagnostic Module Calibration Mis-Match SDM received an incomplete VIN message from the PCM. To reprogram the BCM ECU, do the following: 1. Turn ignition to the RUN position. 2. Press $ to select Misc. Test from the Select Mode menu. 3. Press ! to select Reprogram BCM ECU. 4. Press y to begin reprogramming. The software communicates with the SDM module and reads the current VIN information stored in the memory of the SDM. The SDM VIN information is then used to program the BCM. This allows the BCM to recognize the SDM on initial power up. Confirmation should be displayed on the tester screen. If the BCM reprogramming was unsuccessful, a message is displayed on the tester screen. NOTE Reprogramming the BCM can only be done once per ignition cycle. GM Body Systems Application 1988-2004 Page 140 System Test Modes 5. Selecting and Operating Test Modes SELECT MODE F4:MISC. TESTS SELECT MODE F0: DATA LIST F2: DTC F3: SNAPSHOT $ SELECT MODE F1: REPROGRAM BCM ! REPROGRAM BCM? n [YES OR NO] Return to Select Mode Menu y Reprogramming BCM in Progress BODY CONTROL MODULE REPROGRAMMING COMPLETED or BODY CONTROL MODULE REPROGRAMMING FAILED FIGURE 5-18. Reprogramming the BCM ECU Mode F1: Reprogramming the IPC ECU The Instrument Panel Cluster (IPC) ECU should be reprogrammed when one or more of the following condition(s) exist: • IPC electronic control unit replacement • SDM electronic control unit replacement • DTC 1001 Incorrect Keying Messages stored • DTC 1155 SDM Calibration Mismatch stored • DTC B1159 Loss Of Serial Data-Key Not Received stored • DTC B1160 Loss of Serial Data-VIN Not Received stored IPC TO SDM Circuit Operation During every ignition cycle, the Instrument Panel Cluster (IPC) sends a keying message over the serial data line containing vehicle identification to the Sensing & Diagnostic Module (SDM). The SDM receives this message and compares it to the information stored in memory. The keying message from the IPC contains a partial vehicle identification number (VIN). GM Body Systems Application 1988-2004 Page 141 System Test Modes 5. Selecting and Operating Test Modes The keying message from the IPC must match the same information stored in the SDM or DTC(S) will be set. The following chart shows the conditions for setting DTC B1001, B1155, B1159, and B1160: DTC CONDITION(S) B1001-Configuration Error Incorrect keying messages stored. B1155-SDM Calibration Mismatch Incorrect keying messages sent by the BCM or PCM. B1159-Loss of Serial Data-Key Not Received. IPC keying Message does not match information stored in SDM. B1160-Loss Of Serial Data-VIN Not Received IPC keying Message does not match information stored in SDM. To reprogram the IPC ECU, do the following: 1. Turn ignition to the RUN position. 2. Press $ to select Misc. Test from the Select Mode menu. 3. Press ! to select Reprogram IPC ECU. 4. Press y to begin reprogramming. The software communicates with the SDM module and reads the current VIN information stored in the memory of the SDM. The SDM VIN information is then used to program the IPC. This allows the IPC to recognize the SDM on initial power up. Confirmation should be displayed on the tester screen. If the IPC reprogramming was unsuccessful, a message is displayed on the tester screen. NOTE Reprogramming the IPC can only be done once per ignition cycle. GM Body Systems Application 1988-2004 Page 142 System Test Modes 5. Selecting and Operating Test Modes SELECT MODE F4: MISC. TESTS SELECT MODE F0: DATA LIST F2: DTC F3: SNAPSHOT $ SELECT MODE F1: REPROGRAM IPC ! REPROGRAM IPC? n [YES OR NO] Return to Select Mode Menu y Reprogramming IPC in Progress IPC PROGRAMMED SUCCESSFULLY [ENTER] or NO VEHICLE INTERFACE MODULE COMMUNICATION PRESS [EXIT] FIGURE 5-19. Reprogramming the IPC ECU ENTERTAINMENT & COMFORT BUS (E&C) Vehicle Entertainment & Comfort components communicate with each other using the E&C data bus. Testing of the following components on the E&C data bus is supported by the Body Systems Application. • Radio Control Head • Radio Receiver and Amplifier • Graphic Equalizer Control Head • Cassette Tape Deck • Compact Disk Player • Heating, Ventilation, and Air Conditioning systems • Cellular Telephone • Speaker Operation In some cases, the E&C communication bus must be wired to pin J of the DLC to communicate with the tester. Refer to the charts on the following pages to determine which vehicles need to have the E&C communication bus wired to the DLC. GM Body Systems Application 1988-2004 Page 143 System Test Modes 5. Selecting and Operating Test Modes The E&C bus circuit can be found in Section 8A of the factory GM Service Manual. Any and all jumpers or wiring installed in the vehicle must be temporary and removed when testing is complete. NOTE The 16/12-Pin Non-OBD II DLC adapter and 16-Pin Data Link connector (DLC) must be used to communicate with the E&C communication bus system in GM vehicles from 1995 - present. E&C FUNCTION TESTS BY MODEL YEAR E&C Function Tests for Model Year 1988 E&C FUNCTION TESTS FOR MODEL YEAR 1988 VIN DIV RCVR CNTRL HEAD EQUAL TAPE CD HVAC PHONE E&C CONN . CONN. TO DLC* • YES • YES PASSENGER VEHICLES E 3 4 • N 4 • • 2 • • 3 • • 4 • • • YES • • • NO W • • NO • YES YES TRUCKS C/K TRK *NO = Requires Pin J be connected to the the E E && C C Bus. Bus. This This should shouldbe be aa temporary temporary connection DIVISION 1 CHEVROLET 2 PONTIAC 3 OLDSMOBILE 4 BUICK CAD ILLAC 6 CADILLAC 7 GM/CANADA GM Body Systems Application 1988-2004 Page 144 System Test Modes 5. Selecting and Operating Test Modes E&C Function Tests for Model Year 1989 E&C FUNCTION TESTS FOR MODEL YEAR 1989 VIN DIV RCVR CNTRL HEAD EQUAL TAPE CD HVAC PHONE E&C CONN. TO DLC* PASSENGER VEHICLES C 3 • • 4 • • E 3 • 4 • H 2 • • •+ • 4 • • 2 • • N 4 • • V 6 • • YES NO • J W • • • • YES YES YES NO • POSS. NO • • • YES 2 • • 3 • • 4 • • • YES • • • NO • YES YES TRUCKS C/K TRK *NO = Requires Pin J be connected to the E & C Bus. This should be a temporary connection. + HVAC control for Oldsmobile only has Fan and Set Temperature Control. Mode Control is not DIVISION 1 CHEVROLET 2 PONTIAC 3 OLDSMOBILE 4 BUICK 6 CADILLAC 7 GM/CANADA GM Body Systems Application 1988-2004 Page 145 System Test Modes 5. Selecting and Operating Test Modes E&C Function Tests for Model Year 1990 E&C FUNCTION TESTS FOR MODEL YEAR 1990 VIN DIV RCVR CNTRL HEAD EQUAL TAPE CD HVAC PHONE E&C CONN. TO DLC* PASSENGER VEHICLES A 2 • • • • YES C 3 • • • • YES 4 • • • D 6 • • E 3 • • 4 • • • 2 • • • 4 • • J 2 • • K 6 • • N 4 • • V 6 • • H W Y NO • • • • YES •+ • YES • YES • YES NO • • POSS. • YES • YES NO • 2 • • 3 • • • 4 • • • • 1 • • • • • • • • YES • YES YES • YES TRUCKS C/K TRK NO *NO = Requires Pin J be connected to the E & C Bus. This should be a temporary connection. + HVAC control for Oldsmobile only has Fan and Set Temperature Control. Mode Control is not DIVISION 1 CHEVROLET 2 PONTIAC 3 OLDSMOBILE 4 BUICK 6 CADILLAC 7 GM/CANADA GM Body Systems Application 1988-2004 Page 146 System Test Modes 5. Selecting and Operating Test Modes E&C Function Tests for Model Year 1991 E&C FUNCTION TESTS FOR MODEL YEAR 1991 VIN DIV RCVR CNTRL HEAD EQUAL TAPE CD HVAC PHONE E&C CONN. TO DLC* PASSENGER VEHICLES A C 2 • • 4 • • 3 • • YES YES • • YES 4 YES 6 • • YES • YES D 6 • E 3 • • • YES 4 • • • YES 6 • • • YES F 1 • H 2 • 3 • • 1 • • • • • • • NO • YES 2 J NO • • NO • YES YES NO 2 • K 6 • L 1 • NO 2 • NO • YES N 4 • • V 6 • • 2 • • 3 • • 4 • • • YES 1 • • • YES • • W Y NO • • YES • YES TRUCKS C/K TRK • NO *NO = Requires Pin J be connected to the E & C Bus. This should be a temporary connection. DIVISION 1 CHEVROLET 2 PONTIAC 3 OLDSMOBILE 4 BUICK 6 CADILLAC 7 GM/CANADA GM Body Systems Application 1988-2004 Page 147 System Test Modes 5. Selecting and Operating Test Modes E&C Function Tests for Model Year 1992 E&C FUNCTION TESTS FOR MODEL YEAR 1992 VIN DIV ID MONITOR SNAP RADIO CNTRL EQUAL TAPE PHONE CD HVAC SHOT RCVR HEAD SPKR E&C CONN . TO DLC* PASSENGER VEHICLES A C D E 4 • • • • • 3 • • • • • • • • • • YES 4 • • • • • • • • • • 6 • • • • • • • • • 6 • • • • • • • • • 3 • • • • • • • • • • 4 • • • • • • • • • • 6 • • • • • • • • • • • • • • • • • • NO • • • • • • • • • YES • • • • • • • • • NO • • • • • • • • YES • • • • • • NO • • • • • • • NO • • • • • • • • YES • • • • • • • • YES • • • • • • • • YES • • • • • • • • NO YES YES YES 1 F 2 2 H 3 • 4 1 J 2 K 6 1 L • • 2 2 N 3 • 4 V 6 1 W 2 • • 3 4 Y 1 TRUCKS C/K TRK • *NO = Requires Pin J be connected to the E & C Bus. This should be a temporary connection. DIVISION 1 CHEVROLET 2 PONTIAC 3 OLDSMOBILE 4 BUICK 6 CAD ILLAC 7 GM/CANADA GM Body Systems Application 1988-2004 Page 148 System Test Modes 5. Selecting and Operating Test Modes E&C Function Tests for Model Year 1993 E&C FUNCTION TESTS FOR MODEL YEAR 1993 VIN DIV ID MONITOR SNAP RADIO CNTRL EQUAL TAPE PHONE CD HVAC SHOT RCVR HEAD SPKR E&C CONN. TO DLC* PASSENGER VEHICLES A 4 • • • • • • • • YES • • • • • • • • • NO • • • • • • • • • YES YES 1 B 3 4 3 C • 4 6 • • • • • • • • • D 6 • • • • • • • • • YES E 4 • • • • • • • • • • YES 6 • • • • • • • • • YES • • • • • • • • • NO • • • • • • • • • YES • • • • • • • • • NO • • • • • • • YES • • • • • • • NO • • • • • • • NO • • • • • • • • YES • • • • • • • • YES • • • • • • • • YES • • • • 1 F 2 2 H 3 • 4 1 J 2 K 6 • • 1 L 2 2 N 3 • 4 V 6 1 W 2 • • 3 4 Y 1 TRUCKS C/K TRK • • • U TRK • • • • • • • *NO = Requires Pin J be connected to the E & C Bus. This should be a temporary connection. DIVISION 1 CHEVROLET 2 PONTIAC 3 OLDSMOBILE 4 BUICK 6 CADILLAC 7 GM/CANADA GM Body Systems Application 1988-2004 Page 149 System Test Modes 5. Selecting and Operating Test Modes E&C Function Tests for Model Year 1994 E&C FUNCTION TESTS FOR MODEL YEAR 1994 VIN DIV ID SPKR E&C CONN. TO DLC* • • NO • • NO MONITOR SNAP RADIO CNTRL EQUAL TAPE PHONE CD HVAC SHOT RCVR HEAD PASSENGER VEHICLES A 4 • • • • • B 1 • • • • • 4 • • • • • • • • • • NO C 3 • • • 2001 • • • • • 2001 YES 4 • • • • • • • • • YES D 6 • • • • • • • • • YES E 6 • • • • • • • YES 1 • • • • • • • NO 2 • • • 2001 • • • • • NO 2 GEN 2 2001 • • • • • 2001 3 • • • 2001 • • • • • 2001 4 • • • • • • • • • • 1 • • • • • • • NO 2 • • • • • • • YES 6 • • • • • • YES • • • • • • • YES • • • • • • • NO • • • • • • • NO 1 • • • • • 2 • • • • • • • 3 • • • • • • • 4 • • • • • • • 1 • • • • • F H J K • • • • • • • • YES 1 L 2 3 N 2 • 4 W Y • • YES • • YES • • YES • • YES • • YES • • YES • • NO • • • TRUCKS C/K TRK • • • • • L/M TRK • • • • • • S/T TRK • • • • • • • NO G TRK • • • • • • • NO 2001: The 2001 Series is a new family of radios introduced in the 1994 model year. *NO = Requires Pin J be connected to the E & C Bus. This should be a temporary connection. DIVISION 1 CHEVROLET 2 PONTIAC 3 OLDSMOBILE 4 BUICK 6 CADILLAC 7 GM/CANADA GM Body Systems Application 1988-2004 Page 150 System Test Modes 5. Selecting and Operating Test Modes E&C Function Tests for Model Year 1995 E&C FUNCTION TESTS FOR MODEL YEAR 1995 VIN DIV ID E&C M ONIT SNA P RA DIO CNTRL CD CON EQUA L TA P E P HONE CD HVA C RCVR OR SHOT RCVR HEA D CHA NGER N. TO DLC* P ASSENGER VEHICLES A B 4 • • • • 1 4 • • • 2001 • • • 2001 • • • 2001 • • • • • • • • • • NO 2001 NO 2001 NO 2001 YES • YES • • YES • • YES • YES 2001 YES • YES • • 3 C 4 D E F G • • • • • • • • • • 1 • • • • • • 2 • • • 2001 3 • • • • • 4 • • • • • • • • 2001 1 • • • • 2 • • • • • • • • • • • • • • • • • • • • • • • • • • • • • • 3 • 1 • 1, GM C • 2 H 3 4 J • • • YES • YES • • NO • • NO • NO 2001 2001 NO • 2001 2001 YES • • 2001 • • • • • • • • 2001 L/M TRK • • • • • • • NO S/T TRK • • • • • • • YES • • • • • • • NO K L 3 N • • • • 2 • 4 1 2 W 4 Y • • • • • • 2001 YES • • • YES 2001 NO TRUCKS C/K G TRK *NO = Requires P in J be co nnected to the E & C B us. This sho uld be a tempo rary co nnectio n. 2001: The 2001Series is a new family o f radio s intro duced in the 1994 mo del year. D IV IS IO N 1CHEVROLET 2 P ONTIA C 3 OLDSM OB ILE 4 B UICK 6 CA DILLA C 7 GM /CA NA DA GM Body Systems Application 1988-2004 Page 151 System Test Modes 5. Selecting and Operating Test Modes E&C Function Tests for Model Year 1996 E&C FUNCTION TESTS FOR MODEL YEAR 1996 VIN DIV ID E&C CONN CD M ONIT SNA P RA DIO CNTRL HVA C RCVR EQUA L TA P E P HONE CD . TO CHA NGER OR SHOT RCVR HEA D DLC P ASSENGER VEHICLES A 4 • • • • • • • NO 1 B GEN 2 • YES 4 3 C GEN 2 • • 4 D 6 GEN 2 1 • 2 GEN 2 3 4 F G • • • • • • • • • • • • • • • • • • • 2001 • • NO NO 2 H 3 2001 4 1 J L GEN 2 • NO 2 1 • • • • • • • NO 1 N* 2 GEN 3 • NO GEN 2 • NO GEN2 • 3 1 W 2 3 4 Y 1 • • • • • • • • • • TRUCKS C/K TRK GEN2 • L/M TRK GEN3 • TRK S/T GM TRK • • • • • GEN5 • NO NO • • NO NO This vehicle requires that P in 14 o f the A LDL co nnecto r be wired to P in 14 o f the 9-pin co nnecto r lo cated at the rear o f the radio . * This vehicle requires that P in 14 o f the A LDL co nnecto r be wired to P in 1E o f the 32-P in co nnecto r lo cated at the rear o f the radio . 2001: The 2001Series is a new family o f radio s intro duced in the 1994 mo del year. D IV IS IO N 1CHEVROLET 2 P ONTIA C 3 OLDSM OB ILE 4 B UICK 6 CA DILLA C 7 GM /CA NA DA GM Body Systems Application 1988-2004 Page 152 System Test Modes 5. Selecting and Operating Test Modes E&C TEST MODES Delco Electronics’ advanced entertainment systems are made up of a number of components which perform different functions. For example, the radio switches and displays are contained on one or more control heads, while the radio receiver/amplifier is another box in a remote location, and the graphic equalizer might be located somewhere else. The Entertainment and Comfort (E&C) Bus provides a means of communication between all of these entertainment components and some of the up-option climate control components (C68 and CJ2 HVAC). Information is shared between E&C components via messages which all of the components can transmit on the E&C bus. For example, when the driver presses the seek switch, the radio head sends a seek command to the radio receiver via the E&C bus, and the receiver sends the station number back to the radio head where it is displayed. The GM Body Systems Cartridge provides you with a tool for troubleshooting the ECUs on the E&C communication bus on most GM cars and 88-96 C/K Trucks. With this cartridge, your tester becomes a component on the E&C bus the same as any of the on-board components. The tester allows you to listen to messages transmitted from any of the components and to transmit your own messages on the bus. In this way, you can readily isolate a problem to a particular component or to the bus itself. You can select among five E&C tests: • F0: E&C MONITOR Monitors message transmissions on the E & C bus. • F1: COMPONENT IDENTIFICATION Displays which components are connected to the E&C bus. Identifies E&C bus faults. • F3: SNAPSHOT Captures and stores E&C messages. • F4: CONTROL TEST Transmits E&C messages on the bus. • F5: SPEAKER TEST Routes all of the audio to the selected speaker. SELECT SYSTEM F9: E&C ( SELECT MODE F0: E&C MONITOR F1: IDENTIFY F3: SNAPSHOT F4: E&C CONTROL F5: SPEAKER TEST Scrolls menu page Stops auto-scrolling FIGURE 5-20. E&C Select Mode Menu GM Body Systems Application 1988-2004 Page 153 System Test Modes 5. Selecting and Operating Test Modes Mode F0: E&C Monitor The E&C MONITOR test allows you to monitor transmissions on the E&C bus. This allows you to verify that messages are transmitted in response to driver inputs. For example, you can test all of the switches on the radio control head by pressing the switches and using the tester to verify that the appropriate message gets transmitted on the E&C bus. To perform the E&C Monitor test, do the following: 1. Select the E&C TESTS by pressing (. 2. Select the E&C MONITOR test by pressing (. You should see the following display: E&C DATA MONITOR RECEIVED MSG: NONE FIGURE 5-21. E&C Data Monitor Screen When messages are transmitted from one E&C component to another, you see that message displayed on the tester. An asterisk (*) is displayed in the lower right corner of the display for 1/10 second each time a message is detected. That way you can tell if a message is being transmitted repeatedly (e.g., increase volume). 3. If you wish to stop the display update, press ). An H, for HOLD, is displayed in the corner while the message is being held. 4. If you press !, the tester will WAIT (and display W) until the next message is detected and then hold that message (and display H). 5. Normal operation is resumed by pressing @. This allows you to look for things to happen on the E&C bus. For example, you can set up the tester to WAIT for a message, then press the radio's increase volume switch, and verify that the tester detected the INC VOLUME message on the E&C bus. When the tester is in the HOLD mode (with H being displayed in the lower right corner), the tester saves the next message detected on the E&C bus in a one message forward buffer. 6. To see the message, press the u key. The following example demonstrates how you can use this forward buffer to verify proper operation of two E&C components: a. Press ! to put the tester into the WAIT mode. b. Press the Increase Volume switch on the Radio Control Head. The Radio Head should transmit the Increase Volume message to the Radio Receiver box. The tester should detect this message and display the message INC VOLUME in the HOLD mode. The Radio Receiver should respond by transmitting the Report Volume message to the Radio Head. c. Press u and the tester displays the RPT VOLUME message which was captured in the forward buffer. d. Press @ to terminate the HOLD mode. Using this procedure, you can verify that the Increase Volume switch is working properly, that the Radio Control Head is communicating properly on the E&C bus and that the Radio Receiver Box is responding properly. GM Body Systems Application 1988-2004 Page 154 System Test Modes 5. Selecting and Operating Test Modes See E&C Bus Monitor Messages on page 248. of this manual for summaries of the E&C monitor messages which can be detected by the tester using this cartridge. Message Descriptor E&C DATA MONITOR RECEIVED MSG: mmmmmmmmmm dddd Mode Indicator Message Data (if needed) Modes: * H W O -N Message has just been detected Holding for next message Waiting for next message E&C buffer display (displaying most recent detected message) E&C buffer display (displaying Nth message before most recent message) FIGURE 5-22. Summary of E&C Monitor Test Display GM Body Systems Application 1988-2004 Page 155 System Test Modes 5. Selecting and Operating Test Modes SELECT MODE F0: E&C MONITOR F1: IDENTIFY F3: SNAPSHOT ) E&C DATA MONITOR RECEIVED MSG: NONE Wait to catch next message received from E&C bus. ! E&C DATA MONITOR RECEIVED MSG: NONE W Increase volume key pressed on radio head. E&C DATA MONITOR RECEIVED MSG: INC VOLUME Hold message in display. H u E&C DATA MONITOR RECEIVED MSG: RPT VOLUME 27 H Display Message received after one being held. FIGURE 5-23. Using Wait/Hold to Examine Receiver's Response to E&C Command ACTIVE KEYS ) HOLD last message detected. ! WAIT for next message then HOLD it. @ Display all messages (stop HOLDing or WAITing). u Display message received after the one being held (HOLD mode only). x Return to SELECT E&C TEST. GM Body Systems Application 1988-2004 Page 156 System Test Modes 5. Selecting and Operating Test Modes Mode F1: Identify The E&C component identification test performs two basic functions: it tells you which E&C components are currently operational on the E&C bus, and it identifies possible E&C bus faults (open circuit or shorted bus). To do this, the tester transmits messages to all of the components which might be connected to the bus, and looks for a response from each one. When it sees the response, it displays the name of the component. The components which the tester can recognize are: • Radio Control Head • Radio Receiver and Amplifier • Graphic Equalizer Control Head* • Cassette Tape Deck • Compact Disc Player* • Steering Wheel Controls* • Climate Control Panel • Cellular Telephone * In some vehicles, these components are not recognized in this mode. Use the E&C MONITOR mode to verify operation of these components. NOTE Always verify that the system being tested has an E&C bus. Some radios are not compatible, such as the Delco VF2000 Series. To perform the E&C Component Identification test, do the following: 1. Select the E&C SYSTEM by pressing ). 2. Select the COMPONENT IDENTIFICATION test by pressing !. After a short time, the tester displays the names of the components which it can identify. These names are displayed at three second intervals. If after three seconds the tester has not received a response from any of the E&C components, it displays two alternating screens: EAC COMPONENTS: VERIFY E&C BUS IS INSTALLED ON VEHICLE 3 seconds 3 seconds E&C COMPONENTS: ***NONE*** CHECK FOR OPEN E&C BUS If the tester is unable to successfully transmit a message, a bus fault is indicated, and the tester displays one of the following: E&C COMPONENTS E&C COMPONENTS E&C BUS SHORTED TO GROUND E&C BUS SHORTED TO BATTERY GM Body Systems Application 1988-2004 E&C BUS COMPONENTS *E&C BUS FAULT* CHECK FOR OPEN OR SHORTED BUS Page 157 System Test Modes 5. Selecting and Operating Test Modes SELECT MODE F0: E&C MONITOR F1: IDENTIFY F3: SNAPSHOT ! E&C COMPONENTS: Less than 3 seconds E&C COMPONENTS: RADIO CNTRL HEAD 3 Seconds E&C COMPONENTS: RADIO RECEIVER BOX 3 Seconds E&C COMPONENTS: REMOTE EQUALIZER 3 Seconds E&C COMPONENTS: CASSETTE TAPE 3 Seconds E&C COMPONENTS: COMPACT DISC 3 Seconds E&C COMPONENTS: CELLULAR PHONE 3 Seconds FIGURE 5-24. E&C Component Identification Test GM Body Systems Application 1988-2004 Page 158 System Test Modes 5. Selecting and Operating Test Modes Mode F3: Snapshot The E&C Snapshot function allows you to capture a sequence of messages transmitted between components on the E&C bus. This can be used to look at what messages get transmitted on the bus when you press various keys on the control head(s). For example, when you press the increase volume switch on the Radio Control Head, the control head should send one or more increase volume commands, and the radio receiver should respond with one or more report volume messages. The E&C Snapshot mode can be used to examine these messages. The tester saves the last 25 messages which it detected on the E&C bus. These messages are stored in the tester memory in an area referred to as the E&C Buffer. This data is saved in the tester’s keep-alive memory so that if you disconnect the tester, the data is not lost. One difference between the E&C Snapshot mode and the Snapshot for the Serial Data Link (SDL) is that the E&C Trigger Point (message 0) is always the most recent message. The sample index is always 0 or negative. If the Snapshot buffer is full, this index can be sequenced between 0 and -24. To use the Snapshot function, do the following: 1. Select Snapshot from the E&C Select Mode menu by pressing #. The E&C Snapshot menu allows you to select from the following options: a. F0: REPLAY If there are any messages saved in the Snapshot buffer, the last Snapshot data saved by the tester can be displayed. If there are no messages in the buffer, pressing causes the tester to display *NO DATA SAVED*. Indicates number of messages saved in SNAPSHOT buffer (maximum of 25) MESSAGES RDVD 02 F2: CONTINUE INC VOLUME -1 Prompt line Indicates which message is being displayed (message 0 is most recent message) Message description FIGURE 5-25. Snapshot Function When data is being REPLAYED, use the u and d keys to scroll through the message saved in the Snapshot buffer. The number in the upper right corner indicates how many messages have been saved. When you are in the REPLAY mode, pressing @ allows you to continue collecting data. GM Body Systems Application 1988-2004 Page 159 System Test Modes 5. Selecting and Operating Test Modes b. F1: NEW TEST Use the F1: NEW TEST option when first performing the Snapshot function on a vehicle. When NEW TEST is selected, any data which was saved previously in the Snapshot buffer is cleared and the message received counter displays 0. As E&C messages are detected, this counter increments until it reaches 25. After that the counter stays at 25, and the oldest E&C messages are lost. The tester retains the most recent 25 messages. After data has been collected it can be replayed by pressing the ) key. c. F2: CONTINUE Press the @ key to continue monitoring messages between the E&C components without destroying data which has been saved previously. While monitoring the messages you have the option of reviewing saved Snapshot data by selecting F0: REPLAY. 2. Press X to return to the Select Mode menu. ACTIVE KEYS ) Go to REPLAY mode (in E&C Snapshot menu or in capture data mode). ! Clear E&C SNAPSHOT buffer and go to capture mode (when in E&C Snapshot menu). @ Continue collecting E&C messages without clearing messages saved in Snapshot buffer (when in E&C Snapshot menu or REPLAY mode). u Display next E&C message. d Display previous E&C message. x Return to E&C Snapshot menu or E&C Select Mode menu. GM Body Systems Application 1988-2004 Page 160 System Test Modes 5. Selecting and Operating Test Modes SELECT SYSTEM F9: E&C ( SELECT MODE: F0: E&C MONITOR F1: IDENTITY F3: SNAPSHOT # E&C SNAPSHOT F0: REPLAY F1: NEW TEST F2: CONTINUE ! ) @ If no data is saved. MESSAGES RCVD 00 E&C SNAPSHOT *NO DATA SAVED* F1: NEW TEST F2: CONTINUE NONE If INCREASE VOLUME key on radio head is pressed, at least 2 messages should be transmitted. MESSAGES RCVD 02 F0: REPLAY RPT VOLUME VOL=XX ) If two messages are saved in buffer. @ MESSAGES RCVD 02 F2: CONTINUE RPT VOLUME VOL = XX 0 u MESSAGES RCVD 02 F0: REPLAY NONE ) If the Clock updates. d MESSAGES RCVD 02 F2: CONTINUE INC VOLUME -1 MESSAGES RCVD 03 F0: REPLAY REPORT TIME 11:47 FIGURE 5-26. Example of E&C Snapshot GM Body Systems Application 1988-2004 Page 161 System Test Modes 5. Selecting and Operating Test Modes Mode F4: E&C Control The E&C CONTROL test allows you to send messages to any of the E&C components and control the operation of that component. The tester becomes another control head on the E&C bus in the same way that the Radio Head is a control head. The E&C CONTROL test can help you to isolate a fault to either the control head or the component being controlled. For example, if the Radio Head cannot control the radio’s Seek function but the tester can, the problem is probably in the Radio Head or the Seek switch. To run the E&C Control test, do the following: 1. Select the E&C TESTS by pressing (. 2. Press $ to select the E&C CONTROL test. 3. Select the component you wish to control. Components available for testing vary according to the year and model of the vehicle being tested. • F0: RECEIVER (see Submode F0: Radio Receiver Test) • F1: CONTROL HEAD (see Submode F1: Control Head Test) • F2: REMOTE EQUAL (see Submode F2: Remote Equalizer Test) • F3: CASSETTE TAPE (see Submode F3: Cassette Tape Tests) • F4: COMPACT DISC (see Submode F4: Compact Disc Tests) • F5: HVAC (see Submode F5: HVAC Tests) • F6: CELL PHONE (see Submode F6: Cellular Phone Tests) Once you have selected the E&C component, the tester displays the first function which you can control. 4. Use the Y and N keys to sequence through the functions. Generally, there are two messages which can be transmitted for each function. For example, if you select VOLUME, you can send the increase volume message by pressing u or you can press d to send the decrease volume message. Line 4 tells you what u and d do. Holding u or d down causes the message to be transmitted repetitively. A T is displayed in the lower right corner for 1/10 second every time a message is transmitted. If a transmission error occurs, an E is displayed. Submode F0: Radio Receiver Test For many of the functions, the tester monitors the response message coming from the Radio Receiver and displays the data. For example, the tester displays the volume reported by the receiver when you are controlling the volume. GM Body Systems Application 1988-2004 Page 162 System Test Modes 5. Selecting and Operating Test Modes SELECT MODE: F4: E&C CONTROL F5: SPEAKER TEST $ SELECT COMPONENT F0: RECEIVER F1: CONTROL HEAD F2: REMOTE SIGNAL # RADIO RCVR TEST SELECT FUNCTION: RADIO RECEIVER =ON =OFF y n RADIO RCVR TEST SELECT FUNCTION: VOLUME =INC =DEC y n RADIO RCVR TEST SELECT FUNCTION: FADE =FRONT =REAR y n MORE RADIO RECEIVER TESTS FIGURE 5-27. Example of E&C Radio Receiver Control Test ACTIVE KEYS y,n Select component or sequence through functions. U,D Transmit message. x Return to SELECT E&C TEST. GM Body Systems Application 1988-2004 Page 163 System Test Modes 5. Selecting and Operating Test Modes Submode F1: Control Head Test Submode F2: Remote Equalizer Test SELECT MODE: F4: E&C CONTROL F5: SPEAKER TEST F4 $ SELECT COMPONENT F0: RECEIVER F1: CONTROL HEAD F2: REMOTE EQUAL ! RADIO HEAD TEST DISPLAY CHECK IN PROGRESS Time display toggles between 8:08 and 12:58 @ REMOTE EQUAL TST DISPLAY CHECK IN PROGRESS Equalizer display segments ramp between minimum and maximum. Stereo indicator cycles on and off. Volume indicator ramps up and down. FIGURE 5-28. E&C Control Head and Remote Equalizer Tests GM Body Systems Application 1988-2004 Page 164 System Test Modes 5. Selecting and Operating Test Modes Submode F3: Cassette Tape Tests SELECT MODE: F4: E&C CONTROL F5: SPEAKER TEST $ SELECT COMPONENT F0: RECEIVER F3: TAPE PLAYER F5: HVAC # CASSETTE TEST SELECT FUNCTION: AUDIO SOURCE =TAPE =RADIO y n CASSETTE TEST SELECT FUNCTION: PLAY =FWD =STOP y n CASSETTE TEST SELECT FUNCTION: PLAY =REV =STOP y n MORE CASSETTE TAPE TESTS FIGURE 5-29. Example of Cassette Tape Tests GM Body Systems Application 1988-2004 Page 165 System Test Modes 5. Selecting and Operating Test Modes Submode F4: Compact Disc Tests SELECT MODE: F4: E&C CONTROL F5: SPEAKER TEST $ SELECT COMPONENT F4: COMPACT DISC F6: CELL PHONE $ COMPACT DISC TST SELECT FUNCTION: AUDIO TONE =ON =OFF N y COMPACT DISC TST SELECT FUNCTION: EJECT =TRANSMIT N y FIGURE 5-30. Example of Compact Disc Test GM Body Systems Application 1988-2004 Page 166 System Test Modes 5. Selecting and Operating Test Modes Submode F5: HVAC Tests SELECT MODE: F4: E&C CONTROL F5: SPEAKER TEST $ SELECT COMPONENT F5: HVAC % HVAC HEAD TEST SELECT FUNCTION: HVAC MODE =INC =DEC n y HVAC HEAD TEST SELECT FUNCTION: FAN SPEED =INC =DEC n y HVAC HEAD TEST SELECT FUNCTION: HVAC SET TEMP =INC =DEC n y MORE HVAC TESTS FIGURE 5-31. Example of E&C HVAC Control Test GM Body Systems Application 1988-2004 Page 167 System Test Modes 5. Selecting and Operating Test Modes Submode F6: Cellular Phone Tests SELECT MODE: F4: E&C CONTROL F5: SPEAKER TEST $ SELECT COMPONENT F4: COMPACT DISC F6: CELL PHONE % CELL. PHONE TEST SELECT FUNCTION: SET 987-xxxx =TRANSMIT N CELL. PHONE TEST SELECT FUNCTION: SET xxx-xxx3 =TRANSMIT N CELL. PHONE TEST SELECT FUNCTION: SET xxx-654x =TRAMSMIT N FIGURE 5-32. Example Of Cellular Phone Test GM Body Systems Application 1988-2004 Page 168 System Test Modes 5. Selecting and Operating Test Modes Mode F5: Speaker Test The E&C SPEAKER TEST allows you to test each of the vehicle's speakers independently. In addition, you can use the SPEAKER TEST to evaluate the audio amplifiers for each of the speakers. To do this, the tester sends the appropriate fade and balance commands to the Radio Receiver to output audio to only one speaker at a time. You can also control the volume of that speaker by pressing the u and d keys. NOTE Volume Control is not available on some vehicle applications. To run the E&C Speaker test, do the following: 1. Select the E&C TESTS by pressing (. 2. Select the F5: SPEAKER TEST. 3. Press the N key to sequence to the speaker you want to test. 4. Press u or d to increase or decrease the volume. 5. Terminate the test by pressing X. The audio fade and balance are set to send audio to all speakers. ACTIVE KEYS n Go to next speaker. u Increase volume. d Decrease volume. x Return to SELECT E&C TEST. Restore audio to all speakers. GM Body Systems Application 1988-2004 Page 169 System Test Modes 5. Selecting and Operating Test Modes ACTIVE KEYS SELECT MODE F4: E&C CONTROL F5: SPEAKER TEST % E&C SPEAKER TEST LEFT FRONT SPKR : INC VOLUME : DEC VOLUME n RIGHT FRONT SPKR n RIGHT REAR SPKR n LEFT REAR SPKR n E&C SPEAKER TEST ALL SPEAKERS : INC VOLUME : DEC VOLUME n FIGURE 5-33. Speaker Test FINISHING UP When you've finished testing, check to see if any Diagnostic Trouble Codes are still set. If you've already cleared codes for a component, but the codes are still set, then the conditions which caused the codes to be set are probably still present. You should refer to the GM service manual to isolate the problem. GM Body Systems Application 1988-2004 Page 170 6. FINISHING UP After using the application, do the following: 1. If the repairs are complete, clear the codes from memory before test driving to see if they recur or before releasing the vehicle to the customer. • If you have cleared the codes for a component but the codes are still set, then the conditions which caused the codes to be set may still be present. Refer to the OEM service manual to isolate the problem. 2. If the repairs are not yet complete, or if you want to continue testing at a later time, do not clear the codes from memory. Print a copy of the codes or write the codes down for comparison to the codes displayed when testing is resumed. 3. Disconnect the tester from the cigarette lighter plug or the battery terminal adapter. 4. Disconnect the cables and adapters from the vehicle’s DLC. You may want to inspect the cable, connector, and cigarette lighter for any damage or corrosion. 5. Store all hardware components in the tester storage case. NOTE If the tester becomes dirty, clean it by wiping it with a rag dampened with mild detergent or hand soap. Avoid using harsh, petroleum-based cleaning solvents such as acetone, benzene, and trichloroethylene, as they may damage the tester. Although the tester is water resistant, it is not waterproof, so be sure to thoroughly dry off the tester prior to storage. Do not submerge the tester in water. GM Body Systems Application 1988-2004 Page 171 A. IF YOU’RE HAVING A PROBLEM This section is intended to help you get back on track if the tester appears to be operating abnormally. Examples of most of the displays which you might see under abnormal conditions are shown. In addition, the most likely cause for the condition is given as well as other possible causes and recommendations on how to isolate or eliminate the problem. BLANK SCREEN Most Likely Cause: • No power is applied to the tester. Other Possible Causes: • Tester power supply is malfunctioning. Recommendations: • Plug the tester into another vehicle to verify proper operation. • Check for the 12 volt power at the cigarette lighter. • Check fuse in DLC cable cigarette lighter plug. • Check for proper polarity of 12 volt power (center conductor should be positive). GM Body Systems Application 1988-2004 Page 172 A. If You’re Having a Problem SCREEN DISPLAYS SOLID BARS Most Likely Cause: • Cartridge was inserted while power was applied to tester. Other Possible Causes: • Two master cartridges are installed. • Master cartridge is malfunctioning. • Tester is malfunctioning. Recommendations: • Unplug connector from cigarette lighter and plug it back in. • Make sure that only one master cartridge is installed in the tester. • Remove all cartridges and see if MASTER CARTRIDGE MISSING OR MALFUNCTIONING message is displayed. If it is, try installing another master cartridge. MASTER CARTRIDGE MISSING OR MALFUNCTIONING MASTER CARTRIDGE IS MISSING OR MALFUNCTIONING Most Likely Cause: • Master cartridge is not installed. Other Possible Causes: • Dirty contacts on the master cartridge connector. • Master cartridge is malfunctioning. Recommendations: • Verify that a master cartridge is installed. • Clean contacts on master cartridge connector with alcohol. • Try a different master cartridge. GM Body Systems Application 1988-2004 Page 173 A. If You’re Having a Problem WRONG DISPLAY AFTER POWER IS APPLIED GM 88-99 BODY (VER. x.x Most Likely Cause: • Wrong master cartridge is installed. Other Possible Causes: • Master cartridge is malfunctioning. • Tester is malfunctioning. Recommendations: • Verify that the cartridge is installed in the bottom slot of the tester and that there isn't a master cartridge in the top slot. • Try another cartridge. • Try another selection from the MSC menu. • Remove the master cartridge and perform the tester Self-test (refer to the tester OPERATOR’S MANUAL). DATA NOT BEING RECEIVED WAITING FOR DATA NO DATA RECEIVED FROM BCM Most Likely Cause: • Ignition switch is not in RUN. Other Possible Causes: • Tester cable is not plugged securely into DLC. • Cable is not plugged securely into tester. • Serial data link is shorted or open-circuited. • Body System is malfunctioning. • Tester is malfunctioning. • SIR/DUAL UART Adapter (GM P/N TA00065, Vetronix P/N 02001039) not installed when performing SIR tests on 1991 L-Body. GM Body Systems Application 1988-2004 Page 174 A. If You’re Having a Problem Recommendations: • Verify that ignition is in RUN. • Verify that tester is plugged securely into DLC. • Check for serial data link shorted or open. • Install SIR/DUAL UART Adapter. • Remove SIR/DUAL UART Adapter if not requested to use for system being tested. • EXIT test and retry. INTERMITTENT COMMUNICATIONS An alternating screen, as in the following example, this indicates that communications have been intermittent. When completely lost, only the DATA LOST screen is seen. HVAC SET TEMP 72°F COOLANT TEMP 98°C 208°F Alternating with ALDL DATA LOST Most Likely Cause: • Tester cable has come loose from DLC. Other Possible Causes: • Ignition switch has been turned OFF. • Cable is not plugged securely into tester. • Serial data link is shorted or open-circuited. Recommendations: • Verify that ignition is in RUN. • Verify that tester is plugged securely into DLC. • Check for serial data link shorted or open. • See if data updates. Interruption of data may be just minor communications interference, especially in SDL Monitor Mode. GM Body Systems Application 1988-2004 Page 175 A. If You’re Having a Problem DATA NOT RECEIVED FROM IPC OR SIR TROUBLE CODES WAITING FOR DATA NO DATA RECEIVED FROM IPC TROUBLE CODES WAITING FOR DATA NO DATA RECEIVED FROM SIR OR Most Likely Cause: • The system displayed on the screen is not installed in this vehicle. Other Possible Causes: • The system displayed on the screen is malfunctioning. • Ignition switch has been turned OFF. • Cable is not plugged securely into tester. Recommendations: • Verify that this vehicle contains the system displayed on the screen. • Verify that ignition is in RUN. • Verify that tester is plugged securely into DLC. • Check for serial data link shorted or open. E&C COMPONENTS MESSAGES (1) E&C COMPONENTS: *E&C BUSS FAULT* CHECK FOR OPEN OR SHORTED BUS Alternating with E&C COMPONENTS: VERIFY E&C BUS IS INSTALLED ON VEHICLE The tester queries all possible components and cannot get a response. After three seconds, the following screens are displayed. Most Likely Cause: • This vehicle does not contain E&C components. Other Possible Causes: • Ignition switch is not in RUN. • Tester cable is not plugged in securely. • E&C bus is not connected to pin J of DLC. • E&C components are malfunctioning. GM Body Systems Application 1988-2004 Page 176 A. If You’re Having a Problem Recommendations: • Verify that ignition is in RUN. • Verify that the tester cable is plugged securely into the DLC. • Check for pin in cavity J of DLC and that the pin J wire is indeed connected to the E&C bus (See Service Manual, Section 8A). • Refer to service manual to determine if E&C components should be installed in vehicle. • Refer to service manual for component troubleshooting. E&C COMPONENTS MESSAGES (2) E&C COMPONENTS: *E&C BUS FAULT* CHECK FOR OPEN OR SHORTED BUS The tester has failed in an attempt to transmit messages on the E&C bus. Most Likely Cause: • Tester cable is not plugged in securely. Other Possible Causes: • The E&C bus is open circuited. • The E&C bus is shorted to battery or ground. Recommendations: • Verify that the E&C bus adapter is installed on the end of the tester cable and that the cable is plugged securely into the DLC. • Verify that ignition is in RUN. • Check for open circuited E&C bus. • Check for E&C bus shorts. GM Body Systems Application 1988-2004 Page 177 Repair Service A. If You’re Having a Problem E&C COMPONENTS MESSAGES (3) E&C COMPONENTS E&C COMPONENTS E&C BUS SHORTED TO GROUND OR E&C BUS SHORTED TO BATTERY The tester has failed in an attempt to transmit messages on the E&C bus. NOTE These screens can only be seen on testers with serial numbers after xxx002000. Most Likely Cause: • The E&C bus is shorted to ground or battery. Other Possible Causes: • Ignition switch is not in RUN. • E&C component is malfunctioning. Recommendations: • Verify that ignition is in RUN. • Check for E&C bus shorted to ground or battery. • Refer to service manual for component troubleshooting. REPAIR SERVICE If you suspect that you have a problem with your unit, read the operating instructions carefully to ensure that you are operating the unit properly. Avoid the inconvenience of returning a non-defective unit for repair. It is advisable to exercise the Self-test procedure outlined in this manual to determine if a problem exists. If it is determined that a problem exists, or if you have any questions, please call 1-800-321-4VTX (USA). GM Body Systems Application 1988-2004 Page 178 B. DATA LIST PARAMETERS The tester is capable of displaying a wide variety of parameters in the following modes: • F0: DATA LIST (See Mode F0: DATA LIST on page 92.) • F1: SDL MONITOR (See Mode F1: SDL MONITOR on page 94.) • F3: SNAPSHOT (See Mode F3: SNAPSHOT on page 100.) • F5: VIN & OPTION CONTENT (See Mode F5: VIN and Option Content on page 114.) Each system ECU sends the tester information regarding the state of the ECU and associated sensors. The tester translates and displays this information in the form of diagnostic data parameters selected by the service technician. This section describes those parameters. There are two basic types of diagnostic data parameters: discrete and analog. Discrete parameters are ‘bits’of information and can be in only one of two distinct states (on/off, open/closed, etc.). Switches and solenoids are examples of discrete parameters. Analog parameters are used to represent quantities and are displayed as a value with appropriate units. Examples of analog parameters include Engine Speed and Coolant Temperature. The Data List mode of operation allows you to examine data which the body system ECUs transmit during normal operation. Included are data list parameters for the BCM, EOLM, RAC, DIC, and CCM systems. The status of telltale monitor lamps for the Instrument Panel Cluster (IPC) can also be displayed. NOTE The tester only displays data parameters for body system ECUs installed on the vehicle being tested. In the SDL Monitor mode the tester passively eavesdrops on data being broadcast between the various body system ECUs. You decide which message you want to monitor at any time. Parameters displayed in Snapshot mode are the same as those displayed in Data List mode with the addition of a time and index stamp showing where the data occurred relative to the Snapshot trigger. Snapshot parameters in the E&C mode do not include the time and index stamp. GM Body Systems Application 1988-2004 Page 179 Parameters Listed Alphabetically B. Data List Parameters The following section gives descriptions of the body parameters that can be displayed with the Body Systems Cartridge. Included are: • a description of the states of the discrete parameters • a description of the units, and the range of the analog parameters (analog ranges are widest possible ranges, not necessarily realistic maximum or minimum ranges) • a description of the parameter PARAMETERS LISTED ALPHABETICALLY The following list contains all parameters, listed alphabetically, with those that begin with a number listed first. PARAMETERS (NUMERIC) These parameters begin with a number. 1ST LAMP DRIVER STATES OFF/ON The 1st Lamp Driver parameter indicates the status of the primary lamp driver which is connected to terminal B1. The 1st and 2nd Lamp Drivers control the operation of the AIR BAG warning lamp during bulb check (seven flashes at key-on) and illuminate the lamp when a malfunction is detected. 2ND LAMP DRIVER STATES OFF/ON This parameter indicates the status of the secondary lamp driver which is connected to terminal B1. The 1st and 2nd Lamp Drivers control the operation of the AIR BAG warning lamp during bulb check (seven flashes at key-on) and illuminate the lamp when a malfunction is detected. 4TH GEAR SWITCH STATES OFF/ON This is an ECM parameter input from a switch mounted in the automatic transmission. When the car is in 4th gear the parameter reads ON. Otherwise the tester displays OFF. 8-DIGIT GM PART NUMBER The scan tool displays an 8 digit part number. This number is the GM part number that is stored within the SDM memory. 36 V LOOP RSV UNITS VOLTS RANGE 28.4 to 44.0 This parameter monitors the 36 volt reserve Power Signal from the DERM to each air bag deployment loop. On vehicles with driver side airbag only, this parameter is displayed as 36 V Loop (RSV) GM Body Systems Application 1988-2004 Page 180 Parameters Listed Alphabetically B. Data List Parameters PARAMETERS (A) Parameters beginning with the letter A. A/C CLUTCH REQ. STATES YES/NO The BCM may request the ECM to activate the A/C clutch when it is desired by the driver. A/C COMPRESSOR STATES OFF/ON This parameter displays whether the A/C Compressor is OFF or ON. A/C DESIRED STATES OFF/ON This is a BCM request to the ECM to turn on the A/C clutch. This parameter displays ON if the A/C is requested on. Otherwise the tester displays OFF. A/C HI SIDE TEMP UNITS DEGREES C DEGREES F RANGE -40 to + 215 -40 to +418 The BCM uses a thermistor mounted in the air conditioning high pressure hose to monitor A/C operation. The tester displays degrees F and C. A/C LED STATES OFF/ON The state of the LED in the A/C ON/OFF button. A/C LO SIDE TEMP UNITS DEGREES C DEGREES F RANGE -40 to +215 -40 to +418 A thermistor is mounted in the evaporator low pressure hose of the A/C system. The tester displays degrees F and C. A/C REQUEST STATES OFF/ON Displays if the HVAC ECU is requesting the PCM/VCM to turn the A/C system ON or OFF. ADL STATES LOCK ONLY or LOCK/UNLOCK This parameter indicates the status of the Automatic Door Lock (ADL) system. GM Body Systems Application 1988-2004 Page 181 Parameters Listed Alphabetically AIR DELIVERY MODE B. Data List Parameters STATES SEE BELOW This is the HVAC air delivery mode commanded to the HVAC programmer by the BCM. States can be Defrost, Heat, Recirculate, Automatic, Economy, Bi-Level, Off. AIR INLET DR ACT UNITS COUNTS RANGE 0 to 255 UNITS COUNTS RANGE 0 to 255 UNITS COUNTS RANGE 0 to 255 The actual position of the air inlet door. AIR INLET DR CMD The position of the air inlet door as commanded by the A/C ECU. AIR INLET DR MAX The maximum travel range of the door when it is driven to its stops following a recalibration. AIR INLET DR MIN UNITS COUNTS RANGE 0 to 255 The minimum travel range of the door when it is driven to its stops following a recalibration. AIR MIX DOOR ACT UNITS COUNTS RANGE 0 to 255 UNITS COUNTS RANGE 0 to 255 UNITS % RANGE 0 to 100 The actual position of the air mix door. AIR MIX DOOR CMD The position of the air mix door as commanded by the A/C ECU. ALT F-OUTPUT The BCM monitors the generator field ON time. A value close to 0% represents a minimum regulator ON time, and a value close to 100% represents a maximum ON time. ALT L-STATUS STATES OK/LOW This is the generator feedback to the BCM. The generator pulls this circuit low when it is not charging, and the tester indicates LOW. When the generator is charging it pulls this circuit high, and the tester displays OK. GM Body Systems Application 1988-2004 Page 182 Parameters Listed Alphabetically B. Data List Parameters ALT. T/T OUTPUT BRAKE T/T OUTPUT COOLNT TMP OUTPT OIL T/T OUTPUT STATES OFF/ON These output indicators display ON when a bulb check is performed or when a failure condition occurs. ALTERNATOR FAULT STATES HIGH/LOW The DIC monitors the alternator field activation circuit. The status is normally HIGH during charging and LOW if the alternator pulls the line low signaling a no charge situation. AMB LIGHT STATES LIGHT/DARK The displayed value refers to the amount of ambient light level calculated by the module using the light sensor. The information is used by the module for operation of the following features: • The automatic headlamp feature • The Daytime Running Lamps (DRL) feature AMB. LIGHT SENS. UNITS COUNTS RANGE 0 to 255 The Ambient Light Sensor is used by the CCM to control the instrument panel intensity for varying conditions. A high count signals low light conditions while a low count signals high light level conditions. AMBIENT LT SNSR UNITS VOLTS RANGE 0 - 5.0 The displayed voltage value refers to the amount of ambient light level as measured by the light sensor. This information is used to operate the automatic headlamp feature and the Daytime Running Lamps (DRL) feature. In LIGHT ambient conditions, the sensor resistance is low. In DARK ambient conditions, the sensor resistance is high. The BCM interprets the following conditions as LIGHT when the ambient light sensor resistance is low and the sensor return circuit voltage is between 2.2 and 5.0 volts. The BCM interprets the following conditions as DARK when the ambient light sensor resistance is high and the sensor return circuit voltage is between 0.2 and 1.3 volts. If there is an open or a short to ground in the ambient light sensor circuit, the sensor will read about 0.0 volts. The default state is DARK and the module will turn ON the headlamps. If the headlamps are set to the AUTO position while in the LIGHT state and the ambient light level changes to DARK for 15 seconds, the BCM will turn ON the headlamps. If the headlamps are set to the AUTO position while the DARK state and the ambient light level conditions change to LIGHT for 20 seconds, the BCM will turn the headlamps OFF. GM Body Systems Application 1988-2004 Page 183 Parameters Listed Alphabetically AMBIENT TEMP B. Data List Parameters UNITS DEGREES C DEGREES F RANGE -40 to +215 -40 to +418 The BCM uses a thermister mounted at the front of the vehicle. The tester displays the unfiltered value indicated by the ambient temperature sensor, while the instrument panel displays a filtered value for the driver. ARMING SENSOR STATES CLOSED/OPEN The Arming Sensor monitors vehicle velocity changes. The sensor consists of a sensing element, normallyopen switch contacts, a diagnostic resistor, and two diodes. When a low-level velocity change occurs, the sensing element closes the normally-open switch contacts and supplies voltage to the high side of the deployment module. This parameter displays the open/closed switch status of the sensor circuit. AUTO BUTTON STATES OFF/ON The state of the Auto Button. Pressed is ON, and released is OFF. AUTO HDLMP ENBLE STATES YES/NO The data item refers to the commanded state of the auto headlamp feature. • YES displays when the BCM commands the auto headlamps to turn ON. • NO displays when the BCM commands the auto headlamps to turn OFF AUTO HEADLAMPS STATES ACTIVE/INACTIVE The data item refers to the user setting of the auto headlamps feature. • ACTIVE displays when the auto headlamps feature is ON. • INACTIVE displays when the auto headlamps feature is OFF. AUTO LEARN TIMER • UNITS SECONDS RANGE 0 - 2040 The scan tool displays the seconds used by the BCM to learn valid code from the Passlock™ sensor. The learn procedure consists of 3 consecutive periods. AUX INSD AIR (º) UNITS DEGREES C DEGREES F RANGE -40 to +150 -40 to +300 Output value of the auxiliary inside air temperature sensor inside the vehicle cab. GM Body Systems Application 1988-2004 Page 184 Parameters Listed Alphabetically AUX LOWER OUT (º) B. Data List Parameters UNITS DEGREES C DEGREES F RANGE -40 to +150 -40 to +300 UNITS COUNTS RANGE 0 to 255 UNITS COUNTS RANGE 0 to 255 UNITS COUNTS RANGE 0 to 255 UNITS COUNTS RANGE 0 to 255 Output value of the auxiliary lower/heater outlet temperature sensor. AUX LOWER OUT TEMP Output value of the auxiliary lower/heater outlet temperature sensor. AUX MIX DR ACT Actual position of the auxiliary mix door. AUX MIX DR CMD The position of the auxiliary mix door as commanded by the A/C ECU. AUX MIX DR MAX The maximum travel range of the door when it is driven to its stops following a recalibration. AUX MIX DR MIN UNITS COUNTS RANGE 0 to 255 The minimum travel range of the door when it is driven to its stops following a recalibration. AUX MODE DR ACT UNITS COUNTS RANGE 0 to 255 UNITS COUNTS RANGE 0 to 255 Actual position of the auxiliary mode door. AUX MODE DR CMD The position of the auxiliary mode door as commanded by the A/C ECU. AUX MODE DR MAX UNITS COUNTS RANGE 0 to 255 The maximum travel range of the door when it is driven to its stops following a recalibration. AUX MODE DR MIN UNITS COUNTS RANGE 0 to 255 The minimum travel range of the door when it is driven to its stops following a recalibration. GM Body Systems Application 1988-2004 Page 185 Parameters Listed Alphabetically AUX UPPER OUT (º) B. Data List Parameters UNITS DEGREES C DEGREES F RANGE -40 to +150 -40 to +300 UNITS COUNTS RANGE 0 to 255 Output value of the auxiliary upper outlet temperature sensor. AUX UPPER OUT TEMP Output value of the auxiliary upper outlet temperature sensor. AVE. FUEL RESET STATES ON/OFF The Average Fuel Reset parameter is an input to the IPC that resets the Average Fuel Economy GM Body Systems Application 1988-2004 Page 186 Parameters Listed Alphabetically B. Data List Parameters PARAMETERS (B) Parameters beginning with the letter B. BACKUP WARNING STATES OFF/ON This discrete output turns ON if the Warning Lamp feedback does not match the requested state. BATTERY VOLT UNITS VOLTS RANGE 0 - 18.1 UNITS VOLTS RANGE 0.0 to 25.5 The scan tool displays the value of the battery voltage. BATTERY VOLTAGE This parameter indicates the battery voltage available to the CCM. BCM PROM I.D. BCM Prom I.D. is displayed as a number, and is used with service publications to verify that the correct prom is installed in the vehicle. BLOWER COMMAND UNITS VOLTS VOLTS RANGE 0.0 to 18.6 0.0 to 25.5 Blower Command is the desired HVAC blower voltage commanded by the BCM to the HVAC power module. BLOWER MOTOR PWM AUX BLWR MTR PWM UNITS % RANGE 0 to 98 Speed of the blower motor (auxiliary blower motor). BRAKE FLUID LVL BRAKE FLUID INPUT STATES OK/LOW ON/OFF The Brake Fluid Level/Brake Fluid Input switch is an input to the BCM/IPC that is used to control the red brake warning lamp. This input is the brake pressure switch on NON-ABS cars. BRAKE PRESSURE STATES OK/LOW Brake Pressure is the low brake pressure warning switch for the ABS system. The BCM uses this information to control the anti-lock light. GM Body Systems Application 1988-2004 Page 187 Parameters Listed Alphabetically B. Data List Parameters PARAMETERS (C) Parameters beginning with the letter C. C/C BRAKE SW STATES RELEASED/DEPRESSED The Brake Switch signals the BCM to release the cruise control when the brake is applied. The cruise control must be turned ON when testing this BCM input. C/C RESUME/ACCEL STATES OFF/ON The tester displays ON when the Resume/Accel switch is pressed. Note that the cruise control must be selected ON to test this BCM input. C/C SERVO FDBK. UNITS % RANGE 0 to 100 The BCM uses the Cruise Control Servo Feedback input during cruise control operation. Displayed as a percent, a value close to 0% is the rest position and a value close to 100% is WOT. C/C SET/COAST STATES OFF/ON The tester displays ON when the Set/Coast switch is pressed. Note that the cruise must be selected ON to test this BCM input. C/C STATUS STATES OFF/ON The C/C Status parameter indicates the present status of the cruise control system. CALIBRATION ID The scan tool displays a 4-digit number. This calibration ID is the check sum of the SDM read only memory contacts. CANADA SELECT STATES ON/YES This parameter indicates if the vehicle is set up for Daylight Running Lamps (DRL). GM Body Systems Application 1988-2004 Page 188 Parameters Listed Alphabetically B. Data List Parameters CHIME STATES NONE/ HEADLAMP/ KEY IN IGNITION/ SEAT BELT/ TURN SIGNAL The chime output refers to the commanded state of the audible chime. • NONE displays when No audible chime sound is commanded. • HEADLAMP displays when the headlamp ON reminder feature commands the chime to turn ON. • KEY IN IGNITION displays when the key in ignition reminder feature and the driver door open feature command the chime to turn ON. • SEAT BELT displays when the driver seat belt not buckled reminder feature commands the chime to turn ON. • TURN SIGNAL displays when the turn signal ON reminder feature (on for more than 0.75 mile) commands the chime to turn ON. CHIME #1 STATES OFF/ON The BCM requests Chime #1 when a chime is desired. The tester displays ON when the chime is requested. The speed of the chime depends on the vehicle being tested. CHIME #2 STATES OFF/ON The BCM requests Chime #2 when a chime is desired. The tester displays ON when the chime is requested. The speed of the chime depends on the vehicle being tested. CLIMATE CONTROL KEYS AUTO KEY COOLER KEY 1990 ECON KEY 1991-96 FRONT DEFROST KEY OFF KEY OUTSIDE TEMP KEY REAR DEFROST KEY WARMER KEY STATES OFF/ON NOT CYCLED/CYCLED The Climate Control keys are inputs to the BCM from the CCP. 1990 models: Tester displays the state of each switch as ON when the switch is pressed and held, or OFF when it is released. 1991-96 models: The switch state is NOT CYCLED until the switch is pressed. Once the switch has been pressed, the state remains at CYCLED because the BCM remembers that the key has been pressed this ignition cycle. GM Body Systems Application 1988-2004 Page 189 Parameters Listed Alphabetically CLOCKSPRG CONFIG B. Data List Parameters STATES O.5 OHMS/1.0 OHMS The Clockspring Configuration parameter indicates the software calibration value stored in the DERM for the Clockspring Coil that is to be installed in the steering column. COMPONENT SERIAL #8-11 The scan tool displays digits 8 through 11 of the SDM serial number. COMPONENT SERIAL #12 The scan tool displays digit 12 of the SDM serial number. COMPRESSOR REQ. STATES YES/NO The BCM requests to the ECM that the A/C compressor be turned OFF or ON, depending on the state of the HVAC. COOLANT FAN REQ. STATES YES/NO The BCM may request the ECM to activate the engine cooling fan depending on A/C loads. COOLANT LEVEL STATES OK/LOW The Coolant Level sensor is an optional BCM input that is used to control the instrument panel Low Coolant Level warning lamp. The tester indicates whether the BCM is seeing a normal or low coolant level from this sensor. COOLANT TEMP UNITS DEGREES C RANGE -40 TO + 199 Coolant Temperature is an analog input to the ECM. The Coolant Temperature sensor is a temperature variable resistor in series with a fixed resistor in the ECM and biased with a reference voltage. The ECM reads the voltage across the Coolant Temperature sensor and converts this voltage into temperature. Coolant Temperature is used by many ECM systems. COURT RELAY-FDBK STATES OFF/ON The CCM monitors the courtesy lamp relay's control circuit. A low voltage on this circuit indicates the relay is ON. A high voltage state on the relay control circuit indicates the relay is OFF. COURTESY LMP RLY STATES ON/OFF The BCM uses the courtesy lamp relay input in order to determine the state of the courtesy lamp relay. • ON displays when the BCM commands the courtesy lamps to turn ON by providing a ground for the courtesy lamp relay coil. GM Body Systems Application 1988-2004 Page 190 Parameters Listed Alphabetically • B. Data List Parameters OFF displays when the BCM is not commanding the courtesy lamps to turn ON by not providing a ground for the courtesy lamp relay coil. COURTESY LMP TMR UNITS SECONDS RANGE 0 - 40 The courtesy lamp timer is used to control devices that attach to the following illuminated entry, remote illuminated entry and exit lighting circuit. The time each circuit remains ON is dependent on the lighting calibration. In most cases turning the ignition to the ON position will override the programmed light timing. The value displayed represents the time in seconds before the module turns off the courtesy lamp relay. COURTESY LMP. SW STATES OFF/ON The courtesy lamp switch is located on the instrument panel. When the switch is set to ON it requests the BCM/CCM to turn on the lamps. COURTESY RELAY (BCM) COURTESY OUTPUT (CCM) STATES OFF/ON This parameter displays whether the Courtesy Lamp Relay is being commanded OFF or ON, by the BCM/ CCM. CRANK STATES YES/NO This parameter monitors the status of the crank input to the DERM. When the engine is being cranked, system voltage is applied to the DERM crank input. This causes the DERM to ground the inflatable resistance indicator circuit until cranking stops. This, in turn, causes the DERM to perform the SIR diagnostic system check (self-test). CRT BRIGHTNESS UNITS % RANGE 0 to 100 The BCM sends the CRT a message to control the brightness of the CRT. The tester displays a percentage of full intensity. CRTC TO CRTM STATES OK/PROBLEM The tester displays OK if the Cathode Ray Tube Controller (CRTC) has proper communication with the Cathode Ray Tube Monitor (CRTM).UNITS RANGE CRUISE SET SPEED UNITS MPH KPH RANGE 0 to 159 0 to 255 Cruise Set Speed is the speed that the cruise control system is trying to maintain. The tester displays the Set Speed in MPH. Pressing the & key selects KPH. GM Body Systems Application 1988-2004 Page 191 Parameters Listed Alphabetically CRUISE SWITCH B. Data List Parameters STATES OFF/ON This is the cruise control ON or OFF select switch. The tester displays ON or OFF as selected by the driver. CTRL A/C AT IDLE STATES NO/YES The BCM may request the ECM to control the air conditioning compressor at idle when the HVAC is in Vent or Idle mode, when any of BCM codes B447, B448, B449, B450, or B112 are set, when A/C pressure is LOW, when diagnostic mode is ACTIVE or when the battery voltage is LOW. CURRENT SOURCE STATES DISABLED/ENABLED The Current Source parameter indicates whether the DERM is presently attempting to run the Initiator Assembly Resistance Test. Since the portion of the DERM system test which requires the current source takes approximately 200 mS, there almost never is a resistance where the status is Enabled. GM Body Systems Application 1988-2004 Page 192 Parameters Listed Alphabetically B. Data List Parameters PARAMETERS (D) Parameters beginning with the letter D. DAYTIME RUN LMP STATES ON/OFF This parameter indicates the state of the daytime running lamps. • The tool displays ACTIVE when the daytime running lamps are commanded ON. • The tool displays INACTIVE when the daytime running lamps are commanded OFF. DEFOG RELAY-FDBK STATES OFF/ON The CCM monitors the defog relay's control circuit. A low voltage on this circuit indicates the relay is ON. A high voltage state on the relay control circuit indicates the relay is OFF. DERM CONFIG. DESIRED BLWR MTR STATES 00=DRIV./PASS 01=DRIV. ONLY 02=SERVICE UNITS % RANGE 0 to 98 UNITS NONE RANGE 0.00 to 99.99 Selected blower motor speed. DIC PROM I.D. The tester displays a number corresponding to the revision level of the software and calibration used in the DIC. DIC SWITCH A/D UNITS COUNTS RANGE 0 to 255 The Driver Information Center (DIC) uses one CCM input wire and a resistor network that changes value depending on which switch is being pressed. The CCM converts this analog input to digital counts. If all switches are in their normal state (not pressed), the count is 208-235. A short to ground causes a count of less than 17. An open or short to power causes a count greater than 235. A fault in the DIC switch or circuit may cause the on-board diagnostics to be inoperative. DIL RELAY STATES OFF/ON This parameter displays whether the Delayed Interior Light (DIL) relay is enabled (on). DIL TIMER UNITS SECONDS RANGE 0 to 600 This parameter indicates the amount of time the DIL relay is enabled (on). GM Body Systems Application 1988-2004 Page 193 Parameters Listed Alphabetically DIM POT INPUT B. Data List Parameters STATES ACTIVE/INACTIVE The BCM uses the Dim Pot input in order to determine the position of the dome lamp switch (thumb wheel) when the park lamps are ON. • ACTIVE displays when the dome lamp switch is not in the FULL DOWN position and the park lamps are ON. • INACTIVE displays when you turn the dome lamp switch to the FULL DOWN position (dash lights OFF) and the park lamps are ON. DIMMING STATES ACTIVE/INACTIVE The dimming output refers to the state of the headlamp switch dimmer. The headlamp switch dimming feature is a term describing the customer's ability to control the illumination of the interior panel displays. • INACTIVE displays when the park lamps are OFF. • ACTIVE displays when the Park lamps are ON. DIMMING POT UNITS VOLTS RANGE 0.0 - 18.0 The voltage value displayed indicates the position of the dome lamp switch (thumb wheel). The voltage value displayed should vary between 0.1-12.7 volts depending on the position of the dome lamp switch. Zero (0) volts will be displayed when the following conditions exist: • The headlamp switch is in the AUTO position. • The daytime running lamps are OFF. 10.5 volts will be displayed when the following conditions exist: • The park lamps or the headlamps are turned ON. • The dome lamp switch is in the FULL bright position (thumb wheel turned completely up just before the detent). 0.1volts will be displayed if the following conditions exist: • The park lamps or the headlamps are turned ON. • The dimmer switch is in the FULL DIM position (thumbwheel turned completely down). DIMMING POT UNITS % RANGE 0 to 100 The Dimming Pot is displayed in percent. A value close to 0% represents maximum dimming and a value close to 100% represents maximum brightness. DISCRM SENSOR STATES OPEN/CLOSED The discriminating sensor monitors vehicle velocity changes. Each sensor consists of a sensing element, nominally open switch contacts, and a diagnostic resistor. GM Body Systems Application 1988-2004 Page 194 Parameters Listed Alphabetically B. Data List Parameters DISPLAY MODE UP STATES OFF/ON This parameter monitors the state of the IPC display. The tester displays ON when the Display Mode Up switch is pressed and OFF when the switch is released. DISPLAY ON KEY STATES OFF/ON The Display ON Key parameter reflects the state of the Information Key on the IPC when the Information key is pressed. DISPLAY STYLE STATES TOUR SEDAN/VF UP LEVEL The tester displays whether the vehicle is a Touring Sedan or a Vacuum Florescent Up Level model. DOME LAMP SW STATES ON/OFF The BCM uses the dome lamp switch input in determining if the dome lamp switch (thumb wheel) is requesting the interior lights to turn ON. • ON displays if the dome lamp switch requests the module to turn the interior lights ON (full up position past the detent). • OFF displays when the dome lamp switch does not request the BCM to turn the interior lights ON (not in the full up position past the detent). DOME OVERRIDE SW STATES ON/OFF The module uses the dome override switch input from the dome override switch in order to allow or to defeat the interior lighting when the door opens. The dome override switch is located near the headlamp switch. • ON displays if the dome override switch is overriding the interior lighting. • OFF displays if the dome override switch allows the interior lights to turn ON when any door opens or if the left glass opens (if equipped). DOOR STATES OPEN/CLOSED The Door parameter indicates the state of the door jamb input to the RAC module. Opening any one of the doors changes the status to OPEN. GM Body Systems Application 1988-2004 Page 195 Parameters Listed Alphabetically DOOR HANDLE (CCM) DOOR HANDLE SW (BCM) B. Data List Parameters STATES OFF/ON RELEASED/DEPRESSED The tester displays ON when either front outside door handle is pressed. Door handles are a BCM/CCM wake up input. These are momentary contact switches. The tester SNAPSHOT mode can help test these switches for proper operation. DOOR HANDLE SW STATES ACTIVE/INACTIVE The door handle switch information refers to the position of either of the door handles (outside or inside). The module uses this information to activate the illuminated entry feature. Depending on the vehicle the parameter may apply to both front doors or just the drivers door. • ACTIVE is displayed when either of the handles is raised. • INACTIVE is displayed during normal operation. DOOR HANDLE SW (RAC) STATES OFF/ON Electrical switches at the front door handles notify the RAC module when the handles are pushed in. ON means one of the front door switches is pressed. DOOR JAM (RAC) MINI WEDGE SW (CCM) STATES CLOSED/OPEN This parameter monitors the state of the door jamb input to the RAC/CCM module. Opening any one of the doors changes the status to OPEN. DOOR JAMB SWITCH STATES OFF/ON The tester displays ON when either the driver's or passenger's front door is open. DOOR KEY SW STATES ACTIVE/INACTIVE The door key switch is part of the driver door lock cylinder. The door key switch is an input to the BCM to turn OFF the content theft system. • ACTIVE displays when you turn the door key switch by using the door key. • INACTIVE displays when you do not turn the door key switch by using the door key. DOOR KEY SWITCH STATES NORMAL/UNLOCK This is a CCM input used to disarm the universal theft deterrent system when the doors are unlocked. The tester displays UNLOCK when the lock cylinder is rotated and NORMAL when the lock is at rest. GM Body Systems Application 1988-2004 Page 196 Parameters Listed Alphabetically B. Data List Parameters DOOR LOCK RELAY STATES ON/OFF The door lock relay parameter refers to the operation of the power door locks and power door lock relay. The RAC module can control the power door locks through the relay assembly. • ON displays when the BCM/RAC senses the door lock relay coil is energized motors. • OFF displays when the BCM/RAC does not sense that the door lock relay coil is being energized. DOOR UNLOCK RELAY STATES OFF/ON This parameter indicates that the RAC module has activated the unlock coil of the door lock relay assembly. The RAC module can control the power door locks through the lock relay assembly. DR LOCK RLY FDBK STATES ON/OFF The door lock relay output refers to the commanded state of the door lock relay. • ON displays when the BCM commands the door lock relay coil to turn ON. • ON momentarily displays when you press the RFA transmitter lock button or if you press the power lock button. • OFF displays when you do not press the RFA transmitter lock button or the power lock button. DRIV CURENT SINK STATES OFF/ON The Driver Current Sink parameter indicates whether the DERM is currently grounding Driver Side Low terminal B8. DRIVER 36 VLR UNITS VOLTS RANGE 0.0 to 40.0 The Driver 36 VLR parameter indicates the Driver's Side voltage supplied by the DERMs 36 volt power supply. This measurement is made inside the DERM. DRIVER BAG ENERGY RESERVE UNITS VOLTS RANGE 22 to 24 Steering wheel module loop reserve voltage. DRIVER BELT STATUS CHANGED THIS IGNITION CYCLE STATES NO/YES The scan tool displays YES or NO. Driver seat belt has been buckled or unbuckled after the ignition is turned ON. GM Body Systems Application 1988-2004 Page 197 Parameters Listed Alphabetically DRIVER ENERGY RESERVE B. Data List Parameters UNITS VOLTS RANGE 0.0 to 30.0 This is the voltage of the driver frontal energy reserve capacators inside the SDM, as measured by the SDM. DRIVER FRONTAL RESISTANCE TYPICAL DATA VALUE = 2.8 OHMS UNITS OHMS RANGE 0 - 6.6 The SDM Performs the resistance measurement test once each ignition cycle and verifies the ignition 1 and the 23 VLR Voltages are within the normal ranges. Then the SDM sources a constant current to the driver deployment loop. The SDM then measures the voltage drop across the deployment loop and coverts the measured voltage value to a driver deployment loop resistance value.UNITS RANGE DRIVER FRONTAL SENSELO TYPICAL DATA VALUE = 3.1 VOLTS UNITS VOLTS RANGE 0 to 20 The SDM measures the voltage at the driver frontal low terminal 2 and displays the value as Driver Frontal Senselo.UNITS RANGE DRIVER FRONTAL VDIF TYPICAL DATA VALUE = 4-10MV UNITS MILLIVOLTS RANGE 0 to 500 The SDM measures the voltage difference between driver frontal high and driver frontal low and displays this voltage difference as Driver VDIF. DRIVER HI UNITS VOLTS RANGE 0.0 to 40.0 The Driver High parameter indicates the voltage measured by the DERM at the high side (power side) of the driver inflator module. DRIVER INFO SW This SDL monitor parameter states which driver information switch is pressed at the CCDIC. Note: The time/temp key is not a monitored switch, therefore, when this key is pressed a message is not sent to the BCM or displayed on tester. This does not indicate a problem. DRIVER RESISTANCE UNITS OHMS RANGE 0.0 to 25.5 The SDM performs the resistance measurement test once each ignition cycle, and it verifies that the Ignition 1 and the 23 VLR voltages are within the normal ranges. Then the SDM sources a constant current to the driver deployment loop, measures the voltage drop that occurs across the deployment loop, and converts the measured voltage value to a driver deployment loop resistance value. GM Body Systems Application 1988-2004 Page 198 Parameters Listed Alphabetically B. Data List Parameters DRIVER SBELT MON. STATES UNBUCKLED/BUCKLED The Driver Seatbelt Monitor parameter indicates whether the status of the driver seat belt is stored as crash data during a deployment event. DRIVER SEAT BELT STATES BUCKLED/UNBUCKLED The SDM determines this by looking at whether the driver seat belt is buckled or unbuckled. DRIVER SEAT BELT A/D UNITS VOLTS RANGE 0 to 12 The scan tool displays 0 or 12 volts. Driver’s seat belt buckled = 12 VOLTS Driver’s seat belt unbuckled = 0 VOLTS DRIVER SEAT BELT STATUS STATES BUCKLED/UNBUCKLED The scan tool displays buckled or unbuckled. The signal from the drivers seat built switch indicates whether the driver seat is buckled or unbuckled. DRIVER SEATBELT STATES UNBUCKLED/BUCKLED The Driver Seatbelt parameter indicates the status of the driver seat belt. DRIVER SENSELO UNITS VOLTS RANGE 0.0 to 25.5 The SDM measures the voltage of the driver frontal low terminal voltage and displays it as Driver Senselo. DRIVER SIDE IMPACT SENSOR ID The scan tool displays a 2 digit ID number. The ID signal sent to the SDM from the Driver SIS. DRIVER SOURCE UNITS VOLTS RANGE 0.0 to 40.0 The Driver Source parameter indicates the voltage applied to the high side of the deployment loop. This voltage is measured by the DERM through a diagnostic resistor in the Arming Sensor. DRIVER TEMP DIAL UNITS DEGREES C DEGREES F RANGE 15 to 32 59 to 89 The desired discharge temperature selected by the driver. GM Body Systems Application 1988-2004 Page 199 Parameters Listed Alphabetically B. Data List Parameters DRIVER: UNLOCK ALL: UNLOCK STATES LOCK/UNLOCK DRIVER: UNLOCK is the command from the RAC module to the driver door unlock relay (isolation relay) assembly. This is in response to a command from the remote transmitter to unlock the driver's door. ALL: UNLOCK is the command from the RAC module to the unlock coil of the door lock relay assembly. DRIVER VDIF UNITS mV RANGE 4 to 8 The Driver VDIF parameter indicates the voltage difference between the Driver Side High and Driver Side Low as measured by the DERM during normal non-deployment operation of the SIR system. DRIVER'S/FRONT PSNGR'S/REAR STATES DOOR OPEN/DOOR CLOSED The door switches on Cadillac E and K-Body BCMs are wired as either driver's and passenger's or front and rear doors. DRIVER'S DOOR STATES CLOSED/OPEN This is the BCMs Driver's Side Door Ajar switch. The tester displays OPEN when the door is ajar, or closed when the door is fully closed. DRL RELAY STATES ON/OFF The Daytime Running Lamp (DRL) relay output refers to the commanded state of the DRL relay coil. • ON displays when the module commands the DRL relay coil to turn ON. • OFF displays when the BCM does not command the DRL relay coil to turn ON. DRVR JAMB SW STATES ACTIVE/INACTIVE The driver door jamb switch information refers to the position of the driver door. • INACTIVE is displayed when the driver door is closed and the switch plunger is pushed IN. • ACTIVE is displayed when the driver door is open and the switch plunger is OUT. DUAL BUTTON STATES OFF/ON State of the Dual button. ON is pressed. OFF is released. GM Body Systems Application 1988-2004 Page 200 Parameters Listed Alphabetically DUSK B. Data List Parameters STATES YES/NO The displayed value refers to the amount of ambient light level calculated by the module using the light sensor. Dusk is displayed whenever the park lamps are ON. The information is used by the module for operation of the following features: • The automatic headlamps feature • The Daytime Running Lamps (DRL) feature DVR DR UNLCK RLY STATES ON/OFF The driver door unlock relay output refers to the commanded state of the driver door unlock relay. • ON displays when the module commands the driver door unlock relay to turn ON. • ON momentarily displays when you press the RFA transmitter unlock button or an input from the power door unlock switches. OFF displays when the BCM does not command the driver door unlock relay coil to turn ON and the driver door unlock relay does not energize. DVR TEMP DN BTTN STATES OFF/ON State of the Driver Temp Down button. ON is pressed. OFF is released. DVR TEMP UP BTTN STATES OFF/ON State of the Driver Temp Up button. ON is pressed. OFF is released. GM Body Systems Application 1988-2004 Page 201 Parameters Listed Alphabetically B. Data List Parameters PARAMETERS (E) Parameters beginning with the letter E. ENABLE COUNTER RANGE 0 - 255 The displayed value refers to the number of times the module has been enabled since manufacture. This information is for the assembly plant use only. ENG/MET STATE STATES METRIC/ENGLISH This parameter indicates the measurement system used to indicate numerical values on an IPC, DIC, or CRTC. ENG/MET SWITCH STATES RELEASED/DEPRESSED When the English/Metric switch on the instrument panel is pushed, the tester displays DEPRESSED; otherwise, it displays RELEASED. ENGINE DATA SW STATES ON/OFF Available for 1988 E-Body Oldsmobiles in SDL Monitor mode, the Engine Data Switch parameter indicates the state of the Instrument Panel Display and Engine Data toggle switch on the instrument panel. The tester displays ON when Engine Data Switch is being pressed. ENGINE SPEED UNITS RPM RANGE 0 to 6375 Engine Speed is a PCM/VCM/ECM internal parameter. It is computed by reference pulses from the distributor and is used by virtually all PCM/VCM/ECM systems. The up-option IPC uses the engine speed broadcast by the PCM/VCM/ECM for its tachometer display. EXPORT STRAP STATES EXPORT/DOMESTIC The tester displays EXPORT if the vehicle is built to be exported; otherwise, DOMESTIC is displayed. EXTERIOR LAMP STATES OFF/ON This is the RAC module's command to the exterior lamp control relay during security system operation. The ignition key must be ON to view RAC data list parameters. GM Body Systems Application 1988-2004 Page 202 Parameters Listed Alphabetically B. Data List Parameters PARAMETERS (F) Parameters beginning with the letter F FAN 1 REQUEST FAN 2 REQUEST STATES NO/YES This parameter indicates whether the BCM is requesting Coolant Fan from the ECM. FAN DOWN BUTTON STATES OFF/ON State of the Fan Down speed button to reduce blower motor speed. ON is pressed. OFF is released. FAN SPEED STATES HI/LOW/OFF This parameter indicates the desired speed of the engine cooling fan. FAN UP BUTTON STATES OFF/ON State of the Fan Up speed button to increase blower motor speed. ON is pressed. OFF is released. FLASH TO PASS SW STATES ON/OFF The BCM monitors the flash to pass input on CKT 1356 in order to determine if the high beams are requested ON. The scan tool displays ON when the BCM or the Flash To Pass switch commands the high beams ON. OFF is displayed when the flash to pass switch or the BCM is not commanding the high beams ON. FOG LAMP RELAY STATES OFF/ON The BCM controls the Fog Lamp Relay to be either ON or OFF. FOG LAMP SWITCH STATES OFF/ON The Fog Lamp Switch is mounted on the instrument panel and is a direct input to the BCM on Reatta models requesting the fog lamps. FOG/TWILIGHT RELAY STATES OFF/ON This is the BCM control signal to the fog lamp relay on Reattas and the twilight relay on Rivieras. GM Body Systems Application 1988-2004 Page 203 Parameters Listed Alphabetically FREON PRESSURE B. Data List Parameters STATES OK/LOW The Freon Pressure Switch signals the BCM to illuminate the Service A/C System lamp when freon pressure is very low. FRONT DOOR DRIVER'S DOOR PASSENGER'S DOOR STATES CLOSED/OPEN The tester displays the position of the driver's door on 2-door cars, either the driver's or the front doors on 4door cars (depends on the vehicle being tested), or the passenger's doors as indicated by the BCM’s input switches at each door. FRNT FOG LMP RLY STATES ON/OFF The front fog lamp relay output refers to the commanded state of the front fog lamp relay coil. • ON displays when the BCM commands the front fog lamp relay coil to turn ON. This allows the relay to power up the front fog lamps. • OFF displays when the BCM does not command the front fog lamp relay coil to turn ON. This denies current to the front fog lamps and causes the front fog lamps to be kept OFF. FRONT FOG LMP SW STATES ON/OFF The BCM uses the front fog lamp switch input in order to determine the status of the front fog lamp switch. • ON displays when you depress the front fog lamp switch. • OFF displays when you are not depressing the front fog lamp switch. FRT DEFRST BUTTN STATES OFF/ON State of the Front Defrost button. ON is pressed. OFF is released. FUEL ECONOMY KEYS: AVERAGE KEY FUEL RESET KEY FUEL USED KEY 1990 INSTANT KEY 1991-96 RANGE KEY TIME SET KEY • STATES OFF/ON NOT CYCLED/CYCLED 1990 models: The Fuel Economy keys are inputs to the BCM from the FDP. The tester displays the state of each switch as ON when the switch is pressed and held, or OFF when it is released. GM Body Systems Application 1988-2004 Page 204 Parameters Listed Alphabetically • B. Data List Parameters 1991-96 models: The switch state is NOT CYCLED until the switch is pressed. Once the switch has been pressed, the state remains at CYCLED because the BCM remembers that the key has been pressed this ignition cycle. FUEL ENABLE STATES OFF/ON This parameter indicates the state of the Pass Key Module. If the state is OFF, vehicle starting is inhibited. FUEL GAUGE SWITCH FUEL DATA SWITCH STATES RELEASED/DEPRESSED OFF/ON When the Fuel Gauge Switch on the instrument panel is pushed, the tester displays DEPRESSED; otherwise RELEASED is displayed. The Fuel Data Switch is a momentary switch. The tester displays ON when the switch is pressed and OFF when the switch is released. FUEL LEVEL STATES OK/LOW Fuel Level Sender is an input to the BCM/IPC. It is used to control the fuel gauge at the instrument panel. FUEL LEVEL UNITS GAL LITERS RANGE 0 to 25 0 to 95 The fuel level sender is an input to the BCM. It is used to control the fuel gauge at the instrument panel. FUEL LEVEL STATES GAL/LITERS The Fuel Level parameter displays the current fuel level in whole gallons or liters. GM Body Systems Application 1988-2004 Page 205 Parameters Listed Alphabetically B. Data List Parameters PARAMETERS (G-H) Parameters beginning with the letters G-H. GAUGE DIMMING PWM UNITS % RANGE 0 - 100 The tester displays the CCM’s commanded pulse width to the IPC for Instrument panel illumination. A pulse width close to 100% indicates maximum intensity. GREEN LED DIM UNITS % RANGE 0 - 100 The tester displays the CCM’s commanded pulse width to the Green LED's used in the HVAC control head and other areas of the instrument panel. Due to the low intensity light emitted from LED's, the pulse width is normally near 100%. HATCH STATES CLOSED/OPEN The CCM uses a discrete input switch to determine the position of the rear hatch. OPEN means that the hatch switch indicates the hatch is open. HEAD LAMP SWITCH (BCM) HEAD LAMPS (CCM) STATES OFF/ON This is the Head Lamp request from the Head Lamp Switch to the BCM/CCM. HEADLAMP PWR RLY STATES ON/OFF The headlamp power relay output refers to the commanded state of the headlamp power relay coil. • ON displays when the BCM commands the headlamp power relay coil to turn ON. • OFF displays when the BCM does not command the headlamp power relay coil to turn ON. The BCM then does not allow current to the headlamp power relay coil. The headlamps remain OFF. HEADLMP RELAY FDBK STATES ON/OFF The BCM uses the headlamp relay feedback input in order to determine if the headlamps are ON or OFF by determining if current is present on the headlamp circuit. The BCM monitors CKT 352 in order to determine if the headlamp power relay energizes. • ON displays when the BCM receives a voltage input on the circuit between the headlamp switch and the headlamp power relay coil. The voltage input indicates that the headlamps are ON. • OFF displays when the BCM does not receive a voltage signal on the circuit between the headlamp switch and the headlamp power relay coil. The lack of voltage indicates that the headlamps are OFF. GM Body Systems Application 1988-2004 Page 206 Parameters Listed Alphabetically B. Data List Parameters HEADLAMP REQ SW STATES ACTIVE/ INACTIVE The BCM uses the headlamp request switch input in order to determine the position of the headlamp switch. • ACTIVE displays when the headlamp switch is in the HEADLAMP position. • INACTIVE displays when the headlamp switch is not in the HEADLAMP position. HEATED WINDSHLD STATES ON/OFF This is a discrete input to the BCM from the Heated Windshield module which indicates when the Heated Windshield option is on. HEATED WS REQ. STATES YES/NO Heated Windshield Request is a pulsed output from the BCM to the Heated Windshield module. This is a momentary contact switch only. Use tester snapshot to test switch operation. HIGH BEAM INPUT STATES YES/NO Tester displays YES when the BCM’s beam change input is pulled to ground. HIGH BEAM INPUT UNITS VOLTS RANGE 0.0 - 18.0 The module uses this input in order to determine the state of the high beam headlamps. The High Beam Input voltage will vary depending on the state of the headlamps. Refer to the following table. Headlamps State High Beam Input Voltage DRL Beams ON 5.9-7.0 volts Low Beams ON 11.5-14.0 volts High Beams ON 1.2 volts HIGH BEAM RELAY STATES OFF/ON This is a BCM controlled relay. The BCM turns this relay ON to switch from Low Beams to High Beams. GM Body Systems Application 1988-2004 Page 207 Parameters Listed Alphabetically HIGH BEAM SWITCH B. Data List Parameters STATES ON/OFF The BCM uses the high beam switch input in order to determine if the high beam headlamps are ON by measuring the voltage on CKT 524 between the following components: • Both of the high beam headlamps • The high/low beam selector switch • The flash to pass switch HIGH FAN REQUEST STATES NO/YES This is a request from the BCM to the ECM for the High Fan to activate. HORN RELAY STATES ACTIVE/INACTIVE ON/OFF The horn relay input information refers to the horn operation. ACTIVE/ON displays when the following conditions exist: • The BCM senses that the horn relay coil circuit is grounded. • The horns receive a command to sound. INACTIVE/OFF displays when the following conditions exist: • The BCM does not sense that the horn relay coil circuit is grounded. • The horns do not receive a command to sound. HORN RELAY-FDBK STATES OFF/ON The CCM monitors the horn relay's control circuit. A low voltage on this circuit indicates the relay is ON. A high voltage state on the relay control circuit indicates the relay is OFF. HVAC FAN IS AUTO STATES NO/YES This is a message sent to the CRTC from the BCM when the HVAC Fan speed is set to AUTO. HVAC MODE CONTROL STATES BCM/ECCP This parameter shows whether the BCM or the Electronic Climate Control Panel (ECCP) system is controlling the HVAC system. GM Body Systems Application 1988-2004 Page 208 Parameters Listed Alphabetically B. Data List Parameters HVAC MODE DESCRIPTORS These descriptors indicate the commanded state of the HVAC. The BCM ECU commands the state of the HVAC delivery mode to the remote HVAC program module. A/C BILEVEL HEAT FORCE DEF RECRCULAT A/C RECIRC BLOWER DLY FT DEFOG SNOW INGST A/C PURGE COLD PURGE HEATER UP FORCED AUTO KEY DEFOG LOW FORCE UPPER BILEVEL DEFROST LOWER VENT BILEVEL A/C FIX HEATER MEDIUM BILEVEL DEF FIX BILVL PURGE NRM BILEVEL FRC FIX DFRST PURGE DEF HVAC MOMENTARY SWITCHES STATES OFF/ON The tester displays ON when these keys are pressed and OFF when the keys are released. AUTO KEY FAN UP KEY COOLER KEY FAN DOWN KEY DEFOG KEY OFF KEY ECON KEY REAR DEFOG KEY FRONT DEFORST KEY WARMER KEY HVAC PROGRAM NO. UNITS NONE RANGE 0 to 255 This is an internal BCM calculation used to control the HVAC system. A number close to 0 is maximum air conditioning while a number close to 255 is maximum heat. HVAC SET TEMP SET/EXT. TEMP UNITS DEGREES F DEGREES C RANGE 0 to +210 -18 to +99 This is the temperature that the driver has commanded on the electronic climate control panel. GM Body Systems Application 1988-2004 Page 209 Parameters Listed Alphabetically B. Data List Parameters PARAMETERS (I-J) Parameters beginning with the letters I and J. IGN 1 PRESENT STATES YES/NO Ignition 1 is a discrete input from the ignition switch to the CCM. The tester states whether this input is present at the CCM. IGN POWER MODE STATES OFF/ RUN/ CRANK/ UNKNOWN • OFF is displayed when the ignition switch is in the OFF or the ACCESSORY positions. • RUN is displayed when the switch is in the RUN position. • CRANK is displayed when the ignition switch is in the CRANK position. • UNKNOWN is displayed when the BCM is unable to determine the position of the ignition switch (i.e. between the OFF and the RUN position). IGN. 1 VOLTS UNITS VOLTS RANGE 0.0 to 16.3 The tester displays the actual voltage measured by the CCM at the Ignition 1 input. IGN 3 PRESENT STATES YES/NO Ignition 3 is a discrete input from the ignition switch to the CCM. The tester states whether this input is present at the CCM. IGNITION STATES ON/OFF The Ignition parameter displays ON if the ignition key is on, or OFF if the ignition is off, as seen by the RAC module. IGNITION UNITS VOLTS RANGE 0-25.5 The Ignition parameter displays the system voltage measured by the SDM at its ignition feed. IGNITION TYPICAL DATA VALUE = 12 VOLTS UNITS VOLTS RANGE 0 to 12 The ignition represents the system voltage that is measured by the SDM between terminal 5 and terminal 7. IGNITION 1 UNITS VOLTS RANGE 0.0 to 16.3 Ignition 1 is the voltage present at the switched ignition circuit number 1 to the BCM. GM Body Systems Application 1988-2004 Page 210 Parameters Listed Alphabetically B. Data List Parameters IGNITION 1 STATES ACTIVE/ INACTIVE • ACTIVE is displayed when the ignition switch is in the RUN or CRANK position. • INACTIVE is displayed when the ignition switch is not in the RUN or CRANK position. IGNITION 3 STATES ACTIVE/ INACTIVE • ACTIVE is displayed when the ignition switch is in the RUN position. • INACTIVE is displayed when the ignition switch is not in the RUN position. IGNITION CYCLES LAMP OFF UNITS CYCLES RANGE 0 to 125 UNITS CYCLES RANGE 0 to 125 UNITS VOLTS RANGE 0 to 20 Number of ignition cycles with the warning lamp OFF. IGNITION CYCLES LAMP ON Number of ignition cycles with the warning lamp ON. IGNITION VOLTAGE The Scan tool displays 0-20 volts. This ignition represents the system voltage measured by the SDM in its ignition fee. IN CAR TEMP UNITS DEGREES C DEGREES F RANGE -18 to +99 0 to +210 This sensor is located in the instrument panel for monitoring the inside temperature for the automatic temperature control system. INADVERT PWR RLY STATES ON/OFF The inadvertent power relay output refers to the commanded state of the inadvertent power relay coil. ON displays when the BCM commands the inadvertent power relay coil to energize. The command allows the relay to power up the following components: • The courtesy lamp relay • The vanity lamps • The overhead reading lamps • The underhood lamps • The glove box lamp OFF displays when the BCM does not command the inadvertent power relay coil to turn ON. The inadvertent power relay coil then does not allow current to the following components: GM Body Systems Application 1988-2004 Page 211 Parameters Listed Alphabetically • The courtesy lamp relay • The vanity lamps • The overhead reading lamps • The underhood lamp • The glove box lamp B. Data List Parameters INADVERTENT PWR TMR UNITS SECONDS RANGE 0 - 1216 The module uses this timer to protect the battery against inadvertent battery rundown caused by devices that are attach to the courtesy lamp circuit. If the following lights remain ON, the BCM will turn the lights OFF after 20 minutes: • The dome/courtesy lamp • The vanity lamp • The overhead reading lamp • The underhood or the glove box lamp The lights are turned OFF by the Inadvertent power relay. The number of seconds displayed refers to the amount of time left before the BCM will turn the relay OFF. INCANDESCENT DIMMING UNITS % RANGE 0 TO 100 The tester displays the percentage of full intensity of the incandescent light used in the instrument panel. STATES INCANDESCENT PWM UNITS % RANGE 0 to 100 This is a BCM lighting level command to the IPC from the dimming pot and twilight photo cell. A high percent indicates a bright command and a low percent indicates a dim command. The instrument panel lamps are controlled by the BCM with a Pulse Width Modulated voltage signal. INSIDE AIR (º) UNITS DEGREES C DEGREES F RANGE -40 to +102 (1998-2001 S/T Truck) -40 to +60 (2000-2002 C/K Truck) -40 to +215 (1998-2001 S/T Truck) -40 to +140 (2000-2002 C/K Truck) Output value of the inside air temperature sensor inside the vehicle cab. INSIDE TMP SENS UNITS VOLTS RANGE 0 to 5 Value of the inside air temperature sensor signal. GM Body Systems Application 1988-2004 Page 212 Parameters Listed Alphabetically B. Data List Parameters INT. LIGHT LEVEL UNITS % RANGE 0 to 100 The tester displays the percentage of full intensity of the interior lights in the instrument cluster. The level only changes when the headlights or parking lights are on. INTER LAMP REQ STATES ACTIVE/ INACTIVE The interior lamp request information refers to the interior lamp request circuit. ACTIVE displays momentarily when the driver turns the interior lamp ON and the inadvertent power relay is ON. INACTIVE displays when the inadvertent power relay is ON. INTER LIGHT MODE STATES NONE/ INTERIOR/ ILLUM ENTRY/ EXIT LIGHTING/ REMOTE ILLUM The interior lighting mode output displays the name of the feature that is commanding the interior lights to turn ON. NONE displays when the interior lights are not commanded to turn ON. INTERIOR displays when the dome lamp switch commands the interior lights to turn ON. ILLUM, ENTRY, EXIT LIGHTING, REMOTE ILLUM. display when the respective mode commands the interior lighting to turn ON. INTERIOR LAMP STATES OFF/ON This is the RAC module's command to the interior lamp control relay during illuminated entry operation. Viewing the RAC data is not possible when the ignition switch is off. IPC PROM I.D. RANGE 0 to 65535 The IPC PROM I.D. is displayed as a number, and is used with service publications to verify that the correct PROM is installed in the vehicle. JULIAN DATE OF BUILD The scan tool displays a 3 digit number. An example would be 723. 723 is July 23 which is day 204 based on the Julian Calendar. GM Body Systems Application 1988-2004 Page 213 Parameters Listed Alphabetically B. Data List Parameters PARAMETERS (K-L) Parameters beginning with the letters K-L. KEY CYLINDER REQUEST STATES YES/NO This is an input to the RAC to unlock the power locks from either front door key cylinder. This is used on Level 3 RACs to alert the RAC module to disarm the theft deterrent system. When the key is in the lock and turned, the tester reads YES and the theft deterrent is disarmed. KEY IN IGNITION STATES YES/NO The key in ignition information refers to the position of the ignition key in the ignition switch. • YES displays when you completely insert the ignition key in the ignition switch cylinder. • NO displays when you do not completely insert the ignition ley into the ignition switch cylinder. LAMP DRIVER STATES INTERNAL/EXTERNAL The warning lamp control method for a hard wire lamp is internal. The warning lamp control method for a serial data controlled lamp is external. LAMP DRIVER FEEDBACK STATES ACTIVE/INACTIVE The warning lamp state detected by the SDM. LAST RFA CMD STATES NONE/ LOCK/ UNLOCK/ PANIC/ MANUAL RESYNC/ FOB PROGRAM/ DIAG ACKNOWLEDGE/ DIAG REQUEST The Last RFA Cmd. Since Wake-Up information refers to the last RFA commanded message from the BCM, since the BCM has achieved a wake-up status. NONE is displayed when the BCM has awakened from the asleep statue without commanding a RFA module request. Messages result from a button press from a programmed RFA transmitter (key fob). LED DIMMING STATES NO/YES LED Dimming is a message that is sent to the ECCP by the BCM to control the ECCP dimming. NO = Not Dimming YES = Dimming GM Body Systems Application 1988-2004 Page 214 Parameters Listed Alphabetically B. Data List Parameters LEFT TURN SIGNAL STATES ON/OFF The BCM uses the left turn signal input in order to determine the state of the left turn signal. • ON displays when the left turn signal switch engages. This commands the left turn signal lamps to illuminate. • OFF displays when the left turn signal switch does not engage or the turn signal lamps do not illuminate. The BCM monitors the vehicle speed input for activation of the turn signal reminder chime feature. The scan tool display alternates between ON and OFF as the turn signal flashes. LH MIX MTR FDBK UNITS COUNTS RANGE 0 to 255 UNITS COUNTS RANGE 0 to 255 UNITS OHMS RANGE 0 to 6.6 The position of the left hand air temperature motor (actuator). LH MIX MTR RQST The desired position of the left hand air temperature motor (actuator). LH PRETENS. RESIST. TYPICAL DATA VALUE = 2.4 OHMS The SDM performs the resistance measurement test once each ignition cycle and verified the ignition 1 and 23 VLR voltages are within the normal ranges. Then the SDM sources a constant current to he driver seat belt pretensioner deployment loop. The SDM then measures the voltage drop across the deployment loop and converts the measured voltage value to a driver seat belt pretensioner deployment loop resistance value.UNITS RANGE LH PRETENS. SENSLO TYPICAL DATA VALUE = 3.1 VOLTS UNITS VOLTS RANGE 0 to 20 The SDM measures the voltage at the driver seat belt pretensioner low terminal 9 and displays this value as LH Pretens. Senslo.E LH PRETENSIONER VDIF TYPICAL DATA VALUE = 4 - 10 MV UNITS MILLIVOLTS RANGE 0 to 500 The SDM measures the voltage difference between driver belt high and driver belt low and displays this voltage difference as LH Pretensioner VDIF. LH SIDE AIR BAG RESIST. TYPICAL DATA VALUE = 2.4 OHMS UNITS OHMS RANGE 1 to 6.6 The SDM performs the resistance measurement test once each ignition cycle and verifies that Ignition 1 and Ignition 23 VLR voltages are within the normal ranges. Then the SDM sources a constant current to the LH GM Body Systems Application 1988-2004 Page 215 Parameters Listed Alphabetically B. Data List Parameters side air bag deployment loop and converts the measured voltage value to a LH side air bag deployment loop resistance value.UNITS RANGE LH SIDE AIR BAG SENSELO TYPICAL DATA VALUE = 3.1 VOLTS UNITS VOLTS RANGE 0 to 20 The SDM performs the resistance measurement test once each ignition cycle and verifies the ignition 1 and 23 VLR voltages are within the normal ranges. Then the SDM sources a constant current to the LH side air bag deployment loop. The DSM then measures the voltage drop across the deployment loop and converts the measured voltage value to a LH side air bag deployment loop resistance value. LH SIR AIR BAG SENSELO TYPICAL DATA VALUE = 3.1 VOLTS UNITS VOLTS RANGE 0-20 The SDM measures the voltage at the LH side air bag low terminal 10 and displays this value as LH Side Air bag Senselo. LH SIDE AIR BAG VDIF UNITS TYPICAL DATA VALUE = 4 - 10 MV. UNITS MILLIVOLTS RANGE 0 to 500 The SDM measures the voltage difference between driver side high and driver side low and displays this voltage difference as LH side Air Bag VDIF. LIFT GLASS RELAY STATES ON/OFF The lift glass relay output refers to the commanded state of the lift glass relay coil. • ON displays when the BCM commands the lift glass relay coil to turn ON. • ON momentarily displays when you press the RFA transmitter lift glass release button twice within 3 seconds or you press the lift glass button. • OFF displays when you do not press the RFA transmitter lift glass release button twice within 3 seconds or you do not press the lift glass button. LIFT GLASS SW STATES ON/OFF The lift glass switch information refers to the position of the dash mounted lift glass switch. • ON is displayed when the lift glass switch button is pressed in. • OFF is displayed when the lift glass switch button is not pressed in. LIGHTING CALIB RANGE 16XXXXXX This number refers to the lighting configuration calibration part number in the module. GM Body Systems Application 1988-2004 Page 216 Parameters Listed Alphabetically B. Data List Parameters LIGHTING SUFFIX RANGE AA-ZZ This is the version of the lighting calibration number in the module. LOCK REQUEST STATES YES/NO If the RAC module has seen a request to lock the doors (YES), the remote transmitter's lock button requests the RAC module to lock the doors. On Level 3 RAC systems the door lock request can also be seen by the RAC module from the power lock switches located on the front doors of the vehicle. LOW BEAM RELAY STATES ON/OFF The headlamp power relay output refers to the commanded state of the headlamp power relay coil. • ON displays when the BCM commands the headlamp power relay coil to turn ON. • OFF displays when the BCM does not command the headlamp power relay coil to turn ON. The BCM then does not allow current to the headlamp power relay coil. The headlamps remain OFF. LOW FAN REQUEST STATES NO/YES The BCM may request engine coolant fan operation when the A/C system is operating. LOW FREON PSSR STATES YES/NO This is a discrete input to the BCM for low refrigerant warning. The tester displays YES if the refrigerant is low. LOW WASHER INPUT STATES OFF/ON The tester displays ON when the windshield washer fluid level is low and OFF when the level is OK. LOWER OUTLET (º) UNITS DEGREES C DEGREES F RANGE -40 to +102 (1998-2001 S/T Truck, 2000-2002 C/K Truck) -40 to +215 (1998-2001 S/T Truck, 2000-2002 C/K Truck) Output value of the lower/heater outlet temperature sensor. GM Body Systems Application 1988-2004 Page 217 Parameters Listed Alphabetically LOWER OUTLET (º) B. Data List Parameters UNITS DEGREES C DEGREES F RANGE -40 to +80 -40 to + 176 Temperature of the lower/heater outlet. LT TURN SIGNAL RT TURN SIGNAL STATES OFF/ON These parameters change state anytime the IPC receives a signal from the Turn/Hazard switch. GM Body Systems Application 1988-2004 Page 218 Parameters Listed Alphabetically B. Data List Parameters PARAMETERS (M-O) Parameters beginning with the letters M-O. MIX DOOR ACTUAL UNITS % RANGE 0 to 100 Displayed as a percent, Mix Door Position should follow the commanded mix door position except when the door reaches the mechanical limit of its travel. NOTE For 1990-96 Cadillac E and K-Cars, when in Data List or Snapshot mode, the Mix Door does not move. This does not indicate a problem with the vehicle or the tester. MIX DOOR COMMAND UNITS % RANGE 0 to 100 The Mix Door command is displayed as a percent. A value close to 0% represents a cold air mix, while a value close to 100% represents a warm air mix. MIX DOOR DIRECTN STATES FORWARD/REVERSE The tester displays the direction that the Air Mix Door was last moved. When the door is moved FORWARD, more warm air enters the vehicle. When the door is moved in the REVERSE direction, more cool air enters. MIX DOOR DRIVE STATES OFF/ON The Mix Door Drive moves the Air Mix Door to the desired position. The tester displays ON when the drive is attempting to move the Air Mix Door. MIX DOOR MAX UNITS COUNTS RANGE 0 to 255 UNITS COUNTS RANGE 0 to 255 UNITS COUNTS RANGE 0 to 255 The value of the maximum position following a calibration procedure. MIX DOOR MIN The value of the minimum position following a calibration procedure. MIX DR MIN POS. The value of the Mix Door. GM Body Systems Application 1988-2004 Page 219 Parameters Listed Alphabetically B. Data List Parameters MIX MOTOR STATES NORMAL/INITIALIZING When left and right hand air temperature motors (actuators) are working correctly, the state should be normal. MODE DOOR ACTUAL UNITS COUNTS RANGE 0 to 255 The position of the mode door as indicated by the sensor. Higher values indicate the door is towards its maximum limit; lower values indicate the door is near its minimum limit. MODE DOOR CMND UNITS COUNTS RANGE 0 to 255 The desired position of the mode door. Higher values indicate the door is towards its maximum limit; lower values indicate the door is near its minimum limit. MODE DOOR MAX UNITS COUNTS RANGE 0 to 255 UNITS COUNTS RANGE 0 to 255 Maximum travel range of the Mode Door when recalibrated. MODE DOOR MIN Minimum travel range of the Mode Door when recalibrated. MODE DOWN BUTTON STATES OFF/ON State of the Mode Down button. ON is pressed. OFF is released. MODE UP BUTTON STATES OFF/ON State of the Mode Up button. ON is pressed. OFF is released. MODULE P/N RANGE 16XXXXXX This is the part number assigned to the BCM currently being diagnosed. OAT (º) UNITS DEGREES C DEGREES F RANGE -40 to +102 (1998-2001 S/T Truck) -40 to +60 (2000-2002 C/K Truck) -40 to +215 (1998-2001 S/T Truck) -40 to +140 (2000-2002 C/K Truck) Outside Air Temperature - ambient air temperature value reported by the outside air temperature sensor. GM Body Systems Application 1988-2004 Page 220 Parameters Listed Alphabetically B. Data List Parameters OFF BUTTON STATES OFF/ON State of the OFF button. ON is pressed. OFF is released. OIL LEVEL STATES OK/LOW The engine oil level switch is located in the engine oil pan. The switch signals the oil level is OK or LOW. OIL MONITOR UNITS MILLIONS RANGE 0 to 25.5 The tester displays the number of engine revolutions since the oil monitor was last reset in the CCM. OIL PRESSURE UNITS PSI RANGE 0 to 215 Oil pressure is displayed in PSI only, as indicated by the BCM's engine oil pressure sender. OIL RESET SWITCH STATES OPEN/CLOSED The Oil Reset Switch is a mechanical switch on the EOLM box. It is used to reset the Oil Light telltale switch to the maximum value after the oil has been changed. OPEN indicates the switch is not being reset and CLOSED indicates the switch is being reset. OIL REVS LEFT UNITS HEXADECIMAL RANGE $0B90 or $39D0 The Oil Revs Left parameter is only displayed as a hexadecimal value (not mileage). It should only be used as a check for the number of engine revolutions left on the engine oil as calculated by the EOLM based on factors such as engine speed and coolant temp. The hexadecimal value of $0B90 indicates there is approximately 20% engine oil-life remaining. A value of $39D0 means there is approximately 100% of the engine oil-life remaining. OUTPUTS STATES OFF/ON The following are outputs from the IPC that turn on a Tell Tale light when a fault is detected in the system. • ALT T/T OUTPUT • COOLNT TMP OUTPT • OIL T/T OUTPUT OUTSIDE AIR LED STATES OFF/ON State of the LED in the Outside Air button. GM Body Systems Application 1988-2004 Page 221 Parameters Listed Alphabetically OUTSIDE TMP SNS B. Data List Parameters UNITS VOLTS RANGE 0 to 5 Value of the outside air temperature signal. GM Body Systems Application 1988-2004 Page 222 Parameters Listed Alphabetically B. Data List Parameters PARAMETERS (P) Parameters beginning with the letter P. PARK BRAKE SW STATES SET/ RELEASED The park brake switch information refers to the position of the park brake pedal. • SET displays when you depress the parking brake (switch closed). • RELEASED displays when you do not depress the Parking Brake switch (switch opened). PARK ENGAGED STATES YES/NO Notifies RAC module when the vehicle transmission is in the Park position. The tester displays YES if the transmission is in Park. NO is displayed if the transmission is in any gear other than Park. PARK LAMP INPUT STATES OFF/ON When the park lamps are on, the tester displays ON PARK LAMP RELAY STATES ON/OFF The park lamp relay output refers to the commanded state of the park lamp relay coil. • ON displays when the BCM commands the park lamp relay coil to turn ON. This allows the relay to power up the park lamps. • OFF displays when the BCM does not command the park lamp relay coil to turn ON. This denies current to the park lamps and causes the park lamps to be OFF. PARK LAMP SWITCH STATES OFF/ON This is the Park Lamp request to the BCM from the Park Lamp Switch. PARK LAMPS STATES ON/OFF The BCM monitors the voltage on the park lamp CKT 2409 in order to determine if the park lamps are ON. The scan tool displays ON when the BCM or the headlamp switch turns the park lamps ON. OFF displays when the neither the park lamp switch nor the BCM commands the park lamps to turn ON. PARK NEUTRAL SW. STATES P-N/ -R-DL The Park/Neutral switch is a transmission input. The display reads P-N if the car is in Park or Neutral and R-DL if it is in Reverse, Drive, or Low gear. GM Body Systems Application 1988-2004 Page 223 Parameters Listed Alphabetically B. Data List Parameters PARK SWITCH STATES OFF/ON The Park Switch parameter is an indication to the CCM that the transmission is in Park. PARKING BRAKE STATES OFF/ON The parking brake switch input is used by the BCM to control the red brake warning lamp. The tester displays ON when the parking brake is applied. PARKING LIGHTS STATES OFF/ON This parameter displays the status of the Parklamp/Headlamp input to the CCM. PAS DR UNLCK RLY STATES ON/OFF The passenger door unlock relay output refers to the command state of the passenger door unlock relay coil. • ON displays when the BCM commands the passenger door unlock relay coil to turn ON. • ON displays momentarily when you press the RFA transmitter unlock button twice within 3 seconds. • OFF displays when you do not press the RFA transmitter unlock button twice within 3 seconds or if you use the passenger power door unlock button. PAS DR UNLOCK INP STATES ACTIVE/ INACTIVE The passenger door unlock input information refers to the operation of the following items: • Passenger door(s) unlock function • Passenger door unlock relay ACTIVE displays whenever the passenger door unlock relay coil is energized. An energized coil allows current to flow to the lock/unlock motors. INACTIVE displays whenever the passenger door unlock relay is not energized. This condition prevents current from reaching the lock/unlock motors. PASS 36 ULR UNITS VOLTS RANGE 28.4 to 44.0 This parameter monitors the 36 volt reserve power signal from the DERM to each airbag deployment loop. The reserve power ensures that there is sufficient power to deploy the airbag if ignition power is low or lost on an accident. If the voltage falls below, or exceeds the normal operating range specified above, a fault is set. GM Body Systems Application 1988-2004 Page 224 Parameters Listed Alphabetically PASS FRONTAL RESIST UNITS TYPICAL DATA VALUE = 2.2 OHMS B. Data List Parameters UNITS OHMS RANGE 0 TO 6.6 The SDM performs the resistance measurement test once each ignition cycle and verifies the ignition 1 & 23 VLR voltages are within the normal ranges. Then the SDM sources a constant current to the passenger deployment loop. The SDM then measures the voltage across the deployment loop and converts the measured voltage value to a passenger deployment loop resistance value. PASS FRONTAL SENSELO TYPICAL DATA VALUE = 3.1 VOLTS UNITS VOLTS RANGE 0 to 20 The SDM measures the voltage difference between passenger frontal high and passenger low and displays this voltage difference as Passenger VDIF PASS KEY A/D UNITS NONE RANGE 0 to 255 The CCM reads the ignition key's PASS KEY CODE (VATS) to check against the key code stored in memory. The A/D counts are referenced in the vehicle service manual. Each key to the vehicle should be within the ranges specified. PASS KEY STATUS STATES OK/PROBLEM PASS KEY Status refers to the Vehicle Anti-Theft System. When the ECM recognizes the proper ignition key in the ignition, PASS KEY Status reads OK. If PASS KEY Status is not OK, the tester displays PROBLEM, and the ECM does not provide fuel to the engine. PASS KEY TELLTALE STATES OFF/ON This parameter indicates the status of the Pass Key Lamp on the instrument panel. PASS SENSELO UNITS VOLTS RANGE 0 to 20 The SDM measures the voltage of the passenger frontal low terminal voltage and displays it as Passenger Senselo. PASS TEMP DIAL UNITS DEGREES C DEGREES F RANGE 15 to 32 59 to 89 The desired discharge temperature selected by the passenger. PASS TMP DN BTTN STATES OFF/ON State of the Passenger Temp Down button. ON is pressed. OFF is released. GM Body Systems Application 1988-2004 Page 225 Parameters Listed Alphabetically B. Data List Parameters PASS TMP UP BTTN STATES OFF/ON State of the Passenger Temp Up button. ON is pressed. OFF is released. PASSENGER BAG ENERGY RESERVE UNITS VOLTS RANGE 22 to 24 Instrument Panel (IP) module loop reserve voltage. PASSENGER DOOR STATES OPEN/CLOSED This is the BCM’s passenger side door ajar switch. The tester displays OPEN when the door is ajar, or CLOSED when the door is fully closed. PASSENGER RESISTANCE UNITS OHMS RANGE 0.0 to 6.3 The Passenger Resistance parameter displays resistance as calculated by the DERM of the inflates module, SIR Cool Assembly harness wiring circuits and thermal contact.S PASSENGER SIDE IMPACT SENSOR ID The scan tool displays a 2 digit ID number. The ID signal sent to the SDM from the passenger SIS. PASSENGER SOURCE UNITS VOLTS RANGE 0.0 to 40.0 The Passenger Source parameter indicates voltage applied to the high side of the deployment loop. This voltage is measured by the DERM through the diagnostic resistor in the arming sensor. PASSENGER VDIF UNITS MV RANGE 4 to 8 Voltage difference between passenger frontal high and passenger frontal low terminals. PASSLOCK™ CODE STATES SHORT/TAMPER/VALID CODE # / OPEN The scan tool displays the validity of the Passlock code received by the BCM. The scan tool displays OPEN, SHORTED, TAMPER and a valid code as a numeric value (1-10). PASSLOCK™ DATA UNITS VOLTS RANGE 0.00 to 5.00 The scan tool displays the voltage code from the Passlock sensor to the Body Control Module (BCM). A valid Passlock sensor voltage of 5 volts will be displayed on the scan tool when the ignition cylinder is turned to the ON position. Once the ignition cylinder has been rotated to the crank position the Passlock voltage will drop from 5 to 0.86-4.28 volts depending on which of the 10 possible Passlock sensors the GM Body Systems Application 1988-2004 Page 226 Parameters Listed Alphabetically B. Data List Parameters vehicle is equipped with. The (BCM) then determines if the voltage received is a valid or invalid code. The scan tool will continue to display the Passlock voltage code (0.86-4.28 volts) received by the (BCM) when the ignition cylinder returns to the on/run position. PASSLOCK™ STATE STATES Ignition Off/Normal/Learn Passlck/ Tamper/Monitr Passlck/Fail Enable/ Seedkey Learn/Auto Lrn Pend/Auto Learn The scan tool displays the state of the Passlock system. PASSWRD LRN MODE STATES ACTIVE/ INACTIVE The scan tool displays the state of the VTD password learn mode. The scan tool displays INACTIVE when the Passlock™ system is not in a learn mode. PCM FAIL ENABLE STATES YES/NO The scan tool displays the state of the VCM/PCM fail enable mode. The scan tool displays YES when the Passlock™ system transitions from the Monitor Passlock™ Data state to the VCM/PCM Fail Enable state. PCM FUEL CONT STATES YES/NO The scan tool displays the state of the VCM/PCM fuel continue mode. The scan tool displays YES when the Passlock™ system verifies a valid password to the BCM. PCM LEARN TIMER STATES ACTIVE/ INACTIVE The scan tool displays the state of the VCM/PCM learn timer. The scan tool displays INACTIVE when the BCM is not in a learn mode. PRNDL SWITCHES A, B, C, P STATES HIGH/LOW Transmission switches A, B, C, and P display the status of the transmission. The tester displays HIGH when the switch circuit is OPEN, or LOW when the switch circuit is closed to ground. PROM ID The scan tool displays a 4-digit number. This number is the programmable read-only memory (PROM) ID. PROM ID. NO. RANGE 0 to 65535 PROM identification number of an ECU. GM Body Systems Application 1988-2004 Page 227 Parameters Listed Alphabetically PWR DOOR LOCK B. Data List Parameters STATES YES/NO The CCM uses the Power Door Lock input from the door switches to arm the universal theft deterrent system. The tester displays YES when this input goes high, as when the doors are locked.STATES PWR DOOR UNLOCK STATES YES/NO The CCM uses the Power Door Unlock input from the door switches for wake up input. The tester displays YES when this input goes high, as when the doors are unlocked. GM Body Systems Application 1988-2004 Page 228 Parameters Listed Alphabetically B. Data List Parameters PARAMETERS (Q-R) Parameters beginning with the letters Q-R. QDM FAULT STATES YES/NO A quad driver is an output power device used to control high current components. This parameter should read No. RAC PGM LINE STATES LEVEL II OR III Monitors the status of the RAC program line to pin G. The tester monitors the status of the RAC program circuit at pin G of the ALDL connector. The tester displays ON with an open circuit or high voltage. If this circuit is pulled to ground, tester displays OFF. RAC SYSTEM LEVEL There are three RAC system levels. The tester can test systems in levels 2 and 3. Level 1 RACs do not have Serial Data. LEVEL PRO OPTION RAC Level 1: C97 KP2 Illuminated Entry Retained Accessory Entry RAC level 2: AU4 AU0 SDL Automatic Door Locks Remote Lock Control Serial Data Link plus level 1 content RAC Level 3: AU6 Universal Theft Deterrent plus levels 1 and 2 content RAC VERSION # STATES PILOT/PROTOTYPE 1st/2nd/3rd/4th/5th/6th RAC Version number indicates the level of RAC control module software being used in the RAC system. First through sixth levels are production versions. RADIO LINK FAIL STATES OFF/ON The tester displays FAILED if the CRTC does not receive 3 messages in a row from the radio module over the E&C bus. The BCM does not set any codes or take any action just because this flag is set. RAP CALIB RANGE 16XXXXXX This the RAP (Retained Accessory Power) calibration part number used in the BCM. GM Body Systems Application 1988-2004 Page 229 Parameters Listed Alphabetically B. Data List Parameters RAP RELAY STATES OK/FAILED This parameter displays whether the Retained Accessory Power (RAP) relay is being commanded OFF or ON. The RAP is controlled by the RAC/CCM module and can only be tested with the ignition on. RAP RELAY STATES ON/ OFF The RAP relay output refers to the commanded state of the RAP relay coil. • ON displays when the BCM commands the RAP relay coil to energize. The command allows the relay to power up the following components: • The radio • The power windows • The overhead console • The sunroof with the ignition key removed or in the OFF position with all of the doors closed OFF displays when the BCM commands the RAP relay to turn OFF. RAP RELAY FDBK STATES ON/ OFF The RAP feedback information refers to the operation of the retained accessory power (RAP) circuit. • ON displays whenever the BCM turns ON the RAP relay. • OFF displays whenever the BCM turns OFF the RAP relay. RAP SUFFIX UNITS RANGE AA-ZZ This is the version of the RAP calibration number in the BCM. RAP TIMER UNITS Seconds RANGE 0 - 1198 The module uses this feature to control the devices that attach to the retained accessory power (RAP) circuit. This feature allows the operation of the radio, sunroof, power windows and overhead console for 20 minutes after the ignition key is turned to the OFF position and before any door is opened. The number of seconds displayed refers to the amount of time left before the BCM will turn OFF the RAP relay. RCVR CODE STATUS STATES PROGRAMMED/ NOT PROGRAMMED This parameter gives the status of the RAC module in regard to being programmed or not programmed for a remote transmitter. GM Body Systems Application 1988-2004 Page 230 Parameters Listed Alphabetically B. Data List Parameters REAR DEFOG RR DEFOG OUTPUT STATES OFF/ON The state of the LED/switch in the rear defog switch. REAR DEFOG CONTROL STATES BCM/ECCP The HVAC Programmer controls the Defogger relay based on signals from the BCM or ECCP. REAR DEFOG RELAY STATES OFF/ON The tester displays the CCM’s commanded state of the Rear Defog Relay. REAR DEFOG REQ. STATES YES/NO Rear Defog Request is a discrete input to the CCM to request electric defog. The switch makes only momentary contact to ground. Several depressions of the switch might be necessary to see its signal. Use tester Snapshot mode to capture this switch's input. REAR DEFOG STATE STATES OFF/ON The BCM and CRT send messages to each other noting whether the Rear Defog is on or off. The tester monitors and displays this information. REAR DEFOG TIMER UNITS SECONDS RANGE 0 to 1275 This parameter is a count-down timer for the electric defog system. The tester displays the amount of remaining defog time in seconds. REAR DEFROSTER STATES OFF/ON The HVAC Programmer controls the Defogger relay based on signals from the BCM or ECCP. REAR FOG LAMP SW STATES ON/ OFF The BCM uses the rear fog lamp switch (export only) input in determining the status of the rear fog lamp switch. • ON displays when you depress the rear fog lamp switch. • OFF displays when you are not depressing the rear fog lamp switch. GM Body Systems Application 1988-2004 Page 231 Parameters Listed Alphabetically REAR DOOR(S) B. Data List Parameters STATES CLOSED/OPEN The tester displays OPEN when one or both of the rear doors is open. REAR GATE/ DOOR STATES OPEN/CLOSED The rear gate/door information refers to the position of the rear gate/door and rear glass. • CLOSED is displayed when both the rear gate and the rear glass are completely closed. • OPEN is displayed when the rear gate or the rear glass is not completely closed. RECALL KEY STATES OFF/ON The recall key displays stored IPC messages. The tester displays ON when the key is pressed and OFF when the key is released. RECIRC. BUTTON STATES OFF/ON The state of the Recirculation button. ON is pressed. OFF is released. RECIRC LED STATES OFF/ON The state of the LED in the Recirculation button. REMINDER CALIB RANGE 16XXXXXX This number refers to the reminder warning calibration part number in the module. REMINDER SUFFIX RANGE AA - ZZ This is the version of the reminder calibration number in the module. REQ DIAG DISPLAY STATES DISABLED/ENABLED The Requested Diagnostic Display parameter indicates whether DERM terminal A8 is grounded thus causing the AIR BAG warning lamp to flash diagnostic trouble codes. GM Body Systems Application 1988-2004 Page 232 Parameters Listed Alphabetically B. Data List Parameters RFA MESS WAKE-UP STATES NONE/ PANIC/ ACTIVE UNLOCK Fob (#)/ ACTV LOCK/ PROG MODE CANCEL/ REAR/ PROG MODE REQ/ TRANSMITTER DIAG/ PROG SUCCESSFUL/ MODE ACK/ MANUAL RESYNC The RFA message since wake-up refers to the last message sent to the BCM from the RFA module. The RFA module sends a request to the BCM based on the RFA transmitter (key fob) button presses. The scan tool will display the last RFA Module request to the BCM since the BCM has been awake. • NONE is displayed when the BCM wakes from the asleep status without receiving a message from the RFA Module. Messages result from a button press from a programmed RFA key fob. • ACTIVE UNLOCK FOB (#) is displayed when the respective programmed RFA key fob is pressed to UNLOCK the vehicle. • ACTIVE LOCK is displayed when a lock button is pressed on any programmed RFA key fob. • REAR or PANIC is displayed when the respective button is pressed on any programmed RFA key fob. RH MIX MTR FDBK UNITS COUNTS RANGE 0 to 255 UNITS COUNTS RANGE 0 to 255 UNITS OHMS RANGE 0 to 6.6 The position of the right hand air temperature motor (actuator). RH MIX MTR RQST The desired position of the right hand air temperature motor (actuator). RH PRETENS RESIST. TYPICAL DATA VALUE = 2.4 OHMS The SDM perform the resistance measurement test once each ignition cycle and verifies the ignition 1 and 23 VLR voltages are within the normal ranges. Then the SDM sources a constant current to the passenger seat belt pretensioner deployment loop. The SDM then measures the voltage drop across the deployment loop and converts the measured voltage value to a passenger seat belt pretensioner deployment loop resistance value. RH PRETENS SENSELO TYPICAL DATA VALUE = 3.1 VOLTS UNITS VOLTS RANGE 0 to 20 The SDM measures the voltage at the passenger seat belt pretensioner low terminal 15 and displays the value as RH Pretens. Senselo.UNITS RANGE UNITS RANGE GM Body Systems Application 1988-2004 Page 233 Parameters Listed Alphabetically RH PRETENSIONER VDIF TYPICAL DATA VALUE = 4-10 MV B. Data List Parameters UNITS MILLIVOLTS RANGE 0 to 500 The SDM measures the voltage difference between passenger belt high and passenger belt low and displays this voltage difference as RH Pretensioner VDIF. RH SIDE AIR BAG RESIST TYPICAL DATA VALUE = 2.4 OHMS UNITS OHMS RANGE 0 to 6.6 The SDM performs the resistance measurement test once each ignition cycle and verifies the ignition 1 and 23 VLR voltages are within the normal ranges. Then the SDM sources a constant current to the RH side air bag deployment loop. The SDM then measures the voltage drop across the deployment loop and convert the measured voltage value to a RH side air bag deployment loop resistance value. RH SIDE AIR BAG SENSELO TYPICAL DATA VALUE = 3.1 VOLTS UNITS VOLTS RANGE 0 to 20 The SDM measures the voltage at the RH side air bag low terminal 14 and displays this values as RH side Air Bag Senselo. RH SIDE AIR BAG VDIF TYPICAL DATA VALUE = 4-10 MILLIVOLTS UNITS MILLIVOLTS RANGE 0 to 500 The SDM measures the voltage difference between passenger side high and passenger side low and displays this voltage difference as RH Side Air Bag VDIF. RIDE STATUS SWITCH STATES OFF/ON This parameter displays the Ride Status on the IPC. The tester displays ON when the key is pressed and OFF when the key is released. RIGHT TURN SIGNAL STATES ON/OFF The BCM uses the right turn signal input in order to determine the state of the right turn signal. • ON displays when the right turn signal switch engages. This commands the right turn signal lamps to illuminate. • OFF displays when the right turn signal switch does not engage or the turn signal lamps do not illuminate. The BCM monitors the vehicle speed input for activation of the turn signal reminder chime feature. The scan tool display alternates between ON and OFF as the turn signal flashes. GM Body Systems Application 1988-2004 Page 234 Parameters Listed Alphabetically RR DEFOG SW. B. Data List Parameters STATES OFF/ON The state of the LED in the rear defog switch. RR DEFROST BTTN STATES OFF/ON The state of the Rear Defrost button. ON is pressed. OFF is released. RR PASS DR/LIFT STATES ACTIVE / INACTIVE The rear passenger door/ lift glass jamb switch information refers to the position of the following components: • Right rear passenger door • Left rear passenger door (4-door utility vehicle) • The lift glass (2-door and 4-door utility vehicles) • ACTIVE is displayed when any of the rear passenger doors or the lift glass is not completely closed. • INACTIVE is displayed when both of the rear passenger doors and the lift glass are completely closed. GM Body Systems Application 1988-2004 Page 235 Parameters Listed Alphabetically B. Data List Parameters PARAMETERS (S) Parameters beginning with the letter S. SD TELLTALE STATES DISABLED/ENABLED Serial Data Lamp. SEASON ODOMETER UNITS MILES KILOMETERS RANGE 0 TO 999,999 0 to 1,609,999 This is the total accumulated mileage of the vehicle being tested. The BCMs EEPROM stores this information for display on the IPC. Pressing the & key toggles the display between miles and kilometers. NOTE Y-Car CCM only updates the odometer counter every 16 miles. SEATBELT BUCKLED STATES YES/ NO The seat belt buckled information refers to the position of the driver seat belt buckle. • YES displays when you buckle the driver seat belt buckle (switch opened). • NO displays when you do not buckle the driver seat belt buckle (switch closed). SECURITY CALIB RANGE 16XXXXXX This number refers to the security calibration part number in the module. SECURITY DISPLAY STATES OFF/ON The security display is a Level 3 RAC output. The tester reflects the RAC module's desired control of the lamp, ON or OFF. SECURITY LAMP STATE STATES OFF/ON/FLASHING The scan tool displays the state of the SECURITY lamp. The scan tool displays ON, OFF or FLASHING. SECURITY SUFFIX RANGE AA - ZZ This is the version of the Security Calibration number in the module. GM Body Systems Application 1988-2004 Page 236 Parameters Listed Alphabetically B. Data List Parameters SELECT SOL. 1 STATES OFF/ON The state of the heater/defrost vacuum select solenoid. SELECT SOL. 2 STATES OFF/ON The state of the A/C vacuum select solenoid. SELECT SOL. 3 STATES OFF/ON The state of the heater vacuum select solenoid. SELECT SOL. 4 STATES OFF/ON The state of the defrost vacuum select solenoid. SELECT SOL. 5 STATES OFF/ON The state of the air inlet select solenoid. SELECTED MODE STATES AUTO/UPPER OUTLET/BI-LEVEL/ FLOOR/DEFOG/DEFROST/OFF The current selection for operating mode. SENSOR FEED UNITS VOLTS RANGE 2 to 3 UNITS VOLTS RANGE 0 to 40 Discriminating sensor voltage. SENSOR LOW The DERM monitors the low (ground) side of the airbag deployment loop. This parameter should be within 41-61% of the 36 volt reserve power parameter SET/COAST SWITCH STATES OFF/ON When the Cruise Control is on and the Set/Coast Switch is pressed, the tester displays ON; otherwise it displays OFF. SOFTWARE P/N RANGE 16XXXXXX This information refers to the version of the software (software identification number) in the module. GM Body Systems Application 1988-2004 Page 237 Parameters Listed Alphabetically SOLAR SENSOR B. Data List Parameters UNITS COUNTS RANGE 0 to 255 The value for intensity of the sunlight shining onto the dash. As intensity increases, the sensor value decreases. As intensity decreases, the sensor value increases. SPEEDO DIM PWM UNITS % RANGE 0 to 100 The tester displays the CCM’s commanded pulse width to the IPC for speedometer illumination. A pulse width close to 100% indicates maximum intensity. SSW DESIGN RANGE AA - ZZ This is the version of the software part number in the module. START RELAY-FDBK STATES OFF/ON The CCM has a feedback line from the starter relay to indicate when the starter is OFF or ON. STARTER ENABLE STATES OFF/ON STORE SWITCH STATES OFF/ON This is a momentary switch that stores IPC messages while the IPC is blanked. The tester displays ON when the switch is pressed and OFF when the switch is released. SUN LOAD SENSOR UNITS VOLTS RANGE 0 to 5 UNITS DEGREES F DEGREES C RANGE -40 to +419 -40 to +215 Value of the sun load sensor signal. SUNLOAD TEMP The sunload sensor is located in the instrument panel. It is used by the BCM to determine the load that the sun is placing on the A/C system. SW. BATT. VOLTS UNITS VOLTS RANGE 0.0 to 25.5 Switched Battery Voltage is the vehicle's system voltage after it has been cleaned up by the CCM. The voltage is normally be less than the Ignition 1 input voltage. GM Body Systems Application 1988-2004 Page 238 Parameters Listed Alphabetically SYSTEM MONITOR B. Data List Parameters STATES OFF/ON When the System Monitor Switch on the instrument panel is pushed, the tester displays ON; otherwise, OFF is displayed. This is a momentary contact switch. Use tester Snapshot to test switch operation. GM Body Systems Application 1988-2004 Page 239 Parameters Listed Alphabetically B. Data List Parameters PARAMETERS (T) Parameters beginning with the letter T. TACH SWITCH STATES RELEASED/DEPRESSED When the Tach Switch on the instrument panel is pushed, the tester displays DEPRESSED; otherwise, RELEASED is displayed. This is a momentary contact switch. Use tester Snapshot to test switch operation. TAMPER SWITCH STATES OPEN/CLOSED A normally open switch that closes to ground when a key cylinder assembly is removed. This is a circuit of the universal theft deterrent system used on Level 3 RAC systems. TAMPER TIMER UNITS SECONDS RANGE 0 - 2040 The scan tool displays the time remaining when in the tamper mode. The timer starts when the ignition switch is turned to the RUN position and the BCM receives a Passlock™ data voltage different from the last learned voltage. The timer has a delay of 10 minutes and will stay active even if the ignition switch is cycled from the RUN to the OFF position. TAPE DECK STATUS STATES OK/FAILURE Available for 1988-89 Oldsmobile E-Cars with a CRTC, Tape Deck Status is displayed during Serial Data Link monitoring of the CRTC to BCM message. TELLTALE LAMPS STATES OFF/ON The telltale lamps on the Instrument Panel Cluster can be commanded OFF or ON by the Body Computer Module. The tester displays the BCM’s desired control of each of the following telltale lamps. ALTERNATOR T/T LOW OIL LEVEL BRAKE T/T LOW VOLTS T/T CHANGE OIL T/T LOW WASHER T/T CHECK GAGE METAL TEMP T/T CRUISE T/T OIL LEVEL T/T DOOR AJAR T/T OIL PRESS. T/T ELEC. FAULT T/T RESUME T/T HEADLAMPS ON T/T SEAT BELT T/T HIGH BEAM T/T SECURITY LAMP T/T LOW FUEL T/T SERVICE A/C T/T GM Body Systems Application 1988-2004 Page 240 Parameters Listed Alphabetically B. Data List Parameters TEMP DISPLAY STATES SET TEMP./EXT. TEMP. The tester indicates which temperature is currently being displayed. TEST SWITCH STATES RELEASED/DEPRESSED When the Test Switch on the instrument panel is pushed, the tester displays DEPRESSED; otherwise, RELEASED is displayed. THEFT DET. STATE STATES PASSIVE/ACTIVE DOORS ARMED/ ALARM/TIMEOUT Theft Detection State indicates the setting of the security system in a RAC. THEFT LAMP STATES OFF/ON/FLASHING The security lamp turns ON for 15 seconds and then turns OFF when you open a door by using the handle or the key fob. The security lamp also displays ON STEADY for 3 seconds and then turns OFF when the ignition switch turns from the OFF position to the RUN position. If the IPC is unable to communicate with the BCM, the security telltale displays ON steady and the Passlock™ system functions. The security telltale goes to FLASHING mode momentarily and then displays ON steady for approximately 10 minutes if the vehicle is in the lockout cycle. THEFT STATE STATES OFF/ IDLE/ DISARMED/READY TO ARM/ ARM INITIATED/ ARM DELAY/ ALARM/ ARMED • OFF displays when ignition 1 is ACTIVE and all of the doors, including the rear glass, are closed. • IDLE displays when ignition 1 is ACTIVE and any door or the rear glass is open. • DISARM displays when ignition 1 goes from ACTIVE to INACTIVE and all of the doors and rear glass are closed • READY displays when ignition 1 goes from ACTIVE to INACTIVE and any door or the rear glass are open • ARM INITIATE displays when ignition 1 is INACTIVE, any door is open and the doors are locked. • ARM DELAY displays when ignition 1 is INACTIVE and the vehicle is armed with the doors and rear glass closed. • ARMED displays when the vehicle is in the ARM DELAY state and all of the inputs are monitored in order to determine whether to alarm or disarm the system. In the ARM DELAY state, ignition 1 is INACTIVE, and all of the doors and the rear glass are closed. • ALARM displays when the vehicle is in the ARMED STATE and the system detects a violation on any of the inputs being monitored. GM Body Systems Application 1988-2004 Page 241 Parameters Listed Alphabetically TR CNTRL STAT SW B. Data List Parameters STATES OFF/ON The Transmission Status Switch displays the transmission control status. The tester displays ON when the key is pressed and OFF when the key is released. TRANSMISSION SELECTOR (PRNDL) POSITIONS These descriptors indicate the position of the gear shift selector. 1st 2nd 3rd 4th 5th 6th DRIVE DRIVE 1 DRIVE 2 DRIVE 3 DRIVE 4 NEAUTRAL OVERDRIVE PARK REVERSE TRIP/SEASON ODO. STATES OFF/ON When the Trip/Season Switch on the instrument panel is pushed, the tester displays ON; otherwise, OFF is displayed. TRIP ODO RESET TRIP RST. SW. STATES RELEASED/DEPRESSED OFF/ON When the TRIP ODO reset switch on the instrument panel is pushed, the tester displays DEPRESSED; otherwise, RELEASED is displayed. This is a momentary contact switch. Use tester Snapshot to test switch operation. When the Trip Reset Switch on the instrument panel is pushed, the tester displays ON; otherwise, OFF is displayed. TRIP ODO SELECT STATES RELEASED/DEPRESSED When the TRIP ODO select switch on the instrument panel is pushed, the tester displays DEPRESSED; otherwise, RELEASED is displayed. GM Body Systems Application 1988-2004 Page 242 Parameters Listed Alphabetically TRIP ODOMETER B. Data List Parameters UNITS MILES KILOMTERS RANGE 0 to 1999.9 0 to 3218 The BCM transmits the accumulated trip odometer mileage by the IPC. Pressing the ¶ key toggles the display between MPH and KPH. TRUNK AJAR STATES YES/NO When the trunk is open, a discrete input to the BCM is toggled and the tester displays YES. TRUNK OPEN INPUT STATES OFF/ON The tester displays ON when the trunk is open and OFF when the trunk is closed. TRUNK UNLOCK RELAY STATES OFF/ON This parameter indicates whether the Trunk Unlock Relay is being commanded OFF or ON, by the RAC module. NOTE The remote transmitter cannot be used to unlock the trunk with the ignition ON. TURN SIGNAL STATES YES/NO When either the left or right turn signal is ON, the tester displays YES. TWILIGHT DELAY UNITS % COUNTS RANGE 0 to 100 0 to 255 Twilight Display is an input from the IPC to the BCM and CCM through a variable resistor controlled by the driver. Twilight Delay is displayed in percent by the BCM or in Counts by the CCM. A value close to 0% or 0 counts represents a minimum delay time. A value close to 100% or 255 counts indicates a maximum delay time. TWILIGHT ENABLE STATES OFF/ON This is a discrete input to the IPC, BCM, or CCM depending on the vehicle being tested. The tester indicates if the Twilight Enable switch has been turned on or off. GM Body Systems Application 1988-2004 Page 243 Parameters Listed Alphabetically TWILIGHT PHOTO B. Data List Parameters UNITS % RANGE 0 TO 100 The Twilight Photo Cell is a light sensitive resistor mounted in the instrument panel. Twilight photo is used by the BCM to control the Twilight Sentinel function. A value close to 0% represents daylight while a value close to 100% represents darkness. TWILIGHT RELAY (RIVIERA ONLY) STATES OFF/ON The BCM controls several relays for the Twilight function. These are all controlled through one circuit. The tester indicates whether the relays are being commanded ON or OFF by the BCM. TWILIGHT SWITCH STATES OFF/ON The Twilight Switch is an input to the BCM and is controlled by the driver. The Twilight Switch reads ON when the twilight switch is set to on. GM Body Systems Application 1988-2004 Page 244 Parameters Listed Alphabetically B. Data List Parameters PARAMETERS (U-Y) Parameters beginning with the letters U-Y. UNLOCK REQUEST STATES YES/NO YES indicates that the RAC module has seen a request to unlock the doors. The remote transmitter's unlock button requests the RAC module to unlock the doors. On Level 3 RAC’s the door unlock request can be seen by the RAC module also from the power lock switches located on the front doors of the vehicle. UPPER OUTLET (º) UNITS DEGREES C DEGREES F RANGE -40 to +102 (1998-2001 S/T Truck) -40 to +60 (2000-2002 C/K Truck) -40 to +215 (1998-2001 S/T Truck) -40 to +140 (2000-2002 C/K Truck) Temperature of the air discharged from the upper outlet. VAC SOLENOID 1 VAC SOLENOID 2 VAC SOLENOID 3 VAC SOLENOID 4 VAC SOLENOID 5 STATES OFF/ON The state of the solenoid. If ON, the solenoid is energized. If OFF, the solenoid is not energized. VEHICLE SPEED UNITS MPH KPH RANGE 0 to 159 0 to 255 Vehicle speed information is a signal received directly from the vehicle speed generator to the IPC cluster. Pressing & toggles the display between MPH and KPH. VEHICLE SPEED UNITS KM/H MPH RANGE 0 - 205 0 - 127 The module uses the data for determining how fast the vehicle is traveling. This data is used during the operate of the automatic door lock and turn signal reminder features. VENT BUTTON STATES OFF/ON The state of the Vent button. ON is pressed. OFF is released. GM Body Systems Application 1988-2004 Page 245 Parameters Listed Alphabetically B. Data List Parameters VERY LOW FREON STATES NO/YES The tester monitors the message from the BCM to the ECM and displays YES if the A/C system has very low freon pressure. VF DIMMING UNITS % RANGE 0 TO 100 The Vacuum Florescent Dimming parameter is a BCM to IPC command. The green or blue instrument panel displays are controlled by the Dimming Pot and Twilight Photo Cell. The maximum percentage is approximately 12%. VIN INFORMATION The scan tool displays a list. The DIM (Dash Integration Module) is programmed at the assembly plant with the last four digits of the SDM number and the VIN of the vehicle. VTD FUEL DISABLE STATES OFF/ON The scan tool displays the state of the VTD fuel disable mode. The scan tool displays INACTIVE when the Passlock™ system verifies a valid password. VTD FUEL DISABLE UNTIL IGN OFF STATES YES/NO The scan tool displays the state of the VTD fuel disable until Ignition Off mode. The scan tool displays NO when the Passlock™ system verifies a valid password. WARNING LAMP CONTROL WARNING LAMP CYCLES STATES OFF/ON UNITS CYCLES RANGE 0 to 125 UNITS CYCLES RANGE 0 to 125 The ignition cycles of the current warning lamp state. WARNING LAMP CYCLES TYPICAL DATA VALUE = 0-125 CYCLES WARNING LAMP FBK STATES OFF/ON The Warning Lamp Feedback parameter, under normal operating conditions, should match the status of the 1st Lamp Driver and/or the 2nd Lamp Driver. It indicates to the DERM whether the state of the AIR BAG warning lamp matches the microprocessor commanded state. GM Body Systems Application 1988-2004 Page 246 Parameters Listed Alphabetically WARNING LAMP ON B. Data List Parameters UNITS HRS RANGE 0 to 182 Measures continuous warning lamp on time. WASHER FLUID LVL STATES OK/LOW The tester displays OK or LOW depending on the input from the switch located in the washer fluid reservoir. YEAR MODULE BUILT The scan tool displays what year the module was built. GM Body Systems Application 1988-2004 Page 247 E&C Bus Monitor Messages B. Data List Parameters E&C BUS MONITOR MESSAGES This section contains a list of all the E&C communication bus messages which the tester is able to decode in the E&C MONITOR mode and those messages which the tester can transmit in the E&C CONTROL mode. Also included is a brief description of each of the messages. The following table lists all of the E&C bus monitor messages which can be decoded by the scan tool. Some messages contain data which is displayed on line 4 of the tester (e.g., RPT FREQUENCY). For these messages, this table shows the format for the data display and describes the meaning of the data. Descriptor Message Description SET VOLUME VOL = vv vv = 0 (minimum volume) vv = 64 (maximum volume) RPT VOLUME Report current volume setting. VOL = vv (0-64) INC VOLUME Increase volume by 1 step. DEC VOLUME Decrease volume by 1 step. AUDIO MUTE Turn off amplifier’s audio output. AUDIO UNMUTE Turn on amplifier’s audio output. INC FREQUENCY Increment frequency to next channel. DEC FREQUENCY Decrement frequency to next channel. SET FREQUENCY Set receiver band and channel number. See format for RPT FREQUENCY. RPT FREQUENCY Report current receiver band and frequency of channel: FM xxx.x for U.S. FM -or- AM xxxx for U.S. AM -or- 9AM xxxx for EUROPE AN FM -or- EFM xxx.xx for ASIAN FM -or- WX CH x for WEATH ER -or SEEK UP Increase frequency until station is found. SEEK DOWN Decrease frequency until station is found. SCAN REQUEST Sent from the Steering Wheel Control Head to the Radio Control Head to initiate the Scan function. STOP SCAN Sent from the Steering Wheel Control Head to the Radio Control Head to terminate the Scan function. GO TO AM PRESET n Tune the radio receiver to the AM station defined by AM Preset n. GM Body Systems Application 1988-2004 Page 248 E&C Bus Monitor Messages B. Data List Parameters Descriptor Message Description GO TO FM PRESENT n Tune the radio receiver to the FM station defined by FM Preset n. GO TO LAST AM STATION Tune the radio receiver to the last AM station tuned. GO TO LAST FM STATION Tune the radio receiver to the last FM station tuned. INC PRESET Tune to the next preset station. DEC PRESET Tune to the previous preset station. FADE REAR Fade to the rear by 1 step. FADE FRONT Fade to the front by 1 step. BALANCE RIGHT Move balance to the right by 1 step. BALANCE LEFT Move balance the left by 1 step. SET FADE & BAL Set the fade & balance to a specified value: FLAG COMMAND F=f, BB=bb ff=Fade (63=full rear) bb=Balan ce (63=full right) Set state of radio power, stereo, loudness, and DNR to on or off. abcd (a, b, c & d = 0 or 1) a=0 Radio off a=1 Radio on b=0 Stereo disable b=1 Stereo enable c=0 Loudness off c=1 Loudness on d=0 DNR off d=1 DNR on INC EQUAL CH 1 Increase equalizer band 1 (bass) DEC EQUAL CH 1 Decrease equalizer band 1 (bass) INC EQUAL CH 2 Increase equalizer band 2 DEC EQUAL CH 2 Decrease equalizer band 2 INC EQUAL CH 3 Increase equalizer band 3 DEC EQUAL CH 3 Decrease equalizer band 3 INC EQUAL CH 4 Increase equalizer band 4 DEC EQUAL CH 4 Decrease equalizer band 4 INC EQUAL CH 5 Increase equalizer band 5 DEC EQUAL CH 5 Decrease equalizer band 5 RPT EQUAL 1,5 Report equalizer bands 1 (bass) and 5 (treble) GM Body Systems Application 1988-2004 Page 249 E&C Bus Monitor Messages Descriptor RPT EQUAL 2-4 B. Data List Parameters Message Description b1=bb, bb-base (0-15) b5=tt tt=treble (0-15) Report equalizer bands 2 through 4 xx,yy,zz REPORT TIME xx=Band 2 (0-15) yy=Band3 (0-15) zz=Band 4 (0=15) Report current time of day HH:MM INC TOD HOURS Increase time of day by 1 hour DEC TOD HOURS Decrease time of day by 1 hour INC TOD MINUTE Increase time of day by 1 minute DEC TOD MINUTE Decrease time of day by 1 minute INC SET TEMP Increase HVAC set temperature by 1 degree DEC SET TEMP Decrease HVAC set temperature by 1 degree INC FAN SPEED Increase HVAC fan speed by 1 step DEC FAN SPEED Decrease HVAC fan speed by 1 step SET HVAC MODE Set a specific HVAC mode (e.g. AUTO, DEFROST, BI-LEVEL, OFF). Note: Some HVAC Mode commands are toggle functions where one transmission turns the function on, and a second transmission (some message) turns it off. TOGGLE AM/FM If radio setting is on AM, change to FM. If radio setting is on FM, change to AM. RADIO ON/OF Turn radio on or off, depending on the last state of the radio. STOP/PLAY Causes radio to halt cassette or CD and return to radio. Press again to halt radio and resume cassette or CD. BAND SELECT Alternates radio selection between AM, FM1 and FM2 bands. GM Body Systems Application 1988-2004 Page 250 E&C Bus Control Messages B. Data List Parameters E&C BUS CONTROL MESSAGES The following table summarizes the E&C functions which the tester can control for the E&C components which can be controlled by the tester. The Steering Wheel Control Head is an input device and cannot be controlled by the tester. In general, there are two messages which can be transmitted for a function (e.g., increase volume and decrease volume). The u and d keys, as summarized in the table, control the transmission of the messages. For those functions where only one message can be transmitted, u causes the message to be transmitted, and the d key is ignored. E&C FUNCTION U D MESSAGE DESCRIPTION RADIO RECEIVER MESSAGES RADIO RECEIVER ON OFF Turn radio receiver on or off. VOLUME INC DEC Increase or decrease volume by 1 step. FRONT REAR Fade to the front or rear by 1 step. LEFT RIGHT Move balance to the left or right by 1 step. SEEK UP DOWN Increase or decrease frequency until station is found. FREQ. INC DEC SET AM 760 XMT FADE BALANCE Increment or decrement frequency to next channel. Set frequency to 760 KHz. Note: The radio must be set to the appropriate band (AM or FM) in order for the tester to control the frequency. SET AM 1620 XMT Set frequency to 1620 KHz. Note: The radio must be set to the appropriate band (AM or FM) in order for the tester to control the frequency. SET FM 99.5 XMT Set frequency to 99.5 MHz. Note: The radio must be set to the appropriate band (AM or FM) in order for the tester to control the frequency. SET FM 107.9 XMT Set frequency to 107.9 MHz. Note: The radio must be set to the appropriate band (AM or FM) in order for the tester to control the frequency. AM STEREO ON OF EQUAL. BAND 1 INC DEC Increase or decrease equalizer band 1 volume (bass). EQUAL. BAND 2 INC DEC Increase or decrease equalizer band 2 volume. EQUAL. BAND 3 INC DEC Increase or decrease equalizer band 3 volume. GM Body Systems Application 1988-2004 Enable or disable AM stereo. Page 251 E&C Bus Control Messages E&C FUNCTION B. Data List Parameters MESSAGE DESCRIPTION U D EQUAL. BAND 4 INC DEC Increase or decrease equalizer band 4volume. EQUAL. BAND 5 INC DEC Increase or decrease equalizer band 5 volume (treble). HOURS INC DEC Increment or decrement time of day (hours). MINUTES INC DEC Increment or decrement time of day (minutes). UNLOCK RADIO XMT Deactivate the vehicle anti-theft system. RADIO CONTROL HEAD MESSAGES The tester automatically outputs a sequence of messages to the Remote Control Head to exercise the head’s display functions. RADIO EQUALIZER CONTROL HEAD MESSAGES The tester automatically outputs a sequence of messages to the Remote Control Equalizer head to exercise all segments of the equalizer display. CASSETTE TAPE DECK MESSAGES AUDIO SOURCE TAPE RADIO Switch the amplifier’s input between the Cassette Deck and the Radio Receiver. PLAY FWD STOP Play cassette in direction 1. PLAY REV STOP Play cassette in direction 2. HIGH SPEED FWD STOP Fast forward the tape in direction 1. HIGH SPEED REV STOP Fast forward the tape in direction 2. PROGRAM SEEK FWD REV Go to the next selection on the tape in direction 1 or 2. EJECT XMT Eject the Cassette tape. COMPACT DISK PLAYER MESSAGES AUDIO TONE ON OFF AUDIO SOURCE DISK RADIO PLAY PLAY STOP #1 #5 SEEK SELECTION EJECT XMT Turn audio tone generator on or off. Switch the amplifier’s input between Cassette Deck and the Radio Receiver. Play or stop the compact disk. Go to the first or fifth selection on the disk. Eject the compact disk. HVAC CONTROL MESSAGES HVAC MODE INC GM Body Systems Application 1988-2004 DEC Sequence to the next or previous HVAC mode. Page 252 E&C Bus Control Messages E&C FUNCTION B. Data List Parameters MESSAGE DESCRIPTION U D AUTO LOWER DEFROST OFF Set the HVAC mode to the specified state. HVAC SET TEMP INC DEC Increase or decrease HVAC set temperature. FAN SPEED INC DEC Increase or decrease HVAC fan speed. HVAC MODE CELLULAR TELEPHONE MESSAGES SET 987-xxxx XMT Set first 3 digits to 987. SET XXX-654x XMT Set the middle digits to 654. SET xxx-xxx3 XMT Set the last digit of phone number to 3. GM Body Systems Application 1988-2004 Page 253 C. GLOSSARY AND ABBREVIATIONS This appendix contains terms and abbreviations found in the General Motors body, chassis, and powertrain manuals. 1-4 Skipshift AFECU Alternate Fuel Engine Control Unit 14L 1-4 Shift Light AIR Air Injection Reaction 1ST First Gear ALDL 2AR Secondary Air Injection Reaction Assembly line Diagnostic Link. In 1993 the name was changed to Data Link Connector. 2FP Secondary Fuel Pump ALS Ambient Light Sensor 2IJ Secondary Injector Module ALT Alternator 2ND Second Gear AMB Ambient 2PT Secondary Port Throttle 32S 3-2 Solenoid Analog Data Parameter 3RD Third Gear A parameter which represents a quantity and is displayed as a value with appropriate units (volts, C, %, etc.). 4TH Fourth Gear ANLG Analog 4WAL Four Wheel Anti-lock Brake System ARMD Armed ABS Anti-lock Brake System A/S AIR Solenoid A/C or AC Air Conditioning ASR Acceleration Slip Regulation; Automatic Stability Regulator ACL Low A/C Lamp ASW AIR Switch ACCEL Accelerometer or Acceleration ASY AIR System ACM Heater and A/C Programmer A/T Automatic Transmission ACO AIR Control ATC Automatic Transfer Case ACT Actual Analog to Digital AUTO, AUT Automatic A/D ADVICS Manufacturer of ABS systems B+ Battery Voltage GM Body Systems Application 1988-2004 Page 254 C. Glossary and Abbreviations BARO Barometric Pressure CHG Oil Change T/T BATT Battery CHK Check BCM Body Control Module CKT Circuit BFC Body Function Controller Class 2 BILVL Bilevel BKE Brake Enable Relay GM communication protocol that defines diagnostic data messages and test modes within a vehicle multiplexed network. BKL Brake Light CLCC Closed Loop Carburetor Control BLK Block CLF Closed Loop Fuel BLM Block Learn Multiplier, Block Learn Memory CLM Column CLSD Closed BLT Seatbelt T/T CMD Command Bosch ABS Bosch’s ABS-2U system contained in some GM vehicles. CMFI Central Multi-port Fuel Injection BPMW Brake Pressure Modulator Valve CMP Camshaft Position BPW Blower Pulse Width CNTRL Control BST Boost CNTRLR Controller BYP Bypass CNTS or CNTCS Contacts CAG Check Gauge T/T CNV Catalytic Converter CAL, CALIB Calibration Control Test A test where the tester controls some the vehicle’s functions CAN Controller Area Network COOL Coolant Capture Data Save information coming from the vehicle CPI Central Port Injection CAR Cold Advance Relay CRTC Cathode Ray Tube Controller CARB California Air Resource Board CRTM Cathode Ray Tube Monitor CAT Catalytic CSFI Central Sequential Fuel Injection CC, C/C Cruise Control CSV Courtesy Relay CCDCIC Climate Control and Diagnostic Information Center CTL, CNTL, CNTRL Control CCM Central Control Module CTS Courtesy CCP Climate Control Panel CURR Current CEL Check Engine Light CVRSS CELL Cellular, as in phone Constant Variable Road Sensing System. Used on 1997 and 1998 E and K body. CFI Cross Fire Injection CYCL Cycle CH1 Chime 1 DAB Delayed Accessory Bus Relay CH2 Chime 2 GM Body Systems Application 1988-2004 Page 255 C. Glossary and Abbreviations Data Line Refers to circuit 800, the on-board computer communications network. Discrete Signal An individual voltage or ground signal that is carried on its own wire. Data List Tester operating mode where DLC diagnostic information is displayed. DIV Division, Divert DLC Data Link Connector Data Signal A signal sent to or from a computer on a common wire with many other messages. DLY Delay DOHC Double Overhead Cam DR Door DRA Digital Ratio Adapter DRL Daytime Running Lamps DSIR Desired DTC Diagnostic Trouble Code DVM Digital Volt Meter E&C Entertainment and Comfort E&C Bus Entertainment and Comfort Bus. A communication link which interconnects components of the entertainment and comfort systems of the vehicle. E&C Component A component which performs an entertainment or comfort function and which is connected to the E&C Bus. EBCM Electronic Brake Control Module EBTCM Electronic Brake Traction Control Module Data Parameter A parameter which represents a quantity and is displayed as a value with appropriate units (volts, C, %, etc). DC Duty Cycle DCD Delco Chassis Division DCD ABS III Delco Chassis Division’s ABS III system DCD ABS VI Delco Chassis Division’s ABS VI system DEC Decrease or decrement DERM Diagnostic Energy Reserve Module (SIR System control module. Supplies current through the inflator modules, which will cause deployment of the air bags in the event of a frontal crash of sufficient force up to 30 degrees off the center line of the vehicle). DET Deterrent DETECTN Detection DF Defrost ECCP Electronic Climate Control Panel DFI Digital Fuel Injection ECM DFOG Defog Engine Control Module or Electronic Control Module DFRST or DF Defrost ECU Electronic Control Unit EEPROM Diagnostic Codes Trouble codes. Set by a system to indicate the occurrence of abnormal conditions. Electrically Erasable Programmable Read Only Memory. EFE Early Fuel Evaporation EFI Electronic Fuel Injection DIC Driver Information Center EG1 EGR Valve 1 DIL Delayed Interior Light relay (activates courtesy lights) EG2 EGR Valve 2 DIR Direction EG3 EGR Valve 3 Discrete Data Parameter A parameter which can be in one of only two possible states (HIGH/ LOW, ON/OFF, etc.) EGR Exhaust Gas Recirculation EGV EGR Vent Solenoid GM Body Systems Application 1988-2004 Page 256 C. Glossary and Abbreviations ELC Electronic Level Control ELEC Electric EMB Electromagnetic Brake ENAB Enable ENG Engine, English EOLM Engine Oil Life Monitor EPR Exhaust Pressure Regulator EPROM Erasable Programmable Read Only Memory Function Keys Keys on the tester which can be used to select a particular function: ), !, (, etc. These keys double as numeric keys: 0-9. FUP Fuel Pump Control FWD Front Wheel Drive FXS Fixed Spark GAG Gauges Dimming GEN Generator 1 Terminal GFD General FET Driver Equal Equalizer GLT Governor Light ESB Expansion Spring Brake GMP4 ESC Electronic Spark Control Microcomputer type used in High Speed ECMs EST Electronic Spark Timing GND Ground potential (low side of battery). ETS Electronic Traction Control System GOV Governor EVO Electronically Variable Orifice (an advanced GM steering system) GRD Ground EXH Exhaust G/S Grams per Second F12 Fan 1 and 2 GVWR Gross Vehicle Weight Ratio FDBK or FB Feedback HDL Head Lamps Relay FDC Fuel Data Center HFN High Fan FET Field Effect Transmitter H/L HI/LO Beams FIX Fixed HRN Horn Relay FLD Field HT Heat FLR Fog Lamps Relay HVAC Heating, Ventilation and Air Conditioning module. FN1 Fan 1 HYDRL Hydraulic FN2 Fan 2 IAC Idle Air Control FNCTN Function ICCS FOG Rear Defog Relay Integrated Chassis Controller (used on Cadillac E/K bodies) FPR Fuel Pressure Regulator I.D. or ID Identification FREQ Frequency I/F Interface FRT, FRNT Front IGN Ignition FTD Functional Test Director (interactive test procedure) ILC Idle Load Compensator INC Increase or Increment FTR Fuel Trim Reset INCANDES Incandescent IND, INDIC Indicator GM Body Systems Application 1988-2004 Page 257 C. Glossary and Abbreviations INFL Inflatable LVL Oil Level T/T INGST Ingestion MAF Mass Air Flow INIT Initialization Magna Steer INJ Injector Intermittent Testing Testing which is performed to isolate problems that come and go. INT Interior; Intake; Integrator I/O Input/Output IPC Instrument Panel Cluster A speed dependent steering system that incorporates its controller into the EBCM/EBTCM. Magna Steer controls the amount of effort needed to provide a “road feel” using an electromagnet and rotor at the input of the steering gear. Magna Steer is speed dependent and uses inputs received from the ABS brake controller. IRC Integrated Radio Chassis MANI Manifold ISC Idle Speed Control MAP Manifold Absolute Pressure; Manifold Air Pressure ITV Intake Tuning Valve MAT Manifold Air Temperature KAM Keep Alive Memory M/C Mixture Control Key Tag Keychain sized auditory signal generator to open doors and trunk on C-Body cars with Level II RAC. MD Modulated Displacement MET Metric KPa Kilopascals (a unit of pressure) MFI Multi-port Fuel Injection KPH Kilometers per Hour MIL Malfunction Indicator Lamp LB6 Engine designation for the 2.8L PFI engine used in GM10 vehicles. MIN Minimum MIN-T L.BLM Left Block Learn Chevrolet Minimum Function TBody car LD2 Engine designation for the 2.3L PFI engine used in GM10 vehicles. Misc. Test Miscellaneous Test MON Monitor LED Light Emitting Diode MPH Miles per Hour LEV Level ms Milliseconds (1000ths of a second) LF Left Front MSG Message LFN Low Fan MSM L.INT Left Fuel Integrator Memory Seat Module (1996 Cadillac models) LMP Courtesy Lamp MSVA L.O2 Left Oxygen Sensor Voltage LOC Low Coolant Light LR Left Rear Magna Steer Vehicle Assist: an electronic steering control system that varies the power steering assist according to vehicle speed, otherwise knows as “Speed Dependent Steering System”. LST Loop Status MT Manual Transmission LT or LITE Light MTL Min-T Lean LTPWS Low Tire Pressure Warning System MTR Min-T Rich LV8 Engine Load mV Millivolts (1000ths of a volt) GM Body Systems Application 1988-2004 Page 258 C. Glossary and Abbreviations MXD Mixed Door Maximum PKL Parking Lamps Relay N/C Normally Closed PM-III Powermaster III N/O Normally Open P/N Park/Neutral Switch NRM Normal POS Position Numeric Keys keys (0, 1-9) which are used to enter numeric values such as trouble codes. These keys double as function keys: )-( POT Potentiometer. Variable resistor Powermaste r III O2 Oxygen or oxygen sensor Delco Moraine ABS III component. Integral booster/modulator which provides both normal braking and anti-lock braking. OAT Outside Air Temperature Sensor Pressure OBD On Board Diagnostic PRESS, PSSR, PRSSR OBD II On-Board Diagnostics (Phase II). The California Air Resource Board (CARB) required that, by 1996, all vehicles sold in California (under 8500 GVWR) contain a certain minimum “on- board diagnostic” capability to diagnose emissionsrelated failures of the engine control system. These diagnostic requirements have been designated as OBD II with a goal of monitoring “all of the emissions-related components on-board the vehicle for proper operation.” PRK Park Gear PRNDL Transmission shifter (Park, Reverse, Neutral, Drive and Low) PROM Programmable Read Only Memory P/S Power Steering; Prestroke PSI Pounds per Square Inch PUR Fuel Evaporator Purge PWM Pulse Width Modulation PWR Power O/D Overdrive PZM Platform Zone Module ODO Odometer QDM Quad Driver Module On-Board Anything which is a permanent part of the vehicle. RA Rear Axle OHC Overhead Cam RAC Remote Accessory Control OLF Oil Life RAD Radio Dimming OLL Oil Life Lamp RAP Retained Accessory Power Parameter A piece of information which is displayed by the tester. R.BLM Right Block Learn RCV, RCVR Receive, Receiver RECIRC Recirculate REF Reference REL Relay; Release (when used with “solenoid”) PAS Pass-Key Telltale PCM Powertrain Control Module PFI Port Fuel Injection PGM Program PHN Cellular Mobile Phone REQ Request PK2 Pass Key 2 Starter Inhibit RES Resolution PKEY Pass Key RF Right Front GM Body Systems Application 1988-2004 Page 259 C. Glossary and Abbreviations RFA Remote Function Actuator SHRT, SHT Short R.INT Right Fuel Integrator SIR RLY Relay R.O2 Right Oxygen Sensor RR Right Rear Supplemental Inflatable Restraint (An active restraint system used to protect the automobile’s occupant from being forced into the dash and windshield upon impact in the event of an accident). RS232 or RS-232 A serial data transmission standard between computers and accompanying systems which uses one signal line for data. Snapshot Test Tester operating mode which is used to isolate intermittent problems. SOL Solenoid SPD Speedometer Dimming SPS Speed Signal SRV Service SSS Speed Sensitive Steering. Used on 1997 and 1998 E and K body. RS232 IF Cartridge An auxiliary cartridge that works in conjunction with a vehicle cartridge. The cartridge gives RS232 capability to the Tech 1 so it can communicate with computers and printers. RSS Road Sensing Suspension RST Reset STR Steering RTD Real Time Dampening SW Switch RWAL Rear Wheel Anti-lock Brake System SWPS Steering Wheel Position Sensor SAE Society of Automotive Engineers SYS System SAE J1850 VPW GM data link based on SAE J1850 variable pulse width class B medium speed communication network interface. 10.4kbps VPW, 0-7vDC. TAC Throttle Actuator Control TBI Throttle Body Injection TCC Torque Converter Clutch TCM Transmission Control Module TCP TCC PWM Solenoid TCS Traction Control System (for limiting slippage during acceleration) TDP Twilight Delay Pot TEMP Temperature TEVES Teves Mark IV ABS system contained in some GM vehicles S/C Supercharged SDL Serial Data Link SDM Sensing and Diagnostic Module (part of the SIR system, the SDM contains a sensing device which converts vehicle velocity changes into an electrical signal. The electrical signal is processed by the SDM and compared to a value stored in memory). Secondary Display Climate Control Head, Visual Information Center THK Throttle Kicker SEC Security T/T; Secondary TICS Timing and Ignition rate Control System SECT Section TIM Tire Inflation Module SEL Selective Ride Control TP Temperature SENS Sensor TPI Tuned Port Injection SES Service Engine Soon Light TPL Twilight/Park Lamps SFI Sequential Fuel Injection TPS Throttle Position Sensor GM Body Systems Application 1988-2004 Page 260 C. Glossary and Abbreviations TQUE Torque TRM Terminal Trouble Codes Same as Diagnostic Codes. Set by a system ECU to indicate the occurrence of abnormal conditions. TST Test TT or T/T Telltales; Telltale Lamp. Warning indicators on the instrument panel. UART Universal Asynchronous Receiver Transmitter UNLCK Unlock V Volts VAC Vacuum VATS Vehicle Anti-Theft System VCC Viscous Converter Clutch VCM Vehicle Control Module VES Variable Effort Steering VF Vacuum Fluorescent. Used in many of the displays. VFD Vacuum Fluorescent Dimming VIM Vehicle Interface Module. An in-line interface that expands tester functionality. VIN Vehicle Identification Number VNT Vent VOL Volume VS Vacuum Solenoid VSS Vehicle Speed Sensor WHL Wheel WOT Wide Open Throttle WS or W/S Windshield WSS Wheel Speed Sensor WST Wastegate ZP Zero Pressure GM Body Systems Application 1988-2004 Page 261 INDEX A E ACM tests 110 Adapter (selecting correct) 64 E&C Bus 153 E&C component identification test 157 E&C components 143 E&C control test 162 E&C function tests 1988 144 1989 145 1990 146 1991 147 1992 148 1993 149 1994 150 1995 151 1996 152 E&C monitor test 154 E&C monitor test, performing 154 E&C speaker test 169 E&C Test Modes 3 Eavesdrop 179 B BCM ECU, reprogramming 140 BCM tests, running 112 Body Adapters (required for use with software) 61 C Captured data, printing 101 Captured data, viewing 101 Cellular phone test 168 cigarette lighter polarity 4 CLASS 2 63 Clear codes 117 Compact disk test 166 Control head test 164 Creating data pairs 94 D Data capture phase 103 Data Capture, terminating early 104 Data Display phase 104 Data List mode 92 Data pairs, creating 94 Diagnostic Trouble Codes (DTC) 97 DIC tests 124 DTCs, clearing 98 DTCs, reading 97 GM Body Systems Application 1988-2004 F Flash codes 117 Flash codes (1990 Y-Body) 133 Function keys, tester 86 H HVAC test 167 HVAC tests 129 Index-262 I S install cartridge 5 IPC to SDM circuit operation 141 SDL Monitor 94, 179 SDL Test Modes 2 SIR synchronization 138 snapshot 5 Snapshot data, printing 106 Snapshot, set-up phase 102 Software, before operating 54 to 56 Systems and Test Modes, selecting 91 K keypad 86 M mass storage cartridge 57 master cartridge missing or malfunctioning 173 N no data received 174, 176 O Obstructed parameter, viewing 105 P parking brake 5 Precautions, operating 4 Printing data 92 Problem blank screen 172 data not received 174, 176 E&C components message 176 to 178 intermittent communications 175 master cartridge malfunctioning 173 master cartridge missing 173 solid bars 173 wrong display 174 T Test mode 91 Test Selection menu 60 Tester function keys 86 tester induced DTCs 6 Trigger Condition 100 Trigger Point 100 Trigger, forcing 104 U UART 63 V VIN and option content 112 voltage spikes 5 W wrong display 174 Q quick keys 59 R Radio receiver test 162 Remote equalizer test 164 remove cartridge 5 Reprogramming the BCM ECU 140 Reprogramming the IPC ECU 141 to 142 reverse polarity 4 GM Body Systems Application 1988-2004 Index-263