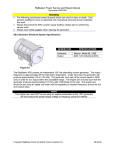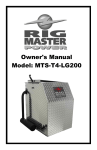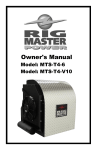
1
RigMaster Power Service and Repair Manual Document # S5A01009 S5A.0 General Engine Information Notice The engine repair manual only covers certain diagnostic and service repairs. For complete engine information and service procedures refer to the appropriate service manual from Perkins or Caterpillar. Engine Description The RigMaster APU has either a Perkins 402-05 engine or a Caterpillar C0.5 engine. Older models are equipped with a Perkins 100 Series engine and specifications and description does apply to those engines as well. Both the Perkins and Cat engines are diesel engines that are controlled with a mechanically actuated fuel injection pump. The engine cylinders are arranged in-line. The cylinder head assembly has one inlet valve and one exhaust valve for each cylinder. Each cylinder valve has a single valve spring. The pistons have two compression rings and an oil control ring. The crankshaft for both engines has two main bearing journals. End play is controlled by thrust washers that are located on the rear main bearing. The timing gears are stamped with timing marks in order to ensure correct timing during assembly. When the no. 1 piston is at top center compression stroke, the teeth that are stamped on the crankshaft gear and the camshaft gear will be in alignment with the idler gear. The crankshaft gear turns the idler gear which then turns the camshaft gear. The fuel injection pump and the fuel priming pump are mounted on the cylinder block. Both pumps are operated by the camshaft lobes. The fuel injection pump conforms to requirements for emissions. Adjustments to the fuel injection pump timing and high idle should only be made by trained personnel. The fuel injection pumps have mechanical governors that control engine rpm. The engine oil pump is a gerotor type pump. The engine oil pump is located in the center of the idler gear. The engine oil pump sends lubricating oil to the main oil gallery through an oil relief valve that is located on the right side of the cylinder block. The rocker arm levers receive pressurized oil though an externally located oil line. The oil line runs from the main oil gallery to the cylinder head. Coolant from the bottom of the radiator passes through the belt driven centrifugal water pump. The coolant is cooled by the radiator and the temperature is regulated by a water temperature regulator. Copyright RigMaster Power by Mobile Thermo Systems Inc. 09-28-09 RigMaster Power Service and Repair Manual Document # S5A01009 Lifting the Engine Notice Failure to follow recommended procedures for handling or transporting engines can lead to engine damage. To avoid possible engine damage, use the following procedure. When you are lifting or moving the engine, use the following procedures in order to prevent engine damage 1. Do not lift the engine to an extreme angle unless the lubricating oil is first drained from the oil pan. 2. Do not turn the engine onto a side or an end surface unless the lubricating oil is first drained from the oil pan. 3. If the oil is not drained prior to tilting the engine or turning the engine onto a side or an end surface, the lubricating oil can flow into the inlet manifold and the cylinder bores. This situation could cause hydraulic lock in the engine. Hydraulic lock can severely damage the engine. 4. The engine oil should be refilled to the correct level before the engine is started. Copyright RigMaster Power by Mobile Thermo Systems Inc. 09-28-09 RigMaster Power Service and Repair Manual Document # S5A11009 S5A.1 Engine Specifications The RigMaster APU comes equipped with either a Perkins or Caterpillar 2 cylinder diesel engine. The purpose and scope of the section is to give an overview of the engine and its specifications. Bore...................................................................................................67 mm (2.64 in) Stroke................................................................................................72 mm (2.83 in) Displacement.....................................................................................0.507 L (30.94 in³) Cylinder Arrangement........................................................................In-line Type of Combustion...........................................................................Indirect Injection Compression Ratio............................................................................23.5:1 Number of Cylinders..........................................................................2 Valves per Cylinder............................................................................2 Valve Lash Inlet valve............................................... 0.2 mm (0.0078 in) Outlet valve............................................ 0.2 mm (0.0078 in) Firing Order..........................................................................................1, 2 Crankshaft rotation is counter clockwise when viewed from the flywheel. Copyright RigMaster Power by Mobile Thermo Systems Inc. 09-28-09 RigMaster Power Service and Repair Manual Document # S5A01009 S5A.2 Fuel System Diagnosis and Testing General Fuel System Operation When the engine is cranking the fuel is pulled from the fuel tank by the fuel priming pump. The fuel priming pump forces the fuel through the fuel filter to the fuel injection pump. The fuel filter also acts as a water separator. The fuel injection pump sends fuel at high pressure to each fuel injector. The fuel injector sprays fuel into a pre-combustion chamber which slows the rate of combustion in the cylinder. The following will result from the reducing of the rate of combustion: Prevention of engine knock Reduction of noise Reduction of emissions The fuel injector injects fuel into the pre-combustion chamber at different angles during two phases. Most of the fuel is injected when the valve is fully open. This process is called indirect injection. The results are more even combustion and complete combustion of the fuel at a reduced temperature. Improved fuel combustion will increase power output while reducing emissions and reducing fuel consumption. Excess fuel from the fuel injectors and the fuel injection pump flows through the return fuel line back to the fuel tank. The excess fuel aids the cooling of the injectors. Also, the fuel return line removes any air trapped in the fuel injectors and fuel injection pump. The fuel injection pump needs fuel for lubrication. If the precision parts of the pump are not adequately lubricated, the components may be easily damaged. The engine must not be started until the fuel injection pump is full of fuel that is free of air. The system must be primed when any parts of the system is drained of fuel. The following list contains examples of both service and repairs when you must prime the system: The fuel filter is changed The low pressure fuel line is removed The fuel injection pump is removed The fuel injectors are removed The fuel tank is drained A leak exists in the low pressure side of the fuel system Governor The fuel rack is connected to the linkage, which controls the fuel injection pump. This linkage is located in the timing case. The movement of the governor weight assembly is transferred to the fuel rack on the injection pump by the control lever, arm and the linkage to the injection pump. A spring controls the movement of the governor weight assembly on the camshaft. Copyright RigMaster Power by Mobile Thermo Systems Inc. 09-28-09 RigMaster Power Service and Repair Manual Document # S5A01009 Testing the Fuel System Inspection A problem with the components that send fuel to the engine can cause low fuel pressure. This can decrease engine performance. 1. Check the fuel level in the fuel tank. Ensure that the vent in the fuel cap is not filled with dirt. 2. Check all fuel lines for fuel leakage. The fuel lines must be free from restrictions and faulty bends. Verify that the fuel return line is not collapsed. 3. Inspect the fuel filter for excessive contamination. If necessary, install a new fuel filter. Determine the source of the contamination. Make the necessary repairs. 4. Operate the hand priming pump. If excessive resistance is felt, inspect the fuel pressure regulating valve. If uneven resistance is felt, test for air in the fuel system. 5. Remove any air that may be in the fuel system. Air in Fuel Test This procedure checks for air in the fuel system. This procedure also assists in finding the source of the air. 1. Examine the fuel system for leaks. Ensure that the fuel line fittings are properly tightened. Check the fuel level in the tank. Air can enter the fuel system on the suction side between the fuel priming pump and the fuel tank. Caution Work carefully around an engine that is running. Engine parts that are hot or parts that are moving, can cause serious personal injury. 2. Install a suitable fuel flow tube with a visual sight gauge in the fuel return line. When possible, install the sight gauge in a straight section of the fuel line that is at least 12 in (305 mm) long. Do not install the sight gauge near the following devices that create turbulence: Elbows Relief valves Check valves Observe the fuel flow during engine cranking. Look for air bubbles in the fuel. If there is no fuel that is present in the sight gauge, prime the fuel system (Refer to “Fuel System – Prime”). If the engine starts, check for air in the fuel while operating under various loads and conditions which have been suspect. Copyright RigMaster Power by Mobile Thermo Systems Inc. 09-28-09 RigMaster Power Service and Repair Manual Document # S5A01009 3. If excessive air is seen in the sight gauge in the fuel return line, connect a second sight gauge at the inlet to the fuel priming pump. If a second sight gauge is unavailable, move the sight gauge from the fuel return line to the fuel supply line to the priming pump. Observe the sight gauge for air bubbles during cranking and running. If there are no air bubbles on the fuel supply line to the priming pump, the air is entering the fuel system after the priming pump. If air is seen at the supply line to the fuel priming pump, then air is entering the system through the suction side of the fuel system between the priming pump and fuel tank. CAUTION To avoid personal injury, always wear eye and face protection when using pressurized air. NOTE To avoid damage, do not use more than 8 psi (55 kPa) to pressurize the fuel tank. 4. Pressurize the fuel tank to 5 psi (35 kPa). Do not use more than 8 psi (55 kPa) in order to avoid damage to the fuel tank. Check for leaks in the fuel lines between the fuel tank and the fuel priming pump. Repair any leaks that are found. Check the fuel pressure in order to ensure that the fuel transfer pump is operating correctly. Copyright RigMaster Power by Mobile Thermo Systems Inc. 09-28-09 RigMaster Power Service and Repair Manual Document # S5A01009 5. If the source of the air in not found, disconnect the supply line from the fuel tank and connect an external fuel supply source to the inlet of the priming pump. If this corrects the problem, repair the fuel tank or the stand pipe in the fuel tank. Fuel Injector Test Perform the following procedures in order to determine if a fuel injector does not work correctly. NOTE If the governor spring breaks, this would stop operation of the injection pump delivering fuel to the injectors. 1. Reduce the engine rpm and operate the engine at a low idle. 2. Loosen the nut for the fuel supply line at each fuel injector. Listen for the low idle to decrease or become rough when the nuts are loosened at each cylinder. The fuel injector may be faulty if the following items occur during the test: Engine rpm does not decrease Engine continues to run properly 3. If the fuel injector is worn or damaged, remove the fuel injector for additional testing by an authorized Perkins or Caterpillar dealer. NOTE If leakage at the nut for the fuel supply line occurs, make sure that the fuel supply line and the nut for the fuel supply line are correctly aligned with the inlet connection of the fuel injector. Do not tighten the nut for the fuel supply line on the high pressure fuel line more than 15 lb/ft. If the net is tightened more, the fuel line may become restricted or the threads of the fuel injector and nut may become damaged Fuel Quality Test Use the following procedure to test for problems regarding fuel quality: 1. Determine if water and/or contaminants are present in the fuel. Check the fuel bowl of the fuel filter for presence of water. If the truck is equipped with a water separator for the main engine, check the water separator for water. 2. Determine if contaminants are present in the fuel. Remove a sample of fuel from the bottom of the fuel tank. Visually inspect the fuel sample for contaminants. The color of the fuel is not necessarily and indication of fuel quality. However, fuel that is black, brown, and/or similar to sludge can be an indication of the growth of bacteria or oil contamination. In cold temperatures, cloudy fuel is an indication that the fuel is not suitable for operating conditions. Copyright RigMaster Power by Mobile Thermo Systems Inc. 09-28-09 RigMaster Power Service and Repair Manual Document # S5A01009 3. If fuel quality is still suspected as a possible cause of problems regarding engine performance, disconnect the fuel inlet line and temporarily operate the engine from a separate known good fuel source. This will determine if the problem has been caused by poor fuel quality. If fuel quality has been found to be the source of poor engine performance, drain the fuel tank and replace the fuel filter. Engine performance can be affected by the following: Cetane number of the fuel Air in the fuel Other fuel characteristics (Bio Diesel percentage) Fuel System Prime CAUTION Fuel leaked or spilled onto hot surfaces or electrical components can cause a fire. To help prevent possible injury, ensure the APU is in a zero energy state when changing the fuel filter or priming the fuel system. NOTE Use a suitable container to catch any fuel that might spill. Clean up any spilled fuel immediately NOTE Do not allow dirt to enter the fuel system. Thoroughly clean the area around the fuel system component that will be disconnected. Fit a suitable cover over disconnected fuel system components. Bleed Screw Fuel Shut Off Valve Fuel Bowl Retaining Ring Fuel Sediment Bowl Fuel Filter Priming Pump Priming Lever 1. Loosen the bleed screw on the fuel filter. 2. Operate the priming pump lever until fuel that is free from air flows from the bleed screw. Tighten the bleed screw. 3. Loosen the vent screw on the fuel injection pump at where the fuel supply line bolts to the injection pump. Copyright RigMaster Power by Mobile Thermo Systems Inc. 09-28-09 RigMaster Power Service and Repair Manual Document # S5A01009 Figure 6-2 Figure 6-3 Injection Pump Air Bleeder 4. Operate the fuel priming pump lever until fuel that is free from air flows from the vent on the injection pump air bleeder screw. Tighten the vent screw. CAUTION Do not over tighten this bleed screw as it has a hollow core and may break off leaving threads in the injection pump. 5. Attempt to start and operate the engine. After the engine has started, check the fuel lines and fittings for leaks. Injection Pump Bleeding/Priming NOTE The injection pump requires diesel fuel for lubrication. Ensure that the injection pump has diesel fuel inside to provide proper lubrication during operation. Operating the injection pump without diesel fuel will result in damage to the precision parts of the pump. There are two procedures that can be used to prime and bleed the injection pump. If bleeding a existing injection pump, perform the following: 1. Loosed both union nuts at the injectors on each cylinder. 2. Crank the engine over and observe the fuel leaking from the injector nuts. Continue until there are no signs of air in the fuel. 3. Tighten the fuel injection nuts on the fuel injectors (15 lb/ft) 4. Start engine and check for leaks. Any small traces of air in the injection pump will bleed out through the fuel return line back to the fuel tank. Copyright RigMaster Power by Mobile Thermo Systems Inc. 09-28-09 RigMaster Power Service and Repair Manual Document # S5A01009 When installing an new injection pump, the pump must be primed prior to operation or damage will occur. Perform the following procedure for a new injection pump: 1. Set the No. 1 cylinder to top dead center compression stroke. 2. Remove the delivery valve holder (1) for the No. 1 cylinder. 3. Remove the delivery valve (5) from the holder. 4. Reinstall the delivery valve holder (1) and spring (2). Tighten the delivery valve (31 lb/ft). 5. Install drain tube (3) to delivery valve holder (1) for No. 1 cylinder. 6. Install the fuel reservoir with a control valve. Install a hose from the fuel reservoir to the inlet of the injection pump. Fill the fuel reservoir with .2 qt (.2 L) of clean fuel. NOTE The fuel reservoir should be approximately 6 in above the fuel injection pump. 7. Put the suitable container below the drain tube in order to catch the fuel. Copyright RigMaster Power by Mobile Thermo Systems Inc. 09-28-09 RigMaster Power Service and Repair Manual Document # S5A01009 8. Open the control valve. If the fuel injection pump is set correctly, then the fuel should flow through the drain tube. 9. From the front of the engine, turn the crankshaft in a clockwise direction until the fuel flow is reduced to 1 drop every 7-10 seconds. This should be the correct timing mark. If the timing mark is incorrect, follow the procedures in the Perkins/Caterpillar service manual or have the timing set by a qualified trained technician. 10. If timing is correct, remove the fuel reservoir and drain tube, remove the fuel delivery holder and reassemble the fuel delivery valve. Reinstall the fuel delivery holder and spring. 11. Bleed the injection pump of air from the fuel lines. 12. Start the engine and inspect for fuel leaks. Copyright RigMaster Power by Mobile Thermo Systems Inc. 09-28-09 RigMaster Power Service and Repair Manual Document # S5A31009 S5A.3 Lubrication System Diagnosis and Testing Engine Oil Pressure Test An oil pressure gauge that has a defect can indicate low oil pressure. Use a suitable gauge that measures the oil pressure in the engine. 1. Ensure that the engine is filled to the correct oil level. 2. Remove the oil pressure sending unit and attach the oil pressure gauge. 3. Operate the engine. Allow the engine to obtain correct operating temperature. 4. Keep the oil temperature constant. Read the pressure gauge and compare to the chart below. Oil Pressure Oil pressure at high idle 28 to 64 psi Excessive Oil Consumption – Inspect External Engine Oil Leaks Check for leakage at the seals at each end of the crankshaft. Look for leakage at the gasket for the engine oil pan and all lubrication system connections. Look for any engine oil that may be leaking from the crankshaft breather. This can be caused by combustion gas leakage around the pistons. A restricted or malfunctioning crankcase breather will cause high pressure in the crankcase which will cause the gaskets and seals to leak. Internal Engine Oil Leaks into the Combustion Chamber Engine oil that is leaking into the combustion area of the cylinders can be the cause of blue smoke. There are several possible ways for engine oil to leak into the combustion area of the cylinders. Leaks between worn valve guides and valve stems. Worn components or damaged components (pistons, piston rings, or dirty return holes for engine oil). Incorrect installation of the compression ring and/or the intermediate ring. Overfilling the crankcase with oil. Wrong dipstick or guide tube. Sustained operation at light loads. Excessive consumption of engine oil can also be the result of engine oil with the wrong viscosity. Thin oil viscosity can been caused by fuel leakage into the crankcase, or by operating at increased temperatures for long periods of time. Copyright RigMaster Power by Mobile Thermo Systems Inc. 09-28-09 RigMaster Power Service and Repair Manual Document # S5A41009 S5A.4 Cooling System Diagnosis and Testing Cooling System Check (Overheating) Above normal coolant temperatures can be caused by many conditions. Use the following procedure to determine the cause of above normal coolant temperatures: 1. Check the coolant level in the cooling system. If the coolant level is too low, air will get into the cooling system. NOTE Air in the cooling system will reduce coolant flow and cause air bubbles. Air bubbles can keep coolant away from engine parts, which will prevent the transfer of heat from the engine to the coolant in the cooling system. Low coolant levels are caused by leaks or improper filling of the cooling system. 2. Check for air in the cooling system. Air can enter the cooling system in many ways. The most common cause of air in the cooling system is not filling the cooling system correctly. The heater core in the RigMaster sits above the engine and so can trap air pockets that can move on to the engine and cause overheating. Another is exhaust gas leakage into the cooling system. Combustion gasses can enter the system through inside cracks or a damaged cylinder head gasket 3. Check the overheat sensor. The temperature sending unit is a normally open ground fault switch. Once engine temperature reaches 230° F (110° C), the sending unit faults to ground setting a low coolant code on the controller. A chaffed wire shorting to the frame can also do the same. 4. On RigMaster units equipped with a low coolant sensor, the sensor circuit is spliced into the overheat sensor. A shorted low coolant sensor can also set off a low coolant/overheat code. 5. Check the radiator for restrictions, debris, dirt or deposits. Check for damaged or missing fins. Check for leaks at seems and welds at the ends of the tubes. 6. Check the filler cap and ensure the cap is holding the correct pressure for the cooling system. Low pressures in the cooling system will lower the boiling point of the coolant. 7. Check for operation of the electric fan during use of the air condition system. An inoperative fan can cause the engine to overheat due to increased engine load and heat from the condenser. 8. Inspect the engine fan and shroud to. Ensure there are no broken blades or missing shroud around the fan. Inspect the gap between the RigMaster outlet fan and the fuel tank. Ensure there is a minimum of 2 inches between the RigMaster and any obstruction. 9. Check for a loose fan belt. A loose fan belt will reduce the CFM of air passing through the radiator and reduce coolant flow through the water pump. Copyright RigMaster Power by Mobile Thermo Systems Inc. 09-28-09 RigMaster Power Service and Repair Manual Document # S5A41009 10. Check the cooling system hoses and clamps. Vibrations can cause hoses and clamps to come loose. Damaged hoses can have soft areas that can collapse or become kinked and reduce coolant flow. Over time the inside of the hoses can deteriorate and case particles to come loose and plug up the cooling system. 11. Check for a restriction of air on the intake side of the engine. A restriction of air can cause high cylinder temperatures that can cause overheating. 12. Check for a restriction on the exhaust side. A restriction on the exhaust coming out of the engine can cause high cylinder temperatures. 13. Check for proper operation of the thermostat. A thermostat stuck closed or not opening fully can result in overheating. On older RigMaster units below serial number RMP 14-63201 have a three way valve on the back of the engine above the flywheel. The thermostat is sealed inside this three way valve. In most cases, this additional external thermostat was added during assembly of the RigMaster with the original engine thermostat still installed. Check if the original engine thermostat is still installed and if so remove the thermostat and reseal the housing without a thermostat. 14. Check the water pump. A water pump with a damaged impeller does not pump enough coolant for correct engine cooling. Remove the water pump and check for damage to the impeller. 15. Consider high outside temperatures. Ensure that the maximum temperature of the outside air entering the unit is below 120° F (50° C). 16. When a load is applied to the engine and the fuel injection pump does not respond to increase fuel to maintain rpm’s, coolant flow through the cooling system is reduced as does the reduction of air flow from the cooling fan. Under these conditions the engine can go into overheat. Ensure that the engine can support the loads being applied. 17. Timing of the engine which is incorrect can cause overheating. Late timing increases engine heat. Early timing reduces engine heat. NOTE If the timing is incorrect, the exhaust valves may be burned and damage to the exhaust manifold can occur. Cooling System Inspection Cooling systems that are not routinely inspected are the cause for increased engine temperatures. Make a visual inspection of the cooling system prior to any tests being performed. CAUTION Personal injury can result from escaping fluid under pressure. If a pressure indication is shown on the indicator, push the release valve in order to relieve pressure before removing any hose from the radiator. Copyright RigMaster Power by Mobile Thermo Systems Inc. 09-28-09 RigMaster Power Service and Repair Manual Document # S5A41009 1. Check the coolant level in the system. 2. Look for visible signs of leaks in the system. NOTE A small amount of coolant leakage across the surface of the water pump seals is normal. This leakage is required in order to provide lubrication for this type of seal. A hole is provided in the water pump housing in order to allow this coolant/seal lubricant to drain from the pump housing. Intermittent leakage of small amounts of coolant from this hole is NOT an indication of a water pump seal failure. 3. Make sure that the air flow through the radiator does not have a restriction. Look for bent core fins between the folded cores of the radiator. Also look for debris between the folded cores of the radiator. 4. Inspect operation of the electric cooling fan during AC system operation. 5. Inspect the fan drive belt. 6. Check for damage to the engine fan blade. Also inspect the gap between the RigMaster and fuel tanks. Ensure there is a minimum gap of 2 inches. 7. Look for air or combustion gasses in the cooling system. 8. Inspect the filler cap and check the surface that seals the filler cap. The surface must be clean. 9. Look for large amounts of dirt in the radiator core. Look for large amounts of dirt on the engine. Remove the dirt from the radiator core and engine. 10. Fan shrouds that are loose or missing can cause poor air flow. Cooling System Test Remember that temperature and pressure work together. When a diagnosis is made of a cooling system problem, temperature and pressure must be checked. The cooling system pressure will have an effect on cooling system temperature. Low cooling system pressure will lower the temperature at which the coolant will begin to boil. CAUTION Personal injury can result from hot coolant, steam and alkali. At operating temperature, engine coolant is hot and under pressure. The radiator, and all lines to heaters or the engine can contain hot coolant or steam. Any contact can cause severe burns. Remove filler cap slowly to relieve pressure only when the engine is stopped and radiator cap is cool enough to touch with your bare hand. The coolant level must be to the correct level in order to check the coolant system. The engine must be cold and the engine must not be running. Copyright RigMaster Power by Mobile Thermo Systems Inc. 09-28-09 RigMaster Power Service and Repair Manual Document # S5A41009 Remove the radiator pressure cap to relieve system pressure when the engine is cold. The coolant level must not be below 0.5 inches from the bottom of the filler neck. Checking the Coolant Pressure Cap PSI Rating Bar Rating 13 PSI = 0.9 Bar 9 PSI = 0.6 Bar Fig. 1 One cause for a pressure loss in the cooling system can be a faulty seal on the radiator pressure cap. To check the amount of pressure that opens the pressure cap, use the following procedure: 1. After the engine cools, carefully open the radiator cap. 2. Inspect the cap carefully. Look for damage to the seal. Look for damage to the surface that seals. Remove any debris on the cap, the seal, or the sealing surface. 3. Install the pressure cap onto a suitable pressurizing pump. 4. Compare the pressure to the pressure rating that is found on the top of the filler cap. 5. If the radiator pressure cap fails, replace the radiator cap. Testing the Radiator and Cooling System for Leaks Use the following procedure to test the radiator and the cooling system for leaks: 1. When the engine has cooled, remove the radiator cap and relieve the system pressure. 2. Make sure that the coolant covers the top of the radiator core. 3. Put a suitable pressurizing pump onto the radiator. 4. Use the pressurizing pump to increase the pressure to an amount of 3 psi more than the operating pressure of the radiator cap. 5. Check the radiator for leaks on the outside. Copyright RigMaster Power by Mobile Thermo Systems Inc. 09-28-09 RigMaster Power Service and Repair Manual Document # S5A41009 6. Check all the hoses and connections for leaks. The radiator and the cooling system does not have any leakage if all of the following conditions exist: You do NOT observe any leakage after five minutes. The applied pressure remains constant beyond five minutes The inside of the cooling system has leakage only if the following conditions exist: The reading on the gauge goes down. You do NOT observe any outside leakage. Make system repairs as required. Engine Coolant Thermostat Testing NOTE On RigMaster units RMP 110 to RMP 104 and on RMP 14-6 models below 3301 utilize an externally mounted three way valve with a sealed thermostat inside. This procedure will not work on those thermostats. 1. Remove the coolant thermostat from the thermostat housing. 2. Heat water in a pan to a temperature of 189° F (87° C) 3. Hang the thermostat into the heated water. The thermostat must be below the surface of the water. The thermostat must be away from the sides and bottom of the pan. 4. Keep the water at the correct temperature for ten minutes. 5. After ten minutes, remove the thermostat and inspect if the thermostat has opened to its full position. Copyright RigMaster Power by Mobile Thermo Systems Inc. 09-28-09 RigMaster Power Service and Repair Manual Document # S5A51009 S5A.5 Engine Electrical Diagnosis and Testing Alternator Testing 1. Connect the positive “+” lead of a suitable digital volt meter to the positive “Bat” post of the alternator. Connect the negative “-“ lead of the digital multi meter to the negative “-“ battery post of the RigMaster. Connect a suitable ammeter clamp around the positive battery cable from the alternator. 2. Start the engine and observe the charging amperage from the alternator. With fully charged batteries a minimum charging amperage of around 30-35A should be observed with no loads applied to the batteries. 3. After 10-15 minutes of running with fully charged batteries, charging voltage should be in the range of 13.5 to 14.5 V DC. Battery Test Most of the tests of the electrical system can be done on the engine. The wiring insulation must be in good condition, the connections must be clean and both components must be tight. CAUTION Never disconnect any charging unit circuit or battery circuit cable from the battery when then charging unit is operated. A spark can cause an explosion from the flammable vapour mixture of hydrogen and oxygen that is released from the electrolyte through the battery outlets. Injury to personnel can be the result. The battery circuit is an electrical load on the charging unit. The load is variable because of the condition of the charge in the battery. NOTE The charging unit will be damaged if the connections between the battery and the alternator become disconnected while the battery is being charged. Damage occurs because the load from the battery is lost and because there is an increase in charging voltage. High voltage will damage the charging unit, the regulator, and other electrical components. The correct procedure to test the batteries of the truck can be found in the manual supplied by the OEM. Alternator Regulator The charging rate of the alternator should be checked when an alternator is charging the battery too much or not charging the battery enough. Alternator output should be 14 ± 0.5 volts. No adjustments can be made in order to change the rate of charge on the alternator regulator. If the rate of charge is not correct, a replacement of the alternator is required. Copyright RigMaster Power by Mobile Thermo Systems Inc. 09-28-09 RigMaster Power Service and Repair Manual Document # S5A51009 Coolant Temperature Switch Using a suitable digital multi meter, measure the resistance of the coolant temperature switch and compare to the chart below. < 122° F (50° C) 248° F (122°C) 54 ± 2 ohms Less than 15 ohms If the resistance readings are not within spec, replace the coolant temperature switch. Electric Starting System Test CAUTION Performing this procedure requires the bypassing of the cover safety switch. All precautions should be taken to prevent personal injury from moving engine parts when the safety switch is bypassed. Remember to reconnect the bypass switch when testing has been completed. NOTE All the relays on the back wall of the RigMaster are grounded at all times. The relays are activated by being fed power from the power module located under the bunk. Check that there is constant battery power from the battery post of the RigMaster to the starter battery post to ground. Remove the starter relay from the base. Check to ensure that the red wire from the battery post is feeding power to the relay. Using the cabin controller, start the RigMaster unit. Check for voltage on the yellow wire from the Power Module J1 connector to ground. If no power is present, check for power at connect J1 pin 8. If power is present, there is a break in the wire harness. Repair the wire to the starter relay. If power is not present at J1 pin 8, the power module is faulty. Replace the power module. Reinstall the relay into the base and start the RigMaster unit again. Observe the operation of the starter motor. Power from the relay should be sent to the solenoid on the starter. If no power is sent to the solenoid on the starter, the starter relay is faulty. Replace the relay. The starter solenoid kicks out the starter pinion to engage the flywheel teeth. The starter solenoid also closes the contacts to activate the starter motor. Connect the positive lead “+” of a suitable digital multi meter to the connection fastened to the starter motor and the negative “-“ lead to a good ground. Activate the starter solenoid and look at the meter. A battery voltage reading shows that the problem is in the starter motor. A zero reading indicates that the solenoid is not closing the contacts. A stuck solenoid will not kick out the starter pinion to engage the flywheel. A starter motor that operates too slowly can have an overload due to excessive friction in the engine that is being started and blow the 100A Bussman fuse in the battery box. Slow operation can also be caused by loose or corroded battery connections or by thick oil in cold temperatures. Copyright RigMaster Power by Mobile Thermo Systems Inc. 09-28-09 RigMaster Power Service and Repair Manual Document # S5A51009 Engine Oil Pressure Switch Test Remove the oil pressure switch from the engine. Using a 12 volt supply, connect the battery, oil pressure switch and a digital ammeter in series together. Measure the amperage of current through the oil pressure switch. The current should be 0.3 to 0.4 A. If the current is greater than 0.42A replace the oil pressure switch. Fuel Shutoff Solenoid Remove the fuel shutoff solenoid from the injection pump. Connect the solenoid to a 12 volt power source and a good ground. The plunger should retract to its full position. If the plunger does not retract all the way or at all, replace the solenoid. Connect an ammeter to the solenoid and a 12 volt source in series and measure the amperage through the solenoid. The current through the solenoid should be 1.0 ± 0.1 amperes. If the reading is out of spec, replace the solenoid. Glow Plug Test Continuity Connect a test light to the glow plug buss bar and to a good ground and activate the glow plugs. If the test light lights up the relay is operational. If no power is present check the relay and wiring connections back to the power module. Remove the buss bar and connect a digital ohm meter and measure the resistance of each glow plug. The maximum resistance of each plug is 1.0 ohm. Connect a test light from the positive post on the RigMaster to each glow plug. If the test light lights up, continuity of the glow plug is correct. If the test light does not light up, replace the glow plug(s). Glow Plug Circuit Disconnect the buss bar from the glow plugs. Using a suitable jumper, connect a digital ammeter between the glow plug and the positive post of the RigMaster. Measure the amperage through the glow plugs and compare to the chart below. Initial current After 6 seconds 11 amperes 8.5 amperes If the reading is below spec replace the glow plug(s). Copyright RigMaster Power by Mobile Thermo Systems Inc. 09-28-09