1
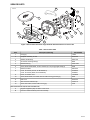
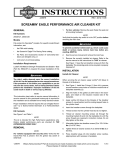
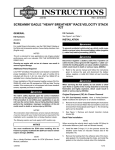
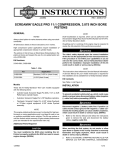
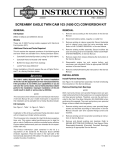
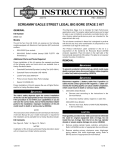
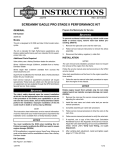
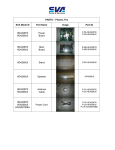
-J06067
REV. 2015-04-23
SCREAMIN' EAGLE VENTILATOR ELITE PERFORMANCE AIR
CLEANER KIT
GENERAL
REMOVAL
Kit Numbers
29400217, 29400218
Models
For model fitment information, see the P&A retail catalog or
the Parts and Accessories section of www.harley-davidson.com
(English only).
Additional Parts Required
Proper installation of this kit requires the use of Digital Technician™ by a factory-trained technician at a Harley-Davidson
dealer.
This kit requires the use of Loctite® 243 Threadlocker and
Sealant - Blue (Part No. 99642-97) and Air Cleaner/Degreaser
(Part No. 99883-88T). Both are available from a Harley-Davidson dealer.
To prevent accidental vehicle start-up, which could cause
death or serious injury, remove main fuse before proceeding. (00251b)
1.
Remove the main fuse. See the service manual.
2.
Remove the existing air cleaner backplate. Refer to the
service manual. Save the original equipment (OE) button
head screw that secures the air cleaner cover. Discard
the remaining parts.
3.
Remove the fuel tank. Refer to the service manual.
4.
See Figure 1. Remove and discard the induction module
support bracket.
is05912
The rider's safety depends upon the correct installation
of this kit. Use the appropriate service manual procedures.
If the procedure is not within your capabilities or you do
not have the correct tools, have a Harley-Davidson dealer
perform the installation. Improper installation of this kit
could result in death or serious injury. (00333a)
NOTE
This instruction sheet refers to service manual information. A
service manual for this year/model motorcycle is required for
this installation and is available from a Harley-Davidson dealer.
Kit Contents
See Figure 3 and Table 1.
Figure 1. Remove Induction Module Support Bracket
NOTES
This Screamin' Eagle Ventilator Elite Performance Air Cleaner
is intended for high performance applications only. This enginerelated performance part is legal for sale or use in California
on pollution controlled motor vehicles. Engine-related performance parts are intended FOR THE EXPERIENCED RIDER
ONLY.
The air cleaner contained in this kit is designed to perform with
this kit only. Any other combination of components is not
confirmed to be legal for street use.
INSTALLATION
Air Cleaner Installation
Use only supplied air cleaner cover. Use of another air
cleaner cover could cause element failure and detachment
of the air cleaner cover, which could distract the rider and
result in death or serious injury. (00596b)
NOTE
When servicing the air cleaner, apply Loctite 243 - Blue to the
threads of all fasteners.
-J06067
Many Harley-Davidson® Parts & Accessories are made of plastics and metals which can be recycled.
Please dispose of materials responsibly.
1 of 3
1.
See Figure 3. Install ACR clip (12) and screws (13).
Tighten screws to 30-40 in-lbs (3.4-4.5 Nm).
2.
Install two O-rings (1) from the kit in the grooves around
the breather bolt holes on the induction module side of
the backplate assembly (2). Install the remaining two Orings in the grooves in the underside of the heads of the
breather bolts (5).
3.
Remove the liner from the adhesive backing of the gasket
(3). Carefully position the adhesive side of the gasket to
the backplate, aligning to the equally spaced screw holes.
Press the gasket firmly into place.
4.
Insert new breather bolts (5) through the backplate.
5.
Apply Loctite 243 - Blue to the breather bolt threads and
the mating tapped holes in the cylinder head.
6.
Thread the bolts into the cylinder head, but do not tighten.
7.
Thread the air cleaner mounting studs (4) through the
backplate (2) until the screw threads are captured in the
induction module. Leave fasteners loose.
8.
Alternately tighten the two breather bolts to 120-144 inlbs (13.6-16.3 Nm).
9.
Tighten the three air cleaner studs to 55-60 in-lbs (6.26.8 Nm).
Final Assembly
1.
Install the main fuse. Refer to the service manual.
ECM Recalibration
You must recalibrate the ECM when installing this kit.
Failure to properly recalibrate the ECM can result in severe
engine damage. (00399b)
Have a Harley-Davidson dealer download the new ECM calibration using Digital Technician™.
MAINTENANCE
Air Cleaner Element Maintenance
NOTES
This is a dry air filter. Do not apply oil to the filter element.
When servicing the air cleaner, apply Loctite 243 - Blue to the
threads of all fasteners.
1.
See Figure 3. Remove the air cleaner cover (8) and inspect
the filter element (7) every 5000 miles (8000 km), or more
often under dusty conditions.
2.
Clean the filter element (see Figure 2):
10. Install fuel tank.
a.
Remove and wash the element by immersing it, on
edge, in a shallow pan containing enough Air
Cleaner/Degreaser (1) to cover no more than threequarters of the depth of the filter pleats (2), about
0.375 inch (9.5 mm). Do not allow dirty solution to
get inside the element. Carefully "roll" the element
in the solution around its perimeter (3) until the entire
outer surface of the filter pleats has been soaked.
b.
Remove the filter element from the cleaner/degreaser.
Allow five minutes for the cleaner to dissolve the dirt.
c.
From the inside out, rinse the element with cold water.
Shake off excess water. Allow the element to air dry.
Do not dry with compressed air.
Air Cleaner Element and Cover Installation
NOTES
This is a dry air filter. Do not apply oil to the filter element.
Whenever the air cleaner cover is installed, apply Loctite 243
- Blue to the air cleaner cover screw (A).
1.
2.
3.
See Figure 3. Secure the air filter element (7) to the air
cleaner mounting studs (4) using three bright-finish TORX®
screws (6) from the kit. Tighten the screws to 55-60 in-lbs
(6.2-6.8 Nm).
Apply Loctite 243 - Blue to the threads of the OE air
cleaner cover screw (A). Secure the air cleaner cover (8)
to the air filter element (7) with the screw. Tighten the
screw to 36-60 in-lbs (4.1-6.8 Nm).
3.
Install air cleaner filter and cover.
is05913
3
Assemble the air cleaner cover insert (9) to the air cleaner
cover with two chrome screws (10). Tighten securely.
NOTE
Install the rain sock over the air filter element in wet or rainy
conditions to prevent water intrusion.
•
If parked, water could enter the engine.
•
If moving, enough water could be sucked in to cause
engine misfiring.
Slip the rain sock (11) over the air filter element under these
circumstances.
2
1
1. Air Cleaner/Degreaser solution
2. Filter pleats
3. Roll filter element in solution around perimeter
Figure 2. Cleaning the Filter Element
-J06067
2 of 3
SERVICE PARTS
is08340b
B
13
12
11
A
3
4
9
10
6
7
2
1
1
5
8
Figure 3. Service Parts: Screamin' Eagle Ventilator Elite Performance Air Cleaner Kit
Table 1. Service Parts Table
Item
Description (Quantity)
Part Number
1
O-ring (4)
11292
2
Backplate assembly, 50 mm
29763-09
3
Gasket, throttle body
29241-08
4
Air cleaner mounting stud (3)
8250
5
Breather bolt (2)
29267-08A
6
Screw, button head TORX, 1/4-20 x 3/8 inch (9.5 mm) long (bright finish) (3)
3938
7
Element, air filter
29670-09
8
Cover, air cleaner (chrome, for kit 29400217)
Cover, air cleaner (black, for kit 29400218)
61300516
61300517
9
Insert, air cleaner cover
14100699
10
Screw, button head, hex socket, #10-24 x 3/8 inch long (chrome) (2)
3048
11
Rain sock
29762-09
12
ACR connector retention clip
16325-10
13
Screw, hex socket, 1/4-20 x 5/8 inch long (2)
4705
Item mentioned in text, but not included in kit:
A
Original equipment (OE) air cleaner cover screw
B
Induction module bracket (remove and discard)
-J06067
3 of 3