1
Digital Scales
Series 3200 / 5200 / 6200 / 8200
Instruction Manual
Arlyn Scales
59 Second Street
East Rockaway, NY 11518
(516) 593-4465
www.arlynscales.com
v6.1-06111
Contents
YOUR NEW SCALE ...................................................................................................................................................................................3
FEATURES...................................................................................................................................................................................................3
PRECAUTIONS .............................................................................................................................................................................................3
BEST CONDITIONS FOR WEIGHING ..............................................................................................................................................................3
INITIAL SET-UP AND OPERATION ................................................................................................................................................................3
CONTROLS AND INDICATORS .............................................................................................................................................................4
MAIN DISPLAY SCREEN ..............................................................................................................................................................................4
FRONT PANEL / KEYBOARD ........................................................................................................................................................................5
Main Function Keys...............................................................................................................................................................................5
Menu Navigation Keys ...........................................................................................................................................................................5
Secondary Function Keys ......................................................................................................................................................................5
SYSTEM OPERATION ..............................................................................................................................................................................6
BASIC MENU OPERATION ...........................................................................................................................................................................6
TARE FUNCTIONS .......................................................................................................................................................................................6
Defining, Editing and Storing Tares ......................................................................................................................................................6
PARTS COUNTING FUNCTIONS (SERIES 8200) .............................................................................................................................................6
SAMPLE ACQUISITION .................................................................................................................................................................................7
Quick Sample .........................................................................................................................................................................................7
Defining, Saving and Editing Samples ..................................................................................................................................................7
Deactivating Samples ............................................................................................................................................................................7
COUNTING PARTS .......................................................................................................................................................................................7
ACCUMULATE FUNCTION ...........................................................................................................................................................................7
TEXT DESCRIPTIONS ...................................................................................................................................................................................8
SYSTEM MEMORY ALLOCATION AND USAGE .............................................................................................................................................8
THE SYSTEM MENU ....................................................................................................................................................................................8
CONFIGURATION AND CALIBRATION..............................................................................................................................................9
PLATFORM ADVANCED SETUP ....................................................................................................................................................................9
CALIBRATION AND TROUBLESHOOTING ....................................................................................................................................................11
Scale reads zero and will not move. ....................................................................................................................................................12
Scale reading is fluctuating wildly. .....................................................................................................................................................12
Scale reading is different on different areas on the platform? ............................................................................................................12
Scale corners properly but does not indicate the correct weight. .......................................................................................................12
SPAN CALIBRATION ..................................................................................................................................................................................12
SPECIFICATIONS ...................................................................................................................................................................................14
LIMITED WARRANTY ...........................................................................................................................................................................14
2
Your New Scale
Congratulations on your purchase of an Arlyn Digital Scale. This Scale offers a combination of versatility, accuracy and
simplicity in an easy to use and easy to maintain package. Advanced menu driven operating software, large memory
capacity and an easy to use menu structure allows the scale to be configured for almost any application. To obtain the best
performance and greatest utilization from your scale, read this instruction booklet completely and carefully.
Please enter the Serial Number, which is located on the scale serial plate. Retain this information for future reference.
No.
.
Features
Easy to read, LCD Graphics display
Automatic Calibration
Multiple Tare Weights
No Moving Parts
Positive Overload Stops (most models)
Large Memory Capacity
Eight Unit Conversions Standard
High Accuracy Parts Counting on Many Models
Automatic or Numeric Entry Tare
Sealed “Click-Type” Control Panel
Abuse Resistant Stainless Steel Load Cell (most
models)
Computerized Self Testing
Automatic Zero Tracking
Full Text and Floating Point Entry
On Line Help
Optional Time and Date
Optional Battery Operation
Optional Weight Average Function
Optional Configurable RS-232 Port
Optional Setpoints
Optional Analog Output
Optional Multiple Platforms
Optional Windows Interface Software
Precautions
1) Prevent inflammables and liquids from entering scale head.
2) Always use the included wall transformer when using AC outlet. NEVER replace the wall transformer with a plug.
This could cause electrical shock and severely damage to the scale.
3) Allow clearance on all sides of scale platform for accurate weighing.
4) Do not drop large loads on scale platform.
5) NEVER EXCEED THE RATED CAPACITY OF THE SCALE.
6) Do not pull on the connecting electrical cables.
7) Make sure that the scale and ramps are properly secured to the floor (most models).
Best Conditions for Weighing
1)
2)
3)
4)
5)
6)
7)
8)
9)
The scale should be level.
Best operating temperature is about 68 degrees F.
The weighing area should be kept clean and dry.
The surface that the scale is resting on should be of solid construction and not prone to vibrations.
Don‟t install the scale near heater or air conditioner vents.
Avoid drafts.
Utilize a stable AC power supply. Avoid heavy motorized equipment on the same power line.
Do not operate the scale in close proximity of RF transmitters like cell phones and walkie-talkies.
Warm-up the scale before use, or leave on “ready” mode.
Initial Set-Up and Operation
1)
2)
3)
4)
Carefully unpack scale from shipping carton. Save packing material for possible future use.
If the level legs are included separately, then screw one into each corner underneath the scale.
Place scale on a level surface and adjust the level legs so that all four legs are touching the surface.
If your scale comes equipped with ramps, fix them to the floor using the mounting holes provided. This way the ramp
will not move during normal use. Be careful not to let the scale platform rub up against the ramp or any other
surface, as this would cause non-repeatability of other inaccuracies.
5) Plug into 117 VAC wall outlet.
6) For non-battery pack equipped scales, the scale will run a self-test procedure to check its load sensors and
electronic circuitry. Upon proper completion, scale will display the prompt (“ready”). Press the ON/OFF key to
activate the unit. Press and hold the ON/OFF key to return the scale to the ready state.
3
7) For battery pack equipped scales, the screen will remain blank until you press the ON/OFF key. To shut the scale
down, press and hold the ON/OFF key until the display blanks out.
8) Allow a five-minute warm-up time for stabilization and most accurate results. Items to be weighed may be placed
anywhere on the platform, but if heavy items are to be weighed, it is advisable to place them near the center. Many
models are equipped with shock absorbers and positive overload stops for protection. Still, care should be taken to
avoid putting excessive stress on the load cell system, as when heavy weights are dropped on the platform. It is
normal for a small amount of drift to occur over periods of time. For the most accurate readings the scale may reacquire a true zero by using the ZERO button prior to weighing.
Controls and Indicators
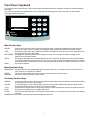
Main Display Screen
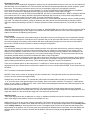
The scale is equipped with 128x64 LCD Graphics Display with a wide viewing angle and variable contrast. For normal
operations, you have a choice of viewing weight information from two main screens. For parts counting scales, two more
screens are available. You can switch screens by pressing the MENU key and then press ENTER to accept the “Next
Screen” menu choice. Doing this will step through the screens shown below in order. For non-counting scales screens 3 and
4 are skipped.
WEIGHT DISPLAY
COUNT DISPLAY
UNITS
NET INDICATOR
STATUS/ZERO
TARE DESCRIPTION
TARE WEIGHT
SAMPLE DESCR
SAMPLE WEIGHT
Shows the weight on the platform in the current units setting.
Shows the current piece count on the platform. If there are any totals in the accumulate register it
will indicate “pcs acc”
Shows the active conversion units.
Shows “Net” if the indicator is in net weighing mode.
Shows either “Zr” if the platform is at zero, a bar graph showing how close the scale is to maximum
capacity or “Ouch!” if the platform is overloaded.
Shows the description of the active tare weight. If the tare was taken from the keyboard using the
TARE key it will show “From Keyboard”.
Shows the weight value of the active tare.
Shows the description of the active sample weight. If the sample was taken from the keyboard using
the SAMPLE key it will show “From Keyboard”.
Shows the weight value of the active sample.
4
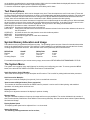
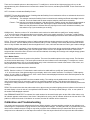
Front Panel / Keyboard
The front panel has a twelve button, click touch key panel that allows easy menu navigation as well as full text and floating
point entry.
The main scale functions are shown in black, menu navigation and floating point numeric entry keys are blue and the
secondary functions are yellow.
.
7
8
.
.
9
5
cum.
ac
6
2
.
3
s
Tare
ple
am
4
?
1
Menu/
Back
.
Print
s
320M 1000 x .2 lb.
ARLYN
SCALES
.
t
hi f
Net
Gross
Units
.
On/Off
ar
cl e
Zero
0
Enter
Main Function Keys
ON/OFF
TARE
NET/GROSS
UNITS
ZERO
Press once to place the scale in its normal operating mode. Pressing and holding the key will return the
scale to the “ready” mode. On battery pack equipped scales, press and hold this key to power it down.
Pressing this key will tare any weight on the platform and switch the scale to the net mode. Holding this key
down will clear any active tare weight.
Will toggle the indicator between the net and gross mode. The net mode will show the weight on the
platform minus any tared weight.
Pressing this key allows you to step through the various conversions. By default, the conversions available
are pounds, kilograms, grams and ounces. There are four other conversions available that can be activated
in the setup menu. This will add troy ounces, pennyweights, grains and a user defined conversion to the list.
Will zero the indicator.
Menu Navigation Keys
MENU/BACK
ENTER
ARROWS
Using this key from the weight display will access the setup menu. In all other areas it is used to back out
from menus or to complete an operation.
This key is used to select items and to complete operations in the various menus.
Are used to navigate and select menu items.
Secondary Function Keys
SAMPLE
In counting scales is used to acquire a quick parts counting sample from the platform. Pressing and holding
this key down will clear the active sample.
ACCUM
In counting scales is used to add the piece count to the accumulate register allowing the totaling of parts.
Pressing and holding this key will clear the accumulate register.
? KEY
Can be used in various areas to call up help screens. In some areas this key needs to be pressed and held.
SHIFT
Used by the text-editing screen to toggle caps on/off.
CLEAR
Used in some editing screens to clear input lines and numbers. In some areas this key needs to be pressed
and held.
NUMBER KEYS Are used in various places to input floating point numbers.
5
System Operation
Basic Menu Operation
The scale operating system uses a menu driven interface that is both intuitive and easy to use. To access the setup menu
press the MENU/BACK key.
There are two basic menu types. The first is a simple list of items. To select an item in the list, use the UP and DOWN
ARROW keys to line up on the desired item and then press ENTER.
The second type of menu is a horizontal list displayed along the bottom of the screen. These menu items indicate
operations to be performed. To select one, use the RIGHT and LEFT ARROW keys to select the desired item and then
press ENTER. Horizontal menus may show a single or double headed arrow on the right side to indicate that there are more
selections to the left and/or right that are not displayed.
Horizontal menus and lists are often used together to perform an operation on a specific item. For example, to delete a tare
entry, use the UP and DOWN ARROWS to select the desired tare from the list, then use the LEFT and RIGHT ARROWS to
select the menu item “DEL” in the horizontal menu. Pressing ENTER will perform the operation.
Selecting menu items will often lead to other menus, sometime drilling down several levels deep. Use the MENU/BACK key
to back your way out. Continuing back will eventually bring you back to the top, which is the main weight display screen.
Consult the menu tree in the back of the manual for help in navigating menus.
Tare Functions
The tare function allows you to temporarily remove from the display any weight that may be on the platform. Tare weights are
often used in filling processes. For example, the user will place an empty box on the platform. The scale will indicate the
weight of the box. The user then presses the TARE key. The scale will now indicate a weight of zero, and will switch to the
NET mode. The box can now be filled. The scale will read out only the weight of the material. Switching to the GROSS mode
will show the weight of the material plus the weight of the box. To clear any active tare, press and hold the TARE key.
Defining, Editing and Storing Tares
Tares can also be taken, named, activated and stored permanently through the setup menu. Go to menu SETUP
MENU/TARES. A list of all tare definitions will be shown. To add a new tare, line up on NEW in the lower menu and then
press ENTER. A new tare will be added to the list with the default description of Tare #XXX. The number XXX is assigned by
the system by counting up the number of tares and then adding one. It is possible that after adding and deleting a few tares
that two tares will have the same description. This is acceptable, albeit confusing, and the description can be changed later.
This new default tare will have a weight value of 0.00 lb when first created.
Editing Tares
You can edit any tare by using the arrow keys to line up on it and the “EDIT” function in the lower menu and then press
ENTER. The next screen will show the tare with it‟s description and weight value in pounds. The lower menu allows you to
change the description (“DESCR”), enter the value directly (“VALUE”) or acquire it automatically from the platform
(“ACQUI”).
Deleting Tares
To delete a tare from the list simply line up on it and the “DEL” function in the lower menu. Press ENTER to delete it. Once a
tare has been deleted it is removed permanently from memory.
Activating Tares
To activate a tare from the list, line up on it and the “ACTV” function in the lower menu, then press ENTER. The tare will be
made active, the scale switched to NET mode and you will immediately be placed back in the weighing screen you were in
when you accessed the setup menu.
Parts Counting Functions (Series 8200)
Parts Counting Mode enables you to count parts automatically on the platform. In order to be accurate, the parts you are
counting must be of a consistent weight from piece to piece and be heavy enough to be detectable by the scale. Scales that
have low maximum capacities can count very light parts while scales of heavier capacities can only count heavier parts.
Attempting to count parts that are too light will case the indicator to drift and become non-repeatable.
The Parts Counting procedure is actually a two step process, first the scale needs to know how much each part weighs. This
is called sample acquisition. Second, the counting mode must be activated with the desired sample.
There are two ways to acquire a sample. One way is to take a quick sample on the platform from the front panel. The other
way is to use the setup menu where samples can be taken, named, stored and activated in a similar manner as Tares.
Multiple platform scales have the distinct advantage of allowing you to take your sample on a low capacity platform (to get a
very accurate sample) and do the actual counting on a large capacity platform.
6
Sample Acquisition
There are two methods for acquiring samples. First is the “Quick Sample” method and the second is to define a sample in
the scale‟s memory for permanent storage. In general the more parts that you use during your sample acquisition the more
accurate your parts counting will be. Using a quick sample restricts you to sample sizes of 10, 25, 50 or 100 pieces. This is
acceptable in many circumstances, especially when the parts are fairly heavy. Saving a sample in memory allows you to
choose any size sample, and is far more accurate.
Quick Sample
The quick sample is limited to sample sizes of 10, 25 and 50 and 100 pieces, which is all that is required for many
operations. To take a quick sample:
Press the SAMPLE key. The number 10 will be displayed.
Press the LEFT ARROW until the desired sample size is displayed, and then press the ENTER key. For best
general accuracy use the largest convenient sample size.
Remove all weight, or place an empty container on the platform, and press ENTER.
Place the correct amount of parts on the platform and then press ENTER. The scale will now automatically switch to
a counting screen.
Quick samples cannot be stored for future use and will remain active only until the power is removed, a new sample
is taken or the sample is cleared through the keyboard. Proceed to the section “Counting Parts”.
Defining, Saving and Editing Samples
Samples can be taken, named, activated and stored permanently through the PARTS COUNTING menu. Go to menu
SETUP MENU/PARTS COUNTING. A list of all sample definitions will be shown.
Add new Sample
To add a new sample, line up on NEW in the lower menu and then press ENTER. A new sample will be added to the list with
the default description of Sample #XXX. The number XXX is assigned by the system by counting up the number of samples
already defined and then adding one. It is possible that after adding and deleting a few samples, two samples will have the
same description. This is acceptable, albeit confusing, and the description can be changed later. This new default sample
will have a weight value of 0.00 lb when first created.
Editing Samples
You can edit any sample by using the arrow keys to select a sample and then select the “EDIT” function in the lower menu
and then press ENTER. The next screen will show the sample with it‟s description and weight value in pounds. The lower
menu allows you to change the description (“DESCR”), enter the value directly (“VALUE”) or acquire it automatically from the
platform (“ACQUI”).
Deleting Samples
To delete a sample from the list simply line up on it and the “DEL” function in the lower menu. Press ENTER to delete it.
Once a sample has been deleted it is removed permanently from memory.
Activating Samples
To activate a sample from the list, line up on it and the “ACTV” function in the lower menu, then press ENTER. The sample
will be made active, and the scale switched to a counting screen. You can now zero the scale and begin counting that part.
Deactivating Samples
If you wish to clear a sample from memory, simply press and hold the SAMPLE key until it clears.
Counting Parts
With sample acquisition complete you may now count your parts. On the top of the counting screen is displayed the
sample‟s description (or “taken from keyboard” if a quick sample was used) and the actual piece weight. Start by emptying
the platform or place an empty container on the platform and then press the ZERO key. Now place your parts on the
platform and the count will be shown on the display.
*** NOTE ***: You should always zero the platform with the ZERO key prior to counting parts.
Accumulate Function
Your scale has an accumulate function that will allow you to keep a running total of parts counted. To activate, place your
parts on the platform and then press the ACCUM key. “Acc” will be shown on the display and the number of parts that were
7
on the platform are added into the accumulate register. While in the Accumulate Mode the display will show the value in the
Accumulate Register PLUS the number of parts on the platform.
To clear the accumulate register, press and hold the ACCUM key until it clears.
Text Descriptions
Many items carry descriptions, which can be changed at any time. These descriptions are useful in the case of Tares and
Counting Samples because the descriptions are shown on the display when activated, eliminating confusion. The scale itself
also has a description and ID number that can be changed in the SETUP MENU/SYSTEM/SCALE DESCRIPTION menu.
Further, there are text definitions that can be created and used in RS232 operations like label printing.
All of these text entries are fourteen characters in length and can be edited through the text-editing screen. When activated,
the text is shown on the top of the screen with an arrow pointing at the first character. In the lower part of the screen is the
entire character set with the current selection highlighted. The keys used for the editing are shown below.
ARROW KEYS Use them to select a character in the lower list.
7 and 9 KEYS Use these to position the arrow on the top line.
ENTER KEY
Changes the character above the arrow to the character selected in the list and then advances the arrow to
the next position.
CLEAR KEY
Will clear the entire line and place the arrow in the leftmost position.
MENU KEY
Will complete the operation.
SHIFT KEY
Selects either upper case or lower case characters.
? KEY
Online help.
System Memory Allocation and Usage
The scale‟s memory is organized as 485 memory slots. The operating system uses ten of these for internal tasks and the
setup for the default platform uses four. This leaves 471 slots available for user definitions that can take the form of tares,
counting samples and other functions. Each definition uses memory differently and is outlined below:
DEFINITION
Platform
Tare
Counting Sample
USAGE
4 slots
1 slot
1 slot
DEFINITION
Print Frame
Text Def
Setpoints
USAGE
2 slots
1 slot
4 slots
For a detailed description on your current memory usage, access menu SETUP MENU/SYSTEM/MEMORY STATUS.
The System Menu
The system menu contains many useful features for checking and configuring your scale. To access, press the MENU
button, then select SETUP MENU->SYSTEM. Each feature is outlined below.
Scale Description / Scale ID Number
Each scale can be assigned a unique description and ID number. This is useful for printing labels and other processes.
Udef Conversion Multiplier
Allows you to enter the multiplier (from pounds) for the user-defined conversion.
*Auto Increment Weight Number (Future expansion)
This number will increment each time the PRINT button is pressed. It can be useful in label printing and statistical
operations. It‟s starting value can be set here.
Display Contrast
Allows you to adjust the contrast of the display for optimum viewing.
Memory Status
Will give a detailed breakdown of memory slot usage and free memory available. The number indicated is the number of
slots, not the number of definitions. Each definition uses memory differently. See the section above entitled “System Memory
Allocation and Usage”.
Display Update Speed
The display update speed can be adjusted from .1 to six seconds.
Startup Parameters
The following startup parameters can be set here;
8
a) The startup screen and conversion units can be set here.
b) The “ready” prompt and the splash screen can be enabled/disabled.
c) Zero lock can be enabled/disabled. Zero lock disables the front panel ZERO key. When this function is enabled the user
must press the ZERO and the PRINT key simultaneously to zero the scale.
Erase User Memory
The entire user memory can be erased at one time, if necessary, using this option. It will erase all user-defined tares,
counting samples, text definitions, print frames and setpoints but will leave platforms and other system memory intact.
Revision Number
Reads out the current operating system revision number.
Auto Shut-Off
Auto Shut-Off allows you to set your scale to automatically shut off when a preset time limit has been reached and there has
been no activity on the scale. This feature is mainly used on battery pack equipped scales to prevent the battery from
inadvertently being deep discharged. Auto Shut-Off can also work on non-battery equipped scales but its operation is slightly
different. In a battery equipped scale the unit will completely shut down and the display will blank. The scale can later be
turned on again using the normal means. On non-battery equipped scales, the display will blank but the scale will remain in
the same condition as when it shut down. Zero, active tare and active parts counting sample as well as the current screen
will all be retained. Pressing any key will return the scale to its normal operating mode.
An inactive scale can be defined as no keys being pressed, and there has been no activity on the platform. It should be
noted that anything that causes a small increase or decrease in the platform reading will be considered an active platform.
Avoid vibrating surfaces, digital filtering constants of non-factory default values, or anything else that causes the platform
reading to drift if this feature is used.
To configure Auto Shut-Off, go to the menu SETUP MENU/SYSTEM/AUTO SHUT-OFF. There are two settable options
available.
ACT
TIME
Activates/deactivates the auto shutoff feature.
Is the time, in minutes, that the unit will shutoff due to inactivity. Any time from 1 to 25 minutes can be used.
Configuration and Calibration
Platform Advanced Setup
The scale‟s operating system revolves around one or more platform definitions that are stored in memory, with most scales
only having one weighing platform. Each platform is fully configurable as to it capacity, displayed resolution, filtering,
calibration and many other parameters which will be outlined in detail below.
To access the platform setups press the MUNU/BACK key to activate the setup menu. Select PLATFORM SETUPS from
the menu and then press ENTER. If your scale has multi-platform capability then a list of platforms will be shown. The
adding, deleting and selection of these platforms are similar to tares and parts counting samples. If your scale is a single
platform type, then you will be shown only the Platform Setup Menu.
Description
A fourteen-character description can be assigned to the platform. The default description is “Plat#001”.
Auto Setup
Auto Setup will erase all of the parameters for the selected platform and return it to the default state. It also erases the
platform‟s span and cornering calibration. Auto setup is useful when the scale is first manufactured or when the user
inadvertently changes a calibration parameter that adversely affects the scale and then forgets the calibration parameter or
its original value.
Upon activation you will presented with a selection of platform capacities and resolutions. Pick the appropriate entry and then
press ENTER. Auto setup will be performed. A span calibration is now necessary.
Input Source
Each platform can take its input from a variety of sources. On multi-platform capable scales, there can be up to eight input
channels that can be driven from standard load cells, 4-20ma or DC voltages. On single platform units there is only one
channel. The default value is “LC Channel 0”.
Span Calibration
Span calibration adjusts the platform‟s sensitivity so that the display reads correctly. A calibrated weight is required to
perform this and the procedure is outlined below in the “Span Calibration” section.
9
Resolution-Overload
Each platform has the capability of displaying its reading in any of eight standard conversion units. Only four are enabled by
default and the user can enable the rest. The conversion units that are automatically enabled are pounds, kilograms, grams
and ounces. The remaining conversions are troy ounces, pennyweights, grains and a user defined conversion.
Each conversion unit‟s resolution can be set individually. To do this, select RESOLUTION-OVERLOAD from the platform
menu. A list of conversions is displayed and each active conversion will have a check mark to its right.
Select the conversion you wish to modify and press ENTER. Use ACTV to activate/deactivate it, DPNT to change its decimal
point location and CNT to change what the least significant displayed digit will count by. In the pounds configuration (the
scale‟s native conversion unit) you can use OVRL to set the overload limit in pounds.
When setting resolution (DPNT and CNT) care must be taken not to exceed 5000 total displayed counts or a drifting reading
may result. The maximum resolution is setup by default by auto setup but can be calculated easily by taking the scale‟s
maximum capacity and dividing it by 5000. For example a 50 pound scale‟s resolution should be .01 pounds (50 / 5000 =
.01).
Auto Zero
Auto zero determines how the platform will zero on power up. Selecting NONE will not perform any zeroing. Selecting AUTO
ZERO will automatically zero out any weight on the platform and LAST ZERO will zero it to the value of the weight on the
platform the last time the ZERO key was pressed.
Zero Tracking
A scale sitting for long periods of time without weight on the platform is prone to drift from zero due to temperature changes
and a number of other factors. Generally this is not a problem and you can press the ZERO button to return the reading to
zero before weighing. Zero tracking, when enabled, will detect small reading changes over time and correct the platform
back to zero. Consult the service manual for details on setup and configuration.
Software Filter
The raw internal reading from the load sensor contains electronic noise and other factors that can cause the reading to be
drifty and non-repeatable. All electronic scales incorporate some sort of filtering to compensate for this. Another use for
filtering is to help stabilize a scale when it is used on a surface that is vibrating, in windy conditions, when subjected to RF
interference or when used on a noisy power line. Your scale has two stages of filtering. The first is a electronic filter that is
permanently enabled and the second is the software filter which is fully configurable.
In general, a low degree of filtering will cause the scale to be quick to react but prone to noise and vibrations. Heavy filtering
will eliminate the noise and vibrations but the platform will react slowly to changes in weight. We have by default set up the
optimum filtering parameters for general use. These should only be changed in extreme circumstances.
There are four settable options on the setup screen. To modify them, use the left and right arrow keys to line up on the
appropriate entry in the horizontal menu located at the bottom of the screen, and then press ENTER. These menu items are
as follows:
ACTV: Activates or deactivates Software Filter.
BUFFER: These are the number of averaging slots in the software filter. The higher this number, the slower the filtering
process, the more accurate the weight reading.
WIND{<Unit>): Sets the number of "d" units that the scale needs to be stable within to qualify as a "steady reading".
A "d" unit is the value of the rightmost digit on your display, which is the scale's resolution. For example, a 100lb capacity
scale's "d" unit is .02lb, for a 50lb scale it is .01lb. It is the scale's lowest displayed resolution and it should be printed on the
capacity label under the main display.
NCNT: This is the noise count of filtering mechanism. This sets the number of weight values that need to be discarded
before considering that the new weight value is a new value and not part of the current weight value averaging process. The
higher this number, the less accurate the weight value, the faster your performance.
Stability Control
If the scale display values are not stable due to a noisy or unstable environment and you do not want to estimate the actual
value of the weight on the platform, the scale can estimate it for you.
Stability Control is not by any means a filtering mechanism. This feature should only be used if you know that the scale will
always be unstable or in constant noise. What this feature does is lock in an appropriate weight based on the stability count
and a stability window you have specified in this screen. The weight locked, may not be the most accurate weight of the
object placed on the platform, but it is a best guess as computed by the Stability Control in this scale. Once the stability lock
has been placed, the lock will not be removed until the platform experiences a weight change greater than the stability
window.
10
There are four settable options on the setup screen. To modify them, use the left and right arrow keys to line up on the
appropriate entry in the horizontal menu located at the bottom of the screen, and then press ENTER. These menu items are
as follows:
ACTV: Activates or deactivates Stability Control.
SOURCE: This sets the primary source of readings that the Stability Control mechanism will use to estimate the best lock-in
weight. There are two selections here.
A/D Reading – This selection makes the Stability Control mechanism take readings unfiltered and straight from the
load cell. This is the fastest and the least complex selection and therefore the default.
Filtered – This selection is an advanced selection. With this selection, Stability control uses filtered weights based on
parameters set by the Software filter. Selecting this option automatically activates software filter.
Make sure the parameters in Software filter are properly set or the scale will behave erratically. Use
this selection only if you know what you are doing.
WIND(<Unit>): Sets the number of "d" units that the scale needs to be stable within to qualify as a "steady reading".
A "d" unit is the value of the rightmost digit on your display, which is the scale's resolution. For example, a 100lb capacity
scale's "d" unit is .02lb, for a 50lb scale it is .01lb. It is the scale's lowest displayed resolution and it should be printed on the
capacity label under the main display
SCCnt: This number indicates the number of stable readings within the window set above to qualify a lock in. Suppose this
number is set to 3, then the Stability Control mechanism will try to read 3 readings consecutively that are within the window
above. If they fall within that window, then the weight will lock in, else, it will reset and start over until it gets 3 stable readings.
After Stability Control is activated, a circle will appear at the bottom of the screen during normal weight readings. While the
scale does not have a stable reading, the circle will appear unfilled. As soon as a weight has been found, it will lock this
weight and the circle will be filled. Once the lock has been obtained, the reading will not budge until a weight change greater
than the window set has occurred.
Zero / Motion Detect
This scale can detect if there is motion on the platform. There are four settable options on the setup screen. The first three
are for the motion detect setup. The fourth option controls the zero indicator on the main display. To modify them, use the
left and right arrow keys to line up on the appropriate entry in the horizontal menu located at the bottom of the screen, and
then press ENTER. These menu items are as follows:
ACTV: Activates or deactivates motion detection.
MOTN: Sets the number of "d" units that the scale needs to be stable within to qualify as a "steady reading".
A "d" unit is the value of the rightmost digit on your display, which is the scale's resolution. For example, a 100lb capacity
scale's "d" unit is .02lb, for a 50lb scale it is .01lb. It is the scale's lowest displayed resolution and it should be printed on the
capacity label under the main display.
TIME: This works along with MOTN to detect a stable reading. The reading must be stable within the selected number of "d"
units for this length of time (in seconds) in order to be considered a stable reading. This allows motion detect to be
configured for many situations to compensate for background vibrations or any other factor that would adversely affect scale
readings.
ZERO: This controls how close the scale needs to be to the true zero point before lighting the zero indicator on the bottom of
the main display. It is set in units of d, as explained in MOTN above. The factory default setting is .25d, or one quarter of
the scales lowest displayed resolution.
After ZERO/MOTION DETECT is activated, the scale needs to be rebooted for this option to take effect. After reboot, a tiny
„M‟ indicator appears at the bottom of the screen. If the platform is moving, the ‟M‟ indicator will show as it is seen here. If the
platform is within the bounds of „No Motion‟ as set here, then the „M‟ indicator will be crossed out.
Calibration and Troubleshooting
Your scale has been precisely calibrated at the factory before shipping. It has the capability to adjust its own calibration to a
certain degree to compensate for aging electronics, and temperature changes. This being the case, it is possible that you will
never have to calibrate the scale. Doing so may leave you with a worse calibration than you started with. Does your scale
really need to be calibrated? If so what steps are needed? Follow the steps outlined below to help make this determination.
11
Scale reads zero and will not move.
Make sure that any and all shipping screws are removed from the platform.
On platform scales, check that all four level legs are contacting solidly against the floor.
If level legs are screwed in all the way then the stud from the level leg may be contacting the underside of the
platform not allowing the load sensor to flex.
Scale reading is fluctuating wildly.
Scale must be on a non-vibrating surface. Breezes may affect scales of lighter capacities.
Scale must be installed on a clean power line. Electric motors, computers or any other devices can cause power line
interference.
RF interference can cause scale readings to fluctuate. Are there any transmitters nearby like cell phones or walkietalkies?
If the scale is a remote platform type, check to see if the cable from the platform to the indicator in plugged in
properly. If so then remove the plug temporarily to check for bent or missing pins.
Check for nicks or cuts on the platform cable.
Scale reading is different on different areas on the platform?
On platform scales, check that all four level legs are solid against the floor. If a level leg is screwed in all the way
then the stud from the level leg may be contacting the underside of the platform not allowing the load sensor to flex.
Check for any mechanical interference. Is there anything rubbing against the platform?
Scale corners properly but does not indicate the correct weight.
On platform scales check that all four level legs are solid against the floor.
Check for any mechanical interference. Is there anything rubbing against the platform?
Perform span calibration.
Span Calibration
Span calibration is used to set the internal gain of the indicator so that it reads correctly. A calibrated weight is needed in
order to perform a span calibration. Any weight may be used within the capacity range of the scale but a weight of 50% of
capacity is recommended. Using weights of less than 10% of capacity is not recommended and may lead to an inaccurate
calibration.
To start the procedure access menu SETUP MENU/PLATFORM SETUPS/SPAN CALIBRATION. The scale will prompt you
for the value of the calibration weight in pounds. Enter the value through the keyboard and then press ENTER. Next, you are
asked to remove all weight from the platform. When the weight is removed press ENTER. Now place the calibration weight
on the center of the platform, pause a second for the scale to stabilize then press ENTER. The scale will now calibrate itself
automatically and return you to the platform menu.
During span calibration a small number will be displayed in the upper left-hand corner. This number represents the raw
unadjusted reading from the load cell and is not calibrated in any way. It is there only to confirm that the platform is operating
properly. The number should increase when weight is applied to the platform.
12
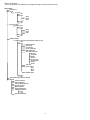
Menu Tree Diagram
The following menu tree will help you navigate through the various system menus.
SETUP MENU
Next Screen
Tares
Tare List
Actv
Edit
Descr
Value
Acqui
New
Del
Parts Counting
Samples List
Actv
Edit
Descr
Value
Acqui
New
Del
Platform Setups
Platform List (scales with multiple platforms only)
Actv
Edit
Edit Description
Auto Setup
Input Source
Corner Calibration
Span Calibration
Resolution-Overload
Pounds
Kilograms
Grams
Ounces
Troy Ounces
Pennyweights
Grains
Carats
Auto Zero
Zero Tracking
Actv
Wind
ZCnt
Software Filter
New
Del
Option Setups (See options manual)
System
Scale Description
Scale ID Number
Auto Inc Weigh Number
Display Contrast
Memory Status
Display Updt Speed
Startup Parameters
Scrn
Conv
Erase User Memory
13
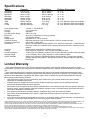
Specifications
Model
Capacity
Resolution
Platform Dimensions
620V/820V
620X/820X
620T/820T
620L/820L
620C/820C
620F/820F
320D
320M
5-4405
5 lbs./2.2 kgs.
10 lbs./4.5 kgs.
25 lbs./11 kgs.
50 lbs./22 kgs.
100 lbs./45 kgs.
150 lbs./67 kgs.
500 lbs./226 kgs.
1000 lbs./453 kgs.
5000 lbs./2260 kgs.
.001 lb./.0005 kg.
.002 lb./.001kg
.005 lbs./.002 kgs.
.01 lb./.005 kg.
.02 lb./.01 kg.
.05 lb./.02 kg.
.1 lb./.05 kg.
.2 lb./.1 kg.
1 lb./.5 kg.
12” x 16”
12” x “16”
12” x “16”
12” x “16”
12” x “16”
12” x “16”
20” x 27” Standard. Other sizes available
20” x 27” Standard. Other sizes available
48” x 48” Standard. Other sizes available
Power Requirements
Accuracy
Leveling
Tare Range/Zero Range
Electronics
Display
Display Speed
Overload Condition
Operating Temperature
Construction
Load Cell
Controls
Overall Dimensions
Shipping Weight
Options Available
117VAC +/- 10% 50/60 Hz
0.1% of full scale
Adjustable
100% Full scale
All circuitry incorporated on one plug in board
LCD graphics display
Adjustable from .1 to six seconds
Displayed warning at 102% of scale capacity. 150% by mechanical stops
14F to 104F / -10C to 40C
Models 620 & 820-Stainless steel platform cover, aluminum construction. 5-4405-Diamond
plate steel. Aluminum or stainless steel is optional. Model 320 aluminum. Stainless steel is
optional.
Stainless steel construction for reliability (most models)
Units conversion, Net/Gross, Tare, Zero with secondary functions
13”Wx16”Dx1.5”H (620/820), 20”Wx27”Dx1.5H (320), Depends on model ordered (5-4405)
21 lbs. (620/820), 30 lbs. (320), Depends on model ordered (5-4405)
Battery pack, Setpoints, USB Remote display, RS232 Interface, Time and date, Weight
average and hold, Multi platform, Analog Output, Ethernet, Wireless Ethernet, USB Flash
Data Logger
Limited Warranty
Arlyn Scales warrants that your Arlyn Scales equipment and systems, when properly installed will operate per written
specifications. All systems and components are warranted against defects in materials and workmanship for a period of one
year.
Arlyn Scales warrants that the equipment sold hereunder will conform to the written specifications authorized by Arlyn
Scales. Arlyn Scales warrants the equipment against faulty workmanship and defective materials. If any equipment fails to
conform to these warranties, Arlyn Scales will, at their option, repair or replace such goods returned within the warranty
period subject to the following conditions:
Upon discovery by Buyer of such nonconformity, Arlyn Scales will be given prompt written notice with a detailed
explanation of the alleged deficiencies.
Individual electronic components returned to Arlyn Scales for warranty purposes must be packaged to prevent
electrostatic discharge (ESD) damage in shipment.
Examination of such equipment by Arlyn Scales confirms that the nonconformity actually exists, and was not caused by
accident, misuse, neglect, alteration, improper installation, improper repair or improper testing; Arlyn Scales will be the
sole judge of all alleged non-conformities.
Such equipment has not been modified, altered or changed by any person other than Arlyn Scales.
Arlyn Scales will have reasonable time to repair or replace the defective equipment. The buyer is responsible for
shipping both ways.
In no event will Arlyn Scales be responsible for travel time, or on-location repairs, including assembly or disassembly of
equipment, nor will Arlyn Scales be liable for the cost of any repairs made by others.
THESE WARRANTIES EXCLUDE ALL OTHER WARRANTIES, EXPRESSED OR IMPLIED, INCLUDING WITHOUT LIMITATION WARRANTIES OF MERCHANTABILITY OR
FITNESS FOR A PARTICULAR PURPOSE. ARLYN SCALES WILL NOT, IN ANY EVENT, BE LIABLE FOR INCIDENTAL OR CONSEQUENTIAL DAMAGES.
ARLYN SCALES AND BUYER AGREE THAT ARLYN SCALES SOLE AND EXCLUSIVE LIABILITY HEREUNDER IS LIMITED TO REPAIR OR REPLACEMENT OF SUCH
GOODS. IN ACCEPTING THIS WARRANTY, THE BUYER WAIVES ANY AND ALL OTHER CLAIMS TO WARRANTY.
SHOULD THE SELLER BE OTHER THAN ARLYN SCALES, THE BUYER AGREES TO LOOK ONLY TO THE SELLER FOR WARRANTY CLAIMS.
NO TERMS, CONDITIONS OR UNDERSTANDING, OR AGREEMENTS PURPORTING TO MODIFY THE TERMS OF THIS WARRANTY SHALL HAVE ANY LEGAL EFFECT
UNLESS MADE IN WRITING AND SIGNED BY A CORPORATE OFFICER OF ARLYN SCALES AND THE BUYER.
14