1
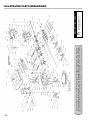
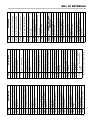
4-Digit Preset Counter Liquid Controls Group An IDEX Fluid & Metering Business Installation & Parts Installation: M500-10 Table of Contents Introduction Maintenance Application Data ....................................................... 3 Preset Models........................................................... 3 Preset Counter Replacement.................................... 8 Environmental Protection.......................................... 8 Lubrication................................................................. 8 Trigger....................................................................... 9 Notch Ring................................................................ 9 Sear........................................................................... 9 Latch......................................................................... 9 Lift Plates................................................................. 10 Reset Keys............................................................... 10 Emergency Stop Button........................................... 10 InStallation Mounting................................................................... 4 Operation and Initial Start-Up.................................... 4 Adjustments.............................................................. 5 Linkage............................................................................. 5 Shutoff............................................................................... 6 Brake........................................................................ 7 Fulcrum..................................................................... 7 Thermal Insulation...................................................... 7 Be Prepared Bill of Materials Illustrated Parts Breakdown..................................... 14 Bill of Materials......................................................... 15 ! WARNING • Before using this product, read and understand the instructions. • All work must be performed by qualified personnel trained in the proper application, installation, and maintenance of equipment and/or systems in accordance with all applicable codes and ordinances. • When handling electronic components and boards, always use proper Electrostatic Discharge (ESD) equipment and follow the proper procedures • Make sure that all necessary safety precautions have been taken. • Provide for proper ventilation, temperature control, fire prevention, evacuation, and fire management. • Provide easy access to the appropriate fire extinguishers for your product. • Consult with your local fire department, state, and local codes to ensure adequate preparation. • Read this manual as well as all the literature provided in your owner’s packet. • Save these instructions for future reference. • Failure to follow the instructions set forth in this publication could result in property damage, personal injury, or death from fire and/or explosion, or other hazards that may be associated with this type of equipment. Introduction The LC 4-digit Preset Counter is a mechanical control device used to accurately and automatically batch liquids. In addition to being mechanically linked to a hydraulically balanced preset valve, optional pneumatic or electrical switches can be mounted on the preset for controlling pump/start circuits or actuating other control circuits, i.e., open/close solenoid valves. The LC preset is a 4-digit, retrograding counter capable of presetting from 1 to 9,999 units (also 10 to 99,990 units in increments of 10 or .1 to 999.9) via front panel mounted push buttons. The two-stage preset counter signals the two-stage preset valve to close partially at a fixed number of units of measure short of final closure. It then signals the valve to close completely when the preset volume has been completely metered. A singlestage preset counter is also available. 2 Publication Updates and Translations The most current English versions of all Liquid Controls publications are available on our web site, www.lcmeter.com. It is the responsibility of the local distributor to provide the most current version of LC manuals, instructions, and specification sheets in the required language of the country, or the language of the end user to which the products are shipping. If there are questions about the language of any LC manuals, instructions, or specification sheets, please contact your local distributor. Suggested Dwell Settings • M-5, MS-5 --- 3-10 U.S. Gallons* • M-7, MS-7 --- 3-10 U.S. Gallons* • M-15, M-25, MS-15 --- 10-30 U.S. Gallons* • M-30, MS-30 --- 10-30 U.S. Gallons* • M-60 --- 30-60 U.S. Gallons* • MS-75 --- 30-60 U.S. Gallons* • MS-120 --- 60-100 U.S. Gallons* These are suggested dwell settings. They may vary with system conditions, i.e., length of line, viscosity of product, etc. Application Data Application Data The LC Preset Counter provides a means of automatically delivering a precise, predetermined quantity of product by controlling the operation of a mechanically linked hydraulically balanced valve. For maximum life, the preset should be operated at or under a maximum of 120 rpm of the right-hand wheel (Example: 1200 gpm in whole gallons, 120 gpm in 1/10 gallons). Presets provide valve control through a mechanical linkage. Presets are available in a choice of models to meet requirements for single-stage or two-stage operation, dwell flow periods, and units of measure. The preset counter is available geared in either a 1:1 or 10:1 ratio. The 1:1 ratio is used when the right-hand wheel of the counter and the right-hand wheel of the preset rotate in unison, with both wheels indicating the same unit of measure. When the right-hand wheel of the counter and preset record whole units, the preset capacity is 9,999. The 10:1 ratio is used when the right-hand wheel of the counter is to indicate tenths and the right-hand wheel of the preset is to indicate whole units (the right-hand wheel of the counter turns ten revolutions for each revolution of the righthand wheel of the preset). The preset is available in a two-stage model to prevent hydraulic shock in the piping system and meter, by gradually reducing and then stopping flow. For installations where hydraulic shock is not a potential problem, single-stage presets are available. OPERATING NOTE: Hydraulic Shock Prevention Hydraulic shock occurs when a volume (mass) of liquid is moving through a pipeline at some flow rate, and a valve is suddenly closed. When the flow is so decreased or stopped, the entire mass of the liquid in the piping system acts as a battering ram, causing a shock effect within the meter. The greater the mass, length of line, and/or velocity, the greater the hydraulic shock. Since the preset/batching valve is usually located downstream of the meter, the meter case, packing gland, and meter internal members receive the full impact of such hydraulic shock, which can cause ruptures, leaks, or other damage. To overcome this hazard, a hydraulically balanced, slowclosing valve should be used in conjunction with a two-stage preset, adjusted for sufficient dwell to decelerate the liquid flow gradually. Preset Models The preset models available provide dwell periods suitable to meet all conditions. The models available with a description of each are listed below. *“Non-random” indicates that the numbers of the preset counter will stop on a digit at the end of a delivery and not at a place between digits. D-4150 Two-stage preset with 30 unit dwell period and a 1:1 ratio side frame. This preset is normally specified on M-5 and M-7 meters when the counter and preset record pounds. Also specified on M-30 and M-60 meters when counter and preset record whole units and on M-15 meters when the counter and preset record in one liter increments; M-60 and larger size meters when counter and preset record in dekaliters. D-4180 Single stage preset (no dwell period) and a 1:1 ratio side frame. This preset is normally specified on M-5 and M-7 meters measuring high viscosity liquids at low flow rates with the counter and preset in pounds or whole units. D-4170 Single stage preset (no dwell period) and a 10:1 ratio side frame. This preset is normally specified on M-5 and M-7 meters measuring high viscosity liquids at low flow rates when the counter is in tenth units and the preset is in whole units. D-4120 Two-stage preset with 3 unit dwell and a 1:1 ratio side frame. This preset is normally specified on M-5 and M-7 meters when the counter and preset are recording in whole units. Also used on M-15 meters when the counter and preset are recording in dekaliters. D-4140 Two-stage preset with a 10 unit dwell and a 1:1 ratio side frame. This preset is normally specified on M-15 meters when the counter and preset are recording in whole units. Also used on M-5 and M-7 meters when the counter and preset are recording in one liter increments and on M-30 meters when the counter and preset are recording in dekaliters. D-4160 Two-stage preset with a 60 unit dwell and a 1:1 ratio side frame. This preset is normally specified on larger meters (M-60, MS-75 and MS-120) when registering in whole units. D-4111 Two-stage preset with 3 unit dwell and a 10:1 ratio side frame. This preset is normally specified on M-7 delivery truck meters when the counter records tenth units and the preset is in whole units. A special clutch assembly prevents non-random* delivery readings. D-4131 Two-stage preset with 10 unit dwell and a 10:1 ratio side frame. This preset is normally specified on M-15 delivery truck meters when the counter records tenth units and the preset is in whole units. A special clutch assembly prevents non-random* delivery readings. 3 Mounting, Operation, and Start-up Mounting Instructions To mount the 4-digit preset to the meter: 1. To mount the Preset Counter, it is necessary to remove the housing (1). This is done by removing the four corner screws (2) and lifting the housing off the base plate. 2. The Preset Counter housing (1) is then mounted to the mechanical register (3) with four hex head screws (04378). To replace the preset base plate (41708) with the attached internals, turn the assembly upside down and gently insert it in the housing. Make sure the slotted shaft (4) of the gear plate is engaged properly with the preset drive shaft (40310). If engagement is not complete, rotate the gear plate drive shaft at the bottom of the preset, to aid in seating. Replace the four screws of the seal wire and screws assembly (40633). 3.Position the trip ring on the base plate taking care that movement of the sear (40375) and latch (40356) assemblies are not hampered. 4. To place the entire assembly “head” on the mounting flange of the meter, turn right side up and position on the counter end cover making sure that the preset counter drive shaft meshes with the slot in the adjuster assembly. Check trip ring for freedom of movement and secure using the four bolts provided with the meter assembly. Operation and Initial Start-Up Single-Stage Operation By pressing the four black buttons located on the front of the preset, the operator selects the quantity to be delivered. Each button controls the number on the wheel above it. There is no need to set the numbers in sequence. Any number can be set first, second, third or fourth. Two-Stage Operation Preset operation is basically the same during singlestage or two-stage closure. The quantity desired is set by the operator and the valve is opened to the full flow position. At a predetermined “dwell” period the preset allows the valve to close partially, slowing the flow to approximately 10-20% of full flow. When the desired quantity has been delivered, the preset releases the valve allowing it to close, completing the delivery. 4 Adjustments Linkage Adjustment There are two main reasons for making linkage adjustments: 1. Field modification of flow direction through the meter. 2. To overcome hydraulic shock. Hydraulic shock occurs when a volume (mass) of liquid is moving through a pipe line and a valve is suddenly closed. When the flow is abruptly stopped, the entire mass of liquid in the piping system acts as a battering ram, causing a shock effect within the meter. The greater the mass, length of line and/or velocity, the greater the hydraulic shock. Since the valve of the meter is usually located at the meter outlet, the meter packing gland and the meter internal components receive the full impact of such hydraulic shock. To prevent this hazard, a two-stage, slow closure valve should be used with the meter. If the linkage adjustment is not properly set, hydraulic shock can occur. To adjust the linkage on standard left-to-right flow meter for a lower flow (shorten linkage), turning the nuts in a clockwise direction will shorten the stroke of the valve reducing the flow rate in dwell. Zero with Linkage Adjustments Linkage adjustments can be used to zero the preset with the counter as long as it does not create hydraulic shock. If hydraulic shock occurs, adjustment of the right-hand wheel will be required (Page 6). If the linkage is too short, the full open notch position may not be reached and the result would be a shut off at dwell rather than at zero. If the linkage is too long, the valve may shut off at dwell never reaching full flow. On those occasions where mass, velocity, etc., are of such magnitude as to preclude the elimination of hydraulic shock by use of a two-stage valve, some sort of shock absorbing device is required. If the dwell flow rate is as slow as possible, but the valve does not reach dwell before final shut off, then a preset with a longer dwell period should be used. If proper adjustment of the preset valve linkage does not result in elimination of hydraulic shock, the viscosity of the product may not be as originally specified, requiring change of the valve dashpot washer. Trip Rings and Ball Joint Extensions The Trip Ring is used only as shown in the parts list with M-5 and M-7 meters. With all larger size meters (M-15, etc.) a Ball Joint Extension is supplied attached to the Trip Ring to permit connection of the ball joint of the linkage arm. When ordering replacement parts, please specify needed parts accordingly. The Preset Trip Ring provides two available notch segments for controlling single-stage valves and four available notch segments for controlling two-stage valves. Should one segment become worn so that it is no longer effective, the trip ring can be repositioned to make use of another available notch segment. The choice of tapped holes and accompanying slots permit trip ring installation for greatest ease in connecting the ball joint of the linkage arm to the trip ring. 5 Adjustments Shutoff Adjustment Preset Counters assembled with meters are adjusted in the factory for proper shut off timing. Due to meter system variations, i.e., rate of flow and/or viscosity, it is sometimes necessary to make shutoff adjustments. Before any shutoff adjustments are made, at least two (2) test runs should be completed. On all presets, make test runs using a value large enough to permit the meter to reach its normal flow rate. For Consistent Shut Off The same flow rate and viscosity must be maintained. When metering products where variation in viscosity and/ or flow rates exist, a two-stage preset should be specified. If after making at least two (2) test runs an error in alignment is indicated, correct the error as follows: 1. Note the position of the zero on the right-hand wheel in relation to the zeros on the other wheels. Determine whether the zero is stopping too early or too late and how much misalignment occurs. 2. Remove the eight (8) screws (A). 3. Remove the bezel (B). 4. Press preset button (C) of units preset wheel (D) until screw (E) appears in opening. 5. Loosen screw (E) in adjustable ring (F) and index the numbers wheel (D) relative to this ring. 6 To correct an early shut off, as illustrated, holding ring (F) in place, move the numbers wheel (D) down enough to correct misalignment. To correct a late shut off, as illustrated, holding ring (F) in place, move the numbers wheel (D) up enough to correct misalignment. 7. Reverse the steps for reassembly. 6 Adjustments Brake Adjustment A brake is used on 1:1 preset to prevent rotation on the counter wheel when setting a number on the right-hand wheel of the preset. To adjust the brake: 1. Remove the register stack (preset, counter, etc.) from the meter. This is done by removing the register stack from the counter mounting flange of the meter. 2. Lift the entire register stack off the meter and turn upside down. 3. Remove the four screws holding the preset base plate (41708*) with attached internals and carefully remove the entire unit from the housing (41709). 4. If the first gear (45208) is loose (moves without lag) the brake should be tightened. Turn the screw (40526) clockwise until the nut (04761) is snug but not tight, against the bracket (40525). 5. If the gear (45208) is too tight and sticks when being rotated, then the brake must be loosened. Thermal Insulation When insulation of the outside of the meter is required to maintain the temperature of a liquid, make sure that the valve linkage movement is not impeded. During application of insulation, continually move the valve handle to be sure movement is not hampered in any way. Fulcrum Adjustment Prior to any fulcrum adjustment, the gap between the trigger (40297) and latch (40356) should be inspected. To inspect the trigger and latch: 1. Remove the four screws connecting the register stack to the counter mounting flange of the meter. 2. Lift the entire register stack off the meter and turn upside down. Inspect the gap between the trigger and latch. The gap should be 1/64” (.4 mm). To adjust the fulcrum: 1. Remove the four screws holding the preset base plate (41708) with the attached internals and carefully remove the entire unit form the housing (41709). 2. Loosen the hex nut (4373) to allow sufficient movement of the fulcrum (41759). 3. Turn the preset on its side and move the fulcrum to set 1/64” (.4 mm) gap between trigger (40297) and latch (40356). 4. After gap is set, tighten the hex nut (4373) and reexamine the gap. If the gap is accurate, reassemble the base plate to housing and the register stack to the counter mounting flange of meter. 5. If the gap is not accurate, repeat the steps above. Refer to the Illustrated Parts Breakdown on Pages 14 & 15 for part number references. 7 Maintenance Replacing the Preset Counter To replace the preset counter: 1. Disconnect the valve linkage (1) from the operating lever (2). 2. Remove the four screws (3) which secure both preset counter (4) and direct reading counter (5) to the meter. 3. Lift both counters off meter and remove the trip ring (6). 4. With the counter assembly turned upside down, remove the four cap screws (7) which secure the cover to the preset counter. 5. Lift the preset counter internals out of the preset cover (4). 6. Install the new preset unit. The longer shaft (3) should extend through the preset. Make sure the slotted shaft in the gear plate is engaged properly with the preset drive shaft (40310). If engagement is not complete, rotate the gear plate drive shaft at the bottom of the preset to aid in seating. 7. Secure the preset to its cover with the four screws (7). Install the trip ring (6). Note the Off Set in the ring should be toward the base, seating trip ring. 8. To replace the register stack on meter, turn the assembly right-side up and position on the counter end cover making sure that the preset counter drive shaft meshes with the slot in the adjuster assembly. Check the trip ring for freedom of movement and secure using the four bolts provided with the meter assembly. Environmental Protection If a meter is exposed to a difficult environment, the unit should be covered. • Be sure to cover the register stack before washing to prevent seepage into the preset and counter housings. • After wash down, carefully dry the register stack to prevent possible damage. • To prevent dust collection inside the housing, insert a hose for low pressure instrument air purge. Refer to the Illustrated Parts Breakdown on Pages 14 & 15 for part number references. Lubrication No field lubrication is necessary. Occasionally it may be necessary to replace certain parts of the preset. All of these repairs require removal of the four screws (04584) and the seal wire and screws assembly (40633). This will release the base plate with attached internals. Carefully remove this entire assembly from the housing (41709). 8 Caution Excessive lubrication will attract foreign contaminants in difficult environments and shorten life of the device. Maintenance Trigger To replace the trigger: Sear To remove the sear: 1. Remove the E-Rings (02188) from the upper comb shaft (40295) and slide the shaft out. 1. Remove the shoulder bolt (42784) and self-locking nut (07197). 2. Disconnect the trigger spring (40371) from the trigger (40297). 2. Disconnect the sear spring (40329) and the latch spring (40324). This will release the sear so it can be lifted off the base plate for replacement. 3. To reassamble, insert the new trigger (40297). Slide the upper comb shaft (40295) into position and replace the E-Rings (02188). Make sure the slot in the trigger straddles the fulcrum shaft. 4. Reconnect the trigger spring (40371). 5. Check the trigger/fulcrum adjustment (Page 7). Notch Ring To replace the notch ring (40539): 1. Remove the front body fit screw (40374) and the locknut (06099). This will release the side frame (45210) allowing it to swing like a gate, permitting removal of the bushing (40285) from the shaft (40282). Slide the shaft (40282) out only far enough to clear the numbers wheel (40287). Remove the numbers wheel (40287) with the inserted ratchet assembly (43064) and attached the notch ring (40539). 2. Remove the notch ring screw (40974) and spread the notch ring enough to remove it from the numbers wheel. Occasionally a burr in the notch ring is all that is wrong. Remove the burr by gently filing it off. Do not mar the surface of the notch ring. 3. To reassamble, replace the sear (40375), and reinstall the shoulder bolt (42784) and self-locking nut (07197). Reconnect the sear spring (40329) and the latch spring (40324) and check sear for freedom of movement. 4. If the sear does not move freely, check the shoulder bolt (42784) and/or preset base plate for burrs. Remove any burrs by gently filing. Caution should be taken not to alter the parts contour. Latch To remove the latch: 1. Disconnect the trigger spring (40371). 2. Remove the shoulder bolt (40330) and the internal washer (04644) and the nut (04373). This will release the latch so it can be lifted off the base plate (41708). 3. To reassamble, replace the latch (40356), shoulder bolt (40330), washer (04644) and the nut (04373). 4. Reconnect the trigger spring (40371). 5. Check the trigger/fulcrum adjustment (Page 7). 3. To reassemble, replace the notch ring on the numbers wheel and replace the notch ring screw (40974). Be sure to reinstall the notch ring in exactly the same position it was in. Reversing it will give a single trigger when twostage shut off is required. 4. Replace the numbers wheel with the attached notch ring and inserted ratchet assembly on the number wheel shaft (40282). Swing the side frame assembly back into position, slide the shaft (40282) in place, replace the bushing, then the self-locking nut (6099) and the body fit screw (40374). Caution When replacing the self-locking nut (06099) DO NOT OVERTIGHTEN. If this nut is overtightened it will collapse the side frames or bind the wheels. Refer to the Illustrated Parts Breakdown on Pages 14 & 15 for part number references. 9 Maintenance Lift Plates In order to replace the lift plates, a spare lower comb bridge shaft (40368) will be required. To replace the lift plates: 1. Remove one of the E-Rings (02188) from the upper comb shaft (40295). This will permit sliding the shaft out. 2. Lay the comb (40294) still attached to the springs back across the guide plate (45209). To remove the forks, the number wheels must be rotated so the forks are in the full forward position. Remove the fork springs (40532) and disconnect the (5) comb springs (40296). 3. Remove the (3) E-Rings (02188) from the lower comb bridge shaft (40368) and slide the shaft with spacer (45217) out just far enough to release one side of the first lift plate (46228). Slide the spare lower comb shaft (40368) into this side. Do not catch the lift plate. Finish sliding the first lower comb shaft out, following through with the spare shaft, releasing the lift plates (46228 and 46229) as you go. This will release the lift plates while holding the (3) detents (40278) and the spacers in position. 4. To remove the lift plates, disconnect the lift plate springs (40981 and 40329) from the side frame and lift plates. Remove the lift plates from the base plate. 5. To reassemble, replace the lift plate (40388). Now with the original lower comb bridge shaft, slide the replacement shaft out following through with the original shaft, catching the lift plate as you go. Make sure that the spacer (45217) is not lost or omitted. 6. Reconnect the lift plate spring (40981) and replace the E-Rings (02188). 7. Replace the three forks one at a time. Next replace the fork springs (40532) and the loading washer (on the fork on the right hand side of the preset ONLY). Then replace the (3) for grommets (45230) and reconnect the (5) comb springs (40296). 8. Reposition the comb (40294) and replace the upper comb shaft (40295) securing with the two E-Rings (02188). 10 Reset Keys To replace preset keys: 1. Remove the front two body fit screws (40374). This will allow the entire key base assembly (45220) to slide out of the preset unit. 2. Remove the E-Rings (02188 and 07268). Release the pawl springs (41019) and remove the cotter pins (06239). This will permit removal of the preset buttons (45223). 3. To reassemble, slide new or repaired preset button (45223) into position and replace the cotter pins (06239) and pawl springs (41019). Next replace the E-Rings (02188 and 07268). 4. Slide the entire key base assembly (45220) into the housing and replace the two body fit screws (40374) Emergency Stop Button Part of the Key Base Assembly To replace emergency stop button: 1. Follow step 1 under Reset Keys. 2.. Remove the E-Ring (06815) which will release the emergency stop button (45224) and the key return spring (40538). 3. To reassemble, replace the key return spring (40538) and emergency stop button (45224) and secure with the E-Ring (06815). 4. Follow step 4 of the Reset Keys instructions Refer to the Illustrated Parts Breakdown on Pages 14 & 15 for part number references. Troubleshooting Problem Stopping at random. PROBABLE CAUSE AND SOLUTION: Worn sear. Replace sear. Worn trip ring. Remove trip ring and select new Notch set. Reposition the ball joint on the trip ring. Reinstall the trip ring. Burr on notch ring. Remove burr or replace notch ring. Right-hand comb finger bent. Adjust right-hand comb finger so it clears the right hand wheel by 1/32” when the remaining wheels are any number other than zero. Comb fingers are bent or damaged. Adjust sensing fingers so that fingers are touching the wheel at the same moment. Problem Preset won’t latch in full flow. PROBABLE CAUSE AND SOLUTION: Worn sear. Replace sear. Worn trip ring. Replace trip ring. Worn sear and latch. Replace sear and latch. Fulcrum adjustment moved. Adjust fulcrum. Valve linkage out of adjustment. Adjust linkage. Problem Product delivered registers more than the preset amount. PROBABLE CAUSE AND SOLUTION: Right-hand wheel of the counter is running 10 times faster than the right-hand wheel of the preset. Wrong mode preset is being used. Change to a 1:1 ration preset with needed dwell. Problem Product delivered registers less than the preset amount. PROBABLE CAUSE AND SOLUTION: The units wheel is over-running on transfer. Improper springs used on forks. Replace the fork springs and ensure the correct number of washers are being used. 11 Troubleshooting Problem The register rolls back. PROBABLE CAUSE AND SOLUTION: The brake is not holding. Adjust the brake. Problem The next digit to the left transfers while resetting the right-hand digit. PROBABLE CAUSE AND SOLUTION: The lift brake is damaged. Replace the lift brake. Problem The reset keys stick. PROBABLE CAUSE AND SOLUTION: Dirt or ice may be jamming the movement of the key or the shaft may be bent. Clean and lubricate components or replace damaged parts. Problem The emergency button sticks. PROBABLE CAUSE AND SOLUTION: Bent or damaged movement. Replace the damaged parts. Problem The pipes rattle. PROBABLE CAUSE AND SOLUTION: Hydraulic shock. Two-stage valve closing is required. Low flow position must be at a low flow rate. Adjust linkage to obtain both the two-stage closure and the low flow rate. Problem Stopping in dwell period. PROBABLE CAUSE AND SOLUTION: mproper preset adjustment. Refer to “Preset Counter shutoff Adjustment” on Page 7. Improper valve adjustment. Refer to the valve service manual. Wrong trip ring notch selection. Refer to “Linkage Adjustment” on Page 6. Notch ring set for single-stage. Remove and reverse. Valve latched in dwell flow when wide open. Adjust the linkage. 12 Troubleshooting Problem The tank overfilled. PROBABLE CAUSE AND SOLUTION: The valve did not close. Refer to the valve service manual. The tank was not empty. Make sure the tank is empty. Make sure it is large enough to hold the preset amount. Ensure the correct amount was set on the preset. The preset valve was within or smaller than the dwell period for two-stage presets. Ensure to set the preset quantity larger than the dwell. Single stage model used with two-stage trip ring notch set. Adjust the notch ring for single-stage closure. Presets with switch operated valve. The switch did not close properly. Disconnect power and open the switch case to determine if the cam is operating properly. Comb did not engage notch ring. Check for proper comb adjustment. Check for bind in comb pivot preventing engagement of the notch ring. High temperature product being used with a net preset. Change to gross or fill lesser quantity. Problem Running past zero and stopping. PROBABLE CAUSE AND SOLUTION: Improper valve adjustment. Refer to the valve service manual. Improper preset adjustment. Refer to “Preset Counter Shutoff Adjustment” on Page 7. Wrong trip ring notch position. Refer to “Linkage Adjustment” on Page 6. Wrong linkage adjustment. Refer to “Linkage Adjustment” on Page 6. Interference by dirt, ice, insulation, etc., with a trip ring or linkage. Refer to “Maintenance” on Pages 9-11. Replace worn component. Worn trigger. Fulcrum adjustment disturbed. Adjust fulcrum. Problem Stopping before zero. PROBABLE CAUSE AND SOLUTION: Improper notch ring adjustment. Adjust the notch ring. Improper valve adjustment. Refer to the valve service manual. 13 … 14 The same parts are used for all model Presets, except (1) the number wheels 40286, 40972, 41026 and 42124 (see model description, pages 3 and 4) and (2) the gears 45204, 45205, 45206, 45207, 45208, that are part of the side frame and gear Assemblies (see description in listing below, Part Nos. 45213 and 45214). 40528 Wheel Spring Washer (1) 46595 Wheel Slider Space (1) Model D4131 & Model D4111 Add Illustrated Parts Breakdown Retainer E-Ring per illustration Groove Pin Jam Nut (2) Retaining Ring Hex Head Screw (4) Internal Shakeproof Washer (4) Square Nut (used on 45212) Flat Head Machine Screw Locknut Groove-Pin Dowel Pin (2) Washer (2) Self-Tapping Screw (8) Retainer E-Ring Self-Tapping Screw (2) Washer Gear Washer Face Gear Detent (3) Number Wheel Shaft Number Wheel Bushing (3) Number Wheel Spacer 04372 04373 04377 04378 04644 04761 06127 06099 06209 06251 06252 09154 06880 06887 07219 07361 40122 40278 40282 40284 40285 Units Wheel Comb Comb Shaft-Upper Comb Spring (5) Trigger Counter Drive Shaft Register Drive Bushing Latch Spring Emergency Stop Spring 40287 40294 40295 40296 40297 40310 40311 40324 40326 40286* Number Wheel (3) Lift Plate Washer 02188 Description V1095 Part Comb Bridge Shaft-Lower Trigger Spring Body Fit Screw (4) Sear Comb Bridge Brake Spring (used on 45212) Bracket (used on 45212 Lift Screw (used on 45212) Spring Washer Adjustable Notch Ring Seal, Wire & Screws Assembly 40368 40371 40374 40375 40386 40524 40525 40526 40528 40539 40633 Loading Washer 40982 Housing Adjustable Fulcrum Assembly 41709 41759 Base Plate Pinion Shaft Idler Shaft 43930 45200 45201 *Number wheel varies with Preset Model. 45204 Trip Ring 42982 Pinion Gear, 24 & 51 teeth (for 1:1 gear ratio assembly No. 45214) Sear Pivot pin 42784 42124* Number Wheel (60 unit dwell) Gasket 41706 41026* Number Wheel (10 unit dwell) Pan Head Screw 40974 40972* Number Wheel (30 unit dwell) Ratchet Assembly (for Preset with 1:1 side frame) Latch Assembly Fork Assembly (3) Shoulder Bolt Sear Spring (2) Description 45231 40356 40346 40330 40329 Part Ny-Liner Retaining Ring Shaft Retaining Ring (4) Button Ny-Liner (5) Key Return Spring (5) Pawl Spring (4) Unit Wheel Pawl Pawl (3) Rubber Channel Pre-Set Key Base Pre-Set Button (4) Emergency Stop Button Slider (2) 06815 07268 07270 40538 41019 41024 41043 41755 45221 45223 45224 45227 Units Wheel Slider (2) Cotter Pin (8) 06239 45238 Retainer E-Ring (4) PRESET KEY BASE ASSEMBLY 02188 45220 Bezel Replacement Fork Spring (3) 46763 48591 Emergency Stop Lever 46505 End Spacer Side Frame (2) same part for left and right 45210 47464 Guide Plate 45209 Lift Plate Spring Gear, 54 teeth for both 1:1 & 10:1 gear ratio assemblies 45208 47082 Idler Gear, 24 teeth for 1:1 gear ratio assembly 45207 45214 Counter Drive Shaft Bushing Assembly inion Gear, 18 & 24 teeth P for 10:1 gear ratio assembly 45206 45213 46766 Idler Gear, 17 & 60 teeth for 10:1 gear ratio assembly Description 45205 45213 Part Bill of Materials 15 Liquid Controls 105 Albrecht Drive Lake Bluff, IL 60044 (847) 295-1050 Liquid Controls Europe/SAMPI Via Amerigo Vespucci 1 55011 Altopascio (Lucca), Italy +39 0583 24751 Liquid Controls India 808 VCCI Complex GIDC Makarpura Vadodara-390 101 Gujarat, India +91 265 2631855 Toptech Systems 1124 Florida Central Parkway Longwood, FL 32750 (407) 332-1774 Nateus Business Park Nieuwe Weg 1-Haven 1053 B-2070 Zwijndrecht (Antwerp), Belguim +32 (0)3 250 60 60 Faure Herman Route de Bonnetable B.P. 20154 72406 La Ferté-Bernard Cedex, France +33 (0)2 43 60 28 60 6961 Brookhollow West Drive Houston, TX 77040 (713) 623-0808 Liquid Controls Sponsler 105 Albrecht Drive Lake Bluff, IL 60044 (847) 295-1050 105 Albrecht Drive Lake Bluff, IL 60044-2242 1.800.458.5262 • 847.295.1050 Fax: 847.295.1057 www.lcmeter.com © 2004 Liquid Controls Pub. No. 48990B (2/10) Corken 3805 Northwest 36th St. Oklahoma City, OK 73112 (405) 946-5576