1
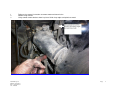
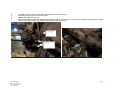
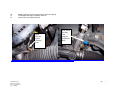
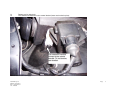
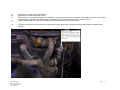
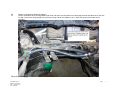
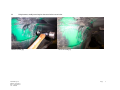
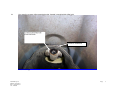
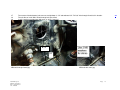
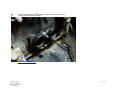
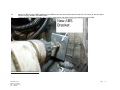
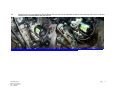
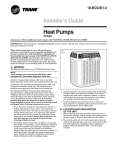
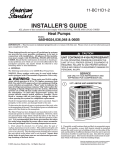
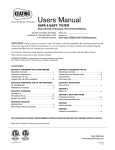
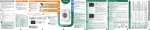
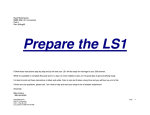
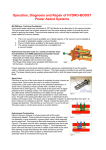
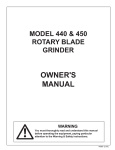
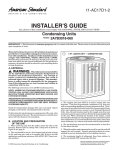
Nash Motorsports
BMW E36 LS1 Conversion
Part 1
Rev 18Oct05
Prepare the Car
Follow these instructions step by step and by the end your car will be ready for marriage to your LS1 powertrain.
While it is possible to complete this prep work in a weekend it is more realistic to plan on 4-5 good days to get everything ready.
It is best to print out these instructions in black and white. Color is nice but it takes a long time and you will burn up a lot of ink.
If there are any questions, please call. I am here to help and want your swap to be a fantastic experience!
Sincerely,
Mike Collins
586-943-6385
1
2
3
Follow service manual instructions to remove motor and transmission.
Remove evap canister.
Using sawzall remove bracket shown in picture. Grind sharp edges and paint bare metal.
Nash Motorsports
E36 LS1 Conversion
Part 1 – Prep the Car
Ver. 18Oct05
Page
2
4
5
6
7
Cut rubber PS reservoir return hose and supply hose close to the reservoir.
Disconnect high pressure line from PS pump.
Remove PS pump and reservoir.
Note: some models use brackets welded to the body to mount the PS reservoir. If you have these brackets remove them by cutting
with a sawzall. Grind away sharp edges and paint exposed metal surfaces.
PS Bracket Removed 1
Nash Motorsports
E36 LS1 Conversion
Part 1 – Prep the Car
Ver. 18Oct05
Page
3
10
11
12
Remove high pressure line from PS rack (Line from pump)
Install power steering line adapter into rack.
Leave return line attached to rack.
High
Pressure
Power
Steering
Line
PS Line with tape.jpg
Nash Motorsports
E36 LS1 Conversion
Part 1 – Prep the Car
Ver. 18Oct05
New Power
Steering
Line
Adapter
Installed in
Rack
PS rack with adapter.jpg
Page
4
13
14
Remove cruise control unit
Use sawzall to remove front cruise control bracket (leave rear bracket in place)
Cruise control and bracket.jpg
Nash Motorsports
E36 LS1 Conversion
Part 1 – Prep the Car
Ver. 18Oct05
Page
5
15
16
17
18
19
Powerwash and clean engine compartment
Place vehicle in work area on jack stands.
While not necessary, removal of fenders, AC condenser, and entire front clip makes installation of the motor much easier and is highly
recommended. It probably takes about 2 hours to completely remove clip but believe me this is time well spent!
Locater heater control valve (next to brake booster) and document how the lines are attached.
Disconnect coolant lines and electrical wires and remove heater control valve. Control valve will be relocated to passenger side of
radiator.
Heater control valve.jpg
Nash Motorsports
E36 LS1 Conversion
Part 1 – Prep the Car
Ver. 18Oct05
Page
6
20
21
Remove insulation from firewall and tunnel.
Using a combination of the existing BMW heater hose and new hose rout heater hoses along top of tunnel and attach to AC line with
tie strap. Leave hoses long enough to reach the passenger side of the radiator as this is where the heater control valve will be
relocated.
Heater hose routing.jpg
Nash Motorsports
E36 LS1 Conversion
Part 1 – Prep the Car
Ver. 18Oct05
Page
7
22
Using hammer, modify tunnel to give clearance for the transmission.
Hammer tunnel.jpg
Nash Motorsports
E36 LS1 Conversion
Part 1 – Prep the Car
Ver. 18Oct05
Tunnel finished.jpg
Page
8
23
Use sawzall to remove shifter mounting bracket. (located in tunnel behind shifter hole)
Remove Insulation
Shifter bracket.jpg
Nash Motorsports
E36 LS1 Conversion
Part 1 – Prep the Car
Ver. 18Oct05
Page
9
24
25
Inside engine compartment remove brake lines from master cylinder, disconnect clutch fluid line from brake reservoir.
24.1 If you have a 92 – 94 car then unplug sensor from booster and install 380 ohm resister.
Inside car, remove driver side kick panel, hush paned, knee bolster cover, and knee bolster so you can get to the brake pedal
brackets.
Knee Bolster
Panels.jpg
Nash Motorsports
E36 LS1 Conversion
Part 1 – Prep the Car
Ver. 18Oct05
Knee bolster.jpg
Page
10
26
27
28
Remove 4 nuts from brake booster studs.
Remove brake booster push rod from brake pedal.
Remove master cylinder and booster from car.
Booster Studs.JPG
Nash Motorsports
E36 LS1 Conversion
Part 1 – Prep the Car
Ver. 18Oct05
Page
11
29
30
Remove retaining clip from clutch master cylinder and remove clutch line from clutch master cylinder.
Reinsert clip into clutch master.
Clutch Line.jpg
Nash Motorsports
E36 LS1 Conversion
Part 1 – Prep the Car
Ver. 18Oct05
Page
12
31
32
From inside of car unplug electrical connectors at the two switches on the pedal bracket
Remove brake pedal, clutch pedal, bracket, and switches.
Brake switches.jpg
Nash Motorsports
E36 LS1 Conversion
Part 1 – Prep the Car
Ver. 18Oct05
Page
13
33
Send brake pedal, pedal bracket, and switches to the following address to be reworked to accept the hydroboost pushrod.
Nash Motorsports
7315 Greeley St
Utica, MI 49317
34
35
36
Remove front and rear brake lines from ABS modulator (leave master cylinder lines attached). Remove ABS modulator and clean area
behind modulator.
Cut ABS brackets using sawzall.
Paint exposed metal.
Cutting ABS bracket.jpg
Nash Motorsports
E36 LS1 Conversion
Part 1 – Prep the Car
Ver. 18Oct05
Page
14
37
38
39
From center of brake booster hole measure straight down 6 1/4" and outboard 3/4". Drill 3/8" hole through firewall at this location.
From inside car install M8 x 25 bolt through hole just drilled.
Install 2 washers provided over bolt to act as shims. (see pics)
AB
6 ¼”
ABS bolt through firewall.jpg
Nash Motorsports
E36 LS1 Conversion
Part 1 – Prep the Car
Ver. 18Oct05
ABS bolt with shims.jpg
Page
15
40
41
Cut the legs off of the rear ABS bracket and drill out existing hole to 3/8"
Attach rear ABS bracket to firewall.
ABS bracket installed.JPG
Nash Motorsports
E36 LS1 Conversion
Part 1 – Prep the Car
Ver. 18Oct05
Page
16
42
43
Attach new ABS bracket to ABS modulator. Place ABS into rear bracket and allow front bracket to rest on frame rail. Be sure rubber
isolators are fully seated in rear ABS bracket.
Using new ABS bracket as template, drill 1/4" hole in wheel house and attach bracket using m8 bolt and nut provided.
Drilling hole in fender for ABS bracket.JPG
Nash Motorsports
E36 LS1 Conversion
Part 1 – Prep the Car
Ver. 18Oct05
Page
17
44
Rebend brake lines and reattach to ABS modulator. Be sure rear line has adequate clearance to the steering shaft. Use a 13mm box
end wrench as a bending tool to work the rear line.
ABS installed.JPG
Nash Motorsports
E36 LS1 Conversion
Part 1 – Prep the Car
Ver. 18Oct05
Brake lines reattached 2.JPG
Page
18
45
46
Place clutch fluid reservoir on firewall and mark mounting hole locations. (see pic)
Drill 1/4" holes for the clutch reservoir and attach using m6 button head SS machine screws.
Clutch Reservoir Location.JPG
Nash Motorsports
E36 LS1 Conversion
Part 1 – Prep the Car
Ver. 18Oct05
Page
19
47
48
49
50
Attach Fuel Pressure Regulator to the bracket on the shock tower using m6 button head SS machine screws. The attached picture
shows an early fuel line routing. Pictures of the actual routings were lost in a hard drive crash - sorry.
Run the fuel pressure line (SS braided line) rearward and tie strap to the ABS bracket pulling the fuel line as close to the fender as
possible then down next to the frame rail and back to the pressure line on the BMW (the pressure line is the one with the fuel filter). Do
not connect yet.
If you have not replaced your fuel filter recently do it now! This motor requires lots of fuel during and a dirty filter will starve the motor.
Run the fuel return line from the BMW forward to the fuel pressure regulator. Run this line next to and below the fuel pressure line. Tie
strap the lines together and keep as close to the fender and rail as possible. Do not connect at this time. We want to be sure there is
good clearance to the headers before cutting the line to its final length.
Fuel Regulator and Lines.JPG
Nash Motorsports
E36 LS1 Conversion
Part 1 – Prep the Car
Ver. 18Oct05
Page
20
50.1
Remove power steering pressure line and install m14 to -6 metric adapter.
PS Pressure line at rack.jpg
Nash Motorsports
E36 LS1 Conversion
Part 1 – Prep the Car
Ver. 18Oct05
Page
21
51
52
53
54
55
56
57
58
Remove steering rack.
Remove front sway bar, and control arms.
Remove front cross member.
Leave struts, knuckles, and brakes installed.
Remove motor mounts from front crossmember and loose install new M3 mounts.
Tighten mounts just enough to engage the antirotation tabs.
From inside of car remove large rubber shifter grommet.
Use Sawzall or saber saw to enlarge shifter hole 1" rearward. Be careful not to cut into console when cutting out tunnel. Remove
console to eliminate this concern.
Trim Carpet.JPG
Nash Motorsports
E36 LS1 Conversion
Part 1 – Prep the Car
Ver. 18Oct05
Tunnel Cut.JPG
Page
22
59
60
Inside engine compartment cut battery tray as shown
Remove PCM mounting brackets in the PCM compartment.
Cut Battery Shelf.JPG
Nash Motorsports
E36 LS1 Conversion
Part 1 – Prep the Car
Ver. 18Oct05
PCM brackets removed.JPG
Page
23
61
Cut edge of PCM access hole enough to allow fcar PCM to be installed into PCM mounting compartment.
Cut Edge of PCM Compartment.JPG
Nash Motorsports
E36 LS1 Conversion
Part 1 – Prep the Car
Ver. 18Oct05
Page
24
62
If not already done, remove front bumper cover.
Bumper trim.JPG
Nash Motorsports
E36 LS1 Conversion
Part 1 – Prep the Car
Ver. 18Oct05
Bumper Bolts.JPG
Page
25
63
Remove lower radiator valance and cut using saber saw as shown.
Lower Radiator Valence.JPG
Nash Motorsports
E36 LS1 Conversion
Part 1 – Prep the Car
Ver. 18Oct05
Page
26
64
Prepare the BMW electrical harness.
a.
Find the fuel pump relay and locate the brown / green attached to socket 87.
Cut this wire leaving long enough to attach a crimp on eyelet connector and attach to a ground lug.
Relay Locations.jpg
Nash Motorsports
E36 LS1 Conversion
Part 1 – Prep the Car
Ver. 18Oct05
Page
27
BMW Electrical Cont.
Find the following wires in the BMW wiring harness:
1 AC Request
2 Low Oil Level
3 Tachometer
4 Check Engine
5 Generator Status
6 Oil Pressure
7 Temp Gauge Power
8 Temp Gauge Ground
9 Backup Lights
10 Backup lights
11 Key on power
12 Start
b.
Violet / Grey
Brown / Green
Black
Grey
Blue
New wire
Brown / Yellow
Brown / Violet
Blue / Yellow
Green / White
Green
Black / Yellow
Connected to Data Link
No
No
Yes
No
Yes
No
No
No
No
Yes
No
Yes
Cut wires 1-10 leaving them about 18" long.
Note: For wires connected to the Data Link be sure to cut these after the Data Link splice.
Nash Motorsports
E36 LS1 Conversion
Part 1 – Prep the Car
Ver. 18Oct05
Page
28
c. Bundle wires 1-8 together, cut to length, and install the wires into the female 8 pin connector. The pins are soldered onto the wires and
then installed into the connector.
d. Bundle wires 10 and 11 together and attach 2 pin connector using crimp splices.
Electrical 8 Wire Harness 1.JPG
Nash Motorsports
E36 LS1 Conversion
Part 1 – Prep the Car
Ver. 18Oct05
Page
29
e. Locate the large green wire (key on power). Pull this wire from the harness and leave as long as possible. This wire will be used to
power the new electrical center.
f. Locate the large black / yellow wire. Pull this wire from the harness and leave as long as possible. This is the “Start” wire coming from
the ignition switch.
g. Run the green “key on” wire and the black / yellow “start” wire in a conduit with the battery wire that attached to the BMW electrical
center. Crimp a blade style connector on the green wire and on the black / yellow wire. It is best to put a male on one and a female on
the other. This will prevent the wires from being hooked up wrong.
BMW power conduit.JPG
Nash Motorsports
E36 LS1 Conversion
Part 1 – Prep the Car
Ver. 18Oct05
Page
30
65
67
Remove data link connector (DLC) from the fcar body wiring harness leaving leads about 12" long.
Remove the glove box inside the car and mount the DLC in the back top of the glove box.
Data Link Connector.JPG
Nash Motorsports
E36 LS1 Conversion
Part 1 – Prep the Car
Ver. 18Oct05
DLC mounting location 1.JPG
Page
31
68
69
Drill a 3/8" hole in the firewall to run the DLC wires through. This hole should be located so the wires will come out below the battery
tray. Install rubber grommet in this hole.
Use excess DLC wire to make jumper wires that go through the rubber grommet in the dash and connect the DLC to the engine
harness, power, and ground. Use crimp on connectors on each end of the jumpers to connect to the DLC and engine harness.
DLC Grommet.JPG
Nash Motorsports
E36 LS1 Conversion
Part 1 – Prep the Car
Ver. 18Oct05
Glovebox removed.JPG
Page
32
70
Install new electrical center (EC) onto battery tray as shown in picture.
Electrical center mounting screws.JPG
Nash Motorsports
E36 LS1 Conversion
Part 1 – Prep the Car
Ver. 18Oct05
Page
33
71
72
73
74
75
Connect the ground (black) wire to the ground terminal on the battery tray.
Cut long black wire to length and connect to ground wire coming from the DLC.
Connect DLC red jumper wire to the bullet connector coming from fuse #7
Large power feed connects to the middle battery terminal. Do not connect until you are ready to start the motor.
Run the long fan wires (F1 & F2) along the edge of the fender up to radiator area. Secure with tie straps.
Electrical center front view.JPG
Nash Motorsports
E36 LS1 Conversion
Part 1 – Prep the Car
Ver. 18Oct05
Page
34
For your reference, this is a schematic of the new electrical center (crude but accurate):
Nash Motorsports
E36 LS1 Conversion
Part 1 – Prep the Car
Ver. 18Oct05
Page
35
76
77
78
79
80
81
Install reworked braked pedal and bracket.
Attach clutch line to barb fitting on reservoir.
Attach steel clutch line to clutch master cylinder being sure it snaps into place past the retaining clip. Loosen ABS modulator and move
out of the way if you need more clearance to get to this fitting.
Remove rubber hose from end of steel clutch line and screw the m10 to -4 flare clutch line adapter to the end of steel clutch line.
Install Hydroboost brake booster and master cylinder.
Attach booster push rod to the brake pedal.
Brake pedal connected to booster.JPG
Nash Motorsports
E36 LS1 Conversion
Part 1 – Prep the Car
Ver. 18Oct05
Page
36
82
83
84
85
86
88
.
Bend brake lines and attach brake lines to master cylinder. Note: the inboard line goes to the rear MC port.
Fill brake fluid reservoir and bleed brakes
Test brakes for leaks by applying holding high force on the brake pedal for 10-15 seconds then inspect each fitting at the master
cylinder and ABS modulator for any signs of leaking.
Slide small diameter firesleeve onto steering shaft to protect rubber sleeve.
Slide large diameter firesleeve onto steering rack flex coupler.
Firesleeve
THAT’S IT FOR CAR PREP!
Nash Motorsports
E36 LS1 Conversion
Part 1 – Prep the Car
Ver. 18Oct05
Page
37
Revisions:
01Jan07 Modified brake line installation to just rebend and attach to master cylinder. Do not cut and flare.
Nash Motorsports
E36 LS1 Conversion
Part 1 – Prep the Car
Ver. 18Oct05
Page
38