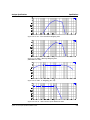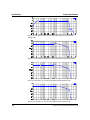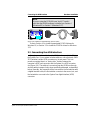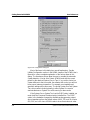
1
System One Description, Installation, and APWIN Guide Version 1.5 December 1997 Audio Precision PN 8211.0004 Copyright 1996, 1998 by Audio Precision, Inc. All rights reserved. No part of this document may be reproduced or transmitted in any form or by any means, electronic or mechanical, including photocopying, recording, or by any information storage and retrieval system, without permission in writing from the publisher. Audio Precision , System One , System One + DSP , System Two , FASTTEST , APWIN , Portable One , and Dual Domain are trademarks or registered trademarks of Audio Precision, Inc. This mark signifies that the product conforms to all applicable requirements of the European Community. A Declaration of Conformance is included with the user information that describes the specifications used to demonstrate conformity. Published by: Audio Precision, Inc. PO Box 2209 Beaverton, Oregon 97075-2209 U.S. Toll Free: 1-800-231-7350 Tel: (503) 627-0832 Fax: (503) 641-8906 email: [email protected] Web: www.audioprecision.com Printed in the United States of America ii System One Description/Installation/APWIN Guide Contents Table of Figures ............................................................................................... vi Safety Information ......................................................................................... viii Safety Symbols................................................................................................. ix Disclaimer ....................................................................................................... ix 1. Introduction 1.1 Scope of This Manual..................................................................... 1-1 1.2 Related Documentation ................................................................. 1-1 1.3 Overview ...................................................................................... 1-2 1.3.1 General System................................................................. 1-2 1.3.2 System One...................................................................... 1-3 1.3.3 Switchers.......................................................................... 1-5 1.3.4 DCX-127 Multi-Function Module...................................... 1-6 1.3.5 SIA-322 Serial Interface Adapter ....................................... 1-7 1.3.6 GAT1 APIB to GPIB Translator .......................................... 1-8 2. Specifications 2.1 System One Generator Specifications ............................................. 2-1 2.1.1 Frequency Related............................................................ 2-1 2.1.2 Amplitude Related............................................................ 2-1 2.1.3 Distortion ......................................................................... 2-2 2.1.4 Output Related................................................................. 2-2 2.1.5 Auxiliary Signals................................................................ 2-2 2.1.6 Dual Output Related (SYS-22 and SYS-20 only) ................. 2-2 2.2 Analyzer Specifications................................................................... 2-3 2.2.1 Input Related.................................................................... 2-3 2.2.2 Amplitude Measurement Related ...................................... 2-4 2.2.3 Bandpass/Bandreject Related ............................................ 2-4 2.2.4 Frequency Measurement Related ...................................... 2-5 2.2.5 THD + N Measurement Related....................................... 2-6 2.2.6 Detector Characteristics .................................................... 2-7 2.2.7 Bandwidth Limiting Filters................................................. 2-7 2.2.8 Monitor Outputs............................................................... 2-8 2.2.9 Dual Input/Phasemeter Related......................................... 2-8 2.2.10 Phase Measurement.......................................................... 2-9 2.2.11 Crosstalk/Ratio Measurement ............................................ 2-9 2.2.12 Option Filters ................................................................... 2-9 2.2.13 IMD Option ................................................................... 2-17 2.2.14 Wow & Flutter Analyzer Option ...................................... 2-19 2.2.15 Burst Noise-Squarewave Option (BUR)............................ 2-20 System One Description/Installation/APWIN Guide iii 2.3 DSP Specifications ....................................................................... 2-21 2.3.1 Analog Input Related Specifications................................. 2-22 2.3.2 Analog Output Related ................................................... 2-22 2.3.3 Digital Input/Output Related (System One Dual Domain only)..................................... 2-23 2.3.4 Signal Output in Digital Domain ..................................... 2-24 2.3.5 Real-Time Program Descriptions ..................................... 2-24 2.3.6 Block Mode Program Descriptions................................... 2-26 2.4 Switchers Specifications ............................................................... 2-28 2.5 DCX-127 Multi-Function Module Specifications ........................... 2-28 2.5.1 DC Volts Measurements.................................................. 2-28 2.5.2 Resistance Measurements ............................................... 2-29 2.5.3 DC Outputs.................................................................... 2-29 2.5.4 Digital Input/Output ....................................................... 2-29 2.5.5 Auxiliary Output Ports..................................................... 2-29 2.6 SIA-322 Serial Interface Adapter Specifications ............................. 2-30 2.7 Primary Power and Fuse Information (all components).................. 2-30 2.8 Environmental (all components) ................................................... 2-31 2.9 Physical Dimensions and Weights ................................................ 2-31 2.9.1 System One.................................................................... 2-31 2.9.2 Switchers, DCX-127, and SIA-322................................... 2-31 2.10 Regulatory Compliances (all components) ................................... 2-32 2.11 Software and Control ................................................................. 2-32 2.11.1 Computer Requirements................................................. 2-32 2.11.2 ISA-WIN APIB Card ........................................................ 2-33 2.11.3 PCM-WIN Card.............................................................. 2-33 2.11.4 Cables and Adapters ....................................................... 2-33 3. Hardware Installation 3.1 Rack Mounting .............................................................................. 3-1 3.1.1 System One...................................................................... 3-1 3.1.2 Switchers, SIA-322, and DCX-127..................................... 3-1 3.2 Primary Power Considerations........................................................ 3-1 3.2.1 AC Mains Switch Required................................................ 3-1 3.2.2 Checking or Changing Power Line Voltage......................... 3-2 3.2.3 Fuse Information............................................................... 3-3 3.2.4 Changing Fusing Arrangement........................................... 3-4 3.2.5 Proper Environment.......................................................... 3-4 3.3 Installing ISA-WIN APIB Card ......................................................... 3-4 3.3.1 Address Jumper Settings.................................................... 3-5 3.4 Installing PCM-WIN PCMCIA Interface Card................................... 3-6 3.5 Connecting the APIB Interface........................................................ 3-7 iv System One Description/Installation/APWIN Guide 3.6 Setting Switcher Addresses and Modes ........................................... 3-8 3.6.1 Switcher Address Settings.................................................. 3-9 3.6.2 Input, Output, and Patch Point Switcher Mode Switches . 3-10 3.6.3 Unbalanced Switcher Mode Switch................................. 3-11 3.6.4 Board Jumpers................................................................ 3-12 4. Software Installation- Windows 95 and NT 4.1 Using PCM-WIN card with Windows 95 or NT............................... 4-7 5. Software Installation- Windows 3.11 5.1 Installing APWIN............................................................................ 5-1 5.2 Installing WIN32S .......................................................................... 5-8 5.3 Using PCM-WIN with Windows 3.11 ........................................... 5-11 5.3.1 Installing APS1DRV.SYS .................................................. 5-11 5.3.2 What APS1DRV.SYS Does............................................... 5-12 5.3.3 Configuring Card Services for use with APS1DRV............. 5-13 6. Getting Started with APWIN 6.1 Starting APWIN ............................................................................. 6-1 6.1.1 Automating APWIN Startup .............................................. 6-4 6.2 User Preferences............................................................................ 6-7 6.3 APWIN Help ................................................................................. 6-9 6.4 Using Printers with APWIN .......................................................... 6-11 6.5 Compatibility with S1.EXE ............................................................ 6-12 6.5.1 Utilizing S1.EXE Test and Procedures............................... 6-13 6.5.2 Remote Operation via RS-232 Inteface ........................... 6-13 6.5.3 S1.EXE Utility Programs................................................... 6-13 6.6 Publishing Graphs ........................................................................ 6-14 7. Maintenance and Troubleshooting 7.1 Error Messages Displayed when Loading APWIN ............................ 7-1 7.2 PCMCIA difficulties........................................................................ 7-3 7.3 Technical Support.......................................................................... 7-4 System One Description/Installation/APWIN Guide v Table of Figures Figure 1-1. SWR-2122 Switchers.....................................................................................1-5 Figure 1-2. DCX-127 Multi-Function Module..................................................................1-6 Figure 1-3. SIA-322 Serial Interface Adapter ...................................................................1-7 Figure 1-4.GAT1 GPIB to APIB Translator .......................................................................1-8 Figure 2-1. Typical bandpass and bandreject responses at 1 kHz....................................2-5 Figure 2-2. Typical residual bandpass noise vs frequency, input shorted.........................2-5 Figure 2-3. Typical reponses of the bandwidth limiting filters..........................................2-8 Figure 2-4. FIL-AWT ANSI-IEC “A” Weighting Filter.....................................................2-12 Figure 2-5. FIL-CCR CCIR-468 / DIN 45404 Noise Weighting Filter ............................2-12 Figure 2-6. FIL-CIT CCITT P53 Noise Weighting Filter .................................................2-13 Figure 2-7. FIL-CMS C-Message Weighting Filter (ANSI/IEEE 743-1984) ....................2-13 Figure 2-8. FIL-CWT “C” Weighting (IEC-179) ............................................................2-13 Figure 2-9. FLP-1K 1 kHz Low Pass 5-pole Butterworth Filter ......................................2-13 Figure 2-10. FLP-20K 20.0 kHz Quasi-elliptic sharp cutoff Low Pass Filter...................2-14 Figure 2-11. FLP-50K 50 kHz 3-pole Butterworth Low Pass Filter ................................2-14 Figure 2-12. FLP-8K 8 kHz 7-pole Butterworth Low Pass Filter ....................................2-14 Figure 2-13. FLP-A20K Apogee “Brick-Wall” 20 kHz Low Pass Filter ...........................2-14 Figure 2-14. FHP-400 400 Hz 9-pole High Pass Filter ..................................................2-15 Figure 2-15. FBP-XXXX Fixed 1/3 Octave Band Pass Filter............................................2-15 Figure 2-16. FBP-500X High-Q 500 Hz Band Pass Filter (for CD linearity testing)........2-15 Figure 2-17. FIL-RCR 200 Hz to 15 kHz with 19 kHz (FM) notch Receiver Testing Filter...............................................................................2-15 Figure 2-18. FIL-IECR 20 Hz to 15 kHz with 15.625 kHz (PAL) notch Receiver Testing Filter...............................................................................2-16 Figure 2-19. FIL-D75B 75 µs with 15.734 kHz (NTSC) notch De-emphasis Filter ........2-16 Figure 2-20. FIL-D75F 75 µs with 19 kHz (FM) notch De-emphasis Filter....................2-16 Figure 2-21. FIL-D50F 50 µs with 19 kHz (FM) notch De-emphasis Filter....................2-16 Figure 2-22. FIL-D75 75 µs De-emphasis Filter ............................................................2-17 Figure 2-23. FIL-D50 50 µs De-emphasis Filter ............................................................2-17 Figure 3-1. Changing power line voltage .........................................................................3-2 Figure 3-2. Voltage selector card positions ......................................................................3-2 Figure 3-3. North American fusing arrangement..............................................................3-3 Figure 3-4. European fusing arrangement ........................................................................3-3 Figure 3-5. Changing fuse types.......................................................................................3-4 Figure 3-6. ISA-WIN Interface Card and cable ................................................................3-5 Figure 3-7. ISA-WIN APIB Card with address jumper selections shown ..........................3-6 Figure 3-8. PCMCIA to APIB interface card and cable.....................................................3-7 Figure 3-9. APIB connections block diagram (typical)......................................................3-8 Figure 3-10. Rear panel DIP switch (typical)....................................................................3-9 Figure 3-11. Unbalanced switcher address/mode switch...............................................3-11 Figure 3-12. Switcher mode jumper positions ...............................................................3-12 vi System One Description/Installation/APWIN Guide Figure 4-1. APWIN installation Setup screen ...................................................................4-2 Figure 4-2. Windows NT Administrator rights warning screen.........................................4-2 Figure 4-3. Setup progression screen...............................................................................4-2 Figure 4-4. Welcome screen............................................................................................4-3 Figure 4-5. Choose Destination Location for APWIN dialog box .....................................4-3 Figure 4-6. Choose Destination Location for sample tests, procedures, and data files dialog box .....................................................................................4-4 Figure 4-7. Choose Components to Install dialog box......................................................4-5 Figure 4-8. Select Program Manager Group dialog box ...................................................4-6 Figure 4-9. Installing progress screen ...............................................................................4-6 Figure 4-10. Insert New Disk dialog box..........................................................................4-6 Figure 4-11. Setup Complete message window...............................................................4-7 Figure 5-1. RUN dialog box .............................................................................................5-2 Figure 5-2. Browse dialog box .........................................................................................5-2 Figure 5-3. Install Win32s message screen.......................................................................5-3 Figure 5-4. APWIN Installation Welcome screen.............................................................5-3 Figure 5-5. Choose Destination dialog box, program files ...............................................5-4 Figure 5-6. Choose Destination dialog box, tests and procedures ...................................5-4 Figure 5-7. Choose Components to Install dialog box......................................................5-5 Figure 5-8. PCMCIA Driver Installation selection screen .................................................5-5 Figure 5-9. PCMCIA Driver Installation selection screen .................................................5-6 Figure 5-10. Installing progression screen ........................................................................5-6 Figure 5-11. Insert New Disk dialog box..........................................................................5-7 Figure 5-12. Setup Complete message window (using ISA-WIN APIB card) ....................5-7 Figure 5-13. Setup Complete message window (using PCM-WIN APIB card) .................5-8 Figure 5-14. Win32s installation startup ..........................................................................5-9 Figure 5-15. Win32s Welcome window ..........................................................................5-9 Figure 5-16. Win32s setup target directory window......................................................5-10 Figure 5-17. Win32s installation completion message window .....................................5-10 Figure 6-1. APWIN directory window .............................................................................6-1 Figure 6-2. Choose Hardware window............................................................................6-1 Figure 6-3. Windows 95 File Open dialog box ................................................................6-3 Figure 6-4. Procedure tool bar.........................................................................................6-3 Figure 6-5. System One Example Selection Menu window .............................................6-3 Figure 6-6. System One Sample Test Procedures window...............................................6-4 Figure 6-7. APWIN Properties dialog box ........................................................................6-5 Figure 6-8. Configuration dialog box ...............................................................................6-8 Figure 6-9. Widows 3.11 How to Use Help screen .......................................................6-10 Figure 6-10. Windows 95 Windows Help screen ..........................................................6-10 Figure 6-11. APWIN Help Contents screen ...................................................................6-11 Figure 6-12. Printer Setup dialog box ............................................................................6-12 Figure 7-1. About APWIN window ..................................................................................7-4 System One Description/Installation/APWIN Guide vii Safety Information Do NOT service or repair this product unless properly qualified. Only a qualified technician or an authorized Audio Precision distributor should perform servicing. Do NOT defeat the safety ground connection. This product is designed to operate only from a 50/60 Hz AC power source (250 Vrms maximum) with an approved three-conductor power cord and safety grounding. Loss of the protective grounding connection can result in electrical shock hazard from the accessible conductive surfaces of this product. For continued fire hazard protection, fuses should be replaced ONLY with the exact value and type as indicated on the rear panel and Section 3.2.3 of this document. The AC voltage selector also must be set to the same voltage as the nominal power source voltage (100, 120, 230, or 240V rms) with the appropriate fuses installed. The International Electrotechnical Commission (IEC 1010-1) requires that measuring circuit terminals used for voltage or current measurement be marked to indicate their Installation Category. The Installation Category is defined by IEC 664 and is based on the amplitude of transient or impulse voltage that can be expected from the AC power distribution network. This product is classified as INSTALLATION CATEGORY II, abbreviated “CAT II” on instrument front panels. Do NOT substitute parts or make any modifications without the written approval of Audio Precision. Doing so may create safety hazards. This product contains a lithium battery. Dispose only in accordance with all applicable regulations. This product is for indoor use – pollution degree 2. viii System Two Description/Installation/APWIN Guide Safety Symbols WARNING! – This symbol alerts you to a potentially hazardous condition, such as the presence of dangerous voltage that could pose a risk of electrical shock. Refer to the accompanying Warning Label or Tag, and exercise extreme caution. ATTENTION! – This symbol alerts you to important operating considerations or a potential operating condition that could damage equipment. Refer to the User’s Manual or Operator’s Manual for precautionary instructions. FUNCTIONAL EARTH TERMINAL – This symbol marks a terminal that is electrically connected to a reference point of a measuring circuit or output and is intended to be earthed for any functional purpose other than safety. PROTECTIVE EARTH TERMINAL – This symbol marks a terminal that is bonded to conductive parts of the instrument. Confirm that this terminal is connected to an external protective earthing system. Disclaimer Audio Precision cautions against using their products in a manner not specified by the manufacturer. To do otherwise may void any warranties, damage equipment, or pose a safety risk to personnel. System One Description/Installation/APWIN Guide ix x System Two Description/Installation/APWIN Guide 1. Introduction 1.1 Scope of This Manual This guide serves several purposes: • It will help you install the hardware and software for APWIN, Audio Precision’s user interface and software package for System One. • It describes several basic hardware considerations for installing the components, such as power line voltage settings, fuse information, APIB Interface Cable connections, and jumper and DIP switch settings. • It contains full specifications for the System One, including its options and ancillary components (switchers, etc). • It contains some fundamental APWIN assistance, such as starting, setting user preferences, APWIN help files, compatibility issues, and troubleshooting. Although intended specifically for APWIN Version 1.5 or later, many parts of this guide are applicable to earlier versions. Section 1.2 gives a list of other System One documents and a brief description of the contents of each. 1.2 Related Documentation • APWIN User’s Manual – contains a comprehensive description of the full capabilities of APWIN. • APWIN Tutorial – designed to lead you through your first operating session with APWIN and System One. • APWIN BASIC (procedure language) User’s Manual and Programmer’s Reference – includes detailed descriptions and syntax for every command. • System One Service Manual – contains detailed System One information, including adjustment procedures, diagnostic procedures, and drawings of electrical and mechanical parts. This manual is not required for routine understanding or operation and must be purchased separately. System One Description/Installation/APWIN Guide 1-1 Introduction Overview • SIA-322 Serial Interface Adapter User’s Manual – details the capabilities and operation of the SIA-322. This manual comes with the SIA-322, a highly specialized optional accessory. • Audio Measurement Handbook – intended as a practical, hands-on assistance for workers in all phases of the audio field. Describes general measurement techniques and includes a glossary of specific audio terminology and test definitions. 1.3 Overview 1.3.1 General System System One is a personal computer-based audio test set with broad, high-performance capabilities for analog, digital, and mixed-signal devices. System One includes both signal generation and analysis capability for audio stimulus-response testing. Virtually all common and many specialized tests are performed on analog domain and digital domain signals and on the digital interface signal (pulse train) itself. The versatility of the System One can be extended through major options and accessories. The SWR-2122-series of Audio Switchers are available in input, output, and insertion (patch point) versions. The DCX127 adds dc measurement and digital generation capabilities. The SIA322 Serial Interface Adapter converts the System One’s parallel input and outputs to a wide variety of serial digital interface formats. These accessories are described in greater detail in the following subsections. The System One and its accessories are controlled by APWIN, Audio Precision’s user interface and software package, which must be installed in the user’s personal computer (the computer is not included). Specifications for the System One and its accessories are found in Section 2. 1-2 System One Description/Installation/APWIN Guide Overview Introduction 1.3.2 System One System One audio test equipment provides stimulus and measurement capability. System One is actually a family of products with three basic configurations: • The SYS-22 provides analog stimulus and measurement capability, using analog capability for signal generation, filtering, and measurement. • The SYS-222 (System One + DSP) adds a digital signal processor for enhanced capability including high-resolution spectrum analysis via FFT, waveform capture and display, and fast multitone testing. • The SYS-322 (System One Dual Domain) includes the capabilities of the 2200 series plus digital audio inputs and outputs in AES/EBU, SPDIF/EIAJ, optical, parallel, generalpurpose serial formats and complete serial interface analysis per AES3. Thus, it provides stimulus and measurement in any combination of digital and analog domains. These major options for testing analog audio devices may be added to any of the three basic configurations listed above: • IMD Adds the IMD (InterModulation Distortion) generator and IMD analyzer. • W&F Adds the wow and flutter analyzer. • BUR Adds the tone burst, square wave, and noise generator. • EURZ Changes the generator output selections to 40/200/600 ohms, prevalent in Europe. Additionally, your System One may include up to five of these optional hardware filters, or may include custom filters. Graphs of many of these filters are shown in Section 2. • FBP-500HQ 500 Hz Hi-Q bandpass filter (for CD linearity measurements) • FBP-xxxxx Fixed 1/3-octave bandpass filter; frequency specified from 100 Hz to 25000 Hz. • FBR-19000 19 kHz band reject (notch) filter System One Description/Installation/APWIN Guide 1-3 Introduction Overview • FHP-xxx High pass filter (specify frequency: 30 Hz, 70 Hz, 400 Hz, or 2 kHz) • FIL-AWT A-weighting filter • FIL-CCR CCR 468-3 weighting filter • FIL-CIT CCITT P.53 weighting filter • FIL-CMS C-message weighting filter • FIL-CWT C-weighting filter • FIL-D50 50 µs de-emphasis filter • FIL-D50E 50 µs de-emphasis with 15.625 kHz notch filter • FIL-D50F 50 µs de-emphasis with 19.0 kHz notch filter • FIL-D75 75 µs de-emphasis filter • FIL-D75AWT 75 µs de-emphasis with A-weighting filter • FIL-D75B 75 µs de-emphasis with 15.734 kHz (NTSC) notch filter • FIL-D75F 75 µs de-emphasis with 19.0 kHz (FM) notch filter • FIL-IECR 200 Hz – 15 kHz kHz band limited with 15.625 kHz (PAL) notch receiver testing filter • FIL-RCR 200 Hz – 15 kHz bandpass with 19 kHz notch filter • FIL-VID Video notch filter (15.625 Hz or 15.734 kHz band reject) • FLP-A20k 20 kHz “brick wall” filter • FLP-xxx Fixed low pass Band Limiting filter. Specify frequency: 5-pole Butterworth filter at 300 Hz, 400 Hz, 500 Hz, or 1 kHz; 7-pole Butterworth filter at 3 kHz, 4 kHz, 5 kHz, or 8 kHz; Sharp Elliptic Response filter at 10 kHz, 12.7 kHz, 15 kHz, 18 kHz, 19 kHz, 20 kHz, or 22 kHz; 3-pole Butterworth filter at 50 kHz. 1-4 System One Description/Installation/APWIN Guide Overview Introduction A rear-panel configuration label on the System One identifies the model number, the options and filters installed, and the warranty expiration date (domestic) or date of manufacture (export). System One is normally supplied with an APWIN-compatible ISA-bus interface card for installation in the user’s PC. An option replaces this card with a type II PCMCIA interface card for use in a notebook computer. Each of these cards comes with the appropriate APIB (Audio Precision Interface Bus) cable to interconnect the computer with the System One. This version of APWIN requires one of these cards, and will not function with earlier System One PCI-1, PCI-2, PCI-3, or ISA-DOS interface cards, or PCM-DOS PCMCIA interface cards. This manual (and APWIN) is not applicable for System Ones that are controlled via GPIB programming. 1.3.3 Switchers Figure 1-1. SWR-2122 Switchers There are four versions of switchers, as described below. Each features 12 x 2 architecture with provisions for cascading up to 16 units, allowing up to 192 channels to be accessed. Switching is computercontrolled via the same APIB as the System One. See Sections 2.4 and 3.6 for further information. • SWR-2122M System One Description/Installation/APWIN Guide Output Switcher. Routes either of the two generator output channels (A & B) to any of 12 channels. Male XLR connectors for balanced signals. Complement mode allows all but one channel to be driven while measuring the 1-5 Introduction Overview undriven channel for worst-case crosstalk on multichannel devices. • SWR-2122F Input Switcher. Routes either of the two analyzer input channels (A & B) from any of 12 channels. Female XLR connectors for balanced signals. • SWR-2122U Unbalanced Switcher. Can be used as either an input or output switcher. Floating BNC connectors for unbalanced signals to prevent ground loops. • SWR-2122P Patch-Point Switcher. 12-point configuration allows a signal path to be interrupted and a test generator inserted while a measuring analyzer can access the output of a previous device. Path continuity is maintained in the default (nonaccessed) mode. Each of the 12 insertion points has a 5-pin XLR connector to allow balanced interface to the previous and next device. 1.3.4 DCX-127 Multi-Function Module Figure 1-2. DCX-127 Multi-Function Module The DCX-127 Multi-Function Module contains an autoranging 4-1/2 digit dc voltmeter-ohmmeter, two 20-bit programmable dc voltage sources, 21 bits of digital I/O, and three 8-bit programmable auxiliary output ports for device control or status indicators. Typical applications include A/D and D/A converter testing, VCA gain control linearity, VCA distortion, amplifier dc offset and power supply checks, power amplifier load switching control, loudspeaker voice coil resistance measurements, temperature measurements, and test fixture control. 1-6 System One Description/Installation/APWIN Guide Overview Introduction The meter features 200 mV – 500 V and 200 Ω – 2 MΩ ranges, fully floating and guarded for accurate measurements in the presence of large common mode voltages. Resistance measurements can be made using either the 4-wire or 2-wire technique. Readings can be offset and scaled by the software. The two independently programmable dc sources have a ±10.5 V bipolar range with 20 µV resolution and monotonicity to 40 µV (19 bits). The software can sweep either dc source. The DCX-127 also contains a simplified 8-bit program control interface that can be defined to execute any pre-defined keystroke sequence. This can be used to run different software procedures based upon switch closures. Refer to Section 2.5 for DCX-127 specifications. 1.3.5 SIA-322 Serial Interface Adapter Figure 1-3. SIA-322 Serial Interface Adapter The SIA-322 Serial Interface Adapter provides a means of interfacing System One to a variety of data acquisition, D–A, A–D converters, and communication hardware that utilize a serial bus for data exchange. This greatly increases the system’s flexibility in interfacing to serial systems for a wide range of tests and measurements. The SIA-322 consists of a parallel-to-serial transmitter and an independent serial-to-parallel receiver. A flexible design allows the SIA to address many serial interface requirements. Refer to Section 2.6 for SIA-322 specifications. The SIA-322 is available only for the domestic (USA) market. System One Description/Installation/APWIN Guide 1-7 Introduction Overview 1.3.6 GAT1 APIB to GPIB Translator Figure 1-4.GAT1 GPIB to APIB Translator The GAT1 interfaces between Audio Precision instruments with APIB (Audio Precision Interface Bus) and a computer with a GPIB (General Purpose Interface Bus, IEEE488.1) controller. This allows interconnecting a System One with a GPIB interface and instruments (switchers and DCX-127) with APIB interfaces. A data sheet is available to describe specific configurations and limitations. The GAT1 is not compatible with instruments controlled by APWIN. 1-8 System One Description/Installation/APWIN Guide 2. Specifications 2.1 System One Generator Specifications All System One configurations contain an analog signal generator consisting of an ultra-low distortion analog sinewave generator and two independent transformer coupled output stages that can be driven from both the analog sources and optional hardware signal generators. Option “BUR” adds analog-generated sine burst, square wave, and noise signals. Option “IMD” adds analog-generated IMD test signals. SYS-222 and SYS-322 configurations also contain dual channel D/A-based signal generation capability. Unless otherwise noted, all specifications are valid for outputs ≥150 µVrms [420 µVpp]. 2.1.1 Frequency Related Range 10 Hz – 204.775 kHz Accuracy High-Accuracy Mode 0.03% 0.5% Resolution 0.005% Fast Mode 0.025 Hz, 10 Hz to 204 Hz 0.25 Hz, 205 Hz to 2.04 kHz 2.5 Hz, 2.05 kHz to 20.4 kHz 25 Hz, 20.5 kHz to 204 kHz 2.1.2 Amplitude Related Range 1 <25 µVrms – 26.66 Vrms (<-90 dBu to +30.7 dBu) 20 Hz – 50 kHz <25 µVrms – 13.33 Vrms (<-90 dBu to +24.7 dBu) 10 Hz – 204 kHz 2 Maximum Output Power Into 600 Ω +30.0 dBm, Rs = 50; +24.7 dBm, Rs = 600 Into 150 Ω +30.0 dBm, Rs = 50 Resolution <0.01 dB or 1.27 µV, whichever is greater Accuracy ±0.1 dB (1%) at 1 kHz Flatness (1 kHz reference) ±0.03 dB, 20 Hz - 20 kHz; ±0.15 dB, 10 Hz - 120 kHz; 1 Unloaded (open circuit). Divide maximum amplitude by 2 (-6 dB) for unbalanced or commonmode configurations. 2 Total peak output current rating is 120 mA balanced/240 mA unbalanced, 20 Hz – 20 kHz. System One Description/Installation/APWIN Guide 2-1 Specifications System One Generator Specifications 2.1.3 Distortion Measured with a passive notch filter and spectrum analyzer. Valid for any Rload >300 Ω. 3 20 Hz – 20 kHz 0.0005% (–106 dB) 10 Hz – 100 kHz 0.0050% (–86 dB) 2.1.4 Output Related Configurations Balanced, unbalanced, or common-mode test (same as balanced except generator is connected between the output common and source impedance center tap). Source Impedance 50 – 150 – 600 Ω balanced, or 25 – 600 Ω 4 unbalanced ; ±1 Ω. Source impedance does not change with output OFF. Maximum Rated Floating Voltage 42 V peak ac, 60 V dc. True transformer isolation. 2.1.5 Auxiliary Signals Sync Output LSTTL-compatible squarewave signal for triggering stable oscilloscope displays with all signals. Monitor Output Ground-referenced replica of the generator signal. Nominally 2.8 Vpp amplitude, Rout = 560 Ω. Trigger/Gate Input LSTTL-compatible input for use with the tone burst option. 2.1.6 Dual Output Related (SYS-22 and SYS-20 only) SYS-22 and SYS-20 configurations provide a second switchable generator output. Frequency, amplitude, impedance, and mode selection apply to both outputs simultaneously. Both outputs must be properly terminated in the A & B and A & –B modes for correct amplitude calibration using dBm or Watts units. Output Modes A only, B only, A & B, A & –B, or OFF Output Separation 110 dB to 20 kHz 2 Maximum Output Power (both channels loaded) 3 Into 600 Ω +29.4 dBm each load, Rs = 50; +24.3 dBm each load, Rs = 600. Into 150 Ω +24.0 dBm each load, Rs = 50 25 Hz if output open circuit voltage exceeds 20 Vrms balanced, or 10 Vrms unbalanced. 4 Specify option EURZ to substitute <40 – 200 – 600 Ω balanced, <20 – 600 Ω unbalanced impedance selections. 2-2 System One Description/Installation/APWIN Guide Analyzer Specifications Specifications 2.2 Analyzer Specifications The System One analyzer contains two independent voltmeters. The “READING” meter displays the selected measurement mode and has the greatest sensitivity and dynamic range. The “LEVEL” meter monitors the wideband-input signal following input attenuation and pre-amplification, before subsequent signal processing filtering, and additional gain stages. Its most sensitive range is 80 mV, limiting full performance to inputs >10 mV (-38 dBu). In the 2-CHANNEL and CROSSTALK modes, the LEVEL meter displays the amplitude of the alternate input (SYS-22 and SYS-02 only), thus enabling simultaneous amplitude measurements on both input channels. Inputs are fully differential (balanced) with female XLR (pin 2 high) and dual banana jack connectors. (Specify Option LXPH to substitute a 1/4-in. stereo phone jack for the XLR.) An additional unbalanced and switchable Auxiliary input (Channel A only) is provided for special applications. Amplitude can be displayed in Vrms, dBV (1.000 Vrms ref), dBu (0.7746 Vrms ref), dBr with respect to any predefined or measured reference, or dBm/watts computed into any arbitrary resistance. The READING meter has selectable rms, average, peak, Q-peak (per CCIR Rec 468-3), and S-peak detectors; the LEVEL meter detector is rms only. Measurement resolution is approx 0.004% (1/25200) of range at “4/s,” varying to 0.032% (1/3150) at “32/s.” All displays are rounded to four digits or 0.01 dB. 2.2.1 Input Related Impedance 100 kΩ ±1%, shunted by 270 pF each side to ground. 5 Selectable 600 – 150 Ω (±1%) terminations. Maximum Rated Input 200 Vpeak, 140 Vrms on main inputs; 100 Vpeak on auxiliary input. 1 W (+30 dBm) with terminations. Common-Mode Rejection Ratio 70 dB, 50 Hz – 20 kHz, Vin <2 V; 50 dB, 50 Hz – 1 kHz, Vin >2 V. 5 Specify Option EURZ to substitute 300 Ω for the 150 Ω termination selection. System One Description/Installation/APWIN Guide 2-3 Specifications Analyzer Specifications 2.2.2 Amplitude Measurement Related 300 µV – 160 Vrms (6-dB steps above 80 mV, 12-dB steps below 80 mV). Autoranging is peak-sensitive to prevent clipping with high crest factor signals. 6 Ranges Accuracy 7 Response Flatness ±0.1 dB (1%), 20 Hz – 20 kHz 7 ±0.03 dB, 20 Hz – 20 kHz; ±0.1 dB, 10 Hz – 120 kHz; +0.2/-3 dB, to 500 kHz Residual Noise (input shorted) 1.5 µV (-114 dBu), 22 Hz – 22 kHz; 3.0 µV (-108 dBu), 22 Hz – 80 kHz; 10.0 µV (-98 dBu), full bandwidth; 1.0 µV (-118 dBu), A-wtg; 5.0 µV (-104 dBqps), Qpeak CCIR-wtg 2.2.3 Bandpass/Bandreject Related The Bandpass/Bandreject modes provide selective amplitude measurements processed through a 4-pole constant-Q filter. Filter tuning may be directly programmed (“FIXED”), tracking (“AUTO”), or swept for spectral displays. Units selection and resolution are the same as the Amplitude Measurement mode, but with one additional range of sensitivity. Amplitude Ranges 75 µV – 160 Vrms (6-dB steps above 80 mV; 12-dB steps below 80 mV). Tuning range (f0) 10 Hz – 200 kHz, ±3% accuracy Bandpass Response (see Figure 2-1) ±0.5 dB (at f0), 20 Hz – 120 kHz; 1/3-octave Class II response per ANSI S1.11-1975. Typically <-32 dB at 0.5 f0 & 2.0 f0. Bandreject Response (see Figure 2-1) ±0.3 dB, 20 Hz – 120 kHz, excluding the band from 0.5 f0 to 2.0 f0. Typically -3 dB at 0.73 f0 & 1.37 f0, -20 dB within ±10% of f0; and -40 dB within ±3% of f0. 6 80 mV – 160 Vrms for LEVEL meter. 7 Vin >5% of range, rms and average detectors only. Peak detectors are +0.2/-0.3 dB, 30 Hz – 100 kHz. 2-4 System One Description/Installation/APWIN Guide Analyzer Specifications Specifications Figure 2-1. Typical bandpass and bandreject responses at 1 kHz Bandpass Noise (input 0.5 µV (-124 dBu), 20 Hz – 5 kHz; shorted) (see Figure 2-2) 1.0 µV (-118 dBu), to 20 kHz; 2.5 µV (-110 dBu), to 120 kHz. Figure 2-2. Typical residual bandpass noise vs frequency, input shorted 2.2.4 Frequency Measurement Related Range 10 Hz to at least 500 kHz Timebase Accuracy 0.003% Resolution 6 digits + 0.0002 Hz Reading Time Determined by the nearest integral number of signal periods greater than the reading rate sample time (see Detector Characteristics). Minimum Input 10 mV (-38 dBu), usable to <1 mV System One Description/Installation/APWIN Guide 2-5 Specifications Analyzer Specifications 2.2.5 THD + N Measurement Related THD + N mode is similar to the Bandreject mode, but with autonulling and fine-tuning loops activated to maintain optimum fundamental rejection. With FIXED tuning, the notch frequency may be directly programmed (±3% tracking range) for quantization distortion or SINAD tests. With AUTO tuning, the notch frequency is ganged to the GEN-1 module frequency during a generator sweep; otherwise it will track the measured input frequency (provided Vin >10 mV and signal THD + N <20%). THD + N may be displayed as a ratio (%, dB, PPM, X/Y) of the total input signal measured by the LEVEL meter, or as an absolute amplitude (volts, dBu, dBm, etc). Fundamental Range 10 Hz – 200 kHz Minimum Input <25 µV (-90 dBu) with FIXED tuning; 10 mV (-38 dBu) with AUTO tuning THD + N Range 0 to 100% Accuracy 8 Residual THD + N ±0.5 dB for harmonics to 120 kHz; +0.5/-3 dB to 500 kHz 9 20 Hz – 20 kHz fundamentals 0.0010% + 1.5 µV, 22 Hz – 22 kHz BW; 0.0015% + 3.0 µV, 22 Hz – 80 kHz BW; 0.0040% + 10 µV, full BW <0.0010% at Vin = 2 Vrms, 22 Hz – 80 kHz BW. 10 Hz – 100 kHz fundamentals Auto-Nulling Time 8 0.010% + 10 µV, full BW Typically 0.3 – 0.4 s above 100 Hz, 1.5 s at 20 Hz, 3.5 s at 10 Hz. A 20 Hz – 20 kHz 16-point sweep will typically run in 9 – 11 s. Input must be >10 mV with a ratio unit selection. 9 System specification including THD + N contributions from the generator (20 – 25 Hz derated near maximum output). The analyzer contribution is mainly noise with THD typically <0.0004%, 10 Hz – 20 kHz. 2-6 System One Description/Installation/APWIN Guide Analyzer Specifications Specifications 2.2.6 Detector Characteristics Five detector selections are available with the principal READING meter: rms, average, true peak, Q-peak (per CCIR Rec 468-3), and Speak (scaled peak to read rms with sinewaves). The LEVEL meter detector is rms only. All detectors are linear with signal crest factors up to seven. Reading rate selection determines the sample time of the measurement; and minimum recommended frequency for specified accuracy/stability: Reading Rate Sample Time Minimum Frequency “32/s” 32.8 ms 50 Hz “16/s” 65.5 ms 30 Hz “8/s” 131 ms 20 Hz “4/s” 262 ms 10 Hz Total measurement time is the sum of the sample time plus an additional 10-30 ms for data transfer and processing. 2.2.7 Bandwidth Limiting Filters Full measurement bandwidth is typically 4 Hz –600 kHz in the AMPLITUDE mode; 6 Hz – 600 kHz in the THD + N and BANDREJECT modes. Measurement bandwidth can be limited by independent high-pass and low-pass filters, or an external filter. Up to five optional filters may also be installed for weighted noise or other special measurements (see OPTION FILTERS). High-Pass Filters 400 Hz ±5%, 3-pole Butterworth; 100 Hz ±5%, 3-pole Butterworth; 22 Hz, 3-pole within CCIR 468-3 limits for unweighted response Low-Pass Filters 80 kHz ±5%, 3-pole Butterworth; 30 kHz ±5%, 3-pole Butterworth; 22 kHz, 6-pole within CCIR 468-3 limits for unweighted response External Filter Connectors Output 560 Ω ±5%, unbalanced. Maximum signal level is 700 mVpp (-10 dBu) Input 1 MΩ ±5%, unbalanced. Protected up to 15 Vpeak overloads. Bandwidth is >200 kHz. System One Description/Installation/APWIN Guide 2-7 Specifications Analyzer Specifications Figure 2-3. Typical responses of the bandwidth limiting filters 2.2.8 Monitor Outputs Channel A Buffered version of Channel-A input signal following attenuation and/or preamplification. 3 Vpp maximum, Rout = 560 Ω ±5%. Channel B Buffered version of Channel-B input signal following attenuation and/or preamplification. 3 Vpp maximum, Rout = 560 Ω ±5%. Reading Signal (Processed Signal) Buffered version of the final (Processed Signal) signal presented to the detector stages following all filtering and additional gain stages. 3 V pp maximum, Rout = 560 Ω ±5%. 2.2.9 Dual Input/Phasemeter Related (SYS-22 and SYS-02 configurations only.) SYS-22 and SYS-02 configurations add a second autoranging Channel-B input and phasemeter, enabling simultaneous measurement of input amplitudes, ratio, or crosstalk. All analyzer specifications valid for either input. The “2-CHANNEL” and “CROSSTALK” measurement modes route the selected input channel through the main measurement path, and the alternate (reference) channel to the LEVEL meter and frequency counter. CROSSTALK mode additionally processes the selected input channel through the 1/3-octave bandpass filter automatically tuned to the reference channel frequency (or generator frequency). 2-8 System One Description/Installation/APWIN Guide Analyzer Specifications Specifications 2.2.10 Phase Measurement Ranges ±180° or 0 – 360°. Phase rotations beyond −180/+360° can be accumulated during sweeps. Resolution 0.1° displayed (measurement quantization is 0.013° at “4/s”, varying to 0.10° at “32/s”) Accuracy 10 ±1°, 20 Hz – 20 kHz; ±2°, 10 Hz – 50 kHz 2.2.11 Crosstalk/Ratio Measurement Ratio Accuracy 11 ±0.1 dB, 20 Hz – 20 kHz; ±0.2 dB, 10 Hz – 120 kHz (typically 0.03 dB on same ranges) 11 Crosstalk Accuracy (Rs <600 Ω) 10 Hz – 20 kHz 20 kHz – 100 kHz The greater of: -140 dB or 1 µV (-118 dBu) -126 dB or 2.5 µV (-110 dBu) 2.2.12 Option Filters Up to five option filters can be installed in the System One analyzer for weighted noise or other special measurements. Option filters function with the principal READING meter, and can be enabled (one at a time) in series with the standard bandwidth limiting filters. Contact Audio Precision for quotations concerning other possible filter designs. Custom designs may be constructed on the FIL-USR blank card. However, please note that the system autoranging is based upon the peak value of the unfiltered signal and will limit the maximum usable dynamic range to approximately 50 dB. Contact Audio Precision or your Audio Precision distributor for complete specifications on option filters. 2.2.12.1 Weighted Noise Measurement FIL-AWT “A” weighting per IEC Rec 179 FIL-CCR Weighting per CCIR Rec 468 and DIN 45404 (Also for CCIR/ARM) FIL-CIT Weighting per CCITT Rec P53 FIL-CMS “C-message” per BSTM 41004 and ANSI/IEEE Std 743-1984 FIL-CWT “C” weighting per IEC Rec 179 10 Both input signals between 10 mV – 8 Vrms. Above 8 Vrms, accuracy is ±1°, 20 Hz –5 kHz; ±2°, 10 Hz –20 kHz; ±3° to 50 kHz. 11 Alternate channel signal must be >10 mV. System One Description/Installation/APWIN Guide 2-9 Specifications Analyzer Specifications 2.2.12.2 Precision De-emphasis Family FIL-D50 50 µs ±1% FIL-D50E 50 µs ±1% + 15.625 kHz notch FIL-D50F 50 µs ±1% + 19.0 kHz notch FIL-D75 75 µs ±1% FIL-D75B 75 µs ±1% + 15.734 kHz notch FIL-D75F 75 µs ±1% + 19.0 kHz notch 2.2.12.3 Precision Sharp Cutoff Low-Pass Family Family Response -3 dB at fc ±1.5%; ±0.2 dB to 0.5 fc, ±0.4 dB to 0.8 fc ; <-50 dB above 1.8 fc FLP-10K fc = 10.0 kHz, quasi-elliptic FLP-15K fc = 15.0 kHz, quasi-elliptic FLP-18K fc = 18.0 kHz, quasi-elliptic FLP-19K fc = 19.0 kHz, quasi-elliptic FLP-20K fc = 20.0 kHz, quasi-elliptic See also FLP-A20K under Miscellaneous 2.2.12.4 Bandwidth Limiting, Low-Pass FLP-400 400 Hz ±3%, 5-pole FLP-500 500 Hz ±3%, 5-pole FLP-1K 1 kHz ±3%, 5-pole Butterworth FLP-3K 3 kHz ±3%, 7-pole Butterworth FLP-4K 4 kHz ±3%, 7-pole Butterworth FLP-8K 8 kHz ±3%, 7-pole Butterworth FLP-50K 50 kHz ±5%, 3-pole Butterworth 2.2.12.5 Bandwidth Limiting, High-Pass 2-10 FHP-70 70 Hz ±3%, 8-pole FHP-400 400 Hz ±3%, 9-pole FHP-2K 2 kHz ±3%, 9-pole FHP-20K 20 kHz ±3%, (per AES-17) System One Description/Installation/APWIN Guide Analyzer Specifications Specifications 2.2.12.6 1/3-Octave (Class II) Bandpass Family Family Response Class II (4-pole) ±0.2 dB from 0.97 fo to 1.03 fo ; <-12 dB at 0.8 fo and 1.25 fo ; <-32 dB at 0.5 fo and 2.0 fo FBP-120 fo = 120 Hz FBP-180 fo = 180 Hz FBP-250 fo = 250 Hz FBP-300 fo = 300 Hz FBP-400 fo = 400 Hz FBP-500 fo = 500 Hz FBP-600 fo = 600 Hz FBP-666 fo = 666 Hz FBP-800 fo = 800 Hz FBP-945 fo = 945 Hz FBP-1000 fo = 1.00 kHz FBP-1200 fo = 1.20 kHz FBP-1500 fo = 1.50 kHz FBP-2000 fo = 2.00 kHz FBP-3000 fo = 3.00 kHz FBP-3150 fo = 3.15 kHz FBP-4000 fo = 4.00 kHz FBP-4500 fo = 4.50 kHz FBP-5000 fo = 5.00 kHz FBP-6000 fo = 6.00 kHz FBP-8000 fo = 8.00 kHz FBP-10000 fo = 10.0 kHz FBP-12500 fo = 12.5 kHz FBP-15000 fo = 15.0 kHz FBP-16000 fo = 16.0 kHz FBP-20000 fo = 20.0 kHz FBP-22000 fo = 22.0 kHz System One Description/Installation/APWIN Guide 2-11 Specifications Analyzer Specifications Receiver Testing FIL-RCR 200 Hz – 15 kHz + 19.0 kHz notch FIL-IECR 20 Hz – 15 kHz + 15.625 kHz notch 2.2.12.7 Miscellaneous FBP-500X High-Q 500 Hz bandpass for CD dac linearity measurements FLP-A20K Apogee 20 kHz “brickwall” filter (OEM design) FIL-USR Kit for building custom filters Note: The option filters described here can be added to the standard band-limiting filters shown in Figure 2-3. Figure 2-4. FIL-AWT ANSI-IEC “A” Weighting Filter CCIR-468-4 DOLBY Figure 2-5. FIL-CCR CCIR-468 / DIN 45404 Noise Weighting Filter 2-12 System One Description/Installation/APWIN Guide Analyzer Specifications Specifications Figure 2-6. FIL-CIT CCITT P53 Noise Weighting Filter Figure 2-7. FIL-CMS C-Message Weighting Filter (ANSI/IEEE 743-1984) Figure 2-8. FIL-CWT “C” Weighting (IEC-179) Figure 2-9. FLP-1K 1 kHz Low Pass 5-pole Butterworth Filter System One Description/Installation/APWIN Guide 2-13 Specifications Analyzer Specifications Figure 2-10. FLP-20K 20.0 kHz Quasi-elliptic sharp cutoff Low Pass Filter Figure 2-11. FLP-50K 50 kHz 3-pole Butterworth Low Pass Filter Figure 2-12. FLP-8K 8 kHz 7-pole Butterworth Low Pass Filter Figure 2-13. FLP-A20K Apogee “Brick-Wall” 20 kHz Low Pass Filter 2-14 System One Description/Installation/APWIN Guide Analyzer Specifications Specifications Figure 2-14. FHP-400 400 Hz 9-pole High Pass Filter Figure 2-15. FBP-XXXX Fixed 1/3 Octave Band Pass Filter Figure 2-16. FBP-500X High-Q 500 Hz Band Pass Filter (for CD linearity testing) Figure 2-17. FIL-RCR 200 Hz to 15 kHz with 19 kHz (FM) notch Receiver Testing Filter System One Description/Installation/APWIN Guide 2-15 Specifications Analyzer Specifications Figure 2-18. FIL-IECR 20 Hz to 15 kHz with 15.625 kHz (PAL) notch Receiver Testing Filter Figure 2-19. FIL-D75B 75 µs with 15.734 kHz (NTSC) notch De-emphasis Filter Figure 2-20. FIL-D75F 75 µs with 19 kHz (FM) notch De-emphasis Filter Figure 2-21. FIL-D50F 50 µs with 19 kHz (FM) notch De-emphasis Filter 2-16 System One Description/Installation/APWIN Guide Analyzer Specifications Specifications Figure 2-22. FIL-D75 75 µs De-emphasis Filter Figure 2-23. FIL-D50 50 µs De-emphasis Filter 2.2.13 IMD Option The IMD option enables intermodulation distortion measurements to all three of the most popular methods: SMPTE (or DIN), DIM (or TIM), and CCIF difference frequency. IMD testing can reveal important forms of non-linearity that are not easy to detect with conventional THD/THD+N tests. 2.2.13.1 Option Configuration The System One IMD Option consists of two circuit boards. The analyzer option board (IMD-DIS) mounts to the DIS-1 distortion measurement module. The generator option board (IMD-GEN) mounts to the main generator module. It contains the SMPTE and CCIF IMfrequency generator and the DIM test signal squarewave generator. The main oscillator of the generator module provides the HF tone for SMPTE, probe tone for DIM, and the carrier (or center frequency) for CCIF signals. System One Description/Installation/APWIN Guide 2-17 Specifications Analyzer Specifications 2.2.13.2 Generator Related Specifications Test Signal Modes Amplitude Range SMPTE1:1, SMPTE4:1, CCIF, DIM-30, DIM-100, and DIM-B 12 <70 µVpp to 75.40 Vpp SMPTE LF Tone Selectable 40, 50, 60, 100, 125, 250, or 500 Hz, all ±2%. CCIF Difference Frequency Selectable 80, 100, 125, 250, 500 Hz, or1 kHz, all ±2%. DIM Squarewave 3.15 kHz (DIM-30 or DIM-100) or 2.96 kHz (DIM-B), ±1%. Squarewave is bandwidth limited with a 1-pole filter at 100 kHz in DIM-100 mode and 30 kHz in DIM30/DIM-B modes. 2.2.13.3 Analyzer Related Specifications Minimum Input 10 mV IMD Range 0 – 20% ±1 dB for indicated IMD products Accuracy Residual IMD 13 0.0018% SMPTE; 0.0020% DIM; 0.0005% CCIF SMPTE Mode 40 – 500 Hz (LF) mixed with 3 – 200 kHz (HF), any ration from 0:1 to 8:1 (LF:HF) Test Signal Compatibility 14 IMD Measured 40 – 500 Hz amplitude modulation products of the HF tone. Measurement bandwidth is typically 30 Hz – 700 Hz; however, the tunable 1/3-octave bandpass filter may be used for improved sensitivity or analysis of individual products. DIM Mode 2.96 – 3.18 kHz squarewave mixed with 4 – 100 kHz sinewave; 4:1 peak-peak. Test Signal Compatibility 15 IMD Measured All products in the 750 Hz – 2.40 kHz band, expressed relative to the amplitude of the sinewave tone. Measurement bandwidth is 400 Hz – 2.45 kHz; however, the tunable 1/3-octave bandpass filter may be used for improved sensitivity or analysis of individual products. 12 Balanced output mode only. Divide maximum amplitude by 2 (-6 dB) for unbalanced output mode. Amplitude is calibrated in V pp. Other units are referenced to an equivalent simewave with the same peak-to-peak amplitude. 13 14 System specification including contributhons from both generator and analyzer. Valid for inputs Complies with SMPTE RP120-1983 and DIN 45403. 15 Technique suggested by Paul Skritek of the Technical University, Vienna, Austria. For more information see “Simplified Methods” by P. Skritek, a paper presented at the 1985 Audio Engineering Society convention in Hamburg, Germany (preprint 2195); and “Practical Extended 2-18 System One Description/Installation/APWIN Guide Analyzer Specifications Specifications CCIF Mode Test Signal Compatibility Two equal amplitude 4 – 200 kHz tones with 80 Hz – 1 kHz separation. 16 IMD Measured Difference frequency product only, expressed relative to the amplitude of either test tone. Measurement bandwidth is always 1/3-octave. 2.2.14 Wow & Flutter Analyzer Option The Audio Precision Wow & Flutter Analyzer Option adds the capability to measure rotational wow and flutter in accordance with IEC 386, DIN 45507, CCIR 409-3, NAB, ANSI C16.5 (1971), JIS 5551 standards, and scrape flutter. Rotational wow & flutter is typically characterized by FM products in the 0.5 – 200 Hz range. Scrape flutter is caused by frictional effects of the tape sliding over guides or the tape heads and is characterized by FM products extending to 5 kHz, often peaking near 3 kHz. System One DSP configurations can perform FFT spectrum analysis of wow and flutter to 0.06-Hz resolution. Test Signal Compatibility Normal “High-band” 2.80 kHz-3.35 kHz 10.0 kHz-13.5 kHz for scrape flutter measurements. Minimum Input 10 mV (-38 dBu) Measurement Range 0 to 1% Accuracy ±(5% of reading + 0.0005%) Detection Modes IEC/DIN, NAB, and JIS Response Selections Weighted 4 Hz bandpass per IEC/DIN/NAB Unweighted 17 Scrape 17 Wideband Residual W+F Weighted 0.5 Hz-200 Hz 200 Hz-5 kHz 0.5 Hz-5 kHz ≤0.001% Unweighted ≤0.002% Scrape or Wideband ≤0.005% Range DIM Measurements” by Bruce E Hofer, a paper presented at the 1986 AES Convention in Montreux, Switzerland (preprint 2334). 16 Complies with IEC 268.3 and IHF A202 recommendations for the difference frequency product. Odd order IMD products are not measured. 17 Operational with high-band test signals (11.5 kHz-13.5 kHz) only. Upper -3 dB rolloff is typically 4.5 kHz using 12.5 kHz. System One Description/Installation/APWIN Guide 2-19 Specifications Analyzer Specifications 2.2.15 Burst Noise-Squarewave Option (BUR) Option BUR adds burst, noise, and squarewave signal selections to the System One generator. Typical applications include dynamic signal processor testing, absolute polarity testing, acoustic response measurements, and investigating amplifier or transducer transient response. The tone bursts are generated by synchronously gating the generator main oscillator at zero crossings. The number of ON cycles, repetition interval, and OFF level relative amplitude are all programmable. The repetition interval can be expressed in total number of cycles, time, or burst-per-second. A front panel input is additionally provided for triggering individual bursts or gating the sinewave from an external signal. Noise signals include white, pink, bandpass, and equalized bandpass. All of the noise signals are based upon a digital white noise generator with a choice of pseudo-random (0.262-s sequence length) or true random modes. Both modes feature excellent conformity to the ideal Gaussian distribution. The white noise signal is lowpass-filtered at 22 kHz to maximize its energy within the audio bandwidth. The pink noise signals contains energy over an extended bandwidth of 10 Hz – 200 kHz with a -3 dB/octave response characteristic. The bandpass noise signal is obtained by passing pink noise through a tunable 2-pole, constant-Q filter with approximately 1/3-octave bandwidth. All noise signals may be gated via the front panel Trigger/Gate input. The squarewave signal is optimized for general purpose time domain testing of audio equipment. It features a controlled 2-µs risetime, very low energy content above 500 kHz, and excellent symmetry. Even harmonic components are typically below -70 dB. 2-20 System One Description/Installation/APWIN Guide DSP Specifications Specifications 2.2.15.1 Tone Burst Signal Frequency Range Amplitude Range 18 20 Hz – 100 kHz <70 µVpp – 37.70 Vpp ON Cycle Range 1 – 65535 cycles. Programmable in cycles, seconds, or %-ON. Interval Range 2 65535 cycles. Programmable in cycles, seconds, or Bursts/second. OFF Amplitude Range and Accuracy 0 dB to <-60 dB; ±0.5 dB, 20 Hz – 20 kHz 2.2.15.2 Noise Signals Spectral Modes Pink Bandwidth limited 10 Hz – 200 kHz White Bandwidth limited 10 Hz – 22 kHz Bandpass 1/3-octave (2-pole) filtered pink noise; continuously tunable or sweepable, 20 Hz – 100 kHz Amplitude Range 18,19 <70 µVpp – 37.70 Vpp Typical Crest Factor 4:1 Pseudo-Random Cycle Time 0.262 s, synchronized to the 4/s analyzer reading rate. 2.2.15.3 Squarewave Signal Frequency Range Amplitude Range Risetime 18 20 Hz – 100 kHz <70 µVpp – 37.70 Vpp Typically 2 µs 2.3 DSP Specifications The Audio Precision System One is available in three levels. The first level (SYS-22 series) includes analog generation and measurement capability. Levels two (SYS-200 series) and three (SYS-300 series) retain all of the capability of level one, but add DSP (Digital Signal Processing) generation and measurement features. System One + DSP (SYS-200 series) provides advanced signal analysis and generation for testing analog domain audio devices. System 18 Unloaded (open circuit). Divide maximum amplitude by 2 (-6 dB) for unbalanced or commonmode configurations. Amplitude is calibrated in Vpp. Other amplitude units are referenced to a sinewave with equivalent Vpp. 19 Noise amplitude calibration is approximate only, and may be exceeded 0.01% of the time. System One Description/Installation/APWIN Guide 2-21 Specifications DSP Specifications One Dual Domain (SYS-300 series) offers these same features for analog domain signals, plus digital domain inputs and outputs. System One’s analog hardware generation and measurement sections operate independently and concurrently with DSP and digital domain functions, and are frequently used together for testing A/D or D/A converters or for analog pre-processing before DSP processing. 2.3.1 Analog Input Related Specifications Any analog domain input signal must be converted to a digital signal before either real time or block mode analysis in the DSP modules. These specifications describe the accuracy and limitations of that conversion. A/D Converters Dual channel independent 16 bit Sample Rates 192 k (80 kHz analog bandwidth), 176.4 k (80 kHz bandwidth), 48 k (22 kHz bandwidth), 44.1 k (20 kHz bandwidth), 32 k (15 kHz bandwidth), or 1 k sample/second (350 Hz bandwidth). Not all sample rates are available with all DSP programs. A/D Analog Sources Selectable Channel A or B following input range sections of analog analyzer, “Reading” (analyzer output, following tunable analog bandreject or bandpass filter and all analog high-pass, low-pass, optional, and external filters), generator monitor output, or panel-mounted dc-coupled fixed-sensitivity BNC inputs. Worst-Case Harmonic or Spurious Product -85 dB for in-band signals (<0.5 x sample rate); -60 dB for out-of-band signals. Direct (BNC) Inputs Input via Analog Analyzer Amplitude Range 2.00 Vrms full scale (2.828 Vpk) 300 µV to 160 Vrms full scale, autoranging Accuracy, Flatness ±0.25 dB dc – (0.45 x sample rate) at sample rates >8 kHz; for example, dc – 20 kHz @ 44.1 kHz sample rate ±0.25 dB 20 Hz – (0.45 x sample rate) at sample rates >8 kHz; for example, 20 Hz – 20 kHz @ 44.1 kHz sample rate 2.3.2 Analog Output Related Four DSP programs (FFTGEN, FASTTEST, FASTTRIG, MLS) include signal generation capability and are often used to test analog domain devices. The digitally generated signal must thus be converted to the analog domain. These specifications describe the accuracy and limitations of that conversion. Note that while FFTGEN, FASTTEST, and FASTTRIG can generate two downloaded independent digital waveforms (typically multitone) from their buffers, only one D/A converter and one analog output stage exists in System One. Two 2-22 System One Description/Installation/APWIN Guide DSP Specifications Specifications waveforms are available simultaneously only at the digital outputs of System One Dual Domain. D/A Converter Single 16-bit, slaved to A/D sample rate Dither ±16 bit, probability and spectral distribution choices as shown below under “Signal Output in Digital Domain” Worst Harmonic/Spurious Signal -85 dB for in-band signals (<0.5 x sample rate); -60 dB for out-of-band signals. th Direct (BNC) Output Output via Analog Generator Output Stage Amplitude Range 2.00 Vrms full scale (2.828 Vpk) Full analog output stage range of 26.66 Vrms to 25 µVrms Accuracy, Flatness ±0.25 dB dc – (0.45 x sample rate); for example, dc – 20 kHz @ 44.1 kHz sample rate ±0.25 dB 20 Hz – (0.45 x sample rate); for example, 20 Hz – 20 kHz @ 44.1 kHz sample rate Amplitude Resolution 1/216 (approx 30 µV) <0.01 dB or 1.27 µV, whichever is greater THD + N <0.01% <0.01% 2.3.3 Digital Input/Output Related (System One Dual Domain only) Digital domain signals may be analyzed by two of the real time programs (BITTEST and GENANLR) and all of the block mode programs, with no conversions necessary. These same two real-time programs and FFTGEN, FASTTEST, FASTTRIG, and MLS can all generate signals in the digital domain to stimulate digital domain devices with no conversions. The following specifications describe the interfaces and formats available in the digital domain. AES/EBU or SPDIF/EIAJ System One Description/Installation/APWIN Guide Supports the full implementation of the AES/EBU digital interface. Data may be 20/24-bits wide. Channel status bit display is provided for Channel A. User-specified channel status bits are transmitted on both channels simultaneously. The user bits are not supported. Electrically compatible with the Sony Philips Digital Interface (SPDIF) and EIAJ interface at both coaxial (RCA) and optical Toshlink connectors. The transmitter and receiver may operate at 32 k, 44.1 k, or 48 k. The transmitter may be slaved to the internal clock or house sync. 2-23 Specifications DSP Specifications Parallel I/O 24-bit dual channel available on two 34-conductor connectors on rear panel (one input, one output). Two channels are multiplexed on each connector. Data rates are selectable 32 k, 44.1 k, or 48 k. Data strobe is included or may be externally supplied. General-Purpose Serial via SIA-322 Serial Interface Adapter Option Refer to Section 2.6. 2.3.4 Signal Output in Digital Domain Real-Time Sinewave Frequency Range vs Sample Rate (FFTGEN, GENANLR): 10 Hz – 15 kHz @ 32 kHz; 10 Hz – 20.67 kHz @ 44.1 kHz; 10 Hz – 22.5 kHz @ 48 kHz Frequency Resolution, Real Time Sinewave Generation (Sample Rate)/224 (approx 0.003 Hz @ 48 kHz rate) Frequency Resolution from Downloaded Waveform Files (FFTGEN, FASTTEST, FASTTRIG) (sample rate/waveform record length); for example, 5.86 Hz at 48 kHz sample rate with maximum 8192sample record length. Amplitude Range Full 24-bit amplitude range from 100% FS to <0.00003% FS (0.00 dB FS to <-130 dB FS) Amplitude Resolution 1 LSB (1/224) Flatness and Accuracy Unmeasurable Distortion <0.00003% FS (-130 dB FS) Rounding/Truncation Rounded to user-selected word width from 8 through 24 bits, or truncated Dither Probability Distribution Triangular or rectangular probability Dither Spectral Distribution Flat (white) or shaped (6 dB/octave rising at high frequency) Dither Amplitude Selectable from ±1 LSB of 8 bit though 24 bit word, or OFF 2.3.5 Real-Time Program Descriptions 2.3.5.1 HARMONIC HARMONIC provides single-channel frequency-selective amplitude measurement of analog signals. The center frequency of a tunable bandpass filter may be steered by manual panel entry, track analog genrator frequency, or track analog analyzer bandpass-bandreject filter frequency. The filter can tune directly to the steering source frequency, to 2 through 9 harmonic of that frequency, or to a user-entered offset frequency. A DSP-implemented RMS detector follows the filter. nd 2-24 th System One Description/Installation/APWIN Guide DSP Specifications Specifications 48 kHz Sample Rate 192 kHz Sample Rate Range 20 Hz – 21.75 kHz 80 Hz – 80 kHz Filter Shapes 6-pole 1/8-octave (Q = 12, 6-pole 1/8-octave (Q = -3-dB BW 8% of center 12, -3-dB BW 8% of frequency) or 10-pole center frequency) 1/10-octave Q = 15, -3-dB BW 6.7% of center frequency) 2.3.5.2 GENANLR GENANLR is a real-time two-channel digital input-output program designed for use only with System One Dual Domain. It generates a sinewave of any amplitude and frequency, acquires digital-format audio data on two channels simultaneously, has two DSP-implemented RMS detectors, and offers a selection of filters including selectable highpass, tunable bandpass or bandreject, A-weighting and CCIR weighting filters plus a quasi-peak detector for noise measurements. It thus emulates in the digital domain most of the common analog domain audio measurements. Belw are the digital analyzer specifications; for digital generator specifications, see the real-time sections of “Signal Output in Digital Domain.” Level Measurement Related Range Resolution Accuracy and Flatness Units 0 dB FS to -125 dB FS ±0.01 dB ±0.02 dB %FS, dB FS Filtered Level Measurement Related Filter Shapes Bandpass (Q = 19, BW 5.3% of center frequency), band reject, highpass at 22 Hz, 100 Hz, or 400 Hz, A weighting, CCIR weighting. 400 Hz highpass is 10pole elliptical when no other filters are in use. 22 Hz and 100 Hz highpass are four poles (24 dB/octave) when BP/BR filter is not in use. All highpass filters two poles (12 dB/octave) when BP/BR filter is in use. Bandpass Frequency Range Bandreject Frequency Range Residual THD + N 0.04% to 40% of sample; for example, 20 Hz – 19.2 kHz @ 48 kHz sample rate 0.1% to 40% of sample; for example, 50 Hz – 19.2 kHz @ 48 kHz sample rate -120 dB Measurement Units %FS, dB FS, BITS, dB (ref LEVEL measurement) Frequency Measurement Related Range 5 Hz to 40% of sample rate for rated accuracy Accuracy 0.01% of reading or 0.0001% at 4 readings/second Resolution Maximum of 0.003% of reading or 0.0001% of sample rate System One Description/Installation/APWIN Guide 2-25 Specifications DSP Specifications 2.3.5.3 BITTEST BITTEST is a real-time two-channel digital input-output program designed for use only with System One Dual Domain. It generates five waveforms. The analyzer section measures any of these waveforms and duisplays bit errors. Any amount of time delay is permissible through the device under test, so signals may be recorded and played back to measure bit errors of digital storage media. Sample Rates 48, 44.1, 32 kHz Signal Waveforms Sinewave (range 60 Hz – 6 kHz), pseudorandom noise, constant values (“digital DC”), and walking one and walking zero patterns Analysis Two-channel displays of input value (decimal or hex) and errors, sampled 4 or 32 times per second Error Display Errors during most recent sampling period (1/4 or 1/32 second), or largest number of errors in any sampling period, or total cumulative errirs since beginning of analysis 2.3.6 Block Mode Program Descriptions The five block mode DSP programs (FFTGEN, FFTSLIDE, FASTTEST, FASTTRIG, and MLS) all contain certain common features, but differ in detail. The table on the following page compares major features. “Full memory” describes either System One Dual Domain or System One + DSP with MEM option. “Small memory” refers to System One + DSP without MEM option. Small memory units cannot run FASTTRIG and MLS programs. All five programs can perform Fourier Transforms of 16,384 samples maximum (assuming full memory), producing 2.92 Hz resolution at 48 kHz sample rate. All programs have an FFT dynamic range in the digital domain of approx 110 dB below the largest signal for 0.25 dB amplitude error. The A/D converters further limit this range when analyzing analog signals. Principal Intended Applications: FFTGEN Spectrum analysis & waveform display plus digital domain signal generation 2-26 FFTSLIDE Spectrum analysis & waveform display FASTTEST Rapid testing of typical electronic devices with input & output at same location, no time delay FASTTRIG Rapid testing of broadcast links, recorded media or other devices with time delay or frequency shift MLS Quasi-anechoic frequency & phase response of loudspeakers System One Description/Installation/APWIN Guide DSP Specifications Specifications FFTGEN 16,384 FFTSLIDE 30,720 FASTTEST 16,384 FASTTRIG 16,384 32,768 4,096 8,192 4,096 NA NA 341 MS 640 ms 341 ms 341 ms 683 ms 16.384 sec. 24.576 sec NA NA NA Normal, interpolate, peak max YES Normal, interpolate, peak, max YES NO NO Normal, interpolate, peak YES YES FFT of any arbitrary section of record NO (beginning of record only) YES Sample rates for acquisition & analysis 192,176.4,4 8, 44.1, 32, 8, 1 kHz NO 192,176.4, 48, 44.1, 32, 8, 1 kHz YES NO (beginning of record only) 48, 44.1, 32 kHz NO (beginning of record only) 48,44.1, 32 kHz YES, by cross correlation of MLS signal YES NO NO NO NO 4,16,64,256, 1024x BlackmanHarris, Hann, Flattop, none YES NO NO NO NO NO NO NO BlackmanHarris, Hann, Flattop, none YES Hann, none Hann, half Hann, 240-8 kHz, 120-16 kHz, none YES Maximum acquisition record length (samples) with full memory Maximum acquisition record length (samples) with small memory Maximum full memory acquisition time, 48 kHz sample rate (scales inversely with sample rate except at 1 kHz sample rate) Maximum full memory acquisition time, 1 kHz sample rate Waveform display modes FFT spectrum analysis Selectable hardware trigger source (external, generator, etc.), slope Pre-triggering FFT averaging FFT window selections MLS 48, 44.1, 32 kHz FFT phase measurement (absolute & interchannel) NO BlackmanHarris, Hann, Flattop, none NO Distortion & noise measurements from multitone signals Recognize & trigger on multitone signals Frequency error correction by comparison to stored signal Real-time high-resolution sinewave generator Generate signals from downloaded waveform (multitone, etc.) Generate Maximum Length Sequence noise NO NO YES YES (interchann el only on Chan. B) YES NO NO NO YES NO NO NO NO YES NO YES NO NO NO NO YES NO YES YES NO NO NO NO NO YES System One Description/Installation/APWIN Guide NO 2-27 Specifications Switchers Specifications END OF SYSTEM ONE SPECIFICATIONS The remainder of the specifications in Section 2 are for optional system components. 2.4 Switchers Specifications Max Voltage Rating 20 Max Signal Power 21 Crosstalk Balanced 600 Load 200 V pk, 160 V rms 30 watts or 1 ampere, whichever is greater 20 kHz -140 dB 100 kHz -126 dB Unbalanced 600 Load 20 kHz -120 dB 100 kHz -106 dB Series Resistance Typically <0.3 ohms per side Shunt Capacitance Typically <90 pF, each side to ground 2.5 DCX-127 Multi-Function Module Specifications 2.5.1 DC Volts Measurements 22 Accuracy 200 mV range 6 rdg/s 25 rdg/s 0.05% + 0.03 mV 0.05% + 0.1 mV 2 V range 0.05% +0.1 mV 0.05% +1 mV 20 V range 0.05% +1 mV 0.05% +10 mV 200 V range 0.05% +10 mV 0.05% +100 mV 500 V range 0.05% +100 mV 0.05% +1 V 200 mV – 200 V ranges 0.005% of range 0.025% of range 500 V range 100 mV 500 mV Resolution Input Resistance 10 MΩ ±1% (all ranges) Common Mode Rejection >120 dB at dc and 50 Hz – 20 kHz 20 Relay contact resistance degrades rapidly with increasing switched power. For maximum relay life (typically 20 x 106 operations) Audio Precision recommends limiting the maximum switched signal power to 5 Watts or 200 mA 21 Measured between any two selectable channels into the specified load impedance. SWR-2122P (patch point switcher) crosstalk from the interrupted input to output is typically 70 dB to 20 kHz. 22 Valid from +15°C to +30°C, <80% RH, for one year. Derate linearly to two times indicated values at +5°C to +40°C. 2-28 System One Description/Installation/APWIN Guide DCX-127 Multi-Function Module Specifications Specifications 2.5.2 Resistance Measurements 22, 23 Accuracy 200 Ω range 6 rdg/s 25 rdg/s 0.05% + 0.04 Ω 0.05% + 0.1 Ω 2 kΩ range 0.05% +0.2 Ω 0.05% +1 Ω 20 kΩ range 0.05% +1 Ω 0.05% +10 Ω 200 kΩ range 0.05% +10 Ω 0.05% +100 Ω 0.15% +100 Ω 0.15% +1 kΩ 0.005% of range 0.025% of range 2 MΩ range 24 Resolution Open Circuit Voltage < 6 Vdc 2.5.3 DC Outputs Range ±10.500 V (bipolar output) Resolution 20 µV (20 bits equivalent) Accuracy ±(0.05% + 0.2 mV) absolute; ±40 µV, relative to best fit line Maximum Output Current 20 mA source; 10 mA sink Output Floating Characteristics Low(-) terminal can float up to 2 Vpk 2.5.4 Digital Input/Output Configuration 22 bit (21 bits data plus sign) words, plus data valid and new data strobes. LSTTL-CMOS compatible. 25pin D-subminiature connectors. Maximum Data Rate Approx 8 ms/transfer, limited by computer speed 2.5.5 Auxiliary Output Ports Configuration Three independent 8-bit parallel ports, LSTTL-CMOS compatible 23 With both 2-wire or 4-wire configurations. When using 4-wire configuration, lead resistance must be <1.5 Ω. 24 Full scale on the 2 MΩ range is 2.50 MΩ. System One Description/Installation/APWIN Guide 2-29 Specifications SIA-322 Serial Interface Adapter Specifications 2.6 SIA-322 Serial Interface Adapter Specifications General-Purpose Serial via SIA-322 Serial Interface Adapter Option Connects serial-interface digital device inputs and outputs to System One Dual Domain parallel inputs and outputs. Switches on SIA-322 front panel provide control of: • one vs two channel operation, • LSB first vs MSB first within serial frame, • internal vs external bit clock, • internal vs external word clock, • high vs low bit clock polarity, • high vs low word clock polarity, • high vs low serial data polarity, • CMOS vs TTL logic levels, • position of word clock transition within serial word, • width of word clock pulse, • ratio of oversampled clock to sample rate (1, 2, 4, or 8), • ratio of bit clock to oversampled clock frequency, • word length from 8 to 32 bits, • data length within word, • right-justified vs left-justified data within frame, and • (for the digital output) zero vs one padding or sign extending of out-of-bounds data. Output logic rise and fall times: <6 ns; 3 ns typical Maximum high frequency clock rate: 12 MHz Maximum sample rate limited by DSP program in use: 192 kHz with FFTGEN, 48 kHz with GENANLR. 2.7 Primary Power and Fuse Information (all components) Refer to Section 3.2 for instructions on selecting primary input voltage range, replacing fuses, and changing fuse types. Primary Voltage Ranges, all components 100, 120, 230, or 240 V ac (-10%/+6%), 50 - 60 Hz Power Ratings 2-30 System One 240 VA max Switcher (each unit) 20 VA max DCX 20 VA max SIA-322 none (powered from the System One) System One Description/Installation/APWIN Guide Environmental (all components) Fuse Requirements Specifications 100 or 120 V 230 or 240 V 2A 1A Switchers 200 mA 100 mA DCX 200 mA 100 mA System One 2.8 Environmental (all components) Temperature Range Operating Storage +5°C to +40°C -40°C to +75°C Humidity 80% RH to at least +40°C (non-condensing) Altitude 2000 m Maximum 2.9 Physical Dimensions and Weights 2.9.1 System One Dimensions Width 17.5 in. (44.4 cm), including handle and feet Height 5.7 in. (14.5 cm), including feet Depth 18 in. (45.7 cm), including connectors Weight Approximately 34 lbs [15.9 kg], depending upon options installed 2.9.2 Switchers, DCX-127, and SIA-322 Dimensions Width 17.2 in. (43.7 cm) Height 1.75 in. (4.4 cm) Depth 10.625 in. (27 cm) Weight Switchers 9.2 lbs (4.2 kg) DC-127 9.5 lbs (4.3 kg) SIA-322 6.9 lbs (3.1 kg) System One Description/Installation/APWIN Guide 2-31 Specifications Regulatory Compliances (all components) 2.10 Regulatory Compliances (all components) 25 EMC Safety Complies with FCC Part 15 Subpart J (class B), 89/336/EEC, 92/31/EEC, and 93/68/EEC, EN 50081-1 (1992) Emissions Class B, EN-50082-1 (1992) Immunity Complies with 73/23/EEC, 93/68/EEC, EN6010-1 (1993) – IEC 1010-1 (1990) + Amendment 1 (1992) + Amendment 2 (1995) Installation category II – Pollution Degree 2 2.11 Software and Control 2.11.1 Computer Requirements APWIN is a Microsoft Windows-based program. As such, it requires that Windows be installed on the computer. Windows in turn has its own hardware and software requirements. Although there is a minimum configuration that will run Windows, practical considerations will suggest a configuration exceeding this to achieve acceptable speed with most applications, including APWIN. If the computer used to run APWIN will also be required to run other Windows applications such as word processors, spread sheets, or data bases we suggest a computer configuration better than the minimum requirement. The following table lists the minimum and recommended requirements. Windows 3.11 Computer CPU: Memory: Hard drive: Free hard drive space: Video: Windows 95, NT 4.0 Computer CPU: Memory: Hard drive: Free hard drive space: Video: Minimum Requirement Recommended Configuration 386SX, 20 MHz 8 MB 100 MB 20 MB VGA (640 x 480) 486DX2, 66MHz 16 MB 500 MB 100 MB SVGA (1024 x 768) 486DX2, 66MHz 16 MB 500 MB 100 MB VGA (640 x 480) Pentium or better 32 MB or more 500 MB or more 100 MB SVGA (1024 x 768) 25 Emission and Immunity levels are influenced by the shielding performance of the connecting cables. The shielding performance of the cable will depend on the internal design of the cable, connector quality, and the assembly methods used. EMC compliance was evaluated using Audio Precision XLR type cables, part number 4155.0117. 2-32 System One Description/Installation/APWIN Guide Software and Control Specifications Note regarding Windows 3.11, Windows 95, and Windows NT APWIN will operate under either Windows 3.11, Windows for WorkGroups, Windows 95, or Windows NT 4.0. We have experienced some minor incompatibilities in some Windows 3.1 installations and therefore recommend upgrading to Windows 3.11 or Windows 95 if problems occur. Windows 95 or Windows NT 4.0 will provide the best performance for APWIN. 2.11.2 ISA-WIN APIB Card The ISA-WIN APIB Card is installed in the user's pc and interfaces between the PC and the APIB (Audio Precision Interface Bus). The ISAWIN card is a half-size, 8-bit card and includes jumpers to set the computer address and an APIB cable to connect to the first device. Refer to Section 3.3 for further information. 2.11.3 PCM-WIN Card The PCM-WIN Card interfaces between a portable computer and the APIB. The computer must have a a Type II PCMCIA slot and, if running Windows 3.11, be version 2 or greater software compliant and have Card and Socket Services release 2.1 or later software installed. Refer to Section 3.4 for further information. 2.11.4 Cables and Adapters 2.11.4.1 Analog Audio Cables These cables provide a convenient method to connect Audio Precision measurement equipment with a device under test. These cable kits consist of four cables, each with a unique color band at the connector ends to facilitate identification. The cables are high quality Mogami NEGLEX super flexible shielded cable, and are 8 ft (2.4 m) long. The cables and connector shells are satin black, and all connectors have gold plated contacts. • CAB-XLR consists of a set of four XLR male to XLR female cables. • CAB-XBR consists of a set of four cables with XLR male connectors to RCA/PHONO male connectors. Also provided are four adapters, from RCA female to BNC male. The cables are wired with pin 2 of the XLR connector as “hot” (center pin of the System One Description/Installation/APWIN Guide 2-33 Specifications Software and Control RCA connector) and pins 1 and 3 connected to ground and shield, to agree with the unbalanced wiring convention of Audio Precision instruments. 2.11.4.2 Digital Audio Cables These cables are designed to meet CE EMI emission requirements. • • • • CAB-AES: Set of two AES/EBU cables, 39 in. (1 m) long. CAB-AES2: Set of two AES/EBU cables, 6.5 ft (2 m) long. CAB-AES4: Set of two AES/EBU cables, 13 ft (4 m) long. CAB-DIO: Set of two interface cables, 4.25 ft (1.3 m) long, to connect between the SYS-2322 rear panel 50-pin ribbon input/output connectors and a DUT fixture with 0.1-in. spaced 2 x 25-pin headers. 2.11.4.3 Cable Adapters • CAD-RCA: set of 14 RCA/PHONO female to BNC male adapters, intended primarily for use with the SWR-2122U Unbalanced Switcher. 2.11.4.4 Digital Control (APIB) Cables These cables can be used as extensions or replacements for the APIB cables that come with each instrument or ISA APIB controller card. • • • 2-34 CAB-D0: Extension APIB Interface cable, 20 in. (0.5 m). CAB-D2: Extension APIB Interface cable, 6.5 ft. (2 m). CAB-D6: Extension APIB Interface cable, 12.7 ft. (6 m). System One Description/Installation/APWIN Guide 3. Hardware Installation Hardware setup involves installing an interface card in the computer and connecting a cable from this interface card to System One or System Two. Every copy of APWIN comes with an ISA-bus half-size interface card or, as a option, a PCMCIA interface card. One of these cards is required for APWIN to communicate with System One or System Two. (Earlier Audio Precision PCI-1, PCI-2, or PCI-3 cards or current ISA-DOS or PCM-DOS interface cards will not work with APWIN.) For table top use, the System One can be stacked with switchers or other instruments. 3.1 Rack Mounting 3.1.1 System One A kit is available to allow rackmounting in a standard 19-inch equipment rack. Contact Audio Precision for further information. 3.1.2 Switchers, SIA-322, and DCX-127 To rack mount the switchers, SIA-322, and DCX-127, note that the rackmounting brackets can be installed in two ways: • To mount the front panels flush with the front of the rack, or • To mount the instruments with the panels recessed, which allows space for the connectors inside the rack. For the switchers, be sure to observe the instruction given in Section 3.2.1 when rackmounting. 3.2 Primary Power Considerations Refer to Section 2.7 or the rear-panel label for fuse specifications. Unplug the power cord from the instrument before changing fuses or performing any other operations described in this section. 3.2.1 AC Mains Switch Required The SWR-2122-Series switchers do not have individual power switches and are intended for continuous operation. However, they should be plugged into a switched power source or mounted to give the user access to the mains cable for disconnect. System One Description/Installation/APWIN Guide 3-1 Hardware Installation Primary Power Considerations 3.2.2 Checking or Changing Power Line Voltage Figure 3-1. Changing power line voltage The AC Mains input to each instrument is made through a connector/fuse block/voltage selector assembly. Before connecting the power cord, confirm that the input voltage selection is correct for your power source. An indicator pin shows the selected input voltage in one of the four holes in the cover (see Figure 3-1). To change the input voltage, refer to Figure 3-1 and proceed as follows: 1. Remove the AC power cord from the AC Mains Connector. 2. Open the cover, using a small blade screwdriver or similar tool. Set aside the cover/fuse block assembly. 3. Pull the voltage selector card straight out of the housing, using the indicator pin. 100 V 90º 120 V 90º 230 V 90º 240 V Figure 3-2. Voltage selector card positions 4. Orient the selector card so that the desired input voltage is readable at the bottom (see Figure 3-2). Then orient the indicator pin to point up when the desired voltage is readable at the bottom, with the indicator pin assembly seated in the notch on the board edge. 3-2 System One Description/Installation/APWIN Guide Primary Power Considerations Hardware Installation 5. Insert the voltage selector card into the housing with the printed side of the card facing toward the connector, and the edge indicating the desired voltage first. 6. Confirm that the correct fuse is installed for the intended input voltage (refer to fuse ratings in Section 2.7 or marked on the rear panel). If necessary, change the fuse type as described in the following section. 7. Replace the cover and verify that the indicator pin shows the desired voltage. 3.2.3 Fuse Information The connector/fuse block/voltage selector assembly allows two fusing arrangements: North American (see Figure 3-3), and European (seeFigure 3-4). The North American fusing arrangement uses a single type 3AG (0.25 x 1.25 in.) SB (“slow blow”) fuse; the European fusing arrangement uses two 5 x 20 mm IEC-approved type T fuses. Refer to the label on the rear panel for fuse current ratings. Jumper bar Fuse block Fuse Cover Figure 3-3. North American fusing arrangement European Fusing arrangement Fuses Fuse block Cover Jumper bar Figure 3-4. European fusing arrangement System One Description/Installation/APWIN Guide 3-3 Hardware Installation Installing ISA-WIN APIB Card 3.2.4 Changing Fusing Arrangement To change from one fusing arrangement to the other: 1. Remove the AC power cord from the AC Mains Connector. 2. Open the cover of the connector/fuse block/voltage selector assembly with a small blade screwdriver or similar tool. 3. On the back of the cover, loosen the Phillips screw two turns, then remove the fuse block by sliding up, then away from the screw and lifting from pedestal at the other end (refer to Figure 3-5). Fuse Fuse block Cover Figure 3-5. Changing fuse types 4. Invert the fuse holder and reassemble it on the Phillips screw and pedestal, and tighten the screw. 5. Change or add the correct fuses as necessary (again, refer to rear panel for the correct fuse current rating). 6. Confirm the line voltage setting as described in the previous section, then replace the cover. 3.2.5 Proper Environment All Audio Precision System One and System Two products are intended for use indoors, in a normal environment. 3.3 Installing ISA-WIN APIB Card The ISA-WIN card, shown in Figure 3-6, is a half size (8-bit) card that must be installed in the host PC to interface the ISA Bus in the PC to the APIB. Included with the card is an APIB interconnecting cable. Alternatively, a PCMCIA interface card is available for use with laptop computers. See Section 3.4. 3-4 System One Description/Installation/APWIN Guide Installing ISA-WIN APIB Card Hardware Installation Figure 3-6. ISA-WIN Interface Card and cable TIP: Whenever handling electronic components such as this interface card, it is necessary to avoid static electricity discharge that can permanently damage the card. Always leave the card in the protective static bag prior to actual insertion. Before picking up the card to install it in the computer, drain any static charge in your body by touching the chassis of the computer. Pick up the card by the metal bracket and avoid touching any of the components on the card. The “snap” discharge you may notice when you touch a metal object after walking across a carpet can be several thousand Volts (although at a very low current) and can do catastrophic damage to unprotected integrated circuits such as those on this interface card. Turn off the power of the computer, remove the cover and install the card in an unused slot. Be sure the card is well seated; it should snap down into the connector of the mother board of the computer. Install the hold-down screw on the card bracket and replace the cover. 3.3.1 Address Jumper Settings You will notice two jumpers near the top edge of the card. In most cases, these will not have to be changed. They define the address location of the card and can be used to change the default address if conflicts arise. Unless you know of a conflict, leave the jumpers in the factory default position. After installation, if conflicts arise, these jumpers can be changed to define an alternate location. To change jumpers, turn off power to the computer, remove the cover and remove the card. Use caution handling the card to avoid static discharge. Refer to Figure 3-7 and set the jumpers to an alternate location. Replace the card and cover. System One Description/Installation/APWIN Guide 3-5 Hardware Installation Installing PCM-WIN PCMCIA Interface Card Address Location J202 J201 238 Removed Installed 298 Installed Installed 2b8 Installed Removed 2d8 Removed Removed Notes Factory Default (Memory space required: eight address locations.) NOTE When APWIN starts, it will automatically look through the possible address locations to find an ISA-WIN or PCMWIN card. In the unlikely event that this auto-detect does not function correctly you can force the software to utilize a specific address location using command line start-up switches. To do this, see Section 6.1.1.3 Figure 3-7. ISA-WIN APIB Card with address jumper selections shown 3.4 Installing PCM-WIN PCMCIA Interface Card The Audio Precision PCM-WIN card is a PCMCIA to APIB interface adapter. It can be used to connect a PC or notebook computer equipped with a PCMCIA type II slot and version 2.1 or later Card and Socket Services to Audio Precision instruments via the Audio Precision Interface Bus (APIB). It functions the same as the ISA-WIN interface card that is used with ISA bus PCs. 3-6 System One Description/Installation/APWIN Guide Connecting the APIB Interface Hardware Installation Note: If you are using the PCM-WIN card, do NOT install it until after the APWIN software is installed, per Section 4 (Windows 95) or Section 5 (Windows 3.11). Figure 3-8. PCMCIA to APIB interface card and cable Refer to Section 4.1 to install the associated PCMCIA drivers for Windows 95, or Section 5.3 to install the PCMCIA drivers for Windows 3.11. 3.5 Connecting the APIB Interface Simply connect the cable from the APIB Interface card in the PC to the System One. If your system includes switchers, notice that each SWR2122 switcher has two APIB connectors on its rear panel. This is to permit connecting them in a “daisy-chain” fashion between the computer’s APIB card connector and the System One APIB connector (see Figure 3-9). The switcher’s connectors pass the APIB lines through, and the switchers respond only when specifically addressed, as described below. Normally, the computer will be connected to the first switcher with a digital interface cable, the first switcher connects to the second, etc, and the last switcher connects to the System One digital interface (APIB) connector. System One Description/Installation/APWIN Guide 3-7 Hardware Installation Setting Switcher Addresses and Modes Figure 3-9. APIB connections block diagram (typical) 3.6 Setting Switcher Addresses and Modes A six-switch binary switch bank is located on the rear panel. The first four switches on this bank select which group of channel numbers the module responds to as described in Table 3-1. The last two switches function as described in the appropriate subsection below. These switches are marked 1 through 6 on the switch itself; on the panel, the first four are labeled 1, 2, 4, and 8, which corresponds to their bit value in the address word. The up, or ON, position corresponds to a logic 0 (low). Input, Output, and patch point switchers may all be combined in the same system. Input and output switchers may share the same addresses. A patch point switcher must not have the same addresses as either an input or output switcher. Two patch point switchers may be set to the same address if one is set as Channel A and the other as Channel B (see Section 3.6.2). 3-8 System One Description/Installation/APWIN Guide Setting Switcher Addresses and Modes Hardware Installation 3.6.1 Switcher Address Settings Each switcher module consists of 12 channels. Up to 16 modules may be stacked to provide up to 192 channels. Rear panel address switches must be set to select to which channel commands from the software each switcher module should respond. For example, the first switcher is normally set to channels 1-12, the second module to channels 13-24, etc. Figure 3-10 shows a typical rear-panel APIB Address switch. Table 3-1 shows relationships among APIB Address switch positions, binary codes, and channel numbers on the APWIN software “panels.” Table 3-1. APIB Address switch settings Channel Numbers 1 (Switch 1) 1 – 12 13 – 24 25 – 36 37 - 48 49 - 60 61 - 72 73 - 84 85 - 96 97 - 108 109 - 120 121 - 132 133 - 144 145 - 156 157 - 168 169 - 180 181 - 196 Up Up Up Up Up Up Up Up Down Down Down Down Down Down Down Down Rear Switch Settings 2 4 (Switch 2) (Switch 3) Up Up Up Up Down Down Down Down Up Up Up Up Down Down Down Down Up Up Down Down Up Up Down Down Up Up Down Down Up Up Down Down 8 (Switch 4) Up Down Up Down Up Down Up Down Up Down Up Down Up Down Up Down Binary Code 0000 0001 0010 0011 0100 0101 0110 0111 1000 1001 1010 1011 1100 1101 1110 1111 Figure 3-10. Rear panel DIP switch (typical) System One Description/Installation/APWIN Guide 3-9 Hardware Installation Setting Switcher Addresses and Modes 3.6.2 Input, Output, and Patch Point Switcher Mode Switches Switches 5 and 6 of the switch bank set the switcher mode as described in Table 3-2. The modes are defined below. Table 3-2. Patch point switcher mode settings Patch Point Mode Rear Switch Switch 5 Switch 6 Either A or B Up Up Channel A Up Down Channel B Down Up Off Down Down Either A or B: The switcher’s channel A responds to the A channel addresses, and channel B responds to B channel addresses. This is the normal mode. Channel A: The switcher’s channel A and channel B both respond to A channel addresses. Channel B: The switcher’s channel A and channel B both respond to B channel addresses. Off: Neither channel responds to any address. 3-10 System One Description/Installation/APWIN Guide Setting Switcher Addresses and Modes Hardware Installation 3.6.3 Unbalanced Switcher Mode Switch The SWR-2122U unbalanced switcher may be used for generator output or analyzer input switching. Switch 6 of the six-switch binary switch bank selects between these modes: Set Switch 6 to the UP position to operate as an input switcher (switcher will use Input switch channel numbers for Channel A and Channel B on A Channel and B Channel addresses). Set Switch 6 to the DOWN position to operate as an output switcher (switcher will use Output switch channel numbers for Channel A and Channel B on A Channel and B Channel addresses). Switch 5 disables the switcher; in the DOWN position, the switcher will not respond to any addresses. Also note the labeling on the rear panel describing the difference in cable connections to the four rear-panel BNCs when used as an input versus output switcher. See Figure 3-11. Figure 3-11. Unbalanced switcher address/mode switch System One Description/Installation/APWIN Guide 3-11 Hardware Installation Setting Switcher Addresses and Modes 3.6.4 Board Jumpers Remove the AC power cord from the AC Mains Connector before removing the cover to inspect or change the jumper settings. A common circuit board design is used in all models of the switchers; two jumpers on the circuit board select whether the switcher functions as an input switcher, output switcher, unbalanced switcher, or patch point switcher. These jumpers, marked P62 and P63, are shown in Figure 3-12. The jumper positions are shown for reference only and will normally not need to be changed. Figure 3-12. Switcher mode jumper positions 3-12 System One Description/Installation/APWIN Guide 4. Software InstallationWindows 95 and NT APWIN comes with an easy to use setup utility that will perform the complete installation. All options and system dependent variances are handled automatically. APWIN uses the standard Windows Notepad program for its error reporting file. Notepad is automatically installed when you install Windows but if you have removed it for some reason, you must reinstall this editor program to be able to use the error file feature of APWIN. Note: APWIN will run in any video resolution supported by Windows including 640 x 480, 800 x 600, 1024 x 768, and 1280 x 1024. If your system has the capability, we find that the 1024 x 768 resolution gives the best visual presentation and functionality. To begin APWIN installation, insert the CD-ROM (or diskette 1) into the appropriate drive. If your CD-ROM’s Autostartup feature is enabled, you should see the screen shown in Figure 4-1. Otherwise, from Windows Explorer, browse to the file SETUP.EXE in the disk’s root directory, and double-click. Note: If your system is to be controlled via a PCM-WIN card, do NOT install the card until AFTER the APWIN software is installed (the ISA-WIN card can be installed either before or after the following APWIN installation). System One Description/Installation/APWIN Guide 4-1 Software Installation– Windows 95 & NT Figure 4-1. APWIN installation Setup screen Click on the Install APWIN 1.50 button. If you are installing under Windows NT 4.0, your account must have Administrator rights. Otherwise, you will get the following screen (Figure 4-2) when you try to install: Figure 4-2. Windows NT Administrator rights warning screen The following screen appears (Figure 4-3): Figure 4-3. Setup progression screen 4-2 System One Description/Installation/APWIN Guide Software Installation– Windows 95 & NT After the setup progression screen completes, you should see the Welcome screen of Figure 4-4: Figure 4-4. Welcome screen Click the button. The following dialog box appears: Figure 4-5. Choose Destination Location for APWIN dialog box This screen (Figure 4-5) will suggest location for the APWIN program files. If you wish to choose an alternate location, click on the System One Description/Installation/APWIN Guide 4-3 Software Installation– Windows 95 & NT button. When you click the 4-6 will appear. button, the dialog shown in Figure Figure 4-6. Choose Destination Location for sample tests, procedures, and data files dialog box This screen (Figure 4-6) will suggest a location for all the sample tests, procedures, and data files. If you wish to choose an alternate location, button. When you click the click on the dialog shown in Figure 4-7 will appear. 4-4 button, the System One Description/Installation/APWIN Guide Software Installation– Windows 95 & NT Figure 4-7. Choose Components to Install dialog box Here you have a choice of what to install and how much space will be required. If you are tight on space or you are re-installing part of the software, you can selectively turn off any of the items shown by clicking on the check boxes (an 7 or 3 means install, a blank box means don’t install). The next dialog box (Figure 4-8) will suggest a new Program Manager Group name and show a list of all your existing program groups. If you accept the default new name, APWIN will create a new Program Group called Audio Precision APWIN 1.50. If you choose one of the existing Program Groups, the new icons will be added to that group rather than put in a new group. System One Description/Installation/APWIN Guide 4-5 Software Installation– Windows 95 & NT Figure 4-8. Select Program Manager Group dialog box Now that all of the installation questions have been answered, APWIN will proceed with the installation. You should see the following screen: Figure 4-9. Installing progress screen If you are installing APWIN from diskettes, the following screen will appear after all of the files form each disk are loaded. At each screen, insert the next disk in the series as instructed. Figure 4-10. Insert New Disk dialog box After APWIN is successfully installed, the following message window (Figure 4-11) will appear. This completes the installation and you should 4-6 System One Description/Installation/APWIN Guide Software Installation– Windows 95 & NT now be able to start APWIN unless you are using the PCM-WIN PCMCIA interface. If you are using the PCM-WIN card with Windows 95, you can now insert the PCM-WIN card and Windows 95 will install the card using the Audio Precision driver. Figure 4-11. Setup Complete message window 4.1 Using PCM-WIN card with Windows 95 or NT As noted earlier, if your system is to be controlled via a PCM-WIN PCMCIA card, the card itself should not be installed until AFTER the APWIN software is installed. If you are running Windows 95, You may now insert the PCM-WIN APIB card in its slot, and connect its cable as described in Section 3.4. If you are running Windows NT 4.0, the computer should be switched off before removing or inserting a PCMCIA card (the Windows NT 4.0 system does not support hot swapping). System One Description/Installation/APWIN Guide 4-7 Software Installation– Windows 95 & NT 4-8 System One Description/Installation/APWIN Guide 5. Software InstallationWindows 3.11 5.1 Installing APWIN APWIN comes with an easy-to-use setup utility that will perform the complete installation. All options and system dependent variances are handled automatically. APWIN uses the standard Windows Notepad program for its errorreporting file. Notepad is automatically installed when you install Windows but if you have removed it for some reason, you must reinstall this editor program to be able to use the error file feature of APWIN. Note: APWIN will run in any video resolution supported by Windows including 640 x 480, 800 x 600, 1024 x 768, and 1280 x 1024. If your system has the capability, we find that the 1024 x 768 resolution gives the best visual presentation and functionality. There are two ways to install APWIN. The installation program SETUP.EXE is in the root directory of the CD-ROM, or on diskette 1. You can either use FILE MANAGER to find the SETUP.EXE program on your floppy drive and then double click on it, or from PROGRAM MANAGER select RUN in the FILE menu. This opens the dialog box shown in Figure 5-1. Note: If your system is to be controlled via a PCM-WIN card, do NOT install the card until AFTER the APWIN software is installed (the ISA-WIN card can be installed either before or after the following APWIN installation). System One Description/Installation/APWIN Guide 5-1 Software Installation- Windows 3.11 Installing APWIN Figure 5-1. RUN dialog box At this point, you can either type in your CD-ROM or diskette drive letter (the one that has the APWIN installation disk 1) and type SETUP as shown and then press the button. Alternately, you can use the button to “find” this file. This is what the Browse... dialog box should look like: Figure 5-2. Browse dialog box Now you can click on the setup.exe file name and click (or just double click on the setup.exe file name) to return to the File Run dialog box. When you click in the Run dialog box, the installation process begins. You should then see the initial opening screen shown in Figure 5-4. 5-2 System One Description/Installation/APWIN Guide Installing APWIN Software Installation- Windows 3.11 Note: If you do not see the Welcome opening screen shown in Figure 5-4, and you are installing APWIN under Windows 3.11, it is possible that your system does not have the Windows 32-bit extensions required to run APWIN. If the Win32s extension to Windows 3.11 has not been previously installed*, you will see the following screen: Figure 5-3. Install Win32s message screen If your screen displays the message shown in Figure 5-3, perform the procedure described in Section 5.2 now. Otherwise, your screen should look like Figure 5-4. Figure 5-4. APWIN Installation Welcome screen * Several 32-bit applications require Win32s to run on Windows 3.11. It is possible that some other application you have previously installed has already installed Win32s. System One Description/Installation/APWIN Guide 5-3 Software Installation- Windows 3.11 Click on the Installing APWIN button to proceed. Figure 5-5. Choose Destination dialog box, program files This screen will suggest locations for the APWIN program files. If you wish to choose an alternate location, click on the button. Note that the sample procedures that come with APWIN expect the default locations specified here and will not run if you change directory locations. (Of course, you could edit the procedures to reflect your alternate choices). When you click on Figure 5-6 will appear. , the dialog box of Figure 5-6. Choose Destination dialog box, tests and procedures As it did with program files, this screen will suggest locations for all the tests, procedures, and data. If you wish to choose alternate locations, 5-4 System One Description/Installation/APWIN Guide Installing APWIN Software Installation- Windows 3.11 click on the button. When you click on dialog box of Figure 5-7 will appear. , the Figure 5-7. Choose Components to Install dialog box Here you have a choice of what to install and how much space will be required. We recommend that all files be installed as shown. If you are tight on space or you are re-installing part of the software, you can selectively turn off any of the items shown by clicking on the check boxes (an 7 or 3 means install, a blank box means don’t install). The next screen asks if you want the Audio Precision PCMCIA driver installed in your CONFIG.SYS file. If you intend to use APWIN with the PCM-WIN card interface, you will need Card and Socket Services and the Audio Precision PCMCIA driver for this interface to function. Click the Install APS1DRV.SYS driver selection on the screen. Figure 5-8. PCMCIA Driver Installation selection screen System One Description/Installation/APWIN Guide 5-5 Software Installation- Windows 3.11 Installing APWIN Click to proceed with the installation. This dialog box will suggest a new Program Manager Group name and show a list of all your existing program groups. If you accept the default new name, APWIN will create a new Program Group called “Audio Precision APWIN1.50.” If you choose one of the existing Program Groups, the new icons will be added to that group rather than put in a new group. Figure 5-9. PCMCIA Driver Installation selection screen to proceed with the installation. You should see a Click screen similar to Figure 5-10. Figure 5-10. Installing progression screen If you are installing APWIN from diskettes, the following screen (Figure 5-11) will appear after all of the files from each disk are loaded. At each screen insert the next disk in the series. 5-6 System One Description/Installation/APWIN Guide Installing APWIN Software Installation- Windows 3.11 Figure 5-11. Insert New Disk dialog box After APWIN is successfully installed, and if you are not using the PCM-WIN card, the following message window (Figure 5-12) will appear. This completes the installation and you should now be able to start APWIN. If you are using the PCM-WIN PCMCIA interface, you should see the message window of Figure 5-13. You must insert the PCMCIA card in its slot and reboot your computer. Figure 5-12. Setup Complete message window (using ISA-WIN APIB card) System One Description/Installation/APWIN Guide 5-7 Software Installation- Windows 3.11 Installing WIN32S Figure 5-13. Setup Complete message window (using PCM-WIN APIB card) 5.2 Installing WIN32S Note: APWIN was designed as a 32-bit application to be able to take advantage of Windows 95 in a future release. Windows 3.11 is a 16-bit operating system but is able to run more advanced 32-bit applications by adding extensions to its basic capability. This extension is called WIN32S and is a Microsoft program. A copy of WIN32S version 1.30 is included with APWIN (under license from Microsoft) . At the start of the APWIN installation, the setup program “looks for” the presence of WIN32S (that may have been already installed by another program). If it finds WIN32S, the APWIN installation continues. If it does not find WIN32S, the installation will inform you that the Microsoft WIN32S installation procedure must be done. You will be prompted to abort the APWIN installation and install WIN32S. After WIN32S is successfully installed you can again run the APWIN installation. If WIN32S has been successfully installed, you will then see the Welcome screen shown in Figure 5-4. Note that APWIN version 1.3 (and previous version 1.2) requires version 1.30 of WIN32S. Earlier versions of APWIN (prior to 1.2) installed an earlier version of WIN32S. The APWIN installation will automatically detect this and require the new version to be installed. 5-8 System One Description/Installation/APWIN Guide Installing WIN32S Software Installation- Windows 3.11 To install WIN32S, abort the APWIN installation and insert Disk 1 of the WIN32S installation disks included with this APWIN package. From the Windows PROGRAM MANAGER, select RUN and use the button to find the SETUP.EXE file on the floppy drive that contains disk 1. You should see the following dialog box: Figure 5-14. Win32s installation startup Double click on SETUP.EXE and the installation will proceed. The next dialog you will see will be the following (Figure 5-15): Figure 5-15. Win32s Welcome window Click on Continue and the following screen (Figure 5-16) will appear: System One Description/Installation/APWIN Guide 5-9 Software Installation- Windows 3.11 Installing WIN32S Figure 5-16. Win32s setup target directory window At the end of the installation you should see the screen shown in Figure 5-17: Figure 5-17. Win32s installation completion message window Windows will restart to enable the new 32-bit extension. At this point you can again run the APWIN installation. Insert disk 1 of the APWIN installation disks and follow the instructions given in Section 5.1. This time you should see the Welcome screen shown in Figure 5-4. 5-10 System One Description/Installation/APWIN Guide Using PCM-WIN with Windows 3.11 Software Installation- Windows 3.11 5.3 Using PCM-WIN with Windows 3.11 Note: For Windows 95, refer to Section 4.1 for PCMCIA card installation instructions. The Audio Precision PCM-WIN interface adapter can be used to connect a PC or notebook computer equipped with a PCMCIA type II slot and version 2.1 or later Card and Socket Services to Audio Precision instruments via the Audio Precision Interface Bus (APIB). It functions the same as the ISA-WIN interface card that is used with ISA bus PCs. To use this PCM-WIN interface, the driver supplied with this kit must be installed. This document explains how to install this driver. Card and Socket services, normally supplied with the notebook computer running Windows 3.11, must also be resident on the target notebook computer. 5.3.1 Installing APS1DRV.SYS This driver enables the operation of the PCM-WIN PCMCIA interface card. It presumes the prior installation of Card and Socket Services in the user’s computer. This would normally have been done to activate the PCMCIA card slots. Since it is a device driver, APS1DRV.SYS must be specified in CONFIG.SYS. Assuming the driver is placed in the user’s default directory on a standard system, the line added to CONFIG.SYS should read: DEVICEHIGH=C:\AP\APWIN150\PCMCIA\APS1DRV.SYS This command assumes MS-DOS version 5.0 or higher is used. The DEVICEHIGH command asks MS-DOS to load the driver in high memory maximizing the base memory for applications. If no high memory is available, the driver will be loaded at the lowest possible memory location. If the driver is to be used with earlier versions of MS-DOS, high memory isn’t available, the command should be: DEVICE=C:\AP\APWIN150\PCMCIA\APS1DRV.SYS Note: This driver must be loaded in the CONFIG.SYS file after the Card and Socket Services drivers. System One Description/Installation/APWIN Guide 5-11 Software Installation- Windows 3.11 Using PCM-WIN with Windows 3.11 To install completely, the driver must complete four steps. The steps are: load (and start running), locate the Card Services device driver, identify an unused advanced multiplexed interrupt service number (AMIS), and “hook” into the system. If all of these steps succeed, the driver will display the following: APS1DRV.SYS: Audio Precision Card Intercept Driver version 1.0 Copyright (c) 1994,1995 Audio Precision Inc. All rights reserved. Card Services driver located. PCMCIA Client has been installed properly. Intercept Driver installed successfully. The troubleshooting section of this document describes what messages appear if the driver fails during the installation. 5.3.2 What APS1DRV.SYS Does APS1DRV acts like a centurion— always watching the PCMCIA slots for PCM-WIN and PCM-WIN cards. Like any other device driver (such as RAMDRIVE.SYS), APS1DRV links into MS-DOS as it starts, and supports a fixed set of well defined operations. The device created by loading APS1DRV.SYS is called “APS1_DRV”. This name must be different from the name of the file that loaded the driver (APS1DRV doesn’t contain an underscore). While the device name is much longer than MS-DOS users are used to, it acts just like ‘COM1’ or ‘LPT3’. This leads to an important point. Just like COMx, LPTx, CON, AUX, and the like, APS1_DRV cannot be used as a disk file name— it is reserved. The experience we have had installing this and other PCMCIA devices on various notebook computers suggests that the “plug-andplay” attribute claimed for PCMCIA devices is an intention but not always the reality. The problems we experienced in trying to install the Audio Precision PCM -WIN interface were always traced to incompatible Card and Socket Services drivers supplied with the notebook computer. These drivers have been going through evolution over the past few years as the PCMCIA standard has evolved. In virtually all cases of incompatibility, we were able to solve the problem by installing a more recent version of the Card and Socket Services driver. In some cases, we changed vendors of the driver if the manufacturer of the driver supplied with the notebook could not supply an updated version. We found the driver from Award Software was able to resolve virtually all conflicts and 5-12 System One Description/Installation/APWIN Guide Using PCM-WIN with Windows 3.11 Software Installation- Windows 3.11 had the easiest installation. We recommend that anyone experiencing difficulties installing this PCM-WIN interface obtain the current Card and Socket Services package called “CardWare™” available from: Award Software International Inc. 777 East Middlefield Road Mountain View, CA 94043-4023 Tel: (415) 968-4433 Fax: (415) 968-0274 5.3.3 Configuring Card Services for use with APS1DRV Card Services assigns I/O and Memory card addresses when the card is inserted. To do that, it must have a “pool” of free memory and I/O addresses to choose from. Each vendor uses a different method of generating and keeping the “pool”. APWIN requires that one of the four PCM-WIN addresses be available. The “pool” of I/O addresses needs to include one of these. Since some vendors don’t include these addresses in their standard “pool”, the user must manually change it. This section describes the changes (if any) that are needed on a vendor by vendor basis. To make it easier to identify the software vendor, their standard installation directory is included with the vendor’s name. 5.3.3.1 System Soft Corporation Installed in CARDSOFT directory More than half of the PCMCIA systems shipped use System Soft’s Card and Socket Services. We have found APS1DRV to be very compatible with their Card Services Release 2.1, Version 2.06. The Socket Services file name is dependent on the interface chip manufacturer. The Card Services file name is always CS.EXE. We have successfully tested the following Socket Services device drivers: SCCIRRUS.EXE (Cirrus interface chip), SS365SL.EXE (Intel interface chip), and SSVLSI.EXE (VLSI Technologies interface chip). We have observed problems with SSDBOOK.EXE (Data Book interface chip). See the section on Award Software for more information. This is likely to be fixed in later versions of Socket Services. CARDSOFT software is installed using a floppy disk and MS-DOS. The installation process automatically detects the interface chip, and System One Description/Installation/APWIN Guide 5-13 Software Installation- Windows 3.11 Using PCM-WIN with Windows 3.11 installs the appropriate Socket Services driver. The installation changes CONFIG.SYS, but leaves AUTOEXEC.BAT alone. As part of the installation process, the PC user is asked to manually change CONFIG.SYS to exclude memory from EMM386. If users are having problems with CARDSOFT software, they should make sure that their EMM386 installation line (if they use it) includes the following string: X=D000-DFFF CARDSOFT software uses a utility to determine what I/O and memory addresses are free for the “pool”. The utility is called CSALLOC.EXE, and it is automatically run as part of the installation process. The “pool” is kept as a text file in the CARDSOFT directory. This file is called CSALLOC.INI, and can be changed by CSALLOC.EXE, or using any text editor (such as NOTEPAD, or EDIT). The four addresses recognized by APWIN are rarely used by other hardware, so at least one of the I/O addresses is available in the “pool”. This means that for most users, once APS1DRV is placed in the CONFIG.SYS file, and the machine has been restarted, APWIN is ready to run. Note: While CSALLOC.INI is a text file that can be changed, the Card Services program only reads it once (at boot time). If the file is changed, make sure the computer is restarted (CTRL-ALT-DEL) so the changes can take effect. 5.3.3.2 Award Software Inc. Installed in CARDWARE directory Award is a recent entry into Card and Socket Services. We have found APS1DRV to be very compatible with their Card Services Level 2.1, Release 2.00 and later. The Socket Services file name is dependent on the interface chip used. The Card Services file name is always PCCS.EXE. We have successfully tested the following Socket Services device drivers: SSPCIC.EXE (Cirrus interface chip), SSPCIC.EXE (Intel interface chip), and SSPCIC.EXE (VLSI Technologies interface chip). It appears this is a somewhat generic driver that can handle many different interface chips. We have observed problems with SSTCIC.EXE (Data Book interface chip). Award has indicated that the Data Book chip contains byte 5-14 System One Description/Installation/APWIN Guide Using PCM-WIN with Windows 3.11 Software Installation- Windows 3.11 registers that must be accessed using word operations. This undocumented Data Book requirement was added to Award’s 2.05 release of Card and Socket Services. CARDWARE software is installed using a floppy disk and Windows. The installation process can be told (by user selection) to automatically detect the interface chip, and install the appropriate Socket Services driver. During installation, both the CONFIG.SYS and AUTOEXEC.BAT files are changed. If the user is running EMM386, the installer will add the following string to the EMM386 command line. X=CF00-CFFF X=D000-D7FF If the user has hardware at these locations, or later changes EMM386 in CONFIG.SYS, he/she must also change the CARDWARE.INI file (discussed below). See the notes at the end of this section for how to match CONFIG.SYS and CARDWARE.INI. CARDWARE software uses a generic text file to set the I/O and memory addresses in the free “pool”. The text file is in the CARDWARE directory, and is called CARDWARE.INI. It can be changed manually by using any text editor (such as EDIT or NOTEPAD). The four addresses recognized by APWIN are not included in the generic “pool”. This means that CARDWARE.INI must be changed before APWIN can run. Our experience with desk top PCs indicates that no hardware ever resides at the I/O address range 2B8-2BF. The user should therefore place the following line in the CARDWARE.INI file (just below the existing lines that start with ‘I/O=’). I/O=0x2B8,0x08,E,10 Once CARDWARE.INI has been changed, the computer must be restarted (CTRL-ALT-DEL ). This is because Card Services reads CARDWARE.INI only once at boot time. If you need to change the file, make sure you restart the computer so the changes can take effect. Note: As discussed earlier, the generic Award installation program assumes 4K bytes of memory at segment CF00, and 32K bytes of memory at segment D000 are available for Card Service’s free “pool”. On some notebook computers this may not be the case. For some advanced users, they may wish to use some of that for RAM (at the expense of not being able to use PCMCIA ATA disks, or RAM cards). System One Description/Installation/APWIN Guide 5-15 Software Installation- Windows 3.11 Using PCM-WIN with Windows 3.11 When the user changes CONFIG.SYS to include one of these memory ranges, CARDWARE.INI must be told to exclude them. The lines in CARDWARE.INI are as follows. MEM=0xCF000,0x1000,E MEM=0xD0000,0x8000,E Change these lines to reflect the excluded memory areas from EMM386. Note: Award installs their PCCARD program so that it automatically starts when Windows starts. It doesn’t place its icon in the Startup folder, so the user can’t easily remove the program from the Windows start process. This gets annoying for anyone who wishes to automatically start any other program, or just come up to Program Manager. If you wish to remove PCCARD from the automatic startup process, you must edit the SYSTEM.INI file in the WINDOWS directory. In the file, there is a line that appears as follows: run=C:\CARDWARE\PCCARD.EXE The line should be deleted to keep PCCARD from executing. 5.3.3.3 Data Book Inc. Installed in CARDTALK directory Data Book was the first vendor of PCMCIA interface hardware. Their software will only run on computers that use their interface chip. We have found APS1DRV to be somewhat compatible with their Card Services Version 3.02, Release 2.10. The problems observed seem to be related to interface hardware and not software. The Socket Services file name is always SNOTESS2.EXE. The Card Services file name is always CTALKCS.EXE. Note: Many older PCMCIA notebook computers were built with Data Book interface chips, but did not contain Card Talk software (Data Book just supplied a few specific drivers for memory and ATA disk cards). These users must contact their manufacturer or Data Book to receive the Card Talk software (usually at no charge). 5-16 System One Description/Installation/APWIN Guide Using PCM-WIN with Windows 3.11 Software Installation- Windows 3.11 CARDTALK software is installed using a floppy disk and MS-DOS. The installation changes CONFIG.SYS and AUTOEXEC.BAT. As part of the installation process, the user is asked to manually change CONFIG.SYS to exclude memory from EMM386. If users are having problems with CARDTALK software, make sure that their EMM386 installation line (if they use it) includes the following string: X=D000-D7FF Unlike the System Soft and Award drivers, CARDTALK uses the entries in CONFIG.SYS to set up the free “pool” of I/O and memory. A driver program called CARDTALK.SYS is loaded immediately after Card Services. On its command line, are switches that set the memory and I/O resources. On a generic configuration, the command line appears as follows. DEVICE=C:\CARDTALK\CARDTALK.SYS /A /IOW=300-31F /MEMW=D000-D7FF As you can see, none of the four addresses recognized by S1.EXE are included in the generic “pool”. This means that CONFIG.SYS must be changed before APWIN can run. Our experience with desk top PCs indicates that standard PC hardware is never in the I/O address range 280-2BF. The user should therefore change the CONFIG.SYS entry to the following. DEVICE=C:\CARDTALK\CARDTALK.SYS /A /IOW=280-2BF /MEMW=D000-D7FF (This will actually be all on one line) When the system is restarted, APWIN should work properly. 5.3.3.4 Phoenix Technologies Inc. Installed in the PCMPLUS directory If a system isn’t shipped with System Soft’s Card and Socket Services, it is likely to use Phoenix Technologies’ software. We have had only a limited time to use their software, but found APS1DRV compatible with a release 2.00 of their Card and Socket Services. We expect release 2.10 to remain compatible. System One Description/Installation/APWIN Guide 5-17 Software Installation- Windows 3.11 Using PCM-WIN with Windows 3.11 5.3.3.5 Freeing up Conventional Memory APWIN needs as much conventional memory as possible. While MSDOS 5.0 (and later) moved DOS to upper memory, the standard PCMCIA installations swallow from 32 to 100K. This leaves a standard configuration with about 500K of conventional memory free. This section is designed to keep track of how to free more conventional memory— by moving drivers to high memory, or removing them entirely. No matter which vendor supplies the software, a minimal installation for APS1DRV involves loading the Socket Services driver, the Card Services driver, and the card allocation driver (always installed as the line immediately following the Card Services installation line). Any other devices (such as RAM card drivers, ATA disk drivers, and Flash memory drivers), are in stalled after these three are installed. If you need to free up conventional memory, and have no plans to use any card but the PCM-WIN, you should comment out any other drivers. Some of the Card and Socket Services installation programs attempt to load their drivers in high memory. Some installation programs don’t try to install anything in high memory. If you need more conventional memory, try moving device drivers to high memory. This is a dangerous game, as drivers that aren’t compatible with high memory will tend to crash the system. As long as you have MS-DOS 6, or a floppy disk that can boot your version of MS-DOS, much of conventional memory can be reclaimed by setting the Card and Socket services device lines to devicehigh. All drivers from System Soft, Award, Data Book, and Phoenix can be placed in high memory. 5-18 System One Description/Installation/APWIN Guide 6. Getting Started with APWIN 6.1 Starting APWIN Figure 6-1. APWIN directory window To start APWIN, simply double click on the APWIN 1.5 icon shown in Figure 6-1. During startup, APWIN loads several files and checks for the presence of the Audio Precision hardware. It will “look for” an ISAWIN or PCM-WIN interface card and then for a System One or System Two. It is able to automatically identify System One or System Two and may, dependent on the configuration, ask you to choose which System to set up for. Figure 6-2. Choose Hardware window (See Configuration preferences below). If APWIN does not find an interface card and then a System, it will announce this and indicate that it will run in Demo mode. Demo mode allows all program functions to be used except those requiring communication with the instrument. All Reading fields will display random numbers. After APWIN is loaded, you can load sample tests, sample procedures, change instrument settings on the various panels, run tests System One Description/Installation/APWIN Guide 6-1 Getting Started with APWIN Starting APWIN and run procedures. See the User’s Manual for complete instructions or use the on-line Help system explained later. APWIN Tests (named with the extension .AT1 and .AT2) are files that contain the complete setup of the System One or System Two hardware, the layout of the panels, the appearance of the graph, and even measured data from the last saved results. Loading a test sets up all of these conditions to allow a user to “run” a new test with all hardware and software conditions correctly established. Procedures (named with the extension .APB) are “scripts” that will perform several operations in succession. This might include loading and running a series of tests in sequence, comparing measured results against predetermined acceptance limits, and displaying and/or printing results. For a quick look at APWIN and an opportunity to see some tests and procedures in action, several examples have been provided. These examples illustrate generic tests such as frequency response, distortion, and noise, and more complex digital audio tests such as codec and AES/EBU interface tests. These procedures load several tests in sequence and illustrate user interaction, limits testing, and graphical presentation. To load these examples, select FILE from the top menu bar and select OPEN from the list. This will present a secondary selection of file types. Select PROCEDURE to run a short menu-driven procedure that will be able to select all of the available sample tests. After selecting the file type (Procedure), the Windows File Open dialog will appear (Figure 6-3): Navigate to the S1 directory (folder) using the normal Windows method. If you installed APWIN with the default file locations, you should find it under the APWIN directory. Double click on the System1.apb procedure. This will then open the Procedure window. At the top of this window will be the Procedure tool bar shown in Figure 6-4 (which may also be at the top or side of the APWIN desktop if you have this tool bar turned on). 6-2 System One Description/Installation/APWIN Guide Starting APWIN Getting Started with APWIN Figure 6-3. Windows 95 File Open dialog box Figure 6-4. Procedure tool bar Push the green Play button (approximately the middle of the bar) to start this procedure. This will then bring up the following menu box: Figure 6-5. System One Example Selection Menu window You can now select from two groups of procedures: Demo Test Procedures includes stored sample data and can be used without a device under test connected (and even without a System One or Two connected); Sample Test Procedures requires measurement hardware and the specific device under test to make actual measurements. After selecting one of these choices, the following menu box should appear. System One Description/Installation/APWIN Guide 6-3 Getting Started with APWIN Starting APWIN Figure 6-6. System One Sample Test Procedures window Here you will find a collection of several sample procedures that will run various illustration tests. Also shown is a Performance Verification procedure that is an excellent example of a detailed test procedure that will make several measurements, test against limits, display measurement graphs, and display a results log. It can also be used to verify the conformance to specification of System One or Two. This can be quite handy if you ever see unusual test results and would like to be sure that the measurement hardware is functioning correctly. 6.1.1 Automating APWIN Startup APWIN can be started in a way that forces certain conditions. These include automatically loading a specific test or procedure and automatically running that test or procedure. Adding Options and Switches force these conditions to the command line that launches APWIN. For example, if you follow the APWIN.EXE program with the argument /RUNPRO followed by the procedure name with its path, that procedure will be loaded and started automatically as soon as APWIN itself starts. If that procedure is a menu selection (similar to the SYSTEM1.APB or SYSTEM2.APB samples provided with APWIN), the 6-4 System One Description/Installation/APWIN Guide Starting APWIN Getting Started with APWIN user need only choose from a predetermined set of choices to begin testing. 6.1.1.1 Windows 95 and NT For Windows 95 and NT, since Windows starts automatically, put APWIN in the STARTUP group. By selecting PROPERTIES (right mouse button) on the APWIN icon, you can specify a command line option in the TARGET line. This is where to put the /RUNPRO path\filename line. The exact syntax for the target line is: “C:\PROGRAM FILES\APWINBIN\APWIN.EXE” /RUNPRO C:\APWIN\APWIN\S1\SYSTEM1.APB (this will actually be all on one line) The quote marks around the first argument are because of the space between PROGRAM and FILES. Change paths and files names to suit your particular setup. Figure 6-7. APWIN Properties dialog box The above examples illustrate the use of command line parameters and switches to automate or control the starting of APWIN. Section 6.1.1.3 lists and describes all of the available command line options and switches. System One Description/Installation/APWIN Guide 6-5 Getting Started with APWIN Starting APWIN 6.1.1.2 Windows 3.11 To start any Windows 3.11 program from the DOS prompt, type WIN followed by the Windows file name. This will automatically start Windows and launch the specified program. If this line is the final one in the AUTOEXEC.BAT file, the complete start up will be automated. As an alternative, the program to be launched can be put in the STARTUP group. Then every time Windows is started, the specified program will launch. Here is a syntax example. Put the following lines at the end of your AUTOEXEC.BAT file: CD\APWINBIN WIN APWIN.EXE /RUNPRO C:\APWIN\S1\SAMPLES\SYSTEM1.APB These commands will launch Windows, launch APWIN, load the procedure SYSTEM2.APB and run this procedure. The sample procedure used in this example presents the user with a series of buttons forming menu choices. Replace the path and filename reference in the example above with your particular procedure name. Section 6.1.1.3 lists and describes all of the available command line options and switches. 6.1.1.3 Command Line Options and Switches Syntax: APWIN [TESTNAME.AT1] [TESTNAME.AT2] [PROCEDUR.APB] [DATAFILE.ADA] [/OPTION] [/OPTION] ... (again, the above will actually be all on one line) Where TESTNAME.AT1 is any valid System One test file. When specified on the command line, this test file will be loaded with APWIN. TESTNAME.AT2 is any valid System Two test file. When specified on the command line, this test file will be loaded with APWIN. PROCEDUR.APB is any valid procedure file. When specified on the command line, this procedure file will be loaded with APWIN. DATAFILE.ADA is any valid APWIN data file. When specified on the command line, this data file will be loaded with APWIN. Note that file extensions (.AT1, .AT2, .APB, .ADA) must be supplied OPTIONS are any of the following: 6-6 System One Description/Installation/APWIN Guide User Preferences Getting Started with APWIN S1 forces APWIN to be configured for System One S2 forces APWIN to be configured for System Two nologo suppresses the APWIN logo at startup (for faster startup) runpro causes a procedure loaded with APWIN to run runsweep causes a test file loaded with APWIN to run the sweep apib238 forces APWIN to communicate with interface card at address 238 apib298 forces APWIN to communicate with interface card at address 298 apib2b8 forces APWIN to communicate with interface card at address 2b8 (the factory default setting) apib2d8 forces APWIN to communicate with interface card at address 2d8 Example APWIN TESTNAME.AT2 PROCEDUR.APB /runpro /apib2b8 6.2 User Preferences APWIN allows the user to customize several aspects of the program. Many of these are in a Configuration dialog that can be accessed under the Utilities menu item. Click on Utilities to drop down a menu list then click on Configuration to bring up the following dialog box: System One Description/Installation/APWIN Guide 6-7 Getting Started with APWIN User Preferences Figure 6-8. Configuration dialog box Most of the items in this dialog box are self explanatory. See the Utilities Configuration section in the MENU chapter of the APWIN User’s Manual for a more complete explanation of the various items in this dialog. The Hardware choices allow the user to override the automatic System detection. If set to Auto Detect, APWIN loads with the correct panels for the attached System (One or Two). If you set the choice to a System different to that connected, the software will run but you will not have proper instrument operation. For example, most readings and generator settings will be erroneous. The forced System One and System Two choices were included primarily to allow System One users to evaluate features on System Two while running in demo mode. If the System One or System Two has the EURZ option installed you must check the European Broadcast option installed box. The EURZ option in the hardware changes the available analog generator output source impedances from the default values of 600, 150, and 50 ohms to 600, 200, and <40 ohms. APWIN needs to know these values in order 6-8 System One Description/Installation/APWIN Guide APWIN Help Getting Started with APWIN to properly set the analog generator output level. The rear panel of System One and System Two should have a CONFIGURATION label that will identify the presence of the EURZ option. The Company Name box defines what name will appear on the graph header. All of the choices entered in this box are saved in a configuration file and will be in place every time the program is loaded. 6.3 APWIN Help APWIN includes virtually the entire User’s Manual in a convenient on-line format allowing rapid access to answers to operational questions. The help system includes hyper text capability allowing the user to quickly jump between primary and related topics. For a more detailed discussion of how to use the Microsoft Windows Help system which all Windows applications including APWIN use, drop down the Help menu and select Using Help. The following pages illustrate the Help information menus in Windows. There are two ways to bring up help on a particular subject. One method is to bring up the Contents list and search for a particular topic. A second method is Context Sensitive Help. Simply highlight a particular field on any panel and push the F1 key. A dialog box will pop up with help information on that particular section. You may click on any of the several topics listed to get specific instructions on that topic. Within each topic there are several places where a deeper treatment of a subject is available. Click on any green and underlined words or sentences to find additional information. Various other navigation tools are available within the Windows Help system as explained in the How To Use Help dialog, which is accessed via the Windows Program Manager Help menu. System One Description/Installation/APWIN Guide 6-9 Getting Started with APWIN APWIN Help Figure 6-9. Widows 3.11 How to Use Help screen Figure 6-10. Windows 95 Windows Help screen 6-10 System One Description/Installation/APWIN Guide Using Printers with APWIN Getting Started with APWIN To bring the APWIN on-line help files to the screen, click on Help and then select Index in the drop down menu list. This will bring up the Contents list of available topics. Figure 6-11. APWIN Help Contents screen 6.4 Using Printers with APWIN APWIN runs under Microsoft Windows and as such is able to use any printer supported by Windows. To select a specific printer that has been previously installed on your computer, select PRINT SETUP under the FILE menu in APWIN. This will show a dialog box that contains a list of all the installed printers including the printer that is currently set as the DEFAULT printer. APWIN will print to either the DEFAULT printer or a Specific Printer depending on which radio button is indicated. To change the Specific Printer, click on the down arrow at the right of the box and select a new printer from the list of installed printers. System One Description/Installation/APWIN Guide 6-11 Getting Started with APWIN Compatibility with S1.EXE Figure 6-12. Printer Setup dialog box To install a new printer in Windows (and therefore have it available to all Windows applications including APWIN), you will need a Windows driver for that printer. These are created by the manufacturer of the printer and normally are supplied on a disk with the printer. Additionally, the Windows installation disks include some drivers for several common printers although more recent updated versions of a particular driver are often available directly from the printer manufacturer. To install a new printer, refer to your Windows documentation for complete instructions. Briefly, from the PROGRAM MANAGER, open the CONTROL PANEL and select PRINTERS. In the dialog box select ADD>. This will bring up a long list of printers. If you do not find your particular printer listed and you have a disk from the manufacturer, select the first item: Install Unlisted or Updated Printer and click on Install. This will guide you through the process of installation including Setup (which configures the driver for the options installed on the printer) and Connect (which determines to which port the printer will print). Again, refer to your Windows documentation for more details. 6.5 Compatibility with S1.EXE Existing customers familiar with the S1.EXE DOS-based program that has been the user interface since the introduction of System One in 1985 will find substantial improvements in capabilities, ease of use, features, and appearance of APWIN compared to S1.EXE. The powerful graphic capabilities in Windows make a more friendly environment and provide the user the ability to customize many attributes of the user interface to suit personal taste. Graphs can be extensively customized in color, line style or line thickness, size and other visual attributes. Graphs can be printed with any Windows supported printer including color printers. APWIN uses a scripting language based on Visual Basic that is far more powerful than the language provided with S1.EXE. This makes it 6-12 System One Description/Installation/APWIN Guide Compatibility with S1.EXE Getting Started with APWIN compatible with a large number of other applications (such as word processors, spreadsheets, and databases). APWIN Basic also has several new commands that have been requested by S1.EXE users. Coupling this capability with Learn Mode provides a fast and errorfree method to create or augment a procedure. The user only needs to enable Learn Mode via the Procedure menu or tool bar selections, and manually go through the test scenario to create a test procedure. 6.5.1 Utilizing S1.EXE Test and Procedures Test and Procedure files created with the S1.EXE software version 2.10A and later may be imported into APWIN. Under the File menu select the Import – S1.EXE Test or S1.EXE Procedure to convert these files to APWIN Tests and Procedures files. 6.5.2 Remote Operation via RS-232 Inteface In the S1.EXE software users had to create executable (.EXE) files to access the RS-232 port. This type of serial communication via the RS232 interface can be done totally within APWIN Basic. 6.5.3 S1.EXE Utility Programs The MAKEWAVE utility has been modified into MAKEWAV2 for use with APWIN. This continues to be a DOS program but can be run under Windows and shows up as an icon in the APWIN program group. This program and its icon are automatically installed by the APWIN installation utility. The PLOT and POST programs that would take a graphics file produced by S1.EXE and create an HPGL plotter file or Postscript file respectively are not available in APWIN. APWIN has access to the powerful printing features of Windows, supported printers (or plotters) can be driven directly from within APWIN without having to use an external utility. It is also possible to produce HPGL “plotter” and Postscript files from APWIN by simply “printing” to file with an HPGL plotter or Postscript printer selected as the default printer. System One Description/Installation/APWIN Guide 6-13 Getting Started with APWIN Publishing Graphs 6.6 Publishing Graphs There are several ways to capture a graph, depending upon your requirements. One simple method is to use the Windows clipboard feature. With the graph visible on screen, push Alt + Prnt Scrn to copy the entire screen to the clipboard, or from the menu select Edit-Copy Panel to copy the active window to the clipboard. Then, in any desktop publishing application, from the EDIT menu paste the contents of the clipboard to the location desired. To save a graph to a file in Windows 95 or NT, from the menu select File-Export-Graphic, and choose the file format: either WMF (Windows MetaFile) or EMF (Enhanced MetaFile). A dialog box will ask for a path and file name. (This feature is not available in Windows 3.11.) Another method is to “print” to a file in APWIN. Depending upon the printer driver used, the file can be saved in PostScript or HPGL. Note that it is not necessary to actually have the physical printer connected, it is only necessary to its driver installed in Windows. When you select Print, you will be prompted for a filename. Enter the name and a suitable extension. With either of these latter methods, the resulting file can then be imported into a graphics or publishing program. 6-14 System One Description/Installation/APWIN Guide 7. Maintenance and Troubleshooting 7.1 Error Messages Displayed when Loading APWIN Cannot find WW_OA232.DLL APWIN is a 32-bit application. Microsoft Windows 3.11 is a 16-bit operating system. By adding an extension called WIN 32S to the Windows 3.11, it is able to run 32-bit applications. The APWIN installation program automatically checks to see if WIN 32S version 1.30 is present on the machine and, if not, requests that it be installed. For WIN 32S to take effect after this installation, the computer must be restarted. The setup program will automatically do this but gives the user the option of not restarting. If APWIN is started with first restarting the computer (after just completing the installation) this message will appear. If a version of WIN32S lower than 1.30 is present or if WIN 32S is inadvertently removed at some future time or some other change is made to the Windows installation that causes WIN 32S to not be present, this message will appear. Reinstall WIN32S by using the WIN32S installation disks supplied with APWIN. Could not find an ISA-WIN or PCM-WIN APIB Interface Card. Will run in DEMO mode APWIN requires an Audio Precision Windows-type interface card to communicate with System One or System Two. An ISA card for a desktop computer or a PCMCIA interface card for a notebook computer is shipped with every copy of APWIN. This card needs to be installed in the computer. APWIN can be run without such a card but all functions requiring the hardware will not function. That is, it will not be possible to receive live readings from the system or to set the generator. However, it is possible to load previously stored data, modify graph appearances, print graphs, and other activities not requiring hardware. Found a non-WIN APIB card. This program requires an ISA-WIN or PCM-WIN card to function. Will run in DEMO mode. The following Audio Precision interface cards will generate this message: PCI-1, PCI-2, PCI-3, ISA-DOS, and PCM-DOS. System One Description/Installation/APWIN Guide 7-1 Maintenance and Troubleshooting Error Messages Displayed when Loading APWIN These cards do not have support for APWIN and are designed for DOS software such as S1.EXE and LIB-C. System One not properly installed or not powered on. Will run in DEMO mode. This message will appear if a correct interface APIB card is present and if any of the following conditions are true: System One not connected, System One not powered on, System One internal interface defective, APIB interface cable defective. System One not properly installed or not powered on. Will run in DEMO mode. This message will appear if a correct interface APIB card is present and if any of the following conditions are true: System One not connected, System One not powered on, System One internal interface defective, APIB interface cable defective. Win32s - Error Unhandled Exception detected Application will be terminated This message can be caused by not loading the Share program in Windows 3.1 or the Vshare program in Windows 3.11. If you are running Windows 3.1, use an ASCII editor to look at your AUTOEXEC.BAT. You should find a line: share. (There may be a path reference before share). This will run the share.exe program at boot time. If this line is missing, look to see if the share.exe program is on your computer. It will most likely be in DOS subdirectory. Add the following line to your AUTOEXEC.BAT to run this program. For example, if share.exe is in the dos directory, the line would look this: C:\dos\share If you are running Windows 3.11, vshare should have been automatically installed with Windows. Look in your SYSTEM.INI file under the heading [386Enh] for the line: device = vshare.386. If the line is missing, add it and be sure that the file vshare.386 is in your WINDOWS/SYSTEM subdirectory. 7-2 System One Description/Installation/APWIN Guide PCMCIA difficulties Maintenance and Troubleshooting 7.2 PCMCIA difficulties See Appendix B and C for descriptions on how to install and troubleshoot PCMCIA installations in Windows 3.11 and Windows 95. If the PCMCIA installation seems to be operating correctly but the software is not communicating with System One or Two you may have an address space conflict. You can determine if the PCMCIA installation is functioning correctly by noting the messages during boot time to verify that Card and Socket Services has loaded correctly. Then when the PCM-WIN card is inserted, Windows should indicate this with a series of beeps. Finally, when APWIN is started, it will look like some communication has been established with System One or Two but control and readings will be erratic and unstable. Most likely Card and Socket Services has put the PCM-WIN card at an address location that is shared by some other device. To prevent this from happening, reserve the four addresses that the PCM-WIN interface could take to prevent anything else overlapping this area. If you are using the Award CardWare Card and Socket Services (as described in Appendix B and C), locate the CARDWARE.INI file. Using an ASCII editor locate the [Resources] section and add the following lines: ; The following four lines reserve four base ; address (238, 298, 2B8, 2D8) plus an ; additional seven consecutive address for ; each base address that the Audio Precision ; PCMCIA card can use to communicate with ; System One or System Two related hardware. I/O=0x238,0x8,E,8 I/O=0x298,0x8,E,8 I/O=0x2b8,0x8,E,8 I/O=0x2d8,0x8,E,8 ; End of Audio Precision changes. This will reserve all possible address locations for the PCM-WIN card to prevent possible conflicts. System One Description/Installation/APWIN Guide 7-3 Maintenance and Troubleshooting Technical Support 7.3 Technical Support If all else fails and you still have problems installing or running APWIN, call our technical support team for assistance. We can be reached during the following hours Monday through Friday except holidays: 8:30 am to 5:00 p.m. Pacific Time. You can reach us in any of the following ways: • U.S. Toll Free Phone: 1-800-231-7350 • Phone: (503) 627-0832 • Fax: (503) 641-8906 • Email: [email protected] • Web: www.audioprecision.com When you call or fax please have the following information available: Your computer: CPU type and speed (e.g.: 386, 486, Pentium; 33MHz, 66MHz, 90MHz etc.) Amount of RAM installed (typically 8, 12, 16 or 32Meg) System One or System Two configuration SYS-22, SYS-222, SYS322, (options such as DSP, Dual Domain, BUR-GEN, IMD) If you call, we strongly recommend that you have the computer keyboard and monitor at the same location as the telephone as we will likely ask you to try several things to assess the situation. If you need to determine which version of APWIN is loaded, click on the Help menu item and then About APWIN in the pull-down menu. The following dialog will appear: Figure 7-1. About APWIN window 7-4 System One Description/Installation/APWIN Guide