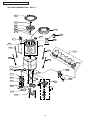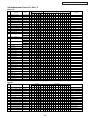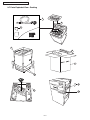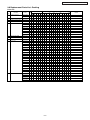
1
Order No. PHAT100404C3
(Revision : Mar. 2013)
Service Manual
Fully Automatic Washing Machine
NA-F65B2
NA-F70B2
NA-F72B2
NA-F852B
NA-F902B
Product colour
Grey, White
Destination
Thailand, Vietnam, Indonesia,
Singapore (DBD), Malaysia, RBD,
India, UAE (AFP), Oman,
Kuwait, Qatar, UAE (PGF),
Philippines,
WARNING
This service information is designed for experienced repair technicians only and is not designed for use by the general
public. It does not contain warnings or cautions to advise non-technical individuals of potential dangers in attempting to
service a product. Products powered by electricity should be serviced or repaired only by experienced professional
technicians. Any attempt to service or repair the product or products dealt within this service information by anyone else
could result in serious injury or death.
IMPORTANT SAFETY NOTICE
There are special components used in this equipment which are important for safety. These parts are marked by
in
the Schematic Diagrams, Circuit Board Diagrams, Exploded Views and Replacement Parts List. It is essential that these
critical parts should be replaced with manufacturer’s specified parts to prevent shock, fire or other hazards. Do not
modify the original design without permission of manufacturer.
© Panasonic Appliances (Thailand) Co., Ltd. 2012.
All rights reserved. Unauthorized copying and
distribution is a violation of law.
NA-F65B2 / F70B2 / F72B2 / F852B / F902B
CONTENT
Page
1. Attention in the repair work security
2. Specification
3. Features and Technical Information
3.1 Function Control with Fuzzy sensor
3.2 Power consumption and Current
4. Installation
4.1 Checking of placement
4.2 Connect the water supply hose
4.3 Install washing machine to steady
4.4 Child Lock program
5. Operations Panel
6. Wiring Diagram
7. Table of Errors
8. Troubleshooting
8.1 Table of troubleshooting
8.2 Symptoms are not trouble
9. Parts Exploded View and Replacement Parts List
9.1 Part Exploded View : Part A
9.2 Replacement Parts List : Part A
9.3 Part Exploded View : Part B
9.4 Replacement Parts List : Part B
9.5 Part Exploded View : Part C
9.6 Replacement Parts List : Part C
9.7 Part Exploded View : Packing
9.8 Replacement Parts List : Packing
10. Detail Change Notice
3
4
5
6
7
8
8
8
9
10
11
12
13 - 14
15
16
17
18
19
20
21
22
23
–2–
NA-F65B2 / F70B2 / F72B2 / F852B / F902B
1. ATTENTION IN THE REPAIR WORK RECURITY
In order to prevent any accident during repair work and ensure security of the product after repair work, somethings
surely followed are explained below.
■The level of the arised damages or dangers, when indicated contents are ignored, are classified by following
indications and explained.
Warning
The content in the column of this indication is "Be assumed that possibly die or get seriously injured".
Attention
The content in the column of this indication is "Be assumed that possibly get damages or possibly only
damaged object occured".
■Types of the contents being followed are classified by following figured symbols and explained.
(The following is an example of expression in pictures.)
This figured symbol means caution "Attention".
This figured symbol means must not do "Prohibition".
This figured symbol means surely execute "Instructions".
Warning
Connection of cables should be done according to regular work.
• Connection of cables should be tightened reliably with strength using solderless terminal.
(specified parts always using regular bonding plier)
• Install a fire protection cover (fireproof) covering connection area completely, and close
opening area by tape. (Please reuse the fire protection cover which came with the product.)
• When drawing cables around, fixing those cables with cable suppression part. Do not touch
rotating part, high temperature part and surface of metal.
• Be sure to replace with cable unit when any cable was snapped. When a part of the cable
unit was cut you must not do the connection repair. It may be the cause of smoke, ignition
or receiving an electric shock.
Be careful about receiving an electric shock.
When doing electric connection service
such as voltage measurement, please
be careful enough about receiving an
electric shock at electric charging parts
and cable terminal parts.
Pull out electric plug when doing repair work.
Disassembling, assembling and replacing
parts should be done after pulling out
electric plug. Receiving an electric shock
or getting an injury may occur.
Be sure to use specified parts.
Do not touch any rotating object with hand unless it
Always use specified parts for the parts with
stops completely.
mark
in the electric circuit diagrams and
Slow rotation may also roll in your hands
parts list. It may be the cause of smoke,
and cause injury.
ignition or damage.
Rebuilding is prohibited.
Do not rebuild machine parts and
components when repairing service.
It may be the cause of damage or ignition.
Straightly pull out or insert in huasuton terminal.
Do not twist it. It may be the cause
of damage or ignition.
Attention
Please wear gloves when disassembling, replacing and assembling.
Always wear gloves to prevent an injury by the metal end face or an electric shock at the time
of the electricity service.
Please be careful to the edges of the metal end face.
Wear the working clothes of long sleeves to prevent an injury by the metal end face
or please work after covering the end face with tape or towel.
–3–
NA-F65B2 / F70B2 / F72B2 / F852B / F902B
2. SPECIFICATION
Model
Rate Voltage
and Frequency
NA-F65B2
220V/50Hz
NA-F70B2
Thailand,
Thailand,
Vietnam,
Vietnam,
UAE (PFG),
UAE (PGF),
Singapore (RBD) Singapore (RBD)
NA-F852B
NA-F902B
Vietnam
Indonesia
Indonesia
230V/50Hz
India
Singapore (RBD),
India
-
-
-
230V/60Hz
Philippines
Philippines
-
-
-
-
-
-
240V/50Hz Malaysia, Oman, Malaysia, Oman,
UAE (AFP),
UAE (AFP),
Qatar, Kuwait.
Qatar, Kuwait.
Rate Power
Consumption
(Wash / Spin)
NA-F72B2
220V/50Hz
400/205W
400/205W
400/220W
400/205W
400/205W
230V/50Hz
410/225W
410/225W
-
-
-
230V/60Hz
460/282W
460/282W
-
-
-
240V/50Hz
420/240W
420/240W
-
-
-
Vietnam
Indonesia
Indonesia
-
-
-
Colour
Grey
White
Outer Dimension
Thailand,
Thailand,
Vietnam,
Vietnam,
Philippines,
Philippines,
Singapore (RBD), Singapore (RBD),
Malaysia, India. Sinapore (DBD),
Malaysia, India.
UAE (AFP),
(UAE (PGF),
Kuwait, Oman,
Qatar.
UAE (AFP),
(UAE (PGF),
Kuwait, Oman,
Qatar.
Body
520 mm. x 540 mm. x 650 mm.
Installation
563 mm. x 560 mm. x 945 mm.
0.03 to 1MPa (0.3 to 10 Kgf / cm2
Water Supply Pressure
Standard Water Consumption
110 Liter
130 Liter
130 Liter
110 Liter
130 Liter
Wash
6.5 Kg
7.0 Kg
7.2 Kg
6.5 Kg
7.0 Kg
Spin
6.5 Kg
7.0 Kg
7.2 Kg
6.5 Kg
7.0 Kg
Weight with Accessories
31 Kg
31 Kg
31 Kg
31 Kg
31 Kg
Weight with Packing
35 Kg
35 Kg
35 Kg
35 Kg
35 Kg
Standard
Capacity
–4–
NA-F65B2 / F70B2 / F72B2 / F852B / F902B
3. FEATURES AND TECHNICAL INFORMATION
3.1 Function Control with Fuzzy sensor
Clothes quantity checking, wash level indication and detergent consumption indication with Fuzzy Logic System.
Turn Switch “ON”
Press “Start” button
1. Check clothes quantity and specify the amount of detergent
<Checking Method>
Check cross pressure at the
capacitor while the Pulsator operates
without water.
<Motor status>
1. Check clothes quantity
2. Check ambient
temperature
Rotate clockwise
Rotate clockwise
stop
stop
stop
stop
stop
A. Check clothes
quantity
B. Control wash time
C. Control spin time
Supply water to a proper
level
Rotate clockwise
Rotate
anti-clockwize
stop
Rotate
anti-clockwize
Rotate
anti-clockwize
2. Temperature checking
Check temperature in the atmosphere when the machine starts.
In case of low temperature, wash timer and spin timer are extended
automatically so that washed clothes are as clean as washing in
high temperature.
1. Wash timer and spin timer with checked clothes quantity
WASH
RINSE
SPIN
Switch will automatically
cut the power current
“OFF”
High
Medium
Low
3.0 Kg and more
1.2 Kg~3.0 Kg
0 Kg~1.2 Kg
Wash Timer
12 min.
12 min.
9 min.
Spin Timer
6 min.
6 min.
5 min.
2. Additional wash timer and spin timer as temperature increases
External temp.
25°C
15°C
5°C
30°C
Wash Timer
+0 min.
+2 min.
+3 min.
-1 min.
Spintimer
+0 min.
+1 min.
+2 min.
+0 min.
–5–
NA-F65B2 / F70B2 / F72B2 / F852B / F902B
3.2 Power consumption and current
The following requirements shall be met in accordance with Product Standard.
(1) Washing
Voltage
Power source
Frequency
Current (A)
220V
50Hz
Power
consumption
(W)
Current (A)
230V
50Hz
Power
consumption
(W)
Current (A)
240V
50Hz
Power
consumption
(W)
Current (A)
230V
60Hz
Power
consumption
(W)
Water load
Rated load
1.28 - 2.02
1.78 - 2.22
257 - 360
357 - 440
1.30 - 2.04
1.80 - 2.24
266 - 371
366 - 451
1.26 - 1.99
1.76 - 2.19
275 - 372
375 - 462
1.52 - 2.37
2.02 - 2.57
310 - 426
410 - 506
Noted : Starting motor and convert based on duty ratio of water flow for that period.
(2) Spinning
Voltage
Frequency
220V
50Hz
Power source
Current (A)
Power
consumption
(W)
Current (A)
230V
50Hz
Power
consumption
(W)
Current (A)
240V
50Hz
Power
consumption
(W)
Current (A)
230V
60Hz
Power
consumption
(W)
Water load
Rated load
0.72 - 1.02
0.82 - 1.02
168 - 225
183 - 225
0.78 - 1.10
0.80 - 1.10
185 - 247
200 - 247
0.78 - 1.11
0.88 - 1.11
199 - 264
214 - 264
1.10 - 1.50
1.20 - 1.50
236 - 310
251 - 310
Noted : Starting motor and convert based on duty ratio of water flow for that period.
–6–
NA-F65B2 / F70B2 / F72B2 / F852B / F902B
4. INSTALLATION
4.1 Checking of placement
Connect the water supply hose
to the water supply valve screw.
Elbow
Water supply
valve screw
Nut
Water Supply
Hose
1. Push the water supply hose nut straights onto
the water supply valve screw.
2. Hold the elbow by lifting it up, screw the nut
onto the water supply valve screw, and firmly
tighten the nut.
3. After the nut is tightened, check whether or
not the elbow is unsteady or loose.
4. After tightening, open the faucet to confirm
that there is no water leakage.
[Cautions]
Drain hose
Firmly tighten the nut, otherwise water leakage
will result.
Water Pressure Rating :
4
5
2.9 x 10 ~ 9.8 x 10 Pa
Hose extension
If extended external part is necessary when connecting the drain hose, the length of the drain hose should be less
than 3 m and the height should be below 10 cm.
Do not put hose tip
under the water
Below 10 cm
Good Example
3 m max.
Over 10 cm
Install the machine 10 cm or more away from the wall.
–7–
NA-F65B2 / F70B2 / F72B2 / F852B / F902B
4.2 Connect the water supply hose
[Note]
- Firmly tighten part B of the water tap adaptor,
otherwise water leakage will result.
- When the hose must be reinstalled (after you
remove, for example), turn B to the left until
about 4 mm of the thread becomes visible,
then carry out the procedure described above.
Screw (4)
Water faucet
Water tap
adaptor
A
B
Lever
Water supply
hose cover
Approx. 4 mm
B
- If a water tap adaptor is already connected,
replace with the attached new one.
4.3 Install washing machine to steady
Adjust Height of leg
1. Turn the adjustable leg knob towards (Loosen)
direction to loose it.
2. Turn the adjustable leg to adjust the levelness.
2.1 When increasing height, turn adjustable leg
towards (Loosen) direction.
2.2 When decreasing height, turn adjustable leg
towards (Tighten) direction.
3. Turn the adjustable leg knob towards (Tighten)
direction to tighten it.
If the floor is largely inclined
Use board or
a like for prop
up under leg
of washing
machine
Adjustable leg knob
Loosen
Tighten
Adjustable leg
To raise
To lower
4.4 Child Lock program
Press the [ POWER OFF/ON] button for at least
5 seconds. The buzzer sounds (two time for
setting) and the [CHILD LOCK] indication turns
on.
Open lid
Less than
10 sec.
More than
10 sec.
Buzzer on
Water drain
Close lid
Buzzer on and
abnormal alarm
–8–
Buzzer off
Unplug the power
cord from the
outlet and re-plug
it again after
5 seconds
–9–
• The appropriate Water Level for the size and
type of your own laundry will be displayed.
If set as the Water Level which is not in
the display, the nearest Water Level will be
displayed.
• You can adjust the Water Level according to
your desired level.
• The Water Level varies for model NA-F65B2.
• According to type of
laundry and stain,
you can select
suitable course
yourself.
• Press the [Reserve]
button to set how many
hours later you would
like the wash to be
completed.
• Press this to start.
• Press this to stop in the middle
of the cycle.
Start/Pause
Caution: If you need to change the [Program] settings after the cycle has already started,
turn the power Off and On it back.
Program
Reserve
• The power automatically turns off when total
operations is finished.
• The power automatically turns off if [Start/
Pause] button is not pressed within 10 minutes
after turning on the power.
• When the machine is in operation, the time display shows
how much time (in minutes) is left.
• When the programmable timer has been set, this display
shows how much time is left until the wash is finished by
pressing the [Reserve] button.
• Timer indication on the panel will show longer time than
selected time as it includes water feeding, draining, etc.
• When pressing [Program] button, the number of Program
such as “2 (Speedy), 3 (Delicate), ...” will be displayed.
• When pressing [Water Level] button, the number of Water
Level such as “16, 18, ...” will be displayed.
• Press to select Wash only, Wash
and Rinse or other individual
functions.
Water Level (Water volume display)
Off/On
[Water Level • Time • Program] display
Process
NA-F65B2 / F70B2 / F72B2 / F852B / F902B
5. OPERATIONS PANEL
NA-F65B2 / F70B2 / F72B2 / F852B / F902B
6. WIRING DIAGRAM
– 10 –
NA-F65B2 / F70B2 / F72B2 / F852B / F902B
7. TABLE OF ERRORS
■ Error indication
If the following indications appear on the display panel. (buzzer sounds, U and H characters appear)
• Check if abnormalities listed below are seen in the external water hose.
• Is the hose connected?
• Is it clogged with lint?
• Is it crushed?
• Is the tip soaked in water?
• Is a part of hose at a height of over 10 cm midway?
• Is the extension hose longer than 3 m?
• Is the hose being used too small?
Restart with
opening
and closing
the lid.
• Check if the lid is opened.
• Close the lid.
• Is the washing machine is an unsteady position, or is it on an inclined floor surface?
• Is the laundry unevenly distributed in the tub?
• Arrange the laundry evenly in the tub, then close the lid.
• Check if you have forgotten to connect the water hose and
to turn on the faucet.
• Is the water supply cut off?
Restart with opening
and closing the lid.
• Check if lid is open when draining operation of the [CHILD LOCK] program is ON.
• In case of H displays such as “H01”, with no buzzer sounds pull out the power plug, and
contact your dealer for service.
– 11 –
NA-F65B2 / F70B2 / F72B2 / F852B / F902B
8. TROUBLESHOOTING
Packing valve
Holding spring
Mechanism case
Capacitor
Gear motor
Safety switch
(have to check)
Water level sensor
Problem
Water Inlet Valve
Corresponding device
Control panel
8.1 Table of Troubleshooting
Others
Machine
No light at the dial
0
does not work
Dial light is on
0
0
Unusual
No sound of water from inlet valve
0
0
amount of
There is sound of water from inlet valve
Check water supply
water inside
Not enough water flow
Check water supply
Water never stops flowing in
0
Washing
Pulsator does not spin (no sound of motor)
0
system
Pulsator does not spin (there is sound of motor)
does not work
Pulsator spins only one way
0
Pulsator spins slowly
0
Unusual
No draining
0
draining
Drains slowly
0
Unusual
No spinning (no soud of motor)
spinning
No spinning (Pulsator spins)
system
No force in spinning (tubspins slowly)
Unusual loud
Loud noise during washing
noise
Loud noise during dry spinning
0
Water leak
Water leaks from drain pipe
0
0
0
Motor
0
0
Belt, Motor
0
Pulley Motor
Belt, Motor
0
0
0
0
0
0
Belt, Motor
Check installation
0
Water leaks at the bottom of machine
Something clogged
Drain pipe A,
Pulsator
Incorrect
Water is supplied during spinning
Unbalanced tub,
working
leaning
Rinses more than 3 times
0
Pulsator spins despite no water
0
0
Unbalanced tub,
leaning
0
Canot change function program
0
Air pipe clogged
Description of
usage
Water does not flow out of a filter
Description of
usage
No overflow during water filling as rinsing
Description of
usage
Selected washing program cannot be memorized
Description of
usage
Fabric softener flows away too fast
Description of
usage
Pulsator spins in short range as washing and rinsing
Description of
usage
Works at low wash level then supplies water again
Description of
usage
– 12 –
NA-F65B2 / F70B2 / F72B2 / F852B / F902B
8.2 Symptoms are not trouble.
Symptoms
Causes
The water is drained even filled
by a bucket
• When the laundry amount is large at the HIGH water level, the machine
sometimes fi lls automatically. When level goes down, the machine fi lls
automatically.
The water level is too high for
the amount of laundry being
washed.
• When the laundry is already soaked with water before the wash is
started, or if there is water in the tub before the wash is started, the
water level will sometimes be higher.
The water level is too low for the
amount of laundry being
washed.
• With light laundry made of synthetic or blended fabric, the water level
will sometimes be lower.
Midway during spinning, the
operation suddenly changes to
rinsing.
• When the laundry is unbalanced during spin, rinsing and automatic
correction of unbalanced laundry will begin. Later spinning will return to
normal condition.
Water does not flow through the
lint filter. Double Cascade does
not operate.
• When the water level is set to very low, water sometimes will not flow
through the lint filter. Double Cascade does not operate when these
setting have been selected.
The water is drained even filled
by a bucket
• Do not leave more than 15 seconds while powered on. Fill the water
while powered off or after pushing the start button.
During draining, the laundry and
the spinner rotates with irregular
movements.
• To suppress soap suds build-up, the washing tub turns slowly and
quickly.
The buttons do not work.
• Only the [WATER LEVEL] button is available after the machine begins
washing.
• To change the setting, press the [START/HOLD] button or press the
[POWER OFF/ON] button and reconfi gure the setting.
If you start with the rinse cycle,
the tub is not fi lled with water.
• When there is water in the tub, the operation starts with the draining.
After spin cycle is fi nished, the tub will be filled with water.
– 13 –
NA-F65B2 / F70B2 / F72B2 / F852B / F902B
Symptoms
Causes
Washing machine does not run
at all.
•
•
•
•
•
•
•
Check if there is power failure.
Check if the power fuse has blown out or the breaker is actuated.
Check if the power plug is plugged in thoroughly.
Check if the “power switch” has been pressed.
Has the water faucet been turned on?
Check if the [START/HOLD] button has been pressed.
Has the machine been programmed under [RESERVE] timer?
Machine begins filling water in
the middle of the wash.
• When the laundry amount is large at the HIGH water level, the machine
sometimes fi lls automatically. When level goes down, the machine fi lls
automatically.
Water is not supplied.
• Check if the water faucet is turned on.
• Is the water supply cut off?
• Check if the connection of the water supply hose is clogged with dirt.
• Check if the lid is opened. Close the lid.
Washing operation still continue
even though the expected
finishing time had passed on
Reserve Program.
• Washing time will be longer because of laundry unbalance, water
feeding and draining condition.
Tub shaking with the sound of
water.
• This is the sound of the liquid to maintain the balance during spinning.
Water supply failure.
• Normally after the water supply failure, the water will become muddy.
Detach the water feeding hose and turn on the water faucet to release
to due muddy water. Fix water hose and start washing.
Power failure
• In this case, [Power On] and [Start-Pause} buttons need to be pressed
again after electricity is restored.Then then the machine will resume
oparation automatically from beginning of the stopeped process
– 14 –
NA-F65B2 / F70B2 / F72B2 / F852B / F902B
9. PARTS EXPLODED VIEW AND REPLACEMENT PARTS LIST
9.1 Parts Exploded View : Part A
A6
A7
A20
A3
A12
A10
A14
A15
A24
A21
A11
A4
A13
A2
A5
A23
A16
A22
A9
A1
A17
A8
A18
A19
– 15 –
NA-F65B2 / F70B2 / F72B2 / F852B / F902B
Important safety notice :
Components identified by mark have special characteristics important for safety.
When replacing any of these components, use only manufacturer’s specified part.
9.2 Replacement Parts List : Part A
Parts List
Model
Ref.
Part Name
Part No.
A1
Country/Qty
Safety
F65B2 F70B2 F72B2 F852B F902B
No.
PANEL FACE B
AXW01467JT00
●
AXW01467JTE0
●
AXW01467JT50
●
TH
VIET INDO
SIN DBD
MAL
SIN INDIA
RBD
PHI
THAILAND / ENGLISH
1
1
VIETNAMESE / ENGLISH
1
●
AXW01467LL00
1
1
1
1
1
1
1
1
1
AXW01467JS00
●
AXW01467JSE0
●
1
AXW01467JSF0
●
1
AXW01467JS50
●
ENGLISH
INDONESIA / ENGLISH
THAILAND / ENGLISH
1
VIETNAMESE / ENGLISH (GREY LID)
VIETNAMESE / ENGLISH (BLUE LID)
1
●
AXW01467UY00
Remark
UAE UAE OMAN KUW QAT
PGF
AFP
1
1
1
1
1
1
1
1
1
ENGLISH
VIETNAMESE / ENGLISH
1
(DARK GREY LID)
●
AXW01467LM00
A2
A3
BODY B
LID UNIT
AXW01027JS0E
●
●
AXW01027JS0D
●
●
●
●
AXW001G7JS0E
S
AXW001G7JS0B
S
AXW001G7UY00
S
AXW001G7JS0D
S
●
●
●
1
●
●
1
1
1
1
COLOUR : GREY
1
1
1
1
1
1
1
1
1
1
1
LID PACKING A
AXW01646UP00
●
●
●
●
●
A5
LEVELLER
AXW03536NA00
●
●
●
●
●
CAP C
AXW05377BK0E
●
●
1
SPINNER LID LABEL
AXW11177JS0E
●
●
1
AXW11177JS5D
●
●
AXW11177JS5E
●
●
●
●
2
COLOUR : BLUE
COLOUR : DARK GREY
1
1
1
1
1
2
2
2
2
2
2
2
2
2
2
2
2
1
1
1
1
1
1
1
1
1
1
1
1
1
1
1
1
1
1
1
1
1
1
1
AXW11177JSEE
●
●
●
A7
FEEDING PORT PACKING
AXW02676UP00
●
●
●
●
●
1
1
1
1
1
1
1
1
1
1
1
1
1
A8
COMPLETE CONTROL UNIT
AXW024C7JS06
●
●
●
●
●
1
1
1
1
1
1
1
1
1
1
1
1
1
A9
CONNECTOR LEAD WIRE UNIT AXW014A7JS00
S
●
●
●
●
●
1
1
1
1
1
1
1
1
1
1
1
1
1
AXW292119706
S
●
●
●
●
●
1
1
1
1
1
1
1
1
1
1
1
1
1
A11 PRESSURE SENSOR UNIT
AXW024T03500
S
●
●
●
●
●
1
1
1
1
1
1
1
1
1
1
1
1
1
A12 LID HINGE SHAFT
AXW01937JS00
●
●
●
●
●
1
1
1
1
1
1
1
1
1
1
1
1
1
A13 SUB DRAIN HOSE UNIT
AXW002Q6UT10
●
●
●
●
●
1
1
1
1
1
1
1
1
1
1
1
1
1
A14 SAFETY SWITCH
AXW166123700
●
●
●
●
●
1
1
1
1
1
1
1
1
1
1
1
1
1
A15 LID HINGE SPRING
AXW11167JS00
●
●
●
●
●
1
1
1
1
1
1
1
1
1
1
1
1
1
A16 PANEL FACE A
AXW01457JS0E
●
●
●
●
●
1
1
1
1
1
1
1
1
AXW01457JS0D
●
●
1
1
1
1
1
A17 INSULATION SPACER A
AXW04867JS00
●
●
●
●
●
1
1
1
1
1
1
1
1
1
1
1
1
1
A18 INSULATION SPACER B
AXW04877JS00
●
●
●
●
●
1
1
1
1
1
1
1
1
1
1
1
1
1
A19 PANEL A SHEET
AXW01437JS00
●
●
●
●
●
1
1
1
1
1
1
1
1
1
1
1
1
1
A20 SWITCH LEVER
AXW1192-7JS00
●
●
●
●
●
1
1
1
1
1
1
1
1
1
1
1
1
1
A21 FEEDING HOSE TIP
AXW02047JS00
●
●
●
●
●
1
1
1
1
1
1
1
1
1
1
1
1
1
A22 PANEL A PACKING
AXW01377JS0E
●
●
●
●
●
2
2
2
2
2
2
2
2
2
2
2
2
2
A23 PRINT BASE A UNIT
AXW024Q7JT06
●
1
1
1
1
1
1
1
1
1
1
1
1
●
1
1
1
1
1
1
1
1
1
1
1
1
1
●
1
1
1
1
1
1
1
1
1
1
1
1
1
●
●
●
AXW01307JS0E
●
●
●
AXW01307JS0D
●
●
AXW024Q7JS06
A24 PANEL A
S
COLOUR : WHITE
1
A10 FEEDING VALVE
S
COLOUR : WHITE
COLOUR : GREY
1
1
1
A4
A6
1
1
●
●
1
1
●
●
INDONESIA / ENGLISH
1
●
COLOUR : GREY
COLOUR : WHITE
COLOUR : GREY
COLOUR : GREY
COLOUR : WHITE
Screws
Ref.
Model
Part Name
Part No.
Country/Qty
Safety
F65B2 F70B2 F72B2 F852B F902B
No.
TH
VIET INDO
SIN DBD
MAL
SIN INDIA
RBD
PHI
Remark
UAE UAE OMAN KUW QAT
PGF
AFP
SPECIAL TAPPING SCREW
XTWAXW469J
●
●
●
●
●
4
4
4
4
4
4
4
4
4
4
4
4
4
BODY B~BODY U
BINDING TAPPING SCREW
XTB4+12CFJ
●
●
●
●
●
2
2
2
2
2
2
2
2
2
2
2
2
2
PANEL A~BODY B
BINDING TAPPING SCREW
XTB4+15CFJ
●
●
●
●
●
2
2
2
2
2
2
2
2
2
2
2
2
2
SAFETY SW.~BODY B
BINDING TAPPING SCREW
XTB4+15CFJ
●
●
●
●
●
2
2
2
2
2
2
2
2
2
2
2
2
2
FEEDING VALVE~BODY B
BINDING TAPPING SCREW
XTB4+12CFJ
●
●
●
●
●
4
4
4
4
4
4
4
4
4
4
4
4
4
CONTROLLER HOLDER
BINDING TAPPING SCREW
XTV3+8GFK
●
●
●
●
●
2
2
2
2
2
2
2
2
2
2
2
2
2
~BODY B
CONTROLLER HOLDER
~WATERPROOFING COVER
– 16 –
NA-F65B2 / F70B2 / F72B2 / F852B / F902B
9.3 Parts Exploded View : Part B
B22
B17
B19
B7
B20
B1
B8
B17
B2
B21
B2
B18
B19
B9
B10
B12
B13
B11
B3
B4
B4
B4
B5
B6
B15
B14
– 17 –
B16
NA-F65B2 / F70B2 / F72B2 / F852B / F902B
9.4 Replacement Parts List : Part B
Parts List
Model
Ref.
Part Name
Part No.
B1
B2
Country/Qty
Safety
F65B2 F70B2 F72B2 F852B F902B
No.
BODY A UNIT
GRIP
AXW001A7JS0E
●
●
AXW001A7JS5E
●
●
AXW001A7JS0D
●
●
AXW01107JP0J
●
●
AXW01107JP0D
●
●
TH
VIET INDO
1
●
●
●
●
●
●
1
2
2
SIN DBD
MAL
1
1
SIN INDIA
RBD
1
COLOUR : GREY
COLOUR : GREY (EXT-EARTH)
1
2
2
2
2
1
1
1
1
1
2
2
2
2
2
COLOUR : WHITE
COLOUR : GREY
2
B3
BASE A
AXW03017JS00
●
●
●
●
●
1
1
1
1
1
1
1
1
1
1
1
1
1
B4
LEG COVERING
AXW03397JS00
●
●
●
●
●
4
4
4
4
4
4
4
4
4
4
4
4
4
B5
ADJUSTABLE LEG THUMB
AXW03436JZ00
●
●
●
●
●
1
1
1
1
1
1
1
1
1
1
1
1
1
B6
ADJUSTABLE LEG
AXW03357EC00
●
●
●
●
●
1
1
1
1
1
1
1
1
1
1
1
1
1
B7
CAPACITOR
AXW04037P157
●
●
●
●
●
1
1
1
1
1
1
1
1
1
1
1
1
1
B8
BACK PANEL
AXW01566ZV10
●
●
●
●
●
1
1
1
1
1
1
1
1
1
1
1
1
1
B9
POWER CORD UNIT
AXW004A72944
S
●
●
AXW004A83400
S
●
●
AXW004A73503
S
●
●
AXW004A77254
S
●
●
AXW004A72914
S
●
●
AXW004A73014
S
●
●
●
●
●
S
Remark
UAE UAE OMAN KUW QAT
PGF
AFP
1
1
2
PHI
1
COLOUR : WHITE
TYPE : C3
TYPE : A2
1
1
1
1
TYPE : B3P
1
1
1
1
TYPE : S3
1
1
1
1
TYPE : C2 + EARTH
TYPE : C2
B10 CHEMICAL COVER
AXW04487EC00
●
●
●
●
●
1
1
1
1
1
1
1
1
1
1
1
1
1
B11 HOSE HOLDER A
AXW01207EC00
●
●
●
●
●
2
2
2
2
2
2
2
2
2
2
2
2
2
B12 FLEXIBLE HOSE B UNIT
AXW002E7ED00
●
●
●
●
●
1
1
1
1
1
1
1
1
1
1
1
1
1
B13 HOSE BAND
AXW02457EC00
●
●
●
●
●
1
1
1
1
1
1
1
1
1
1
1
1
1
B14 HOSE HOLE COVER A
AXW01287EC00
●
●
●
●
●
1
1
1
1
1
1
1
1
1
1
1
1
1
B15 SERVICE PRESSURE HOSE UNIT AXW012D7BK00
●
●
●
●
●
1
1
1
1
1
1
1
1
1
1
1
1
1
B16 BOTTOM COVER
AXW21587JS00
●
●
●
●
●
1
1
1
1
1
1
1
1
1
1
1
1
1
B17 BODY A PROTECTION (R&L)
AXW90466AA6M
●
●
●
●
●
2
2
2
2
2
2
2
2
2
2
2
2
2
SIDE : RIGHT & LEFT
B18 BODY A PROTECTION (F-L)
AXW90467LK00
●
●
●
●
●
1
1
1
1
1
1
1
1
1
1
1
1
1
SIDE : FRONT LEFT
B19 BODY A PROTECTION (F-R&B) AXW90467LK50
●
●
●
●
●
2
2
2
2
2
2
2
2
2
2
2
2
2
SIDE : FRONT RIGHT & BACK
1
1
1
1
1
1
1
1
1
1
1
1
1
1
1
1
1
1
B20 NAME PLATE
AXW01537JT00
S
●
AXW01537JTA0
S
●
AXW01537JTK0
S
●
AXW01537LL00
S
AXW01537JS00
S
●
AXW01537JSA0
S
●
AXW01537JSK0
S
●
AXW01537UY00
S
AXW01537LM00
S
B21 WIRING DIAGRAM
AXW04707JS00
B22 EARTH WIRE UNIT
AXW030C6SP20
S
Part No.
Safety
1
1
1
●
1
1
1
1
1
1
1
1
●
1
●
●
●
●
●
●
●
●
●
●
●
1
1
1
1
1
1
1
1
1
1
1
1
Screws
Ref.
Model
Part Name
Country/Qty
F65B2 F70B2 F72B2 F852B F902B
No.
TH
VIET INDO
SIN DBD
MAL
SIN INDIA
RBD
PHI
Remark
UAE UAE OMAN KUW QAT
PGF
AFP
PAN HEAD SCREW
XSN5+10BNS
●
●
●
●
●
1
1
1
1
1
1
1
1
1
1
1
1
1
EARTH
SPECIAL TAPPING SCREW
XTTAXW444J
●
●
●
●
●
4
4
4
4
4
4
4
4
4
4
4
4
4
BASE A
SPECIAL TAPPING SCREW
XTTAXW444J
●
●
●
●
●
4
4
4
4
4
4
4
4
4
4
4
4
4
BACK PANEL
BIND TAPPING SCREW
XTB4+15CFJ
●
●
●
●
●
1
1
1
1
1
1
1
1
1
1
1
1
1
HOSE HOLDER A
PAN HEAD TAPPING SCREW XTN4+8HFJ
●
●
●
●
●
1
1
1
1
1
1
1
1
1
1
1
1
1
EARTH U~BODY A
BIND TAPPING SCREW
●
●
●
●
●
1
1
1
1
1
1
1
1
1
1
1
1
1
CAPACITOR
XYNAXW438J
– 18 –
NA-F65B2 / F70B2 / F72B2 / F852B / F902B
9.5 Parts Exploded View : Part C
C1
C2
C3
C4
C5
C6
C29
C25
C23
C7
C26
C27
C22
C8a
C8a
C16-1
C16
C16-2
C16-3
C16-4
C8c
C16-5
C8b
C16-6
C16-7
C9
C28
C17
C19
C10
C11
C18
C12
C20
C21
C13
C24
C14
C15
– 19 –
NA-F65B2 / F70B2 / F72B2 / F852B / F902B
9.6 Replacement Parts List : Part C
Parts List
Model
Ref.
Part Name
Part No.
Safety
No.
Country / Q’ty
F65B2 F70B2 F72B2 F852B F902B
TH
VIET INDO
SINDBD
MAL
SIN- INDIA
RBD
PHI
UAE- OMAN KUW
AFP
QAT
Remark
UAEPGF
C1
OUTER TUB COVER
AXW32246MC0M
●
●
●
●
●
1
1
1
1
1
1
1
1
1
1
1
1
1
C2
O-RING
AXW02577BK00
●
●
●
●
●
1
1
1
1
1
1
1
1
1
1
1
1
1
C3
PULSATOR
AXW-05016ZV0E
●
●
●
●
●
1
1
1
1
1
1
1
1
1
1
1
1
1
C4
SHAFT BUSHING
AXW05046ZR00
●
●
●
●
●
1
1
1
1
1
1
1
1
1
1
1
1
1
C5
SPINNER SHAFT FLANGE NUT AXW15176RU10
●
●
●
●
●
1
1
1
1
1
1
1
1
1
1
1
1
1
C6
SPINNER FLANGE WASHER B AXW151980200
●
●
●
●
●
1
1
1
1
1
1
1
1
1
1
1
1
1
C7
FILTER U
AXW022A6RU10
●
●
●
●
●
1
1
1
1
1
1
1
1
1
1
1
1
1
C8a
SUSPENSION UNIT (R-RL)
AXW034U7JS00
●
●
●
●
●
2
2
2
2
2
2
2
2
2
2
2
2
2
C8b
SUSPENSION UNIT (F-R)
AXW034U7JS50
●
●
●
●
●
1
1
1
1
1
1
1
1
1
1
1
1
1
REAR : RIGHT & LEFT
C8C
SUSPENSION UNIT (F-L)
AXW034U7JSA0
●
●
●
●
●
1
1
1
1
1
1
1
1
1
1
1
1
1
FRONT : RIGHT
FRONT : LEFT
C9
OUTER TUB A
AXW12016NK20
●
●
●
●
●
1
1
1
1
1
1
1
1
1
1
1
1
1
C10
MOTOR WASHER A
AXW04207JS00
●
●
●
●
●
2
2
2
2
2
2
2
2
2
2
2
2
2
C11
MOTOR
AXW040158506
S
●
●
1
1
1
1
1
1
1
1
1
1
AXW040159204
S
●
●
●
●
●
1
1
1
2
2
2
2
2
2
1
1
1
1
1
1
1
1
1
1
STRATOR : 45 MM.
C12
MOTOR WASHER B
AXW04217BK10
●
●
●
●
●
2
2
2
2
2
2
2
C13
MOTOR PULLEY
AXW04117ED00
●
●
●
●
●
1
1
1
1
1
1
1
AXW04116ZV00
●
●
C14
V-BELT
AXW04127BL60
●
●
●
●
●
1
1
1
1
1
1
1
AXW041219860
●
●
1
1
C15
SPINNER PLATE B
AXW32327JS00
●
●
●
●
●
1
1
1
1
1
1
1
1
1
1
1
1
1
C16
VALVE UNIT
AXW009D6ZV00
●
●
●
●
●
1
1
1
1
1
1
1
1
1
1
1
1
1
C16-1 VALVE ROD A
AXW093259U5M
●
●
●
●
●
1
1
1
1
1
1
1
1
1
1
1
1
1
C16-2 VALVE LID
AXW090380210
●
●
●
●
●
1
1
1
1
1
1
1
1
1
1
1
1
1
C16-3 VALVE SPRING B
AXW097157T0A
●
●
●
●
●
1
1
1
1
1
1
1
1
1
1
1
1
1
C16-4 VALVE ROD B
AXW098180210
●
●
●
●
●
1
1
1
1
1
1
1
1
1
1
1
1
1
C16-5 VALVE SPRING
AXW092259U0A
●
●
●
●
●
1
1
1
1
1
1
1
1
1
1
1
1
1
C16-6 VALVE PACKING
AXW090956N2A
●
●
●
●
●
1
1
1
1
1
1
1
1
1
1
1
1
1
C16-7 VALVE FRAME A
AXW090156N00
1
●
●
●
●
●
1
1
1
1
1
1
1
1
1
1
1
1
C17
GEARED MOTOR
AXW348202516
S
●
●
●
●
●
1
1
1
1
1
1
1
1
1
1
1
1
1
C18
LEAD WIRE UNIT
AXW01486UP00
S
●
●
●
●
●
1
1
1
1
1
1
1
1
1
1
1
1
1
AXW02346UP0A
●
●
●
●
●
1
1
1
1
1
1
1
1
1
1
1
1
1
●
●
●
●
●
1
1
1
1
1
1
1
1
1
1
1
1
1
C19
OVER FLOW HOSE B
C20
EARTH WIRE UNIT (INTERNAL) AXW003F6UP00
C21
MECHA-CASE UNIT
AXW020A6UP6C
●
●
●
●
●
1
1
1
1
1
1
1
1
1
1
1
1
1
C22
TUB UNIT
AXW002A7JS00
●
●
●
●
●
1
1
1
1
1
1
1
1
1
1
1
1
1
C22-1 BALANCER UNIT
S
STRATOR : 40 MM.
AXW035A7JS00
●
●
●
●
●
1
1
1
1
1
1
1
1
1
1
1
1
1
C23
RINSE CASE
AXW21715WP0E
●
●
●
●
●
1
1
1
1
1
1
1
1
1
1
1
1
1
C24
OUTER TUB B
AXW12027JS00
●
●
●
●
●
1
1
1
1
1
1
1
1
1
1
1
1
1
C25
FILTER UNIT
AXW022A7JS00
●
●
●
●
●
1
1
1
1
1
1
1
1
1
1
1
1
1
C26
TUB C UNIT
AXW012U7JS00
●
●
●
●
●
1
1
1
1
1
1
1
1
1
1
1
1
1
C27
TUB B UNIT
AXW012T7JS00
●
●
●
●
●
1
1
1
1
1
1
1
1
1
1
1
1
1
C28
BALANCE WEIGHT
AXW12317JS00
●
●
●
●
●
1
1
1
1
1
1
1
1
1
1
1
1
1
C29
BALANCER UNIT
AXW035A7JS00
●
●
●
●
●
1
1
1
1
1
1
1
1
1
1
1
1
1
SINDBD
MAL
QAT
UAEPGF
t = 1.4 mm.
Screws
Model
Ref.
Part Name
Part No.
No.
Safety
Country / Q’ty
F65B2 F70B2 F72B2 F852B F902B
TH
VIET INDO
SIN- INDIA
RBD
PHI
UAE- OMAN KUW
AFP
Remark
SPECIAL TAPPING SCREW
XTWAXW523
●
●
●
●
●
8
8
8
8
8
8
8
8
8
8
8
8
8
TUB A ~ TUB D
SPECIAL TAPPING SCREW
XTWAXW529
●
●
●
●
●
6
6
6
6
6
6
6
6
6
6
6
6
6
SPINNER SHAFT FLANGE
PAN HEAD TAPPING SCREW XTN4+8HFJ
●
●
●
●
●
1
1
1
1
1
1
1
1
1
1
1
1
1
EARTH U ~ BODY A
PAN HEAD TAPPING SCREW XTN4+8HFJ
●
●
●
●
●
1
1
1
1
1
1
1
1
1
1
1
1
1
EARTH U ~ OUTER TUB B
SPECIAL SMALL SCREW
XSSAXW682
●
●
●
●
●
1
1
1
1
1
1
1
1
1
1
1
1
1
PULSATOR
SPECIAL BOLT
XVGAXW703J
●
●
●
●
●
1
1
1
1
1
1
1
1
1
1
1
1
1
MOTOR PULLEY
SPECIAL BOLT
XVGAXW839J
●
●
●
●
●
2
2
2
2
2
2
2
2
2
2
2
2
2
MOTOR
SPECIAL BOLT
XVGAXW812J
●
●
●
●
●
4
4
4
4
4
4
4
4
4
4
4
4
4
MECHA CASE ~ OUTER TUB B
SPECIAL TAPPING SCREW
XTWAXW6517J
●
●
●
●
●
2
2
2
2
2
2
2
2
2
2
2
2
2
SPINNER PLATE B
SPECIAL TAPPING SCREW
XTWAXW6517J
●
●
●
●
●
6
6
6
6
6
6
6
6
6
6
6
6
6
OUTER TUB A, B
SPECIAL TAPPING SCREW
XTWAXW6518J
●
●
●
●
●
3
3
3
3
3
3
3
3
3
3
3
3
3
GEARED MOTOR (CLUTCH)
SPECIAL TAPPING SCREW
XTWAXW531
●
●
●
●
●
2
2
2
2
2
2
2
2
2
2
2
2
2
OUTER TUB A, B ~ CENTER
SPECIAL TAPPING SCREW
XTWAXW6518J
●
●
●
●
●
3
3
3
3
3
3
3
3
3
3
3
3
3
BALANCE WEIGHT
SPECIAL FLAT WASHER
XWEAXW705
●
●
●
●
●
3
3
3
3
3
3
3
3
3
3
3
3
3
BALANCE WEIGHT
SPRING LOCK WASHER
XWA8BFJ
●
●
●
●
●
3
3
3
3
3
3
3
3
3
3
3
3
3
BALANCE WEIGHT
– 20 –
NA-F65B2 / F70B2 / F72B2 / F852B / F902B
9.7 Parts Exploded View : Packing
7
6
5
4
8
1
2
9
3
10
– 21 –
NA-F65B2 / F70B2 / F72B2 / F852B / F902B
9.8 Replacement Parts List : Packing
Parts List
Ref.
Model
Part Name
Part No.
1
Country/Qty
Safety
F65B2 F70B2 F72B2 F852B F902B
No.
PROTECTION CASE A
AXW90017JS00
●
●
AXW90017JS50
●
●
TH
VIET INDO
SIN DBD
MAL
SIN INDIA
RBD
PHI
●
●
●
1
1
1
1
1
1
1
1
UAE UAE OMAN KUW QAT
PGF
AFP
1
1
1
1
1
2
CORNER CUSHION
AXW90157JS50
●
●
●
●
●
1
1
1
1
1
1
1
1
1
1
1
1
1
3
PROTECTION CASE B UNIT
AXW090B7JS00
●
●
●
●
●
1
1
1
1
1
1
1
1
1
1
1
1
1
4
POLYETHYLENE COVER
AXW90606UP20
●
●
●
●
●
1
1
1
1
1
1
1
1
1
1
1
1
1
5
OPERATING INSTRUCTION
AXW99017JS00
●
●
AXW99017JS50
●
●
AXW99017JSA0
●
●
1
1
AXW99017JSE0
●
●
AXW99017JSK0
●
●
AXW99017JSP0
●
●
1
1
1
1
1
1
1
1
1
1
●
AXW99017UY00
1
●
●
6
SPIN TUB SUPPORTER
AXW90857JS00
●
●
●
●
●
1
1
1
1
1
1
1
1
1
1
1
1
1
7
ACCESSORY BAG
AXW90576UP20
●
●
●
●
●
1
1
1
1
1
1
1
1
1
1
1
1
1
8
BODY COVER
AXW90047JS00
●
●
●
●
●
1
1
1
1
1
1
1
1
1
1
1
1
1
9
STOCK CARD
AXW99187JT00
●
AXW99187JTE0
●
AXW99187JT50
●
1
1
1
1
AXW99017LM00
1
1
●
●
AXW99187JTA0
●
AXW99187JTK0
●
AXW99187JTP0
●
AXW99187JTS0
●
1
1
1
AXW99187JS00
●
AXW99187JSE0
●
AXW99187JSF0
●
1
1
1
●
1
●
AXW99187LM00
AXW99187JSH0
●
AXW99187JSA0
●
AXW99187JSK0
●
AXW99187JSP0
●
AXW99187JSS0
●
AXW91187JT00
AXW91187UY00
AXW91187LM00
1
1
1
1
1
1
1
1
1
1
●
2
2
●
AXW91187LL00
AXW91187JS00
MODEL : BLUE LID
1
●
AXW99187JS50
CASE PLATE A
1
1
AXW99187UY00
10
1
1
AXW99187LL00
AXW99187JTH0
Remark
2
2
2
2
2
2
2
2
2
2
2
2
2
2
2
2
2
2
2
●
2
●
2
2
2
●
2
– 22 –
NA-F65B2 / F70B2 / F72B2 / F852B / F902B
DETAIL CHANGE NOTICE
REVISION
ITEM NO.
PAGE
AUG. 2010
1
18
CHANGE PART NO. TO
AXW348202516
REF. NO. C17
OCT. 2010
1
1
MOVE “SPECIFICATION ” TO NEW
PAGE & ADD DETAIL OF NA-F72B2
MOVE TO P. 3
2
3 - 20
NEW RUNNING PAGE NO. & SUBJECT
NEW RUNNING PAGE NO. TO 3 - 21
1
2
ADD NEW PAGE FOR CONTENT
IT’S PAGE NO. 2
2
2 - 23
NEW RUNNING PAGE NO. & SUBJECT
NEW RUNNING PAGE NO. TO 2 - 23
3
20
REVISE PART NO. OF MOTOR
FOR TH, VIET AND INDO
1
19
ADD NEW PICTURE AT C22-1
ADD BALANCER UNIT
2
20
ADD PART NAME AND PART NO.
NEW PART OF BALANCER UNIT
1
19
ADD NEW PICTURE AT C16-1 ~ 7
ADD PARTS ASSY OF VALVE UNIT
2
20
ADD PART NAME & NO. AND Q’TY USE
FOR PART ASSY OF VALVE UNIT
1
19
ADD BALANCER PICTURE
FOR SALES SEPARTE PART
2
20
ADD PART NAME AND PART NO.
FOR SALES SEPARTE PART
AUG. 2011
OCT. 2011
JUL. 2012
MAR. 2013
DETAIL
– 23 –
REMARK