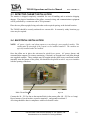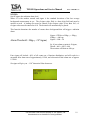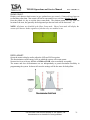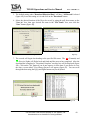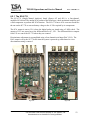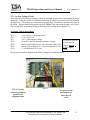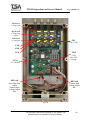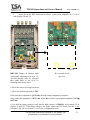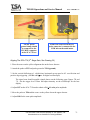
1
Train Monitor TM-850 Operations & Service Manual Doc: # 5022 Rev. A April, 2007 TM-850 Operations and Service Manual Doc: # 5022 Rev. A ____________________________________________________________________________________________________________________ STANDARD WARRANTY FOR TSA SYSTEMS INSTRUMENTS TSA Systems, Ltd. warrants this instrument to be free from defects in workmanship and materials for a period of twelve months from the date of shipment, provided that the equipment has been used in a proper manner and not subjected to abuse. At TSA’s option, repairs or replacements will be made on in-warranty instruments without charge at the TSA factory. Warranty of sub-systems made by other manufacturers will be extended to TSA customers only to the extent of the manufacturer’s liability to TSA. TSA reserves the right to modify the design of its product without incurring responsibility for modification of previously manufactured units. Since installation conditions are beyond the company’s control, TSA does not assume any risks or liabilities associated with methods of installation or with installation results. Every effort is made to keep the manuals up to date and accurate. However, because TSA Systems is constantly improving and upgrading the product line, TSA can make no guarantee as to the content of current manuals. No obligations are assumed for notice of change or future manufacture of these instruments. Manufactured by TSA Systems, Ltd. 14000 Mead Street Longmont, Colorado 80504-9698 USA Phone: +1.970.535.9949 Fax: +1.970.535.3285 [email protected] _______________________________________________________________________________________________________________________________ This document is the exclusive property of TSA Systems, Ltd. Unauthorized use or distribution is strictly prohibited 2 TM-850 Operations and Service Manual Doc: # 5022 Rev. A ____________________________________________________________________________________________________________________ Table of Contents 1.0 INTRODUCTION.............................................................................................. 5 1.1 SCOPE AND PURPOSE OF MANUAL.............................................................................. 5 1.2 GENERAL DESCRIPTION.................................................................................................. 5 1.3 SPECIFICATIONS................................................................................................................ 7 1.4 OPTIONAL COMPONENTS............................................................................................... 8 1.4.1 Alarm Monitor Model AM-270...................................................................................... 8 1.4.2 Occupancy Detectors...................................................................................................... 8 2.0 INSTALLATION................................................................................................ 9 2.1 INSPECTION........................................................................................................................ 9 2.1.1 Damage Claims............................................................................................................... 9 2.1.2 Storage............................................................................................................................ 9 2.1.3 Shipping.......................................................................................................................... 9 2.2 SITE SELECTION AND PREPARATION.......................................................................... 9 2.3 DETECTOR CABINET INSTALLATION........................................................................ 10 2.4 ELECTRICAL INSTALLATION....................................................................................... 10 2.5 PILLAR TO PILLAR INTERCONNECTIONS................................................................. 11 2.6 START-UP AND SELF TEST............................................................................................ 12 3.0 SET-UP AND PROGRAMMING.................................................................... 13 3.1 SET-UP................................................................................................................................ 13 3.2 PASSWORD CONTROL.................................................................................................... 14 3.3 PROGRAMMING THE SYSTEM..................................................................................... 14 3.3.1 GAMMA PARAMETERS........................................................................................... 17 HI/LO LEVELS:................................................................................................................17 INTERVALS:.................................................................................................................... 18 OCCUP HOLDIN:.............................................................................................................18 NSIGMA:...........................................................................................................................19 DET. ONLINE: .................................................................................................................20 3.3.2 GAMMA FUNCTIONS............................................................................................... 20 SHOW COUNT:................................................................................................................21 DSCR. ADJUST:............................................................................................................... 21 VARIANCE:......................................................................................................................23 SET CLOCK:.....................................................................................................................24 RELAY OUTPUT:............................................................................................................ 24 3.3.3 ADVANCED GAMMA............................................................................................... 25 ALGORITHM:.................................................................................................................. 25 BKG TIME:....................................................................................................................... 26 SHOW VERSION:............................................................................................................ 26 CLEAR G-CNTS:..............................................................................................................27 F-ALARM TEST:..............................................................................................................27 BKG. NSIGMA:................................................................................................................ 27 SYSTEM ID:..................................................................................................................... 27 PROFILING:......................................................................................................................28 3.3.4 NEUTRON PARAMETERS........................................................................................ 28 ____________________________________________________________________________________________________________________ This document is the exclusive property of TSA Systems, Ltd. Unauthorized use or distribution is strictly prohibited TM-850 Operations and Service Manual Doc: # 5022 Rev. A ____________________________________________________________________________________________________________________ HI LEVELS:...................................................................................................................... 28 MAX INTRVALS:............................................................................................................ 29 ALPHA VALUE:...............................................................................................................29 ZMAX VALUE:................................................................................................................ 30 SEQ. TEST:....................................................................................................................... 30 3.3.5 NEUTRON FUNCTIONS............................................................................................ 30 SHOW COUNT:................................................................................................................31 DSCR. ADJUST:............................................................................................................... 31 CLEAR N-CNTS:..............................................................................................................32 NEU. ENABLE:................................................................................................................ 33 3.3.6 COMM SET.................................................................................................................. 33 IP: 33 SUBNET:...........................................................................................................................33 DNS: 34 GATEWAY:...................................................................................................................... 34 3.4 OPERATIONAL TEST / INSTALLATION CHECKLIST................................................ 35 4.0 PC COMMUNICATIONS............................................................................... 36 4.1 INSTALLING THE SOFTWARE...................................................................................... 36 4.2 PORT................................................................................................................................... 36 4.3 GAMMA PARAMETER.....................................................................................................37 4.3.1 Gamma Alarm Data...................................................................................................... 37 4.3.2 Gamma Show Count..................................................................................................... 38 4.4 PORTAL HISTORY............................................................................................................ 38 4.4.1 Downloading System History Using SC-770 Com...................................................... 39 4.4.2 Extra.............................................................................................................................. 41 4.5 NEUTRON PARAMETERS............................................................................................... 42 4.5.1 Neutron Show Count.....................................................................................................42 5.0 THEORY OF OPERATION............................................................................ 43 5.1 GAMMA OVERVIEW....................................................................................................... 43 5.2 NEUTRON OVERVIEW.................................................................................................... 45 5.3 MODES................................................................................................................................47 5.3.1 Self-Test Mode..............................................................................................................47 5.3.2 Background Mode......................................................................................................... 47 5.3.3 Fast Count Mode........................................................................................................... 48 5.3.4 Variance Analyzer Mode (Gamma Only)..................................................................... 48 6.0 COMPONENTS............................................................................................... 49 6.1 THE SC-770.........................................................................................................................49 6.1.1 THE SC-771..................................................................................................................49 6.1.2 Rabbit Board................................................................................................................. 50 6.1.3 The GPRB-756..............................................................................................................50 6.2 THE SCA-775 ..................................................................................................................... 51 6.2.1 The SCA-774................................................................................................................ 52 6.2.2 The HHV-448............................................................................................................... 53 6.3 THE DA-630 DETECTOR ASSEMBLY (GAMMA)....................................................... 54 6.4 THE NEUTRON DETECTOR ASSEMBLY..................................................................... 55 ____________________________________________________________________________________________________________________ This document is the exclusive property of TSA Systems, Ltd. Unauthorized use or distribution is strictly prohibited TM-850 Operations and Service Manual Doc: # 5022 Rev. A ____________________________________________________________________________________________________________________ 6.2.3 PMFX Box.................................................................................................................... 56 6.3 THE BATTERY MODULE................................................................................................ 57 6.4 NANO CONTROLLER.......................................................................................................57 6.5 RS-232 to RS-485 CONVERTER BOX..............................................................................58 6.6 MEDIA CONVERTER....................................................................................................... 59 6.7 THE LD-260 LOAD DISCONNECT.................................................................................. 61 6.8 OCCUPANCY DETECTORS............................................................................................. 62 6.8.1 Ultrasonic...................................................................................................................... 62 6.8.2 IR Photo Beam / Speed Sense....................................................................................... 63 6.9 ALARM LIGHTS AND AUDIBLE ANNUNCIATOR..................................................... 64 7.0 MAINTENANCE............................................................................................. 65 7.1 PERIODIC INSPECTION & GENERAL MAINTENANCE............................................. 65 7.2 GAMMA MAINTENANCE............................................................................................... 65 7.2.1 Periodic Inspection........................................................................................................65 7.2.2 Field Electronic Alignment Procedures........................................................................ 66 Tools and Equipment......................................................................................................... 66 SCA-775 (Master Pillar).................................................................................................... 66 Aligning The HHV-448 (1st Stage Gain).......................................................................... 69 Aligning The SCA-774 (2nd Stage Gain, See Drawing 20)..............................................71 SCA-775 (Slave Pillar)...................................................................................................... 72 7.2.3 Variance Analyzer Mode.............................................................................................. 72 7.2.4 Operational Test............................................................................................................ 72 7.2.5 Performance Verification Checklist (Gamma)............................................................. 73 7.3 NEUTRON MAINTENANCE............................................................................................ 74 7.3.1 Electronic Alignment Procedure................................................................................... 74 Tools and Equipment......................................................................................................... 74 SCA-775 (Master Pillar).................................................................................................... 74 NOTE: Be careful not to force the lid open and break the hinge...................................... 74 Alignment The HHV-448.................................................................................................. 75 Aligning The SCA-774 See Drawing 20 Component Designator..................................... 75 SCA-775 (Slave Pillar)...................................................................................................... 75 7.3.2 Neutron Detector Tune-up Procedure........................................................................... 76 7.3.3 Operational Test............................................................................................................ 76 7.3.4 Performance Verification Checklist (Neutron)............................................................. 77 8.0 TROUBLESHOOTING................................................................................... 78 8.1 COMPONENT ACCESS.................................................................................................... 78 8.2 POWER DISTRIBUTION...................................................................................................80 8.3 INDIVIDUAL ASSEMBLIES............................................................................................ 81 8.3.1 Gamma Detector Assemblies........................................................................................ 81 8.4 SC-770 CONTROLLER...................................................................................................... 82 8.5 OCCUPANCY SENSOR.................................................................................................... 83 9.0 GLOSSARY...................................................................................................... 84 10.0 APPENDIX A................................................................................................. 85 11.0 APPENDIX B (Data String Outputs & Definitions).................................... 88 12.0 PARTS LISTS.................................................................................................93 ____________________________________________________________________________________________________________________ This document is the exclusive property of TSA Systems, Ltd. Unauthorized use or distribution is strictly prohibited TM-850 Operations and Service Manual Doc: # 5022 Rev. A ____________________________________________________________________________________________________________________ 12.1 SPARE PARTS ORDERING INFORMATION............................................................. 93 12.2 RECOMMENDED SPARE PARTS............................................................................... 93 13.0 LIST OF DRAWINGS................................................................................... 94 ____________________________________________________________________________________________________________________ This document is the exclusive property of TSA Systems, Ltd. Unauthorized use or distribution is strictly prohibited 1.0INTRODUCTION 1.1 SCOPE AND PURPOSE OF MANUAL This manual is designed to enable operating and service personnel to properly install, test, operate, and care for the TSA Train monitor. Since applications are necessarily site-specific, operation procedures are given in general terms. Service and repair are covered to the subassembly level. Anything more complex than this requires that the instrument or assembly be returned to TSA. 1.2 GENERAL DESCRIPTION TSA’s Systems are highly reliable systems for the radiometric detection of special nuclear material (SNM). The Train Monitor, Model TM-850, is designed for outdoor installation. When the system is not occupied, the system will automatically monitor background radiation and periodically update a display on the controller. When the system is occupied, the system begins fast count monitoring and will alarm if the count exceeds a predetermined alarm level. The system will generate a background fault if the background radiation level exceeds or falls below preset limits. The monitor is equipped with tamper switches and power fail indicators. These conditions may be monitored from a remote location using a TSA model AM-270 Alarm Monitor. A system can consist of one or two pillars which contain the subsystem modules. The TM-850 pillars are spaced far enough apart, (6 meters or 20 feet), to permit safe passage for train traffic. The monitor is powered by a battery, which will provide at least 12 hours of continuous service in case of a power failure. The battery is continually charged by the power supply as long as ac power is available. The system may be setup in any location where a 90 - 250 Vac, 47 - 63 Hz power source is available. Each pillar contains four gamma radiation detector assemblies. The TM-850 contains sixteen 3He tubes for neutron measurement. TM-850 Operations and Service Manual Doc: # 5022 Rev. A ____________________________________________________________________________________________________________________ The master pillar also has a System Controller (Model SC-770), a Single Channel Analyzer (Model SCA-775), a battery, battery charger, load disconnect (LD-260), RS-232 to RJ-485 converter, Ethernet to Fiber media converter, PMFX/Signal Pick Off box, speed sense Nano Controller, occupancy detectors, alarm lights, and an audio indicator(s). The slave pillar contains a Single Channel Analyzer (Model SCA-775), two occupancy emitters and an ultrasonic sensor. The pillars use lead shielding on the rear and sides of the gamma detectors, to reduce the background radiation and increase the ability of the system to detect SNM passing through the system. User-supplied conduits for the TM-850 are required for power and signal cables between pillars and communication to external equipment. If the system is equipped with heaters, ac power must be supplied to the heaters in both pillars. The ac power and interface signals may be run in the same conduit unless this is prohibited by local code. TM-850 in a railroad monitoring application ( the electronics box on the back can also be mounted on the bottom) ___________________________________________________________________________________________________________________ This document is the exclusive property of TSA Systems, Ltd. Unauthorized use or distribution is strictly prohibited 6 TM-850 Operations and Service Manual Doc: # 5022 Rev. A ____________________________________________________________________________________________________________________ 1.3 SPECIFICATIONS Gamma Detectors: Two 12"w x 48"l x 1.5"d (30 x 120 x 3.8 cm) organic plastic scintillators in each pillar Neutron Detectors: TM-850: eight 2"Ø x 36"l (5 Ø x 91 cm), 2ATM 3He detectors in each pillar Sensitivity: Please contact TSA for details. Power: 12 volt, 26 amp hour sealed, lead-acid battery charged by 90 – 250 Vac, 47 - 63 Hz line power Passage Time: TM-850: 3 seconds at 5mph (8kph) Serviceability: System: All components are easily accessible for testing and maintenance. System Controller: Self-checking routines and easily performed tests simplify board level trouble shooting. The modular design allows quick and easy repair and maintenance. Occupancy Detectors: TM-850: One programmable ultrasonic sensor and one set of infra-red photo beams/speed sensors Weight: TM-850: Approximately 1600 lb (724 kg) per pillar TM-850 Electronics Panels: 400 lb (181 kg) per pair Dimensions: Not including mounting flanges TM-850: 120"h x 48"w x 10"d (305 x 122 x 25 cm) ___________________________________________________________________________________________________________________ This document is the exclusive property of TSA Systems, Ltd. Unauthorized use or distribution is strictly prohibited 7 TM-850 Operations and Service Manual Doc: # 5022 Rev. A ____________________________________________________________________________________________________________________ 1.4 OPTIONAL COMPONENTS 1.4.1 Alarm Monitor Model AM-270 The TSA Model AM-270 Alarm Monitor (figure 1A) is a self-contained unit designed for use with TSA’s Monitors. The AM-270 provides both remote audible and remote visual alarm indicators for radiation levels, high and low background, and tamper conditions. In addition, output relays are provided to integrate the AM-270 into existing alarm systems. Using TB3 circled in figure 1B, which is the 10 pin terminal block, in the master side just above the SC-770 controller, you can access the output relay contacts for the remote alarm panel. The pins are used for the following: (NOTE: RELAY OUTPUT must be left in the <ON> position for the AM-270 to function, reference Section 7.2.2.1a). Terminal Signal AM-270 Block 2 Wire Color Pin 1 gRAD1 Brown (Red Light) Pin 3 NRAD1 Red (Blue Light) Pin 5 Fault Orange (Yellow Light) Pin 7 Tamper White (Yellow Light) Pin 12 GND Black Figure 1A Figure 1B 1.4.2 Occupancy Detectors Any occupancy detector which uses a normally open relay closure may be wired in parallel with the existing occupancy detector. Check with TSA’s technical staff for further details. ___________________________________________________________________________________________________________________ This document is the exclusive property of TSA Systems, Ltd. Unauthorized use or distribution is strictly prohibited 8 TM-850 Operations and Service Manual Doc: # 5022 Rev. A ____________________________________________________________________________________________________________________ 2.0INSTALLATION The following procedures should enable on-site personnel to correctly install the system for normal operation. Follow the procedures in the order given. A checklist is included at the end of Section 3. It is recommended that a copy of this be filled out after initial installation and whenever the system is put into service after prolonged storage. If necessary, consult TSA Systems for assistance in case of unusual site conditions or requirements. 2.1 INSPECTION Immediately inspect the instrument for mechanical damage, scratches, dents or other defects. It should be examined for evidence of concealed as well as external damage. 2.1.1 Damage Claims If the instrument is damaged in transit or fails to meet specifications upon receipt, notify the carrier and TSA Systems immediately. Shipping cartons, packing materials, waybills and other such documentation should be preserved for the carrier’s inspection. TSA will assist in providing replacement or repair of the instrument if necessary. 2.1.2 Storage If the instrument is to be stored for any length of time, disconnect power to the instrument and remove and store any batteries separately in a cool place. If batteries are to be stored for any length of time, they should be inspected, and, if necessary, fully charged at least once a month. The enclosures may be laid flat on their backs, but should not be stacked. Care should always be taken to avoid subjecting the instrument to severe mechanical or environmental shock. The instrument should be stored in a dry, temperature controlled location. 2.1.3 Shipping Before returning the instrument for any reason, notify TSA Systems of the difficulty encountered, giving the model and serial numbers of the equipment. TSA will furnish specific shipping instructions. 2.2 SITE SELECTION AND PREPARATION Select a site in accordance with vulnerability assessments and engineering surveys. The pillars will need to have an adequate base or some means of stabilization to insure that they remain stationary after alignment. In addition, the system requires 90 - 250 Vac, 47 - 63 Hz site power supply. ___________________________________________________________________________________________________________________ This document is the exclusive property of TSA Systems, Ltd. Unauthorized use or distribution is strictly prohibited 9 TM-850 Operations and Service Manual Doc: # 5022 Rev. A ____________________________________________________________________________________________________________________ 2.3 DETECTOR CABINET INSTALLATION The monitor is shipped completely assembled for ease of handling and to minimize shipping damage. The physical installation of the pillars, external wiring, and communications equipment will be performed by a contractor and or TSA personnel. Place the two pillars upright, facing each other at the required spacing, at the desired location. The TM-850 should be securely anchored to a cement slab. In extremely windy locations guy wires may be required. 2.4 ELECTRICAL INSTALLATION NOTE: AC power, signals, and alarm outputs are run through a user-supplied conduit. This conduit must be watertight if the system is to be installed outdoors. The conduits are typically installed under the roadbed. Once the pillars are in place, the unit must be wired for ac power. AC power, alarms, and communication outputs (for remote monitoring, if desired) are brought into each pillar through user-supplied conduits. These conduits may be brought into the pillar at any convenient location (normally near the bottom of the pillar), but should not be placed in such a way as to interfere with the opening of the door. Main Circuit Breaker Figure 2A Connect the 90 - 250 Vac line to the terminal block in the master pillar (90 - 250 Vac at 1 amp). Hot to bottom of circuit breaker, neutral to terminal 1, and ground to terminal 5. All wiring should be done in compliance with local electrical codes. ___________________________________________________________________________________________________________________ This document is the exclusive property of TSA Systems, Ltd. Unauthorized use or distribution is strictly prohibited 10 TM-850 Operations and Service Manual Doc: # 5022 Rev. A ____________________________________________________________________________________________________________________ 2.5 PILLAR TO PILLAR INTERCONNECTIONS The TM-850 uses a 25 pin terminal block in each pillar (figure 2B). Cross Over Cable Master TB1 1 2 3 4 5 6 7 8 9 10 11 12 13 14 15 16 17 18 19 20 21 22 23 24 25 Slave TB2 1 2 3 4 5 6 7 8 9 10 11 12 13 14 15 16 17 18 19 20 21 22 23 24 25 Signal Occupancy + Tamper + SC + DI + CS0 + Count 1+ Count 2+ Count 3+ Count 4+ Occupancy Tamper SC DI CS0 Count 1Count 2Count 3Count 4Empty Empty Empty Battery+ Media Conv. Media Conv. Ground Wire Color Green Pink Brown Grey White Orange Yellow Blue Violet White / Green White / Pink White / Brown White / Grey White / Black White / Orange White / Yellow White / Blue White / Violet Empty Empty Empty Red & White / Red Red Black Black & White / Black Two Pin Jumper Once pillar interconnections are complete, install the battery. 1. 2. 3. Figure 2B Check that the Power switch on the LD-260 is in the OFF position. Using a Volt Meter, check for a short between power and ground. Install the battery in the master pillar by connecting the battery cable to the in-line connector from the LD-260. All of the other cables are factory installed. This completes the internal wiring of the monitor. With the main circuit breaker (figure 2A) switched to the ON position, the yellow AC light on the LD-260 should be lit. When the LD-260 power toggle is switched to the ON position, both the yellow and the green LEDs will be illuminated and the system is energized. ___________________________________________________________________________________________________________________ This document is the exclusive property of TSA Systems, Ltd. Unauthorized use or distribution is strictly prohibited 11 TM-850 Operations and Service Manual Doc: # 5022 Rev. A ____________________________________________________________________________________________________________________ 2.6 START-UP AND SELF TEST 1. Turn on the power switch located on the Load Disconnect (LD-260). The unit will automatically perform a Power On Self Test (POST) which takes approximately seven seconds. 2. The test results are displayed on the screen as they are run. If any tests fail, the system will be halted. The problem must be corrected before operation can commence. After all the tests are completed successfully, the system will collect an initial BACKGROUND Mode. The initial background acquisition takes twenty-two seconds. After the initial background has been gathered, the system status will be displayed. The status screen consists of four lines: GAMMA BKG = nnnnnn (background counts in cps) NEUTRON BKG = nnnnnn (background counts in cps) SYSTEM STATUS (OK, TAMPER, or OCCUPIED)* DATE/TIME (mm/dd/yy hh:mm) *SYSTEM STATUS When a pillar door is opened the status line will indicate TAMPER. When ac power is lost the status line will indicate TAMPER. When an occupancy is sensed, the status line will indicate OCCUPIED. In addition to the above mentioned TAMPER conditions, there are three other fault conditions that can occur during operation, Gamma HI, Gamma LO, and Neutron HI. The system is now ready for programming and set-up. ___________________________________________________________________________________________________________________ This document is the exclusive property of TSA Systems, Ltd. Unauthorized use or distribution is strictly prohibited 12 TM-850 Operations and Service Manual Doc: # 5022 Rev. A ____________________________________________________________________________________________________________________ 3.0SET-UP AND PROGRAMMING 3.1 SET-UP The monitor is fully aligned at the factory. Since these adjustments may be affected during shipment, the alignment should be verified using the Electronic Alignment Procedure in Sections 7.2.2 & 7.3.1. The SC-770 (figure 2C) is a general purpose controller that is used in several systems. It has many user programmable parameters that can be used to optimize it for a wide variety of applications. Refer to Section 3 for details on programming the SC-770. Figure 2C SC-770 Controller ___________________________________________________________________________________________________________________ This document is the exclusive property of TSA Systems, Ltd. Unauthorized use or distribution is strictly prohibited 13 TM-850 Operations and Service Manual Doc: # 5022 Rev. A ____________________________________________________________________________________________________________________ 3.2 PASSWORD CONTROL The zero <0> key on the keypad is used to enter the set-up mode from the operating screen. Before the menus can be accessed, the password must be input, followed by the pound <#> key. If the password is not entered correctly, the system will return to the operating screen. NOTE: The password is set to "1234" and can not be changed. 3.3 PROGRAMMING THE SYSTEM CAUTION: Once the password is entered and programming mode is enabled, all alarm functions are disabled. DO NOT leave the system in programming mode for normal operation! CAUTION: Always verify the alignment of the system before attempting to program it, reference Section 7.2.2. All of the system parameters are controlled from the SC-770 controller located in the master pillar. In order to access the SC-770, the electronics cabinet door must be opened using the keys supplied with the system. The door may stick a little due to the weather seal bonding to the door face. The SC-770 has a twelve-key keypad on the face of the controller. Using this keypad, the operator can perform system set-up and diagnostic tests. After the system has been powered up and acquired its initial background, the set-up menu can be accessed. The system parameters and diagnostic functions are protected by password access. This section outlines the menus and provides a detailed description of the functions. Pressing the number associated with the desired operation permits the operator to access that function. Pressing the zero key will display the next page of the current menu, where appropriate. Pressing the pound <#> key will return the operator to the previous menu or exit the menu mode. ___________________________________________________________________________________________________________________ This document is the exclusive property of TSA Systems, Ltd. Unauthorized use or distribution is strictly prohibited 14 TM-850 Operations and Service Manual Doc: # 5022 Rev. A ____________________________________________________________________________________________________________________ When a parameter display contains a “NEW =” prompt below it, a new value for that parameter may be entered from the keypad. Pressing the asterisk <*> key clears the current operator entry; pressing the pound <#> key accepts the current value or the new value that has been entered by the operator. It’s always a good idea to go back and check to make sure that all entries are valid after making changes. The first menu presented to the operator offers three choices. Those choices are: Selecting the desired menu choice will present the operator with another menu allowing the operator to access the appropriate parameters and or functions. GAMMA NEUTRON COMM-SET ` ___________________________________________________________________________________________________________________ This document is the exclusive property of TSA Systems, Ltd. Unauthorized use or distribution is strictly prohibited 15 TM-850 Operations and Service Manual Doc: # 5022 Rev. A ____________________________________________________________________________________________________________________ SC-770 Display Menu Options Factory Settings 1: GAMMA 1: PARAMETERS 1: HI/LO LEVELS 2: INTERVALS 3: OCCP HOLDIN 4: NSIGMA 5: DET. ONLINE 2: FUNCTIONS 1: SHOW COUNTS 2: DSCR. ADJUST 3: VARIANCE 4: SET CLOCK 5: RELAY OUTPUT 3: ADVANCED 1: ALGORITHM 2: BKG. TIME 3: SHOW VERSION 4: CLEAR G-CNTS 5: F-ALARM TEST 6: BKG. NSIGMA 7: SYSTEM I.D. 8: PROFILING 2: NEUTRON 1: PARAMETERS 1: HI LEVEL 2: MAX INTERVALS 3: ALPHA VALUE 4: ZMAX VALUE 5: SEQUENCING 2: FUNCTIONS 1: SHOW COUNTS 2: DSCR. ADJUST 3: CLEAR N-CNTS 4: NEU. ENABLE 3: COMM-SET 1: PARAMETERS 1: IP 2: SUBNET 3: DNS 4: GATE WAY 1/2 Bkg of 1 det.(LO) / 1.5 x Bkg of 1 det. (HI) 5 (ensure scanning of entering object) 10 Vehicle Monitor (VM250AGN) ensure scanning of departing object, 5 Pedestrian 0-100 (must enter leading zero) 1234 All approx. the same 0.068 & 0.455 Must be below .150 after 5 passes 24h, hr, min, mon, date, year Off (1), ON (2) , Auto (3) Sum & Vert ON for VM-250AGN Sum & Horizontal for PM-700AGN 20 (Use 1 to increase & 7 to decrease) 1.08.8B (Current Rabbit Firmware) Shows # of occ's & Alarms since powered up Shows # of alarm comp made & # of alarms 0.0 (throw-through alarm) 1 (must be set through RS-232) ON (ASCII string via RS-232 & Ethernet) 50 2 30 (1/33333 false alarm rate) 1200 4 All approx. the same 0.504 & 5.040 ON 192.168.001.100 255.255.255.000 000.000.000.000 000.000.000.000 No leading 0's when setting up in a PC ___________________________________________________________________________________________________________________ This document is the exclusive property of TSA Systems, Ltd. Unauthorized use or distribution is strictly prohibited 16 TM-850 Operations and Service Manual Doc: # 5022 Rev. A ____________________________________________________________________________________________________________________ 3.3.1 GAMMA PARAMETERS 1. 2. 3. 4. 5. HI/LO LEVELS: Background fault levels INTERVALS: Number of 200ms intervals per comparison OCCUP HOLDIN: Number of 200ms intervals to hold in after occupancy NSIGMA: N*sigma radiation alarm level DET. ONLINE: Number and position of detectors in the system HI/LO LEVELS: Sets the low and high background fault levels, in cps per detector. If the counts fall outside this window, the system will indicate a HI or LO Gamma background fault, and will not allow further operation until the problem is corrected. These faults are intended to flag a failure in the detector or electronics and to protect against artificially elevating the background to reduce the monitor’s sensitivity. The precise settings will vary with local conditions and requirements, but a good starting point is usually half of the average background for the low and 1.5 times background of the average background for the high. The previously mentioned percentages are based on a single detector’s counts. ___________________________________________________________________________________________________________________ This document is the exclusive property of TSA Systems, Ltd. Unauthorized use or distribution is strictly prohibited 17 TM-850 Operations and Service Manual Doc: # 5022 Rev. A ____________________________________________________________________________________________________________________ INTERVALS: “INTERVALS” actually controls two functions: 1. The number of 200 ms intervals to "look back" after the system detects occupancy. 2. The number of 200 ms intervals that are used for each alarm comparison. This feature ensures that the front of the approaching object is scanned, and prevents it from affecting the background. The factory setting is 5 intervals (one second), but the optimum setting may vary with local conditions. NOTE: The number of intervals is an important parameter. Reducing the number of intervals results in fewer counts per alarm comparison, (i.e. poorer counting statistics, which in turn increases the measured false alarm rate.) If the number of intervals is set to anything except 5, the occupied count rate is NOT in cps. The alarm comparisons will be based on the sum of the counts during the selected number of intervals. OCCUP HOLDIN: Occupancy HoldIn is the number of 200ms intervals to hold in after the occupancy signal indicates the system is vacant. This feature ensures that the rear of the departing vehicle is scanned, and prevents it from affecting the background. The factory setting is 10 intervals (two seconds) for Vehicle and Train monitors but the optimum setting may vary with local conditions. NOTE: This setting is also used for neutron. ___________________________________________________________________________________________________________________ This document is the exclusive property of TSA Systems, Ltd. Unauthorized use or distribution is strictly prohibited 18 TM-850 Operations and Service Manual Doc: # 5022 Rev. A ____________________________________________________________________________________________________________________ NSIGMA: Sets N*sigma, the radiation alarm level. Where N is the number entered and sigma is the standard deviation of the last average background measurement in cps. The n*sigma value filed is a three digit field and must be entered as such. A leading zero must be entered if the n*sigma value is less than 10.0, a 4 n*sigma value must be entered as 04.0. The decimal will automatically be placed. This formula determines the number of counts above background that will trigger a radiation alarm. Alarm Threshold = Bkgavg + N*sigma) Sigma = STD dev of Bkgavg = √Bkgavg If Bkgavg = 400 cps Sigma = √400 = 20 So, if your alarm set point is 4*sigma, Thresh = 400 + 4(20) = 480 The monitor will alarm at 480 cps Four sigma will include ~90% of all counts on a Gaussian distribution, and will result in a measured false alarm rate of approximately 1/1200, and a theoretical false alarm rate of approx. 1/33000. Six sigma will give you ~ 1/106 theoretical false alarm rate. ___________________________________________________________________________________________________________________ This document is the exclusive property of TSA Systems, Ltd. Unauthorized use or distribution is strictly prohibited 19 TM-850 Operations and Service Manual Doc: # 5022 Rev. A ____________________________________________________________________________________________________________________ DET. ONLINE: Indicates the detectors in the system which are enabled. The SC-770 will support up to eight detector inputs. If less than four detectors are installed in a system, the unused inputs must be disabled to allow proper system operation. The DET. ONLINE will normally display "1234". To disable an individual detector, type a zero in its position. For example: typing "1034", would disable detector number 2, the detectors on-line would display 1_34. To enable all four detector inputs (the normal setting for a system) enter "1234", the detectors on-line will display "1234". To enable a Master only system, the detector setup should be “12_ _” TM-850 Detector Arrangement 3.3.2 GAMMA FUNCTIONS 1. 2. 3. 4. 5. SHOW COUNT: Displays detector counts DSCR. ADJUST: Discriminator adjustment VARIANCE: Performs a variance test on the detectors SET CLOCK: Sets system time and date RELAY OUTPUT: Determines functionality of output relay & local alarms ___________________________________________________________________________________________________________________ This document is the exclusive property of TSA Systems, Ltd. Unauthorized use or distribution is strictly prohibited 20 TM-850 Operations and Service Manual Doc: # 5022 Rev. A ____________________________________________________________________________________________________________________ SHOW COUNT: Displays each detector’s counts, in cps, updated once per second. Show Count mode will display detector count rates on all operable detectors including those that are disabled in “DET. ONLINE”. Press the pound <#> key to exit the Show Count mode. NOTE: All alarms are disabled in the Show Count mode. DSCR. ADJUST: Opens the menu to display and/or adjust the LLD and ULD set points. The discriminators set the energy levels at which the system will be accept counts. The energy window may be changed using the discriminators. The relationship of the discriminator voltage to energy level, in keV, is approximately 1 volt of discriminator level equals 330 keV. Using this formula, the factory settings equal: LLD 0.069 volts = 22 keV ULD 0.455 volts = 144 keV This relationship is an approximation. In practice, the actual values will vary slightly. Always test the system with the isotope(s) of interest to ensure maximum sensitivity. Refer to the formula for signal to background ratio in Appendix A (Section 10) for details on optimizing the discriminator settings for specific isotopes. If SNM is the primary concern, leaving the discriminators set at the factory defaults of 0.069 and 0.455 volts is recommended. If the isotopes are unknown, setting the ULD to its maximum setting, 5.040 volts will improve the high energy response. The master and slave discriminators are set independently to permit maximum flexibility in programming the system. In almost all cases, the settings will be the same for both the master and slave pillar. NOTE: After changing the discriminator settings, always run a variance test to ensure that system noise is not affecting the count data. ___________________________________________________________________________________________________________________ This document is the exclusive property of TSA Systems, Ltd. Unauthorized use or distribution is strictly prohibited 21 TM-850 Operations and Service Manual Doc: # 5022 Rev. A ____________________________________________________________________________________________________________________ Three methods of adjustment are provided: 1. Direct Entry: Press the zero <0> key from the "MASTER ULD/LLD" menu. The operator will be prompted for a “NEW =” LLD setting. Enter the new value, the first digit entered is volts, the second digit entered is tenths of a volt, etc., and press the pound <#> key, or simply press the pound <#> key to accept the current setting. NOTE: Since the DACs have limited resolution, manual entries will be rounded to nearest value the DACs can output. Once the pound <#> key has been pressed, the ULD menu will be presented. Use the same method to set the ULD. This sets the discriminator levels for the master pillar. After the discriminators in the master pillar have been set, the menu heading will change to "SLAVE ULD/LLD". Repeat the above process to set the discriminators for the slave pillar. 2. Manual Adjustment: At the "MASTER ULD/LLD" menu, the discriminators may be adjusted one step at a time while observing the counts from both detectors. The following keys are used: <1> increments the LLD by one step (approximately 0.0098 volts) <7> decrements the LLD by one step <3> increments the ULD by one step (approximately 0.0196 volts) <9> decrements the ULD by one step When the settings are satisfactory, press the pound <#> key to accept the settings and advance the menu for the slave pillar. The display will change from "MASTER ULD/LLD" to "SLAVE ULD/LLD" to indicate that the discriminators in the slave pillar are ready to be adjusted. Repeat the process for the slave pillar. ___________________________________________________________________________________________________________________ This document is the exclusive property of TSA Systems, Ltd. Unauthorized use or distribution is strictly prohibited 22 TM-850 Operations and Service Manual Doc: # 5022 Rev. A ____________________________________________________________________________________________________________________ 3. Factory Defaults: Pressing the asterisk <*> key at either the master or slave screen will load the default discriminator settings of LLD = 0.069 and ULD = 0.455 for a given pillar. Complete this step for both the Master and Slave pillar. VARIANCE: Performs a variance test on all gamma detectors. The SC-770 runs 15 second variance passes. TSA recommends running five, 15 second passes. After five passes all variance readings should be less than 0.150. Refer to Appendix A (Section 10) for further detail on the variance test and the formulas used. Press the pound <#> key to terminate the variance test. NOTE: The variance for a detector that is disabled or disconnected will be 99.000 ___________________________________________________________________________________________________________________ This document is the exclusive property of TSA Systems, Ltd. Unauthorized use or distribution is strictly prohibited 23 TM-850 Operations and Service Manual Doc: # 5022 Rev. A ____________________________________________________________________________________________________________________ NOTE: For a successful variance test to run, all movement in the immediate vicinity of the pillars must be ceased throughout the duration of the test. A vehicle, person, or object moving through, behind or around the pillars could cause a detector or detectors to fail the variance test. The shielding, due to an object’s attenuation may change the count rate sufficiently to cause a test failure. SET CLOCK: Sets the system time and date. The operator will be prompted to enter the hours (in 24-hour format), minutes, month, date, and year (last two digits only) from the keypad. When the pound <#> key is pressed after the last entry, the data is written to the internal clock/calendar. RELAY OUTPUT: Determines functionality of output relay and local alarms. Entering <1> = OFF, disables local audio and visual alarms and fault indicator after power up. Entering <2> = ON, enables local audio and visual alarms and fault indicator after power up. Entering <3> = AUTO, local audio and visual alarms are disabled unless the Ethernet connection is lost, then the system will automatically revert to “ON”. ___________________________________________________________________________________________________________________ This document is the exclusive property of TSA Systems, Ltd. Unauthorized use or distribution is strictly prohibited 24 TM-850 Operations and Service Manual Doc: # 5022 Rev. A ____________________________________________________________________________________________________________________ 3.3.3 ADVANCED GAMMA 1. 2. 3. 4. 5. 6. 7. 8. ALGORITHM BKG. TIME SHOW VERSION CLEAR G-CNTS F-ALARM TEST BKG. NSIGMA SYSTEM I.D. PROFILING ALGORITHM: Permits the operator to select various configurations of gamma detectors to be included in the alarm comparisons. This allows the operator to optimize the system operation for local conditions. When this mode is selected, the selections will be presented on the display one at a time. Pressing any key, except the <#> will toggle the calculation on and off. To accept the current setting, press the <#> key to step to the next selection. The available selections are: SUM: Performs an alarm comparison on the sum of all detectors in the system, usually four (this results in 1 alarm comparison per occupied interval). HORIZontal: Performs an alarm comparison on the sum of the two top detectors and the sum of the two bottom detectors (this results in 2 alarm comparisons per occupied interval) VERTical: Performs an alarm comparison on the sum of the upper and the lower detectors in each pillar (this results in 2 alarm comparisons per occupied interval). SINGLE: Performs alarm comparisons on each detector individually (this results in either 2 or 4 alarm comparisons per occupied interval depending on the number of detectors). 3 comparisons each 200 mSec x 2 sec = 30 alarm comparisons for a 2 second occupancy. ___________________________________________________________________________________________________________________ This document is the exclusive property of TSA Systems, Ltd. Unauthorized use or distribution is strictly prohibited 25 TM-850 Operations and Service Manual Doc: # 5022 Rev. A ____________________________________________________________________________________________________________________ The standard Algorithm configuration for Train and Vehicle monitors is with SUM and VERTICAL calculations enabled. Again, this set-up will result in 3 alarm comparisons per interval. 3 comparisons each 200 mSec x 3 sec = 45 alarm comparisons for a 3 second occupancy. The Algorithm configuration has a direct impact on the false alarm rate. The standard configurations listed above will produce a false alarm rate of 1/1000 occupancies. If the configuration is changed to enable the “single” option, 4 additional alarm comparisons are made per 200 mSec interval (one for each detector). While this will increase the sensitivity of the system, the false alarm rate will increase to 1/233 occupancies. BKG TIME: Sets the background counting time for the system. Press <1> to increment the time by 5 seconds, press <7> to decrement the time by 5 seconds, and press <#> to accept the setting. Range is from 20 - 120 seconds. NOTE: Changing this setting will cause the system to reset and collect a new background. *If you are in an area with large background fluctuations, you can increase the BKG Time to help average out those background spikes over a longer period of time. SHOW VERSION: Displays the firmware version currently installed. ___________________________________________________________________________________________________________________ This document is the exclusive property of TSA Systems, Ltd. Unauthorized use or distribution is strictly prohibited 26 TM-850 Operations and Service Manual Doc: # 5022 Rev. A ____________________________________________________________________________________________________________________ CLEAR G-CNTS: The SC-770 counts the number of occupancies and alarms since the system was turned on or since midnight. NOTE: Counts are cleared at midnight every night. These numbers are displayed here. The counter may be cleared by pressing <1>, pressing any other key exits this mode without clearing the counter. Each time the system is power cycled these numbers will be cleared from memory. F-ALARM TEST: The False Alarm Test displays the number of alarm comparisons that have been made and the number of alarms that were detected. These values are cleared when the system is turned off. The primary use for this feature is to test the number of false alarms in a controlled environment. BKG. NSIGMA: Sets the sigma value for a "throw-through alarm". This routine runs continuously in background mode to ensure that a source is not thrown through the monitor without an occupancy being sensed. Throw-through alarm comparisons are performed every 200 ms during background mode. The range is from 0.0 to 99.9. Setting the value to 0.0 will disable this feature. A high false alarm rate can occur if this value is set too low. SYSTEM ID: Assigns an identification number to the system. The number is used to uniquely identify the system to a PC. This number must be used by the PC to establish a communications link. This range of this number is 1 - 32,767. This number is set to 1 when the system is shipped from the factory. ___________________________________________________________________________________________________________________ This document is the exclusive property of TSA Systems, Ltd. Unauthorized use or distribution is strictly prohibited 27 TM-850 Operations and Service Manual Doc: # 5022 Rev. A ____________________________________________________________________________________________________________________ PROFILING: The controller can be set to continuously output an ASCII data string to the Ethernet and RS-232 outputs when the unit is in occupancy. The display will show "ON" or "OFF". Pressing any key other than the <#> key toggles the setting. The <#> key accepts the current setting refer to Section 11 Appendix B Data String Outputs. 3.3.4 NEUTRON PARAMETERS 1. 2. 3. 4. 5. HI LEVEL: HI background fault level MAX INTRVALS: Maximum number of one second intervals for alarm comparison ALPHA VALUE: False alarm rate ZMAX VALUE: Alarm value after MAX intervals is reached SEQ TEST: Forces a neutron alarm if set point is exceeded HI LEVELS: Sets the high background fault level, in cps per detector bank. If the counts exceed this level the system will indicate a HI background fault and will not allow further operation until the problem is corrected. This level should be set to alarm if the average background deviates too far from normal, normally set at ~50 cps per detector bank. This alarm is intended to flag a failure in the electronics. NOTE: There are no LO neutron alarms because the neutron background routinely fluctuates to zero counts per second per bank of detector tubes. ___________________________________________________________________________________________________________________ This document is the exclusive property of TSA Systems, Ltd. Unauthorized use or distribution is strictly prohibited 28 TM-850 Operations and Service Manual Doc: # 5022 Rev. A ____________________________________________________________________________________________________________________ MAX INTRVALS: Maximum number of one second intervals used in the test before the result is compared to the ZMAX value. The range is (0 - 20) intervals, the factory default setting 2. ALPHA VALUE: Alpha value is a term used to express the false alarm rate and, its value is used to select the alarm and background values used in the algorithm. If this number is not entered exactly, the selected rate will be the closest lower value. Normally set at 47. Alpha Value: 12785 9459 6924 5016 3596 2551 1791 1245 856 583 393 262 173 113 73 47 30 19 11 7 4 Approximate false alarm rate: 1/78 1/106 1/144 1/200 1/278 1/392 1/558 1/803 1/1168 1/1715 1/2545 1/3817 1/5780 1/8850 1/13699 1/21277 1/33333 1/52632 1/90909 1/142857 1/250000 Z Alarm Value 433 462 492 524 555 588 621 656 690 726 762 799 836 874 912 950 989 1028 1075 1112 1160 ___________________________________________________________________________________________________________________ This document is the exclusive property of TSA Systems, Ltd. Unauthorized use or distribution is strictly prohibited 29 TM-850 Operations and Service Manual Doc: # 5022 Rev. A ____________________________________________________________________________________________________________________ ZMAX VALUE: This is the alarm threshold that is used if the controller has counted to MAX intervals without an alarm decision. Its range is from 0 - 1200. An alarm will occur if this value is less than the current Z value after MAX intervals. The factory default setting is 1200, which effectively disables this feature. SEQ. TEST: The sequential number sets the number of consecutive 200ms intervals above background, needed to allow a potential neutron alarm or HI fault condition to be acknowledged. The normal setting is 4. (800 mSecs) 3.3.5 NEUTRON FUNCTIONS 1. 2. 3. 4. SHOW COUNT: Displays detector counts DSCR. ADJUST: Discriminator adjustment CLEAR N-CNTS: Clears occupancies and alarms since power up NEU. ENABLE: Enables the neutron channels ___________________________________________________________________________________________________________________ This document is the exclusive property of TSA Systems, Ltd. Unauthorized use or distribution is strictly prohibited 30 TM-850 Operations and Service Manual Doc: # 5022 Rev. A ____________________________________________________________________________________________________________________ SHOW COUNT: Displays each detector bank counts, in cps, updated once per second. (if intervals have been set to something other than 5 the counts will not be represented in cps, reference Section 7.2.2.1a. Press the pound <#> key to exit the show count mode. The neutron counts will very from one location to the next, but generally the background per detector bank will be between 0 – 10. NOTE: All alarms are disabled in the Show Count mode. Show Count mode will display the counts of all detector banks regardless of whether they are enabled or not. DSCR. ADJUST: Opens the menu to display and/or adjust the LLD and ULD set points. The discriminators set the energy levels at which the system will accept counts. Neutron levels set to factory defaults of 0.504 and 5.040 volts are normally acceptable. The master and slave discriminators are set independently to permit maximum flexibility in programming the system. In almost all cases the settings will be the same for both pillars. ___________________________________________________________________________________________________________________ This document is the exclusive property of TSA Systems, Ltd. Unauthorized use or distribution is strictly prohibited 31 TM-850 Operations and Service Manual Doc: # 5022 Rev. A ____________________________________________________________________________________________________________________ Three methods of adjustment are provided: 1. Direct Entry: reference Section 3.3.2 for direct entry method. 2. Manual Adjustment: reference Section 3.3.2 for manual adjustment method. 3. Factory Defaults: Pressing the asterisk <*> key at either the master or slave screen will load the default discriminator settings: LLD = 0.504 and ULD = 5.040 for a given pillar. Complete this step for both the Master and Slave pillar. CLEAR N-CNTS: The SC-770 keeps a record of the number of occupancies and alarms since it was turned on. These numbers are displayed here. The counter may be cleared by pressing <1>, pressing any other key exits this mode without clearing the counters. Each time the system is power cycled these numbers will be cleared from memory. ___________________________________________________________________________________________________________________ This document is the exclusive property of TSA Systems, Ltd. Unauthorized use or distribution is strictly prohibited 32 TM-850 Operations and Service Manual Doc: # 5022 Rev. A ____________________________________________________________________________________________________________________ NEU. ENABLE: Pressing a <1> enables the neutron channels; pressing a <0> disables them. 3.3.6 COMM SET IP: Enter the desired IP address using the keypad. All entries must be 3 digits, if a one or two digit value is used, it must be padded with leading zeros. (i.e. 192.168.001.101) NOTE: When entering an IP address into a Computer program all leading zeros must be removed. (i.e.192.168.1.101) SUBNET: Enter desired value. ___________________________________________________________________________________________________________________ This document is the exclusive property of TSA Systems, Ltd. Unauthorized use or distribution is strictly prohibited 33 TM-850 Operations and Service Manual Doc: # 5022 Rev. A ____________________________________________________________________________________________________________________ DNS: GATEWAY: NOTE: DNS & Gateway are not used in a local area network and should be set to zero. ___________________________________________________________________________________________________________________ This document is the exclusive property of TSA Systems, Ltd. Unauthorized use or distribution is strictly prohibited 34 TM-850 Operations and Service Manual Doc: # 5022 Rev. A ____________________________________________________________________________________________________________________ 3.4 OPERATIONAL TEST / INSTALLATION CHECKLIST Operational Test Form Monitor Location : Monitor Spacing: SCA-775 (Master) SN: SC-770 SN: GAMMA PARAMETER SETTINGS Low Alarm: High Alarm: Intervals: LLD (Master): LLD (Slave): ULD (Slave): (Mstr) 1st Stage: Master: HIGH VOLTAGE BACKGROUND CPS Isotope Used: SCA-775 (Slave) SN: FIRMWARE VERSION: ULD (Master): GAIN SETTINGS Monitor SN: SYSTEM I.D.: Occ Hold In: N*Sigma: Relay Output: oOn Algorithm: oSum 2nd Stage: oOff oAuto oHorz oVert (Slv) 1st Stage: Det 2: Original Activity: Avg. Total: oSingle 2nd Stage: Slave: Vdc Det 1: Det. Online: Vdc Det 3: Mfg. on Date: Det 4: Current Activity: NEUTRON PARAMETER SETTINGS High Alarm: Max Intervals: Alpha Value: LLD (Master): ULD (Master): HIGH VOLTAGE Master: BACKGROUND CPS Isotope Used: Det 1: Sequence Test: LLD (Slave): Vdc Det 2: Original Activity: ZMax: Avg. Total: ULD (Slave): Slave: Vdc Det 3: Det 4: Mfg. on Date: Current Activity: COMM-SET PARAMETER SETTINGS IP: p p p p p p p p p p SUBNET: GENERAL CHECK ac Wiring Correct Pillar to Pillar Connections Check NVRAM Battery v Connect Battery Check for Short Turn LD260 on Power Supply Voltage v Verify Audio / Visual Alarms Align 1st & 2nd Stage Gains Weather Seal Cross Bars Test Completed By: p p p p p p p p p p DNS: GENERAL CONTINUED Test RS-232 Output Test Media Convert Output Tamper Switch Function Tamper Switches Secured Battery Voltage v Offsets Between -1 & -15mv Thru Beam Sensor Function Ultrasonic Sensor Function Verify Amber Light Function Utility Cabinet Switch Secured p p p p p p p p p GATEWAY: GAMMA Run Variance Set Clock / Date Check Bkg. Time (20 sec.) Check Bkg. Nsigma (0.0) Check Profiling (ON) Verify Gamma Alarm Verify Gamma LOW Fault Verify Gamma HI Fault BNC GND Adjust NEUTRON p Neutron Enable (ON) p Verify Neutron Alarm p Verify Neutron HI Fault p p p p Charging System Check Desiccant Placed Bottom Foamed In Media Conv. Half Duplex Date: ___________________________________________________________________________________________________________________ This document is the exclusive property of TSA Systems, Ltd. Unauthorized use or distribution is strictly prohibited 35 TM-850 Operations and Service Manual Doc: # 5022 Rev. A ____________________________________________________________________________________________________________________ 4.0PC COMMUNICATIONS The TSA PC Communications Program (SC-770 Com) is supplied on the CD that ships with the system documentation. The program requires an IBM/PC compatible computer running Microsoft Windows XP, 2000, NT4, 98, or 95. The program allows the operator to examine the system parameters and download data from the non-volatile RAM NOTE: Communications with the SC-770 Com program will not work properly if profiling is turned ON. Profiling must be turned on for monitoring continuous (state of health), messages via Ethernet or serial communications in Hyper Terminal. 4.1 INSTALLING THE SOFTWARE To install the SC-770 com program, go to www.tsasystems.com and select the Archives pull down menu at the top of the screen, next select Software, this should bring up a list of downloadable software options. Click on SC-770ComSetUp which is under the Communications Software heading. Save the file to the desired location on the hard drive. After the file has been saved go to the location of the saved file and click on the SC-770 setup file. The program will walk you through the rest of the installation. 4.2 PORT Selects the port that is to be used to communicate with the TM system (figure 4A). The value is immediately changed and stored in the configuration file. If the selected port is not available a warning message will be displayed. When the correct COM port is selected the RX, (receive), box will flash green every 5 seconds if in the Gamma or Neutron Show Count tab, indicating the COM program is receiving data from the SC-770 controller. Figure 4A ___________________________________________________________________________________________________________________ This document is the exclusive property of TSA Systems, Ltd. Unauthorized use or distribution is strictly prohibited 36 TM-850 Operations and Service Manual Doc: # 5022 Rev. A ____________________________________________________________________________________________________________________ 4.3 GAMMA PARAMETER Permits the operator to view the gamma parameters (figure 4B). The parameters cannot be changed from the PC. Figure 4B 4.3.1 Gamma Alarm Data Displays the date, time and counts from the last six gamma alarms (figure 4C). Selecting one of the six “View” buttons will bring up the “View Alarm Data” screen (figure 4D) for that alarm and displays the data leading up to the alarm in a graph format. Figure 4C Figure 4D ___________________________________________________________________________________________________________________ This document is the exclusive property of TSA Systems, Ltd. Unauthorized use or distribution is strictly prohibited 37 TM-850 Operations and Service Manual Doc: # 5022 Rev. A ____________________________________________________________________________________________________________________ 4.3.2 Gamma Show Count Displays the gamma counts, in cps, for each detector and the sum (figure 4E). The data is updated every 5 seconds. Figure 4E 4.4 PORTAL HISTORY Allows the operator to download the entire contents of the system’s non-volatile RAM, or any number of the most recent records (figure 4F). After the data is downloaded, the operator may elect to view the current download or skip this option. If the operator chooses to view the history data file, it will appear as the sample below (figure 4G). Figure 4F Figure 4G ___________________________________________________________________________________________________________________ This document is the exclusive property of TSA Systems, Ltd. Unauthorized use or distribution is strictly prohibited 38 TM-850 Operations and Service Manual Doc: # 5022 Rev. A ____________________________________________________________________________________________________________________ 4.4.1 Downloading System History Using SC-770 Com 1. With the monitor turned ON, plug the female end of the 9 pin Serial to Serial cable (figure 4H) into your laptop (figure 4J). Figure 4H Figure 4J 2. Plug the male end of the cable into the serial port on the top of the SC-770 as pictured below (figure 4K). Figure 4K 3. Double click on the SC-770Comm icon on your desktop 4. The screen (figure 4L) should appear. Click on the right arrow button until the System History tab is showing (figure 4M), then click on the "System History" tab (figure 4N). Figure 4L Figure 4M Figure 4N ___________________________________________________________________________________________________________________ This document is the exclusive property of TSA Systems, Ltd. Unauthorized use or distribution is strictly prohibited 39 TM-850 Operations and Service Manual Doc: # 5022 Rev. A ____________________________________________________________________________________________________________________ 5. The default setting under "Download Historical Data" will have "All Records" selected (figure 4P), leave this setting as it is and click on the "Download" button 6. Select the desired location of the file to be saved, by using the pull down menu on the "Save in:" box, then type desired file name in the "File Name:" box, next click the "Save" button (figure 4Q). Figure 4P Figure 4Q 7. The records will begin downloading to the specified file name. The TX (Transmit) and RX (Receive) lights will flicker back and forth until the process has completed. After the download has completed, a "Download Complete" message box will be displayed (figure 4R). Click on the "No" button if you do not want to view the data, if you choose to view the data, a screen titled "View History Record" will appear (figure 4S). You can scroll through the data using the PgUp and PgDn buttons on your keyboard. Figure 4R Figure 4S ___________________________________________________________________________________________________________________ This document is the exclusive property of TSA Systems, Ltd. Unauthorized use or distribution is strictly prohibited 40 TM-850 Operations and Service Manual Doc: # 5022 Rev. A ____________________________________________________________________________________________________________________ 4.4.2 Extra The “Extra” tab (figure 4T) allows the user to access additional information. The "About SC-770 Com" button displays the version information of the program (figure 4V). The "View Saved History File" button opens a file viewer window (figure 4U). The files may also be viewed using Notepad or any other text editor. Figure 4T Figure 4U Figure 4V ___________________________________________________________________________________________________________________ This document is the exclusive property of TSA Systems, Ltd. Unauthorized use or distribution is strictly prohibited 41 TM-850 Operations and Service Manual Doc: # 5022 Rev. A ____________________________________________________________________________________________________________________ 4.5 NEUTRON PARAMETERS Permits the operator to view the neutron parameters (figure 4W). The parameters cannot be changed from the PC. 4.5.1 Neutron Show Count Figure 4W Displays the neutron counts, in cps, for each detector and the sum (figure 4X). The data is updated every second. Figure 4X ___________________________________________________________________________________________________________________ This document is the exclusive property of TSA Systems, Ltd. Unauthorized use or distribution is strictly prohibited 42 TM-850 Operations and Service Manual Doc: # 5022 Rev. A ____________________________________________________________________________________________________________________ 5.0THEORY OF OPERATION The software algorithms are totally different for the gamma and neutron systems. GAMMA OVERVIEW covers the gamma operation only. Refer to NEUTRON OVERVIEW for details on how the neutron algorithm works. 5.1 GAMMA OVERVIEW The system makes its decisions for radiation alarms in the following manner. A level for the desired alarm threshold (n*sigma) is selected by the operator using the keypad. Whenever an occupancy is sensed, the monitor enters FAST COUNT mode and begins making alarm comparisons based on the parameters that have been stored in the controller’s FLASH memory. When unoccupied, the system constantly updates the background count to reflect changes in the environment. The background is updated in 5 second increments, with the current background reading equal to the one-second average of the background time. This updates the background completely every selected background time (20-120 seconds). When the unit is occupied, it ignores the current 5-second background interval, and goes into FAST COUNT mode. The monitor collects its counts in 200 millisecond intervals. For example, if the number of intervals is set to 5, the alarm comparison will be based on 1.0 second rolling sum data sets (5 x 200 mSec). This sum of counts is then compared to an alarm level which is normalized to that number of intervals. The number of intervals should be selected based on an average monitoring time. The normal speed for vehicles passing through the monitor is 5 mph / 8 kph. The summed counts of the chosen number of intervals should reflect the time a given point on a vehicle will be in the detection zone, resulting in the maximum probability of detecting an alarm condition. While the monitor is occupied, it makes an alarm comparison every 200 milliseconds, based on a rolling sum of the most recent “n” x 200 millisecond intervals. Actually the monitor makes several alarm comparisons every 200 milli seconds depending on the “Algorithm” set-up. See Section 3.3.3. number 1. The intervals are stored continuously, so that as soon as the monitor is occupied, it waits for the current interval to end, then sums the counts in the selected number of intervals and makes an alarm comparison. This means that if the monitor is set to five intervals, it is effectively starting to monitor the passage 1 second before the monitor has been occupied. This is called "look back." The monitor will continue to make comparisons until the "occupancy hold-in" time has expired after the end of the occupancy. This is called "look after." The "occupancy hold-in" forces the unit to continue to make alarm comparisons after the occupancy detector has cleared (look after). The amount of time selected for this parameter is based on the estimated speed of passage and pillar spacing. ___________________________________________________________________________________________________________________ This document is the exclusive property of TSA Systems, Ltd. Unauthorized use or distribution is strictly prohibited 43 TM-850 Operations and Service Manual Doc: # 5022 Rev. A ____________________________________________________________________________________________________________________ Gamma Background 5 second background interval 1st 20 second “rolling average” Bkg estimation (in cps) 2nd 20 second “rolling average” Bkg estimation 3rd 20 second “rolling average” Bkg estimation When the monitor is occupied, the system will Used for ignore the current 5 second background interval N*Sigma and calculate the alarm threshold based on the Calculation previous completed interval. Gamma Occupancy 200 mSec interval Occupancy sensed 1st one second “rolling sum” alarm comparison (look back) 2nd one second “rolling sum” alarm comparison 3rd one second “rolling sum” alarm comparison (This is displayed in cps if # of intervals =5) The sum of these counts is compared to an alarm level which is normalized to that number of intervals ___________________________________________________________________________________________________________________ This document is the exclusive property of TSA Systems, Ltd. Unauthorized use or distribution is strictly prohibited 44 TM-850 Operations and Service Manual Doc: # 5022 Rev. A ____________________________________________________________________________________________________________________ 5.2 NEUTRON OVERVIEW The system makes its decisions for neutron radiation alarms in the following manner. A level for Alpha is selected using the keypad. Whenever the occupancy detector senses that a the monitor is occupied, the monitor enters FAST COUNT mode and starts making alarm comparisons based on the parameters that have been stored in the controller’s NVRAM. When unoccupied, the system constantly updates the background count to reflect changes in the environment. The background is updated in 5 second increments, with the current background reading equal to the one-second rolling average of the last N 5 second intervals. This updates the background completely every selected background time (20-120 seconds). When the unit is occupied, it ignores the current 5 second background interval, and goes into FAST COUNT mode. While the monitor is occupied, it makes an alarm comparison every second; using this one second count it calculates a value "Z" that is compared to stored background and alarm values. It is important to note that the occupied neutron count rate data IS NOT a rolling sum. Three decisions can be reached from the "Z" value. 1. 2. Background: "Z" is set to zero and it gets another one second count. No decision: "Z" is stored, the next one second count is entered into the formula, a new "Z" value is calculated, and this value is compared to Background and Alarm values. 3. Alarm: Stops comparisons and sets alarm relay. The monitor is set to start monitoring the passage 1 second before the monitor has been occupied. This is called "look back." The monitor will continue to make comparisons until the "occupancy hold-in" time has expired after the end of the occupancy. This is called "look after." The "occupancy hold-in" forces the unit to continue to make alarm comparisons after the occupancy detector has cleared (look after). The amount of time selected for this parameter is based on the estimated speed of passage and pillar spacing. ___________________________________________________________________________________________________________________ This document is the exclusive property of TSA Systems, Ltd. Unauthorized use or distribution is strictly prohibited 45 TM-850 Operations and Service Manual Doc: # 5022 Rev. A ____________________________________________________________________________________________________________________ Neutron Background 5 second background interval 1st 20 second “rolling average” Bkg estimation 2nd 20 second “rolling average” Bkg estimation 3rd 20 second “rolling average” Bkg estimation When the monitor is occupied, the system will ignore the current 5 second background interval and calculate the alarm threshold based on the previous completed interval. Neutron Occupancy 200 msec interval Occupancy sensed 1st one second alarm comparison (look back) 2nd one second alarm comparison Note that this IS NOT a rolling average ___________________________________________________________________________________________________________________ This document is the exclusive property of TSA Systems, Ltd. Unauthorized use or distribution is strictly prohibited 46 TM-850 Operations and Service Manual Doc: # 5022 Rev. A ____________________________________________________________________________________________________________________ 5.3 MODES 5.3.1 Self-Test Mode When the system is turned on, it performs a Power-On Self Test (POST). The POST performs the following: RAM: Tests conventional memory, primarily the area used for the processor’s stack NVRAM: Tests the battery-backed, non-volatile memory used to store parameters, and downloadable data LAMPS: The audio enunciator and both lamps are turned on for approximately 7 seconds. If any of these tests fail, the SC-770 will display a "FAIL" message. The system cannot be put into service until the problem is corrected. ETHERNET LINK: Test for Ethernet link After completing the POST, the system will enter the BACKGROUND mode and be ready to operate after the initial 20-second background is obtained. 5.3.2 Background Mode BACKGROUND mode is the default mode for routine operation. The system will automatically go to this mode after the initial self-test series. The display counts down to 0 during the first background collection period. During this initial countdown, no other functions are available, and OCCUPANCIES and TAMPER conditions are ignored. The unit then continuously takes 5 second background counts and adds the most recent set together to display the current average background count. After the initial countdown, system status is displayed, and the system starts monitoring for occupancy. The gamma and neutron background on the display will update every five seconds, to show the current background being used for alarm calculations. While collecting background counts, the SC-770 compares the latest count with the HI/LO LEVEL background alarm settings once a second. If the background counts are outside these limits, the unit will display DET X:LO/HI NNNNN, where X is the detector number, and NNNNN is the current background for that detector. It will also illuminate the amber fault light on the master pillar, and the appropriate alarm lamp on a remote alarm console, if one is included in the system. ___________________________________________________________________________________________________________________ This document is the exclusive property of TSA Systems, Ltd. Unauthorized use or distribution is strictly prohibited 47 TM-850 Operations and Service Manual Doc: # 5022 Rev. A ____________________________________________________________________________________________________________________ 5.3.3 Fast Count Mode While this mode does not take counts any faster, it does update the display more often - every second instead of every five seconds - and begins testing for alarm conditions every 200 milliseconds. The controller also "anticipates" an occupancy by storing the number of 200 millisecond intervals in NVRAM. The system may be forced into the fast count mode by pressing the asterisk <*> key on the keypad. • • Pressing the pound <#> key returns the system to background mode. Closing all the doors will clear a tamper condition, giving the system a state change, and will also return the system to background mode. Upon entering the fast count mode, the unit waits for the current interval to go to completion, (200 milliseconds maximum), discards the oldest interval, adds the latest one, tests for alarm conditions, and begins another 200 millisecond collection interval. This cycle continues during manual FAST COUNT, or during an occupancy, and the "occupancy hold-in" period, which starts when the unit drops out of occupancy. If an alarm condition occurs, the system will hold the alarm on for 7 seconds. The radiation alarm level is calculated on the basis of variation from the background. The formula for N*Sigma may be found in Appendix A (Section 10.0). CAUTION: Do not leave the system in this forced state for normal operation. 5.3.4 Variance Analyzer Mode (Gamma Only) In this mode, the unit takes seventy five 200 milli second background counts and performs a variance calculation on the data. A more detailed description of the variance test may be found in Appendix A (Section 10.0). ___________________________________________________________________________________________________________________ This document is the exclusive property of TSA Systems, Ltd. Unauthorized use or distribution is strictly prohibited 48 TM-850 Operations and Service Manual Doc: # 5022 Rev. A ____________________________________________________________________________________________________________________ 6.0COMPONENTS 6.1 THE SC-770 The SC-770 module is installed in the electronics cabinet (figure 6A). It is made up of the following components: Figure 6A 6.1.1 THE SC-771 The SC-771 board is the main data collection point and uses program software to run the unit and perform all functions (figure 6B). The SC-771 receives battery voltage and uses a dc-dc converter to supply the ±5 Vdc required by its on board circuitry. The SC-771 board uses highly integrated components. If a failure occurs in this board, it must be replaced. ___________________________________________________________________________________________________________________ This document is the exclusive property of TSA Systems, Ltd. Unauthorized use or distribution is strictly prohibited 49 TM-850 Operations and Service Manual Doc: # 5022 Rev. A ____________________________________________________________________________________________________________________ Figure 6B 6.1.2 Rabbit Board Program firmware is stored and executed by the rabbit. The Rabbit Board is responsible for sending data string messages through the RS-232 and RJ-485 ports (figure 6C). It also sends the signals for lights and alarms to turn on or off. This includes the power up sequence lights and alarms. The rabbit board is secured to the SC-771 board by a single screw in the middle of the board. This screw must be removed to remove the board from the SC-771 board. To avoid bending the pins on the two 34 pin connectors on the bottom side, rock the board back and forth while pulling it gently away from the SC-771. Figure 6C 6.1.3 The GPRB-756 The General Purpose Relay Board (GPRB-756) (figures 6D and 6E) accepts the system status signals from the SC-771 and switches the appropriate relay contacts. The second set of relay outputs are not used by the system, but may be used by an AM-270, or interfaced to the customer’s security systems. NOTE: If the RELAY OUTPUT is turned OFF under the GAMMA/PARAMETERS menu option, the local lights and audible alarms as well as these relay contacts will be disabled. ___________________________________________________________________________________________________________________ This document is the exclusive property of TSA Systems, Ltd. Unauthorized use or distribution is strictly prohibited 50 TM-850 Operations and Service Manual Doc: # 5022 Rev. A ____________________________________________________________________________________________________________________ Figure 6D Figure 6E 6.2 THE SCA-775 One SCA-775 is installed in each pillar (figure 6F). It is made up of the following components: Figure 6F ___________________________________________________________________________________________________________________ This document is the exclusive property of TSA Systems, Ltd. Unauthorized use or distribution is strictly prohibited 51 TM-850 Operations and Service Manual Doc: # 5022 Rev. A ____________________________________________________________________________________________________________________ 6.2.1 The SCA-774 The SCA-774 (Single-Channel Analyzer) board (figures 6G and 6H) is a four-channel, amplifier/SCA board. The analog/SCA portion of the board uses a dual operational amplifier and a dual comparator to perform the SCA function. The SCA-774 has a dc-dc converter much like the one on the SC-770 to convert battery voltage to the ±5 Vdc required by its components. The SCA output is sent to U16, where the digital pulses are timed using a 2 MHz clock. The outputs of U16 are passed on to the differential driver IC, U21. The differential driver outputs from U21 are sent to the SC-770 where they are counted. Discriminator adjustment is accomplished using a four-channel serial input DAC (U14). The DAC output is set by the SC-770 each time the system is powered up, and whenever a new discriminator setting is entered. Figure 6G Figure 6H ___________________________________________________________________________________________________________________ This document is the exclusive property of TSA Systems, Ltd. Unauthorized use or distribution is strictly prohibited 52 TM-850 Operations and Service Manual Doc: # 5022 Rev. A ____________________________________________________________________________________________________________________ 6.2.2 The HHV-448 The HHV-448 high voltage power supply board (figures 6J and 6K) provides regulated dc high voltage to the Voltage Divider networks (PB-4.7m) which are attached to the photo-multiplier tube on the detector. Also refer to Section 7.2.2.1a figure 7E. Neutron HV Gamma HV Gamma HV Neutron HV Figure 6J Figure 6K High Voltage Plate Top Side High Voltage Plate Bottom Side ___________________________________________________________________________________________________________________ This document is the exclusive property of TSA Systems, Ltd. Unauthorized use or distribution is strictly prohibited 53 TM-850 Operations and Service Manual Doc: # 5022 Rev. A ____________________________________________________________________________________________________________________ 6.3 THE DA-630 DETECTOR ASSEMBLY (GAMMA) The DA-1248 Detector Assembly consists of a plastic scintillation detector coupled to a photomultiplier tube (PMT) through a plastic light pipe (figure 6L). A voltage divider signal network (VD-580) plugs into the PMT base, supplying high voltage to the PMT and returning the gamma signal to the SCA-775. In general the detector converts gamma rays to photons which are amplified as voltage by the PMT. The VD-580 is the only field replaceable part, and can be removed by releasing the three springs and pulling it away from the PMT base (figure 6M). The MHV and BNC may be detached before or after removal. Figure 6L Figure 6M ___________________________________________________________________________________________________________________ This document is the exclusive property of TSA Systems, Ltd. Unauthorized use or distribution is strictly prohibited 54 TM-850 Operations and Service Manual Doc: # 5022 Rev. A ____________________________________________________________________________________________________________________ 6.4 THE NEUTRON DETECTOR ASSEMBLY The neutron detector assembly consists of two 3He detectors mounted in a high-density polyethylene chamber (figures 6N and 6P). Figure 6N Figure 6P ___________________________________________________________________________________________________________________ This document is the exclusive property of TSA Systems, Ltd. Unauthorized use or distribution is strictly prohibited 55 TM-850 Operations and Service Manual Doc: # 5022 Rev. A ____________________________________________________________________________________________________________________ 6.2.3 PMFX Box The high voltage signal pick off box sums two neutron tubes per output (figures 6Q and 6R). There are no serviceable parts inside the PMFX Box. Signal Output Figure 6Q High Voltage Input Detectors Signal Output Figure 6R ___________________________________________________________________________________________________________________ This document is the exclusive property of TSA Systems, Ltd. Unauthorized use or distribution is strictly prohibited 56 TM-850 Operations and Service Manual Doc: # 5022 Rev. A ____________________________________________________________________________________________________________________ 6.3 THE BATTERY MODULE The Battery consists of a 26 amp/hr 12 volt sealed lead-acid battery and a constant voltage charger (figure 6S). Figure 6S 6.4 NANO CONTROLLER This is a micro controller used in the TM-850 to sense velocity and occupancy (figure 6T). It converts the travel time between two photo beam sensors into an ASCII text RS232 output. The inputs are also used for occupancy detection. Figure 6T ___________________________________________________________________________________________________________________ This document is the exclusive property of TSA Systems, Ltd. Unauthorized use or distribution is strictly prohibited 57 TM-850 Operations and Service Manual Doc: # 5022 Rev. A ____________________________________________________________________________________________________________________ 6.5 RS-232 to RS-485 CONVERTER BOX The RS-232 to RS-485 converter box takes the RS-232 output from the Nano Controller and converts it to RS-485 for transmission to the SC-770 controller (figure 6U). Figure 6U ___________________________________________________________________________________________________________________ This document is the exclusive property of TSA Systems, Ltd. Unauthorized use or distribution is strictly prohibited 58 TM-850 Operations and Service Manual Doc: # 5022 Rev. A ____________________________________________________________________________________________________________________ 6.6 MEDIA CONVERTER The media converter takes up to two Ethernet (10/100 BaseT) inputs and converts them to a multi-mode fiber optic output (figures 6V and 6W). The fiber optic output uses a SC-type connector. LED Indicators POWER: 10/100: LK/ACT: F/H: Steady ON when power is applied Steady ON for 100 Mbps; OFF for 10 Mbps Steady ON for LINK (LK) with no traffic, BLINKING indicates port is transmitting / receiving (ACT) Steady ON for full-duplex, OFF for half duplex Both of the RJ-45 ports of the CS14 support auto-cross (MDIX) operation performing the autocross function under auto-negotiation mode only. Two sets of LEDs to indicate the operating status of ports are mounted on the top and front. For each port, there are Link and Activity (LK/ACT) LEDs on the top indicating that the media cables are connected correctly and showing, by flashing, when there is traffic. ___________________________________________________________________________________________________________________ This document is the exclusive property of TSA Systems, Ltd. Unauthorized use or distribution is strictly prohibited 59 TM-850 Operations and Service Manual Doc: # 5022 Rev. A ____________________________________________________________________________________________________________________ Figure 6V Figure 6W Switch Fiber Port #1 is controlled by an “F –H” switch, provided underneath the port socket. “F” enables full-duplex mode and “H” enables half duplex mode. The default setting is “F”. NOTE: This switch is very small and can easily be broken; care must be taken when switching form one mode to the other. ___________________________________________________________________________________________________________________ This document is the exclusive property of TSA Systems, Ltd. Unauthorized use or distribution is strictly prohibited 60 TM-850 Operations and Service Manual Doc: # 5022 Rev. A ____________________________________________________________________________________________________________________ 6.7 THE LD-260 LOAD DISCONNECT The LD-260 Load Disconnect controls the power to the system and shows the status of the power with a pair of LEDs (figure 6X). The amber LED indicates that ac power is present; the green LED indicates that the system power is turned on. The toggle switch is used to manually turn the system power on and off. While turned on, the load disconnect monitors the battery voltage level. If the battery voltage drops below 10.5 Vdc the load disconnect will turn the system power off. When as power returns, the battery will recharge through the LD-260 as power is automatically reconnected to the system. LD-260 Figure 6X Battery Charger ___________________________________________________________________________________________________________________ This document is the exclusive property of TSA Systems, Ltd. Unauthorized use or distribution is strictly prohibited Figure 6Y 61 TM-850 Operations and Service Manual Doc: # 5022 Rev. A ____________________________________________________________________________________________________________________ 6.8 OCCUPANCY DETECTORS TSA Systems employs two different types of occupancy detectors depending on the application, environment, and local operations. Each type of sensor has strengths and weaknesses. The three types are: Ultrasonic IR Photo Beam 6.8.1 Ultrasonic Ultrasonic occupancy detectors are used mainly in vehicle and train systems (figure 6Y). The sensor emits a short ultrasonic frequency pulse, shuts down, and monitors for a return signal bouncing back off of an object. NOTE: Small and or rounded objects do not reflect the ultrasonic pulses particularly well Figure 6Y • If a vehicle parks to close to, or in the middle of a monitor, it can depress the background counts, and when the vehicle leaves, the background can spike and possibly cause a false alarm. • If a vehicle parks between the pillars (holding occupancy) this will significantly increase the possibility of a false alarm. ___________________________________________________________________________________________________________________ This document is the exclusive property of TSA Systems, Ltd. Unauthorized use or distribution is strictly prohibited 62 TM-850 Operations and Service Manual Doc: # 5022 Rev. A ____________________________________________________________________________________________________________________ To set the distance, complete the following steps: Step 1: Press and hold appropriate “Teach” button until it’s Teach LED turns Red. Step 2: Adjust target to the 1st limit point. Press Teach button. (Teach flashes). Step 3: Adjust target to the 2nd limit point. Press Teach button. (Teach turns off). Step 4: Repeat steps 1 – 3 for other output if necessary. European wiring standards for dc are +Vdc = brown wire GND = blue wire 6.8.2 IR Photo Beam / Speed Sense Current IR photo beams are an IR “Break Beam” (figures 6Z, 6AA, and 6AB). They have an emitter in the slave pillar and receiver in master pillar, which signals occupancy when the “beam” between the emitter and receiver is broken. When only one beam is employed, the sensor works solely as an occupancy sensor. Current applications employ two sensors in a system which makes object speed indication available. Two photo beam assemblies are mounted parallel to each other approximately 12” apart. Each assembly utilizes different frequencies within the IR range to prevent cross-talk. One sensor set is color coded black and the other yellow. Signals from the sensors are sent to a Nano-Controller which analyzes the timing between beam breaks and provides RS-232 object speed information and a dry contact occupancy signal to the SC-770 controller. The sensors have a range of approximately 70 meters. Figure 6Z Figure 6AA Figure 6AB ___________________________________________________________________________________________________________________ This document is the exclusive property of TSA Systems, Ltd. Unauthorized use or distribution is strictly prohibited 63 TM-850 Operations and Service Manual Doc: # 5022 Rev. A ____________________________________________________________________________________________________________________ NOTE: Pay special attention to the wire colors when wiring into a system European wiring standards for dc are +Vdc = brown wire GND = blue wire Photo beam sensors are wired +Vdc = blue wire GND = brown wire This applies only to IR photo beam sensors with Nano Controllers because they are configured as Dark Sensing – Current Sourcing. 6.9 ALARM LIGHTS AND AUDIBLE ANNUNCIATOR A red strobe light and audio enunciator are used to indicate gamma radiation alarms. A blue strobe light and audio enunciator are used to indicate neutron radiation alarms. All operate on 12 Vdc. A steady amber light is used to indicate a High or Low Fault condition and or ac power loss. Audible Neutron Light Gamma Light Fault Light TM-850 Figure 6AC ___________________________________________________________________________________________________________________ This document is the exclusive property of TSA Systems, Ltd. Unauthorized use or distribution is strictly prohibited 64 TM-850 Operations and Service Manual Doc: # 5022 Rev. A ____________________________________________________________________________________________________________________ 7.0MAINTENANCE It is recommended that scheduled maintenance be completed on regular intervals. Cleaning can be completed using water and a mild detergent along with a brush or wash cloth. WARNING: Do not use high pressure sprayers as they may force water into the enclosure which may cause the system to malfunction and or damage the perimeter door seals. 7.1 PERIODIC INSPECTION & GENERAL MAINTENANCE Periodic inspection and general maintenance is recommended to insure proper operation. This should include but is not limited to the following: - remove rust and flaking paint & repaint - replace or recharge desiccant as needed - lubricate key holes - lubricate hinges - clean face of sensor(s) - check battery - check cabinet alignment - wash outside of enclosure 7.2 GAMMA MAINTENANCE Once initial installation has been completed, little maintenance is required. 7.2.1 Periodic Inspection Periodic inspection is recommended to insure proper functioning. This should include but is not limited to the following: - visual inspection for loose wires, etc. - check electronic alignment - run a variance test - perform drive-through tests A Performance Verification Checklist is included at the end of this section. It is recommended that a copy of this be filled out whenever the system is put into service after tuning and alignment. ___________________________________________________________________________________________________________________ This document is the exclusive property of TSA Systems, Ltd. Unauthorized use or distribution is strictly prohibited 65 TM-850 Operations and Service Manual Doc: # 5022 Rev. A ____________________________________________________________________________________________________________________ 7.2.2 Field Electronic Alignment Procedures WARNING: This procedure involves High Voltage and should only be performed by qualified personnel! Tools and Equipment Since the electronic alignment procedure requires specialized tools and knowledge, only qualified technical personnel should perform these adjustments and measurements. The following tools will be needed for this procedure: DVM with a resolution of 0.1 millivolts (.0001 volts) High voltage probe with a range of 10,000 Vdc and Zin ≥100 M Ω Oscilloscope with greater than 20 MHz bandwidth 5 to 10µCi of 137Cs (Cesium) NOTE: Other mono-energetic sources may be used. Call TSA for full details. SCA-775 (Master Pillar) NOTE: Be careful not to force the lid of the SCA-775 open and break the hinge. All of the alignment adjustments are located in the SCA-775 enclosure. To gain access for the alignment, unlock the latch on the electronics cabinet door and swing the door open. Loosen the four captive thumb screws located on the lid. Gently pull the lid away from the bottom of the enclosure and swing the lid down to expose the electronics. The top board is the SCA-774 board. This board contains the amplifiers and SCA electronics. The base contains two HHV-448 boards; refer to Figures 7D & 7E in Section7.2.2.1a to identify the boards. One of the HHV-448 boards provides high voltage to the gamma detectors; the other provides high voltage to the neutron tubes. ___________________________________________________________________________________________________________________ This document is the exclusive property of TSA Systems, Ltd. Unauthorized use or distribution is strictly prohibited 66 TM-850 Operations and Service Manual Doc: # 5022 Rev. A ____________________________________________________________________________________________________________________ 2.2.1.1.a Low Voltage Checks This step verifies that the low voltage circuitry is operating properly before performing the actual alignment. Using the DVM, verify that the following dc voltages are present before performing an alignment. All readings are referenced to ground; there are numerous ground test points on the board. Always connect the ground lead first. TP14-17 are convenient grounds, use a microclip lead and leave it connected while performing all low voltage checks (figure 7A). Test Point Voltage Description TP31 TP33 TP9 TP30 TP10 TP18 TP34 +12.6 volts or > (Switched battery) +5 ±0.2 volts VCC -3 to -5 volts negative voltage +5 ±0.005 volts, discriminator reference voltage Gamma LLD setting ±0.012 volts (normally 0.069 Vdc) Gamma ULD setting ±0.012 volts (normally 0.455 Vdc) 3.3 volt Reference ±0.3 volts If TP10 or TP18 are not set properly refer to Section 3.3.2 to adjust values. Do not proceed with the alignment until these voltages are within tolerance. TP14-17 can be used as a ground for all electronic alignment steps Figure 7A Use press on clip lead adapters to make the job easier ___________________________________________________________________________________________________________________ This document is the exclusive property of TSA Systems, Ltd. Unauthorized use or distribution is strictly prohibited 67 TM-850 Operations and Service Manual Doc: # 5022 Rev. A ____________________________________________________________________________________________________________________ TP1 thru 4 1st Stage Gain R17 thru 20 2nd Stage Gain Adjust TP5 thru 8 2nd stage gain TP9 -3 to -5 Vdc LLD GND ULD TP30 5 Vdc Disc. Ref. Voltage TP34 3.3 Vdc Ref. HHV-448 First Stage Gain Adjust Gamma High Voltage Adjust R1 HHV-448 Neutron High Voltage Adjust R1 Figure 7B ___________________________________________________________________________________________________________________ This document is the exclusive property of TSA Systems, Ltd. Unauthorized use or distribution is strictly prohibited 68 TM-850 Operations and Service Manual Doc: # 5022 Rev. A ____________________________________________________________________________________________________________________ Aligning The HHV-448 (1st Stage Gain) The high voltage is set to ensure that the peak pulse amplitude at the output of the first stage amplifier is at least 0.75 volts. This setting will provide the best overall performance of the system. If the high voltage is too low, the signal to noise ratio will suffer. While following this procedure refer to Drawing 21 Schematic and Drawings 15 and 22 Component Designator. 1. Attach the oscilloscope to the SCA-774 board (figure 7B) and set as follows: channel 1 probe to TP1 and probe ground to TP14. Ensure that the scope probe is set to 10X 2. Set the vertical deflection to 1 volt/division, horizontal sweep speed to 0.5 µsec/division and positive edge triggering. (500mV/div and 1µsec. for digital oscilloscopes) 3. Place the source on the yellow dot of the lower detector. NOTE: It makes the alignment process easier if you tape the source to the detector. 4. Adjust the trigger level and intensity on the oscilloscope for the best display (figure 7C). The trigger level is critical! Figure 7C ___________________________________________________________________________________________________________________ This document is the exclusive property of TSA Systems, Ltd. Unauthorized use or distribution is strictly prohibited 69 TM-850 Operations and Service Manual Doc: # 5022 Rev. A ____________________________________________________________________________________________________________________ 5. Adjust R1 on the HHV-448 board to achieve a peak pulse amplitude of 0.75 ±0.05 volts (figures 7D and 7E). The HHV-448 boards are mounted underneath the SCA-774 board Gamma Neutron Figure 7D HHV-448 Gamma & Neutron high voltage R1 adjustment trim pots are accessed through must be accessed thru small holes in the SCA-774 mounting plate shown above. Figure 7E R1 is located in side the circle 6. Move the source to the upper detector. 7. Move the oscilloscope probe to TP2. If the peak pulse amplitude is ≥0.75 volts, the high voltage alignment is complete. If the peak pulse amplitude is <0.75 volts, adjust R1 to achieve a peak pulse amplitude of 0.75 ± 0.05 volts. 8. Use the high voltage probe to verify that the high voltage is <1,500Vdc, and is stable ±5Vdc (figures 7F and 7G). If the High Voltage is not stable, replace the HV board, if the HV is not less than 1,500 Vdc see Section 7.2.2.1 for the 1st alignment process. ___________________________________________________________________________________________________________________ This document is the exclusive property of TSA Systems, Ltd. Unauthorized use or distribution is strictly prohibited 70 TM-850 Operations and Service Manual Doc: # 5022 Rev. A ____________________________________________________________________________________________________________________ Figure 7F The HV probe ground clamp should be connected to the HV MHV connecter at the SCA-775 box Figure 7G Ensure the GND tab on the HV probe connecter is connected in the COM hole on the multi-meter Aligning The SCA-774 (2nd Stage Gain, See Drawing 20) 1. Place the source on the yellow alignment dot on the lower detector. 2. Attach the probe to TP5 and probe ground to TP14 (ground). 3. Set the vertical deflection to 1 volt/division, horizontal sweep speed to 0.5 µsec/division and positive edge triggering. (1V/div and 1µsec. for digital oscilloscopes) The signal seen should resemble signals shown on the following page (figures 7H and 7J). Set the trigger level 320mv and adjust intensity on the oscilloscope for the best display. 4. Adjust R17 on the SCA-774 board to obtain a 2.0 ±0.1 volts pulse amplitude. 5. Move the probe to TP6 and the source to the yellow dot on the upper detector. 6. Adjust R18 for the same pulse amplitude. ___________________________________________________________________________________________________________________ This document is the exclusive property of TSA Systems, Ltd. Unauthorized use or distribution is strictly prohibited 71 TM-850 Operations and Service Manual Doc: # 5022 Rev. A ____________________________________________________________________________________________________________________ Figure 7H Setting the 2nd Stage Gain signal to 2v with the scope set at 1.00V/div. Figure 7J Setting the 2nd Stage Gain signal to 2v with the scope set at 500mv/div. SCA-775 (Slave Pillar) Repeat steps 7.1.2.3. - 7.1.2.4. on the slave pillar. This completes the gamma alignment. NOTE: Always run a variance test after an alignment to ensure that everything is working properly. 7.2.3 Variance Analyzer Mode After an alignment is completed, a variance test should be performed. The variance analyzer can identify potential issues with the detectors and associated electronics. TSA recommends running 5, 15-second passes. After five passes all variance readings should be less than 0.150. Refer to Appendix A (Section 10.0) for further details on the variance test and the formulas used. Press the pound <#> key to terminate the variance test. NOTE: The variance for a detector that is disabled will be 99.00. 7.2.4 Operational Test Due to the many different environments and materials being monitored, the operational test will vary from site to site, although several general principles apply in all cases. 1. 2. Select an appropriate source and instruct the driver (or pedestrian) to drive (or walk) at the normal speed used for monitoring. Repeat the test several times and record the sources and values used. ___________________________________________________________________________________________________________________ This document is the exclusive property of TSA Systems, Ltd. Unauthorized use or distribution is strictly prohibited 72 TM-850 Operations and Service Manual Doc: # 5022 Rev. A ____________________________________________________________________________________________________________________ 7.2.5 Performance Verification Checklist (Gamma) ___ Repairs made (if any): list component and type of repair: _____________________________________________________________________________ _____________________________________________________________________________ __ ___ System Alignment: _____ unchanged ______ new values: PARAMETERS: Low Fault set to: _______________ High Fault set to: _______________ Alarm Comparison Interval set to: _______________ Occupancy Hold-in set to: _______________ N*Sigma set to: _______________ Detectors Online: _______________ FUNCTIONS: Master LLD set to: ______________ Master ULD set to: ______________ Slave LLD set to: _______________ Slave ULD set to: _______________ Variance Test = 1: _______ 2: _______ 3: _______ 4: _______ Relay Output: __________________ ADVANCE: Algorithm set to: Sum____ Horizontal____ Vertical____ Single____ Background Time set to: _______________ Firmware Version: _____________ Background N*Sigma set to: _______________ Profiling: __________ ___ Electronic Alignment: Master Pillar: _____ SCA-774 ______ HHV-448 Slave Pillar: _____ SCA-774 ______ HHV-448 ___ System starts up and runs initial self-test without errors. ___ All modes operational ___ Background mode in operation area; count = _______________ ___ Operational test; list isotope and activity: ____________________________________________________________ Performed by: _____________________________ Date: ______________ ___________________________________________________________________________________________________________________ This document is the exclusive property of TSA Systems, Ltd. Unauthorized use or distribution is strictly prohibited 73 TM-850 Operations and Service Manual Doc: # 5022 Rev. A ____________________________________________________________________________________________________________________ NOTE: Most of this data should have been collected on the form provided in Section 3.4 7.3 NEUTRON MAINTENANCE Once initial installation has been completed, little maintenance is required. Periodic inspection is recommended to insure proper functioning. This should include but is not limited to the following: - visual inspection for loose wires - field alignment - checking the settings of the control module - perform drive-through tests A Performance Verification Checklist is included at the end of this section. It is recommended that a copy of this be filled out whenever the system is put into service after tuning and alignment. 7.3.1 Electronic Alignment Procedure WARNING: This procedure involves High Voltage and should only be performed by qualified personnel! Since the alignment procedure requires specialized tools and knowledge, only qualified technical personnel should work on these instruments. Tools and Equipment The following tools are needed for this procedure: DVM with a resolution of 0.1 millivolts (.0001 volts) High voltage probe with a range of 10,000 Vdc and Zin ≥100 M Ω SCA-775 (Master Pillar) NOTE: Be careful not to force the lid open and break the hinge. All of the alignment adjustments are located in the SCA-775 enclosure. To gain access for the alignment, unlock the latch on the electronics cabinet door and swing the door open. Loosen the four captive thumb screws located on the lid. Gently pull the lid away from the bottom of the enclosure and swing the lid down to expose the electronics. The top board is the SCA-774 board. This board contains the amplifiers and SCA electronics. ___________________________________________________________________________________________________________________ This document is the exclusive property of TSA Systems, Ltd. Unauthorized use or distribution is strictly prohibited 74 TM-850 Operations and Service Manual Doc: # 5022 Rev. A ____________________________________________________________________________________________________________________ The base contains two HHV-448 boards; refer to Drawing 15 to identify the boards. One of the HHV-448 boards provides high voltage to the gamma detectors; the other provides high voltage to the neutron tubes. 3.1.1.1.a Low Voltage Checks This step verifies that the low voltage circuitry is operating properly before performing the actual alignment. Using the DVM, verify that the following dc voltages are present before performing an alignment. All readings are referenced to ground; there are numerous ground test points on the board. Always connect the ground lead first. TP14-17 are convenient grounds, use a microclip lead and leave it connected while performing all low voltage checks. Test Point Voltage Description TP31 TP33 TP9 TP30 TP12 TP20 TP34 +12.6 volts or > Switched battery +5 ±0.2 volts VCC -3 to -5 volts negative voltage +5 ±0.005 volts, discriminator reference voltage Neutron LLD setting ±0.012 volts (normally 0.504 Vdc) Neutron ULD setting ±0.012 volts (normally 5.040 Vdc) 3.3 volt Reference ±0.3 volts If TP12 or TP20 are not set properly refer to Section 3.3.2 to adjust values. Do not proceed with the alignment until these voltages are within tolerance. Alignment The HHV-448 Refer to Drawings 15 and 22 Component Designator. The High Voltage is adjusted using R1 on the HHV-448 board. Use the high voltage probe to verify that the high voltage is 1,375Vdc (±10Vdc), and is stable ± 5Vdc. Verify and adjust by disconnecting the MHV high voltage supply cable from the PMFX box (see Section 6.2.3) and measuring at the center pin with the probe ground on the outside of the connector. DVM should read 1.375 Vdc (= 1375Vdc) Aligning The SCA-774 See Drawing 20 Component Designator Adjust R19 and R20 to maximum CW. SCA-775 (Slave Pillar) Repeat steps 7.2.1.3. through 7.2.1.4. on the slave pillar. This completes the neutron alignment. ___________________________________________________________________________________________________________________ This document is the exclusive property of TSA Systems, Ltd. Unauthorized use or distribution is strictly prohibited 75 TM-850 Operations and Service Manual Doc: # 5022 Rev. A ____________________________________________________________________________________________________________________ 7.3.2 Neutron Detector Tune-up Procedure 7.3.3 Operational Test Due to the many different environments and materials being monitored, the operational test will vary from site to site, although several general principles apply in all cases. Select an appropriate source, and test at the normal speed used for monitoring. Repeat the test several times and record the sources and sizes used. ___________________________________________________________________________________________________________________ This document is the exclusive property of TSA Systems, Ltd. Unauthorized use or distribution is strictly prohibited 76 TM-850 Operations and Service Manual Doc: # 5022 Rev. A ____________________________________________________________________________________________________________________ 7.3.4 Performance Verification Checklist (Neutron) ___ Repairs made (if any): list component and type of repair: _____________________________________________________________________________ _____________________________________________________________________________ _____________________________________________________________________________ ___ ___ System Alignment: _____ unchanged ______ new values: PARAMETERS: High Level Fault set to: _______________ Max Intervals set to: __________________ Alpha Value set to: ___________________ Zmax Value set to: ___________________ Sequential Test set to: _______________ FUNCTIONS: Master Pillar: _____ SCA-774 ______ HHV-448 LLD: _______volts ULD: _______volts Slave Pillar: _____ SCA-774 ______ HHV-448 LLD: _______volts ULD: _______volts Neutron Enable: _______________ ___ Electronic Alignment ___ System starts up and runs initial self-test without errors. ___ All modes operational ___ Background mode in operation area; total counts = _______________ ___ Drive-through test; list sources and sizes used ____________________________________________________________ Performed by: _____________________________ Date: ______________ NOTE: Most of this data should have been collected on the form provided in Section 3.4 ___________________________________________________________________________________________________________________ This document is the exclusive property of TSA Systems, Ltd. Unauthorized use or distribution is strictly prohibited 77 TM-850 Operations and Service Manual Doc: # 5022 Rev. A ____________________________________________________________________________________________________________________ 8.0TROUBLESHOOTING This guide is designed so that on-site personnel can service the system and effect necessary minor repairs. It covers procedures and parts down to the board level. Any other problems should be referred to factory authorized service personnel. Unauthorized repair voids warranty. When a problem occurs, it is important to isolate the cause as much as possible. This is accomplished by a step by step procedure which checks each of the assemblies for proper function and works upwards through the system. Begin with a physical inspection of the unit, and then check the power supply and cabling. Examine the exterior of the cabinets for physical damage, faulty wiring, loose connections, etc. Open the cabinets and do the same inside, checking all wiring carefully. If the physical inspection shows no obvious cause for the problem, proceed by checking the detectors, controllers, and other individual assemblies, as outlined in the following steps. After repairs have been made, a field alignment must be performed. See (Section 7) for alignment procedures. 8.1 COMPONENT ACCESS Before attempting to replace or remove any of the items listed below, make sure that the system power is in the off position at the LD-260 and the ac breaker. Battery: To remove the battery, disconnect the in-line connector between the LD-260 and the battery, remove the bracket if one is installed, and lift out. To reinstall the battery, reverse the previous steps. Load Disconnect: The load disconnect may be removed by disconnecting the three wiring connectors and removing the two mounting screws. To reinstall the load disconnect, reverse the previous steps. NOTE: Be careful to reinstall the connectors properly as to avoid damaging the LD-260 at power up. Battery Charger: The battery charger is mounted to the back plate below the LD-260 in the TM-850 reference (Section 6.9). NOTE: Disconnect the ac power to the system before proceeding. Disconnect the cable from the LD-260 and disconnect the ac line cord from the battery charger. Remove the charger by removing the mounting screws. To reinstall the battery charger, reverse the previous steps. Neutron Detector Bank contains two 3He tubes. To remove tubes disconnect the MHV connectors, unscrew the four screws holding the front lid in place and take off the lid. Remove the brackets holding the tubes in place by taking out the screws holding each bracket in place. The tubes should now be able to slide out the bottom of the hole. (Reference Section 6.4) ___________________________________________________________________________________________________________________ This document is the exclusive property of TSA Systems, Ltd. Unauthorized use or distribution is strictly prohibited 78 TM-850 Operations and Service Manual Doc: # 5022 Rev. A ____________________________________________________________________________________________________________________ RS232 to RS-485 Converter can be found on the top left corner of the electronics plate. Remove the two screws holding the converter to the plate, next remove the power wires connected to the converter by releasing the screws in the power connecter. PMFX Box assembly can be removed by disconnecting all BNC & MHV cables, make sure to label where each cable is connected to ensure correct reinstallation. Unscrew the four screws inside the enclosure holding it in place, to access these screws take the four screws holding the lid in place out and remove the lid. (Reference Section 6.2.3) Media Converter can be removed by disconnecting all Ethernet and fiber optic cables, disconnect the 12 volt power supply, and removing the two screws holding the mounting plate to the electronics plate. NOTE: Never hold or move the gamma detector by the neck or photo multiplier tube as it may damage the assembly. Gamma Detector Assemblies can be removed by disconnecting the BNC and MHV cables, removing the bracket, and releasing the two zip ties securing the detectors in place. (Reference Section 6.3) Handle the detectors with EXTREME care to avoid damage. To reinstall a detector, reverse the previous steps. The SC-770 and SCA-775 are mounted in the middle portion of their respective pillars electronics plates. Four Phillips screws hold each module onto the electronics plate. To remove the module, disconnect the cables going to the unit, release the four screws holding the lid closed, open the lid, then remove the four screws in the corners of the module. To reinstall this module, reverse the previous steps. The IR Occupancy Sensors are mounted on the pillar doors. To remove, disconnect the cable connector from the back of the sensor, and then remove the IR mounting nut(s). To reinstall the sensors, reverse the previous steps. The Ultrasonic Presence Sensor is mounted on the pillar door. To remove, disconnect the cable connector from the back of the sensor and then remove the four mounting screws. Remove the sensor. To reinstall the sensor, reverse the previous steps. The Lights and Audible Alarms are secured to the pillar doors by screws or a locking collar. To remove, disconnect the wires from Terminal Block (TB2) and remove the screws. To reinstall, replace the light or audible alarm, replace the screws, and connect the wires to TS2. Be sure to use silicone caulking liberally to ensure water-tight integrity of the pillar. ___________________________________________________________________________________________________________________ This document is the exclusive property of TSA Systems, Ltd. Unauthorized use or distribution is strictly prohibited 79 TM-850 Operations and Service Manual Doc: # 5022 Rev. A ____________________________________________________________________________________________________________________ 8.2 POWER DISTRIBUTION If the unit is totally inoperative, verify that the unit is receiving power throughout the system. Open the door of the master pillar electronics cabinet and measure the ac voltage at the ac terminal block with a DVM, VOM or other ac tester. If 90 -250 Vac is not present; the site power must be checked and restored. Do not go on to the next step until the 90 - 250 Vac is present at the ac terminal block. Next, check the cartridge fuse in the LD-260. Check the fuse if ac is present but dc is absent when the LD-260 is turned on. The battery charger and heaters are the only assemblies that use the 90 - 250 Vac directly. To test the battery charger, remove the 3-pin connector from the load disconnect and measure the voltage on pins 1 and 3 of the connector (pin 1 is + and pin 3 is ground). The voltage should be approximately 13.6 Vdc. If the voltage is low or not present, the battery charger must be replaced or adjusted, reference figures 6X. To check the 12 volt power system, check the battery voltage with the connector at LD-260, J4 disconnected (the battery voltage should be at least 12.5 Vdc). Reconnect J4, and check that the switch on the load disconnect is in the ON position and the green LED is on. If the battery voltage is low (less than 12.5 Vdc), and the charger is working, try to recharge the battery. If the battery will not charge it must be replaced. The load disconnect will not turn on if there is a short in the system, a blown fuse, or a defective LD-260. To test for this condition remove LD-260, J2. If the green LED comes on, there is a short in the system. See Drawing 26 for more details. All low voltage power (12 Vdc) for the pillar is controlled by the load disconnect. The solidstate relay in the LD-260 switches the battery voltage to the system. When the LD-260 is turned on, it energizes the "coil" of the solid-state relay. This closes the relay and supplies battery voltage to TS2 through a 5 amp cartridge fuse. From there it is distributed to the system electronics. By checking for the presence of 12 Vdc at the various points it is possible to eliminate the power cabling and connections as the source of problems. If a point does not have the proper voltage then the cables between that point and the LD-260 should be checked for "open" conditions and replaced if faulty. In this step the wires to the IR detectors and lights are tested. ___________________________________________________________________________________________________________________ This document is the exclusive property of TSA Systems, Ltd. Unauthorized use or distribution is strictly prohibited 80 TM-850 Operations and Service Manual Doc: # 5022 Rev. A ____________________________________________________________________________________________________________________ 8.3 INDIVIDUAL ASSEMBLIES This section deals with the individual assemblies and how to repair them. As stated at the start of this section the steps only go to board level. 8.3.1 Gamma Detector Assemblies Each gamma detector assembly is held in place with two releasable zip ties and a bracket. To remove a detector, disconnect the BCN and MHV connectors shown below, remove the bracket by backing out the two screws holding it in place, release the two zip ties and carefully remove the detector. NOTE: The signal cable is the one with the BNC connectors, and the high voltage cable is the one with the MHV connectors, which are the larger of the two. BNC Connector MHV Connector Figure 8A Figure 8B 1. Using a DVM with a high-voltage probe, verify the high voltage at the MHV connectors on the SCA-775. 2. Disconnect the MHV connectors from each detector and measure the high voltage from the center conductor (+) to ground (-). The voltage should be between 600 and 1,500Vdc, and stable within ±5 Vdc. 3. Record the voltage, and test range stability of the HHV-448 board. 4. Adjust R1 on the HHV-448 board to at least 50 volts above and 50 volts below the recorded voltage to ensure that the high voltage is operating properly. If this voltage is out of spec and/or will not adjust over this range, replace the defective HHV-448 board before continuing with this procedure. Otherwise, adjust R1 to its initial value. 5. Verify the signal outputs from the detectors using an oscilloscope. 6. Set the oscilloscope to 500mv/division vertical gain and the time base to 50.0µs/division and trigger to negative slope. Use the existing BNC cable from the detector and connect ___________________________________________________________________________________________________________________ This document is the exclusive property of TSA Systems, Ltd. Unauthorized use or distribution is strictly prohibited 81 TM-850 Operations and Service Manual Doc: # 5022 Rev. A ____________________________________________________________________________________________________________________ it to the oscilloscope probe input as seen in figure 8D. If necessary, the BNC cable from the detector may be extended using a BNC to BNC adaptor. The oscilloscope should display negative going pulses ranging from 50 to 1200 milli volts in amplitude as seen in figure 8C Figure 8C Repeat this test for any suspect detector. Figure 8D After placing a 10µCi source of 137Cs on the detector, the above display should appear (figure 8D). NOTE: If the pulses are not present for any detector, check the trigger level and intensity on the scope If the pulses are not present, substitute the voltage divider assembly with a known working assembly, or replace the entire detector assembly. The system must be electronically realigned after a detector or SCA component has been replaced. 8.4 SC-770 CONTROLLER Physically inspect the unit for harness wiring or connector problems. This procedure does not cover the replacement of wires or connectors. Such replacement should only be done by qualified service personnel. Questions concerning parts or wire type and availability may be addressed to TSA Engineering staff. In the master pillar the SCA signals are fed into the SC-770 controller, where they are processed. If an alarm condition is found, the SC-770 activates the lights and audible alarm. The SC-770 receives occupancy input from either the IR or ultrasonic sensors. If a problem is suspected in the SC-770 unit, replace it with a known good assembly, either from spare parts or from another unit. ___________________________________________________________________________________________________________________ This document is the exclusive property of TSA Systems, Ltd. Unauthorized use or distribution is strictly prohibited 82 TM-850 Operations and Service Manual Doc: # 5022 Rev. A ____________________________________________________________________________________________________________________ 8.5 OCCUPANCY SENSOR To check the occupancy sensor on the master pillar: 1. Turn the unit on, 2. Connect a DVM to TS2-5(+) and TS2-9(-) and verify +5Vdc "NO" condition when unoccupied and a 0Vdc "NC" condition when the pillar is occupied. ___________________________________________________________________________________________________________________ This document is the exclusive property of TSA Systems, Ltd. Unauthorized use or distribution is strictly prohibited 83 TM-850 Operations and Service Manual Doc: # 5022 Rev. A ____________________________________________________________________________________________________________________ 9.0GLOSSARY ADC: Analog to Digital Converter is an integrated circuit that converts an analog signal into a binary number than can be used by the microprocessor. CPS or cps: Counts Per Second High Background Fault: The condition that occurs if the counts exceed the programmed high background level. This condition prevents further operation until the problem is corrected. Normally set in cps. LCD: Liquid Crystal Display LED: Light Emitting Diode LLD: The Lower Level Discriminator provides an adjustable threshold that determines the lowest signal level that will be accepted as a nuclear pulse by the system’s electronics. Some systems have both upper and lower level discriminators that can be used to set a discriminator window. The discriminator window can be used to effectively reduce the background counts, and increase system sensitivity to certain isotopes. Low Background Fault: The condition that occurs if the counts fall below the programmed low background level. This condition prevents further operation until the problem is corrected. Usually set in cps. POST: Power On Self Test Rolling Background: This is the background accumulation method used in most of TSA’s instruments. Background accumulation is done in ten separate buffers, each buffer representing 1/10 of the total background time. As each buffer is filled, the background is updated. This results in a background update at background time/10. Initial background accumulation requires the full background time. Standard Background: Standard background requires the full background time for the initial background and updates. ULD: The Upper Level Discriminator provides an adjustable threshold that determines the highest signal level that will be accepted as a nuclear pulse by the system’s electronics. Some systems do not have an ULD. Also see LLD. ___________________________________________________________________________________________________________________ This document is the exclusive property of TSA Systems, Ltd. Unauthorized use or distribution is strictly prohibited 84 TM-850 Operations and Service Manual Doc: # 5022 Rev. A ____________________________________________________________________________________________________________________ 10.0APPENDIX A The following formulas are used in various systems manufactured by TSA Systems, Ltd. They are provided to assist in verifying system operation and to give our customers a better understanding of how the systems operate. This is a general list, but most systems use some of these formulas. ACTIVITY FROM COUNTS Activity = N Eff • 37 Where: Activity = Activity in nCi Eff = Decimal efficiency (i.e. 10% = 0.10) N = Net counts per second (cps - background cps) 37 = bq per nCi EFFICIENCY E= N 37 • activity Where: N = cps with source - background cps activity = test source activity in nCi N*Sigma Alarm Level Used to calculate the alarm level on instruments using n*sigma alarm algorithm. Most systems that use n*sigma alarm levels operate in counts/second. ( Alarm Level = N • ) bkg + bkg Where: bkg = Background counts Sigma = 1bkg N = N*Sigma value ___________________________________________________________________________________________________________________ This document is the exclusive property of TSA Systems, Ltd. Unauthorized use or distribution is strictly prohibited 85 TM-850 Operations and Service Manual Doc: # 5022 Rev. A ____________________________________________________________________________________________________________________ RELIABLE DETECTABLE ACTIVITY (RDA) FORMULA This formula calculates the minimum activity, in disintegrations per minute that can be reliably detected under a given set of operational conditions. ( CON + F = G= ) CON 2 + 4 FA BKG + BKG 2 2 F − BKG CT RDA = Where: 2200 • G 37 • E BKG = total background counts per count time CON = confidence sigma CT = count time in seconds E = Decimal efficiency (i.e. 10% = 0.10) F = false alarm level in cps FA = false alarm sigma G = intermediate variance RDA = reliable detectable activity in DPM SIGNAL TO BACKGROUND RATIO The following formula is helpful in determining the optimum discriminator settings. Always perform a variance test at the final setting of the lower-level discriminator to ensure that system noise is not being introduced into the amplifier stage. Q= S B Where: Q = Quality factor S = Net signal (count with source - background) B = Background count Higher values of Q result in better sensitivity. ___________________________________________________________________________________________________________________ This document is the exclusive property of TSA Systems, Ltd. Unauthorized use or distribution is strictly prohibited 86 TM-850 Operations and Service Manual Doc: # 5022 Rev. A ____________________________________________________________________________________________________________________ VARIANCE The variance analyzer mode is used to check whether the counts seen by the controller are actually from the proper distribution. If the distribution approaches normal, the resulting number will approach 0. Any significant deviation from the normal distribution will result in a larger number. The two most common problems resulting in variance failure are light leaks in the detectors, and periodic noise in the electronics. Periodic noise will result in a number of about 1, a light leak will usually result in a number larger than 2. The number displayed during a variance test is the absolute value of the average of a number of these tests, with one test being performed every nn seconds. The data is valid after three iterations of nn seconds. The pass/fail criterion varies from unit to unit and is included in the variance section of the manual on most units. C= S 2 ∑ C N (C − C ) =∑ R= 2 N−1 S2 − C C Where: C = counts per sample time _ C = mean counts I = number of iterations N = number of samples taken R = sample variance modified to equal 0, rather than 1, for Gaussian distribution _ R = mean variance, this term is referred to as variance in TSA’s manuals S2 = sample variance ___________________________________________________________________________________________________________________ This document is the exclusive property of TSA Systems, Ltd. Unauthorized use or distribution is strictly prohibited 87 TM-850 Operations and Service Manual Doc: # 5022 Rev. A ____________________________________________________________________________________________________________________ 11.0APPENDIX B (Data String Outputs & Definitions) Version SC-770 1.08.8 RS-232 and Ethernet TCP Output Documentation: RS-232 and TCP Ethernet output messages are the same except for scanning or alarms. The output string consists of two characters followed by four detector counts that are comma delimited. The string is ASCII characters with a carriage return line feed (CRLF) at the end. For Gamma the first two detectors are in the master pillar and the second two are in the slave pillar. Detector 1 is master lower, Detector 2 is master upper, Detector 3 is slave lower, and Detector 4 is slave upper. For Neutron the first two detectors are in the master pillar and the second two are in the slave pillar. The neutron detectors are numbered 5-8. Detector 5 is master upper, Detector 6 is master lower, Detector 7 is slave upper, and Detector 8 is slave lower. Reference Section 7.2.2.1a TM-850 Detector Arrangement for detector locations. The RS-232 port settings are as follows: Baud rate set at (19,200) bps, Data bits set at (8), Parity set at (0), Stop bits set at (1), Flow control set at (None) The PC Ethernet or HyperTerminal port settings are as follows: “Host address:” should be set to the exact IP address entered in the SC-770, the “Port number:” must be set at (1600), and “Connect using:” is set to (TCP (Winsock)). Output: GB,xxxxx,xxxxx,xxxxx,xxxxx CRLF Definition: Gamma Background sent every 5 seconds. The one-second counts are averaged from a 20-second count buffer. The 20 second buffer is based on four 5-second rolling averages. Output: NB,xxxxx,xxxxx,xxxxx,xxxxx CRLF Definition: Neutron Background sent every 5 seconds. The one-second counts are averaged from a 20-second count buffer. The 20 second buffer is based on four 5-second rolling averages. Output: GH,xxxxx,xxxxx,xxxxx,xxxxx CRLF Definition: Gamma High Background Fault is sent every 5 seconds for the duration of the fault condition. (The high background fault condition is a settable parameter in the controller). Output: GL,xxxxx,xxxxx,xxxxx,xxxxx CRLF Definition: Gamma Low Background Fault is sent every 5 seconds for the duration of the fault condition. (The low background fault condition is a settable parameter in the controller.) Output: NH,xxxxx,xxxxx,xxxxx,xxxxx CRLF Definition: Neutron High Background Fault is sent every 5 seconds for the duration of the fault condition. (The high background fault condition is a settable parameter in the controller.) ___________________________________________________________________________________________________________________ This document is the exclusive property of TSA Systems, Ltd. Unauthorized use or distribution is strictly prohibited 88 TM-850 Operations and Service Manual Doc: # 5022 Rev. A ____________________________________________________________________________________________________________________ RS-232 OUTPUT Output: GS,xxxxx,xxxxx,xxxxx,xxxxx CRLF Definition: Gamma Scan - Gamma counts sent every 200mSec while occupied and not in an alarm state. The RS-232 output displays in CPS, averaged from five 200mSec counts in the rolling count buffer. The counts are one second, averaged from five 200mSec rolling count buffer. Output: GA,xxxxx,xxxxx,xxxxx,xxxxx CRLF Definition: Gamma Alarm - Gamma counts sent every 200mSec while occupied and in an alarm state. The counts are one second, averaged from five 200mSec rolling count buffer. (The threshold is a settable parameter in the controller.) Ethernet OUTPUT Output: GS,xxxxx,xxxxx,xxxxx,xxxxx CRLF Definition: Gamma Scan - Gamma counts are sent every 200mSec while occupied and not in an alarm state. The counts are 200mSec based. NOTE: When an occupancy occurs five – 200mSec pre-occupancy count strings are sent out immediately. Output: GA,xxxxx,xxxxx,xxxxx,xxxxx CRLF Definition: Gamma Alarm - Gamma counts are sent every 200mSec while occupied and in an alarm state. The counts are 200mSec based. (The threshold is a settable parameter in the controller.) Output: NS,xxxxx,xxxxx,xxxxx,xxxxx CRLF Definition: Neutron Scan - Neutron counts are sent every second while occupied and not in an alarm state. The counts are one second, from five 200mSec count buffer. Output: NA,xxxxx,xxxxx,xxxxx,xxxxx CRLF Definition: Neutron Alarm - Neutron counts are sent every second while occupied and in an alarm state. The counts are one second, from five 200mSec count buffer. Output: TT,000000,000000,000000,000000 CRLF Definition: Tamper Fault - Tamper or power-fail condition. This is sent only once when the following conditions occur: ac power loss, charger output failure, or when any of the doors in the tamper circuit are opened. (Fields are padded for 32 bytes.) Output: TC,111111,111111,111111,111111 CRLF Definition: Tamper Cleared - Tamper or power-fail condition cleared. This is sent only once when the following conditions occur: ac power returned, or when the doors are closed on the pillar. (Fields are padded for 32 bytes.) ___________________________________________________________________________________________________________________ This document is the exclusive property of TSA Systems, Ltd. Unauthorized use or distribution is strictly prohibited 89 TM-850 Operations and Service Manual Doc: # 5022 Rev. A ____________________________________________________________________________________________________________________ Output: GX,xxxxxx,000000,000000,000000 CRLF Definition: Occupancy Cleared - Pillar occupancies since midnight of each day. xxxxxx = 1 – 99,999 occupancies. This message is sent with an incremented count every time the pillar clears the occupancy. This variable is automatically cleared after a power cycle and or at midnight every night. (Fields are padded for 32 bytes.) Output: SP,0.1234,04.234,006.23,000000 CRLF Definition: Speed Sense - The first field is the time the object takes to travel (12 inches), the second field is MPH (99.999 max), and the third field is KPH (999.99 max). (Fields are padded for 32 bytes.) NOTE: Ethernet and Serial Port data will not be sent if the profiling parameter is turned OFF. ___________________________________________________________________________________________________________________ This document is the exclusive property of TSA Systems, Ltd. Unauthorized use or distribution is strictly prohibited 90 TM-850 Operations and Service Manual Doc: # 5022 Rev. A ____________________________________________________________________________________________________________________ Ethernet Output Only The following messages are sent on power up if there is an Ethernet link established. The messages are also sent when the Pmode (program mode) is exited back to a normal operating screen and at midnight of the SC-770 internal clock. These messages are sent so that the user can see the current settings of the monitor. SG1,002000,000068,05,10,07.0,P SG2,1100,0.069,0.455,01,1010,P SG3,0.069,0.455,20,0.00,1.08.8 SN1,000050,02,0047,1200,04,PPP SN2,0.504,5.040,0.504,5.040,PP Output: SG1,002000,000068,05,10,07.0,P CRLF Definition: “S”etup “G”amma 1, Background High Fault Alarm, Background Low Fault Alarm, Intervals, Occupancy Holdin, Nsigma. Background High and Low fault alarms units are in counts per second per detector. Intervals and Occupancy Holdin units are 200 millisecond intervals. Nsigma is a float value used in the alarm algorithm. P = a place holder to make the message 32 bytes to match all other messages. Output: SG2,1111,0.069,0.455,01,1010,P CRLF Definition: “S”etup “G”amma 2, Detectors on line, Master Lower level discriminator, Master Upper level discriminator, Relay output, Algorithm. Detectors on line: 1 1 0 0 = Masters ON, Slave OFF. Position Definition - First number = Master lower, Second number = Master upper, Third number = Slave lower, and Fourth number = Slave upper. Master Lower and Upper level discriminators voltages. Relay Output: 0 = OFF, 1= ON, 3= AUTO Algorithm: 1 0 1 0 = SUM & VERTICAL (ON). Position Definition – First number = SUM, Second number = HORIZONTAL, Third number = VERTICAL, and Fourth number = SINGLE. P = Place holder. Output: SG3, 0.069,0.455,20,0.000,1.08.8 CRLF Definition: “S”etup “G”amma 3, Slave Lower level discriminator, Slave Upper Level discriminator, Background Time, Background Nsigma, Software Version. Master Lower and Upper level discriminators voltages. Background time in seconds. Background Nsigma is a float used for throw through (Should be 0.00) Software Version. ___________________________________________________________________________________________________________________ This document is the exclusive property of TSA Systems, Ltd. Unauthorized use or distribution is strictly prohibited 91 TM-850 Operations and Service Manual Doc: # 5022 Rev. A ____________________________________________________________________________________________________________________ Output: SN1,000050,2,0047,1200,04,PPP CRLF Definition: “S”etup “N”eutron 1, High neutron fault alarm, Maximum Intervals, Alpha value, Zmax value, Sequential intervals. Background High fault alarm units are in counts per second per neutron detector block. Maximum Intervals used in the SPRT algorithm. Alpha false alarm probability used in SPRT. Zmax, the value used for an alarm when max intervals is reached. Sequential Intervals in the amount of 200 millisecond intervals that must be above background, a filter used to stop cosmic nuisance alarms. P’s = place holders. Output: SN2,0.504,5.040,0.504,5.040,PP CRLF Definition: “S”etup “N”eutron 2, Master Lower Level Discriminator, Master Upper Level Discriminator, Slave Lower Level Discriminator, Slave Upper Level Discriminator Master lower and upper level discriminator voltages, (LLD’s & ULD’s). Slave lower and upper level discriminator voltages, (LLD’s & ULD’s). Ethernet Input Only The following message is accepted to set the time and date on the SC-770 controller. It uses UDP messaging on port 1600. INPUT: 01:02,03,04,05,06,07 CRLF Definition: 01: = Attention character Time/Date update message HH,MM,SS,MM,DD,YY 22 bytes "01:02,03,04,05,06,07\r\n" translates into message type 1 for a Date/Time message with a time of 2:03:04 and a date of 5/6/7 ___________________________________________________________________________________________________________________ This document is the exclusive property of TSA Systems, Ltd. Unauthorized use or distribution is strictly prohibited 92 TM-850 Operations and Service Manual Doc: # 5022 Rev. A ____________________________________________________________________________________________________________________ 12.0PARTS LISTS 12.1 SPARE PARTS ORDERING INFORMATION To facilitate the processing of spare parts orders the following information is required: Product Number, Product Serial Number, TSA Stock number, Part description (from parts list). When ordering PROM chips, the software version is required. This can be found on the PROM label. NOTE: Model number suffixes are generally not included in the text of the manual. However, the suffixes in the parts lists must be included on orders for spare parts. FOR ASSISTANCE CALL: TSA Systems, Ltd. 12.2 RECOMMENDED SPARE PARTS The list of spare parts given here is based on the following assumptions. One - that the maximum downtime allowable is 2 hours, and two, and that a technical background is not needed to perform the repairs. Stock# O353 2725A 6456B 6463C 6661 6661B 6720C 7230 7346 7346A 7346B 7346C 7354 7818 8244 8403A 8453 8590 8699 8753 8754 8870A 9411 9413 Qty 1 1 *1 1 1 1 1 1 1 1 1 1 1 6 4 4 2 1 2 1 2 4 1 2 Description Mfr. Part# TM-850 COAX LOT RS-232 TO RS485 BATTERY 12V 26AMP. HOUR CHARGER 15V 5AMP SPEED SENSOR KIT ULTRASONIC SENSOR 3 He TUBE (2"x36") HEATER STRIP STROBE (RED) STROBE (BLUE) SIREN DRIVER (ELK-100) SIREN (ELK-1RT) AMBER LIGHT (FAULT) TAMPER SWITCH DA1248 (GAMA DET.) HHV-448D LD-260 MEDIA CONVERTER PMFX4 (COMPLETE) SC-771 BOARD SCA-774 BOARD VD-580 (COMPLETE) SC-770 SCA-775 * Recommend a local supplier due to limited shelf life. ___________________________________________________________________________________________________________________ This document is the exclusive property of TSA Systems, Ltd. Unauthorized use or distribution is strictly prohibited 93 TM-850 Operations and Service Manual Doc: # 5022 Rev. A ____________________________________________________________________________________________________________________ 13.0LIST OF DRAWINGS Drawing Description TM-850 Pictorial..........................................................................................................................1 TM-850 Schematic Diagram........................................................................................................2 TM-850 Internal Views................................................................................................................3 SC-770 External View................................................................................................................. 4 SC-770 Wiring diagram...............................................................................................................5 SC-770 Internal View.................................................................................................................. 6 SC-771 Schematic Diagram sheet 1 of 4..................................................................................... 7 SC-771 Schematic Diagram sheet 2 of 4..................................................................................... 8 SC-771 Schematic Diagram sheet 3 of 4..................................................................................... 9 SC-771 Schematic Diagram sheet 4 of 4................................................................................... 10 SC-771 Circuit Board Component Designator.......................................................................... 11 GPRB-756 Schematic Diagram................................................................................................. 12 GPRB-756 Component Designator............................................................................................13 SCA-775 External View............................................................................................................ 14 SCA-775 Wiring Diagram......................................................................................................... 15 SCA-775 Internal View............................................................................................................. 16 SCA-774 Schematic Diagram sheet 1 of 4................................................................................ 17 SCA-774 Schematic Diagram sheet 2 of 4................................................................................ 18 SCA-774 Schematic Diagram sheet 3 of 4................................................................................ 19 SCA-774 Schematic Diagram sheet 4 of 4................................................................................ 20 SCA-774 Component Designator.............................................................................................. 21 HHV-448 Schematic Diagram...................................................................................................22 HHV-448 Component Designator............................................................................................. 23 PMFX 4 Quad Signal Pickoff Board Schematic Diagram.........................................................24 PMFX 4 Quad Signal Pickoff Board Component Designator................................................... 25 LD-260 Schematic Diagram & Component Designator............................................................26 Voltage Divider Schematic Diagram (VD-580)........................................................................ 27 Typical Pulse Profile .................................................................................................................28 ___________________________________________________________________________________________________________________ This document is the exclusive property of TSA Systems, Ltd. Unauthorized use or distribution is strictly prohibited 94