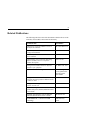
1
HSZ70 Array Controller
HSOF Version 7.3
EK–CLI70–RM. B01
Compaq Computer Corporation
Houston, Texas
CLI Reference Manual
January 1999
While Compaq Computer Corporation believes the information included in this manual is correct as of date of
publication, it is subject to change without notice. Compaq Computer Corporation makes no representations that the
interconnection of its products in the manner described in this document will not infringe existing or future patent
rights, nor do the descriptions contained in this document imply the granting of licenses to make, use, or sell
equipment or software in accordance with the description. No responsibility is assumed for the use or reliability of
firmware on equipment not supplied by Compaq Computer Corporation or its affiliated companies. Possession, use,
or copying of the software or firmware described in this documentation is authorized only pursuant to a valid
written license from Compaq Computer Corporation, an authorized sublicensor, or the identified licensor.
Commercial Computer Software, Computer Software Documentation and Technical Data for Commercial Items are
licensed to the U.S. Government with the Compaq Computer Corporation standard commercial license and, when
applicable, the rights in DFAR 252.227 7015, “Technical Data—Commercial Items.”
© 1999 Compaq Computer Corporation.
All rights reserved. Printed in U.S.A.
Compaq, DIGITAL, the Compaq and DIGITAL logos are registered with the U.S. Trademark and Patent office.
DIGITAL UNIX, DECconnect, HSZ, StorageWorks, VMS, OpenVMS, are trademarks of Compaq Computer
Corporation.
UNIX is a registered trademark of the Open Group in the US and other countries. Windows NT is a registered
trademark of the Microsoft Corporation. Sun is a registered trademark of Sun Microsystems, Inc. Hewlett-Packard
and HP–UX are registered trademarks of the Hewlett-Packard Company. IBM and AIX are registered trademarks of
International Business Machines Corporation. All other trademarks and registered trademarks are the property of
their respective owners.
This equipment has been tested and found to comply with the limits for a Class A digital device, pursuant to Part 15
of the FCC Rules. These limits are designed to provide reasonable protection against harmful interference when the
equipment is operated in a commercial environment. This equipment generates, uses and can radiate radio
frequency energy and, if not installed and used in accordance with the manuals, may cause harmful interference to
radio communications. Operation of this equipment in a residential area is likely to cause harmful interference in
which case the user will be required to correct the interference at his own expense. Restrictions apply to the use of
the local-connection port on this series of controllers; failure to observe these restrictions may result in harmful
interference. Always disconnect this port as soon as possible after completing the setup operation. Any changes or
modifications made to this equipment may void the user's authority to operate the equipment.
Warning!
This is a Class A product. In a domestic environment this product may cause radio interference in which case the
user may be required to take adequate measures.
Achtung!
Dieses ist ein Gerät der Funkstörgrenzwertklasse A. In Wohnbereichen können bei Betrieb dieses Gerätes
Rundfunkstörungen auftreten, in welchen Fällen der Benutzer für entsprechende Gegenmaßnahmen verantwortlich
ist.
Avertissement!
Cet appareil est un appareil de Classe A. Dans un environnement résidentiel cet appareil peut provoquer des
brouillages radioélectriques. Dans ce cas, il peut être demandé à l’ utilisateur de prendre les mesures appropriées.
iii
Contents
Precautions . . . . . . . . . . . . . . . . . . . . . . . . . . . . . . . . . . . . . . . . . . . . . . . . . . . . vii
Electrostatic Discharge Precautions . . . . . . . . . . . . . . . . . . . . . . . . . . . . . . vii
VHDCI Cable Precautions . . . . . . . . . . . . . . . . . . . . . . . . . . . . . . . . . . . . . viii
Local-Connection Maintenance Port Precautions . . . . . . . . . . . . . . . . . . . viii
Conventions. . . . . . . . . . . . . . . . . . . . . . . . . . . . . . . . . . . . . . . . . . . . . . . . . . . . viii
Typographical Conventions . . . . . . . . . . . . . . . . . . . . . . . . . . . . . . . . . . . . . ix
Special Notices. . . . . . . . . . . . . . . . . . . . . . . . . . . . . . . . . . . . . . . . . . . . . . . .x
Required Tools . . . . . . . . . . . . . . . . . . . . . . . . . . . . . . . . . . . . . . . . . . . . . . . . . . .x
Related Publications . . . . . . . . . . . . . . . . . . . . . . . . . . . . . . . . . . . . . . . . . . . . . . xi
Revision History . . . . . . . . . . . . . . . . . . . . . . . . . . . . . . . . . . . . . . . . . . . . . . . . xii
Command Line Interpreter
Introduction . . . . . . . . . . . . . . . . . . . . . . . . . . . . . . . . . . . . . . . . . . . . . . . . . . . . . .2
Using the CLI . . . . . . . . . . . . . . . . . . . . . . . . . . . . . . . . . . . . . . . . . . . . . . . . . . . .2
Command Overview . . . . . . . . . . . . . . . . . . . . . . . . . . . . . . . . . . . . . . . . . . .3
Getting Help . . . . . . . . . . . . . . . . . . . . . . . . . . . . . . . . . . . . . . . . . . . . . . . . . .4
Entering CLI Commands . . . . . . . . . . . . . . . . . . . . . . . . . . . . . . . . . . . . . . . .4
Command Syntax . . . . . . . . . . . . . . . . . . . . . . . . . . . . . . . . . . . . . . . . . . . . . .6
CLI Command Descriptions . . . . . . . . . . . . . . . . . . . . . . . . . . . . . . . . . . . . . . . . .6
ADD CDROM . . . . . . . . . . . . . . . . . . . . . . . . . . . . . . . . . . . . . . . . . . . . . . . .7
ADD DISK. . . . . . . . . . . . . . . . . . . . . . . . . . . . . . . . . . . . . . . . . . . . . . . . . . .9
ADD MIRRORSET . . . . . . . . . . . . . . . . . . . . . . . . . . . . . . . . . . . . . . . . . . .12
ADD PASSTHROUGH . . . . . . . . . . . . . . . . . . . . . . . . . . . . . . . . . . . . . . . .15
ADD RAIDSET . . . . . . . . . . . . . . . . . . . . . . . . . . . . . . . . . . . . . . . . . . . . . .17
ADD SPARESET . . . . . . . . . . . . . . . . . . . . . . . . . . . . . . . . . . . . . . . . . . . . .21
ADD STRIPESET . . . . . . . . . . . . . . . . . . . . . . . . . . . . . . . . . . . . . . . . . . . .22
ADD UNIT. . . . . . . . . . . . . . . . . . . . . . . . . . . . . . . . . . . . . . . . . . . . . . . . . .24
CLEAR_ERRORS CLI . . . . . . . . . . . . . . . . . . . . . . . . . . . . . . . . . . . . . . . .30
CLEAR_ERRORS controller INVALID_CACHE . . . . . . . . . . . . . . . . . . .31
CLEAR_ERRORS unit-number LOST_DATA . . . . . . . . . . . . . . . . . . . . . .33
CLEAR_ERRORS UNKNOWN . . . . . . . . . . . . . . . . . . . . . . . . . . . . . . . . .35
CLEAR_ERRORS unit-number UNWRITEABLE_DATA . . . . . . . . . . . .36
CREATE_PARTITION . . . . . . . . . . . . . . . . . . . . . . . . . . . . . . . . . . . . . . . .37
iv
CLI Reference Manual
DELETE container-name . . . . . . . . . . . . . . . . . . . . . . . . . . . . . . . . . . . . . . 39
DELETE FAILEDSET disk-name . . . . . . . . . . . . . . . . . . . . . . . . . . . . . . . 41
DELETE SPARESET disk-name . . . . . . . . . . . . . . . . . . . . . . . . . . . . . . . . 42
DELETE unit-number . . . . . . . . . . . . . . . . . . . . . . . . . . . . . . . . . . . . . . . . . 43
DESTROY_PARTITION . . . . . . . . . . . . . . . . . . . . . . . . . . . . . . . . . . . . . . 44
DIRECTORY . . . . . . . . . . . . . . . . . . . . . . . . . . . . . . . . . . . . . . . . . . . . . . . 46
HELP . . . . . . . . . . . . . . . . . . . . . . . . . . . . . . . . . . . . . . . . . . . . . . . . . . . . 47
INITIALIZE . . . . . . . . . . . . . . . . . . . . . . . . . . . . . . . . . . . . . . . . . . . . . . . . 49
LOCATE . . . . . . . . . . . . . . . . . . . . . . . . . . . . . . . . . . . . . . . . . . . . . . . . . . . 54
MIRROR . . . . . . . . . . . . . . . . . . . . . . . . . . . . . . . . . . . . . . . . . . . . . . . . . . . 57
REDUCE . . . . . . . . . . . . . . . . . . . . . . . . . . . . . . . . . . . . . . . . . . . . . . . . . . . 60
RENAME . . . . . . . . . . . . . . . . . . . . . . . . . . . . . . . . . . . . . . . . . . . . . . . . . . 63
RESTART controller . . . . . . . . . . . . . . . . . . . . . . . . . . . . . . . . . . . . . . . . . . 64
RETRY_ERRORS UNWRITEABLE_DATA . . . . . . . . . . . . . . . . . . . . . . 66
RUN. . . . . . . . . . . . . . . . . . . . . . . . . . . . . . . . . . . . . . . . . . . . . . . . . . . . . . . 67
SELFTEST controller . . . . . . . . . . . . . . . . . . . . . . . . . . . . . . . . . . . . . . . . . 69
SET controller . . . . . . . . . . . . . . . . . . . . . . . . . . . . . . . . . . . . . . . . . . . . . . . 71
SET device-name. . . . . . . . . . . . . . . . . . . . . . . . . . . . . . . . . . . . . . . . . . . . . 82
SET EMU . . . . . . . . . . . . . . . . . . . . . . . . . . . . . . . . . . . . . . . . . . . . . . . . . . 84
SET FAILEDSET . . . . . . . . . . . . . . . . . . . . . . . . . . . . . . . . . . . . . . . . . . . . 87
SET FAILOVER . . . . . . . . . . . . . . . . . . . . . . . . . . . . . . . . . . . . . . . . . . . . . 89
SET mirrorset-name . . . . . . . . . . . . . . . . . . . . . . . . . . . . . . . . . . . . . . . . . . 91
SET MULTIBUS_FAILOVER . . . . . . . . . . . . . . . . . . . . . . . . . . . . . . . . . . 96
SET NOFAILOVER . . . . . . . . . . . . . . . . . . . . . . . . . . . . . . . . . . . . . . . . . . 99
SET RAIDset-name . . . . . . . . . . . . . . . . . . . . . . . . . . . . . . . . . . . . . . . . . . 101
SET unit-number . . . . . . . . . . . . . . . . . . . . . . . . . . . . . . . . . . . . . . . . . . . . 104
SHOW . . . . . . . . . . . . . . . . . . . . . . . . . . . . . . . . . . . . . . . . . . . . . . . . . . . . 109
SHUTDOWN controller . . . . . . . . . . . . . . . . . . . . . . . . . . . . . . . . . . . . . . 115
UNMIRROR . . . . . . . . . . . . . . . . . . . . . . . . . . . . . . . . . . . . . . . . . . . . . . . 117
Glossary
Index
v
Tables
Table 1 Recall and Edit Command Keys . . . . . . . . . . . . . . . . . . . . . . . . . . . . . . .5
Table 2 ADD UNIT Switches for New Containers . . . . . . . . . . . . . . . . . . . . . .25
Table 3 SET controller Switches (ALLOCATION_CLASS) . . . . . . . . . . . . .71
Table 4 SET controller Switches (CACHE_FLUSH_TIMER) . . . . . . . . . . . .72
Table 5 SET controller Switches (CACHE_UPS) . . . . . . . . . . . . . . . . . . . . . . .73
Table 6 SET controller Switches (COMMAND_CONSOLE_LUN) . . . . . . .73
Table 7 SET controller Switches (HOST_FUNCTION) . . . . . . . . . . . . . . . .74
Table 8 SET controller Switches (ID) . . . . . . . . . . . . . . . . . . . . . . . . . . . . . . .75
Table 9 SET controller Switches (INITIAL_CONFIGURATION) . . . . . . . . . .76
Table 10 SET controller Switches (MIRRORED_CACHE) . . . . . . . . . . . . . . .77
Table 11 SET controller Switches (PREFERRED_ID) . . . . . . . . . . . . . . . . . . .78
Table 12 SET controller Switches (PROMPT) . . . . . . . . . . . . . . . . . . . . . . . . .79
Table 13 SET controller Switches (TERMINAL_PARITY) . . . . . . . . . . . . . . . .79
Table 14 SET controller Switches (TERMINAL_SPEED) . . . . . . . . . . . . . . . .79
Table 15 SET controller Switches (TIME) . . . . . . . . . . . . . . . . . . . . . . . . . . . .80
Table 16 SET controller Switches (TRANSFER_RATE_REQUESTED) . . . . . .80
Table 17 EMU Set Point Temperatures . . . . . . . . . . . . . . . . . . . . . . . . . . . . . . .85
Table 18 SET UNIT Switches for Existing Containers . . . . . . . . . . . . . . . . . .104
vii
Preface
This book provides information and guidance for operating the command line
interface (CLI) for the HSZ70 Array Controller running HSOF V7.3. This book
defines, explains, and presents examples of how you can implement the
commands supported by the software accompanying your controller.
This book does not contain information about the operating environments to
which the controller may be connected, nor does it contain detailed information
about subsystem enclosures or their components. See the documentation that
accompanied these peripherals for information about them.
Precautions
Use the precautions described in the following paragraphs when you are carrying
out any servicing procedures:
■
Electrostatic Discharge Precautions, page vii
■
VHDCI Cable Precautions, page viii
■
Local-Connection Maintenance Port Precautions, page viii
Electrostatic Discharge Precautions
Static electricity collects on all nonconducting material, such as paper, cloth, and
plastic. An electrostatic discharge (ESD) can easily damage a controller or other
subsystem component even though you may not see or feel the discharge. Follow
these precautions whenever you’re servicing a subsystem or one of its
components:
■
Always use an ESD wrist strap when servicing the controller or other
components in the subsystem. Make sure that the strap contacts bare skin and
fits snugly, and that its grounding lead is attached to a bus that is a verified
earth ground.
■
Before touching any circuit board or component, always touch a verifiable
earth ground to discharge any static electricity that may be present in your
clothing.
■
Always keep circuit boards and components away from nonconducting
material.
viii
CLI Reference Manual
■
Always keep clothing away from circuit boards and components.
■
Always use antistatic bags and grounding mats for storing circuit
boards or components during replacement procedures.
■
Always keep the ESD cover over the program card when the card is
in the controller. If you remove the card, put it in its original
carrying case. Never touch the contacts or twist or bend the card
while you’re handling it.
■
Do not touch the connector pins of a cable when it is attached to a
component or host.
VHDCI Cable Precautions
All of the cables to the controller, cache module, and external cache
battery use very-high-density cable interconnect connectors (VHDCI).
These connectors have extraordinarily small mating surfaces that can
be adversely affected by dust and movement.
Use the following precautions when you’re connecting cables that use
VHDCI connectors:
■
Clean the mating surfaces with a blast of clean air.
■
Mate the connectors by hand, then tighten the retaining screws to
1.5 inch-pounds—approximately 1/4 additional turn after the
connectors have fully mated.
■
Test the assembly by gently pulling on the cable, which should not
produce visible separation.
Local-Connection Maintenance Port Precautions
The local-connection maintenance port generates, uses, and radiates
radio-frequency energy through cables that are connected to it. This
energy may interfere with radio and television reception. Do not leave a
cable connected to this port when you’re not communicating with the
controller.
Conventions
This book adheres to the typographical conventions and special notices
found in the paragraphs that follow to help you find what you’re
looking for.
ix
Typographical Conventions
Convention
ALLCAPS BOLD
Meaning
Command syntax that must be entered exactly as
shown, for example:
SET FAILOVER COPY=OTHER_CONTROLLER
ALLCAPS
Monospaced
Command syntax discussed within text, for example:
“Use the SHOW SPARESET command to show the
contents of the spareset.”
Screen display.
Sans serif italic Command variable or numeric value that you supply,
for example: SHOW RAIDset-name (when being
described within the text) or
set this_controller id=(n,n,n,n,) when showing how to
enter the command syntax.
italic
Reference to other books, for example: “See HSZ70
Array Controller HSOF Version 7.3 Configuration
Manual for details.”
.
.
.
Indicates that a portion of an example or figure has
been omitted, for example:
ADD RAIDSET RAID1 DISK10000 DISK20000
INITIALIZE RAID1
.
.
.
SHOW RAID1
“this controller”
The controller in a dual-redundant pair serving your
current CLI session through a locally-connected
maintenance (remote) terminal.
“other controller” The controller in a dual-redundant pair that is not
connected to the maintenance (remote) terminal.
x
CLI Reference Manual
Special Notices
This book does not contain detailed descriptions of standard safety
procedures. However, it does contain warnings for procedures that
could cause personal injury and cautions for procedures that could
damage the controller or its related components. Look for these
symbols when you’re carrying out the procedures in this book:
Warning A warning indicates the presence of a hazard that can cause
personal injury if you do not avoid the hazard.
Caution A caution indicates the presence of a hazard that might
damage hardware, corrupt software, or cause a loss of data.
In addition, there are two other notices to aid you in your understanding
of the subject matter being read:
Tip A tip provides alternative methods or procedures that may not be
immediately obvious. A tip may also alert prior customers that the
controller’s behavior being discussed is different from prior software or
hardware versions.
Note A note provides additional information that’s important to the
completion of an instruction or procedure.
Required Tools
The following tools are needed for servicing the controller, cache
module, and external cache battery:
■
A small screwdriver for loosening and tightening the cableretaining screws.
■
An antistatic wrist strap.
■
An antistatic mat on which to place modules during servicing.
■
An SBB Extractor for removing StorageWorks building blocks.
This tool is not required, but it will enable you to provide more
efficient service.
xi
Related Publications
The following table lists some of the documents related to the use of the
controller, cache module, and external cache battery.
Document Title
Part Number
HSZ70 Array Controller HSOF Version 7.3
CLI Reference Manual
EK–CLI70–RM. A01
HSZ70 Array Controller HSOF Version 7.3
Configuration Manual
EK–HSZ70–CG. A01
HSZ70 Array Controller HSOF Version 7.3
Service Manual
EK–HSZ70–SV. A01
HSZ70 Family Array Controller Operating
Software (HSOF) Version 7.3 Software
Product Description
SPD xx.xx. 00
Getting Started–HSZ70 Solutions Software
Version 7.3 for...platform
AA–R60xx–TE. A01
Polycenter Console Manager
See the Getting
Started guide for the
platform-specific
order number
StorageWorks Array Controller HSZ70 Array EK–HSZ70–RN. A01
Controller Operating Software HSOF Version
7.3 Release Notes
StorageWorks Getting Started with Command
Console, Version 2.0
AA–R0HJC–TE
DIGITAL StorageWorks Ultra SCSI RAID
Cabinet Subsystem (SW600) Installation and
User’s Guide
EK–SW600–UG
DIGITAL StorageWorks Ultra SCSI RAID
Enclosure (BA370-Series) User’s Guide
EK–BA370–UG
The RAIDBOOK—A Source for RAID
Technology
RAID Advisory
Board
xii
CLI Reference Manual
Revision History
The current revisions of this document include:
EK-CLI70-RM.B01
EK-CLI70-RM.A01
HSOF V7.3
HSOF V7.0
January 1999
July 1997
CLI Commands
1
Command Line Interpreter
This section of the HSZ70 Array Controller CLI Reference Manual
describes the command line interpreter (CLI):
■
■
■
“Introduction,” page 2
“Using the CLI,” page 2
– “Command Overview,” page 3
– “Getting Help,” page 4
– “Entering CLI Commands,” page 4
– “Command Syntax,” page 6
“CLI Command Descriptions,” page 6
– “ADD” commands, pages 7—29
– “CLEAR” commands, pages 30—34
– “CREATE_PARTITION,” page 37
– “DELETE” commands, pages 37—40
– “DESTROY_PARTITION,” page 44
– “DIRECTORY,” page 46
– “HELP,” page 47
– “INITIALIZE,” page 49
– “LOCATE,” page 54
– “MIRROR,” page 57
– “REDUCE,” page 60
– “RENAME,” page 63
– “RESTART controller,” page 64
– “RETRY_ERRORS UNWRITEABLE_DATA,” page 66
– “RUN,” page 67
– “SELFTEST controller,” page 69
– “SET commands, pages 62—92
– “SHOW,” page 109
– “SHUTDOWN controller,” page 115
– “UNMIRROR,” page 117
2
CLI Reference Manual
Introduction
The CLI is one of the user interfaces through which you control your
StorageWorks array controller in the StorageWorks subsystem. CLI
commands allow you to manage the subsystem by viewing and
modifying the configuration of the controller and the devices attached
to them. You can also use these CLI commands to start controller
diagnostic and utility programs.
While the CLI provides the most detailed level of subsystem control, a
graphical user interface (GUI) is available for use with the CLI. The
StorageWorks Command Console (SWCC) GUI is capable of
duplicating most of the functions available within the CLI. The graphic
display form of the GUI provides a user-friendly method of executing
the CLI commands.
Some CLI commands for configuring and viewing the controllers in a
dual-redundant configuration use the relative terms “this controller”
and “other controller.” See “Typographical Conventions,” on page ix,
for an explanation of these terms.
Using the CLI
You can access the CLI by connecting a terminal to the maintenance
port in the front bezel of the controller or by using HSZterm software
(remote connection). See the HSZ70 Array Controller HSOF Version
7.3 Configuration Manual for instructions explaining how to connect a
local terminal to the controller. After you have initially configured the
controller, making it visible to the host, you can perform all other
configuration tasks through a remote connection.
The section entitled “Local-Connection Maintenance Port Precautions,”
on page viii, explains precautions you should observe when operating
the CLI through a local connection port.
CLI Commands
Command Overview
Command Overview
CLI commands consist of six basic types as shown in the following
table:
Command Type
Controller
Description
Configures:
Controller SCSI ID numbers,
■ Maintenance terminal characteristics,
■ CLI prompts, and so forth.
Controller commands are also used to shut
down and restart the controller.
■
Device
Creates and configures containers made
from physical devices attached to the
controller.
Storageset
Creates and configures complex containers
made from groups of device containers.
There are four basic types of storagesets:
■ Stripesets
■ RAIDsets
■ Striped-mirrorsets
■ Mirrorsets.
Storageset commands group device
containers together and allow them to be
handled as single units.
Logical Unit
Creates and optimizes access to logical
units made from containers.
Failover
Configures the controllers in a dualredundant pair to operate in one of two
failover modes:
■ Transparent or
■ Multiple-bus failover
while providing support for dual-redundant
configurations.
Diagnostic and Utility
Perform general controller support
functions
3
4
Getting Help
CLI Reference Manual
Getting Help
Help for using the CLI is at your fingertips. Enter “help” whenever the
prompt is displayed for an overview of the CLI help system. For help
with a specific command or to determine what switches are available
with a command, enter as much of the command as you know followed
by a space and a question mark. For example, to get information on the
switches used with the SET this_controller command, enter:
SET THIS_CONTROLLER ?
See the HELP command on page 47 for further information.
Entering CLI Commands
Use the following tips and techniques when entering CLI commands:
■ Commands are not case sensitive.
■ For most commands, you only need to enter enough of the
command to make the command unique. For example, SHO is the
same as entering SHOW.
■ The controller processes each command in sequence. You may
continue entering subsequent commands while the controller is
processing prior commands. A device experiencing heavy data
input and output (I/O) may respond slowly to CLI commands.
Note Due to space limitations, some examples in this manual contain
commands which exceed one line in length. In such instances, the
paragraph preceding the example identifies which command is
continued on the next line.
Specific keys or a combination of keys allow you to recall and edit the
last four commands. This feature can save time and prevent mistakes
when you need to enter similar commands during the configuration
process. Table 1 lists the keys used to recall and edit commands.
CLI Commands
Entering CLI Commands
Table 1
5
Recall and Edit Command Keys
Key
Function
Up Arrow (↑) or Ctrl/B,
Down Arrow (↓) or Ctrl/N
Steps backward and forward through
the four most recent CLI commands.
Left arrow (←) or Ctrl/D,
Right arrow (→) or Ctrl/F
Moves the cursor left or right in a
command line.
Ctrl/E
Moves the cursor to the end of the line.
Ctrl/H or Backspace
Moves the cursor to the start of the line.
Ctrl/J or Linefeed
Deletes the word to the left of the
cursor.
Ctrl/U
Deletes all characters on the same line
as the cursor.
Ctrl/A
Toggles between insert mode and
overstrike mode:
■ Insert mode (default)—allows you
to insert characters at the cursor
location, moving the existing
characters to the right.
■ Overstrike mode—replaces
existing characters. The CLI
returns to insert mode at the
beginning of each line.
Ctrl/R
Recalls the contents of the command
line (helpful if the system issues a
message interrupting your typing).
6
Command Syntax
CLI Reference Manual
Command Syntax
CLI Commands to the controller use the following structure:
COMMAND parameter SWITCHES
where,
■ COMMAND = a word or phrase expressed as a verb used to
instruct the controller what to do. Every CLI command begins with
a command. This manual represents commands in upper-case form.
■ parameter = one or more words or phrases entered to supply
necessary information to support the action of the command. Not
all CLI commands require parameters. Parameters are represented
in this manual in lower-case italicized form.
■ SWITCHES= an optional word or phrase which modifies the
command. Not all CLI commands require switches. Switches are
represented in this manual as capitalized, italicized text.
CLI Command Descriptions
This section contains the descriptions of the 30 available CLI
commands used with HSOF V7.3. Each command is described using
the following format:
■ Command name/brief description
■ Syntax needed to enable command
■ Parameters needed (if any) to further specify the command
■ Switches needed (if any) to modify the command
■ Example(s) to illustrate the command usage
■ “See Also” section to cross-reference to others with similar usage
CLI Commands
ADD CDROM
7
ADD CDROM
Places a CD-ROM device into the controller configuration.
Syntax
ADD CDROM container-name SCSI-port-location
Parameters
container-name
Assigns a name to the CD-ROM device. This is the same name
used with the ADD UNIT command to create a single-disk unit
(JBOD).
The container name must start with a letter (A through Z) and may
consist of a maximum of nine characters including letters A
through Z, numbers 0 through 9, periods (.), dashes (-), or
underscores ( _ ).
SCSI-port-location
Indicates the PTL address of the CD-ROM used by the controller.
See the HSZ70 Array Controller HSOF Version 7.3 Configuration
Manual for an explanation of the PTL addressing naming format.
Note See the HSZ70 Array Controller HSOF Version 7.3
Release Notes to confirm the compact disc device you are
planning to use is compatible with the controller.
Switches
None.
Example
This example shows how to add a CD-ROM with a device name of
CD_PLAYER (located at port 1, target 8, LUN 0):
ADD CDROM CD_PLAYER 1 8 0
8
ADD CDROM
CLI Reference Manual
See also
ADD UNIT
DELETE container-name
SHOW CDROM
SHOW DEVICES
CLI Commands
ADD DISK
9
ADD DISK
Places a disk drive into the controller configuration.
Syntax
ADD DISK container-name SCSI-port-location
Parameters
container-name
Assigns a name to the disk device. This is the same name used
with the ADD UNIT command to create a single-disk unit (JBOD).
The container name must start with a letter (A through Z) and may
consist of a maximum of nine characters including letters A
through Z, numbers 0 through 9, periods (.), dashes (-), or
underscores ( _ ).
Tip It is common to name a disk drive DISKptl, where ptl is the
disk Port-Target-LUN address. Although other naming conventions
are acceptable, this naming convention offers the advantage of
presenting to the user both the type of disk drive and its SCSI
location in an intuitive manner.
SCSI-port-location
Indicates the PTL address of the disk device. See “CLI Command
Descriptions,” on page 6 for an explanation of the PTL
addressing naming format.
Note See the HSZ70 Array Controller HSOF Version 7.3
Release Notes to confirm the disk drive you are planning to use is
compatible with the controller.
Switches
NOTRANSPORTABLE (Default)
TRANSPORTABLE
The transportable/notransportable switch indicates whether a disk
drive can be accessed exclusively by StorageWorks controllers:
10
ADD DISK
CLI Reference Manual
■
NOTRANSPORTABLE —the controller makes a small portion
of a non-transportable disk inaccessible to the host. This
restricted space is used to store information (metadata) used to
improve data reliability, error detection, and the ability to
recover data. Because of this metadata, only StorageWorks
controllers can retrieve data from non-transportable devices.
Disks used as storagesets cannot be set as being transportable.
If the NOTRANSPORTABLE switch is specified and there is no
metadata on the unit, the unit must be initialized.
■
TRANSPORTABLE—disk drives do not contain any metadata
or restricted areas on them. Therefore, transportable disks
forfeit the advantage metadata provides. However,
transportable disks can be moved to a non-StorageWorks
environment with their data intact.
Note It is recommended that you avoid making a disk
TRANSPORTABLE unless it is imperative and there is no other
way to accomplish moving the data.
TRANSFER_RATE_REQUESTED=ASYNCHRONOUS
TRANSFER_RATE_REQUESTED=20MHZ (Default)
TRANSFER_RATE_REQUESTED=10MHZ
TRANSFER_RATE_REQUESTED=5MHZ
This switch specifies the maximum data transfer rate at which the
controller is to communicate with the disk drive. The transfer rate
may need to be limited to accommodate long cable lengths
between the controllers and the device, such as with a tape library.
Examples
1. This example shows how to add disk number 10000 to port 1, target 0,
and LUN 0:
ADD DISK DISK10000 1 0 0
2. This example shows how to add disk number 40200 as a transportable
disk drive to port 4, target 2, LUN 0:
ADD DISK DISK40200 4 2 0 TRANSPORTABLE
CLI Commands
ADD DISK
11
3. This example shows how to add disk number 30200 as nontransportable device to port 3, target 2, LUN 0, and set the data transfer
rate to 10 MHz (enter the command on one line):
ADD DISK DISK30200 3 2 0 NOTRANSPORTABLE
TRANSFER_RATE_REQUESTED=10MHZ
See also
ADD MIRRORSET
ADD UNIT
DELETE container-name
LOCATE
SHOW DISKS
SHOW DEVICES
SET container-name
12
ADD MIRRORSET
CLI Reference Manual
ADD MIRRORSET
Creates a mirrorset and adds it to the controller configuration.
Syntax
ADD MIRRORSET mirrorset-name disk-name1 disk-nameN
Parameters
mirrorset-name
Assigns a name to the mirrorset. This is the same name used with
the ADD UNIT command to identify the mirrorset as a hostaddressable unit.
The mirrorset name must start with a letter (A through Z) and may
consist of a maximum of nine characters including letters A
through Z, numbers 0 through 9, periods (.), dashes (-), or
underscores ( _ ).
Tip It is common to name a mirrorset MIRRn, where n is a
sequentially assigned, unique identifier. Other naming conventions
are acceptable, but this naming convention presents both the type
of container and its unique identifier in an intuitive manner.
disk-name1 disk-name2 ...disk-nameN
Identifies the disk drives making up the mirrorset. A mirrorset may
contain one to six disk drives.
Switches
COPY=FAST
COPY=NORMAL (Default)
Sets the speed at which the controller copies data from normal
mirrorset members to a new member or members when data is
being mirrored to the storagesets disk drives:
■
COPY=FAST—use when you want the creation of mirrored
data to take priority over other controller operations. When
COPY=FAST is specified, the controller uses more resources
to create the mirrored data. Copying takes less time. However,
overall controller performance is reduced.
CLI Commands
ADD MIRRORSET
■
13
COPY=NORMAL—use when operations performed by the
other controller should take priority over the copy operation.
When COPY=NORMAL is specified, the controller uses
relatively few resources when creating the mirrored data,
resulting in minimal impact on performance.
POLICY=BEST_FIT
POLICY=BEST_PERFORMANCE (Default)
NOPOLICY
Sets the selection criteria the controller uses to choose a
replacement member from the spareset when a mirrorset member
fails:
■
POLICY=BEST_FIT —use when choosing a replacement disk
drive from the spareset most closely matching the capacity of
the mirrorset. If there is more than one disk drive in the
spareset most closely matching the capacity of the mirrorset,
the controller selects the disk drive having the best
performance.
■
POLICY=BEST_PERFORMANCE—use when choosing a
replacement disk drive from the spareset having the best
performance. The controller attempts to select a disk on a
different port than existing mirrorset members. If there is more
than one disk drive in the spareset matching the best
performance criteria, the controller selects the disk drive most
closely matching the capacity of the mirrorset.
■
NOPOLICY —use to prevent the controller from automatically
replacing a failed disk device. The mirrorset operates in a
reduced state until a POLICY=BEST_FIT or
POLICY=BEST_PERFORMANCE is selected, or a member is
manually replaced in the mirrorset (see “SET mirrorset-name,”
Table 16 on page 91).
READ_SOURCE=disk-name
READ_SOURCE=LEAST_BUSY (Default)
READ_SOURCE=ROUND_ROBIN
Selects the mirrorset member used by the controller to satisfy a
read request:
14
ADD MIRRORSET
CLI Reference Manual
■
READ_SOURCE=disk-name—use to specify a storageset
member to which you want the controller to direct all read
requests. If the member fails out of the mirrorset, the controller
selects the first normal member it finds to satisfy its read
requests.
■
READ_SOURCE=LEAST_BUSY—use to direct read requests
to the mirrorset member with the least amount of work in its
queue.
■
READ_SOURCE=ROUND_ROBIN—use to sequentially
direct read requests to each mirrorset member. The controller
equally queries all normal members for each read request.
Examples
1. This example shows how to add disk numbers 10000, 20100, and 30200
as a mirrorset using the name MIRR1:
ADD
ADD
ADD
ADD
DISK DISK10000 1 0 0
DISK DISK20100 2 1 0
DISK DISK30200 3 2 0
MIRRORSET MIRR1 DISK10000 DISK20100 DISK30200
2. This example creates a host-addressable unit after the mirrorset MIRR1
has been created:
INITIALIZE MIRR1
ADD UNIT D305 MIRR1
See also
ADD DISK
ADD UNIT
DELETE container-name
INITIALIZE
MIRROR
REDUCE
SHOW mirrorset-name
SHOW MIRRORSETS
SHOW STORAGESETS
UNMIRROR
CLI Commands
ADD PASSTHROUGH
15
ADD PASSTHROUGH
Creates a passthrough container. A passthrough container bypasses
controller processing and allows the host to have direct access to the
device. A passthrough device appears as if it were connected
directly to the host bus rather than to the controller. Use
passthrough containers to communicate with tape devices and tape
loaders because they do not require the controller for optimum
operation performance.
Note Pass-through devices may not be added to a storage subsystem
which is configured in multiple-bus failover mode.
Syntax
ADD PASSTHROUGH passthrough-name SCSI-port-location
Parameter
passthrough-name
Names the device being added to or changed in a subsystem
configuration. This is the same name used with the ADD UNIT
command to create a host-addressable unit. You may want to use a
name indicating the type of device is being added as a passthrough
container, such as TAPE or LOADER.
The container name must start with a letter (A through Z) and may
consist of a maximum of nine characters including letters A
through Z, numbers 0 through 9, periods (.), dashes (-), or
underscores ( _ ).
Tip It is common to name a tape passthrough device TAPEptl,
where ptl is the tape’s Port-Target-LUN address. Although other
naming conventions are acceptable, this naming convention offers
the advantage of presenting to the user both the type of device and
its SCSI location in an intuitive manner.
16
ADD PASSTHROUGH
CLI Reference Manual
SCSI-port-location
Indicates the PTL address of the passthrough device. See “CLI
Command Descriptions,” on page 6 for an explanation of the
PTL addressing naming format.
Note See the HSZ70 Array Controller HSOF Version 7.3
Release Notes to confirm the passthrough device you are
planning to use is compatible with the controller.
Switches
TRANSFER_RATE_REQUESTED=ASYNCHRONOUS
TRANSFER_RATE_REQUESTED=20MHZ (Default)
TRANSFER_RATE_REQUESTED=10MHZ
TRANSFER_RATE_REQUESTED=5MHZ
This switch specifies the maximum data transfer rate for the
controller to use in communicating with the device. For example,
the transfer rate may need to be limited to accommodate long cable
lengths between the controller and the device, such as with a tape
library. The transfer rate is negotiated immediately and does not
require a restart in order to take effect.
Example
This example shows how to add tape device number 20300 to port 2,
target 3, LUN 0:
ADD PASSTHROUGH TAPE20300 2 3 0
ADD UNIT P100 TAPE20300
See also
ADD UNIT
DELETE container-name
SHOW DEVICES
SHOW PASSTHROUGH
SHOW passthrough-name
CLI Commands
ADD RAIDSET
17
ADD RAIDSET
Creates a RAIDset and adds the RAIDset to the controller
configuration. StorageWorks RAIDsets are often referred to as RAID
level 3/5 storagesets because they use the best characteristics of RAID
level 3 and RAID level 5. The number of members in the storageset is
determined by the number of containers specified by the containername parameter in the command. The data capacity of the RAIDset is
determined by the storage size of the smallest member.
Syntax
ADD RAIDSET RAIDset-name container-name1 container-name2
container-name3 ...container-nameN
Parameters
RAIDset-name
Assigns a name to the RAIDset. This name is also used with the
ADD UNIT command to identify the RAIDset as a hostaddressable unit.
The container name must start with a letter (A through Z) and may
consist of a maximum of nine characters including letters A
through Z, numbers 0 through 9, periods (.), dashes (-), or
underscores ( _ ).
Tip It is common to name a RAIDset RAIDn, where n is a
sequentially assigned, unique identifier. This naming convention
presents to the user both the type of container and its unique
identifier in an intuitive manner.
container-name1 container-name2 container-name3 ...containernameN
Specifies the disks making up the RAIDset.
18
ADD RAIDSET
CLI Reference Manual
Switches
POLICY=BEST_FIT
POLICY=BEST_PERFORMANCE (Default)
NOPOLICY
Switches set the selection criteria the controller uses to choose a
replacement member from the spareset when a RAIDset member
fails:
■
POLICY=BEST_FIT—use when choosing a replacement disk
drive from the spareset most closely matching the sizes of the
remaining members of the RAIDset. If more than one disk
drive in the spareset is the correct size, the controller selects
the disk drive giving the best performance.
■
POLICY=BEST_PERFORMANCE—use when choosing a
replacement disk drive from the spareset resulting in the best
performance of the RAIDset. The controller attempts to select
a disk on a different port than existing RAIDset members. If
there is more than one disk drive in the spareset matching the
best performance criteria, the controller selects the disk drive
most closely matching the size of the remaining members of
the RAIDset selected.
■
NOPOLICY—use to prevent the controller from automatically
replacing a failed disk device. This causes the RAIDset to
operate in a reduced state until a POLICY=BEST_FIT or
POLICY=BEST_PERFORMANCE is selected, or a member is
manually replaced in the mirrorset. See the “SET RAIDsetname,” Table 16 on page 101, for more information regarding
this procedure.
RECONSTRUCT=FAST
RECONSTRUCT=NORMAL (Default)
Sets the speed at which the controller reconstructs data to a new
RAIDset member replacing a the failed member:
■
RECONSTRUCT=FAST—use to allow the reconstruct process
to take precedence over other controller operations. When this
switch is specified, the controller uses more resources to
perform the reconstruction. Reconstruction takes less time, but
overall controller performance is reduced during
reconstruction
CLI Commands
ADD RAIDSET
■
19
RECONSTRUCT=NORMAL—use to balance other controller
operations with the reconstruct operation. The controller uses
relatively few resources to perform the reconstruct process.
Thus, there is little impact on performance.
REDUCED
NOREDUCED (Default)
The reduced/noreduced switch permits the addition of a RAIDset
missing a member:
■
REDUCED—use when you add a RAIDset missing a member.
■
NOREDUCED—use when all RAIDset members making
up the RAIDset are present—for instance, when creating a
new RAIDset.
Note Verify the RAIDset contains at least two disk drives
before specifying the REDUCED switch.
Examples
1. This example shows how to create a RAIDset named RAID9 containing
disks numbers 10000, 20100, and 30200:
ADD
ADD
ADD
ADD
DISK DISK10000 1 0 0
DISK DISK20100 2 1 0
DISK DISK30200 3 2 0
RAIDSET RAID9 DISK10000 DISK20100 DISK30200
2. This example shows how to create a RAIDset named RAID8 containing
disks numbers 10000, 20100, and 30200, and using the BEST_FIT
switch to indicate the replacement policy (enter the ADD RAIDSET
command on one line):
ADD DISK DISK10000 1 0 0
ADD DISK DISK20100 2 1 0
ADD DISK DISK30200 3 2 0
ADD RAIDSET RAID8 DISK10000 DISK20100 DISK30200
POLICY=BEST_FIT
20
ADD RAIDSET
CLI Reference Manual
3. This example creates RAIDset named RAID8, and then creates a hostaddressable unit:
INITIALIZE RAID8
ADD UNIT D304 RAID8
4. This example shows how you can create a three-member RAIDset from
the members of an already reduced four-member RAIDset. Do not
initialize the RAIDset again because it was initialized when it was
added:
ADD DISK DISK10300 1 3 0
ADD DISK DISK20400 2 4 0
ADD DISK DISK30500 3 5 0
ADD RAIDSET RAID6 DISK10300 DISK20400 DISK30500 reduced
Caution
Data contained on the RAIDset is erased if you reinitialize
the RAIDset.
See also
ADD UNIT
DELETE container-name
SET RAIDSET
SHOW RAIDSET
SHOW RAIDset-name
SHOW STORAGESETS
INITITALIZE
CLI Commands
ADD SPARESET
21
ADD SPARESET
Adds a disk drive to the spareset and initializes the metadata on it.
Syntax
ADD SPARESET disk-name
Parameter
disk-name
Indicates the name of the disk drive being added to the spareset.
Only one disk drive can be added to the spareset with each ADD
SPARESET command.
Switches
None.
Example
This example shows how to add disks numbered 20200 and 30300 to a
spareset:
ADD
ADD
ADD
ADD
DISK DISK20200 2 2 0
DISK DISK30300 3 3 0
SPARESET DISK20200
SPARESET DISK30300
See also
DELETE SPARESET
SET FAILEDSET
SHOW SPARESET
SHOW STORAGESETS
22
ADD STRIPESET
CLI Reference Manual
ADD STRIPESET
Creates a stripeset and adds it to the controller configuration. Stripesets
are sometimes referred to as RAID level 0 storagesets. The number of
members in the stripeset is determined by the number of containername parameters specified. Specify at least two disk drives for
RAIDsets.
Syntax
ADD STRIPESET stripeset-name container-name1 container-name2
...container-nameN
Parameters
stripeset-name
Assigns a name to the stripeset. This is the same name used with
the ADD UNIT command to identify the stripeset as a hostaddressable unit.
container-name1 container-name2 ...container-nameN
Indicates the name of name of the disk drive being added to or
changed in a subsystem configuration. This is the same name used
with the ADD UNIT command to create a host-addressable unit.
The container name must start with a letter (A through Z) and may
consist of a maximum of nine characters including letters A
through Z, numbers 0 through 9, periods (.), dashes (-), or
underscores ( _ ).
Tip It is common to name a stripeset STRIPEn, where n is a
sequentially assigned, unique identifier. This naming convention
presents to the user both the type of container and its unique
identifier in an intuitive manner.
container-name1 container-name2 ...container-nameN
Identifies the disk drives or mirrorsets making up the stripeset.
Switches
None.
CLI Commands
ADD STRIPESET
23
Examples
1. This example shows how to create a stripeset named STRIPE1 with
three disks numbered 10000, 20100, and 30200:
ADD
ADD
ADD
ADD
DISK DISK10000 1 0 0
DISK DISK20100 2 1 0
DISK DISK30200 3 2 0
STRIPESET STRIPE1 DISK10000 DISK20100 DISK30200
2. This example show how to create a stripeset named STRIPE1 and then
create a logical unit from it:
INITIALIZE STRIPE1
ADD UNIT D403 STRIPE1
3. This example shows how to create a two-member striped mirrorset (a
stripeset whose members are mirrorsets), and how to create a logical
unit from it. Because you can initialize the stripeset, you do not need to
individually initialize the mirrorsets.
ADD DISK DISK10000 1 0 0
ADD DISK DISK20100 2 1 0
ADD DISK DISK30200 3 2 0
ADD DISK DISK40300 4 3 0
ADD MIRRORSET MR1 DISK10000 DISK20100
ADD MIRRORSET MR2 DISK30200 DISK40300
ADD STRIPESET STRIPE1 MR1 MR2
INITIALIZE STRIPE1
ADD UNIT D304 STRIPE1
See also
ADD UNIT
ADD MIRRORSET
DELETE container-name
INITIALIZE
SHOW STORAGESET
SHOW STRIPESET
SHOW stripeset-name
24
ADD UNIT
CLI Reference Manual
ADD UNIT
Creates a logical unit from a device, container, or partition. The
controller maps all requests from the host to the logical-unit number as
requests to the container specified in the ADD UNIT command.
Initialize the disk drive or storageset container before adding it as a
logical unit.
Syntax
ADD UNIT unit-number container-name
Parameters
unit-number
Assigns a number to the unit being created from a device,
container, or partition in the subsystem. The host uses this number
to indicate the source or target for every I/O request it sends to the
controller. The unit-number is a host-addressable LUN.
container-name
Specifies the name of the container (that is, disk drive, device,
storageset, or partition) being used to create the unit.
The maximum of 32 devices are allowed in each unit.
Switches
Table 3 lists all switches for the ADD UNIT command and identifies
which switches may be used with each type of device or storageset.
Descriptions of each switch follow the table.
CLI Commands
25
Stripeset
Mirrorset
Non-Transportable Disk
Transportable Disk
CD-ROM
Partition
✓
✓
✓
✓
✓
✓
✓
PARTITION=partition-number
✓
✓
✓
✓
✓
✓
✓
MAXIMUM_CACHED_TRANSFER
✓
✓
✓
✓
✓
✓
✓
✓
✓
✓
✓
✓
✓
✓
✓
✓
✓
✓
✓
✓
✓
✓
✓
✓
✓
✓
✓
✓
✓
✓
✓
✓
✓
✓
✓
✓
Switch
ACCESS_ID=ALL
ACCESS_ID=unit identification
PREFERRED_PATH
NOPREFERRED_PATH
READ_CACHE
NOREAD_CACHE
RUN
NORUN
WRITE_PROTECT
NOWRITE_PROTECT
WRITEBACK_CACHE
NOWRITEBACK_CACHE
Passthrough
RAIDset
ADD UNIT Switches for New Containers
Container Type
Table 2
ADD UNIT
✓
✓
✓
ACCESS_ID=ALL (Default)
ACCESS_ID=unit identification
Grants exclusive unit access privileges to the host:
■
ACCESS_ID=ALL—Use to allow any host to access the unit.
■
ACCESS_ID=unit identification—Used to permit only the
specified initiator target ID to read from or write to the unit.
When used, the access ID number must be set to the initiator
SCSI ID number used by the host to communicate with the
controller.
26
ADD UNIT
CLI Reference Manual
Note Units added as passthrough LUNs do not accept
ACCESS_ID numbers. The ACCESS_ID switch for passthrough
LUNs is set to ALL by default.
PARTITION=partition_number
The partition switch identifies the unit number for a partition on a
container. The partition_number identifies the partition associated
with the unit number being added. Use the SHOW container_name
command to find the partition numbers used by the storageset or a
single-disk unit.
Note Partitions must have the same target ID number and be
part of the same container.
MAXIMUM_CACHED_TRANSFER=32 (Default)
MAXIMUM_CACHED_TRANSFER=n
Sets the largest number of write blocks to be cached by the
controller. The controller will not cache any transfers over the set
size. Accepted write block sizes are 1 through 1024.
Note Regardless of the storageset type, the RUN and NORUN
switches cannot be specified for partitioned units.
PREFERRED_PATH=OTHER_CONTROLLER
PREFERRED_PATH=THIS_CONTROLLER
NOPREFERRED_PATH (Default)
This switch may be set only when dual-redundant controllers are
operating in a multiple bus failover configuration. In a multiple bus
failover configuration, the host determines which controller the
units are accessed through. The host’s unit-to-controller settings
always take precedence over the preferred path assigned to units
with this switch. The target ID numbers assigned with the SET
controller ID= command determines which target ID number the
controller uses to respond to the host.
CLI Commands
ADD UNIT
27
Note If your controllers are configured to operate in
transparent failover mode, do not set the PREFERRED_PATH
switch with the ADD UNIT or SET unit-number command—
otherwise, an error message is displayed. The error message
indicates the assignment of a preferred controller path at the unit
level is valid only when operating in multiple bus failover mode.
When no preferred path is assigned, the unit is targeted through the
controller which detects the unit first after the controllers start.
Select PREFERRED_PATH=THIS_CONTROLLER to instruct “this
controller” to bring the units online.
Select PREFERRED_PATH=OTHER_CONTROLLER to instruct
the “other controller” to bring the units online.
See the HSZ70 Array Controller HSOF Version 7.3 Configuration
Manual for information regarding multiple bus failover.
Tip Subsystem performance is better if target ID numbers are
balanced across the dual-redundant pair.
READ_CACHE (Default)
NOREAD_CACHE
The READ_CACHE switch is used to set the controller cache read
policy function.
Read caching improves performance in almost all situations.
Therefore, it is recommended you leave its default setting
READ_CACHE enabled. However, read caching may not be
necessary (under certain conditions) since only a small amount of
data is cached (such as when performing a backup). In such
instances, it may be beneficial to disable the read cache function
and remove the processing overhead associated with caching data.
RUN (Default)
NORUN
Controls the unit's availability to the host:
■
RUN—use to make a unit available to the host.
28
ADD UNIT
CLI Reference Manual
■
NORUN —use to make a unit unavailable to the host and to
cause any data in cache to be flushed to one or more drives.
NORUN spins down the devices used in the unit. The drives
making up the unit spin down after the data has been
completely flushed.
Note Do not specify the RUN and NORUN switches for
partitioned storagesets.
WRITE_PROTECT
NOWRITE_PROTECT (Default)
Instructs the controller whether data contained on the unit can be
overwritten:
■
WRITE_PROTECT—use to prevent the host from writing data
to the unit. The controller may still write to a write-protected
RAIDset to complete a reconstruct operation and metadata,
reconstruct data, and copy data is still written to
RAIDsets and mirrorsets.
■
NOWRITE_PROTECT—use to allow the host to write data
to the unit. This allows the controller to overwrite existing
data.
WRITEBACK_CACHE
NOWRITEBACK_CACHE (Default)
Enable or disable the write-back data caching function of the
controller:
■
WRITEBACK_CACHE—use for all new units you want to take
advantage of the controller write-back caching feature.
■
NOWRITEBACK_CACHE—use for units you want to receive
data directly from the host without being cached.
Caution
Though there is built-in redundancy to protect data
contained in cache, allowing data to be written to write-back cache
may result in the loss of data if a catastrophic subsystem failure
occur.
CLI Commands
ADD UNIT
29
Examples
1. This example shows how to create unit D102 from a disk numbered
10000 and sets the host access to the unit through “this controller”:
ADD DISK DISK10000 1 0 0
INITIALIZE DISK10000
ADD UNIT D102 DISK10000
PREFERRED_PATH=THIS_CONTROLLER
2. This example shows how to create unit D107 from a RAIDset named
RAID9 and instructs the unit to take advantage of the controller’s writeback caching feature.
ADD DISK DISK10100 1 1 0
ADD DISK DISK20100 2 1 0
ADD DISK DISK30100 3 1 0
ADD DISK DISK40100 4 1 0
ADD RAIDSET RAID9 DISK10100 DISK20100 DISK30100
DISK40100
INITIALIZE RAID9
ADD UNIT D107 RAID9 WRITEBACK_CACHE
See also
CREATE_PARTITION
DELETE unit-number
SET unit-number
SHOW UNITS
30
CLEAR_ERRORS CLI
CLI Reference Manual
CLEAR_ERRORS CLI
Stops the display of current or previous error messages at the CLI
prompt. This command does not clear the error conditions, it only stops
the display of errors at the CLI prompt.
After the cause of the error condition has been corrected, issue the
CLEAR_ERRORS CLI command to clear the error message.
Enter this command to clear errors existing from previous error
conditions.
Syntax
CLEAR_ERRORS CLI
Parameters
None.
Switches
None.
Example
This example shows how to clear the message “All NVPM components
initialized to their default settings” from the CLI prompt:
ALL NVPM COMPONENTS INITIALIZED TO THEIR DEFAULT
SETTINGS
CLEAR_ERRORS CLI
See also
CLEAR_ERRORS INVALID_CACHE
CLEAR_ERRORS LOST_DATA
CLEAR_ERRORS UNKNOWN
CLEAR_ERRORS UNWRITEABLE_DATA
CLI Commands
CLEAR_ERRORS controller INVALID_CACHE
31
CLEAR_ERRORS controller INVALID_CACHE
Clears an invalid cache error and allows the controller and cache to
resume operation. If the error is due to an incorrectly mirrored
configuration, the controller indicates mirrored mode status after the
error is cleared.
Use this command in the following situations:
■ When the controller or cache modules have been replaced,
resulting in mismatched data between the controllers.
■ When the controller or cache module is replaced while data is
still in cache and not properly flushed with the SHUTDOWN
or
SET NOFAILOVER COPY= commands.
Syntax
CLEAR_ERRORS controller INVALID_CACHE
Note
Completely spell out the phrase INVALID_CACHE.
Parameters
controller
Identifies which controller is to receive the CLEAR_ERRORS
command. You must specify this_controller or other_controller.
Switches
DATA-RETENTION-POLICY
This parameter instructs the controller on how to handle write-back
cached data:
■
NODESTROY_UNFLUSHED_DATA
■
DESTROY_UNFLUSHED_DATA
NODESTROY_UNFLUSHED_DATA (default)
DESTROY_UNFLUSHED_DATA
32
CLEAR_ERRORS controller INVALID_CACHE
CLI Reference Manual
■
NODESTROY_UNFLUSHED_DATA—use to retain the cached
data and discard controller information in the following
situations:
– If the controller module has been replaced.
– If the controller’s nonvolatile memory (NVMEM) has lost
its contents, possibly from an NVMEM battery failure.
■
DESTROY_UNFLUSHED_DATA—use to retain the controller
information and discard the cached data in the following
situations:
– If the cache module has been replaced.
– Any other reason not listed above.
Caution
Specifying the DESTROY_UNFLUSHED_DATA switch
destroys data remaining in cache, which can result in the possible
loss of data.
Examples
1. This example shows how to clear an invalid cache error on “this
controller” after you have replaced a controller module. Enter the
command on one line.
CLEAR_ERRORS THIS_CONTROLLER INVALID_CACHE
NODESTROY_UNFLUSHED_DATA
2. This example shows how to clear an invalid cache error on the “other
controller” after a cache module has been replaced. Enter this command
on the same line. Enter the command on one line.
CLEAR_ERRORS OTHER_CONTROLLER INVALID_CACHE
DESTROY_UNFLUSHED_DATA
See also
CLEAR_ERRORS CLI
CLEAR_ERRORS LOST_DATA
CLEAR_ERRORS UNKNOWN
CLEAR_ERRORS UNWRITEABLE_DATA
CLI Commands
CLEAR_ERRORS unit-number LOST_DATA
33
CLEAR_ERRORS unit-number LOST_DATA
Clears lost data errors on a selected unit (all partitions on the unit’s
container are effected).
The controller reports a lost data error on the unit when:
■ You remove a write-back cache module, or
■ When the cache module contains unflushed data.
These conditions may exist possibly due to an interruption in the
primary power source and no backup power is present. The
CLEAR_ERRORS LOST_DATA command clears the lost data error
but does not recover the lost data.
Note Clearing lost data errors or lost data block errors on a RAIDset
causes a reconstruction of all parity blocks. Clearing lost data errors or
lost data block errors on a mirrorset causes members to normalize.
Syntax
CLEAR_ERRORS unit-number LOST_DATA
Note
Completely spell out the phrase LOST_DATA.
Caution
This command may cause data loss.
Parameters
unit-number
Identifies the unit on which the lost data error is to be cleared. The
unit-number is the same name given to the unit when you added it
to the controller’s configuration.
Switches
None.
34
CLEAR_ERRORS unit-number LOST_DATA
CLI Reference Manual
Example
This example shows how to clear the lost data error on disk storage unit
number 103:
CLEAR_ERRORS D103 LOST_DATA
See also
CLEAR_ERRORS CLI
CLEAR_ERRORS INVALID_CACHE
CLEAR_ERRORS UNKNOWN
CLEAR_ERRORS UNWRITEABLE_DATA
CLI Commands
CLEAR_ERRORS UNKNOWN
35
CLEAR_ERRORS UNKNOWN
Clears unknown errors from a device the controller identifies as
unknown or not correctly configured.
If a device failure causes the controller to label the device as unknown,
the controller does not check the device again to see if it has been
repaired or if the error condition has been corrected. You must enter
this command so the controller can recognize the device after the cause
of the error has been corrected.
Use this command to force the controller to recognize a failed
device, regardless of the controller’s prior evaluation of the
device’s condition.
Syntax
CLEAR_ERRORS device-name UNKNOWN
Note
Completely spell out the word UNKNOWN.
Parameters
device-name
Identifies the device with the unknown error.
Switches
None.
Example
This example shows how to force the controller to recognize a
previously unknown storage device named DISK30000:
CLEAR_ERRORS DISK30000 UNKNOWN
See also
CLEAR_ERRORS CLI
CLEAR_ERRORS INVALID_CACHE
CLEAR_ERRORS UNKNOWN
CLEAR_ERRORS UNWRITEABLE_DATA
36
CLEAR_ERRORS unit-number UNWRITEABLE_DATA
CLI Reference Manual
CLEAR_ERRORS unit-number UNWRITEABLE_DATA
This command clears an unwriteable data error on a selected unit
(affecting all partitions on the same container).
If a storageset or disk drive fails before its data has been written to the
it, the controller reports an unwriteable data error. The
CLEAR_ERRORS UNWRITEABLE_DATA command removes the
data from the cache and clears the unwriteable data error.
Caution
This command causes data loss.
Syntax
CLEAR_ERRORS unit-number UNWRITEABLE_DATA
Note
Completely spell out the phrase UNWRITEABLE_DATA.
Parameters
unit-number
Identifies the unit having the unwriteable data error. The unitnumber is the name given to the unit when it was created with the
ADD UNIT command.
Switches
None.
Example
This example shows how to clear the unwriteable data error on disk
unit D103:
CLEAR_ERRORS D103 UNWRITEABLE_DATA
See also
CLEAR_ERRORS CLI
CLEAR_ERRORS INVALID_CACHE
CLEAR_ERRORS LOST_DATA
CLEAR_ERRORS UNKNOWN
RETRY_ERRORS UNWRITEABLE_DATA
CLI Commands
CREATE_PARTITION
37
CREATE_PARTITION
This command divides a non-transportable disk drive or single-disk
storageset into several, separately-addressable storage units. The
command marks a specified percentage of a disk drive or storageset to
be used as a separately addressable unit. You can divide any nontransportable disk into a maximum of eight partitions. Each partition
can be separately presented to the host. Partitions are not supported in
multiple bus failover mode. Initialize disks and storagesets before
creating partitions.
Note Partitioned storagesets and partitioned single-disk units cannot
function in multiple-bus failover dual-redundant configurations.
Because they are not supported, you must delete your partitions before
configuring the controllers for multiple bus failover.
After you partition a container, you must initialize it before destroying
the partitions.
Syntax
CREATE_PARTITION container-name SIZE=percent
Parameters
container-name
Identifies the disk or storageset to partition. This is the same name
given to the disk or storageset when it was created with the ADD
command (for example, ADD DISK, ADD STRIPESET, and so
forth). Any disk, stripeset, mirrorset, striped mirrorset, or RAIDset
can be partitioned. A transportable disk cannot be partitioned. You
must initialize the container before creating a partition.
Switches
SIZE=percent
SIZE=LARGEST
Specifies the size of the partition to be created as a percentage of
the total container’s storageset size.
38
CREATE_PARTITION
CLI Reference Manual
■
SIZE=percent—use to create a partition by specifying a
percentage of the container’s total capacity. The entire
container is then divided into segments equal to the percentage
specified. For example, if SIZE=20, the container is divided
into five (1.0/0.2=5) equal segments. The resulting partition is
slightly smaller than the size specified because metadata also
accompanies each partition.
■
SIZE=LARGEST—use in the following situations:
– To have the controller create the largest partition possible
from unused space on the disk or storageset.
– To create the last partition on a container. Because the
remaining space is not equal to an exact percentage value,
specifying LARGEST allows you to optimize use of the
remaining space.
Example
This example shows how to create a RAIDset named RAID9 and
divide it into four equal parts. It also creates host-addressable units for
each partition:
ADD DISK DISK10000 1 0 0
ADD DISK DISK20100 2 1 0
ADD DISK DISK30200 3 2 0
ADD RAIDSET RAID9 DISK10000 DISK20100 DISK30200
INITIALIZE RAID9
CREATE_PARTITION RAID9 SIZE=25
CREATE_PARTITION RAID9 SIZE=25
CREATE_PARTITION RAID9 SIZE=25
CREATE_PARTITOIN RAID9 SIZE=LARGEST
ADD UNIT D101 RAID9 PARTITION=1
ADD UNIT D102 RAID9 PARTITION=2
ADD UNIT D103 RAID9 PARTITION=3
ADD UNIT D104 RAID9 PARTITION=4
See also
ADD UNIT
DELETE unit-number
DESTROY PARTITION
SHOW
CLI Commands
DELETE container-name
39
DELETE container-name
Deletes a container from the controller configuration. However, any
container in use by a higher-level container cannot be deleted. For
example, you cannot delete a disk belonging to a member of a
RAIDset, or a RAIDset being declared as a unit; you must first delete
the higher-level container or containers.
Note This command does not delete spareset or failedsets. Spareset
and failedset containers cannot be deleted.
When a container is deleted, the individual disks are free to be used by
another container. If the container is again created with the exact same
disk configuration, and none of the disks have been used for anything,
then the container can be reassembled using its original disks.
Syntax
DELETE container-name
Parameters
container-name
Specify container-name to identify the container to be deleted.
This is the name given to the container when it was created using
the ADD command (for example, ADD DISK, ADD STRIPESET,
and so forth).
Switches
None.
Examples
1. This example shows how to delete a disk unit number 10000:
DELETE DISK10000
2. This example shows how to delete a stripeset named STRIPE1:
DELETE STRIPE1
3. This example shows how to delete a RAIDset named RAID9:
DELETE RAID9
40
DELETE container-name
CLI Reference Manual
See also
DELETE FAILEDSET
DELETE SPARESET
UNMIRROR
CLI Commands
DELETE FAILEDSET disk-name
41
DELETE FAILEDSET disk-name
Removes a disk drive from the failedset. The failedset contains disk
drives removed by the controller from RAIDsets and mirrorsets
because they failed or were manually removed using the SET
command. Enter the DELETE FAILEDSET command before removing
failed members from the storage shelf for testing, repair, or
replacement.
Regard disk drives in the failedset defective. Repair or replace
defective disk devices.
Syntax
DELETE FAILEDSET disk-name
Parameter
disk-name
Identifies the disk you want to delete from the failedset. Remove
only one disk at a time from a failedset.
Switches
None.
Example
This example shows how to delete DISK20200 from the failedset:
DELETE FAILEDSET DISK20200
See also
SET FAILEDSET
SHOW FAILEDSET
42
DELETE SPARESET disk-name
CLI Reference Manual
DELETE SPARESET disk-name
Removes a disk drive from the spareset.
Syntax
DELETE SPARESET disk-name
Parameter
disk-name
Identifies the disk drive being deleted from the spareset.
Note
Remove only one disk at a time from a spareset.
Switches
None.
Example
This example shows how to remove DISK20300 from the spareset:
DELETE SPARESET DISK20300
See also
ADD SPARESET
SHOW SPARESET
CLI Commands
DELETE unit-number
43
DELETE unit-number
Deletes a logical unit from the controller configuration. The host cannot
address deleted units, deleted devices, storagesets, or partitions. If the
controller’s write-back caching feature is enabled, the controller flushes
the cached data to the unit’s devices before deleting the unit.
Note Before using the DELETE unit-number command, clear any
errors with the CLEAR_ERRORS UNWRITEABLE_DATA or
CLEAR_ERRORS LOST_DATA commands.
Syntax
DELETE unit-number
Parameters
unit-number
Specify unit-number to identify the unit number to be deleted. This
is the name given to the unit when it was created using the ADD
UNIT command.
Switches
None.
Example
This example shows how to delete disk unit number 103:
DELETE D103
See also
ADD UNIT
CLEAR_ERRORS LOST_DATA
CLEAR_ERRORS UNWRITEABLE_DTA
DESTROY_PARTITION
44
DESTROY_PARTITION
CLI Reference Manual
DESTROY_PARTITION
Labels a reserved partition as available. The partition is then
consolidated with any adjacent available partitions.
Caution
Data contained in the selected partition is lost when you
enter the DESTROY_PARTITION command.
You cannot destroy a partition that has been assigned a unit number.
First enter the DELETE unit-number command to delete the unit using
the partition.
Syntax
DESTROY_PARTITION container-name PARTITION=partitionnumber
Parameters
container-name
Identifies the disk or storageset containing the partition to be
destroyed. This is the name given to the container when it was
created using the ADD command (for example, ADD DISK, ADD
STRIPESET, and so forth).
partition-number
Identifies the partition to be destroyed. Use the SHOW containername command to identify the correct partition before carrying out
the DESTROY_PARTITION command.
Switches
None.
Example
This example shows how to delete the unit for partition 2 on RAIDset
RAID9 and destroy the partition:
DELETE D102
DESTROY_PARTITION RAID9 PARTITION=2
CLI Commands
DESTROY_PARTITION
See also
CREATE_PARTITION
DELETE unit-number
SHOW
45
46
DIRECTORY
CLI Reference Manual
DIRECTORY
Lists the diagnostics and utilities available on the controller that the
maintenance terminal is plugged into (“this controller”).
Syntax
DIRECTORY
Parameters
none.
Switches
None.
Example
This example displays a sample directory listing:
DIRECTORY
HSUTILV70Z
D
FRUTILV70Z
D
CFMENUV70Z
D
CHVSN V70Z
D
CLCP
V70Z
D
CLONE V70Z
D
CONFIGV70Z
D
DILX
V70Z
D
DIRECTV70Z
D
DSTAT V70Z
D
FMU
V70Z
D
VTDPY V70Z
D
Note CHVSN and DSTAT are not user utilities. They may be used
by authorized service personnel only.
See also
RUN
CLI Commands
HELP
47
HELP
Displays a brief explanation of how to use the question mark (?) to
obtain help on any command or CLI function. You must precede the
question mark with a space.
Syntax
HELP
Parameters
None.
Switches
None.
Example
This example shows how to display information regarding the HELP
command:
HELP
Help may be requested by typing a question mark (?) at the CLI
prompt. This will print a list of all available commands For
further information you may enter a partial command and type
a space followed by a (?) to print a list of all available
options at that point in the command. For example:
SET THIS_CONTROLLER ?
Prints a list of all legal SET THIS_CONTROLLER commands
This example shows how to get help on the SET command using the
question mark (?):
SET ?
Your options are:
EMU
FAILOVER
NOFAILOVER
MULTIBUS_FAILOVER
NOMULTIBUS_FAILOVER
48
HELP
CLI Reference Manual
OTHER_CONTROLLER
THIS_CONTROLLER
LOG
FAILEDSET
Unit number or mirrorset or raidset or device name
CLI Commands
INITIALIZE
49
INITIALIZE
Initializes a designated container. This allows a logical unit to be
associated with it. During initialization, a small amount of disk space is
reserved for controller metadata and is made inaccessible to the host.
Disks made transportable do not contain controller metadata.
Syntax
INITIALIZE container-name
Caution
The INITIALIZE command destroys all user data on the
selected container unless you enter the NODESTROY switch.
If you make a single-disk container transportable, any metadata
contained on the disk is destroyed and the entire disk drive is accessible
by the host.
Use the INITIALIZE command when:
■ Creating a unit from a newly installed disk.
■ Creating a unit from a newly created RAIDset, stripeset, or
mirrorset.
■ Initializing the data structure of a previously partitioned container.
Do not use the INITIALIZE command when:
Creating a unit from the same disks previously initialized, such as
when a RAIDset is moved.
■ Creating a storageset from deleted members.
■ Adding a RAIDset with the REDUCED switch.
■
Parameters
container-name
Specifies the container to initialize. This is the same name given to
the disk or storageset when it was created using the ADD
command (for example, ADD DISK, ADD STRIPESET, and so
forth).
50
INITIALIZE
CLI Reference Manual
Switches
CHUNKSIZE=DEFAULT (Default)
CHUNKSIZE=n
Specifies the block chunksize to be used for RAIDsets and
stripesets:
■
CHUNKSIZE=DEFAULT—use to allow the controller to
determine the optimal chunk block size.
■
CHUNKSIZE=n—use to specify the chunk block size.
Note
The CHUNKSIZE switch does not apply to mirrorsets.
The default chunk size for storagesets is:
■
Less than nine members = 256 blocks (128 kilobytes).
■
More than nine members = 128 blocks (64 kilobytes).
The default values provide optimal storageset performance for a
wide variety of applications. A chunksize less than 128 blocks
(64K) is not recommended.
Tip Accept the default chunksize setting for most applications.
Do not change the default setting unless you are fully aware of the
impact to the storageset performance.
See the HSZ70 Array Controller HSOF Version 7.3 Configuration
Manual for information regarding recommended chunksize
settings for your application.
DESTROY (Default)
NODESTROY
Controls how the metadata on the initialized container is to be
handled:
■
NODESTROY—use to preserve forced error metadata during
the initialization process. Use NODESTROY only when a unit
is to be created from disk drives reduced from mirrorsets. This
CLI Commands
INITIALIZE
51
allows the data on the container to be accessed by a disk,
stripeset, or mirrorset unit. This switch is ignored for RAIDsets
and single-disk configurations.
■
DESTROY —use to overwrite user data and forced error flags
during the initialization.
Note The DESTROY and NODESTROY switches are only
valid with stripesets and mirrorsets.
SAVE_CONFIGURATION
NOSAVE_CONFIGURATION (Default)
Instructs the controller whether to save the controller configuration
to the container being initialized. See also
SET controller INITIAL_CONFIGURATION on page 71.
Save configuration is intended only for use with single controller
applications. The SAVE_CONFIGURATION switch requires only
one disk to be initialized with this option. However, more disks
may be used if desired.
■
SAVE_CONFIGURATION —use to store a copy of the
controller configuration on the container being initialized. A
new controller can receive information from a container
containing configuration information saved with the
SAVE_CONFIGURATION switch.
If SAVE_CONFIGURATION is specified for a multi-device
storageset, such as a stripeset, the complete controller
configuration information is stored on each disk drive in the
storageset.
A disk drive initialized with the SAVE_CONFIGURATION
switch specified has slightly less storage space available for
user data.
■
NOSAVE_CONFIGURATION—use if you do not want to store
a copy of the controller configuration on a container.
See the HSZ70 Array Controller HSOF Version 7.3 Configuration
Manual for more information regarding
SAVE_CONFIGURATION.
52
INITIALIZE
CLI Reference Manual
Examples
1. This example shows how to initialize container DISK10000 and how to
save a copy of the controller configuration on it.
ADD DISK DISK10000 1 0 0
INITIALIZE DISK10000 SAVE_CONFIGURATION
2. The follows example shows sample devices with the
SAVE_CONFIGURATION switch enabled:
SHOW DEVICES FULL
Name
Type
Port Targ
Lun
Used by
----------------------------------------------------------------------------DISK10000
disk
DEC
RZ28M
1
0
0
S2
(C) DEC 1003
Switches:
NOTRANSPORTABLE
TRANSFER_RATE_REQUESTED = 20MHZ (synchronous 10.00 MHZ negotiated)
Size: 4108970 blocks
Configuration being backed up on this container
DISK30300
disk
DEC
RZ28M
3
3
0
S2
(C) DEC 1003
Switches:
NOTRANSPORTABLE
TRANSFER_RATE_REQUESTED = 20MHZ (synchronous 10.00 MHZ negotiated)
Size: 4108970 blocks
Configuration being backed up on this container
TAPE40300
passthrough tape
DEC
TZS20
4
3
0
P1107
(C)DEC 01ab
Switches:
TRANSFER_RATE_REQUESTED = 20MHZ (synchronous 10.00 MHZ negotiated)
CLI Commands
INITIALIZE
53
Example
This example shows how to initialize stripeset STRIPE1 with the
default chunksize. The chunksize does not have to be specified. The
controller initializes the unit with the default chunksize.
ADD DISK DISK10100 1 1 0
ADD DISK DISK20100 2 1 0
ADD DISK DISK30100 3 1 0
ADD STRIPESET STRIPE1 DISK10100 DISK20100 DISK30100
INITIALIZE STRIPE1
This example shows how to initialize RAIDset RAID9 with a
chunksize of 20:
ADD DISK DISK10200 1 2 0
ADD DISK DISK20200 2 2 0
ADD DISK DISK30200 3 2 0
ADD RAIDSET RAID9 DISK10200 DISK20200 DISK30200
INITIALIZE RAID9 CHUNKSIZE=20
This example shows how to initialize DISK40400 and preserve the data
after it is removed (reduced) from a mirrorset:
REDUCE DISK40400
INITIALIZE DISK40400 NODESTROY
54
LOCATE
CLI Reference Manual
LOCATE
Indicates the location of configured units, storagesets, and devices by
flashing the amber device fault LED on the front of the storage building
block (SBB). The device fault LED flashes once per second until
turned off with the LOCATE CANCEL command. The LOCATE
command can also be used to test the LED itself.
The device fault LED on a failed device stays on continuously. When
located, the device fault LED on a good device flashes. The flashing
LED helps to distinguish between located devices and failed devices.
The device fault LED on failed devices stays on after the LOCATE
CANCEL command is entered.
Syntax
LOCATE parameter
Parameters
Note Only one of the following parameters may be entered with each
LOCATE command.
all
Causes the amber device fault LEDs of all configured devices to
flash. You can also use specify ALL to test all of the LEDs at once.
Enter LOCATE cancel to turn off the LEDs.
cancel
Turns off all amber device fault LEDs turned on with the LOCATE
command.
disks
Causes the amber device fault LEDs of all configured disks to
flash. Enter LOCATE cancel to turn off the LEDs.
opticals
Causes the amber device fault LEDs of all configured optical
devices to flash. Enter LOCATE cancel to turn off the LEDs.
ptl (SCSI-location)
Causes the amber device fault LED on the device at the given
SCSI location to flash. See the HSZ70 Array Controller HSOF
CLI Commands
LOCATE
55
Version 7.3 Configuration Manual for an explanation of the PTL
addressing naming format.
Note Not all devices have a device fault LED. Therefore, they
do not appear to respond to the LOCATE command.
units
Causes the amber device fault LEDs of all devices used by the
units to flash. This command is useful to determine which devices
are not currently configured into logical units. Enter LOCATE
cancel to turn off the device fault LEDs.
container-name
Causes the amber device fault LEDs on the devices within the
container-name to flash. If a device name is given, the device’s
fault LED is turned on. If a storageset name is given, the fault LED
on all of the devices assigned to the storageset turns on. Use
LOCATE cancel to turn off the LEDs.
unit-number
Causes the amber device fault LEDs on the devices making up the
unit-number to flash. Use LOCATE cancel to turn off the LEDs.
Switches
None.
Examples
1. This example shows how to cause the amber device fault LED on device
DISK10000 to flash:
LOCATE DISK10000
LOCATE CANCEL
2. This example shows how to cause the device fault LEDs on all of the
devices assigned to disk unit number D102 to flash:
LOCATE D102
3. This example shows how to cause the device fault LEDs on all
configured disk devices to flash:
LOCATE DISKS
56
LOCATE
CLI Reference Manual
4. This example shows how to turn off the flashing device fault LEDs on
all devices:
LOCATE CANCEL
CLI Commands
MIRROR
57
MIRROR
Creates a one-member mirrorset from a single disk. This command is
used only on disks configured as units or members of a stripeset. Enter
the ADD MIRRORSET command to create a mirrorset from disk
drives not already members of higher level containers.
After the disk drive is converted to a mirrorset, increase the nominal
number of members by entering the
SET mirrorset-name MEMBERSHIP=number-of-members command.
Enter the |SET mirrorset-name REPLACE=disk-name command to add
more members to the mirrorset.
Syntax
MIRROR disk-name mirrorset-name
Parameters
disk-name
Specifies the name of the disk to convert to a one-member
mirrorset. The disk must be part of a unit.
mirrorset-name
Assigns a name for the mirrorset.
Note It is common to name a mirrorset MIRRn, where n is a
sequentially assigned, unique identifier. Other naming
conventions are acceptable, but this naming convention presents
to the user both the type of container and its unique identifier in
an intuitive manner.
Switches
COPY=FAST
COPY=NORMAL (Default)
Sets the speed at which the controller copies data from a normal
mirrorset member, or members, to new members:
■
COPY=FAST —use when the creation of mirrored data is to
take priority over other controller operations. The controller
uses more resources to create the mirrored data. Copying takes
less time, but overall controller performance is reduced.
58
MIRROR
CLI Reference Manual
■
COPY=NORMAL—use when other controller operations are to
take priority over the copy operation. The controller uses
relatively few resources when creating the mirrored data,
resulting in minimal impact on performance.
POLICY=BEST_FIT
POLICY=BEST_PERFORMANCE
NOPOLICY (Default)
Sets the selection criteria the controller uses to choose a
replacement member from the spareset when a mirrorset member
fails:
■
POLICY=BEST_FIT—use to choose a replacement disk drive
from the spareset most closely matching the individual
capacities of the remaining members. If there is more than one
disk drive in the spareset most closely matching the capacity of
the remaining members, the controller selects the disk drive
having the best performance.
■
POLICY=BEST_PERFORMANCE —use to choose a
replacement disk drive from the spareset resulting in the best
performance. The controller attempts to select a disk on a
different port than existing members. If there is more than one
disk drive in the spareset matching the best performance
criteria, the controller selects the disk drive most closely
matching the individual capacities of the remaining members.
■
NOPOLICY —use to prevent the controller from automatically
replacing a failed disk device. This causes the mirrorset to
operate in a reduced state until a POLICY=BEST_FIT or
POLICY=BEST_PERFORMANCE is selected, or a member is
manually replaced in the mirrorset. See “SET mirrorset-name,”
page 91.
Example
This example shows how to create a one-member mirrorset from each
member of a stripeset. The succeeding commands:
■ Set the nominal number of members in each mirrorset to two
■ Add a second disk to each mirrorset.
CLI Commands
MIRROR
59
It is not necessary to initialize the mirrorsets or add them as units; the
higher-level structure of the stripeset is carried down to the mirrorsets.
ADD DISK DISK10100 1 1 0
ADD DISK DISK20100 2 1 0
ADD DISK DISK30100 3 1 0
ADD DISK DISK10200 1 2 0
ADD DISK DISK20200 2 2 0
ADD DISK DISK30200 3 2 0
ADD STRIPESET STRIPE1 DISK10100 DISK20100 DISK30100
INITIALIZE STRIPE1
ADD UNIT D102 STRIPE1
MIRROR DISK10100 MIRROR1
SET MIRROR1 MEMBERSHIP=2
SET MIRROR1 REPLACE=DISK20200
MIRROR DISK20100 MIRROR2
SET MIRROR2 MEMBERSHIP=2
SET MIRROR2 REPLACE=DISK30200
MIRROR DISK30100 MIRROR3
SET MIRROR3 MEMBERSHIP=2
SET MIRROR3 REPLACE=DISK10200
See also
ADD MIRRORSET
REDUCE
SHOW MIRRORSETS
UNMIRROR
60
REDUCE
CLI Reference Manual
REDUCE
Removes member disk drives from mirrorsets and decreases the
nominal number of members in the mirrorsets.
Unlike the SET mirrorset-name REMOVE=disk-name command,
reduced members are not placed into the failedset. When using the
REDUCE command to copy a striped mirrorset, you must reduce all
mirrorsets at the same time with one command (the CLONE utility
does this automatically).
The nominal number of members in a mirrorset is determined by the
number of members assigned to the mirrorset with one of the following
commands:
■ SET mirrorset-name MEMBERSHIP=number-of-members
■ ADD MIRRORSET mirrorset-name disk-name1 [disk-nameN]
In other words, the number of disks that the mirrorset originally
contained before reductions are applied to it.
The actual number of members contained in the mirrorset may be less
than the nominal number of members if:
■ A disk drive is not added back to the mirrorset
■ A member remains removed from the mirrorset
■ The mirrorset replacement policy switch NOPOLICY is specified
with the SET mirrorset-name command
■ No spare disks exist
The actual number of members in the mirrorset can never be greater
than the nominal number of members. The disks to be removed do not
need to be members of the same mirrorset. However, the disks must all
be part of the same unit (for example, the same striped mirrorset).
When a disk is reduced from a mirrorset, the controller:
■ Pauses I/O to the unit
■ Flushes all of the unit’s data from write-back data cache
■ Removes the specified mirrorset disk(s)
■ Decreases the nominal number of members of the mirrorset(s) by
the number of disk(s) removed from the mirroset(s).
CLI Commands
REDUCE
61
For each reduced mirrorset, there must be at least one remaining
normal member after the reduction. If this is not true for all of the disknames specified, the mirrorset is not reduced.
Only normal members can be reduced. A normal member is a mirrorset
member whose entire contents are the same as all other normal
members within the mirrorset.
Note An error is displayed if you attempt to reduce the only normal
mirrorset member.
Syntax
REDUCE disk-name1 disk-name2 disk-name3...
Parameters
disk-name1 disk-name2 disk-name3...
Specifies one or more names of one or more normal
mirrorset members to be removed. Multiple members can be
removed with the REDUCE command.
Switches
None.
Example
This example shows how to remove DISK20100, DISK20500, and
DISK40200 from their respective mirrorsets:
SHOW STRIPE1
Name
Storageset
Uses
Used by
----------------------------------------------------------------------STRIPE1
stripeset
MIRR1
D304
MIRR2
MIRR3
SHOW MIRRORSETS
Name
Storageset
Uses
Used by
-----------------------------------------------------------------------
62
REDUCE
MIRR1
CLI Reference Manual
mirrorset
DISK10100
STRIPE1
DISK20100
MIRR2
mirrorset
DISK10200
STRIPE1
DISK20500
MIRR3
mirrorset
DISK30300
STRIPE1
DISK40200
REDUCE DISK20100 DISK20500 DISK40200
SHOW MIRRORSETS
Name
Storageset
Uses
Used by
-----------------------------------------------------------------------MIRR1
mirrorset
DISK10100
STRIPE1
MIRR2
mirrorset
DISK10200
STRIPE1
MIRR3
mirrorset
DISK30300
STRIPE1
See also
ADD MIRRORSET
MIRROR
RUN CLONE
SHOW MIRRORSET
SET mirrorset-name
CLI Commands
RENAME
63
RENAME
Renames a specified container.
Syntax
RENAME old-container-name new-container-name
Parameters
old-container-name
Specifies the existing name of the container.
new-container-name
Assigns the new name for the container.
See “Command Syntax,” on page 6, for information regarding
container naming rules.
Note
Units may not be renamed.
Switches
None.
Example
This example shows how to rename DISK10000 to MYDISK:
SHOW DISKS
Name
Type
Port Targ Lun
Used by
------------------------------------------------------------------------DISK10000
disk
DISK10100
. . . . . . . . . . . . . . . . . . . . .
1
disk
1
1
0
0
0
D100
D101
RENAME DISK10000 MYDISK
SHOW DISKS
Name
Type
Port Targ Lun
Used by
-------------------------------------------------------------------MYDISK
disk
1
0
0
D100
DISK10100
disk
1
1
0
D101
64
RESTART controller
CLI Reference Manual
RESTART controller
Flushes all user data from the specified controller’s write-back cache (if
present) and restarts the controller. This operation could take several
minutes depending upon how much data needs to be flushed from
cache.
Syntax
RESTART controller
Parameters
controller
The controller parameter indicates which controller is to be
restarted. Specify other_controller or this_controller.
Switches
IGNORE_ERRORS
NOIGNORE_ERRORS (Default)
Switches control the reaction of the controller based on the
status of write-back cache:
Caution
The IGNORE_ERRORS and IMMEDIATE_SHUTDOWN
switches cause the controller to keep unflushed data in the writeback cache until it restarts and is able to write the data to
devices. Do not perform any hardware changes until the
controller flushes the cache.
■
IGNORE_ERRORS—use to instruct the controller to restart
even if the data within write-back cache cannot be written
to the devices.
■
NOIGNORE_ERRORS—use to instruct the controller to not
restart if the data within write-back cache cannot be
written to the devices.
IMMEDIATE_SHUTDOWN
NOIMMEDIATE_SHUTDOWN (Default)
Instructs the controller when to shutdown:
CLI Commands
RESTART controller
65
■
IMMEDIATE_SHUTDOWN—use to instruct the controller
to restart immediately without checking for online devices
or before flushing data from the write-back cache to
devices.
■
NOIMMEDIATE_SHUTDOWN —use to instruct the
controller not to restart without checking for online
devices or before all data has been flushed from writeback cache to the devices.
Examples
1. This example shows how to restart “this controller”:
RESTART THIS_CONTROLLER
2. This example shows how to restart the “other controller”:
RESTART OTHER_CONTROLLER
See also
SELFTEST controller
SHUTDOWN controller
66
RETRY_ERRORS UNWRITEABLE_DATA
CLI Reference Manual
RETRY_ERRORS UNWRITEABLE_DATA
Causes the controller to attempt to write previously unwriteable data
from the write-back cache to the devices. If a container fails, an
unwriteable data error is reported. This is due to the write-back cache
data not being written to the container. If possible, correct the condition
causing the unwriteable data and try the write operation again. No data
is lost if the retry fails.
Syntax
RETRY_ERRORS unit-number UNWRITEABLE_DATA
Parameter
unit-number
Identifies the unit number to which the data contained in writeback cache tries to write. The unit-number is the same name given
to the unit when it was created using the ADD UNIT command.
Switches
None.
Example
This example shows how to retry writing the cached data previously
marked unwriteable to disk storage unit 103:
RETRY_ERRORS D103 UNWRITEABLE_DATA
See also
CLEAR_ERRORS UNWRITEABLE_DATA
CLI Commands
RUN
67
RUN
Runs a diagnostic or utility program on “this controller” (diagnostic
and utility programs may only be run on “this controller”).
Syntax
RUN program-name
Parameter
program-name
The program-name parameter specifies the name of the diagnostic
or utility program to be run. The following programs can currently
be run:
■
cfmenu—A utility used to configure storage devices attached
to the controller. See the HSZ70 Array Controller HSOF
Version 7.3 Configuration Manual for more information
regarding this utility.
■
chvsn—This is not a user utility. This utility may be used by
authorized service personnel only.
■
clcp—A utility used to load updated software code or patches.
See the HSZ70 Array Controller HSOF Version 7.3 Service
Manual for more information regarding this utility.
■
clone—A utility used to partially automates the process of
mirroring units to create a snapshot copy of host unit data. See
the HSZ70 Array Controller HSOF Version 7.3 Configuration
Manual for more information regarding this utility.
■
config—A utility used to locate and add devices to the
controller configuration. CONFIG may be run anytime new
devices are added to the subsystem. See the HSZ70 Array
Controller HSOF Version 7.3 Configuration Manual for more
information regarding this utility.
■
dilx—A utility used to test and verify the controller’s operation
with an attached storage device under a high or low I/O load.
Run DILX (disk inline exerciser) only when there is no activity
on the controller. The total I/O load is handled by the
controller, bypassing the host.
The DILX utility can be run in read-only mode and
automatically:
68
RUN
CLI Reference Manual
–
–
–
Tests all of the disk units configured (selection of specific
disk units not permitted).
Performs thorough tests with writes enabled.
Provides run time and performance summary options.
Caution
Run the DILX utility only at initial installations. When
write operations are enabled, the DILX utility may overwrite existing
data.
■
direct—A command used to display a list of all executable
diagnostic or utility programs.
■
dstat—This is not a user utility. This utility may be used by
authorized service personnel only.
■
fmu—A fault management utility used to control several
spontaneous errors. FMU also displays information regarding
the most recent controller and memory system failure.
■
frutil—A utility used when replacing a failed controller,
external cache battery, or cache module.
■
hsutil—A utility used to format a newly installed device or to
load new software to a tape or disk device.
■
vtdpy—A utility used to display the current controller state,
performance data, processor utlization, host post activity and
status, device state, logical unit state, cache performance, and
I/O performance.
See the HSZ70 Array Controller HSOF Version 7.3 Service
Manual for more information regarding the above utilities.
Example
This example shows how to start the DILX diagnostic program:
RUN DILX
.
.
.
See also
DIRECTORY
CLI Commands
SELFTEST controller
69
SELFTEST controller
Flushes the data from the specified controller’s write-back cache (if
present) and shuts down the controller. It then restarts the controller in
self-test mode. Press the controller reset (//) button to take the
controller out of self-test mode.
Syntax
SELFTEST controller
Parameters
controller
The controller parameter indicates which controller is to perform
the self-test program. Specify other_controller or this_controller.
Switches
IGNORE_ERRORS
NOIGNORE_ERRORS (Default)
Instruct the controller how to respond to write-back cache errors:
Caution
The IGNORE_ERRORS switch may cause data to remain
in write-back cache. See the HSZ70 Array Controller HSOF Version
7.3 Configuration Manual for considerations when implementing
write-back cache.
■
IGNORE_ERRORS—use to instruct the controller to ignore
any write-back cache errors. Such errors can result from data
contained within write-back cache unable to be written to the
devices or lost data errors.
■
NOIGNORE_ERRORS—use to instruct the controller not to
run the self-test program if the write-back cache errors are
detected.
IMMEDIATE_SHUTDOWN
NOIMMEDIATE_SHUTDOWN (Default)
Instructs the controller when to shutdown when running the selftest program:
70
SELFTEST controller
CLI Reference Manual
Caution
The IMMEDIATE_SHUTDOWN switch instructs the
controller to immediately shutdown, without regard to any data
contained within write-back cache. See the HSZ70 Array Controller
HSOF Version 7.3 Configuration Manual for considerations when
implementing write-back cache.
■
IMMEDIATE_SHUTDOWN —use to instruct the controller to
run the self-test program immediately without checking for
online devices or without flushing user data from write-back
cache to devices.
■
NOIMMEDIATE_SHUTDOWN —use to instruct the controller
to flush data from write-back cache before running the self-test
program.
Examples
1. This example shows how to start the self-test program on “this
controller”:
SELFTEST THIS_CONTROLLER
2. This example shows how to run the self-test program on the “other
controller,” even if the “other controller” cannot flush all data from the
write-back cache:
SELFTEST OTHER_CONTROLLER IGNORE_ERRORS
See also
RESTART controller
SHUTDOWN controller
CLI Commands
SET controller
71
SET controller
Changes parameters on the specified controller.
Syntax
SET this_controller
SET other_controller
Parameters
this_controller
other_controller
Indicates which controller is to be set.
Note this_controller indicates the controller the maintenance
terminal is using (connected to) to insert the CLI commands.
Switches
Table 3 through Table 16 lists the switches available with this
command along with the switch values and descriptions.
Table 3
SET controller Switches (ALLOCATION_CLASS)
Switch/Value
Description
ALLOCATION_CLASS=n
■
■
OpenVMS value: may be any
number between 1 and 65535.
All other Operating Systems:
use 0 (default) in disk storage
subsystems using single or
dual-redundant controllers.
The allocation class switch value is used by operating systems
to uniquely identify logical units on the matched dualredundant HSZ70 controller pairs in failover configurations.
Please refer to the respective operating system configuration
documentation for the correct use of this switch.
By default, the allocation class value is zero and should not be
changed to a non-zero value unless specified by the specific
operating system configuration document.
72
SET controller
Table 3
CLI Reference Manual
SET controller Switches (ALLOCATION_CLASS) (Continued)
Switch/Value
ALLOCATION_CLASS=n
(Continued)
Description
This number should be unique for every pair of dualredundant controllers in the cluster (see Example in the SET
MULTIBUS_FAILOVER description). This value must not
be zero (default) in dual-redundant configurations for
operating systems that implement ALLOCATION_CLASS.
Using a zero value for an operating system that does
implement ALLOCATION_CLASS causes the operating
system to disable failover between the controller pair.
Operating systems that do not implement allocation class
should use the default of zero. Results are unpredictable when
a non-zero value is used for those operating systems.
Assigning ALLOCATION_CLASS value to one of the
controllers changes both controllers in a dual-redundant pair.
Table 4
SET controller Switches (CACHE_FLUSH_TIMER)
Switch/Value
Description
CACHE_FLUSH_TIMER=n
CACHE_FLUSH_TIMER=10)
(default)
1–65535 sec, 10 (default)
Specifies how many seconds of idle time (1–65535) may
elapse before the write-back cache flushes its entire contents
to a given device or RAIDset.
The default setting is 10 seconds. When changed, the new
value entered for this switch takes effect immediately.
CLI Commands
Table 5
SET controller
73
SET controller Switches (CACHE_UPS)
Switch/Value
Description
CACHE_UPS
NOCACHE_UPS
(default)
Specifies whether the controller should perform regular battery
condition checks (when changed, you must restart both
controllers for the new setting to take effect):
■ CACHE_UPS—use if your storage subsystem power is
supported by an uninterruptable power supply (UPS). The
controller does not check the condition of the cache
batteries and ignores the battery’s state. This causes
RAIDsets and mirrorsets to always be available,
regardless of the condition of the cache batteries.
■ NOCACHE_UPS—use to instruct the controller to
perform regular cache battery checks and evaluate the
condition of the cache batteries.
Caution
Setting CACHE_UPS without having a UPS or
similar backup system in place may result in data loss if power
is interrupted.
Note Setting the CACHE_UPS switch for either controller
sets the CACHE_UPS switch for both controllers.
Table 6
SET controller Switches (COMMAND_CONSOLE_LUN)
Switch/Value
Description
COMMAND_CONSOLE_LUN
NOCOMMAND_CONSOLE_LUN
(default)
Enable or disables the virtual LUN used with the
StorageWorks Command Console. When changed, the
new setting for this switch takes effect immediately.
Select COMMAND_CONSOLE_LUN to enable the virtual
LUN. Select NOCOMMAND_CONSOLE_LUN to disable
the virtual LUN.
74
SET controller
Table 7
CLI Reference Manual
SET controller Switches (HOST_FUNCTION)
Switch/Value
Description
HOST_FUNCTION=mode
■
A, B, C, D, E, F
Configures the host compatibility mode for all the targets on a
controller (or pair of controllers in a dual-redundant
configuration). When changed, you must restart both controllers
in order for the new setting to take effect.
Mode
Description
A
Normal (default) mode:
■ OpenVMS®
■ Digital UNIX®
■ Hewlett-Packard® UNIX
B
IBM AIX®
C
HSZ15
D
Microsoft® Windows NT®
E
Silicon Graphics, Inc. ® IRIX
F
Sun Solaris®
Select the HOST_FUNCTION=mode switch to set all of the
targets on the host interface to the same mode. The default mode
is A.
Note When loading an older version of HSOF code (one that
does not support Host Mode “E” (or “F”), the controller goes into
an “UNKNOWN” Host Mode state after a reboot when Host
Mode “E” (or “F”) is the selected mode. Controller behavior is
unpredictable at this point. Avoid this situation by changing the
host mode function to one that is supported by the older code
version (A—D), then rebooting the controller before loading the
older code version.
CLI Commands
Table 7
SET controller
SET controller Switches (HOST_FUNCTION) (Continued)
Switch/Value
HOST_FUNCTION=mode
(continued)
Table 8
75
Description
Note Silicon Graphics, Inc. and SUN operating system
customers running StorageWorks Command Console V2.0 must
use the HSZ70 Storage Window V2.0b(?) in order to select Host
Function Mode “E” or “F” through the graphical user interface.
Selection of Host Function Mode “E” or “F” may also be
achieved using the CLI window.
SET controller Switches (ID)
Switch/Value
ID(n1,n2,n3...)
■ 0–15 (maximum of 8
target ID number)
Description
A controller can present up to eight units to the host on each
target ID number. Unit numbers identify both the target ID
number and the LUN. For example, D203 indicates a disk is
addressed through target 2, LUN 3. D5 is target 0, LUN 5.
If two controllers are in a dual-redundant configuration, both
controllers support the same target ID numbers. When the ID
numbers are changed on one controller, the other controller is
automatically updated.
Use the PREFERRED_ID switch along with the ID= switch to
specify which targets are assigned to each of your controllers. If
you do not specify the preference of your targets as you add them,
the controller automatically prefers all of the targets to the “other
controller.”
76
SET controller
Table 9
CLI Reference Manual
SET controller Switches (INITIAL_CONFIGURATION)
Switch/Value
INITIAL_CONFIGURATION
■ None
Description
Erases the entire configuration on “this controller” and restores
the controller’s default configuration. The default configuration
is determined by the configuration information last stored in nonvolatile memory with the
INITIALIZE container-name SAVE_CONFIGURATION
command. When entered, this switch takes effect immediately.
The INITIAL_CONFIGURATION switch can be specified on
“this controller” in nofailover mode only. Enter this switch to
ensure all of the old configuration information is removed when
a controller is moved from one location to another within the
same subsystem.
The controllers stop after this command is carried out. Press the
reset buttons on the front of the controllers to restart them.
If the controller cannot find any saved configuration information,
an error message is displayed on the terminal screen.
Note
Completely spell out: INITIAL_CONFIGURATION.
CLI Commands
SET controller
77
Table 10 SET controller Switches (MIRRORED_CACHE)
Switch/Value
Description
MIRRORED_CACHE
NOMIRRORED_CACHE
(default)
Enables the mirrored-write-back-data cache feature on dual-redundant
controllers. When changed, both controllers restart for the new switch
setting to take effect.
The following tasks are performed when the
NOMIRRORED_CACHE switch is specified (both controllers must be
operational before this command is accepted):
■ Data in write-back cache is flushed when cache is configured in
non-mirrored mode.
■ Enables mirrored write-back cache on both controllers.
If an invalid cache configuration exists within the cache modules, an
error is generated.
Issue this switch through only one controller. The controller must
contain a valid cache configuration before specifying this switch. See
the HSZ70 Array Controller HSOF Version 7.3 Configuration
Manual for rules regarding valid cache configurations.
The controllers automatically restart when this switch is specified.
All unwritten write-cached data is automatically flushed from cache
before restart when the MIRRORED_CACHE switch is specified.
Depending on the amount of data to be flushed, this command may
take several minutes to complete before the controller is restarted.
The NOMIRRORED_CACHE switch disables mirror mode. Data in
write-back cache is flushed when this switch is entered from mirrored
mode. This switch disables mirrored write-back cache on both
controllers.
Therefore, this switch is only to be issued through one controller. The
controller must contain a valid cache configuration before this switch
is assigned.
Switching from mirrored mode to nonmirrored mode is permitted
with a failed cache module (unlike going from nonmirrored mode to
mirrored mode). The controller automatically restarts when this
switch is specified.
78
SET controller
CLI Reference Manual
Table 11 SET controller Switches (PREFERRED_ID)
Switch/Value
Description
PREFERRED_ID=(n1,n2,n3...)
NOPREFERRED_ID
(default)
■ 0–15
(maximum of 8 target IDs)
In dual-redundant configurations, specifies which targets and
units are handled by the specified controller. First, specify the
total set of ID numbers with the preferred ID number switch. If
you enter two or more PREFERRED_ID numbers, the numbers
must be enclosed within parentheses and separated with
commas. When changed, the new setting for this switch takes
effect immediately.
Note Only target ID numbers set with the ID= switch can be
preferred with the PREFERRED_ID= switch.
Except in a multiple bus failover environment, when the
PREFERRED_ID numbers are assigned on one controller, the
other controller is automatically updated to support the
remaining ID numbers, if any.
For example, if a dual-redundant pair of controllers is set to ID
numbers 0, 1, and 2, one controller can be set to respond to ID
numbers 0 and 1; the other controller automatically responds to
only ID number 2. The first controller presents unit numbers 0
through 7 and 100 through 107 (the other controller presents unit
numbers 200 through 207).
Setting the PREFERRED_ID switch in multiple bus failover
configurations does not affect how the controller handles units.
The controller permits the host operating to determine which
controller units are accessed through.
Specify NOPREFERRED_ID for one controller so it is
immediately available if the other controller fails. The other
controller processes all of the data during normal operation.
However, if the other controller fails, the controller assigned the
NOPREFFERED_ID switch assumes control of the targets
assigned to the failed controller.
CLI Commands
SET controller
79
Table 12 SET controller Switches (PROMPT)
Switch/Value
Description
PROMPT
■
1–16 characters
Specifies a 1- to 16-character prompt displayed when the
controller's CLI prompts for input. Only printable ASCII
characters and spaces are valid. The new prompt name must be
enclosed within quotes. When changed, the new text entered
for this switch takes effect immediately.
Table 13 SET controller Switches (TERMINAL_PARITY)
Switch/Value
Description
TERMINAL_PARITY=ODD
TERMINAL_PARITY=EVEN
NOTERMINAL_PARITY
(default)
■ odd, even
Specifies the parity with which data is transmitted and received.
When changed, the new setting for this switch takes effect
immediately.
Table 14 SET controller Switches (TERMINAL_SPEED)
Switch/Value
Description
TERMINAL_SPEED=baud_rate
TERMINAL_SPEED=9600
(default)
■
4800, 9600, 19200
Sets the terminal transmission and reception speed (baud
rate) to 4800, 9600 (default), or 19200 baud. When changed,
the new value entered for this switch takes effect immediately.
80
SET controller
CLI Reference Manual
Table 15 SET controller Switches (TIME)
Switch/Value
Description
TIME=
■
dd–mmm–yyyy:hh:mm:ss
Sets the date and time. The time is set on both controllers in a
dual-redundant configuration.When changed, the new value
entered for this switch takes effect immediately.
Table 16 SET controller Switches (TRANSFER_RATE_REQUESTED)
Switch/Value
Description
TRANSFER_RATE_REQUESTED=
■
■
■
5Mhz
10Mhz
20Mhz (default)
Specifies the maximum data transfer rate the controllers
use when communicating with the host.
The transfer rate may need to be limited to accommodate
long cables between the subsystem and the host system.
Set the same transfer rate for both controllers in a dualredundant configuration.
When changed in a dual-redundant configuration, you
must restart both controllers in order for the new setting to
take effect.
When changed in a single configuration, restart only the
controller on which the new setting will take effect.
The controller must be restarted for any changes to the data
transfer rate to take effect.
The table that follows lists the maximum transfer rates for
different lengths of fast and slow SCSI buses (cable lengths
plus shelf-bus lengths).
Transfer Rate
Meters
Feet
5 MHz
6
19.7
10 MHz
3
9.8
20 MHz
25
82.0
CLI Commands
SET controller
81
Note It is highly recommended that you perform a SHOW
this_controller and SHOW other_controller command to verify any
changes made by the SET commands
Examples
1. This example shows how to change the other controller’s CLI prompt:
SET OTHER_CONTROLLER PROMPT=”CONTROLLER B”
2. This example shows how to set “this controller” so it responds to
requests for target ID numbers 2 and 5:
SET THIS_CONTROLLER ID=(2,5)
See also
SHOW controller
82
SET device-name
CLI Reference Manual
SET device-name
Changes the transportable characteristics and the maximum data
transfer rate between the controller and the specified device.
Syntax
SET device-name
Parameter
device-name
Specifies the name the device to change. This can be a previously
named device, disk, passthrough device, or container.
Switches
TRANSFER_RATE_REQUESTED=ASYNCHRONOUS
TRANSFER_RATE_REQUESTED=20MHZ (Default)
TRANSFER_RATE_REQUESTED=10MHZ
TRANSFER_RATE_REQUESTED=5MHZ
This switch specifies the maximum data transfer rate for the
controller to use in communicating with the device. You may need
to limit the transfer rate to accommodate long cables between the
controllers and the device, such as with a tape library.
TRANSPORTABLE
NOTRANSPORTABLE (Default)
Indicates whether a disk can be accessed exclusively by
StorageWorks controllers:
■
TRANSPORTABLE—use for disks only. The controller makes
a small portion of a non-transportable disk inaccessible to the
host. This restricted space is used to store metadata which
improves data reliability, error detection, and the ability to
recover data. Because of this metadata, only StorageWorks
controllers can retrieve data from non-transportable initialized
disk devices.
■
NOTRANSPORTABLE—use for all disks used in RAIDsets,
stripesets, and mirrorsets and sparesets (storagesets cannot be
made transportable).
CLI Commands
SET device-name
83
Transportable disks do not contain any metadata or restricted
areas on the disk. Therefore, transportable disks forfeit the
advantage metadata provides. Transportable disks can be
moved to a non-StorageWorks environment with their data
intact.
If NOTRANSPORTABLE is specified and there is no metadata
on the unit, the unit must be initialized.
Note it is recommended that you avoid specifying
TRANSPORTABLE unless transportability of the device or media
is imperative and there is no other way to accomplish moving the
data.
Examples
1. This example shows how to set the data transfer rate of DISK20000 to
5MHz:
SET DISK20000 TRANSFER_RATE_REQUESTED=5MHZ
2. This example shows how to set DISK10300 to transportable:
SET DISK10300 TRANSPORTABLE
See also
ADD DISK
SHOW DISKS
84
SET EMU
CLI Reference Manual
SET EMU
Sets operating parameters for the environmental monitoring unit
(EMU).
Syntax
SET EMU
Parameters
None.
Switches
SENSOR
FANSPEED
SENSOR_1_SETPOINT nn
SENSOR_2_SETPOINT nn
SENSOR_3_SETPOINT nn
SENSOR_x_SETPOINT 35 (Default)
FANSPEED=HIGH
FANSPEED=AUTOMATIC (Default)
The SENSOR and FANSPEED switches control both the master
and slave EMU settings. The EMU within the primary cabinet
instructs the EMUs within the other cabinets to operate at the same
SENSOR and FANSPEED settings to which the master EMU is set.
SENSOR_1_SETPOINT through SENSOR _X_SETPOINT switches
set the acceptable temperatures at which the subsystem operates.
Sensor 1 and Sensor 2 set the maximum operating temperature for
the primary subsystem cabinet. Sensor 3 sets the maximum
operating temperature for the EMU unit. The allowable range for
the setpoint is 0°C (32°F) to 49°C (120°F). The EMU determines
the default setpoint for all three sensors.
CLI Commands
SET EMU
85
Table 17 lists the valid EMU set-point temperatures in both
Fahrenheit and Celsius.
Table 17 EMU Set Point Temperatures
ºC
ºF
ºC
ºF
ºC
ºF
ºC
ºF
ºC
ºF
0
32
10
50
20
68
30
86
40
104
1
34
11
52
21
70
31
88
41
106
2
36
12
54
22
72
32
90
42
108
3
37
13
55
23
73
33
91
43
109
4
39
14
57
24
75
34
93
44
111
5
41
15
59
25
77
35
95
45
113
6
43
16
61
26
79
36
97
46
115
7
45
17
63
27
81
37
99
47
117
8
46
18
64
28
82
38
100
48
118
9
48
19
66
29
84
39
102
49
120
If any of the setpoints assigned to a slave EMU do not match the
corresponding setpoints assigned to the master EMU, the slave
EMU settings change to match the corresponding master EMU
settings.
Refer to the for detailed information regarding setting the EMU
temperature set points.
The FANSPEED= switch sets the speed at which the fan operates:
■
FANSPEED=HIGH —use to force the fans in all connected
cabinets to operate at high speed continuously.
■
FANSPEED=AUTOMATIC—use to allow the EMU to control
the fan speed for the fans in all connected cabinets.
The EMU instructs the fans to operate at high speed when any of
the temperature setpoints are exceeded or when one or more fans
are not functioning.
86
SET EMU
CLI Reference Manual
Examples
1. This example shows how to set EMU sensor number 2 to 34°C:
SET EMU SENSOR_2_SETPOINT 34
2. This example shows how to set the EMU fan to operate at high speed:
SET EMU FANSPEED=HIGH
See also
SHOW
CLI Commands
SET FAILEDSET
87
SET FAILEDSET
Changes the automatic replacement policy for the failedset.
Syntax
SET FAILEDSET replacement policy
Parameters
replacement policy
Specifies the policy to be used by the controller when a disk drive
is physically replaced in the failedset:
■
AUTOSPARE—use to instruct the controller to automatically
move devices replaced in the failedset into the spareset.
■
NOAUTOSPARE—use to instruct the controller to leave
devices having failed in the failedset. The device, though
replaced, remains in the failedset until it is manually removed
with the DELETE FAILEDSET command.
In most circumstances, the failed disk placed into the failedset
contains no metadata—that is, a new or initialized device. When
the AUTOSPARE switch is specified, the controller checks to see if
any metadata is present. If the controller detects metadata, the disk
remains in the failedset. If the controller does not detect metadata,
the controller automatically initializes the disk and moves it from
the failedset to the spareset. Now a member of the spareset, the
disk is available for any mirrorset or RAIDset requiring a
replacement member. If the automatic initialization fails, the disk
remains in the failedset.
When you move the disk into the spareset, some metadata is
written to it—meaning it is no longer transportable. Additional
metadata is written to the disk when it is moved from the spareset
into a RAIDset or mirrorset.
To make a failedset disk containing metadata on it available as a
spareset replacement disk, perform the following steps.
1.
2.
Delete all containers to which the disk belongs.
Make the disk transportable:
SET DISK10000 TRANSPORTABLE.
88
SET FAILEDSET
CLI Reference Manual
3.
Initialize the disk.
INIT DISK10000
4.
Delete the disk.
DELETE DISK10000
5.
Remove DISK10000 from the cabinet until it is time to replace
a failed disk.
Example
This example shows how to enable the automatic spare feature:
SET FAILEDSET AUTOSPARE
This example shows how to disable the automatic spare feature:
SET FAILEDSET NOAUTOSPARE
See also
SHOW FAILEDSET
CLI Commands
SET FAILOVER
89
SET FAILOVER
Configures both controllers to operate in a dual-redundant, transparent
failover, configuration. This allows both controllers to access the
storage devices, providing controller fault-tolerant data processing. If
one of the two controllers fail, the devices and any cache attached to
the failed controller become available to and accessible through the
other controller.
Note The controllers must be present and placed in non-failover
mode by entering the SET NOFAILOVER command before they can
be set to failover mode.
Syntax
SET FAILOVER COPY=controller
Parameters
controller
Caution
Make sure you know which controller has the good
configuration information before entering this command.The device
configuration information from the controller specified by the
controller parameter overwrites the information on the companion
controller.
Specifies which controller contains the source configuration for the
copy. The companion controller receiving the configuration
information restarts after the command is carried out:
■
Specify this_controller to copy the device configuration
information from “this controller” to “other controller.”
■
Specify other-controller to copy the device configuration
information from the “other controller” to “this controller.”
Due to the amount of information being passed from one controller
to the other, this command may take up to one minute to complete.
90
SET FAILOVER
CLI Reference Manual
Example
This example shows how to set the controllers in a dual-redundant
configuration and copy the configuration information from “this
controller” to the “other controller”:
SET FAILOVER COPY=THIS_CONTROLLER
See also
SET MULTIBUS_FAILOVER
SET NOFAILOVER
CLI Commands
SET mirrorset-name
91
SET mirrorset-name
Changes the characteristics of a mirrorset, including the addition and
removal of members.
Syntax
SET mirrorset-name
Parameter
mirrorset-name
Specifies the name of the mirrorset to modify. This is the same
name given to the mirrorset when it was created with the ADD
MIRRORSET command.
Switches
COPY=FAST
COPY=NORMAL (Default)
Sets the speed at which the controller copies data from normal
mirrorset members to new members:
■
NORMAL—use when other controller operations are to take
priority over the copy operation. The controller uses relatively
few resources when creating the mirrored data, resulting in
minimal impact on performance.
■
FAST—use when the creation of mirrored data is to take
priority over other controller operations. The controller uses
more resources to create the mirrored data. Copying takes less
time, but overall controller performance is reduced.
MEMBERSHIP=number-of-members
Sets the nominal number of mirrorset members to the number you
specify for the number-of-members value. A maximum of six
members can be specified.
Note No other switches can be set when you specify the
MEMBERSHIP switch.
92
SET mirrorset-name
CLI Reference Manual
POLICY=
If you increase the number of members and specify a replacement
policy with the POLICY= switch, the controller automatically adds
disk drives from the spareset to the mirrorset until the new number
of members is reached, or there are no more suitable disk drives in
the spareset.
If you increase the number of members and the NOPOLICY switch
is specified, the REPLACE=disk-name switch must be specified to
bring the mirrorset up to the new nominal number of members.
You cannot set the nominal number of members lower than the
actual number of members. Specify the REMOVE=disk-name
switch to reduce the number of disk drives from the mirrorset.
REMOVE=disk-name
Instructs the controller to remove a member from an existing
mirrorset. The disk drive specified by disk-name is removed from
the mirrorset specified by mirrorset-name. The removed disk drive
is added to the failedset.
Note No other switches can be set when the REMOVE= switch
is specified.
If the mirrorset would not have a normal member remaining if the
disk drive were removed, the controller reports an error and no
action is taken. A normal member is a mirrorset member whose
contents are the same as all other normal members.
For each reduced mirrorset, there must be at least one remaining
normal member after the reduction.
The REMOVE switch does not change the nominal number of
members in the mirrorset. If the mirrorset has a replacement policy
and there are acceptable disk drives in the spareset, the controller
adds disk drives from the spareset to the mirrorset to make the
actual number of members equal to the nominal number of
members.
CLI Commands
SET mirrorset-name
93
Note Normalizing members exist only when you first create a
mirrorset is first created, or when you clear lost data on a
mirrored unit. The controller recognizes the member as normal,
and all other original mirrorset members are recognized as
“normalizing.” New data is written to the mirrorset is written to
all members. The controller copies the data existing before the
mirrorset was created on the normal member to the normalizing
members. The controller recognizes the normalizing members as
normal when the mirrorset member’s block are all the same.
REPLACE=disk-name
Instructs the controller to add a disk member to an existing
mirrorset if the following conditions are met:
■
The replacement policy is set to NOPOLICY
■
The mirrorset is missing at least one member
If these conditions are met, the disk drive specified by disk-name is
added to the mirrorset specified by mirrorset-name. The nominal
number of members does not change.
The disk name used is the name given to a disk when it was added
to the configuration with the ADD DISK command.
Note Do not specify any other switches when the REPLACE=
switch is specified.
POLICY=BEST_FIT
POLICY=BEST_PERFORMANCE (Default)
NOPOLICY
Sets the selection criteria the controller uses to choose a
replacement member from the spareset when a mirrorset member
fails:
■
POLICY=BEST_FIT —use to choose a replacement disk drive
from the spareset most closely matching the capacity of the
mirrorset. If there is more than one disk drive in the spareset
most closely matching the capacity of the mirrorset, the
controller selects the disk drive having the best performance.
94
SET mirrorset-name
CLI Reference Manual
■
POLICY=BEST_PERFORMANCE—use to choose a
replacement disk drive from the spareset resulting in the best
performance. The controller attempts to select a disk on a
different port than existing members. If there is more than one
disk drive in the spareset matching the best performance
criteria, the controller selects the disk drive most closely
matching the capacity of the mirrorset.
■
NOPOLICY—use to prevent the controller from automatically
replacing a failed disk device. This causes the mirrorset to
operate in a reduced state until you choose a
POLICY=BEST_FIT or POLICY=BEST_PERFORMANCE, or
you manually replace a member in the mirrorset.
READ_SOURCE=disk-name
READ_SOURCE=LEAST_BUSY (Default)
READ_SOURCE=ROUND_ROBIN
Selects the mirrorset member used by the controller to satisfy a
read request:
■
READ_SOURCE=disk-name—use the disk name to specify a
member to which all read requests are directed. If the member
selected fails out of the mirrorset, the controller selects the first
normal member found for mirrorset read requests.
■
READ_SOURCE=LEAST_BUSY—use to direct read requests
to the normal mirrorset member with the least amount of work
in the queue.
■
READ_SOURCE=ROUND_ROBIN—use to sequentially
direct read requests to each normal mirrorset member. All
normal members are equally queried for each read request.
Examples
1. This example shows how to change the replacement policy of mirrorset
MIRR1 to BEST_FIT:
SET MIRR1 POLICY=BEST_FIT
CLI Commands
SET mirrorset-name
2. This example shows how to remove member DISK30000 from
mirrorset MIRR1 created above. If the mirrorset has a replacement
policy and an acceptable disk drive is in the spareset, the controller
automatically adds the spare disk drive to the mirrorset.
SET MIRR1 REMOVE=DISK30000
3. This example shows how to add disk DISK30200 to MIRR1:
SET MIRR1 REPLACE=DISK30200
A copy operation begins immediately on DISK30200.
See also
ADD MIRRORSET
MIRROR
REDUCE
SHOW MIRRORSET
UNMIRROR
95
96
SET MULTIBUS_FAILOVER
CLI Reference Manual
SET MULTIBUS_FAILOVER
HSOF V7.3 supports Multiple-Bus Failover in single-host systems for
systems with Intel® processors using the Windows NT ® operating
system. This command places “this controller” and the “other
controller” into a dual-redundant (failover) configuration within a
multiple bus environment. Multiple bus failover mode allows a pair of
controllers to be connected to two different buses adding availability by
removing a single point of failure (host, adapter, cable, and controller).
If one host, adapter, cable, or controller fails, the devices and cache
attached to the failed controller become available to and accessible
through the remaining controller. Multiple buses may be run
simultaneously, providing a greater throughput. See HSZ70 Array
Controller HSOF Version 7.3 Configuration Manual Chapter 4 for a
description of the cabling necessary to achieve multiple-bus failover.
Note Customers running StorageWorks Command Console V2.1
must use the HSZ70 Storage Window V2.1 in order to select Multiple
Bus Failover through the graphical user interface. Selection of Multiple
Bus Failover may also be achieved using the CLI window.
Note Refer to your operating system specific documentation for
configuration requirements before setting this mode.
Both controllers must be configured for NOFAILOVER before you enter
the SET MULTIBUS_FAILOVER command. Host operating system
involvement is required to coordinate failover (that is, the host assists
in the failover).
Using the SET MULTIBUS_FAILOVER command reconfigures the
two controllers into multiple bus failover mode. During the changeover
period, the drives are not accessible.
Note Partitioned storagesets and partitioned single-disk units are not
supported in multiple bus failover dual-redundant configurations.
Because partitions are not supported, you must delete your partitions
before configuring the controllers for multiple bus failover.
CLI Commands
SET MULTIBUS_FAILOVER
97
Note Pass-through devices (tape and CD-based storage devices)
cannot be supported by an HSZ70 dual-redundant pair operating in
multiple-bus failover mode. This restriction is inherent in the
architecture of the pass-through concept and the mechanisms by which
the host operating system is aware of device location.
Syntax
SET MULTIBUS_FAILOVER COPY=controller
Parameters
controller
Specifies which controller contains the source configuration for the
copy. The companion controller receiving the configuration
information restarts after the command is carried out.
Caution
Make sure you know which controller has the good
configuration information before entering this command. The device
configuration information from the controller specified by the
controller parameter overwrites the information on the companion
controller.
■
Specify this_controller to copy the device configuration
information from the “this controller” to “other controller.”
■
Specify other_controller to copy the device configuration
information from the “other controller” to “this controller.”
Due to the amount of information being passed from one controller
to the other, this command may take up to one minute to complete.
Switches
None.
98
SET MULTIBUS_FAILOVER
CLI Reference Manual
Example
This example shows how to configure two controllers to operate in
dual-redundant mode within a multiple bus environment (assuming
both controllers are previously set to SET NOFAILOVER):
SET THIS_CONTROLLER ID=(0,1,2,3)
SET THIS_CONTROLLER ALLOCATION_CLASS = n
SET MULTIBUS_FAILOVER COPY=THIS_CONTROLLER
Note Other commands may be required to satisfy operating system
constraints. Check your operating system specific documentation for
the use of the ALLOCATION_CLASS=n switch.
The ALLOCATION_CLASS=n switch is explained in the SET
controller section of this manual.
Note Use of the CLI command: SET MULTIBUS_FAILOVER
COPY= causes both controllers to reboot.
The configuration information on “this controller” is automatically
copied to “other controller” when you issue the CLI command:
SET MULTIBUS_FAILOVER COPY=. If you want to prefer (assign)
specific units to specific controllers, use the following commands after
setting multiple bus failover:
SET D100 PREFERRED=THIS_CONTROLLER
SET D101 PREFERRED=OTHER_CONTROLLER
In the preceding example, device units D100 and D101 are assigned
(preferred) to a specific controller (D100 to “this controller”, and D101
to “other controller”).
See also
SET FAILOVER
SET NOFAILOVER
SET NOMULTIBUS_FAILOVER
CLI Commands
SET NOFAILOVER
99
SET NOFAILOVER
Reconfigures both controllers to operate in a non-dual-redundant
configuration (no failover to the other controller).
Note The SET NOFAILOVER command should only be used to exit
from a single bus failover configuration. Use the
SET NOMULTIBUS_FAILOVER command to exit from multiple bus
failover mode.
It is recommended that both controllers be present when this command
is issued. Otherwise, the controllers become misconfigured with each
other, which requires additional steps to synchronize the configurations
on the controller pair.
Note This command affects both controllers, regardless of which
controller the command is issued to. All devices accessed
through the “other controller” failover to “this controller”. The
“other controller” then shuts down (“this controller” stays up while
“other controller” reboots). No configuration information is lost
when the
SET NOFAILOVER command is issued.
Using the SET NOMULTIBUS_FAILOVER command to accomplish
the reconfiguration to NOFAILOVER mode, causes “this controller” to
reboot, while the “other controller” goes down. During this period of
time, the drives are not accessible.
Syntax
SET NOFAILOVER
Parameters
None.
Switches
DESTROY_UNFLUSHABLE_DATA
NODESTROY_UNFLUSHABLE_DATA (Default)
Instructs the controller how to handle data contained within writeback cache. These switches have no effect if both controllers are
100
SET NOFAILOVER
CLI Reference Manual
operational. Select one of these switches to indicate how the
controller handles data contained in cache when one controller
fails before it can be properly shut down with the SET
NOFAILOVER or SHUTDOWN commands.
Under some circumstances, the data in a failed controller’s writeback cache may not fail over to the operating controller’s writeback cache. For example, if the cache battery fails on the “other
controller,” failover mode tries to pass the failed controller’s
cached data to the cache area of the “other controller.” Therefore,
the write-cache data configured with “this controller” is
unflushable. In this circumstance, the cached data from “this
controller” is lost if power is interrupted.
■
DESTROY_UNFLUSHABLE_DATA—use to reconfigure the
operational controller before replacing the failed controller.
The unwritten data of the failed controller may reference
devices not present in the new configuration. If you do not
destroy the old configuration data, it may conflict with the new
configuration and cause the subsystem to behave
unpredictably.
■
NODESTROY_UNFLUSHABLE_DATA—use to leave the
unwritten data intact in the failed controller’s write-back cache.
When the failed controller is replaced and placed into service,
the write-back cache data is flushed to the appropriate devices.
Caution
Unflushed data cannot be recovered after it is destroyed.
Example
This example shows how to terminate failover mode between two
controllers in a dual-redundant configuration:
SET NOFAILOVER
See also
SET FAILOVER
CLI Commands
SET RAIDset-name
101
SET RAIDset-name
Changes the characteristics of a RAIDset.
Syntax
SET RAIDset-name
Parameters
RAIDset-name
Specifies the name of the RAIDset to modify. This is the same
name given to the RAIDset when it was created with the ADD
RAIDSET command.
Switches
POLICY=BEST_FIT
POLICY=BEST_PERFORMANCE (Default)
NOPOLICY
Switches specify the replacement policy to use when a member
within the RAIDset fails:
■
BEST_FIT —use to choose a replacement disk drive from the
spareset most closely matching the sizes of the remaining
members of the RAIDset. If more than one disk drive in the
spareset is the correct size, the controller selects the disk drive
having the best performance.
■
POLICY=BEST_PERFORMANCE—use to choose a
replacement disk drive from the spareset resulting in the best
performance of the RAIDset. The controller attempts to select
a disk on a different port than existing members. If more than
one disk drive in the spareset matches the best performance
criteria, the controller selects the disk drive most closely
matching the size of the remaining members of the RAIDset
selected.
■
NOPOLICY—use to prevent the controller from automatically
replacing a failed disk device. This causes the RAIDset to
operate in a reduced state until POLICY=BEST_FIT or
POLICY=BEST_PERFORMANCE is selected, or a member is
manually replaced in the mirrorset.
102
SET RAIDset-name
CLI Reference Manual
RECONSTRUCT=FAST
RECONSTRUCT=NORMAL (Default)
Sets the speed at which the controller reconstructs the data on the
new RAIDset member replacing a failed member:
■
FAST—use when the reconstruct operation must take
precedence over other controller operations. The controller
uses more resources to perform the reconstruction.
Reconstruction takes less time, but overall controller
performance is reduced during the reconstruction.
■
NORMAL—use to balance other controller operations against
the reconstruct operation. The controller uses relatively few
resources to perform the reconstruct, and there is little impact
on performance.
REMOVE=disk-name
Instructs the controller to remove a member from an existing
RAIDset. The disk drive specified by disk-name is removed from
the RAIDset specified by RAIDset-name. The removed disk drive
is added to the failedset.
If a RAIDset is already in a reduced state, an error is displayed and
the command is rejected. If a replacement policy is specified, the
replacement is taken from the spareset to replace the removed
member using the policy specified.
If the NOPOLICY switch is specified with the SET RAIDset
command, the RAIDset continues to operate in a reduced state
until a replacement policy is specified or the REPLACE switch is
specified. See the REPLACE=disk-name switch for information on
manually replacing a RAIDset member. See the POLICY and
NOPOLICY switch descriptions for information regarding setting a
policy for automatic member replacement.
Note Do not specify other switches when you use the
REMOVE= switch.
REPLACE=disk-name
Instructs the controller to add a disk member to an existing
RAIDset if the following conditions are met:
CLI Commands
SET RAIDset-name
■
The replacement policy is set to NOPOLICY.
■
The disk member is not in any configuration, including a
spareset.
103
An error is displayed and the command is rejected if the RAIDset
is not in a reduced state, if a replacement policy is already
specified, or if the disk specified is already being used by a
configuration (including a spareset).
Note Do not specify other switches when you use the
REPLACE= switch.
Examples
1. This example shows how to change the replacement policy for RAIDset
RAID9 to BEST_FIT:
SET RAID9 POLICY=BEST_FIT
2. This example shows how to remove member DISK10000 from the
RAID9 RAIDset:
SET RAID9 REMOVE=DISK10000
If there is a replacement policy, the controller moves a disk from the
spareset to the RAIDset automatically.
3. This example shows how to add disk DISK20100 to the reduced
RAIDset, RAID9:
SET RAID9 REPLACE=DISK20100
Reconstruction immediately begins on DISK20100.
See also
ADD RAIDSET
SHOW RAIDSETS
104
SET unit-number
CLI Reference Manual
SET unit-number
Changes the characteristics of a unit.
Syntax
SET unit-number
Parameter
unit-number
Specifies the logical unit number to modify. The unit-number is the
name given to the unit when it was created using the ADD UNIT
command.
Switches
Table 18 lists all switches for the SET unit-number command and
shows which switches can be used with each type of device and
storageset. Descriptions of the switches follow the table.
ACCESS_ID=ALL
ACCESS_ID=n
✓
✓
✓
✓
✓
✓
✓
✓
PARTITION=partition_number
✓
✓
✓
✓
✓
✓
✓
✓
MAXIMUM_CACHED_TRANSFER=n
MAXIMUM_CACHED_TRANSFER=32
✓
✓
✓
✓
✓
✓
✓
✓
Passthrough
Partition
CD-ROM
Optical Disk
Transportable Disk
Non-transportable Disk
Mirrorset
Stripeset
Container Type
RAIDset
Switch
Table 18 SET UNIT Switches for Existing Containers
CLI Commands
SET unit-number
105
PREFERRED_PATH=OTHER_CONTROLLER
PREFERED_PATH=THIS_CONTROLLER
NOPREFERRED_PATH
✓
✓
✓
✓
✓
✓
✓
✓
READ_CACHE
NOREAD_CACHE
✓
✓
✓
✓
✓
✓
✓
✓
RUN
NORUN
✓
✓
✓
✓
✓
✓
✓
WRITE_PROTECT
NOWRITE_PROTECT
✓
✓
✓
✓
✓
✓
✓
WRITEBACK_CACHE
NOWRITEBACK_CACHE
✓
✓
✓
✓
✓
✓
Passthrough
Partition
CD-ROM
Optical Disk
Transportable Disk
Non-transportable Disk
Mirrorset
Stripeset
Container Type
RAIDset
Switch
Table 18 SET UNIT Switches for Existing Containers (Continued)
✓
Note Regardless of storageset type, the RUN and NORUN switches
cannot be specified for partitioned units.
ACCESS_ID=ALL (Default)
ACCESS_ID=n
Controls the host access to any unit. Set the access ID number set
to the initiator SCSI ID number used by the host to communicate
with the controller. When a specific you assign ID number, only
106
SET unit-number
CLI Reference Manual
the initiator ID number specified is permitted to write to or read
from the unit. When set to ALL, any host may access the unit.
Passthrough LUNs cannot accept ACCESS_ID numbers.
Passthrough LUNs are set to ALL by default
.
PARTITION=partition-number
Identifies the unit number for a partition on a container. The
partition-number identifies the partition associated with the unit
number being added. Use the SHOW container-name command to
find the partition numbers used by a storageset or a single-disk
unit.
MAXIMUM_CACHED_TRANSFER=n
MAXIMUM_CACHED_TRANSFER=32 (Default)
Sets the largest number of write blocks to be cached by the
controller. The controller does not cache any transfers over the set
size. Accepted values are 1 through 1024.
PREFERRED_PATH=OTHER_CONTROLLER
PREFERRED_PATH=THIS_CONTROLLER
NOPREFERRED_PATH (Default)
Switches may be set only when dual-redundant controllers are
operating in a multiple bus failover configuration. The host
determines which controller units are accessed through. The host
settings always take precedence over the preferred path assigned to
units. The target ID numbers assigned with the SET controller ID=
command only determine which target ID number the controller
uses to respond to the host.
Note When the controllers are configured to operate in
transparent-failover mode, if you set the PREFERRED_PATH
switch with the
ADD UNIT or SET unit-number command, an error message
displays because you can only assign a preferred controller path
at the unit level only when in multiple bus failover mode.
If you do not assign preferred path, the unit is targeted through
whichever controller detects the unit first when the controller
starts:
CLI Commands
SET unit-number
■
107
PREFERRED_PATH=THIS_CONTROLLER—use to permit
“this controller” to bring the unit online.
■
PREFERRED_PATH=OTHER_CONTROLLER—use to permit
the “other controller” to bring the unit online.
See the HSZ70 Array Controller HSOF Version 7.3 Configuration
Manual for information regarding multiple bus failover.
READ_CACHE (Default)
NOREAD_CACHE
Switches enable or disable the read-cache function for the unit.
Read caching improves performance in almost all situations, so it
is generally recommended to leave it enabled. However, under
certain types of conditions, such as when performing a backup,
read-caching may not be necessary since only a small amount of
data is cached. In such instances, it may be beneficial to disable
read cache and remove the processing overhead associated with
caching.
RUN (Default)
NORUN
Controls the disk drive operation and availability to the host:
■
RUN—use to make a unit available to the host.
■
NORUN—use to make a unit unavailable to the host and to
cause any data in cache to be flushed to one or more drives.
NORUN spins down the devices making up a unit. The drives
making up the unit spin down after the data has been
completely flushed.
Note Do not specify the RUN and NORUN switches for
partitioned units.
WRITE_PROTECT
NOWRITE_PROTECT (Default)
Assigns to the unit’s a write-protect policy:
■
WRITE_PROTECT—use to prevent host write operations to
the unit. However, the controller may still write to a writeprotected RAIDset to satisfy a reconstruct pass or to
108
SET unit-number
CLI Reference Manual
reconstruct a newly replaced member. However, metadata,
reconstruct, and copy writes are still be allowed to
RAIDsets and mirrorsets.
■
NOWRITE_PROTECT—use to write data to the unit,
overwriting existing data.
WRITEBACK_CACHE
NOWRITEBACK_CACHE (Default)
Specifies whether or not the unit is to take advantage of the
controller’s write-back caching feature:
■
WRITEBACK_CACHE—use for all new RAIDsets, mirrorsets,
and units you want to take advantage of write-back caching.
■
NOWRITEBACK_CACHE—use for units you want to receive
data directly from the host without being cached.
Caution
Specifying NOWRITEBACK_CACHE may result in data
loss if the controller fails.
Note The controller may take up to 5 minutes to flush data
contained within the write-back cache when you specify the
NOWRITEBACK_CACHE switch.
Example
This example shows how to enable write protect and turn off the read
cache on unit D102:
SET D102 WRITE_PROTECT NOREAD_CACHE
See also
SHOW UNITS
SHOW unit-number
CLI Commands
SHOW
109
SHOW
Displays information about controllers, storagesets, devices, partitions,
and units.
The SHOW command may not display some information for devices
accessed through the companion controller in a dual-redundant
configuration. When information regarding a device or parameter does
not appear, enter the same SHOW command from a terminal on the
other controller.
Syntax
SHOW cdroms
SHOW controller
SHOW devices
SHOW device-type
SHOW device-name
SHOW disks
SHOW emu
SHOW failsets
SHOW logdisks
SHOW log
SHOW mirrorsets
SHOW opticals
SHOW passthrough
SHOW raidsets
SHOW sparesets
SHOW stripesets
SHOW storagesets
SHOW storageset-type
SHOW storageset-name
SHOW units
SHOW unit-number or container_name
Parameters
device-type
Specifies the type of devices you want to be displayed. Valid
choices are:
■
DEVICES—Shows all devices attached to the controller
■
CDROMS—Shows all CD-ROM devices attached to the
controller
110
SHOW
CLI Reference Manual
■
DISKS—Shows all disks attached to the controller
■
OPTICALS—Shows all optical disks attached to the controller
■
PASSTHROUGH—Shows all passthrough containers attached
to the controller
device-name
Specifies the name of a particular device to be displayed. For
example, SHOW DISK20100 displays information about the disk
storage unit 20100.
EMU
Displays information regarding the status of the environmental
monitoring unit (EMU).
storageset-type
Specifies the type of storageset to be displayed. Valid types are:
■
storagesets—Shows all storagesets configured with the
controller
■
raidsets—Shows all RAIDsets configured to the controller
■
stripesets—Shows all stripesets configured to the controller
■
mirrorsets—Shows all mirrorsets configured to the controller
■
sparesets—Show the spareset configured to the controller
■
failedsets—Shows the failedset configured to the controller
storageset-name
Specifies the name of a particular storageset to be displayed. For
example, SHOW STRIPE1 displays information about the stripeset
named STRIPE1.
UNITS
Displays information for all units configured to the controller.
unit-name
Specifies the name of a particular unit to be displayed. For
example, SHOW D102 displays information about the unit named
D102.
CLI Commands
SHOW
111
THIS_CONTROLLER
OTHER_CONTROLLER
Specifies the controller to be displayed.
Switches
FULL
Displays additional information about each device, storageset, or
controller.
Examples
1. This example shows how to display a listing of disks:
SHOW DISKS
Name
Type
Port Targ Lun
Used by
----------------------------------------------------------DISK20300
disk
2
3
0
D203
DISK20400
disk
2
4
0
D204
2. This example shows a full listing of devices attached to the controller:
SHOW DEVICES FULL
112
SHOW
CLI Reference Manual
Name
Type
Port Targ
Lun
Used by
----------------------------------------------------------------------------DISK11200
disk
1
12
0
R0
Switches:
NOTRANSPORTABLE
TRANSFER_RATE_REQUESTED = ASYNCHRONOUS (ASYNCHRONOUS negotiated)
Size: 8378028 blocks
DISK11400
disk
1
14
0
R0
Switches:
NOTRANSPORTABLE
TRANSFER_RATE_REQUESTED = ASYNCHRONOUS (ASYNCHRONOUS negotiated)
Size: 8378028 blocks
DISK11500
disk
1
15
0
R0
Switches:
NOTRANSPORTABLE
TRANSFER_RATE_REQUESTED = ASYNCHRONOUS (ASYNCHRONOUS negotiated)
Size: 8378028 blocks
DISK21200
disk
2
12
0
S0
Switches:
NOTRANSPORTABLE
TRANSFER_RATE_REQUESTED = ASYNCHRONOUS (ASYNCHRONOUS negotiated)
Size: 8377528 blocks
Configuration being backed up on this container
DISK21400
disk
DEC
2
RZ28D
14
0
S0
(C) DEC 0008
Switches:
NOTRANSPORTABLE
TRANSFER_RATE_REQUESTED = ASYNCHRONOUS (ASYNCHRONOUS negotiated)
Size: 4108970 blocks
Configuration being backed up on this container
DISK21500
disk
2
15
0
S0
Switches:
NOTRANSPORTABLE
TRANSFER_RATE_REQUESTED = ASYNCHRONOUS (ASYNCHRONOUS negotiated)
Size: 8377528 blocks
Configuration being backed up on this container
CLI Commands
SHOW
113
3. This example shows how to display a complete listing of the mirrorset
named MIRR1:
SHOW MIRR1
Name
Storageset
Uses
Used by
-----------------------------------------------------------------------------MIRR1
mirrorset
DISK50300
S0
DISK60300
Switches:
POLICY (for replacement) = BEST_PERFORMANCE
COPY (priority) = NORMAL
READ_SOURCE = LEAST_BUSY
MEMBERSHIP = 2, 2 members present
State:
NORMAL
DISK60300 (member
0) is NORMAL
DISK50300 (member
1) is NORMAL
Size: 17769177 blocks
4. This example shows the full information for a controller:
SHOW THIS_CONTROLLER FULL
Controller:
Not configured for dual-redundancy
Device port SCSI address 7
Time: NOT SET
Host port:
SCSI target(s) (0, 2, 4, 5)
Preferred target(s) (0, 2, 4)
TRANSFER_RATE_REQUESTED = 20MHZ
Host Functionality Mode = A
Command Console LUN is target 0, lun 4
Cache:
64 megabyte write cache, version 4
Cache is GOOD
Battery is GOOD
No unflushed data in cache
CACHE_FLUSH_TIMER = DEFAULT (10 seconds)
NOCACHE_UPS
Mirrored Cache:
64 megabyte write cache, version 4
114
SHOW
CLI Reference Manual
Cache is GOOD
Battery is GOOD
No unflushed data in cache
Extended information:
Terminal speed 19200 baud, eight bit, no parity, 1 stop bit
Operation control: 00000001
Security state code: 75580
Configuration backup disabled
5. This example shows how to display the current settings for the EMU:
SHOW EMU
EMU CABINET SETTINGS
SENSOR_1_SETPOINT
35
DEGREES C
SENSOR_2_SETPOINT
35
DEGREES C
SENSOR_3_SETPOINT
35
DEGREES C
FANSPEED AUTOMATIC
CLI Commands
SHUTDOWN controller
115
SHUTDOWN controller
Flushes all user data from the specified controller’s write-back cache (if
present) and shuts down the controller. The controller does not
automatically restart. All units accessed through the failed controller
failover to the surviving controller.
Syntax
SHUTDOWN controller
Parameter
controller
Indicates which controller is to shut down. Specify
other_controller or this_controller.
Switches
IGNORE_ERRORS
NOIGNORE_ERRORS (Default)
Controls the reaction of the controller based on the status of writeback cache:
Caution
The IGNORE_ERRORS and IMMEDIATE switches cause
the controller to keep unflushed data in the write-back cache until it
restarts and is able to write the data to devices. Do not perform any
hardware changes until the controller flushes the cache.
■
IGNORE_ERRORS—use to instruct the controller to shutdown
even if the data within write-back cache cannot be written to
the devices.
■
NOIGNORE_ERRORS—use to instruct the controller to stop
operation if the data within write-back cache cannot be written
to the devices.
IMMEDIATE_SHUTDOWN
NOIMMEDIATE_SHUTDOWN (Default)
Instructs the controller when to shutdown:
116
SHUTDOWN controller
CLI Reference Manual
■
IMMEDIATE_SHUTDOWN—use to cause the controller to
shutdown immediately without checking for online devices or
before flushing data from the write-back cache to devices.
■
NOIMMEDIATE_SHUTDOWN—use to cause the controller
not to shutdown without checking for online devices or before
all data has been flushed from the write-back cache to devices.
Examples
1. This example shows how to shut down “this controller”:
SHUTDOWN THIS_CONTROLLER
2. This example shows how to shut down the “other controller”, even if it
cannot write all of the write-back cached data to the units:
SHUTDOWN OTHER_CONTROLLER IGNORE_ERRORS
See also
RESTART controller
SELFTEST controller
CLI Commands
UNMIRROR
117
UNMIRROR
Converts a one-member mirrorset back to a non-mirrored disk drive
and deletes its mirrorset name from the list of known mirrorsets. This
command can be used on mirrorsets already members of higher-level
containers (stripesets or units).
The UNMIRROR command is not valid for disk drives having a
capacity greater than the capacity of the existing mirrorset. If a
mirrorset is comprised of disk drives with different capacities, the
mirrorset capacity is limited to the size of the smallest member; larger
members contain unused capacity. If a member with unused capacity is
the last remaining member of a mirrorset, the UNMIRROR command
cannot be used to change the disk drive back to a single-disk unit. This
change would cause a change in the reported disk capacity, possibly
confusing the operating system.
Syntax
UNMIRROR disk-name
Parameter
disk-name
Specifies the name of the normal mirrorset member to be removed
from a mirror storageset.
Switches
None.
Example
This example shows how to convert DISK10300, a one-member
mirrored storage disk, into a single device:
UNMIRROR DISK10300
See also
ADD MIRRORSET
MIRROR
REDUCE
RUN CLONE
SET mirrorset-name
119
Glossary
This glossary defines terms pertaining to the HSZ70 array controller. It
is not a comprehensive glossary of computer terms.
adapter
A device that converts the protocol and hardware interface of one bus
type into another without changing the function of the bus.
Agent
The StorageWorks Command Console’s secure, TCP/IP network
communication program. Agent runs on your storage subsystem host
computer and is available in a number of operating system versions. An
Agent running on a host system can be accessed by one or more Client
Programs. One Agent can communicate with multiple storage
subsystems on the same host using the system SCSI bus. You can
configure Agent with password protection to prevent unauthorized
users form accessing your storage subsystem(s).
ANSI
An acronym for American National Standards Institute. An
organization who develops standards used voluntarily by many
manufacturers within the USA. ANSI is not a government agency.
arbitrate
A process of selecting one L_Port from a collection of several ports
that request use of the arbitrated loop concurrently.
array controller
See controller.
asynchronous
Pertaining to events that are scheduled as the result of a signal asking
for the event; pertaining to that which is without any specified time
relation. See also synchronous
autospare
An option that (when enabled) causes physically replaced drives to be
placed in a pool of spare devices.When a failed device is physically
removed and replaced in the same physical location with a device that
does not contain metadata, the controller initializes the device and
moves it to the pool of spare devices. The new device is then available
for any redundant RAID unit that is missing a member. If the automatic
initialization fails, the drive is again marked as a failed device. If you
120
CLI Reference Manual
replace a failed device with an operational device that has not been
previously initialized, the fault LED on the device flashes briefly, the
device is initialized, and then moved to the pool of spare devices.
backplane
The electronic printed circuit board into which you plug subsystem
devices—for example, the SBB or power supply.
bad block
A data block that contains a physical defect.
bad block replacement
Abbreviated BBR. A replacement routine that substitutes defect-free
disk blocks for those found to have defects. This process takes place in
the controller, transparent to the host.
BBR
See bad block replacement.
bit
A single binary digit having a value of either 0 or 1. A bit is the
smallest unit of data a computer can process.
block
Also called a sector. The smallest collection of consecutive bytes
addressable on a disk drive. In integrated storage elements, a block
contains 512 bytes of data, error codes, flags, and the block address
header.
bootstrapping
A method used to bring a system or device into a defined state by
means of its own action. For example, a machine routine whose first
few instructions are enough to bring the rest of the routine into the
computer from an input device.
built-in self-test
A diagnostic test performed by the array controller software on the
controller’s policy processor.
byte
A binary character string made up of 8 bits operated on as a unit.
cache memory
A fast, temporary storage buffer in a controller or computer.
CCITT
Acronym for Consultive Committee International Telephone and
Telegraph. An international association that sets worldwide
communication standards, recently renamed International
Telecommunications Union (ITU).
CCL
an acronym for Command Console LUN. The CCL is a “virtual”
logical unit number whose purpose is to enable communication
between the controller and the SWCC. If no storage units are assigned
Glossary
121
to the controller, the SWCC cannot “see” the controller to communicate
with it. The use of a CCL therefore, creates an initial entry path
between the SWCC and the controller in the absence of assigned
storage units to the controller. Also called communication LUN.
CDU
An abbreviation for cable distribution unit. The power entry device for
StorageWorks cabinets. The CDU provides the connections necessary
to distribute power to the cabinet shelves and fans.
channel
An interface which allows high speed transfer of large amounts of data.
Another term for a SCSI bus. See also SCSI.
chunk
In any form of RAID that stripes data, data is stored in segments that
are called “chunks”. One chunk is stored on each member device in the
unit. Taken together, the chunks make up a stripe. The chunk size can
be used in some controllers to tune the stripeset for a specific
application.
chunk size
The number of data blocks, assigned by a system administrator, written
to the primary RAIDset or stripeset member before the remaining data
blocks are written to the next RAIDset or stripeset member.
If a stripeset is set up with a chunk size that is small compared to the
size of the average host request, the controller can break the host data
up into chunks and can perform its device accesses in parallel, using
RAID3 techniques. This optimizes the stripeset for applications
requiring high data transfer rates.
If the stripeset is set up with a stripesize that is large compared to the
size of the average host request, the controller can perform many
device read accesses in parallel, using RAID5 techniques. This
optimizes the stripeset for applications requiring high I/O request rates.
CLCP
An abbreviation for code-load code-patch utility.
CLI
An abbreviation for command line interpreter. The configuration
interface to operate the controller software. Also called command line
interface.
Client
The SWCC program that contains the graphical user interface and most
of the functionality of the product. The CLient graphical interface
consists of one or more windows, each displaying storage subsystem
122
CLI Reference Manual
information in a different way and providing control features
appropriate to that information.
cold swap
A method of device replacement that requires the entire subsystem to
be turned off before the device can be replaced. See also hot swap and
warm swap.
command line
interpreter
The configuration interface to operate the controller software.
configuration file
A file that contains a representation of a storage subsystem’s
configuration.
container
(1) Any entity that is capable of storing data, whether it is a physical
device or a group of physical devices. (2) A virtual, internal controller
structure representing either a single disk or a group of disk drives
linked as a storageset. Stripesets, mirrorsets, and JBODs are examples
of containers the controller uses to create units.
controller
A hardware device that, with proprietary software, facilitates
communications between a host and one or more devices organized in
an array. HSxxx family controllers are examples of array controllers.
copying
A state in which data to be copied to the mirrorset is inconsistent with
other members of the mirrorset. See also normalizing.
copying member
Any member that joins the mirrorset after the mirrorset is created is
regarded as a copying member. Once all the data from the normal
member (or members) is copied to a normalizing or copying member,
the copying member then becomes a normal member. See also
normalizing member.
CSR
An abbreviation for control and status register.
DAEMON
Pronounced “demon” (diagnostic and execution monitor). A program
usually associated with a UNIX systems that performs a utility
(housekeeping or maintenance) function without being requested or
even known of by the user.
data center cabinet
A generic reference to large COMPAQ subsystem cabinets, such as the
SW600-series and 800-series cabinets in which StorageWorks
components can be mounted.
Glossary
123
data striping
The process of segmenting logically sequential data, such as a single
file, so that segments can be written to multiple physical devices
(usually disk drives) in a round-robin fashion. This technique is useful
if the processor is capable of reading or writing data faster than a single
disk can supply or accept the data. While data is being transferred from
the first disk, the second disk can locate the next segment.
differential I/O module
A 16-bit I/O module with SCSI bus converter circuitry for extending a
differential SCSI bus. See also I/O module.
differential SCSI bus
A bus in which the level of a signal is determined by the potential
difference between two wires. A differential bus is more robust and less
subject to electrical noise than is a single-ended bus.
DILX
An abbreviation for disk inline exerciser. The diagnostic software used
to test the data transfer capabilities of disk drives in a way that
simulates a high level of user activity.
dirty data
A term to express the write-back cached data that has not been written
to storage media, even though the host operation processing the data
has completed.
DOC
An acronym for DWZZA-On-a-Chip. An NCR53C120 SCSI bus
extender chip used to connect a SCSI bus in an expansion cabinet to the
corresponding SCSI bus in another cabinet.
dual-redundant
configuration
A storage subsystem configuration consisting of two active controllers
operating as a single controller. If one controller fails, the other
controller assumes control of the failed controller’s storage devices.
DUART
An acronym for dual universal asynchronous receiver and transmitter.
An integrated circuit containing two serial, asynchronous transceiver
circuits.
DWZZA
A StorageWorks SCSI-bus-signal converter used to connect 8-bit
single-ended devices to hosts with 16-bit differential SCSI adapters.
This converter extends the range of a single-ended SCSI cable to the
limit of a differential SCSI cable. See also SCSI bus signal converter.
DWZZB
A StorageWorks SCSI bus signal converter used to connect a variety of
16-bit single-ended devices to hosts with 16-bit differential SCSI
adapters. See also SCSI bus signal converter.
124
CLI Reference Manual
DWZZC
The 16-bit SCSI table-top SCSI bus signal converter used to extend a
differential SCSI bus, or connect a differential SCSI bus to a single
ended SCSI bus. See also SCSI bus signal converter.
ECB
An abbreviation for external cache battery. The unit that supplies
backup power to the cache module in the event the primary power
source fails or is interrupted.
ECC
An abbreviation for error checking and correction.
EDC
An abbreviation for error detection code.
EIA
An abbreviation for Electronic Industries Association. EIA is a
standards organization specializing in the electrical and functional
characteristics of interface equipment.
EMU
An acronym for the environmental monitoring unit. The EMU is a unit
that provides increased protection against catastrophic failures. Some
subsystem enclosures include an EMU which works with the controller
to detect conditions such as failed power supplies, failed blowers,
elevated temperatures, and external air sense faults. The EMU also
controls certain cabinet hardware including DOC chips, alarms, and fan
speeds.
ESD
An abbreviation for electrostatic discharge. ESD is the discharge of
potentially harmful static electrical voltage as a result of improper
grounding.
extended subsystem
A subsystem in which two cabinets are connected to the primary
cabinet.
external cache battery
See ECB.
Failback
The process of restoring data access to the newly-restored controller in
a dual-redundant controller configuration (see failover).
failedset
A group of failed mirrorset or RAIDset devices automatically created
by the controller.
failover
The process that takes place when one controller in a dual-redundant
configuration assumes the workload of a failed companion controller.
Failover continues until the failed controller is repaired or replaced (see
failback)
Glossary
125
FCC
An abbreviation for Federal Communications Commission. The FCC is
a federal agency responsible for establishing standards and approving
electronic devices within the United States.
FCC Class A
A term used on a certification label that appears on electronic devices.
This label is placed on equipment that can only be used in a
commercial environment within the United States.
FCC Class B
A term used on a certification label that appears on electronic devices.
This able is placed on equipment that can only be used in a home or
commercial environment within the United States.
FD SCSI
The fast, narrow, differential SCSI bus with an 8-bit data transfer rate
of 10 MB/s. See also FWD SCSI and SCSI.
flush
A term used to represent the act of writing dirty data from cache to a
storage media (see dirty data).
FMU
An abbreviation for fault management utility.
forced errors
A data bit indicating a corresponding logical data block contains
unrecoverable data.
FRU
An abbreviation for field replaceable unit. A hardware component that
can be replaced at the customer’s location by COMPAQ service
personnel or qualified customer service personnel.
full duplex (n)
A communications system in which there is a capability for 2-way
transmission and acceptance between two sites at the same time.
full duplex (adj)
Pertaining to a communications method in which data can be
transmitted and received at the same time.
FWD SCSI
A fast, wide, differential SCSI bus with a maximum 16-bit data transfer
rate of 20 MB/s. See also SCSI and FD SCSI.
FWD SCSI
A fast, wide, differential SCSI bus with a maximum 16-bit data transfer
rate of 20 MB/s. See also SCSI and FD SCSI.
HDA
See host adapter.
host
The primary or controlling computer to which a storage subsystem is
attached.
126
CLI Reference Manual
host adapter
A device that connects a host system to a SCSI bus. The host adapter
usually performs the lowest layers of the SCSI protocol. This function
may be logically and physically integrated into the host system. Also
called host bus adapter, or HDA.
host compatibility mode
A setting used by the controller to provide optimal controller
performance with specific operating systems. This improves the
controller’s performance and compatibility with the specified operating
system. See the SET controller command in this manual for a listing
and description of the available modes.
hot disks
A disk containing multiple hot spots. Hot disks occur when the
workload is poorly distributed across storage devices and prevents
optimum subsystem performance. See also hot spots.
hot spots
A portion of a disk drive frequently accessed by the host. Because the
data being accessed is concentrated in one area, rather than spread
across an array of disks providing parallel access, I/O performance is
significantly reduced. See also hot disks.
hot swap
A method of device replacement that allows normal I/O activity on a
device’s bus to remain active during device removal and insertion. The
device being removed or inserted is the only device that cannot perform
operations during this process. See also cold swap and warm swap.
HSOF
An abbreviation for Hierarchical Storage Operating Firmware. HSOF is
software that provides the operating system for the array controller.
This software is loaded from a removable ROM program card. See also
PCMCIA.
initiator
A SCSI device that requests an I/O process to be performed by another
SCSI device, namely, the SCSI target. The controller is the initiator on
the device bus. The host is the initiator on the host bus.
instance code
A four-byte value displayed in most text error messages and issued by
the controller when a subsystem error occurs. The instance code
indicates when the error was detected.
I/O module
A 16-bit SBB shelf device that integrates the SBB shelf with either an
8-bit single ended, 16-bit single-ended, or 16-bit differential SCSI bus.
See also I/O Module.
Glossary
127
I/O operation
The process of requesting a transfer of data from a peripheral device to
memory (or visa versa), the actual transfer of the data, and the
processing and overlaying activity to make both of those happen.
JBOD
An acronym for just a bunch of disks. A term used to describe a group
of single-device logical units that are in no particular container
configuration. See also container, unit.
LBN
An abbreviation for logical block number.
LED
An acronym for light emitting diode.
local connection
A connection to the subsystem using either its serial maintenance port
or the host SCSI bus. A local connection enables you to connect to one
subsystem controller within the physical range of the serial or host
SCSI cable.
local terminal
A terminal plugged into the EIA-423 maintenance port located on the
front bezel of the controller. See also maintenance terminal.
logical block number
See LBN.
logical bus
A single-ended bus connected to a differential bus by a SCSI bus signal
converter.
logical unit
A physical or virtual device addressable through a target ID number.
LUNs use their target’s bus connection to communicate on the SCSI
bus.
logical unit number
Abbreviated LUN. A LUN is (1) A value that identifies a specific
logical unit belonging to a SCSI target ID number. (2) A number
associated with a physical device unit during a task’s I/O operations.
Each task in the system must establish its own correspondence between
logical unit numbers and physical devices.
LRU
An abbreviation for least recently used. A cache term used to describe
the block replacement policy for read cache.
maintenance terminal
An EIA-423-compatible terminal used with the controller. This
terminal is used to identify the controller, enable host paths, enter
configuration information, and check the controller’s status. The
maintenance terminal is not required for normal operations.
See also local terminal.
128
CLI Reference Manual
Mb/s (Mbps)
An abbreviation for one million (106) bits per second (megabits per
second).
MB/s (MBps)
An abbreviation for one million (106) bytes per second (megabytes per
second).
member
A container that is a storage element in a RAID array.
metadata
The data written to a disk for the purposes of controller administration.
Metadata improves error detection and media defect management for
the disk drive. It is also used to support storageset configuration and
partitioning. Non-transportable disks also contain metadata to indicate
they are uniquely configured for StorageWorks environments.
Metadata can be thought of as “data about data.”
mirroring
A term used to represent the act of creating an exact copy or image of
data on another storage device.
mirrored write-back
caching
A method of caching data that maintains two copies of the cached data.
The copy is available if either cache module fails.
mirrorset
See RAID level 1.
nominal membership
The desired number of mirrorset members when the mirrorset is fully
populated with active devices. If a member is removed from a
mirrorset, the actual number of members may fall below the “nominal”
membership.
non-redundant
controller configuration
A term that represents a controller configuration which does not
include a second controller (a single controller configuration).
normal member
A mirrorset member that, block-for-block, contains the same data as
other normal members within the mirrorset. Read requests from the
host are always satisfied by normal members.
normalizing
Normalizing is a state in which, block-for-block, data written by the
host to a mirrorset member is consistent with the data on other normal
and normalizing members. The normalizing state exists only after a
mirrorset is initialized. Therefore, no customer data is on the mirrorset.
normalizing member
A mirrorset member whose contents is the same as all other normal and
normalizing members for data that has been written since the mirrorset
was created or lost cache data was cleared. A normalizing member is
Glossary
129
created by a normal member when either all of the normal members fail
or all of the normal members are removed from the mirrorset. See also
copying member.
NVM
An abbreviation for Non-Volatile Memory. A type of memory—the
contents of which survive loss of power. Sometimes referred to as
NVMEM.
OCP
An abbreviation for operator control panel. The control or indicator
panel associated with a device. The OCP is usually mounted on the
device and is accessible to the operator.
other controller
The controller in a dual-redundant pair that is connected to the
controller that is serving your current CLI session. See also this
controller.
parity
A method of checking if binary numbers or characters are correct by
counting the ONE bits. In odd parity, the total number of ONE bits
must be odd; in even parity, the total number of ONE bits must be
even. Parity information can be used to correct corrupted data.
RAIDsets use parity to improve the availability of data.
parity bit
A binary digit added to a group of bits that checks to see if there are
errors in the transmission.
parity RAID
See RAIDset.
partition
A logical division of a container, represented to the host as a logical
unit.
PCM
Polycenter Console Manager.
PCMCIA
Personal Computer Memory Card Industry Association. An
international association formed to promote a common standard for PC
card-based peripherals to be plugged into notebook computers. The
card commonly known as a PCMCIA card is about the size of a credit
card.
peripheral device
Any unit, distinct from the CPU and physical memory, that can provide
the system with input or accept any output from it. Terminals, printers,
tape drives, and disks are peripheral devices.
130
CLI Reference Manual
point-to-point
connection
A network configuration in which a connection is established between
two, and only two, terminal installations. The connection may include
switching facilities.
port
In general terms, the port is (1) A logical channel in a communications
system. (2) The hardware and software used to connect a host
controller to a communications bus, such as a SCSI bus or serial bus.
Regarding the controller, the port is: (1) the logical route for data in and
out of a controller that can contain one or more channels, all of which
contain the same type of data. (2) The hardware and software that
connects a controller to a SCSI device.
primary cabinet
The primary cabinet in an extended subsystem cabinet arrangement.
This cabinet contains the controllers, cache modules, external cache
batteries, and the PVA module.
program card
The PCMCIA card containing the controller’s operating software.Used
to load the software into the controller.
PTL
An abbreviation for Port-Target-LUN. The controller’s method of
locating a device on the controller device bus.
PVA module
An abbreviation for power verification and addressing module. The
PVA module provides unique addresses for each cabinet in an extended
subsystem. Each BA370 enclosure in an extended subsystem must have
a unique PVA ID. Use PVA ID 0 for the enclosure that contains the
controllers. Use PVA IDs 2 and 3 for the additional enclosures.
quiesce
A term used to represent the act of rendering bus activity inactive
(dormant). For example, “quiesce the SCSI bus operations during a
device warm-swap.”
RAID
An acronym for Redundant Array of Independent Disks. RAID
represents multiple levels of storage access developed to improve
performance or availability or both.
RAID level 0
A RAID storageset that stripes data across an array of disk drives. A
single logical disk spans multiple physical disks, allowing parallel data
processing for increased I/O performance. While the performance
characteristics of RAID level 0 is excellent, this is the only RAID level
that does not provide redundancy. Raid level 0 storagesets are
sometimes referred to as stripesets.
Glossary
131
RAID level 0+1
A RAID storageset that stripes data across an array of disks (RAID
level 0) and mirrors the striped data (RAID level 1) to provide high I/O
performance and high availability. Raid level 0+1 storagesets are
sometimes referred to as striped mirrorsets.
RAID level 1
A RAID storageset of two or more physical disks that maintains a
complete and independent copy of the entire virtual disk’s data. This
type of storageset has the advantage of being highly reliable and
extremely tolerant of device failure. Raid level 1 storagesets are
sometimes referred to as mirrorsets.
RAID level 3
A RAID storageset that transfers data parallel across the array’s disk
drives a byte at a time, causing individual blocks of data to be spread
over several disks serving as one enormous virtual disk. A separate
redundant check disk for the entire array stores parity on a dedicated
disk drive within the storageset. Contrast RAID level 5.
RAID Level 5
A RAID storageset that, unlike RAID level 3, stores the parity
information across all of the disk drives within the storageset. Contrast
RAID level 3.
RAID level 3/5
A COMPAQ-developed RAID storageset that stripes data and parity
across three or more members in a disk array. A RAIDset combines the
best characteristics of RAID level 3 and RAID level 5. A RAIDset is
the best choice for most applications with small to medium I/O
requests, unless the application is write intensive. A RAIDset is
sometimes called parity RAID.
RAIDset
See RAID level 3/5.
RAM
An acronym for random access memory.
read-ahead caching
A caching technique for improving performance of synchronous
sequential reads by pre-fetching data from disk.
read caching
A cache management method used to decrease the subsystem response
time to a read request by allowing the controller to satisfy the request
from the cache memory rather than from the disk drives.
reconstruction
The process of regenerating the contents of a failed member’s data. The
reconstruct process writes the data to a spareset disk and then
incorporates the spareset disk into the mirrorset, striped mirrorset, or
RAIDset from which the failed member came. See also regeneration.
132
CLI Reference Manual
reduced
A term that indicates that a mirrorset or RAIDset is missing one
member because the member has failed or has been physically
removed.
redundancy
The provision of multiple interchangeable components to perform a
single function in order to cope with failures and errors. A RAIDset is
considered to be redundant when user data is recorded directly to one
member and all of the other members include associated parity
information.
regeneration
A term used to represent (1) The process of calculating missing data
from redundant data. (2) The process of recreating a portion of the data
from a failing or failed drive using the data and parity information from
the other members within the storageset. The regeneration of an entire
RAIDset member is called reconstruction. See also reconstruction.
RFI
An abbreviation for radio frequency interference. The disturbance of a
signal by an unwanted radio signal or frequency.
replacement policy
The policy specified by a switch with the SET FAILEDSET command
indicating whether a failed disk from a mirrorset or RAIDset is to be
automatically replaced with a disk from the spareset. The two switch
choices are AUTOSPARE and NOAUTOSPARE.
SBB
An abbreviation for storage building block (1) A modular carrier plus
the interface required to mount the carrier into a standard
StorageWorks shelf. (2) any device conforming to shelf mechanical and
electrical standards installed in a 3.5-inch or 5.25-inch carrier, whether
it is a storage device or power supply.
SCSI
An acronym for small computer system interface (1) An ANSI
interface standard defining the physical and electrical parameters of a
parallel I/O bus used to connect initiators to devices. (2) a processorindependent standard protocol for system-level interfacing between a
computer and intelligent devices including hard drives, floppy disks,
CD-ROMs, printers, scanners, and others.
SCSI-A cable
A 50-conductor (25 twisted-pair) cable generally used for single-ended,
SCSI-bus connections.
SCSI bus signal
converter
Sometimes referred to as an adapter (1) A device used to interface
between the subsystem and a peripheral device unable to be mounted
directly into the SBB shelf of the subsystem. (2) a device used to
Glossary
133
connect a differential SCSI bus to a single-ended SCSI bus. (3) A
device used to extend the length of a differential or single-ended SCSI
bus. See also DWZZA, DWZZB, DWZZC, and I/O module.
SCSI device
A term used to represent (1) A host computer adapter, a peripheral
controller, or an intelligent peripheral that can be attached to the SCSI
bus. (2) Any physical unit that can communicate on a SCSI bus.
SCSI device ID number
A bit-significant representation of the SCSI address referring to one of
the signal lines, numbered 0 through 7 for an 8-bit bus, or 0 through 15
for a 16-bit bus. See also target ID number.
SCSI ID number
The representation of the SCSI address that refers to one of the signal
lines numbered 0 through 15.
SCSI-P cable
A 68-conductor (34 twisted-pair) cable generally used for differential
bus connections.
SCSI port
(1) Software: The channel controlling communications to and from a
specific SCSI bus in the system. (2) Hardware: The name of the logical
socket at the back of the system unit to which a SCSI device is
connected.
signal converter
See SCSI bus signal converter.
SIMM
An acronym for Single Inline Memory Module.
single-ended I/O module
A 16-bit I/O module. See also I/O module.
single-ended SCSI bus
A bus type in which one wire carries the signal and another wire (or
shield) is connected to electrical ground. Each signal’s logic level is
determined by the voltage of the signal wire in relation to ground. This
is in contrast to a differential connection where the second wire carries
an inverted signal.
spareset
A collection of disk drives made ready by the controller to replace
failed members of a storageset.
storage array
An integrated set of storage devices.
storage array subsystem
See storage subsystem.
134
CLI Reference Manual
storageset
(1) A group of devices configured with RAID techniques to operate as
a single container. (2) Any collection of containers, such as stripesets,
mirrorsets, striped mirrorsets, and RAIDsets.
storage subsystem
The controllers, storage devices, shelves, cables, and power supplies
used to form a mass storage subsystem.
storage unit
The general term that refers to storagesets, single-disk units, and all
other storage devices that are installed in your subsystem and accessed
by the host. A storage unit can be any entity that is capable of storing
data, whether it is a physical device or a group of physical devices.
StorageWorks
A family of COMPAQ modular data storage products which allow
customers to design and configure their own storage subsystems.
Components include power, packaging, cabling, devices, controllers,
and software. Customers can integrate devices and array controllers in
StorageWorks enclosures to form storage subsystems.
StorageWorks systems include integrated SBBs and array controllers to
form storage subsystems. System-level enclosures to house the shelves
and standard mounting devices for SBBs are also included.
stripe
The data divided into blocks and written across two or more member
disks in an array.
striped mirrorset
See RAID level 0+1.
stripeset
See RAID level 0.
stripe size
The stripe capacity as determined by n–1 times the chunksize, where n
is the number of RAIDset members.
striping
The technique used to divide data into segments, (chunks). The
segments are striped (distributed), across members of the stripeset.
Each stripeset member receives an equal share of the I/O request load,
improving performance. This technique also helps to distribute hot
spots across the array of physical devices to prevent hot disks. See also
host spots, hot disks.
surviving controller
The controller in a dual-redundant configuration pair that serves its
companion’s devices when the companion controller fails.
tape inline exerciser
See TILX.
Glossary
135
target
A term representing (1) A SCSI device that performs an operation
requested by an initiator. (2) The target identification (ID) number of
the device.
target ID number
The address a bus initiator uses to connect with a bus target. Each bus
target is assigned a unique target address. See also initiator.
this controller
The controller that is serving your current CLI session through a local
or remote terminal. See also other controller.
TILX
Tape inline exerciser. The controller’s diagnostic software to test the
data transfer capabilities of tape drives in a way that simulates a high
level of user activity.
Ultra SCSI bus
A term used to represent a wide, fast-20 SCSI bus.
unit
A container made accessible to a host. A unit may be created from a
single disk drive or tape drive. A unit may also be created from a more
complex container such as a RAIDset. The controller supports a
maximum of eight units on each target. See also target and target ID
number.
unwritten cached data
Sometimes called unflushed or “dirty” data. See dirty data.
UPS
An abbreviation for uninterruptable power supply. A battery-powered
power supply guaranteed to provide power to an electrical device in the
event of an unexpected interruption to the primary power supply.
Uninterruptable power supplies are usually rated by the amount of
voltage supplied and the length of time the voltage is supplied.
VHDCI
An abbreviation for very high-density-cable interface. A 68-pin interface
that is required for Ultra-SCSI connections.
virtual terminal
A software path from an operator terminal on the host to the controller's
CLI interface (sometimes called a host console). The path can be
established via the host port on the controller (using HSZ term) or via
the maintenance port through an intermediary host.
VTDPY
An abbreviation for virtual terminal display utility.
warm swap
A device replacement method that allows the complete system to
remain online during device removal or insertion. The system bus may
136
CLI Reference Manual
be halted (quiesced), for a brief period of time during the warm-swap
procedure. See also quiesce.
worldwide name
A unique 64-bit number assigned to a subsystem by the Institute of
Electrical and Electronics Engineers (IEEE) and set by COMPAQ
manufacturing prior to shipping. This name is referred to as the node
ID within the CLI
write-back caching
A cache management method used to decrease the subsystem response
time to write requests by allowing the controller to declare the write
operation “complete” as soon as the data reaches its cache memory.
The controller performs the slower operation of writing the data to the
disk drives at a later time.
write-through caching
A cache management method used to decrease the subsystem response
time to a read. This method allows the controller to satisfy the request
from the cache memory rather than from the disk drives.
write hole
The period of time in a RAID level 1 or RAID level 5 write operation
when there is an opportunity for undetectable RAIDset data corruption.
Write holes occur under conditions such as power outages, where the
writing of multiple members can be abruptly interrupted. A cache
design using battery back-up eliminates the write hole because data is
preserved in cache and unsuccessful write operations can be retried.
write-through cache
A cache management technique for retaining host write requests in read
cache. When the host requests a write operation, the controller writes
data directly to the storage device. This technique allows the controller
to complete some read requests from the cache, greatly improving the
response time to retrieve data. The operation is complete only after the
data to be written is received by the target storage device.
This cache management method may update, invalidate, or delete data
from the cache memory accordingly, to ensure that the cache contains
the most current data.
137
Index
A
ADD CDROM command, syntax, 7
ADD device-name command
switches
TRANSFER_RATE_REQUESTED, 10
ADD DISK command
switches
NOTRANSPORTABLE, 9
TRANSPORTABLE, 9
syntax, 9
ADD MIRRORSET command
switches
COPY, 12
POLICY, 13
READ_SOURCE, 13
syntax, 12
ADD PASSTHROUGH command
switches
TRANSFER_RATE_REQUESTED, 16
syntax, 15
ADD RAIDSET command
switches
NOPOLICY, 18
POLICY, 18
RECONSTRUCT, 18
REDUCED, 19
syntax, 17
ADD SPARESET command, syntax, 21
ADD STRIPESET command, syntax, 22
ADD UNIT command
switches
ACCESS_ID, 25
MAXIMUM_CACHED_TRANSFER,
26
PREFERRED_PATH, 26
RUN, 27, 107
WRITE_PROTECT, 28, 107
WRITEBACK_CACHE, 28, 108
syntax, 24
adding
CD-ROM drives, 7
disks, 9
mirrorsets, 12
passthrough containers, 15
sparesets, 21
stripesets, 22
units, 24
C
cables
tightening, viii
cache, setting flush timer, 73
Caution, defined, x
CD-ROM
adding to configuration, 7
deleting, 39
showing, 109
CD-ROMs
displaying information, 109
CFMENU, running, 67
chunksize, setting storageset size, 50
CLEAR_ERRORS CLI command, syntax, 30
CLEAR_ERRORS controller
INVALID_CACHE command
syntax, 31
CLEAR_ERRORS controller
INVALID_CACHE command, syntax, 31
CLEAR_ERRORS LOST_DATA command,
syntax, 33
CLEAR_ERRORS UNKNOWN command, syntax, 35
CLEAR_ERRORS UNWRITEABLE_DATA
138
CLI Reference Manual
command, syntax,
36
CLI
abbreviating commands, 4
command editing keys, 5
command syntax entering, 6
commands overview, 3
customizing the prompt, 79
entering commands ahead, 4
getting help, 4
help, 47
rules for entering commands, 4
command line interpreter. See CLI
commands
ADD CDROM, 7
ADD DISK, 9
ADD MIRRORSET, 12
ADD PASSTHROUGH, 15
ADD RAIDSET, 17
ADD SPARESET, 21
ADD STRIPESET, 22
ADD UNIT, 24
CLEAR_ERRORS CLI, 30
CLEAR_ERRORS
INVALID_CACHE,
31
CLEAR_ERRORS LOST_DATA, 33
CLEAR_ERRORS UNKNOWN, 35
CLEAR_ERRORS
UNWRITEABLE_DATA, 36
CREATE_PARTITION, 37
DELETE container-name, 39
DELETE SPARESET, 42
DESTROY_PARTITION, 44
DIRECTORY, 46
HELP, 47
INITIALIZE, 49
LOCATE, 54
MIRROR, 57
REDUCE, 60
RENAME, 63
RETRY_ERRORS, 66
RUN, 67
SET device-name, 82
SET EMU, 84
SET FAILEDSET, 87
SET FAILOVER, 89
SET mirrorset-name, 91
SET MULTIBUS_FAILOVER, 96
SET NOMULTIBUS_FAILOVER. See SET
NOFAILOVER
SET RAIDset-name, 101
SET unit-number, 104
SHOW, 109
UNMIRROR, 117
configuration
modifying controller configurations, 2
restoring, 51
connection
remote, 2
container
defined, 122
initializing, 49
controllers
"this" and "other" defined, ix
displaying information, 109
load balancing, 78
showing, 109
shutting down, 115
conventions
typographical, viii
warnings, cautions, tips, notes, viii
CREATE_PARTITION command, syntax, 37
creating
CD-ROMs, 7
disks, 9
mirrorsets, 12
passthrough containers, 15
single-disk units, 29
sparesets, 21
stripesets, 22
units, 24
D
data center cabinet,
122
Index
DELETE container-name command, syntax,
39, 43
DELETE FAILEDSET command, syntax, 41
DELETE SPARESET command, syntax, 42
deleting
CD-ROMs, 39
devices, 39
mirrorsets, 39
optical disk drives, 39
RAIDsets, 39
storagesets, 39
stripesets, 39
tape drives, 39
tape loaders, 39
DESTROY_PARTITION command, syntax,
44
devices
locating, 54
setting data transfer rate, 10, 16, 82
showing, 109
diagnostics
listing of, 46
running, 67
DIRECTORY command, syntax, 46
disk drives
adding to configuration, 9
deleting, 39
displaying information, 109
initializing, 49
making transportable, 82
mirroring, 57
removing from a mirrorset, 60
removing from the failedset, 41
removing from the spareset, 42
renaming, 63
setting device data transfer rate, 10, 16
showing, 109, 110
transfer rate, 10, 16
documentation, related, xi
dual-redundant configuration
enabling, 89
DUART, 123
DWZZA,
DWZZB,
123
123
E
electrostatic discharge See ESD, vii
EMU
defined, 124
setting, 84
error messages
clearing from CLI, 30
clearing unwriteable data errors, 36
ESD
defined, 124
precautions, vii
ESD wrist strap, vii
F
failedset, deleting members, 41
failover
defined, 124
disabling, 99
finding devices and storagesets, 54
FWD SCSI, 125
H
HELP command, syntax, 47
history, revision of this manual, xii
host
compatibility mode, 74
hot standby controller, 78
HSOF, 126
HSZterm. See remote connection
I
initialize
before adding unit, 24
saving user data, 51
139
140
CLI Reference Manual
INITIALIZE command
switches
CHUNKSIZE, 50
DESTROY, 50
SAVE_CONFIGURATION,
syntax, 49
N
51
L
nominal membership, 128
non-redundant configuration,
nonvolatile, defined
normalizing member, 128
Note, defined, x
NV. See nonvolatile
128
listing diagnostics and utilities, 46
load balancing, 78
local connection port, precautions, viii
local terminal, 127
LOCATE command, syntax, 54
lost data error, clearing, 33
LRU, 127
optical disk drives
deleting, 39
displaying information,
showing, 109
other controller, explained,
M
P
Maintenance port precautions, viii
maintenance terminal, defined, 127
MIRROR command
switches
COPY, 57
POLICY, 58
syntax, 57
mirrorset
adding to configuration, 12
choosing a replacement member, 13, 18
converting back to a single device, 117
creating from a single disk, 57
deleting, 39
initializing, 49
removing a member, 60
setting a replacement policy, 13, 18
showing, 109
unmirroring, 117
mirrorsets
displaying information, 109
renaming, 63
partitions
creating, 37
displaying size, 109
setting size, 37
showing, 109
passthrough containers
adding to configuration, 15
deleting, 39
renaming, 63
showing, 109
port-target-LUN, defined, 130
precautions
electrostatic discharge, vii
local connection port, viii
VHDCI cables, viii
preferred SCSI target ID numbers, setting, 78
PTL
defined, 130
specifying with ADD CDROM command,
7
specifying with ADD DISK command, 9
specifying with ADD PASSTHROUGH command, 16
O
109
2
Index
publications, related,
Q
quiesce,
CFMENU, 67
command syntax,
xi
141
67
S
130
R
RAIDset
adding while missing a member, 19
changing characteristics, 101
deleting, 39
displaying information, 109
initializing, 49
removing a member, 102
replacing a member, 102
showing, 109
specifying chunksize, 50
specifying replacement policy, 101
RAIDsets
renaming, 63
REDUCE command, syntax, 61
redundancy, defined, 132
regenerate process, defined, 132
related publications, xi
remote connection, 2
removing a mirrorset member, 60
RENAME command, syntax, 63
Required tools, x
RESTART controller command
switches
IGNORE_ERRORS, 64
IMMEDIATE_SHUTDOWN, 64– 65
NOIGNORE_ERRORS, 64
64–
NOIMMEDIATE_SHUTDOWN,
65
syntax, 64
RETRY_ERRORS command, syntax, 66
RETRY_ERRORS UNWRITEABLE_DATA
command, syntax, 66
revision history, xii
RUN
SBB, 132
SCSI
preferring target ID numbers, 78
SCSI-A cable, 132
SCSI-B cable, 133
SELFTEST controller command
switches
IGNORE_ERRORS, 69
IMMEDIATE_SHUTDOWN, 69
syntax, 69
SET controller command, 71
switches
CACHE_FLUSH_TIMER, 72
COMMAND_CONSOLE_LUN, 73
MIRRORED_CACHE, 77
PREFERRED_ID, 78
PROMPT, 79
TERMINAL_PARITY, 79
TERMINAL_SPEED, 79
TIME, 80
syntax, 71
SET device-name
switches
TRANSFER_RATE_REQUESTED, 82
SET device-name command
switches
NOTRANSPORTABLE, 82– 83
TRANSFER_RATE_REQUESTED, 10,
16
TRANSPORTABLE, 82– 83
syntax, 82
SET EMU command
switches
FANSPEED, 84
SENSOR SETPOINT, 84
syntax, 84
SET FAILEDSET command, syntax, 87
142
CLI Reference Manual
SET FAILOVER command
switches
DESTROY_UNFLUSHABLE_DATA,
99
syntax, 89
SET mirrorset-name command
switches
COPY, 91
MEMBERSHIP, 91
POLICY, 93
READ_SOURCE, 94
REMOVE, 92
REPLACE, 93
syntax, 91
SET MULTIBUS_FAILOVER command, syntax, 97
SET NOFAILOVER command
switches, 99– 100
syntax, 99
SET RAIDset-name command
switches
POLICY, 101
RECONSTRUCT, 102
REMOVE, 102
REPLACE, 102
syntax, 101
SET unit-number command
switches
ACCESS_ID, 105
MAXIMUM_CACHED_TRANSFER,
106
PREFERRED_PATH, 106
READ_CACHE, 107
syntax, 104
setting
cache flush timer, 73
CLI prompt, 79
control of metadata, 50
controller behavior at restart, 64
controller behavior at shutdown, 115
controller behavior selftest, 69
controller cache flush timer, 73
controller cache ups policy, 73
controller configuration handling, 51
controller error handling at restart, 64
controller error handling at selftest, 64, 69
controller error handling at shutdown, 115
controller initial configuration, 77
controller preferred target ID number, 78
data retention policy, 31
device data transfer rate, 10, 16, 82
device transfer rate, 10, 16, 82
failedset autospare feature, 87
fan speed, 85
full display, 111
mirrored write-back cache, 77
mirrorset copy data, 57
mirrorset copy speed, 12, 91
mirrorset member read source, 13
mirrorset read source, 13
mirrorset spareset replacement policy, 13
number of blocks cached by controller, 26,
106
number of mirrorset members, 91
partition size, 31, 37
preferred path for units, 26, 106
preferred SCSI target ID numbers, 78
18,
RAIDset member reconstruct policy,
102
13,
RAIDset member replacement policy,
18, 101
RAIDset reduced member policy, 19
read cache for units, 27, 107
storageset chunksize, setting, 50
subsystem temperature sensor setpoint, 84
terminal parity, 79
terminal speed, 79
transportability of devices, 82
transportability of disks, 9, 82
unit access ID number, 25, 105
unit availability to the host, 27, 107
write protect for units, 28, 107
write-back cache for units, 28, 108
SHOW command
Index
parameters, 109– 111
switches, FULL, 111
syntax, 109
SHUTDOWN controller command
parameters, 115
switches, 115– 116
IGNORE_ERRORS, 115
IMMEDIATE_SHUTDOWN, 115
syntax, 115
spareset
adding to configuration, 21
removing a disk drive, 42
speed. See transfer rate
Static, vii
Static electricity, vii
storagesets
defined, 134
displaying information, 109
initializing, 49
locating, 54
renaming, 63
showing, 109
StorageWorks Command Console, 2
stripe size, defined, 134
stripe, defined, 134
stripesets
adding to configuration, 22
deleting, 39
displaying information, 109
initializing, 49
mirroring, 57
renaming, 63
showing, 109
specifying chunksize, 50
SWCC, 2
Syntax, CLI command entering, 6
Syntax, command entering, 6
T
tape drives
deleting,
39
143
displaying information, 109
renaming, 63
showing, 109
tape loaders
deleting, 39
displaying information, 109
showing, 109
terminal
setting parity, 79
setting speed, 79
testing controllers, 69
this controller
defined, ix
explained, 2
removing from dual-redundant configuration,
99
starting diagnostic or utility programs, 67
tightening VHDCI cables, viii
Tip, defined, x
Tools, x
transfer rate
setting device, 10, 16, 82
typographical conventions, viii
U
units
adding to configuration, 24
changing characteristics, 104
clearing lost data error, 33
displaying configured units, 110
displaying information, 109
mirroring, 57
showing, 109
UNMIRROR command
parameters, 117
syntax, 117
unwriteable data error, retrying, 66
utilities
CFMENU, 67
listing of, 46
running, 67
144
CLI Reference Manual
V
W
VHDCI cable precautions, viii
virtual disk, setting. See SET controller
COMMAND_CONSOLE_LUNcommand
Warning, defined, x
write hole, 136
write-back cache, setting the flush timer,
72