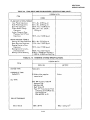
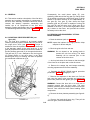
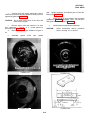
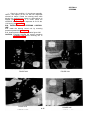
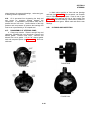
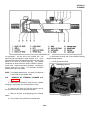
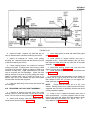
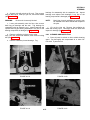
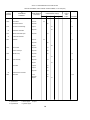
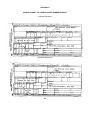
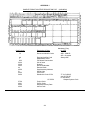
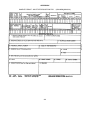
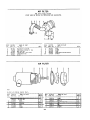
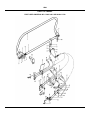
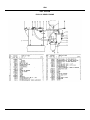
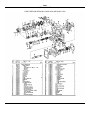
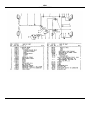
1
TM 5-3895-348-14&P-1
TECHNICAL MANUAL
OPERATOR'S ORGANIZATIONAL,
DIRECT SUPPORT, GENERAL
SUPPORT, AND DEPOT
MAINTENANCE MANUAL
(INCLUDING REPAIR PARTS
INFORMATION AND SUPPLEMENTAL
OPERATING, MAINTENANCE AND
REPAIR PARTS INSTRUCTIONS)
ROLLER MOTORIZED,
STEEL WHEEL2 DRUM
TANDEM, 10-14
TON (CCE)
HYSTER MODEL C350B-D
NSN 3895-00-578-0372
H E A D Q U A R T E R S ,
D E P A R T M E N T
27 MARCH 1981
O F
T H E
A R M Y
WARNING:
Never shut down the engine when attempting to stop the unit. This will reduce or eliminate all dynamic
braking capabilities.
WARNING:
Always use extreme caution when positioning scrapers as they are under considerable spring tension and
may become sharp when worn.
WARNING:
Always support ballast securely when removing or installing ballast mounting capscrews.
WARNING:
In order to check the high-pressure relief valve, it is necessary to bring the unit to stall. CAUTION must
be taken to ensure the safety of personnel when attempting to stall the unit.
WARNING:
Changing the quantity of shims in the relief valves is not recommended.
WARNING:
When adjusting the Displacement Control Valve, the drive drum must be safely blocked off the ground.
Any movement of the Control Valve Spool causes the unit to shift out of neutral and the drum will turn.
CAUTION personnel to stand clear of the drive drum.
WARNING:
The brake assembly will be removed prior to drive drum removal. Block the machine safely to prevent
movement.
WARNING:
When removing the drive drum, take caution. The drive drum is extremely heavy (approximately 12,000
lb., 5440 kg without ballast). CAUTION personnel to stand clear.
WARNING:
During transmission start-up procedure, disconnect the cable from the pump until after initial start-up.
This will allow the pump to remain in neutral (see figure 7-104).
WARNING:
Connect the drum hub to a hoist before removal from the drive drum. The outer planetary assembly will
accompany the drum hub upon removal. Care should be taken when handling these components.
WARNING:
When assembling the steering control unit, alignment of the cross slot in the drive with the valleys
between the teeth of the meter gear star determines proper valve timing of the unit. There are 12 teeth
on the spline and 6 pump teeth on the star. Alignment is exactly right in 6 positions and exactly wrong in
6 positions. If the parts slip out of position during this part of assembly, repeat until you are certain
correct alignment is obtained (see figure 9-57).
A
WARNING:
DO NOT extend the hands or arms through the center of the steering wheel during start-up after the
steering control unit has been reassembled. If the steering control unit has been disassembled and
incorrectly timed, the steering wheel may suddenly become motorized or rotate abruptly with extreme
force. If this occurs, see figure 9--2 and paragraph 9-27, step t and retime the control unit as shown.
WARNING:
When checking water spray motor brushes, be sure ignition key switch and water spray switch are in the
OFF position before inspecting brushes.
WARNING:
Support heavy components securely BEFORE attempting to remove them.
WARNING:
Always block the unit securely to prevent movement while performing maintenance or repairs.
B
THIS MANUAL CONTAINS COPYRIGHTED MATERIAL AND IS
PUBLISHED WITH PERMISSION OF HYSTER COMPANY AND DETROIT DIESEL ALLISON,
DIVISION OF GENERAL MOTORS CORPORATION.
TM 5-3895-348-14&P-1
TECHNICAL MANUAL
NO. 5-3895-348-14&P-1
HEADQUARTERS
DEPARTMENT OF THE ARMY
WASHINGTON, DC, 27 March 1981
}
OPERATOR'S, ORGANIZATIONAL, DIRECT SUPPORT,
GENERAL SUPPORT, AND DEPOT MAINTENANCE MANUAL
(INCLUDING REPAIR PARTS INFORMATION AND SUPPLEMENTAL
OPERATING, MAINTENANCE AND REPAIR PARTS INSTRUCTIONS)
ROLLER MOTORIZED, STEEL WHEEL 2 DRUM
Tandem 10-14 TON (CCE)
HYSTER MODEL C350B-D
NSN 3895-00-578-0372
CONTRACT NO. DSA700-74-C-9024
REPORTING OF ERRORS
You can help improve this manual. If you find any mistake or if you know of a way
to improve the procedures, please let us know. Mail your letter or DA Form 2028
(Recommended Changes to Publications and Blank Forms) direct to: Commander,
US Army Tank-Automotive Materiel Readiness Command, ATTN: DRSTA-MBS,
Warren, MI 48090. A reply will be furnished to you.
Page
VOLUME
1
PART
Section
I
1.
2.
3.
4.
5.
6.
7.
8.
9.
10.
11.
PART
Section
II
I
II
III
A.
B.
C.
D.
E.
APPENDIX
Service Manual, Supplemental Operating, Maintenance and Repair Parts
Instructions, and Parts Manual
SERVICE MANUAL
Introduction .........................................................................................................
Specification........................................................................................................
Operations .........................................................................................................
Hyster-Care Maintenance ...................................................................................
Troubleshooting...................................................................................................
Electrical .. .........................................................................................................
Transmission .......................................................................................................
Final Drive .........................................................................................................
Steering .... .........................................................................................................
Park Brake .........................................................................................................
Water Spray System ...........................................................................................
1-2
2-1
3-1
4-1
5-1
6-1
7-22
8-2
9-1
10-1
11-1
SUPPLEMENTAL OPERATING, MAINTENANCE AND REPAIR PARTS INSTRUCTIONS
General .... .........................................................................................................
1
Maintenance .......................................................................................................
3
Repair Parts Supply ............................................................................................
6
EQUIPMENT PUBLICATIONS ...........................................................................
8
WARRANTY GUIDELINES .................................................................................
9
MAINTENANCE ALLOCATION CHART .............................................................
11
MODIFICATION PROCEDURE ..........................................................................
25
BASIC ISSUE ITEMS LIST .................................................................................
26
i
TM 5-3895-348-14&P-1
Page
F.
G.
H.
I.
J.
K.
L.
M.
N.
O.
PRESCRIBED LOAD LIST (PLL) & AUTHORIZED STOCKAGE
LIST (ASL) ........................................ ..............................................................
ADDITIONAL REPAIR PARTS ............................................... ............................
SAMPLE FORMAT DA FORM 2765 REQUEST (PART NUMBER) ................. ...
SAMPLE FORMAT, MILSTRIP REQUEST (NSN) ............................... ...............
SAMPLE FORMAT, MILSTRIP REQUEST (NON-NSN) .......................... ...........
SAMPLE FORMAT, MILSTRIP REQUEST (NON-NSN MANUAL) ......................
MAINTENANCE & OPERATING SUPPLY LIST ................................ .................
PREVENTIVE MAINTENANCE CHECKS & SERVICES .....................................
OPERATOR/CREW PMCS ................................................. ............................
ORGANIZATIONAL PMCS ..............................................................................
HYSTER TECHNICAL PUBLICATION CORRECTION .......................... .............
HYSTER TECHNICAL PUBLICATION CORRECTION .......................... .............
PART
VOLUME
PART
Section
III
PARTS MANUAL
2
Engine Operators, Service, and Parts Manual
I
ENGINE OPERATORS MANUAL
1.
Description ................................................................. ........................................
2.
Engine System .............................................................. .....................................
3.
Engine Equipment ........................................................... ...................................
4.
Operating Instruction ........................................................ ..................................
5.
Lubrication and Preventive Maintenance ......................................... ...................
6.
Engine Tune-Up Procedures ...............................................................................
7.
Trouble Shooting ................................................... .............................................
8.
Storage ...............................................................................................................
9.
Built-In Parts Book ..............................................................................................
10.
Owner Assistance ............................................................ ...................................
INDEX, ALPHABETICAL
PART
II
ENGINE SERVICE MANUAL
Section
1.
Engine (Less Major Assemblies) ................................................ .........................
2.
Fuel System and Governors .................................................... ...........................
3.
Air Intake System ........................................................... ....................................
4.
Lubrication System .......................................................... ...................................
5.
Cooling System .............................................................. ....................................
6.
Exhaust System ..................................................................................................
7.
Electrical Equipment ...........................................................................................
13.
Operating Instructions .........................................................................................
14.
Engine Tune-Up ............................................................ .....................................
15.
Preventive Maintenance-Trouble Shooting-Storage ................................ ............
INDEX, ALPHABETICAL
PART
III
ENGINE PARTS MANUAL
ENGINE (LESS MAJOR ASSEMBLIES) .............................................................
FUEL SYSTEM .......................................... ........................................................
AIR SYSTEM.......................................................................................................
LUBRICATING SYSTEM ..................................................................................
COOLING SYSTEM ......................................................... ..................................
EXHAUST SYSTEM ........................................................ ..................................
ELECTRICAL SYSTEM .....................................................................................
This technical manual is an authentication of the manufacturers' commercial literature and does
not conform with the format and content specified in AR 310-3, Military Publications. This
technical manual does, however, contain available information that is essential to the operation
and maintenance of the equipment.
ii
27
28
29
30
31
33
35
37
39
43
45
47
4
13
31
47
55
75
113
119
123
147
3-149
1-1
2-1
3-1
4-1
5-1
6-1
7-1
13-1
14-1
15-1
INDEX 1
A1
B1
C1
D1
E1
F1
G1
PART I
SERVICE MANUAL
STEEL WHEEL ROLLER C350B
CONTRACT NO. DSA 700-74-C-9024
OPERATING INSTRUCTIONS
C350B STEEL WHEEL ROLLER
Starting
1. Set park brake.
2. Move throttle bail to neutral (vertical position).
3. Start engine.
4. To Protect Engine and Transmission:
Do not operate above half throttle until transmission temperature is over 100°F.
Operating
1. Release park brake.
2. Direction and speed are controlled by bail. Machine will travel in direction bail is moved. Additional bail
movement increases speed.
3. To prevent lugging engine on an upgrade move bail back towards neutral position.
4. Use emergency stop, identified on dash in red, only if engine speed cannot be controlled.
Stopping
1. Put throttle bail in neutral (vertical position).
2. Set park brake.
3. Turn ignition switch to off position.
Do not Tow - In case of machine malfunction, vehicle may be moved at slow speed by opening transmission by-pass
valve. This is done by pulling up and locking the control cable located under the hood on the hydraulic tank side of
the unit.
FOR SAFETY
TRAINED OPERATOR ONLY
1.
2.
3.
4.
5.
Use slower speed and added caution when operating close to fill edge and when traveling downhill.
Travel up and down the grade when operating on slopes.
Report damage and faulty operation immediately, do not operate machine until corrected.
Always set park brake before getting off machine. Transmission will not hold parked machine on a grade.
Follow the operating instructions above and in the owners and operators manual. Extra copies available from
your Hyster dealer.
DIESEL ENGINE GUARANTY CLAUSE
FOR GOVERNMENT CONTRACTS
Notwithstanding the provisions of Clause 5 of the General Provisions, entitled "Inspection", the Contractor guarantees
that, at the time of delivery thereof, the supplies provided for under this contract will be free from defects in material or
workmanship and will conform to the requirements set forth in the contract. Notice of any alleged defect or nonconformance shall be given by the Government to the Contractor within one (1) year following delivery of the allegedly
defective or non-conforming item. The Contractor shall be afforded the opportunity to examine the allegedly defective or
non-conforming supplies, or parts thereof, at the site at which the suspected malfunction is experienced or, if field
examination cannot be accomplished, such allegedly defective or non-conforming supplies, or parts thereof, shall be
returned freight collect via cheapest transportation to the Contractor's plant. The Contractor shall with all possible speed,
exchange such supplies, or parts thereof, with supplies or parts of like kind and ship such supplies or parts thereof freight
prepaid to the location from which the defective or non-conforming supplies or parts thereof were returned or, if such
location is not within CONUS, to the port of embarkation or other location within the original 48 States or the District of
Columbia prescribed by the Contracting Officer, provided examination of such supplies or parts thereof discloses to the
Contractor's satisfaction that the material received (a) was defective or non-conforming when delivered, or (b) has
become defective or non-conforming since delivery for reasons other than as a result of having been (1) improperly
repaired, altered or subjected to misuse, negligence, accident, or lack of normal maintenance services, or (2) operated at
load factors which, although consistent with the user's duty cycle requirements, are in excess of Detroit Diesel Allison's
published commercial ratings for the product. This Guaranty shall then continue as to any such exchange supplies or
parts thereof until one (1) year after the date of delivery thereof.
Notwithstanding the foregoing, the Contractor's total liability for transportation charges shall not exceed the cost of
transporting the allegedly defective or non-conforming supplies, or parts thereof, by the usual commercial surface
method of shipment, from the shipping destination originally specified under this contract for the applicable CLIN to the
Contractor's plant and return, and the Government shall reimburse the Contractor for all transportation expense in excess
of such amount upon request.
If the Government does not require the exchange of any supplies, or parts thereof agreed to be defective or nonconforming, the Contractor, if required by the Contracting Officer within a reasonable time after notice of the defect or
non-conformance, shall repay such portion of the contract price for the supplies as is equitable in the circumstances and
comparable to the price(s) at which the Contractor then offers the exchanged supplies, or parts thereof, for sale to the
Government.
March 1974
TABLE OF CONTENTS
SECTION 1.
INTRODUCTION
GENERAL . ........................................................................................................................................
UNIT NAMEPLATE ............................................................................................................................
SERIAL NUMBER DATA ...................................................................................................................
SYSTEM DESIGN SPECIFICATIONS ...............................................................................................
OPERATING INSTRUCTIONS ..........................................................................................................
HYSTER-CARE MAINTENANCE .......................................................................................................
TROUBLESHOOTING .......................................................................................................................
SYSTEM DESCRIPTIONS AND REPAIRS ........................................................................................
SAFETY PRECAUTIONS ..................................................................................................................
Page
1-2
1-2
1-2
1-2
1-2
1-2
1-2
1-3
1-3
SECTION 2.
SPECIFICATIONS
GENERAL . ........................................................................................................................................
COMPACTOR DIMENSIONS ............................................................................................................
PERFORMANCE SPECIFICATIONS .................................................................................................
WEIGHT, BALLAST COMPRESSION DATA .....................................................................................
2-1
2-1
2-2
2-2
DETROIT DIESEL ENGINE SPECIFICATIONS..................................................................................
WATER SPRAY SYSTEM SPECIFICATIONS ...................................................................................
HYDROSTATIC TRANSMISSION SPECIFICATIONS .......................................................................
FINAL DRIVE AND DRUM ASSEMBLY SPECIFICATIONS ...............................................................
STEERING SYSTEM SPECIFICATIONS .......................... ................................................................
BRAKE SYSTEM SPECIFICATIONS .................................................................................................
TORQUE SPECIFICATIONS FOR STANDARD HARDWARE ...........................................................
2-5
2-6
2-7
2-10
2-11
2-13
2-14
SECTION 3.
OPERATION
GENERAL ........................................................................................................................................
OPERATING CONTROLS AND INDICATORS ....................... ...........................................................
SAFETY PRECAUTIONS ....................................... ...........................................................................
STARTING THE UNIT ....................... ................................................................................................
OPERATING THE UNIT ....................................................................................................................
SPEED AND DIRECTION CONTROL ................................................................................................
DYNAMIC BRAKING .........................................................................................................................
DRUM SCRAPERS ...........................................................................................................................
COCO MAT ........................................................................................................................................
WATER SPRAY SYSTEM .................................. ...............................................................................
UNIT SHUTDOWN ............................................................................................................................
EMERGENCY ENGINE STOP (DETROIT DIESEL ONLY) ................................................................
RESETTING EMERGENCY ENGINE STOP (DETROIT DIESEL ONLY) ...........................................
MOVING THE UNIT ...........................................................................................................................
SHIPPING THE UNIT ........................................................................................................................
MISCELLANEOUS OPERATING POINTS .........................................................................................
3-1
3-4
3-4
3-5
3-6
3-6
3-6
3-6
3-6
3-7
3-6
3-7
3-7
3-7
3-8
3-8
SECTION 4.
HYSTER-CARE MAINTENANCE
GENERAL........ ........................................................................................................................................
HYSTER-CARE MAINTENANCE SCHEDULE .........................................................................................
HYSTER-CARE MAINTENANCE PROCEDURES ...................................................................................
FUEL SYSTEM ........................................................................................................................................
4-1
4-1
4-5
4-5
DETROIT DIESEL FUEL STRAINER AND FILTER .................................................................................
4-7
i
AIR FILTRATION SYSTEM ..............................................................................................................
AIR CLEANER FILTER(S)............................................................................................................
Page
4-8
4-8
DIESEL CRANKCASE BREATHER .............................................................................................
DETROIT DIESEL BLOWER SCREEN ........................ ...............................................................
ENGINE AIR BOX DRAIN ...........................................................................................................
ELECTRICAL SYSTEM ...................................... ...............................................................................
CHECKING BATTERY ELECTROLYTE LEVEL .................... ......................................................
4-9
4-9
4-9
4-9
4-9
ALTERNATOR AND WATER PUMP DRIVE BELT(S) .................................................................
ELECTRICAL WIRING .................................. ..............................................................................
COOLING SYSTEM ...................................... ....................................................................................
RADIATOR ..................................................................................................................................
FAN SHROUD ............................................................................................................................. .
WATER PUMP ............................................................................................................................ .
HOSES ........................................................................................................................................
FLUSHING THE SYSTEM ...........................................................................................................
DETROIT DIESEL FAN DRIVE BELTS .............................................................................................
ENGINE LUBRICATION SYSTEM .....................................................................................................
ENGINE OIL ...................................... .......................................................................................
ENGINE OIL FILTER ...................................................................................................................
LUBRICATING THROTTLE AND TRANSMISSION LINKAGE ...........................................................
HYDRAULIC SYSTEM .......................................................................................................................
FILLING THE TANK ................................... .................................................................................
CHANGING THE HYDRAULIC OIL .......................... ...................................................................
TRANSMISSION HYDRAULIC FILTERS .....................................................................................
4-10
4-11
4-11
4-12
4-13
4-13
4-13
4-13
4-14
4-16
4-16
4-16
4-17
4-17
4-17
4-17
4-17
WATER SPRAY SYSTEM .................................. ...............................................................................
FILTERS .......................... ...........................................................................................................
MANIFOLD AND NOZZLES ........................ ................................................................................
STORAGE ...................................................................................................................................
PARKING BRAKE ...................................... .......................................................................................
LUBRICATION ....................................... .....................................................................................
ADJUSTING ......................................... .......................................................................................
FINAL DRIVE ASSEMBLY .................................................................................................................
CHECKING LUBRICANT LEVEL ........................... .......................................................................
FLUSHING THE FINAL DRIVE MECHANISM ...............................................................................
STEERING ........................................................................................................................................
GUIDE ROLL AXLE BEARINGS ..................................................................................................
TRUNNION ASSEMBLY ..............................................................................................................
STEERING CYLINDER BALL JOINTS ........................................................................................
REMOVING AND REPLACING STEEL BALLAST .............................................................................
UNIT STORAGE ................................................................................................................................
WATER SPRAY SYSTEM ...........................................................................................................
DRUM BALLAST .........................................................................................................................
STEERING CYLINDER ................................................................................................................
FUEL SYSTEM ...........................................................................................................................
ENGINE COOLING SYSTEM ......................................................................................................
ENGINE CYLINDERS .................................................................................................................
BATTERY ....................................................................................................................................
4-18
4-18
4-18
4-18
4-19
4-19
4-19
4-20
4-20
4-20
4-20
4-20
4-20
4-21
4-22
4-22
4-22
4-22
4-22
4-22
4-22
4-22
4-22
ii
SECTIONS 5.
TROUBLESHOOTING
GENERAL ........................................................................................................................................
TROUBLE ANALYSIS FOR WATER SPRAY SYSTEM .....................................................................
TROUBLE ANALYSIS FOR SUNDSTRAND HYDROSTATIC TRANSMISSION. ................................
TROUBLE ANALYSIS FOR FINAL DRIVE ASSEMBLY .....................................................................
TROUBLE ANALYSIS FOR STEERING SYSTEM .............................................................................
TROUBLE ANALYSIS FOR BRAKE SYSTEM ...................................................................................
5-1
5-1
5-4
5-7
5-8
5-12
SECTION 6.
ELECTRICAL
GENERAL ........................................................................................................................................
6-1
ELECTRICAL SCHEMATIC FOR DETROIT ENGINE .....................................................................
INSTRUMENT PANEL DETAIL FOR DETROIT ENGINE ...............................................................
ROUTING DIAGRAM FOR DETROIT DIESEL ENGINE ....................................................................
6-4
6-5
6-6
iii
SUNDSTRAND HYDROSTATIC TRANSMISSION ..................... .......................................................
GENERAL ............................................. ............................................................................................
HYDRAULIC SYSTEM .......................................................................................................................
HYDRAULIC OIL ....................................... ..................................................................................
HYDRAULIC SYSTEM COMPONENTS ........................... .................................................................
GENERAL ........................................... ........................................................................................
CHARGE PUMP CIRCUIT ........................................................................................................... ..
CHARGE PUMP ....................................................................................................................
NEUTRAL CHARGE PUMP RELIEF VALVE ......................................................................... ..
SUCTION FILTER ...................................... .................................................................................
COOLING CIRCUIT ..................................... ...............................................................................
OIL COOLER ........................................................................................................................
OIL COOLER BY-PASS VALVE ............................................................................................
SHUTTLE VALVE ........................................................................................................................
CONTROL FUNCTION ................................................................................................................
MAKEUP CIRCUIT ......................................................................................................................
HYDROSTATIC PUMP ASSEMBLY ........................ ..........................................................................
VARIABLE DISPLACEMENT HYDROSTATIC PUMP ..................... ............................................
CHARGE PUMP ..........................................................................................................................
CHECK VALVES .........................................................................................................................
SERVO CONTROL SYSTEM ................................ ......................................................................
DISPLACEMENT CONTROL VALVE ........................ ............................................................
SERVO CONTROL CYLINDERS ............ ..............................................................................
HYDROSTATIC MOTOR ASSEMBLY ...............................................................................................
FIXED DISPLACEMENT HYDROSTATIC MOTOR ... ..................................................................
MANIFOLD ..................................................................................................................................
HIGH PRESSURE RELIEF VALVES ................................. ..........................................................
SHUTTLE VALVE ........................................................................................................................
LOW CHARGE PRESSURE RELIEF VALVE ..............................................................................
PRESSURE CHECKS ...... .................................................................................................................
CHECKING NEUTRAL CHARGE PRESSURE .. ..........................................................................
CHECKING LOW CHARGE PRESSURE ..... ...............................................................................
CHECKING HIGH PRESSURE ..................... ..............................................................................
CHECKING CONTROL PRESSURE ..................... ......................................................................
CHECKING CASE PRESSURE ...................................................................................................
VACUUM CHECK. .......................................................................................................................
ADJUSTMENTS ................................................................................................................................
DISPLACEMENT CONTROL VALVE NEUTRAL ADJUSTMENT .................................................
TRANSMISSION CONTROL LINKAGE ADJUSTMENT ..............................................................
THROTTLE CONTROL LINKAGE ADJUSTMENT .......................................................................
TRANSMISSION REPAIR ................................... ..............................................................................
HYDROSTATIC PUMP REMOVAL ..............................................................................................
REMOVAL OF HYDROSTATIC MOTOR .....................................................................................
REPLACEMENT OF CHARGE PUMP .........................................................................................
REPLACEMENT OF CHECK VALVES ... .....................................................................................
REPLACEMENT OF ROTARY BY-PASS VALVE AND
MOTOR MANIFOLD ................................... ..........................................................................
REPLACEMENT OF HIGH PRESSURE RELIEF VALVES ............. .............................................
REPLACEMENT OF DISPLACEMENT CONTROL VALVE ............ .............................................
REPLACEMENT OF MOTOR OR PUMP SHAFT SEAL ..............................................................
iv
7-23
7-23
7-23
7-23
7-23
7-23
7-23
7-23
7-23
7-23
7-23
7-27
7-27
7-27
7-27
7-27
7-27
7-27
7-28
7-28
7-28
7-28
7-29
7-29
7-29
7-29
7-29
7-29
7-30
7-30
7-30
7-30
7-31
7-32
7-32
7-32
7-32
7-32
7-33
7-35
7-36
7-36
7-37
7-37
7-38
7-38
7-40
7-40
7-40
REMOVAL OF DRIVE DRUM ......................................................................................................
REMOVAL OF MOTOR CARRIER ..............................................................................................
DISASSEMBLY OF MOTOR CARRIER ................... ...................................................................
REASSEMBLY OF MOTOR CARRIER ..................... ..................................................................
INSTALLATION OF MOTOR CARRIER ................ ......................................................................
INSTALLATION OF DRIVE DRUM ..............................................................................................
INSTALLATION OF HYDROSTATIC MOTOR .............................................................................
INSTALLATION OF HYDROSTATIC PUMP ................................................................................
CLEANING THE HYDRAULIC SYSTEM ............................................................................................
SUNDSTRAND TRANSMISSION START-UP PROCEDURE ............................................................
BY-PASS VALVE ...............................................................................................................................
BY-PASS CONTROL ADJUSTMENT ..........................................................................................
7-43
7-44
7-44
7-46
7-48
7-48
7-51
7-51
7-51
7-52
7-53
7-53
SECTION 8.
FINAL DRIVE
GENERAL . ........................................................................................................................................
C350B FINAL DRIVE DESCRIPTION ..........................................................................................
REMOVAL AND DISASSEMBLY OF FINAL DRIVE ASSEMBLY ........ ........................................
CLEANING AND INSPECTION ............................. ......................................................................
REASSEMBLY AND INSTALLATION OF FINAL DRIVE ASSEMBLY ..........................................
8-2
8-2
8-2
8-6
8-7
SECTION 9.
STEERING
GENERAL ........................................................................................................................................
DESCRIPTION ..................................................................................................................................
STEERING SYSTEM .........................................................................................................................
DESCRIPTION ............................................................................................................................
OPERATION ...............................................................................................................................
REMOVAL OF STEERING CONTROL UNIT ...............................................................................
DISASSEMBLY OF STEERING CONTROL UNIT .......................................................................
INSPECTION ..............................................................................................................................
REASSEMBLY OF STEERING CONTROL UNIT .................. ......................................................
INSTALLATION OF STEERING CONTROL UNIT .......................................................................
9-1
9-1
9-1
9-1
9-3
9-4
9-4
9-10
9-10
9-17
STEERING PUMP (DETROIT DIESEL) .............................................................................................
DESCRIPTION ............................................................................................................................
DISASSEMBLY OF STEERING PUMP ........................ ...............................................................
CLEANING AND INSPECTION ...................................................................................................
REASSEMBLY OF STEERING PUMP ........................... .............................................................
FLOW DIVIDER (DETROIT DIESEL) ................................... .............................................................
DESCRIPTION ............................................................................................................................
OPERATION ....................................... ........................................................................................
REMOVAL OF FLOW DIVIDER ................................... ...............................................................
DISASSEMBLY OF FLOW DIVIDER ...........................................................................................
9-23
9-23
9-24
9-24
9-25
9-26
9-26
9-27
9-27
9-27
v
CLEANING AND INSPECTION ....................................... ............................................................
REASSEMBLY AND INSTALLATION OF FLOW DIVIDER ..........................................................
ADJUSTMENT OF FLOW DIVIDER RELIEF VALVE ..................................................................
STEERING CYLINDER ......................................................................................................................
DESCRIPTION ............................................................................................................................
REMOVAL OF STEERING CYLINDER .......................................................................................
DISASSEMBLY OF STEERING CYLINDER ................................................................................
CLEANING AND INSPECTION ............................. ......................................................................
REASSEMBLY OF STEERING CYLINDER .................................................................................
INSTALLATION OF STEERING CYLINDER .............................................................................
BLEEDING THE SYSTEM .................................................................................................................
CHECKING RELIEF PRESSURE ......................................................................................................
STEERING TRUNNION ASSEMBLY .................................................................................................
DESCRIPTION ............................................................................................................................
REMOVAL OF GUIDE ROLLS AND STEERING AXLE ASSEMBLY . ..........................................
DISASSEMBLY OF AXLE SHAFT ASSEMBLY ................... .......................................................
CLEANING AND INSPECTION ...................................................................................................
REASSEMBLY OF AXLE SHAFT ASSEMBLY ............................................................................
INSTALLATION OF GUIDE ROLLS AND STEERING AXLE ASSEMBLY.....................................
REMOVAL AND DISASSEMBLY OF YOKE AND KING PIN ASSEMBLY ....................................
CLEANING AND INSPECTION ............................ ....................................................................... .
REASSEMBLY AND INSTALLATION OF YOKE AND
KING PIN ASSEMBLY ..... .....................................................................................................
9-27
9-27
9-27
9-27
9-27
9-28
9-29
9-29
9-29
9-29
9-30
9-30
9-31
9-31
9-31
9-32
9-32
9-33
9-35
9-36
9-37
9-38
SECTION 10.
PARK BRAKE
GENERAL ........................................................................................................................................
DESCRIPTION ...................................... ............................................................................................
REMOVAL AND DISASSEMBLY ........................ ...............................................................................
CLEANING AND INSPECTION .........................................................................................................
REASSEMBLY AND INSTALLATION ................................................................................................
ADJUSTMENT ...................................................................................................................................
BRAKE LINING BREAK-IN PROCEDURE .........................................................................................
10-1
10-1
10-1
10-2
10-2
10-3
10-3
SECTION 11.
WATER SPRAY SYSTEM
GENERAL .............................. ...........................................................................................................
DESCRIPTION ..................................................................................................................................
CHECKS AND ADJUSTMENTS ........................................................................................................
SPRAY MANIFOLDS ...................................................................................................................
WATER PRESSURE ................................................................................................................... ..
CHECKING MOTOR BRUSHES .................................................................................................
REMOVAL OF PUMP AND MOTOR ASSEMBLY ..............................................................................
REPAIR .... ........................................................................................................................................
INSTALLATION OF PUMP AND MOTOR ASSEMBLY ......................................................................
CLEANING THE WATER TANK ........................................................................................................
11-1
11-1
11-1
11-1
11-2
11-2
11-2
11-3
11-3
11-3
vi
DELETED PAGE 1-1.
1.
GENERAL.
1-2.
This manual contains Operation and Maintenance
Instructions for the
C350B Steel Wheel Roller (figure 1-3 and 1-4). Operating
instructions must be carefully reviewed and understood
before attempting to operate a unit. The individual
assigned to operate the unit should see that it is kept in
good condition to ensure prolonged efficiency.
1-3.
UNIT NAMEPLATE.
1-4.
The unit nameplate is located at the front of the
operator's compartment as shown in figure 1-4. Make sure
the nameplate remains attached to the unit at all times.
NOTE: Make sure that nameplate information is complete.
If not, contact a Hyster Dealer.
1-5.
SERIAL NUMBER DATA (see figure 1-4).
CAUTION: The COMPLETE serial number must be
identified
when
ordering
parts
or
communicating service information to Hyster
Company.
SECTION 1
INTRODUCTION
1-6.
The unit serial number is located on the unit
nameplate. It is also stamped on the left hand side of the
gooseneck. The serial number indicates the design series,
manufacturing plant, serial number of the unit and year
manufactured, Example B89 C 0000 T.
1-7.
SYSTEM DESIGN SPECIFICATIONS.
1-8.
Design specifications for individual systems of the
unit are listed: in Section 2. Maintenance Specifications are
given in Section 4.
1-9.
OPERATING INSTRUCTIONS.
1-10. All instructions necessary for safe and efficient
operation are given in Section 3.
1-11.
HYSTER— CARE MAINTENANCE.
1-12. Section 4 Contains the schedule and procedures
required for proper maintenance. The schedule lists
recommended time intervals between maintenance
checks. The procedures provide detailed instructions for
performing maintenance checks.
1-13.
FIGURE 1-3.
1-2.
TROUBLESHOOTING.
SECTION 1
INTRODUCTION
1-14. Refer to C350B Service Manual or Section 5 of this
publication.
1-15.
SYSTEM DESCRIPTIONS AND REPAIRS.
1-16.
Refer to C350B Service Manual.
1-17.
SAFETY PRECAUTIONS.
1-18. When operating the unit, always observe
recommended procedures given on the inside front cover
of this manual.
FIGURE 1-4.
1-3.
SECTION 2
SPECIFICATIONS
2-1.
GENERAL.
2-2.
This section contains specification tables for each
major system of the compactor.
Additional specification tables are included for unit
dimensions, weight, performance and torques. Following is
a list of specification tables included in this section:
TABLE
2-1
2-2
2-3
TITLE
Compactor Dimensions
Performance Specifications
Weight, Ballast Compression Data
2-6
2-7
2-8
2-9
2-10
2-11
2-12
Detroit Diesel Engine Specifications
Water Spray System Specifications
Hydrostatic Transmission Specifications
Final Drive and Drum Assembly Specifications
Steering System Specifications
Brake System Specifications
Torque Specifications for Standard Hardware
TABLE 2-1. COMPACTOR DIMENSIONS (see figure 2-1).
2-1.
SECTION 2
SPECIFICATIONS
FIGURE 2-1.
TABLE 2-2. PERFORMANCE SPECIFICATIONS.
.
2-2.
SECTION 2
SPECIFICATIONS
TABLE 2-3. WEIGHT, BALLAST COMPRESSION DATA (CONT.)
2-3.
DELETED PAGE 2-4.
SECTION 2
SPECIFICATIONS
TABLE 2-6. DETROIT DIESEL ENGINE SPECIFICATIONS.
2-5.
SECTION 2
SPECIFICATIONS
TABLE 2-6. DETROIT DIESEL ENGINE SPECIFICATIONS (CONT.).
.
2-6.
DELETED PAGE 2-7.
SECTION 2
SPECIFICATIONS
TABLE 2-8B. SUNDSTRAND HYDROSTATIC TRANSMISSION SPECIFICATIONS.
2-8.
SECTION 2
SPECIFICATIONS
TABLE 2-8B.
SUNDSTRAND HYDROSTATIC TRANSMISSION SPECIFICATIONS (CONT.).
2-9.
SECTION 2
SPECIFICATIONS
TABLE 2-8B. SUNDSTRAND HYDROSTATIC TRANSMISSION SPECIFICATIONS (CONT.).
2-10.
SECTION 2
SPECIFICATIONS
TABLE 2-9. FINAL DRIVE AND DRUM ASSEMBLY SPECIFICATIONS (CONT.).
2-11.
SECTION 2
SPECIFICATIONS
TABLE 2-10. STEERING SYSTEM SPECIFICATIONS. (CONT.).
2-12.
SECTION 2
SPECIFICATIONS
TABLE 2-10. STEERING SYSTEM SPECIFICATIONS (CONT.).
2-13.
SECTION 2
SPECIFICATIONS
TABLE 2-12.
TORQUE SPECIFICATIONS FOR STANDARD HARDWARE.
FIGURE 2-2. TYPES OF HARDWARE.
2-14.
SECTION 3
OPERATION
3-1.
GENERAL.
3-2. This section contains instructions necessary for
operation of the
C350B Steel Wheel Roller.
These instructions must be carefully reviewed and
understood before attempting to operate the unit. Also,
new operators must be thoroughly trained by a skilled
operator before attempting to operate the unit
unassisted.
3-3. The individual assigned to operate the compactor
should always maintain it in good mechanical condition to
ensure prolonged efficiency.
Report any mechanical
failures immediately for correction. Even minor failures or
damage may eventually result in major failures if
uncorrected.
NOTE: Follow all operating instructions in the order given
on the operating instructions decal (see figure 3-3).
FIGURE 3-1. OPERATING CONTROLS AND INDICATORS
3-1.
SECTION 3
OPERATION
TABLE 3-1. OPERATING CONTROLS AND INDICATORS.
3-2.
SECTION 3
OPERATION
TABLE 3-1. OPERATING CONTROLS AND INDICATORS (CONT.).
3-3.
SECTION 3
OPERATION
TABLE 3-1. OPERATING CONTROLS AND INDICATORS (CONT.).
3-4. OPERATING CONTROLS AND INDICATORS.
3-5. The controls and indicators necessary for operation
of the compactor are listed and described in Table 3-1
and illustrated in figure 3-1 .
3-6. SAFETY PRECAUTIONS.
3-7. Always observe the following safety precautions to
prevent possible injury to personnel and damage to the
equipment.
c. Never travel across a slope. Always travel up
or down a grade.
d. Always set the park brake before dismounting
the unit.
e. Never shut down the engine when traveling
downhill. Always move the Direction-Throttle Bail toward
the "neutral" position to slow the unit.
f. Report
damage
and
faulty
operation
immediately. Do not operate the unit until corrected.
a. TRAINED OPERATORS ONLY.
b. Always use slower unit speeds and added
caution when operating close to a lift edge or when
traveling
downhill.
g. Make sure the operating decal is attached to
the unit as shown in figure 3-3. make sure that the
markings on the decal are legible.
3-4.
SECTION 3
OPERATION
3-8.
STARTING THE UNIT (see figure 3 -1).
a. Set the park brake by moving the control lever
to BRAKE ON position (UP).
b. Place the Direction-Throttle Bail in Neutral
detented position (vertical).
c. Pull Hand Throttle out slightly (at approximately
a 700 RPM setting).
NOTE: During cold weather conditions it may be
necessary to proceed as follows:
Detroit Diesel Engine; Consult manufacturers service
literature.
d. Turn the Ignition Key fully clockwise to engage
the starter.
CAUTION:
Do not crank the engine for more than
THIRTY SECONDS at any or e time. If the
engine fails to start, set the IGNITION key
to off and wait one (1) minute - allowing the
starter to cool.
FIGURE 3-3. OPERATING INSTRUCTIONS DECAL.
3-5.
SECTION 3
OPERATION
drum" locking position. To lock any of the four scrapers
into the "off-the-drum" position:
NOTE: If the Detroit Diesel engine fails to start after the
third attempt, check the EMERGENCY STOP
Control has been manually reset as described in
paragraph 3-28.
3-9.
OPERATING THE UNIT (see figure 3 -1).
1.
Pull scraper away from the drum.
2.
Move the pawl into the lock position.
3. Slowly move the scraper towards the drum
until the pawl holds the scraper.
NOTE: Before operating the unit, allow the engine to idle
at 700 RPM for approximately two minutes to
allow engine and hydraulic oil to begin to reach
operating temperature.
WARNING:
3-10. Release the park brake by pushing the control
lever to the BRAKE OFF position (down),
Always use extreme caution when
positioning scrapers as they are under
considerable spring tension and may
become sharp when worn.
3-11. SPEED AND DIRECTION CONTROL .
3- 18.
COCO MATS (See figure 3-4).
3-12. Speed and direction of the unit are controlled by
the Direction-Throttle Bail (figure 3-1).
Move the
Direction-Throttle Bail off of "neutral" in the desired
direction (forward or reverse). To increase unit speed,
move the lever further away from the "neutral" position.
To decrease unit speed, move the lever back toward the
"neutral" position.
3-19. A full width COCO mat is located on each roll and
is used in conjunction with the water spray system to keep
the rolls clean.
3-20. Both coca mat arrangements have "off-the-drum"
locking positions. To lock either of the two coca mats
"off-the-drum, “:
NOTE: Optimum torque to the drive drum is achieved by
moving the Direction-Throttle Bail toward the
'`neutral" position when the engine starts to lug
down. Move bail until engine RPM increases to
loaded RPM speed.
1.
Pull or lift the coca mat off of the drum.
2.
Engage the mat hook in the mat link.
3. Slowly move the coco mat towards the drum
until the mat hook holds the mat.
3-13. DYNAMIC BRAKING.
3-14. Slowing or stopping the unit during operation is
accomplished by moving the Direction-Throttle Bail
toward "Neutral".
WARNING: Never shut down the engine when attempting
to stop the unit. This will reduce or eliminate
all dynamic braking capabilities.
3-15. DRUM SCRAPERS (see figure 3-4).
3-16. Both Guide Rolls and the Drive roll are equipped
with full width, adjustable scrapers mounted ahead and
behind each of the drums. These scraper bars are
designed to keep the large pieces of material from
clinging to the rolls when moving in either forward or
reverse. Scrapers are spring loaded to provide positive
drum contact.
3-17. All
four
scraper
bars
have
an
FIGURE 3-4.
3-21. WATER SPRAY SYSTEM (see figure 3-1).
"off-the
3-22. The water spray system is designed to help keep
the drums clean when rolling asphalt.
To activate
3-6.
SECTION 3
OPERATION
control is used to remotely trip the latch,
shut-off valve.
the water spray system, push the water spray switch to
the ON position. This will produce pressurized water
spray on the Guide Roll and Drive Roll drums. The
pressurized supply to the Guide Roll drum can be turned
off (if conditions dictate) by rotating the Front Spray
Shut-off lever. The water spray switch should be in the
OFF position when the water spray system is not needed.
3-27. RESETTING EMERGENCY ENGINE
(Detroit Diesel Only) (see figure 3-5).
STOP
3-28. The emergency engine stop must be manually
reset before the engine can be restarted. To reset the
emergency stop, push the cam-pin handle (located on the
engine air inlet housing) downward. This will open the
shut-off valve. Then push the EMERGENCY STOP
Control lever against the instrument panel.
CAUTION: Do Not operate water system without water.
Damage to pump may result.
3-23.
closing the
UNIT SHUTDOWN (see figure 3 -1).
a. Set the Direction-Throttle bail to the "neutral"
position.
b. Set the Park Brake Control Lever to the BRAKE
ON position (UP).
c. Set the IGNITION key to the "off" (vertical)
position.
d. On units equipped with a diesel engine, pull the
ENGINE STOP out. Hold in this position until the engine
stops.
NOTE: If the Detroit Diesel engine fails to stop, pull out
the EMERGENCY STOP lever. Reset the control
as specified in paragraph 3-28. Troubleshoot the
system to determine the malfunction bed fore
operating the unit again.
e. Position the Vandalism Shield over the
instrument panel. If the unit is to be left unattended, lock
the shield.
FIGURE 3-5.
3-29.
3-24. EMERGENCY ENGINE STOP (Detroit Diesel
Only) (see figure 3-1).
MOVING THE UNIT (see figure 3 -6).
3-30.
Before moving a malfunctioning unit,
the
transmission by-pass valve MUST be opened. If the
valve is not opened, the drive drum will have restricted
movement.
3-25. A manually operated EMERGENCY STOP
Control is mounted on the instrument panel to shut down
the Detroit Diesel engine in the event of a serious engine
malfunction. If the engine continues to run after the ~
ENGINE STOP has been pulled out, or if the engine
overspends, the shut-down device will prevent damage to
the engine by cutting off the air supply and thus stop the
engine.
Rotate the slotted cam 90 degrees clockwise. On
units equipped with a Sundstrand Transmission, pull up
and lock the control cable located under the hood on the
hydraulic tank side of the unit.
CAUTION: The by-pass valve is not intended for towing
a unit from one jobsite to another. Tow at
speeds of one (1 ) to two (2) M PH (1.61-3.22
km/in) for as short a distance as possible.
3-26. The shut-down device (figure 3-5) consists of an
air shut-off valve mounted in the engine air inlet housing.
The shut-off valve is retained in the open position by a
latch. A cable connected to the EMERGENCY STOP
3-7.
SECTION 3
OPERATION
FIGURE 3-6. SUNDSTRAND TRANSMISSION
BY-PASS VALVE ON DIESEL
UNITS.
3-31.
SHIPPING THE UNIT.
3-32.
When shipping the roller, the four tie
down eyes should be used. One eye is located
at each end of the rear scraper bar mount and
under each operator mounting step in front. The
drive roll should be blocked front and rear and
on both sides. The guide rolls must be blocked
on both sides.
CAUTION:
3-33.
Do not block the guide rolls front
and rear as it will shock load the
trunnion king pin and bearings.
MISCELLANEOUS
POINTS.
OPERATING
a. Using the hood as an arm rest will
ensure smooth control.
b. No more than two people are allowed
on the machine when operating.
c. Do not use the steering wheel or direction-throttle bail as machine mounting assists.
d.
3-8.
Always look in the direction of travel.
SECTION 4
HYSTER-CARE MAINTENANCE
4-1.
GENERAL.
4-2. This section contains instructions necessary for
proper Hyster-Care Maintenance for the C350B Steel
Wheel Roller. Hyster-Care Maintenance is divided into
two subsections: Hyster-Care Maintenance Schedule and
Hyster-Care Maintenance Procedures. The maintenance
schedule lists the recommended time intervals between
maintenance checks.
The procedures subsection
provides detailed instructions for performing the
maintenance checks. Instructions listed in the procedures
subsection are given by systems and are not necessarily
in the order listed in Table 4-1.
4-3. Hyster-Care
Maintenance
is
a
planned
maintenance program that: includes periodic inspection
and lubrication. Hyster-Care maintenance should be
correlated closely with the operating hours recorded on
the hourmeter located on the instrument panel.
4-4.
HYSTER-CARE MAINTENANCE SCHEDULE.
4-5. Table 4-1 lists the recommended maintenance
checks. It is outlined in two schedules: the hourly
schedule and the periodic schedule. If the unit is
operated more than eight hours per day, the hourly
schedule should be followed. If the unit is operated less
than eight hours per day, the periodic schedule should be
followed.
4-6. Maintenance checks given in Table 4-1 are listed
in the same sequence as listed on the maintenance decal
starting with the eight hour checks. The first and last
columns of the table
FIGURE 4-1. MAINTENANCE CHECKPOINTS.
4-1
SECTION 4
HYSTER-CARE MAINTENANCE
TABLE 4-1. HYSTER-CARE MAINTENANCE SCHEDULE.
4-2.
SECTION 4
HYSTER-CARE MAINTENANCE
TABLE 4-1. HYSTER-CARE MAINTENANCE SCHEDULE (CONT.).
4-3.
SECTION 4
HYSTER-CARE MAINTENANCE
TABLE 4-1. HYSTER-CARE MAINTENANCE SCHEDULE (CONT.).
4-4.
SECTION 4
HYSTER-CARE MAINTENANCE
should be used to locate the applicable
maintenance procedure. Figure 4-1 shows the
location of all maintenance points.
4-7. HYSTER-CARE MAINTENANCE
PROCEDURES.
4-5.
DELETED PAGE 4-6.
SECTION 4
HYSTER-CARE MAINTENANCE
FIGURE 4-6. DETROIT DIESEL FUEL FILTER AND FUEL STRAINER.
4-17. DETROIT DIESEL FUEL STRAINER AND FILTER
(see figure 4-6).
4-18. Drain approximately 1/4 pint of fuel from each filter bowl
daily to remove dirt and water accumulations. A drain cock is
located in the bottom of each filter bowl for this purpose. The
filter elements in the strainer and filter must be replaced at the
time interval specified in Table 4-1. Replace the elements as
follows:
a.
With the engine shut down, place a suitable container
under the bowl of the strainer or filter and open the applicable
drain cock. The fuel will drain more freely if the retaining nut at
the inlet/outlet head is loosened slightly.
b.
Support the bowl, then unscrew the retaining nut and
remove the bowl and element.
c.
Remove and discard the element and gasket. Clean the
bowl with fuel oil and dry thoroughly with a clean, lint-free cloth
and compressed air.
d.
Place a new filter element, that has been thoroughly
soaked in clean fuel oil, over the stud and push the element
down onto the seat. Close the drain cock and fill the bowl
approximately two-thirds full of clean fuel oil.
4-7
SECTION 4
HYSTER-CARE MAINTENANCE
FIGURE 4-7. AIR CLEANER MAINTENANCE.
replaced, however, after ten cleanings or when the
specified change interval occurs. Remove and clean
the element as follows:
NOTE: Clean the exterior of the air cleaner body before
disassembly.
a. Loosen the retainer bar securing the element.
Then remove the retainer bar from the housing.
b. Remove the element from the housing.
c. Tap the element lightly against a smooth
surface while keeping it parallel to the surface to avoid
damage to the end cap.
d. Blow out the element in the opposite direction of
normal air flow using compressed air. Do not exceed 30
PSI (2.1 kg/cm2) air
e. Install a new gasket in the inlet/outlet head.
Place the bowl with element into position under the
inlet/outlet head and start the retaining nut into the bowl
stud.
f. Tighten the retaining nut only enough to prevent
fuel leakage. Remove the plug in the inlet/outlet head
and fill the bowl with clean fuel oil.
4-19. AIR FILTRATION SYSTEM.
4-20. AIR CLEANER FILTERS(S) (see figure 4-7).
4-21 .
The Detroit Diesel restriction indicator should be
checked every eight hours of operation, or daily.
4-22. The air cleaner element is a reusable element
that can be cleaned periodically. The element should be
4-8.
SECTION 4
HYSTER-CARE MAINTENANCE
4-25. DIESEL CRANKCASE BREATHER
(see figure 4-9).
pressure against the element.
4-26. Remove the crankcase breather from the engine
each 1,000 hours of operation and wash the breather in
clean fuel oil. Dry thoroughly with compressed air. Also
clean the breather cap, mounted on the valve rocker arm
cover, in clean fuel oil every time the engine oil is
changed.
e. Carefully inspect the dry element for damaged
paper pleats by placing a light inside of the element.
Replace element if it is damaged or after ten cleanings.
f. Clean the intake housing with a lint-free cloth
moistened with cleaning solvent before installing element.
4-27. DETROIT DIESEL BLOWER SCREEN
(see figure 4-10).
g. On Detroit Diesel units, reset the restriction
indicator by pushing the reset button at the end of the
indicator body after reassembly.
4-28. Inspect the blower screen each 1,000 hours of
operation. If necessary, clean the screen in clean fuel oil
and dry thoroughly with compressed air. Reinstall the
screen and gasket assembly with the screen side of the
assembly toward the blower.
h. Check rubber dust unloading valve for cracks,
clogging or deterioration.
4-29. ENGINE AIR BOX DRAIN (see figure 4 -11).
4-30. With the engine running, check for flow of air from
the air box drain tubes each 1,000 hours of operation. If
the tubes are clogged, remove, clean and reinstall the
tubes. The air box drain tubes should be cleaned
periodically even though a clogged condition is not
apparent.
4-31. ELECTRICAL SYSTEM.
4-32. CHECKING BATTERY ELECTROLYTE LEVEL.
4-33. The electrolyte level in each battery cell should
never be below the top of the plates. If the level is low,
add drinking water. The electrolyte level is correct when
filled to the bottom of the split ring in each cell.
4-9.
SECTION 4
HYSTER-CARE MAINTENANCE
FIGURE 4-9. DIESEL CRANKCASE BREATHER.
4-36. ALTERNATOR AND WATER PUMP DRIVE
BELT(S).
FIGURE 4-10. SERVICING DETROIT
DIESEL- BLOWER SCREEN.
FIGURE 4-11. DETROIT DIESEL AIR BOX DRAIN
TUBES.
4-37. Examine the belt(s) for cracks on the inner surface
of the plys before making tension adjustments. A belt that
is adjusted too tight places an added load on the water
pump and alternator bearings, as well as the belt. A belt
that is too loose allows slippage, premature failure of the
belt and may lower the output of
4-10.
SECTION 4
HYSTER-CARE MAINTENANCE
the charging system. The drive belt(s) should be checked and
adjusted after each 50 hours of operation or weekly. The
alternator belt(s) should deflect 1/4 inch (6.35 mm) with six
pounds (2.7 kg) of force.
CAUTION: (Detroit Diesel Only) Replace both alternator drive
belts when one or both needs replacing.
4-38. ELECTRICAL WIRING (see figure 4-14) .
4-39. Periodically inspect all wiring for: Proper routing, loose
terminal connections, cracks, wear, faulty insulation, brittleness,
and that they are free from oil and grease.
Electrical
components should be connected per the schematic drawing
(figure 4-14) when components are replaced.
CAUTION: Do not use a wire smaller than the original factory
installed wires.
4-40. COOLING SYSTEM (see figure 4-15).
4-11.
SECTION 4
HYSTER-CARE MAINTENANCE
FIGURE 4-14.. ELECTRICAL SYSTEM SCHEMATIC (WITH DIESEL ENGINE)
4-41. RADIATOR.
4-42. The radiator should be filled to one inch (2.54 cm)
below the filler neck.
4-43. The radiator core must be serviced if it becomes
clogged at any point where light cannot be seen through
the core. Blow out thoroughly with compressed air, then
steam clean if facilities are available. Apply the air or
steam to the side opposite of normal air flow. Be careful
not to bend the radiator fins. If fins are bent, straighten
carefully.
FIGURE 4-15. CHECKING Cooling SYSTEM.
4-44. The radiator cap gasket and filler neck seat must
also be checked to be sure that they are providing the
proper seal. If the rubber face of the valve is damaged, a
new cap must be installed. Always install a cap having a
7 PSI (0.53 kg/cm2) pressure rating. Always inspect the
overflow pipe for restrictions. A plugged or damaged pipe
may prevent the cap from venting excess pressure.
4-12.
SECTION 4
HYSTER-CARE MAINTENANCE
4-45. FAN SHROUD.
4-49. HOSES.
4-46. The fan shroud directs air flow through the radiator
with a minimum loss of air due to turbulence. On Detroit
Diesel units, the four capscrews securing the shroud can
be loosened so that the shroud can be moved up or down
for proper positioning with respect to the fan blades. DO
NOT ALTER, ADD TO, OR REMOVE THE SHROUD.
Check to see that it is anchored securely and not bent
from its original shape. The depth that the fan penetrates
into the shroud is critical and should not be altered.
4-50. Examine hoses at least twice each year for cracks,
hardening, softening and swelling. Remove the hose and
check the interior section. Hoses can deteriorate on the
inside and appear satisfactory on the outside. The
4-47. WATER PUMP.
4-52. Rust in the radiator or coolant indicate c that the
corrosion inhibitor has lost its effectiveness. This can be
avoided by draining and flushing the system at least once
each year. For effective flushing, remove the radiate,
hoses and the thermostat. Open the engine
4-48. The water pump should be checked for leaks after
each 50 hours of operation. Water pump leaks may allow
air to be drawn into the cooling system. This can cause
foaming or overheating. Repair or replace the pump
immediately if leakage occurs.
Hose, must be pliable and able to pass coolant without
restriction.
4-51. FLUSHING THE SYSTEM.
DETROIT 5-53
FIGURE 4-16. ENGINE COOLANT DRAIN COCKS.
4-13.
SECTION 4
HYSTER-CARE MAINTENANCE
FIGURE 4-17. REVERSE FLUSHING ENGINE BLOCK.
FIGURE 4-19. DETROIT DIESEL FAN BELT
ADJUSTMENTS.
FIGURE 4-18. REVERSE FLUSHING RADIATOR.
NOTE: Make sure that the thermostat is removed.
Flushing as shown in figure 4-17 will close the
thermostat and prevent complete flushing of the
block. After flushing the system, add coolant as
specified in Table 4-1.
drain cock (see figure 4-16) and allow the block to drain.
Close the drain cock and reverse flush the block as shown
in figure 4-17. Reverse flush the radiator as shown in
figure 4-18.
4-53. DETROIT DIESEL FAN DRIVE BELTS
(see figure 4-19).
4-54. Examine the belt for cracks on the inner
4-14.
SECTION 4
HYSTER-CARE MAINTENANCE
DETROIT 3-53
FIGURE 4-20. CHECKING AND CHANGING ENGINE OIL AND FILTER.
4-15.
SECTION 4
HYSTER-CARE MAINTENANCE
plys before making tension adjustments. The fan drive
belts should be checked and adjusted after each 50 hours
of operation, or weekly.
4-55. New drive belts will stretch after the first few hours
of operation. After the first eight hours of operation,
check the belts again and retighten if necessary. Adjust
the belt tension so that a firm push with the thumb at a
point midway between the longest span deflects the belts
approximately 3/4 inch (2 cm). Adjust the belt tension as
follows:
a. Loosen the four capscrews (2 on each side of engine)
securing the fan bracket to its mounting blocks. Also
loosen the four capscrews securing the fan shroud to the
radiator.
b. If the belts are too tight, push the fan bracket
downward to loosen the belts. If the belts are too loose,
use a pry bar (between the stud welded on the inside of
mounting bracket and the mounting block) to move the
bracket upward.
CAUTION: When adjusting the fan pulley, always adjust
the fan shroud the same distance in either
direction. The fan must always be centered
in the shroud.
c. When the correct adjustment is obtained, tighten the
four fan bracket capscrews securely. Tighten the four fan
shroud capscrews.
CAUTION: Before starting the engine, make sure that fan
blade tips do not contact the shroud.
NOTE: Replace the two drive belts as a matched set
when one is worn. Single belts of similar size shout De
uses as a substitute for a matched belt set. Premature
belt wear can result because of belt length variations after
short periods of operation.
4-56. ENGINE LUBRICATION SYSTEM.
4-57. ENGINE OIL (see figure 4-20).
4-58. Engine lubrication oil should be kept up to the FULL
mark on the dipstick. To accurately check the oil level,
stop the engine and allow approximately five minutes for
the oil to drain off of engine internal parts.
This
eliminates the possibility of overfilling. The oil should
generally be changed every 100 hours or two weeks, or
more often where adverse
FIGURE 4-21. LUBRICATING THROTTLE AND
TRANSMISSION LINKAGE.
conditions prevail. Color cannot be relied upon as
indicating the need for an oil change. The use of an oil
analysis service is the only reason for not following the
change interval specified in Table 4-1. When checking
the oil level, make sure that the area around the dipstick
and filler cap are clean before removing them.
4-59. ENGINE OIL FILTER (see figure 4 -20).
4-60.
The Detroit Diesel oil filter should be changed each time
the oil is changed. Clean the outside of the filter flange to
prevent dirt from entering the engine. Be sure that a new
HYSTER-APPROVED filter and gasket are installed.
4-16.
SECTION 4
HYSTER-CARE MAINTENANCE
4-63. HYDRAULIC SYSTEM (see figure 4-22).
NOTE: The steering system and the hydrostatic
transmission system share a common
reservoir (located under the right hand
operators seat).
4-64. FILLING THE TANK.
4-65. Check the oil level when the hydraulic system is
cold and with the steering cylinder fully extended. The
oil in the hydraulic tank should be visible through the
sight gauge or slightly above gauge level when the oil is
cold. Add oil when no longer visible in the sight gauge
until oil fills the sight gauge window.
CAUTION: Do not completely fill the tank with oil. Air
space is designed into the tank for
expansion
at
warm
temperatures.
Pressurization will occur in the tank at
operating temperature. No attempt should
be made to vent the hydraulic system.
4-66. CHANGING THE HYDRAULIC OIL.
4-67. After each 1,000 hours of operation or yearly
(whichever occurs first), the hydraulic oil should be
drained from the tank and replaced with new oil. This
removes dirt, water and mechanical wear particles that
have accumulated in the tank. Also, the chemical
structure of the oil deteriorates after prolonged use.
4-68. Drain the oil by removing the drain plug at the
bottom of the tank. Fill the tank through the filler neck
shown in figure 4-22.
CAUTION: Make absolutely sure that the oil level can
be seen in the sight guage before starting
the engine and operating the steering or
hydrostatic transmission systems.
4-69. TRANSMISSION HYDRAULIC FILTERS.
FIGURE 4-22. SERVICING THE HYDRAULIC
SYSTEM.
4-61.
4-70. The suction filter should be checked every 100
hours of operation or at two week intervals by noting the
reading on the vacuum gauge. Change the filter element
if the reading exceeds 9 inches of mercury with oil
temperature at 100°F and engine at high idle. Always
replace the suction filter element at least once a year or
1,000 hours, whichever occurs first.
LUBRICATION THROTTLE AND
TRANSMISSION LINKAGE (see
figure 4-21).
4-62. Place a few drops of engine oil on the detent plate
and crank arm connections every 100 hours of operation
or at two week intervals.
NOTE: Removal of hydraulic lines or hoses is not
required for replacement of the element in the
suction filter assembly.
4-17.
SECTION 4
HYSTER-CARE MAINTENANCE
a. Unscrew the bowl center post fitting at the bottom
of the bowl.
4-74. WATER SPRAY SYSTEM.
b. Remove and discard the element. Inspect filter
head o-ring and bowl gasket. Replace if necessary.
4-75. FILTERS (see figure 4-23).
c. Wipe the bottom section of the filter head using a
clean, lint-free cloth. Install a new o-ring in the filter
head if required. Use a light film of grease to hold the oring in place if necessary.
4-76. The non-corrosive sump filter normally requires no
maintenance because of the self cleaning action of the
water washing back and forth in the tank. If excessive
foreign material accumulates in the tank, the filter and
the tank will need cleaning. The filter can be inspected
by removing the tank access plate.
CAUTION: Do not use lint-type cloth to clean hydraulic
components. Lint deposits can affect the
operation of the system.
4-77. The tank inlet screen filter should be periodically
cleaned when the water does not readily pass through.
The screen lifts out of the tank freely after snap ring is
removed.
d. Install a new element in the filter bowl.
CAUTION:
Use only
elements.
HYSTER-APPROVED
filter
e. Screw the assembled filter bowl into the filter head.
When tightening the center post, hold the bowl from
turning because it may stretch the o-ring out of shape
and cause suction leakage. Tighten the center post to a
maximum of 20 ft.-lbs.(2.8 kg-m).
4-71. The throw-a-way return filter should be replaced at
1,000 hours of operation or every year, whichever
occurs first. Always change the return filter if the suction
filter is replaced.
a. Unscrew the filter from the filter head and discard
the filter.
b. Wipe bottom of the filter using a clean, lint-free
cloth.
CAUTION: Use only HYSTER-APPROVED filters.
c. Apply a film of oil or grease to the new filter gasket
(integral with filter).
d. Hand turn the filter into the filter head until the
gasket just makes contact. Then tighten one-quarter turn
only.
FIGURE 4-23. WATER FILTER
4-78. MANIFOLD AND NOZZLES (see
figure 4-24).
4-79. The nozzles are mounted so they receive water
from the center of the manifold tube where corrosion
and sediment are minimized. This eliminates most of
the nozzle plugging problems. Periodically the end caps
on the water spray manifold should be removed and the
sediment blown from the manifold.
4-80. STORAGE.
4-81. Drain the entire water spray system to
4-18.
SECTION 4
HYSTER-CARE MAINTENANCE
prevent freezing of water and the resulting damage to
components. A drain hole is provided in the tank bottom
left corner to drain the tank. Be sure to open the pump
drain cock (see figure 4-25). The suction shutoff valve
should be open when draining the pump so all the water
from the suction side is removed. Water in the pressure
side of the system should be blown out with compressed
air.
4-82. PARKING BRAKE (see figure 4-26).
4-83. LUBRICATION.
4-84. The parking brake lever assembly should be lubed
after each 100 hours of operation or every two weeks.
This will prevent the adjusting threads from rusting.
4-85. ADJUSTING.
4-86. The parking brake lever should be adjusted
sufficiently to require at least 80 pounds (36.3 kg) to pull
it into the brake applied position. Twist the end of the
brake lever clockwise (lever in brake off position) to
increase force required to apply the brake.
FIGURE 4-24. CLEANING MANIFOLD AND
NOZZLES.
FIGURE 4-26. PARKING BRAKE LEVER
FIGURE 4-25. PUMP DRAIN COCKS,
MAINTENANCE.
4-19.
SECTION 4
HYSTER-CARE MAINTENANCE
4-87. FINAL DRIVE ASSEMBLY (see
figure 4-27).
plug is 171/2 inches (44.5 cm) from the ground. Remove
the plug. If no lubricant is present at the filler hole, turn
the drum until the hole is again at its high extreme and
add two quarts (1.9 Itr) of specified lubricant. Refer to
Table 4-1 for lubricant type. Recheck lubricant level.
Replace and tighten the plug.
4-88. CHECKING LUBRICANT LEVEL.
4-89. Model C350B has a fill-and-check plug as
described in paragraph 4-90.
4-90. On model C350B, the small pipe plug located on
the left-hand side of the drive drum communicates with
the final drive compartment. The correct lubricant level
of the final drive compartment can be checked by
rotating the plug to its high extreme. Then slowly rotate
the drive drum until the bottom of the
4-92. FLUSHING THE FINAL DRIVE
MECHANISM.
4-93. Each 1,000 hours of operation, or yearly, the final
drive mechanism should be flushed to remove the old
lubricant and accumulated foreign material. Drain the
mechanism by removing the drain plug with the
communication hole at its extreme low. After all the oil
drains out, rotate the hole to its high extreme. Add 4
quarts (3.8 liters) of diesel fuel. Install the plug. Rotate
the drum one and one-half revolutions so the plug ends
up at its extreme low. Remove the plug and allow all
diesel fuel to drain prior to filling with fresh lubricant.
FIGURE 4-27. SERVICING C350B FINAL
DRIVE ASSEMBLY.
4-94. STEERING.
4-95. GUIDE ROLL AXLE BEARINGS
(see figure 4-28).
4-96. The guide roll bearings should be lubricated daily
with multipurpose grease. There are two grease fittings,
one on each end of the guide roll shaft. Apply
pressurized grease into the grease fittings until
movement of the old grease around the seal is
observed.
4-97. TRUNNION ASSEMBLY (see figure 4-29).
4-98. The kingpin and oscillator shaft bearing should be
repacked yearly.
NOTE: Refer to Section 9 of the
C350B SERVICE
MANUAL, part number 599661, for the detailed
procedure for disassembling and assembling
trunnion components.
4-20.
SECTION 4
HYSTER-CARE MAINTENANCE
a. Remove the trunnion assembly from the main
frame.
seals. Torque bearing retainer nut to specifications listed
in Section 2.
b. Remove oscillator shaft assembly.
CAUTION: Use only HYSTER-APPROVED parts.
c. Clean, inspect, and re-pack kingpin and oscillator
shaft bearings.
e. Install kingpin bearings and lower seal.
f. Install trunnion assembly into, the frame and torque
bearing retainer nut to the specification listed in Section
2.
d. Install oscillator shaft bearings and new
4-99. STEERING CYLINDER BALL JOINTS
(see figure 4-30).
4-100. The steering ball joints should be re-packed
yearly.
a. Remove rubber dust covers.
b. Disassemble the ball joint on each end of the
cylinder.
c. Clean and inspect components.
d. Pack each ball joint assembly with multi-purpose
grease.
e. Reassemble the ball joints and adjust so there is no
end play.
FIGURE 4-28. LUBRICATING GUIDE ROLL
AXLE BEARINGS.
f. Install rubber dust covers.
CAUTION: Damaged dust covers will not keep out
contaminants. Replace with HY- STERAPPROVED parts if original dust covers are
damaged.
FIGURE 4-29. TRUNNION ASSEMBLY.
FIGURE 4-30. STEERING CYLINDER
BALL JOINTS.
4-21.
SECTION 4
HYSTER-CARE MAINTENANCE
4-113. ENGINE COOLING SYSTEM
4-101. REMOVING AND REPLACING STEEL
BALLAST (see figure 4 -31).
4-114. When storing the unit, the engine cooling system
should be protected against freezing. This can be done
by either draining the system or adding one of the
various anti -freeze mixtures. To drain the system, open
the stop cocks on the bottom of the radiator and the side
of the engine (see figure 4 -16). When using anti freeze, drain the system and add an anti -freeze of
ethylene -glycol base (Preston. Permaguard, Zerex,
etc.). Test the anti -freeze solution to determine the
freezing point. Record this information on a tag and
attach it to the radiator overflow pipe.
4 -102. The steel ballast can be removed to provide
access to the lower engine compartment.
WARNING: Always support ballast securely when
removing or installing capscrews.
4-103. UNIT STORAGE.
4-104. To prevent deterioration of components the
following precautions should be taken when storing the
roller for any length of time.
4-115. ENGINE CYLINDERS.
4 -105. WATER SPRAY SYSTEM.
4-116. Over a long period of storage, the cylinder walls
may rust due to moisture condensation within the
cylinder. To prevent rusting of cylinder walls, the or fuel
injectors should be removed and a small amount of
engine oil squirted into each cylinder. Turn the engine
over several times with the starter to spread the oil on
the entire cylinder wall. Replace the or fuel injectors.
Repeat this procedure prior to starting after storage.
4-106. Drain the entire water spray system to prevent
freezing of water and the resulting damage to
components. A drain hole is provided in the tank bottom
left corner to drain the tank. Be sure to open the pump
drain cock (see figure 4 -25). The suction shut -off valve
should be open when draining the pump so all water
from the suction side is removed. Water in the pressure
side of the system should be blown out with compressed
air. Cap or tape the nozzles and coat the tank fill cap
threads with grease.
4-117. BATTERY.
4-118. A fully charged battery will maintain itself for a
long period of time if kept cool and disconnected. The
electrolyte in the battery should be checked periodically
to insure a proper level. If it is low, add clean drinking
water until proper level is obtained. Check the
electrolyte specific gravity periodically and recharge the
battery as necessary. This is especially important if
freezing temperatures are expected. Clean and dry the
battery, especially the terminals. Coat the terminals with
HYSTER -APPROVED battery terminal coating to
prevent corrosion.
4-107. DRUM BALIAST.
4-108. If water ballast is being used in the guide rolls
and drive drum, this water should be drained before
storing. Rotate each drum until the ballast plug (largest
plug) is at its low extreme when draining. Replace the
drain plugs for storage.
4-109. STEERING CYLINDER.
4-110. After the roller has been positioned for storage,
turn the steering wheel to provide minimum steering
cylinder rod exposure. This will prevent rusting of the
sliding contact surface of the rod. Coat the cylinder rods
and control valve spools with a heavy grease.
4-111. FUEL SYSTEM.
4-112.
Diesel fuel will leave a waxy substance that plugs the
system. If the unit is placed in storage for any
appreciable length of time, all fuel should be drained
from the tank and the engine run until the fuel in the
system is used.
4-22.
5-1. GENERAL.
5-2. Tables 5-1 through 5-5 are trouble anal-
SECTION 5
TROUBLE SHOOTI NG
ysis check charts for the individual systems of
the compactor.
TABLE 5-1. TROUBLE ANALYSIS FOR WATER SPRAY SYSTEM.
5-1.
DELETED PAGES 5-2 AND 5-3.
SECTION 5
TROUBLESHOOTING
TABLE 5-2B. TROUBLE ANALYSIS FOR SUNDSTRAND HYDROSTATIC TRANSMISSION.
*Refer to manufacturer's warranty policy.
5-4.
SECTION 5
TROUBLESHOOTING
TABLE 5-2B. TROUBLE ANALYSIS FOR SUNDSTRAND HYDROSTATIC TRANSMISSION (CONT.).
*Refer to manufacturer's warranty policy.
5-5.
SECTION 5
TROUBLESHOOTING
TABLE 5-2B. TROUBLE ANALYSIS FOR SUNDSTRAND HYDROSTATIC TRANSMISSION (CONT.).
*Refer to manufacturer's warranty policy.
5-6.
SECTION 5
TROUBLESHOOTING
TABLE 5-2B. TROUBLE ANALYSIS FOR SUNDSTRAND HYDROSTATIC TRANSMISSION (CONT.).
TABLE 5-3. TROUBLE ALALYSIS FOR FINAL DRIVE ASSEMBLY.
5-7.
SECTION 5
TROUBLESHOOTING
TABLE 5-3. TROUBLE ANALYSIS FOR FINAL DRIVE ASSEMBLY (CONT.).
5-8.
DELETED PAGE 5-9.
SECTION 5
TROUBLESHOOTING
TABLE 5-4. TROUBLE ANALYSIS FOR STEERING SYSTEM (CONT.).
5-10.
SECTION 5
TROUBLESHOOTING
TABLE 5-4. TROUBLE ANALYSIS FOR STEERING SYSTEM (CONT.).
5-11.
SECTION 5
TROUBLESHOOTING
TABLE 5-4. TROUBLE ANALYSIS FOR STEERING SYSTEM (CONT.).
TABLE 5-5. TROUBLE ANALYSIS FOR BRAKE SYSTEM.
5-12.
SECTION 5
TROUBLESHOOTING
TABLE 5-5. TROUBLE ANALYSIS FOR BRAKE SYSTEM (CONT.).
5-13.
SECTION 6
ELECTRICAL
When checking for default each subsystem should be
considered because of their interdependence. The
electrical system specifications are given in Section 2,
and a troubleshooting guide is presented in Section 5.
6-1. GENERAL (see figure 6 -1).
6-2.
The electrical system consists of several
subsystems, they are: starting circuit, charging circuit
and the discharge circuit (gauges, lights, etc.)
6-1.
DELETED PAGES 6-2 AND 6-3.
SECTION 6
ELECTRICAL
FIGURE 6-4. ELECTRICAL SCHEMATIC FOR DETROIT
6-4.
SECTION 6
ELECTRICAL
FIGURE 6-5. INSRTUMENT PANEL DETAIL FOR DETROIT
6-5.
ENGINE
SECTION 6
ELECTRICAL
FIGURE 6-6. ROUTING DIAGRAM FOR DETROIT DIESEL ENGINE.
SEE FIGURE 6-4 FOR ELECTRICAL SCHEMATIC
6-6
DELETED PAGE 6-7.
DELETED PAGES 7-1 THRU 7-21.
SECTION 7
TRANSMISSION
FIGURE 7-32
7-22.
SECTION 7
TRANSMISSION
SUNDSTRAND HYDROSTATIC TRANSMISSION
ground conditions which establish the demand on the
system. The pump and motor are contained in separate
housings and are connected by high-pressure hoses. All
valves required for a closed loop circuit are included in
either the pump or motor assemblies. A reservoir, filter,
oil cooler and lines complete the circuit. Figure 7-33, 734 and 7-35 illustrate the system in neutral, forward and
reverse modes.
7-85. GENERAL.
7-86. This section contains a description of the
Sundstrand hydrostatic transmission, transmission
components and their function in their hydraulic circuits.
Service instructions are given that include removal of
components, disassembly, inspection, reassembly and
installation procedures.
7-87. Checks and adjustments are presented in this
section. Design and performance specifications are
presented in Section 2. The troubleshooting guide is
presented in Section 5.
7-95. CHARGE PUMP CIRCUIT.
7-96. CHARGE PUMP.
7-88. HYDRAULIC SYSTEM (see figure 7-32).
7-97. A charge pump is a part of the hydrostatic
pump assembly. When the engine is running, the
charge pump provides oil supply, cooling and
pressure for control functions.
7-98. The charge pump draws oil from the hydraulic
tank, through the suction filter to supply oil, under
pressure, to the low-pressure side of the main circuit.
7-89. The closed loop hydraulic system consists of two
subsystems: the hydrostatic transmission subsystem
and the steering subsystem. The two subsystems share
hydraulic oil and hydraulic tank. These components are
presented in this section. Refer to the steering section
for the remaining coverage of the steering hydraulic
components.
7-90. HYDRAULIC OIL.
7-99. NEUTRAL CHARGE PRESSURE RELIEF
VALVE.
7-91. Specifications for hydraulic oil are given in Section
2.
7-92. HYDRAULIC SYSTEM COMPONENTS
(see figures 7-33, 7-34 and 7-35).
7-100. When the transmission is in neutral, charge
pump pressure is controlled by the neutral charge
pressure relief valve. This valve is an integral part of the
charge pump and has no adjustments that can be made
in the field. When charge pressure exceeds the range of
190 to 220 PSI (13.36-15.47 kg/cm2) above case
pressure, the neutral charge pressure relief valve opens
allowing oil to flow into the pump case, oil cooler and
hydraulic tank.
7-101. SUCTION FILTER.
7-93. GENERAL.
7-94. The hydrostatic transmission offers infinite control
of speed and direction. Control of the variable
displacement, axial piston pump and the fixed
displacement motor is the key to controlling the unit.
When the variable pump swash plate is tilted, by
movement of the Direction-Throttle Control Bail, a
positive stroke to the pistons is created. This, at any
given input speed, produces a flow from the pump. This
flow is transferred through high-pressure lines to the
motor. The ratio of the volume of flow from the pump to
the displacement of the motor will determine the speed
of the motor output shaft. Movement of the DirectionThrottle Control Bail to the opposite side of neutral
causes the flow from the pump to reverse and the motor
output shaft turns in opposite direction. Speed of the
output shaft is controlled by adjusting the displacement
(flow) of the transmission. Load (working pressure) is
determined by external conditions such as grade and
7-102. A low-pressure filter is mounted on the hydraulic
tank. It serves as the suction filter for the transmission
inlet oil. It is a 10 micron filter. There is no by-pass
valve on the suction filter.
7-103. COOLING CIRCUIT.
7-104. The cooling circuit maintains a flow of oil through
the transmission for cooling purposes. Excess oil from
the low-charge- pressure relief valve enters the motor
housing. Flow is then directed through drain lines to the
pump housing. The circuit is completed from the pump
housing through the oil cooler to the oil tank. When the
hydrostatic pump is in
7-23.
SECTION 7
TRANSMISSION
FIGURE 7-33. SUNSTRAND TRANSMISSION IN FORWARD.
7-24.
SECTION 7
TRANSMISSION
FIGURE 7-34. SUNSTRAND TRANSMISSION IN NEUTRAL
7-25
SECTION 7
TRANSMISSION
FIGURE 7-35. SUNSTRAND TRANSMISSION IN REVERSE.
7-26.
SECTION 7
TRANSMISSION
neutral, the shuttle valve (located in the hydrostatic
motor manifold) is centered allowing oil from the charge
pump to be directed to the cooling circuit by the lowcharge-pressure relief valve. Cooling circuit flow in
neutral is not admitted to the motor, but is directed to
the pumps' drain circuit, through the oil cooler to the
hydraulic tank.
7-109. SHUTTLE VALVE.
7-110. When in neutral, the shuttle valve directs oil flow
to the cooling circuit. The shuttle valve prevents loss of
high pressure oil when transmission is reversed.
7-105. OIL COOLER.
7-106. The oil cooler is mounted with the engine
radiator. It is connected between the motor case drain
port and the hydraulic tank. Excess cooing oil from the
low-charge- pressure relief valve enters the motor case,
then flows through the case drain line through the pump
case to the oil cooler and the tank.
7-113. MAKE-UP CIRCUIT.
7-114. The charge pump provides oil to the circuit to
make up for internal leakage.
7-111. CONTROL FUNCTION.
7-112. The charge pump provides oil under pressure to
control valves.
7-115. HYDROSTATIC PUMP ASSEMBLY .
7-116. The hydrostatic transmission employs a variable
displacement hydraulic pump driving a fixed
displacement hydraulic motor to transfer engine power
to the final drive.
7-117. The hydrostatic pump assembly is attached to,
and driven by, a hub assembly on the engine flywheel.
7-107. OIL COOLER BYPASS VALVE.
7-108. The oil cooler bypass valve prevents high backpressure at the pump case. Back- pressure can result
from cold fluid or a restricted oil cooler passage. The
valve is set to open at 15 PSI (1.05 kg/cm2) pressure at
normal operating temperature. During cold start
conditions or if flow through the cooler becomes
restricted, the valve opens to allow flow from the pump
directly to the hydraulic tank.
7-118. VARIABLE DISPLACEMENT
HYDROSTATIC PUMP (see figure 7-36).
FIGURE 7-36.
7-27
SECTION 7
TRANSMISSION
high-pressure and return functions of the main circuit
lines.
7-126. When the transmission is in neutral, the
swashplate in the hydrostatic pump is also in neutral and
the cylinder pistons are not stroking. In this mode no oil
is being pumped into the main circuit, therefore, the
cylinder block assembly in the motor is stationary and
the motor output shaft does not turn.
7-119. The variable displacement hydrostatic pump
consist primarily of a drive shaft, charge pressure relief
valve, replenishing check valves, servo pistons,
swashplate, cylinder block assembly and valve-bearing
plate.
7-120. The pump drive shaft is splined into the center of
the cylinder block. The cylinder block assembly contains
nine (9) cylinder pistons. When the engine is running the
cylinder block and pistons are always rotating.
7-1 21. Movement of the Direction-Throttle Control Bail
causes the servo control circuit to act on the
displacement control valves. These valves cause one or
the other of the two (2) servo pistons to move the pump
swashplate.
7-122. The pump swashplate can tilt either side of
center. When the swashplate in exactly centered, the
transmission is in neutral.
7-123. Each cylinder piston has a slipper plate at one
end. The slipper retainer keeps all nine
(9) slippers in contact with the thrust plate which
contacts the swashplate. When the swashplate is
centered, the cylinder pistons do not stroke in the
cylinders. When the swashplate is tilted, the cylinder
pistons stroke. The degree of tilt determines the volume
(displacement) of oil pumped by each ,cylinder piston.
7-124. The valve-bearing plate contains elon- gated
ports that are in contact with the cylinder block. The
opposite side of the valve-bearing plate mates with the
pump end cap. Two ports in the end cap are connected
through high-pressure lines to a hydrostatic motor.
7-125. When the swashplate is tilted, each cylinder
piston moves back and forth in its cylinder with each
revolution of the cylinder block. When a piston rotates
past the inlet ports in the valve-bearing plate, it moves
out of the block and draws low-pressure oil into the
cylinder. This is the intake stroke of the piston. Further
rotation of the cylinder block moves the filled cylinders
toward the outlet ports in the valve-bearing plate. They
are forced into the cylinder block by the tilt of the
swashplate. The oil under high pressure ports to the
outlet port in the end cap through the valve-bearing
plate. With the swashplate tilted to either side of center,
one side will be forward vehicle motion with one main
circuit line to the motor being high-pressure and the
other being return. The opposite tilt of the swashplate
reverses the vehicle direction and it also reverses the
7-127. CHARGE PUMP.
7-128. A charge pump is a part of the hydrostatic pump
assembly. Whenever the engine is running, oil is being
drawn from the tank through the suction filter by the
charge pump.
7-129. CHECK VALVES.
7-130. There are two (2) check valves in the hydrostatic
pump assembly. With the transmission in neutral, both
check valves will open allowing charge pressure to
lubricate the system. With the transmission out of
neutral, one of the valves will be closed and the other
open. The valve on the high-pressure side of the main
circuit will be held closed by high-pressure. The other
valve will admit oil from the charge pump to the lowpressure side of the cylinder block assembly to maintain
adequate oil in the loop.
7-131. SERVO CONTROL SYSTEM.
7-132. Control of swashplate angle (displacement) is
accomplished in the hydrostatic pump by use of a
powered servo system.
7-133. DISPLACEMENT CONTROL VALVE.
7-134. The Displacement Control valve assembly is a
closed center four-way valve with the servo pressure
ports exhausted at the center (neutral) position. The
valve is operated through internal linkage connections
with both the swashplate and the external control
(Direction-Throttle Control Bail).
7-135. To put the pump in stroke, the control handle
moves the displacement control spool through a torsion
spring. Once the swashplate angle is set, a feed-back
link returns the displacement spool almost to neutral
where it ports just enough oil to the servo cylinder to
keep the swashplate at the proper angle.
7-28
SECTION 7
TRANSMISSION
main circuit reverses the direction of the motor output
shaft.
7-147. The motor shaft and cylinder block assembly
rotate together. The direction of rotation depends on the
direction of the high-pressure oil entering the motor from
the hydrostatic pump. High-pressure oil enters one of
the motor main ports to push the cylinder pistons out of
their cylinder and firmly against the motor swashplate.
This action causes each piston slipper, which is
protected by a thin film of oil to slide down the face of
the thrustplate, rotating the entire cylinder block
assembly. The cylinder block is splined to, and rotates
the motor output shaft. As the cylinder block rotates and
the filled cylinders pass the other main port, return oil
flows to the hydrostatic pump at low-pressure. The
speed at which the cylinder block rotates is determined
by the volume of pump output oil.
7-136. When the Direction-Throttle Control Bail is
released, the displacement control spool tends to be
returned to neutral by a spring.
7-137. SERVO CONTROL CYLINDERS.
7-138. The hydrostatic pump is equipped with two (2)
servo cylinders. They are controlled by low-pressure oil
directed from the displacement
control valve.
7-139. When the pump is stroked, oil under charge
pressure is ported to the servo cylinder. The piston
moves the swashplate against the opposite servo spring.
Both servo springs are constrained so that they can only
force the swashplate toward neutral. When the swashplate has moved to the angle set by the control handle,
the feed-back link returns the displacement control spool
almost to neutral where it ports just enough oil to the
servo cylinder to keep the swashplate at the proper
angle. 7-140. When the Direction-Throttle Bail is
released, the displacement control spool is returned to
neutral by a spring. This allows oil from both servo
cylinders to flow into the case through the small
underlaps. Both servo cylinders are thus exhausted
and one of the servo springs mechanically forces the
swash- plate to neutral.
7-148. MANIFOLD.
7-149. The manifold is connected across the
high-pressure and low-pressure sides of the
main circuit. It includes:
(1) two high-pressure relief valves
(2) a shuttle valve
(3) a low-charge-pressure relief valve.
7-150. HIGH-PRESSURE RELIEF VALVES.
7-151. Two high-pressure relief valves are part of the
manifold. They serve to prevent abnormal pressure
surges in either of the two branch lines of the main
circuit. They accomplish this by dumping oil from the
high-pressure line to the low-pressure line. Situations
such as rapid acceleration, abrupt braking and sudden
application of load will activate the relief valves.
7-141. HYDROSTATIC MOTOR ASSEMBLY (see
figure 7-36).
7-142. The fixed displacement motor is an axial-piston
motor that converts fluid power (received from the
variable displacement pump) into rotary mechanical
power.
7-143. The fixed displacement motor is attached to the
unit final drive mechanism at the right-hand side of the
drive drum (as viewed from the rear of the unit). The
ports of the variable displacement pump are connected
to the motor through high-pressure hoses.
7-152. SHUTTLE VALVE.
7-153. At other than neutral setting, the shuttle valve
establishes a connection between one of the lowcharge-pressure relief valves and whichever branch of
the main circuit is at low-pressure. This connection
provides a control of charge pressure and a path for
excess oil to escape to the cooling circuit. When the two
branches of the main circuit are reversing their highpressure and low-pressure functions, the springcentered design of the shuttle valve closes the valve to
prevent loss of
7-144. FIXED DISPLACEMENT HYDROSTATIC
MOTOR.
7-145. The fixed displacement hydrostatic motor output
is coupled to a final drive by a shaft extending through
the center of the drive drum.
7-146. The hydrostatic motor converts high- pressure
hydraulic power into rotary mechanical power. The
motor shaft can rotate in either direction. The action of
the hydrostatic pump reversing the direction of oil in the
7-29.
SECTION 7
TRANSMISSION
c. Start the engine and increase speed to 1500
RPM. The gauge should indicate 190 to 220 PSI (13.36
to 15.47 kg/cm2) above case pressure with oil at
operating temperature. If. the pressure is not within the
specified limits, troubleshoot the system as specified in
Table 5-2B.
high-pressure oil.
7-154. LOW-CHARGE-PRESSURE RELIEF VALVE.
7-155. The low-charge-pressure relief valve works with
the shuttle valve to control pressure in the charge circuit
and to remove excess oil to the cooling circuit. This
valve will allow additional oil to dump if the highpressure relief valves cannot dump fast enough under
excessive conditions. Excess oil will be ported through
the drain circuit to the oil cooler. It is operative only
when the transmission is not in neutral.
7-156. PRESSURE CHECKS.
7-157.
Pressure
checks
are
troubleshooting the hydraulic system.
imperative
7-160. CHECKING LOW CHARGE PRESSURE
(see figure 7-38).
7-161. The low charge pressure should be between 150
and 180 PSI (10.55 and 12.66 kg/cm2) above case
pressure with oil at operating temperature, when the
transmission is operating in forward or reverse. The low
charge pressure relief valve is located in the motor
manifold as shown in figure 7-38. Check the pressure as
follows:
a. Remove the threaded plug from the Low Charge
Pressure Check Port. Install a 600 PSI (40 kg/cm2)
gauge equipped with a short section of hose. Use an oring adapter in the port. Make sure that the gauge is
accurately calibrated.
b. Block the drive drum safely off the ground and
start the engine.
c. Increase engine speed to 1500 RPM. Move the
Direction-Throttle Control Bail slightly to
in
7-158. CHECKING NEUTRAL CHARGE PRESSURE
(see figure 7-37).
7-159. Neutral charge pressure can be checked at the
transmission pump as follows:
a. Remove the threaded plug from the charge
pressure port. Install a 600 PSI (40 kg/cm2) gauge
equipped with a short section of hose. Make sure the
gauge is accurately calibrated.
NOTE: Use a 7/16 x 20 o-ring adapter in the port.
b. Place the Direction-Throttle Control Bail in
neutral.
FIGURE 7-37.
FIGURE 7-38.
7-30.
SECTION 7
TRANSMISSION
the forward and reverse positions. The gauge should
indicate 150 to 180 PSI above case pressure (10.55 to
12.66 kg/cm2) in each direction.
d. If the pressure is not within the specified limits,
replace the low charge pressure relief valve. If this fails
to correct the pressure, troubleshoot the system as
specified in Table 5-2B.
FIGURE 7-39.
a. Movement of the unit must be safely restricted.
b. Remove the cover from the right-hand side of
the frame at the drive drum.
c. Connect a 10,000 PSI (700 kg/cm2) gauge to
the REVERSE check port (see figure 7-39).
d. Start the engine and set Park Brake. Increase
engine speed to 1500 RPM.
e. Slowly move the Direction-Throttle Control Bail
in the Reverse direction from neutral and bring the unit
to stall. Observe the pressure gauge. With the
transmission stalled, the gauge should indicate 5500
PSI (386.7 kg/cm2). If not, stop the engine and remove
the two (2) high-pressure relief valves. It will be
necessary to disconnect the two (2)
high-pressure hoses.
f. Reverse the relief valves in the manifold ports
and recheck at the REVERSE check port. If the
pressure is normal, replace the relief valve originally
removed from the reverse side of the manifold. If the
pressure
remains
abnormal,
troubleshoot
the
transmission as specified in Table 5-2B.
WARNING: Changing the quantity of shims in the relief
valve is not recommended
7-162. CHECKING HIGH PRESSURE RELIEF (see
figure 7-39).
CAUTION: Transmission should NOT be stalled at high
pressure relief for periods longer than 15 seconds.
7-163. The pressure in the high-pressure lines should be
5500 PSI (386.7 kg/cm2) when the transmission is in a
stalled condition. Two (2) high-pressure relief valves are
located in the motor manifold as shown in figure 7-39.
Two (2) check ports are located at the side of the
manifold for checking the setting of the relief valves.
Check the high-pressure valves as follows:
WARNING: In order to check the high-pressure relief
valves it is necessary to bring the unit to
stall. CAUTION must be taken to ensure the
safety of personnel when attempting to stall
the unit.
WARNING: Changing the quantity of shims in the
relief valves is not recommended.
g. If pressure reading at Reverse port was normal
then connect the gauge to the FORWARD check port
(see figure 7-39).
h. Start the engine again and increase speed to
1500 RPM.
i. Slowly move the Direction-Throttle C6ntrol Bail
in the Forward direction from neutral and bring the unit
to stall. Observe the pressure gauge. With the
transmission stalled, the gauge should indicate 5500
PSI (386.7 kg/cm2). If not, stop the engine and remove
the two (2) high-pressure relief valves.
j. Reverse the relief valves in the manifold ports
and recheck the pressure at the FORWARD port. If
the pressure is normal, replace the relief valve originally
removed from the forward side of the manifold. If the
pressure remains abnormal, troubleshoot the system as
specified in Table 5-2B.
k. Stop the engine and disconnect the gauge.
Install all plugs and tighten all fittings
FIGURE 7-39
7-31.
SECTION 7
TRANSMISSION
securely.
7-166. CHECKING CASE PRESSURE (see figure
7-41).
7-167. Case pressure should not be greater than
40 PSI (2.8 kglcm2). Attach adequate gauge to
either pump or motor case as shown in figure 7-11.
7-164. CHECKING CONTROL PRESSURE
(see figure 7-40).
7-165. The control pressure can be checked at the
transmission pump as follows:
a. Remove the. threaded plugs from the two check
ports and install a 600 PSI (40 kg/cm2) gauge equipped
with a short hose in each port. Make sure that the
gauges are accurately calibrated.
b. Place the Direction-Throttle Control Bail in
neutral. Block the drive drum safely off the ground.
c. Start the engine and set speed at approximately
1500 RPM with the transmission in neutral. Shift the
Direction-Throttle Control Bail to the forward position
and observe the gauge. The pressure should be 45 PSI
(3.2 kg/cm2) initially, then gradually reach charge
pressure. Shift the Control Bail to the reverse position.
The gauge should indicate 45 PSI (3.2 kg/cm2) initially,
then gradually reach charge pressure.
d. If the pressures in both the forward and reverse
directions is not as specified, the control valve assembly
may be dirty or defective. If the pressure is abnormal in
one direction only, the associated servo piston may be
leaking.
7-168. VACUUM CHECK
7-169. The suction filter is equipped with a vacuum
gauge which indicates flow from the tank to the
charge pump. The maximum vacuum at the charge
pump inlet should not exceed ten inches (254 mm)
of mercury at normal
operating
conditions.
During cold start-up it is acceptable to have a
higher reading. The unit should not be operated
until hydraulic oil is at normal operating
temperature and vacuum is below 10 inches (254
mm) of mercury.
7-170. ADJUSTMENTS.
7-171. DISPLACEMENT CONTROL VALVE
NEUTRAL ADJUSTMENT (see figure 7-42).
WARNING:
The drive drum MUST be safely
blocked off the ground. Any
movement of control valve spool
causes the unit to shift out of neutral
and the drum will turn. Caution
personnel to stand clear of the drive
drum.
FIGURE 7-40.
FIGURE 7-41.
7-32
SECTION 7
TRANSMISSION
FIGURE 7-42
a. Remove end play from centering spring
mechanism with lockout (Ref. A) loose and holding the
centering spring housing (Ref. C), turn the spring
adjusting screw (Ref. B) until the screw is just touching
the centering spring washer; thus taking the free end
play out of the centering spring mechanism. This is best
done by exerting a light back and forth force on the
control valve spool (Ref. F) at the same time adjusting
screw is being turned down. Care must be taken not to
compress the centering spring (Ref. D) beyond its
installed height. Tighten the locknuts (Ref.A) and
recheck the spool (Ref. F) for end play.
b. Adjust control valve spool for neutral position.
Remove the 7/16 x 20 straight thread o-ring plugs on
either side of the control valve housing (Ref. I) to reveal
the servo cylinder porting holes (Ref. H). Loosen locknut
(Ref. G) and adjust the control valve by screwing the
centering spring housing (Ref. C) in or out so that the
open areas (shaded areas of Ref. J) between the spool
lands and sides of the porting holes are equal. Tighten
locknut (Ref. G), recheck the open areas and reinstall
the two 7/16 x 20 plugs.
7-172. TRANSMISSION CONTROL LINKAGE
ADJUSTMENT (see figure 7-43).
a. Place Direction-Throttle Control Bail in neutral
(vertical) position. Adjust control cable at pump so that
jam nut on end of cable has full thread engagement and
no more. Tighten jam nut securely. Loosen jam, nut on
engine flywheel housing and adjust cable so that the
swivel on the servo pump control arm is centered in the
bracket. Tighten jam nut securely. Measure distance
between swivel bracket and external cable end. These
must be a minimum of 13/32 in.(27.69 mm). Refer to
figure 7-43.
7-33.
SECTION 7
TRANSMISSION
FIGURE 7-43.
7-34.
SECTION 7
TRANSMISSION
1/16 in. (1.59 mm) gap between swivel and wire stop
(see figure 7-44).
g. Adjust ball joint in slotted crank on bail shaft to
allow full throttle when bail is moved to either full
forward or full reverse.
h. Adjust friction control nuts and spring assembly
so that Direction-Throttle Control Bail will remain in any
desired position.
b. Adjust and tighten ball joint of control cable at
bail shaft end. Adjust neutral start safety (transmission
lockout) switch so that it makes contact in neutral.
c. Move Direction-Throttle Control Ball in the
forward direction until control cable at servo lever has
traveled 11/16 - 31 /32 In.(24.64 - 26.92 mm). Adjust
ball stops so that cable cannot be moved beyond this
point.
d. Repeat step c In reverse direction.
CAUTION:
Ensure that the amount of ball (control
cable) travel is limited by bail stops and not the interval
servo stops.
e. Return Direction-Throttle Control Bail to neutral
(vertical) position.
f. Adjust and tighten wire stop at throttle crank for
7-173.
THROTTLE
CONTROL
LINKAGE
ADJUSTMENT PROCEDURE (see figure 7-44).
a. Adjust transmission control linkage per
procedure outlined in paragraph 7-172 (Sundstrand).
FIGURE 7-44
7-35
SECTION 7
TRANSMISSION
prevent dirt from entering the transmission.
b. Place Direction-Throttle Bail in detonated
neutral position.
c. Adjust wire stop (A) at lower throttle crank for
1/16 in. (1.59 mm) gap between swivel and wire stop.
d. Adjust position of upper throttle link (B) ball joint
in slot of throttle actuator arm (C) so that full stroke of
throttle is obtained when Direction-Throttle Bail is
stroked from stop to stop. LENGTHEN upper throttle link
(B) to reduce throttle stroke or SHORTEN link to
increase throttle stroke.
CAUTION: Whenever a component of the hydrostatic
system has been re- moved, the
transmission start-up procedure MUST be
performed before the unit can be started,
operated or returned to service.
7-178. HYDROSTATIC PUMP REMOVAL (see figure
7-45).
a. Remove the suction line at the filter and plug or
cap hose and fitting.
b. Disconnect control linkage from servo control
lever.
c. Disconnect the hydraulic lines at the top of the
pump.
d.
Disconnect the high-pressure lines from the
pump end housing. Plug or cap all hoses and fittings.
NOTE: Throttle stroke should be identical in forward
and reverse. Check for bent or binding linkage
if a problem exists.
e. Adjust friction nuts (D) so Direction Throttle Bail
will stay in any position.
f. Adjust the neutral safety switch adjustment
bracket (E) so that the switch will just barely be
activated when the Direction-Throttle Bail is in neutral
position.
WARNING: Use a hoist and sling arrangement to
support the weight of the pump.
7-174. TRANSMISSION REPAIR.
7-175. Should it become necessary to perform repairs to
the Sundstrand transmission during the warranty period,
certain parts, components or kits may be replaced
without affecting or violating the warranty.
7-176. The following parts, components or kits may be
replaced in the field as an assembly without affecting,
violating or voiding the transmission warranty:
a. Charge pump
b. Check valves
c. Motor manifold assembly
d. High-pressure relief valves
e. Displacement control valve (pump)
f. Pump or motor shaft seals
7-177. The proper procedures for replacement of the
above components are presented in the following
paragraphs.
NOTE: Unauthorized
repairs
to
transmission
components other than those listed in
paragraph 7-176 may void the warranty.
Contact Hyster Company before attempting to
perform repairs other than those presented in
this manual.
CAUTION: When working on all hydraulic equipment,
cleanliness is very important. Before
removing any of the transmission
components, clean the immediate area to
e. Remove the capscrews securing the pump to
mount plate.
f. Pull pump straight back and tilt shaft end of
pump up enough to lift pump from unit.
FIGURE 7-45.
7-36
SECTION 7
TRANSMISSION
g. Plug or cap all ports to prevent contamination.
c. Pull charge pump away from the main pump. Use
caution not to drop aluminum spacer.
7-179. REMOVAL OF HYDROSTATIC MOTOR
(see figure 7-46).
a. Remove hydrostatic motor inspection plate on the
right-hand side of the frame.
b. Disconnect high-pressure lines. Plug or cap ports
on hoses. Remove the by-pass valve linkage.
c. Support the hydrostatic motor and remove the four
(4) motor mounting bolts.
d. Carefully pull the motor far enough out of the motor
carrier to remove the case drain line. Plug or cap all hoses
and ports to prevent contamination of the hydrostatic
system.
7-180. REPLACEMENT OF CHARGE PUMP.
7-181. REMOVAL (see figure 7-47).
a. Remove the line connecting the charge pump to the
reservoir and plug to prevent draining of the reservoir.
Remove the connector fitting.
7-182. INSTALLATION (see figures 7-48 and 7-49).
a. Install a new gasket. Make sure that the new gasket
is properly installed as shown in figure 7-48. If positioned
wrong, the relief valve port will be covered by the gasket.
b. Line the drive tank on charge pump shaft with the
slot on the main pump shaft (see figure 7-49). The charge
pump should assemble freely with the main pump. Do not
force charge pump into position. Hold aluminum spacer in
position with fingers to prevent its dislodging.
c. Torque the four (4) mounting bolts 10-11 ft. -lbs. (1
38-1.52 kg-m).
d. Install the connector to charge pump and torque to
14-20 ft.-lbs. (1.93-2.76 kg-m).
b. Remove the four (4) capscrews.
NOTE:
CAUTION: Do not use sharp tools to pry charge pump
from main pump. A scratch on the sealing
surface may cause leakage. If charge pump
does not pull loose, tap LIGHTLY on the side
of the charge pump with a plastic hammer to
break paint or gasket seal.
Do not remove the capscrews at the top and
bottom of the charge pump (see figure 7-47).
e. Install the line from the reservoir to the connector
on the charge pump.
FIGURE 7-47.
FIGURE 7-46.
7-37.
SECTION 7
TRANSMISSION
FIGURE 7-48.
FIGURE 7-51.
NOTE: Excessive tightening may distort the charge pump
and cause leakage or malfunction.
f.
Check oil level in the reservoir.
7-183. REPLACEMENT OF CHECK VALVES.
7-184. REMOVAL.
a. Remove the charge pump (see paragraph 7-181).
b. Using a drag link, unscrew check valve from end
cap (see figures 7-50 and 7-51).
FIGURE 7-49.
NOTE: There are two check valves. It is advisable to
replace both check valves at the same time.
7-185. INSTALLATION.
a. Prior to installation, inspect o-rings for damage (see
figure 7-52).
b. Apply a light coat of oil.
c. Install check valves and torque to 80-90 ft.-lbs.
(11.06-12.44 kg-m).
d. Install charge pump (see paragraph 7-182).
CAUTION: The valves must assemble below the face of
the end cap.
7-186.
REPLACEMENT OF BY-PASS VALVE AND
MOTOR MANIFOLD.
FIGURE 7-50.
7-38.
SECTION 7
TRANSMISSION
7-187. REMOVAL.
a. Prior to removal of the manifold assembly remove
all dirt and clean the area where manifold assembly is
attached to the end cap.
b. Place drain pan under manifold to catch oil.
Remove by-pass valve linkage.
FIGURE 7-52
c. Remove the four (4) corner bolts holding the
manifold to motor end cap (see figure 7-53).
d. Grasp manifold to prevent it from dropping and
remove the remaining two (2) mounting bolts (see figure 754). There is no gasket between the manifold and the end
cap. Sealing is obtained by o-rings and back-up rings.
7-188. INSTALLATION.
a. Use new o-rings and back-up rings.
b. The two grooves side by side on manifold assembly
(see figure 7-55) require an o-ring and a back-up ring (one
of each per groove).
The o-ring goes into the groove first. Then install the backup ring on top of the o-ring. The flat side of the back-up
ring faces away from the o-ring.
c. The groove positioned by itself (see figure 7-55)
requires only an o-ring.
FIGURE 7-53.
d. Place the manifold against the motor end cap.
Install the bolts while making certain that
FIGURE 7-54.
FIGURE 7-55.
7-39.
SECTION 7
TRANSMISSION
the o-rings do not slip from their- grooves. Torque bolts to
19-21 ft.-lbs. (2.66-2.90 kg-m).
from link in the pump.
7-189.
NOTE:
REPLACEMENT OF HIGH-PRESSURE RELIEF
VALVES.
7-190. REMOVAL.
Caution must be taken to prevent these parts
from falling into the pump housing. A clean
rag placed in the opening will help to prevent
accidentally dropping parts into housing.
a. Apply a wrench on HEX portion of the valve and
unscrew from manifold block (see figures 7-56 and 7-57).
d. Remove orifice and o-rings from control valve (see
figure 7-60). Check to ensure that orifice is open.
NOTE: There are two relief valves in the manifold block.
7-194. INSTALLATION.
7-191. INSTALLATION.
a. Install orifice tip down, and new o-rings in control
valve.
a. Prior to installation, inspect o-rings and back-up
rings for damage.
b. Install new gasket on control valve (dry).
c.
b. Apply a lubricant to the o-ring and install in the
manifold block.
c.
Install pin in control valve links and pump links.
d. Place washer in pin, install the cotter pin and
spread.
Torque valves to 20 ft.-lbs. (2.76 kg-m).
7-192. REPLACEMENT OF DISPLACEMENT CONTROL
VALVE.
NOTE:
7-193. REMOVAL.
a. Remove the control linkage from the displacement
control valve assembly.
Caution must be taken during installation of
these parts to prevent them from falling into
the unit.
Lightly coating the parts with
petroleum (NOT grease) is advised.
e. Install valve to motor and torque the nine (9) bolts
to 10-11 ft.-lbs. (1.38-1.52 kg-m).
b. Remove the nine (9) capscrews holding the valve to
the pump housing (see figure 7-58).
c. Lift the valve away from the housing and remove
the cotter pin and washer (see figure7-59). Remove pin
7-195. REPLACEMENT OF MOTOR OR PUMP SHAFT
SEAL.
FIGURE 7-56.
FIGURE 7-57.
7-40.
SECTION 7
TRANSMISSION
FIGURE 7-58.
FIGURE 7-60.
FIGURE 7-59.
FIGURE 7-61.
7-196. REMOVAL.
(see figure 7-63).
a. Disconnect hoses and remove pump or motor from
unit.
b. Insert Tru-Arc #7 pliers in snap ring holes, compress
the ring and roll it out (see figure 7-61).
c. Remove the aluminum
screwdriver (see figure 7-62).
seal
retainer
d. Remove the steel stationary seal.
usually come out with the retainer
with
e. With fingers or two screwdrivers remove bronze
rotating part of the seal from drive shaft (see figure 7-64).
CAUTION: Use care not to damage bronze rotating ring or
shaft splines.
a
f.
This seal will
See figure 7-63 and account for all the parts shown.
7-197. INSTALLATION.
7-41.
SECTION 7
TRANSMISSION
FIGURE 7-64.
FIGURE 7-62.
FIGURE 7-65.
FIGURE 7-66.
FIGURE 7-63.
CAUTION: Always replace both stationary and rotating
parts of the seal. DO NOT mix old and new parts.
a. Wash and clean air dry new seal parts.
b. Install the seal springs into the aluminum seal
retainer. Install the new o-rings (dry) on stationary steel
part of seal into retainer so notch is located in pin in
retainers (see figure 7-65).
c.
Install large o-ring O.D. of retainer (see figure 7-65).
FIGURE 7-67.
7-42.
SECTION 7
TRANSMISSION
d. Install new o-ring in I.D. of bronze rotating part of
seal (see figure 7-66).
e. Wrap a piece of plastic around the drive shaft and
slide the rotating bronze part over the shaft making sure It
is sealed. Do not press on seal surface (see figure 7-67).
f. Install stationary seal and retainer into place and
press the retainer in so the snap ring groove is open (see
figure 7-68).
FIGURE 7-68.
g. Close the snap ring with pliers. Install snap ring
with tapered edge out.
h. For ease of installation, start snap ring in groove
with the side opposite the snap ring holes (see figure 7-69).
7-198. REMOVAL OF DRIVE DRUM.
a. Complete the hydrostatic motor removal procedure
presented in paragraph 7-179 (Sundstrand). Remove the
drive shaft from the center of the drum (see figure 7-70).
b. Support the frame on both sides at the rear of the
unit. Block the unit at the front and rear of the guide roll to
prevent movement.
WARNING:
FIGURE 7-69.
The brake assembly will be removed prior
to drum removal. Block the machine
safety to prevent movement.
c. Complete brake assembly removal
presented in Section 10, paragraph 10.
procedure
d. Drain the final drive lubricant (refer to Section 4).
e. Remove the flange anchor capscrews. Before
removing the hub capscrews, pull the anchor flange using
the puller holes provided and appropriate capscrews. At
the same time pry between the right side frame and drum
moving the motor housing out of the side frame pilot (see
figure 7-71).
f. Remove the hub (12 point) capscrews (C350B only)
from the anchor flange and remove the flange from the
drive drum. Then remove the brakeshaft outer snap ring
(C350B only). Push brakeshaft in so that it will clear the
frame for drum removal (see figure 7-72).
FIGURE 7-70.
g. Carefully lift the drive drum from the unit. An
alternate procedure is to remove the scraper beam at the
rear of the unit and roll the drive
7-43.
SECTION 7
TRANSMISSION
FIGURE 7-71.
FIGURE 7-73.
7-200. DISASSEMBLY OF MOTOR CARRIER.
a. Remove o-ring on outside of bearing carrier for
replacement. Remove bearing lock plate and shims.
Check flatness of lock plate with a straight edge. Replace
if deformed (see figure 7-75).
b. Lift off bearing carrier, upper bearing, and seal from
motor housing. Tag the bearing cone with its respective
cup (see figure 7-76).
FIGURE 7-72.
drum out of the rear of the unit taking care not to damage
machined surfaces (see figure 7-73).
CAUTION:
Care must be taken not to damage
machined surfaces.
WARNING:
The drive drum is extremely heavy
(approximately 12,000 lbs.
(5,440 kg)
without ballast.) Caution personnel in area
to stand clear.
c. Inspect the bearings, cups and cones. Remove
bearing from the carrier and replace if the rollers or cups
are worn, pitted or damaged in any way (see figure 7-77).
7-199. REMOVAL OF MOTOR CARRIER.
a. Complete the drive drum removal procedure
presented in paragraph 7-198.
b. Remove the motor carrier-to-drum mounting
capscrews by turning the carrier and aligning the hole in
carrier with capscrews (see figure 7-74).
WARNING:
Support the motor carrier with hoist and
sling arrangement.
c. Using the puller holes provided, pull the carrier and
lift from unit.
7-44.
FIGURE 7-74.
SECTION 7
TRANSMISSION
FIGURE 7-75.
FIGURE 7-78.
FIGURE 7-79.
FIGURE 7-76.
FIGURE 7-77.
FIGURE 7-80.
7-45.
SECTION 7
TRANSMISSION
d. Remove oil seal for replacement.
CAUTION: The o-ring and oil seal in the motor side of
the drive drum play a critical part in
preventing premature failure of drum
support bearing and the planetary system.
These seals should be replaced during
overhaul (see figure 7-78).
e. Replace o-ring if required by inspection in step c
(see figure 7-79).
b. Install a new oil seal with a press. Avoid use of
drifts and hammers. They may easily damage
component parts. Lubricate the oil seal lip (see figure 781).
c. Install bearing on housing by heating slightly if
necessary. Seat the bearing cone firmly against the
motor housing shoulder (see figure 7-82).
7-201. REASSEMBLY OF MOTOR CARRIER.
d. Set the bearing carrier with bearing cups and oil
seal on the housing mounted bearing cone (see figure 783).
a. If new bearing cups are to be installed, press them
firmly against the bearing carrier shoulders. Lubricate
the bearings and cups with light machine oil or grease
(see figure 7-80).
e. Place the bearing cone around motor housing hub
and seat it into the bearing cup (see figure 7-84).
FIGURE 7-81.
FIGURE 7-83.
FIGURE 7-84.
FIGURE 7-82.
7-46.
SECTION 7
TRANSMISSION
distance between the motor housing hub and the
straight edge (see figure 7-86).
NOTE: Rotate the bearing carrier on the motor housing
hub to insure proper seating of the bearing and
the oil seal lip.
h. Assemble a shimpack equaling measurement
determined in step g plus .001 in. (.025 mm). Replace
the bearing retainer plate and torque capscrews to 105
ft.-lbs. (14.521 kg-m) (see figure 7-87).
f. Temporarily install the bearing retainer plate and
torque the capscrews to 25 ft.-lbs. (3.457 kg-m). Rotate
the bearing retainer on the motor housing hub to insure
proper seating of the bearings (see figure 7-85).
i. Install the o-ring (well lubricated) on the bearing
carrier. Seat against the mounting flange (see figure 788).
g. Remove the bearing retainer plate and place a
straight edge across the end of the motor housing hub
and bearing cone. With a feeler gauge measure the
FIGURE 7-87.
FIGURE 7-85.
FIGURE 7-88.
FIGURE 7-86.
.
7-47.
SECTION 7
TRANSMISSION
a. Position the drum directly behind the unit and lift or
roll the drum into the frame until the drum is aligned with
the large holes in the frame (see figure 7-90).
7-202. INSTALLATION OF MOTOR CARRIER.
a. Lift motor housing with hoist and pilot the bearing
carrier into the drum.
b. Rotate the motor housing in the drum until the
access hole in the back wall of the housing is at its
highest extreme. Position motor housing pilot flange so
it will fit into the frame (see figure 7-91).
CAUTION: Care should be taken when installing the
motor housing in the drum as not to damage
the o-ring.
c. Align the frame to motor housing capscrew holes
and insert the capscrews. Tighten the capscrews in an
alternate pattern back and forth across the motor
housing. Turn these capscrews only 1/4 to 1/2 turn at a
time until the motor housing is piloted into and bottomed
against the frame (see figure 7-92).
b. Align the capscrew mounting holes of the bearing
carrier flange with those of the drum flange. This can be
done through the access hole in the back surface of the
motor housing. Coat capscrews with John Crane number
2 seal. Insert capscrews and torque per specifications
(see figure 7-89). Torque C350B cap- screws to 130 ft.lbs.
(17.98
kg-m).
FIGURE 7-91.
FIGURE 7-89.
FIGURE 7-92.
FIGURE 7-90.
7-48.
SECTION 7
TRANSMISSION
g. Install two alignment bolts and spline the planetary
anchor flange on to the outer planetary hub (C350B
only) (see figure 7-95). Install two capscrews in two
remaining holes and torque to 120 ft.lbs. (C350B only)
(16.6 kg-m).
NOTE: The frame-motor housing capscrews will turn
hard as the drum is being pulled into position by
these cap- screws. Torque the capscrews per
specification. Install the drive shaft.
d. Install snap ring on brake shaft (C350B only) (see
figure 7-93).
NOTE: The alignment mark on the anchor flange should
be aligned to the alignment mark on the
planetary hub (C350B only).
e. Turn the drive shaft from the motor housing end
until the oil holes in the outer planetary hub are
horizontal with the floor and above center (C350B only)
(see figure 7-94).
h. Insert three equally spaced capscrews. Torque
these capscrews to 15 ft.-lbs. (2.074 kg-m) and then
remove them (see figure 7-96).
f. Install scraper bar and bumper assembly if removed
during disassembly.
FIGURE 7-95.
FIGURE 7-93.
FIGURE 7-94.
FIGURE 7-96.
7-49.
SECTION 7
TRANSMISSION
i. Measure the distance between the frame and the
planetary anchor flange. Take this measurement in
three equally spaced locations. The best method of
measurement is to use a depth micrometer and
measure the depth from the outside of the flange
through the puller bolt holes to the machined face of the
frame. Total the three measurements taken and record
them. Remove the anchor flange by using three puller
capscrews (see figure 7-97). With a micrometer,
measure the thickness of the flange next to the puller
holes. Total the three measurements taken and subtract
from the depth measurement. Divide your answer by
three to obtain the shim thickness needed. For the
C350B assemble a shim pack equal to the final answer
plus .003 in. (.076 mm) or minus .002 in. (.051 mm).
j. Insert a shim pack equal (or as close as possible
with available shims) to the measured distance in step i.
Be sure marks are aligned as in step g (C350B only)
(see figure 7-98).
CAUTION: The mating surface of the frame, shims, and
planetary anchor flange must be cleaned
with solvent and dried with compressed air.
Any lubricant on -these surfaces could
cause the planetary anchor flange to work
back and forth.
k. Install the four planetary-to-anchor flange
capscrews and torque to 120 ft.-lbs. (16.6 kg-m) (C350B
only). Insert all of the frame-to-anchor flange capscrews
and torque to 200 ft.-lbs. (27.7 kg-m) (see figure 7-99).
I. Pump the brake shaft support bearing full
FIGURE 7-97.
FIGURE 7-99.
FIGURE 7-100.
FIGURE 7-98.
7-50.
SECTION 7
TRANSMISSION
hydraulic system should be disassembled and cleaned.
of oil (C350B only). Reassemble the brake (refer to
Section 10) (see figure 7-100).
7-209. Removal and disassembly of the following list of
components is required when any system component
fails. Inspect each component for damage and rebuild or
replace as required.
m. Fill final drive with lubricant (refer to Section 4).
n. Install the hydrostatic pump and motor.
o. Replenish transmission lubricant supply (refer to
Section 4).
a. Steering pump.
b. Steering cylinder.
p. Follow transmission start-up procedure before
returning unit to service.
c. Steering control unit.
NOTE: Matching of mating parts is critical.
7-204. INSTALLATION OF HYDROSTATIC
MOTOR.
d. Cooler by-pass valve.
e. Hydraulic tank.
7-205. Install the hydrostatic motor by reversing the
procedure presented in paragraph 179. Note the
following:
f. Transmission displacement control valve.
g. Transmission servo cylinders.
h. All hoses.
a. The motor mounting surface should be coated with
a plastic sealer.
NOTE: Replace the oil filter with a Hyster approved 10
micron filter only. It is recommended after
overhaul that the oil filter be replaced at 50
hours after start- up before returning to normal
maintenance cycle.
b. Torque the motor mounting bolts to 75 ft.-lbs. (10.4
kg-m).
c. Torque the high-pressure lines to 35 ft.-lbs. (4.8 kgm). Connect by-pass valve linkage.
7-210. Refill the hydraulic
specifications (see Section 2).
d. After installation the transmission start-up
procedure must be completed before returning the unit
to service.
with
oil
per
7-211. Precharge the hydraulic system as follows:
a. Disconnect the case drain hose at the pump.
7-206. HYDROSTATIC PUMP INSTALLATION.
b. Fill pump and motor cases with specified oil (see
Section 2).
7-207. Install the hydrostatic pump by reversing the
procedures presented in paragraph 7-178. Take note of
the following:
c. Loosen the end of the suction hose at the charge
pump. If hydraulic oil is not present, pressurize the tank
to a maximum of 10 PSI (0.7 kglcm2).
a. Torque pump mounting capscrews to 75 ft.-lbs.
(10.4 kg-m).
d. Retighten hose fittings when oil appears.
b. Torque high-pressure line capscrews to 35 ft.-lbs.
(4.8 kg-m).
CAUTION:
system
e. Complete the transmission start-up procedure.
Follow transmission start-up procedure
before returning unit to service.
NOTE: Partial cleaning of the system is ineffective.
Any contamination left in the system may cause
a repeat failure.
7-208. CLEANING THE HYDRAULIC SYSTEM.
CAUTION: The importance of cleaning the entire
hydraulic system after any component
failure cannot be over- emphasized. If a
failure occurs in either the hydrostatic drive
system or the steering circuit, the entire
7-51.
SECTION 7
TRANSMISSION
d. Fill the pump and motor cases through the upper
case drain openings with specified oil (see Section 2).
All fluid should be passed through a 10 micron filter.
Reinstall and tighten case drain line.
CAUTION: Oil MUST be at the charge pump before
engine is started.
7-212. SUNDSTRAND TRANSMISSION
START-UP PROCEDURE.
e. Loosen the charge pump line, coming from the
filter/reservoir (see figure 7-103).
a. Block the drive drum safely off the ground.
b. After the transmission has been installed, remove
the threaded plug from the top of the main pump
housing (see figure 7-101). Install a 600 PSI (42.19
kg/cm2) pressure gauge with a short section of hose.
The port is 7/16 x 20 straight thread with o-ring. Low
charge pressure may be checked at the motor case port
as shown in figure 7-102.
c. Check all fittings to be sure that they are tight.
FIGURE 7-101.
f. Fill the reservoir and hoses with specified oil (see
Section 2). Install and tighten the hoses (see figure 7103).
WARNING: Disconnect the push-pull cable from the
pump until after Initial start-up. This will
allow the pump to remain in neutral (see
figure 7-104).
g. Pull out the engine coil wire or close the
FIGURE 7-103.
FIGURE 7-104.
FIGURE 7-102.
7-52 .
SECTION 7
TRANSMISSION
pressure. Repeat cycle for five minutes.
injector rack and turn the engine over until charge
pressure reaches 30 PSI (2.1 kg cm2) or more.
CAUTION: Should the charge pressure drop below 100
PSI (7.0 kg/cm2) above pump case
pressure at any time, discontinue start-up
until trouble has been determined.
h. Start the engine and maintain a 750 RPM speed for
five (5) minutes. This will allow the system to fill
properly. Pressure surges may be observed on pressure
gauge - this is normal while running at 750 RPM, the
charge pressure must be at least 100 PSI (7.0 kg/cm2)
above case pressure. If it is not, shut down and
troubleshoot (see Section 5).
n. Run engine at maximum RPM with the pump in
neutral. Observe the reading of the suction filter vacuum
gauge located on the filter. This gauge should be
reading NORMAL.
i. Increase speed to 1000 RPM; charge pressure
should be 190-220 PSI (13.4-15.5 kg/cm2) above pump
case pressure.
o. Shut down engine, remove all gauges and replace
all lines and plugs. Check reservoir oil level and tighten
oil fill cap.
j. Shut down the engine and reconnect the push-pull
cable to the pump linkage.
p. Machine is now ready for operation.
k. Check oil level in reservoir. Fill if necessary.
7-213. BY-PASS VALVE.
I. Restart engine and run at 1500 to 1800 RPM.
Charge pressure should be 190-220 PSI (13.4-15.5
kg/cm2) above pump case pressure.
7-214. Refer to Section 3, paragraph 3-29 for a
complete explanation of the by-pass valve and its
function.
m. Move Direction-Throttle Control Bail slowly to the
forward and then to the reverse position. Charge
pressure will drop to 160-180 PSI (11.2-12.7 kg/cm2)
above pump case
7-215. BY-PASS CONTROL ADJUSTMENT.
a. Adjust wire stop on control cable for 1/8 - 114 in.
(3.2-6.4 mm) free play (see figure
FIGURE 7-105.
7-53.
SECTION 8
FINAL DRIVE
FIGURE 8-1.
8-1.
SECTION 8
FINAL DRIVE
Consequently, the small planet carrier (E) (nonstationary) walks around the ring gear (D). Planet carrier
(E) is splined to and drives a second sun gear (F) which
rotates in the same direction as, but independently of,
sun gear (B). Sun gear (F) then drives the larger
planetary gear set (G) which is capable of turning the
ring gear (D) and the drive drum. (Ring gear (D) is
attached to the drum.) The second larger planet carrier
(H) is bolted to the frame, and provides the reaction
necessary to drive the drum.
8-1. GENERAL.
8-2. This section contains a description of the final drive
operation and overhaul instructions for components of
the drive drum assembly. Overhaul instructions include
removal, dis- assemly, inspection, reassembly and
installa- tion of all components of the final drive
assembly. Design specifications are given in Section 2.
Troubleshooting instructions are given in Section 5.
8-6. REMOVAL AND DISASSEMBLY OF FINAL
DRIVE ASSEMBLY.
8-4. C350B FINAL DRIVE DESCRIPTION ( see
figure 8-2).
8-5. The final drive consists of an internal, double
reduction planetary system located within the left side of
the single drive drum (see figure 8-1). Torque is
transferred from the hydraulic motor (across the drum)
to the planetary system by the drive shaft (A). A sun
gear (B) Is splined to this shaft and drives the smaller of
the two planetary gear sets (C) in the opposite direction.
This gear set (C), in turn, attempts to turn the ring gear
(D) (bolted directly to the drive drum) in the same
direction gear set (C) is traveling, but does not possess
the mechanical advantage to do so.
a. Drain the lubricant (refer to Section 4).
NOTE: Inspect the lubricant for foreign particles. Keep
samples for failure analysis.
b. Block the guide rolls front and rear.
WARNING: Do not depend on the parking brake to
prevent the unit from moving. The brake
assembly will be removed prior to the
removal of the drive drum.
c. Jack up both sides of the frame so that the weight
of the frame is on the jacks and not the drive drum.
d. Remove the scraper bar and bumper assembly
mounting capscrews and lift off the assembly.
e. Complete the DRIVE DRUM removal procedure
presented in Section 7, paragraph 7-1 98.
f. Remove the capscrews in the drum hub. Pull the
hub using the puller holes provided and appropriate
puller bolts. jnstall two dowl (guide) pins (see figure 8-3).
WARNING: Connect the drum hub to a hoist prior to
complete removal from the drive drum. The outer
planetary assembly will accompany the drum hub upon
removal. Care should be taken when handling these
components.
g. Remove the inner planetary assembly (see figure 84).
h. Remove the brake shaft snap ring. Then pull the
inner sun gear, small thrust washers
FIGURE 8-2.
8-2.
SECTION 8
FINAL DRIVE
k. Remove the planetary anchor flange oil seal for
replacement. Remove snap ring, dust protector and
bearing if it is worn or damaged (see figure 8-7).
and needle thrust bearing from inner planetary assembly
to prevent their loss or damage (see figure 8-5).
i. Inspect ring gear for wear, damage, cracked teeth or
any other signs of impending failure. Use the puller
holes provided to remove ring gear if replacement or
repair is necessary (see figure 8-6).
I. Inspect the interlocked sun gear for excessive
wear on both of its thrust surfaces (one located at each
end) and twisted or cracked splines or any other signs of
impending failure. Remove if necessary by removing
snap ring from inside of the carrier and lift out the gear
(see figure 8-8).
j. Seal off drive shaft hole and steam clean planetary
gear case in the drive drum. make sure pockets and
corners are cleaned thoroughly.
FIGURE 8-3
FIGURE 8-5
FIGURE 8-6
FIGURE 8-4
8-3.
SECTION 8
FINAL DRIVE
m. Press outer planetary assembly out of the drive
drum hub using an arbor press (see figure 8-9).
CAUTION: The drum hub must be supported in three
equally spaced points when pressing out the
outer planetary assembly to prevent
damage to the drum hub.
n. Disassembly of drive drum hub. Remove the oil
seal for replacement. Check that companion flange seal
surface is smooth (see figure 8-10).
FIGURE 8-7
FIGURE 8-10
FIGURE 8-8
FIGURE 8-11
FIGURE 8-9
8-4.
SECTION 8
FINAL DRIVE
o. Pry out the snap ring with a large screwdriver or
medium size pry bar; Replace if worn or scored (see
figure 8-11).
NOTE: Since the planetary pinions are extremely hard,
a punch is not effective. To mark these
planetary pinions, paint a small portion of each
gear with a light color paint and etch either 1, 2,
or 3 on each gear.
p. Turn the drum hub over and place it in an arbor
press. Using an appropriate size pusher, press out the
large bearing (see figure 8-12).
NOTE: The planetary carrier can be marked correspondingly with a punch.
q. Place the inner planetary assembly on a protected
surface with the interlocked sun gear down.
s. With the planetary pinion gears and carrier properly
marked, unlock and remove one pinion gear capscrew,
lockplate and spacer (see figure 8-14).
r. Clean the webbed portion of each of the three
planetary pinion gear and mark their position with
respect to the planetary carrier (see figure 8-13).
t. Push the pinion gear riding pin out of the
FIGURE 8-12
FIGURE 8-14
FIGURE 8-15
FIGURE 8-13
8-5.
SECTION 8
FINAL DRIVE
carrier and gear. Lift out planetary pinion gear, thrust
washers, and bearings (see figure 8-15).
8-7. CLEANING AND INSPECTION.
8-8. All gears (including both sun gears), carrier, pins,
plates, and capscrews should be cleaned in solvent.
Inspect each gear for galling, nicking, chipping and
cracking, especially at the root of each tooth.
CAUTION: The bearing cones will fall out of the pinion
gear as soon as they are free to do so. Keep
each cone with its respective cup by tying
them in position in the pinion gears.
Remove the other two, pinion gears from the
carrier using the same procedure. Keep each
gear and its associated parts separate. Do
not mix component parts.
8-9. All bearings should be washed in fresh solvent.
Agitate in the solvent; do not use a brush as some of the
bristles may break off and lodge in the bearing. Blow
u.
Inspect each bearing cup and cone, including
those not removed from the pinion gears, and replace if
rollers or cups are worn, pitted or damaged in any way.
Remove parts needing replacement (see figure 8-16).
v.
Remove bearing cups from planetary pinion
with a small soft punch and hammer.
NOTE: A snap ring separates and locates the two cups in
each pinion gear. Remove the lower cup only,
i.e., the pinion must be turned over once to
remove both cups (see figure 8-17).
w.
Remove the snap ring with a screwdriver or a
small pry bar and inspect for chipping or wear. Replace if
necessary (see figure 8-18).
x.
Place the outer planetary assembly on a
protective surface with the large splined hub upward.
Follow steps q through w of the inner planetary
disassembly procedure.
FIGURE 8-17.
FIGURE 8-16.
FIGURE 8-18.
8-6
SECTION 8
FINAL DRIVE
bearing completely dry, do not spin, with compressed air.
Oil bearing with light oil and rotate several times by hand.
Discard bearing if rotation is not free of binding and
clicking. Compare bearing looseness with a new one.
Discard the bearing if there is a considerable difference.
The bearing cages must be tight and the bearings free of
defects. Wrap bearings in clean paper if they are not to
be installed immediately.
c.
Assembly of Outer Planetary Assembly. Place
the outer planetary assembly on a protective surface with
the large splined hub upward. Note that the outer
planetary pinions do not have a longer hub as do the
inner planetary pinions. The outer planetary pinions are
symmetrical and can be installed correctly with either side
towards the splined hub (see figure 8-22).
d.
Install the snap ring, bearing cups, and bearing
cones in each pinion gear. Place thrust washer between
pinion gear and planetary carrier on the capscrew side of
8-10. Discard all seals, snap rings and thrust washers
that are worn or scored.
8-11. REASSEMBLY AND INSTALLATION OF FINAL
DRIVE ASSEMBLY.
a.
Install the snap ring, bearing cups, and bearing
cones in each pinion gear (see figure 8-20).
b.
Matching the marks on the pinion gear and
planetary carrier install one pinion gear into the planetary
carrier (long hub on pinion gear away from interlocked
sun gear). Place thrust washer between pinion gear and
planetary carrier on the capscrew side of the pinion gear.
Align the gear, thrust washer and planetary carrier and
insert the riding pin. Install the spacer, lockplate and
capscrew. Rotate the planetary pinion gear to insure
proper seating of the bearings and thrust washer. Torque
the capscrews per specification back off one flat and lock.
Then install the other two pinion gears in the same
manner (see figure 8-21).
FIGURE 8-20A.
FIGURE 8-19.
FIGURE 8-20B.
8-7
SECTION 8
FINAL DRIVE
the pinion gear (see figure 8-23).
e.
Align the gear, thrust washer and planetary
carrier and insert the riding pin. Install the spacer,
lockplate and capscrew. Rotate the planetary pinion gear
to insure proper seating of the bearings and thrust washer.
Torque the capscrew per specification, back off one flat
and lock. Then install the other two pinion gears in the
same manner (see figure 8-24).
f.
Place the planetary anchor flange on a
protective surface with the oil breather side up. Press the
bearing into the flange and install the snap ring. Press
the oil seal into the flange until the seal bottoms on the
shoulder provided (see figure 8-25). Install dust protector
onto anchor flange and tighten dust protector mounting
bolts.
g. Assembly of drive drum hub. Press the bearing into
the drum hub (see figure 8-26).
FIGURE 8-23.
FIGURE 8-21.
FIGURE 8-24.
FIGURE 8-22.
8-8.
SECTION 8
FINAL DRIVE
FIGURE 8-28.
FIGURE 8-25.
FIGURE 8-29.
FIGURE 8-26.
FIGURE 8-30.
FIGURE 8-27.
8-9.
SECTION 8
FINAL DRIVE
h.
Install the large snap ring (see figure 8-27).
i.
Press the oil seal into the drum hub until it
bottoms against the snap ring (see figure 8-28).
j.
Assembly of Inner Planetary Assembly. Install
the interlocking sun gear in planetary carrier and lock it in
place with the snap rings. Place the planetary carrier on a
protective surface with the long hub of the interlocked sun
gear down (see figure 8-29).
k.
gear
Installation of the Planetary System. If the ring
has
been
removed,
clean
its
FIGURE 8-31.
mounting flange and paint it with "Loctite Plastic Gasket"
or equivalent (see figure 8-30).
I.
Do the same to the mating machined surface of
the drum (see figure 8-31).
m.
Install the ring gear using a pilot stud. Using
four capscrews, seat the ring gear in the drum. Remove
the four capscrews (see figure 8-32).
n.
Insert thrust washer first, then needle thrust
bearing into the machined pilot of the interlocked sun gear
of the inner planetary assembly using a heavy machine
grease to hold them in the pilot (see figure 8-33).
FIGURE 8-33.
FIGURE 8-34.
FIGURE 8-32.
8-10.
SECTION 8
FINAL DRIVE
o.
Install the small sun gear on the brake shaft.
Then install the snap ring into its retaining groove (see
figure 8-34).
p.
Assemble brake shaft into inner planetary gear
(see figure 8-35).
q.
8-36).
Install inner planetary into ring gear (see figure
r.
Apply a large amount of lubriplate. Insert thrust
washer first and then assemble needle bearing into outer
planetary (see figure 8-37).
s.
gear,
the ring gear, and push this assembly into the drum until it
bottoms against the thrust washers (see figure 8-38).
NOTE: Check to see that the two planetary carriers do
not touch. Also, check that the thrust needle
bearings have not fallen out of place.
Planetaries must be removed if these conditions
are a problem.
t. Paint outer face of ring gear with "Locktite Plastic
Gasket" or equivalent. Apply Lubriplate to machine boss
of outer planetary (see figure 8-39).
Lift the outer planetary assembly into the ring
meshing
the
planetary
pinions
with
FIGURE 8-37.
FIGURE 8-35.
FIGURE 8-38.
FIGURE 8-36.
8-11.
SECTION 8
FINAL DRIVE
gear. Tighten capscrews until splined gear is flush with
bearing (see figure 8-43).
u.
Position drum hub loosely against drive wheel.
Use three place bolts equally spaced to initially pull hub
against ring gear (see figure 8-40).
CAUTION:
y.
Install the drive drum following the procedure
presented in Section 7, paragraph 7-203. Fill final drive
with specified lubricant (refer to Section 4).
Do not align puller holes of the drum with
those of the ring gear.
v.
Remove puller bolts and install the 16 drum
hub capscrews.
Torque in a circular pattern to
specification (see figure 8-41).
w.
Manufacture a puller per illustration in figure 842.
x.
Assemble
special
puller
onto
z.
Install scraper bar and bumper assembly.
CAUTION:
Follow transmission start-up procedure
before returning unit to service.
splined
\
FIGURE 8-39.
FIGURE 8-41.
FIGURE 8-42.
FIGURE
8-40.
FIGURE 8-40.
8-12
SECTION 8
FINAL DRIVE
FIGURE 8-43B.
FIGURE 8-43A.
8-13.
DELETED PAGES 8-14 THRU 8-20.
SECTION 9
STEERING
9-1.
(1) an engine mounted hydraulic power pump
GENERAL.
9-2.
This section contains a description of the steering
system operation and overhaul instructions for major
components.
Overhaul instructions include removal,
disassembly, inspection, reassembly and installation
procedures. System checks and adjustments are given at
the end of steering cylinder repairs.
Design and
performance specifications are given in Section 2.
Troubleshooting instructions are given in Section 5.
9-3.
(2) the gooseneck mounted power steering control
unit
(3) double acting hydraulic steering cylinder
(4) steering wheel
(5) hydraulic fluid reservoir (common with the
transmission hydraulic reservoir)
DESCRIPTION (see figure 9-1).
(6) hydraulic lines and fittings.
9-4.
STEERING SYSTEM.
9-5.
The steering system is a hydrostatic operated,
manually controlled system with provisions for manual
steering. The steering system has a natural feel for the
operator by provide in a direct relation between the
steering wheel position and the guide roll position.
9-6.
9-7.
STEERING CONTROL UNIT.
9-8.
DESCRIPTION (see figure 9-2).
9-9.
The steering control unit is an open-center rotary
actuated unit consisting of three major section:
(1) a column section
Components of the steering system are:
(2) control section
FIGURE 9-1.
9-1.
SECTION 9
STEERING
FIGURE 9-2.
9-2.
SECTION 9
STEERING
(3) a metering section.
The column section provides a means of mounting and
actuating the control and metering sections. The control
section distributes the oil to and from the metering section.
The metering section determines the quantity of oil
delivered to the control section.
9-10. The column section consists of a splined shaft and
housing assembly. The unit steering wheel is splined to
one end of the shaft. The opposite end of the shaft is
splined into the control section spool to rotate the spool for
distribution of oil.
configuration opposite the cavity. Due to the interaction
between the rotor and stator, there are 42 overlapping fluid
discharging actions in one revolution of the rotor.
9-15.
OPERATION (see figure 9-2).
9-16. Rotation of the steering wheel actuates three main
components in the steering control unit:
(1) The control section spool
(2) The control section sleeve
(3) The metering element (rotor) in the metering
section.
9-11. The control section consists of a spool and sleeve
assembly, six centering springs and a manual steering
check valve mounted in a cast housing. The housing also
contains an inlet port, a dump port and two steering
cylinder ports. The spool is fitted into the center of the
sleeve and is held in place in the sleeve by a straight pin
and the set of six centering springs. The pin extends
through the sleeve and two radial slots in the spool. The
pin is a tight fit in the sleeve and a loose fit in the spool.
The centering springs extend through the spool and out
each side of the sleeve so that they return the spool to the
center position. The spool contains a series of porting
holes that align with similar holes in the sleeve when the
spool is rotated off of the center position.
9-12. A shaft with a radial slot at one end and splines at
the opposite end connects the control section to the
metering section. The slotted end of the shaft mates with
the straight pin extending through the spool. The splined
end fits into the center of the rotor set closest to the control
section. The control section is also attached to the
metering section through a porting plate.
9-13. The metering section consists of a rotor set
(metering element) which is connected to the control
section spool. The rotor set consists of a matched rotor
and stator.
9-14. The stator has seven concave configurations
(serving as oil cavities). It also contains the same number
of convex configurations, each one being diametrically
opposite a cavity. The rotor contains six lobes that are
formed to mate with the stator cavities. Each lobe has a
diametrically opposite lobe: therefore when one rotor is in a
cavity of the stator, its opposite lobe is at the crest of the
stator convex
When the steering wheel is stationary, the control section
spool and sleeve are held in the center position by the six
centering springs. During this condition, oil is received
from the system hydraulic pump and is routed back to the
tank.
9-17. As the steering wheel is turned and the spool just
begins to rotate, the spring set tends to rotate the sleeve to
maintain the "center" relationship between the spool and
sleeve. However, the force required to turn the rotor set is
greater than the spring pressure and the6springs start to
flex. This "flexing" action permits the spool to move within
the sleeve (approximately 1/8 inch) until the ends of the
spool slots contact the straight pin extending through the
sleeve and the spool. In this position, the porting holes in
the sleeve and spool are aligned. This permits incoming
oil to flow to the metering section and opens one of the
cylinder ports.
9-18. Further rotation of the steering wheel causes the
spool to rotate the pin, which then turns the sleeve and the
rotor in the metering section. At this time, oil is being
metered by the metering section and is allowed to flow
through the spool and sleeve to one side of the steering
cylinder. The porting arrangement also allows the oil to
flow from the opposite side of the cylinder, through the
control section and back to the hydraulic tank. The output
of the metering section is directly proportional to the speed
and distance that the steering wheel rotates.
9-19. When rotation of the steering wheel stops, the
metering action in the metering section also stops. The six
centering springs then return the sleeve to the neutral
(open-center) position. When this occurs,
9-3.
SECTION 9
STEERING
pressure is maintained in the cylinder to maintain guide roll
position, but all incoming oil from the system pump flows
back to the tank. To return the guide roll to the straight
ahead position, the steering wheel must be rotated in the
opposite direction. The control unit will then function as
described, but all parts will rotate in the opposite direction.
9-20.
c. Remove gooseneck access plate (see figure 9-5).
d. Disconnect the two hydraulic hoses and the water
spray hose. Plug or cap all hoses and fittings (see figure 96).
NOTE: Mark the hydraulic hoses as to their position with
respect to the steering cylinders.
REMOVAL OF STEERING CONTROL UNIT.
a. Remove the horn cover and lock ring, then lift the
horn button assembly from the steering wheel (see figure
9-3).
b. Remove steering wheel jam nut and use a puller to
remove steering wheel. Then remove the two countersunk
mounting capscrews from the gooseneck (see figure 9-4).
e. Disconnect the inlet hose from the pump and the return
hose from the tank. Plug or cap all hoses and fittings.
Remove the control unit and hoses from the gooseneck
opening (see figure 9-7).
9-21.
FIGURE 9-3.
DISASSEMBLY OF STEERING CONTROL UNIT
(see figures 9-2 and 9-8).
FIGURE 9-5.
FIGURE 9-4.
FIGURE 9-6.
9-4.
SECTION 9
STEERING
a. Place the unit in vise, control end up. Clamp
across port surface and opposite side of housing lightly.
Remove the two capscrews that fasten column to lower
unit. Remove column and set aside. Mark the capscrew
holes so that the ports will be in the proper direction when
reassembled (see figure 9-9).
b. Clamp unit in vise across mounting plate edges
with meter end up and remove 7 capscrews (see figure 910).
c. Lift off metering section (see figures 9-11, 9-12,
and 9-13).
d. Remove control assembly from vise and check for
free rotation of the control spool and sleeve parts with
column shaft (see figure 9-14).
FIGURE 9-7.
e. Place clean wooden block across vise throat to
support spool parts and clamp unit
FIGURE 9-8.
9-5.
SECTION 9
STEERING
FIGURE 9-9A.
FIGURE 9-11.
FIGURE 9-9B.
FIGURE 9-12.
FIGURE 9-10.
FIGURE 9-13.
9-6.
SECTION 9
STEERING
across port face with control end up. Remove and set
aside four (4) capscrews (see figure 9-1 5).
f. Hold spool assembly down against block in vise
and lift off end cap (see figure 9-16).
g. Inspect mating surfaces for obvious leakage path,
wear, seal condition (see figure 9-17).
h. Remove cap locator bushing (see figure 9-18).
i. Place housing on solid surface with port face down
so that it can be held securely and remove spool-sleeve
assembly from the 14 hole end of housing (see figure 919).
FIGURE 9-14.
FIGURE 9-15.
FIGURE 9-17.
FIGURE 9-16.
FIGURE 9-18.
9-7.
SECTION 9
STEERING
j. Be extremely careful to prevent these parts from
binding as they are very closely fitted and must generally
be rotated slightly as they are withdrawn (see figure 9-20).
k. Using a small bent tool or wire, the check valve
seal can be removed by pushing on it, reaching it through
the "out" port. Do not pry against edge of hole in housing
bore (see figure 9-21).
I. Place housing in vise, control end up, and unscrew
check valve seat with 3/16 inch hex wrench (see figure 922).
m. Up-end the housing and tap slightly with butt of
hand. Hold check valve hole toward lowest corner and
remove check valve seat, ball and spring (see figure 9-23).
FIGURE 9-21.
FIGURE 9-19.
FIGURE 9-22.
FIGURE 9-20.
FIGURE 9-23.
9-8.
SECTION 9
STEERING
FIGURE 9-27.
FIGURE 9-24.
FIGURE 9-25.
FIGURE 9-28.
FIGURE 9-26.
FIGURE 9-29.
9-9.
SECTION 9
STEERING
plate glass or better. If the 600 grit paper is new it
should first be rubbed down with a scrap steel part to
remove grit which would produce scratches. The ends of
the star gear can be used for this purpose if necessary.
Then both sides of the ring gear, both sides of the plate,
the 14 hole end of the housing and the flat side of the
end cap should be cleaned lightly.
n. In spool assembly, push the cross pin to loosen
from spool sleeve assembly (see figure 9-24). Remove
cross pin and set aside (see figure 9-25).
o. Push inside lower edge of spool so that spool
moves towards splined end and remove carefully from
sleeve (see figures 9-26 and 9-27).
p. Push centering spring set out of spring slot in
spool (see figures 9-28 and 9-29).
9-26. Stroke each surface across the abrasive several
times and observe the part (see figures 9-30, 9-31 and
9-32). Any small bright area near an edge indicates a
burr which must be removed. Hold the part so that
contact with the abrasive is as flat as possible (Do not
push one edge down hard or the part will become
rounded). Check each part after 6 to 10 strokes across
the abrasive. After polishing each part, rinse clean in
solvent and blow dry. Keep these parts absolutely clean
until they are assembled.
9-22. INSPECTION.
9-23. Each part should be rinsed carefully in clean
solvent, even such exterior parts as all capscrews and
all seals that appear to be reusable. If in doubt, replace
with new seals. It is good service policy to replace all
seals when unit is reassembled. They are available in kit
form. Rinsing and cleaning can be done while other
parts of the unit are being disassembled and parts can
be set to dry on clean paper towel. The meter gear set
must be disassembled and cleaned similarly.
9-27. REASSEMBLY OF STEERING CONTROL UNIT .
9-24. Inspect all moving surfaces to insure that they
have not been scored or abraded by dirt particles or
otherwise disrupted. Smooth burnished surfaces are
normal in many areas. Slightly scored parts can be
cleaned with 600 grit abrasive paper by hand rubbing
only.
CAUTION: Observe the shaft-to-rotor alignment
procedures specified in figure 9-2. Do not oil
any component prior to reassembly. The
sealing of one component to another is
dependent on lapped surfaces. Seepage
may occur as a result of dust retained in an
oil film. Blow all parts dry with compressed
air prior to reassembly.
9-25. To prepare all surfaces of the meter section for
reassembly and insure that all edges of the parts are
burr free, place a piece of 600 grit abrasive paper face
up on an extremely flat, clean, hard surface. The
surface to be used for this purpose should be as flat as
FIGURE 9-30
a. Place housing in vise with control end up.
FIGURE 9-31
9-10.
9-32
SECTION 9
SECTION
STEERING
9
STEERING
Protect 14 hole end and clamp across port surface lightly.
Drop check valve spring into check hole with large end
down (see figure 9-33).
b. Drop check ball into check hole and insure that it
rests on top of the small end of the spring within the hole
(see figure 9-34). Place the check valve seat on hex
wrench and screw into threads within check hole so that
the machined counterbore of the check seat is towards
the ball (see figure 9-35).
c. Torque check seat to 12.5 ft.-lbs. (1.728 kg-m)
(see figure 9-36). Test check ball action by pushing ball
with small clean pin against spring force. Ball need NOT
be snug against seat for proper function.
d. Install spool within sleeve carefully so that spring
slots of both parts will be at same end. Rotate while
sliding parts together (see figures 9-37 and 9-38). Test for
free rotation. Spool should rotate smoothly in sleeve with
finger tip force applied at splined end.
FIGURE 9-33
FIGURE 9-36
FIGURE 9-34
FIGURE 9-37
FIGURE 9-35
9-11.
SECTION 9
STEERING
FIGURE 9-38
FIGURE 9-41
FIGURE 9-39
FIGURE 9-42
FIGURE 9-43
FIGURE 9-40
9-12
STEERING
SECTION 9
STEERING
e. Bring spring slots in both parts in line and stand
on end of bench. Position pairs of centering springs (or 2
sets of 3 each) on bench so that extended edge is down
and arched center is together. Enter one end of one
spring set into slot just far enough to edge on opposite
side (see figure 9-39).
f. Enter second spring set from opposite side from
installed spring set. Work the spring set around until
spring set enters slot on opposite side. The two spring
sets will now have tension between them at their arches
(see figure 9-40).
g. Center the spring set so that they push down
evenly and flush with the upper surface of the spool and
sleeve (see figure 9-41).
h. Install cross pin through spool assembly (see figure
9-42).
i. Push into place until cross pin is flush or slightly
below the sleeve diameter at both ends (see figure 9-43).
j. Position the housing on a solid surface with the
port face down. Start the spool assembly so that the
splined end of the spool enters the 14 hole end of the
housing first (see figure 9-44).
k. Be extremely careful that the parts do not cock
out of position while entering. Push parts gently into place
with slight rotating motion (see figure 9-45). Bring the
spool assembly entirely within the housing bore until the
parts are flush at the meter end or 14 hole end of the
housing. Do not pull the spool assembly beyond this point
to prevent the cross pin from dropping into the discharge
groove of the
FIGURE 9-44
FIGURE 9-45
FIGURE 9-46
FIGURE 9-47
9-13.
SECTION 9
STEERING
housing. With the spool assembly in this flush position,
check for free rotation within the housing by turning with
light finger force at the splined end (see figure 9-46). Hold
the parts in this flush position and rest the 14 hole end of
the assembly on the protective block on the vise and
clamp lightly across the port face with the vise.
NOTE: It is good service policy to replace all seals when
unit is reassembled. They are available in kit
form.
NOTE: Do not force the spool into the housing if it will not
slide In freely. The assembly tolerance is so close
that the temperature of your hand can expand
metal of the spool enough that it will not slide in
the housing.
I. Check the condition of the o-ring seal on the
check plug and replace it if necessary. Install the check
plug in the check hole with a steady pressure while
rocking it slightly so that the o-ring feeds in smoothly
without cutting (see figures 9-47 and 9-48).
m. Position the cap locator bushing with large O. D.
chamfer UP partly into end of housing (see figure 9-49).
Insure that it seats against spool assembly flat and
smooth by rotating with finger tips.
n. Check the mounting plate and shaft seal carefully
to insure that they are clean and in good condition. Insure
that the mounting plate seal grooves are clean and
smooth. Each of these seals are slightly larger than its
seal grooves so that they will be adequately retained in
service. Push each gently into place and smooth down
into seal groove with finger tip (see figure 9-50).
o. Thin oil seal at exterior of mounting is a dirt
exclusion seal and does not generally need replacement.
If this is replaced, it should be pressed into counterbore
so that the lip is directed away from the unit.
p. Place the mounting plate sub-assembly over
spool shaft and slide down into place over cap locator
bushing smoothly so that seals will not be disrupted in
assembly (see figure 9-51). Be certain that the mounting
plate rests fairly flush against the end of housing
assembly so that the cap locator bushing is not cocked
and install four mounting plate capscrews. Tighten these
evenly and gradually to a torque setting of 21 ft.-lbs. (2.9
kg-m)
(see
figure
9-52).
9-14.
FIGURE 9-48
FIGURE 9-49
FIGURE 9-50
FIGURE 9-51
SECTION 9
STEERING
FIGURE 9-54
FIGURE 9-52
q. Reposition in vise and clamp across the edges of
the mounting plate lightly. Check to insure that the spool
and sleeve are flush or slightly below the 14 hole surface
of the control housing (see figure 9-53).
r. Clean the upper surface of the housing by wiping
with the back of a clean hand or the butt of the thumb.
Clean each of the flat surfaces of the meter section parts
as it is ready for assembly in a similar way (see figure 954).
s. Place the plate over this assembly so that the
bolt- holes in the plate-align-with the tapped holes in the
housing (see figure 9-55). Place the meter gear ring on
the assembly so that the bolt holes align (see figure 9-56).
t. Place the splined end of the drive within the
meter gear star so that the slot at the control end of the
drive is in alignment with the valleys between the meter
gear teeth (see figure 9-57). Push the splined end of the
drive
FIGURE 9-55
FIGURE 9-56
FIGURE 9-53
FIGURE 9-57
9-15.
SECTION 9
STEERING
through the gear so that the spline extends about one half
its length beyond the meter gear star and hold It in this
position while installing into the unit. Note the position or
direction of the cross pin within the unit. Enter the meter
gear star into the meter gear ring and wiggle the parts
slowly in position so that the drive does not become
disengaged from the meter gear star. Hold the plate and
meter gear ring in position on the assembly while the star
is being installed. Rotate the meter gear star slightly to
bring the cross slot of the drive into engagement with the
cross pin and the splined end of the drive will drop down
against the plate (see figures 9-58, 9-59 and 9-60).
WARNING: Alignment of the cross slot in the drive with
valleys between the teeth of the meter gear
star determines proper valve timing of the
unit. There are 12 teeth on the spline and 6
pump teeth on the star. Alignment is exactly
right in 6 positions and exactly wrong in 6
positions. If the parts slip out of position
during this part of assembly, repeat until you
are certain correct alignment is obtained (see
figure 9-57).
u. Place the spacer in position within the end of the
meter gear star (see figure 9-61). If the spacer does not
drop flush with the gear surface, the drive has not
properly engaged the cross pin - RECHECK. Place the
meter end cap over the assembly and install two (2)
capscrews, finger tight, to maintain alignment of the parts
(see figure 9-62). Install all seven capscrews and bring
them gradually and evenly to 12.5 ft.-lbs. (1.728 kg-m)
(see figure 9-63).
FIGURE 9-59
FIGURE 9-60
FIGURE 9-58
9-16.
FIGURE 9-61
SECTION 9
STEERING
v. Check the condition of the column assembly,
clean it, and replace on the unit with two capscrews
oriented as before. Rotate the steering shaft while
bringing the surfaces into contact to allow splines to
engage (see figure 9-64). If in doubt, follow the
orientation as shown. Tighten capscrews to 23.3 ft.-lbs.
(3.22 kg-m) (see figure 9-65).
9-28. INSTALLATION OF STEERING CONTROL
UNIT.
9-29. Install the steering control unit by reversing
procedure presented in paragraph
9-19. Install hydraulic hoses per illustration figure 9-66.
CAUTION: Complete bleeding the system procedure
paragraph 9-83 before returning unit to
service.
FIGURE 9-64
FIGURE 9-62
FIGURE 9-63
FIGURE 9-65
9-17.
SECTION 9
STEERING
FIGURE 9-66.
9-18.
DELETED PAGES 9-19 THRU 9-22.
SECTION 9
STEERING
9-52.
STEERING PUMP (DETROIT DIESEL UNITS).
9-53.
DESCRIPTION.
9-54.
The steering pump Is a positive displacement
gear pump. It is located at the right rear of the Detroit
Diesel engine and is gear driven (see figure 9-82).
9-55.
The pump (see figure 9-91) is made up of a
housing, two gears, four bearings, a front cover and a
rear cover. Pressure loading the front bearing assures
correct gear-to-bearing clearance.
During pump
operation, pressurized oil is directed to an area between
the front cover and bearings, forcing them toward the
gears. Pressure from the outlet side of the pump is
against the opposite side of the bearings. When the two
pressures are balanced,
a thin film of oil
FIGURE 9-82.
9-23.
SECTION 9
STEERING
exists between the gears and bearings, and actual gearto-bearing contact is prohibited.
9-56. Oil is prevented from by-passing the body and
end covers by neoprene gaskets between the
components. A replaceable low pressure shaft seal is
pressed into the front cover. Communication of the high
pressure and low pressure oil between the bearings and
front cover is prevented by a "W" shaped seal.
b. Mark relative position of front and rear bearings
and body (see figure 9-84). Do not scratch; use Prussion
blue for marking of all pump parts. Push on rear of gear
shafts until front bearings are free of the housing (see
figure 9-85). Remove bearings. Mark relative position of
gears, then extract gears. Match mark and remove rear
bearings.
9-58.
CLEANING AND INSPECTION.
9-57. DISASSEMBLY OF STEERING PUMP.
a. Clean pump exterior. Remove woodruff key and
capscrews. Separate rear cover from body. Remove and
discard gasket. Remove front cover. Remove and
discard front cover gasket. Lift out "W" shaped gasket
seal and neoprene spacer (see figure 9-83). Drive out
shaft seal.
FIGURE 9-85.
FIGURE 9-83.
FIGURE 9-84.
FIGURE 9-86.
9-24.
SECTION 9
STEERING
these clearances exceed specifications (refer to Section
2).
a. Clean all parts thoroughly in cleaning solvent.
b. Check gears and shafts for nicks, burrs, cracks
or chipping. Discard defective components.
c. Examine gear chamber of body for contact
between gears and body, especially the intake cavity of
the body. Although wear of more than 1/64 of an inch
(0.397 mm) is abnormal, it is not critical if the bearings
are not defective. The intake cavity is shown in figure 986.
d. Inspect the body and bearing for irregularities of
the bore caused by bearing attempting to turn or signs of
working. (see figure 9-87).
e. Examine bearings and body for scratches and
pitting (see figure 9-88). Use fine sand paper on a
surface plate to dress out any slight imperfections of
bearings (see figure 9-89). Do not attempt to remove
deep scratches or gouges. Check bearing bores for
concentricity (see figure 9-90). Place bearings !n their
respective positions in the body and check clearance
between bearing flats. Under no circumstances should
FIGURE 9-87.
f.
Check milled seal and gasket recesses of the
cover for any obstruction that would prevent normal
seating. Make sure internal threads of front cover and
threads on capscrews are in good condition.
9-59. REASSEMBLY OF STEERING PUMP (see
figure 9-91).
a.
Apply a light coat of non-hardening gasketcement to the bore in the front cover. Press new shaft
seal into the bore and wipe off excess cement. Stake
seal in three places.
NOTE: Generously lubricate all parts with SAE 10 W oil
during pump assembly.
b.
Install front bearing gears and rear bearings in
their respective positions. Make sure all marks previously
made during disassembly are aligned.
FIGURE 9-89.
FIGURE 9-88.
FIGURE 9-90.
9-25.
SECTION 9
STEERING
c. Position gasket, spacer and "W" shaped gasket
seal In front cover recesses.
d. Assemble front and rear cover to the body, being
careful that the "W" gasket seal retains its position in the
recess of the front cover. Tighten capscrews to specified
torque.
CAUTION: The pump rotation is identified by arrow
stamped on the pump body. When
assembling the pump, the front cover (drive
end of the pump) should be located on the
"arrow" end.
9-60.
INSTALLATION.
a. Tighten the mounting bolts securely.
b. Make certain all hydraulic fittings are tightened.
c.
Bleed the system as specified in paragraph 983.
CAUTION: Check for abnormal hot spots.
If any
particular area is hot, disassemble and
inspect.
FIGURE 9-91.
9-61.
FLOW DIVIDER (DETROIT DIESEL).
9-62.
DESCRIPTION (see figure 9-92).
FIGURE 9-92.
9-26.
SECTION 9
STEERING
9-63. The flow divider is mounted on the front, righthand side of the engine compartment. Four hoses are
routed to and from the flow divider. The unit consists of a
body, a pressure-compensated piston and a pilot
operated relief valve.
disasssembly of the relief valve is required, follow these
steps:
9-64. Port "P" is for the pump supply hose. Port "CF" is
for controlled flow and is connected to the steering control
unit at the gooseneck. Port "EF" is for excess flow and is
connected to the inlet fitting of the pump. Port "S" is for
relief flow and is connected to the outlet fitting in the
hydraulic tank.
(2) Push the piston out of the housing by
inserting a small drift into the hose end of the housing.
Removal of piston may be difficult because the o-ring has
to slide past threads.
9-65.
(1) Remove the spring loaded end cap and
remove the spring and pin.
9-71.
CLEANING AND INSPECTION.
a. Clean all parts thoroughly.
OPERATION (see figure 9-92).
9-66. At low pump speed, with input flow equal or less
than set controlled flow, all flow is directed to the
controlled flow "CF" port. The pressure-compensating
pistons prevent or block any flow to the excess flow
port. Controlled flow in this situation may be used up to
the full integral relief valve pressure, however, the rate
of controlled flow will decrease if the input flow decreases.
b. Check bores and spools for nicks and scratches.
Spools must slide freely in their bores.
9-67. When input flow is increased, the pressurecompensated piston, in maintaining a fixed pressure drop
across the orifice, moves further away from its stop
position to allow fluid to flow from the input port to the
excess flow "EF" port in maintaining the set controlled
flow.
CAUTION: Replace and oil all o-rings.
9-68. The pilot operated relief valve is factory set to
1500 ± 50 PSI (105.5 ± 3.5 kg/cm") and cannot be
adjusted. This valve relieves excessive pressures due to
shock loads or other causes.
9-69.
c. Ports and orifices must be free of obstructions.
9-72. REASSEMBLY AND INSTALLATION OF FLOW
DIVIDER (see figures 9-1 and 9-92).
a. Insert the relief piston into the relief valve
housing. Insert the pin into the piston (the short side goes
into the piston) and the spring. Screw the end cap into
relief valve housing.
b. Screw the relief valve housing assembly into the
flow divider.
c. Install the piston, spring and cap.
d. Install the mounting capscrews.
REMOVAL OF FLOW DIVIDER (see figure 9-1.)
a. Remove all hydraulic lines from the flow divider
and cap all openings.
b. Unscrew mounting capscrews and remove flow
divider from mounting bracket.
e. Connect the hydraulic lines.
9-73. ADJUSTMENT OF FLOW D IVIDER RELIEF
VALVE.
9-70. DISASSEMBLY OF FLOW DIVIDER (see figure
9-92).
9-74. The relief valve is factory set at 1500 ±50 PSI
(105.5 ± 3.5 kg/cm2). Do not try to adjust or repair the
relief valve, but replace the whole valve.
CAUTION: The piston end cap is spring loaded.
9-75.
STEERING CYLINDER.
a. Remove end cap, spring and piston.
9-76.
DESCRIPTION (see figure 9-93).
b. Remove relief valve assembly.
9-77. The steering cylinder is a double-acting cylinder
consisting primarily of a shell, piston and rod assembly
and two end plugs. Hydraulic oil applied to one of the
cylinder ports acts against the piston, causing piston and
9-27.
If further
SECTION 9
STEERING
FIGURE 9-93.
e. Disconnect the shell end of the cylinder following
rod movement. As one side of the cylinder fills, the
steps b through d above.
opposite side is dumping an equal amount of oil. Oil is
prevented from internally transferring from one side of the
f. Lift off cylinder and drain.
piston to the other by a teflon seal ring. The cylinder
completes its stroke when the piston reaches a retainer.
At this time, hydraulic pressure increases, causing the
system relief valve to open. This prevents excessive
pressure buildup in the system.
NOTE: For straight-ahead travel, the piston is positioned
in the center of the cylinder shell.
9-78.
REMOVAL OF STEERING CYLINDER (see
figure 9-94).
a. Disconnect the hydraulic lines from the cylinder
and plug or cap to keep out dirt and reduce oil loss.
b. Remove the cotter pin from the trunnion end of
the cylinder and remove the plug and ball seat.
c. Remove dirt boot by straightening the connector
straps.
d. Pry rod end of the cylinder from the ball stud.
9-28.
FIGURE 9-94.
SECTION 9
STEERING
9-79.
c. Install inner o-ring in the piston.
DISASSEMBLY OF STEERING CYLINDER
(see figure 9-93).
a. Remove rod end ball joint.
b. Unscrew and remove the retainer.
c. Using a section of hollow round stock, push the
retainer into the cylinder shell until the snap ring can be
easily removed from the shell.
d. Remove snap ring.
d. Install the-wear ring,
piston ring on the piston.
outer o-ring and teflon
e. Lubricate the piston with "Hyster Approved"
Packing Lubricant and install the piston on the rod.
f. Remove tape and install jam nut.
specification.
Torque per
g. Compress wear ring and piston ring with fingers
and insert into the cylinder shell.
e. Pull sharply on rod to remove retainer, piston and
h. Push the rod and the retainer into the shell until
the snap ring can be installed easily. Install snap ring.
rod.
f. Clamp rod in a vise between two pieces of clean,
soft wood. Remove piston jam nut.
i. Pull sharply on the rod until the retainer bottoms
against the snap ring.
g. Tape rod threads and remove piston.
h. Remove the wear ring from piston if damaged,
scored or chipped.
j. Install the nut on the retainer. Torque per
specification.
k. Install rod end ball joint.
i. Remove the teflon piston ring and o-ring.
j. Remove the inner o-ring from the piston.
k. Remove retainer from the cylinder rod and
remove the outer and inner o-rings and back-up rings.
I. Lubricated the five rod end ball joint internal parts
which include the spring seat, spring, both ball stud seats
and threaded plug (refer to Section 4).
9-82.
INSTALLATION OF STEERING CYLINDER (see
figure 9-94).
I. Remove wiper seal from the end of the retainer.
9-80.
CLEANING AND INSPECTION.
a. Wash all parts in solvent and inspect for nicks,
burrs, and scratches. Dress parts with fine sandpaper or
India stone if necessary.
b. Check all contact surfaces for any abnormalities
and piston rings for wear. Replace if necessary.
a. Install the spring seat, spring and one ball stud
seat in the shell end of the cylinder and position the
cylinder on the gooseneck mounted ball stud.
b. Install the remaining ball stud seat and threaded
plug. Tighten plug until the cylinder will hold its position
horizontal to the floor without assistance.
c.
Tighten plug until the cotter pin can be installed.
Install cotter pin.
9-81. REASSEMBLY OF STEERING CYLINDER (see
figure 9-93).
NOTE: All o-rings and wipers should be replaced on
reassembly.
a. Install outer and inner o-rings and backup rings
and wiper seal in the retainer.
d. Connect hydraulic hoses to the cylinder.
e. Position the rod end ball stud joint on the trunnion
arm mounted ball stud. Install the remaining ball stud
seat the threaded plug.
f. Tighten plug until all the spring movement in the
ball joint is taken up. Tighten plug until the cotter pin can
be installed. Install the cotter pin.
b. Lubricate the rod and the entire retainer with
"Hyster Approved" Packing Lubrication. Carefully install
the retainer on the rod.
9-29.
SECTION 9
STEERING
g. Fold boots over the ball joints and secure their
position with the metal ribbons.
9-86. CHECKING RELIEF PRESSURE (see figure 995).
9-83.
9-87.
BLEEDING THE SYSTEM.
9-84. Air may become trapped in the system if any
hoses or components are removed. An aerated system Is
indicated by jerky or spongy operation when the steering
wheel is turned.
Pressure can be checked at the base of the
steering cylinder fitting. Use a gauge rated at
3000 PSI (200 kg/cm2) or greater.
Oil
temperature should be approximately 100° F.
(37° C).
To check pump output pressure,
proceed as follows:
9-85. All hydraulic hoses leading to and from the
cylinder enter at the top of the cylinder. Therefore, the
system can be bled without disconnecting the hoses.
Bleed the system as follows:
a. Fill the hydraulic tank with the specified oil (refer
to Section 4).
b. Start the engine and allow to idle at 500 to 600
RPM for approximately one minute. This allows large. air
bubbles in the system to escape.
WARNING: Do not extend the hands or arm through the
center of the steering wheel. If the steering
control unit has been disassembled and
incorrectly timed, the wheel may suddenly
become motorized or rotate abruptly with
extreme force. If this occurs, see figure 9-2
and paragraph 9-27, step t and retime the
control unit as shown.
FIGURE 9-95.
a. Remove the plug at the steering cylinder base
inlet fitting.
b. Connect pressure gauge to the cylinder fitting.
c. Increase engine speed to approximately 1, 000
RPM and rotate the steering wheel as fast as possible in
either direction.
This should produce enough
compression of oil to force the air out of the lines.
c. Start the engine and set speed at high idle.
Rotate steering wheel from stop-to-stop. As guide rolls
reach stops, the pressure gauge should indicate relief
pressure (refer to Section 2).
d. Continue to rotate the wheel in the same direction
until the guide roll reaches its limit. Quickly reverse the
steering wheel rotation to pressurize the opposite end of
the steering cylinder.
CAUTION: Do not hold system over relief for longer than
20 seconds. This will damage the pump.
e. Continue to rotate the wheel left and right, from
stop to stop, until steering control is normal.
NOTE: If proper pressure is not obtained, remove the
relief valve and clean all parts thoroughly. Carefully
check the relief valve spool for burrs. Install the valve
and recheck the pressure. If proper pressure cannot be
NOTE: If steering control fails to return to normal, air
may be entering the system at the suction side
of the pump (see figure 9-82). Check and
tighten all hose fittings securely. Also check
system pressure as specified in paragraph 9-86.
9-30.
SECTION 9
STEERING
obtained, replace the relief valve assembly. If pressure
remains low, disassemble the pump and inspect all parts
for damage and wear.
9-88.
STEERING TRUNNION ASSEMBLY.
9-89.
DESCRIPTION (see figure 9-96).
can be used to lift the front end of the unit so the guide
rolls and steering axle assembly can be removed.
a. Remove front scraper assembly. Then position
guide roll rear scraper in the "up" position (see figure 997).
WARNING: The scraper bar may be sharp.
9-90. The Steering Trunnion Assembly consists
primarily of a king pin assembly, oscillation pin assembly,
steering yoke, axle assembly, and two guide rolls. The
unit gooseneck frame rests on the trunnion assembly.
Two guide rolls are used to prevent scuffing of material
during turns. The oscillation pin assembly allows the
steering yoke to adjust to differences in ground levels
preventing bridging between the drive drum and guide
rolls.
b. Remove the capscrews (four) from both steering
yoke caps. Then remove and tag the caps (see figure 998).
NOTE: Yoke caps are matched and must be assembled
to the same side of the yoke from which they
were removed.
WARNING: Be sure drive drum is securely blocked.
9-91. REMOVAL OF GUIDE ROLLS AND STEERING
AXLE ASSEMBLY.
9-92. The method of removing the axle shaft assembly
depends upon the availability of the equipment. An
overhead crane of a lift truck
c. Lift the gooseneck up until the guide roll shaft will
clear the steering yoke. Carefully roll the guide roll
ahead. Block up the front of unit frame (see figure 9-99).
d. Lower the gooseneck until the frame is securely
held by the blocks. Then lift the axle
FIGURE 9-96.
9-31.
SECTION 9
STEERING
shaft assembly away from the unit (see figure 9-100).
9-93.
NOTE:
d. Perform steps a and b on the remaining drum, then
pull the axle shaft from the drum.
DISASSEMBLY OF AXLE SHAFT ASSEMBLY
(see figure 9-101).
Remove axle shaft assembly from unit by
following procedure outlined in paragraph 9-91.
Then position axle shaft assembly on a hard
level surface.
e. Remove seals, bearings, shim(s) and center spacer
from axle shaft.
CAUTION: Tag bearings and shim(s) for reassembly into
same position.
f.
a. Remove cotter pin, slotted nut, and thrust washer
from one side.
b. Remove split spacers and solid spacer.
reassembly into same position.
Tag for
c. Slightly lift the drum (with components removed)
and slide the drum off of the axle.
Clean and inspect components per paragraph 9-94.
9-94. CLEANING AND INSPECTION.
a. Clean all parts in solvent or other suitable cleaning
agent. Dry thoroughly with compressed air or clean lintfree cloth. If parts are not to be assembled immediately,
coat all machined surfaces with clean oil and cover.
FIGURE 9-99.
FIGURE 9-97.
FIGURE 9-100.
FIGURE 9-98.
9-32.
SECTION 9
STEERING
FIGURE 9-101.
b. Inspect all seals. Replace any seals that are cut,
worn or otherwise have a doubtful remaining service life.
c. Insert center spacer on shaft and install locking pins
(see figure 9-104).
c. Inspect all bearings for cracks, nicks, galling,
brinelling, etc. Replace all parts that are defective or have
a doubtful remaining service life.
d. Install shim(s) in original location (see step e,
paragraph 9-101). Insert shaft assembly Into one drum,
then insert the other drum into the other side of the shaft
assembly (see figure 9-105).
d. Check bearing surfaces for evidence of bearings
turning on the shaft. If bearing Inner race is turning, check
concentricity of the shaft. Repair or replace if found to be
eccentric or badly worn. Slight imperfections of the shaft
may be removed with fine sandpaper. Check the roller
bearing surfaces of the shaft for nicks, galling and cracks.
Repair or replace shaft if any of these are found or if a
definite step can be felt between the worn and unworn
surfaces when checked with fingernail.
e. Clean the shaft cavity of the drums with solvent and
dry thoroughly.
9-95. REASSEMBLY OF AXLE SHAFT ASSEMBLY.
a. Lubricate all bearing cup bores (four), then install
bearing cups (one inner and outer cup per drum) into the
drums. Be sure cups are firmly seated (see figure 9-102).
b. Install inside bearing cones and grease seals into
inside hubs on both drums (see figure 9-103).
e. Install outer bearing, grease seal, and outer solid
spacer into each drum (see figure 9-106).
f. Install split spacers, thrust washers, and slotted nuts
(see figure 9-107).
g. Working at each end separately, torque slotted nut
to 200 ft.-lbs. (27.7 kg-m); back off to 25 ft.-lbs. (3.5 kg-m),
then retorque to 45 ft.-lbs. (6.3 kg-m) or next higher slot.
Install cotter pin (see figure 9-108).
NOTE:
Ensure that the drums are on a flat, level
surface. Placing one drum on a pallet and the other drum
supported with a lift truck or hand dolly will allow the drums
to easily assemble together.
h. Check to see If clearance between guide rolls is
within specifications. If correct clearance does not exist,
remove one drum and adjust shim pack between center
spacer and bearing to maintain .010 - .030 in. (.25 - .76
mm) clearance (see figure 9-109).
9-33.
SECTION 9
STEERING
FIGURE 9-102.
FIGURE 9-105.
FIGURE 9-103.
FIGURE 9-106.
FIGURE 9-104.
FIGURE 9-107.
9-34.
SECTION 9
STEERING
9-96.
INSTALLATION OF
STEERING AXLE ASSEMBLY.
GUIDE
ROLLS
AND
a. Lift axle shaft assembly so it parallels the position of
the steering yoke (see figure 9-110).
b. Lift the gooseneck up until the steering yoke clears
the axle shaft spacers. Then carefully roll the guide rolls
until yoke is directly over the axle shaft (see figure 9-111).
c. Position the spacer slits so they line up with the slits
between the caps and the steering yoke. Remove the
frame blocking and lower the gooseneck until the axle shaft
carries the weight (see figure 9-112).
FIGURE 9-108.
d. Install each cap on the original side it was removed
from. Be sure groove (larger I. D.) is to the outside (see
figure 9-113).
FIGURE 9-109.
FIGURE 9-111.
FIGURE 9-110.
FIGURE 9-112.
9-35.
SECTION 9
STEERING
e. Torque the capscrews to specification (see figure
9-114).
f. Install the front scraper bar. Lubricate the axle shaft
assembly (refer to Section 4). See figure 9-115.
9-97. REMOVAL AND DISASSEMBLY OF YOKE AND
KING PIN ASSEMBLY.
NOTE:
Remove axle shaft assembly from unit by
following procedures outlined in paragraph 991. Then proceed as follows:
a. Remove scraper bar and coco mat assembly, water
spray manifold and disconnect steering cylinder ball joint
assembly (see figure 9-116).
FIGURE 9-113.
FIGURE 9-114.
FIGURE 9-116.
FIGURE 9-117.
FIGURE 9-115.
9-36.
SECTION 9
STEERING
b. Support yoke with a hoist or lift truck. Then remove
king pin dust cover, cotter pin, jam nut, and thrust washer
(see figure 9-117).
bearings for reassembly with its respective cup. Inspect
bearings and replace both bearings if any one of the
bearing components is damaged (see figure 9-120).
WARNING:
NOTE:
Be sure unit is securely blocked.
c. Lower yoke assembly onto the floor, then remove
both king pin bearings and the seal. Tag bearings for
reassembly with Its respective cup. Inspect bearings and
replace both king pin bearing assemblies if any one; of the
bearing components is damaged (see figure 9-118).
d. Remove oscillation pin dust covers, cotter
keys, jam nuts, and thrust washers, then remove locking
bolt (see figure 9-119).
e. Remove oscillation pin and bearings. Tag
Mark king pin and oscillation pin so they may
be installed at the same attitude with respect to
the yoke.
f. Lift out the king pin. Remove the oscillation pin
seals and bearing cups. Thoroughly clean the bores and
inspect for damage (see figure 9-121).
9-98. CLEANING AND INSPECTION.
a. Clean all parts in solvent or other suitable cleaning
agent. Dry thoroughly with compressed air or clean lintfree cloth. If parts are not
FIGURE 9-118.
FIGURE 9-120.
FIGURE 9-119.
FIGURE 9-121.
9-37.
SECTION 9
STEERING
to be assembled immediately, coat all machined surfaces
with clean oil and cover.
definite step can be felt between the worn or unworn
surfaces when checked with fingernail.
b. Inspect all seals. Replace all seals that are cut,
worn or otherwise have a doubtful remaining service life.
e. Clean the inside of the gooseneck with solvent and
dry thoroughly.
c. Inspect all bearings for cracks, nicks, galling,
brinelling, etc. Replace all parts that are defective or have
a doubtful remaining service life.
9-99.
d. Check bearing surfaces for evidence of bearings
turning on the shaft. If bearing inner race is turning, check
concentricity of the shaft. Repair or replace if found to be
eccentric or badly worn. Slight imperfections of the shaft
may be removed with fine sandpaper. Check the roller
bearing surfaces of the shaft for nicks, galling and cracks.
Repair or replace shaft if and of these are found or if a
REASSEMBLY AND INSTALLATION OF YOKE
AND KING PIN ASSEMBLY.
a. Install bearing cups into gooseneck housing if
removed during disassembly (see figure 9-122).
b.
Pack bearing
multipurpose grease.
cones
with
Hyster
Approved
c. Install bearing cone and oil seal into gooseneck (see
figure 9-122).
d. Insert king pin into gooseneck and fill housing with
Hyster approved multipurpose grease.
e. Install upper bearing cone washer and slotted nut
(see figure 9-123).
f.
Install bearing cups into yoke (see figure 9-1 24).
g. Insert oscillation pin into yoke and king pin. Install
two locking bolts into oscillation pin and torque to 200 ft.lbs. (27.7 kg-m). See figure 9-125.
h. Pack bearing cones with Hyster approved
multipurpose grease and install two (2) washer and slotted
nut on each end of the oscillation
FIGURE 9-122.
FIGURE 9-124.
FIGURE 9-123.
9-38.
SECTION 9
STEERING
pin (see figure 9-126). Tighten slotted nuts equally so that
king pin remains centered on yoke. Torque one slotted nut
to 200 ft.-lbs. (27.7 kg-m) lubed then back off to loose and
retorque to 75 ft.-lbs. (10.4 kg-m). Check torque on
opposite slotted nut. It should be 75 ft.-lbs. (10.4 kg-m).
NOTE:
Check that running clearance exists on both
sides of king pin. Adjust if necessary by
repeating step h.
i. Install cotter keys into slotted nuts on both ends of
the oscillation pin. Fill dust caps half full with Hyster
approved multipurpose grease and install.
j.
Install guide roll assembly (refer to paragraph 9-96).
k. Place unit on ground so that entire weight of
gooseneck rests on king pin. Torque slotted nut to 200 ft.lbs. (27.7 kg-m) lubed. Back off to loose and retorque to
75 ft.-lbs. (10.4 kg-m).
FIGURE 9-126A..
I. Install cotter key and fill dust cap half full with
Hyster approved multipurpose grease and install.
FIGURE 9-125.
FIGURE 9-126B.
9-39.
SECTION 10
BRAKES
SECTION 10
10-1. GENERAL.
10-2. This section contains a description of the parking
brake system and repair instruction for the brake drum
assembly. Repair instructions include removal,
inspection, and installation of the park brake assembly.
10-3. Design specifications are given in Section 2.
Maintenance requirements are discussed in Section 4.
Troubleshooting instructions are given in Section 5.
10-4. DESCRIPTION.
10-5. The parking brake is a mechanically operated
friction brake mechanism that prevents the final drive
from rotating. The braking mechanism is mounted on
the left-hand side of the final drive housing. It is
operated by a handlever mounted to the gooseneck. A
flexible teflon coated steel cable connects the braking
mechanism to the handlever. When the handlever is
pulled, the cable retracts, operating an actuator lever
which forces the brake shoe-type lining against the
Inside of the brake drum. The brake drum is splined to
the final drive shaft.
10-6. REMOVAL AND DISASSEMBLY (see
figure 10-1).
10-7. Block guide roll and drive drums prior to removal
of the brake drum assembly to prevent movement of the
unit. Set the parking brake handlever to the brake
applied position. Remove parking brake access cover
located on the rear of the left-hand frame channel.
FIGURE 10-1.
10-1.
SECTION 10
BRAKES
a. Remove the brake drum capscrews, then release
the parking brake control lever. Remove the brake
drum.
b. Remove the brake shaft cotter pin, then remove
slotted nut. Remove hub and spacer.
c. Disconnect and remove the brake return springs.
Remove brake shoes.
d. Lift out the brake shoe actuator lever and
disconnect the control cable.
e. Remove backing plate capscrews, then remove the
backing plate.
FIGURE 10-2.
10-8. CLEANING AND INSPECTION.
a. Use solvent to clean all metal parts except the
brake shoe assemblies. The shoe rib and table can be
wiped with a solvent dampened cloth. No solvent should
get on the lining.
b. Examine drum for cracks, heat checks and deep
grooves. The drums should not be bell-mouthed of
barrel-shaped, nor should the mounting holes be
elongated. If any of these conditions exist, the drum
should be replaced. Glaze on the drum, which is
otherwise in good condition, can be removed with
coarse sandpaper .
c. The brake shoe linings should be replaced if worn to
within 1115 inch (1.69 mm) or If bonding agent is failing.
Do not attempt to save lining soaked with oil or with
deep scores.
FIGURE 10-3.
d. Check springs and discard them If broken, rusted,
twisted, nicked or appear fatigued.
10-9. REASSEMBLY AND INSTALLATION.
CAUTION: Use only Hyster Approved replacement
parts.
a. Install backing plate with actuator lever depression
in position shown (see figure 10-2).
b. Install backing plate capscrews and torque to 49 ft.lbs. (6.8 kg-m). Then install rollers on both actuator
cranks (see figure 10-3).
c. Connect actuator lever to control cable, then
position actuator lever into backing plate as shown (see
figure 10-4).
FIGURE 10-4.
10-2.
SECTION 10
BRAKES
d.
Next install brake hub, rubber seal, washer and
slotted nut (see figure 10-5).Tighten slotted nut to
remove end play. Back off one (1) flat (.012 in. - .305
mm loose). DO NOT EXCEED 26 FT.-LBS. TORQUE.
Secure with cotter pin
e. Install brake shoes and return springs in position
shown (see figure 10-6).
f. Install brake drum and torque capscrews to 49 ft.lbs. (6.8 kg-m) (see figure 10-7).
FIGURE 10-7.
10-10. ADJUSTMENT (see figure 10-8).
10-11. The parking brake handlever should be adjusted
sufficiently to require at least 80 pounds (36.3 kg) to pull
it into the applied position. Turn the adjusting knob on
the handlever clockwise (lever in brake-off position) to
increase force required to apply the brake.
10-12. Whenever the brake lining wears to the point
where the brake cannot be adjusted with the handlever
adjusting knob or when new lining is installed because of
wear, another adjustment must be made. This
adjustment is made in the linkage on the actuator lever
end of the brake cable.
FIGURE 10-5.
a. Disconnect the brake cable from the actuator lever
and loosen the cable end jam nut on the cable.
b. Push the actuator lever arm until the shoes contact
the brake drum. Adjust cable end until it aligns with the
actuator lever arm in the shoe contact position.
c. Connect the cable to the actuator lever and adjust
the handlever to obtain maximum braking power.
10-13. BRAKE LINING BREAK-IN PROCEDURE.
CAUTION: Break-in is essential to ensure adequate
braking of the unit.
a. Jack the drive roll off the ground.
b. Warm up unit (Hydraulic oil temperature 100°F).
FIGURE 10-6.
10-3.
SECTION 10
BRAKES
c. Adjust brake handlever to 40 lb. (18.2 kg) pull.
d. (1)Using full throttle, gradually pull brake handlever
"on" until transmission is almost to stall and hold for 5
seconds. (2) Release brake for 60 seconds and then
repeat steps (1) and (2) 20 times.
e. Adjust brake handlever to 80 lbs. (36.3 kg)
minimum pull.
FIGURE 10-8.
10-4.
SECTION 11
WATER SPRAY SYSTEM
Once the motor is electrically energized it rotates the
centrifugal pump. This causes the water to gravity feed
from the tank into the pump, the pump then pressurizes
the water to about 10 PSI (0.7 kglcm2). Water then flows
through the lines to the spray manifolds. Each manifold
distributes the water to the drum(s).
11-1. GENERAL.
11-2. This section contains the water spray system
description, checks, adjustment and service repair
information. Refer to Section 2 for Water Spray System
Specifications. Hyster-Care Maintenance Instructions
are contained in Section 4 and a troubleshooting guide
is presented in Section 5.
11-6. The non-corrosive sump filter normally requires no
maintenance because of the self-cleaning action of the
water washing back and forth in the tank. The filter
should be cleaned when the tank needs cleaning
because of excessive accumulation of foreign material
(see figure 11-2).
11-3. DESCRIPTION. (see figure 11-1).
11-4. The Water Spray System consists of a water tank,
Inlet screen, sump filter, water pump and motor, spray
manifolds (bars), associated lines and fittings, electrical
switch and a circuit breaker. Refer to Section 6 for
electrical schematic. The water pump is centrifugal type
pump. The pump is mounted in a cavity recessed into
the bottom of the water tank and accessible from under
right- hand side of unit.
11-7. CHECKS AND ADJUSTMENTS.
11-8. SPRAY MANIFOLDS.
11-9. The water spray angle is adjusted by rotating the
spray manifold. Check to see that the spray pattern
completely covers the drum(s). Adjust the spray pattern
so that spray
11-5. The Water Spray System is activated when the
operator turns the water spray switch to the ON position.
FIGURE 11-1.
11-1.
SECTION 11
WATER SPRAY SYSTEM
11-10. WATER PRESSURE.
11-11. Water pressure and flow can be varied by turning
the (spray) control valve located in the operator's
compartment directly below the steering wheel. If
greater pressure is desired on the drive drum the front
(guide roll) spray can be restricted by turning the shutoff valve located under the unit steering wheel.
11-12. CHECKING MOTOR BRUSHES (see
figure 11-3).
WARNING: Be sure ignition key switch and water spray
switch are in the OFF position before
inspecting brushes.
11-13. To inspect the brushes, unscrew the brush
retainers. Blow out any brush "dust" with compressed
air. Check for at least 3/8 inch (9.5 mm) of brush length
at the shortest point.
11-14. Examine the commutator for burns, pits or wear.
The space between the segments should be clean and
free of deposits. Replace motor if commutator is
damaged.
FIGURE 11-2.
strikes drum at upper edge of coco mat. Adjust as
follows:
11-15. REMOVAL OF PUMP AND MOTOR
ASSEMBLY.
a. Turn the shut-off valve located at the pump under the
unit (see figure 11-4).
a. Loosen the manifold mounting U-bolts.
b. Rotate the manifold to give desired spray pattern.
c. Re-tighten the U-bolts when desired pattern
adjustment is completed.
b. Disconnect electrical wiring, pressure and suction
lines (see figure 11-4).
FIGURE 11-3.
11-2.
SECTION 11
WATER SPRAY SYSTEM
c. Remove four (4) mounting plate capscrews and
lower unit to floor.
WARNING: Support mounting plate during capscrew
removal. DO NOT allow subassembly to
fall.
11-16. REPAIR.
11-17. Determine if pump or motor has failed. Separate
pump or motor and replace failed unit. Refer to CHECK
MOTOR BRUSHES paragraph 11-12.
NOTE: The pump impellar is pressed on the armature
shaft.
11-18. INSTALLATION OF PUMP AND MOTOR
ASSEMBLY.
11-19. Install pump and motor assembly by reversing
procedure presented in paragraph 11-15.
11-20. CLEANING THE WATER TANK.
a. Drain the water tank for periodic cleaning by
removing the drain plug located under the unit (see
figure 11-5). An access plate Is located at the front of
the unit frame.
FIGURE 11-4.
FIGURE 11-5.
11-3.
PART II
SUPPLEMENTAL OPERATING MAINTENANCE
AND
REPAIR PARTS INSTRUCTIONS
STEEL WHEEL ROLLER C350B
CONTRACT NO. DSA 700-74-C-9024
SUPPLEMENTAL OPERATING MAINTENANCE AND REPAIR PARTS INSTRUCTIONS
FOR
ROLLER, MOTORIZED, STEEL WREEL 2 DRUM TANDEM 10-14 TON
MODEL C350BD
TABLE OF CONTENTS
Section I
GENERAL
Purpose
Scope
CCE Item
Description
Operational Concept
Procurement Status
Equipment Publications
Personnel and Training
Logistics Assistance
Warranty
Reporting
Section II
Page
1-1
1-2
1-3
1-4
1-5
1-6
1-7
1-8
1-9
1-10
1-11
1
1
1
1
1
1
2
2
2
2
3
2-1
2-2
2-3
2-4
2-5
2-6
2-7
2-8
2-9
2-10
2-11
2-12
2-13
2-14
2-15
2-16
3
3
4
4
4
4
4
4
4
4
5
5
5
5
5
5
3-1
3-2
3-3
3-4
3-5
6
6
6
7
7
MAINTENANCE
Maintenance Concept
Maintenance Allocation Chart
Modifications
Equipment Improvement Recommendations
Equipment Readiness Reporting
Maintenance Expenditure Limits
Shipment and Storage
Destruction to Prevent Enemy Use
Fire Protection
Basic Issue Items List
Maintenance and Operating Supply List
Special Tools and Equipment
Maintenance Forms and Records
Towing the Roller
Starting the Roller
Safety Precautions
Section III
Paragraph
REPAIR PARTS SUPPLY
General
Prescribed Load List
Authorized Stockage List
Requisitioning Repair Parts
Submitting Requisitions
*This publication superseded USMP 5-3895-348, dated Jul 76.
i
APPENDIXES
A
B
C
D
E
F
G
H
I
J
K
L
M
N
0
Page
Equipment Publications
Warranty Guidelines
Maintenance Allocation Chart
Modification Procedure
Basic Issue Items List
Prescribed Load List (PLL) & Authorized Stockage List (ASL)
Additional Repair Parts
Sample Format, DA Form 2765, Request (Part Number)
Sample Format, MILSTRIP Request (NSN)
Sample Format, MILSTRIP Request (Non-NSN)
Sample Format, MILSTRIP Request (Non-NSN Manual)
Maintenance & Operating Supply List
Preventive Maintenance Checks & Services
Operator/Crew PMCS
Organizational PMCS
HESTER Technical Publication Correction
HYSTER Technical Publication Correction
ii
8
9
11
25
26
27
28
29
30
31
33
35
37
39
43
45
47
SECTION I
GENERAL
1-1. Purpose. To provide User and Support personnel supplemental maintenance and repair parts instructions that have
special application to Commercial Construction Equipment (CCE) items.
1-2. Scope. This publication applies to Department of the Army Units, Organizations and Activities that use and/or
support the CCE Roller Motorized Steel Wheel, 10-14 Ton.
1-3. CCE Item. The term "CCE" Item used in this publication applies to a standard commercial item of commercial
equipment that has been approved for a specific TOE requirements and is procured and supported under the CCE
System Plan. This plan permits maximum utilization of the civilian construction industry's competitive research and
develop- ment, manufacturer's equipment publications and commercial sources for repair parts.
1-4. Description. The CCE Roller Steel Wheel is manufactured by Hyster Co. of Kewanee, IL. It is powered by an in-line
three cylinder (3-53 series) Detroit Diesel Engine. The final drive consists of an internal, double reduction planetary
system located within the left side of the single drive drum. Engine power is transferred to the final drive assembly by a
closed hydrostatic transmission system. The steering system is a hydrostatic operated, manually controlled system, with
provi- sions for manual steering.
1-5. Operational Concept. The CCE Roller, Steel Wheel will be deployed worldwide as a replacement for the following:
5-8 Ton Roller (LIN S1068), 8-12 Ton Roller (LIN S11136), 9-14 Ton Roller (LIN S11205) and (LIN S11273). It will also
partially replace the 10 Ton Roller listed under LINs S11479 and S11616.
The Roller is intended for use in road construction and rehabilitation, airfield, heliport and port construction. Primary tasks
are breakdown and finish rolling asphalt pavements and asphalt patch work. Secondary uses are compaction of
pavement base courses and stabilized bases and pavements.
1-6. Procurement Status. The procurement contract number is DSA 700-74-C-9024 and was awarded June 1974.
1
1-7. Equipment Publications.
a.
Initially two sets of the manufacturer's commercial publications will be overpacked and shipped with each
Roller (reference Appendix A).
b.
Additional commercial manuals may be obtained by requisitioning from Defense Construction Supply
Center (DCSC). Requisitions to DCSC should be prepared in the same manner as for part numbered repair parts, using
the Federal Supply Code for manufacturer' s FSCM and manual numbers listed in Appendix A. If DD Form 1348-6 is
used, mail it direct to Commander, DCSC, ATTN: DCSC-OSR, Columbus, OH 43215.
c. If additional assistance is required, contact the address in paragraph 1-11 of this publication.
1-8. Personnel and Training.
a.
MOS Requirements:
(1)
Operator: 62J20, General Construction Machine Operator.
(2)
Organizational Maintenance: 62B20, Construction Equipment Repairman.
(3) Direct and General Support Maintenance: 62B30, Construction Equipment Repairman; 63G20, Fuel and
Electrical Systems Repairman, 44B20 Metal Body Repairman.
b.
New Equipment Training: New Equipment Training Teams (NETTs) are available to major field
commands. Requests for NETTs should be forwarded to Commander, US Army Tank-Automotive Materiel Readiness
Command (TAROOM), ATTN: DRSTA-MLT, Warren, MI 48090. Training teams should be requested only when trained
personnel are not available in the command to operate and/or maintain the Roller.
1-9. Logistics Assistance.
a. Tank-Automotive Command Field Maintenance Technicians stationed at CONUS and OCONUS installations will be
fully qualified and available to furnish on-site training and or assistance concurrent with receipt of the Roller.
b. Assistance can be obtained by contacting the Logistics Assistance Office listed in Appendix B or AR 700-4.
1-10. Warranty. The CCE Roller contractor warrants the products furnished under this contract according to the terms
and conditions described in the equipment publications and Appendix B of this publication . All
2
warranties furnished to the Roller contractor by subcontractors of assemblies or components utilized in the manufacture
of the end item will be extended to the Government. See Appendix B for warranty guide-lines.
1-11. Reporting. You can improve this publication by recommending improvements, using DA Form 2028
(Recommended Changes to Publications and Blank Forms) and mail direct to Commander, US Army Tank-Automotive
Materiel Readiness Command, ATTN: DRSTA-MVB, Warren, MI 48090.
SECTION II
MAINTENANCE
2-1. Maintenance Concept. The CCE Roller will not require any new or special maintenance considerations. All
maintenance functions can be accomplished within the current maintenance concepts established for construction
equipment.
a. Operator/Crew Maintenance: Operator and crew maintenance is limited to daily preventive maintenance checks
and services.
b. Organizational Maintenance: Organizational maintenance consists of scheduled preventive maintenance
services, minor repairs and adjustments.
c. Direct Support Maintenance: Direct support maintenance consists of repairs on-site or in a direct support unit's
shops. Repairs are accomplished with a minimum of tools and test equipment; the assemblies and end items thus
repaired are returned to their users.
d. General Support Maintenance: General support maintenance overhauls selected assemblies and repairs items
designated by the area support command for return to stock.
e. Depot Maintenance: Depot Maintenance overhauls end items and selected major assemblies when they are
required to satisfy overall Army requirements. Overhaul of the end item may also be performed by contract with the
manufacturer.
2-2. Maintenance Allocation Chart. Maintenance will be performed as necessary by the category indicated in the
Maintenance Allocation Chart (MAC) (Appendix C) to retain or restore serviceability. All authorized maintenance within
the capability of a using organization will be accomplished before referring the item to support maintenance. Higher
categories will perform the maintenance functions of lower categories when required or directed by the appropriate
Commanders. Using and support units may exceed their authorized scope and functions in the
3
MAC when approval is granted by the next higher support maintenance Commander.
2-3. Modifications. Modifications will be accomplished by the end item manufacturer after TARCOM approves the field
campaign or modification plan. See Appendix D.
2-4. Equipment Improvement Recommendations (EIR). Equipment Improvement Recommendations will be submitted
in accordance with TM 38-750.
2-5. Equipment Readiness Reporting. Readiness Reporting will be accomplished as required by the current TM 38-750.
2-6. Maintenance Expenditure Limits. The average life expectancy for the Roller is 15 years.
PERCENT OF REPAIR
YEAR
50%
45%
40%
35%
30%
20%
100
1982
1985
1987
1989
1991
1993
1994
2-7. Shipment and Storage.
a. Shipment and Storage. Refer to TB 740-97-2 for procedures covering preservation of equipment for shipment
and storage.
b. Administrative Storage. Refer to TM 74D0-90-1 for instructions covering administrative storage of equipment.
2-8. Destruction to Prevent Enemy Use. Refer to TM 750-244-3 for procedures covering destruction of equipment to
prevent enemy use.
2-9. Fire Protection.
a. A hand operated fire extinguisher may be installed at the discretion of the using unit.
b. Approved hand-portable five extinguishers are listed in TB 5-4200-200-10.
2-10. Basic Issue Items List (BILL). See Appendix E for a list of items which accompany the end item or are required for
operation and/or operator's maintenance.
4
2-11. Maintenance and Operating Supply List. See Appendix L for a list of maintenance and operating supplies required
for initial operation.
2-12. Special Tools and Equipment. No special tools or equipment are required for operation and maintenance of the
Roller.
2-13. Maintenance Forms and Records. Operational, Maintenance and Historical records will be maintained as required
by the current TM 38-750.
2-14. Towing the Roller. Before towing a unit that has malfunctioned ensure that the transmission by-pass valve is in the
open position and park brake has been released. The by-pass valve is located under the hood next to the batteries.
After towing be sure that the b-pass valve has been closed.
CAUTION: The by-pass valve is not intended for towing a unit from one job site to another. Tow at speeds of one (1)
to (2) MPE for as short a distance as possible.
2-15. Starting the Roller.
a. Always set the park brake by moving the control lever to BRAKE ON position (up).
b. Place the Direction-Throttle Bail in Neutral detented position (vertical).
c. Start engine.
2-16. Safety Precautions. Always observe the following safety pre-cautions to prevent possible injury to personnel and
damage to the equipment.
a. TRAINED OPERATIONS ONLY.
b. Always use slower unit speeds and added caution when operating close to a lift edge or when traveling downhill.
c. Never travel across a slope. Always travel up or down a slope.
d. Always engage the parking brake before dismounting the unit.
e. Never shut down the engine when traveling up or down a slope
Always move the Direction-Throttle Bail toward the neutral position to slow the unit.
5
SECTION III
REPAIR PARTS SUPPLY
3-1. General.
a. The basic policies are procedures in AR 710-2, AR 725-50 and DA Cir 700-27 are generally applicable to repair
parts management for CCE items.
b. Manufacturer's parts manuals are furnished with CCE items instead of Department of the Army Repair Parts and
Special Tool List (RPSTL).
c. National Stock Number (NSNs) are initially assigned only to PLL/ASL parts and major assemblies, i.e. engines,
transmissions, etc. Additional NSNs are assigned by the supply support activities as demands warrant.
d. Proper use of project codes and weapon systems designator codes on parts requisitions is essential.
e. Automated Processing (AUTODIN) of Federal Supply Code Manufacturer (FSCM) part number requisitions,
without edit for matching NSNs and exception data, is authorized.
f. Repair parts are available from commercial sources and may
be purchased locally in accordance with AR 710-2 and AR 734-110.
g. Initial Prescribed Load List (PLL) and Authorized Stock List (ASL) will be distributed by US Army Tank-Automotive
Materiel Readiness Command, (TARCOM), ATTN: DRSTA-FH.
3-2. Prescribed Load List (PLL). The PLL distributed by TARCOM is an estimated 15 days supply recommended for
initial stockage at organizational maintenance. Management of PLL items will be governed by the provisions of AR 7102 and local command procedures. Selection of PLL parts for shipment to CONUS/OCONUS units is based upon the
receiving Command's recommendation after their review of the TAROOM prepared list. Organizations and activities in
CONUS/OCONUS will establish PLL stocks through normal requisitioning process.
3-3. Authorized Stockage List (ASL). The ASL distributed by TARCOM is an estimated 45 days supply of repair parts for
support units and activities. The ASL parts will be shipped according to the recommendations of the receiving
commands, after they have reviewed the initial list distributed by TARCOM. Support units and activities in
CONUS/OOONUS will establish ASL stocks through normal requisitioning process.
6
3-4. Requisitioning Repair Parts.
a. Using Units/Organizations: Requisitions (DA Form 2765 Series) will be prepared according to AR 710-2 and local
command directives. All requisitions will have the Weapons System Designator code "BD" (Interim Change 5-1, AR 7102 per DA Message, DALO-SMS 091400Z Jun 78) entered in the 2nd and 3rd positions of block 18. Units in CONUS will
use project code "BGW" in block 19. Units OCONUS will enter in block 19 project code "JZC", Appendix H.
b. Support Units and Activities:
(1) General: All MILSTRIP requisitions (DD Form 1348 Series) prepared for repair parts support of CCE items will
include distribution and project codes, see Appendixes I, J and K.
(2) Distribution Code: Supply customers in CONUS will use code "F" in card column 54. Customer OCONUS will
use the appropriate code from Appendix P, paragraph P-3a(1) AR 725-50. Weapons System Designator code "BD" (DA
Message 091400Z, DALO-SMS, June 78), will be entered in card columns 55 and 56 of all requisitions for parts to
support the roller.
(3) Project Codes: The applicable project code will be entered in card columns 57-59 of requisitions for Non-NSN
parts, whether CONUS or OCONUS customers. Project code "BGW" will be used by CONUS customers when
requisitioning part numbered parts. Supply customers OCONUS will use project code "JZC" for part numbered parts.
3-5. Submitting Requisitions.
a. Using Units and Organizations will submit DA Form 2765 Series requisitions to designated support units or
activities in accordance with local procedures.
b. Support units and activities will forward MILSTRIP requisitions for NSN parts through the Defense Automated
Addressing System (DAAS) to the Managing Supply Support Activity. Requisitions for part numbered part will be
forwarded through DAAS to the Defense Construction Supply Center (DCSC).
NOTE: When the manufacturers part number and Federal Supply Code for Manufacturer (FSCM) exceed the space in
card columns 8 through 22 of A02/AOB requisitions, prepare an A05/AOE requisition (DD Form 1348-6) and mail it to
Commander Defense Construction Supply Center, ATTN: DCSC-OSR; Columbus, OH 43215.
7
TM 5-3895-348-14&P-1
APPENDIX A
REFERENCES
A-1. Publications
Logistic Assistance Program .................................................................................................................... AR700-4
Material Management for Using Units, Support Units and Installations .................................................... AR 710-2
Requisitioning Receipt and Issue System .............................................................................................. AR 725-50
Indexes should be consulted frequently for latest change of revisions of references and for new publications
relating to material covered in this publication.
Index of Administrative Publications................................................................................................DA PAM 310-1
Index of Blank Forms ......................................................................................................................DA PAM 310-2
Index of Doctrinal Training and Organization Publications...............................................................DA PAM 310-3
Index of Technical Manuals Technical Bulletins, Supply Manuals (Types 7, 8, and 9), Supply
Bulletins and Lubrication Orders .................................................................................................DA PAM 310-4
Index of Graphic Training Aid and Devices .....................................................................................DA PAM 310-5
A-2. Forms
Refer to TM 38-750, The Army Maintenance Management System (TAMMS), for instructions on the use of
maintenance forms pertaining to the materiel.
A-3. Other Publications
The following publications contain information pertinent to the major item and associated equipment.
a Camouflage.
Camouflage ..............................................................................................................................................FM 5-20
b. Decontamination.
Chemical, Biological, and Radiological (CBR) Decontamination..............................................................TM 3-220
NBC (Nuclear, Biological and Chemical) Defense ...................................................................................FM 21-40
c. General.
Utilization of Engineer Construction Equipment.....................................................................................TM 5-331A
Basic Cold Weather Manual....................................................................................................................FM 31-70
Northern Operations................................................................................................................................FM 31-71
Operation and Maintenance of Ordnance Materiel in Cold Weather (0°to -650 F)...................................FM 9-207
Procedures for Destruction of Equipment to Prevent Enemy Use ..................................................... TM 750-244-3
d. Maintenance and Repair
Inspection, Care and Maintenance of Antifriction Bearings ......................................................................TM 9-214
Welding Theory and Application..............................................................................................................TM 9-237
Hand Portable Fire Extinguishers Approved for Army Users.......................................................TB 5-4200-200-10
e. Administrative Storage.
Administrative Storage of Equipment .................................................................................................TM 740-90-1
Preservation of USAMECOM Mechanical Equipment for Shipment and Storage................................ TB 740-97-2
8
APPENDIX B
WARRANTY GUIDELINES
1. A warranty period of 12 months applies to the Roller, Motorized, Steel Wheel, Model C350B-D, Contract Number DSA
700-74-C-9024, manufactured by HYSTER Co. after delivery to the Government. This warranty applies to the end item,
components and all supplies furnished under the contract.
2. Using units may not contact their local dealer. You must mail DA Form 2407 to the Maintenance Directorate,
TARCOM, at the following address: US Army Tank-Automotive Material Readiness Command, ATTN: DRSTA-MVB,
Warren Michigan 48090. To expedite actions you may call the information to AUTOVON 273-3349 or 273-3439 with
the information from your DA 2407, section 1, block 1 through 11, blocks 16, 17, 18 and 20.
3. General information:
a. DA Form 2407 (prepared in accordance with warranty claim actions in TM 38-750) will be used to submit warranty
claim actions for end items when components, parts or assemblies are defective and are covered by a manufacturer's
warranty. End items under warranty are identified by a decal plate and/or warranty statement included in the operator's
and maintenance manual for the end item. All warranty actions settled or unsettled will be reported to the National
Maintenance Point (NMP) on DA Form 2407. For warranties settled locally the DA Form 2407 will contain a statement
"For Information Only" in block 35.
b. Maintenance activities in support of organizational maintenance are the responsible points of contract between
the originator of warranty claims and the National Maintenance Point (US Army Tank-Automotive Material Readiness
Command, DRSTA-MVB, AUTOVON 273-3349, or 273-3439 Warren, Michigan 48090, which serves as the DA
Representative with the contractor in warranty matters.
NOTE: In certain instances, the originating organization and the support activity are one and the same.
c. Before you take your equipment to a dealer for repair, whether or not it was necessary for you to go through the
NMP (TARCOM), check with your local procurement office to see if a funds commitment document is needed.
Sometimes, even though the majority of the repairs are covered by the warranty, there may be a small charge for normal
maintenance costs, i.e., oil filters, oil, etc. Further, the cause of damage could be determined by the dealer to be directly
related to "operator abuse." In that case, the Government may be obligated to pay for tear-down services even if the
repairs are no longer desired, or for the complete cost if repairs are to be completed by the dealer.
9
d. When the equipment is given to the dealer for repairs, find out how long the work will take, the extend of the
problem, if possible, and the charges, if any, which may be involved. Leave the name and telephone number of the
person to be contacted for pickup of the equipment and specifically state that he should be called as soon as the repairs
are finished. In addition, state he should be telephoned if unexpected problems, costs and/or delays are encountered.
Get the name and telephone number of the Service Manager, for any required follow-up purposes.
e. When you arrive to pick up your equipment after completion of servives, make certain that you know exactly what
repairs were performed and/or parts replaced. This is required for overall problem trend evaluation by the NMP and
must be identified upon completion of warranty servives.
f. Telephone the NMP at TARCOM, AUTOVON 273-3349, 273-3439 and/or 273-3387 if:
(1) Your equipment requires repairs and you cannot obtain these servives using the procedures listed above.
(2) The length of time required for repairs may seriously hamper your mission, or if the dealer's overall response to
your requirements are not satisfactory.
(3) You have any questions regarding warranty procedures - either in general or about a specific job. Do not wait
until your problems become critical.
g. Do not attempt to conduct negotiations regarding a breech of warranty. This is a function of the Contracting
Officer, through the NMP at TARCOM.
10
APPENDIX C
MAINTENANCE ALLOCATION CHART
FOR
Roller, Motorized, Steel Wheel, Model C35B-D
Section I. INTRODUCTION
1. General: This Maintenance Allocation Chart designates responsibility for performance of Maintenance functions to
specific Maintenance categories.
2. Maintenance functions:
a. Inspect: To determine the serviceability of an item by comparing its physical, mechanical and/or electrical
characteristics with established standards through examination.
b. Test: To verify serviceability and detect incipient failures by measuring the mechanical or electrical characteristics
of an item and comparing those characteristics with prescribed standards.
c. Service: Operations required periodically to keep an item in proper operating condition, i.e., to clean
(decontaminate), to preserve, to drain, to paint, or to replenish fuel, lubricants, hydraulic fluids, or compressed air
supplies.
d. Adjust: To maintain, within prescribed limits, by bringing into proper or exact position, or by setting the operating
characteristics to specified parameters.
e. Align: To adjust specified variable elements of an item to bring about optimum or desired performance.
f. Calibrate: To determine and cause corrections to be made or to be adjusted on instruments or test measuring and
diagnostic equipment used in precision measurement. Consists of comparisons of two instruments, one of which is a
certified standard of known accuracy, to detect and adjust any discrepancy in the accuracy of the instrument being
compared.
g. Install: The act of emplacing, seating, or fixing into position an item, part, or module (component or assembly) in a
manner to allow the proper functioning of an equipment or system.
h. Replace: The act of substituting a serviceable like type part, subassembly, or module (component or assembly)
for an unserviceable counterpart.
i. Repair: The application of maintenance services or other maintenance actions to restore serviceability to an item
by correcting specific damage, fault, malfunction, or failure in a part, subassembly, module (component or assembly),
end item, or system.
11
j. Overhaul: That maintenance effort (service/action) necessary to restore an item to a completely
serviceable/operational condition as prescribed by maintenance standards (i.e., DM:IR) in appropriate technical
publications. Overhaul is normally the highest degree of maintenance performed by the Any. Overhaul does not
normally return an item to like new condition.
k. Rebuild: Consists of those services/actions necessary for the restoration of unserviceable equipment to a like new
condition in accordance with original manufacturing standards. Rebuild is the highest degree of materiel maintenance
applied to Army equipment. The rebuild operation includes the act of returning to zero those age measurements
(hours/miles, etc.) considered in classifying Army equipments/components.
3. Column entries: Columns used in the Maintenance allocation chart are explained below:
a. Column l, Group Number: Column I lists group numbers, the purpose of which is to identify components,
assemblies, subassemblies, and modules with the next higher assembly.
b. Column 2, Component/Assembly: Column 2 contains the noun names of components, assemblies,
subassemblies, and modules for which maintenance is authorized.
c. Column 3, Maintenance Functions: Column 3 lists the functions to be performed on the item listed in Column 2.
d. Column 4, Maintenance Category: Column 4 specifies, by the listing of a "work time" figure in the appropriate
subcolumn(s), the lowest level of maintenance -authorized to perform the function listed in Column 3. This figure
represents the active time required to perform that maintenance function at the indicated category of maintenance. If the
number or complexity of the tasks within the listed maintenance function vary at different maintenance categories,
appropriate "work time" figures will be shown for each category. The number of man-hours specified by the "work time"
figure represents the average time required to restore an item (assembly, subassembly, component, module, end item or
system) to a serviceable condition under typical field operating conditions. This time includes preparation time,
troubleshooting time, and quality assurance/ quality control time in addition to the time required to perform the specific
tasks identified for the maintenance functions authorized in the Maintenance Allocation Chart.
e. Column 5, Tools and Equipment: Column 5 specifies by code those common tool sets (not individual tools) and
special tools, test, and support equipment required to perform the designated function.
f. Column 6, Remarks: Column 6 contains an alphabetic code which leads to the remark in Section IV, Remarks,
which is pertinent to the item opposite the particular code.
12
TM 11-5805-244-34P
APPENDIX C
Section II. MAINTENANCE ALLOCATION CHART
ROLLER MOTORIZED, STEEL WHEEL 2 DRUM TANDEM, 10-14 TON (CCE)
(1)
GROUP
NUMBER
(2)
COMPONENT
ASSEMBLY
(3)
MAINTENANCE
FUNCTION
(4)
MAINTENANCE Category
C
01
0100
O
F
Engine Assembly
Test
2.0
REMARKS
1,2,3,4
0.1
Replace
16.0
Repair
21.0
Overhaul
0102
D
(6)
ENGINE
Service
0101
H
(5)
TOOLS
AND
EQUIP
Engine Mounts
Replace
Cylinder Block
Test
48.0
3.0
5.0
Replace
40.0
Repair
16.0
Cylinder Sleeve
Replace
Cylinder Head
Replace
3.0
4.0
Repair
4.0
Overhaul
8.0
Crankshaft
Main Bearings
Replace
Replace
5.0
4.0
Drive Pulley
Replace
2.0
0103
Flywheel
Replace
0104
Pistons & Connecting
Rods
Replace
3.0
Repair
2.0
Replace
0.5
Rings & Bearings
*The subcolumns are as follows:
C--operator/crew
F--direct support
D-depot
O--organizational
H--general support
1,2,3,4
3.0
13
1,2
1,2
Section II. MAINTENANCE ALLOCATION CHART
ROLLER MOTORIZED, STEEL WHEEL 2 DRUM TANDEM, 10-14 TON (CCE)
(1)
GROUP
NUMBER
(2)
COMPONENT
ASSEMBLY
(3)
MAINTENANCE
FUNCTION
(4)
MAINTENANCE Category
C
0105
0106
0108
Rocker Arms
Replace
Valve Springs
Test
Replace
Valves, Exhaust
Adjust
Replace
O
F
H
D
(5)
TOOLS
AND
EQUIP
(6)
REMARKS
0.5
0.8
0.3
2.0
1.0
Repair
2.0
Camshaft, Bearings &
Gears
Replace
4.0
Oil Cooler
Service
0.2
1,2
Replace
1.0
Oil Pan
Replace
Repair
1.5
1.0
Oil Pump
Replace
Repair
0.8
2.0
Oil Pressure Regulator
Adjust
Replace
0.2
0.5
Oil Filter Assembly
Service
Replace
0.5
Oil Filter Element
Replace
0.5
Exhaust Manifold
Replace
Repair
1.0
1.0
1.0
*The subcolumns are as follows:
C--operator/crew
F--direct support
D-depot
O--organizational
H--general support
14
1,2,3,4
Section II. MAINTENANCE ALLOCATION CHART
ROLLER MOTORIZED, STEEL WHEEL 2 DRUM TANDEM, 10-14 TON (CCE)
(1)
GROUP
NUMBER
(2)
COMPONENT
ASSEMBLY
(3)
MAINTENANCE
FUNCTION
(4)
MAINTENANCE Category
C
03
Fuel Injector
Test
Replace
0302
Fuel Pump
Replace
Repair
0305
D
REMARKS
Air Cleaner
Service
Replace
1,2
1.0
0.4
1
1.0
Repair
0.5
Air Cleaner Element
Replace
0.5
Blower, Air Intake
Service
Replace
0.3
Fuel Tank
1,2
1.0
1,2
1.0
2.0
Service
Replace
0.2
1,2
1.5
Repair
0308
H
1.0
1.5
Repair
0306
F
(6)
FUEL SYSTEM
0301
0304
O
(5)
TOOLS
AND
EQUIP
1.0.
Lines & Fittings
Replace
1.0
Governor, Engine Speed
Test
Adjust
0.5
0.5
Replace
1.0
Repair
1,2
2.0
*The subcolumns are as follows:
C--operator/crew
F--direct support
D-depot
O--organizational
H--general support
15
Section II. MAINTENANCE ALLOCATION CHART
ROLLER MOTORIZED, STEEL WHEEL 2 DRUM TANDEM, 10-14 TON (CCE)
(1)
GROUP
NUMBER
(2)
COMPONENT
ASSEMBLY
(3)
MAINTENANCE
FUNCTION
(4)
MAINTENANCE Category
C
0309
0312
04
0401
05
0501
O
Fuel Filters
Service
0.2
Fuel Filter Element
Replace
Throttle Control/Linkage
Adjust
0.1
Replace
0.4
Muffler & Exhaust Pipes
Replace
1.0
Radiator
Service
l
1
0.2
1,2
2.0
2.0
Thermostat
Replace
1.0
Hoses & Clamps
Replace
0.5
Water Pump
Replace
2.0
Pan Assembly
Fan Belts
0601
1,2
COOLING SYSTEM
1,2
1.0
Replace
1.0
Repair
06
REMARKS
EXHAUST SYSTEM
Repair
0505
D
1
Repair
0504
H
(6)
0.5
Replace
0503
F
(5)
TOOLS
AND
EQUIP
1,2
1.0
Inspect
0.1
Adjust
0.5
Replace
1.0
Test
Replace
Repair
0.1
0.5
ELECTRICAL SYSTEM
Alternator
1,2,5
1.5
*The subcolumns are as follows:
C--operator/crew
F--direct support
D-depot
O--organizational
H--general support
16
Section II. MAINTENANCE ALLOCATION CHART
ROLLER MOTORIZED, STEEL WHEEL 2 DRUM TANDEM, 10-14 TON (CCE)
(1)
GROUP
NUMBER
(2)
COMPONENT
ASSEMBLY
(3)
MAINTENANCE
FUNCTION
(4)
MAINTENANCE Category
C
Alternator Drive Belt
0603
Starting Motor
Inspect
O
Instrument Panel
Accessories
H
D
(6)
REMARKS
0.1
Adjust
0.2
Replace
0.2
Test
Replace
0.2
1.0
Repair
0607
F
(5)
TOOLS
AND
EQUIP
1,2,5
1.5
Replace
Repair
0.5
0.7
1,5
Replace
0.5
1,5
Head Light Assembly
Replace
Repair
0.2
0.4
1,5
Read Light Lamp Units
Replace
0.2
Sending Unites/Warning
Switches.
Replace
0.2
1,5
0611
Horn Assembly
Replace
0.3
1,5
0612
Battery
Inspect
Test
0.1
Service
Replace
0.2
0608
0609
0610
Miscellaneous Electrical
Items: (Switches,
Circuit Breakers, etc.)
Battery Cables
1,5
0.3
0.5
Replace
Repair
0.4
0.5
*The subcolumns are as follows:
C--operator/crew
F--direct support
D-depot
O--organizational
H--general support
17
Section II. MAINTENANCE ALLOCATION CHART
ROLLER MOTORIZED, STEEL WHEEL 2 DRUM TANDEM, 10-14 TON (CCE)
(1)
GROUP
NUMBER
(2)
COMPONENT
ASSEMBLY
(3)
MAINTENANCE
FUNCTION
(4)
MAINTENANCE Category
C
0613
07
0721
Wiring Harness
Replace
Repair
O
F
H
1.0
1.0
D
(5)
TOOLS
AND
EQUIP
(6)
REMARKS
1,5
TRANSMISSION SYSTEM
Hydraulic Tank
Service
Replace
0.2
1,2
3.0
Repair
Suction Filter
Hydrostatic Pump
3.0
Service
0.3
Replace
1.0
Replace
Repair
2.0
2.0
Overhaul
Servo Control Valve
Direction-Throttle
Control Assy
Hydrostatic Motor
4.0
Replace
Repair
1.5
2.0
Service
Adjust
0.2
1.0
Replace
2.0
Repair
2.0
Replace
Repair
1.5
3.0
Overhaul
Transmission By-.Pass
Valve
4.0
Replace
1.0
*The subcolumns are as follows:
C--operator/crew
F--direct support
D-depot
O--organizational
H--general support
18
Section II. MAINTENANCE ALLOCATION CHART
ROLLER MOTORIZED, STEEL WHEEL 2 DRUM TANDEM, 10-14 TON (CCE)
(1)
GROUP
NUMBER
(2)
COMPONENT
ASSEMBLY
(3)
MAINTENANCE
FUNCTION
(4)
MAINTENANCE Category
C
O
Repair
Hydraulic Oil Cooler
Service
Replace
Lines & Fittings
11
1100
12
1201
D
REMARKS
0.3
1.5
2.0
Service
Replace
Case Pressure Relief
Valve
H
(6)
1.0
Repair
Oil Return Filter
F
(5)
TOOLS
AND
EQUIP
0.3
1.0
Replace
Repair
Replace
Repair
1.0
1.0
1.0
1.0
FI.AL DRIVE
Drive Drum Assembly
Replace
Repair
2.0
3.0
Motor Carrier Assembly
Replace
Repair
1.5
2.5
Final Drive Assembly
Service
Replace
Repair
Overhaul
0.5
Adjust
0.4
8.0
**The subcolumns are as follows:
C--operator/crew
O--organizational
1,2,3,4
3.0
3.0
PARKIC BRAKE SYSTEM
Brake Lever
1,2,3,4
F--direct support
D-depot
H--general support
19
Section II. MAINTENANCE ALLOCATION CHART
ROLLER MOTORIZED, STEEL WHEEL 2 DRUM TANDEM, 10-14 TON (CCE)
(1)
GROUP
NUMBER
(2)
COMPONENT
ASSEMBLY
(3)
MAINTENANCE
FUNCTION
(4)
MAINTENANCE Category
C
Replace
1.0
Repair
1.0
Cable & Linkage
Replace
Repair
1.0
1.0
Brake Shoe
Replace
Repair
2.0
Replace
Repair
2.0
1.0
Brake Drum
14
O
F
H
D
(5)
TOOLS
AND
EQUIP
(6)
REMARKS
1.0
1.0
STEERING SYSTEM
1401
Steering Wheel
Replace
1405
Guide Rolls
Replace
Repair
Axle Shaft Bearings
Service
Replace
1
3.0
1.0
1,2
0.2
4.0
Repair
3.0
Yoke & Pin Assembly
Service
Replace
Repair
3.0
3.0
2.0
1407
Steering Control Unit
Replace
Repair
2.0
2.0
1410
Hydraulic Pump
Replace
Repair
2.0
2.0
*The subcolumns are as follows:
C--operator/crew
F--direct support
D-depot
O--organizational
H--general support
20
1,2
Section II. MAINTENANCE ALLOCATION CHART
ROLLER MOTORIZED, STEEL WHEEL 2 DRUM TANDEM, 10-14 TON (CCE)
(1)
GROUP
NUMBER
(2)
COMPONENT
ASSEMBLY
(3)
MAINTENANCE
FUNCTION
(4)
MAINTENANCE Category
C
O
Overhaul
Hoses, Lines & Fittings
Replace
1.0
1412
Steering Cylinder
Service
Replace
1.0
15
Flow Divider
H
D
(6)
REMARKS
4.0
1411
1414
F
(5)
TOOLS
AND
EQUIP
1
1,2
1.5
Repair
2.0
Replace
Repair
1.5
1.0
1,2
4.0
1,2
FRAME
1501
18
Frame Assembly
BODY, HOOD & COWLING
Repair
1801
Hood & Cowling
Replace
1.0
Repair
1.5
1
1806
Seat Assembly
Replace
1.0
1
1806
Tool Box
Repair
Replace
1.0
0.5
1
Repair
0.5
Service
0.2
Replace
1.0
Repair
1.0
Replace
0.5
74
1476
EARTH MOVING EQUIPMENT
COMPONENTS
Roll Scrapers
Roll Mat
*The subcolumns are as follows:
C--operator/crew
F--direct support
D-depot
O--organizational
H--general support
21
1
Section II. MAINTENANCE ALLOCATION CHART
ROLLER MOTORIZED, STEEL WHEEL 2 DRUM TANDEM, 10-14 TON (CCE)
(1)
GROUP
NUMBER
(2)
COMPONENT
ASSEMBLY
(3)
MAINTENANCE
FUNCTION
(4)
MAINTENANCE Category
C
7471
O
Water Spray System Tank
Spray Pump & Motor
Service
Replace
Repair
0.5
2.0
2.0
Water Tank Inlet Screen
Service
Replace
0.3
0.3
Water Tank Sump Filter
Service
Replace
0.3
0.3
Service
0.5
Replace
0.5
Repair
1.0
Replace
1.0
Repair
1.0
Spray Manifolds &
Nozzles
Spray Pipes, Valves &
Hoses
*The subcolumns are as follows:
C--operator/crew
F--direct support
D-depot
O--organizational
H--general support
22
F
H
D
(5)
TOOLS
AND
EQUIP
(6)
REMARKS
1,2
MAINTENANCE ALLOCATION CHART FOR
Roller, Motorized, Steel Wheel, Model c350B-D
SECTION III - TOOL AND TEST EQUIPMENT REQUIREMENTS
TOOL OR TEST
EQUIPMENT
REFERENCE
CODE
MAINTENANCE
CATEGORY
NATIOHAL/NATO
NOMENCLATURE
TOOL
STOCK NUMBER
NUMBER
Unless otherwise noted,
functions can be accomplished
contained in the following
all maintenance
with the tools
common two sets.
Shop Equip Contact Maint.
TRK MTD (SC 4940-97-C1lE05)
Shop Equip Org Repair,
Light RK MTD (SC 4940-97CL-D4)
49'40-00-294-9518
T10138
1/940-*.294-9516
T13152
Tool Kit Automotive Maint,
Org Maint Common #1 (SC
4910-95-CL-A74)
Tool Kit Automotive Maint,
Org Maint Common #2 (SC
4910-95-CL-A72)
4910-00-754-0654
W32593
4910-00-754-0650
W32730
Tool Kit, Light Weight
5180-90-CL-W26)
Shop Equip Auto Maint and
Repair Org Maint Supp #1
(SC 4910-95-CL-A73)
(SC 51t0-00-177-7033
W33004
4910-00-754-0653
W32867
1
O, F, H
1
O, F, H
1
O, F, H
1
O, F, H
1
O, F, H
1
O, F, H
1
O, F, H
Shop Equip Welding Field
Maint (SC 3470-95-CL-A08)
3470-00-357-7268
T16714
1
O, F, H
Tool Set, Veh Full Tracket.
Sugg #2 SC 4940-95-CL-A08
49400-00-754-073
W65747
2
F, H
Shop Equip Gen Purp Repair
Semitrlr MTD (SC 4940-97C-ED 3)
4914000-287-4894
T10549
2
F, H
Tool Kit Automotive, Fuel
and Elec Sys Repair (SC
4910-95-CL-A50)
5180-00-754-0655
W32456
2
F, H
Tool Kit, Master Mechanic
and Equip Maint and Repair
(SC 51S0-9o-CLEO5 )
5180-00-699-5273
W45060
23
MAINTENANCE ALLOCATION CHART FOR
Roller, Motorized, Steel Wheel, Model C350B-D
SECTION III - TOOL AND TEST EQUIPMENT REQUIREMENTS
TOOL OR TEST
EQUIPMENT
REFERENCE
CODE
MAINTENANCE
CATEGORY
NOMENCLATURE
NATIONAL/NATO
STOCK NUMBER
TOOL
NUMBER
2
F, H
Shop Set, Fuel and Elec
Sys Field Maint Basic (SC
4910-95-CL-AO1)
4910-00-754-0714
T30414
2
F, H
Shop Set, Fuel and Elec
Sys Field Maint Basic Sup
#2 (SC 4910-95-CL-A65)
4910-00-390-7775
T30688
2
F, H
Shop Equip Machine Shop,
Field Maint Basic (SC
3470-95-CL-Ao2)
3470-00-754-0708
T15644
2
F, H
Measuring and Lay Out Tool
Set Mach (SC 5280-95-CLA02)
5280-00-511-1950
W44512
2
F, H
Tool Kit Body and Fender
Repair
5180-00-754-0643
W33689
3
F, H
Wrench Set Socket, 3/4"
Drive Hex Type
49400-754-0743
W65747
4
O, F, H
Wrench Torque, 3/4" Drive
500 lb Cap
5120-00-542-5577
Y84966
5
O, F, H
Multimeter
6625-00-999-7465
M80242
24
APPENDIX D
25
APPENDIX E
BASIC ISSUE ITEMS LIST
NOMENCLATURE:
MANUFACTURER:
SERIAL NUMBER RANGE:
(I)
(2)
(3)
(4)
MFR PART NO.
MVR FED CODE
DESCRIPTION
UNIT OF ISSUE
(5)
QUANITITY
FURNISHED
W/EQUIP
N-O-N-E
(1)
SMR
CODE
ITEMS TROOP INSTALLED OR AUTHORIZED LIST
(3)
DESCRIPTION
NATIONAL STOCK
NUMBER
REF No & IFR
USABLE
CODE
ON CODE
(2)
(4)
(5)
UNIT
OF
QTY
AUTH
NOTE: The following items
are overpacked with the
roller.
7520-00-559-9618
Case, Cotton Duck: MIL-B11743 (81349)
EA
1
7510-00-889-3494
Log Book Binder: MIL-B-43064
EA
1
NOTE: The following items
are authorized but not issued
with the roller.
4210-00-889-2221
Extinguisher, Fire Dry Chemical
EA
1
4930-00-277-9525
Grease Gun, Hand
EA
1
4930-00-204-2550
Adapter, Grease Gun
Coupling, Rigid
EA
1
4930-00-288-1511
Adapter, Grease Gun
Coupling, Flex
EA
1
26
APPENDIX F
INITIAL RECOMMENDATION
PRESCRIBED LOAD LIST (PLL)
AUTHORIZED STOCKAGE LIST (ASL)
END ITEM: Roller, Motorized, Steel Wheel, 2 Drum
Tandem 10-14 Ton (CCE)
MFR PART NO:
NSN:
N/A
3895-00-578-0372
MAKE:
MODEL
HYSTER
SERIAL NUMBER RANGE
TO
U/M
SMR CODE
NATIONAL STOCK
NUMBER
PART NUMBER
C350B-D
DATE
Feb 79
QTY OF PARTS REQ’D
FOR NO. OF END ITEMS
PLL
ASL
FSCM
1-5
1-5
6-20
21-50
PAOZZ
2940-00-019-8087
5574978
72582
Element, Engine Oil Filter
EA
1
1
2
4
PAOZZ
2910-00-792-8985
5774961
72582
Element, Primary Fuel Filter
EA
1
1
2
4
PAOZZ
2910-00-890-2436
5573261
72582
Element, Secondary Fuel Filter
EA
1
2
4
PAOZZ
3030-00-899-4888
154382
30076
V-Belt, Alternator
EA
1
1
2
PAOZZ
2940-00-755-6584
180595
30076
Element, Hydraulic Oil Filter
EA
1
1
2
PAOZZ
2940-00-368-8338
156954
30076
Element, Air Cleaner
EA
1
3
6
PAOZZ
3030-00-982-1212
5126447
72582
V-Belt, Matched, Fan
EA
1
1
2
PAOZZ
2540-01-042-5750
157321
30076
Cocoa Mat
EA
1
2
PAGE
27
OF
12
APPENDIX G
ADDITIONAL REPAIR PARTS
NSN
P/4
FSCM
4120-01-013-1355
472D--01-013-1354
2340-00-019-8087
2910-00-792-8985
2910-00-890-2436
5930-00-220-6716
6620-00-933-3594
5925-01-010-1084
5920-00-925-2639
3030-00-899-4888
2940-00-755-6584
4330-00-355-7750
100434
169107
5574978
5774961
5573261
169776
77328
163762
53123
154382
180595
237014
30076
30076
72582
72582
72582
30076
30076
30076
30076
30076
30076
30076
5330-01-016-7837
2530-00-158-1312
5330-01-016-7838
4320-00-237-3947
6240-00-733-2984
6240-00-155-7859
5920-00-131-9915
5920-00-925-2640
5330-01-013-7673
2940-00-368-8338
4320-01-032-7972
4320-01-032-7973
4320-01-032-7974
3030-00-982-1212
2540-01-042-5750
5330-01-043-1803
6140-00-917-2141
243868
189585
223641
158913
156776
MS15571-8
F02832V20A
53124
169787
156954
190641
267025
194393
5126447
157321
156961
79792
30076
30076
30076
30076
30076
96906
81349
30076
30076
30076
30076
30076
30076
72582
30076
30076
30076
28
Description
Hose, Radiator, Upper
Hose Radiator, Lower
Element, Engine Oil Filter
Element, Primary Fuel Filter
Element, Secondary Fuel Filter
Sender, Oil Pressure
Sender, Water Temperature
Breaker, Circuit
Fuse, 5 Ampere
V-Belt, Alternator
Element, Hyd Oil Filter
Seal Element Kit, Hyd Oil
Filter
Seal Kit, Steering Control
Parts Kit, Steering Control
Seal Kit, Steering Cyl
Kit - Minor, Steering Pump
Element Light, Seal Beam
Bulb, 12 Volt
Fuse, 20 Ampere
Fuse, 10 Ampere
O-Ring, Hose Flange
Element, Air Cleaner
Seal, Kit
Manifold Valve Kit, Hyd Sys
Manifold Seal Kit, Hyd Sys
Belt-V Matched, Fan
Cocoa Mat
O-Ring, Air Cleaner
Battery, 12-Volt
APPENDIX H
SAMPLE FORMAT - DA FORM 2765 PART NUMBER REQUEST
(CONUS Requester)
(OCONUS Requester)
29
APPENDIX I
SAMPLE FORMAT-MILSTRIP REQUISTITIONS FOR (NSN)
Card Column
Description of Data
1-3
Document Identifier Code
4-6
7
8-22
23-24
25-29
30-43
44
45-50
51
52-53
54-56
Routing Identifier Code
Media/Status Code
NSN
Unit of Issue
Quantity
Document Number
Demand Code
Supplementary Address
Signal Code
Fund Code
Distribution Code CC-54
57-59
60-61
62-64
65-66
CC-55-56
Project Code
Priority Code
Required Delivery Date
Advice Code
30
Mandatory Entry
for CCE
A0A - CONUS
A011 - Overseas
"F" for CONUS;
see AR 725-50
for OCONUS
Weapon System Code
APPENDIX J
SAMPLE FORMAT-MILSTRIP REQUISITION FOR
Card Column
Description of Data
1-3
Document Identifier Code
4-6
7
8-22
23-24
25-29
30-43
44
45-50
51
52-53
54-56
Routing Identifier Code
Media/Status Code
FSCM and Part Number
Unit of Issue
Quantity
Document Number
Demand Code
Supplementary Address
Signal Code
Fund Code
Distribution Code CC-54
57-59
60-61
62-64
65-66
CC-55-56
Project Code
Priority Code
Required Delivery Date
Advice Code
31.
(NON-NSN)
Mandatory Entry
for CCE
A0B - CONUS
A02 - Overseas
Always S9C
"F" for CONUS;
see AR 725-50
for OCONUS
Weapon System Code
CARD
COLUMN
DESCRIPTION OF DATA
67-69
Blank
70
MANDATORY ENTRY
FOR CCE
Identification code applicable to
entry in cc 71-80.
A - Technical order or Technical
Manual.
B - End Item Identification
C - Noun Description
D- Drawing or Specification No.
71-80
Reference Identification
32.
Identification of
reference specified
in cc 70
APPENDIX K
SAMPLE FORMAT - MILSTRIP REQUISITION FOR
33.
(NON-NSN)(MANUAL)
INSTRUCTIONS
This form will only be used in those cases where the manufacturer's code and part number exceed the spaces allocated
in card columns S - 22 of the requisition.
CARD
COLUMN
DESCRIPTION DATA
1-3
Document Identifier Code
4-6
Routing Identifier Code
7
FSCM and Part Number
23-24
Unit of Issue
25-29
Quantity
30-43
Document Number
45-50
A0E - CONUS
A05 - OCONUS
Always S9C
Media Status Code
8 - 22
44
MATUDATORY ENTRY
FOR CCE
Leave Blank
Enter In Block 1
under Identification
Data
Demand Code
Supplementary Address
51
Signal Code
52-53
Fund Code
54-56
Distribution Code CC 54
CC 55-56
57-59
Project Code
60-61
Priority Code
62-64
Required Delivery Date
65-66
Advice Code
67-80
"'F" for CONUS. (See
AR 725-50 for OCONUS)
Weapon Systems Code
Blank
IDENTIFICATION DATA - Lower half of DD Form 1348-6, complete Blocks 1 thru 9.
34.
APPENDIX___L_____
MAINTENANCE AND OPERATING SUPPLY LIST
NOMENCLATURE. Roller, Motorized, Steel Wheel 2
Drum Tandem, 10-14 Ton (CCE)
MFR PART NO:
NSN:
MAKE
3845-00-578-0372
SERIAL NO. RANGE
TO
N/A
(1)
(2)
MFR PART NO
OR
NAT'L STOCK NO
MODEL:
HYSTER
DATE
Feb 79
(6)
(5)
QTY REQ
F/8 HRS
OPN
Fuel Tank
9140-00-286-5296
Diesel Fuel, DF2
(4) QTY REQ
QTY REQ
F/INITIAL
OPN
25 Gal
Engine Crankcase
9150-00-189-6727
Oil Lubricating OE/HDO 10
14 qts
9150-00-186-6668
MIL-L-2104C
5 gal.
9150-00-186-6681
Oil Lubricating OE/HDO 30
1 qt.
9150-00-188-9858
MIL-L-2104C
5 gal
9150-00-189-6727
Oil Lubricating O0/4DO 10
9150-00-186-6668
MIL-L-2104C
9150-01-035-5392
Oil Lubricating GO80W/90
9150-01-035-5393
MIL-L-2105C
COMPONENT
APPLICATION
Hydraulic
Reservoir
Final Drive
(3)
C350-D
DESCRIPTION
9 gal
NOTES
*
55 gal drum
*
1 qt
*
1 qt
5 gal
6 qts
*
1 qt
5 gal
9150-01-035-5394
55 gal
35.
MAINTENANCE AND OPERATING SUPPLY LIST
NOMENCLATURE. Roller, Motorized, Steel Wheel 2
Drum Tandem, 10-14 Ton (CCE)
MFR PART NO:
NSN:
MAKE
3845-00-578-0372
SERIAL NO. RANGE
TO
N/A
(1)
COMPONENT
APPLICATION
(2)
MFR PART NO
OR
NAT'L STOCK NO
General
Application
9150-00-190-0905
Cooling System
6850-00-181-7933
MODEL:
HYSTER
(3)
(5)
QTY REQ
F/8 HRS
OPN
(4) QTY REQ
QTY REQ
F/INITIAL
OPN
DESCRIPTION
GAA Grease MIL-G-10924
*
*
Anti-Freeze Permanent
MIL-A-46153
16 qts
*
36.
C350-D
DATE
Feb 79
(6)
NOTES
50-50 solution
APPENDIX M
PREVENTIVE MAINTENANCE CHECKS AND SERVICES
Maintenance Forms and Records
Every mission begins and ends with the paperwork. There isn't much of it, but you have to keep it up. The forms and
records you fill out have several uses. They are a permanent record of the services, repairs, and modifications made on
your vehicle. They are reports to organizational maintenance and to your commander. And they are a checklist for you
when you want to know what is wrong with the vehicle after its last use, and whether those faults have been fixed. For the
information you need on forms and records, see TM 38-750.
Preventive Maintenance Checks and Services
1. Do your before (B) PREVENTIVE MAINTENANCE just before you operate the vehicle. Pay attention to the
CAUTIONS and WARNINGS.
2. During checks and services (D) of PREVENTIVE MAINTENANCE will be performed while the equipment and/or its
component systems are in operation.
3. Do your after (A) PREVENTIVE MAINTENANCE right after operating the vehicle. Pay attention to the CAUTIONS
and WARNINGS.
4. Do your weekly (W) PREVENTIVE MAINTENANCE weekly.
5. Do your monthly (M) PREVENTIVE MAINTENANCE once a month.
6. If something doesn't work, troubleshoot it with the instructions in this manual or notify your supervisor.
7. Always do your PREVENTIVE MAINTENANCE in the same order so it gets to be a habit. Once you've had some
practice, you'll spot anything wrong in a hurry.
8. If anything looks wrong and you can't fix it, write it on your DA Form 2404. If you find something seriously wrong,
report it to organizational maintenance TRGHT NOW.
9. When you do your PREVENTIVE MAINTENANCE, take along the tools you need to rake all the checks. You always
need a rag or two.
A-Keep it clean: Dirt, grease, oil, and debris only get in the way and may cover up a serious problem. Clean as you work
and as needed. Use dry cleaning solvent (SD-2) on all metal surfaces. Use soap and water when you clean rubber or
plastic material.
WARNING
Dry cleaning solvent, used to clean parts is potentially dangerous to personnel
and property. Do not use near open flame or excessive heat. Flash point of
solvent is 1000F - 1380F.
37.
B - Bolts, nuts, and screws: Check them all for obvious looseness, missing, bent or broken condition. You can't try them
all with a tool, of course, but look for chipped paint, bare metal, or rust around bolt heads. If you find one you think is
loose, tighten it, or report it to organizational maintenance if you can't tighten it.
C - Welds: Look for loose or chipped paint, rust, or gaps where parts are welded together. If you find a bad weld, report it
to organizational maintenance.
D - Electric wires and connectors: Look for cracked or broken insulation, bare wires, and loose or broken connectors.
Tighten loose connectors and make sure the wires are in good shape.
E - Hoses and fluid lines: Look for wear, damage, and leaks, and make sure clamps and fittings are tight. Wet spots show
leaks, of course. But a stain around a fitting or connector can mean a leak. If a leak comes from a loose fitting or
connector, tighten it. If something is broken or worn out, report it to organizational maintenance.
10. It is necessary for you to know how fluid leakage affects the status of your vehicle. The following are definitions of
the types/classes of leakage an operator or crew member needs to know to be able to determine the status of his/her
vehicle. Learn, then be familiar with them and REMEMBER - WHEN IN DOUBT, NOTIFY YOUR SUPERVISOR!
Leakage Definitions for Crew/Operator PMCS
Class I
Class II
Class III
Seepage of fluid (as indicated by wetness or discoloration) not great enough to form
drops.
Leakage of fluid great enough to form drops but not enough to cause drops to drip from
item being checked/inspected.
Leakage of fluid great enough to form drops that fall from the item being
checked/inspected.
CAUTION
EQUIPMENT OPERATION IS ALLOWABLE WITH MINOR LEAKAGES (CLASS I OR II). OR COURSE,
CONSIDERATION MUST BE GIVEN TO THE FLUID CAPACITY IN THE ITEM/SYSTEM BEING
CHECKED/INSPECTED. WHEN IN DOUBT, NOTIFY YOUR SUPERVISOR.
38.
39.
40.
41.
42.
43.
44.
APPENDIX N
HYSTER
Technical Publication Correction
TITLE:
C350B Parts Manual
NUMBER:
599352
CONTRACT NUMBER:
DSA 700-74-C-9024
Make the following corrections to the publication listed above:
1.
Cross out page 1D05 (Air Filters) as it does not apply to this roller.
2.
Include attached page 1E04 in your manual.
45.
46.
APPENDIX O
HESTER
TECHNICAL PUBLICATION CORRECTION
TITLE:
NIMBER:
CONTRACT NUMBER:
C350B Service Manual
7109M
DSA 700-74-C-9024
Make the following corrections to the publication listed above:
1.
Section 2, Table 2-11, page 2-16 entitled BRAYR. SYSTEM SPECIFICATIONS. Torque specification on BRAKR
SEART NUT reads 100 ft-lbs (13.8 g-m) and should read 26 ft-lbs (3.6 kg-m) maximum. Please note change in
manual.
2.
Figure 4-14, page 4-12 and figure 6-4, page 6-4 have been revised to include the horn circuit. The revised figures
are attached--please include in the manual.
3.
Figure 7-40, page 7-32 shows two (2) arrows pointing to control pressure port. The top (upper most) arrow is
incorrect. Cross out the upper most arrow.
4.
Figure 7-41, page 7-32 is incorrect. Cross out the entire figure. Case pressure must be checked by tying into the
case drain line on top of the hydrostatic pump.
5.
Figure 7-44, page 7-35 is incorrect. Cross out entire figure. The revised figure is attached - please include in the
manual.
6.
Section 7, paragraph 7-172 a, page 7-33 reads a dimension of 13/32. Please correct copy to read 1-3/32
7.
Section 7, paragraph c, page 7-35 reads a dimension of 11/16. Please correct copy to read 1-1/16
8.
Section 8, figure 8-42, page 8-12 is incorrect. Cross out entire figure. The revised figure is attached - please
include in the manual.
47.
FIGURE 4-14. ELECTRICAL SYSTEM SCHEMATIC (WITH DIESEL ENGINE).
48.
SECTION 6
ELECTRICAL
FIGURE 6-4. ELECTRICAL SCHEMATIC FOR DETROIT.
6-4.
SECTION 7
TRANSMISSION
b. Adjust and tighten ball Joint of control cable at
bail shaft end. Adjust neutral start safety (transmission
lockout) switch so that it makes contact in neutral.
f. Adjust and tighten wire stop at throttle crank for
1116 In. (1.59 mm) gap between swivel and wire stop
(see figure 7-44).
c. Move Direction-Throttle Control Bail In the
forward direction until control cable at servo lever has
traveled 11/16 - 31/32 in.(24.64 - 26.92 mm). Adjust bail
stops so that cable cannot be moved beyond this point.
g. Adjust ball Joint in slotted crank on bail shaft to
allow full throttle when bail Is moved to either full
forward or full reverse.
h. Adjust friction control nuts and spring assembly
so that Direction-Throttle Control Bail will remain in any
desired position.
d. Repeat step c in reverse direction.
CAUTION: Ensure that the amount of bail (control
cable) travel Is limited by ball stops and not the interval
servo stops.
7-173.THROTTLE CONTROL LINKAGE
ADJUSTMENT PROCEDURE (see figure 7-44).
e. Return Direction-Throttle Control Ball to neutral
(vertical) position.
a. Adjust transmission control linkage per
procedure outlined in paragraph 7-172 (Sundstrand).
FIGURE 7-44.
7-35.
50.
FIGURE 8-42.
51.
A01
ILLUSTRATED INDEX
1
2
3
4
5
1
FRAME AND BODY PARTS, WATER SPRAY SYSTEM ............
1A04
2
POWER UNIT .............................................................................
1B02
3
FUEL SYSTEM ...........................................................................
1D02
4
ELECTRICAL SYSTEM...............................................................
1F02
5
TRANSMISSION AND POWER TRAIN.......................................
2A04
6
BRAKES AND LINKAGE.............................................................
2C02
7
STEERING AND LINKAGE .........................................................
2D02
8
OPTIONAL EQUIPMENT ............................................................
2E02
9
NUMERICAL INDEX ...................................................................
G02
6
7
8
9
A02
ALPHABETICAL INDEX
ALTERNATOR...................................................
BRAKE AND LINKAGE ......................................
CARBURETOR..................................................
CONTROL LINKAGE .........................................
COOLING SYSTEM...........................................
DECALS AND PAINTING INSTRUCTIONS .......
DISTRIBUTOR...................................................
1F09
2C03
1E04
2A09
1B09
FUEL SYSTEM-3-53 DIESEL............................
1E03
HORN ...............................................................
1F08
HYDRAULIC MOTOR .......................................
2A11
HYDRAULIC PUMP ................................. 2A13 & 2B03
HYDRAULIC SYSTEM ......................................
2A06
LIGHTING SYSTEM..........................................
2E03
OIL FILTER.......................................................
2802
SCRAPERS AND HATS....................................
SERVO CONTROL VALVE ...............................
1A06
2B01
STEERING CONTROL......................................
STEERING CYLINDER .....................................
2D04
2D07
STEERING PUMP-3-53 DIESEL .......................
STEERING SYSTEM ........................................
STEERING TRUNNION AND DRUMS ..............
2D07
2D03
2D05
THROTTLE LINKAGE .......................................
1D07
WATER SPRAY SYSTEM.................................
1A07
1A08
1F04
ELECTRICAL SYSTEM-4-236 AND 3-53 DIESEL 1F05
ENGINE NOUNTS-3-53 DIESEL........................
1C07
EXHAUST SYSTEM-3-53 DIESEL .....................
1C08
FINAL ORIVE-C350B.........................................
FRAME AND COWLING....................................
2B05
1A05
A03
UNIT IDENTIFICATION
UNIT SERIAL NO.
(1) & (2) The first letter and number denote the design series and model
of the unit.
(3)
The second letter denotes the plant at which the unit was
manufactured.
(4)
The number series denotes the serial number of the unit.
(5)
The final letter denotes the year of manufacture starting with "A"
in 1957. The letters "I", "O", and "Q" will not be used.
Parts Referred To In This Book As Right Or Left Hand Parts
Are In Accordance With The Illustration Below
R. H. Side
L. H. Side
CAUTION!
Never Attempt To Clean, Oil Or Adjust A Machine
While It Is In Motion
HOW TO USE THE ILLUSTRATED PARTS MANUAL
This parts manual describes and illustrates assemblies
subassemblies and detail parts needed for serious
replacement.
It also includes all parts peculiar to units built in overseas
plants. These parts are indicated by keys, symbols and
footnotes.
II
When The Part Number And Next Higher Assembly Is
Not Known:
When The Part Number Is Known:
5.
1.
2.
USE: Determine the function and application of the
part required. Turn to the illustrated index page
immediately behind the front cover, and select the
most appropriate area.
Line up the black arrow containing the appropriate
reference number, with the black tab on the division
index page with the same reference number. Use the
division index to determine the assembly which would
normally contain the part required. Proceed then to
locate the part on the assembly breakdown page.
When The Part Number Is Not Known And Next Higher
Assembly Is Known:
3.
Determine the assembly the required part Is used on.
Turn to the alphabetical index immediately following
the Illustrated index.
4.
Locate the assembly the required part is used on and
turn to the page indicated for that assembly. Proceed
then to locate the part on the assembly breakdown
page.
Use the numerical Index to find the part number. Turn
to the page listed and locate the part as indicated by
the reference number.
GENERAL:
The assembly breakdowns include part
numbers, description, quantities required, keys and
footnotes to help in selecting the correct parts.
6.
Keys are used to show effective serial numbers, two
or more similar assemblies, RH and LH assembly
parts, etc. Select the appropriate key, "A", "B", "C" or
"D" and the corresponding quantity column to find the
required part.
7.
Indent numbers are used to indicate assemblies and
sub-parts of assemblies. Number 1 Is the major
assembly. Part descriptions which are indented under
2, 3, or 4 are sub-parts of that major assembly shown
above.
8.
Quantities shown are for one assembly. Note that
three assemblies are shown, but the quantities of the
sub-parts are indicated as one and two This means
one and two per assembly.
ORDERING PARTS: When ordering replacement parts, give the unit serial number, part
number, name of part and quantity required.
For any further information on parts, service, or ordering, consult your local Hyster dealer.
III
FIRE PRECAUTION
To avoid fires, operators should be instructed to refuel compactors in
well lighted areas outside of buildings. Repairs and adjustments should
be made on only those compactors which have been taken to a garage
or maintenance shop.
STORAGE OF COMPACTOR
Lubricate the compactor according to lubrication recommendations if it is
to be left standing for any length of time. This will protect against
rusting.
The engine should be run once a week until it is thoroughly warm. This
will circulate the oil and prevent rusting from condensation, in addition to
keeping the battery charged.
If freezing weather is expected before the engine will be started again,
see that the cooling system is adequately protected against freezing.
Drain all water ballast from drums, or use calcium chloride solution.
If the engine is to be stored or left standing longer than a normal day, fill
the fuel tank with clean fuel to keep out moisture laden air. This will
prevent condensation and rust from forming inside the tank.
OPERATION AND MAINTENANCE TIPS
The following tips will help increase compactor life and contribute to the
reduction of expensive downtime.
1.
Check lubricating and hydraulic oils and engine coolant at the
beginning of each work shift. Use only recommended oils.
2.
Don't work compactor until engine and hydraulic oils are warm.
3.
Don't let engine idle for extended periods.
4.
Don't operate compactor with faulty engine governor or with
excessive hydraulic pressure. Have qualified personnel make
these checks.
5.
Make sure the air cleaner and oil filters are serviced correctly.
All connections must be tight with no leaks in the system.
6.
Do not add coolant to an overheated engine.
7.
After working compactor let engine idle a few minutes before
stopping.
8.
Fill fuel tank at the end of the shift, when compactor is warm.
9.
Repair minor defects immediately.
10.
Adhere to lubrication and maintenance recommendations.
1A04
FRAME AND BODY PARTS, WATER SPRAY SYSTEM
DECALS AND PAINTING INSTRUCTIONS............
FRAME AND COWLING ........................................
SCRAPERS AND MATS.........................................
WATER SPRAY SYSTEM......................................
1A08
1A05
1A06
1A07
1A05
FRAME AND COWLING
1A06
SCRAPERS AND MATS
1A07
WATER SPRAY SYSTEM
1A08
DECALS AND PAINTING INSTRUCTIONS
1B02
1B09
COOLING SYSTEM
1C07
ENGINE MOUNTS, CRANKCASE DRAIN, AND FILTER HOSES
FOR 3-53 DIESEL ENGINE
1C08
EXHAUST SYSTEM
FOR 3-53 DIESEL ENGINE
1D02
FUEL SYSTEM
AIR FILTER-GAS....................................................
AIR FILTER-4-236 DSL ..........................................
AIR FILTER-3-53 DSL ............................................
CARBURETOR.......................................................
FUEL INJECTION PUMP-4-236 DSL......................
FUEL INJECTION SYSTEM-4-236 DSL .................
FUEL OIL LIFT PUMP-4-236 DSL ..........................
FUEL PUMP-GAS ..................................................
FUEL SYSTEM-GAS ..............................................
FUEL SYSTEM-4-236 DSL .....................................
FUELS SYSTEM-3-53 DSL.....................................
GOVERNOR...........................................................
SECONDARY FUEL FILTER040236 DSL...............
SECONDARY FUEL FILTER-3-53 DSL ..................
THROTTLE LINKAGE ............................................
1D04
1D04
1E04
1E04
1D13
1D12
1E01
1D03
1D03
1D11
1E03
1D03
1E01
1E03
1D07
1D05
AIR FILTER
1D09
THROTTLE LINKAGE
FIRST USED ON SERIAL NO. 889C-3401 AND A146C-1700
1D10
THROTTLE LINKAGE
FIRST USED ON SERIAL NO. 889C-3401 AND A146C-1700
1E03
FUEL SYSTEM
FOR 3-53 DIESEL ENGINE
1F02
ELECTRICAL SYSTEM
1F05
ELECTRICAL SYSTEM
FOR DIESEL ENGINE
1F06
ELECTRICAL SYSTEM
FOR DIESEL ENGINE
1F08
STARTING MOTOR
1F09
ALTERNATOR
2A04
TRANSMISSION AND POWER TRAIN
CONTROL LINKAGE ..................2A09
FINAL DRIVE-C3508 .................. 2805
FINAL DRIVE 6340A.................. 2807
HYDRAULIC MOTOR .................2A11
HYDRAULIC PUMP ........2A13 & 2803
HYDRAULIC SYSTEM ................2A05
OIL FILTER ................................ 2802
SERVO CONTROL VALVE ......... 2801
2A07
HYDRAULIC SYSTEM
FIRST USED ON SERIAL NO. 889C-3401 AND A146C-1700
2A08
HYDRAULIC SYSTEM
FIRST USED ON SERIAL NO. 889C-3401 AND A146C-1700
2A10
CONTROL LINKAGE
FIRST USED ON SERIAL NO. B89C-3401 AND A146C-1700
2A12
HYDRAULIC MOTOR
FIRST USED ON SERIAL NO. B89C-3401 AND A146C-1700
2802
OIL FILTER
2803
HYDRAULIC PUMP
FIRST USED ON SERIAL NO. B89C-3401 AND A146C-1700
2804
HYDRAULIC PUMP
FIRST USED ON SERIAL NO. 889C-3401 AND A146C-1700
2805
FINAL DRIVE
FOR C3508
2806
FINAL DRIVE
FOR C3508
2C02
BRAKE AND LINKAGE
PARKING BRAKE AND LINKAGE ................2C03
2C03
PARKING BRAKE AND LINKAGE
2D02
STEERING SYSTEM
STEERING CONTROL ............................. 2D04
STEERING CYLINDER AND SOCKETS .. 2D07
STEERING PUMP 0A3 AND 4 236 DL ..... 2D0L
STEERING PUMP-3-53 DSL .................... 2D07
STEERING SYSTEM ............................... 2D03
STEERING TRUNNION AND DRUMS ..... 2D05
2D03
STEERING SYSTEM
2D04
STEERING SYSTEM
2D05
STEERING TRUNNION AND DRUMS
2D06
STEERING PUMP
2D07
STEERING CYLINDER AND SOCKETS
2E02
OPTIONAL EQUIPMENT
LIGHTING SYSTEM .............................................. 2E03
2E03
LIGHTING SYSTEM
G02
NUMERICAL INDEX
125
-
30368 .......................... G03
30375
134938
-
134936......................... G04
58447 .......................... G05
158452
-
164134......................... G06
164141173218 -
-
172885......................... G07
196285 ........................ G08
196431-
-
243606 ........................ G09
243608
984326
-
984275 ........................ G10
L199287 ....................... G11
G03
NUMERICAL INDEX
G04
NUMERICAL INDEX
G05
NUMERICAL INDEX
G06
NUMERICAL INDEX
G07
NUMERICAL INDEX
G08
NUMERICAL INDEX
G09
NUMERICAL INDEX
G10
NUMERICAL INDEX
G11
NUMERICAL INDEX
TM 5-3895-348-14&P-1
By Order of the Secretary of the Army:
Official:
E. C. MEYER
General, United States Army
Chief of Staff
J. C. PENNINGTON
Major General, United States Army
The Adjutant General
Distribution:
To be distributed in accordance with DA Form 12-25B, Organizational maintenance requirements for Roller,
Vibratory, Selfpropelled.
* U.S. GOVERNMENT PRINTING OFFICE : 1996 - 409-304
PIN: 048458-000
This fine document...
Was brought to you by me:
Liberated Manuals -- free army and government manuals
Why do I do it? I am tired of sleazy CD-ROM sellers, who take publicly
available information, slap “watermarks” and other junk on it, and sell it.
Those masters of search engine manipulation make sure that their sites that
sell free information, come up first in search engines. They did not create it...
They did not even scan it... Why should they get your money? Why are not
letting you give those free manuals to your friends?
I am setting this document FREE. This document was made by the US
Government and is NOT protected by Copyright. Feel free to share,
republish, sell and so on.
I am not asking you for donations, fees or handouts. If you can, please
provide a link to liberatedmanuals.com, so that free manuals come up first in
search engines:
<A HREF=http://www.liberatedmanuals.com/>Free Military and Government Manuals</A>
– Sincerely
Igor Chudov
http://igor.chudov.com/