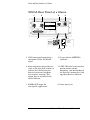
1
097-59551-02 Issue 1: Apr 00 59551A GPS Measurements Synchronization Module and 58503A GPS Time and Frequency Reference Receiver Operating and Programming Guide Copyright 2000 Symmetricom, Inc. All rights reserved. Printed in U.S.A. In This Guide This guide describes how to operate the 59551A GPS Measurements Synchronization Module and the 58503A GPS Time and Frequency Reference Receiver via the RS-232C port(s). The information in this guide applies to instruments having the number prefix listed below, unless accompanied by a “Manual Updating Changes” package indicating otherwise. SERIAL PREFIX NUMBER: 3542 and above (59551A) 3542 and above (58503A) Instruments with serial numbers below 3542 may have earlier versions of firmware installed. There are no operator-specific differences in previous versions of firmware. FIRMWARE REVISION: 3543 and above (59551A) 3543 and above (58503A) Firmware revision can be identified by using a “*IDN?” command sent to the Receiver via RS-232C port. Refer to Chapter 2, “Serial Interface Capabilities,” in this guide for instructions on connecting a computer or terminal to this product. Warning Symbols Used In This Book ! Instruction manual symbol; the product will be marked with this symbol when it is necessary for the user to refer to the instruction manual. Indicates hazardous voltages. Indicates earth (ground) terminal. or For assistance, contact: Symmetricom, Inc. 2300 Orchard Parkway San Jose, CA 95131-1017 U.S.A. Call Center: 888-367-7966 (from inside U.S.A. only – toll free) 408-428-7907 Indicates terminal is connected to chassis when such connection is not apparent. Indicates Alternating current. Indicates Direct current. U.K. Call Center: +44.7000.111666 (Technical Assistance) +44.7000.111888 (Sales) Fax: 408-428-7998 E-mail: [email protected] Internet: http://www.symmetricom.com ii Contents Warning Symbols Used In This Book ii Chapter 1: Front and Rear Panels at a Glance 1 59551A Front Panel at a Glance 2 59551A Rear Panel at a Glance 3 58503A Front Panel at a Glance 4 58503A Rear Panel at a Glance 5 Chapter 2: Serial Interface Capabilities 1 About the RS-232C Serial Port(s) PORT 1 Rear-Panel PORT 2 Front-Panel RS-232C Serial Port (59551A Only) 3 3 Connecting a Computer or Modem To Connect the GPS Receiver to a PC, Laptop, or Modem Via the Rear-Panel DB-25 Serial Port Connecting to the Personal Computer (PC) Connecting to a Modem To Connect the 59551A to a Laptop Computer Via the Front-Panel DB-9 Serial Port 5 Configuring the RS-232C Port(s) If You Need To Make Changes to the Serial Port Settings Configuring PORT 1 Configuring PORT 2 (59551A Only) If Changes Have Already Been Made to the 4 6 6 6 7 9 10 10 11 iii Contents Serial Port Settings 11 Chapter 3: Visual User Interface 1 Chapter Contents 2 Overview of the Visual User Interface 3 Setting Up the GPS Receiver To Connect Antenna System to the Receiver To Connect PC to the Receiver To Configure Terminal Communications for Windows-based PC To Configure Terminal Communications for DOS-based PC (No Windows) To Power Up the Receiver 4 4 4 Accessing the Receiver Status Screen (the Visual User Interface) Overview of the Visual User Interface To Access the Manually Operated Receiver Status Screen To Install the Automated SatStat Program for Continual Status Updates To Operate the Automated SatStat Program 5 6 7 7 7 7 8 9 Using and Reading the Receiver Status Screen Tutorial on Using the Status Screen to Interface With the Receiver Demonstration of Holdover Operation 10 15 The Receiver Status Screen at a Glance 17 Chapter 4: Command Quick Reference 1 Chapter Contents 2 An Introduction to GPS Receiver Commands 4 iv 10 Contents SCPI Conformance Information Command Syntax Conventions Command Presentation 4 4 4 GPS Satellite Acquisition Facilitating Initial Tracking Establishing Position Selecting Satellites Compensating for Antenna Delay Monitoring Acquisition 4 5 5 6 6 6 1 PPS Reference Synchronization Monitoring 1 PPS Synchronization Assessing 1 PPS Quality Operating in Holdover Initiating Manual Holdover Recovering from Holdover 7 7 7 7 7 7 Operating Status Clearing and Presetting Alarms Reading and Qualifying Alarms Reading and Qualifying Receiver Status Reading and Qualifying Command Error Status Reporting Questionable Status Assessing Receiver Health 8 8 8 9 9 9 9 System Time Identifying Time of Next 1 PPS Reference Edge Reading Current Time Applying Local Time Zone Offset Defining the 1 PPS Reference Edge (59551A Only) Reading Leap Second Status 10 10 10 10 Programmable Pulse Output (59551A Only) 11 Event Time Stamping (59551A Only) Defining the Time-stamped Edge Clearing Time Stamp Memory Reading Time Stamps Processing Memory Overflow 12 12 12 12 12 10 10 v Contents Serial Interface Communication Configuring I/O Port 1 Configuring I/O Port 2 (59551A Only) Recovering the Last Query Response 13 13 13 13 Receiver Initialization 14 Receiver Identification/Upgrade Reading Product Identification Installing Firmware via I/O Port 1 15 15 15 Receiver Commands at a Glance 16 Chapter 5: Command Reference 1 Command Syntax Conventions 3 Description Format Commands and Returns Query-Specific Information Description of Response Formats (ASCII-encoded) 4 4 5 GPS Satellite Acquisition 6 5 1 PPS Reference Synchronization 21 Operating Status 29 System Time 55 Programmable Pulse Output (59551A Only) 64 Event Time Stamping (59551A Only) Defining the Time-stamped Edge ___________________ 70 vi 70 Contents Clearing Time Stamp Memory Processing Memory Overflows 72 76 Serial Interface Communication 79 Receiver Initialization 85 Receiver Identification/Upgrade 89 Appendix A: Error Messages 1 Introduction 2 Reading an Error 2 Error Queue 3 Error Types No Error Syntactic Error Semantic Error Hardware/Firmware Error Query Error 4 4 4 4 5 6 General Error Behavior 6 List of Errors 8 Appendix B: Command Syntax and Style 1 Appendix Contents 2 Command Types, Format, and Elements Command Types Command Formats Common Command Format 3 3 3 3 vii Contents SCPI Command and Query Format Elements of SCPI Commands Common Command Syntax Subsystem Command Syntax Abbreviated Commands Keyword Separator Parameter Data Types Parameter Separator Query Parameters Suffixes Suffix Elements Suffix Multipliers Command Terminator Using Multiple Commands Program Messages Program Message Syntax Elements of Response Messages Response Messages Response Message Syntax Response Formats 3 4 4 4 5 5 6 6 6 6 7 7 8 8 8 8 9 9 10 11 Appendix C: Receiver Firmware Installation 1 Reference Documentation 2 Downloading New Firmware Using SatStat Program 3 viii In This Guide Chapter 1, “Front and Rear Panels at a Glance,” provides overview of the Receiver’s indicators, inputs, and outputs. Chapter 2, “Serial Interface Capabilities,” provides RS-232 serial interface port connection and configuration instructions. Chapter 3, “Visual User Interface,” which is subtitled “Using the Receiver and Status Screen,” provides information on how to use the Receiver Status screen and the SatStat program. An illustrated foldout of the Receiver Status screen, which is a comprehensive summary of key operation conditions and settings, is provided at the end of this chapter. Chapter 4,“Command Quick Reference,” is a quick reference that summarizes the Receiver commands. The commands are presented or grouped by their functions. A foldout sheet that presents all of the commands on one side (Receiver Commands at a Glance) and illustrates the status reporting system on the other side (Status Reporting System at a Glance) is provided at the end of this chapter. Chapter 5, “Command Reference,” provides a description of each command that can be used to operate the GPS Receiver. The commands are grouped by functions. The functions are grouped and ordered the same as they are in Chapter 4, “Command Quick Reference,” and on the foldout “Receiver Commands at a Glance.” A comprehensive discussion on how you can monitor and control alarm conditions using the status registers is also provided in this chapter. Appendix A, “Error Messages,” lists all error messages the Receiver could generate along with descriptions of possible causes for the errors. Appendix B, “Command Syntax and Style,” provides an overview of the Standard Commands for Programming Instrument (SCPI) syntax and style to help you program the Receiver. Appendix C, “Receiver Firmware Installation,” provides a procedure for downloading new firmware to the GPS Receiver. Command Index, lists all of the commands alphabetically and provides page references. General Index ix In This Guide x 1 Front and Rear Panels at a Glance Front and Rear Panels at a Glance 59551A Front Panel at a Glance 59551A GPS MEASUREMENTS SYNCHRONIZATION MODULE Power GPS Lock Holdover Alarm PORT 2 1 2 3 4 5 1 When the Power indicator is illuminated, it indicates that the proper input power is supplied to the Module. 4 When the Alarm indicator is illuminated, it indicates that the Module has detected a condition that requires attention. 2 When the GPS Lock indicator is illuminated, it indicates that the Module is tracking satellites and has phase-locked its internal reference to the reference provided by GPS. 5 PORT 2 RS-232C serial interface port for local control, monitoring, and retrieving of the Module’s memory data. 3 When the Holdover indicator is illuminated, it indicates that the Module is not phase-locking its internal reference to the reference provided by GPS. Typically, this would happen due to loss of satellite tracking. The internal reference oscillator will determine the accuracy of the 1 PPS signal when the Module is operating in holdover. (See specification for Accuracy in Holdover in Chapter 3,“59551A Specifications,” in the Getting Started guide.) Front and Rear Panels at a Glance 1-2 Front and Rear Panels at a Glance 59551A Rear Panel at a Glance 6 WARNING: 1 2 4 3 5 NO OPERATOR SERVICEABLE PARTS INSIDE, REFER SERVICING TO SERVICE TRAINED PERSONNEL. ANTENNA OUTPUTS TIME TAG INPUTS 2 3 1 Alarm BITE ! ! ! ! PORT 1 Programmable Pulse IRIG-B WARNING: This unit must be earth grounded. CAUTION: METRIC & INCH HARDWARE. WARNING: SERIAL PLATE ~ POWER 1 PPS 120-240 VAC 50/60 Hz 50 VA MAX ! FOR CONTINUED FIRE PROTECTION, USE SPECIFIED ~ LINE FUSE. FOR LABORATORY USE BY QUALIFIED PERSONNEL FOUR USAGE EN LABORATOIRE PAR PERSONNEL QUALIFIE 7 8 1. 1 PPS connector for outputting a continuous 1 Pulse Per Second signal. 2. Programmable Pulse output connector for outputting pulses at user-specified time/period. 3. Alarm BITE (Built-In Test Equipment) relay for external devices (such as red light, bell, or horn) to indicate that the Module has detected an internal condition that requires attention. The relay opens and closes with the Alarm indicator. (Mating connector is Amphenol part number 31224 [glass-filled Noryl] or #31-2226 [Teflon] ). 4. IRIG-B output for outputting formatted time-code signals. (This signal is used for general purpose time distribution and magnetic tape annotation applications requiring the time of year.) 5. Time tag input connectors for time stamping TTL conditioned signals. 6. N-type (female) ANTENNA connector. 7. PORT 1 RS-232C serial interface port for remote control, monitoring, and retrieving of the Module’s memory data and upgrading Module software. 8. Power input jack. Front and Rear Panels at a Glance 1-3 Front and Rear Panels at a Glance 58503A Front Panel at a Glance 58503B GPS TIME AND FREQUENCY REFERENCE RECEIVER Power GPS Lock Holdover Alarm 1 2 3 4 1 When the Power indicator is lit, it indicates that the proper input power is supplied to the Receiver. 2 When the GPS Lock indicator is lit, it indicates that the Receiver is tracking satellites and has phase-locked its internal reference to the reference provided by GPS. 3 When the Holdover indicator is lit, it indicates that the Receiver is not phase-locking its internal reference to the reference provided by GPS. Typically, this would happen due to loss of satellite tracking. The internal reference oscillator will determine the accuracy of the 1 PPS signal and the 10 MHz reference output when the Receiver is operating in holdover. (See specification for Accuracy in Holdover in Chapter 4, “58503A Specifications,” in the Getting Started guide.) 4 When the Alarm indicator is lit, it indicates that the Receiver has detected a condition that requires attention. Front and Rear Panels at a Glance 1-4 Front and Rear Panels at a Glance 58503A Rear Panel at a Glance 1 WARNING: 2 3 4 NO OPERATOR SERVICEABLE PARTS INSIDE, REFER SERVICING TO SERVICE TRAINED PERSONNEL. OUTPUTS 1 PPS Alarm (TTL) ANTENNA 10 MHz OUT WARNING: This unit must be earth grounded. ! ! CAUTION: POWER METRIC & INCH HARDWARE 110 VAC CONSULT SERVICE MANUAL I/O PORT 1 24 VDC WARNING: This unit must be earth grounded. CAUTION: SERIAL PLATE 48 VDC METRIC & INCH HARDWARE WARNING: ! FOR CONTINUED FIRE PROTECTION, USE SPECIFIED ~ LINE FUSE. 5 ~ POWER POWER 120-240 VAC 50/60 Hz 50 VA MAX 24 VDC 48 VDC ! 50 VA MAX ! 6 1 1 PPS connector for outputting a continuous 1 Pulse Per Second signal. 4 N-type (female) ANTENNA connector. 2 Alarm output for external devices (such as red light, bell, or horn) to indicate that the Receiver has detected an internal condition that requires attention. This output goes on and off with the Alarm indicator. 5 PORT 1 RS-232C serial interface port for remote control, monitoring, and downloading of the Receiver’s memory data and upgrading Receiver software. 3 10 MHz OUT output for user-specific applications. 6 Power input jack. Front and Rear Panels at a Glance 1-5 Front and Rear Panels at a Glance Front and Rear Panels at a Glance 1-6 2 Serial Interface Capabilities Serial Interface Capabilities Chapter Contents This chapter describes how to operate the 59551A GPS Measurements Synchronization Module and the 58503A GPS Time and Frequency Reference Receiver via the RS-232C serial interface port. Hardware connections and configuration are discussed. This chapter is organized as follows: • About the RS-232C Serial Port(s) – PORT 1 Rear-Panel RS-232C Serial Interface Port – PORT 2 Front-Panel RS-232C Serial Interface Port (59551A Only) • • page 2-2 page 2-3 page 2-4 Connecting a Computer or Modem page 2-5 – To Connect the 59551A to a PC or Modem Via the Rear-Panel DB-25 Serial Port page 2-6 – To Connect the 59551A to a Laptop Computer Via the Front-Panel DB-9 Serial Port page 2-7 Configuring the RS-232C Port(s) – If You Need To Make Changes to the Serial Port Settings – If Changes Have Already Been Made to the Serial Port Settings Serial Interface Capabilities 2-2 page 2-9 page 2-10 page 2-11 Serial Interface Capabilities About the RS-232C Serial Port(s) The 59551A has separate rear-panel (PORT 1) and front-panel (PORT 2) RS-232C serial interface ports. The 58503A has only a rear-panel (PORT 1) RS-232C serial interface port. The rear-panel (PORT 1) RS-232C serial interface port is the only port which can be used to upgrade the Receiver firmware; therefore, it is referred to as the PRIMARY port. The 59551A ’s front-panel (PORT 2) RS-232C serial interface port is referred to as the SECONDARY port because it cannot be used to upgrade the Receiver firmware. The operation and configuration of these ports are described in the following paragraphs. More information is provided in the sections titled “Connecting a Computer or Modem” and “Configuring the RS-232C Port(s)” in this chapter on pages 2-5 and 2-9, respectively. Either port allows you full communication with the Receiver. This can be done by connecting any computer with an RS-232C serial interface and suitable terminal emulation software, then sending the correct commands for transmitting or retrieving data. PORT 1 Rear-Panel This 25-pin female subminiature D (DB-25) connector (PORT 1) RS-232C Serial Interface Port, located on the rear panel. The pins used for PORT 1 RS-232C communication are described in Table 2-1. NOTE Manufacturing reserves the right to impose signals on other pins; therefore, your connection should be restricted to the pins described in Table 2-1. Serial Interface Capabilities 2-3 Serial Interface Capabilities Table 2-1. PORT 1 Rear-Panel RS-232C Serial Port Connections *Pin Number Input/Output Description 2 Output Transmit Data (TxD). GPS Receiver output. 3 Input Receive Data (RxD). GPS Receiver input. 7 _____ Signal Ground (SG) Refer to the sections titled “Connecting a Computer or Modem” in this chapter, on page 2-5, for wiring diagrams and more information on the RS-232C interface cables. PORT 2 Front-Panel RS-232C Serial Port (59551A Only) This 9-pin female subminiature D (DB-9) connector (PORT 2) RS-232C Serial Interface Port, located on the front panel. The pins used for PORT 2 RS-232C communication are described in Table 2-2. NOTE Manufacturing reserves the right to impose signals on other pins; therefore, your connection should be restricted to the pins described in Table 2-2. Table 2-2. PORT 2 Front-Panel RS-232C Serial Port Connections (59551A Only) *Pin Number Input/Output Description 2 Input Receive Data (RxD). GPS Receiver input. 3 Output Transmit Data (TxD). GPS Receiver output. 5 _____ Signal Ground (SG) Refer to the sections titled “Connecting a Computer or Modem” in this chapter, on page 2-5, for wiring diagrams and more information on the RS-232C interface cables. Serial Interface Capabilities 2-4 Serial Interface Capabilities Connecting a Computer or Modem To connect the GPS Receiver to a computer or modem, you must have the proper interface cable. Most computers are DTE (Data Terminal Equipment) devices. Since the Receiver is also a DTE device, you must use a DTE-to-DTE interface cable when connecting to a computer. These cables are also called “null-modem”, “modem-eliminator”, or “crossover” cables. Most modems are DCE (Digital Communication Equipment) devices; thus, you must use a DTE-to-DCE interface cable. The interface cable must also have the proper connector on each end and the internal wiring must be correct. Connectors typically have 9 pins (DB-9 connector) or 25 pins (DB-25 connector) with a “male” or “female” pin configuration. A male connector has pins inside the connector shell and a female connector has holes inside the connector shell. To simplify interface cable selections, the following sections tells you which cables to use. Serial Interface Capabilities 2-5 Serial Interface Capabilities To Connect the GPS Receiver to a PC, Laptop, or Modem Via the Rear-Panel DB-25 Serial Port Connecting to the Personal Computer (PC) Use an 24542G interface cable or equivalent to connect the Receiver’s rear-panel PORT 1 DB-25 female connector to a PC or laptop as shown in Figure 2-2. GPS Receiver (Rear view) F1015-80002 or equivalent ! ANT ! ! 5181-6640 Adapter Computer Figure 2-2. Connecting the GPS Receiver to a Computer Connecting to a Modem Use an HP 40242M interface cable or equivalent to connect the Receiver’s rear-panel PORT 1 DB-25 female connector to a modem, which is a DCE (Digital Communication Equipment) device, as shown in Figure 2-3. Serial Interface Capabilities 2-6 Serial Interface Capabilities GPS Receiver (Rear view) WARNING: NO OPERATOR SERVICEABLE PARTS INSIDE, REFER SERVICING TO SERVICE TRAINED PERSONNEL. OUTPUTS 1 pps Programmable Irig-B TOD Time Tag 1 INPUTS Time Tag 2 ANTENNA ALARM BITE Time Tag 3 ! POWER ! 129 VDC ! Port 1 FOR LABORATORY USE BY QUALIFIED PERSONNEL FOUR USAGE EN LABORATOIRE PAR PERSONNEL QUALIFIE SERIAL PLATE 48 VDC 129 VDC ! WARNING: FOR CONTINUED FIRE PROTECTION, USE SPECIFIED ~ LINE FUSE. Modem set to Auto-Answer 40242M Telephone Line Figure 2-3. Connecting the GPS Receiver to a Modem To Connect the 59551A to a Laptop Computer Via the Front-Panel DB-9 Serial Port Use the 9-pin (f) to miniature 9-pin (f) RS-232C interface cable supplied for the laptop computer, and a “straight-through” type of 9-pin male-to-male adapter to connect the 59551A Module’s front-panel PORT 2 DB-9 female connector to a laptop computer as shown in Figure 2-4 CAUTION The 9-pin male-to-male adapter should be wired as shown in Figure 2-5. Pins 2, 3, and 5 should be straight-through pin connections (no crossover of pins). 59551A 59551A GPS MEASUREMENTS SYNCHRONIZATION MODULE Power GPS Lock Holdover Alarm OUTPUT RS-232 Computer Figure 2-4. Connecting the 59551A to Laptop Computer Serial Interface Capabilities 2-7 Serial Interface Capabilities If you choose to make your own cable, see figures 2-5 and 2-6. Figures 2-5 and 2-6 illustrate the 24542U cable (9-pin female to 9-pin female connectors) and the 24542G cable (25-pin male to 9-pin female connectors), respectively. Each of these cables are null-modem cables. Note that pins 2 and 3 of the 24542G 25-pin (male) to 9-pin (female) cable, shown in Figure 2-6, DO NOT cross; nevertheless, this cable is a null-modem cable. Data Terminal Equipment PC RS-232 (9-pin) PC input PC output RXD TXD GND 24542U or F1015-80002 Interface Cable 1 2 3 4 5 6 7 8 9 Adapter 1 2 3 4 5 6 7 8 9 DE-9P DE-9S Male Female Data Communications Equipment PORT 2 RS-232 (9-pin) DE-9S Female 1 2 3 4 5 6 7 8 9 1 2 3 4 5 6 7 8 9 DE-9P Male RXD TXD Instrument input Instrument output GND DE-9P DE-9S Male Female Figure 2-5. DB-9 to DB-9 Serial Connection Data Terminal Equipment PC RS-232C (9-pin) PC input PC output RX TX GND DE-9P Male DE-9S-to-DE-9P (DTE-to-DCE) Interface Cable 1 2 3 4 5 6 7 8 9 DE-9S Female Data Communications Equipment 59551A PORT 2 RS-232C (9-pin) 1 2 3 4 5 6 7 8 9 DE-9P Male Figure 2-6. DB-25 to DB-9 Serial Connection Serial Interface Capabilities 2-8 RX TX GND DE-9S Female Instrument input Instrument output Serial Interface Capabilities Configuring the RS-232C Port(s) The 59551A has separate rear-panel (PORT 1) and front-panel (PORT 2) RS-232C serial interface ports. The 58503A has one RS-232C serial interface port (PORT 1) on the rear panel. Software pacing, baud rate, parity, data bits, and stop bits parameters for each port are user-selectable and independent of the configuration of the other. Tables 2-3 and 2-4 list the configuration factory-default values for PORT 1 and PORT 2, respectively. Table 2-3. PORT 1 Configuration Factory-Default Values Parameter Default Possible Choices Software Pacing NONE XON or NONE Baud Rate 9600 1200, 2400, 9600, or 19200 Parity NONE EVEN, ODD, or NONE Data Bits 8 7 or 8 Stops Bits 1 1 or 2 Full Duplex ON ON or OFF Table 2-4. PORT 2 Configuration Factory-Default Values (59551A Only) Parameter Default Possible Choices Software Pacing NONE XON or NONE Baud Rate 9600 1200, 2400, 9600, or 19200 Parity NONE EVEN, ODD, or NONE Data Bits 8 Fixed at 7 when parity is even or odd. Fixed at 8 when parity is none. Stops Bits 1 Fixed (no choices available) Full Duplex ON ON or OFF Serial Interface Capabilities 2-9 Serial Interface Capabilities Procedures for configuring the RS-232C ports are provided in the following paragraphs. If You Need To Make Changes to the Serial Port Settings CAUTION If you change the serial port settings, your changes will be stored in the Receiver. Cycling power will not reset to factory defaults. Therefore, if you make a change, it is recommended that you record the settings and keep the record with the Receiver. If you need to change the serial port settings, for example, to set up for a different computer, use the guidelines given in this section. Serial port settings are changed by issuing commands. It is recommended that you issue a single compound command which simultaneously sets all the serial port parameters. Then connect the other computer and begin using the instrument with the new settings. NOTE If you choose to set parameters one at a time, you will make the procedure more difficult. That is, with each change, the instrument will be updated, but your computer will retain its original settings. At each step, you will have stopped serial communications and be forced to modify your PC settings to match the Receiver in order to continue. It is recommended that you make all changes in a single compound command, verify the changes, and record all parameters. Configuring PORT 1 Complete configuration of PORT 1 requires that you set five parameters. The command line sent in the following example would set the RS-232C port pacing to XON, baud rate to 2400, parity to EVEN, data bits to 7, and stop bits to 2. This command line must be transmitted on PORT 1. SYST:COMM:SER:PACE XON; BAUD 2400; PARITY EVEN; BITS 7; SBITS 2 Serial Interface Capabilities 2-10 Serial Interface Capabilities Configuring PORT 2 (59551A Only) Complete configuration of PORT 2 requires that you set three parameters. The command line sent in the following example would set the RS-232C port pacing to XON, baud rate to 2400, and parity to EVEN. This command line must be transmitted on PORT 2. SYST:COMM:SER2:PACE XON; BAUD 2400; PARITY EVEN If Changes Have Already Been Made to the Serial Port Settings If you connect your PC, press Return, and do not get a scpi> prompt back from the Receiver, your Receiver’s serial communication settings may have been modified. You need to systematically step through the data communication settings on your PC until your PC matches the Receiver. The Receiver cannot communicate its settings until this process is complete. Iterate until you are able to verify that settings on your PC match the Receiver. When you are successful, you will have restored full RS-232C communications, enabling you to query the Receiver’s communication settings. Once you establish communications with one serial port, you can query the Receiver for settings of either port. Issue the following queries to either serial port to verify PORT 1’s configuration. SYST:COMM:SER:PACE? SYST:COMM:SER:BAUD? SYST:COMM:SER:PARITY? SYST:COMM:SER:BITS? SYST:COMM:SER:SBITS? Issue the following queries to either serial port to verify PORT 2’s configuration. SYST:COMM:SER2:PACE? SYST:COMM:SER2:BAUD? SYST:COMM:SER2:PARITY? SYST:COMM:SER2:BITS? SYST:COMM:SER2:SBITS? Serial Interface Capabilities 2-11 Serial Interface Capabilities Serial Interface Capabilities 2-12 3 Visual User Interface Visual User Interface Chapter Contents This chapter is organized as follows: • Overview of the Visual User Interface • Setting Up the GPS Receiver – To Connect Antenna System to the Receiver – To Connect PC to the Receiver – To Power Up the Receiver • Accessing the Receiver Status Screen (the Visual User Interface) – To Access the Manually Operated Receiver Status Screen – To Install the Automated SatStat Program for Continual Status Updates – To Operate the Automated SatStat Program • Using and Reading the Receiver Status Screen – Tutorial on Using the Status Screen to Interface With the Receiver – Demonstration of Holdover Operation • The Receiver Status Screen at a Glance Visual User Interface 3-2 page 3-7 page 3-4 page 3-4 page 3-5 page 3-7 page 3-7 page 3-7 page 3-8 page 3-9 page 3-10 page 3-10 page 3-15 page 3-17 Visual User Interface Overview of the Visual User Interface The combination of the PC and the GPS Receiver yields a visual user interface called the Receiver Status Screen that lets the user see what the Receiver is doing and how it is progressing towards tracking satellites to eventually lock to the GPS signal. When connected to a properly configured PC, the Receiver Status Screen can be accessed. There are two ways to access and use the Receiver Status Screen: • By installing a commercially available terminal emulation program, and manually sending the :SYSTEM:STATUS? query. • By installing the SatStat program for continual status screen updates. Visual User Interface 3-3 Visual User Interface Setting Up the GPS Receiver To Connect Antenna System to the Receiver Connect the antenna system to the rear-panel ANTENNA Type-N connector of the Receiver as described in the instructions given in the subsection titled “To Assemble and Install the Antenna System” in Chapter 1 of the Getting Started guide. NOTE Do not apply power to the Receiver unless a fully operational antenna system is connected to the rear-panel ANTENNA input connector. Power applied with no antenna input or a non-functioning antenna will initiate an extended search process that may increase time to reach GPS lock. You can halt the extended search by cycling the Receiver power (you may need to leave power off for greater than five seconds). To Connect PC to the Receiver 1 Although this isn’t necessary for the Receiver to attain GPS lock, connect the GPS Receiver to the serial port of a PC via the Receiver’s rear-panel PORT 1 RS-232C port to observe the progress of the Receiver. Use an HP 24542G interface cable or equivalent as shown in Figure 3-1. Personal Computer or Laptop GPS Receiver (Rear view) WARNING: NO OPERATOR SERVICEABLE PARTS INSIDE, REFER SERVICING TO SERVICE TRAINED PERSONNEL. OUTPUTS 1 pps Programmable Irig-B TOD Time Tag 1 INPUTS Time Tag 2 ANTENNA ALARM BITE Time Tag 3 ! POWER ! Port 1 129 VDC ! FOR LABORATORY USE BY QUALIFIED PERSONNEL FOUR USAGE EN LABORATOIRE PAR PERSONNEL QUALIFIE SERIAL PLATE 48 VDC 129 VDC ! WARNING: FOR CONTINUED FIRE PROTECTION, USE SPECIFIED ~ LINE FUSE. Figure 3-1. Connecting the GPS Receiver to a Computer 2 Turn the PC on. You will need to run a terminal emulation or telecommunication program on your PC in order to communicate via the RS-232C serial port. Most PCs contain a terminal emulation program, especially PCs equipped with Windows. If your PC does not contain a telecommunication program, purchase one of the following programs: PROCOMM PLUS (DATASTORM Technologies, Inc.), PROCOMM PLUS for Windows, Cross Talk (Hayes), Visual User Interface 3-4 Visual User Interface or any other terminal emulation program. (Note: Symmetricom is not endorsing any of these products.) If you are using a Windows-based PC, perform procedure in the subsection titled “To Configure Terminal Communications for Windows-based PC ” on page 3-5. If you are using a DOS-based PC (no Windows application), perform procedure in the subsection titled “To Configure Terminal Communications for DOS-based PC (No Windows)” on page 3-6. To Configure Terminal Communications for Windows-based PC 1 Select or double click on the Terminal icon (a picture of a PC with a telephone in front of it) in the Accessories window. 2 Select Settings, then choose Communications. A dialog box is displayed that allows you to configure your PC. 3 Set the RS-232C port of your PC to match the following default values: Pace: NONE Baud Rate: 9600 Parity: NONE Data Bits: 8 Stops Bits: 1 NOTE The RS-232C port configurations of the Receiver and the PC must be the same for communications between the two. Thus, for this power-up procedure, set your PC to match the default values listed above if this Receiver is being powered up for the first time from the factory. If the default values have been changed, as would be indicated by an error generation or no scpi> prompt displayed after pressing Return (or Enter) on your PC, then refer to the subsection titled “If Changes Have Already Been Made to the Serial Port Settings” in Chapter 2 of this guide for more information. NOTE Do not apply power to the Receiver unless a fully operational antenna system is connected to the rear-panel ANTENNA input connector. Power applied with no antenna input or a non-functioning antenna will initiate an extended search process that may increase time to reach GPS lock. You can halt the extended search by cycling the Receiver power (you may need to leave power off for greater than five seconds). Visual User Interface 3-5 Visual User Interface 4 In the Communications dialog box, be sure to select the appropriate port or connector (COM2, for example). 5 Next, perform the power-up procedure described in the subsections titled “To Power Up the Receiver.” To Configure Terminal Communications for DOS-based PC (No Windows) 1 Make sure you have a DOS telecommunication program such as PROCOMM PLUS and refer to a DOS reference guide for the proper command to send. Hint: send MODE COM2:9600, N,8,1 or MODE COM2:BAUD=9600, PARITY=NONE, DATA=8,STOP=1. 2 Next, perform the power-up procedure described in the following subsection. Visual User Interface 3-6 Visual User Interface To Power Up the Receiver 1 Apply the proper power source to the rear-panel Power input jack of the Receiver. (See the appropriate subsection titled “To Assemble the DC Power Connector” or “To Connect AC Power” in Chapter 1 of the Getting Started guide. The following sequence of events occurs after power is applied to the Receiver. a. Only the front-panel Power indicator lights. b. After a moment, the Receiver runs through its self-test diagnostics as indicated by the flashing front-panel indicators. c. After the self test is completed, just the Power indicator remains illuminated, and the scpi> prompt is displayed on the screen of the PC. (There could also be an E xxx> prompt if a pre-existing error has occurred.) If the Alarm indicator lights, a failure may have occurred during the self test. Refer to the section titled “Operating Status” in Chapter 5, “Command Reference,” of the Operating and Programming guide for a complete description of the Alarm capability. d. The Receiver begins to search the sky for all available satellites. Accessing the Receiver Status Screen (the Visual User Interface) Overview of the Visual User Interface The combination of the PC and the GPS Receiver yields a visual user interface called the Receiver Status Screen that lets the user see what the Receiver is doing and how it is progressing towards tracking satellites to eventually lock to the GPS signal. When connected to a properly configured PC, the Receiver Status Screen can be accessed. There are two ways to access and use the Receiver Status Screen: • By installing a commercially available terminal emulation program, and manually sending the :SYSTEM:STATUS? query. • By installing the SatStat Windows program for continual status screen updates. To Access the Manually Operated Receiver Status Screen 1 From the computer keyboard, type :SYSTEM:STATUS? and press Enter (or Return). If no prompt or a corrupted prompt is displayed, then refer to the subsection titled “If Changes Have Already Been Made to the Serial Port Settings” in Chapter 2 of this guide for more information. Visual User Interface 3-7 Visual User Interface The computer displays the status screen as shown in the sample status screen in Figure 3-2. (Note that you must re-enter the SYSTEM:STATUS? command each time you want an updated status screen.) 2 See the section titled “Using and Reading the Receiver Status Screen" on page 3-10 of this guide for a description of how to use and read the satellite acquisition information displayed in the status screen. ---------------------------- Receiver Status ---------------------------SYNCHRONIZATION ........................... [ Outputs Valid/Reduced Accuracy ] Reference Outputs SmartClock Mode TFOM FFOM 6 1 >> Locked to GPS: stabilizing frequency Recovery 1PPS TI +71 ns relative to GPS Holdover HOLD THR 1.000 us Power-up Holdover Uncertainty Predict -ACQUISITION ...............................................[GPS 1PPS Valid] Not Tracking: 4 Tracking: 5 Time PRN El Az C/N PRN El Az UTC 17:56:44 31 Jan 1996 2 70 337 49 9 11 292 GPS 1PPS Synchronized to UTC 7 48 46 188 16 24 243 ANT DLY 0 ns 15 33 82 38 *26 Acq.. Position 31 -- --19 28 113 36 Survey: 1.2% complete MODE 22 65 91 49 AVG LAT N 37:19:34.746 AVG LON W 121:59:50.502 +34.14 m (GPS) AVG HGT ELEV MASK 10 deg *attempting to track HEALTH MONITOR ...................................................... [ OK ] Self Test: OK Int Pwr: OK Oven Pwr: OK OCXO: OK EFC: OK GPS Rcv: OK Figure 3-2. Sample Status Screen To Install the Automated SatStat Program for Continual Status Updates This Windows program provides, among other things, continual status updates of the Receiver Status Screen. Your PC must have Windows installed to operate the program. The program is easy to install and operate. 1 Insert the SatStat disk in drive A. 2 From the File menu in either the Program Manager or File Manager, choose Run. 3 Type a:setup, and click OK or press Enter (Return). The SatStat Setup screen will appear, and installation will proceed. 4 Once the program is installed, you can start it by double-clicking the SatStat icon that was created during the installation. Visual User Interface 3-8 Visual User Interface 5 You should establish communication with the GPS Receiver. This requires connection from a serial RS-232C port on your PC to the GPS Receiver’s serial port (a 25-pin RS-232C connection). Assuming you’ve got the cable attached to make this connection, you may want to check the settings. a. Select CommPort, then choose Settings. The Communication Settings dialog box is displayed. Unless someone has reprogrammed the CommPort settings on the GPS Receiver, these settings are probably OK. The one setting that is likely to need changing is the Com Port. The application defaults it to Com1, but the serial port on your PC may be assigned to a different Com Port. Select the appropriate setting. If you are unsure, Com1 will be your best bet (worst case, you can cycle through all of them until it works). b. If you made any changes on this Settings form, select OK, otherwise you can just Cancel. To Operate the Automated SatStat Program 1 Select CommPort, then choose Port Open. The main form of the Receiver Status Screen is displayed. The program will send some commands to the GPS Receiver and then the main form should begin to periodically update every few seconds. If you are getting screen updates, proceed to the next step. Otherwise, something is wrong with your CommPort settings or perhaps the physical connection between your PC and the GPS Receiver. If you need to control the Receiver or query for the status of a setting of the Receiver, use the “Control & Query” form. To activate this form, click anywhere on it. Select Control (or Query), then choose the type of control (or query) you want. This will pull down a list of control (or query) functions that you can choose from, and the corresponding command will be displayed. To send the command, click on Send Cmd. Hence, with the Control & Query form you can control the Receiver without knowing the command or query. More information about the Windows program is provided in the “Getting Started” Help file. 2 Refer to the section titled “Using and Reading the Receiver Status Screen” on page 3-10 for a tutorial and demonstration of what to look for when viewing the status screen. Visual User Interface 3-9 Visual User Interface Using and Reading the Receiver Status Screen As mentioned earlier in this chapter, the Receiver Status Screen can be accessed when the Receiver is connected to a properly configured PC. There are two ways to access and use the Receiver Status Screen: • By installing a commercially available terminal emulation program, and manually sending the :SYSTEM:STATUS? query (see pages 3-7 and 3-8). • By installing the SatStat program for continual status screen updates (see pages 3-8 and 3-10). The following tutorial demonstrates how you can use the Receiver Status Screen to observe Receiver operation. The tutorial uses the manual (:SYSTEM:STATUS?) method. Tutorial on Using the Status Screen to Interface With the Receiver Type :SYSTEM:STATUS? at the scpi> prompt. An initial power-up screen is displayed, which is similar to the demonstration screen shown in Figure 3-3. The first data that you should look at is in the SYNCHRONIZATION area of the screen. It is telling you that it is in the Power-up state as indicated by the >> marker. That is, the Receiver has just been put on line. Visual User Interface 3-10 Visual User Interface ---------------------------- Receiver Status ---------------------------SYNCHRONIZATION ............................[ Outputs Valid/Reduced Accuracy ] Reference Outputs SmartClock Mode TFOM FFOM 4 1 >> Locked to GPS: stabilizing frequency Recovery 1PPS TI +20 ns relative to GPS Holdover HOLD THR 1.000 us Power-up Holdrover Uncertainty Predict 432.0 us/initial 24 hrs ACQUISITION ............................................... [GPS 1PPS Valid] Not Tracking: 1 Tracking: 6 Time PRN El Az C/N PRN El Az UTC 2 70 301 40 16 13 258 18:47:07 31 Jan 1996 GPS 1PPS Synchronized to UTC 7 38 35 186 19 40 102 38 ANT DLY 0 ns Position 22 71 60 39 Survey: 5.4% complete MODE 26 19 317 36 31 16 41 35 AVG LAT N 37:19:34.937 AVG LON W 121:59:50.457 +67.94 m (GPS) AVG HGT ELEV MASK 10 deg HEALTH MONITOR ...................................................... [ OK ] Self Test: OK Int Pwr: OK Oven Pwr: OK OCXO: OK EFC: OK GPS Rcv: OK Figure 3-3. Receiver Status Screen at Powerup The ACQUISITION area of the screen is telling you that no satellites have been tracked. The identification numbers of several satellites appear in the Not Tracking column. The asterisk next to the satellite identification number, or pseudorandom noise code (PRN), indicates the Receiver is attempting to track it. The current time and date are shown in the Time quadrant of the ACQUISITION area. The default power-up setting, indicated by [?], is corrected when the first satellite is tracked. Since the Receiver is not tracking any satellites, the GPS 1 PPS reference signal is invalid. An accurate position is necessary to derive precise time from GPS. The Position quadrant indicates that the Receiver is in survey mode, which uses GPS to determine the position of the GPS antenna. This process has not yet started, since position calculations can be performed only while tracking four or more satellites. INIT LAT, INIT LON, and INIT HGT are the initial estimate of the true position. These coordinates are refined by the survey process. The Receiver uses this position and the time-of-day to select satellites to track. Therefore, you can reduce satellite acquisition time by specifying an close approximation of position and time. Now, let’s send the :SYSTEM:STATUS? query again to see what kind of progress the Receiver has made. You can now see that the Receiver is tracking several satellites as shown in Figure 3-4. The process of acquiring and tracking satellites is described in the following paragraphs. Visual User Interface 3-11 Visual User Interface ---------------------------- Receiver Status ---------------------------SYNCHRONIZATION ........................... [ Outputs Valid/Reduced Accuracy ] Reference Outputs SmartClock Mode 3 2 TFOM FFOM Locked to GPS Recovery 1PPS TI ->> Holdover: GPS 1PPS invalid HOLD THR 1.000 us Power-up Holdover Uncertainty Predict 432.0 us/initial 24 hrs Holdover Duration: 0m 14s Present 1.0 us ACQUISITION ............................................. [GPS 1PPS Invalid] Not Tracking: 7 Tracking: 0 Time PRN El Az PRN El Az UTC 20:56:14 31 Jan 1996 *2 71 316 *31 12 29 GPS 1PPS Inaccurate: not tracking *7 41 186 ANT DLY 0 ns 15 11 86 Position *19 35 107 MODE Survey: 71.1% complete *22 68 78 *26 23 314 LAT N 37:19:32.472 LON W 121:59:51.784 HGT +42.19 m (GPS) ELEV MASK 10 deg *attempting to track HEALTH MONITOR ...................................................... [ OK ] Self Test: OK Int Pwr: OK Oven Pwr: OK OCXO: OK EFC: OK GPS Rcv: OK Figure 3-4. Receiver Status Screen Displaying Initial Satellite Acquisition An asterisk (*) next to the PRN of a satellite in the Not Tracking column indicates the Receiver is attempting to track it. The elevation (El) and azimuth (Az) angles of the satellite are indicated. Acq . or Acq .. tell you that the Receiver is attempting to track that satellite. One dot after the Acq indicator shows that the Receiver is attempting to acquire its signal, and two dots indicate impending lock. Eventually, you will see the satellite move from the Not Tracking column, which shows the satellite PRN, the elevation angle of the satellite in the sky (90° being zenith), the azimuth angle (number of degrees bearing from true north), and the signal strength (SS). A good signal strength is a number above 20, which would be efficient for the Receiver to operate. Numbers below 20, suggest intermittent tracking of the satellite or no tracking; check your antenna system should this be the case. As indicated by the demonstration screen in Figure 3-4, the Receiver is now surveying for position. It is tracking four satellites which is the minimum number that must be tracked to determine postion. As you can see, the Position MODE line indicates survey is 1.2% complete. A complete survey would take two hours during which four satellites or more are continuously tracked. Also, you can see the initial (estimated) position has been replaced with a computed position, which the Receiver continuous to refine until it gets a very accurate position. The status screen indicates that a computed position is being used by displaying the averaged latitude, and longitude height (AVG LAT, AVG LON, and AVG HGT). If the position were not precise, GPS timing information would be inaccurate by an amount corresponding to the error in the computed position. An error in the computed position of the antenna translates into an error in the derived time and will compromise the Receiver’s ability to be a timing source. Let’s consider a case where four satellites are not visible at powerup because of a poor antenna Visual User Interface 3-12 Visual User Interface location, such as an “urban canyon” (located between tall city buildings). If accurate position is known from a Geodetic survey of that site, it can be programmed with the position command, thereby bypassing the survey operation. This is useful when four satellites cannot be tracked for an extended period of time. Let’s send the :SYSTEM:STATUS? query again to observe the current status of the Receiver. The updated demonstration status screen in Figure 3-5 indicates that the position survey is now 5.4% complete. Thus, the survey task is beginning to iterate toward an accurate position. In the Time quadrant, the UTC time is now correct. The date is correct, and the GPS reference signal is synchronized to UTC. Visual User Interface 3-13 Visual User Interface ---------------------------- Receiver Status ---------------------------SYNCHRONIZATION ............................[ Outputs Valid/Reduced Accuracy ] Reference Outputs SmartClock Mode 3 1 TFOM FFOM >> Locked to GPS: Stabilizing frequency Recovery 1PPS TI +10.6 ns relative to GPS Holdover HOLD THR 1.000 us Power-up Holdover Uncertainty Predict 432.0 us/initial 24 hrs ACQUISITION ............................................... [GPS 1PPS Valid] Not Tracking: 0 Tracking: 6 Time PRN El Az C/N UTC 20:59:28 31 Jan 1996 2 71 317 40 GPS 1PPS Synchronized to UTC 7 34 185 38 ANT DLY 0 ns 19 41 101 37 Position 22 67 80 40 MODE Survey: 71.4% complete 26 24 312 37 31 12 27 36 LAT N 37:19:32.486 LON W 121:59:52.082 HGT +40.06 m (GPS) ELEV MASK 10 deg HEALTH MONITOR ...................................................... [ OK ] Self Test: OK Int Pwr: OK Oven Pwr: OK OCXO: OK EFC: OK GPS Rcv: OK Figure 3-5. Receiver Status Screen Displaying Progress Towards Steady-State Operation In the SYNCHRONIZATION area, the >> marker is pointed at the Locked to GPS line, indicating that the Receiver is locked to GPS and stabilizing the frequency of its oscillator. This means that the Receiver has phase-locked its oscillator to the 1 PPS reference signal provided by GPS, but it is not at its final, or most stable, state. The Receiver is locked and the front-panel GPS Lock LED is illuminated. For users without the command interface (PC/Terminal emulator connected to the Receiver), the illuminated GPS Lock LED is probably the first indication that after powerup that the Receiver is moving towards a stable state. With the command interface and status screen, you can get more detailed information. For example, you can read the reference outputs quality indicators in the Reference Outputs area of the status screen. These are the Time Figure of Merit (TFOM) and Frequency Figure of Merit (FFOM) indicators. As shown in Figure 3-5, the TFOM is 4 and the FFOM is 1. These values will eventually decrease towards the ultimate values that represent steady-state performance. Refer to the subsection titled “Reference Outputs,” in Chapter 2, “Features and Functions,” of the Getting Started guide for more information about TFOM and FFOM. Also indicated is a prediction of the accuracy of the Receiver should it go into holdover operation. Visual User Interface 3-14 Visual User Interface Demonstration of Holdover Operation CAUTION The Receiver typically reaches stable state 24 hours after powerup, and it will learn best if its experiences no holdover in the first 24 hours. Therefore, the holdover demonstration in the following paragraphs will compromise the Receiver’s ability to learn the characteristics of its internal reference oscillator. For the purpose of education only, you will be shown how to initiate a holdover. A user should never initiate holdover during the first 24 hours while the Receiver is learning its internal oscillator characteristics. The Receiver should maintain GPS lock during this time because it is using the GPS signal to discipline the oscillator. It will learn what the oscillator drift characteristics are relative to the GPS signal. It will learn how the oscillator ages, and the software will learn how to compensate for that aging. Thus, it is recommended that the Receiver is always kept locked to GPS during the first 24 hours. For demonstration purposes, and since the Receiver has been powered up for a while, let’s put the Receiver into holdover by simply removing the antenna connection. (Note that holdover also can be manually initiated by sending the SYNCHRONIZATION:HOLDOVER:INITIATE command; however, for this demonstration, disconnect the antenna cable.) The following will occur : • The front-panel Holdover LED will illuminate, and • after sending the :SYSTEM:STATUS? query again, a screen similar to Figure 3-6 should appear. Let’s send the :SYSTEM:STATUS? query. Figure 3-6 should appear. Visual User Interface 3-15 Visual User Interface ---------------------------- Receiver Status ---------------------------SYNCHRONIZATION .......................................... [ Outputs Valid ] Reference Outputs SmartClock Mode >> Locked to GPS 3 0 TFOM FFOM Recovery 1PPS TI +7.2 ns relative to GPS Holdover HOLD THR 1.000 us Power-up Holdover Uncertainty Predict 49.0 us/initial 24 hrs ACQUISITION ................................................[GPS 1PPS Valid] Not Tracking: 1 Tracking: 6 Time PRN El Az C/N PRN El Az +1 leap second pending UTC 49 2 49 243 14 11 82 23:59:59 31 Dec 1995 GPS 1PPS Synchronized to UTC 46 16 24 282 ANT DLY 120 ns 47 18 38 154 Position 49 19 65 52 MODE Survey: 17.5% complete 49 27 62 327 47 31 34 61 AVG LAT N 37:19:32.264 AVG LON W 121:59:52.112 AVG HGT +41.86 m (GPS) ELEV MASK 10 deg HEALTH MONITOR ...................................................... [ OK ] Self Test: OK Int Pwr: OK Oven Pwr: OK OCXO: OK EFC: OK GPS Rcv: OK Figure 3-6. Receiver Status Screen Displaying Holdover Operation In the SYNCHRONIZATION area, you can see that the Receiver has gone into holdover as indicated by >> marker that is pointing at the Holdover line. The status screen indicates that the reason the Receiver is in holdover is because the GPS 1 PPS reference signal is invalid. You would expect this since the antenna has been disconnected. The status screen shows, instantaneously, loss of the GPS signal. As you can see on the screen, all of the satellites in the Tracking column moved into the Not Tracking column. The status screen in Figure 3-6 shows that the Receiver has been in holdover operation for 14 seconds. If the Receiver SmartClock had had enough time to learn the internal oscillator characteristics (24 hours), the Receiver status screen would show that the Receiver went into holdover, and the Receiver’s outputs were maintained during holdover by the SmartClock. When the GPS antenna is re-connected and the GPS signal has been re-acquired, the Receiver has the ability to recover from holdover by itself. The SYNCHRONIZATION area of the screen will show the >> marker pointing at the Recovery line (and then eventually at the Locked to GPS line), the GPS Lock LED will illuminate, and the screen will look similar to Figure 3-7. Figure 3-7. Receiver Status Screen Following Recovery from Holdover Operation You can see the Receiver has recovered from holdover almost immediately and it has returned to locked operation. Visual User Interface 3-16 Visual User Interface The Receiver Status Screen at a Glance SYNCHRONIZATION SYNCHRONIZATION SYNCHRONIZATION SYNCHRONIZATION SYNCHRONIZATION SYNCHRONIZATIONprofiles profiles profilesthe the theprocess process processof of ofsynchronizing synchronizing synchronizing time time timeand and andfrequency frequency frequencyreference reference referencesignals signals signalswith with withGPS. GPS. GPS. SmartClock SmartClock SmartClocktechnology technology technologycompares compares comparesand and andadjusts adjusts adjusts(locks) (locks) (locks)the the the reference reference referenceoscillator oscillator oscillatorto to toGPS. GPS. GPS. In In Inthe the theabsence absence absenceof of ofGPS, GPS, GPS, SmartSmartSmartClock Clock Clockoperates operates operatesin in in"holdover" "holdover" "holdover"mode, mode, mode,which which whichmaintains maintains maintainsprecise precise precise time time timeand and andfrequency frequency frequencyover over overan an anextended extended extendedduration duration durationby by bypredicting predicting predicting and and andcompensating compensating compensatingfor for foraging aging agingand and andtemperature temperature temperatureeffects. effects. effects. SmartClock SmartClock SmartClockMode Mode Mode Locked Locked Lockedto to toGPS GPS GPS stabilizing stabilizing Reference Reference Referencesignals signals signalsare are aresynchronous synchronous synchronouswith with withGPS. GPS. GPS. When When Whenstabilizing isreported, reported, reported,short-term short-term short-termfrequency frequency frequencyerrors errors errorslimit limit limitthe the the frequency frequency frequencyisis accuracy accuracy accuracyof of ofthe the the10-MHz 10-MHz 10-MHzreference. reference. reference. Recovery: Recovery: Recovery:... ... ... Adjusting Adjusting Adjustingthe the thefrequency frequency frequencyand and andphase phase phaseof of ofthe the theoscillator oscillator oscillatorto to tocorrect correct correct errors errors errorsaccrued accrued accruedwhile while whilein in inholdover holdover holdoveroperation. operation. operation. The The Thephase phase phasedifference difference difference between between betweenthe the theGPS GPS GPS1PPS 1PPS 1PPSreference reference referenceand and anddisciplined disciplined disciplinedoscillator oscillator oscillator 1PPS 1PPS 1PPSsignal signal signalisis isshown. shown. shown. Holdover: Holdover: Holdover:... ... ... Reference Reference Referenceoutputs outputs outputsare are arenot not notsynchronous synchronous synchronouswith with withGPS GPS GPSdue due dueto to tothe the the reported reported reportedcondition. condition. condition. SmartClock SmartClock SmartClockmaintains maintains maintainstiming timing timingaccuracy accuracy accuracy by by byapplying applying applyinglearned learned learnedoscillator oscillator oscillatorcharacteristics. characteristics. characteristics. GPS GPS GPS 1PPS 1PPS 1PPS invalid invalid invalid Not Not Nottracking tracking trackingany any anysatellites, satellites, satellites,or or orposition position positionisis isinaccurate inaccurate inaccurate 1PPS 1PPS 1PPS TI TI TI exceeds exceeds exceeds hold hold hold threshold threshold threshold Phase Phase Phasedifference difference differencebetween between between1PPS 1PPS 1PPSsignals signals signalsexceeds exceeds exceedsaaaspecified specified specified limit limit limit(HOLD (HOLD (HOLDTHR) THR) THR) manually manually manually initiated initiated initiated User-initiated User-initiated User-initiatedholdover. holdover. holdover. Holdover Holdover HoldoverDuration Duration Durationisis isthe the thecumulative cumulative cumulativeduration duration durationof of ofholdover holdover holdoverand and and recovery recovery recoveryoperations. operations. operations. Power-up: Power-up: Power-up:... ... ... Warm-up/initial Warm-up/initial Warm-up/initialadjustment adjustment adjustmentof of ofthe the theoscillator. oscillator. oscillator. Reference Reference ReferenceOutputs Outputs Outputs Measures Measures Measuresof of ofsignal signal signalquality: quality: quality: TFOM TFOM TFOM(Time (Time (TimeFigure Figure Figureof of ofMerit) Merit) Merit) Accuracy Accuracy Accuracyof of ofthe the the1PPS 1PPS 1PPS reference. reference. reference. AA Anumber number numberbetween between between000(best) (best) (best) TFOM-1 TFOM-1to TFOM TFOM to to10 10 10TFOM and and and999that that thatdenotes denotes denotesaaatiming timing timingerror error errorof of of10 10 10TFOM-1 nanoseconds. nanoseconds. nanoseconds. FFOM FFOM FFOM(Frequency (Frequency (FrequencyFigure Figure Figureof of ofMerit) Merit) Merit) Frequency Frequency Frequencystability stability stabilityof of ofthe the the10-MHz 10-MHz 10-MHzreference: reference: reference: 000 Stable, Stable, Stable,signal signal signalwithin within withinspecification specification specification 111 Stabilizing Stabilizing Stabilizingthis this thissignal signal signal 222 Holdover Holdover Holdovermode; mode; mode;frequency frequency frequencywill will willdrift drift drift 333 Signal Signal Signalisis isunusable. unusable. unusable. 1PPS 1PPS 1PPSTI TI TI(Time (Time (TimeInterval) Interval) Interval) Average Average Averagephase phase phasedifference difference differencebetween between betweenthe the theGPS GPS GPSreference reference referenceand and and oscillator oscillator oscillator1PPS 1PPS 1PPSsignals. signals. signals. HOLD HOLD HOLDTHR THR THR(Holdover (Holdover (HoldoverThreshold) Threshold) Threshold) 1PPS 1PPS 1PPSphase phase phasedifference difference differencethat that thatwhile while whileexceeded exceeded exceededforces forces forcesholdover holdover holdover operation. operation. operation. ------------------------------------------------------- Receiver Status ---------------------------.......................... .......................... SYNCHRONIZATION SYNCHRONIZATION SYNCHRONIZATION.......................... SmartClock SmartClock SmartClock Mode Mode Mode Locked Locked Locked phase phase alignment alignment alignment [TI [TI [TI +1.296 +1.296 +1.296 us] us] us] Recovery: Recovery: phase >> >> >>Recovery: Holdover Holdover Holdover Power-up Power-up Power-up Holdover Holdover Holdover Duration: Duration: Duration: 1m 1m 1m 45s 45s 45s ACQUISITION ACQUISITION ACQUISITION Tracking: Tracking: Tracking: 11 1 PRN PRN PRN El El El Az Az Az C/N C/N C/N 31 31 31 75 75 75 254 254 254 49 49 49 Not Not Not Tracking: Tracking: Tracking: 99 9 El El Az Az Az PRN PRN PRN PRN El PRN PRN El El El Az Az Az Not Not OK OK OK ** * 22 2 19 19 19 313 313 313 29 29 29 Not ** * 44 4 Acq Acq Acq . Acq Acq .. ** * 55 5 Acq ** * 77 7 ---- ------35 35 140 140 140 ** * 99 9 35 15 15 15 Ignore Ignore Ignore .. .. Acq Acq .. *24 *24 *24 Acq 47 47 258 258 258 *26 *26 *26 47 10 10 deg deg deg *attempting ELEV ELEV ELEV MASK MASK MASK 10 *attempting *attempting to to to track track track HEALTH HEALTH HEALTH MONITOR MONITOR MONITOR Self Self Self Test: Test: Test: OK OK OK Int Int Int Pwr: Pwr: Pwr: OK OK OK Oven Oven Oven Pwr: Pwr: Pwr: OK OK OK Tracking Tracking Tracking HEALTH HEALTH HEALTHMONITOR MONITOR MONITOR HEALTH HEALTH HEALTHMONITOR MONITOR MONITORreports reports reportsthe the theoperational operational operationalstatus status statusof of ofkey key keyreceiver receiver receiver Err Errisis isreported: reported: reported: components components componentsand and andinternal internal internalsignals. signals. signals. When When WhenErr Self Self SelfTest Test Test Last Last Lastdiagnostic diagnostic diagnosticcheck check checkof of ofthe the themiscroprocessor miscroprocessor miscroprocessorsystem, system, system,reference reference reference oscillator, oscillator, oscillator,satellite satellite satellitereceiver receiver receiverand and andpower power powersupplies supplies suppliesfailed. failed. failed. Int Int IntPwr Pwr Pwr Internal Internal Internalpower power powersupply supply supplyvoltage(s) voltage(s) voltage(s)exceeds exceeds exceedstolerance. tolerance. tolerance. Oven Oven OvenPwr Pwr Pwr Oscillator Oscillator Oscillatoroven oven ovenpower power powersupply supply supplyvoltage voltage voltageexceeds exceeds exceedstolerance. tolerance. tolerance. OCXO OCXO OCXO Oscillator Oscillator Oscillatoroutput output outputfailed. failed. failed. EFC EFC EFC Oscillator Oscillator Oscillatorcontrol control controlvoltage voltage voltageisis isat at ator or ornear near nearfull-scale. full-scale. full-scale. GPS GPS GPSRcv Rcv Rcv Satellite Satellite Satellitereceiver receiver receivercommunication communication communicationfailed, failed, failed,or or orGPS GPS GPS1PPS 1PPS 1PPSreference reference reference isis isabsent. absent. absent. PRN PRN PRN EI EI EI Az Az Az Holdover Holdover HoldoverUncertainty Uncertainty Uncertainty Estimations Estimations Estimationsof of oftiming timing timingaccuracy accuracy accuracywhile while whilein in inholdover holdover holdovermode, mode, mode,which which which reflect reflect reflectthe the theextent extent extentto to towhich which which SmartClock SmartClock SmartClockhas has haslearned learned learnedthe the the oscillator's oscillator's oscillator'scharacteristics: characteristics: characteristics: Predict Predict Predict Maximum Maximum Maximumtiming timing timingerror error errorthat that thatcan can canbe be beexpected expected expectedover over overthe the theinitial initial initial 24 24 24hours hours hoursof of ofholdover holdover holdoveroperation. operation. operation. Present Present Present Maximum Maximum Maximumtiming timing timingerror error errorcurrently currently currentlyexpected. expected. expected. C/N C/N C/N Acq Acq Acq Acq Acq Acq ... Acq Acq Acq .. .. .. Ignore Ignore Ignore Not Not Not OK OK OK Visual User Interface 3-17 Visual User Interface Receiver Receiver Status Status ------------------------------------------------------[ Outputs Valid/Reduced Accuracy ] Reference Reference Outputs Outputs TFOM TFOM 3 3 FFOM FFOM 2 2 1PPS 1PPS TI TI --HOLD HOLD THR THR 1.000 1.000 us us Holdover Holdover Uncertainty Uncertainty Predict Predict 55.8 55.8 us/initial us/initial 24 24 hrs hrs Present Present 1.0 1.0 us us [ [ GPS GPS 1PPS 1PPS Valid Valid ] ] Az Az PRN PRN El El Az Az 29 29 Not Not OK OK . . Time Time UTC UTC GPS GPS 1PPS 1PPS ANT ANT DLY DLY Position Position MODE MODE AVG AVG LAT LAT AVG AVG LON LON AVG AVG HGT HGT .. .. Oven Oven Pwr: Pwr: OK OK OCXO: OCXO: OK OK 03:11:57 03:11:57 31 31 Jan Jan 1996 1996 Synchronized Synchronized to to UTC UTC 120 120 ns ns Survey: Survey: 26.1% 26.1% complete complete Suspended: Suspended: track track <4 <4 sats sats N N 37:19:31.797 37:19:31.797 W W 121:59:52.018 121:59:52.018 60.52 60.52 m m (GPS) (GPS) EFC: EFC: OK OK [ [ OK OK ] ] GPS GPS Rcv: Rcv: OK OK Tracking Tracking Satellites Satellites currently currently tracked tracked by by the the receiver. receiver. Four Four or or more more satellites satellites must must be be tracked tracked to to determine determine position. position. Timing Timing information information is is derived derived from from all all tracked tracked satellites, satellites, and and is is considered considered accurate accurate while while tracking tracking at at least least one one satellite satellite from from aa known known position. position. The The receiver receiver selects selects satellites satellites highest highest in in the the sky sky that that are are at at or or above above the the minimum minimum elevation elevation angle angle specified specified by by ELEV ELEV MASK. MASK. ACQUISITION ACQUISITION ACQUISITION ACQUISITION profiles profiles the the process process of of acquiring acquiring precise precise time time from from GPS. GPS. GPS GPS provides provides time-of-day time-of-day information information and and aa 1PPS 1PPS reference reference signal signal used used to to discipline discipline the the internal internal oscillator. oscillator. Time Time Time Time of of day: day: Coordinated Coordinated Universal Universal Time Time UTC UTC UTC UTC with with local local time time zone zone offset offset LOCAL LOCAL GPS GPS Time Time GPS GPS GPS GPS Time, Time, with with time time zone zone offset. offset. LOCL LOCL GPS GPS [[ ?? ]] identifies identifies aa default default power-up power-up setting setting that that is is corrected corrected when when the the first first satellite satellite is is tracked. tracked. +1 +1 (or (or -1) -1) leap leap second second pending pending is is reported reported ifif aa leap leap second second correction correction to to UTC UTC is is pending. pending. GPS GPS 1PPS 1PPS indicates indicates the the validity validity of of the the GPS GPS 1PPS 1PPS reference: reference: Synchronized Synchronized to to UTC UTC (or (or GPS GPS Time) Time) 1PPS 1PPS reference reference is is synchronous synchronous with with GPS GPS Questionable Questionable accuracy... accuracy... Assessing Assessing stability... stability... 1PPS 1PPS must must be be accurate accurate for for 35 35 seconds seconds Inaccurate: Inaccurate: not not tracking tracking One One or or more more satellites satellites must must be be tracked tracked Inaccurate: Inaccurate: inacc inacc position position Postition Postition must must be be known known to to derive derive time time Inaccurate: Inaccurate: Time Time RAIM RAIM err err GPS GPS timing timing integrity integrity is is suspect. suspect. ANT ANT DLY DLY offsets offsets the the GPS GPS 1PPS 1PPS reference reference to to compensate compensate for for signal signal propagation propagation delays delays introduced introduced by by the the antenna antenna system. system. (Time (Time is is referenced referenced to to the the position position of of the the antenna.) antenna.) Not Not Tracking Tracking Satellites Satellites considered considered for for tracking. tracking. These These satellites satellites are are predicted predicted to to be be visible visible or or are are selected selected by by the the "sky "sky search" search" algorithm. algorithm. Visibility Visibility is is predicted predicted from from the the satellite satellite almanac, almanac, current current time time and and position. position. Tracking Tracking and and Not Not Tracking Tracking tables tables provide provide supplemental supplemental information information about about satellite satellite position, position, signal signal strength strength and and health: health: PRN PRN Identification Identification number number (pseudorandom (pseudorandom noise noise code) code) assigned assigned to to the the satellite. satellite. Satellites Satellites are are sorted sorted by by ascending ascending PRNs. PRNs. EI EI Elevation Elevation of of the the satellite satellite (degrees) (degrees) predicted predicted by by the the almanac. almanac. "---" "---" denotes denotes itit is is unknown, unknown, such such as as when when the the satellite satellite is is not not predicted predicted to to be be visible visible but but is is selected selected for for tracking tracking by by the the sky sky search search algorithm. algorithm. Az Az Azimuth Azimuth of of the the satellite satellite (degrees), (degrees), referenced referenced to to true true north, north, predicted predicted by by the the almanac; almanac; "---" "---" ifif unknown. unknown. C/N C/N Carrier-to-noise Carrier-to-noise ratio ratio of of the the received received signal. signal. The The maximum maximum value value is is 50; 50; 35 35 is is the the minimum minimum range range for for stable stable tracking. tracking. Acq Acq Acq Acq .. Acq Acq .. .. Ignore Ignore Not Not OK OK Locking Locking code code and and carrier carrier tracking tracking loops loops to to initially initially acquire acquire the the satellite satellite signal. signal. Demodulating Demodulating the the satellite satellite broadcast broadcast (NAV) (NAV) message, message, and and determining determining current current time. time. Reading Reading the the satellite satellite ephemeris ephemeris (orbital (orbital information) information) from from the the NAV NAV message. message. The The satellite satellite is is excluded excluded from from the the selection selection process. process. GPS GPS or or Time Time RAIM RAIM reports reports the the satellite satellite is is unhealthy. unhealthy. Visual User Interface 3- 18 Position Position An An accurate accurate position position is is necessary necessary to to transfer transfer time time from from GPS. GPS. Two Two position position MODEs MODEs are are provided, provided, hold hold and and survey. survey. In In Hold Hold mode, mode, aa fixed fixed position position is is used used to to derive derive time. time. This This position position may may be be specified specified ifif known, known, or or determined determined by by the the survey survey process. process. In In Survey Survey mode, mode, position position is is determined determined from from GPS. GPS. Four Four or or more more satellites satellites must must be be tracked. tracked. Successive Successive positional positional estimates estimates (pseudoranges) (pseudoranges) are are refined refined to to obtain obtain the the true true position, position, which which is is entered entered as as the the held held position position at at the the completion completion of of this this process. process. Averaged Averaged (AVG) (AVG) position position coordinates coordinates and and progress progress are are reported reported while while surveying. surveying. When When surveying surveying is is suspended, suspended, an an advisory advisory message message describes describes the the reason: reason: Suspended: Suspended: track track <4 <4 sats sats Four Four or or more more satellites satellites must must be be tracked tracked to to determine determine position position Suspended: Suspended: poor poor geometry geometry DOP DOP (dilution (dilution of of precision) precision) is is too too large large for for an an accurate accurate pseudopseudorange range measurement. measurement. Specifying Specifying an an approximate approximate initial initial (INIT) (INIT) position position will will reduce reduce satellite satellite acquisition acquisition time. time. 4 Command Quick Reference Command Quick Reference Chapter Contents Chapter Contents This chapter is a quick reference that summarizes the GPS Receiver commands which allow you to operate and program the Receiver. This chapter is organized as follows: • An Introduction to the GPS Receiver Commands – SCPI Conformance Information page 4-4 page 4-4 – Command Syntax Conventions page 4-4 – Command Presentation GPS Satellite Acquisition – Facilitating Initial Tracking – Establishing Position – Selecting Satellites – Compensating for Antenna Delay – Monitoring Acquisition 1 PPS Reference Synchronization • – Monitoring 1 PPS Synchronization – Assessing 1 PPS Quality – Operating in Holdover Operating Status • – Receiver Operation at a Glance – Reading the Error Queue – Reading the Diagnostic Log – Monitoring Status/Alarm Conditions – Assessing Receiver Health • Command Quick Reference 4-2 page 4-4 page 4-4 page 4-4 page 4-5 page 4-6 page 4-6 page 4-6 page 4-7 page 4-7 page 4-7 page 4-7 page 4-8 page 4-8 page 4-8 page 4-29 page 4-8 page 4-9 Command Quick Reference Chapter Contents • • • • • • • System Time – Identifying Time of Next 1 PPS Reference Edge – Reading Current Time – Applying Local Time Zone Offset – Defining the 1 PPS Reference Edge (59551A Only) – Reading Leap Second Status Programmable Pulse Output (59551A Only) Event Time Stamping (59551A Only) – Defining the Time-stamped Edge – Clearing Time Stamp Memory – Reading Time Stamps – Processing Memory Overflows Serial Interface Communication – Configuring I/O Port 1 – Configuring I/O Port 2 (59551A Only) – Recovering the Last Query Response Receiver Initialization Receiver Identification/Upgrade – Reading Product Identification – Installing Firmware via I/O Port 1 Receiver Commands at a Glance/ Status Reporting System at a Glance page 4-10 page 4-10 page 4-10 page 4-10 page 4-10 page 4-10 page 4-11 page 4-12 page 4-12 page 4-12 page 4-12 page 4-12 page 4-13 page 4-13 page 4-13 page 4-13 page 4-14 page 4-15 page 4-15 page 4-15 page 4-1 Command Quick Reference 4-3 Command Quick Reference An Introduction to GPS Receiver Commands An Introduction to GPS Receiver Commands SCPI Conformance Information The SCPI commands used in the GPS Receiver are in conformance with the SCPI Standard Version 1994.0. Details of all the GPS Receiver commands can be found in Chapter 5, “Command Reference,” of this guide. Information on the SCPI commands format, syntax, parameter, and response types is provided in Appendix B, “SCPI Syntax and Style,” of this guide. Command Syntax Conventions POSition Means you MUST use either all the upper case letters or the entire word. The lower case letters are optional. For example, POS and POSITION are both valid. However, POSI is not valid. (Note POSition is used here as an example, but this convention is true for all command keywords.) In other words, the short form of the keywords is shown in uppercase. NOTE When you see quotation marks in the command’s parameter, you must send the quotation marks with the command. Command Presentation The shaded commands listed in the following sections are the “basic” (fundamental) or most commonly used commands. These commands are essential for operating the Receiver; thus, a brief description of each of these commands is included in this section. More complete descriptions are provided in Chapter 5, “Command Reference.” The non-shaded commands listed in this section are not fundamental or not commonly used. These commands are used for one-time setup, advanced, or specialized operation of the Receiver. Descriptions of these commands are provided in Chapter 5 only. GPS Satellite Acquisition The following commands are provided to faciliate initial GPS satellite tracking, to establish accurate GPS antenna position, to select or ignore satellites, to compensate for antenna cable delay, and to monitor the acquisition. Command Quick Reference 4-4 Command Quick Reference GPS Satellite Acquisition Facilitating Initial Tracking :GPS:INITial:DATE <four-digit year>, <month>, <day> :GPS:INITial:POSition N or S, <latitude degree>, <latitude minute>, <latitude second>, E or W, <longitude degree>, <longitude minute>, <longitude second>, <height above mean sea level, in meters> :GPS:INITial:TIME <hour>, <minute>, <second> Establishing Position :GPS:POSition N or S, <latitude degree>, <latitude minute>, <latitude second>, E or W, <longitude degree>, <longitude minute>, <longitude second>, <height above mean sea level, in meters> Specifies the position of the GPS antenna. :GPS:POSition? Returns the current average position of the GPS antenna. :GPS:POSition:ACTual? Returns the current instantaneous position of the GPS antenna. :GPS:POSition LAST :GPS:POSition SURVey :GPS:POSition:HOLD:LAST? :GPS:POSition:HOLD:STATe? :GPS:POSition:SURVey:PROGress? :GPS:POSition:SURVey:STATe ONCE :GPS:POSition:SURVey:STATe? :GPS:POSition:SURVey:STATe:POWerup ON or OFF :GPS:POSition:SURVey:STATe:POWerup? __________________________ Command Quick Reference 4-5 Command Quick Reference GPS Satellite Acquisition Selecting Satellites <select> = IGNore or INCLude :GPS:SATellite:TRACking:EMANgle <degrees> Sets the GPS elevation mask angle value. :GPS:SATellite:TRACking:EMANgle? Returns the GPS elevation mask angle value. :GPS:SATellite:TRACking:IGNore <PRN>, ... , <PRN> Sends list of satellites to ignore. :GPS:SATellite:TRACking:IGNore? Returns list of satellites to ignore. :GPS:SATellite:TRACking:INCLude <PRN>, ... , <PRN> :GPS:SATellite:TRACking:INCLude? :GPS:SATellite:TRACking:<select>:ALL :GPS:SATellite:TRACking:<select>:COUNt? :GPS:SATellite:TRACking:<select>:NONE :GPS:SATellite:TRACking:<select>:STATe? <PRN> Compensating for Antenna Delay :GPS:REFerence:ADELay <seconds> Sets the GPS antenna delay value in seconds. :GPS:REFerence:ADELay? Returns the GPS antenna delay value in seconds. Monitoring Acquisition :GPS:REFerence:VALid? Indicates whether the date and time are valid (1 = valid). :GPS:SATellite:TRACking? Returns a list of all satellites being tracked. :GPS:SATellite:VISible:PREDicted? Returns the list of satellites (PRN) that the almanac predicts should be visible, given date, time, and position. :GPS:SATellite:TRACking:COUNt? :GPS:SATellite:VISible:PREDicted:COUNt? __________________________ Command Quick Reference 4-6 Command Quick Reference 1 PPS Reference Synchronization 1 PPS Reference Synchronization The following commands are provided to monitor the operating mode of the reference oscillator, to determine the accuracy and stability of the reference output signal(s), and to control the oscillator holdover process. Monitoring 1 PPS Synchronization :SYNChronization:STATe? Returns the Receiver state. :DIAGnostic:ROSCillator:EFControl:RELative? :LED:GPSLock? :LED:HOLDover? Assessing 1 PPS Quality :SYNChronization:FFOMerit? Returns the Frequency Figure of Merit. :SYNChronization:HOLDover:TUNCertainty:PREDicted? Returns an estimate of the time error that can be expected for a one day holdover, given the current state of SmartClock learning in the Receiver. :SYNChronization:HOLDover:TUNCertainty:PRESent? Returns the current time interval error at any time during holdover operation, given the current state of SmartClock learning in the Receiver. :SYNChronization:TFOMerit? Returns the Time Figure of Merit. :SYNChronization:TINTerval? Returns the difference or timing shift between the SmartClock 1 PPS and the GPS 1 PPS signals. :SYNChronization:HOLDover:DURation? :SYNChronization:HOLDover:DURation:THReshold <seconds> :SYNChronization:HOLDover:DURation:THReshold? :SYNChronization:HOLDover:DURation:THReshold:EXCeeded? Operating in Holdover Initiating Manual Holdover :SYNChronization:HOLDover:INITiate Recovering from Holdover :SYNChronization:HOLDover:WAITing? Returns prioritized reason why the Receiver is waiting to recover. :SYNChronization:HOLDover:RECovery:INITiate :SYNChronization:HOLDover:RECovery:LIMit:IGNore :SYNChronization:IMMediate __________________________ Command Quick Reference 4-7 Command Quick Reference Operating Status Operating Status The following commands are provided to obtain Receiver status information. There are several ways to obtain Receiver status using commands. For example, you can send a command to display the Receiver Status screen, to read the error queue, and to read the diagnostic log. You can also send a sequence of commands to read and control the status registers for alarm generation. Receiver Operation at a Glance :SYSTem:STATus? Outputs a fully formatted status screen. :SYSTem:STATus:LENGth? Reading the Error Queue :SYSTem:ERRor? Returns the oldest error in the Error Queue and removes that error from the queue (first in, first out). Reading the Diagnostic Log :DIAGnostic:LOG:CLEar Clears the diagnostic log. :DIAGnostic:LOG:READ:ALL? Returns all of the most recent diagnostic log entries. :DIAGnostic:LOG:CLEar <current log size> :DIAGnostic:LOG:COUNt? :DIAGnostic:LOG:READ? :DIAGnostic:LOG:READ? <entry number> Monitoring Status/Alarm Conditions Clearing and Presetting Alarms *CLS Clears the event status registers and error queue. :STATus:PRESet:ALARm Reading and Qualifying Alarms :LED:ALARm? Returns status of front-panel Alarm LED. *SRE <bit mask> *SRE? *STB? _ Command Quick Reference 4-8 Command Quick Reference Operating Status _________________________ Reading and Qualifying Receiver Status <register> = OPERation <register> = QUEStionable <register> = OPERation:HARDware <register> = OPERation:HOLDover <register> = OPERation:POWerup :STATus:<register>:CONDition? Returns the Condition Status Register value. :STATus:<register>:EVENt? Returns the Event Status Register value. :STATus:<register>:ENABle <bit mask> :STATus:<register>:ENABle? :STATus:<register>:NTRansition <bit mask> :STATus:<register>:NTRansition? :STATus:<register>:PTRansition <bit mask> :STATus:<register>:PTRansition? Reading and Qualifying Command Error Status *ESE <bit mask> *ESE? *ESR? Reporting Questionable Status :STATus:QUEStionable:CONDition:USER SET or CLEar :STATus:QUEStionable:EVENt:USER PTR or NTR Assessing Receiver Health *TST? Executes an internal selftest and reports the results. :DIAGnostic:LIFetime:COUNt? :DIAGnostic:TEST? ALL or DISPlay or PROCessor or RAM or EEPROM or UART or QSPI or FPGA or INTerpolator or IREFerence or GPS or POWer :DIAGnostic:TEST:RESult? Command Quick Reference 4-9 Command Quick Reference System Time System Time The following commands are provided to allow you to monitor and control the system date and time. These commands allow you access to a very accurate system clock that provides both date and time, to customize the clock for a local time zone, to identify the exact time, to identify the accumulated time difference (in seconds) between the GPS and UTC timelines, and to monitor leap second occurrences. Identifying Time of Next 1 PPS Reference Edge R :PTIMe:TCODe? Returns timecode message 980 to 20 ms prior to 1 PPS of indicated time. Reading Current Time :PTIMe:DATE? or :SYSTem:DATE? :PTIMe:TIME? or :SYSTem:TIME? :PTIMe:TIME:STRing? Applying Local Time Zone Offset :PTIMe:TZONe <hours>, <minutes> Sets the time zone local time offset to provide an offset from UTC to serve as the basis for all reported time. :PTIMe:TZONe? Returns the local time zone offset. Defining the 1 PPS Reference Edge (59551A Only) :PTIMe:PPS:EDGE RISing or FALLing Selects the polarity of the 1 PPS on-time edge. :PTIMe:PPS:EDGE? Returns the polarity of the 1 PPS on-time edge. Reading Leap Second Status :PTIMe:LEAPsecond:ACCumulated? Returns the leap second difference accumlulated between GPS time and UTC time since the beginning of GPS time. The time units are seconds. :PTIMe:LEAPsecond:DATE? :PTIMe:LEAPsecond:DURation? :PTIMe:LEAPsecond:STATe? __________________________ R: Accessible via rear-panel PORT 1. Command Quick Reference 4-10 Command Quick Reference Programmable Pulse Output (59551A Only) Programmable Pulse Output (59551A Only) The following commands are provided to allow you to operate and control the programmable pulse output of the 59551A GPS Receiver. The pulse output, which is programmable by the user, can either generate a stream of pulses at a specified start time and repetition interval, or can produce a single pulse at a specified time and then stop. :PULSe:CONTinuous:PERiod <seconds> Sets the interval between pulses in seconds. :PULSe:CONTinuous:PERiod? Returns the interval between pulses in seconds. :PULSe:CONTinuous:STATe ON or OFF Selects whether the Programmable Pulse output will be just one pulse or a sequence of pulses. :PULSe:CONTinuous:STATe? Identifies whether the Programmable Pulse output is set to output a single pulse or sequence of pulses. :PULSe:REFerence:EDGE RISing or FALLing Selects the polarity of the Programmable Pulse on-time edge. :PULSe:REFerence:EDGE? Returns the polarity of the Programmable Pulse on-time edge. :PULSe:STARt:DATE <four-digit year>, <month>, <day> Sets the date when the individual pulse (or first pulse of the pulse sequence) is to be generated at the Programmable Pulse output. :PULSe:STARt:DATE? Returns the date when the individual pulse (or first pulse of the pulse sequence) is generated at the Programmable Pulse output. :PULSe:STARt:TIME <hour>, <minute>, <second> Sets the time when the individual pulse (or first pulse of the pulse sequence) is to be generated at the Programmable Pulse output. :PULSe:STARt:TIME? Returns the time when the individual pulse (or first pulse of the pulse sequence) is generated at the Programmable Pulse output. ______________________ Command Quick Reference 4-11 Command Quick Reference Event Time Stamping (59551A Only) Event Time Stamping (59551A Only) The following commands are provided to allow you to time-tag and record events such as power surges and power outages. The time tagging input feature allows you to use the Receiver with equipment which produce a TTL edge when some important event happens in the base station. The Receiver has three time tagging inputs which record the time of occurrence of TTL edge(s). Defining the Time-stamped Edge <channel> = 1 or 2 or 3 :SENSe:TSTamp<channel>:EDGE RISing or FALLing Selects the polarity of the edges the Receiver will timestamp. :SENSe:TSTamp<channel>:EDGE? Returns the polarity of the edges the Receiver will timestamp. Clearing Time Stamp Memory :SENSe:DATA:CLEar Clears the data in the measurement buffer for all Time Tag inputs. :SENSe:DATA:CLEar "TSTamp 1" or "TSTamp 2" or "TSTamp 3" Reading Time Stamps :SENSe:DATA? "TSTamp 1" or "TSTamp 2" or "TSTamp 3" Returns the data in the timestamp measurement buffer for the specified Time Tag input. :FORMat:DATA ASCii or INTeger :FORMat:DATA? :SENSe:DATA:POINts? :SENSe:DATA:POINTs? "TSTamp 1" or "TSTamp 2" or "TSTamp 3" :SENSe:DATA:TSTamp? "TSTamp 1" or "TSTamp 2" or "TSTamp 3", <entry number> Processing Memory Overflow :SENSe:DATA:MEMory:OVERflow:COUNt? :SENSe:DATA:MEMory:OVERflow:COUNt? "TSTamp 1" or "TSTamp 2" or "TSTamp 3" :SENSe:DATA:MEMory:SAVE FIRST or LAST :SENSe:DATA:MEMory:SAVE? __________________________ Command Quick Reference 4-12 Command Quick Reference Serial Interface Communication Serial Interface Communication The following commands are provided to allow you to configure the serial interface port(s) for instrument communications. Configuring I/O Port 1 R :SYSTem:COMMunicate? R :SYSTem:COMMunicate:SERial1:BAUD 1200 or 2400 or 9600 or 19200 R,F :SYSTem:COMMunicate:SERial1:BAUD? R :SYSTem:COMMunicate:SERial1:BITS 7 or 8 R,F :SYSTem:COMMunicate:SERial1:BITS? R :SYSTem:COMMunicate:SERial1:FDUPlex ON or OFF R,F :SYSTem:COMMunicate:SERial1:FDUPlex? R :SYSTem:COMMunicate:SERial1:PACE XON or NONE R,F :SYSTem:COMMunicate:SERial1:PACE? R :SYSTem:COMMunicate:SERial1:PARity EVEN or ODD or NONE R,F :SYSTem:COMMunicate:SERial1:PARity? R :SYSTem:COMMunicate:SERial1:SBITs 1 or 2 R,F :SYSTem:COMMunicate:SERial1:SBITs? Configuring I/O Port 2 (59551A Only) F :SYSTem:COMMunicate? F :SYSTem:COMMunicate:SERial2:BAUD 1200 or 2400 or 9600 or 19200 R,F :SYSTem:COMMunicate:SERial2:BAUD? R,F :SYSTem:COMMunicate:SERial2:BITS? F :SYSTem:COMMunicate:SERial2:FDUPlex ON or OFF R,F :SYSTem:COMMunicate:SERial2:FDUPlex? F :SYSTem:COMMunicate:SERial2:PACE XON or NONE R,F :SYSTem:COMMunicate:SERial2:PACE? F :SYSTem:COMMunicate:SERial2:PARity EVEN or ODD or NONE or ONE R,F :SYSTem:COMMunicate:SERial2:PARity? R,F :SYSTem:COMMunicate:SERial2:SBITs? Recovering the Last Query Response :DIAGnostic:QUERy:RESPonse? __________________________ R: Accessible via Rear-panel PORT 1. F: Accessible via Front-panel PORT 2 of the 59551A Command Quick Reference 4-13 Command Quick Reference Receiver Initialization Receiver Initialization The following commands are provided to allow you to initialize or preset the serial interface port(s) and the Receiver to their factory shipment values. R :SYSTem:COMMunicate:SERial1:PRESet :SYSTem:COMMunicate:SERial2:PRESet (59551A Only) :SYSTem:PRESet __________________________ R: Accessible via Rear-panel PORT 1 . Command Quick Reference 4-14 Command Quick Reference Receiver Identification/Upgrade Receiver Identification/Upgrade The commands provided in this section allow you to query the identification of the Receiver, and to perform firmware upgrades in the field after you obtain a new firmware disk. Reading Product Identification *IDN? Returns the Receiver identification. Installing Firmware via I/O Port 1 R *CLS R :DIAGnostic:DOWNload <Motorola S-record> R :DIAGnostic:ERASe R :DIAGnostic:ERASe? R :SYSTem:ERRor? R :SYSTem:LANGuage "INSTALL" or "PRIMARY" R :SYSTem:LANGuage? __________________________ Command Quick Reference 4-15 Command Quick Reference Receiver Commands at a Glance Receiver Commands at a Glance GPS Satellite Acquisition Operating Status Facilitating Initial Tracking Receiver Operation at a Glance :GPS:INITial:DATE <year>, <month>, <day> :GPS:INITial:POSition <position>1 :GPS:INITial:TIME <hour>, <minute>, <second> Establishing Position :GPS:POSition <position>1 :GPS:POSition? :GPS:POSition:ACTual? :GPS:POSition LAST :GPS:POSition SURVey :GPS:POSition:HOLD:LAST? :GPS:POSition:HOLD:STATe? :GPS:POSition:SURVey:PROGress? :GPS:POSition:SURVey:STATe ONCE :GPS:POSition:SURVey:STATe? :GPS:POSition:SURVey:STATe:POWerup ON or OFF :GPS:POSition:SURVey:STATe:POWerup? Selecting Satellites <select> = IGNore or INCLude :GPS:SATellite:TRACking:EMANgle <degrees> :GPS:SATellite:TRACking:EMANgle? :GPS:SATellite:TRACking:IGNore <PRN>, ...., <PRN> :GPS:SATellite:TRACking:IGNore? :GPS:SATellite:TRACking:INCLude <PRN, ...,<PRN> :GPS:SATellite:TRACking:INCLude? :GPS:SATellite:TRACking:<select>:ALL :GPS:SATellite:TRACking:<select>:COUNt? :GPS:SATellite:TRACking:<select>:NONE :GPS:SATellite:TRACking:<select>:STATe? <PRN> Compensating for Antenna Delay :GPS:REFerence:ADELay <seconds> :GPS:REFerence:ADELay? Monitoring Acquisition :GPS:REFerence:VALid? :GPS:SATellite:TRACking? :GPS:SATellite:VISible:PREDicted? :GPS:SATellite:TRACking:COUNt? :GPS:SATellite:VISible:PREDicted:COUNt? 1 PPS Reference Synchronization Monitoring 1 PPS Synchronization :SYNChronization:STATe? :DIAGnostic:ROSCillator:EFControl:RELative? :LED:GPSLock? :LED:HOLDover? Assessing 1 PPS Quality :SYNChronization:FFOMerit? :SYNChronization:HOLDover:TUNCertainty:PREDicted? :SYNChronization:HOLDover:TUNCertainty:PRESent? :SYNChronization:TFOMerit? :SYNChronization:TINTerval? :SYNChronization:HOLDover:DURation? :SYNChronization:HOLDover:DURation:THReshold <seconds> :SYNChronization:HOLDover:DURation:THReshold? :SYNChronization:HOLDover:DURation:THReshold:EXCeeded? Operating in Holdover Initiating Manual Holdover :SYNChronization:HOLDover:INITiate Recovering from Holdover :SYNChronization:HOLDover:WAITing? :SYNChronization:HOLDover:RECovery:INITiate :SYNChronization:HOLDover:RECovery:LIMit:IGNore :SYNChronization:IMMediate Command Quick Reference 4-16 :SYSTem:STATus? :SYSTem:STATus:LENGth? Reading the Error Queue :SYSTem:ERRor? Reading the Diagnostic Log :DIAGnostic:LOG:CLEar :DIAGnostic:LOG:READ:ALL? :DIAGnostic:LOG:CLEar <current log size> :DIAGnostic:LOG:COUNt? :DIAGnostic:LOG:READ? :DIAGnostic:LOG:READ? <entry number> Monitoring Status/Alarm Conditions Clearing and Presetting Alarms *CLS :STATus:PRESet:ALARm Reading and Qualifying Alarms :LED:ALARm? SRE <bit mask> SRE? STB? * * * Reading and Qualifying Receiver Status <register> = QUEStionable <register> = OPERation <register> = OPERation:HARDware <register> = OPERation:HOLDover <register> = OPERation:POWerup :STATus:<register>:CONDition? :STATus:<register>:EVENt? :STATus:<register>:ENABle <bit mask> :STATus:<register>:ENABle? :STATus:<register>:NTRansition <bit mask> :STATus:<register>:NTRansition? :STATus:<register>:PTRansition <bit mask> :STATus:<register>:PTRansition? Reading and Qualifying Command Error Status <bit mask> *ESE *ESE? *ESR? Reporting Questionable Status :STATus:QUEStionable:CONDition:USER SET or CLEar :STATus:QUEStionable:EVENt:USER PTRansition or NTRansition Assessing Receiver Health TST? *:DIAGnostic:LIFetime:COUNt? :DIAGnostic:TEST? ALL or <specfic test>2 :DIAGnostic:TEST:RESult? Command Quick Reference Receiver Commands at a Glance System Time Serial Interface Communication Identifying Time of Next 1 PPS Reference Edge Configuring I/O Port 1 <port> = SERial1 or SERial Configuring I/O Port 2 <port> = SERial2 (59551A) R :PTIMe:TCODe? Reading Current Time :PTIMe:DATE? or :SYSTem:DATE? :PTIMe:TIME? or :SYSTem:TIME? :PTIMe:TIME:STRing? Applying Local Time Zone Offset :PTIMe:TZONe <hours>, <minutes> :PTIMe:TZONe? Defining the 1 PPS Reference Edge (59551A) R,F R,F† R,F R R,F R,F† R,F R,F† R,F R F R,F R R,F :PTIMe:PPS:EDGE RISing or FALLing :PTIMe:PPS:EDGE? Reading Leap Second Status :PTIMe:LEAPsecond:ACCumulated? :PTIMe:LEAPsecond:DATE? :PTIMe:LEAPsecond:DURation? :PTIMe:LEAPsecond:STATe? :SYSTem:COMMunicate? :SYSTem:COMMunicate:<port>:BAUD <rate>4 :SYSTem:COMMunicate:<port>:BAUD? :SYSTem:COMMunicate:SERial1:BITS 7or 8 :SYSTem:COMMunicate:<port>:BITS? :SYSTem:COMMunicate:<port>:FDUPlex ON or OFF :SYSTem:COMMunicate:<port>:FDUPlex? :SYSTem:COMMunicate:<port>:PACE XON or NONE :SYSTem:COMMunicate:<port>:PACE? :SYSTem:COMMunicate:SERial1:PARity <parity>5 :SYSTem:COMMunicate:SERial2:PARity <parity>5 or ONE :SYSTem:COMMunicate:<port>:PARity? :SYSTem:COMMunicate:SERial1:SBITs 1or 2 :SYSTem:COMMunicate:<port>:SBITs? Recovering the Last Query Response :DIAGnostic:QUERy:RESPonse? Programmable Pulse Output (59551A) :PULSe:CONTinuous:PERiod <seconds> :PULSe:CONTinuous:PERiod? :PULSe:CONTinuous:STATe ON or OFF :PULSe:CONTinuous:STATe? :PULSe:REFerence:EDGE RISing or FALLing :PULSe:REFerence:EDGE? :PULSe:STARt:DATE <year>, <month>, <day> :PULSe:STARt:DATE? :PULSe:STARt:TIME <hour>, <minte>, <second> :PULSe:STARt:TIME? Event Time Stamping R :SYSTem:COMMunicate:SERial1:PRESet :SYSTem:COMMunicate:SERial2:PRESet :SYSTem:PRESet (59551A) Receiver Identification/Upgrade Reading Product Identification *IDN? Installing Firmware via I/O Port 1 (59551A) Defining the Time-stamped Edge Receiver Initialization <channel> = 1 or 2 or 3 :SENSe:TSTamp<channel>:EDGE RISing or FALLing :SENSe:TSTamp<channel>:EDGE? R R R R R R R Clearing Time Stamp Memory CLS *:DIAGnostic:DOWNload <Motorola S-record> :DIAGnostic:ERASe :DIAGnostic:ERASe? :SYSTem:ERRor? :SYSTem:LANGuage "INSTALL" or "PRIMARY" :SYSTem:LANGuage? :SENSe:DATA:CLEar :SENSe:DATA:CLEar <data set>3 Reading Time Stamps :SENSe:DATA? <data set>3 :FORMat:DATA ASCii or INTeger :FORMat:DATA? :SENSe:DATA:POINts? :SENSe:DATA:POINts? <data set>3 :SENSe:DATA:TSTamp? <data set>3, <data element number> Processing Memory Overflows :SENSe:DATA:MEMory:OVERflow:COUNt? 3 :SENSe:DATA:MEMory:OVERflow:COUNt? <data set> :SENSe:DATA:MEMory:SAVE FIRSt or LAST :SENSe:DATA:MEMory:SAVE? Accessible via: Parameter Syntax: R: Rear-panel PORT 1. F: Front-panel PORT 2 of the 59551A. 1 <position> = N or S, <latitude degree>, <latitude minute>, <latitude second>, E or W, <longitude degree>, <longitude minute>, <longitude second>, <height above mean sea level, in meters> † Must be received via the specified I/O port. R,F † :SYSTem:COMMunicate:<port>:BAUD <rate> 4 Shading identifies basic commands that access key receiver functions and settings. Header Parameter(s) Long and short form mnemonics of headers and parameters are listed, with the short form portion shown in uppercase characters. Although mnemonics are not case-sensitive, only the exact long forms and exact short forms are recognized. Literal parameters are enumerated settings that are represented by mnemonics (e.g., ON). Non-literal data types (or literal parameters requiring further explanation) are denoted by syntactic elements, which appear in italic type between angle brackets (<>). 2 <specific test> = DISPlay or PROCessor or RAM or EEPRom or UART or QSPI or FPGA or INTerpolator or IREFerence or GPS or POWer 3 <data set> = "TSTamp 1" or "TSTamp 2" or "TSTamp 3" 4 <rate> = 1200 or 2400 or 9600 or 19200 5 <parity> = EVEN or ODD or NONE Many commands have a corresponding query form. A query is a command header with a question mark (?) appended. Command Quick Reference 4-17 Command Quick Reference Receiver Commands at a Glance Command Quick Reference 4-18 5 Command Reference Command Reference Chapter Contents This chapter provides a description of each command that can be used to operate the GPS Receiver. The commands are grouped by functions. The functions are grouped and ordered the same as they are in Chapter 4, “Command Quick Reference,” and on the foldout “Receiver Commands at a Glance.” This chapter is organized as follows: • • • • • Command Syntax Conventions Description Format – Commands and Returns – Query-Specific Information GPS Satellite Acquisition – Facilitating Initial Tracking – Establishing Position – Selecting Satellites – Compensating for Antenna Delay – Monitoring Acquisition 1 PPS Reference Synchronization – Monitoring 1 PPS Synchronization – Assessing 1 PPS Quality – Operating in Holdover Operating Status – Receiver Operation at a Glance – Reading the Error Queue – Reading the Diagnostic Log – Monitoring Status/Alarm Conditions – Assessing Receiver Health Command Reference 5-2 page 5-3 page 5-4 page 5-4 page 5-5 page 5-6 page 5-7 page 5-9 page 5-13 page 5-17 page 5-19 page 5-21 page 5-22 page 5-23 page 5-7 page 5-8 page 5-30 page 5-8 page 5-29 page 5-36 page 5-9 Command Reference • • • • • • System Time – Identifying Time of Next 1 PPS Reference Edge – Reading Current Time – Applying Local Time Zone Offset – Defining the 1 PPS Reference Edge (59551A Only) – Reading Leap Second Status Programmable Pulse Output (59551A Only) Event Time Stamping (59551A Only) – Defining the Time-stamped Edge – Clearing Time Stamp Memory – Reading Time Stamps – Processing Memory Overflows Serial Interface Communication – Configuring I/O Ports – Recovering the Last Query Response Receiver Initialization Receiver Identification/Upgrade – Reading Product Identification – Installing Firmware via I/O Port 1 page 5-10 page 5-57 page 5-10 page 5-10 page 5-61 page 5-10 page 5-64 page 5-12 page 5-70 page 5-72 page 5-12 page 5-76 page 5-79 page 5-79 page 5-13 page 5-14 page 5-89 page 5-89 page 5-15 See Appendix B, “Command Syntax and Style,” for details regarding command Expanded Syntax, parameter types, and query response types. Command Syntax Conventions POSition <n> "TSTamp 1" Means you MUST use either all the upper case letters or the entire word. The lower case letters are optional. For example, POS and POSITION are both valid. However, POSI is not valid. (Note POSition is used here as an example, but this convention is true for all command keywords.) In other words, the short form of the keywords is shown in uppercase. The notation <n> ending a command keyword indicates a numeric suffix, used to differentiate multiple instances of the same structure. The numeric suffix is applied to both the short and long forms. The valid range for the value n is specified from an enumerated list, for example [1|2|3], or from a range, for example [1..3] to indicate any of the integers from 1 to 3. When you see quotation marks in the command’s parameter, you must send the quotation marks with the command. Command Reference 5-3 Command Reference Description Format Commands and Returns Product Compatibility (if not present, the command is supported by both products) Command Index Required characters are shown in bold type. "..." denotes one or more parameters; refer to Expanded Syntax for details. Default Setting (commands only) Scope (commands only) 59551A Synopsis c Identifies a "basic" (fundamental) command. a b :PULSe:STARt:DATE . . . Identifies the date when the individual p the pulse sequence) is generated at th output. Description This command identifies the date when the pulse sequence) is generated at the Pr Command Mnemonic Consult Appendix B: Command Syntax and Style for notational style. Expanded Syntax :PULSe:STARt:DATE <four-digit year Allowed Values, Range and Resolution When the command may be issued Parameter The <four-digit year> range is 1994 to The <month> range is 1 to 12. The <day> range is 1 to 31. Context Dependencies If you select a date and time which occu the completion of powerup and first GPS successfuly find a start – and therefore w If the Receiver has been set up to use a t and time, the parameters provided should time. :SYSTem:PRESet sets the date to January Secondary effects on other functions. Concepts Side Effects Theory Command Reference 5-4 :SYSTem:PRESet 1994,1,1 NON-VOLATILE Command Reference Query-Specific Information Response Format (Refer to the following section titled "Description of Response Formats (ASCII-encoded)" for more information.) 59551A c a b :PULSe:STARt:DATE? RESPONSE FORMAT Returns the date when the individual pu the pulse sequence) is generated at th output. ± dd, ... This query returns the date when the in pulse sequence) is generated at the Prog returns year, month, and day. Response Definition Response Three fields are separated by commas: <f Description of Response Formats (ASCII-encoded) The following legend provides the meaning of each type of response format. Refer to Table B-3 in Appendix B, “Command Syntax and Style,” for details. Example Description 0 or 1 0 Single character, one or zero ± dd +10 Integer ±d.d +1.5 Fixed-point number ±d.dEe +1.00000E-009 Floating-point number XYZ LOCK Alphanumeric characters “ XYZ ” “19:49:51” or “No error” Quoted string ± dd, ... +14, +15, +18, +22, +29 Comma-separated list of integers “ XYZ”, ... “Log 001:19950101.00:00:00: Power on”, “Log 002:19950101.00:10:00: Log cleared” Comma-separated list of quoted strings RESPONSE FORMAT Command Reference 5-5 Command Reference GPS Satellite Acquisition The GPS Receiver is designed to acquire time transfer information (time, date, and position) from the GPS satellites, which is used by the Receiver’s internal reference oscillator and SmartClock technology to lock to GPS. It acquires a precise time and date by tracking at least one satellite. By tracking at least four satellites, it precisely determines the position of the antenna. With this information, the Receiver can produce a precise 1 PPS signal that is exactly synchronous to Coordinated Universal Time (UTC) as determined by GPS. The following commands are provided to facilitate initiate GPS satellite tracking, to establish accurate GPS antenna position, to select or ignore satellites, to compensate for antenna cable delay, and to monitor the acquisition. Facilitating Initial Tracking :GPS:INITial:DATE ... :GPS:INITial:POSition ... :GPS:INITial:TIME ... Establishing Position :GPS:POSition ... :GPS:POSition? :GPS:POSition:ACTual? :GPS:POSition:HOLD:LAST? :GPS:POSition:HOLD:STATe? :GPS:POSition:SURVey:PROGress? :GPS:POSition:SURVey:STATe ... :GPS:POSition:SURVey:STATe? :GPS:POSition:SURVey:STATe:POWerup ... :GPS:POSition:SURVey:STATe:POWerup? Selecting Satellites :GPS:SATellite:TRACking:EMANgle ... :GPS:SATellite:TRACking:EMANgle? :GPS:SATellite:TRACking:IGNore ... :GPS:SATellite:TRACking:IGNore? :GPS:SATellite:TRACking:INCLude ... :GPS:SATellite:TRACking:INCLude? :GPS:SATellite:TRACking:<select>:COUNt? :GPS:SATellite:TRACking:<select>:STATe? ... Compensating for Antenna Dela :GPS:REFerence:ADELay ... :GPS:REFerence:ADELay? Monitoring Acquisition :GPS:REFerence:VALid? :GPS:SATellite:TRACking? :GPS:SATellite:VISible:PREDicted? :GPS:SATellite:TRACking:COUNt? :GPS:SATellite:VISible:PREDicted:COUNt? Command Reference 5-6 Command Reference Facilitating Initial Tracking ____________________________ :GPS:INITial:DATE . . . Sets an approximate date for faster initial GPS acquisition. :SYSTem:PRESet Not affected VOLATILE This command sets an approximate date for faster initial GPS acquisition. Following powerup, the Receiver obtains the current date from satellite data. This process occurs automatically. Providing an approximate date, however, reduces the time to initial GPS tracking by assisting the Receiver in finding satellites. Expanded Syntax :GPS:INITial:DATE <four-digit year>,<month>,<day> Parameter Range: the year, month, and day must be valid. Context Dependencies This command is valid prior to first satellite tracked (see bit 0 of the Operation Status Register). Sending this command after this time will generate error -221. The initial date and time needs to be within 3 minutes of the actual date and time to be effective in enabling faster initial GPS acquisition. :GPS:INITial:POSition . . . Sets an approximate position for faster initial GPS acquisition. :SYSTem:PRESet :Not affected VOLATILE This command sets an approximate position for faster initial GPS acquisition. Following powerup, the Receiver refines its position from the satellite data. This process occurs automatically. This command is most effective when the retained position differs significantly from the Receiver’s true position. Expanded Syntax :GPS:INITial:POSition N or S, <latitude degree>, <latitude minute>, <latitude second>, E or W, <longitude degree>, <longitude minute>, <longitude second>, <height above mean sea level, in meters> Parameter This command requires three position coordinates: latitude, longitude, and height. Position must be specified with respect to the World Geodetic System 1984 (WGS-1984) datum absolute earth coordinates. Command Reference 5-7 Command Reference The latitude coordinate is preceded by either N or S, which denotes the northern or southern hemisphere, respectively. The longitude coordinate is preceded by either E or W, which denotes the eastern or western hemisphere, respectively. The following table lists the allowed settings of other parameters: Parameter Range Precision Parameter Range Precision <latitude degrees> 0 to 90 1 <longitude degrees> 0 to 180 1 <latitude minutes> 0 to 59 1 <longitude minutes> 0 to 59 1 <latitude seconds> 0 to 59.999 0.001 <longitude seconds> 0 to 59.999 0.001 <height, m> -1000.00 to 18,000.00 0.01 Context Dependencies This command is valid while the Receiver is in survey mode prior to first computed position. Sending this command while the Receiver is not in survey mode will generate error -221. :GPS:INITial:TIME . . . Sets an approximate time for faster initial GPS acquisition. :SYSTem:PRESet Not affected VOLATILE This command sets an approximate time for faster initial GPS acquisition. Following powerup, the Receiver obtains the current time from satellite data. This process occurs automatically. Providing an approximate time, however, reduces the time to initial GPS tracking by assisting the Receiver in finding satellites. Expanded Syntax :GPS:INITial:TIME <hour>,<minute>,<second> Parameter Range: all parameters (hour, minutes, seconds) must be valid. Context Dependencies This command is valid prior to first satellite tracked (see bit 0 of the Operation Status Register). Sending this command after this time will generate error -221. The initial date and time needs to be within 3 minutes of the actual date and time to be effective in enabling faster initial GPS acquisition. Command Reference 5-8 Command Reference Establishing Position ___________________________________ :SYSTem:PRESet :GPS:POSition . . . latitude: longitude: height: Defines the position of the Receiver. N 0:00:00.000 E 0:00:00.000 0 meters NON-VOLATILE This command defines the position of the Receiver. The Receiver uses this position to predict satellite visibility and to determine time. An accurate position is necessary for precise time transfer. Expanded Syntax :GPS:POSition N or S, <latitude degree>, <latitude minute>, <latitude second>, E or W, <longitude degree>, <longitude minute>, <longitude second>, <height above mean sea level, in meters> :GPS:POSition LAST :GPS:POSition SURVey Parameter The numeric form of this command requires three position coordinates: latitude, longitude, and height. Position must be specified with respect to the World Geodetic System 1984 (WGS-1984) datum absolute earth coordinates. The latitude coordinate is preceded by either N or S, which denotes the northern or southern hemisphere, respectively. The longitude coordinate is preceded by either E or W, which denotes the eastern or western hemisphere, respectively. The following table lists the allowed settings of other parameters: Parameter Range Precision Parameter Range Precision <latitude degrees> 0 to 90 1 <longitude degrees> 0 to 180 1 <latitude minutes> 0 to 59 1 <longitude minutes> 0 to 59 1 <latitude seconds> 0 to 59.999 0.001 <longitude seconds> 0 to 59.999 0.001 <height, m> -1000.00 to 18,000.00 0.01 LAST denotes the last specified position. This parameter is provided to cancel surveying (automatic position computation) and restore the last position setting. SURVey directs the Receiver to stop surveying and use the computed position. This position is the average of individual position computations. Context Dependencies Error -221 is generated if this command is sent as SURV and no valid survey calculation has ever been computed. Command Reference 5-9 Command Reference Side Effects This command stops position surveying. The computed position is retained and applied only when SURVey is specified. :GPS:POSition? Returns the current average position of the GPS antenna. RESPONSE FORMAT XYZ or ± dd or ± d.dEe, ... This query returns the current average position of the Receiver. Response Returns a list of values defining the Receiver position: N or S, <latitude degree>, <latitude minute>, <latitude second>, E or W, <longitude degree>,<longitude minute>, <longitude second>, <height above mean sea level, meters> Context Dependencies Error -230 is generated if in survey and first calculation has not occurred. :GPS:POSition:ACTual? Returns the current instantaneous position of the GPS antenna. RESPONSE FORMAT XYZ or ± dd or ± d.dEe, ... This query returns the current instantaneous position of the GPS antenna. Response Returns a list of values defining the Receiver position: N or S, <latitude degree>, <latitude minute>, <latitude second>, E or W, <longitude degree>,<longitude minute>, <longitude second>, <height above mean sea level, in meters> Context Dependencies Error -230 is generated if in survey and first calculation has not occurred. :GPS:POSition:HOLD:LAST? Returns the last position-hold setting. RESPONSE FORMAT XYZ or ± dd or ± d.dEe, ... This query returns the last position-hold setting, which is restored when the :GPS:POSition LAST command is sent. Refer to the description of the :GPS:POSition command on page 5-10 for details. Command Reference 5-10 Command Reference Response Returns a list of values defining the Receiver position: N or S, <latitude degree>, <latitude minute>, <latitude second>, E or W, <longitude degree>,<longitude minute>, <longitude second>, <height above mean sea level, meters> Context Dependencies This query is always valid, but if the Receiver has not been in position-hold mode since it was preset (see :SYSTem:PRESet), the value returned will be the preset position. :GPS:POSition:HOLD:STATe? Identifies whether the Receiver is in position-hold or survey mode. RESPONSE FORMAT 0 or 1 This query identifies whether the Receiver is in position-hold or survey mode. In survey mode, the Receiver continually refines its position. In position-hold mode, the position setting does not change. Response A value of 0 indicates not in position hold (in survey mode); a value of 1 indicates in position hold. :GPS:POSition:SURVey:PROGress? Returns percent completed while in survey mode. RESPONSE FORMAT ± d.d This query returns percent completed while in survey mode. Automatic transition to position-hold mode occurs following completion of survey mode (indictated by 100). Response The range is 0 to 100%. The units are percent. Context Dependencies This query is only valid while surveying for position (:GPS:POS:SURV:STATe? returns ONCE or status bit 3 = 0 in the Operation Status Register). If queried while not surveying, error -221 is generated. :GPS:POSition:SURVey:STATe . . . Initiates survey mode during which the Receiver determines its position from satellite data. :SYSTem:PRESet ONCE This command initiates survey mode during which the Receiver determines its position from satellite data. The Receiver refines successive positional estimates to obtain a final position, transitions from survey to position-hold mode. Expanded Syntax :GPS:POSition:SURVey:STATe ONCE Command Reference 5-11 Command Reference :GPS:POSition:SURVey:STATe? RESPONSE FORMAT Identifies whether the Receiver is in survey or position-hold mode. XYZ or 0 This query identifies whether the Receiver is in survey or position-hold mode. In survey mode, the Receiver continually refines its position. In position-hold mode, the position does not change. Response A response of ONCE indicates that the Receiver is in survey mode. A response of 0 indicates the Receiver is in position-hold mode. :GPS:POSition:SURVey:STATe:POWerup . . . :SYSTem:PRESet Selects position mode to be used at powerup. ON NON-VOLATILE This command specifies whether the Receiver always surveys at powerup or restores its last position at powerup. Expanded Syntax :GPS:POSition:SURVey:STATe:POWerup ON or OFF Parameter OFF sets the Receiver to powerup in the last valid position. ON sets the Receiver to survey on powerup. :GPS:POSition:SURVey:STATe:POWerup? RESPONSE FORMAT Returns the position mode to be used at powerup. 0 or 1 This query returns the position mode to be used at powerup. Response A value of 0 indicates the Receiver is set to powerup in the last valid position. A value of 1 indicates the Receiver is set to survey on powerup. Command Reference 5-12 Command Reference Selecting Satellites ______________________________________ :GPS:SATellite:TRACking:EMANgle . . . Sets the GPS elevation mask angle value (in degrees). :SYSTem:PRESet 10 NON-VOLATILE This command instructs the Receiver to allow tracking those satellites for which the elevation angle is greater than this elevation mask angle. Satellites below this elevation are visible, but will not be tracked. Expanded Syntax :GPS:SATellite:TRACking:EMANgle <degrees> Parameter <degrees> range is 0 degrees (horizon) to 89 degrees. The resolution is 1 degree. The maximum recommended value while the position is being surveyed is 15 degrees, to allow tracking of four satellites needed for an accurate position determination. Once the survey is complete, the elevation mask angle can be increased to avoid interference problems caused by buildings and trees and minimize effects of multipath, if necessary. Values above 40 degrees severely limit GPS signal availability, and are not recommended. :GPS:SATellite:TRACking:EMANgle? Returns the GPS elevation mask angle value. RESPONSE FORMAT ± dd This query returns the GPS elevation mask angle value. Response The range is 0 degrees to 89 degrees. :GPS:SATellite:TRACking:IGNore . . . Adds the specified satellites to the list that the Receiver ignores for tracking. :SYSTem:PRESet No satellites ignored NON-VOLATILE This command adds the specified satellites to the list that the Receiver ignores for tracking. Each satellite is identified by its pseudorandom noise code (PRN). Command Reference 5-13 Command Reference Expanded Syntax :GPS:SATellite:TRACking:IGNore <PRN>, . . ., <PRN> :GPS:SATellite:TRACking:IGNore:NONE :GPS:SATellite:TRACking:IGNore:ALL Parameter <PRN> parameter is the pseudorandom noise code of the satellite(s) you want the Receiver to ignore. Each satellite has its own unique PRN. Context Dependencies This command is always valid. On send, if any item in the <PRN> list is invalid, the entire list will be rejected. Error -222 will be generated. :GPS:SATellite:TRACking:IGNore? Returns list of satellites to ignore. RESPONSE FORMAT ± dd, ... This query returns a list of satellites to ignore for tracking. Each satellite is identified by its pseudorandom noise code (PRN). Zero (0) indicates no satellites being ignored. Response A value of 0 indicates no satellites being ignored. If any satellite is being ignored, the pseudorandom noise code (PRN) of the satellite is returned. Context Dependencies This query is always valid. :GPS:SATellite:TRACking:INCLude . . . Adds the specified satellites to the list that the Receiver considers for tracking.. :SYSTem:PRESet All satellites included NON-VOLATILE This command adds the specified satellites to the list that the Receiver considers for tracking. Actual satellite selection is based on satellite visibility, geometry, and health. Expanded Syntax :GPS:SATellite:TRACking:INCLude <PRN>, . . ., <PRN> :GPS:SATellite:TRACking:INCLude:NONE :GPS:SATellite:TRACking:INCLude:ALL Parameter <PRN> parameter is the pseudorandom noise code of the satellite(s) you want the Receiver to include. Each satellite has its own unique PRN. Context Dependencies This command is always valid. On send, if any item in the <PRN> list is invalid, the entire list will be rejected. Error -222 will be generated. Command Reference 5-14 Command Reference :GPS:SATellite:TRACking:INCLude? Returns a list of satellites to include. RESPONSE FORMAT ± dd, ... This query returns a list of satellites to include for tracking. Each satellite is identified by its pseudorandom noise code (PRN). Zero (0) indicates no satellites being included (i.e., the satellites are still on the ignored list). Context Dependencies This query is always valid. :GPS:SATellite:TRACking:IGNore:COUNt? RESPONSE FORMAT Returns the number of satellites that are on the list to ignore for tracking. ± dd :GPS:SATellite:TRACking:INClude:COUNt? ± dd Returns the number of satellites that are on the list to include for tracking. The query :GPS:SATellite:TRACking:IGNore:COUNt? returns the number of satellites that are on the list to ignore for tracking. The query :GPS:SATellite:TRACking:INClude:COUNt? returns the number of satellites that are on the list to be included for tracking. Response There may be some delay between changes made to the list of satellites being ignored and their actual removal and inclusion in the tracking process. At :SYSTem:PRESet, all satellites are put on the list to include for tracking. :GPS:SATellite:TRACking:IGNore:STATe? . . . RESPONSE FORMAT Returns the ignored status of individual satellites. 0 or 1 :GPS:SATellite:TRACking:INClude:STATe? . . . 0 or 1 Returns the include status of the specified satellite. The query :GPS:SATellite:TRACking:IGNore:STATe? returns the ignored status of the specified satellite. A satellite is specified by its pseudorandom noise code (PRN). The query :GPS:SATellite:TRACking:INClude:STATe? returns the include status of the specified satellite. A satellite is specified by its pseudorandom noise code (PRN). Command Reference 5-15 Command Reference There may be some delay between changes made to the list of satellites being ignored and their actual removal and inclusion in the tracking process. Expanded Syntax :GPS:SATellite:TRACking:IGNore:STATe? <PRN> :GPS:SATellite:TRACking:INClude:STATe? <PRN> Parameter <PRN> parameter is the pseudorandom noise code of the satellite(s) you want the Receiver to ignore or include. Each satellite has its own unique PRN. Response A value of 0 indicates not on the selected list. A value of 1 indicates on the selected list. Context Dependencies After a :SYSTem:PRESet, all satellites are removed from the list to ignore. Command Reference 5-16 Command Reference Compensating for Antenna Delay :GPS:REFerence:ADELay . . . :SYSTem:PRESet Sets the GPS antenna delay value in seconds. 0.0 NON-VOLATILE This command sets the GPS antenna delay value in seconds. It instructs the Receiver to output its 1 PPS output pulse earlier in time to compensate for antenna cable delay. CAUTION Using this command while the Receiver is in normal locked operation could cause the Receiver go into holdover. Expanded Syntax :GPS:REFerence:ADELay <numeric_value> Parameter Numeric_value range is 0 to 0 .000999999 seconds. The resolution is 1 nanosecond. Zero cable delay is set for a zero-length antenna cable. Consult a cable data book for the delay per meter for the particular antenna cable used in order to compute the total cable delay needed for a particular installation. See Also :GPS:REFerence:ADELay? The table below lists the delay values that you need to use with the GPS:REFerence:ADELay command for the available cable assemblies. Cable Model Number Length RG 213 or Belden 8267 Antenna Delay Value 58506A 50 ft (15.2 m) 77 nanoseconds 58507A 100 ft (30.5 m) 154 nanoseconds 58508A 175 ft (53.3 m) 270 nanoseconds 58511A 200 ft (61 m) 308 nanoseconds The nominal delay value is labeled on the 58506A/507A/508A/511A cable. Command Reference 5-17 Command Reference :GPS:REFerence:ADELay? Returns the GPS antenna delay value in seconds. RESPONSE FORMAT ±d.dEe This query returns the GPS antenna delay value in seconds. This is the delay value set by the system installer (or the factory default). It is not a value measured by the Receiver. Response The time units are seconds. Command Reference 5-18 Command Reference Monitoring Acquisition __________________________________ :GPS:REFerence:VALid? Identifies whether date and time are valid. RESPONSE FORMAT 0 or 1 This query identifies whether date and time are valid. Returns 0 or 1; 1 indicates date and time are valid. This is the same as bit 2 in the Powerup Status Register. This command makes it convenient to check whether the date and time are valid without checking the Powerup Status Register. Response A value of 1 indicates date and time are valid. A value of 0 indicates date and time are not valid. :GPS:SATellite:TRACking? Returns a list of all satellites being tracked. RESPONSE FORMAT ± dd, ... This query returns a list of all satellites being tracked. Each satellite is identified by its pseudorandom noise code (PRN). Response A comma-separated list of satellite pseudorandom noise codes ( <PRN>). The range of each <PRN> is 1 to 32. A response of 0 indicates no satellites being tracked. :GPS:SATellite:VISible:PREDicted? Returns the list of satellites (PRN) that the almanac predicts should be visible, given date, time, and location. RESPONSE FORMAT ± dd, ... This query returns the list of satellites (PRN) that the almanac predicts should be visible, given date, time, and location (if any of these values are incorrect, the prediction will be incorrect). Each satellite is identified by its pseudorandom noise code (PRN). Response A comma-separated list of satellite pseudorandom noise codes ( <PRN>). The range of each <PRN> is 1 to 32. Command Reference 5-19 Command Reference A response of 0 indicates no satellites predicted visible. Theory Satellites must be in view to be tracked. At least four satellites must be in view, and tracked, to determine the position in position survey operation. Only one satellite must be in view, and tracked, to maintain operation of the reference oscillator locked to GPS when in position hold operation. :GPS:SATellite:TRACking:COUNt? RESPONSE FORMAT Returns the number of satellites being tracked. ± dd This query returns the number of satellites being tracked. Response If there are no satellites being tracked, this query returns a 0. :GPS:SATellite:VISible:PREDicted:COUNt? Returns the number of satellites that the almanac predicts should be visible, given date, time, and location. RESPONSE FORMAT ± dd This query returns the number of satellites that the almanac predicts should be visible, given date, time, and location (if any of these are incorrect, the prediction will be incorrect). Response Number of satellites predicted visible. Theory Satellites must be in view to be tracked. At least four satellites must be in view, and tracked, to determine the position in position survey operation. Only one satellite must be in view, and tracked, to maintain operation of the reference oscillator locked to GPS when in position hold operation. Command Reference 5-20 Command Reference 1 PPS Reference Synchronization 1 PPS and 10 MHz (58503A only) output signals are generated by the Receiver’s internal reference oscillator. This oscillator is synchronized (phased locked) to GPS while a sufficient number of satellites are tracked. When the GPS signal is interrupted or absent, the Receiver maintains timing and frequency accuracy through its oscillator “holdover” process. While in holdover, the frequency of the reference oscillator is adjusted as necessary to compensate for aging characteristics. The Receiver returns to “locked” operation through a “holdover recovery” process. The following commands are provided to monitor the operating mode of the reference oscillator, to determine the accuracy and stability of the reference output signal(s), and to control the oscillator holdover process. Monitoring 1 PPS Synchronization :SYNChronization:STATe? :DIAGnostic:ROSCillator:EFControl:RELative? :LED:GPSLock? :LED:HOLDover? Assessing 1 PPS Quality :SYNChronization:FFOMerit? :SYNChronization:HOLDover:TUNCertainty:PREDicted? :SYNChronization:HOLDover:TUNCertainty:PRESent? :SYNChronization:TFOMerit? :SYNChronization:TINTerval? :SYNChronization:HOLDover:DURation? :SYNChronization:HOLDover:DURation:THReshold ... :SYNChronization:HOLDover:DURation:THReshold? :SYNChronization:HOLDover:DURation:THReshold:EXCeeded? Operating in Holdover Initiating Manual Holdover :SYNChronization:HOLDover:INITiate Recovering from Holdover :SYNChronization:HOLDover:WAITing? :SYNChronization:HOLDover:RECovery:INITiate :SYNChronization:HOLDover:RECovery:LIMit:IGNore :SYNChronization:IMMediate Command Reference 5-21 Command Reference Monitoring 1 PPS Synchronization ______________________ :SYNChronization:STATe? Returns the Receiver state. RESPONSE FORMAT XYZ This query returns the Receiver state. Response OFF, or HOLD, or WAIT, or REC, or LOCK, or POW. OFF indicates in diagnostic mode or a temporary start-up mode; HOLD indicates in manual holdover; WAIT indicates waiting for external conditions to allow recovery from holdover; REC indicates actively recovering from holdover; LOCK indicates locked to GPS; POW indicates in powerup prior to first lock. Context Dependencies :SYSTem:PRESet sets the state to POWerup. :DIAGnostic:ROSCillator:EFControl:RELative? Returns the Electronic Frequency Control (EFC) output value of the internal reference oscillator. RESPONSE FORMAT ±d.dEe This query returns the Electronic Frequency Control (EFC) output value of the internal reference oscillator. It returns a percentage value. Response Range is -100% to +100%. :LED:GPSLock? Returns the state of the front-panel GPS Lock LED. RESPONSE FORMAT 0 or 1 This query returns the state of the front-panel GPS Lock LED. The Receiver sets this indicator during normal operation when it has locked the internal reference oscillator and 1 PPS output to GPS. Command Reference 5-22 Command Reference Response A value of 0 indicates the LED is off. A value of 1 indicates the LED is on. RESPONSE FORMAT :LED:HOLDover? Returns the state of the front–panel Holdover LED. 0 or 1 This query returns the state of the front-panel Holdover LED.The Receiver sets this indicator when in holdover operation. Response A value of 0 indicates the LED is off. A value of 1 indicates the LED is on. Assessing 1 PPS Quality _________________________________ :SYNChronization:FFOMerit? RESPONSE FORMAT Returns the Frequency Figure of Merit. ±dd This query returns the Frequency Figure of Merit (FFOM). Use this query when you want to know the stability of the Receiver’s 10 MHz output. The 10 MHz output is controlled by the SmartClock’s Phase-Locked Loop (PLL). Thus, the FFOM value is determined by monitoring the status of the PLL. Response The following table lists and defines the FFOM values (0 thru 3) that could be returned. FFOM Value Definition 0 PLL stabilized — 10 MHz output within specification. 1 PLL stabilizing 2 PLL unlocked (holdover) — Initially the 10 MHz output will be within specifications. However, when in holdover, the 10 MHz output will eventually drift out of specification. 3 PLL unlocked (not in holdover) — Do not use the output. Command Reference 5-23 Command Reference :SYNChronization:HOLDover:TUNCertainty:PREDicted? Returns an estimate of the time interval error that can be expected for a one day holdover, given the current state of SmartClock learning in the Receiver. RESPONSE FORMAT ±d.dEe, 0 or 1 This query returns an estimate of the time interval error that can be expected for a one day holdover, given the current state of SmartClock learning in the Receiver. Response The first number in the response is the estimated time interval error. The units are seconds, the resolution is 100 nanoseconds. The second number in the response identifies the holdover state. A value of 0 indicates the Receiver is not in holdover; a value of 1 indicates the Receiver is in holdover. Context Dependencies This query is not valid prior to first lock following powerup (see bit 2 of the Powerup Status Register) or :SYSTem:PRESet. Sending this query before first lock will generate error -230. :SYNChronization:HOLDover:TUNCertainty:PRESent? Returns the current time interval error during holdover operation, given the current state of SmartClock learning in the Receiver. RESPONSE FORMAT ±d.dEe This query returns the current time error during holdover operation, given the current state of SmartClock learning in the Receiver. Response The time error units are seconds. Context Dependencies This query is valid when the Receiver is in holdover. If not in holdover, error -230 is generated. :SYNChronization:TFOMerit? Returns the Time Figure of Merit. RESPONSE FORMAT ±dd This query returns the Time Figure of Merit. Use this query when you want to know the accuracy of the Receiver’s 1 PPS output. A low TFOM value indicates a more accurate output. A value of 3 indicates that the Time Error ranges from 100 to 1000 nanoseconds. Response The following table lists the TFOM values that could be returned and provides the corresponding Time Error. Command Reference 5-24 Command Reference TFOM Value Time Error (in nanoseconds) TFOM Value Time Error (in nanoseconds) *0 less than 1 5 104 – 105 *1 1 – 10 6 105 – 106 *2 10 – 100 7 106 – 107 3 100 – 1000 8 107 – 108 4 103 – 104 9 greater than 108 * The TFOM values 0, 1, and 2 are not presently used in the 58503A and 59551A products. The 58503A and 59551A products will display TFOM values ranging from 9 to 3, which is consistent with the specified accuracies of each product. :SYNChronization:TINTerval? Returns the difference or timing shift between the SmartClock 1 PPS and the GPS 1 PPS signals. RESPONSE FORMAT ±d.dEe This query returns the difference or timing shift between the SmartClock 1 PPS and the GPS 1 PPS signals. It generates an error when this interval is unavailable (That is, if no GPS 1 PPS). Response Time interval units are seconds. Resolution is 1E-10 seconds. :SYNChronization:HOLDover:DURation? Returns the duration of the present or most recent period of operation in the holdover and holdover processes. RESPONSE FORMAT ±d.dEe, 0 or 1 This query returns the duration of the present or most recent period of operation in the holdover and holdover processes.This is the length of time the reference oscillator was not locked to GPS. The time units are seconds. Response The first number in the response is the holdover duration. The duration units are seconds, and the resolution is 1 second. If the Receiver is in holdover, the response quantifies the current holdover duration. If the Receiver is not in holdover, the response quantifies the previous holdover. The second number in the response identifies the holdover state. A value of 0 indicates the Receiver is not in holdover; a value of 1 indicates the Receiver is in holdover. Command Reference 5-25 Command Reference Context Dependencies This query is always valid. If this query is sent before the first holdover has occurred, the response will be 0,0, indicating that the Receiver is currently not in holdover and last holdover duration was 0 seconds (user infers there has not been one yet). Set to 0,0 after a :SYSTem:PRESet. If there was a prior holdover, the duration will be lost. :SYNChronization:HOLDover:DURation:THReshold . . . Sets the duration (in seconds) to be used as a limit each time holdover begins. :SYSTem:PRESet 86400 (i.e., 1 day) NON-VOLATILE This command sets the duration (in seconds) which represents a limit against which the elapsed time of holdover is compared. If the elapsed time in holdover (and associated processes) exceeds the limit, a flag is set. The flag indicating the limit is exceeded can be queried using the :SYNC:HOLD:DUR:THR:EXCeeded? query. Expanded Syntax :SYNChronization:HOLDover:DURation:THReshold <seconds> Parameter Resolution of the <seconds> parameter is 1 second. :SYNChronization:HOLDover:DURation:THReshold? Returns the duration (in seconds) which represents a limit against which the elapsed time of holdover is compared. RESPONSE FORMAT ±dd This query returns the duration (in seconds) which represents a limit against which the elapsed time of holdover is compared. If the elapsed time of holdover (and associated processes) exceeds the limit, a flag is set. Expanded Syntax :SYNChronization:HOLDover:DURation:THReshold? Response The threshold units are seconds. The resolution is 1 second :SYNChronization:HOLDover:DURation:THReshold :EXCeeded? Identifies if the Receiver has been in holdover longer than the amount of time specified by the THReshold command. Command Reference 5-26 RESPONSE FORMAT 0 or 1 Command Reference This query identifies if the Receiver has been in holdover longer than the amount of time specified by the THReshold command. If it has, 1 will be returned. Response A value of 1 indicates that the Receiver is in holdover, and has been operating in holdover for a duration that exceeds the specified duration. The value 0 indicates either the Receiver is not in holdover, or it has been in holdover for less than the specified duration. Operating in Holdover ___________________________________ Initiating Manual Holdover ________________________________ :SYNChronization:HOLDover:INITiate Places the Receiver in holdover mode. EVENT This command places the Receiver in holdover mode. The Receiver will stay in holdover until you send :SYNC:HOLD:REC:INIT. Context Dependencies This command is not valid prior to the first lock following powerup (see bit 2 of the Powerup Status Register) or :SYSTem:PRESet. Sending this command before the first lock will generate error -221. See Also :SYNChronization:HOLDover:RECovery:INITiate Recovering from Holdover _________________________________ :SYNChronization:HOLDover:WAITing? Returns prioritized reason for why the Receiver is waiting to recover. RESPONSE FORMAT XYZ This query returns prioritized reason for why the Receiver is waiting to recover. Response HARD indicates there is an internal hardware reason, GPS indicates there are no satellites, LIM indicates the time interval between GPS and internal oscillator is exceeding the limit, and NONE indicates the Receiver isn’t waiting to recover. Command Reference 5-27 Command Reference Note that if holdover has been initiated by sending the :SYNC:HOLD:INIT command, the Receiver is not waiting to recover; the response is NONE. This query is always valid. If not in holdover and waiting to recover, NONE will be the response. :SYNChronization:HOLDover:RECovery:INITiate Initiates a recovery from manually initiated holdover. EVENT This command initiates a recovery from manually initiated holdover. Use this command to take the Receiver out of a manually selected holdover. This command is not needed to initiate holdover recovery in any other situation. See Also :SYNChronization:HOLDover:INITiate :SYNChronization:HOLDover:RECovery:LIMit:IGNore Initiates recovery from holdover if recovery was inhibited by time intervals exceeding limit. EVENT This command initiates recovery from holdover if recovery was inhibited by time intervals exceeding limit. The time interval used for this comparison is the time interval between the internal oscillator’s 1 PPS edge and the GPS system’s 1 PPS edge. When this time interval consistently exceeds the specified limit, the instrument enters the holdover state, “Waiting to Recover.” Recovery is initiated when the time intervals consistently fall within limits, or when the limit is ignored by issuing this command. :SYNChronization:IMMediate Initiates a near-instantaneous alignment of the GPS 1 PPS and Receiver output 1 PPS if the command is issued during recovery from holdover. EVENT This command initiates a near-instantaneous alignment of the GPS 1 PPS and Receiver output 1 PPS if the command is issued during recovery from holdover. Context Dependencies This command is only valid when recovering from holdover. See bit 2 of the Holdover Status Register (if it is 1, this command is okay). Sending this command when the Receiver is not recovering will generate error -221. Command Reference 5-28 Command Reference Operating Status This section describes the commands that can be use to obtain Receiver status information. There are several ways to obtain Receiver status using commands. For example, you can send a command to display the Receiver Status screen, to read the error queue, and to read the diagnostic log. You can also send a sequence of commands to read and control the status registers for alarm generation. This section defines all of the commands used for status reporting. A comprehensive discussion on how you can monitor and control alarm conditions using the the status registers is included. Receiver Operation at a Glance :SYSTem:STATus? :SYSTem:STATus:LENGth? Reading the Error Queue :SYSTem:ERRor? Reading the Diagnostic Log :DIAGnostic:LOG:CLEar :DIAGnostic:LOG:READ:ALL? :DIAGnostic:LOG:CLEar ... :DIAGnostic:LOG:COUNt? :DIAGnostic:LOG:READ? :DIAGnostic:LOG:READ? ... Monitoring Status/Alarm Conditions Clearing and Presetting Alarms *CLS :STATus:PRESet:ALARm Reading and Qualifying Alarms :LED:ALARm? *SRE ... *SRE? *STB? Command Reference 5-29 Command Reference Reading and Qualifying Receiver Status <register> = OPERation <register> = OPERation:HARDware <register> = OPERation:HOLDover <register> = OPERation:POWerup <register> = QUEStionable :STATus:<register>:CONDition? :STATus:<register>:EVENt? :STATus:<register>:ENABle ... :STATus:<register>:ENABle? :STATus:<register>:NTRansition ... :STATus:<register>:NTRansition? :STATus:<register>:PTRansition ... :STATus:<register>:PTRansition? Reading and Qualifying Command Error Status *ESE ... *ESE? *ESR? Reporting Questionable Status :STATus:QUEStionable:CONDition:USER ... :STATus:QUEStionable:EVENt:USER ... Assessing Receiver Health *TST? :DIAGnostic:LIFetime:COUNt? :DIAGnostic:TEST? ... :DIAGnostic:TEST:RESult? Receiver Operation at a Glance ______________________ :SYSTem:STATus? Outputs a formatted status screen. RESPONSE FORMAT ASCII Data This query outputs a formatted Receiver Status screen. Use this screen to monitor GPS acquisition, derivation of time and position, and synchronization of reference outputs to GPS. Refer to Chapter 3, “Visual User Interface,” for detailed information on the Receiver Status screen. Response Sending this command will display a status screen similar to the following figure. Command Reference 5-30 Command Reference :SYSTem:STATus:LENGth? Returns the number of lines of formatted text that are in the Receiver Status screen. RESPONSE FORMAT ±dd This query returns the number of lines of formatted text that are in the Receiver Status screen. Reading the Error Queue ________________________________ :SYSTem:ERRor? Returns the oldest error in the Error Queue and removes that error from the queue (first in, first out). RESPONSE FORMAT ±dd,“XYZ” This query returns the oldest error in the Error Queue and removes that error from the queue (first in, first out). See Appendix A, “Error Messages,” in this guide for detailed error information. Response The error response format is: <error_number>,"<error_description>", where • The <error_number> is an integer transferred as ASCII bytes in <NR1>format (integer). The range is -32768 to 32767. • Negative error numbers are defined by the SCPI standard. • Positive error numbers are defined specifically for this Receiver. • An error number value of zero indicates that the Error Queue is empty. • The maximum length of the <error_description> is 255 characters. Context Dependencies :SYSTem:PRESet clears the Error Queue. The queue is cleared (emptied) on *CLS, power-on, or upon reading the last error from the queue. If the Error Queue overflows, the last error in the queue is replaced with the error -350, "Queue overflow". Any time the queue overflows, the least recent errors remain in the queue and the most recent error is discarded. The maximum length of the Error Queue is 30. Command Reference 5-31 Command Reference Reading the Diagnostic Log __________________________ The Diagnostic Log is one way to obtain Receiver status. The following activities and events are recorded in the diagnostic log: • power-on sequence, • automatic or manual transitions between locked, and holdover, • automatic or manual transitions between position survey and position hold operation, • alarm indications, and • self-test failures. Each entry is date-and-time tagged. The log entries are stored in non-volatile memory so all data remains valid even if power is lost. Access to the diagnostic log entries is through commands in the :DIAGnostic:LOG subtree. For example, to read the first diagnostic log entry, use the command :DIAG:LOG:READ? 1 The possible log messages that can be displayed on your computer display are listed in the following table. Diagnostic Log Messages Log Message Log cleared Power on Re-boot Survey mode started Position hold mode started GPS lock started GPS reference valid at yyyymmdd.hh:mm:ss Holdover started, manual Holdover started, TI error Holdover started, TI limit exceeded Holdover started, not tracking GPS Holdover started, GPS RAIM alarm Holdover started, GPS Alarm Comments Always becomes first log message when the log is cleared. See :DIAG:LOG:CLEAR. Indicates Receiver has been powered on. Indicates Receiver processor has re-booted. Indicates beginning of survey for position. Indicates transition from survey to position hold. Indicates transition into locked operation. indicates when GPS reference first become valid. Time in log is the present time from GPS. Indicates transition to holdover based on user request. See :SYNC:HOLD:INIT. Indicates transition to holdover due to problem detected with Receiver ability to properly measure interval between GPS 1 PPS and internal oscillator 1 PPS. Indicates transition to holdover due to the interval from GPS 1 PPS to internal oscillator 1 PPS exceeding a limit threshold for numerous measurements. Indicates transition to holdover since GPS is not tracking sufficient satellites. Indicates transition to holdover since time RAIM algorithm has detected GPS 1PPS timing inaccuracy. Indicates transition to holdover due to GPS engine communication failure. Command Reference 5-32 Command Reference Log Message Holdover started, invalid GPS 1PPS Holdover started, GPS Holdover started, HW error Holdover started, temporary Holdover started Self-test failed System preset Hardware failure EEPROM save failed Comments Indicates transition to holdover due to problem with the GPS 1PPS signal. Indicates transition to holdover due to some other GPS problem. Indicates transition to holdover due to internal hardware error. Indicates temporary transition to holdover due to changing of certain settings. Indicates transition to holdover for any reason not covered above. Indicates self-test failed on powerup. Indicates that the Receiver has been preset to factory settings. Indicates that a hardware failure has been detected. See Hardware Status Register for details. Indicates that an attempt to save information to the EEPROM has failed. The DIAGnostic commands for the log are described in the following text. :DIAGnostic:LOG:CLEar Clears the diagnostic log. :SYSTem:PRESet Log is cleared NON-VOLATILE This command is an event that removes all previous diagnostic log entries, and effectively sets the number of diagnostic log entries to one. :DIAGnostic:LOG:READ:ALL? Returns all of the most recent diagnostic log entries. RESPONSE FORMAT “XYZ”, ... This query returns all of the most recent diagnostic log entries. :DIAGnostic:LOG:CLEar . . . Clears only the current diagnostic log. :SYSTem:PRESet Log is cleared NON-VOLATILE This command clears the diagnostic log. The optional log count parameter is provided to ensure that no log entries are unread at the time of the clear. Expanded Syntax :DIAGnostic:LOG:CLEar <current log size> Parameter If the value sent for the optional log parameter does not match the current log entry count (use :DIAG:LOG:COUN? to obtain this number), the clear will not take place. Command Reference 5-33 Command Reference Context Dependencies This command is always valid. If the optional log count parameter is sent, and the current and actual log count does not match log count value, the clear will not be performed and error -222 will be generated. :DIAGnostic:LOG:COUNt? Identifies the number of entries in the diagnostic log. RESPONSE FORMAT ±dd This query identifies the number of entries in the diagnostic log. Response Range is 1 to 222, maximum is subject to change. :DIAGnostic:LOG:READ? Returns the most recent diagnostic log entry. RESPONSE FORMAT “XYZ” This query returns the most recent diagnostic log entry. Response The diagnostic log entry format is: "Log NNN: YYYYMMDD.HH:MM:SS: <log_message>", where: Log indicates a diagnostic log entry, and NNN is the log entry number YYYYMMDD.HH:MM:SS is the date and time of the diagnostic log entry. The <log_message> is a sequence of up to 255 characters. :DIAGnostic:LOG:READ? . . . Returns the user-specified diagnostic log entry. Returns the most recent diagnostic log entry if no parameter is supplied. RESPONSE FORMAT “XYZ” This query returns the user-specified diagnostic log entry. Expanded Syntax :DIAGnostic:LOG:READ? <entry number> Parameter Range is 1 to current log count. Response The diagnostic log entry format is: "Log NNN: YYYYMMDD.HH:MM:SS: <log_message>", where: Command Reference 5-34 Command Reference Log indicates a diagnostic log entry, and NNN is the log entry number YYYYMMDD.HH:MM:SS is the date and time of the diagnostic log entry. The <log_message> is a sequence of up to 255 characters. Context Dependencies This query is always valid. If no log message is associated with the requested log number, error 222 is generated. Command Reference 5-35 Command Reference Monitoring Status/Alarm Conditions _____________________ The Receiver is at all times monitoring various operating conditions through a status/alarm reporting system. The Receiver is shipped from the factory with the status system set to generate an alarm under a default set of operating conditions. The monitored operating conditions are organized by function into three major groups: Questionable status, Command Error status, and Operation status. The Operation status group has three functional subgroups: Powerup status, Holdover status, and Hardware status. All of the operating conditions are summarized by the Alarm status. Figure 5-1, on the next page, includes the identification of the default alarm conditions. Those conditions which are enabled to “feed” all the way through the system will generate an alarm in a Receiver configured with the factory defaults. (Note a diagram identical to Figure 5-1 is provides as part of the Receiver Commands at a Glance/Status Reporting System at a Glance foldout — pages 4-17 and 4-18, respectively.) Command Reference 5-36 Command Reference Questionable Binary Weights 1 0 2 1 4 2 8 3 4 16 5 32 6 64 7 128 0 1 8 256 9 512 10 1024 11 2048 12 4096 13 8192 14 16384 15 32768 "OR" Time Reset User-reported Alarm Command Error not used not used not used 3 not used 2 3 4 5 Query Error Hardware/Firmware Error Semantic Error Syntactic Error "OR" 5 6 7 not used 7 Powerup 0 1 2 First Satellite Tracked Oscillator Oven Warm Date & Time Valid Holding Waiting to Recover Recovering Exceeding Threshold 0 1 2 0 1 2 3 4 Selftest Failure +15V Supply Exceeds Tolerance -15V Supply Exceeds Tolerance +5V Supply Exceeds Tolerance Oven Supply Exceeds Tolerance 6 7 8 9 10 11 12 EFC Voltage Near Full-Scale EFC Voltage Full-Scale GPS 1 PPS Failure GPS Failure TI Measurement Failed EEPROM Write Failed Internal Reference Failure "OR" Questionable Summary not used Alarm Command Error Summary Master Summary Operation Summary Power Cycled Operation "OR" Holdover 0 1 2 3 "OR" not used 3 4 5 6 Powerup Summary Locked Holdover Summary Position Hold 1 PPS Reference Valid Hardware Summary Log Almost Full "OR" Hardware not used "OR" Shading identifies summary bit. Powerup Summary Default Transition Filter Default Event Enable False-to-true (positive) transition latches event. Event enabled to report to summary bit. Not applicable Event disabled Figure 5-1. 59551A/58503A Status Reporting System DiagramMonitoring The following describes, for each functional group of operating status shown in Figure 5-1, each of the operating conditions that is monitored through the status/alarm system. Each monitored condition bit is “set” (to one) when the named condition is true and “cleared” (to zero) when the named condition is false. Each monitored event bit is set when the named event has occurred and cleared at powerup and when the user executes a command which reads or clears the event register. All of the conditions and events are cleared at powerup and :SYSTem:PRESet. Alarm Status The Alarm Status summarizes condition changes from the three major functional status groups (Questionable, Command Error, and Operation). • The Questionable Summary condition (bit 3) reflects one or more latched condition changes in the Questionable status group. Command Reference 5-37 Command Reference • The Command Error Summary condition (bit 5) reflects one or more latched condition changes in the Command Error status group. • The Master Summary condition (bit 6) indicates that there was at least one reason for generating an Alarm. • The Operation Summary condition (bit 7) reflects one or more latched condition changes in the Operation status group. Operation Status The Operation Status is comprised of the Operation subgroup (Powerup, Holdover, and Hardware) summaries, Locked, Position Hold, 1 PPS Reference Valid, and Log Almost Full status. • The Powerup Summary condition (bit 0) reflects one or more latched condition changes in the Powerup status group. • The Locked condition (bit 1) indicates whether or not the Receiver is locked to GPS. • The Holdover Summary condition (bit 2) reflects one or more latched condition changes in the Holdover status group. • The Position Hold condition (bit 3) indicates whether the Receiver is in position hold or survey mode. • The 1 PPS Reference Valid condition (bit 4) indicates that the GPS 1 PPS signal is suitable to use as a locking reference. • The Hardware Summary condition (bit 5) reflects one or more latched condition changes in the Hardware status group. • The Log Almost Full condition (bit 6) indicates whether or not the diagnostic log is approaching the point where new entries will no longer be logged. Hardware Status This Operation subgroup comprises operating status that indicates the health of the Receiver hardware. One or more of the condition changes from this group are summarized in the Operation Status group. • The Selftest Failure condition (bit 0) indicates whether a failure was detected during the powerup or last user-initiated self test. • The following conditions reflect the status of specific hardware that is continuously monitored by the Receiver: +15V Supply Exceeds Tolerance condition Command Reference 5-38 (bit 1) Command Reference −15V Supply Exceeds Tolerance condition +5V Supply Exceeds Tolerance condition Oven Supply Exceeds Tolerance condition EFC Voltage Near Full-Scale condition EFC Voltage Full-Scale condition GPS 1 PPS Failure condition GPS Failure condition Time Interval Measurement Failed event Internal Reference Failure condition • (bit 2) (bit 3) (bit 4) (bit 6) (bit 7) (bit 8) (bit 9) (bit 10) (bit 12) The EEPROM Write Failed event (bit 11) indicates that an attempt to write to the non-volatile memory failed. Holdover Status This Operation subgroup is comprised of operating status that occurs during holdover. One or more of the condition changes from this group are summarized in the Operation Status group. • The following conditions indicate that the Receiver is in holdover, and the specific holdover state: Holding condition Waiting to Recover condition Recovering condition • (bit 0) (bit 1) (bit 2) The Exceeding User-Threshold condition (bit 3) indicates whether or not the user-specified holdover duration (:SYNC:HOLDover:DURation:THReshold) is being exceeded. Powerup Status This Operation subgroup is comprised of operating status that occurs at powerup. One or more of the condition changes from this group are summarized in the Operation Status group. • The First Satellite Tracked condition (bit 0) is cleared at powerup and set when the first satellite becomes tracked following powerup. • The Oscillator Oven Warm condition (bit 1) is cleared at powerup and set when the internal oscillator has warmed up following powerup. • The Date & Time Valid event (bit 2) is cleared at powerup and set when the date and time are set during the first lock is attained after powerup. Command Reference 5-39 Command Reference Questionable Status The Time Reset status event (bit 0) indicates that the Receiver reset its time because the Receiver's time was found to be different from the time being reported by the satellites. This could occur after an extensive holdover period. The User-reported condition (bit 1) indicates the setting reported by the user with the :STATus:QUEStionable:CONDition:USER or :STATus:QUEStionable:EVENt:USER command. This is the only condition in the status/alarm reporting that the user can directly affect. Command Error Status This group contains events which indicate a command error has occurred, and an event which indicates that the power has cycled. (See Figure 5-1.) The following status events indicate that a command error occurred: • The Query Error status event (bit 2). Errors -400 through -499 are query errors. • The Hardware/Firmware Error status event (bit 3). Errors -300 through -399 are hardware/firmware errors. • The Semantic Error status event (bit 4). Errors -200 through -299 are semantic errors. • The Syntactic Error status event (bit 5). Errors -100 through -199 are syntactic errors. • The Power Cycled status event (bit 7) is set at powerup. Clearing and Presetting Alarms ___________________________ *CLS Clears the current alarm and prepares the Receiver for the next alarm activation. EVENT When the *CLS command clears the event status registers and error queue, the Receiver’s Alarm LED and Alarm BITE output will no longer indicate that there was a reason to alarm. Furthermore, the Receiver is then ready to detect a new alarm. Command Reference 5-40 Command Reference Context Dependencies In the 59551A, the error queue (and corresponding serial port prompt) of the I/O port which transmitted *CLS will be cleared. Side Effects The Alarm LED is extinguished. The Alarm BITE output is set “inactive/off.” The prompt of the serial I/O port (which transmits *CLS) reflects error queue clearing. The event status registers are cleared. The error queue (and corresponding serial port prompt) of the I/O port which transmitted *CLS will be cleared. Theory The *CLS command clears the event status registers and error queue. (They are also cleared at power-up.) Since the Alarm Condition register summarizes the event registers, it is cleared as a result of the clearing of all of the event registers. The alarm remains active even after the condition that caused it has gone away. If the condition that caused the alarm to occur is still set, a new alarm cannot be detected until the condition clears and resets. This command has no effect on condition, enable, or transition filter registers. :STATus:PRESet:ALARm Presets the status/alarm reporting system to generate an alarm when a factory default set of operating conditions occurs. EVENT When the configurable portion of the status/alarm reporting system is preset, the Receiver is configured to generate an alarm under the factory default set of operating conditions. Use this command to restore only the status/alarm reporting system to the factory (:SYSTem:PRESet) settings. Theory The configurable portion of the status/alarm reporting system consists of enable and transition filter registers. Figure 5-1 identifies the factory default enables and transitions. Command Reference 5-41 Command Reference The status/alarm reporting configuration is stored in non-volatile memory. This command performs a subset of the :SYSTem:PRESet command in that it only presets the configuration associated with status/alarm reporting system. This command does not affect condition or event registers. Reading and Qualifying Alarms ____________________________ Alarm Condition Register not used not used not used *STB? 3 Questionable Summary not used 5 6 7 Command Error Summary Master Summary Operation Summary "AND" & Alarm Enable Register "OR" & :LED:ALARm? Alarm not used not used not used *SRE <bit mask> *SRE? 3 & Questionable Summary not used 5 Command Error Summary not used 7 Operation Summary Figure 5-2. Alarm Condition and Enable Registers :LED:ALARm? Returns the status of the front-panel Alarm LED. RESPONSE FORMAT 0 or 1 This query returns the status of the front-panel Alarm LED, which indicates that a change in operating conditions was recorded. The alarm remains active even after the condition that caused it has gone away. Command Reference 5-42 Command Reference Theory This query essentially reads the Master Summary bit (bit 6) of theAlarm Condition Register. At power-up, the alarm status is cleared. :SYSTem:PRESet *SRE . . . Sets the Alarm Enable Register. 136 NON-VOLATILE The setting of the Alarm Enable Register (Figure 5-2) selects which summary status from the Alarm Condition Register is enabled to generate an alarm. Expanded Syntax *SRE <bit mask> Semantics The <bit mask> has a range of 0 to 255. The <bit mask> value represents the sum of the binary-weighted values of the register. Attempts to set unused bits in the register are ignored — the value of unused bits is zero. RESPONSE FORMAT *SRE? Identifies the status conditions enabled to generate an alarm. ±dd This query identifies the status conditions enabled to generate an alarm. Reading the Alarm Enable Register identifies which summary status from the Alarm Condition Register is enabled to generate an alarm. Response The range is 0 to 255. The response value represents the sum of the binary-weighted values of the register. The value of unused bits is zero. Theory Reading/Querying the Alarm Enable Register does not change its contents. Command Reference 5-43 Command Reference *STB? RESPONSE FORMAT Reads the Alarm Condition Register. ±dd This query reads the Alarm Condition Register (Figure 5-2). Response The range is 0 to 255. The response value represents the sum of the binary-weighted values of the register. The value of unused bits is zero. Theory The Alarm Condition Register continuously monitors the summary status of the instrument. The Alarm Condition Register bits are updated in real time — there is no latching or buffering. Reading/Querying the Alarm Condition Register does not change its contents. At powerup, the Alarm Condition Register is cleared. Command Reference 5-44 Command Reference Reading and Qualifying Receiver Status ___________________ Condition Register Transition Filter Event Register 0 1 2 * * * 0 1 2 "AND" & n * Continuously monitors conditions :STATus:<register>:CONDition? Enables condition changes to report to Event Register :STATus:<register>:PTR . . . :STATus:<register>:PTR? :STATus:<register>:NTR . . . :STATus:<register>:NTR? n "OR" & Summary Bit Latches condition changes :STATus:<register>:EVENt? & Event Enable Register & 0 1 2 *= positive transition or negative transition or either transition or n neither transition <register> = OPERation or QUEStionable or OPERation:HARDware or OPERation:HOLDover or OPERation:POWerup Enables events to report to summary bit :STATus:<register>:ENABle <bit mask> :STATus:<register>:ENABle? Figure 5-3. Condition, Transition Filter, Event Enable, and Event Registers :STATus:<register>:CONDition? Reads the specified condition register. RESPONSE FORMAT ±dd This query reads the specified condition register (figures 5-3 and 5-1). Expanded Syntax :STATus:OPERation:CONDition? :STATus:QUEStionable:CONDition? :STATus:OPERation:HARDware:CONDition? :STATus:OPERation:HOLDover:CONDition? :STATus:OPERation:POWerup:CONDition? Response The range is 0 to 65535. The response value represents the sum of the binary-weighted values of the register. The value of unused bits is zero. Command Reference 5-45 Command Reference Note that some bits, those which are “event-only”, have no corresponding conditions. Theory A condition register continuously monitors the hardware and firmware status (that is, the operating conditions) of the instrument. Conditions register bits are updated in real time — there is no latching or buffering. Reading/Querying a condition register does not change its contents. At powerup, the conditions registers are cleared. :STATus:<register>:EVENt? Reads the specified event register. RESPONSE FORMAT ±dd This query reads the specified event register (figures 5-3 and 5-1), retrieving information about what has happened to the instrument since it was last queried, or cleared by :SYSTem:PRESet or *CLS. Expaned Syntax :STATus:OPERation:EVENt? :STATus:QUEStionable:EVENt? :STATus:OPERation:HARDware:EVENt? :STATus:OPERation:HOLDover:EVENt? :STATus:OPERation:POWerup:EVENt? Response The range is 0 to 65535. The response value represents the sum of the binary-weighted values of the register. The value of unused bits is zero. Side Effects Reading/Querying an event register clears it. Theory An event register captures changes in conditions. When a transition occurs, the corresponding bit in the event register is set TRUE. The instrument can be configured (using :STATus:<register>:NTRansition and :STATus:<register>:PTRansition), for each bit position, to capture the positive, the negative, either, or neither transition. Event register bits, once set, are latched. That is, they remain set until they are read. When they are read, they are cleared. Command Reference 5-46 Command Reference At powerup, the event registers are cleared. See Also :STATus:<register>:NTRansition . . . :STATus:<register>:PTRansition . . . :STATus:<register>:ENABle . . . Sets the specified enable register. :SYSTem:PRESet See Figure 5-1 for Default Event Enable identification NON-VOLATILE The setting of an enable register (figures 5-3 and 5-1) selects which events from the corresponding event register are enabled to report to the corresponding summary bit of the summarizing condition register. Expanded Syntax :STATus:OPERation:ENABle <bit mask> :STATus:QUEStionable:ENABle <bit mask> :STATus:OPERation:HARDware:ENABle <bit mask> :STATus:OPERation:HOLDover:ENABle <bit mask> :STATus:OPERation:POWerup:ENABle <bit mask> Parameter The <bit mask> has a range of 0 to 65535. The <bit mask> value represents the sum of the binary-weighted values of the register. Attempts to set unused bits in an enable register are ignored — the value of unused bits is zero. :STATus:<register>:ENABle? Reads the specified enable register. RESPONSE FORMAT ±dd Reading an enable register (figures 5-3 and 5-1) identifies which events from the corresponding event register are enabled to report to the corresponding summary bit of the summarizing condition register. Expanded Syntax :STATus:OPERation:ENABle? :STATus:QUEStionable:ENABle? :STATus:OPERation:HARDware:ENABle? :STATus:OPERation:HOLDover:ENABle? :STATus:OPERation:POWerup:ENABle? Response The range is 0 to 65535. Command Reference 5-47 Command Reference The response value represents the sum of the binary-weighted values of the register. The value of unused bits is zero. Theory Reading/Querying an enable register does not change its contents. :STATus:<register>:NTRansition . . . :STATus:<register>:PTRansition . . . Sets the specified transition filter registers. :SYSTem:PRESet See Figure 5-1 for Default Transition Filter identification NON-VOLATILE The setting of the transition filter registers selects which condition transitions (positive, negative, either, or neither) are enabled to report events. Expanded Syntax :STATus:OPERation:NTRansition <bit mask> :STATus:QUEStionable:NTRansition <bit mask> :STATus:OPERation:HARDware:NTRansition <bit mask> :STATus:OPERation:HOLDover:NTRansition <bit mask> :STATus:OPERation:POWerup:NTRansition <bit mask> :STATus:OPERation:PTRansition <bit mask> :STATus:QUEStionable:PTRansition <bit mask> :STATus:OPERation:HARDware:PTRansition <bit mask> :STATus:OPERation:HOLDover:PTRansition <bit mask> :STATus:OPERation:POWerup:PTRansition <bit mask> Parameter The <bit mask> has a range of 0 to 65535. The <bit mask> value represents the sum of the binary-weighted values of the register. Attempts to set unused bits in the transition filter are ignored — the value of unused bits is zero. To enable negative (one to zero) transitions of specific conditions, set the corresponding bits to one in the <bit mask > for the NTRansition register command. To enable positive (zero to one) transitions of specific conditions, set the corresponding bits to one in the <bit mask > for the PTRansition register command. Note that some bits, those which are “event-only”, have no transition filter setting. Attempts to set these bits are ignored. Command Reference 5-48 Command Reference :STATus:<register>:NTRansition? :STATus:<register>:PTRansition? RESPONSE FORMAT ±dd Reads the specified transition filter registers. Reading the transition filter registers identifies which condition transitions (positive, negative, either, or neither) are enabled to report events. Expanded Syntax :STATus:OPERation:NTRansition? :STATus:QUEStionable:NTRansition? :STATus:OPERation:HARDware:NTRansition? :STATus:OPERation:HOLDover:NTRansition? :STATus:OPERation:POWerup:NTRansition? :STATus:OPERation:PTRansition? :STATus:QUEStionable:PTRansition? :STATus:OPERation:HARDware:PTRansition? :STATus:OPERation:HOLDover:PTRansition? :STATus:OPERation:POWerup:PTRansition? Response The range is 0 to 65535. The response value represents the sum of the binary-weighted values of the register. The value of unused bits is zero. The bits which are set to one in the <bit mask> of the NTRansition query response indicate the enabled negative transitions of corresponding conditions. The bits which are set to one in the <bit mask> of the PTRansition query response indicate the enabled positive transitions of corresponding conditions. Theory Reading/Querying a transition filter register does not change its contents. Command Reference 5-49 Command Reference Reading and Qualifying Command Error Status ___________ Command Error Event Register not used not used ESR? * 2 3 4 5 Query Error Hardware/Firmware Error Semantic Error Syntactic Error 7 Power Cycled "AND" & not used Command Error Enable Register & "OR" & Command Error Summary Bit of Alarm Condition Register not used not used ESE <bit mask> ESE? * * 2 3 4 5 Query Error Hardware/Firmware Error Semantic Error Syntactic Error & & not used 7 Power Cycled Figure 5-4. Command Error Event and Enable Registers *ESE . . . Sets the Command Error Enable Register. :SYSTem:PRESet 0 NON-VOLATILE The setting of the Command Error Enable Register (Figure 5-4) selects which events from the Command Error Event Register are enabled to report to the Command Error Summary bit of the Alarm Condition Register. Expanded Syntax *ESE <bit mask> Parameter The <bit mask> has a range of 0 to 255. The <bit mask> value represents the sum of the binary-weighted values of the register. Attempts to set unused bits in the register are ignored — the value of unused bits is zero. Command Reference 5-50 Command Reference RESPONSE FORMAT *ESE? Reads the Command Error Enable Register. ±dd This query identifies the status conditions enabled to generate an alarm. Reading the Command Error Enable Register (Figure 5-4) identifies which events from the Command Error Event Register are enabled to report to the Command Error Summary bit of the Alarm Condition Register. Response The range is 0 to 255. The response value represents the sum of the binary–weighted values of the register. The value of unused bits is zero. Theory Reading/Querying the Command Error Enable Register does not change its contents. RESPONSE FORMAT *ESR? Reads the Command Error Event Register. ±dd This query reads the Command Error Event Register, retrieving information about errors (or power cycles) that have occurred since the instrument was last queried, or cleared by SYSTem:PRESet or *CLS. Response The range is 0 to 255. The response value represents the sum of the binary-weighted values of the register. The value of unused bits is zero. Reporting Questionable Status ____________________________ SYSTem:PRESet :STATus:QUEStionable:CONDition:USER . . . Sets the User-reported bit of the Questionable Condition Register. Clear NON-VOLATILE This command sets the User-reported bit of the Questionable Condition Register. Command Reference 5-51 Command Reference Expanded Syntax :STATus:QUEStionable:CONDition:USER SET or CLEar Parameter SET will cause the User-reported bit of Questionable Condition Register to be set to 1. CLEar will cause the User-reported bit of Questionable Condition Register to be set to 0. Side Effects The User-reported bit of the Questionable Condition Register is set or cleared by this command. Theory A condition change (from SET to CLEAR, or CLEAR to SET) of the Userreported bit of the Questionable Condition Register, and the appropriate configuration of the Questionable Transition Filter is necessary to generate an event in the Questionable Event Register. Furthermore, when the User-reported bit of Questionable Event Enable Register is enabled, and the Questionable Summary bit of the Alarm Enable Register is enabled, then a transition of the User-reported condition will generate an ALARM. :STATus:QUEStionable:EVENt:USER . . . Generates a transition of the User-reported bit of the Questionable Condition Register. EVENT NON-VOLATILE This command generates a transition of the User-reported bit of the Questionable Condition Register. Expanded Syntax :STATus:QUEStionable:EVENt:USER PTRansition or NTRansition Parameter PTRansition will cause the User-reported bit of Questionable Condition Register to transition from a setting of 0 to a setting of 1. NTRansition will cause the User-reported bit of Questionable Condition Register to transition from a setting of 1 to a setting of 0. Context Dependencies Issuing PTRansition, while the User-reported bit of the Questionable Positive Transition Register is enabled, sets the User-reported bit of the Questionable Event register. Command Reference 5-52 Command Reference Issuing NTRansition, while the User-reported bit of the Questionable Negative Transition Register is enabled, sets the User-reported bit of the Questionable Event register. Side Effects The user-reported bit of the Questionable Condition Register is set by the PTRansition parameter or cleared by the NTRansition parameter. Theory A positive or negative (PTRansition or NTRansition) of the User-reported bit of the Questionable Condition Register, and the appropriate configuration of the Questionable Transition Filter is necessary to generate an event in the Questionable Event Register. Furthermore, when the User-reported bit of Questionable Event Enable Register is enabled, and the Questionable Summary bit of the Alarm Enable Register is enabled, then a User-reported event will generate an ALARM. Command Reference 5-53 Command Reference Assessing Receiver Health ______________________________ *TST? Executes an internal selftest and reports the results. RESPONSE FORMAT ±dd This query causes an internal selftest and the response indicates whether any errors were detected. This test takes about 40 seconds to complete. Error -330, “Self test failed” is generated if the selftest fails. NOTE Manual operation of internal self-test diagnostics will affect normal Receiver operation, including disruption of any or all of the following: GPS satellite tracking, reference oscillator frequency, 1 PPS output timing, and Receiver status information. When invoked manually, any of these diagnostics should be considered to be destructive tests. The following elements and functions are tested: CPU EPROM RAM EEPROM UART QSPI FPGA logic Interpolators GPS engine Power supply levels Reference oscillator Response A value of 0 indicates the tests passed, a non-zero value indicates the selftest was not completed or was completed with errors detected. :DIAGnostic:LIFetime:COUNt? Returns the lifetime count, indicating the total powered-on time. RESPONSE FORMAT ±dd This query returns the lifetime count, indicating the total powered-on time. Response Range of the integer is 0 to 4,294,967,296 with a resolution of 1. Each count represents three hours of operation. Command Reference 5-54 Command Reference RESPONSE FORMAT :DIAGnostic:TEST? . . . Returns information for user-specified test. ±dd This query returns information for user-specified test. Expanded Syntax :DIAGnostic:TEST? ALL or DISPlay or PROCessor or RAM or EEPRom or UART or QSPI or FPGA or INTerpolator or GPS or POWer. Response A value of 0 (zero) indicates test passed. Parameter ALL returns test information for all of the tests :DIAGnostic:TEST:RESult? Returns the result of the last test and the type of test performed. RESPONSE FORMAT ±dd, XYZ This query returns the result of the last test and the type of test performed. Use this query, for example, following powerup to check the outcome of the powerup selftest. Response A value of 0 indicates test passed. Non-zero value indicates test failed. The literal or alphanumeric characters portion of the response identifies the specific test. System Time The GPS Receiver is designed to allow you access to a very accurate system clock that provides both date and time, to customize the clock for a local time zone, to identify the exact time, to identify the accumulated time difference (in seconds) between the GPS and UTC timelines, and to monitor and adjust for leap second occurrences. The following commands are provided to allow you to monitor and control the system date and time. Command Reference 5-55 Command Reference _____________________________________________________________________ _ Identifying Time of Next 1 PPS Reference Edge :PTIMe:TCODe? Reading Current Time or :PTIMe:DATE? or :PTIMe:TIME? :PTIMe:TIME:STRing? :SYSTem:DATE? :SYSTem:TIME? Applying Local Time Zone Offset :PTIMe:TZONe ... :PTIMe:TZONe? Defining the 1 PPS Reference Edge (59551A Only) :PTIMe:PPS:EDGE ... :PTIMe:PPS:EDGE? Reading Leap Second Status :PTIMe:LEAPsecond:ACCumulated? :PTIMe:LEAPsecond:DATE? :PTIMe:LEAPsecond:DURation? :PTIMe:LEAPsecond:STATe? Command Reference 5-56 Command Reference Identifying Time of Next 1 PPS Reference Edge __________________________________________ RESPONSE FORMAT :PTIMe:TCODe? Returns timecode message 980 to 20 ms prior to 1 PPS of indicated time. R ASCII Data This query returns timecode message 980 to 20 ms prior to 1 PPS of indicated time. This special query provides not only accurate time but also provides the user the opportunity to correctly correlate this time with a corresponding 1 PPS edge. Response The query response provides the following type of information: • date and time of next on-time edge, • Time Figure of Merit, • Frequency Figure of Merit, • leap second indicator • alarm indication, and • service request. An example response is: T2199505112055233000049 The following text describes this response. The previous response example is in the "T2YYYYMMDDHHMMSSMFLRVcc" format, where T2 indicates a timecode message. YYYYMMDD is the calendar date at the next 1 PPS on-time edge. HHMMSS is the 24 hour time at the next 1 PPS on-time edge. Note that this value is influenced by the ptim:tzon setting. M is time figure of merit. F is frequency figure of merit. Command Reference 5-57 Command Reference L is leapsecond indicator (- means a -1 leapsecond is pending, 0 means no leapsecond pending, + means a 1 leapsecond is pending). R is the request for service bit from the status system (0 = no service requested, 1 = service requested). An alarm will be generated when this byte transitions to 1. V is validity byte. 1 indicates that time-related information isn't valid, 0 indicates that it is valid. cc is the checksum of the prior bytes (two Hex bytes). Reading Current Time___________________________________ :PTIMe:DATE? :SYSTem:DATE? Returns the current calendar date. RESPONSE FORMAT ±dd, ±dd, ±dd This query returns the current calendar date. The local calendar date is always referenced to UTC time, offset by any local time zone value that has been provided by the user. The year, month, and day are returned. Response Three fields are separated by commas: <year>,<month>,<day>. • The <year> range is 1994 to 2077. • The <month> range is 1 to 12. • The <day> range is 1 to 31. Context Dependencies This query is not valid prior to the first lock following powerup (see bit 2 of the Powerup Status Register) or :SYSTem:PRESet. Sending this query before the first lock will generate error -230. :PTIMe:TIME? :SYSTem:TIME? Returns the current 24-hour time. RESPONSE FORMAT ±dd, ±dd, ±dd This query returns the current 24-hour time. The local time is always referenced to UTC time, offset by any local time zone value that has been provided by the user. The hour, minute, and second is returned. Command Reference 5-58 Command Reference Response Three fields are separated by commas: <hour>,<minute>,<second>. • The <hour> range is 0 to 23. • The <minute> range is 0 to 59. • The <second> range is 0 to 60. The value of 60 only occurs as the UTC leapsecond. Context Dependencies This query is not valid prior to the first lock following powerup (see bit 2 of the Powerup Status Register) or :SYSTem:PRESet. Sending this query before the first lock will generate error -230. :PTIMe:TIME:STRing? Returns the current 24-hour time suitable for display. RESPONSE FORMAT “XYZ” This query returns the current 24-hour time suitable for display (for example, 15:23:06). Context Dependencies This query is not valid prior to the first lock following powerup (see bit 2 of the Powerup Status Register) or :SYSTem:PRESet. Sending this query before the first lock will generate error -230. Command Reference 5-59 Command Reference Applying Local Time Zone Offset ________________________ :PTIMe:TZONe . . . Sets the time zone local time offset to provide an offset from UTC to serve as the basis for all reported time. :SYSTem:PRESet 0,0 NON-VOLATILE This command sets the time zone local time offset to provide an offset from Universal Coordinated Time (UTC) to serve as the basis for all reported time. The local 24-hour time and local calendar date depend on the present setting of the time zone parameter, which is used to indicate the offset from UTC. Typical application of this command is to account for time zone differences between the installed Receiver location and the prime meridian at Greenwich, which uses UTC uncorrected. Expanded Syntax :PTIMe:TZONe <hour>, <minutes> Parameter • The <hour> range is -12 to +12, and is rounded to the nearest integer. • The optionally supplied <minute> range -59 to +59, and is rounded to the nearest integer. The <minute> is defaulted to 0 if not supplied. Context Dependencies :SYSTem:PRESet sets the time zone to zero (0,0). :PTIMe:TZONe? Returns the local time zone offset. RESPONSE FORMAT ±dd, ±dd This query returns the local time zone offset. Response The first returned value is offset hours. The second returned value is offset minutes. Command Reference 5-60 Command Reference Defining the 1 PPS Reference Edge (59551A Only) ____ 59551A :PTIMe:PPS:EDGE . . . :SYSTem:PRESet Selects the polarity of the 1 PPS on-time edge. RISing NON-VOLATILE This command selects the polarity of the 1 PPS on-time edge. Expanded Syntax :PTIMe:PPS:EDGE RISing or FALLing Parameter The RISing parameter sets the 1 PPS rising edge as the on-time edge. The FALLing parameter sets the 1 PPS falling edge as the on-time edge. 59551A :PTIMe:PPS:EDGE? RESPONSE FORMAT Returns the polarity of the 1 PPS on-time edge. XYZ This query returns the polarity of the 1 PPS on-time edge. Response RIS indicates that the 1 PPS on-time edge is the rising edge. FALL indicates that the 1 PPS on-time edge is the falling edge. Command Reference 5-61 Command Reference Reading Leap Second Status ________________________ :PTIMe:LEAPsecond:ACCumulated? Returns the leap second difference accumulated between GPS time and UTC time since the beginning of GPS time. The time units are seconds. RESPONSE FORMAT ±dd This query returns the leap second difference accumulated between GPS time and UTC time since the beginning of GPS time. The time units are seconds. Response An example response is: +10 which indicates that the accumlated leap second difference between the GPS time and UTC is 10 seconds. Context Dependencies This query is not valid prior to the first lock following powerup (see bit 2 of the Powerup Status Register) or :SYSTem:PRESet. Sending this query before the first lock will generate error − 230. Theory The leap second value is initialized during the power-on sequence by evaluating :PTIMe:LEAPsecond:ACC = GPS time - UTC time. In July 1994, the value was 10 seconds. The value is automatically adjusted immediately following the occurrence of a leap second correction to the UTC time scale. When a 1 leap second addition is made to the UTC time scale, the extra second delays the arrival of midnight UTC causing :PTIM:LEAP:ACC? to increase by 1 second. When a 1 leap second subtraction is made to the UTC time scale, the missing second hastens the arrival of UTC midnight causing :PTIM:LEAP:ACC? to decrease by 1 second. :PTIMe:LEAPsecond:DATE? Returns the UTC calendar date of next leap second. RESPONSE FORMAT ±dd, ±dd, ±dd This query returns the UTC calendar date of next leap second. The year, month, and day are returned. Command Reference 5-62 Command Reference Response Three fields are separated by commas: <year>,<month>,<day>. • The <year> range is 1994 to 2077. • The <month> range is 1 to 12. • The <day> range is 1 to 31. Context Dependencies This query is not valid prior to the first lock following powerup (see bit 2 of the Powerup Status Register) or :SYSTem:PRESet, or if no leap second is pending. Sending this query before the first lock or if no leap second is pending will generate error − 230. RESPONSE FORMAT :PTIMe:LEAPsecond:DURation? Returns the duration of the minute corrected by the next leap second. ±dd This query identifies whether a leap second is pending, distinguishes between leap seconds which extend the minute, and leap seconds which shorten the minute. This query returns the duration of the minute corrected by the next leap second. The duration units are seconds. Response Returns a value of 59, 60 or 61: • A value of 59 indicates subtraction of 1 second is pending. • A value of 60 indicates no leap second pending. • A value of 61 indicates addition of 1 second is pending. Context Dependencies This query is not valid prior to the first lock following powerup (see bit 2 of the Powerup Status Register) or :SYSTem:PRESet, or if no leap second is pending. Sending this query before the first lock or if no leap second is pending will generate error − 230. :PTIMe:LEAPsecond:STATe? Identifies if leap second is pending. RESPONSE FORMAT 0 or 1 Command Reference 5-63 Command Reference This query identifies if a leap second is pending. This query looks ahead to indicate a pending leap second. Response A value of 0 indicates no leap second is pending. A value of 1 indicates a leap second is pending. The leap second adjustment can be either the addition of a second or the subtraction of a second. Context Dependencies This query is not valid prior to the first lock following powerup (see bit 2 of the Powerup Status Register) or :SYSTem:PRESet (but is valid if no leap second is pending). Sending this query before the first lock will generate error − 230. Programmable Pulse Output (59551A Only) The Programmable Pulse output feature provides a means of using the GPS Receiver as a pulse generator. The pulse output, which is programmable by the user, can either generate a stream of pulses at a specified start time and repetition interval, or it can produce a single pulse at a specified time and then stop. The following commands are provided to allow you to operate and control the programmable output of the 59551A GPS Receiver. Note that the configuring of the Programmable Pulse output requires consideration of five settings: start date, start time, continuous on/off, pulse period, and pulse polarity. Changing any one of the settings will stop any previously configured pulse stream and reassert all five settings. If the start date has already passed when you modify the repetition interval, the pulse output will halt until you provide a new start date. :PULSe:CONTinuous:PERiod ... :PULSe:CONTinuous:PERiod? :PULSe:CONTinuous:STATe ... :PULSe:CONTinuous:STATe? :PULSe:REFerence:EDGE ... :PULSe:REFerence:EDGE? :PULSe:STARt:DATE ... :PULSe:STARt:DATE? :PULSe:STARt:TIME ... :PULSe:STARt:TIME? Command Reference 5-64 Command Reference 59551A :SYSTem:PRESet :PULSe:CONTinuous:PERiod . . . Sets the interval between pulses in seconds. 1 NON-VOLATILE This command sets the interval between pulses in seconds. Expanded Syntax :PULSe:CONTinuous:PERiod <seconds> Parameter The <seconds> parameter range is 1 to 31536000, equivalent to one year. Resolution is 1. Context Dependencies The interval set by this command is only used if :PULSe:CONTinuous:STATe is ON. 59551A :PULSe:CONTinuous:PERiod? RESPONSE FORMAT Returns the interval between pulses in seconds. ±dd This query returns the interval between pulses in seconds. Command Reference 5-65 Command Reference 59551A :PULSe:CONTinuous:STATe . . . Controls whether the Programmable Pulse output will be just one pulse or a sequence of pulses. :SYSTem:PRESet OFF NON-VOLATILE This command controls whether the Programmable Pulse output will be just one pulse or a sequence of pulses. Expanded Syntax :PULSe:CONTinuous:STATe ON or OFF Parameter OFF selects one pulse. ON selects a sequence of pulses. Context Dependencies With either state (OFF or ON) the output commences at the time and date defined by :PULSe:STARt:DATE and :PULSe:STARt:TIME commands. 59551A :PULSe:CONTinuous:STATe? Identifies whether the Programmable Pulse output is set to output a single pulse or a sequence of pulses. RESPONSE FORMAT 0 or 1 This query identifies whether the Programmable Pulse output is set to output a single pulse or a sequence of pulses. Response • A value of 0 indicates the Receiver is set to output one pulse. • A value of 1 indicates the Receiver is set to output a sequence of pulses. Command Reference 5-66 Command Reference 59551A :SYSTem:PRESet :PULSe:REFerence:EDGE . . . Selects the polarity of the Programmable Pulse on-time edge. RISing NON-VOLATILE This command selects the polarity of the Programmable Pulse on-time edge. Expanded Syntax :PULSe:REFerence:EDGE RISing or FALLing Parameter The RISing parameter sets the Programmable Pulse rising edge as the on-time edge. The FALLing parameter sets the Programmable Pulse falling edge as the on-time edge. 59551A RESPONSE FORMAT :PULSe:REFerence:EDGE? Returns the polarity of the Programmable Pulse on-time edge. XYZ This query returns the the polarity of the Programmable Pulse on-time edge. Response RIS indicates that the Programmable Pulse on-time edge is the rising edge. FALL indicates that the Programmable Pulse on-time edge is the falling edge. Command Reference 5-67 Command Reference 59551A :PULSe:STARt:DATE . . . Identifies the date when the individual pulse (or first pulse of the pulse sequence) is generated at the Programmable Pulse output. :SYSTem:PRESet 1994, 1, 1 NON-VOLATILE This command identifies the date when the individual pulse (or first pulse of the pulse sequence) is generated at the Programmable Pulse output. Expanded Syntax :PULSe:STARt:DATE <four-digit year>,<month>,<day> Parameter • The <four-digit year> range is 1994 to 3000. • The <month> range is 1 to 12. • The <day> range is 1 to 31. Context Dependencies If you select a date and time which occurs prior to the current time or prior to the completion of powerup and first GPS lock, the Receiver will not successfully find a start — and therefore will produce no pulses. If the Receiver has been set up to use a time zone offset to produce local date and time, the parameters provided should also be expressed as local date and time. 59551A :PULSe:STARt:DATE? Returns the date when the individual pulse (or first pulse of the pulse sequence) is generated at the Programmable Pulse output. RESPONSE FORMAT ±dd, ±dd, ±dd This query returns the date when the individual pulse (or first pulse of the pulse sequence) is generated at the Programmable Pulse output. This query returns year, month, and day. Response Three fields are separated by commas: <four-digit year>,<month>,<day>. • The <four-digit year> range is 1994 to 3000. • The <month> range is 1 to 12. • The <day> range is 1 to 31. Command Reference 5-68 Command Reference 59551A :SYSTem:PRESet :PULSe:STARt:TIME . . . Identifies the time when the individual pulse (or first pulse of the pulse sequence) is generated at the Programmable Pulse output. 0,0,0 NON-VOLATILE This command identifies the time when the individual pulse (or first pulse of the pulse sequence) is generated at the Programmable Pulse output. Expanded Syntax :PULSe:STARt:TIME <hour>,<minute>,<second> Parameter Three fields are separated by commas: <hour>,<minute>, <second>. • The <hour> range is 0 to 23. • The <minute> range is 0 to 59. • The <second> range is 0 to 59. Context Dependencies If you select a date and time which occurs prior to the current time or prior to the completion of powerup and first GPS lock, the Receiver will not successfully find a start — and therefore will produce no pulses. If the Receiver has been set up to use a time zone offset to produce local date and time, the parameters provided should also be expressed as local date and time. 59551A RESPONSE FORMAT :PULSe:STARt:TIME? Returns the time when the individual pulse (or first pulse of the pulse sequence) is generated at the Programmable Pulse output. ±dd, ±dd, ±dd This query returns the time when the individual pulse (or first pulse of the pulse sequence) is generated at the Programmable Pulse output. Response Three fields are separated by commas: <hour>, <minute>, <second>. • The <hour> range is 0 to 23. • The <minute> range is 0 to 59. • The <second> range is 0 to 59. Command Reference 5-69 Command Reference Event Time Stamping (59551A Only) The time stamping feature allows you to use the Receiver with equipment such as a fault analyzer or a surge detector that produces a TTL edge when some important event happens in the base station. The Receiver has three time tagging inputs (Time Tag 1, Time Tag 2, Time Tag 3) which record the time of occurrence of TTL edge(s). The following commands are provided to allow you to tag and record events such as power surges and power outages. Defining the Time-stamped Edge :SENSe:TSTamp<channel>:EDGE ... :SENSe:TSTamp<channel>:EDGE? Clearing Time Stamp Memory :SENSe:DATA:CLEar :SENSe:DATA:CLEar ... Reading Time Stamps :SENSe:DATA? ... :FORMat:DATA ... :FORMat:DATA? :SENSe:DATA:POINts? :SENSe:DATA:POINts? ... :SENSe:DATA:TSTamp? ... Processing Memory Overflow :SENSe:DATA:MEMory:OVERflow:COUNt? :SENSe:DATA:MEMory:OVERflow:COUNt? ... :SENSe:DATA:MEMory:SAVE ... :SENSe:DATA:MEMory:SAVE? Defining the Time-stamped Edge ___________________ 59551A :SENSe:TSTamp<channel>:EDGE . . . Selects the polarity of the edges the Receiver will time stamp. :SYSTem:PRESet RISing NON-VOLATILE Command Reference 5-70 Command Reference This command selects the polarity of the edges the Receiver will time stamp. Expanded Syntax :SENSe:TSTamp1:EDGE RISing or FALLing :SENSe:TSTamp2:EDGE RISing or FALLing :SENSe:TSTamp3:EDGE RISing or FALLing Parameter • The RISing parameter sets the time-stamped edge as the rising edge. • The FALLing parameter sets the time-stamped edge as the falling edge. 59551A :SENSe:TSTamp<channel>:EDGE? RESPONSE FORMAT Returns the polarity of the edges the Receiver will time stamp. XYZ This query returns the polarity of the edges the Receiver will time stamp. Response RIS indicates that the time-stamped edge is the rising edge. FALL indicates that the time-stamped edge is the falling edge. 59551A :SENSe:DATA:CLEar Clears the data in the measurement buffer for all Time Tag inputs. EVENT This command clears the data in the measurement buffer and clears the overflow counts for all Time Tag inputs. Context Dependencies :SYSTem:PRESet clears the time stamp measurement buffers and overflow counts. Command Reference 5-71 Command Reference Clearing Time Stamp Memory ______________________ 59551A :SENSe:DATA:CLEar . . . : Clears the data in the time stamp measurement buffer for the user-specified Time Tag input. EVENT This command clears the data in the time stamp measurement buffer for the user-specified Time Tag input. Use "TSTamp 1" or "TSTamp 2" or "TSTamp 3" to select one input. Expanded Syntax :SENSe:DATA:CLEar "TSTamp 1" or "TSTamp 2" or "TSTamp 3" Parameter "TSTamp 1" clears the data in Time Tag 1 input buffer. "TSTamp 2" clears the data in Time Tag 2 input buffer. "TSTamp 3" clears the data in Time Tag 3 input buffer. Context Dependencies :SYSTem:PRESet clears the time stamp measurement buffers. 59551A :SENSe:DATA? . . . Outputs data from the one specified time stamp measurement buffer. RESPONSE FORMAT FORMAT = ASCii ±dd, ... FORMAT = INTeger BINARY Data This query outputs data from the one specified time stamp measurement buffer (or Time Tag input). This query does not clear the buffer. Each time stamp provides the year, month, day, hours, minutes, seconds, milliseconds, microseconds, nanoseconds, and TFOM (Time Figure of Merit). Expanded Syntax :SENSe:DATA? "TSTamp 1" or "TSTamp 2" or "TSTamp 3" Response If the format is ASCii (the default format), the response is a sequence of comma-separated integers. Command Reference 5-72 Command Reference If the format is INTeger, the response is BINARY Data (see Table B-3, in Appendix B, “SCPI Syntax and Style,” in this guide for details). To determine which format is selected, use query :FORmat:DATA?. Parameter Use "TSTamp 1" or "TSTamp 2" or "TSTamp 3" to select one input at a time: • "TSTamp 1" outputs the data from Time Tag 1 input buffer. • "TSTamp 2" outputs the data from Time Tag 2 input buffer. • "TSTamp 3" outputs the data from Time Tag 3 input buffer. Context Dependencies :SYSTem:PRESet clears the time stamp measurement buffers and overflow counts. Time stamps are not collected until after the Receiver has completed its powerup, and has reached initial lock to GPS. Time stamps are not collected while the user is reading/clearing or otherwise accessing the time stamp buffers. 59551A :FORMat:DATA . . . :SYSTem:PRESet Selects output format for the time stamps. ASCii NON-VOLATILE This command selects the output format for the time stamps. Expanded Syntax :FORMat:DATA ASCii or INTeger Parameter If the format is ASCii (the default format), the response is a sequence of comma-separated integers. If the format is INTeger, the response to the :SENSe:DATA? query is BINARY Data (see Table B-3, in Appendix B, “Command Syntax and Style,” in this guide for details). When ASCii formatting is selected the output stream data is buffered. In general, INT mode will provide faster output than ASC, but will require special data-handling routines to interpret the BINARY Data. Command Reference 5-73 Command Reference 59551A :FORMat:DATA? RESPONSE FORMAT Returns the output format for time stamp data. XYZ This query returns the output format for time stamp data. Response ASC or INT is returned. 59551A :SENSe:DATA:POINts? RESPONSE FORMAT Returns the number of time stamps in each of the three Time Tag inputs. ±dd, ... This query returns the number of time stamps in each of the three Time Tag inputs. Response Returns three comma-separated integers corresponding to the number of time stamps recorded for inputs 1, 2, and 3. The numeric range for each integer is 0 to 256. Context Dependencies :SYSTem:PRESet clears the time stamp measurement buffers and overflow counts. Time stamps are not collected until after the Receiver has completed its powerup and has reached initial GPS lock. 59551A :SENSe:DATA:POINts? . . . RESPONSE FORMAT Returns the number of time stamps recorded for the one specified Time Tag input. ±dd This query returns the number of time stamps recorded for the one specified Time Tag input. Use "TSTamp 1", "TSTamp 2", or "TSTamp 3" to select one input. Expanded Syntax :SENSe:DATA:POINts? "TSTamp 1" or "TSTamp 2" or "TSTamp 3" Response Returns an integer corresponding to the number of time stamps recorded for the specified input. Command Reference 5-74 Command Reference • Numeric range is 0 to 256. Parameter "TSTamp 1"queries for the number of points in Time Tag 1 input buffer. "TSTamp 2" queries for the number of points in Time Tag 2 input buffer. "TSTamp 3" queries for the number of points in Time Tag 3 input buffer. Context Dependencies :SYSTem:PRESet clears the time stamp measurement buffers and overflow counts. Time stamps are not collected until after the Receiver has completed its powerup and has reached initial GPS lock. 59551A RESPONSE FORMAT :SENSe:DATA:TSTamp? . . . Returns a single time stamp. ±dd, ... This query returns a single time stamp. Use "TSTamp 1" or "TSTamp 2" or "TSTamp 3" to select an input channel. Use <time stamp entry> to select a single time stamp recorded on that input. Expanded Syntax :SENSe:DATA:TSTamp? "TSTamp 1" or "TSTamp 2" or "TSTamp 3", <time stamp entry> Response The query response represents the single time stamp requested. The query response is a sequence of ten comma-separated integers constituting a single time stamp. The time stamp provides the year, month, day, hours, minutes, seconds, milliseconds, microseconds, nanoseconds, and TFOM (Time Figure of Merit). For example, :SENSe:DATA:TSTamp? "TSTamp 2", 37 Selects the 37th time stamp recorded on Time Tag Input 2. Parameter <time tag input> parameter: • "TSTamp 1" to select Time Tag 1 input buffer. Command Reference 5-75 Command Reference • "TSTamp 2" to select Time Tag 2 input buffer. • "TSTamp 3" to select Time Tag 3 input buffer. <time stamp entry> parameter range is 1 to 256 Context Dependencies :SYSTem:PRESet clears the time stamp measurement buffers and overflow counts. Time stamps are not collected until after the Receiver has completed its powerup and has reached initial GPS lock. Processing Memory Overflows _______________________ 59551A :SENSe:DATA:MEMory:OVERflow:COUNt? Returns an overflow count for each of the three Time Tag inputs. RESPONSE FORMAT ±d.dEe, ... This query returns an overflow count for each of the three Time Tag inputs. An “overflow count” occurs after 256 time stamps have been recorded. When any additional events are detected at the input, the overflow count increments. If memory management protocol has been set to “FIRST,” the first 256 time stamps are recorded. The overflow count indicates the number of time stamps which followed the last recorded stamp, and which were discarded. If memory management protocol has been set to “LAST,” the most recent 256 time stamps are recorded. The overflow count indicates the number of stamps which were collected prior to the first recorded stamp, and which were overwritten. Response Returns three comma-separated floating-point numbers corresponding to the overflow count of each of the three inputs: 1, 2, 3. Context Dependencies :SYSTem:PRESet clears the time stamp measurement buffers and overflow counts. Time stamps are not collected until after the Receiver has completed its powerup and has reached initial GPS lock. 59551A Command Reference 5-76 Command Reference :SENSe:DATA:MEMory:OVERflow:COUNt? . . . RESPONSE FORMAT Returns an overflow count for the selected Time Tag input. ±d.dEe This query returns an overflow count for the selected Time Tag input. Use "TSTamp 1", "TSTamp 2", or "TSTamp 3" to select or query one input at a time. Expanded Syntax :SENSe:DATA:MEMory:OVERflow:COUNt? "TSTamp 1" or "TSTamp 2" or "TSTamp 3" Response Returns one floating-point number corresponding to the overflow count of the selected Time Tag input. Context Dependencies :SYSTem:PRESet clears the time stamp measurement buffers and overflow counts. Time stamps are not collected until after the Receiver has completed its powerup and has reached initial GPS lock. 59551A :SENSe:DATA:MEMory:SAVE . . . :SYSTem:PRESet Sets the Receiver’s memory management protocol. FIRSt NON-VOLATILE This command sets the Receiver’s memory management protocol. Expanded Syntax :SENSe:DATA:MEMory:SAVE FIRSt or LAST Parameter FIRSt retains time stamps for the first 256 events detected. LAST retains time stamps of the last (most recent) 256 events detected. Context Dependencies :SYSTem:PRESet sets memory management protocol to retain time stamps for FIRSt 256 events. Command Reference 5-77 Command Reference 59551A :SENSe:DATA:MEMory:SAVE? Returns the state of the memory management protocol. RESPONSE FORMAT XYZ This query returns the state of the memory management protocol. Response FIRS indicates that the memory retains time stamps for the first 256 events detected. LAST indicates that the memory retains time stamps for the last (most recent) 256 events detected. Command Reference 5-78 Command Reference Serial Interface Communication The 59551A and 58503A GPS Receivers provide a set of commands that allow you to configure the serial interface port(s) for instrument communications. A set of special commands is provided for the 59551A Receiver since it has two different serial ports (PORT 1, PORT 2). Both Receivers have the rear-panel RS-232C serial interface port (PORT 1). The 59551A has an additional front-panel RS-232C serial interface port (PORT 2). The following commands are provided to allow you to configure the ports Configuring I/O Port 1 <port> = SERial1 or SERial Configuring I/O Port 2 <port> = SERial2 (59551A Only) :SYSTem:COMMunicate? :SYSTem:COMMunicate:<port>:BAUD ... :SYSTem:COMMunicate:<port>:BAUD? :SYSTem:COMMunicate:SERial1:BITS ... :SYSTem:COMMunicate:<port>:BITS? :SYSTem:COMMunicate:<port>:FDUPlex ... :SYSTem:COMMunicate:<port>:FDUPlex? :SYSTem:COMMunicate:<port>:PACE ... :SYSTem:COMMunicate:<port>:PACE? :SYSTem:COMMunicate:<port>:PARity ... :SYSTem:COMMunicate:<port>:PARity? :SYSTem:COMMunicate:SERial1:SBITs ... :SYSTem:COMMunicate:<port>:SBITs? Recovering the Last Query Response :DIAGnostic:QUERy:RESPonse? Configuring I/O Ports __________________________________ :SYSTem:COMMunicate? Identifies which serial port is being used. RESPONSE FORMAT XYZ This query identifies which serial port is being used. Use this query when the Receiver is installed out of sight or at a remote location. The distinction between SERIAL1 and SERIAL2 is required in communication commands for setting parameters such as baud and parity. Command Reference 5-79 Command Reference Response SER1 or SER2 is returned. :SYSTem:COMMunicate:<port>:BAUD . . . :SYSTem:PRESet R, F✝ Not affected Sets the baud rate of specified port. NON-VOLATILE This command sets the baud rate of the specified port. Expanded Syntax :SYSTem:COMMunicate:SERial1:BAUD 1200 or 2400 or 9600 or 19200 :SYSTem:COMMunicate:SERial2:BAUD 1200 or 2400 or 9600 or 19200 Parameter The possible baud rate values that can be entered are 1200, 2400, 9600, or 19200. Context Dependencies The baud rate value is stored in non-volatile memory. It is unaffected by powerup and :SYSTem:PRESet. :SYSTem:COMMunicate:<port>:PRESet sets the baud rate to 9600, which is the factory-default value. _________________________ ✝ Must be received via the specified I/O port. :SYSTem:COMMunicate:<port>:BAUD? Returns the baud rate of specified port. RESPONSE FORMAT R, F ±dd This query returns the baud rate of specified port. Expanded Syntax :SYSTem:COMMunicate:SERial1:BAUD? :SYSTem:COMMunicate:SERial2:BAUD? :SYSTem:COMMunicate:SERial1:BITS . . . Sets the data bits value of PORT 1. :SYSTem:PRESet Not affected. NON-VOLATILE This command sets the data bits of PORT 1. Command Reference 5-80 R Command Reference Expanded Syntax :SYSTem:COMMunicate:SERial1:BITS 7 or 8 Parameter The possible data bits values that can be entered are 7 or 8. Context Dependencies The data bits value is stored in non-volatile memory. It is unaffected by powerup and :SYSTem:PRESet. :SYSTem:COMMunicate:SERial1:PRESet sets the data bits to 8, which is the factory-default value. :SYSTem:COMMunicate:<port>:BITS? RESPONSE FORMAT Returns the data bits value of specified port. R, F ±dd This query returns the data bits value of the specified port. Expanded Syntax :SYSTem:COMMunicate:SERial1:BITS? :SYSTem:COMMunicate:SERial2:BITS? :SYSTem:COMMunicate:<port>:FDUPlex . . . :SYSTem:PRESet R, F✝ Not affected Sets the duplex state of specified port. NON-VOLATILE This command sets the duplex state of the specified port. Use this command when you cannot see on the computer screen the characters you are typing for your command. Expanded Syntax :SYSTem:COMMunicate:SERial1:FDUPlex ON or OFF :SYSTem:COMMunicate:SERial2:FDUPlex ON or OFF Parameter ON enables echoing of the characters you type (i.e., when typing a command, the ON state allows you to see on the computer screen the characters you type). OFF disables the echoing of the characters you type . Command Reference 5-81 Command Reference Context Dependencies The duplex state is stored in non-volatile memory. It is unaffected by powerup and :SYSTem:PRESet. SYSTem:COMMunicate:<port>:PRESet sets the duplex state to ON, which is the factory-default state. ________________________ ✝ Must be received via the specified I/O port. :SYSTem:COMMunicate:<port>:FDUPlex? RESPONSE FORMAT Returns the duplex state of the specified port. R, F 0 or 1 This query returns the duplex state of the specified port. Expanded Syntax :SYSTem:COMMunicate:SERial1:FDUPlex? :SYSTem:COMMunicate:SERial2:FDUPlex? Response A value of 0 indicates echo is OFF. A value of 1 indicates echo is ON. :SYSTem:COMMunicate:<port>:PACE . . . :SYSTem:PRESet R, F✝ Not affected Sets flow control of the specified port. NON-VOLATILE This command sets flow control of the specified port. Expanded Syntax :SYSTem:COMMunicate:SERial1:PACE XON or NONE :SYSTem:COMMunicate:SERial2:PACE XON or NONE Parameter The choices are XON or NONE. Context Dependencies The software pacing or flow control state is stored in non-volatile memory. It is unaffected by powerup and :SYSTem:PRESet. Command Reference 5-82 Command Reference :SYSTem:COMMunicate:<port>:PRESet sets the flow control to NONE, which is the factory-default state. _________________________ ✝ Must be received via the specified I/O port. :SYSTem:COMMunicate:<port>:PACE? R, F RESPONSE FORMAT Returns flow control state of the specified port. XYZ This query returns the flow control state of specified port. Expanded Syntax :SYSTem:COMMunicate:SERial1:PACE? :SYSTem:COMMunicate:SERial2:PACE? Response XON or NONE is returned. :SYSTem:COMMunicate:<port>:PARity . . . :SYSTem:PRESet R, F✝ Not affected Sets parity of the specified port. NON-VOLATILE This command sets parity of the specified port. Expanded Syntax :SYSTem:COMMunicate:SERial1:PARity: EVEN or ODD or NONE :SYSTem:COMMunicate:SERial2:PARity: EVEN or ODD or NONE or ONE Parameter The choices for SERial1 are EVEN, ODD, or NONE. The choices for SERial2 are EVEN, ODD, NONE, or ONE. Context Dependencies The parity state is stored in non-volatile memory. It is unaffected by powerup and :SYSTem:PRESet. :SYSTem:COMMunicate:<port>:PRESet sets the parity to NONE, which is the factory-default state. If parity is enabled, the Receiver sends/receives 7 data bits plus 1 parity bit. If parity is disabled, the Receiver sends/receives 8 data bits. Command Reference 5-83 Command Reference _________________________ ✝ Must be received via the specified I/O port. :SYSTem:COMMunicate:<port>:PARity? RESPONSE FORMAT Returns parity setting of the specified port. R, F XYZ This query returns the parity setting of the specified port. Expanded Syntax :SYSTem:COMMunicate:SERial1:PARity? :SYSTem:COMMunicate:SERial2:PARity? Response EVEN, ODD, NONE, or ONE is returned. :SYSTem:COMMunicate:SERial1:SBITs . . . :SYSTem:PRESet R Not affected Sets the stop bits value of PORT 1. NON-VOLATILE This command sets the stop bits value of PORT 1. Expanded Syntax :SYSTem:COMMunicate:SERial1:SBITs 1 or 2 Parameter The possible stop bits values that can be entered are 1 or 2. Context Dependencies The stop bits value is stored in non-volatile memory. It is unaffected by powerup and :SYSTem:PRESet. :SYSTem:COMMunicate:SERial1:PRESet sets the stop bits value to 1, which is the factory-default value. :SYSTem:COMMunicate:<port>:SBITs? RESPONSE FORMAT Returns the stop bits value of the specified port. This query returns the stop bits value of specified port. Command Reference 5-84 ±dd R, F Command Reference Expanded Syntax :SYSTem:COMMunicate:SERial1:SBITs? :SYSTem:COMMunicate:SERial2:SBITs? Recovering the Last Query Response ____________________ RESPONSE FORMAT :DIAGnostic:QUERy:RESPonse? Returns the last response item issued through the Receiver's serial interface for use in an error recovery process. Format depends on the last issued query. This query returns the last response item issued through the Receiver's serial interface for use in an error recovery process. In the case of a serial interface data transmission error, this query can be used to get the last response item which may otherwise be unavailable because of the side effects of the original command. For example, the :SYST:ERRor? query removes the oldest entry from the error queue, so to see the entry again following a data transmission error, use :DIAG:QUER:RESP? instead of repeating the original command. Response The format depends on the last issued query. Receiver Initialization The following commands are provided to allow you to initialize or preset the serial interface port(s) and the Receiver to their factory shipment values. :SYSTem:COMMunicate:SERial1:PRESet :SYSTem:COMMunicate:SERial2:PRESet :SYSTem:PRESet (59551A Only) Command Reference 5-85 Command Reference :SYSTem:COMMunicate:<port>:PRESet Sets the specified port configuration to its factory-default values. EVENT This command is an event that sets specified port parameters to their factory-default values. Expanded Syntax :SYSTem:COMMunicate:SERial1:PRESet :SYSTem:COMMunicate:SERial2:PRESet PORT 1 Configuration Factory-Default Values Parameter Software Pacing Baud Rate Parity Data Bits Stop Bits Full Duplex Default NONE 9600 NONE 8 1 ON Possible Choices XON or NONE 1200, 2400, 9600, or 19200 EVEN, ODD, or NONE 7 or 8 1 or 2 ON or OFF PORT 2 Configuration Factory-Default Values (59551A Only) Parameter Default Software Pacing Baud Rate Parity Data Bits NONE 9600 NONE 8 Stop Bits Full Duplex 1 ON Possible Choices XON or NONE 1200, 2400, 9600, or 19200 EVEN, ODD, NONE, or ONE Fixed at 7 when parity is even or odd. Fixed at 8 when parity is none. Fixed (no choices available) ON or OFF Context Dependencies The SERial1 preset command only is valid if transmitted on the rear-panel (PORT 1). :SYSTem:PRESet Restores the Receiver parameters settings to their factory-default values. EVENT This command is an event that restores the Receiver parameters settings to their factory shipment or factory-default values (see the following Table 5-2). NOTE Issuing this command will result in disruption of all of the following: GPS satellite tracking, reference oscillator frequency, 1 PPS output timing, and Receiver status information. Command Reference 5-86 Command Reference Table 5-2. System Preset (Factory Default) Parameter Settings Summary Commands :SYSTem:PRESet *ESE ... 0 (NV*) *SRE ... 136 (NV) :DIAGnostic:LOG:CLEar :DIAGnostic:LOG:COUNt? :DIAGnostic:QUERy:RESPonse? Log is cleared. 2 cleared. :FORMat:DATA ... ASCII (NV) :GPS:POSition ... :GPS:POSition:HOLD:LAST? :GPS:POSition:HOLD:STATe? :GPS:POSition:SURVey:STATe ... :GPS:POSition:SURVey:STATe:POWerup ... N,0,0,0,E,0,0,0,0 (NV) LAST is also set to this position. (NV) N,0,0,0,E,0,0,0,0 (NV) 0 (NV) ONCE ON (NV) :GPS:REFerence:ADELay ... 0.0 (NV) :GPS:SATellite:TRACking:EMANgle ... :GPS:SATellite:TRACking:IGNore:STATe? ... :GPS:SATellite:TRACking:IGNore ... :GPS:SATellite:TRACking:INCLude ... :GPS:SATellite:TRACking:INCLude:STATe? ... 10 (NV) 0 for every PRN. No satellites ignored (NV) All satellites included (NV) 1 for every PRN. :PTIMe:TZONe ... 0,0 (NV) :PULSe:CONTinuous:PERiod ... :PULSe:CONTinuous:STATe ... 1 (NV) OFF (NV) :PULSe:STARt:DATE ... :PULSe:STARt:TIME ... 1994,1,1 (NV) 0,0,0 (NV) :SENSe:DATA? :SENSe:DATA:MEMory:OVERflow:COUNt? Data is cleared. :SENSe:DATA:MEMory:SAVE ... :SENSe:DATA:POINts? FIRSt (NV) All responses become 0 (zero). (V) All timestamps cleared. :SENSe:DATA:TSTamp? ... All counts are cleared (V**). ___________________________ * NV stands for non-volatile memory. **V stands for volatile memory. Command Reference 5-87 Command Reference Table 5-2. System Preset (Factory Default) Parameter Settings Summary (Continued) Commands :SYSTem:PRESet :STATus:OPERation:ENABle ... 36 (NV) :STATus:OPERation:HARDware:ENABle ... :STATus:OPERation:HARDware:NTRansition ... :STATus:OPERation:HARDware:PTRansition ... :STATus:OPERation:HOLDover:ENABle ... :STATus:OPERation:HOLDover:NTRansition ... :STATus:OPERation:HOLDover:PTRansition ... 8191 (NV) 0 (NV) 5119 (NV) 8 (NV) 0 (NV) 15 (NV) :STATus:OPERation:NTRansition ... 0 (NV) :STATus:OPERation:POWerup:ENABle ... :STATus:OPERation:POWerup:NTRansition ... :STATus:OPERation:POWerup:PTRansition ... 7 (NV) 0 (NV) 7 (NV) :STATus:OPERation:PTRansition ... 127 (NV) :STATus:QUEStionable:CONDition:USER ... :STATus:QUEStionable:ENABle ... :STATus:QUEStionable:NTRansition ... :STATus:QUEStionable:PTRansition ... Cleared (NV) 3 (NV) 0 (NV) 2 (NV) :SYNChronization:HOLDover:DURation? :SYNChronization:HOLDover:DURation:THReshold ... 0,0 (Even if there was a prior holdover, its duration will be lost.) 86400 (that is, 1 day), (NV) :SYNChronization:STATe? POWerup :SYSTem:ERRor? :SYSTem:LANGuage ... Error queue is cleared. "PRIMARY" ___________________________ * NV stands for non-volatile memory. **V stands for volatile memory. Command Reference 5-88 Command Reference Receiver Identification/Upgrade The commands provided in this section allow you to query the identification of the Receiver, and to perform firmware upgrades in the field after you obtain a new firmware disk. Reading Product Identification *IDN? Installing Firmware via I/O PORT 1 *CLS :DIAGnostic:DOWNload ... :DIAGnostic:ERASe :DIAGnostic:ERASe? :SYSTem:ERRor? :SYSTem:LANGuage ... :SYSTem:LANGuage? Reading Product Identification _________________________ RESPONSE FORMAT *IDN? Returns the Receiver identification. ASCII Data This query returns the Receiver identification. Response • A sequence of ASCII-encoded bytes: HEWLETT-PACKARD, 59551A, XXXXYZZZZZ, WWWW – V where 59551A is the product model number, XXXXYZZZZZ is the product serial number, and WWWW is the product’s firmware revision date code, and V is the hardware revision letter. In the product serial number (XXXXYZZZZZ): – XXXX is a four-digit prefix that identifies a series of instruments. Command Reference 5-89 Command Reference – Y identifies the country in which the instrument was manufactured (e.g., the “A” in 3426A000123 stands for America). – ZZZZZ is a five-digit suffix that identifies a particular instrument within a series. • For example, HEWLETT-PACKARD, 59551A,3426A00123,3422 – A This query should be the last query in a terminated program message; otherwise, error -440 is generated. Context Dependencies Preparatory to installation of new product firmware, the instrument is switched to the “INSTALL” language, available only on PORT 1. The “INSTALL” language includes an *IDN? query which returns the revision identification for the installation firmware. The response format is the same as described above for the instrument’s “PRIMARY” language, but the identification code may be different. The commands in this section represent the command set of the “INSTALL” language. The “INSTALL” language is part of a highly-specialized set of features used to erase the Receiver’s firmware, and to install a new firmware revision. It should be selected only when firmware installation is required. The “INSTALL” language offers the limited number of commands and queries which are documented in this section. This set is designed to provide the Receiver status and control capability required during firmware upgrade. NOTE The SatStat program provides a Service menu which automates firmware installation. R *CLS Clears errors. EVENT This command clears errors. R :DIAGnostic:DOWNload . . . Sends down a MotorolaS-record. Command Reference 5-90 EVENT Command Reference This command sends down a Motorola S-record. Expanded Syntax :DIAGnostic:DOWNload <Motorola S-record> R :DIAGnostic:ERASe Erases the flash EEPROM. EVENT This command erases the flash EEPROM. It should ONLY be sent to the Receiver as a preparatory step during firmware upgrade. Erasing flash EEPROM will disable the instrument until flash EEPROM is reloaded with factory-supplied instrument firmware. RESPONSE FORMAT :DIAGnostic:ERASe? Verifies flash EEPROM has been erased. R 0 or 1 This query verifies the flash EEPROM has been erased. Response A value of 1 indicates that flash EEPROM has been erased. This condition normally occurs when the instrument software in flash EEPROM is erased in preparation for installation of a more recent software revision. That is, after command :DIAG:ERASe has been issued and erase is complete, the :DIAG:ERASe? query response is “1”. RESPONSE FORMAT :SYSTem:ERRor? Returns the oldest error in the Error Queue and removes that error from the queue (first in, first out). R ±dd, “XYZ” This query returns the oldest error in the Error Queue and removes that error from the queue (first in, first out). See Appendix A, “Error Messages,” in this guide for detailed error information. Response The error response format is: <error_number>,"<error_description>", where • The <error_number> is an integer transferred as ASCII bytes in <NR1>format (integer). The range is -32768 to 32767. Command Reference 5-91 Command Reference • Negative error numbers are defined by the SCPI standard. • Positive error numbers are defined specifically for this Receiver. • An error number value of zero indicates that the Error Queue is empty. • The maximum length of the <error_description> is 255 characters. Context Dependencies :SYSTem:PRESet clears the Error Queue. The queue is cleared (emptied) on *CLS, power-on, or upon reading the last error from the queue. If the Error Queue overflows, the last error in the queue is replaced with the error -350, "Queue overflow". Any time the queue overflows, the least recent errors remain in the queue and the most recent error is discarded. The maximum length of the Error Queue is 30. :SYSTem:LANGuage . . . Switches the operation mode (primary or install) of the Receiver. :SYSTem:PRESet “PRIMARY” NON-VOLATILE This command switches the operation mode (primary or install) of the Receiver. Expanded Syntax :SYSTem:LANGuage "INSTALL" or "PRIMARY". Parameter The “INSTALL” language is part of a highly-specialized set of features used to erase the Receiver’s firmware, and to install a new firmware revision. It should be selected only when firmware installation is required. The “INSTALL” language offers the limited number of commands and queries which are documented in this section. This set is designed to provide the Receiver status and control capability required during firmware upgrade. NOTE The SatStat program provides a Service menu which automates firmware installation. The “PRIMARY” language provides the capabilities required for normal Receiver operation. If the “INSTALL” language has been selected as part of the firmware upgrade, the “PRIMARY” language should be selected after the upgrade to restore normal operation. Command Reference 5-92 R Command Reference RESPONSE FORMAT :SYSTem:LANGuage? Identifies the operation mode (primary or install) of the Receiver. “XYZ” This query identifies the operation mode (primary or install) of the Receiver. Response “INSTALL” or “PRIMARY” is returned. Command Reference 5-93 R Command Reference Command Reference 5-94 A Error Messages Error Messages Introduction This appendix explains how to read any errors from the Receiver, discusses the error queue, types of errors and general error behavior, and provides a table of all of the Receiver’s errors and their probable causes. Reading an Error Executing the :SYSTEM:ERROR? command reads the oldest error from the error queue and erases that error from the queue. The :SYST:ERR? response has the form: <error number>, <error string> An example response is: -113,"Undefined header" scpi> Positive error numbers are specific to the Receiver. Negative error numbers are command language related and are discussed later in this appendix. All errors set a corresponding bit in the Standard Event Status Register (see Figure 5-1). Error Messages A-2 Error Messages Error Queue As errors are detected, they are placed in an error queue. This queue is first in, first out. That is, if there has been more than one error, the first one in the queue is read out with :SYST:ERR?. Subsequent responses continue until the queue is empty. If the error queue overflows, the last error in the queue is replaced with error −350, "Queue overflow". Any time the queue overflows, the least recent errors remain in the queue, and the most recent error is discarded. The length of the Receiver’s error queue is 30 (29 positions for the error messages, and 1 position for the “Queue overflow” error). Reading an error from the head of the queue removes that error from the queue, and opens a position at the tail of the queue for a new error, if one is subsequently detected. When all errors have been read from the queue, further error queries return +0, "No error". The error queue is cleared when any of the following occur: • Upon power-on. • Upon receipt of a *CLS command. • Upon reading the last item from the queue. Error Messages A-3 Error Messages Error Types Error numbers are categorized by type as shown in Table A-1. Each error is listed in Table A-2. Table A-1. Error Types Error Number Error Type +0 No Error −100 to −199 Syntactic Errors −200 to −299 Semantic Errors −300 to −350 Hardware/Firmware Errors −400 to −499 Query Errors The first error described in each class (for example, -100, -200, -300, -400) is a “generic” error. No Error The :SYST:ERR? response +0, "No error" indicates that the Receiver has no errors. The error queue is empty when every error in the queue has been read (:SYST:ERR? query) or the queue was cleared by poweron or *CLS. Syntactic Error An <error number> in the range [−100 to −199] indicates that an IEEE 488.2 syntax error has been detected by the Receiver’s parser. The occurrence of any error in this class causes the syntactic error bit (bit 5) in the Event Status Register to be set. One of the following events has occurred: • An IEEE 488.2 syntax error has been detected by the parser. That is, a controller-to-Receiver message was received that is in violation of the IEEE 488.2 Standard. Possible violations include a data element that violates the Receiver listening formats or whose type is unacceptable to the Receiver. • An unrecognized header was received. Unrecognized headers include incorrect Receiver-specific headers and incorrect or unimplemented IEEE 488.2 Common Commands. Events that generate syntactic errors do not generate semantic errors, hardware/firmware errors, or query errors. Semantic Error An <error number> in the range [−200 to −299] indicates that an error Error Messages A-4 Error Messages has been detected by the Receiver’s execution control block. The occurrence of any error in this class causes the semantic error bit (bit 4) in the Event Status Register to be set. One of the following events has occurred: • A <PROGRAM DATA> element following a header was evaluated by the Receiver as outside of its legal input range or is otherwise inconsistent with the Receiver’s capabilities. • A valid program message could not be properly executed due to some Receiver condition. Semantic errors are reported by the Receiver after rounding and expression evaluation operations have been taken place. Rounding a numeric data element, for example, is not reported as a semantic error. Events that generate semantic errors do not generate syntactic errors, hardware/firmware errors, or query errors. Hardware/Firmware Error An <error number> in the range [−300 to −399] or [+1 to +32767] indicates that the Receiver has detected an error that is not a syntactic error, a query error, or a semantic error; some Receiver operations did not properly complete, possibly due to an abnormal hardware or firmware condition. These codes are also used for self-test response errors. The occurrence of any error in this class causes the hardware/firmware error bit (bit 3) in the Event Status Register to be set. Error Messages A-5 Error Messages Query Error An <error number> in the range [−400 to −499] indicates that the output queue control of the Receiver has detected a problem with the message exchange protocol. The occurrence of any error in this class should cause the query error bit (bit 2) in the Event Status Register to be set. One of the following is true: • An attempt is being made to read data from the output queue when no output is either present or pending. • Data in the output queue has been lost. General Error Behavior For Commands (i.e., non-query; doesn’t provide a response): • For any command that has numeric parameters, if the value is out of range (beyond either the min or max allowed settings), the value will be clipped to the appropriate limit and error −222 will be generated (data out-of-range error) as an indication that the value wasn’t set to the requested value. There are some commands having numeric parameters where the clipping behavior described above doesn’t make sense. These include the satellite include and ignore commands, and the status system mask commands. For these commands, an out-of-bounds value is ignored and error −222 is generated. Also, a single out-of-bounds value may cause the entire command to be ignored. For example, GPS:SAT:TRAC:INCL 3,87,5 will be entirely ignored because 87 is out-of-range (i.e., 3 and 5 do not become included even though they are in-range). Commands with multiple numeric parameters can produce multiple errors. For example, if the initial date command is sent as GPS:INIT:TIME 25,66,−7, the actual programmed value will be 23:59:00 (23 is max hour, 59 is max minute, 0 is min second) and three out-of-range errors will be generated. As always, only a single prompt will be returned, but in this case three errors will be in the error queue (de-queued via SYST:ERR? or *CLS). • • For Queries (response-generating commands) If the query produces an error, there will not be a response (other than the prompt that always occurs). If the query includes a numeric parameter, and that parameter is Error Messages A-6 Error Messages • out of range, error −222 will be generated and there won’t be a response (this is consistent with the prior bullet). An example of this would be DIAG:LOG:READ? 25 when there are fewer than 25 messages in the log. Note that for this specific example, to get the most recent log entry, simply use DIAG:LOG:READ?. Another way you can view this: if you get a query response you can know that it is responding precisely to the question asked by the query. Error Messages A-7 Error Messages List of Errors Table A-2 lists and describes the error messages. Number Error String Cause +0 No error The error queue is empty. Every error in the queue has been read (SYSTem:ERRor? query) or the queue was cleared by power-on or *CLS. -100 Command error This is the generic syntax error used if the Receiver cannot detect more specific errors. -101 Invalid character A syntactic element contains a character that is invalid for that type. -102 Syntax error An unrecognized command or data type was encountered. -103 Invalid separator The parser was expecting a separator and encountered an illegal character. -104 Data type error The parser recognized a data element different than one allowed. For example, numeric or string data was expected, but block data was received. -108 Parameter not allowed More parameters were received than expected for the header. -109 Missing parameter Fewer parameters were received than required for the header. -112 Program mnemonic too long The header or character data element contains more than twelve characters. -113 Undefined header The header is undefined. For example, the command ":HELLO". -120 Numeric data error This error, as well as errors -121 through -129, is generated when parsing a data element which appears to be numeric. This particular error message is used when the Receiver cannot detect a more specific error. -121 Invalid character in number An invalid character for the data type being parsed was encountered. For example, a "9" in ocatal data. -123 Exponent too large Numeric overflow. -124 Too many digits The mantissa of a decimal numeric data element contained more than 255 digits excluding leading zeros. -128 Numeric data not allowed A legal numeric data element was received, but the Receiver does not accept one in this position for the header. -131 Invalid suffix The suffix does not follow the syntax described in IEEE 488.2 or the suffix is inappropriate for the Receiver. -134 Suffix too long The suffix contained more than 12 characters. -138 Suffix not allowed A suffix was encounterd after a numeric element that does not allow a suffix. -141 Invalid character data The character data element contains an invalid character. -148 Character data not allowed A legal character data element was encountered where prohibited by the Receiver. -150 String data error This error can be generated when parsing a string data element. This particular error message is used if the Receiver cannot detect a more specific error. -151 Invalid string data A string data element was expected but was invalid for some reason. Error Messages A-8 Error Messages Number Error String Cause -158 String data not allowed A string data element was encountered but was not allowed by the Receiver at this point in parsing. -170 Expression error This error can be generated when parsing an expression data element. It is used if the Receiver cannot detect a more specific error. -178 Expression data not allowed Expression data was encountered but was not allowed by the Receiver at this point in parsing. -200 -220 Execution error Parameter error -221 Settings conflict -222 Data out of range -223 Too much data -224 -230 -240 Illegal parameter value Data corrupt or stale Hardware error -241 Hardware missing -300 -310 -311 -315 -321 -330 -350 -360 Device-specific error System error Memory error Configuration memory lost Out of memory Self-test failed Queue overflow Communication error -361 Parity error in program message Framing error in program message Input buffer overrun -362 -363 -440 Query UNTERMINATED after indefinite response This is the generic syntax error if the Receiver cannot detect more specific errors. Indicates that a program data element error occurred. This error is used when the Receiver cannot detect more specific errors. Indicates that a legal program data element was parsed but cound not be executed due to the current Receiver state. Indicates that a legal program data element was parsed but could not be executed because the interpreted value is outside the legal range defined by the Receiver. Indicates that a legal program data element of block, expression, or string type was received that contained more data than the Receiver could handle due to memory or related receiver-specific requirements. Used where exact value, from a list of possible values, was expected (but not received). No valid data available. Indicates that a legal program command or query could not be executed because of a hardware problem in the Receiver. Indicates that a legal program command or query could not be executed because of missing Receiver hardware. This is the generic device-dependent error. Indicates that a system error occurred. Occurs on EEPROM write failure. Could happen on powerup or preset if a nonvolatile memory problem is detected. Indicates that the Receiver has detected that insufficient memory is available. Indicates at least one failure occurred when *TST? or :DIAG:TEST? was executed. An error occurred but was not recorded because the error queue is full. This is the generic communication error for devices that cannot detect the more specific errors described for errors -361 through -363. Parity bit not correct when data received for example, on a serial port. A stop bit was not detected when data was received. For example, on a serial port (for example, a baud rate mismatch). Software or hardware input buffer on serial port overflows with data caused by improper or nonexistent pacing. Indicates that a query was received in the same program message after a query requesting an indefinite response (e.g., *IDN? or :PTIM:TCOD? or :SYST:STAT?). Error Messages A-9 Error Messages Error Messages A-10 B Command Syntax and Style Command Syntax and Style Appendix Contents Appendix Contents This appendix provides an overview of the Standard Commands for Programming Instrument (SCPI) syntax and style to help you program the Receiver. A section that lists SCPI reference documentation is also provided. This appendix is organized as follows: • • Command Types, Formats, and Elements – Command Types – Command Formats – Elements of SCPI Commands – Using Multiple Commands – Elements of Response Messages Reference Documentation Command Syntax and Style B-2 page B-3 page B-3 page B-3 page B-4 page B-8 page B-9 page B-2 Command Syntax and Style Command Types, Format and Elements Command Types, Format, and Elements Command Types There are two types of GPS Receiver programming commands: IEEE 488.2 Common Commands and Standard Commands for Programmable Instruments (SCPI). The IEEE 488.2 Common Commands control and manage communications between the Receiver and the controller, terminal, or personal computer. The SCPI commands control instrument functions. The format of each type of command is described in the following paragraphs. Command Formats Common Command Format The IEEE 488.2 Standard defines the Common commands as commands that perform functions like reset, self-test, status byte query, and identification. Common commands always begin with the asterisk (*) character, and may include parameters. The command keyword is separated from the first parameter by a space character. Some examples of Common commands are as follows: *IDN? *ESE 32 SCPI Command and Query Format SCPI commands perform functions like instrument setup. A subsystem command has a hierarchical structure that usually consists of a top level (or root) keyword, one or more lower-level keywords, and parameters. The following example shows a command and its associated query: :GPS:POSition:SURVey:STATe ONCE :GPS:POSition:SURVey:STATe? GPS is a root-level keyword with POSition the second-level keyword, SURVey the third-level keyword, and STATe the fourth-level. ONCE is the command parameter. Command Syntax and Style B-3 Command Syntax and Style Command Types, Format, and Elements Elements of SCPI Commands A program command or query is composed of functional elements that include a header (keywords with colon separators), program data, and terminators. These elements are sent to the Receiver over the serial interface as a sequence of ASCII characters. Examples of a typical Common Command and Subsystem Command are: *CLS :SYST:ERR? Common Command Syntax Figure B-1 shows the simplified syntax of a Common Command. You must use a space (SP) between the command mnemonic and the parameter in a Common Command. sp mnemonic parameter * ? NOTE: sp = space. ASCII character decimal 32 Figure B-1. Simplified Common Command Syntax Diagram Subsystem Command Syntax Figure B-2 shows the simplified syntax of a Subsystem Command. You must use a space (SP) between the last command mnemonic and the first parameter in a Subsystem Command. Note that if you send more than one parameter with a single command, you must separate adjacent parameters with a comma. , : : sp mnemonic ? parameter suffix NOTE: sp = space. ASCII character decimal 32 Figure B-2. Simplified Program Command Syntax Diagram Command Syntax and Style B-4 Command Syntax and Style Command Types, Format and Elements Abbreviated Commands The command syntax shows most keywords as a mixture of upper and lower case letters. Upper case letters indicate the abbreviated spelling for the command. For better program readability, you may send the entire keyword. The Receiver accepts either command form and is not case sensitive. For example, if the command syntax shows SYNChronization, then SYNC and SYNCHRONIZATION are both acceptable forms. Other forms of SYNChronization, such as SYNCHR or SYNCHRONIZ will generate an error. You may use upper and/or lower case letters. Therefore, SYNCHRONIZATION, synchronization, SyNchROnizatioN, and SYnC are all acceptable. Keyword Separator A colon (:) always separates one keyword from the next lower-level keyword as shown below: :SYST:ERR? Command Syntax and Style B-5 Command Syntax and Style Command Types, Format, and Elements Parameter Data Types Table B-1 contains explanations and examples of parameter types. Parameter types may be numeric value, Boolean, literal, NRf, string, or non-decimal numeric. Table B-1. Command and Query Parameter Types TYPE EXPLANATIONS AND EXAMPLES <numeric value> Accepts all commonly used decimal representation of numbers including optional signs, decimal points, and scientific notation: 123, 123e2, -123, −1.23e2, .123, 1.23e−2, 1.23000E−01. Special cases include MINimum and MAXimum as follows: MINimum selects minimum value available. MAXimum selects maximum value available. Queries using MINimum or MAXimum return the associated numeric value. <Boolean> Represents a single binary condition that is either true or false: 1 or ON, 0 or OFF (Query response returns only 1 or 0.) An <NRf> is rounded to an integer. A non-zero value is interpreted as 1. <literal> Selects from a finite number of choices. These parameters use mnemonics to represent each valid setting. An example of a <literal> parameter is: GPS <NRf> Flexible numeric representation. Only positive integers are used for NRf parameters in the instrument. <string> A string parameter is delimited by either single quotes or double quotes. Within the quotes, any characters in the ASCII B-bit code may be specified. <non-decimal numeric> Format for specifying hexadecimal (#H1F), octal (#Q1077), and binary (#B10101011) numbers using ASCII characters. May be used in :STATus subsystem commands. Parameter Separator If you send more than one parameter with a single command, you must separate adjacent parameters with a comma. Query Parameters All selectable <numeric value> parameters can be queried to return the minimum or maximum values they are capable of being set to by sending a MINimum or MAXimum parameter after the “?.” For example, consider the :GPS:REF:ADEL? query. If you send the query without specifying a parameter (:GPS:REF:ADEL?), the present antenna delay value is returned. If you send the MIN parameter (using :GPS:REF:ADEL? MIN), the command returns the minimum value currently available. If you send the MAX parameter, the command returns the maximum value currently available. Be sure to place a space between the question mark and the parameter. Suffixes Command Syntax and Style B-6 Command Syntax and Style Command Types, Format and Elements A suffix is the combination of suffix elements and multipliers that can be used to interpret the <numeric value> sent. If a suffix is not specified, the Receiver assumes that <numeric value> is unscaled (that is, Volts, seconds, etc.) For example, the following two commands are equivalent: :GPS:REF:ADELay 100 NS :GPS:REF:ADELay 100E-9 Suffix Elements Suffix elements, such as HZ (Hertz), S (seconds), V (Volts), OHM (Ohms), PCT (percent), and DEG (degrees) are allowed within this format. Suffix Multipliers Table B-2 lists the suffix multipliers that can be used with suffix elements (except PCT and DEG. ). Table B-2. Suffix Multipliers DEFINITION MNEMONIC NAME 1E9 G GIGA 1E6 MA ( or M for OHM and HZ)* MEGA 1E3 K KILO 1E-3 M (except for OHM and HZ)* MILLI 1E-6 U MICRO 1E-9 N NANO 1E-12 P PICO *The suffix units, MHZ and MOHM, are special cases that should not be confused with <suffix multiplier>HZ and <suffix multiplier>OHM. Command Syntax and Style B-7 Command Syntax and Style Command Types, Format, and Elements Command Terminator A command may be terminated with a line feed (ASCII LF character 10 decimal), a carriage return (ASCII CR character 13 decimal), or one followed immediately by the other in any order. Using Multiple Commands Program Messages Program Messages are a combination of one or more properly formatted SCPI Commands. Program messages always go from the DTE to the Receiver. They are sent to the Receiver over the Receiver’s serial interface as a sequence of ASCII characters. Program Message Syntax Figure B-3 shows the simplified syntax of a program message. You can see Common Commands and Subsystem Commands in the same program message. If you send more than one command in one message, you must separate adjacent commands with a semicolon. ; <carriage return> Subsystem Command <carriage return> <new line> Common Command <new line> <carriage return> <new line> NOTE: <new line> = ASCII character decimal 10 <carriage return> = ASCII character decimal 13 Figure B-3. Simplified Program Message Syntax Diagram When using IEEE 488.2 Common commands with SCPI Subsystem commands on the same line, use a semicolon between adjacent commands. For example: *CLS;:SYST:ERR? Command Syntax and Style B-8 Command Syntax and Style Command Types, Format and Elements When multiple SCPI Subsystem commands are sent in one program message, the first command is always referenced to the root node. Subsequent commands, separated by “;”, are referenced to the same level as the preceding command if no “:” is present immediately after the command separator (the semicolon). For example, sending :GPS:INIT:DATE 1994,7,4;TIME 12,34,56 is equivalent to sending: :GPS:INIT:DATE 1994,7,4 :GPS:INIT:TIME 12,34,56 or :GPS:INIT:DATE 1994,7,4;:GPS:INIT:TIME 12,34,56 The “:” must be present to distinguish another root level command. For example: :SYNC:HOLD:DUR?;:GPS:SAT:VIS:PRED? is equivalent to sending: :SYNC:HOLD:DUR? :GPS:SAT:VIS:PRED? If the “:”(which is following the “;” and is in front of GPS) is omitted, the Receiver assumes that the second command is :SYNC:HOLD:GPS:SAT:VIS:PRED? and generates a syntax error. Elements of Response Messages Response Messages Response messages are data sent from the Receiver to the DTE in response to a query. (A query is a command followed by a question mark. Queries are used to find out how the Receiver is currently configured and to transfer data from the Receiver to the DTE.) After receiving a query, the Receiver interrogates the requested configuration and issues its response message as soon as possible. The message is transmitted across the serial interface to the DTE. Command Syntax and Style B-9 Command Syntax and Style Command Types, Format, and Elements Response Message Syntax Figure B-4 shows the simplified syntax of a Response Message. Response messages may contain both commas and semicolon separators. When a single query command returns multiple values, a comma is used to separate each item. When multiple queries are sent in the same program message, the groups of data corresponding to each query are separated by a semicolon. ; , response data <carriage return> <new line> NOTE: <new line> = ASCII character decimal 10 <carriage return> = ASCII character decimal 13 ; = multiple response separator (ASCII character decimal 59) , = data separator within a response (ASCII character decimal 44) Figure B-4. Simplified Response Message Syntax Diagram Command Syntax and Style B-10 Command Syntax and Style Command Types, Format and Elements Response Formats Table B-3 contains explanations of response formats. Table B-3. Response Formats *Format Description ±dd This numeric format represents an integer (e.g., +9). + <digit> − The maximum number of characters in ±dd response data is 17 (maximum 16 digits, 1 sign). ±dd, ... This numeric format represents a comma-separated list of integers (e.g., +1,+2,+3). ±d.d This numeric format represents a fixed (e.g., +10.5). + . <digit> <digit> − ±d.dEe This numeric format represents a floating-point number (e.g., +1.00E+000). + <digit> . <digit> − + E ±d.dEe, ... 0 or 1 <digit> − The maximum number of characters in ±d.dEe response data is 13 (maximum 6 mantissa digits, 2 signs, 1 decimal point, 1 'E' character, 3 exponent digits). This numeric format represents comma-separated list of floating-numbers (e.g., +1.00000E-009, +2.00000E-009, +5.00000E-009). A single ASCII-encoded byte, 0 or 1, is returned for the query of settings that use ON, OFF, 1, or 0 parameters. Command Syntax and Style B-11 Command Syntax and Style Command Types, Format, and Elements Table B-3. Response Formats (Continued) Format Description XYZ ASCII-encoded bytes corresponding to the literal used as the command parameter. alpha alpha digit An example of an alphanumeric response is: NONE “ XYZ ” A string response consists of ASCII characters enclosed by double quotes. For example, string data is used for the “<error description>” portion of :SYST:ERR? response. “ XYZ”, ... A list of string responses consist of comma-separated ASCII characters enclosed by double quotes. (e.g., “log 224:19951017.00:00:26:30: Holdover started, GPS”, “log 225:19951017.00:00:29:02: GPS lock started”) ASCII Data A sequence of ASCII-encoded bytes. Binary Data The syntax is a pound sign (#) followed by a non-zero digit representing the number of digits in the subsequent decimal integer. The decimal integer specifies the number of 8-bit data bytes being sent. This is followed by the actual data. The terminator is a line feed. For example, for transmitting 8 bytes of data, the format might be: Number of digits that follow Actual data Terminator # 2 08<8 bytes of data> <carriage return><new line> Number of bytes to be transmitted The “2” indicates the number of digits that follow and the two digits “08” indicate the number of data bytes to be transmitted. <carriage return> is defined as a single ASCII-encoded byte corresponding to 13 decimal. <new line> is defined as a single ASCII-encoded byte corresponding to 10 decimal. Command Syntax and Style B-12 C Receiver Firmware Installation Receiver Firmware Installation Reference Documentation Reference Documentation This section contains a list of documentation related to the use of the Receiver’s RS-232C serial port. Additional information that you may find useful can be found in the following publications: 1. Beginner’s Guide to SCPI (Part Number H2325-90001, July 1990 Edition). 2. Beginner’s Guide to SCPI, Barry Eppler (Hewlett-Packard Press, Addison-Wesley Publishing Co. 1991). 3. Standard Commands for Programmable Instruments (SCPI), Version 1992.0. This standard is a guide for the selection of messages to be included in programmable instrumentation. It is primarily intended for instrument firmware engineers. However, you may find it useful if you are programming more than one instrument that claims conformance to the SCPI standard. You can verify the use of standard SCPI commands in different instruments. To obtain a copy of this standard, contact: SCPI Consortium 8380 Hercules, Suite P3 La Mesa, CA 91942 Phone: (619) 697-8790 FAX: (619) 697-5955 4. The International Institute of Electrical Engineers and Electronic Engineers, IEEE Standard 488.2-1987, IEEE Standard Codes, Formats, Protocols, and Common Commands for Use with ANSI/IEEE Std 488.1-1987 Programmable Instrumentation. This standard defines the underlying message formats and data types used in SCPI. It is intended more for firmware engineers than for instrument users/programmers. However, it can be useful if you need to know the precise definition of specific message formats, data type, or common commands. To obtain a copy of this standard, write to: Receiver Firmware Installation C-2 Downloading New Firmware Using SatStat Program 1 Copy the file of the updated firmware disk to a directory on your PC disk drive. If you haven’t already installed SatStat, you should install it now (follow instructions on the disk label or in the section titled “To Install the Automated SatStat Program for Continual Status Updates” in Chapter 3, “Visual User Interface,” of this guide). 2 Start SatStat (easiest way is to double-click on the icon). 3 You should establish communication with the GPS Receiver. This requires connection from a serial RS-232 port on your PC to the GPS Receiver’s serial port (a 25-pin RS-232 connection). Assuming you’ve got the cable attached to make this connection, you may want to check the settings. a. Select CommPort, then choose Settings. The Communication Settings dialog box is displayed. Unless someone has reprogrammed the CommPort settings on the GPS Receiver, these settings are probably OK. The one setting that is likely to need changing is the Com Port. The application defaults it to Com1, but the serial port on your PC may be assigned to a different Com Port. Select the appropriate setting. If you are unsure, Com1 will be your best bet (worst case, you can cycle through all of them until it works). b. If you made any changes on this form, select OK, otherwise you can just Cancel. 4 Select CommPort, then choose Port Open. The main form of the Receiver Status screen is displayed. The application will send some commands to the GPS Receiver and then the main form should begin to periodically update every few seconds. If you are getting screen updates, proceed to the next step. Otherwise, something is wrong with your CommPort settings or perhaps the physical connection between your PC and the GPS Receiver. Prior to download, interrogate the product, record any custom configuration parameters. This step is necessary because downloading new instrument firmware will reset all parameters to system-preset defaults. Parameters typically recorded include: • antenna delay Receiver Firmware Installation C-3 Command Index • elevation mask angle • time zone offset A table of all system-preset defaults is printed on page 5-87 in Chapter 5 of this guide; refer to it to identify additional parameters whose default values are inappropriate for your application. Record the settings you use prior to download. NOTE 5 Performing the download works best if the periodic updates are disabled. On the main form, select the Function menu, choose Status (check mark appears), and choose Disable Updates (check mark appears). 6 Activate the form titled “Control & Query” by clicking anywhere on it. Select Service, then choose Download Firmware. This will bring up a form titled “Firmware Download”. 7 Now you need to select the file that you will download. Select the control labeled File. This brings up a form for file selection. Download files for the GPS Receiver have a .s appended to the file name. This form is set to only find .s type files. In this case, you want to find and select the filename, for example s_3503.s. Depending on where you have placed this file, you may have to use this form to navigate for it. If it is on a different drive, use the Drives selection in the lower right. Once you’ve located s_3503.s select it (clicking on the name is probably the easiest) and then select OK. The file, along with its path should now appear in the “File to Download” portion of the “Firmware Download” form. 8 You’re now ready to perform the download. Select the control titled Download and an erase warning will appear. This is just a double-check to make sure you really want to do this. Assuming you do, select Yes, Perform the Download. The program will switch the GPS Receiver to the “INSTALL” language, erase the flash memory, and begin downloading Srecords. The S-records are the long character strings that appear in the lower part of the form as the downloading process proceeds. The total downloading time varies depending on the type of PC you have, but with communication settings optimized a typical time is about 30 minutes. Once the download is under way, an estimate of the time to complete the process is updated every 100 S-records. 9 When the downloading has completed, the “Minutes Until Finished” field will say “DONE”. You can then select Close on the Firmware Download form. Receiver Firmware Installation C-4 There are a couple of ways to confirm that the new firmware has been installed; the easiest is to just power-cycle the unit. Once it has powered up, you can confirm that the new revision is in place by selecting Query, then choosing Product ID (from the “Control & Query” form) and selecting Send Cmd. The product ID will appear on the Control & Query form and should contain the new date code “3503”, for example. An alternative way to check the download is to type SYST:LANG "PRIMARY" in the edit field on the “Control & Query” form and select Send Cmd. This will return the unit to normal operating mode without power-cycling. If you do this, you could then check the product ID as described above. NOTE: it is expected that in early software revisions the alarm will come on the first time you power-cycle (or switch to “primary” using SYST:LANG “PRIMARY”). If you investigate the alarm, you will find it is the software safeguard — it has gone off because you have changed the instrument firmware. On subsequent power-ons the alarm will not come on. Receiver Firmware Installation C-5 Command Index Receiver Firmware Installation C-6 Command Index ( (PORT 1, 5-122, 5-123, 5-124, 5125, 5-126, 5-127, 5128, 5-129 (PORT 2, 5-122, 5-123, 5-124, 5125, 5-126, 5-127, 5128, 5-129 TEST?, 5-90 :FORMat DATA, 5-115 DATA?, 5-115 :GPS INITial DATE, 5-9 POSition, 5-10 TIME, 5-12 * POSition, 5-13 *CLS, 5-73, 5-137 *ESE, 5-85 *ESE?, 5-86 *ESR?, 5-86 *IDN?, 5-136 *SRE, 5-76 *SRE?, 5-76 *STB?, 5-77 *TST?, 5-89 ACTual?, 5-17 HOLD LAST?, 5-17 STATe?, 5-19 SURVey PROGress?, 5-19 STATe, 5-20 POWerup, 5-21 POWerup?, 5-22 STATe?, 5-21 : :CALCulate Subsystem CALCulate WMARgin DATA?, 4-25 :DIAGnostic DOWNload, 5-137 ERASe, 5-138 ERASe?, 5-139 LIFetime COUNt?, 5-90 LOG CLEar, 5-61 CLEar <current log size>, 5-62 COUNt?, 5-63 READ ALL?, 5-62 READ?, 5-63 READ? <entry number>, 5-64 QUERy RESPonse?, 5-130 ROSCillator POSition?, 5-15 REFerence ADELay, 5-30 ADELay?, 5-32 VALid?, 5-33 SATellite TRACking COUNt?, 5-35 EMANgle, 5-23 EMANgle?, 5-24 IGNore, 5-25 ALL, 5-25 COUNt?, 5-28 NONE, 5-25 STATe?, 5-29 IGNore?, 5-26 INClude COUNt?, 5-28 STATe?, 5-29 EFControl RELative?, 5-39 INCLude, 5-27 TEST ALL, 5-27 RESult?, 5-91 Command Index NONE, 5-27 INCLude?, 5-27 TRACking?, 5-34 VISible PREDicted COUNt?, 5-37 PREDicted?, 5-35 :LED ALarm, 5-75 GPSLock, 5-40 HOLDover, 5-40 :PTIMe DATE?, 5-95 LEAPsecond ACCumulated?, 5-99 DATE?, 5-100 DURation?, 5-101 STATe?, 5-102 PPS EDGE, 5-98 EDGE?, 5-98 TCODe?, 5-93 TCODe? response, 5-93 TIME STRing?, 5-96 TIME?, 5-95 TZONe, 5-97 TZONe?, 5-97 :PULSe CONTinuous PERiod, 5-104 PERiod?, 5-104 STATe, 5-105 STATe?, 5-105 REFerence EDGE, 5-106 EDGE?, 5-106 STARt DATE, 5-107 DATE?, 5-107 TIME, 5-108 TIME?, 5-109 :SENSe DATA CLEar, 5-112 CLEar <data set>, 5-113 MEMory OVERflow COUNt?, 5-119 COUNt? <data set>, 5-120 Command Index-2 SAVE, 5-120 SAVE?, 5-121 POINts?, 5-116 POINts? <data set>, 5-116 TSTamp? <data set>, 5-117 DATA? <data set>, 5-114 TSTamp<channel> EDGE, 5-111 EDGE?, 5-111 :STATus <register> CONDition?, 5-79 ENABle, 5-81 ENABle?, 5-82 EVENt?, 5-80 NTRansition, 5-83 NTRansition?, 5-84 PTRansition, 5-83 PTRansition?, 5-84 PRESet ALARm, 5-74 QUEStionable CONDition USER, 5-87 EVENt USER, 5-88 :SYNChronization FFOMerit?, 5-41 HOLDover DURation THReshold, 5-47 EXCeeded?, 5-48 THReshold?, 5-47 DURation?, 5-46 INITiate, 5-49 RECovery INITiate, 5-50 LIMit IGNore, 5-52 TUNCertainty PREDicted?, 5-42 PRESent?, 5-43 WAITing?, 5-50 IMMediate, 5-52 STATe?, 5-39 TFOMerit?, 5-44 TINTerval?, 5-45 :SYSTem COMMunicate <port> BAUD, 5-123 BAUD?, 5-124 Command Index BITS, 5-124 BITS?, 5-125 FDUPlex, 5-125 FDUPlex?, 5-126 PACE, 5-126 PACE?, 5-127 PARity, 5-127 PARity?, 5-128 PRESet, 5-132 SBITs?, 5-129 SERial1 SBITs, 5-128 COMMunicate?, 5-123 DATE?, 5-95 ERRor?, 5-57, 5-139 LANGuage, 5-140 LANGuage?, 5-141 PRESet, 5-132 STATus LENGth?, 5-56 STATus?, 5-55 TIME?, 5-95 :SYSTEM STATUS? query, 3-3 < <numeric value>, 5-8 1 1 PPS reference edge, 4-32 10MHz output, 5-38 10MHz output quality, 4-27, 4-32, 5-38, 5-39, 5-40, 541, 5-42, 5-43, 5-44, 5-45, 5-46, 5-47, 548 1PPS connector, 58503A, 1-3 1PPS connector, 59551A, 1-3 1PPS error estimation, 5-42 1PPS output, 1-3, 5-38 1PPS output quality, 4-27, 4-32, 538, 5-39, 5-40, 5-41, 5-42, 5-43, 5-44, 545, 5-46, 5-47, 5-48 1PPS polarity, 4-32, 5-98 1PPS reference synchronization, 427, 5-38 A abbreviated commands, 5-7 ac power, 1-3 accessing the Receiver Status Screen, 3-8 acquisition satellite, 4-23, 5-7 acquisition of satellites, 4-25, 5-8 alarm analysis, 4-29, 5-53, 5-54, 565, 5-66, 5-68, 5-70, 5-71, 5-72, 5-73, 574, 5-75, 5-76, 5-77, 5-78, 5-79, 5-80, 581, 5-82, 5-83, 5-84, 5-85, 5-86, 5-87, 588 alarm BITE, 4-29, 5-53, 5-65, 5-68, 5-70, 5-71, 5-72, 573, 5-75, 5-76, 5-77, 5-78, 5-79, 5-80, 581, 5-82, 5-83, 5-84, 5-85, 5-86, 5-87, 588 Alarm BITE, 59551A, 1-3 alarm clear, 4-29, 5-53, 5-73, 5-74, 5-75, 5-76, 5-77 Alarm indicator, 1-2, 1-3, 1-2, 4-29, 5-53, 5-75 alarm relay, 1-3, 4-29, 5-53, 5-65, 566, 5-68, 5-70, 5-71, 5-72, 5-73, 5-74, 575, 5-76, 5-77, 5-78, 5-79, 5-80, 5-81, 582, 5-83, 5-84, 5-85, 5-86, 5-87, 5-88 alarm setup, 4-29, 5-53, 5-65, 5-68, 5-70, 5-71, 5-72, 573, 5-75, 5-76, 5-77, 5-78, 5-79, 5-80, 581, 5-82, 5-83, 5-84, 5-85, 5-86, 5-87, 588 alarm status, 5-68 alarm test, 4-29, 5-53, 5-54, 5-87, 588, 5-89, 5-90, 5-91 Alarm, 58503A, 1-3 antenna connection, 1-3, 3-4, 5-30 antenna delay compensation, 4-25, 5-8, 5-30 Command Index-3 Command Index antenna delay values, 5-30 antenna input, 1-3 antenna placement, 1-3, 3-4, 4-25, 5-8, 5-30 antenna system, 3-4 application SatSat, 3-8 applying local time zone offset, 5-97 ASCII Data, 5-16 assessing 1 PPS quality, 5-41 B baud, 2-9, 5-123, 5-132 baud, 5-124 baud rate, 2-9 Belden 8267 cable, 5-31 Binary Data, 5-17 BINARY Data, 5-115 BITE, alarm, 1-3 Boolean, 5-8 C cable assemblies antenna, 5-30 cable delay compensation, 4-25, 5-8, 5-30 cables antenna, 5-30 crossover, 2-5 HP 24542G, 2-8 HP 24542G interface, 2-6 HP 24542U, 2-8 HP 40242M interface, 2-6 modem-eliminator, 2-5 null-modem, 2-5 clear, 5-112, 5-113 clear alarm, 4-29, 5-53, 5-73 errors, 4-29, 5-53, 5-57, 5137 clear alarm, 4-29, 5-53 clear errors, 5-137 clear time stamp memory, 5-110 comma, 5-5, 5-8, 5-12 command abbreviated, 5-7 common, 5-4 Command Index-4 format, 5-5 parameter, 5-8 SCPI, 5-4 syntax, 5-3, 5-7 terminator, 5-10 terminators, 5-5 command error, 4-30, 5-54, 5-65, 572 Command Error status, 5-65 command syntax conventions, 4-22, 5-4 commands introduction, 4-22 Commands at a Glance, 4-2 commands summary, 4-2 common command syntax, 5-5 Common Command Format, 5-4 common commands description, 5-4 communication serial interface port, 2-3, 2-4 communication, serial interface port, 5-122, 5-123, 5-125, 5-126, 5-127, 5-128 compensating for antenna delay, 530 configuration PORT 1, 2-11, 5-122 PORT 2, 2-11, 5-122 configuration factory-default values, 5-132 configure serial interface port(s), 5122 configuring I/O Port 1, 4-38 configuring I/O Port 2 (59551A), 438 Configuring PORT 1, 2-10 Configuring PORT 2, 2-11 configuring the RS-232C ports, 2-9 configuring the serial interface port(s), 5-122 conformance Information SCPI, 4-22 connecting antenna, 1-3, 4-25, 5-8, 5-30 Command Index connecting a computer, 2-5 connecting a laptop, 2-7 connecting a Laptop, 2-6 connecting a modem, 2-5, 2-6 connecting a PC, 2-6, 3-4 connecting the antenna system, 3-4 Connecting to a PC, 3-4 connection laptop, 2-7 modem, 2-6 connectors 1PPS, 1-3 Alarm BITE, 1-3 Alarm, 58503A, 1-3 ANTENNA, 1-3 IRIG-B, 1-3 Programmable Pulse, 1-3 time tag, 1-3 conventions command syntax, 4-22, 5-4 Coordinated Universal Time, 5-7 CPU, 5-89 crossover cable, 2-5 current time, 4-32 D d.dEe, 5-14 d.dEe, ..., 5-14 data, 5-114 data bits, 2-9, 5-124, 5-125, 5-132 date and time outputs, 4-25, 4-32, 58 DB-25 connector, 2-5 DB-9 connector, 2-5 dc power, 1-3 DCE, 2-5 dd, 5-13 dd, ..., 5-13 decimal point, 5-8, 5-14 default values, 3-5 defaults, factory, 3-5 defaults, factory settings, 2-9, 4-40, 5-131, 5-132 DEG, 5-9 delay values antenna cables, 5-30 delay values, antenna cables, 4-25, 5-8, 5-30 description response formats (ASCII), 56 serial interface ports, 2-3 status registers, 5-65 status reporting system, 5-65 status/alarm reporting system, 5-65 description format, 5-5 diagnostic log, 4-29, 5-53, 5-59, 560, 5-61, 5-63, 5-64 diagnostic Log messages, 5-59 diagnostic test, 5-90 diagnostic tests, 4-30, 5-54, 5-89, 590, 5-91 result, 5-91 diagnostics internal self-test, 5-89 diagram serial interface cable, 2-8 Diagram:, 5-68 documents list, 5-18 related, 5-18 download, 5-137 downloading Using SatStat, 5-3 downloading new firmware, 5-3 DTE, 2-5 duplex state, 5-125, 5-126 E echoing of the characters you type, 5-125, 5-126, 5-132 EEPROM, 5-89, 5-138 EPROM, 5-89 erasing EEPROM, 5-139 error hardware/firmware error, 5-5 query, 5-6 semantic, 5-5 syntactic, 5-4 error analysis, 4-29, 5-53, 5-54, 5Command Index-5 Command Index 57, 5-139 error behavior, 5-6 error log, 4-29, 5-53, 5-54, 5-57, 5139 error messages, 4-29, 5-53 error queue, 4-29, 5-53, 5-57, 5-139, 5-3 error recovery, serial port, 4-29, 438, 5-53, 5-130 error types, 5-4 error types, list, 5-4 error, command, 5-65, 5-72 error, reading, 5-2 external devices, 1-3 F factory default settings, 2-9, 3-5, 440, 5-131, 5-132 factory-default values, 2-9 failure of merit, 4-27 failure protection, satellite loss, 427, 5-38, 5-46, 5-47, 5-48 FDUPlex, 5-125, 5-126 FFOM, 4-27, 5-41 Figure command list, 4-2 status reporting system, 5-68 figure of merit, 5-41, 5-44, 5-93 firmware error, 5-5 firmware installation, 2-3, 4-42, 5135, 5-137, 5-139, 5140, 5-141 firmware revision code, 2-3, 4-42, 5-136 firmware upgrade, 2-3, 5-137 FIRS, 5-121 flash EEPROM, 5-138 flow control state, 5-126, 5-127 format ASCii, 5-115 INTeger, 5-115 FPGA logic, 5-89 front panel PORT 2, 2-4 full duplex, 2-9, 5-132 Command Index-6 G GPS engine, 5-89 GPS lock, 4-23, 4-25, 5-7, 5-46, 547, 5-48 GPS Lock indicator, 1-2, 4-27, 5-40 GPS position, 4-23, 5-7, 5-13, 5-15, 5-17, 5-19 GPS satellite acquisition, 4-23, 4-25, 5-7, 5-46, 5-47, 5-48 GPS timeline, 5-92 GUI, 3-3, 3-8, 3-9, 3-10 H hardware status, 5-70, 5-79, 5-80, 581, 5-82, 5-83, 5-84 Hardware status, 5-65, 5-70 hardware/firmware error, 5-5 holdover status, 5-65 holdover tutorial, 3-15 Holdover indicator, 1-2, 4-27, 5-40 holdover loss of satellites, 4-27 holdover operation, 3-15 holdover process, 5-38 holdover recovery, 4-27, 5-38, 5-50 holdover status, 4-30, 5-71 How to use the Status Screen, 3-10 HP 24542G cable, 2-8 HP 24542G interface cable, 2-6 HP 24542U cable, 2-8 HP 40242M interface cable, 2-6 58503A indicators Alarm, 1-2 GPS Lock, 1-2 Holdover, 1-2 Power, 1-2 58503A inputs Power, 1-3 58503A interface port PORT 1, 1-3 58503A outputs 10 MHz OUT, 1-3 1PPS, 1-3 Alarm, 1-3 58506A/507A/508A cable, 5-31 59551A indicators Command Index Alarm, 1-2 GPS Lock, 1-2 Holdover, 1-2 Power, 1-2 59551A inputs Power, 1-3 59551A interface port PORT 1, 1-3 PORT 2, 1-2 59551A outputs 1PPS, 1-3 Alarm BITE, 1-3 IRIG-B, 1-3 Programmable Pulse, 1-3 SatStat, 3-3, 3-8, 3-9, 3-10, 5-3 58506A antenna cable assembly, 530 58507A antenna cable assembly, 530 58508A antenna cable assembly, 530 58511A antenna cable assembly, 530 HZ, 5-9 I I/O Port 1, 4-38 identification of Receiver, 4-42, 5136 IEEE 488.2 description, 5-4 IEEE Standard 488.2 obtaining copy of standard, 5-18 IEEE488.2 syntax, 5-5 In This Guide, 0-3, ix indicator Alarm, 1-3 indicators Alarm, 1-2 GPS Lock, 1-2 Holdover, 1-2 Power, 1-2 initialization, 5-131 initialize, 4-40 initializing the Receiver, 4-40 initiating manual Holdover, 5-38, 549 input antenna, 3-4, 4-25, 5-8, 5-30 Time Tag, 4-36 input power, 1-3 inputs antenna, 1-3 time tag, 1-3 install firmware, 2-3, 5-135 INSTALL, 5-140 INSTALL language, 5-137 installation, 4-42, 5-9, 5-23 installing firmware, 5-137 installing firmware via I/O Port 1, 442 installing firmware via I/O PORT 1, 5-135, 5-137 installing SatStat, 3-8 installing the SatStat, 3-8 interface RS-232C, 2-3 interface port PORT 1, 1-3 PORT 2, 1-2 internal reference oscillator, 5-7, 538 internal self-test diagnostics, 5-89 Interpolators, 5-89 introduction commands, 4-22 IRIG-B connector, 1-3 IRIG-B output, 1-3 J jack, power power, 1-3 K keyword separator, 5-7 L laptop, connection, 2-7 LAST, 5-121 latitude, 4-23, 5-7, 5-13, 5-15, 5-17, 5-18 Command Index-7 Command Index leap second, 4-32 leap second status, 5-92 LED Alarm, 1-2 GPS Lock, 1-2 Holdover, 1-2 Power, 1-2 LED, Alarm, 4-29, 5-53 LED, GPS Lock, 4-27 LED, Holdover, 4-27 LEDs, 4-27 lifetime count, 5-90 lifetime count, 4-30 list of commands, 4-2 configuration factory-default values, 5-132 error types, 5-4 factory-default values, 5-132 response format, 5-13 system preset, 5-133 literal, 5-8 local time, 4-32 locking to GPS satellites, 4-23, 425, 5-7, 5-8, 5-9, 510, 5-12, 5-13, 5-15, 5-17, 5-19, 5-21, 523, 5-25, 5-27, 5-28, 5-29, 5-30, 5-32, 533, 5-35, 5-37, 5-46, 5-47, 5-48, 5-49, 550, 5-52, 5-53 log, diagnostic, 4-29, 5-53, 5-59, 560, 5-61, 5-63, 5-64 log, error, 4-29, 5-53, 5-54, 5-57, 5139 longitude, 4-23, 5-7, 5-13, 5-15, 517, 5-18 M MAXimum, 5-8 maximum value, 5-8 memory overflow, 4-36, 5-110 messages program, 5-10 response, 5-11 Command Index-8 MINimum, 5-8 minimum value, 5-8 modem-eliminator cable, 2-5 monitoring 1 PPS synchronization, 5-38, 5-39 multipliers, 5-9 N new line, 5-17 NONE, 5-126 NRf, 5-8 null-modem cable, 2-5 O OHM, 5-9 one pulse per second, 1-3 operating in Holdover, 5-38, 5-49 operating status, 5-53 operation status, 5-69, 5-79, 5-80, 581, 5-82, 5-83, 5-84 Operation status, 5-65 output 10MHz, 4-27, 4-32, 5-38, 539, 5-40, 5-41, 5-42, 5-43, 5-44, 5-45, 546, 5-47, 5-48 1PPS, 5-38, 5-39, 5-40 1PPS, 4-27, 4-32, 5-38, 5-39, 5-40, 5-41, 5-42, 543, 5-44, 5-45, 5-46, 5-47, 5-48, 5-98 alarm, 4-27 programmable pulse, 5-103, 5-104, 5-105, 5-106, 5-107, 5-108 Programmable Pulse, 4-34 synchronization, 5-39, 5-40, 5-41, 5-42, 5-43, 544, 5-45, 5-46, 5-47, 5-48 output pulse, 4-34, 5-103, 5-104, 5105, 5-106, 5-107, 5108 output synchronization, 4-27 outputs 1PPS, 1-3 Alarm BITE, 1-3 Command Index Alarm, 58503A, 1-3 IRIG-B, 1-3 Programmable Pulse, 1-3 overview SatStat, 3-3 Receiver Status Screen, 3-3 P pace, 2-9, 5-126, 5-127, 5-132 pacing, 5-132 parameter separator, 5-8 parameter types, 5-8 literal, 5-8 string, 5-8 Parameter types Boolean, 5-8 parameters baud rate, 2-9 parity, 2-9 Software pacing, 2-9 stop bits, 2-9 parity, 2-9, 5-127, 5-128, 5-132 PCT, 5-9 pin assignment PORT 1, 2-4 PORT 2, 2-4 polarity of 1PPS output, 4-32, 5-98 polarity of edges 1PPS, 4-32, 5-98 programmable pulse, 4-34 time stamp, 4-36, 5-110, 5111 polarity of the edges time stamp, 5-111 polarity, programmable pulse, 4-34 polarity, time stamp, 4-36 POR 1, 1-3 PORT 1, 2-6, 4-38, 5-132 factory-default values, 2-9 PORT 1 configuration, 2-11 PORT 1 rear panel, 2-3 PORT 2, 1-2, 4-38, 5-132 factory-default values, 2-9 PORT 2 configuration, 2-11 PORT 2 front panel, 2-4 position, 4-23, 5-7, 5-13, 5-15, 5-17, 5-18, 5-19, 5-20 position at powerup, 5-21, 5-22 position hold, 5-19 power ac, 1-3 dc, 1-3 Power indicator, 1-2 Power input, 1-3 power outages, 5-110 Power supply levels, 5-89 power surges, 5-110 powering up the Receiver, 3-7 powerup status, 5-71 Powerup status, 5-65 predicted visible satellites, 5-35 preface, 0-3, ix preset, 4-40, 5-131 preset to factory defaults, 2-9, 4-40, 5-131, 5-132 product identification, 4-42, 5-136 program SatSat, 3-8 program messages definition, 5-10 syntax, 5-10 programmable pulse, 4-34, 5-103, 5104, 5-105, 5-106, 5107, 5-108 Programmable Pulse connector, 1-3 Programmable Pulse output, 1-3 pulse generator, 4-34, 5-103, 5-104, 5-105, 5-106, 5-107, 5-108 pulse output, 4-34, 5-103, 5-104, 5105, 5-106, 5-107, 5108 pulse per second, 1-3 pulse polarity, 4-34 Q QSPI, 5-89 query, 5-8, 5-11 query error, 5-6 query parameters <numeric value>, 5-8 MAXimum, 5-8 Command Index-9 Command Index MINimum, 5-8 querying instrument identification, 5-135 questionable status, 5-71 Questionable status, 5-65 queue overflows, 5-3 queue, error, 4-29, 5-53, 5-139 quick reference command list, 4-2 factory instrument settings, 5-133 factory serial port settings, 5132 R RAM, 5-89 reading leap second status, 5-99 rear panel PORT 1, 2-3 Receiver Commands at a Glance, 42 Receiver identification, 4-42, 5-135, 5-136 Receiver initialization, 4-40 receiver operation at a glance, 4-29, 5-53, 5-55 Receiver status screen, 5-55 Receiver Status Screen at a Glance, 3-17 recovering from holdover, 4-27, 538, 5-50 recovering from Holdover, 5-38, 550 recovering the last query response, 4-38, 5-122 recovery from Holdover, 3-16 Reference oscillator, 5-89 related documentation, 5-18 relay, alarm, 1-3, 4-29, 5-53, 5-65, 5-66, 5-68, 5-70, 571, 5-72, 5-73, 5-74, 5-75, 5-76, 5-77, 578, 5-79, 5-80, 5-81, 5-82, 5-83, 5-84, 585, 5-86, 5-87, 5-88 removes error from error queue, 5Command Index-10 139 reset to factory defaults, 2-9, 4-40, 5-131, 5-132 response PTIMe TCODe?, 5-93 response message syntax, 5-12 response messages, 5-11 data types, 5-13 restore factory defaults, 4-40 restore to factory defaults, 2-9, 5131, 5-132 revision code, 4-42, 5-136 RG-213 cable, 5-30 RS-232 default values, 3-5 RS-232C PORT 1, 1-3 PORT 2, 1-2 RS232C interface, 5-123, 5-124, 5125, 5-126, 5-127, 5128, 5-129 RS-232C interface, 4-38, 5-122 RS-232C ports:, 2-3 S S, 5-9 sample status screen, 3-8 satellite acquisition, 4-23, 4-25, 5-7, 5-46, 5-47, 5-48 satellite failure protection, 4-27, 538, 5-46, 5-47, 5-48 satellite loss, 4-27, 5-46, 5-47, 5-48 satellite management, 4-23, 4-25, 57, 5-9, 5-10, 5-12, 513, 5-15, 5-17, 5-19, 5-21, 5-23, 5-25, 527, 5-28, 5-29, 5-30, 5-32, 5-33, 5-35, 537, 5-46, 5-47, 5-48, 5-49, 5-50, 5-52, 553 satellite reacquisition, 4-27 satellite selection, 4-25, 5-7 satellite tracking at installation, 423, 5-7, 5-9 satellites, selection, 5-23 SatStat, 3-8, 3-9, 3-10 Command Index SCPI, 5-3 description, 5-4 version, 4-22 SCPI Command and Query Format, 5-4 SCPI conformance Information, 422 SCPI standard, 5-18 self test, 3-7, 4-30, 5-54, 5-89, 5-90, 5-91 selftest, 5-89 self-test diagnostics, 3-7 semantic error, 5-5 separator keyword, 5-7 parameter, 5-8 serial interface cable diagram, 2-8 serial interface communication, 4-38 serial interface port preset, 5-131 serial interface port PORT 1, 1-3 PORT 2, 1-2 serial Interface port, 2-3, 2-4 serial interface ports, 2-3 serial number, 5-136 serial port error recovery, 4-29, 438, 5-53, 5-130 serial port I/O, 4-38, 5-132 serial port settings, 2-11 SERIAL1, 5-123 SERIAL2, 5-123 setting up the Receiver, 3-4 settings, serial port, 2-11 setup, 4-42, 5-9, 5-23 signal loss, 4-27, 5-38, 5-46, 5-47, 5-48, 5-49, 5-50, 552 Software pacing, 2-9 status alarm, 5-68, 5-75 command error, 5-72, 5-85 hardware, 5-70, 5-79, 5-80, 5-81, 5-82, 5-83, 584 holdover, 5-71, 5-79, 5-80, 5-81, 5-82, 5-83, 584 operation, 5-69, 5-79, 5-80, 5-81, 5-82, 5-83, 584 powerup, 5-71, 5-79, 5-80, 5-81, 5-82, 5-83, 584 questionable, 5-71, 5-79, 580, 5-81, 5-82, 5-83, 5-84, 5-87 status information, 5-53 status registers, 5-65 status reporting, 4-29, 4-30, 5-53, 554, 5-65, 5-68, 5-70, 5-71, 5-72, 5-73, 575, 5-76, 5-77, 5-78, 5-79, 5-80, 5-81, 582, 5-83, 5-84, 5-85, 5-86, 5-87, 5-88 status reporting system, 5-65 Status Reporting System Diagram, 5-68 status screen, 3-8, 3-11, 4-29, 5-55 status/alarm reporting system, 5-65 stop bits, 2-9, 5-128, 5-129, 5-132 string, 5-8 subsystem command syntax, 5-5 suffix elements, 5-9 multiplers, 5-9 suffix, multipler, 5-9 suffixes, 5-8 summary commands, 4-2 survey mode, 5-19, 5-20 synchronization of output signals, 427, 5-39, 5-40, 5-41, 5-42, 5-44, 5-46, 547, 5-48 synchronizing to reference, 4-27, 538 syntactic error, 5-4 syntax, 4-22, 5-4 program messages, 5-10 Command Index-11 Command Index response messages, 5-12 syntax, SCPI, 5-3 SYSTEM STATUS? command, 3-8 STATUS? query, 3-8 system preset, 5-133 system time, 4-32, 5-92 T Table antenna delay table, 5-30 factory instrument settings, 5-132, 5-133, 5-134 factory serial port settings, 5132 telecommunication, 3-6 terminal communications, 3-5, 3-6 terminal emulation program, 3-4 terminal emulation program, 3-4 terminator command, 5-10 test result, 5-91 TFOM, 4-27, 5-44, 5-93 time and date outputs, 4-25, 4-32, 58, 5-33, 5-92, 5-93, 5-94, 5-95, 5-96 time of day outputs, 4-25, 4-32, 5-8, 5-33, 5-92, 5-93, 594, 5-95, 5-96 time stamp polarity of the edges, 5-111 Time Stamp memory, 4-36 time stamp polarity, 4-36, 5-110, 5111 time stamping, 1-3, 4-36, 5-110, 5111, 5-113, 5-114, 5115, 5-116, 5-117, 5118, 5-119, 5-120, 5121 time stamps, 5-110 Time Stamps, 4-36 time tag, 1-3, 4-36, 5-110, 5-111, 5113, 5-114, 5-115, 5116, 5-117, 5-118, 5119, 5-120, 5-121 Time tag inputs, 1-3 Command Index-12 time tagging input, 4-36 time transfer information, 5-7 time zone setting, 4-32, 5-92, 5-97 time-stamped edge, 5-111 time-stamped edge, 5-111 Time-stamped Edge, 4-36 timing outputs, 4-27, 5-39, 5-40, 541, 5-42, 5-44, 5-46, 5-47, 5-48 TSTamp n, 5-113, 5-114, 5-117 tutorial using the Status Screen, 3-10 U UART, 5-89 units, 5-9 upgrading firmware, 2-3, 5-135 Upgrading firmware, 4-42 using the Receiver Status Screen, 31 UTC, 5-7 UTC timeline, 5-92 V V, 5-9 visible satellites, 5-35 W Windows program Receiver Status screen, 5-3 Receiver Status Screen, 3-8 X XON, 5-126 XYZ, 5-16 (PORT 1, 5-122, 5-123, 5-124, 5-125, 5-126, 5-127, 5-128, 5-129 (PORT 2, 5-122, 5-123, 5-124, 5-125, 5-126, 5-127, 5-128, 5-129 * *CLS, 5-73, 5-137 *ESE, 5-85 *ESE?, 5-86 *ESR?, 5-86 *IDN?, 5-136 *SRE, 5-76 *SRE?, 5-76 *STB?, 5-77 *TST?, 5-89 : :CALCulate Subsystem CALCulate WMARgin DATA?, 4-25 :DIAGnostic DOWNload, 5-137 ERASe, 5-138 ERASe?, 5-139 LIFetime COUNt?, 5-90 LOG CLEar, 5-61 CLEar <current log size>, 5-62 COUNt?, 5-63 READ ALL?, 5-62 READ?, 5-63 READ? <entry number>, 5-64 QUERy RESPonse?, 5-130 ROSCillator EFControl RELative?, 5-39 TEST RESult?, 5-91 TEST?, 5-90 :FORMat DATA, 5-115 DATA?, 5-115 :GPS INITial DATE, 5-9 POSition, 5-10 TIME, 5-12 POSition, 5-13 ACTual?, 5-17 HOLD LAST?, 5-17 STATe?, 5-19 SURVey PROGress?, 5-19 STATe, 5-20 POWerup, 5-21 POWerup?, 5-22 STATe?, 5-21 POSition?, 5-15 REFerence ADELay, 5-30 ADELay?, 5-32 VALid?, 5-33 SATellite TRACking COUNt?, 5-35 EMANgle, 5-23 EMANgle?, 5-24 General Index IGNore, 5-25 ALL, 5-25 COUNt?, 5-28 NONE, 5-25 STATe?, 5-29 IGNore?, 5-26 INClude COUNt?, 5-28 STATe?, 5-29 INCLude, 5-27 ALL, 5-27 NONE, 5-27 INCLude?, 5-27 TRACking?, 5-34 VISible PREDicted COUNt?, 5-37 PREDicted?, 5-35 :LED ALarm, 5-75 GPSLock, 5-40 HOLDover, 5-40 :PTIMe DATE?, 5-95 LEAPsecond ACCumulated?, 5-99 DATE?, 5-100 DURation?, 5-101 STATe?, 5-102 PPS EDGE, 5-98 EDGE?, 5-98 TCODe?, 5-93 TCODe? response, 5-93 TIME STRing?, 5-96 TIME?, 5-95 TZONe, 5-97 TZONe?, 5-97 :PULSe CONTinuous PERiod, 5-104 General Index-2 PERiod?, 5-104 STATe, 5-105 STATe?, 5-105 REFerence EDGE, 5-106 EDGE?, 5-106 STARt DATE, 5-107 DATE?, 5-107 TIME, 5-108 TIME?, 5-109 :SENSe DATA CLEar, 5-112 CLEar <data set>, 5-113 MEMory OVERflow COUNt?, 5-119 COUNt? <data set>, 5-120 SAVE, 5-120 SAVE?, 5-121 POINts?, 5-116 POINts? <data set>, 5-116 TSTamp? <data set>, 5-117 DATA? <data set>, 5-114 TSTamp<channel> EDGE, 5-111 EDGE?, 5-111 :STATus <register> CONDition?, 5-79 ENABle, 5-81 ENABle?, 5-82 EVENt?, 5-80 NTRansition, 5-83 NTRansition?, 5-84 PTRansition, 5-83 PTRansition?, 5-84 PRESet ALARm, 5-74 QUEStionable CONDition General Index USER, 5-87 EVENt USER, 5-88 :SYNChronization FFOMerit?, 5-41 HOLDover DURation THReshold, 5-47 EXCeeded?, 5-48 THReshold?, 5-47 DURation?, 5-46 INITiate, 5-49 RECovery INITiate, 5-50 LIMit IGNore, 5-52 TUNCertainty PREDicted?, 5-42 PRESent?, 5-43 WAITing?, 5-50 IMMediate, 5-52 STATe?, 5-39 TFOMerit?, 5-44 TINTerval?, 5-45 :SYSTem COMMunicate <port> BAUD, 5-123 BAUD?, 5-124 BITS, 5-124 BITS?, 5-125 FDUPlex, 5-125 FDUPlex?, 5-126 PACE, 5-126 PACE?, 5-127 PARity, 5-127 PARity?, 5-128 PRESet, 5-132 SBITs?, 5-129 SERial1 SBITs, 5-128 COMMunicate?, 5-123 DATE?, 5-95 ERRor?, 5-57, 5-139 LANGuage, 5-140 LANGuage?, 5-141 PRESet, 5-132 STATus LENGth?, 5-56 STATus?, 5-55 TIME?, 5-95 :SYSTEM STATUS? query, 3-3 < <numeric value>, 5-8 1 1 PPS reference edge, 4-32 10MHz output, 5-38 10MHz output quality, 4-27, 4-32, 5-38, 5-39, 5-40, 5-41, 5-42, 5-43, 5-44, 5-45, 5-46, 5-47, 5-48 1PPS connector, 58503A, 1-3 1PPS connector, 59551A, 1-3 1PPS error estimation, 5-42 1PPS output, 1-3, 5-38 1PPS output quality, 4-27, 4-32, 5-38, 5-39, 5-40, 5-41, 5-42, 5-43, 5-44, 5-45, 5-46, 5-47, 5-48 1PPS polarity, 4-32, 5-98 1PPS reference synchronization, 4-27, 5-38 A abbreviated commands, 5-7 ac power, 1-3 accessing the Receiver Status Screen, 3-8 acquisition satellite, 4-23, 5-7 acquisition of satellites, General Index-3 General Index 4-25, 5-8 alarm analysis, 4-29, 5-53, 5-54, 5-65, 5-66, 5-68, 5-70, 5-71, 5-72, 5-73, 5-74, 5-75, 5-76, 5-77, 5-78, 5-79, 5-80, 5-81, 5-82, 5-83, 5-84, 5-85, 5-86, 5-87, 5-88 alarm BITE, 4-29, 5-53, 5-65, 5-68, 5-70, 5-71, 5-72, 5-73, 5-75, 5-76, 5-77, 5-78, 5-79, 5-80, 5-81, 5-82, 5-83, 5-84, 5-85, 5-86, 5-87, 5-88 Alarm BITE, 59551A, 1-3 alarm clear, 4-29, 5-53, 5-73, 5-74, 5-75, 5-76, 5-77 Alarm indicator, 1-2, 1-3, 1-2, 4-29, 5-53, 5-75 alarm relay, 1-3, 4-29, 5-53, 5-65, 5-66, 5-68, 5-70, 5-71, 5-72, 5-73, 5-74, 5-75, 5-76, 5-77, 5-78, 5-79, 5-80, 5-81, 5-82, 5-83, 5-84, 5-85, 5-86, 5-87, 5-88 alarm setup, 4-29, 5-53, 5-65, 5-68, 5-70, 5-71, 5-72, 5-73, 5-75, 5-76, 5-77, 5-78, 5-79, 5-80, 5-81, 5-82, 5-83, 5-84, 5-85, 5-86, 5-87, 5-88 alarm status, 5-68 alarm test, 4-29, 5-53, 5-54, 5-87, 5-88, 5-89, 5-90, 5-91 Alarm, 58503A, 1-3 antenna connection, 1-3, 3-4, 5-30 antenna delay compensation, 4-25, 5-8, General Index-4 5-30 antenna delay values, 5-30 antenna input, 1-3 antenna placement, 1-3, 3-4, 4-25, 5-8, 5-30 antenna system, 3-4 application SatSat, 3-8 applying local time zone offset, 5-97 ASCII Data, 5-16 assessing 1 PPS quality, 5-41 B baud, 2-9, 5-123, 5-132 baud, 5-124 baud rate, 2-9 Belden 8267 cable, 5-31 Binary Data, 5-17 BINARY Data, 5-115 BITE, alarm, 1-3 Boolean, 5-8 C cable assemblies antenna, 5-30 cable delay compensation, 4-25, 5-8, 5-30 cables antenna, 5-30 crossover, 2-5 HP 24542G, 2-8 HP 24542G interface, 2-6 HP 24542U, 2-8 HP 40242M interface, 2-6 modem-eliminator, 2-5 null-modem, 2-5 clear, 5-112, 5-113 clear alarm, 4-29, 5-53, 5-73 errors, 4-29, 5-53, 5-57, 5-137 clear alarm, 4-29, 5-53 General Index clear errors, 5-137 clear time stamp memory, 5-110 comma, 5-5, 5-8, 5-12 command abbreviated, 5-7 common, 5-4 format, 5-5 parameter, 5-8 SCPI, 5-4 syntax, 5-3, 5-7 terminator, 5-10 terminators, 5-5 command error, 4-30, 5-54, 5-65, 5-72 Command Error status, 5-65 command syntax conventions, 4-22, 5-4 commands introduction, 4-22 Commands at a Glance, 4-2 commands summary, 4-2 common command syntax, 5-5 Common Command Format, 5-4 common commands description, 5-4 communication serial interface port, 2-3, 2-4 communication, serial interface port, 5-122, 5-123, 5-125, 5-126, 5-127, 5-128 compensating for antenna delay, 5-30 configuration PORT 1, 2-11, 5-122 PORT 2, 2-11, 5-122 configuration factory-default values, 5-132 configure serial interface port(s), 5-122 configuring I/O Port 1, 4-38 configuring I/O Port 2 (59551A), 4-38 Configuring PORT 1, 2-10 Configuring PORT 2, 2-11 configuring the RS-232C ports, 2-9 configuring the serial interface port(s), 5-122 conformance Information SCPI, 4-22 connecting antenna, 1-3, 4-25, 5-8, 5-30 connecting a computer, 2-5 connecting a laptop, 2-7 connecting a Laptop, 2-6 connecting a modem, 2-5, 2-6 connecting a PC, 2-6, 3-4 connecting the antenna system, 3-4 Connecting to a PC, 3-4 connection laptop, 2-7 modem, 2-6 connectors 1PPS, 1-3 Alarm BITE, 1-3 Alarm, 58503A, 1-3 ANTENNA, 1-3 IRIG-B, 1-3 Programmable Pulse, 1-3 time tag, 1-3 conventions command syntax, 4-22, 5-4 Coordinated Universal Time, 5-7 CPU, 5-89 crossover cable, 2-5 current time, 4-32 General Index-5 General Index D d.dEe, 5-14 d.dEe, ..., 5-14 data, 5-114 data bits, 2-9, 5-124, 5-125, 5-132 date and time outputs, 4-25, 4-32, 5-8 DB-25 connector, 2-5 DB-9 connector, 2-5 dc power, 1-3 DCE, 2-5 dd, 5-13 dd, ..., 5-13 decimal point, 5-8, 5-14 default values, 3-5 defaults, factory, 3-5 defaults, factory settings, 2-9, 4-40, 5-131, 5-132 DEG, 5-9 delay values antenna cables, 5-30 delay values, antenna cables, 4-25, 5-8, 5-30 description response formats (ASCII), 5-6 serial interface ports, 2-3 status registers, 5-65 status reporting system, 5-65 status/alarm reporting system, 5-65 description format, 5-5 diagnostic log, 4-29, 5-53, 5-59, 5-60, 5-61, 5-63, 5-64 diagnostic Log messages, 5-59 diagnostic test, 5-90 diagnostic tests, 4-30, 5-54, 5-89, 5-90, 5-91 General Index-6 result, 5-91 diagnostics internal self-test, 5-89 diagram serial interface cable, 2-8 Diagram:, 5-68 documents list, 5-18 related, 5-18 download, 5-137 downloading Using SatStat, 5-3 downloading new firmware, 5-3 DTE, 2-5 duplex state, 5-125, 5-126 E echoing of the characters you type, 5-125, 5-126, 5-132 EEPROM, 5-89, 5-138 EPROM, 5-89 erasing EEPROM, 5-139 error hardware/firmware error, 5-5 query, 5-6 semantic, 5-5 syntactic, 5-4 error analysis, 4-29, 5-53, 5-54, 5-57, 5-139 error behavior, 5-6 error log, 4-29, 5-53, 5-54, 5-57, 5-139 error messages, 4-29, 5-53 error queue, 4-29, 5-53, 5-57, 5-139, 5-3 error recovery, serial port, 4-29, 4-38, 5-53, 5-130 error types, 5-4 error types, list, 5-4 General Index error, command, 5-65, 5-72 error, reading, 5-2 external devices, 1-3 F factory default settings, 2-9, 3-5, 4-40, 5-131, 5-132 factory-default values, 2-9 failure of merit, 4-27 failure protection, satellite loss, 4-27, 5-38, 5-46, 5-47, 5-48 FDUPlex, 5-125, 5-126 FFOM, 4-27, 5-41 Figure command list, 4-2 status reporting system, 5-68 figure of merit, 5-41, 5-44, 5-93 firmware error, 5-5 firmware installation, 2-3, 4-42, 5-135, 5-137, 5-139, 5-140, 5-141 firmware revision code, 2-3, 4-42, 5-136 firmware upgrade, 2-3, 5-137 FIRS, 5-121 flash EEPROM, 5-138 flow control state, 5-126, 5-127 format ASCii, 5-115 INTeger, 5-115 FPGA logic, 5-89 front panel PORT 2, 2-4 full duplex, 2-9, 5-132 G GPS engine, 5-89 GPS lock, 4-23, 4-25, 5-7, 5-46, 5-47, 5-48 GPS Lock indicator, 1-2, 4-27, 5-40 GPS position, 4-23, 5-7, 5-13, 5-15, 5-17, 5-19 GPS satellite acquisition, 4-23, 4-25, 5-7, 5-46, 5-47, 5-48 GPS timeline, 5-92 GUI, 3-3, 3-8, 3-9, 3-10 H hardware status, 5-70, 5-79, 5-80, 5-81, 5-82, 5-83, 5-84 Hardware status, 5-65, 5-70 hardware/firmware error, 5-5 holdover status, 5-65 holdover tutorial, 3-15 Holdover indicator, 1-2, 4-27, 5-40 holdover loss of satellites, 4-27 holdover operation, 3-15 holdover process, 5-38 holdover recovery, 4-27, 5-38, 5-50 holdover status, 4-30, 5-71 How to use the Status Screen, 3-10 24542G cable, 2-8 24542G interface cable, 2-6 24542U cable, 2-8 40242M interface cable, 2-6 58503A indicators Alarm, 1-2 GPS Lock, 1-2 Holdover, 1-2 Power, 1-2 58503A inputs Power, 1-3 General Index-7 General Index 58503A interface port PORT 1, 1-3 58503A outputs 10 MHz OUT, 1-3 1PPS, 1-3 Alarm, 1-3 58506A/507A/508A cable, 5-31 59551A indicators Alarm, 1-2 GPS Lock, 1-2 Holdover, 1-2 Power, 1-2 59551A inputs Power, 1-3 59551A interface port PORT 1, 1-3 PORT 2, 1-2 59551A outputs 1PPS, 1-3 Alarm BITE, 1-3 IRIG-B, 1-3 Programmable Pulse, 1-3 SatStat, 3-3, 3-8, 3-9, 3-10, 5-3 58506A antenna cable assembly, 5-30 58507A antenna cable assembly, 5-30 58508A antenna cable assembly, 5-30 58511A antenna cable assembly, 5-30 HZ, 5-9 I I/O Port 1, 4-38 identification of Receiver, 4-42, 5-136 IEEE 488.2 description, 5-4 IEEE Standard 488.2 obtaining copy of standard, General Index-8 5-18 IEEE488.2 syntax, 5-5 In This Guide, 0-3, ix indicator Alarm, 1-3 indicators Alarm, 1-2 GPS Lock, 1-2 Holdover, 1-2 Power, 1-2 initialization, 5-131 initialize, 4-40 initializing the Receiver, 4-40 initiating manual Holdover, 5-38, 5-49 input antenna, 3-4, 4-25, 5-8, 5-30 Time Tag, 4-36 input power, 1-3 inputs antenna, 1-3 time tag, 1-3 install firmware, 2-3, 5-135 INSTALL, 5-140 INSTALL language, 5-137 installation, 4-42, 5-9, 5-23 installing firmware, 5-137 installing firmware via I/O Port 1, 4-42 installing firmware via I/O PORT 1, 5-135, 5-137 installing SatStat, 3-8 installing the SatStat, 3-8 interface RS-232C, 2-3 interface port PORT 1, 1-3 PORT 2, 1-2 internal reference oscillator, General Index 5-7, 5-38 internal self-test diagnostics, 5-89 Interpolators, 5-89 introduction commands, 4-22 IRIG-B connector, 1-3 IRIG-B output, 1-3 J jack, power power, 1-3 K keyword separator, 5-7 L laptop, connection, 2-7 LAST, 5-121 latitude, 4-23, 5-7, 5-13, 5-15, 5-17, 5-18 leap second, 4-32 leap second status, 5-92 LED Alarm, 1-2 GPS Lock, 1-2 Holdover, 1-2 Power, 1-2 LED, Alarm, 4-29, 5-53 LED, GPS Lock, 4-27 LED, Holdover, 4-27 LEDs, 4-27 lifetime count, 5-90 lifetime count, 4-30 list of commands, 4-2 configuration factory-default values, 5-132 error types, 5-4 factory-default values, 5-132 response format, 5-13 system preset, 5-133 literal, 5-8 local time, 4-32 locking to GPS satellites, 4-23, 4-25, 5-7, 5-8, 5-9, 5-10, 5-12, 5-13, 5-15, 5-17, 5-19, 5-21, 5-23, 5-25, 5-27, 5-28, 5-29, 5-30, 5-32, 5-33, 5-35, 5-37, 5-46, 5-47, 5-48, 5-49, 5-50, 5-52, 5-53 log, diagnostic, 4-29, 5-53, 5-59, 5-60, 5-61, 5-63, 5-64 log, error, 4-29, 5-53, 5-54, 5-57, 5-139 longitude, 4-23, 5-7, 5-13, 5-15, 5-17, 5-18 M MAXimum, 5-8 maximum value, 5-8 memory overflow, 4-36, 5-110 messages program, 5-10 response, 5-11 MINimum, 5-8 minimum value, 5-8 modem-eliminator cable, 2-5 monitoring 1 PPS synchronization, 5-38, 5-39 multipliers, 5-9 N new line, 5-17 NONE, 5-126 NRf, 5-8 null-modem cable, 2-5 O OHM, 5-9 one pulse per second, 1-3 operating in Holdover, 5-38, 5-49 General Index-9 General Index operating status, 5-53 operation status, 5-69, 5-79, 5-80, 5-81, 5-82, 5-83, 5-84 Operation status, 5-65 output 10MHz, 4-27, 4-32, 5-38, 5-39, 5-40, 5-41, 5-42, 5-43, 5-44, 5-45, 5-46, 5-47, 5-48 1PPS, 5-38, 5-39, 5-40 1PPS, 4-27, 4-32, 5-38, 5-39, 5-40, 5-41, 5-42, 5-43, 5-44, 5-45, 5-46, 5-47, 5-48, 5-98 alarm, 4-27 programmable pulse, 5-103, 5-104, 5-105, 5-106, 5-107, 5-108 Programmable Pulse, 4-34 synchronization, 5-39, 5-40, 5-41, 5-42, 5-43, 5-44, 5-45, 5-46, 5-47, 5-48 output pulse, 4-34, 5-103, 5-104, 5-105, 5-106, 5-107, 5-108 output synchronization, 4-27 outputs 1PPS, 1-3 Alarm BITE, 1-3 Alarm, 58503A, 1-3 IRIG-B, 1-3 Programmable Pulse, 1-3 overview SatStat, 3-3 Receiver Status Screen, 3-3 P pace, 2-9, 5-126, 5-127, 5-132 pacing, 5-132 parameter separator, 5-8 General Index-10 parameter types, 5-8 literal, 5-8 string, 5-8 Parameter types Boolean, 5-8 parameters baud rate, 2-9 parity, 2-9 Software pacing, 2-9 stop bits, 2-9 parity, 2-9, 5-127, 5-128, 5-132 PCT, 5-9 pin assignment PORT 1, 2-4 PORT 2, 2-4 polarity of 1PPS output, 4-32, 5-98 polarity of edges 1PPS, 4-32, 5-98 programmable pulse, 4-34 time stamp, 4-36, 5-110, 5-111 polarity of the edges time stamp, 5-111 polarity, programmable pulse, 4-34 polarity, time stamp, 4-36 POR 1, 1-3 PORT 1, 2-6, 4-38, 5-132 factory-default values, 2-9 PORT 1 configuration, 2-11 PORT 1 rear panel, 2-3 PORT 2, 1-2, 4-38, 5-132 factory-default values, 2-9 PORT 2 configuration, 2-11 PORT 2 front panel, 2-4 position, 4-23, 5-7, 5-13, 5-15, 5-17, 5-18, 5-19, 5-20 position at powerup, 5-21, 5-22 General Index position hold, 5-19 power ac, 1-3 dc, 1-3 Power indicator, 1-2 Power input, 1-3 power outages, 5-110 Power supply levels, 5-89 power surges, 5-110 powering up the Receiver, 3-7 powerup status, 5-71 Powerup status, 5-65 predicted visible satellites, 5-35 preface, 0-3, ix preset, 4-40, 5-131 preset to factory defaults, 2-9, 4-40, 5-131, 5-132 product identification, 4-42, 5-136 program SatSat, 3-8 program messages definition, 5-10 syntax, 5-10 programmable pulse, 4-34, 5-103, 5-104, 5-105, 5-106, 5-107, 5-108 Programmable Pulse connector, 1-3 Programmable Pulse output, 1-3 pulse generator, 4-34, 5-103, 5-104, 5-105, 5-106, 5-107, 5-108 pulse output, 4-34, 5-103, 5-104, 5-105, 5-106, 5-107, 5-108 pulse per second, 1-3 pulse polarity, 4-34 Q QSPI, 5-89 query, 5-8, 5-11 query error, 5-6 query parameters <numeric value>, 5-8 MAXimum, 5-8 MINimum, 5-8 querying instrument identification, 5-135 questionable status, 5-71 Questionable status, 5-65 queue overflows, 5-3 queue, error, 4-29, 5-53, 5-139 quick reference command list, 4-2 factory instrument settings, 5-133 factory serial port settings, 5-132 R RAM, 5-89 reading leap second status, 5-99 rear panel PORT 1, 2-3 Receiver Commands at a Glance, 4-2 Receiver identification, 4-42, 5-135, 5-136 Receiver initialization, 4-40 receiver operation at a glance, 4-29, 5-53, 5-55 Receiver status screen, 5-55 Receiver Status Screen at a Glance, 3-17 recovering from holdover, 4-27, 5-38, 5-50 recovering from Holdover, 5-38, 5-50 recovering the last query response, 4-38, 5-122 General Index-11 General Index recovery from Holdover, 3-16 Reference oscillator, 5-89 related documentation, 5-18 relay, alarm, 1-3, 4-29, 5-53, 5-65, 5-66, 5-68, 5-70, 5-71, 5-72, 5-73, 5-74, 5-75, 5-76, 5-77, 5-78, 5-79, 5-80, 5-81, 5-82, 5-83, 5-84, 5-85, 5-86, 5-87, 5-88 removes error from error queue, 5-139 reset to factory defaults, 2-9, 4-40, 5-131, 5-132 response PTIMe TCODe?, 5-93 response message syntax, 5-12 response messages, 5-11 data types, 5-13 restore factory defaults, 4-40 restore to factory defaults, 2-9, 5-131, 5-132 revision code, 4-42, 5-136 RG-213 cable, 5-30 RS-232 default values, 3-5 RS-232C PORT 1, 1-3 PORT 2, 1-2 RS232C interface, 5-123, 5-124, 5-125, 5-126, 5-127, 5-128, 5-129 RS-232C interface, 4-38, 5-122 RS-232C ports:, 2-3 S S, 5-9 sample status screen, 3-8 satellite acquisition, 4-23, General Index-12 4-25, 5-7, 5-46, 5-47, 5-48 satellite failure protection, 4-27, 5-38, 5-46, 5-47, 5-48 satellite loss, 4-27, 5-46, 5-47, 5-48 satellite management, 4-23, 4-25, 5-7, 5-9, 5-10, 5-12, 5-13, 5-15, 5-17, 5-19, 5-21, 5-23, 5-25, 5-27, 5-28, 5-29, 5-30, 5-32, 5-33, 5-35, 5-37, 5-46, 5-47, 5-48, 5-49, 5-50, 5-52, 5-53 satellite reacquisition, 4-27 satellite selection, 4-25, 5-7 satellite tracking at installation, 4-23, 5-7, 5-9 satellites, selection, 5-23 SatStat, 3-8, 3-9, 3-10 SCPI, 5-3 description, 5-4 version, 4-22 SCPI Command and Query Format, 5-4 SCPI conformance Information, 4-22 SCPI standard, 5-18 self test, 3-7, 4-30, 5-54, 5-89, 5-90, 5-91 selftest, 5-89 self-test diagnostics, 3-7 semantic error, 5-5 separator keyword, 5-7 parameter, 5-8 serial interface cable diagram, 2-8 serial interface communication, 4-38 serial interface port preset, 5-131 General Index serial interface port PORT 1, 1-3 PORT 2, 1-2 serial Interface port, 2-3, 2-4 serial interface ports, 2-3 serial number, 5-136 serial port error recovery, 4-29, 4-38, 5-53, 5-130 serial port I/O, 4-38, 5-132 serial port settings, 2-11 SERIAL1, 5-123 SERIAL2, 5-123 setting up the Receiver, 3-4 settings, serial port, 2-11 setup, 4-42, 5-9, 5-23 signal loss, 4-27, 5-38, 5-46, 5-47, 5-48, 5-49, 5-50, 5-52 Software pacing, 2-9 status alarm, 5-68, 5-75 command error, 5-72, 5-85 hardware, 5-70, 5-79, 5-80, 5-81, 5-82, 5-83, 5-84 holdover, 5-71, 5-79, 5-80, 5-81, 5-82, 5-83, 5-84 operation, 5-69, 5-79, 5-80, 5-81, 5-82, 5-83, 5-84 powerup, 5-71, 5-79, 5-80, 5-81, 5-82, 5-83, 5-84 questionable, 5-71, 5-79, 5-80, 5-81, 5-82, 5-83, 5-84, 5-87 status information, 5-53 status registers, 5-65 status reporting, 4-29, 4-30, 5-53, 5-54, 5-65, 5-68, 5-70, 5-71, 5-72, 5-73, 5-75, 5-76, 5-77, 5-78, 5-79, 5-80, 5-81, 5-82, 5-83, 5-84, 5-85, 5-86, 5-87, 5-88 status reporting system, 5-65 Status Reporting System Diagram, 5-68 status screen, 3-8, 3-11, 4-29, 5-55 status/alarm reporting system, 5-65 stop bits, 2-9, 5-128, 5-129, 5-132 string, 5-8 subsystem command syntax, 5-5 suffix elements, 5-9 multiplers, 5-9 suffix, multipler, 5-9 suffixes, 5-8 summary commands, 4-2 survey mode, 5-19, 5-20 synchronization of output signals, 4-27, 5-39, 5-40, 5-41, 5-42, 5-44, 5-46, 5-47, 5-48 synchronizing to reference, 4-27, 5-38 syntactic error, 5-4 syntax, 4-22, 5-4 program messages, 5-10 response messages, 5-12 syntax, SCPI, 5-3 SYSTEM STATUS? command, 3-8 STATUS? query, 3-8 system preset, 5-133 system time, 4-32, 5-92 T Table antenna delay table, 5-30 factory instrument settings, General Index-13 General Index 5-132, 5-133, 5-134 factory serial port settings, 5-132 telecommunication, 3-6 terminal communications, 3-5, 3-6 terminal emulation program, 3-4 terminal emulation program, 3-4 terminator command, 5-10 test result, 5-91 TFOM, 4-27, 5-44, 5-93 time and date outputs, 4-25, 4-32, 5-8, 5-33, 5-92, 5-93, 5-94, 5-95, 5-96 time of day outputs, 4-25, 4-32, 5-8, 5-33, 5-92, 5-93, 5-94, 5-95, 5-96 time stamp polarity of the edges, 5-111 Time Stamp memory, 4-36 time stamp polarity, 4-36, 5-110, 5-111 time stamping, 1-3, 4-36, 5-110, 5-111, 5-113, 5-114, 5-115, 5-116, 5-117, 5-118, 5-119, 5-120, 5-121 time stamps, 5-110 Time Stamps, 4-36 time tag, 1-3, 4-36, 5-110, 5-111, 5-113, 5-114, 5-115, 5-116, 5-117, 5-118, 5-119, 5-120, 5-121 Time tag inputs, 1-3 time tagging input, 4-36 time transfer information, 5-7 time zone setting, 4-32, General Index-14 5-92, 5-97 time-stamped edge, 5-111 time-stamped edge, 5-111 Time-stamped Edge, 4-36 timing outputs, 4-27, 5-39, 5-40, 5-41, 5-42, 5-44, 5-46, 5-47, 5-48 TSTamp n, 5-113, 5-114, 5-117 tutorial using the Status Screen, 3-10 U UART, 5-89 units, 5-9 upgrading firmware, 2-3, 5-135 Upgrading firmware, 4-42 Using the Receiver Status Screen, 3-1 UTC, 5-7 UTC timeline, 5-92 V V, 5-9 visible satellites, 5-35 W Windows program Receiver Status screen, 5-3 Receiver Status Screen, 3-8 X XON, 5-126 XYZ, 5-16