1
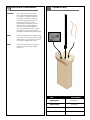
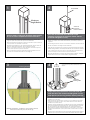
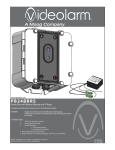
PV1
Accessories-CCTV Poles and PolEvator (Option)
www.videolarm.com
Installation and Operation Instructions for the following models:
PV1
Lightning rod for free-standing poles
CERTIFIED
Before attempting to connect or operate this product,
please read these instructions completely.
81-IN5256
02-03-2011
IMPORTANT SAFEGUARDS
1
Read these instructions.
2
Keep these instructions.
3
Heed all warnings
4
Follow all instructions.
5
Do not use this apparatus near water.
6
Clean only with damp cloth.
7
CAUTION
RISK OF ELECTRIC SHOCK
DO NOT OPEN
Do not block any of the ventilation openings. Install in accordance with the
manufacturers instructions.
8
9
SAFETY PRECAUTIONS
Cable Runs- All cable runs must be within permissible distance.
CAUTION: TO REDUCE THE RISK OF
ELECTRIC SHOCK, DO NOT REMOVE
COVER ( OR BACK). NO USER- SERVICEABLE PARTS INSIDE. REFER SEVICING
TO QUALIFIED SERVICE PERSONNEL.
Mounting - This unit must be properly and securely mounted to a supporting
structure capable of sustaining the weight of the unit.
Accordingly:
a. The installation should be made by a qualified installer.
b. The installation should be in compliance with local codes.
c. Care should be exercised to select suitable hardware to install the unit, taking into
account both the composition of the mounting surface and the weight of the unit.
10 Do not install near any heat sources such as radiators, heat registers, stoves, or other
apparatus ( including amplifiers) that produce heat.
11 Do not defeat the safety purpose of the polarized or grounding-type plug. A
polarized plug has two blades with one wider than the other. A grounding type
plug has two blades and a third grounding prong. The wide blade or the third
prong are provided for your safety. When the provided plug does not fit into your
outlet, consult an electrician for replacement of the obsolete outlet.
12 Protect the power cord from being walked on or pinched particularly at plugs,
convenience receptacles, and the point where they exit from the apparatus.
13 Only use attachment/ accessories specified by the manufacturer.
14 Use only with a cart, stand, tripod, bracket, or table specified by the manufacturer,
or sold with the apparatus. When a cart is used, use caution when moving the cart/
apparatus combination to avoid injury from tip-over.
15 Unplug this apparatus during lighting storms or when unused for long periods of time.
16 Refer all servicing to qualified service personnel. Servicing is required when the
apparatus has been damaged in any way, such as power-supply cord or plug is
damaged, liquid has been spilled of objects have fallen into the apparatus, the
The lightning flash with an arrowhead symbol,
within an equilateral triangle, is intended to
alert the user to the presence of non-insulated
“dangerous voltage” within the product’s
enclosure that may be of sufficient magnitude
to constitute a risk to persons.
Este símbolo se piensa para alertar al usuario a la presencia
del “voltaje peligroso no-aisIado” dentro del recinto de los
productos que puede ser un riesgo de choque eléctrico.
Ce symbole est prévu pour alerter I’utilisateur à la presence
“de la tension dangereuse” non-isolée dans la clôture de
produits qui peut être un risque de choc électrique.
Dieses Symbol soll den Benutzer zum Vorhandensein der
nicht-lsolier “Gefährdungsspannung” innerhalb der
Produkteinschließung alarmieren die eine Gefahr des
elektrischen Schlages sein kann.
Este símbolo é pretendido alertar o usuário à presença “di
tensão perigosa non-isolada” dentro do cerco dos produtos
que pode ser um risco de choque elétrico.
Questo simbolo è inteso per avvertire I’utente alla presenza
“di tensione pericolosa” non-isolata all’interno della
recinzione dei prodotti che può essere un rischio di scossa
elettrica.
apparatus has been exposed to rain or moisture, does not operate normally, or
has been dropped.
Be sure to periodically examine the unit and the supporting structure to make sure that the integrity
of the installation is intact. Failure to comply with the foregoing could result in the unit separating
from the support structure and falling, with resultant damages or injury to anyone or anything struck
by the falling unit.
UNPACKING
Unpack carefully. Electronic components can be
damaged if improperly handled or dropped. If an item
appears to have been damaged in shipment, replace
it properly in its carton and notify the shipper.
Be sure to save:
1 The shipping carton and packaging material.
They are the safest material in which to make future
shipments of the equipment.
2 These Installation and Operating Instructions.
SERVICE
If technical support or service is needed, contact us at
the following number:
TECHNICAL SUPPORT
AVAILABLE 24 HOURS
1 - 800 - 554 -1124
The exclamation point within an equilateral
triangle is intended to alert the user to
presence of important operating and
maintenance (servicing) instructions in the
literature accompanying the appliance.
Este símbolo del punto del exclamation se piensa para
alertar al usuario a la presencia de instrucciones importantes
en la literatura que acompaña la aplicación.
Ce symbole de point d’exclamation est prévu pour alerter
l’utilisateur à la presence des instructions importantes dans
la littérature accompagnant l’appareil.
Dieses Ausruf Punktsymbol soll den Benutzer zum
Vorhandensein de wichtigen Anweisungen in der Literatur
alarmieren, die das Gerät begleitet.
Este símbolo do ponto do exclamation é pretendido alertar o
usuário à presença de instruções importantes na literatura
que acompanha o dispositivo.
Questo simbolo del punto del exclamaton è inteso per
avvertire l’utente alla presenza delle istruzioni importanti nella
letteratura che accompagna l'apparecchio.
LIMITED WARRANTY FOR VIDEOLARM INC. PRODUCTS
VIDEOLARM INC. warrants this Product to be free from defects in material or workmanship,as follows:
PRODUCTCATEGORY
PARTS
LABOR
All Enclosuresand Electronics
Five (5) Years
Five (5) Years
Pan/Tilts
Three (3) Years **6 months if used in autoscan
Three (3) Years **6 months if used in autoscan
/tour operation
Poles/PoleEvators
Three (3) Years /tour operation
Three (3) Years
Warrior/Q-View/I.R.Illuminators
Five (5) Years
Five (5) Years
Five (5) Years **6 months if used in autoscan
SView Series
Five (5) Years **6 months if used in autoscan
/tour operation
Controllers
Five (5) Years /tour operation
Five (5) Years
PowerSupplies
Five (5) Years
Five (5) Years
AccessoryBrackets
Five (5) Years
Five (5) Years
During the labor warranty period, to repair the Product,Purchaserwill either return the defective product, freight prepaid, or deliver it to Videolarm Inc.
Decatur GA.The Productto be repaired is to be returned in either its original carton or a similar package
an equal degree of protection with a
RMA# (Return Materials Authorization number) displayed on the outer box or packing slip. To obtain a RMA#you must contact our TechnicalSupport
Team at 800.554.1124,extension 101.Videolarm will return the repaired Productfreight prepaid to Purchaser.Videolarm is not obligated to provide
Purchaserwith a substitute unit during the warranty period or at any time. After the applicable warranty period, Purchasermust pay all labor and/or
parts charges.
The limited warranty stated in these product instructions is subject to all of the following terms and conditions:
TERMS AND CONDITIONS
1. NOTIFICATIONOF CLAIMS: WARRANTYSERVICE: If Purchaser believes that the Product is defective in material or workmanship, then written notice
with an explanation of the claim shall be given promptly by Purchaser to Videolarm but all claims for warranty service must be made within the
warranty period. If after investigation Videolarm determines that the reported problem was not covered by the warranty, Purchaser shall pay Videolarm
for the cost of investigating the problem at its then prevailing per incident billable rate. No repair or replacement of any Product or part thereof shall
extend the warranty period as to the entire Product. The
warranty on the repaired part only shall be in
for a period of ninety (90) days
following the repair or replacement of that part or the remaining period of the Product parts warranty, whichever is greater.
2. EXCLUSIVE REMEDY: ACCEPTANCE:Purchaser’s exclusive remedy and Videolarm’s sole obligation is to supply (or pay for) all labor necessary to repair
any Product found to be defective within the warranty period and to supply, at no extra charge, new or rebuilt replacements for defective parts.
3. EXCEPTIONS TO LIMITED WARRANTY: Videolarm shall have no liability or obligation to Purchaser with respect to any Product requiring service
during the warranty period which is subjected to any of the following: abuse, improper use: negligence, accident, lightning damage or other acts
of God (i.e., hurricanes, earthquakes),
failure of the end-user to follow the directions outlined in the product instructions, failure of the
end-user to follow the maintenance procedures recommended by the International Security Industry Organization, written in product instructions,
for regular
or recommended in the service manual for the Product. Furthermore, Videolarm shall have no liability where a schedule is
replacement or maintenance or cleaning of certain parts (based on usage) and the end-user has failed to follow such schedule; attempted repair by
personnel; operation of the Product outside of the published environmental and electrical parameters, or if such Product’s original
(trademark, serial number) markings have been defaced, altered, or removed. Videolarm excludes from warranty coverage Products sold
AS IS and/or WITH ALL FAULTS and excludes used Products which have not been sold by Videolarm to the Purchaser. All software and accompanying
documentation furnished with, or as part of the Product is furnished “AS IS” (i.e., without any warranty of any kind), except where expressly provided
otherwise in any documentation or license agreement furnished with the Product.
4. PROOF OF PURCHASE: The Purchaser’s dated bill of sale must be retained as evidence of the date of purchase and to establish warranty eligibility.
DISCLAIMEROF WARRANTY
EXCEPT FOR THE FOREGOING WARRANTIES, VIDEOLARM HEREBY DISCLAIMS AND EXCLUDES ALL OTHER WARRANTIES, EXPRESS OR IMPLIED,
INCLUDING, BUT NOT LIMITED TO ANY AND/OR ALL IMPLIED WARRANTIES OF MERCHANTABILITY, FITNESS FOR A PARTICULAR PURPOSE AND/OR ANY WARRANTY WITH
REGARD TO ANY CLAIM OF INFRINGEMENT THAT MAY BE PROVIDED IN SECTION 2-312(3) OF THE UNIFORM COMMERCIAL CODE AND/OR IN ANY OTHER COMPARABLE
STATE STATUTE. VIDEOLARM HEREBY DISCLAIMS ANY REPRESENTATIONS OR WARRANTY THAT THE PRODUCT IS COMPATIBLE WITH ANY COMBINATION OF NON-VIDEOLARM
PRODUCTS OR NON-VIDEOLARM RECOMMENDED PRODUCTS PURCHASER CHOOSES TO CONNECT TO PRODUCT.
LIMITATION OF LIABILITY
THE LIABILITY OF VIDEOLARM, IF ANY, AND PURCHASER’S SOLE AND EXCLUSIVE REMEDY FOR DAMAGES FOR ANY CLAIM OF ANY KIND
WHATSOEVER, REGARDLESS OF THE LEGAL THEORY AND WHETHER ARISING IN TORT OR CONTRACT, SHALL NOT BE GREATER THAN THE ACTUAL PURCHASE PRICE OF THE
PRODUCT WITH RESPECT TO WHICH SUCH CLAIM IS MADE. IN NO EVENT SHALL VIDEOLARM BE LIABLE TO PURCHASER FOR ANY SPECIAL, INDIRECT, INCIDENTAL, OR
CONSEQUENTIAL DAMAGES OF ANY KIND INCLUDING, BUT NOT LIMITED TO, COMPENSATION, REIMBURSEMENT OR DAMAGES ON ACCOUNT OF THE LOSS OF PRESENT
OR PROSPECTIVE PROFITS OR FOR ANY OTHER REASON WHATSOEVER.
!
IMPORTANT SAFEGUARDS
CAUTION:
These instructions show only how to attach
the Air Terminal and Aluminum Bonding Plate
to the PolEvator™. Underwriters Laboratories
has developed a stringent list of requirements
for installation of lightning protection systems,
which address a wide range of scenarios.
Moog Videolarm recommends that you contact
a firm which specializes in the installation of
such systems before placing this equipment on
the pole, and that the firm be allowed to complete
the installation per UL requirements (Installation
Requirements for Lightnin Protection Systems UL96A).
NOTE:
Attach the PV1 Lightning Rod to the PolEvator™ while
on the ground. If the PV1 is being placed at an existing
installation, the Polevator™ will have to be lowered to
the ground before installing the Air Terminal.
NOTE:
The products provided in this kit are UL listed, per
manufacturer's certification (Harger Lightning
Protection, Inc.).
Content of Box
PART
REPLACEMENT #
Lightning Rod
RP70LRBT01
Copper Cable
RP70LRCN01
Aluminium Cable
RP70LRCN02
Packet
RP40PRPV1
2
1
Air Terminal
Aluminum
Angle Bracket
Aluminum
Hex Head
Bolt and Washer
Remove plastic coating from aluminum angle bracket.
Be sure to remove all paint from bracket if needed.
•
•
•
•
•
Quite el recubrimiento plástico del corchete menor/mayor de aluminio. Esté
seguro de quitar toda la pintura del soporte si está necesitado.
Enlevez le revêtement en plastique du chevron en aluminium. Soyez sûr d'enlever
toute la peinture de la parenthèse si nécessaire.
Entfernen Sie Plastiküberzug von der Aluminiumwinkelstütze. Seien Sie sicher, alle
Farbe vom Haltewinkel zu entfernen, wenn Sie gebraucht werden.
Remova o revestimento plástico do suporte de ângulo de alumínio. Seja certo
remover toda a pintura do suporte se necessário.
Rimuova il rivestimento di plastica dalla staffa di angolo di alluminio. Sia sicuro
rimuovere tutta la vernice dalla staffa se avuto bisogno di.
•
•
•
•
•
3
Place the air terminal in one of the holes on the
aluminum angle bracket. Attach the washer and hex
head bolt and tighten securely.
Ponga el aeropuerto en uno de los agujeros en el corchete menor/mayor de
aluminio. Ate el perno de la cabeza de la arandela y de maleficio y apriete con
seguridad.
Placez l'aérogare dans un des trous sur le chevron en aluminium. Attachez le boulon
de tête de rondelle et de sortilège et serrez solidement.
Legen Sie den Air-Terminal in eins der Löcher an der Aluminiumwinkelstütze. Bringen
Sie den Unterlegscheiben- und Hexekopfschraubbolzen an und ziehen Sie sicher fest.
Coloc o terminal de ar em um dos furos no suporte de ângulo de alumínio. Una o
parafuso da cabeça da arruela e de hex e aperte-o firmemente.
Disponga l'ærostazione in uno dei fori sulla staffa di angolo di alluminio. Attacchi il
bullone della testa di sfortuna e della rondella e stringa saldamente.
4
Anchor Jig Assembly Figure 7
NOTE: The balance of this installation should be completed per UL
requirements by a firm specializing in Lightning Protection System
installation.
Aluminum
Bonding Plate
•
•
•
NOTE: The Flat Washers, Lock Washers , and remaining Hex Nuts
will be used to fasten the pole to the Anchor Jig.
•
•
Scrape away any paint from the area underneath the
fourth bolt. Place the aluminum bonding plate over the
fourth bolt and secure using washers and the fourth bolt.
Raspe lejos cualquier pintura del área por debajo el cuarto perno. Coloque la
placa de vinculación de aluminio sobre el cuarto perno y asegúrela usando las
arandelas y el cuarto perno.
Éraflez loin n'importe quelle peinture du secteur sous le quatrième boulon. Placez
la languette en aluminium au-dessus du quatrième boulon et la fixez utilisant les
rondelles et le quatrième boulon.
Reiben Sie weg jede mögliche Farbe vom Bereich unter den vierten Schraubbolzen.
Setzen Sie das Aluminiummasseblech über dem vierten Schraubbolzen und sichern
Sie unter Verwendung der Unterlegscheiben und des vierten Schraubbolzens.
Raspe afastado toda a pintura da área debaixo do quarto parafuso. Coloc a placa
de ligação de alumínio sobre o quarto parafuso e fixe-a usando arruelas e o quarto
parafuso.
Raschi via tutta la vernice dalla zona sotto il quarto bullone. Disponga il piatto di legame
di alluminio sopra il quarto bullone e fissi per mezzo delle rondelle e del quarto bullone.
Product Registration/Warranty
Thank you for choosing Videolarm. We value your patronage and are solely committed to
providing you with only the highest quality products available with unmatched customer service
levels that are second-to-none in the security industry.
Should a problem arise, rest assure that Videolarm stands behind its products
by offering some of the most impressive warranty plans available: 3 Years
on all Housings, Poles, Power Supplies, and Accessories and 5 Years on
all camera systems (SView, QView, Warriors), and InfraRed Illuminators.
Register Your Products
Option 1: Online Option 2: Mail-In
Take a few moments and validate your purchase with our Online Product Registration Form
www.videolarm.com/productregistration.jsp
at
or complete and mail-in the bottom portion of this flyer.
Register your recent Videolarm purchases and benefit from the following:
• Simple and Trouble-Free RMA process
• Added into customer database to receive product updates / news
• Eliminate the need to archive original purchase documents:
Receipts, Purchase Orders, etc…
Main Contact Info
Cut at the dotted Line
Place in envelope, affix stamp and mail to: Videolarm ATTN: Warranty
2525 Park Central Ave.
Decatur, GA 30035
First Name:
Last Name:
Professional Title:
Company:
Address 1:
Address 2:
City:
State / Province/Country:
Zip / Postal Code:
Phone Number:
Product Information Please Circle One:
Name & Location of Company / Store where Purchased:
(City, State, Country)
Videolarm Product ID
Product Description
Serial #
(Available only for Camera Systems, IR Illuminators, Wireless Devices)
PO#
E-mail Address:
Business
Personal