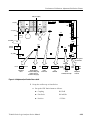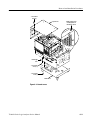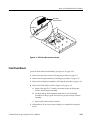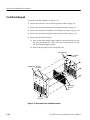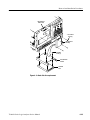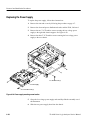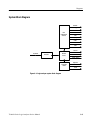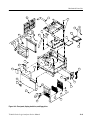
1
Service Manual TLA600 Series Logic Analyzer 071-0728-01 Warning The servicing instructions are for use by qualified personnel only. To avoid personal injury, do not perform any servicing unless you are qualified to do so. Refer to all safety summaries prior to performing service. www.tektronix.com Copyright © Tektronix, Inc. All rights reserved. Tektronix products are covered by U.S. and foreign patents, issued and pending. Information in this publication supercedes that in all previously published material. Specifications and price change privileges reserved. Tektronix, Inc., P.O. Box 500, Beaverton, OR 97077 TEKTRONIX and TEK are registered trademarks of Tektronix, Inc. HARDWARE WARRANTY Tektronix warrants that the products that it manufactures and sells will be free from defects in materials and workmanship for a period of one (1) year from the date of shipment. If a product proves defective during this warranty period, Tektronix, at its option, either will repair the defective product without charge for parts and labor, or will provide a replacement in exchange for the defective product. In order to obtain service under this warranty, Customer must notify Tektronix of the defect before the expiration of the warranty period and make suitable arrangements for the performance of service. Customer shall be responsible for packaging and shipping the defective product to the service center designated by Tektronix, with shipping charges prepaid. Tektronix shall pay for the return of the product to Customer if the shipment is to a location within the country in which the Tektronix service center is located. Customer shall be responsible for paying all shipping charges, duties, taxes, and any other charges for products returned to any other locations. This warranty shall not apply to any defect, failure or damage caused by improper use or improper or inadequate maintenance and care. Tektronix shall not be obligated to furnish service under this warranty a) to repair damage resulting from attempts by personnel other than Tektronix representatives to install, repair or service the product; b) to repair damage resulting from improper use or connection to incompatible equipment; c) to repair any damage or malfunction caused by the use of non-Tektronix supplies; or d) to service a product that has been modified or integrated with other products when the effect of such modification or integration increases the time or difficulty of servicing the product. THIS WARRANTY IS GIVEN BY TEKTRONIX IN LIEU OF ANY OTHER WARRANTIES, EXPRESS OR IMPLIED. TEKTRONIX AND ITS VENDORS DISCLAIM ANY IMPLIED WARRANTIES OF MERCHANTABILITY OR FITNESS FOR A PARTICULAR PURPOSE. TEKTRONIX’ RESPONSIBILITY TO REPAIR OR REPLACE DEFECTIVE PRODUCTS IS THE SOLE AND EXCLUSIVE REMEDY PROVIDED TO THE CUSTOMER FOR BREACH OF THIS WARRANTY. TEKTRONIX AND ITS VENDORS WILL NOT BE LIABLE FOR ANY INDIRECT, SPECIAL, INCIDENTAL, OR CONSEQUENTIAL DAMAGES IRRESPECTIVE OF WHETHER TEKTRONIX OR THE VENDOR HAS ADVANCE NOTICE OF THE POSSIBILITY OF SUCH DAMAGES. Table of Contents General Safety Summary . . . . . . . . . . . . . . . . . . . . . . . . . . . . . . . . . . . Service Safety Summary . . . . . . . . . . . . . . . . . . . . . . . . . . . . . . . . . . . . Preface . . . . . . . . . . . . . . . . . . . . . . . . . . . . . . . . . . . . . . . . . . . . . . . . . . . ix xi xiii Manual Structure . . . . . . . . . . . . . . . . . . . . . . . . . . . . . . . . . . . . . . . . . . . . . . . . Manual Conventions . . . . . . . . . . . . . . . . . . . . . . . . . . . . . . . . . . . . . . . . . . . . . . Contacting Tektronix . . . . . . . . . . . . . . . . . . . . . . . . . . . . . . . . . . . . . . . . . . . . . xiii xiii xiv Introduction . . . . . . . . . . . . . . . . . . . . . . . . . . . . . . . . . . . . . . . . . . . . . . xv The TLA600 Series Logic Analyzer . . . . . . . . . . . . . . . . . . . . . . . . . . . . . . . . . Adjustment and Certification Interval . . . . . . . . . . . . . . . . . . . . . . . . . . . . . . . . Strategy for Servicing . . . . . . . . . . . . . . . . . . . . . . . . . . . . . . . . . . . . . . . . . . . . . Service Offerings . . . . . . . . . . . . . . . . . . . . . . . . . . . . . . . . . . . . . . . . . . . . . . . . xvi xvii xvii xviii Characteristic Tables . . . . . . . . . . . . . . . . . . . . . . . . . . . . . . . . . . . . . . . 1--1 TLA600 Series Logic Analyzer Description . . . . . . . . . . . . . . . . . . . . . . . . . . . User Interface . . . . . . . . . . . . . . . . . . . . . . . . . . . . . . . . . . . . . . . . . . . . . . . . . . . Operating System and Application Interface . . . . . . . . . . . . . . . . . . . . . . . . . . . Online Help . . . . . . . . . . . . . . . . . . . . . . . . . . . . . . . . . . . . . . . . . . . . . . . . . . . . . Software Installation and Removal . . . . . . . . . . . . . . . . . . . . . . . . . . . . . . . . . . 2-- 1 2-- 2 2-- 6 2-- 6 2-- 6 Hardware . . . . . . . . . . . . . . . . . . . . . . . . . . . . . . . . . . . . . . . . . . . . . . . . . . . . . . . Probe Interface . . . . . . . . . . . . . . . . . . . . . . . . . . . . . . . . . . . . . . . . . . . . . . . . . . Acquisition . . . . . . . . . . . . . . . . . . . . . . . . . . . . . . . . . . . . . . . . . . . . . . . . . . . . . 3-- 1 3-- 2 3-- 3 Specifications Operating Instructions Theory of Operation Performance Verification Performance Verification: Logic Analyzer . . . . . . . . . . . . . . . . . . . . . 4--1 Summary Verification . . . . . . . . . . . . . . . . . . . . . . . . . . . . . . . . . . . . . . . . . . . . . Test Equipment . . . . . . . . . . . . . . . . . . . . . . . . . . . . . . . . . . . . . . . . . . . . . . . . . . Functional Verification . . . . . . . . . . . . . . . . . . . . . . . . . . . . . . . . . . . . . . . . . . . . Certification . . . . . . . . . . . . . . . . . . . . . . . . . . . . . . . . . . . . . . . . . . . . . . . . . . . . Performance Verification Instructions . . . . . . . . . . . . . . . . . . . . . . . . . . . . . . . . Performance Verification Tests . . . . . . . . . . . . . . . . . . . . . . . . . . . . . . . . . . . . . 4-- 1 4-- 3 4-- 4 4-- 9 4-- 9 4-- 15 Performance Verification: Adjustment/Verification Fixture . . . . . . . 4--21 Test Equipment . . . . . . . . . . . . . . . . . . . . . . . . . . . . . . . . . . . . . . . . . . . . . . . . . . Functional Verification . . . . . . . . . . . . . . . . . . . . . . . . . . . . . . . . . . . . . . . . . . . . Certification . . . . . . . . . . . . . . . . . . . . . . . . . . . . . . . . . . . . . . . . . . . . . . . . . . . . Performance Verification . . . . . . . . . . . . . . . . . . . . . . . . . . . . . . . . . . . . . . . . . . Test Procedures . . . . . . . . . . . . . . . . . . . . . . . . . . . . . . . . . . . . . . . . . . . . . . . . . . 4-- 21 4-- 21 4-- 25 4-- 25 4-- 27 Calibration Data Report . . . . . . . . . . . . . . . . . . . . . . . . . . . . . . . . . . . 4--37 TLA600 Series Logic Analyzer Service Manual i Table of Contents Adjustment Procedures TLA600 Adjustment Procedures . . . . . . . . . . . . . . . . . . . . . . . . . . . . . 5--1 Prerequisites . . . . . . . . . . . . . . . . . . . . . . . . . . . . . . . . . . . . . . . . . . . . . . . . . . . . Using the Software . . . . . . . . . . . . . . . . . . . . . . . . . . . . . . . . . . . . . . . . . . . . . . . Test Equipment . . . . . . . . . . . . . . . . . . . . . . . . . . . . . . . . . . . . . . . . . . . . . . . . . . Adjustment Instructions . . . . . . . . . . . . . . . . . . . . . . . . . . . . . . . . . . . . . . . . . . . Tests Performed . . . . . . . . . . . . . . . . . . . . . . . . . . . . . . . . . . . . . . . . . . . . . . . . . Adjustment Procedures . . . . . . . . . . . . . . . . . . . . . . . . . . . . . . . . . . . . . . . . . . . . Self Calibration . . . . . . . . . . . . . . . . . . . . . . . . . . . . . . . . . . . . . . . . . . . . . . . . . . Completing the Adjustment Steps . . . . . . . . . . . . . . . . . . . . . . . . . . . . . . . . . . . 5-- 1 5-- 2 5-- 2 5-- 3 5-- 4 5-- 5 5-- 5 5-- 7 Adjustment/Verification Fixture Adjustments . . . . . . . . . . . . . . . . . . 5--9 Adjustment/Verification Fixture Adjustment . . . . . . . . . . . . . . . . . . . . . . . . . . . 5-- 9 Preparation . . . . . . . . . . . . . . . . . . . . . . . . . . . . . . . . . . . . . . . . . . . . . . . . . . . . . Preventing ESD . . . . . . . . . . . . . . . . . . . . . . . . . . . . . . . . . . . . . . . . . . . . . . . . . Inspection and Cleaning . . . . . . . . . . . . . . . . . . . . . . . . . . . . . . . . . . . . . . . . . . . 6-- 1 6-- 1 6-- 2 Removal and Installation Procedures . . . . . . . . . . . . . . . . . . . . . . . . . 6--5 Preparation . . . . . . . . . . . . . . . . . . . . . . . . . . . . . . . . . . . . . . . . . . . . . . . . . . . . . General Instructions . . . . . . . . . . . . . . . . . . . . . . . . . . . . . . . . . . . . . . . . . . . . . . Equipment Required . . . . . . . . . . . . . . . . . . . . . . . . . . . . . . . . . . . . . . . . . . . . . . Removing the Trim and Covers . . . . . . . . . . . . . . . . . . . . . . . . . . . . . . . . . . . . . Adding Memory . . . . . . . . . . . . . . . . . . . . . . . . . . . . . . . . . . . . . . . . . . . . . . . . . Removing the Display . . . . . . . . . . . . . . . . . . . . . . . . . . . . . . . . . . . . . . . . . . . . Display Adapter Board . . . . . . . . . . . . . . . . . . . . . . . . . . . . . . . . . . . . . . . . . . . . Standby/On Switch Flex Circuit Removal . . . . . . . . . . . . . . . . . . . . . . . . . . . . . Removing the Closed Face Bracket (TLA 60X Series) . . . . . . . . . . . . . . . . . . . Front-Panel Knobs . . . . . . . . . . . . . . . . . . . . . . . . . . . . . . . . . . . . . . . . . . . . . . . Front Panel Assembly . . . . . . . . . . . . . . . . . . . . . . . . . . . . . . . . . . . . . . . . . . . . . Front Panel Board . . . . . . . . . . . . . . . . . . . . . . . . . . . . . . . . . . . . . . . . . . . . . . . . Front Panel Keypad . . . . . . . . . . . . . . . . . . . . . . . . . . . . . . . . . . . . . . . . . . . . . . Replacing the Hard Disk Drive . . . . . . . . . . . . . . . . . . . . . . . . . . . . . . . . . . . . . Replacing the Floppy Disk Drive . . . . . . . . . . . . . . . . . . . . . . . . . . . . . . . . . . . . Replacing the CD ROM Drive . . . . . . . . . . . . . . . . . . . . . . . . . . . . . . . . . . . . . . Replacing the CPU Board . . . . . . . . . . . . . . . . . . . . . . . . . . . . . . . . . . . . . . . . . Replacing the Microprocessor . . . . . . . . . . . . . . . . . . . . . . . . . . . . . . . . . . . . . . Replacing the Interface Board . . . . . . . . . . . . . . . . . . . . . . . . . . . . . . . . . . . . . . Replacing the Acquisition Board . . . . . . . . . . . . . . . . . . . . . . . . . . . . . . . . . . . . Replacing the Power Supply . . . . . . . . . . . . . . . . . . . . . . . . . . . . . . . . . . . . . . . Replacing the Fan Assembly . . . . . . . . . . . . . . . . . . . . . . . . . . . . . . . . . . . . . . . Verifying Operation . . . . . . . . . . . . . . . . . . . . . . . . . . . . . . . . . . . . . . . . . . . . . . 6-- 5 6-- 5 6-- 6 6-- 7 6-- 12 6-- 13 6-- 14 6-- 15 6-- 17 6-- 18 6-- 19 6-- 21 6-- 22 6-- 24 6-- 26 6-- 28 6-- 30 6-- 32 6-- 34 6-- 36 6-- 38 6-- 39 6-- 40 Troubleshooting . . . . . . . . . . . . . . . . . . . . . . . . . . . . . . . . . . . . . . . . . . . 6--41 Service Level . . . . . . . . . . . . . . . . . . . . . . . . . . . . . . . . . . . . . . . . . . . . . . . . . . . Check for Common Problems . . . . . . . . . . . . . . . . . . . . . . . . . . . . . . . . . . . . . Diagnostics . . . . . . . . . . . . . . . . . . . . . . . . . . . . . . . . . . . . . . . . . . . . . . . . . . . . . 6-- 41 6-- 42 6-- 43 Repackaging Instructions . . . . . . . . . . . . . . . . . . . . . . . . . . . . . . . . . . . 6--47 Packaging . . . . . . . . . . . . . . . . . . . . . . . . . . . . . . . . . . . . . . . . . . . . . . . . . . . . . . Shipping to the Service Center . . . . . . . . . . . . . . . . . . . . . . . . . . . . . . . . . . . . . . 6-- 47 6-- 47 Maintenance ii TLA600 Series Logic Analyzer Service Manual Table of Contents Options Probe Options . . . . . . . . . . . . . . . . . . . . . . . . . . . . . . . . . . . . . . . . . . . . . . . . . . . 7-- 1 Hardware Architechure Block Diagram ............................ Interconnection Block Diagram . . . . . . . . . . . . . . . . . . . . . . . . . . . . . . . . . . . . . System Block Diagram . . . . . . . . . . . . . . . . . . . . . . . . . . . . . . . . . . . . . . . . . . . . 9-- 1 9-- 2 9-- 3 Parts Ordering Information . . . . . . . . . . . . . . . . . . . . . . . . . . . . . . . . . . . . . . . . . Using the Replaceable Parts List . . . . . . . . . . . . . . . . . . . . . . . . . . . . . . . . . . . . 10-- 1 10-- 2 Electrical Parts List Diagrams Mechanical Parts List TLA600 Series Logic Analyzer Service Manual iii Table of Contents List of Figures iv Figure i: TLA600 Series logic analyzers . . . . . . . . . . . . . . . . . . . . . . . xvi Figure 1--1: Dimensions of the TLA600 series logic analyzer . . . . . . 1--13 Figure 2--1: TLA600 series logic analyzers . . . . . . . . . . . . . . . . . . . . . 2--1 Figure 4--1: Calibration/certification procedure flow chart . . . . . . . Figure 4--2: Probe functional verification test setup . . . . . . . . . . . . . . Figure 4--3: Activity monitor . . . . . . . . . . . . . . . . . . . . . . . . . . . . . . . . . Figure 4--4: Adjustment/verification fixture connections and jumper locations . . . . . . . . . . . . . . . . . . . . . . . . . . . . . . . . . . . . . . . Figure 4--5: FPV_DC_Threshold test setup . . . . . . . . . . . . . . . . . . . . . Figure 4--6: Initial FPV_Setup_0F test setup . . . . . . . . . . . . . . . . . . . Figure 4--7: Initial FPV_Hold_0F test setup . . . . . . . . . . . . . . . . . . . . Figure 4--8: FPV_Maxsync test setup . . . . . . . . . . . . . . . . . . . . . . . . . . Figure 4--9: Adjustment/verification fixture detail . . . . . . . . . . . . . . . Figure 4--10: Probe tip adapter detail . . . . . . . . . . . . . . . . . . . . . . . . Figure 4--11: Adjustment/verification fixture detail . . . . . . . . . . . . . . 4--2 4--7 4--8 4--16 4--17 4--18 4--19 4--20 4--23 4--26 4--28 Figure 5--1: P6434 probe detail . . . . . . . . . . . . . . . . . . . . . . . . . . . . . . . Figure 5--2: Initial deskew test setup . . . . . . . . . . . . . . . . . . . . . . . . . . Figure 5--3: Adjustment/verification fixture circuit board layout . . . 5--3 5--6 5--11 Figure 6--1: Trim and covers . . . . . . . . . . . . . . . . . . . . . . . . . . . . . . . . Figure 6--2: Closed face trim ring and covers (TLA 60X Series) . . . Figure 6--3: Internal covers . . . . . . . . . . . . . . . . . . . . . . . . . . . . . . . . . . Figure 6--4: Memory board location . . . . . . . . . . . . . . . . . . . . . . . . . . Figure 6--5: Flat panel display assembly removal . . . . . . . . . . . . . . Figure 6--6: Display adaptor board removal . . . . . . . . . . . . . . . . . . . . Figure 6--7: Standby/On switch flex circuit removal . . . . . . . . . . . . . Figure 6--8: Removal of the closed face bracket . . . . . . . . . . . . . . . . . Figure 6--9: Knob removal . . . . . . . . . . . . . . . . . . . . . . . . . . . . . . . . . . Figure 6--10: Front panel assembly removal . . . . . . . . . . . . . . . . . . . . Figure 6--11: JR1 flex cable connector removal . . . . . . . . . . . . . . . . . Figure 6--12: Front panel board & keyboard removal . . . . . . . . . . . . Figure 6--13: Hard disk drive replacement . . . . . . . . . . . . . . . . . . . . . 6--9 6--10 6--11 6--12 6--14 6--15 6--16 6--17 6--18 6--20 6--21 6--22 6--25 TLA600 Series Logic Analyzer Service Manual Table of Contents Figure 6--14: Floppy disk drive location . . . . . . . . . . . . . . . . . . . . . . . Figure 6--15: CD-ROM drive location . . . . . . . . . . . . . . . . . . . . . . . . Figure 6--16: Replacing the CPU board . . . . . . . . . . . . . . . . . . . . . . . . Figure 6--17: Microprocessor removal . . . . . . . . . . . . . . . . . . . . . . . . . Figure 6--18: Replacing the interface board . . . . . . . . . . . . . . . . . . . . Figure 6--19: Replacing the acquisition board . . . . . . . . . . . . . . . . . . Figure 6--20: Power supply mounting screw location . . . . . . . . . . . . . Figure 6--21: Replacing the fan assembly . . . . . . . . . . . . . . . . . . . . . . 6--27 6--29 6--31 6--33 6--35 6--37 6--38 6--40 Figure 9--1: Logic analyzer hardware architecture . . . . . . . . . . . . . . Figure 9--2: Logic analyzer interconnection block diagram . . . . . . . Figure 9--3: Logic analyzer system block diagram . . . . . . . . . . . . . . . 9--1 9--2 9--3 Figure 10--1: External parts . . . . . . . . . . . . . . . . . . . . . . . . . . . . . . . . Figure 10--2: Front panel, display, hard drive, and floppy drive . . . Figure 10--3: Power supply, processor, and CD drive . . . . . . . . . . . . Figure 10--4: Acquisition assembly . . . . . . . . . . . . . . . . . . . . . . . . . . . . Figure 10--5: Accessories . . . . . . . . . . . . . . . . . . . . . . . . . . . . . . . . . . . . Figure 10--6: Adjustment/verification fixture exploded view . . . . . . . 10--7 10--9 10--13 10--15 10--16 10--19 TLA600 Series Logic Analyzer Service Manual v Table of Contents List of Tables Table i: TLA600 series family . . . . . . . . . . . . . . . . . . . . . . . . . . . . . . . Table 1--1: TLA600 input parameters with probes . . . . . . . . . . . . . . Table 1--2: TLA600 timing latencies . . . . . . . . . . . . . . . . . . . . . . . . . Table 1--3: TLA600 external signal interface . . . . . . . . . . . . . . . . . . Table 1--4: TLA600 channel width and depth . . . . . . . . . . . . . . . . . . Table 1--5: TLA600 clocking . . . . . . . . . . . . . . . . . . . . . . . . . . . . . . . . Table 1--6: TLA600 trigger system . . . . . . . . . . . . . . . . . . . . . . . . . . . Table 1--7: TLA600 MagniVu feature . . . . . . . . . . . . . . . . . . . . . . . . . Table 1--8: TLA600 Data handling . . . . . . . . . . . . . . . . . . . . . . . . . . . Table 1--9: TLA600 internal controller . . . . . . . . . . . . . . . . . . . . . . . . Table 1--10: TLA600 display system . . . . . . . . . . . . . . . . . . . . . . . . . . Table 1--11: TLA600 front-panel interface . . . . . . . . . . . . . . . . . . . . . Table 1--12: TLA600 rear-panel interface . . . . . . . . . . . . . . . . . . . . . . Table 1--13: TLA600 AC power source . . . . . . . . . . . . . . . . . . . . . . . . Table 1--14: TLA600 cooling . . . . . . . . . . . . . . . . . . . . . . . . . . . . . . . . Table 1--15: TLA600 mechanical characteristics . . . . . . . . . . . . . . . . Table 1--16: Atmospheric characteristics . . . . . . . . . . . . . . . . . . . . . . Table 1--17: Certifications and compliances . . . . . . . . . . . . . . . . . . . . Table 1--18: Adjustment/verification fixture specifications . . . . . . . . Table 2--1: Table 2--2: Table 2--3: Table 2--4: vi xvi 1--1 1--2 1--3 1--5 1--5 1--7 1--10 1--10 1--10 1--11 1--11 1--11 1--12 1--12 1--13 1--14 1--14 1--16 USB (universal serial bus) pin assignments . . . . . . . . . . SVGA OUT pin assignments . . . . . . . . . . . . . . . . . . . . . . COM OUT pin assignments . . . . . . . . . . . . . . . . . . . . . . . LPT (parallel interface) pin assignments . . . . . . . . . . . . 2--2 2--4 2--4 2--5 Table 4--1: Test equipment . . . . . . . . . . . . . . . . . . . . . . . . . . . . . . . . . . Table 4--2: TLA600 Functional verification procedures . . . . . . . . . . Table 4--3: TLA600 PV/Adjust software performance verification tests . . . . . . . . . . . . . . . . . . . . . . . . . . . . . . . . . . . . . . . . . . . . . . . . . Table 4--4: TLA600 characteristics indirectly checked by the performance verification and adjustment software performance verification tests . . . . . . . . . . . . . . . . . . . . . . . . . . . . . . . . . . . . . . . Table 4--5: Adjustment/verification fixture performance verification tests . . . . . . . . . . . . . . . . . . . . . . . . . . . . . . . . . . . . . . . . . . . . . . . . . Table 4--6: Adjustment/verification fixture jumper settings . . . . . . . 4--3 4--4 4--10 4--11 4--25 4--28 TLA600 Series Logic Analyzer Service Manual Table of Contents Table 6--1: Tools required for module removal . . . . . . . . . . . . . . . . . Table 6--2: Failure symptoms and possible causes . . . . . . . . . . . . . . . Table 6--3: TLA 700 Power-on diagnostic tests . . . . . . . . . . . . . . . . . Table 6--4: BIOS error codes and explanations . . . . . . . . . . . . . . . . . 6--6 6--42 6--44 6--45 Table 7--1: Probe options . . . . . . . . . . . . . . . . . . . . . . . . . . . . . . . . . . . 7--1 Table 10--1: Parts lists column descriptions . . . . . . . . . . . . . . . . . . . . 10--2 TLA600 Series Logic Analyzer Service Manual vii Table of Contents viii TLA600 Series Logic Analyzer Service Manual General Safety Summary Review the following safety precautions to avoid injury and prevent damage to this product or any products connected to it. To avoid potential hazards, use this product only as specified. Only qualified personnel should perform service procedures. While using this product, you may need to access other parts of the system. Read the General Safety Summary in other system manuals for warnings and cautions related to operating the system. To Avoid Fire or Personal Injury Use Proper Power Cord. Use only the power cord specified for this product and certified for the country of use. Use Proper Voltage Setting. Before applying power, ensure that the line selector is in the proper position for the power source being used. Connect and Disconnect Properly. Do not connect or disconnect probes or test leads while they are connected to a voltage source. Ground the Product. This product is grounded through the grounding conductor of the power cord. To avoid electric shock, the grounding conductor must be connected to earth ground. Before making connections to the input or output terminals of the product, ensure that the product is properly grounded. Observe All Terminal Ratings. To avoid fire or shock hazard, observe all ratings and markings on the product. Consult the product manual for further ratings information before making connections to the product. Do not apply a potential to any terminal, including the common terminal, that exceeds the maximum rating of that terminal. Do Not Operate Without Covers. Do not operate this product with covers or panels removed. Use Proper Fuse. Use only the fuse type and rating specified for this product. Avoid Exposed Circuitry. Do not touch exposed connections and components when power is present. Do Not Operate With Suspected Failures. If you suspect there is damage to this product, have it inspected by qualified service personnel. Do Not Operate in Wet/Damp Conditions. Do Not Operate in an Explosive Atmosphere. Keep Product Surfaces Clean and Dry. TLA600 Series Logic Analyzer Service Manual ix General Safety Summary Provide Proper Ventilation. Refer to the manual’s installation instructions for details on installing the product so it has proper ventilation. Symbols and Terms Terms in this Manual. These terms may appear in this manual: WARNING. Warning statements identify conditions or practices that could result in injury or loss of life. CAUTION. Caution statements identify conditions or practices that could result in damage to this product or other property. Terms on the Product. These terms may appear on the product: DANGER indicates an injury hazard immediately accessible as you read the marking. WARNING indicates an injury hazard not immediately accessible as you read the marking. CAUTION indicates a hazard to property including the product. Symbols on the Product. The following symbols may appear on the product: CAUTION Refer to Manual Battery Recycling Protective Ground (Earth) Terminal WARNING High Voltage This product contains a Nickel Cadmium (NiCd) battery, which must be recycled or disposed of properly. For the location of a local battery recycler in the U.S. or Canada, please contact: RBRC Rechargeable Battery Recycling Corp. P.O. Box 141870 Gainesville, Florida 32614 x (800) BATTERY (800) 227-7379 www.rbrc.com TLA600 Series Logic Analyzer Service Manual Service Safety Summary Only qualified personnel should perform service procedures. Read this Service Safety Summary and the General Safety Summary before performing any service procedures. Do Not Service Alone. Do not perform internal service or adjustments of this product unless another person capable of rendering first aid and resuscitation is present. Disconnect Power. To avoid electric shock, switch off the instrument power, then disconnect the power cord from the mains power. Use Care When Servicing With Power On. Dangerous voltages or currents may exist in this product. Disconnect power, remove battery (if applicable), and disconnect test leads before removing protective panels, soldering, or replacing components. To avoid electric shock, do not touch exposed connections. TLA600 Series Logic Analyzer Service Manual xi Service Safety Summary xii TLA600 Series Logic Analyzer Service Manual Preface This is the service manual for the TLA600 Series Logic Analyzer Read this preface to learn how this manual is structured, what conventions it uses, and where you can find other information related to servicing this product. Read the Introduction following this preface for safety and other important background information needed before using this manual for servicing this product. Manual Structure This manual is divided into chapters, which are made up of related subordinate topics. These topics can be cross referenced as sections. Be sure to read the introductions to all procedures. These introductions provide important information needed to do the service correctly, safely, and efficiently. Manual Conventions This manual uses certain conventions that you should become familiar with before attempting service. Safety Specifications Replaceable Parts Symbols and terms related to safety appear in the Service Safety Summary found at the beginning of this manual. All specifications and characteristics are located in the user manual. You will need a copy of the user manual in order to perform many of the tasks in this manual. This manual refers to any field-replaceable assembly or mechanical part specifically by its name or generically as a replaceable part. In general, a replaceable part is any circuit board or assembly that is listed in the replaceable parts list. TLA600 Series Logic Analyzer Service Manual xiii Preface Contacting Tektronix Phone 1-800-833-9200* Address Tektronix, Inc. Department or name (if known) 14200 SW Karl Braun Drive P.O. Box 500 Beaverton, OR 97077 USA Web site www.tektronix.com Sales support 1-800-833-9200, select option 1* Service support 1-800-833-9200, select option 2* Technical support Email: [email protected] 1-800-833-9200, select option 3* 1-503-627-2400 6:00 a.m. - 5:00 p.m. Pacific time * xiv This phone number is toll free in North America. After office hours, please leave a voice mail message. Outside North America, contact a Tektronix sales office or distributor; see the Tektronix web site for a list of offices. TLA600 Series Logic Analyzer Service Manual Introduction This manual contains information needed to properly service the logic analyzer. This introduction contains information critical to safe and effective servicing. To prevent personal injury or damage to the logic analyzer, consider the following requirements before attempting service: H Read the General Safety Summary and Service Safety Summary found at the beginning of this manual. H The procedures in this manual should only be performed by a qualified service person. H Read the Preface. H Read Operating Information chapter. Be sure to follow all warnings, cautions and notes. TLA600 Series Logic Analyzer Service Manual xv Introduction The TLA600 Series Logic Analyzer The TLA600 Series logic analyzer is an instrument that is a high-performance logic analyzer. There are two basic styles, one style has an internal display, and the other style uses an external display. Both styles are shown in figure Figure i. Figure i: TLA600 Series logic analyzers The TLA600 series is comprised of 12 logic analyzers as listed in Table i. Table i: TLA600 series family xvi Logic analyzer Description TLA601 34 channel, 2 GHz timing, 100 MHz state, 64 K depth External display only TLA602 68 channel, 2 GHz timing, 100 MHz state, 64 K depth External display only TLA603 102 channel, 2 GHz timing, 100 MHz state, 64 K depth External display only TLA604 136 channel, 2 GHz timing, 100 MHz state, 64 K depth External display only TLA600 Series Logic Analyzer Service Manual Introduction Table i: TLA600 series family (Cont.) Logic analyzer Description TLA611 34 channel, 2 GHz timing, 100 MHz state, 64 K depth Internal and external display TLA612 68 channel, 2 GHz timing, 100 MHz state, 64 K depth Internal and external display TLA613 102 channel, 2 GHz timing, 100 MHz state, 64 K depth Internal and external display TLA614 136 channel, 2 GHz timing, 100 MHz state, 64 K depth Internal and external display TLA621 34 channel, 2 GHz timing, 100 MHz state, 1 M depth Internal and external display TLA622 68 channel, 2 GHz timing, 100 MHz state, 1 M depth Internal and external display TLA623 102 channel, 2 GHz timing, 100 MHz state, 1 M depth Internal and external display TLA624 136 channel, 2 GHz timing, 100 MHz state, 1 M depth Internal and external display Adjustment and Certification Interval Generally, you should perform the adjustments and certification (calibration) described in the Performance Verification and Adjustment Procedures chapters once per year, or following repairs that affect adjustment or calibration. Strategy for Servicing This manual supports and contains information needed for periodic maintenance of the logic analyzer. This manual supports and contains information for corrective maintenance of this product: H supports isolation of faults to the failed circuit board or assembly level shown in the replaceable parts list of Chapter 10 H supports removal and replacement of those boards or assemblies H supports removal and replacement of the fuse, knobs, chassis, and other mechanical parts listed in the replaceable parts list This manual does not support component-level fault isolation and replacement. TLA600 Series Logic Analyzer Service Manual xvii Introduction Service Offerings Tektronix provides service to cover repair under warranty as well as other services that are designed to meet your specific service needs. Whether providing warranty repair service or any of the other services listed below, Tektronix service technicians are equipped to service the logic analyzer. Services are provided at Tektronix Services Centers and on-site at your facility, depending on your location. Warranty Repair Service Tektronix warrants this product for one year from date of purchase. The warranty is located behind the title page in this manual. Tektronix technicians provide warranty service at most Tektronix service locations worldwide. The Tektronix product catalog lists all service locations worldwide, or you can visit us on our Customer Services World Center web site at: Tektronix.com/Measurement/Service Calibration and Repair Service In addition to warranty repair, Tektronix Service offers calibration and other services which provide solutions to your service needs and quality standards compliance requirements. The following services can be tailored to fit your requirements for calibration and/or repair of your logic analyzer. Service Options. Tektronix Service Options can be selected at the time you purchase your instrument. You select these options to provide the services that best meet your service needs. These service options are listed on the Tektronix Service Options page following the title page of this manual. Service Agreements. If service options are not added to the instrument purchase, then service agreements are available on an annual basis to provide calibration services or post-warranty repair coverage. Service agreements may be customized to meet special turn-around time and/or on-site requirements. Service on Demand. Tektronix offers calibration and repair services on a “per-incident” basis that is available with standard prices. Self Service. Tektronix supports repair to the replaceable-part level by providing for circuit board exchange. Use this service to reduce down-time for repair by exchanging circuit boards for remanufactured ones. Tektronix ships updated and tested exchange boards. Each board comes with a 90-day service warranty. For More Information. Contact your local Tektronix service center or sales engineer for more information on any of the Calibration and Repair Services just described. xviii TLA600 Series Logic Analyzer Service Manual Specifications This chapter contains the specifications for the logic analyzer and for the adjustment/verification fixture. Characteristic Tables All specifications are guaranteed unless noted Typical. Typical characteristics describe typical or average performance and provide useful reference information. Specifications that are check marked with the n symbol are checked directly (or indirectly) in the Performance Verification chapter of this manual. The specifications apply to all versions of the TLA600 series logic analyzer unless otherwise noted. The performance limits in this specification are valid with these conditions: H The logic analyzer must be in an environment with temperature, altitude, humidity, and vibration within the operating limits described in these specifications. H The logic analyzer must have had a warm-up period of at least 30 minutes. Table 1- 1: TLA600 input parameters with probes Characteristic Description n Threshold Accuracy ±100 mV Threshold range and step size Setable from +5 V to - 2 V in 50 mV steps Threshold channel selection 16 threshold groups assigned to channels. P6417 and P6418 probes have two threshold settings, one for the clock/qualifier channel and one for the data channels. P6434 probes have four threshold settings, one for each of the clock/qualifier channels and two for the data channels (one per 16 data channels). n Channel-to-channel skew ≤ 1.6 ns maximum Channel-to-channel skew (Typical) ≤ 1.0 ns Sample uncertainty Asynchronous: Sample period Synchronous: 500 ps Probe input resistance (Typical) 20 kΩ TLA600 Series Logic Analyzer Service Manual 1- 1 Specifications Table 1- 1: TLA600 input parameters with probes (Cont.) Characteristic Description Probe input capacitance: P6417, P6434 (Typical) 2 pF Probe input capacitance: P6418 (Typical) 1.4 pF data channels 2 pF CLK/Qual channels Minimum slew rate (Typical) 0.2 V/ns Maximum operating signal 6.5 Vp-p - 3.5 V absolute input voltage minimum 6.5 V absolute input voltage maximum Probe overdrive: P6417, P6418 P6434 ±250 mV or ±25% of signal swing minimum required beyond threshold, whichever is greater ±300 mV or ±25% of signal swing minimum required beyond threshold, whichever is greater ±4 V maximum beyond threshold Maximum nondestructive input signal to probe ±15 V Minimum input pulse width signal (single channel) (Typical) 2 ns Delay time from probe tip to input probe connector (Typical) 7.33 ns Table 1- 2: TLA600 timing latencies Characteristic Description System Trigger and External Signal Input Latencies1 (Typical) External System Trigger Input to LA Probe - 266 ns Tip2 External Signal Input to LA Probe Tip via Signal 3, 43 - 212 ns + Clk External Signal Input to LA Probe Tip via Signal 1, 23, 4 - 208 ns + Clk System Trigger and External Signal Output Latencies (Typical) LA Probe Tip to External System Trigger Out5 376 ns + SMPL LA Probe Tip to External Signal Out via Signal 3, 45 1- 2 TLA600 Series Logic Analyzer Service Manual Specifications Table 1- 2: TLA600 timing latencies (Cont.) Characteristic Description OR function 366 ns + SMPL AND function 379 ns + SMPL LA Probe Tip to External Signal Out via Signal 1, 24, 5 normal function 364 ns + SMPL inverted logic on backplane 364 ns + SMPL 1 All system trigger and external signal input latencies are measured from a falling-edge transition (active true low) with signals measured in the wired-OR configuration. 2 In the Waveform window, triggers are always marked immediately except when delayed to the first sample. In the Listing window, triggers are always marked on the next sample period following their occurrence. 3 “Clk” represents the time to the next master clock at the destination logic analyzer. In the asynchronous (or internal) clock mode, this represents the delta time to the next sample clock beyond the minimum asynchronous rate of 4 ns. In the synchronous (or external) clock mode, this represents the time to the next master clock generated by the setup of the clocking state machine and the supplied system under test clocks and qualification data. 4 Signals 1 and 2 (ECLTRG0, 1) are limited to a “broadcast” mode of operation, where only one source is allowed to drive the signal node at any one time. That single source may be utilized to drive any combination of destinations. 5 SMPL represents the time from the event at the probe tip inputs to the next valid data sample. In the Normal Internal clock mode, this represents the delta time to the next sample clock. In the MagniVu Internal clock mode, this represents 500 ps or less. In the External clock mode, this represents the time to the next master clock generated by the setup of the clocking state machine, the system-under-test supplied clocks, and the qualification data. Table 1- 3: TLA600 external signal interface Characteristic Description System Trigger Input TTL compatible input via rear panel mounted BNC connectors Input Levels VIH VIL TTL compatible input. ≥ 2.0 V ≤ 0.8 V Input Mode Falling edge sensitive, latched (active low) Minimum Pulse Width 12 ns Active Period Accepts system triggers during valid acquisition periods via real-time gating, resets system trigger input latch between valid acquisition periods Maximum Input Voltage 0 to +5 V peak External Signal Input TTL compatible input via rear panel mounted BNC connectors Input Destination Signal 1, 2, 3, 4 Input Levels VIH VIL TTL compatible input. ≥ 2.0 V ≤ 0.8 V TLA600 Series Logic Analyzer Service Manual 1- 3 Specifications Table 1- 3: TLA600 external signal interface (Cont.) Characteristic Input Mode Description Active (true) low, level sensitive Bandwidth1 Input Signal 1, 2 Signal 3, 4 50 MHz square wave minimum 10 MHz square wave minimum Active Period Accepts signals during valid acquisition periods via real-time gating Maximum Input Voltage 0 to +5 V peak System Trigger Output TTL compatible output via rear panel mounted BNC connectors Source Mode Active (true) low, falling edge latched Active Period Outputs system trigger state during valid acquisition period, resets system trigger output to false state between valid acquisitions Output Levels VOH 50 Ω back terminated TTL-compatible output ≥4 V into open circuit ≥ 2 V into 50 Ω to ground ≤ 0.7 V sinking 10 ma VOL Output Protection External Signal Output Short-circuit protected (to ground) TTL compatible outputs via rear panel mounted BNC connectors Source Selection Signal 1, 2, 3, 4, or 10 MHz clock Output Modes Level Sensitive User definable Active (true) low or active (true) high Output Levels VOH 50 Ohm back terminated TTL output ≥ 4 V into open circuit ≥ 2 V into 50 Ω to ground ≤ 0.7 V sinking 10 ma VOL Bandwidth2 Output Signal 1, 2 Signal 3, 4 Active Period 50 MHz square wave minimum 10 MHz square wave minimum Outputs signals during valid acquisition periods, resets signals to false state between valid acquisitions Outputs 10 MHz clock continuously Output Protection Short-circuit protected (to ground) Intermodule Signal Line Bandwidth Signal 1, 2 (ECLTRG 0,1) Signal 3, 4 (ECLTRG 0,1) Minimum bandwidth up to which the signals are specified to operate correctly 50 MHz square wave minimum 10 MHz square wave minimum 1 The Input Bandwidth specification only applies to signals to the modules; it does not apply to signals applied to the External Signal Input and sent back to the External Signal Output. 2 The Output Bandwidth specification only applies to signals from the modules; it does not apply to signals applied to the External Signal Input and sent back to the External Signal Output. 1- 4 TLA600 Series Logic Analyzer Service Manual Specifications Table 1- 4: TLA600 channel width and depth Characteristic Description Number of channels Product Channels TLA601, TLA611, TLA621 32 data and 2 clock/qualifier TLA602, TLA612, TLA622 64 data and 4 clock/qualifier TLA603, TLA613, TLA623 96 data, 4 clock/qualifier, and 2 qualifier TLA604, TLA614, TLA624 128 data, 4 clock/qualifier, and 4 qualifier Product Memory depth TLA601, TLA602, TLA603, TLA604 64 K or 256 K samples1 TLA611, TLA612, TLA613, TLA614 64 K or 256 K samples1 TLA621, TLA622, TLA623, TLA624 1 M samples b Acquisition memory depth 1 PowerFlex options Table 1- 5: TLA600 clocking Characteristic Description Asynchronous clocking n Internal sampling period1 4 ns to 50 ms in a 1-- 2-- 5 sequence n Minimum recognizable word2 (across all channels) Channel-to-channel skew + sample uncertainty Example: for a P6417 or a P6418 Probe and a 4 ns sample period = 1.6 ns + 4 ns = 5.6 ns Synchronous clocking Number of clock channels3 Number of qualifier channels5 Product Clock channels TLA601, TLA611, TLA621 2 TLA602, TLA612, TLA622 4 TLA603, TLA613, TLA623 4 TLA604, TLA614, TLA624 4 Product Qualifier channels TLA601, TLA611, TLA621 0 TLA602, TLA612, TLA622 0 TLA603, TLA613, TLA623 2 TLA604, TLA614, TLA624 4 TLA600 Series Logic Analyzer Service Manual 1- 5 Specifications Table 1- 5: TLA600 clocking (Cont.) Characteristic Description n Setup and hold window size (data and qualifiers) Maximum window size = Maximum channel-to-channel skew + (2 x sample uncertainty) + 0.4 ns Maximum setup time = User interface setup time + 0.8 ns Maximum hold time = User interface hold time + 0.2 ns Examples: for P6417 or a P6418 probe and user interface setup and hold of 2.0/0.0 typical: Maximum window size = 1.6 ns + (2 x 500 ps) + 0.4ns = 3.0 ns Maximum setup time = 2.0 ns + 0.8 ns = 2.8 ns Maximum hold time = 0.0 ns + 0.2 ns = 0.2ns Setup and hold window size (data and qualifiers) (Typical) Channel-to-channel skew (typical) + (2 x sample uncertainty) Example: for P6417 or P6418 Probe = 1 ns + (2 x 500 ps) = 2 ns Setup and hold window range The setup and hold window can be moved for each channel group from +8.5 ns (Ts) to - 7.0 ns (Ts) in 0.5 ns steps (setup time). Hold time follows the setup time by the setup and hold window size. n Maximum synchronous clock rate4 200 MHz in full speed mode (5 ns minimum between active clock edges) 100 MHz (10 ns minimum between active clock edges) Demux clocking TLA603, TLA613, TLA623 TLA604, TLA614, TLA624 Channels multiplex as follows: A3(7:0) to D3(7:0) A2(7:0) to D2(7:0) A1(7:0) to D1(7:0) A0(7:0) to D0(7:0) TLA601, TLA611, TLA621 TLA602, TLA612, TLA622 Channels multiplex as follows: A3(7:0) to C3(7:0) A2(7:0) to C2(7:0) A1(7:0) to D1(7:0) TLA602, TLA612, TLA622 A0(7:0) to D0(7:0) TLA602, TLA612, TLA622 Time between DeMux clock edges4 (Typical) 5 ns minimum between Demux clock edges in full-speed mode 10 ns minimum between Demux clock edges in half-speed mode Time between DeMux store clock edges4 (Typical) 10 ns minimum between Demux master clock edges in full-speed mode 20 ns minimum between Demux master clock edges in half-speed mode Data Rate4 (Typical) 400 MHz (200 MHz option required) half channel. (Requires channels to be multiplexed.) These multiplexed channels double the memory depth. 1- 6 TLA600 Series Logic Analyzer Service Manual Specifications Table 1- 5: TLA600 clocking (Cont.) Characteristic Description Clocking state machine Pipeline delays Each channel group can be programmed with a pipeline delay of 0 through 3 active clock edges. 1 It is possible to use storage control and only store data when it has changed (transitional storage). 2 Applies to asynchronous clocking only. Setup and hold window specification applies to synchronous clocking only. 3 Any or all of the clock channels may be enabled. For an enabled clock channel, either the rising, falling, or both edges can be selected as the active clock edges. The clock channels are stored. 4 Full and half speed modes are controlled by PowerFlex options and upgrade kits. 5 All qualifier channels are stored. For custom clocking there are an additional 4 qualifier channels on C2 3:0 regardless of channel width. Table 1- 6: TLA600 trigger system Characteristic Description Triggering resources Word/Range recognizers 16 word recognizers. The word recognizers can be combined to form full width, double bounded, range recognizers. The following selections are available: 16 word recognizers 13 word recognizers 10 word recognizers 7 word recognizers 4 word recognizers Range recognizer channel order 0 range recognizers 1 range recognizer 2 range recognizers 3 range recognizers 4 range recognizers From most-significant probe group to least-significant probe group: C3 C2 C1 C0 E3 E2 E1 E0 A3 A2 D3 D2 A1 A0 D1 D0 Q3 Q2 Q1 Q0 CK3 CK2 CK1 CK0 Missing channels for modules with fewer than 136 channels are omitted. Glitch detector1,2 Each channel group can be enabled to detect a glitch Minimum detectable glitch pulse width (Typical) 2.0 ns (single channel with P6417, P6418, or a P6434 probe) Setup and hold violation detector1,3 Each channel group can be enabled to detect a setup and hold violation. The range is from 8 ns before the clock edge to 8 ns after the clock edge. The range can be selected in 0.5 ns increments. The setup and hold violation of each window can be individually programmed. Transition detector1 Each channel group can be enabled or disabled to detect a transition between the current valid data sample and the previous valid data sample. This mode can be used to create transitional storage selections where all channels are enabled. TLA600 Series Logic Analyzer Service Manual 1- 7 Specifications Table 1- 6: TLA600 trigger system (Cont.) Characteristic Description Counter/Timers 2 counter/timers, 51 bits wide, can be clocked up to 250 MHz. Maximum count is 251. Maximum time is 9.0076 seconds or 104 days. Counters and timers can be set, reset, or tested and have zero reset latency. External Signal In1 A backplane input signal External Trigger In A backplane input signal that causes the main acquisition and the MagniVu acquisition to trigger if they are not already triggered Active trigger resources 16 maximum (excluding counter/timers) Word recognizers are traded off one-by-one as External Signal In, glitch detection, setup and hold detection, or transition detection resources are added. Trigger States 16 n Trigger State sequence rate Same rate as valid data samples received, 250 MHz maximum Trigger machine actions Main acquisition trigger Triggers the main acquisition memory Main trigger position Trigger position is programmable to any data sample (4 ns boundaries) MagniVu acquisition trigger Triggering of MagniVu memory is controlled by the main acquisition trigger MagniVu trigger position The MagniVu trigger position is programmable within 4 ns boundaries and separate from the main acquisition memory trigger position. Increment counter Either of the two counter/timers used as counters can be incremental. Start/Stop timer Either of the two counter/timers used as timers can be started or stopped. Reset counter/timer Either of the two counter/timers can be reset. When a counter/timer is used as a timer and is reset, the timer continues from the started or stopped state that it was in prior to the reset. Signal out A signal sent to the backplane to be used by other instruments Trigger out A trigger out signal sent to the backplane to trigger other instruments 1- 8 TLA600 Series Logic Analyzer Service Manual Specifications Table 1- 6: TLA600 trigger system (Cont.) Characteristic Description Storage Control Global storage Storage is allowed only when a specific condition is met. This condition can use any of the trigger machine resources except for the counter/timers. Storage commands defined in the current trigger state will override the global storage control. Global storage can be used to start the acquisition with storage initially turned on (default) or turned off. By event Storage can be turned on or off; only the current sample can be stored. The event storage control overrides any global storage commands. Block storage When enabled, 31 samples are stored before and after the valid sample. Not allowed when glitch storage or setup and hold violation is enabled. Glitch violation storage The acquisition memory can be enabled to store glitch violation information with each data sample when asynchronous clocking is used. The probe data storage size is reduced by one half (the other half holds the violation information). The fastest asynchronous clocking rate is reduced to 10 ns. Setup and hold violation storage The acquisition memory can be enabled to store setup and hold violation information with each data sample when synchronous clocking is used. The probe data storage size is reduced by one half (the other half holds the violation information). The maximum clock rate is reduced by half. 1 Each use of External Signal In, glitch detector, setup and hold violation detector, or transition detector requires a trade-off of one word recognizer resource. 2 Any glitch is subject to pulse width variation of up to the channel-to-channel skew specification + 0.5 ns. 3 Any setup value is subject to variation of up to 1.8 ns; any hold value is subject to variation of up to 1.2 ns. TLA600 Series Logic Analyzer Service Manual 1- 9 Specifications Table 1- 7: TLA600 MagniVu feature Characteristic Description MagniVu memory depth 2016 samples per channel MagniVu sampling period Data is asynchronously sampled and stored every 500 ps in a separate high resolution memory. There are no clocking options. Table 1- 8: TLA600 Data handling Characteristic Description Nonvolatile memory retention time (Typical) Battery is integral to the NVRAM. Battery life is > 10 years. Table 1- 9: TLA600 internal controller Characteristic Description Operating System Microsoft Windows Microprocessor Intel Celron , 566 MHz Main Memory SDRAM Style 168 pin DIMM, 2 Sockets Speed 66 MHz Installed Configurations Minimum Maximum 256 MB loaded in one socket 512 MB with both sockets loaded Real-Time Clock and CMOS Setups, Plug & Play NVRAM Retention Time Battery life is typically > 3 years when the logic analyzer is not connected to line voltage. When connected to line voltage the life of the battery is extended. Lithium battery, CR3032 Hard Disk Drive Standard PC compatible IDE (Integrated device Electronics) hard disk drive residing on an EIDE interface. Size Minimum Maximum 10 GByte 30 GByte Continually subject to change due to the fast-moving PC component environment. These storage capacities valid at product introduction. CD ROM Drive Standard PC compatible IDE (Integrated device Electronics) 40X (minimum) CD ROM drive residing on an EIDE interface. Continually subject to change due to the fast-moving PC component environment. Floppy Disk Drive 1- 10 Standard 3.5 inch 1.44-MB PC compatible high-density, double-sided floppy disk drive. TLA600 Series Logic Analyzer Service Manual Specifications Table 1- 10: TLA600 display system Characteristic Description Classification Standard PC graphics accelerator technology (bitBLT-based); capable of supporting both internal color LCD display and external color SVGA/XGA monitor Display Memory DRAM-based frame-buffer memory Size 2 MB Display Selection Both front panel and external displays can be used simultaneously, each with independent resolutions. Supports Windows dual monitor capability. External Display Drive One SVGA/XGA-compatible analog output port Display Size Selected via Windows Plug and Play support for DDC1 and DDC2 A and B Resolution (Pixels) 640 x 480 640 x 480 640 x 480 800 x 600 800 x 600 800 x 600 1024 x 768 1280 x 1024 Colors 256 64,000 16,800,000 256 64,000 16,800,000 256 256 Internal Display Classification Thin Film Transistor (TFT) 10.4 inch active-matrix color LCD display; CCFL backlight; intensity controllable via software Resolution 800 x 600 pixels Color Scale 262,144 colors (6-bit RGB) Table 1- 11: TLA600 front-panel interface Characteristic Description QWERTY Keypad ASCII keypad to support naming of files, traces, and keyboard equivalents of pointing device inputs for menus Special Function Knobs Various functions Table 1- 12: TLA600 rear-panel interface Characteristic Description Parallel Interface Port (LPT) 36-pin high-density connector supports standard Centronics mode, Enhanced Parallel Port (EPP), or Microsoft high-speed mode (ECP) Serial Interface Port (COM 1) 9-pin male sub-D connector to support RS-232 serial port TLA600 Series Logic Analyzer Service Manual 1- 11 Specifications Table 1- 12: TLA600 rear-panel interface (Cont.) Characteristic Description Single USB Ports One USB (Universal Serial Bus) compliant port SVGA Output Port (SVGA OUT) 15-pin sub-D SVGA connector Mouse Port PS/2 compatible mouse port utilizing a mini DIN connector Keyboard Port PS/2 compatible keyboard port utilizing a mini DIN connector Type I and II PC Card Port Standard Type I and II PC-compatible PC card slot Type I, II, and III PC Card Port Standard Type I, II, and III PC-compatible PC card slot Table 1- 13: TLA600 AC power source Characteristic Description Source Voltage and Frequency 90-- 250 VRMS, 45-- 66 Hz, continuous range CAT II 100-- 132 VRMS, 360-- 440 Hz, continuous range CAT II Fuse Rating 90 V - 250 V Operation (2 required) UL198/CSA C22.2 0.25 in × 1.25 in, Fast Blow, 8 A, 250 V Tektronix part number: 159-0046-00 Bussman part number: ABC-- 8 Littlefuse part number: 314008 90 V - 250 V Operation (2 required) IEC 127/Sheet 1 5 mm × 20 mm, Fast Blow, 6.3 A, 250 V Tektronix part number: 159-0381-00 Bussman part number: GDA-- 6.3 Littlefuse part number: 21606.3 Maximum Power Consumption 600 Watts line power maximum Steady-State Input Current 6 ARMS maximum Inrush Surge Current 70 A maximum Power Factor Correction Yes On/Standby Switch and Indicator Front Panel On/Standby switch, with indicator. The power cord provides main power disconnect. Table 1- 14: TLA600 cooling Characteristic Description Cooling System Forced air circulation (negative pressurization) utilizing six fans operating in parallel Cooling Clearance 2 in (51 mm), sides and rear; unit should be operated on a flat, unobstructed surface 1- 12 TLA600 Series Logic Analyzer Service Manual Specifications Table 1- 15: TLA600 mechanical characteristics Characteristic Description Overall Dimensions See Figure 1-- 1 on page 1-- 13 for overall chassis dimensions Weight Includes empty accessory pouch and front cover TLA614, TLA624, TLA613 and TLA623 18.1 Kg (40 lbs) TLA612, TLA622, TLA611 and TLA621 18 Kg (39.75 lbs) TLA604 and TLA603 17.6 Kg (38.75 lbs) TLA602 and TLA601 17.5 Kg (38.5 lbs) 457.20 mm (18.00 in) 421.64 mm (16.60 in) 281.94 mm (11.10 in) 457.20 mm (18.00 in) 414.02 mm (16.30 in) 281.94 mm (11.10 in) Figure 1- 1: Dimensions of the TLA600 series logic analyzer TLA600 Series Logic Analyzer Service Manual 1- 13 Specifications Table 1- 16: Atmospheric characteristics Characteristic Description Temperature: Operating and nonoperating Operating (no media in floppy disk drive): +5_C to +50_C, 15_C/hr maximum gradient, non-condensing (derated 1_C per 1000 ft above 5000 foot altitude) Nonoperating (no media in floppy disk drive or CD ROM drive): - 20_C to +60_C, 15_C/hr maximum gradient, non-condensing. Relative Humidity: Operating and nonoperating Operating (no media in floppy disk drive or CD ROM drive): 20% to 80% relative humidity, non-condensing. Maximum wet bulb temperature: +29_C (derates relative humidity to approximately 22% at +50_C). Nonoperating (no media in floppy disk drive or CD ROM drive): 8% to 80% relative humidity, non-condensing. Maximum wet bulb temperature: +29_C (derates relative humidity to approximately 22% at +50_C). Altitude: Operating and nonoperating Operating: To 10,000 ft (3040 m), (derated 1_C per 1000 ft (305 m) above 5000 ft (1524 m) altitude) Nonoperating: 40,000 ft (12190 m). Table 1- 17: Certifications and compliances Category Standards or description EC Declaration of Conformity EMC Meets intent of Directive 89/336/EEC for Electromagnetic Compatibility. Compliance was demonstrated to the following specifications as listed in the Official Journal of the European Communities: EN 61326 IEC 61000-- 4-- 2 IEC 61000-- 4-- 3 IEC 61000-- 4-- 4 IEC 61000-- 4-- 5 IEC 61000-- 4-- 6 IEC 61000-- 4-- 11 EN 61000-- 3-- 2 Australia / New Zealand Declaration of Conformity EMC 1 1- 14 EMC requirements for Class A electrical equipment for measurement, control and laboratory use.1 Electrostatic discharge immunity (Performance criterion B) RF electromagnetic field immunity (Performance criterion A) Electrical fast transient / burst immunity (Performance criterion B) Power line surge immunity (Performance criterion B) Conducted RF immunity (Performance criterion A) Voltage dips and interruptions immunity (Performance criterion B) AC power line harmonic emissions Complies with EMC provision of Radiocommunications Act per the following standard(s): AS/NZS 2064.1/2 Industrial, Scientific, and Medical Equipment: 1992 Emissions which exceed the levels required by this standard may occur when this equipment is connected to a test object. TLA600 Series Logic Analyzer Service Manual Specifications Table 1- 17: Certifications and compliances (Cont.) Category Standards or description EC Declaration of Conformity Low Voltage g Compliance was demonstrated to the following specification as listed in the Official Journal of the European Communities: Low Voltage Directive 73/23/EEC, amended by 93/68/EEC EN 61010-1/A2:1995 Safety requirements for electrical equipment for measurement control and laboratory use. EN 61010-2-031:1994 Particular requirements for hand-held probe assemblies for electrical measurement and test equipment. EN 61010-2-032:1995 Particular requirements for hand-held current clamps for electrical measurement and test equipment. Canadian Certification CAN/CSA C22.2 No. 1010.1 Safety requirements for electrical equipment for measurement, control, and laboratory use. Installation (Overvoltage) Category g y Terminals on this product may have different installation (overvoltage) category designations. The installation categories are: Pollution Degree CAT III Distribution-level mains (usually permanently connected). Equipment at this level is typically in a fixed industrial location. CAT II Local-level mains (wall sockets). Equipment at this level includes appliances, portable tools, and similar products. Equipment is usually cord-connected. CAT I Secondary (signal level) or battery operated circuits of electronic equipment. A measure of the contaminates that could occur in the environment around and within a product. Typically the internal environment inside a product is considered to be the same as the external. Products should be used only in the environment for which they are rated. Pollution Degree 2 Normally only dry, nonconductive pollution occurs. Occasionally a temporary conductivity that is caused by condensation must be expected. This location is a typical office/home environment. Temporary condensation occurs only when the product is out of service. Safety Certification Compliance Equipment Type Test and measuring Safety Class Class 1 (as defined in IEC 1010-1, Annex H) - grounded product Overvoltage Category Overvoltage Category II (as defined in IEC 1010-1, Annex J) Pollution Degree Pollution Degree 2 (as defined in IEC 1010-1). Note: Rated for indoor use only. TLA600 Series Logic Analyzer Service Manual 1- 15 Specifications Table 1- 18: Adjustment/verification fixture specifications Characteristic Description Instrument characteristics Number of data outputs For P6417 and P6418 Probes 18 grouped in two groups of eight and one group of two For P6434 Probes 36 grouped in one connector Number of setup and hold clock outputs For P6417 Probes and P6418 Probes Two grouped in one group of two For P6434 Probes One clock Number of DC threshold outputs For P6417 Probes and P6418 Probes 16 grouped in two groups of eight and one group of two For P6434 Probes 36 grouped in one connector External clock in External clock input provided by user through a BNC connector DC threshold input External input provided by user through a BNC connector DC power in Provided by a wall transformer DC power supply (9 V to 12 V DC) VDD DC level (typical) +5 V referenced to VEE VDD to analog ground level (typical) +2 V referenced to ground (GND) VDD switcher noise (typical) 50 mVp-p (measured at C17) n Internal clock frequency 50.065 MHz ±0.01% Output electrical characteristics Data/clock output amplitude 10K Motorola ECLinPS family outputs DC threshold output Output equals user-applied input Input requirements External Clock input 1.0 Vp-p centered around the fixture ground. Specification is valid between 5 MHz and 210 MHz DC power in 12 Volts DC at 1.5 A. Power is provided by one of the following power supply wall plugs: 119-4855-00, 119-4856-00, 119-4859-00, and 119-4857-00 DC threshold input Input not greater than ±5 V ground referenced Output timing n Data output (channel-to-channel skew) 50 ps (all channels within 50 ps relative to each other) n Setup clock output timing Adjusted for +3.0 ns (setup) ±100 ps, referenced to one of the data outputs n Hold clock output timing Adjusted for 0.0 ns (hold) ±100 ps, referenced to one of the data outputs Minimum data output pulse width Adjusted for 2.0 ns ±100 ps (jumpered in minimum pulse width mode) Fuse rating Recommended replacement fuse 1- 16 1.5 AF, 125 V, Tektronix part number 159-5009-00 TLA600 Series Logic Analyzer Service Manual Operating Information This chapter contains basic information about your logic analyzer. Refer to the Tektronix Logic Analyzer Family User Manual and to the online help for more information on how to use your logic analyzer. TLA600 Series Logic Analyzer Description The TLA600 series is a high-performance line of logic analyzers. There are two basic styles: one style has an internal display, and the other uses an external display (TLA60X Series) as shown in Figure 2--1. Internal and external display External display only (TLA60X Series) Figure 2- 1: TLA600 series logic analyzers TLA600 Series Logic Analyzer Service Manual 2- 1 Operating Information User Interface The external display only version uses an external mouse and keyboard for controls. The internal and external display version uses both front panel controls and an external mouse and keyboard. Color LCD Display Front Panel Keypad and Knobs The internal and external logic analyzer features a 10.4-inch diagonal, 600 X 800, flat-panel color LCD display. The front panel of the logic analyzer includes a QWERTY keyboard, and five front panel knobs. The keypad is active simultaneously with an external keyboard. The front panel knobs include a large multi-function knob and four smaller positioning/scale knobs. The multi-function knob is used primarily for incrementing and decrementing values in selected menu boxes. The four positioning and scale knobs provide scrolling of logic analyzer displays. USB Port There is one USB (universal serial bus) port. The USB port can be used for any USB complaint device. Table 2--1 lists the pin assignments of the USB connector. Table 2- 1: USB (universal serial bus) pin assignments Mouse Port Keyboard Port PC Card Port 2- 2 Pin number Pin function Pin number Pin function A1 Vcc B1 Vcc A2 A DATA - B2 B DATA - A3 A DATA + B3 B DATA + A4 GND B4 GND The logic analyzer supports an external pointing device. The mouse connector is a standard six-pin, PS/2-compliant DIN connector. The mouse port can be connected to an external, standard PS/2-compliant three-button mouse. The logic analyzer has an external keyboard port. The keyboard connector is a standard six-pin PS/2-compliant DIN connector. The keyboard port can be connected to an external, standard PS/2-compliant keyboard. There are two PCMCIA card slots that support an industry standard Type I, II, or III PCMCIA PC card. TLA600 Series Logic Analyzer Service Manual Operating Information Hard Disk Drive CD-ROM Drive There is one hard drive. Because of the speed at which the PC industry evolves, the hard disk drive is subject to change. This service manual lists the size of the hard disk drive available at the time the product was introduced. Consult your Tektronix Sales Representative for the maximum hard disk drive available. The logic analyzer has one CD-ROM drive. Floppy Disk Drive The logic analyzer has one standard 1/2 inch drive that supports 3.5 inch, 1.44 MByte, high-density/double-sided floppy disk media. Memory SO DIMMs The logic analyzer utilizes 168-pin DIMM modules. The memory devices must have gold pins. Refer to the specifications for memory parameters. External I/O BNCs The logic analyzer has four test I/O BNC connectors on the rear panel. These connectors are as follows: SYSTEM TRIG IN Connector. The System Trigger Input is a TTL-compatible signal input that is user definable in software. The System Trigger Input utilizes a BNC connector. Refer to your user manual for additional information. SYSTEM TRIG OUT Connector. The System Trigger Output is a TTL-compatible output signal that is user definable in software. The System Trigger Output utilizes a BNC connector. Refer to your user manual for additional information. EXTERNAL SIGNAL IN Connector. The External Signal Input is a TTL-compatible input signal that is user definable in software. The External Signal Input utilizes a BNC connector. Refer to your user manual for additional information. EXTERNAL SIGNAL OUT Connector. The External Signal Output is a TTL-compatible output signal that is user definable in software. The System Trigger Output utilizes a BNC connector. Refer to your user manual for additional information. TLA600 Series Logic Analyzer Service Manual 2- 3 Operating Information SVGA Port The SVGA OUT port supports an industry standard SVGA color monitor. The connector is a 15-pin, sub-D SVGA-compliant connector. See Table 2--2 for pin assignments. Table 2- 2: SVGA OUT pin assignments COM Port Pin number Pin function Pin number Pin function 1 RED 2 GRN 3 BLU 4 NC 5 GND 6 GND 7 GND 8 GND 9 (KEY) 10 GND 11 NC 12 DDC DAT 13 HSYNC 14 VSYNC 15 DDD CLK The COM port is an industry standard RS-232 serial port. Table 2- 3: COM OUT pin assignments 2- 4 Pin number Pin function Pin number Pin function 1 DCD 2 RXD 3 TXD 4 DTR 5 GND 6 DSR 7 RTS 8 CTS 9 Ring Indicator TLA600 Series Logic Analyzer Service Manual Operating Information LPT Port The LPT port is a parallel printer port. This parallel printer port supports standard Centronics mode, Enhanced Parallel Port (EPP), or Microsoft highspeed mode (ECP) and utilizes a 36-pin high density Centronics-compliant connector. See Table 2--4 for pin assignments. Table 2- 4: LPT (parallel interface) pin assignments Pin number Pin function Pin number Pin function 1 BUSY 19 GND 2 SLCT 20 GND 3 ACK* 21 GND 4 ERR* 22 GND 5 PE 23 GND 6 D0 24 GND 7 D1 25 GND 8 D2 26 GND 9 D3 27 GND 10 D4 28 GND 11 D5 29 GND 12 D6 30 GND 13 D7 31 GND 14 INIT* 32 GND 15 STB* 33 GND 16 SLIN* 34 GND 17 AFD* 35 GND 18 HI 36 H1 See IEEE specification P1284-C for pin connection definitions for other modes TLA600 Series Logic Analyzer Service Manual 2- 5 Operating Information Operating System and Application Interface The logic analyzer comes with the Microsoft Windows operating system factory-installed. Operations and capabilities when running on the logic analyzer are the same as with Microsoft Windows running on a high-performance personal computer. Windows Help is available from the Start menu of the Windows Task Bar. Early versions of the logic analyzer came with Windows 98, while newer version (with system software version 4.0 and up) come with Windows 2000 Professional. The logic analyzer also comes with the TLA series application software configured at the factory to launch after the logic analyzer boots up and the operating system is running. The TLA series application software controls data acquisition and processing by the logic analyzer. The TLA series application software is included with the product. You can also install other Windows-based software as needed to work with your applications. Online Help Much of the user information for operating the logic analyzer is available through online help. Refer to the online help for information on the individual menus, icons, and fields within each window. Refer to your Microsoft Windows documentation for information on using Windows help. Software Installation and Removal The following procedures describe loading and unloading the performance verification and adjustment software. Refer to the Tektronix Logic Analyzer Family User Manual for information on installing or removing any other software. It is recommended you have ≥10 MB of free space on the hard drive before installing the software. The Performance Verification software is located on Disk 1 of the Tektronix Logic Analyzer Family Application Software CD. 2- 6 TLA600 Series Logic Analyzer Service Manual Operating Information NOTE. This installation program uses parameters you supply to create a custom start-up file in your hard disk directory. The batch file enables the software to configure your instrument properly before it runs the program. 1. Power on the instrument. 2. Exit the Application. Verify the Software Version If your logic analyzer already has performance verification and adjustment software loaded on it, you must verify that the version is the same as the version printed on Disc 1 of the Tektronix Logic Analyzer Family Application Software CD. If the version of the performance verification and adjustment software loaded on your logic analyzer is an earlier version, you must delete the earlier version before you can load the newer version. Verify Directories If your logic analyzer already has a directory named Tekcats or Temptek on the hard drive, the software installation cannot be completed. Follow these instructions to verify the directory is not present: 1. Select Start → Search → For Files or Folders. 2. In the “Search for files or folders named:” box, type “Tekcats” or “Temptek” and then click the Search Now button to sesarch for either directory. 3. If either directory is found follow the instructions under Removing the Software to remove the software and the directories. Install the Software Follow these instructions to install the performance verification and adjustment software. 1. Close all open windows on the desktop. 2. Insert Disk 1 of the Tektronix Logic Analyzer Family Application Software CD in the CD-ROM drive. 3. Click the My Computer Icon and double-click the CD-ROM drive. 4. Double-click the TLA Performance Verification folder. 5. Double-click on the Logic Analyzer PV folder and then double-click the Disk1 folder. 6. Double-click the Setup.exe icon to begin the installation program. TLA600 Series Logic Analyzer Service Manual 2- 7 Operating Information 7. Follow the on-screen instructions to install the software on the hard disk. 8. After the installation is complete, go back to the TLA Performance Verification folder on the CD. This completes the software installation procedure. Removing the Software Use the following procedure to remove the performance verification and adjustment software from the instrument. These steps are necessary when you want to upgrade the PV software. 1. Open Windows Explorer and then locate and select the C:\Tekcats folder. 2. Go to the File menu and select Delete to delete the folder. 3. Repeat steps 1 and 2 to delete the Temptek folder if it exists. 4. Select Start → Settings → Taskbar & Start Menu. 5. Click the Advanced tab followed by the Advanced button. 6. Open the following directory path under Documents and Settings: All Users → Start Menu → Programs 7. Locate and delete the TLA Performance Verification item. 2- 8 TLA600 Series Logic Analyzer Service Manual Theory of Operation This section provides a brief overview of the board level theory of operation for the logic analyzer. Refer to page 9--1 for a functional block diagrams. Hardware The logic analyzer contains the following major components: Controller Board An NLX mother board based on an Intel Celeron microprocessor and the 810E chip set runs the operating system software in the TLA600 series logic analyzers. This controller provides the hardware connections to the following devices: H USB port H PS2 mouse and keyboard H Serial port H Parallel port H SVGA port The NLX mother board receives power through a riser board connected to the interface board. The mother board communicates with the interface board through the PCI bus and the USB bus. Riser Board Interface Board IA Bus Power Distribution (Rear) The Riser board connects the NLX mother board to the interface board. It also has the connections to the hard disk drive and to the CD-ROM drive. The interface board contains the circuitry to interface the PCI bus to the VXI bus to route the external signal and trigger I/O signals to generate the CLK10 reference. This generates the display signals for the internal display system (if used). The IA bus allows communication with the instrument. This is a message-based system that allows SCPI commands sent from the NLX/Interface controller to the LPU circuitry on the acquisition board. This board connects the power supply to the Interface board and to the acquisition board. TLA600 Series Logic Analyzer Service Manual 3- 1 Theory of Operation Power Distribution (Front) Power Supply Front Panel Keyboard Display Mechanical Chassis This board is an additional connection between the power supply and the acquisition board. The power supply provides all voltages and currents to the logic analyzer. In addition to the main power supply, the interface board generates the --2 V and --5 V needed for proper operation. This board contains the front panel keypad and five control knobs. The circuitry is connected to the interface board through a USB bus. The internal display is a 10.4-inch diagonal active matrix thin-film-transistor (TFT) liquid crystal display with a built-in back light similar to the TLA700 Portable Mainframe. The back light can be dimmed to 60% of its value through a custom Tektronix screen saver to extend its life and prevent the burning of the screen. The color LCD is supported by an external DC switching regulator board to provide the back light high voltage and a display adaptor board which connects the interface board to the display. The mechanical chassis provides the mechanical support structure for the instrument, and includes the cooling system, the EMI shielding system, and all the subsystems. Probe Interface The logic analyzer connects to the target system through the probe interface. There is one connector per probe for a maximum of eight connectors depending on the instrument configuration. The logic analyzer can use the following probes to connect to the target system: H P6417 H P6418 H P6434 Depending on the instrument configuration, you can connect up to eight P6417 or P6418 general purpose probes, or up to four P6434 high-density probes. 3- 2 TLA600 Series Logic Analyzer Service Manual Theory of Operation Acquisition The acquisition board is mounted on the bottom of the instrument. It has several custom CMOS ASCIs ,several full custom bipolar ICs, RAM for the acquisition memory, and other miscellaneous circuitry. The acquisition board takes the data acquired by the probes, determines when to clock the data into memory, and communicates the acquisition information with the rest of the instrument. The acquisition board also contains the LPU circuitry which interfaces between the VXI bus and the acquisition circuitry. No manual calibration or adjustments exist. All calibration is done by software but requires the adjustment/verification fixture (671-3599-XX) to be used for proper deskew. The calibration procedures are described in the Adjustment Procedures chapter. TLA600 Series Logic Analyzer Service Manual 3- 3 Theory of Operation 3- 4 TLA600 Series Logic Analyzer Service Manual Performance Verification: Logic Analyzer This chapter contains procedures for functional verification, certification, and performance verification procedures for the TLA600 Series Logic Analyzers and the adjustment/verification fixture. Generally, you should perform these procedures once per year or following repairs that affect certification. Summary Verification Functional verification procedures verify the basic functionality of the instrument inputs, outputs, and basic instrument actions. These procedures include power-on diagnostics, extended diagnostics, and manual check procedures. These procedures can be used for incoming inspection purposes. Certification procedures certify the accuracy of an instrument and provide a traceability path to national standards. Calibration data reports are produced for the logic analyzer modules as output from the performance verification and adjustment software. In some cases, you will be required to manually fill out certification data. For those cases, you can make copies of the calibration data report included with this manual, and then fill out the reports with the data that you obtain from the procedures. Performance verification procedures confirm that a product meets or exceeds the performance requirements for the published specifications documented in the Specifications chapter of this manual. Refer to Figure 4--1 on page 4--2 for a graphic overview of the procedures. Adjustment procedures check for, and if necessary, correct any adjustment errors discovered when performing functional or performance verification procedures. The adjustment procedures for the logic analyzer modules are controlled by software while the procedures for the adjustment/verification fixture require manual intervention. Some of the adjustment procedures for the logic analyzer modules also require manual intervention to move probes or change test equipment settings. The performance verification and adjustment software is provided on the product CD-ROM. If you have not already done so, refer to Software Installation and Removal beginning on page 2--6 for instructions on installing the performance verification and adjustment software. TLA600 Series Logic Analyzer Service Manual 4- 1 Performance Verification: Logic Analyzer Determine equipment to certify. Use Tektronix-supplied probes. No Go to appropriate procedure(s). Allow instrument and equipment to warm up (30 minutes). Gather required test equipment. Load PV/Adjust software. Is it OK with customer to remove/reconnect probes from System Under Test? Perform procedure using software. Yes Do tests pass? Select procedure. No Repair or adjust equipment as required. Yes Print Calibration Data Report. Configure instrument as described in procedure. Create necessary Calibration Certificate. Set up test equipment. No Are all certifications complete? Yes Done Figure 4- 1: Calibration/certification procedure flow chart 4- 2 TLA600 Series Logic Analyzer Service Manual Performance Verification: Logic Analyzer Test Equipment The procedures use external, traceable signal sources to directly test characteristics that are designated as checked (n) in the Specifications chapter of this manual. Table 4--1 shows the required equipment list; the equipment is required for the performance verification procedures and adjustment procedures for the logic analyzer modules and for the adjustment/verification fixture. Table 4- 1: Test equipment Item number and description Minimum requirements Example 1. Mainframe TLA600 Series Logic Analyzer - 2. Adjustment/verification fixture, with one of the following Power Supplies: USA/CAN Europe Japan United Kingdom Tektronix part number 671-3599-XX 12 V, 1.5 A 12 V, 1.5 A 12 V, 1.5 A 12 V, 1.5 A Tektronix part numbers: 119-4855-XX 119-4856-XX 119-4859-XX 119-4857-XX 3. Oscilloscope 1 GHz bandwidth Delay time accuracy ±25 ppm over any ≥ 1 ms interval Tektronix TDS 784D 4. DSO probes Two required, with < one-inch ground leads Tektronix P6243 or P6245 probe, with accessories 5. 1X probe One required, with < one-inch ground leads Tektronix P6101B probe, with accessories 6. Logic analyzer probes Two required Tektronix P6417 or P6418 Logic Analyzer probes 7. High density logic analyzer probe (optional) One required Tektronix P6434 Logic Analyzer probe 8. Frequency counter Frequency range: 1 GHz Tektronix DC508 9. Digital multimeter with leads DCV accuracy: 0.1% from - 10 V to +100 V Tektronix DMM 900 Series 10. Connector, dual-banana Female BNC-to-dual banana Tektronix part number 103-0090-XX 11. Voltage reference Accuracy: ≤0.01% Data Precision 8200 0.1 F, 200 V Tektronix part number 283-0189-XX 13. Adapter, N-to-BNC Male type N-to-female BNC Tektronix part number 103-0045-XX 14. Shorting jumpers Strip of 10, 2-wide Tektronix part number 131-5829-XX 15. Cable, precision 50 Ω coaxial 50 Ω, 36 in, male-to-male BNC connectors Tektronix part number 012-0482-XX 16. Signal Generator 250 MHz Tektronix SG503 12. 1 Capacitor1 The capacitor is installed across the Data Precision 8200 output terminals to reduce noise. If your voltage reference produces <4 mVp-p of noise, external noise reduction is not necessary. TLA600 Series Logic Analyzer Service Manual 4- 3 Performance Verification: Logic Analyzer Functional Verification This section contains instructions for performing the functional verification procedures for the TLA600 Series Logic Analyzers; functional verification procedures for the adjustment/verification fixture begin on page 4--21. These procedures provide an easy way to check the basic functionality of the LA modules and probes. Table 4--2 lists the functional verification procedures available for the logic analyzer and probes. Table 4- 2: TLA600 Functional verification procedures Instrument Procedure Adjustment/verification fixture required Logic Analyzer Power-up diagnostics No Logic Analyzer Extended diagnostics No Logic Analyzer Mainframe diagnostics No Logic Analyzer CheckIt Utilities No P6417, P6418, or P6434 logic analyzer probes Signal Input check Yes NOTE. Running the extended diagnostics will invalidate any acquired data. If you want to save any of the acquired data, do so before running the extended diagnostics. If any check within this section fails, refer to the Troubleshooting section in the Maintenance chapter of this manual for assistance. Failed tests indicate the instrument needs to be serviced. This procedure provides a functional check only. If more detailed testing is required, perform the Performance Verification Procedure after completing this procedure. Perform these tests whenever you need to gain confidence that the instrument is operating properly. You will need the following equipment to complete the functional verification procedures: 4- 4 Equipment required Cable, 50 Ω coaxial (item 15) Prerequisites Warm-up time: 30 minutes TLA600 Series Logic Analyzer Service Manual Performance Verification: Logic Analyzer Power-On Diagnostics During power-on, the power-on diagnostics are run. If any power-on diagnostics fail, the instrument displays the Calibration and Diagnostics property sheet. Extended Diagnostics Complete the following steps to run the extended diagnostics: NOTE. Perform the following steps to complete the functional verification procedures. Before beginning this procedure, be sure that no active signals are applied to the logic analyzer. Certain diagnostic tests will fail if signals are applied to the probe during the test. 1. Power on the instrument and wait for the system application to start. 2. Go to the System menu and select Calibration and Diagnostics. 3. Verify that all power-on diagnostics pass. 4. Click the Extended Diagnostics tab. 5. Select All Modules, All Tests (top line) and click the Run button on the property sheet. The diagnostics software performs each one of the tests listed in the menu under the module selection. All tests that displayed an Unknown status will change to a Pass or Fail status depending on the outcome of the tests. 6. Scroll through the test results for the instrument and verify that all tests pass. NOTE. If Extended Diagnostics fail, run the self calibration for the logic analyzer and then rerun Extended Diagnostics. To run the self calibration, click the Self Calibration tab, click the Run button, and follow any on-screen instructions. TLA600 Series Logic Analyzer Service Manual 4- 5 Performance Verification: Logic Analyzer Mainframe Diagnostics The TLA Mainframe Diagnostics check the functionality of the instrument. To run these diagnostics, do the following steps: 1. Exit the TLA application. 2. Click the Windows Start button. 3. Select Programs from the Start menu. 4. Select Tektronix Logic Analyzer from the Programs menu. 5. Select Tektronix TLA Mainframe Diagnostics from the Tektronix Logic Analyzer menu. 6. Run the mainframe diagnostics. Connect the BNC cable when requested. When the TLA Mainframe Diagnostics are run, a Mainframe Diagnostics Warning dialog box appears. Clicking OK will initiate a SYSRESET, which will invalidate any acquired data. CheckIt Utilities CheckIt Utilities is a comprehensive software application used to check and verify the operation of the PC hardware in the instrument. You can test most of the hardware in the instrument using selected tests with CheckIt Utilities. You don’t need to run all of the tests, since CheckIt Utilities has tests for PC hardware that is not present in the logic analyzer. CAUTION. Before starting the CheckIt Utilities, install a test floppy disk in the floppy disk drive and a test CD in the CD-ROM drive. To run CheckIt, follow these instructions: 1. Exit the TLA application. 2. Click the Windows Start button. 3. Select Programs. 4. Select CheckIt Utilities. 5. Run the selected tests that you are interested in. Checking the Cooling Fan Operation Probe Functional Verification 4- 6 Power on the instrument and inspect the side of the instrument to verify that all six cooling fans are rotating. The following procedure checks the basic operation of the probes by verifying that the probes recognize signal activity at the probe tips. TLA600 Series Logic Analyzer Service Manual Performance Verification: Logic Analyzer Equipment required Adjustment/verification fixture (item 2 ) Prerequisites Warm-up time: 30 minutes for instrument and test equipment P6417, P6418, or P6434 probe connected to the instrument1 Test equipment connected as shown in Figure 4-- 2 Diagnostics pass 1 Do not mix probes; only one type of probe can be functionally verified at a time. C2/C3/CK3 Channel/Group Clock channel J5 Adjustment/verification fixture Fixture supply J3 J26 J1 J2 Figure 4- 2: Probe functional verification test setup Test Procedure Perform the following steps to complete the probe functional verification procedure: 1. Ensure that the jumper at J15 on the adjustment/verification fixture is in the INT position to select the internal 50.065 MHz clock. 2. Open the Setup window and click the Set Thresholds button to display the Probe Threshold dialog box. 3. Adjust the threshold level to 700 mV for all channels. NOTE. These procedures assume a P6418 or P6417 probe is used. If you are use a P6434 probe, use J5, the Data Out connector on the adjustment/ verification fixture to verify probe functionality. Observe proper polarity: pin 1 to pin 1. TLA600 Series Logic Analyzer Service Manual 4- 7 Performance Verification: Logic Analyzer 4. Refer to Figure 4--2 and connect the podlets of the acquisition probe to J1 and J2 on the fixture. Ensure that you connect the ground side of the podlets to the ground side of the connectors. 5. Connect the single clock (CK n) or the qualifier (Q n) channel to one of the J3 CLK OUT connector pairs on the fixture. 6. Return to the Setup window and click the Show Activity button to display the Activity Monitor. 7. Verify that the Activity Monitor shows activity on all probe channels connected to the test fixture. Figure 4--3 shows an example of the Activity Monitor. Note the signal activity for clock CK3 and data channels for the C3(7-0) and C2(7-0) groups. Also note that there is no activity on the other groups because the probe podlets are not connected to a signal source (the channels are all high). Figure 4- 3: Activity monitor 8. Verify that none of the connected channels are stuck high or stuck low. 9. Disconnect the probe from the fixture and the instrument. 10. Repeat the steps for any remaining probes. 11. Close the Activity Monitor. 12. Return the threshold levels to their former values in the Probe Threshold dialog box. 13. This completes the probe functional verification procedure. 4- 8 TLA600 Series Logic Analyzer Service Manual Performance Verification: Logic Analyzer Certification Use the performance verification procedures to check the accuracy of the system clock and to perform the DC Threshold test. The instrument is certifiable if these parameters meet specifications. Running the system clock test requires you to record the test data on a copy of the Calibration Data Report (found at the end of this chapter). You can print out a software-generated Calibration Data Record for the DC Threshold test after running the performance verification and adjustment software. Other specifications can also be verified by running the complete performance verification procedures. Performance Verification Instructions This section contains procedures to verify that the TLA600 series instruments perform as warranted. Verify instrument performance whenever the accuracy or function of your instrument is in question, or as part of an annual calibration/certification. As a general rule, these tests only need to be done once a year. You will use the performance verification and adjustment software to complete most of the performance verification procedures. You will check the accuracy of the 10 MHz system clock manually without the software. The performance verification and adjustment software contains instructions and control programs for testing each characteristic designated as checked (n) in the Specifications chapter of this manual. Prerequisites These procedures ask for the serial number of the instrument under test. Record the serial number and state speed of the instrument (located on a label on the right side of the back panel) so that you can enter the information when prompted by the software. The tests in this section comprise an extensive, valid confirmation of performance and functionality when the following requirements are met: H The logic analyzer application must not be running. H The performance verification and adjustment software must be loaded. Refer to Software Installation and Removal on page 2--6. H The logic analyzer must have been operating for at least 30 minutes at an ambient temperature between +20_ C and +30_ C. H The logic analyzer must have been last adjusted at an ambient temperature between +20_ C and +30_ C. TLA600 Series Logic Analyzer Service Manual 4- 9 Performance Verification: Logic Analyzer H Procedure Overview The logic analyzer must be in an operating environment within the limits described in the Specifications chapter of this manual. You will begin the procedures by performing the 10 MHz System Clock (CLK10) test using manual checks and recording the results on copies of the Calibration Data Report. You will then use the performance verification and adjustment software to complete the remaining tests. When using the performance verification and adjustment software, you will connect external test equipment to the logic analyzer in response to prompts on the screen. You will connect the test signals and then instruct the program to continue. The performance verification and adjustment software automatically selects the instrument settings and determines the results of each test. The results of the tests are recorded in a temporary file and are available upon test completion for completing test records for certification. To obtain partial test information you can also run individual tests or selected groups. NOTE. The self calibration (Self_Cal) test must run successfully before the other tests are performed. The remaining tests can then be performed in any order. Before testing an instrument following repair, you must first complete the adjustment procedure. The performance verification and adjustment software contains the tests shown in Table 4--3. Each test verifies one or more parameters. All of the tests check characteristics that are designated as checked (n) in the Specifications chapter. By running a full PV sequence, you will verify the performance of the logic analyzer. Table 4- 3: TLA600 PV/Adjust software performance verification tests Performance verification test name Specification tested 1. System clock (CLK10)1 Signal output check 2. FPV_DC_THRESHOLD1 Threshold accuracy 3. FPV_SETUP_0F Setup time 4 Hold time FPV_HOLD_0F 5. FPV_MAXSYNC 1 4- 10 Maximum synchronous clock rate Certifiable parameter TLA600 Series Logic Analyzer Service Manual Performance Verification: Logic Analyzer Table 4--4 lists the additional characteristics that are designated as checked (n) in the Specifications chapter of this manual. These characteristics are indirectly tested by the performance verification and adjustment software tests named in the table. Table 4- 4: TLA600 characteristics indirectly checked by the performance verification and adjustment software performance verification tests Performance verification test name Specification tested 1. FPV_SETUP_0F Minimum recognizable word1,2 2 Minimum recognizable word1,2 FPV_HOLD_0F 3. All tests Trigger state sequence rate 4. All tests, and Extended Diagnostics Internal sampling period3 1 When the setup and hold time tests are both performed, the setup and hold window size is indirectly verified. 2 When the setup and hold time tests are both performed, the channel-to-channel skew is indirectly verified. 3 When all of the tests are performed, including Extended Diagnostics, the internal sampling period is indirectly verified. In addition to the basic system setup, you will need some of the equipment shown in Table 4--1 on page 4--3 to complete the performance verification procedures. Each procedure includes a table that calls out the equipment used. Use Table 4--1 for equipment specifications. If you substitute equipment, always choose instruments that meet or exceed the minimum requirements specified. TLA600 Series Logic Analyzer Service Manual 4- 11 Performance Verification: Logic Analyzer Using the Software The software consists of executable software files. Use the following steps to start and run the software: 1. Allow the instruments to warm up for at least 30 minutes before beginning the procedure. 2. Quit all applications including the TLA application. 3. Select Start → Programs → TLA Performance Verification. 4. To run the performance verification and adjustment software, select LA 6XX PV. 5. Follow the instructions on the screen to enter the name you want to appear in the User Name field as shown below. This name will appear on the Calibration Data Reports. 6. The program lists several different instruments, referred to as DUT (Device Under Test). Enter the number corresponding to the instrument type that you want to test; then click Enter to continue. The screen will display an error message if the DUT chosen does not match the installed DUT. 7. Click Enter to continue. 8. Enter the complete serial number of the DUT (for example, B010100). Click Enter to continue. If you select no, a prompt asks you to enter the serial number again. 4- 12 TLA600 Series Logic Analyzer Service Manual Performance Verification: Logic Analyzer 9. The program lists sequences for PV (performance verification) and ADJ (adjustments). Enter a number to select which sequence you want and click Enter to continue. 10. If an instrument is being tested, the program lists the different probe types available for testing. Enter the appropriate number corresponding to your probe and then click Enter to continue. 11. Enter the operating temperature in degrees C (entries in the range of 20 to 30 degrees are valid). Click Enter to continue. 12. Enter the operating humidity as a percentage (0% to 100% entries are valid). Click Enter to continue. 13. Determine which sequence to run: H RUN FULL SEQUENCE runs the entire sequence from beginning to end. This is the recommended selection. H RUN PARTIAL SEQUENCE runs part of the full sequence. The sequence runs from the selected starting point to the end of the sequence. H SELECT TEST(S) runs only the selected tests. To run a single test, enter the test number. To run multiple tests, enter a comma-separated list of numbers or a hyphen-separated list of numbers. Enter the number next to your choice and click Enter to continue. 14. Follow the on-screen instructions to connect and adjust test equipment. 15. When testing is completed, disconnect the test equipment. Using the Interrupt Button While the program is running, you can interrupt the program to rerun a test, start over, or to exit the program by clicking the Interrupt button (shown below). The program will then provide a list of choices. Enter the number next to the choice that you want and click Enter. NOTE. If you interrupt a test before it has completed, you must restart the test to obtain valid test data. Some tests such as Internal Cal do not allow interrupts. If you stop these tests using more aggressive methods, you may have to reboot the instrument. TLA600 Series Logic Analyzer Service Manual 4- 13 Performance Verification: Logic Analyzer Obtaining Test Results The results of all tests can be stored in a file on the hard disk. You can view the test results, print the test results to a printer, or save the test results in another file on the hard disk. The software stores the test results in a file containing the module name and serial number (for example, TLA621.B020123). The file is located under the following path: C:\Tekcats\Rpt. NOTE. If you want to save the content of the Report file, you must rename or copy the Report file using the Windows file utilities such as Explorer. The Report file will be overwritten the next time you run the performance verification and adjustment software and print or view a new set of test data. After completing a full or partial test sequence (or just before you exit the program) you can generate the test data and write it to a file. You have the option of printing the file, viewing the file on screen, or transferring the file to another directory or host computer. You can print the test data directly from the program. Ensure that a printer is connected to your logic analyzer and follow the on-screen instructions to print the test results. If a printer is not available, you can view the test results directly from the screen, or you can copy the test results to a different file or folder/host computer for future use. Field Adjust/PV Software Housekeeping Troubleshooting The performance verification and adjustment software creates data log files (.dlf files) that store program data. The .dlf files are used by the performance verification and adjustment software to generate the view data and print out options. Each .dlf file is identified by the product serial number; for example, B010100.dlf. The files are stored in the Tekcats folder under each TLA6xx folder. To conserve disk space, you must occasionally delete the .dlf files. If any tests fail, use the following steps to troubleshoot the problems: 1. Check all test equipment for improper or loose connections. 2. Check that all test equipment is powered on and has the proper warm-up time. 3. If you are using the adjustment/verification fixture, verify the LED is lighted, the jumper positions match the on-screen instructions, and the external connections are correct. (See Figure 4--4 for jumper locations.) 4. Rerun mainframe or module diagnostics and module adjustment. 5. Run the tests a second time to verify the failure. 4- 14 TLA600 Series Logic Analyzer Service Manual Performance Verification: Logic Analyzer Performance Verification Tests Use the following tables and figures to set up and execute each procedure. Procedure 1: 10MHz System Clock (CLK10) This procedure verifies the accuracy of the system clock. Equipment required Frequency counter (item 8) Prerequisites Warm-up time: 30 minutes for the logic analyzer and test equipment Precision BNC cable (item 15) All diagnostics pass 1. Connect the frequency counter to the External Signal Out TTL BNC connector on the back of the instrument. 2. Verify that the Tektronix Logic Analyzer application is running. 3. Go to the System window and select System Configuration from the System menu. 4. In the System Configuration dialog box, select 10 MHz Clock from the list of routable signals in the External Signal Out selection box and click OK. 5. Verify that the output frequency at the External Signal Out TTL connector is 10 MHz ±1 kHz. Record the measurement on the Calibration Data Report. 6. In the system configuration dialog box, reset the External Signal Out signal to None. 7. Disconnect the frequency counter. TLA600 Series Logic Analyzer Service Manual 4- 15 Performance Verification: Logic Analyzer NOTE. The illustrations in the following procedures show P6418 or P6417 probes. If you have a P6434 probe, use J14 on the adjustment/verification fixture for the DC Threshold test; all other procedures using the P6434 probe use J5, the Data Out connector. When using either type of probe, always observe correct polarity (GND to GND, pin 1 to pin 1). P6434 Threshold out P6417 and P6418 Threshold out J14 J6 J7 J20 J1 J15 J16 J10 J8 DC in P6417 and P6418 Data out J2 J26 J3 Threshold in J22 J19 External Clock in J18 J13 J5 P6434 Data out J17 J4 J11 J9 Deskew Hold Ext Setup J17 Hold/Setup select J19 Jumper installed: clocked on falling edge Jumper removed: clocked on rising edge Int J15 Ext/Int Clock select 1 2 3 4 5 J16 Deskew 1 Probe setup 6 J13 P6434 Deskew/Probe setup Clock Clock GND GND J4 Setup/Hold Clock out Figure 4- 4: Adjustment/verification fixture connections and jumper locations 4- 16 TLA600 Series Logic Analyzer Service Manual Performance Verification: Logic Analyzer Procedure 2: FPV_DC_Threshold This procedure verifies the DC Threshold Accuracy of the logic analyzer. This test is performed once and applies to all channels of the instrument. SW test name FPV_DC_Threshold Equipment required Adjustment/verification fixture and fixture supply (item 2) Voltage reference (item 11) Precision BNC cable (item 15) Dual banana-to-BNC adapter (item 10) Capacitor, 0.1 F (item 12) Prerequisites Warm-up time: 30 minutes Test equipment connected as shown in Figure 4-- 5 Diagnostics and SELF_CAL pass Voltage reference Dual banana-toBNC adapter BNC cable + -- 0.1 F Capacitor Fixture supply Adjustment/verification fixture J22 C2/C3/CK3 Channel/Group J7 J26 J6 J14 Threshold out P6434 Figure 4- 5: FPV_DC_Threshold test setup 1. If the logic analyzer application is running, quit the application. Verify that all of the prerequisites listed previously are met for the procedure. 2. Run the performance verification and adjustment software as described in Using the Software on page 4--12. Run the C:\Tekcats\Tla_la program and then select the correct module type and the PV test option. 3. Follow the on-screen instructions to run each portion of the test for each parameter of the instrument. 4. Verify that all of the tests pass. TLA600 Series Logic Analyzer Service Manual 4- 17 Performance Verification: Logic Analyzer Procedure 3: FPV_Setup_0F This procedure verifies the setup time of the logic analyzer. SW test name FPV_Setup_0F Equipment required Adjustment/verification fixture and fixture supply (item 2) Prerequisites Warm-up time: 30 minutes Test equipment connected as shown in Figure 4-- 6 Diagnostics and SELF_CAL pass J5 J4 Adjustment/verification fixture Clock channel C2/C3/CK3 Channel/Group Fixture supply J2 J26 J1 Figure 4- 6: Initial FPV_Setup_0F test setup 1. If the logic analyzer application is running, quit the application and verify that all of the prerequisites listed previously are met for the procedure. 2. Follow the on-screen instructions to run each portion of the test for each parameter of the instrument. 3. Verify that all of the tests pass. If a test fails, run the Deskew routine as described on page 5--6, then rerun the test. 4- 18 TLA600 Series Logic Analyzer Service Manual Performance Verification: Logic Analyzer Procedure 4: FPV_Hold_0F This procedure verifies the hold time of the logic analyzer. SW test name FPV_Hold_0F Equipment required Adjustment/verification fixture and fixture supply (item 2) Prerequisites Warm-up time: 30 minutes Test equipment connected as shown in Figure 4-- 7 Diagnostics and SELF_CAL pass J5 J4 Adjustment/verification fixture Clock channel C2/C3/CK3 Channel/Group Fixture supply J2 J26 J1 Figure 4- 7: Initial FPV_Hold_0F test setup 1. If the logic analyzer application is running, quit the application and verify that all of the prerequisites listed previously are met for the procedure. 2. Follow the on-screen instructions to run each portion of the test for each parameter of the instrument. 3. Verify that all of the tests pass. If a test fails, run the Deskew routine as described on page 5--6, then rerun the test. TLA600 Series Logic Analyzer Service Manual 4- 19 Performance Verification: Logic Analyzer Procedure 5: FPV_Maxsync This procedure checks the Maximum Synchronous Clock Rate and the Trigger State Sequence Rate of the logic analyzer. This test is performed once and applies to all channels of the instrument. SW test name FPV_Maxsync Equipment required Adjustment/verification fixture and fixture supply (item 2) Sine wave generator (item 16) BNC cable (item 15) Adapter, N-to-BNC (item 13) Prerequisites Warm-up time: 30 minutes Test equipment connected as shown in Figure 4-- 8 Diagnostics and SELF_CAL pass Sine wave generator Type N-to-BNC adapter BNC cable J5 C2/C3/CK3 Channel/Group J4 Adjustment/verification fixture J18 Fixture supply J2 Clock channel J26 J1 Figure 4- 8: FPV_Maxsync test setup 1. If the logic analyzer application is running, quit the application and verify that all of the prerequisites listed previously are met for the procedure. 2. Follow the on-screen instructions to run the test. 3. Verify that all of the tests pass. After completing the performance verification procedures, obtain a copy of the test results and verify that all parameters are within the allowable specifications as listed in the Specifications chapter of this manual. 4- 20 TLA600 Series Logic Analyzer Service Manual Performance Verification: Adjustment/Verification Fixture This section contains the functional verification procedures, performance verification procedures, and certification procedures for the adjustment/verification fixture. A calibration data report for the adjustment/verification fixture is also available at the end of this chapter where you can record the certifiable parameters. Test Equipment These procedures use external, traceable signal sources to directly test characteristics that are designated as checked (n) in the Specifications chapter of this manual. Table 4--1 on page 4--3 shows the required equipment list for the procedures in this section. Each piece of equipment used in these procedures is referenced by an item number to the equipment listed in Table 4--1. Functional Verification The functional verification procedure consists of the following checks: H Basic power supply verification H External clock input circuit verification This procedure provides a functional check only. If more detailed testing is required, perform the performance verification procedure, which begins on page 4--25, after completing this procedure. Power Supply Use the following procedure to verify that the fixture power supply is functional. 1. Plug the fixture power supply included with the adjustment/verification fixture into an appropriate socket and plug the DC connector into J26. 2. The LED adjacent to J26 should light. This indicates the input power supply is functioning properly. TLA600 Series Logic Analyzer Service Manual 4- 21 Performance Verification: Ajustment/Verification Fixture External Clock Input Use the following procedure to verify the external clock input circuit is dividing the input frequency by two and routing this clock signal to the proper output connectors. This test provides a basic functionality check of the adjustment/verification fixture. Parameter tested External clock input Equipment required Sine wave generator (item 16) Precision BNC cable (item 15) Oscilloscope (item 3) Oscilloscope probe (item 4) Prerequisites Warm-up time: 30 minutes for adjustment/verification fixture and test equipment 1. Set the jumper positions as called out in the table. Refer to Figure 4--9 on page 4--23 for jumper locations. Jumper Jumper name Jumper setting J13 P6434 Setup & Hold/Deskew select Disconnected J15 Clock selection EXT J16 Deskew 1-2 and 4-5 connected J17 Setup/hold select Disconnected J19 Clock polarity select Disconnected 2. Connect the sine wave generator to J18, EXT CLK IN, on the adjustment/ verification fixture. 3. Set the generator output to 210 MHz, 1 V p-p. 4. Set up the oscilloscope by pressing Setup, Factory Setup, and then press OK Confirm Factory Init to return the oscilloscope to default conditions. 4- 22 TLA600 Series Logic Analyzer Service Manual Performance Verification: Ajustment/Verification Fixture R38 (VDD adjust ) J8 (VEE) J14 J6 J7 J20 J1 J10 (VDD) J15 DC in J16 J2 J26 R85 J3 Threshold in J22 R321 J19 External Clock in R67 J18 J13 J5 J17 J4 J9 ( GND ) R39 R127 Denotes ground side of resistor DESKEW HOLD EXT SETUP J17 Setup/Hold select J19 Jumper installed: clocked on falling edge Jumper removed: clocked on rising edge 1 INT J15 Ext/Int Clock select 1 2 3 4 5 J16 DESKEW Clock Clock PROBE SETUP 6 J13 P6434 Deskew/Probe setup GND GND J4 Setup/Hold Clock out Figure 4- 9: Adjustment/verification fixture detail 5. Set up the oscilloscope as listed below. a. Set up the CH1 Vertical menu as follows: H Coupling DC/50 Ω H Fine Scale 200 mV/div H Position --3.32 div TLA600 Series Logic Analyzer Service Manual 4- 23 Performance Verification: Ajustment/Verification Fixture b. Set up the Horizontal menu as follows: H Time Base Main H Record Length 5000 H Horizontal Scale Main Scale @ 5 ns/div c. Set up the Trigger menu as follows: H Source CH1 H Coupling DC H Slope + H Level 700 mV H Mode Normal d. Set up the Measure menu as follows: H Select Measurement for CH1 Frequency H Gating Off e. Set up the Cursor menu as follows: H f. Function Off Set up the Acquire menu as follows: H Acquisition Mode Sample H Repetitive Signal On 6. Using the oscilloscope and the custom probe adapter shown in Figure 4--10 on page 4--26, verify that the output frequency at J1 pin-2 on the adjustment/ verification fixture is 105 MHz. 7. Press the Run/Stop button to stop the acquisition. 8. Disconnect the test equipment from the adjustment/verification fixture. 9. This completes the functional verification procedures for the adjustment/verification fixture. 4- 24 TLA600 Series Logic Analyzer Service Manual Performance Verification: Ajustment/Verification Fixture Certification The internal system clock and clock output timing are checked for accuracy. The adjustment/verification fixture accuracy is certifiable if these parameters meet specifications. The procedure is described in the performance verification section, beginning on page 4--25. Make a copy of the Calibration Data Report at the end of this chapter and then record the results on the copy. Performance Verification This section contains procedures to verify the accuracy of the adjustment/verification fixture. Prerequisites The tests in this section provide a valid confirmation of performance and functionality when the following requirements are met: H The adjustment/verification fixture must have been operating for a warm-up period of at least 30 minutes, and must be operating at an ambient temperature between +20_ C and +30_ C. H The adjustment/verification fixture must have been last adjusted at an ambient temperature between +20_ C and +30_ C. H The adjustment/verification fixture must be in an environment within the same limits as for the logic analyzer, described in the Specifications section of the Tektronix Logic Analyzer Family User Manual. These tests should be performed once every two years. Tests Performed Each test verifies one or more parameters. Table 4- 5: Adjustment/verification fixture performance verification tests Test name Specification tested Power supply VDD Internal clock frequency1 50.065 MHz Data skew1 Less than 50 ps between any 2 channels Hold time1 Setup time1 1 0.0 ns +3.0 ns Certifiable parameter TLA600 Series Logic Analyzer Service Manual 4- 25 Performance Verification: Ajustment/Verification Fixture Custom Probe Tip Adapter A custom probe tip adapter is used in these procedures to ensure signal integrity when making precise measurements. The primary function of the custom probe tip adapter is to minimize the length of the ground lead of the probe. Build the custom probe tip adapter as shown in Figure 4--10. Socket, Tektronix P/N 131-0258-00 Solder pin to socket frame .025 in Berg pin, Tektronix P/N 131-1426-00 Adjust this distance to span a 1206 SMT component, such as R85 on the adjustment/verification fixture. Figure 4- 10: Probe tip adapter detail 4- 26 TLA600 Series Logic Analyzer Service Manual Performance Verification: Ajustment/Verification Fixture Test Procedures Refer to Figure 4--11 on page 4--28 for component and test point locations used in the following procedures. Table 4--6 on page 4--28 describes the functions of the jumpers used on the fixture for verifying the performance of the Tektronix logic analyzers. The jumpers are also used in these procedures. All procedures must be followed sequentially. If any single step fails or is out of calibration, then upon retest, you must start at the first test and follow this section through from start to finish sequentially. Power Supply Checks The following procedures check the DC power supply characteristics. Parameter tested Power supply Equipment required DMM with test leads (item 9) Prerequisites Warm-up time: 30 minutes for adjustment/verification fixture and test equipment 1. Plug the fixture supply into an appropriate AC outlet and connect the DC plug to J26 on the adjustment/verification fixture. 2. Connect the DMM (--) lead to J8 (VEE). 3. Connect the DMM (+) lead to J10 (VDD) and verify a voltage reading of +5.00 V ±100 mV. 4. Leave the (+) lead of the DMM connected to J10 (VDD) and connect the DMM (--) lead to J9 (GND). Verify a voltage reading of +2.00 V ±30 mV. TLA600 Series Logic Analyzer Service Manual 4- 27 Performance Verification: Ajustment/Verification Fixture R38 (VDD adjust ) J8 (VEE) J14 J6 J7 J20 J1 J10 (VDD) J15 DC in J16 J2 J26 R85 J3 Threshold in J22 R321 J19 External Clock in R67 J18 J13 J5 J17 J4 J9 ( GND ) R39 R127 Denotes ground side of resistor DESKEW HOLD EXT SETUP J17 Setup/Hold select J19 Jumper installed: clocked on falling edge Jumper removed: clocked on rising edge 1 INT J15 Ext/Int Clock select 1 2 3 4 5 J16 DESKEW Clock Clock PROBE SETUP 6 J13 P6434 Deskew/Probe setup GND GND J4 Setup/Hold Clock out Figure 4- 11: Adjustment/verification fixture detail Table 4- 6: Adjustment/verification fixture jumper settings 4- 28 Jumper Jumper name Jumper function J13 P6434 Deskew/probe Determines whether checking setup/hold or deskew for the setup P6434 probe (J5) J15 Clock selection Determines whether the internal clock (50.065 MHz) or the external clock (J18, BNC) will drive the circuitry J16 Deskew Selects between minimum or nominal pulse width J17 Setup/hold select Determines whether checking setup time or hold time J19 Clock polarity select Selects polarity of the clock for setup and hold testing TLA600 Series Logic Analyzer Service Manual Performance Verification: Ajustment/Verification Fixture Verify Internal Clock Frequency Use the following procedure to verify the internal clock frequency. Parameter tested Internal clock frequency Equipment required Frequency counter (item 8) Prerequisites Warm-up time: 30 minutes for adjustment/verification fixture and test equipment 1. Set the jumper positions as listed in the table. Jumper Jumper name Jumper setting J13 P6434 Deskew/probe setup 3-5 connected J15 Clock selection INT J16 Deskew 2-3 and 4-5 connected J17 Setup/hold select HOLD J19 Clock polarity select Removed 2. Using the frequency counter, measure the oscillator frequency at pin J1-2. The frequency should match what is listed on the Calibration Data report. 3. Record this measurement on the Calibration Data Report. TLA600 Series Logic Analyzer Service Manual 4- 29 Performance Verification: Ajustment/Verification Fixture Verify Data Output Channel-to-Channel Skew Use the following procedure to verify the channel-to-channel data skew. Parameter tested Channel-to-channel data skew Equipment required Oscilloscope (item 3) 2 DSO probes (item 4) Custom probe tip adapter (see Figure 4-- 10, page 4-- 26) Prerequisites Warm-up time: 30 minutes for adjustment/verification fixture and test equipment 1. Set the jumper positions as listed in the following table. Jumper Jumper name Jumper setting J13 P6434 Deskew/probe setup 3-5 connected J15 Clock selection INT J16 Deskew 2-3 and 4-5 connected J17 Setup/hold select HOLD J19 Clock polarity select Removed 2. Set up the oscilloscope by pressing Setup, Factory Setup, and then OK Confirm Factory Init to return the oscilloscope to default conditions. 3. Set up the oscilloscope as listed below. a. Set up the CH1 and CH2 Vertical menu as follows: H Coupling DC/50 Ω H Fine Scale 200 mV/div H Position --3.00 div CH1 H Position --3.32 div CH2 b. Set up the Horizontal menu as follows: 4- 30 H Time Base Main H Record Length 5000 H Horizontal Scale Main Scale @ 2 ns/div TLA600 Series Logic Analyzer Service Manual Performance Verification: Ajustment/Verification Fixture c. Set up the Trigger menu as follows: H Source CH2 H Coupling DC H Slope + H Level 700 mV H Mode Normal d. Set up the Measure menu as follows: H Select Measurement for CH1 Measure H Gating On e. Set up the Cursor menu as follows: H f. Function V Bars Set up the Acquire menu as follows: H Acquisition Mode Average 90 H Repetitive Signal On 4. Connect CH2 of the oscilloscope to J4-2 on the adjustment/verification fixture. 5. Select Deskew from the Vertical menu of the oscilloscope. NOTE. Observe proper polarity when doing the following steps. See Figure 4--9 on page 4--23 to identify the ground side of the components being measured. 6. Connect the CH1 probe of the oscilloscope to the custom probe tip adapter and measure the signal across R85. 7. Use the large knob at the upper right of the oscilloscope panel to adjust delay until the leading edges of the two waveforms coincide and the displayed value of CH1-CH2 delay is averaged around 0 ±25 ps. 8. Move the CH1 probe to R321, R67, and R39 and press the Run/Stop button to start an acquisition. Verify that the CH1-CH2 delay between any two measurements does not exceed 90 ps. 9. The maximum difference between the three measured values represents the channel-to-channel skew. Record this difference on the Calibration Data Report. TLA600 Series Logic Analyzer Service Manual 4- 31 Performance Verification: Ajustment/Verification Fixture Verify Hold Clock Output Timing Use the following procedure to verify the hold time. Parameter tested Hold time Equipment required Oscilloscope (item 3) 2 DSO probes (item 4) Custom probe tip adapter (see Figure 4-- 10, page 4-- 26) Prerequisites Warm-up time: 30 minutes, adjustment/verification fixture and test equipment 1. Set the jumper positions as listed in the table. Jumper Jumper name Jumper setting J13 P6434 Deskew/probe setup 1-3 and 5-6 connected J15 Clock selection INT J16 Deskew 1-2 and 4-5 connected J17 Setup/hold select HOLD J19 Clock polarity select Disconnected 2. Set up the oscilloscope by pressing Setup, Factory Setup, and then OK Confirm Factory Init to return the oscilloscope to default conditions. 3. Set up the oscilloscope as listed below. a. Set up the CH1 Vertical menu as follows: H Coupling DC/50 Ω H Fine Scale 200 mV/div H Position --3.00 div CH1 H Position --3.32 div CH2 b. Set up the Horizontal menu as follows: 4- 32 H Time Base Main H Record Length 5000 H Horizontal Scale Main Scale @ 2 ns/div TLA600 Series Logic Analyzer Service Manual Performance Verification: Ajustment/Verification Fixture c. Set up the Trigger menu as follows: H Source CH2 H Coupling DC H Slope + H Level 700 mV H Mode Normal d. Set up the Measure menu as follows: H Select Measurement for CH1 Measure H Gating On e. Set up the Cursor menu as follows: H f. Function V Bars Set up the Acquire menu as follows: H Acquisition Mode Average 90 H Repetitive Signal On 4. Connect the CH2 probe of the oscilloscope to J1-2 on the adjustment/verification fixture. 5. Select Deskew from the Vertical menu. NOTE. Observe proper polarity when performing the following steps. See Figure 4--9 on page 4--23 to identify the ground side of the components being measured. 6. Connect the CH1 probe of the oscilloscope to the custom probe tip adapter and measure the signal across R67. 7. Begin the acquisition by pressing the Run/Stop button. 8. Use the large knob at the upper right of the panel to adjust delay until the leading edges of the two waveforms coincide and the displayed value of CH1-CH2 delay is averaged around 0. 9. Connect the CH1 probe to R127. Verify the CH1-CH2 delay is averaged around 0 ns ±100 ps. TLA600 Series Logic Analyzer Service Manual 4- 33 Performance Verification: Ajustment/Verification Fixture 10. The CH1-CH2 delay represents the hold time at R127. Record the hold time at R127 on the Calibration Data Report. 11. Connect the CH1 probe to R321. Verify the CH1-CH2 delay is averaged around 0 ns ±100 ps. 12. The CH1-CH2 delay represents the hold time at R321. Record the hold time at R321 on the Calibration Data Report. Verify Setup Clock Output Timing Use the following procedure to verify the setup time. Parameter tested Setup time Equipment required Oscilloscope (item 3) 2 DSO probes (item 4) Custom probe tip adapter (see Figure 4-- 10, page 4-- 26) Prerequisites Warm-up time: 30 minutes for adjustment/verification fixture and test equipment 1. Set the jumper positions as listed in the table. Jumper Jumper name Jumper setting J13 P6434 Deskew/probe setup 1-3 and 5-6 connected J15 Clock selection INT J16 Deskew 1-2 and 4-5 connected J17 Setup/hold select SETUP J19 Clock polarity select Disconnected 2. Set up the oscilloscope by pressing Setup, Factory Setup, and then OK Confirm Factory Init to return the oscilloscope to default conditions. 3. Set up the oscilloscope as listed below. a. Set up the CH1 Vertical menu as follows: 4- 34 H Coupling DC/50 Ω H Fine Scale 200 mV/div H Position --3.00 div CH1 H Position --3.32 div CH2 TLA600 Series Logic Analyzer Service Manual Performance Verification: Ajustment/Verification Fixture b. Set up the Horizontal menu as follows: H Time Base Main H Record Length 5000 H Horizontal Scale Main Scale @ 2 ns/div c. Set up the Trigger menu as follows: H Source CH2 H Coupling DC H Slope + H Level 700 mV H Mode Normal d. Set up the Measure menu as follows: H Select Measurement for CH1 Measure H Gating On e. Set up the Cursor menu as follows: H f. Function V Bars Set up the Acquire menu as follows: H Acquisition Mode Average 90 H Repetitive Signal On 4. Connect the CH2 probe of the oscilloscope to J1 pin-2 on the adjustment/ verification fixture. 5. Select Deskew from the Vertical menu of the oscilloscope. NOTE. Observe proper polarity when doing the following steps. See Figure 4--9 on page 4--23 to identify the ground side of the components being measured. 6. Connect the CH1 probe of the oscilloscope to the custom probe tip adapter and measure the signal across R67. 7. Press the Run/Stop button to stop the acquisition and read the measurement. 8. Use the large knob at the upper right of the panel to adjust delay until the leading edges of the two waveforms coincide and the displayed value of CH1-CH2 delay is averaged around 0. TLA600 Series Logic Analyzer Service Manual 4- 35 Performance Verification: Ajustment/Verification Fixture 9. Set one of the vertical cursors before the leading edge of the CH 2 pulse, and the other cursor after the leading edge of the CH 1 pulse. 10. Connect the CH1 probe to R127. Verify the CH1-CH2 delay is averaged around 3.0 ns ±100 ps. 11. The CH1-CH2 delay represents the setup time at R127. Record the setup time at R127 on the Calibration Data Report. 12. Connect the CH1 probe to R321. Verify the CH1-CH2 delay is averaged around 3.0 ns ±100 ps. 13. The CH1-CH2 delay represents the setup time at R321. Record the setup time at R321 on the Calibration Data Report. Verify External Clock Input Use the following procedure to verify the external clock input. Parameter tested External Clock Input Equipment required Frequency Counter (item 8) Signal Generator (item 16) Shorting Jumpers (item 14) Prerequisites Warm-up time: 30 minutes for adjustment/verification fixture and test equipment 1. Set the jumper positions as listed in the table. Jumper Jumper name Jumper setting J13 P6434 Deskew/probe setup 1-3 and 5-6 connected J15 Clock selection EXT J16 Deskew 1-2 and 4-5 connected J17 Setup/hold select SETUP J19 Clock polarity select Disconnected 2. Using the signal generator, insert a 225 MHz, 1 Vp-p signal at J18 EXT CLK IN. 3. Using the frequency counter, verify that the data is being output at a 112.5 MHz clocked rate at J1 and J2. 4- 36 TLA600 Series Logic Analyzer Service Manual Calibration Data Report TLA600 Logic Analyzer Instrument model number: Serial number: Certificate number: Verification performed by: Verification date: System Clock Test Data Characteristic Specification Tolerance Clock frequency 10 MHz ±1 kHz (9.9990 MHz-10.0010 MHz) Procedure reference Page 4-- 15, Step 5 Incoming data Outgoing data TLA600 Adjustment Procedures This chapter contains procedures which use the performance verification and adjustment software to adjust the TLA600 Series Logic Analyzers to within factory specifications. The performance verification and adjustment software contains instructions and control programs for adjusting the logic analyzer. The software describes test equipment connections and settings, selects setup parameters, and loads calibration constants into memory. This chapter also contains adjustment procedures for the adjustment/verification fixture which begin on page 5--9. These procedures adjust the logic analyzer for conformance with the warranted characteristics listed in the Specifications chapter of this manual. Adjustments should be done after repair or when any performance verification tests have failed. Prerequisites These procedures ask for the serial number of the instrument under test. You can access the serial number through the logic analyzer application. In the application, go to the System menu, select System Properties, and click on the LA tab. However, you must quit the application before continuing with the performance verification and adjustment software procedures. Only trained service technicians should perform this procedure after meeting the following requirements: H The logic analyzer application must not be running. H The performance verification and adjustment software must be loaded. Refer to Software Installation and Removal beginning on page 2--6. H The logic analyzer requires a 30-minute warm-up time in a +20_ C to +30_ C environment before it is adjusted. Adjustments performed before the operating temperature has stabilized may cause errors in performance. TLA600 Series Logic Analyzer Service Manual 5- 1 TLA600 Adjustment Procedures Using the Software This section describes how to perform adjustments using the performance verification and adjustment software. Performing the Adjustments There are no manual adjustments for the logic analyzer. Instead, the performance verification and adjustment software adjusts the instrument hardware using external test equipment connections that you provide in response to prompts on the screen. Upon successful completion of each adjustment, the performance verification and adjustment software automatically loads the new calibration data into memory. Adjustment Sequences and Dependencies The performance verification and adjustment software allows you to run groups of adjustments, or sequences. A sequence consists of one or more individual adjustments. Normally you will perform a RUN FULL SEQUENCE, which executes each adjustment in the proper order. The performance verification and adjustment software also provides instructions for running each adjustment individually. However, you should only perform individual adjustments while troubleshooting. Adjustment After Repair You must perform a full adjustment sequence following replacement of any circuit board. Test Equipment In addition to the basic system setup, you will need some of the equipment shown in Table 4--1 on page 4--3 in the Performance Verification chapter. Each procedure includes a table that calls out the equipment used. Use Table 4--1 to identify required equipment specifications. If you substitute equipment, always choose instruments that meet or exceed the minimum requirements specified. 5- 2 TLA600 Series Logic Analyzer Service Manual TLA600 Adjustment Procedures Adjustment Instructions This section describes how to perform adjustments using the performance verification and adjustment software. Using the PV/Adjust Software The performance verification and adjustment software contains instructions for performing the adjustments. The basic steps for completing the procedures follow: 1. Start the program, enter user and product identification information and temperature and humidity. 2. If you are using P6417 or P6418 probes, label one probe as the Reference Probe, and the other probe as the Probe Under Test. 3. If you are using a P6434 probe, label the probe channel group identified as the pin 38 side as Probe A. Label the probe channel group identified as the pin 1 side as Probe B, refer to Figure 5--1. Pin 1 label Recess on pin 1 side Pin 38 side Beveled corners Pin 1 side Beveled corners End view Pin 38 side Figure 5- 1: P6434 probe detail 4. Select a full adjustment sequence. 5. Connect the test equipment. TLA600 Series Logic Analyzer Service Manual 5- 3 TLA600 Adjustment Procedures 6. Set up the test equipment for the output signals described by on-screen instructions and by the connection illustration for each test. 7. Run each adjustment step as instructed by following the on-screen prompts. 8. After completing all the adjustment steps, view the results to confirm that the adjustment was successful. Troubleshooting If any adjustments fail, use the following steps to troubleshoot the problems: H Check all test equipment for improper or loose connections. H Check that all test equipment is powered on and has the proper warm-up time. H Verify that the adjustment/verification fixture LED is lighted, the jumper positions match the on-screen instructions, and the external connections are correct. H Rerun the diagnostics and self calibration (SELF_CAL). H Run the adjustment procedures a second time to verify the failure. Tests Performed The adjustment procedures check and adjust the following parameters of the logic analyzer: H SELF_CAL, an internal routine in the application software that adjusts acquisition thresholds, internal module and signal timing. H Deskew, an adjustment routine in the performance verification and adjustment software which time-aligns all channels. NOTE. Do not mix probe types (P6417, P6418 and P6434) when performing the deskew procedure. 5- 4 TLA600 Series Logic Analyzer Service Manual TLA600 Adjustment Procedures Adjustment Procedures Refer to the following procedures to identify the initial setup for each adjustment. Then follow the program instructions to complete the adjustments. Self Calibration SELF_CAL is an internal routine that optimizes performance at the current ambient temperature to maximize measurement accuracy. No external equipment or user actions are needed to complete the procedure. The logic analyzer saves data generated by the self calibration in memory. Passing the self calibration provides a higher level of confidence of functionality. NOTE. Performing the self calibration does not guarantee that all parameters operate within limits. Operation within limits is achieved by performing the adjustment procedures. Verification of operation within limits is accomplished by performing the performance verification procedures. When to Perform the Self Calibration. You can run the self calibration at any time during normal operation. To maintain measurement accuracy, perform the self calibration if the following conditions occur: TLA600 Procedure 1: SELF_CAL H After repair and replacement of any circuit boards H It has been a year since the last self calibration was run Perform the following steps to run the SELF_CAL routine. Before beginning this procedure, be sure that no active signals are applied to the instrument. Self calibration can fail if signals are applied to the probe during the procedure. Prerequisites Warm-up time: 30 minutes Power-up diagnostics pass 1. Ensure that the logic analyzer has had a 30-minute warm up before attempting the self calibration, and that the logic analyzer application is running. 2. Disconnect any probes connected to the logic analyzer. 3. Select the Calibration and Diagnostics property sheet from the System menu. 4. Select the Self Calibration tab. TLA600 Series Logic Analyzer Service Manual 5- 5 TLA600 Adjustment Procedures 5. Click the Run button to start the self calibration. The self calibration takes several minutes to complete, depending on the number of channels in the instrument. Upon successfully completing the self calibration, the status changes from Running to Calibrated, and the Date and Time field is set to the present. TLA600 Procedure 2: Deskew The deskew procedure is used to calibrate and adjust the timing alignment of the probe data channels and receivers. Perform the deskew procedure: H Once a year H If you have replaced the acquisition board (the probe constants are stored on the acquisition board) This procedure checks and adjusts the time alignment of all channels. There are no manual adjustments. SW test name Deskew Equipment required Adjustment/verification fixture and fixture supply (item 2 ) Two P6417 or P6418 Logic Analyzer probes (item 6), OR One P6434 Logic Analyzer probe (item 7) Prerequisites Warm-up time: 30 minutes for the TLA600 and test equipment Test equipment connected as shown in Figure 5-- 2 Diagnostics and SELF_CAL pass J5 C2/C3/CK3 Channel/Group Fixture supply Adjustment/verification fixture J3 Clock channel J26 J1 J2 Figure 5- 2: Initial deskew test setup 5- 6 TLA600 Series Logic Analyzer Service Manual TLA600 Adjustment Procedures 1. If the logic analyzer application is running, quit the application. 2. Verify that all of the prerequisites listed previously are met for the procedure. 3. Run the performance verification and adjustment software as described in the Running the LA and DSO Software on page 2--6. Run the C:\Tekcats\Tla_la program and select the correct options. NOTE. These procedures assume that a P6418 or P6417 probe is being used. If you are using a P6434 probe, use J5, the Data Out connector on the adjustment/ verification fixture for performing the deskew test. Observe proper polarity: pin 1 to pin 1. 4. Follow the on-screen prompts to perform the adjustment procedure. 5. Verify no failures occur for each test. If desired, you can print or save the results of the deskew adjustment operation. However, this is not required for calibration. The file will be over written when the next adjustment or performance verification sequence is run. If failures do occur, confirm that diagnostics and SELF_CAL pass. Completing the Adjustment Steps After completing the adjustments, obtain a copy of the test results and verify that all tests passed. Run the Performance Verification Procedures to verify that the all parameters are within the allowable specifications. TLA600 Series Logic Analyzer Service Manual 5- 7 TLA600 Adjustment Procedures 5- 8 TLA600 Series Logic Analyzer Service Manual Adjustment/Verification Fixture Adjustments This section contains the adjustment procedures for the adjustment/verification fixture. Most of the adjustments consist of moving jumpers or wires that change the delays at specific locations on the board. Once these jumpers have been set (soldered) you should rarely have to change them. Each procedure includes a table that calls out the equipment used. Use Table 4--1 on page 4--3 to identify required equipment specifications. If you substitute equipment, always choose instruments that meet or exceed the minimum requirements specified. Adjustment/Verification Fixture Adjustment Equipment Required Adjustment/verification fixture and power supply (item 2) Oscilloscope (item 3) Two 1 MΩ 10X oscilloscope probe (item 4) Frequency counter (item 8) Signal generator (item 16) 1X Probe (item 5) DMM with test leads (item 9) Shorting jumpers (item 14) Prerequisites Warm-up time: 30 minutes for adjustment/verification fixture and test equipment 1. Warm up the adjustment/verification fixture and all test equipment. a. Connect the external power supply to fixture and perform the power supply checks and other functional steps while allowing the fixture to warm up for 20 minutes. b. Turn on the oscilloscope, signal generator, and frequency counter. Allow them to warm up for 20 minutes. TLA600 Series Logic Analyzer Service Manual 5- 9 Adjustment/Verification Fixture Adjustment Power Supply Checks The following procedure checks the DC power supply. Refer to Figure 5--3 for test point locations. Parameter tested Power supply Equipment Required DMM with test leads (item 9) Prerequisites Warm-up time: 30 minutes for adjustment/verification fixture and test equipment 2. Connect the DMM (--) lead to J8 (VEE). 3. Connect the DMM (+) lead to J10 (VDD) and check for a voltage reading of +5 V ± 0.10 V. 4. Connect the DMM negative (--) lead to J9 (GND). 5. Connect the DMM positive (+) lead to J10 (VDD) and adjust R38 for a voltage reading of +2.00 V ±10 mV. 5- 10 TLA600 Series Logic Analyzer Service Manual Adjustment/Verification Fixture Adjustment R38 (VDD adjust ) J8 (VEE) J6 J14 J7 J20 J1 J10 (VDD) J15 J16 J2 J26 R85 J3 R321 J19 External Clock in C17 J18 Vcc R67 GND J13 J5 J17 J4 J9 ( GND ) Deskew Hold Ext Setup J17 Hold/Setup select J19 Jumper installed: clocked on falling edge Jumper removed: clocked on rising edge Int J15 Ext/Int Clock select 1 2 3 4 5 J16 Deskew R39 R127 1 Probe setup J13 P6434 Deskew/Probe setup Clock Clock GND GND J4 Setup/Hold Clock out Figure 5- 3: Adjustment/verification fixture circuit board layout TLA600 Series Logic Analyzer Service Manual 5- 11 Adjustment/Verification Fixture Adjustment Internal Clock Frequency Check The following procedure checks the internal clock frequency. Parameter tested Internal Clock Frequency Equipment Required Adjustment/verification fixture and power supply (item 2) Frequency counter (item 8) Signal generator (item 16) Shorting jumpers (item 14) Prerequisites Warm-up time: 30 minutes for adjustment/verification fixture and test equipment 1. Set up the frequency counter as follows: a. Right input (10 Hz -- 100 MHz) b. Select Direct Resolution: 10 Hz c. 1 M input termination d. X1 Attenuation 2. Move one jumper on J16 to DESKEW (pins 2 and 3). Keep the other jumper connected to pins 4 and 5. 3. Using the frequency counter, measure the oscillator frequency at J1. It will measure 50.0650 MHz ±0.01% (50.0600 -- 50.0700). 5- 12 TLA600 Series Logic Analyzer Service Manual Adjustment/Verification Fixture Adjustment Data Pulse Width Adjustment The following procedure adjusts the data pulse width. Parameter tested Data Pulse Width Equipment Required Adjustment/verification fixture and power supply (item 2) Oscilloscope (item 3) Two 1 MΩ 10X oscilloscope probe (item 4) Shorting jumpers (item 14) Prerequisites Warm-up time: 30 minutes for adjustment/verification fixture and test equipment 1. Set up the oscilloscope by pressing Setup, and then press Factory Setup, and then press OK Confirm Factory Init to return the oscilloscope to default conditions. 2. Set up the oscilloscope as listed below. a. Set up the CH1 Vertical menu as follows: H Coupling DC/50 Ω H Fine Scale 200 mV/div H Position --3.32 div b. Set up the Horizontal menu as follows: H Time Base Main H Record Length 5000 H Horizontal Scale Main Scale @ 1 ns/div c. Set up the Trigger menu as follows: H Source CH1 H Coupling DC H Slope + H Level 700 mV H Mode Normal d. Set up the Measure menu as follows: H Select Measurement for CH1 Measure H Gating Off TLA600 Series Logic Analyzer Service Manual 5- 13 Adjustment/Verification Fixture Adjustment e. Set up the Cursor menu as follows: H f. Function V Bars Set up the Acquire menu as follows: H Acquisition Mode Sample H Repetitive Signal On 3. Move shorting jumpers at J16 to MIN PULSE. Connect the jumpers to pins 1--2, and pins 3--4. a. Connect the CH1 probe to J2--2. Measure the pulse width using the vertical cursor bars. b. Using the delay taps on Delay DATA PULSE ADJ, add or subtract the appropriate delay to ensure a 1.9 ns (±50 ps) data pulse width. See Note that follows. NOTE. The trace loops on the circuit board add delay according to their length. The longer the loop, the more delay is added to the circuit. The loops, from shortest to longest, add approximately 50 ps, 100 ps, 200 ps, 400 ps, and 800 ps respectively. The length of the jumper wire also adds delay, so care should be used in the length of the jumper wire you add. It will be necessary to add small loops to the wire jumpers to obtain correct delays and pulse widths on some of the following adjustments. c. Move shorting jumpers at J16 to DESKEW. Connect the jumper to pins 4--5, and 2--3. d. With the CH1 probe still connected to J2--2, measure the pulse width using the vertical cursor bars. e. Using the delay taps on Delay DESKEW PULSE ADJ add or subtract the appropriate delay to ensure a 8--10 ns pulse width. See Note following step b. 5- 14 TLA600 Series Logic Analyzer Service Manual Adjustment/Verification Fixture Adjustment Data Timing Adjustment The following procedure is used to adjust the timing. Parameter tested Data Timing Adjustment Equipment Required Adjustment/verification fixture and power supply (item 2) Oscilloscope (item 3) Two 1 MΩ 10X oscilloscope probe (item 4) Shorting jumpers (item 14) Prerequisites Warm-up time: 30 minutes for adjustment/verification fixture and test equipment 1. Install the following jumpers: Jumper Jumper name Jumper setting J13 P6434 Deskew/probe setup 3-5 connected J15 Clock selection INT J16 Deskew 2-3 and 4-5 connected J17 Setup/hold select HOLD J19 Clock polarity select Removed 1. Set up the oscilloscope by pressing Setup, and then press Factory Setup, and then press OK Confirm Factory Init to return the oscilloscope to default conditions. 2. Set up the oscilloscope as listed below. a. Set up the CH1 Vertical menu as follows: H Coupling DC/50 Ω H Fine Scale 200 mV/div H Position --3.32 div b. Set up the Horizontal menu as follows: H Time Base Main H Record Length 5000 H Horizontal Scale Main Scale @ 200 ps/div TLA600 Series Logic Analyzer Service Manual 5- 15 Adjustment/Verification Fixture Adjustment c. Set up the Trigger menu as follows: H Source CH2 H Coupling DC H Slope + H Level 700 mV H Mode Normal d. Set up the Measure menu as follows: H Select Measurement for CH1 Measure H Gating Off e. Set up the Cursor menu as follows: H f. Function V Bars Set up the Acquire menu as follows: H Acquisition Mode Sample H Repetitive Signal On 3. Connect the CH2 probe to J4 and trigger on the rising edge of pulse. 4. Connect the CH1 probe to R85 (CLK0) and position the rising-edge on the center graticule. 5. Connect the CH1 probe to R67 (P6434 A) and record the positive delay between R85 and R67 using the vertical cursor bars on the oscilloscope. 6. Using the delay taps on Delay CLK1 ADJ, add or subtract the appropriate delay to ensure zero skew (±25 ps) between R85 and R67 (P6434 A). See Note on page 5--14. 7. Connect the CH1 probe to R39 (P6434 B) and record the positive delay between R85 and R39. 8. Using the delay taps on Delay CLK2 ADJ, add or subtract the appropriate delay to ensure zero skew (±25 ps) between R85 and R39 (P6434 B). See Note on page 5--14. 9. Connect the CH1 probe to R321 (P6434 deskew CLK) and record the positive delay between R85 and R321. 10. Using the delay taps on Delay DESKEW CLK ADJ (next to P6434) add or subtract the appropriate delay to ensure zero skew (±25 ps) between R85 and R321 (P6434 deskew CLK). See Note on page 5--14. 5- 16 TLA600 Series Logic Analyzer Service Manual Adjustment/Verification Fixture Adjustment Hold Time Adjustment The following procedure is used to adjust the hold time. Parameter tested Hold Time Adjustment Equipment Required Adjustment/verification fixture and power supply (item 2) Oscilloscope (item 3) Two 1 MΩ 10X oscilloscope probe (item 4) Shorting jumpers (item 14) Prerequisites Warm-up time: 30 minutes for adjustment/verification fixture and test equipment 1. Install the following jumpers: Jumper Jumper name Jumper setting J13 P6434 Deskew/probe setup 1-3 and 5-6 connected J15 Clock selection INT J16 Deskew 1-2 and 4-5 connected J17 Setup/hold select HOLD J19 Clock polarity select Removed 1. Set up the oscilloscope by pressing Setup, and then press Factory Setup, and then press OK Confirm Factory Init to return the oscilloscope to default conditions. 2. Set up the oscilloscope as listed below. a. Set up the CH1 Vertical menu as follows: H Coupling DC/50 Ω H Fine Scale 200 mV/div H Position --3.32 div b. Set up the Horizontal menu as follows: H Time Base Main H Record Length 5000 H Horizontal Scale Main Scale @ 200 ps/div TLA600 Series Logic Analyzer Service Manual 5- 17 Adjustment/Verification Fixture Adjustment c. Set up the Trigger menu as follows: H Source CH2 H Coupling DC H Slope + H Level 700 mV H Mode Normal d. Set up the Measure menu as follows: H Select Measurement for CH1 Measure H Gating Off e. Set up the Cursor menu as follows: H f. Function V Bars Set up the Acquire menu as follows: H Acquisition Mode Sample H Repetitive Signal On 3. Connect the CH2 probe to J1 and trigger on the rising edge of the pulse. Connect the CH1 probe to R67 and center the rising edge on the center horizontal graticule. 4. Connect the CH1 probe to R127 and record the difference in timing between R67 and R127 using the vertical cursor bars on the oscilloscope. 5. Using the delay taps on delay labeled HOLD ADJ, add or subtract the appropriate delay to ensure zero skew (±25 ps) between R67 and R127 (J4 CLK Out). See Note on page 5--14. 6. Connect the CH1 probe to R321 and record the difference in timing between R67 and R321 using the vertical cursor bars on the (P6434 Setup/Hold timing). 7. Using the delay taps on delay labeled SU/HOLD CLK ADJ. Add or subtract the appropriate delay to ensure zero skew (±25 ps) between R67 and R321 (P6434 deskew CLK Out). See Note on page 5--14. 8. Verify that that J17 has a jumper installed in the HOLD position. 5- 18 TLA600 Series Logic Analyzer Service Manual Adjustment/Verification Fixture Adjustment 9. Connect the CH1 probe to J2 and center the rising edge on the center horizontal graticule. Trigger on the CH2 probe connected to J1. 10. Connect the CH1 probe to J4 (SU/HOLD CLK OUT) and verify for a 0 skew (±25 ps). Setup Time Adjustment The following procedure is used to adjust the setup time. Parameter tested Setup Time Adjustment Equipment Required Adjustment/verification fixture and power supply (item 2) Oscilloscope (item 3) Two 1 MΩ 10X oscilloscope probe (item 4) Shorting jumpers (item 14) Prerequisites Warm-up time: 30 minutes for adjustment/verification fixture and test equipment 1. Install the following jumpers: Jumper Jumper name Jumper setting J13 P6434 Deskew/probe setup 1-3 and 5-6 connected J15 Clock selection INT J16 Deskew 1-2 and 4-5 connected J17 Setup/hold select SETUP J19 Clock polarity select Removed 2. Set up the oscilloscope by pressing Setup, and then press Factory Setup, and then press OK Confirm Factory Init to return the oscilloscope to default conditions. 3. Set up the oscilloscope as listed below. a. Set up the CH1 Vertical menu as follows: H Coupling DC/50 Ω H Fine Scale 200 mV/div H Position --3.32 div b. Set up the Horizontal menu as follows: H Time Base TLA600 Series Logic Analyzer Service Manual Main 5- 19 Adjustment/Verification Fixture Adjustment H Record Length 5000 H Horizontal Scale Main Scale @ 500 ps/div c. Set up the Trigger menu as follows: H Source CH2 H Coupling DC H Slope + H Level 700 mV H Mode Normal d. Set up the Measure menu as follows: H Select Measurement for CH1 Measure H Gating Off e. Set up the Cursor menu as follows: H f. Function V Bars Set up the Acquire menu as follows: H Acquisition Mode Sample H Repetitive Signal On 4. Using the delay taps on Delay SETUP ADJ., add or subtract the appropriate delay to ensure a 3.0 ns (±25 ps) timing difference between R67 and R127 (J4 -- SU/HOLD CLK OUT). See Note on page 5--14. 5. Install a jumper at J19 and verify that the signal at R127 changes to a Falling Edge. 6. After completing the adjustment/verification fixture adjustment procedure, do the performance verification procedure that starts on page 4--21. 5- 20 TLA600 Series Logic Analyzer Service Manual Maintenance This chapter provides procedures for inspecting and cleaning the logic analyzer, removing and replacing internal chassis components, and isolating problems to the board or replacement part level. To repair, you must exchange or replace the failed part; this manual does not provide component-level procedures for isolating components on the failed part. Preparation The information in this chapter is designed for use by qualified service personnel. Read the Safety Summary at the front of this manual before attempting any procedures in this chapter. Refer to the Operating Information chapter for information on the location of controls, indicators, and connectors used with the chassis. Preventing ESD When performing any service which requires internal access to the logic analyzer, adhere to the following precautions to avoid damaging internal circuit boards and their components due to electrostatic discharge (ESD). CAUTION. Many components within the chassis are susceptible to staticdischarge damage. Service the chassis only in a static-free environment. Observe standard handling precautions for static-sensitive devices while servicing the chassis. Always wear a grounded wrist strap, or equivalent, while servicing the chassis. 1. Minimize handling of static-sensitive circuit boards. 2. Transport and store static-sensitive circuit boards in their static protected containers or on a metal rail. Label any package that contains static-sensitive boards. 3. Discharge the static voltage from your body by wearing a grounded antistatic wrist strap while handling these circuit boards. Do service of static-sensitive circuit boards only at a static-free work station. 4. Nothing capable of generating or holding a static charge should be allowed on the work station surface. TLA600 Series Logic Analyzer Service Manual 6- 1 Maintenance 5. Handle circuit boards by the edges when possible. 6. Do not slide the circuit boards over any surface. 7. Avoid handling circuit boards in areas that have a floor or work-surface covering capable of generating a static charge. WARNING. To avoid electric shock, always power off the chassis and disconnect the power cord before cleaning or servicing the chassis. Inspection and Cleaning The logic analyzer is inspected mechanically and electrically before shipment. It should be free of marks or scratches and should meet or exceed all electrical specifications. To confirm this, inspect the chassis for physical damage incurred during transit. Retain the chassis packaging in case shipment for repair is necessary. If there is damage or deficiency, contact your local Tektronix representative. Cleaning procedures consist of exterior and interior cleaning of the chassis. Clean the chassis as needed, based on the operating environment. Interior Cleaning Use a dry, low-velocity stream of air to clean the interior of the chassis. Use a soft-bristle, non-static-producing brush for cleaning around components. If you must use a liquid for minor interior cleaning, use a 75% isopropyl alcohol solution and rinse with deionized water. Exterior Cleaning Clean the exterior surfaces of the chassis with a dry lint-free cloth or a softbristle brush. If any dirt remains, use a cloth or swab dipped in a 75% isopropyl alcohol solution. Use a swab to clean narrow spaces around controls and connectors. Do not use abrasive compounds on any part of the chassis that may damage the chassis. Clean the On/Standby switch using a dampened cleaning towel. Do not spray or wet the switch directly. 6- 2 TLA600 Series Logic Analyzer Service Manual Maintenance CAUTION. Avoid getting moisture inside the chassis during exterior cleaning; use just enough moisture to dampen the cloth or swab. Do not wash the front-panel On/Standby switch. Cover the switch while washing the chassis. Use only deionized or distilled water when cleaning. Use a 75% isopropyl alcohol solution as a cleanser and rinse with deionized or distilled water. Do not use chemical cleaning agents; they may damage the chassis. Avoid chemicals that contain benzene, toluene, xylene, acetone, or similar solvents. Flat Panel Display Cleaning The logic analyzer display is a soft plastic display and must be treated with care during cleaning. CAUTION. Improper cleaning agents or methods can damage the flat panel display. Avoid using abrasive cleaners or commercial glass cleaners to clean the display surface. Avoid spraying liquids directly on the display surface. Avoid scrubbing the display with excessive force. Clean the flat panel display surface by gently rubbing the display with a clean-room wipe (such as Wypall Medium Duty Wipes, #05701, available from Kimberly-Clark Corporation). If the display is very dirty, moisten the wipe with distilled water or a 75% isopropyl alcohol solution and gently rub the display surface. Avoid using excess force or you may damage the plastic display surface. TLA600 Series Logic Analyzer Service Manual 6- 3 Maintenance 6- 4 TLA600 Series Logic Analyzer Service Manual Removal and Installation Procedures This section contains procedures for removal and installation of field-replaceable parts. This section is set up as a series of tasks. Preparation WARNING. Before performing this or any other procedure in this manual, read the Safety Summary found at the beginning of this manual. To prevent possible injury to service personnel or damage to the logic analyzer, read Installation in Chapter 2, and Preventing ESD on page 6--1 in this section. WARNING. Dangerous voltages may be present. Before performing any procedure in this subsection, disconnect the power cord from the line voltage source. Failure to do so could cause serious injury or death. General Instructions NOTE. Read the following general instructions before removing a part. Following these instructions helps ensure that you remove the part to be serviced while removing the minimum number of additional parts. First read over the Summary of Procedures that follows to understand how the procedures are grouped. Then see Table 6--1, page 6--6 for a list of the tools needed to remove and install replaceable parts in this logic analyzer. If you are removing a part for service, begin by looking up the procedure for that part. If any procedures are listed as required in advance in order to gain access to the part, perform those procedures first. TLA600 Series Logic Analyzer Service Manual 6- 5 Removal and Installation Procedures Equipment Required Most parts in this logic analyzer can be removed with a screwdriver with a T-15 Torx tip. Table 6- 1: Tools required for module removal Item no. Name Description General tool number 1 Screwdriver handle Accepts TorxR-driver bits 620-440 2 T-10 Torx tip Used for removing the electrical or 640-235 optical module chassis. TorxR-driver bit for T-10 size screw heads 3 T-15 Torx tip Used for removing most the instrument’s screws. TorxR-driver bit for T-15 size screw heads 640-247 4 T-20 Torx tip Used for removing the handle hardware. TorxR-driver bit for T-20 size screw heads 640-250 5 1/ inch flat-bladed 8 Screwdriver for unlocking cable connectors Standard tool 6 #0 phillips screwdriver Screwdriver for removing small phillips screws, CD, floppy drive Standard tool 7 #1 phillips screwdriver Screwdriver for removing small phillips screws, hard drive Standard tool 8 Angle-Tip Tweezers Used to remove front panel knobs Standard tool 9 3/ 16 inch open-end wrench Used to remove the rear panel nut posts Standard tool 10 5/ 16 inch open-end wrench Used to remove the rear panel nut posts Standard tool 11 9/ inch open-end wrench Used to remove the four bnc nuts on Standard tool the rear panel screwdriver 6- 6 16 TLA600 Series Logic Analyzer Service Manual Removal and Installation Procedures Removing the Trim and Covers Remove the trim and covers as shown in Figures 6--1 and 6--2 starting on page 6--9, by following this procedure. 1. Turn the logic analyzer off. 2. Remove the power cord and all probes. 3. Remove the front panel trim: Grasp the trim ring by its top edge and pull toward you to remove the three plastic snaps. (Alternatively, you can use a flat-bladed screwdriver or other small prying tool to help you detach the snaps.) 4. Remove the top cover trim. a. Remove the accessory pouch; it snaps off. b. Remove the four T-15 Torxdrive screws that secure the top cover trim to the instrument. The T-15 Torxdrive screws also secure the snap studs to the top cover. c. Remove the top cover trim from the instrument. 5. Remove the carrying handle and right/left side trim. a. Remove the T-20 Torxdrive screws that secure the handle to the instrument. Remove the handle from the instrument. b. Slide the side trim panels toward the rear of the instrument allowing the tabs to clear the cover openings, then pull out to remove the panels from the instrument. 6. Reinstallation: Do in reverse steps 2 through 5 to reinstall the appropriate trim. 7. Remove the input panel; Remove the three T-15 Torxdrive screws that secure the input panel to the instrument. 8. Remove the bottom cover (with feet) as shown in Figure 6--3 on page 6--11 by following this procedure. a. Remove the four T-15 Torxdrive screws that secure the bottom cover to the instrument. b. Remove the bottom cover from the instrument. 9. Reinstallation: Do in reverse steps 8a and 8b to reinstall the bottom cover. 10. Remove the left and right covers as shown in Figure 6--3 on page 6--11 by following this procedure. TLA600 Series Logic Analyzer Service Manual 6- 7 Removal and Installation Procedures NOTE. All mounting screw holes are indicated by a star etched around the mounting hole. a. Remove the eleven T-15 Torxdrive screws that secure the covers to the top and both sides of the chassis. b. Remove the seven T-15 Torxdrive screws that secure the covers to the bottom of the chassis. c. Pull the bottom-right cover down and slide to the right to remove from the instrument. Pull the top-left cover upward and slide to the left to remove from the instrument. CAUTION. Take care not to bind or snag the covers on the instrument’s internal cabling as you remove or install. 11. Reinstallation: Do in reverse steps 10a through 10c to reinstall the cabinet. 6- 8 TLA600 Series Logic Analyzer Service Manual Removal and Installation Procedures Snap stud (4) T-15 Torxdrive screw (4) Top cover trim Left side trim Right side trim Front panel trim Carrying handle Input panel T-20 Torxdrive screw (2) T-15 Torxdrive screw (3) To remove the trim ring, grasp its top edge and flex it toward you before pulling upward. Figure 6- 1: Trim and covers TLA600 Series Logic Analyzer Service Manual 6- 9 Removal and Installation Procedures T-15 Torxdrive screw (4) Snap stud (4) Top cover trim Left side trim Closed face trim To remove the trim ring, grasp its top edge and flex it toward you before pulling upward. Figure 6- 2: Closed face trim ring and covers (TLA 60X Series) 6- 10 TLA600 Series Logic Analyzer Service Manual Removal and Installation Procedures T-15 Torxdrive screw (5) Top left cover All left and right cover mounting holes are indicated as shown. Bottom right cover T-15 Torxdrive screw (11) T-15 Torxdrive screw (4) Bottom cover Figure 6- 3: Internal covers TLA600 Series Logic Analyzer Service Manual 6- 11 Removal and Installation Procedures Adding Memory To add memory to your logic analyzer, follow these instructions. 1. Remove the trim and covers by following the procedure on page 6--7. 2. Install the memory in the location shown in Figure 6--4. Memory board(s) Figure 6- 4: Memory board location 3. Install the trim and covers by following the procedure on page 6--6. 4. Verify the operation by following the procedure on page 6--40. 6- 12 TLA600 Series Logic Analyzer Service Manual Removal and Installation Procedures Removing the Display To remove the display, follow these instructions: 1. Remove the trim and covers by following the procedure on page 6--7. CAUTION. To avoid damage to the front panel Standby/On switch assembly, do not set the Display module assembly on a work surface. Sliding the instrument over the edge of the work surface could break off the Standby/On switch assembly. a. Remove the four T-15 Torxdrive screws that secure the Display assembly to the chassis as shown in Figure 6--5, page 6--14. b. Grasp the top edge of the Display assembly and pull forward far enough to allow access to the flex cable connector. c. Disconnect J2 flex cable from the display assembly. Remove the display module assembly from the instrument. d. Lift the bottom edge of the flat panel display assembly and rotate it upward and off the front face of the instrument. 2. To install the display, follow these instructions: a. Connect J2 cable to the panel display assembly to the interface board. b. Replace the flat panel display assembly into the instrument. c. Install the screws that secure the flat panel display assembly to the instrument as shown in Figure 6--5. 3. Install the trim and covers by following the procedure on page 6--6. TLA600 Series Logic Analyzer Service Manual 6- 13 Removal and Installation Procedures T-15 Torxdrive screw (4) Hard drive assembly J2 Flex cable Display module assembly Figure 6- 5: Flat panel display assembly removal Display Adapter Board To remove the display adapter board perform the following: 1. Remove the trim and covers by following the procedure on page 6--7. 2. Remove the display assembly by following the procedure on page 6--18. 3. Remove the Display Adapter Board: See Figure 6--6, page 6--15. a. Disconnect J1, J3, and J5 cable from the Display Adapter board. b. Remove the three T-15 Torxdrive screws that secure the Display Adapter circuit board to the Display assembly. Remove the Display Adapter from the assembly. 4. Reinstallation: Do in reverse steps a and b to reinstall the board. 6- 14 TLA600 Series Logic Analyzer Service Manual Removal and Installation Procedures Display module J1 J5 J3 Display adaptor board Back view J2 T-15 Torxdrive screw (3) Figure 6- 6: Display adaptor board removal Standby/On Switch Flex Circuit Removal 1. Remove the trim and covers by following the procedure on page 6--7. 2. Remove the display assembly by following the procedure on page 6--18. 3. Orient the oscilloscope: Set the oscilloscope so its bottom is down on the work surface and its front is facing you. 4. Remove the Standby/On Switch flex circuit: See Figure 6--7, page 6--16. a. Peel the Standby/On switch flex circuit away from the front of the display assembly. b. Disconnect the flex circuit from J3 on the Display Adapter circuit board. c. Grasp the flex circuit and pull it out of the Display assembly. 5. Reinstallation: Do following procedure to reinstall the Standby/On Switch. a. Remove the protective backing on the Standby/On switch flex circuit. TLA600 Series Logic Analyzer Service Manual 6- 15 Removal and Installation Procedures b. Slide the connector end of the Standby/On switch flex circuit through the slot in the Display assembly. Make sure the flex circuit connector aligns with J3 on the Display Adapter circuit board. c. Align the holes in the flex circuit to the two index posts on the front side of the Display assembly. d. Firmly press the flex circuit to the Display assembly chassis surface. Display assembly Standby/On switch flex circuit Front view Display adaptor board Standby/On switch flex circuit J3 Back view Figure 6- 7: Standby/On switch flex circuit removal 6- 16 TLA600 Series Logic Analyzer Service Manual Removal and Installation Procedures Removing the Closed Face Bracket (TLA 60X Series) To remove the closed face bracket for a TLA 60X instrument, follow these instructions: 1. Remove the ten T-15 Torxdrive screws that secure the closed face bracket to the logic analyzer as shown in Figure 6--8. 2. Disconnect the ribbon cable connector J2 from the display circuit board. To install the closed face bracket, follow these instructions: 3. Connect the ribbon cable connector from the display circuit board. 4. Replace the closed face bracket into the logic analyzer install the ten T-15 Torxdrive screws removed in the previous step. Display board J2 ribbon cable connector Hard drive assembly Closed face bracket T-15 Torxdrive screw (10) Figure 6- 8: Removal of the closed face bracket TLA600 Series Logic Analyzer Service Manual 6- 17 Removal and Installation Procedures Front-Panel Knobs 1. Set the instrument so its bottom is down on the work surface and its front is facing you. 2. Remove the knob(s): Grasp any knob you want to remove and pull it straight out from the front panel 1@4 inch to create some clearance between the base of the knob and the front panel. Insert the angled-tip tweezers between the knob and front panel and use them to remove the knob. See Figure 6--9. 3. Reinstallation: To reinstall, align knob to shaft and push it in until it snaps. CAUTION. To prevent damage to the encoders located onto the circuit board, apply pressure to the encoders while pushing the knob on the shaft. Figure 6- 9: Knob removal 6- 18 TLA600 Series Logic Analyzer Service Manual Removal and Installation Procedures Front Panel Assembly To remove the front panel assembly locate the Front Panel assembly, see Figure 6--10, page 6--20 and follow these procedures: 1. Remove the front panel knobs by following the procedure on page 6--17. 2. Remove the trim and covers by following the procedure on page 6--6. 3. Set the instrument so its bottom is down on the work surface and its front panel is facing you. a. Remove the six T-15 Torxdrive screws that secure the Front panel assembly to the front chassis. See Figure 6--10, page 6--20. b. Grasp the top of Front Panel assembly and pull forward to allow access to the ribbon cable connector on the front panel board. c. Use the 1@8 inch flat-bladed screwdriver to carefully lift JR1 cable connector lock up to disconnect JR1 flex cable from the display module assembly. See Figure 6--11, page 6--21. Note the connector’s pin 1 index mark and the black stripe on the cable for later reassembly. d. Pull the Front Panel assembly forward and remove from the instrument. 4. Reinstallation: Do in reverse steps a through d to reinstall the front panel assembly. TLA600 Series Logic Analyzer Service Manual 6- 19 Removal and Installation Procedures Floppy disk support tab (2) Chassis slot (2) JR1 ribbon cable Front panel assembly Front panel square opening (2) T-15 Torxdrive screw (6) Figure 6- 10: Front panel assembly removal 6- 20 TLA600 Series Logic Analyzer Service Manual Removal and Installation Procedures Black stripe toward connector Screwdriver Figure 6- 11: JR1 flex cable connector removal Front Panel Board Locate the Front Panel board assembly, see Figure 6--12, page 6--22. 1. Remove the trim and covers by following the procedure on page 6--6. 2. Remove the front panel knobs by following the procedure on page 6--17. 3. Remove the front panel assembly by following the procedure on page 6--18. 4. Remove the Front Panel board: See Figure 6--12, page 6--12. a. Remove the eight T-15 Torxdrive screws that secure the Front panel board to the Front panel assembly. b. Pry the board up off the alignment studs. Place a Use flat bladed screwdriver in the pry point access holes to pry the board up from the assembly. c. Remove the board from the assembly. 5. Reinstallation: Do in reverse steps a through c to reinstall the front panel board. TLA600 Series Logic Analyzer Service Manual 6- 21 Removal and Installation Procedures Front Panel Keypad Locate the Front Panel keypad, see Figure 6--12. 1. Remove the trim and covers by following the procedure on page 6--6. 2. Remove the front panel knobs by following the procedure on page 6--17. 3. Remove the front panel assembly by following the procedure on page 6--18. 4. Remove the front panel board by following the procedure on page 6--21. 5. Remove the Front Panel keypad: a. Pull on each of the keypad support guides to separate the keypad from the Front panel board. Use a pair of tweezers or equivalent tool to pull the twelve keypad support guides. b. Remove the keypad from the front panel board. Front panel board T-15 Torxdrive screw (8) Alignment stud Pry point access hole Keypad support guide (13) Keypad Pry point access hole Figure 6- 12: Front panel board & keyboard removal 6- 22 TLA600 Series Logic Analyzer Service Manual Removal and Installation Procedures CAUTION. When removing or installing the keypad, make sure you do not touch the switch contact with your fingers. The oils in your fingers will degrade or damage the switch contacts. To help prevent damage to the keypad use cotton gloves when removing or installing the keyboard pad. 6. Reinstallation: Do in reverse steps to reinstall the Keypad, front panel board, and the front panel assembly. Then see the following instructions: a. Make sure the keypad is aligned properly on the Front Panel board. b. Make sure the ribbon cable is routed correctly when installing the Front Panel into the chassis. c. Insert the two floppy disk support tabs into the front panel square openings. Both left front panel tabs must go into the chassis slots. See Figure 6--10, page 6--20. TLA600 Series Logic Analyzer Service Manual 6- 23 Removal and Installation Procedures Replacing the Hard Disk Drive To replace the hard disk drive, follow these instructions: 1. Remove the trim and covers by following the procedure on page 6--7. 2. For an internal monitor logic analyzer, remove the display following the procedure on page 6--13. 3. Locate the hard disk drive shown in Figure 6--5 or Figure 6--8 on page 6--14 or 6--17. 4. TLA 60X series logic analyzer: remove the closed face bracket following the procedure located on page 6--17. 5. Disconnect the ribbon cable connector from the hard disk drive. Note the cable connector pin location for later reassembly. 6. Remove the four T-15 Torxdrive screws that secure the hard disk drive bracket to the chassis. 7. Lift the hard disk drive and bracket out of the chassis. 8. Remove the four #1 phillips screws that secure the hard disk drive to the bracket. 9. Lift out the old hard disk drive. 10. Install the new hard disk drive. 11. Install the four #1 Phillips screws that to mount the hard disk drive to the bracket. 12. Replace the hard disk drive and bracket into the chassis. 13. Install the four T-15 Torxdrive screws that secure the hard disk drive bracket to the chassis. 14. Connect the cable connector to the hard disk drive connector. 15. For an internal monitor logic analyzer, replace the display following the procedure on page 6--13. 16. Install the covers and trim following the procedures that start on page 6--6. 17. Verify the operation by following the procedure on page 6--40. 6- 24 TLA600 Series Logic Analyzer Service Manual Removal and Installation Procedures Hard disk drive ribbon cable T-15 Torxdrive screw (4) Hard disk drive assembly #0 Philips screw (4) Hard disk drive bracket Hard disk drive Figure 6- 13: Hard disk drive replacement TLA600 Series Logic Analyzer Service Manual 6- 25 Removal and Installation Procedures Replacing the Floppy Disk Drive To replace the floppy disk drive, follow these instructions: 1. Remove the trim and covers by following the procedure on page 6--7. 2. The floppy disk drive is located at the top right hand corner as shown in Figure 6--14 on page 6--27. 3. Disconnect the ribbon cable from the floppy disk drive. 4. Remove the two T-15 Torxdrive screws that secure the floppy disk drive bracket to the chassis. 5. Slide the floppy disk drive and bracket toward the rear of the chassis and remove it from the instrument. 6. Remove the two #0 phillips screws that secure the floppy disk drive to the bracket. 7. Lift out the old floppy disk drive. 8. Install the new floppy disk drive. 9. Install the two #0 phillips screws that mount the floppy disk drive to the bracket. 10. Replace the floppy disk drive and bracket into the chassis. 11. Install the two T-15 Torxdrive screws that secure the floppy disk drive bracket to the chassis. 12. Connect the cable connector to the floppy disk drive connector. 13. Install the covers and trim following the procedures that start on page 6--6. 14. Verify the operation by following the procedure on page 6--40. 6- 26 TLA600 Series Logic Analyzer Service Manual Removal and Installation Procedures T-15 Torxdrive screw (2) #0 Philips screw (2) Floppy disk drive bracket Floppy disk drive Floppy disk drive cable Figure 6- 14: Floppy disk drive location TLA600 Series Logic Analyzer Service Manual 6- 27 Removal and Installation Procedures Replacing the CD-ROM Drive To replace the CD-ROM drive, follow these instructions: 1. Remove the trim and covers by following the procedure on page 6--7. 2. The CD-ROM drive is located at the rear right hand corner as shown in Figure 6--15 on page 6--29. 3. Remove the four phillips screws that secure the CD-ROM bracket to the chassis. WARNING. Be careful not to impact the microprocessor with your screwdriver while removing or installing the phillips screw. Contacting the microprocessor may cause the microprocessor to partially come out of the socket. 4. Disconnect the power connector J890 from the interface circuit board. 5. Slide the CD-ROM out of the instrument to allow you to access to the CD-ROM signal connector J250 on the riser circuit board. 6. Disconnect signal connector J250 from the riser circuit board. 7. Slide the CD-ROM drive and signal connector out of the bracket. 8. Connect the signal and power connectors to the CD-ROM drive. 9. Slide the new CD-ROM drive with cables into the bracket to allow you to connect the signal connector J250 to the riser circuit board. 10. Then slide the CD-ROM all the way into the bracket. 11. Install the four phillips screws that mount the CD-ROM drive to the bracket. 12. Connect the power connector J890 to the interface circuit board. 13. Install the covers and trim following the procedures that start on page 6--6. 14. Verify the operation by following the procedure on page 6--40. 6- 28 TLA600 Series Logic Analyzer Service Manual Removal and Installation Procedures Phillips drive screw (4) Microprocessor CD-ROM drive J250 ribbon cable : J890 cable Figure 6- 15: CD-ROM drive location TLA600 Series Logic Analyzer Service Manual 6- 29 Removal and Installation Procedures Replacing the CPU Board To replace the CPU board, follow these instructions: 1. Remove the trim and covers by following the procedure on page 6--7. 2. Remove the floppy disk drive following the procedure on page 6--26. 3. Remove the CD ROM drive following the procedure on page 6--28. 4. Remove the six 3@16 inch nut posts that secure the three D-type connectors to the rear chassis. 5. Remove the four T-15 Torxdrive screws that secure the CPU board to the rear chassis. 6. Remove the four T-15 Torxdrive screws that secure the CPU board to the support bracket. 7. Lift the CPU board out of the bracket by disconnecting it from the riser adapter board connector. 8. Remove the two T-15 Torxdrive screws that secure the riser board to the CPU board, and remove the riser adapter board. 9. Replace the old CPU board with the new CPU board and reconnect the riser board with the two T-15 Torxdrive screws. 10. Place the CPU board back into the chassis by connecting the riser board into the riser adapter board connector. 11. Secure the CPU board to the chassis with the four T-15 Torxdrive screws. 12. Secure the six 3@16 inch nut posts to the three D-type connectors. 13. Replace the CD ROM drive following the procedure on page 6--28. 14. Replace the floppy disk drive following the procedure on page 6--26. 15. Install the covers and trim following the procedures that start on page 6--6. 16. Verify the operation by following the procedure on page 6--40. 6- 30 TLA600 Series Logic Analyzer Service Manual Removal and Installation Procedures T-15 Torxdrive screw (4) CPU board CPU board assembly chassis Leave hard disk drive cable attached T-15 Torxdrive screw (4) 3/ Inch nut 16 post (6) Riser adapter board T-15 Torxdrive screw (2) Processor board edge connector T-15 Torxdrive screw (4) Figure 6- 16: Replacing the CPU board TLA600 Series Logic Analyzer Service Manual 6- 31 Removal and Installation Procedures Replacing the Microprocessor To replace the microprocessor, follow these instructions: 1. Remove the trim and covers by following the procedure on page 6--7. CAUTION. The microprocessor is susceptible to static-discharge damage. Service this component only in a static-free environment. Observe standard handling precautions for static-sensitive devices while servicing the chassis. Always wear a grounded wrist and foot straps while servicing the microprocessor, CPU or processor boards. 2. Remove the microprocessor: See Figure 6--17, page 6--33. a. Disconnect the fan power cable J1H from the CPU board. b. Push down and pull out on the holding bracket located nearest to the outer edge of the circuit board. c. Pull out and unlatch the remaining bracket. Lift the fan/heatsink assembly out from the microprocessor. d. Lift the microprocessor socket locking lever upward. Remove the microprocessor. 3. Reinstallation: To reinstall the microprocessor to the CPU board as follows: a. Install the microprocessor in the socket. b. Lower the socket locking lever. c. Make sure the fan/heatsink assembly is positioned with the fan cable toward the outer edge of the circuit board. d. Place the fan/heatsink assembly on the microprocessor to allow you to latch the bracket to the tab that is nearest to the center of the circuit board. e. Set the remaining edge of the fan/heatsink down on the microprocessor and fasten the remaining bracket to the assembly. f. 6- 32 Connect the fan power cable J1H from the CPU board. TLA600 Series Logic Analyzer Service Manual Removal and Installation Procedures Fan and heatsink Microprocessor Locking lever J1H power cable Push down and pull out to release clamp Push down and pull out to release clamp NLX board Figure 6- 17: Microprocessor removal TLA600 Series Logic Analyzer Service Manual 6- 33 Removal and Installation Procedures Replacing the Interface Board To replace the interface board, follow these instructions: 1. Remove the trim and covers by following the procedure on page 6--7. 2. Remove the CPU board following the procedure on page 6--30. 3. Remove the rear power distribution board. 4. Disconnect the P200, I-A bus board 5. Disconnect the fan power cables at the cable extender connectors. 6. Remove the four 9@16 inch nuts from the BNC connectors that secure them to the rear chassis. 7. Remove the five T-15 Torxdrive screws that secure the interface board to the rear chassis. 8. Remove the seven T-15 Torxdrive screws that secure the interface board to the chassis. 9. Remove the old interface board. 10. Install the new interface board. 11. Install the four 9@16 inch nuts that secure the BNC connectors to the rear chassis. 12. Install the twelve T-15 Torxdrive screws that secure the interface board to the instrument. 13. Reconnect the fan cables. 14. Replace the CPU board following the procedure that starts on page 6--30. 15. Install the covers and trim following the procedures that start on page 6--6. 16. Verify the operation by following the procedure on page 6--40. 6- 34 TLA600 Series Logic Analyzer Service Manual Removal and Installation Procedures T-15 Torxdrive screw (5) Fan connector extender cable (2) Interface board Chassis support T-15 Torxdrive screw (5) Rear power distribution circuit board IA bus circuit board Figure 6- 18: Replacing the interface board TLA600 Series Logic Analyzer Service Manual 6- 35 Removal and Installation Procedures Replacing the Acquisition Board To replace the acquisition board, follow these instructions: 1. Remove the trim and covers by following the procedure on page 6--7. 2. Remove the front and rear power distribution boards. 3. Disconnect the P200, I-A bus board 4. Place the instrument so its top is down on the work surface and the bottom is facing you. 5. Remove the seven T-15 Torxdrive screws that secure the acquisition board to the bottom chassis. 6. Remove the six T-15 Torxdrive screws that secure the acquisition board to the front chassis. 7. Remove the old acquisition board. 8. Install the new acquisition board using seven T-15 Torxdrive screws to secure the acquisition board to the bottom chassis. 9. Install the six T-15 Torxdrive screws to secure the acquisition board to the front chassis. 10. Install the front and rear power distribution boards, and the P200, I-A board. 11. Install the covers and trim following the procedures that start on page 6--6. 12. Verify the operation by following the procedure on page 6--40. 6- 36 TLA600 Series Logic Analyzer Service Manual Removal and Installation Procedures Front power distribution board IA bus board T-15 Torxdrive screw (7) Rear power distribution board Acquisition board T-15 Torxdrive screw (6) Figure 6- 19: Replacing the acquisition board TLA600 Series Logic Analyzer Service Manual 6- 37 Removal and Installation Procedures Replacing the Power Supply To replace the power supply, follow these instructions: 1. Remove the trim and covers by following the procedure on page 6--7. 2. Remove the front and power distribution boards, and the P200, I-A board. 3. Remove the two T-15 Torxdrive screws securing the low-voltage power supply to the right-side chassis support. See Figure 6--20. 4. Remove the three T-15 Torxdrive screws securing the low-voltage power supply to the rear chassis. T-15 Torxdrive screw (2) Power supply T-15 Torxdrive screw (2) Figure 6- 20: Power supply mounting screw location 5. Grasp the low-voltage power supply and carefully slide the assembly out of the instrument. 6. Slide the new power supply board into the chassis. 6- 38 TLA600 Series Logic Analyzer Service Manual Removal and Installation Procedures 7. Install the five screws that secure the power supply to the chassis as shown in Figure 6--20 on page 6--38. 8. Install the front and rear power distribution boards and the P200, I-A board. 9. Install the covers and trim following the procedures that start on page 6--6. 10. Verify the operation by following the procedure on page 6--40. Replacing the Fan Assembly To replace the fans, follow these instructions: 1. Remove the trim and covers by following the procedure on page 6--7. 2. Disconnect the two fan power cables at the cable extender connectors. 3. Remove the two T-15 Torxdrive screws that secure the fan assembly to the chassis. 4. Lift the old fan assembly out of the chassis. 5. Slide the new fan assembly into the chassis. 6. Connect the two fan power cables. 7. Install the two T-15 Torxdrive screws that secure the fan assembly to the chassis. 8. Install the covers and trim following the procedures that start on page 6--6. TLA600 Series Logic Analyzer Service Manual 6- 39 Removal and Installation Procedures T-15 Torxdrive screw (2) Disconnect from J130 Disconnect from J170 Figure 6- 21: Replacing the fan assembly Verifying Operation To verify the proper operation of the logic analyzer, follow these steps: 1. Plug the power cord in and turn the logic analyzer on. 2. Exit all applications and close any open windows. 3. Click Start in the Windows tool bar. 4. Select Programs from the Start menu. 5. Select the QA+Win32 application from the Programs menu. 6. Run the appropriate verification tests from the QA+Win32 diagnostics. 7. Turn the logic analyzer off, and then on again before running any application software including the TLA application software. 6- 40 TLA600 Series Logic Analyzer Service Manual Troubleshooting WARNING. Before performing this or any other procedure in this manual, read the General Safety Summary and Service Safety Summary found at the beginning of this manual. To prevent possible injury to service personnel or damage to electrical components, please read Preventing ESD on page 6--1. This section contains information and procedures designed to help you isolate faults to within the logic analyzer. The process is as follows: H Do Check for Common Problems on page 6--42 to eliminate easy-to-find problems first. H Do Diagnostics, beginning on page 6--43, to locate the failed replaceable part within the logic analyzer. For assistance, contact your local Tektronix Service Center. Service Level This section supports isolation of faults within the logic analyzer to the replaceable-part level. In most cases, faults are isolated to circuit boards or assemblies, but not to individual components on those boards. TLA600 Series Logic Analyzer Service Manual 6- 41 Troubleshooting Check for Common Problems Use Table 6--2 to quickly isolate possible failures. The table lists problems related to the logic analyzer and possible causes. The list is not exhaustive, but it may help you eliminate a problem that is quick to fix, such as a blown fuse or loose cable. Table 6- 2: Failure symptoms and possible causes 6- 42 Symptom Possible cause(s) Logic analyzer will not turn on H Power cord not plugged in. H Failed fuse. H Faulty power supply. Controller appears “dead”; power light comes on, but monitor screen(s) is (are) blank, logic analyzer emits no beeps H SO DIMMs incorrectly installed or missing. H Defective controller board. External monitor does not power on H Monitor power cord not plugged in. H Failed fuse. H Monitor failure. External monitor powers on, but is blank H External monitor controls turned down. H Monitor cable faulty or not connected to logic analyzer. H Monitor defective. Hard disk drive related symptoms H H H H H Defective hard disk drive. Incorrect hard disk type selected in the BIOS setup. Power supply failure. Corrupted BIOS firmware, reinstall firmware. Controller BIOS setup problem. See BIOS Settings. CD-ROM related symptoms H H H H Defective CD-ROM. Defective CD-ROM drive cable. Defective CD-ROM board. Incorrect CD-ROM configuration in the BIOS setup. TLA600 Series Logic Analyzer Service Manual Troubleshooting Table 6- 2: Failure symptoms and possible causes (Cont.) Symptom Possible cause(s) Flat panel display blank H Display selection jumper set incorrectly on front panel interface board (there are no jumpers on the board when the logic analyzer is shipped from the factory; this is the correct default setting). H External monitor plugged in (look on external monitor for display). H External monitor plugged in but not powered on. H Defective cable from front panel interface board to display adapter board. H Defective cable from controller board to front panel interface board. H Defective cable from inverter board to display adapter board. H Defective cable from inverter board to backlighting display lamp. H Defective backlighting display lamp. H Faulty display. H Faulty controller board. H Faulty inverter board. H Faulty front panel interface board. BIOS error messages H Refer to the BIOS error message table on page 6-- 44. Diagnostics The primary diagnostics for the logic analyzer are the power-on diagnostics and the CheckIt Utilities. Procedures for running these diagnostics are described below. CheckIt Utilities For PC hardware diagnostics the Logic Analyzer uses a third party diagnostic software tool called CheckIt Utilities (earlier instruments used QAPLus-32) To use CheckIt Utilities click Start, point to programs, and click CheckIt Utilities. For details on using CheckIt Utilities, refer to the built in online help. NOTE. To test the floppy disk drive and the CD-ROM drives, you must insert a test floppy disk or CD before starting the CheckIt Utilities. TLA600 Series Logic Analyzer Service Manual 6- 43 Troubleshooting Power On Diagnostics The power-on diagnostics check the basic functionality of the logic analyzer at power on. If any failures occur at power on, the screen displays the calibration and diagnostics property page. Table 6--3 lists a subset of the power on tests. Use the results of the tests to help you isolate problems. If there are no failures, you can view the results of the tests in the Calibration and Diagnostics page under the System menu. To view the Extended diagnostics, click on the Extended tab. Table 6- 3: TLA700 Power-on diagnostic tests BIOS and TLA Diagnostic Software Component Group & test Power on Extended Logic analyzer VTC Reset Test n VTC Walk1 Test n ADG Register Test n ADG VXI Addr Test n ADG VXI Data Test n Interrupt Lines n n Trigger Lines n n The logic analyzer performs BIOS and TLA application diagnostics every time you turn it on. The diagnostics window displays if any of the diagnostic tests fail. To run any of the diagnostics tests, go to the TLA System window and click System, click Calibration and Diagnostics, and select the tab for the test you are interested in. Select the test you want to perform and click Run. For more information on any of the diagnostic tests click Help. BIOS Setup Error Messages 6- 44 The logic analyzer runs a BIOS test at boot up. If the BIOS test encounters a problem, the program displays the error on the display. Table 6--4 lists the error codes, an explanation of each error code, and actions that can be taken. Refer to the user manual for information on BIOS setup parameters. TLA600 Series Logic Analyzer Service Manual Troubleshooting Table 6- 4: BIOS error codes and explanations Error code Explanation Action to be taken Diskette drive A error The BIOS test recognizes the presence of the floppy disk drive, but the floppy disk drive fails the power-on self-test. Verify the floppy disk drive is configured correctly in the CMOS setup. The floppy disk drive may be defined incorrectly in the CMOS setup. Verify that the floppy disk drive cable is connected on the floppy disk drive and the adapter board. The floppy disk drive may not be connected correctly on the adapter board. Extended RAM Failed at offset: nnnn The extended memory may not be configured correctly or the extended memory is defective at HEX address nnnn. Verify that the extended memory is configured correctly in the CMOS setup. Exchange the SO DIMMs. If one of the SO DIMMs is defective the error address should change. Failing Bits: nnnn The RAM address mapped to HEX nnnn in the system, shadow, or extended memory has failed. A 1 in the map indicates a failed bit. Exchange the SO DIMMs. If one of the SO DIMMs is defective the error address should change. Fixed Disk 0 Failure The hard disk drive may not be defined correctly in the CMOS setup. Verify the hard disk drive is configured correctly in the CMOS setup. The hard disk drive may not be connected correctly. The hard disk drive may be defective. Verify that the hard disk drive cable is connected. (or) Fixed Disk Controller Failure Replace the hard disk drive and reinstall the TLA application software. Incorrect Drive A Type - run Setup The floppy disk drive may not be defined correctly in the CMOS setup. Verify the floppy disk drive is configured correctly in the CMOS setup. Invalid NVRAM media type The BIOS cannot access the NVRAM. Replace the controller board. Keyboard controller error The keyboard controller may be defective. Swap keyboard with a known good keyboard. Keyboard error (Front panel keypad error) The keyboard may be missing or defective. Swap keyboard with a known good keyboard. Keyboard error nn There may be a stuck or defective key. Note: This error is quite uncommon because both the external keyboard and the front panel keypad would have to be missing or defective. The BIOS returns the address of the key where HEX nn is the address of the key. Swap keyboard with a known good keyboard. Monitor type does not The monitor type may be defined incorrectly in SETUP. match CMOS - Run SETUP Verify that the monitor type is defined correctly in the CMOS setup. Operating system not found Insert a bootable disk into the floppy disk drive and try to reboot. The operating system cannot be found. Reload the Windows operating system. TLA600 Series Logic Analyzer Service Manual 6- 45 Troubleshooting Table 6- 4: BIOS error codes and explanations (Cont.) Error code Explanation Action to be taken Parity Check 1 A parity error was found on the communications bus. The BIOS will return the address of the error or display ???? if it cannot. Replace the controller board. Parity Check 2 A parity error was found on the I/O bus. The BIOS will return the address of the error, or display ???? if it cannot. Replace the controller board. Press <F1> to resume, <F2> to Setup This message is displayed after a recoverable error message. Press the F1 key to restart the boot process, or press the F2 key to enter the CMOS setup and make changes to the definitions. This is an informational message. Press the F1 key to restart the boot process, or press the F2 key to enter the CMOS setup and make changes to the definitions. Verify that the CMOS setup is configured correctly. Press and hold CTRLALT-F2 to enter SETUP This is an optional message that can be turned on and off in CMOS setup. It is only displayed during a power-on self-test. This is an informational message. Previous boot incomplete Default configuration used The previous power-on self- test was not successful. If the This is an informational message. Verify power-on self-test fails, it loads default values and displays that the CMOS setup is configured a message to run the CMOS setup. If incorrect values are correctly. loaded, future boot attempts may fail. Real time clock error The real time clock may be defective. Replace the controller board. Shadow Ram Failed at offset: nnnn The shadow RAM has failed at HEX location nnnn. The system will run without shadow RAM, but it will run slowly. Exchange the SO DIMMs; if one of the SO DIMMs is defective, the error address should change. System battery is dead Replace and run SETUP The CMOS clock may be dead or disconnected. The CMOS setup may have to be reset. The system battery is internal to the RAM/Calendar component. To replace the system battery, replace the RAM/Calendar component. System BIOS shadowed The system BIOS was copied to shadow RAM. This is an informational message. No action needs to be performed. System cache error - Cache When the system BIOS failed the cache test, the cache disabled was disabled. The system will run without cache RAM, but it will run slowly. Try rebooting the system. System CMOS checksum bad - run SETUP This is an informational message. Reboot the system, and then verify that the CMOS setup is configured correctly. The system CMOS settings may be incorrect or modified incorrectly by some application. The CMOS setup may have to be re-defined. System RAM Failed at offset: nnnn The system RAM at HEX address nnnn may be defective. Exchange the SO DIMMs; if one of the SO DIMMs is defective the error address should change. System timer error The BIOS failed the timer test. The controller board may be defective. Try rebooting the system first. If this message keeps reappearing, replace the controller board. 6- 46 TLA600 Series Logic Analyzer Service Manual Repackaging Instructions This section contains the information needed to repackage the logic analyzer for shipment or storage. Packaging When repacking the logic analyzer for shipment, use the original packaging. If the packaging is unavailable or unfit for use, contact your local Tektronix representative to obtain new packaging. Seal the shipping carton with an industrial stapler or strapping tape. Shipping to the Service Center Contact the Service Center to get an RMA (return material authorization) number, and any return or shipping information you may need. If the instrument is being shipped to a Tektronix Service Center, enclose the following information: H The RMA number. H The owner’s address. H Name and phone number of a contact person. H Type and serial number of the instrument. H Reason for returning. H A complete description of the service required. Mark the address of the Tektronix Service Center and the return address on the shipping carton in two prominent locations. TLA600 Series Logic Analyzer Service Manual 6- 47 Repackaging Instructions 6- 48 TLA600 Series Logic Analyzer Service Manual Options This section provided a list of options that might be installed in the instrument. Probe Options Table 7- 1: Probe options Instrument Option Probe Quantity TLA601,, TLA611,, & TLA621 1P P6418 2 2P P6434 1 3P P6417 2 1P P6418 4 2P P6434 2 3P P6417 4 1P P6418 6 2P P6434 3 3P P6417 6 1P P6418 8 2P P6434 4 3P P6417 8 TLA602,, TLA612,, & TLA622 TLA603,, TLA613,, & TLA623 TLA604,, TLA614,, & TLA624 TLA600 Series Logic Analyzer Service Manual 7- 1 Options 7- 2 TLA600 Series Logic Analyzer Service Manual Electrical Parts List Refer to the Mechanical Parts List chapter for a complete list and description of all replaceable parts. TLA600 Series Logic Analyzer Service Manual 8- 1 Electrical Parts List 8- 2 TLA600 Series Logic Analyzer Service Manual Diagrams Hardware Architechure Block Diagram Front panel keypad ECB CardBus LCD display 800 X 600 USB NLX Controller LAN, COM, USB parallel, VGA, PS2 mouse, keyboard, and audio Interface ECB Riser ECB PCI USB PCI USB To HDD FDD CDROM VXI Bus Connect to exit Trig in/out, CardBus, LCD, front panel keypad interface, fan cntl, PCI to ISA, ISA to VTC, Power supply Acq/Lpu Acquisition ECB 34 Channel LA or 68 Channel LA or 102 Channel LA or 136 Channel LA Power Dist Rear ECB IA Bus ECB Power Dist front ECB VXI Bus Figure 9- 1: Logic analyzer hardware architecture TLA600 Series Logic Analyzer Service Manual 9- 1 Diagrams Interconnection Block Diagram NLX board Riser Power bus Rear Power supply PA bus board Interface board Power bus front LPU/ACQ board Figure 9- 2: Logic analyzer interconnection block diagram 9- 2 TLA600 Series Logic Analyzer Service Manual Diagrams System Block Diagram CDROM Floppy Removable HD NLX motherboard and riser SVGA I LAN Mouse/Keyboard COM1 Parallel USB SVGA II Acquistion LPU/ACQ Interface board LCD 2 x Cardbus Trig I/O, Sig I/O Keyboard Front panel control LED Knob Figure 9- 3: Logic analyzer system block diagram TLA600 Series Logic Analyzer Service Manual 9- 3 Diagrams 9- 4 TLA600 Series Logic Analyzer Service Manual Mechanical Parts List This chapter contains a list of standard accessories, optional accessories, and replaceable parts. Parts Ordering Information Replacement parts are available through your local Tektronix field office or representative. Changes to Tektronix products are sometimes made to accommodate improved components as they become available and to give you the benefit of the latest improvements. Therefore, when ordering parts, it is important to include the following information in your order. H Part number (see Part Number Revision Level below) H Instrument type or model number H Instrument serial number H Instrument modification number, if applicable If you order a part that has been replaced with a different or improved part, your local Tektronix field office or representative will contact you concerning any change in part number. Part Number Revision Level Tektronix part numbers contain two digits representing the revision level of the part. For most parts in this manual, you will find the letters XX in place of the revision level number. Part Number Revision Level 670-7918-03 Revision Level May Show as XX 670-7918-XX When you order parts, Tektronix will provide you with the most current part for your product type, serial number, and modification (if applicable). At the time of your order, Tektronix will determine the part number revision level needed for your product, based on the information you provide. Module Servicing Modules can be serviced by selecting one of the following options. Contact your local Tektronix service center or representative for repair assistance. TLA600 Series Logic Analyzer Service Manual 10- 1 Mechanical Parts List Module Repair and Return. You may ship your module to Tektronix for repair, after which Tektronix will return it to you. New Modules. You may purchase replacement modules in the same way as other replacement parts. Using the Replaceable Parts List The rest of this chapter contain lists of the replaceable mechanical and/or electrical components of the Logic Analyzer. Use these lists to identify and order replacement parts. The following table describes each column in the lists. Table 10- 1: Parts lists column descriptions Column number Abbreviations 10- 2 Column name Description 1 Figure & Index Number Figure and index numbers in the exploded view illustrations. 2 Tektronix Part Number Use this part number when ordering replacement parts from Tektronix. 3 and 4 Serial Number Column 3 indicates the serial number at which the part was first effective. Column 4 indicates the serial number at which the part was discontinued. No entries in either column indicates the part is good for all serial numbers. 5 Qty Quantity of parts used. 6 Name & Description An item name is separated from the description by a colon (:). Because of space limitations, an item name may sometimes appear incomplete. Use the U. S. Federal Catalog Handbook H6-1 for further item name identification. 7 Mfr. Code Manufacturer code. 8 Mfr. Part Number Manufacturer’s or vendor’s part number. Abbreviations conform to American National Standard ANSI Y1.1-1972. TLA600 Series Logic Analyzer Service Manual Mechanical Parts List Mfr. Code to Manufacturer Cross Index The table titled Manufacturers Cross Index shows codes, names, and addresses of manufacturers or vendors of components listed in the parts list. Manufacturers Cross Index Mfr. code Manufacturer Address City, state, zip code 05791 LYN-- TRON, INC 6001 S THOMAS MALLEN RD SPOKANE, WA 99224-- 9406 060D9 UNITREK CORPORATION 3000 COLUMBIA HOUSE BLVD, SUITE 1 20 VANCOUVER, WA 98661 06383 PANDUIT CORP 17303 RIDGELAND AVE TINLEY PARK, IL 60477-3048 07416 NELSON NAME PLATE COMPANY 2800 CASITAS AVENUE LOS ANGELES, CA 90039-- 2942 0B445 ELECTRI-CORD MFG CO INC 312 EAST MAIN STREET WESTFIELD, PA 16950 0J9P9 GEROME MFG CO INC PO BOX 737 403 NORTH MAIN NEWBERG, OR 97132 0KB01 STAUFFER SUPPLY CO 810 SE SHERMAN PORTLAND, OR 97214-- 4657 0KB05 NORTH STAR NAMEPLATE INC 5750 NE MOORE COURT HILLSBORO, OR 97124-- 6474 0V618 VIEWSONIC CORPORATION 381 BREA CANYON ROAD WALNUT, CA 91789 1DM20 PARLEX CORP 7 INDUSTRIAL WAY SALEM, NH 03079 22526 FCI/BERG ELECTRONICS INC 825 OLD TRAIL ROAD ETTERS, PA 17319-- 9769 22670 GM NAMEPLATE INCORPORATED 2040 15TH AVE WEST SEATTLE, WA 98119-- 2783 26003 MARTEK POWER MDI 4115 SPENCER STREET TORRANCE, CA 90503-- 2489 2W733 BELDEN WIRE & CABLE COMPANY 2200 US HWY 27 SOUTH; PO BOX 1980 RICHMOND, IN 47374 2W733 BELDEN WIRE & CABLE COMPANY 2200 US HWY 27 SOUTH PO BOX 1980 RICHMOND, IN 47374-- 1980 34649 INTEL CORPORATION 3065 BOWERS PO BOX 58130 SANTA CLARA, CA 95051-- 8130 46628 LOGITECH INC 6505 KAISER DR FREMONT, CA 94555 4T165 NEC ELECTRONICS, INC. 2880 SCOTT BLVD; PO BOX 58062 SANTA CLARA, CA 95052-8062 50356 TEAC AMERICA INC 7733 TELEGRAPH RD PO BOX 750 MONTEBELLO, CA 90640-- 6537 52152 3M COMPANY INDUSTRIAL TAPE DIVISION 3M CENTER ST PAUL, MN 55144-- 1000 60128 MICROSOFT CORPORATION ONE MICROSOFT WAY DEPARTMENT 101 REDMOND, WA 98052-- 8300 61058 PANASONIC INDUSTRIAL CO ECG M/S 7H-- 4 TWO PANASONIC WAY SECAUCUS, NJ 07094 6Y440 MICRON SEMICONDUCTOR PRODUCTS INC 8000 S FEDERAL WAY PO BOX 6 BOISE, ID 83707-- 0006 7X318 KASO PLASTICS INC 5720-- C NE 121ST AVE, STE 110 VANCOUVER, WA 98682 80009 TEKTRONIX INC 14150 SW KARL BRAUN DR PO BOX 500 BEAVERTON, OR 97077-- 0001 93907 CAMCAR DIV OF TEXTRON INC ATTN: ALICIA SANFORD 516 18TH AVE ROCKFORD, IL 611045181 9F560 IBM CORPORATION 420 E SOUTH TEMPLE ST SALT LAKE CITY, UT 84145 S3109 FELLER U.S. CORPORATION 68 VERONICA AVE, UNIT #5 SOMERSET, NJ 08873 TLA600 Series Logic Analyzer Service Manual 10- 3 Mechanical Parts List Manufacturers Cross Index (Cont.) Mfr. code Manufacturer Address City, state, zip code TK0JL CHROMA ATE INC 43 WU-- CHUAN ROAD WU-- KU INDUSTRIAL PARK WU-- KU, TAIPEI HSIEN, TAIWAN CN TK1373 PATELEC-- CEM 10156 TORINO VAICENTALLO 62/456 ITALY, TK1943 NEILSEN MANUFACTURING INC 3501 PORTLAND RD NE SALEM, OR 97303 TK2250 ARROW ELECTRONICS INC. 9500 SW NIMBUS AVE, BLDG E BEAVERTON, OR 97008-- 7163 TK2383 PANASONIC INDUSTRIAL CO 1600 MCCANDLESS DR MILPITAS, CA 95035 TK2548 XEROX CORPORATION 14181 SW MILLIKAN WAY BEAVERTON, OR 97005 TK2647 INSTRUMENT SPECIALTIES CO INC. C/O TEMCO NW 1336 SE 51ST STREET HILLSBORO, OR 97123 TK2582 TUFF CAT USA LLC 814 N HAYDEN MEADOWS DRIVE PORTLAND, OR 97217 TK2647 INSTRUMENT SPECIALTIES CO INC. C/O TEMCO NW 1336 SE 51ST STREET HILLSBORO, OR 97123 TK6110 OWNCO MARKETING 14150 SW MILTON CT TIGARD, OR 97224 TK6372 VOLEX INC POWER CORD PRODUCTS 5350 LAKEVIEW PARKWAY SOUTH DRIVE, SUITE D INDIANAPOLIS, IN 46268 TK6181 IMC PLASTICS INC 19400 SW TETON AVE TUALATIN, OR 97062 10- 4 TLA600 Series Logic Analyzer Service Manual Mechanical Parts List Replaceable parts list Fig. & index number Tektronix part number Serial no. effective Serial no. discont’d Qty Name & description Mfr. code Mfr. part number 1-- 1 016-- 1441-- 00 1 POUCH, PLASTIC: TLA SERIES 80009 016-- 1441-- 00 -2 211-- 1050-- 00 28 SCREW,MACHINE:6-- 32 X 0.312 L,PNH,STL CAD,T15 0KB01 OBD -3 355-- 0298-- 00 4 STUD.SNAP:0.570 DIA,0.165 THK,STAINLESS STEEL TK0588 355-- 0298-- 00 -4 348-- 1648-- 00 4 FOOT:REAR W/CORD WRAP,THERMOPLASTIC TK6181 348164800 -5 211-- 0720-- 00 4 SCR,ASSEM WSHR:6-- 32 X 0.500,PNH,STL,CD,T-- 15 0KB01 ORDER BY DESCRIPTION -6 161-- 0104-- 00 1 CABLE ASSEMBLY:3,18 AWG, 98 L, 250V/10AMP, RIGHT ANGLE, IEC320, NEMA 15-- 5P, WITH CORD GRIP, US S3109 ORDER BY DESCRIPTION -6 161-- 0066-- 00 1 CA ASSY,PWR:3,18 AWG,250V/10A,98 INCH,STR,IEC320,RCPT X NEMA 5-- 15P,US 0B445 ECM-- 161-- 0066-- 00 -7 159-- 0046-- 00 2 FUSE,CARTRIDGE:3AG,8A,250V,15SEC,CER 71400 ABC 8 -7 159-- 0381-- 00 2 FUSE,CARTRIDGE:5 X 20 MM,6.3A,250V,FAST BLOW,HIGH BREAKING CAPACITY,UL REC,SEMKO, 71400 GDA-- 6.3 -8 200-- 2264-- 00 2 CAP,FUSEHOLDER:3AG FUSES (AMERICAN) 61935 FEK 031 1666 -8 200-- 2265-- 00 2 CAP,FUSEHOLDER:5 X 20MM FUSES (EUROPEAN) 61935 FEK 031.1663 -9 200-- 4522-- 00 1 COVER,RIGHT:PCABS,13.645L X 8.250W, BLUE TK6181 200-- 4522-- 00 - 10 212-- 0232-- 00 2 SCREW,MACHINE:8-- 32 X 1.125L, PNH,STL,BLACK OXIDE,T-- 20 0KB01 OBD - 11 367-- 0477-- 00 1 HANDLE,CARRYING:POLYPROPYLENE VINYL GRIP 12136 PT 3170 - 12 200-- 4511-- 01 1 COVER:BOTTOM RIGHT 0J9P9 200-- 4511-- 01 - 13 200-- 4622-- 00 1 COVER ASSEMBLY:BOTTOM,VINYL CLAD AL,W/FEET (ITEMS 13 & 14) 0J9P9 200-- 4622-- 00 - 14 348-- 1515-- 00 1 FEET,CABINET:CABINET,BLACK,GLASS-- FIBRE REINFORCED PLASTIC,SET OF 4 FEET, W/SCREWS 76096 63-- 526 - 15 333-- 4329-- 00 1 PANEL,FRONT:ACQUISITION,34 CH, 0.050 AL,W/LEXAN, TLA601, 611, 621 0KB05 333-- 4329-- 00 - 15 333-- 4330-- 00 1 PANEL,FRONT:ACQUISITION,68 CH, 0.050 AL,W/LEXAN, TLA602, 612, 622 0KB05 333-- 4330-- 00 - 15 333-- 4331-- 00 1 PANEL,FRONT:ACQUISITION,102 CH, 0.050 AL,W/LEXAN, TLA603, 613, 623 0KB05 333-- 4331-- 00 - 15 333-- 4332-- 00 1 PANEL,FRONT:ACQUISITION,136 CH, 0.050 AL,W/LEXAN, TLA604, 614, 624 0KB05 333-- 4332-- 00 - 16 101-- 0151-- 01 1 TRIM,FRONT:PCABS,17.200W X 8.450H, SILVER GRAY, TLA611, 612, 613, 614, 622, 623, 624 TK6181 101-- 0151-- 01 - 17 200-- 4519-- 00 1 COVER,FRONT:PC ABS,17.420L X 8.670W X 2.000TH,TEK BLUE 7X318 2TEK1636 - 18 101-- 0157-- 00 1 TRIM,FRONT:BLANK,NO DISPLAY OR CONTROL PANEL,PC/ABS, TLA601. 602, 603, 604 7X318 2TEK1649 - 19 260-- 2719-- 00 1 SWITCH,PUSH:ELASTOMERIC,POWER BUTTON TK2376 260-- 2719-- 00 TLA600 Series Logic Analyzer Service Manual 10- 5 Mechanical Parts List Replaceable parts list (cont.) Fig. & index number Tektronix part number Serial no. effective Serial no. discont’d Qty Name & description Mfr. code Mfr. part number - 20 334-- 9997-- 00 1 MARKER,IDENT:LABEL,MKD TLA611 0KB05 334-- 9997-- 00 - 20 334-- 9998-- 00 1 MARKER,IDENT:LABEL,MKD TLA612 0KB05 334-- 9998-- 00 - 20 334-- 9999-- 00 1 MARKER,IDENT:LABEL,MKD TLA613 0KB05 334-- 9999-- 00 - 20 335-- 0000-- 00 1 MARKER,IDENT:LABEL,MKD TLA614 0KB05 335-- 0000-- 00 - 20 335-- 0332-- 00 1 MARKER,IDENT:LABEL,MKD TLA621 0KB05 335-- 0332-- 00 - 20 335-- 0333-- 00 1 MARKER,IDENT:LABEL,MKD TLA622 0KB05 335-- 0333-- 00 - 20 335-- 0334-- 00 1 MARKER,IDENT:LABEL,MKD TLA623 0KB05 335-- 0334-- 00 - 20 335-- 0335-- 00 1 MARKER,IDENT:LABEL,MKD TLA624 0KB05 335-- 0335-- 00 - 20 335-- 0272-- 00 1 MARKER,IDENT:LABEL,MKD TLA601 0KB05 335-- 0272-- 00 - 20 335-- 0273-- 00 1 MARKER,IDENT:LABEL,MKD TLA602 0KB05 335-- 0273-- 00 - 20 335-- 0274-- 00 1 MARKER,IDENT:LABEL,MKD TLA603 0KB05 335-- 0274-- 00 - 20 335-- 0275-- 00 1 MARKER,IDENT:LABEL,MKD TLA604 0KB05 335-- 0275-- 00 - 21 200-- 4510-- 01 1 COVER:TOP,LEFT,0.050 AL 0J9P9 200-- 4510-- 01 - 22 200-- 4521-- 00 1 COVER,LEFT:PCABS,13.654L X 8.250W,BLUE TK6181 200-- 4521-- 00 - 23 200-- 4520-- 00 1 COVER,TOP:PCABS,17.200L X 13.550W,BLUE TK6181 200-- 4520-- 00 10- 6 TLA600 Series Logic Analyzer Service Manual Mechanical Parts List 2 1 3 4 5 22 6 23 7 8 9 21 20 19 10 11 16 15 2 12 18 13 17 14 Figure 10- 1: External parts TLA600 Series Logic Analyzer Service Manual 10- 7 Mechanical Parts List Replaceable parts list Fig. & index number Tektronix part number 2-- 1 Serial no. effective Serial no. discont’d Qty Name & description Mfr. code Mfr. part number 174-- 4371-- 00 1 CA ASSY,SP:RIBBON,IDC,44,28 AWG,SOCKET BOTH ENDS (HARD DISK DRIVE) 060D9 174-- 4371-- 00 -2 211-- 1050-- 00 40 SCREW,MACHINE:6-- 32 X 0.312L,PNH,STL CAD,T15 0KB01 OBD -3 119-- 6106-- 00 1 DISK DRIVE:FLOPPY,3.5INCH,1.44 MB,0.5 IN,DDDS TK2250 FD-- 05HF5630 - 343-- 0775-- 00 1 CABLE,CLAMP:RIBBON,1.0 X 1.0,GRAY,POLYVINYL, W/URETHANE FOAM TAPE BACKING,RETAINS 6 RIBBON C 52152 80610029243/3484-- 10 00 -4 407-- 4706-- 00 1 BRACKET:FLOPPY DRIVE,6.064 X 5.075,ALUMINUM TK1943 407-- 4706-- 00 -5 174-- 4320-- 00 1 CA ASSY:FLAT FLEX,26 POS, 9.753L (FLOPPY DRIVE TO RISER BD) 060D9 174-- 4320-- 00 -6 211-- 1079-- 00 2 SCREW,MACH:2.6X0.45MM,3.0L,PNH,STL,PHILLIPS 0KB01 10310188-- 0 -7 671-- 4847-- 00 1 CIRCUIT BD ASSY:IA BUS CONNECTOR 80009 671-- 4847-- 00 -8 671-- 4846-- 00 1 CIRCUIT BD ASSY:REAR POWER DISTRIBUTION 80009 671-- 4846-- 00 -9 361-- 1762-- 00 8 SPACER,SUPPORT:0.250 X 0.171 X 0.375 06915 CPST-- 4-- 01 - 10 671-- 4845-- 00 1 CIRCUIT BD ASSY:FRONT POWER DISTRIBUTION, 80009 671-- 4845-- 00 - 11 614-- 0980-- 01 1 PANEL ASSEMBLY:FRONT,TLA61X & TLA62X (ITEMS 12 THROUGH 17, 2) 80009 614-- 0980-- 01 - 12 671-- 4823-- 01 1 CIRCUIT BD ASSY:FRONT PANEL 80009 671-- 4823-- 01 - 13 260-- 2726-- 00 1 SWITCH,KEYPAD:ELASTOMERIC,FRONT PANEL 22670 260-- 2726-- 00 - 14 333-- 4333-- 01 1 PANEL,FRONT:CONTROL,TLA600 SERIES 0KB05 333-- 4333-- 01 - 15 366-- 0822-- 00 1 KNOB,CAP:0.925 DIA,TEK SILVER GRAY 22670 366-- 0822-- 00 - 16 366-- 0821-- 00 2 KNOB,CAP:0.650 D,TEK SILVER GRAY 22670 366-- 0821-- 00 - 17 366-- 0820-- 00 2 KNOB,CAP:0.425 DIA,TEK SILVER GRAY 22670 366-- 0820-- 00 - 18 259-- 0155-- 00 1 FLEX CIRCUIT:POWER SWITCH,W/LED 07416 259-- 0155-- 00 - 19 407-- 4790-- 01 1 BRACKET,FRONT:BLANK,NO DISPLAY,AL TK1943 407-- 4790-- 01 - 20 679-- 5410-- 00 1 CKT BD SUBASSY:DISPLAY ADAPTER 80009 679-- 5410-- 00 - 21 119-- 6493-- 00 1 DISK DRIVE:WINCHESTER,2.5 IN,10GB,SINGLE PLATTER,IDE,07N4390, 9F560 119-- 6493-- 00 - 21 119-- 6494-- 00 1 DISK DRIVE:WINCHESTER,2.5 IN,30.0GB,SINGLE PLATTER,IDE,07N4392, 9F560 119-- 6494-- 00 - 22 407-- 4776-- 00 1 BRKT,MOUNTING:0.032 THK STEEL,GALVANIZED TK1943 407-- 4776-- 00 - 23 211-- 1081-- 00 4 SCREW,MACHI:M3 X 0.5 X 3.5MM,PHILLIPS 0KB01 211-- 1081-- 00 - 24 650-- 4301-- 00 1 FRAME ASSEMBLY:DISPLAY (ITEMS 25 THROUGH 29, 2, 18, 20) 80009 650-- 4301-- 00 - 25 131-- 6417-- 00 4 CONTACT,ELEC:GROUNDING,0.600 L X 0.250 W X 0.220 D,ELECTROLESS NICKEL PLATE TK2647 7701118003 - 26 407-- 4675-- 00 1 BRACKET:DISPLAY FRAME,0.050 AL TK1943 407-- 4675-- 00 - 27 174-- 4265-- 00 1 CA ASSY:FLAT FLEX,DISPLAY ADAPTER, FEMALE 1DM20 174-- 4265-- 00 - 28 407-- 4712-- 00 1 BRACKET,DISPLAY:0.050 AL,9.830 X 7.602 TK1943 407-- 4712-- 00 - 29 174-- 3618-- 00 1 CA,ASSY SP:RIBBON,CPR,28 AWG,9.5 060D9 OBD 10- 8 TLA600 Series Logic Analyzer Service Manual Mechanical Parts List 32 1 2 5 31 2 4 29 24 30 20 28 3 27 26 18 25 6 2 23 22 2 21 7 2 20 10 19 8 18 2 9 2 2 17 12 16 13 11 15 14 Figure 10- 2: Front panel, display, hard drive, and floppy drive TLA600 Series Logic Analyzer Service Manual 10- 9 Mechanical Parts List Replaceable parts list (cont.) Fig. & index number Tektronix part number Serial no. effective Serial no. discont’d Qty Name & description Mfr. code Mfr. part number 2-- 30 174-- 4321-- 00 1 CA ASSY:FLAT FLEX,26POS,10.440L,0.039 CTR (FRONT PANEL TO INTERFACE BD) ,TLA61X & TLA62X 060D9 174-- 4321-- 00 - 31 174-- 4266-- 00 1 CA ASSY:RIBBON,,28 AWG,IDC,50 POS, (DISPLAY TO INTERFACE) 060D9 174-- 4266-- 00 - 32 437-- 0486-- 00 1 ASSY,FAN:SIX FANS ASSEMBLY 0J9P9 437-- 0486-- 00 10- 10 TLA600 Series Logic Analyzer Service Manual Mechanical Parts List TLA600 Series Logic Analyzer Service Manual 10- 11 Mechanical Parts List Replaceable parts list 7 Fig. & index number Tektronix part number 3-- 1 Serial no. effective Serial no. discont’d Qty Name & description Mfr. code Mfr. part number 119-- 6511-- 00 1 IC,PROCESSOR:CMOS,MICROPROCESSOR,CELER ON,566 MHZ INTERNAL CLOCK,XXMHZ BUS,SOCKET 370 COMPATIB 34649 BX80526F566128 - 650-- 4041-- 01 1 RISER SUBASSY (ITEMS 1 THROUGH 4, 2-5, 17, AND 18) 80009 650-- 4041-- 01 -2 214-- 3903-- 00 6 SCREW,JACK:4-- 40 X 0.312 LONG,0.188 H HEX HEAD STAND OFF,4-- 40 INT THD, X 0.312 THD EXT 4-- 40 05791 LT4276 -3 039-- 0077-- 00 1 NLX BOARD:SU810 MOTHERBOARD W/O PROCESSOR & MEMORY TK2172 BESULANS3C -4 211-- 1050-- 00 23 SCREW,MACHINE:6-- 32 X 0.312 L,PNH,CAD PLT,T15 0KB01 OBD -5 174-- 4267-- 00 2 CA ASSY:DESCRETE,IDC,STR,6 POS,24 AWG WIRE,7.0L 060D9 174-- 4267-- 00 -6 131-- 6680-- 00 1 CONN HDR:CARDBUS HDR,SMD,MALE,RTANG,2 X 34, DOUBLE DECK,TOP MT,RIGHT EJECT 22526 61555-- 200CA -7 386-- 7151-- 00 1 PANEL,REAR:I/O INTERFACE BD ADAPTR,0.050 AL TK1943 386-- 7151-- 00 -8 210-- 1039-- 00 4 WASHER,LOCK:0.521 ID,INT,0.025 THK,SST 0KB01 1224-- 02-- 00-- 0541C -9 220-- 0497-- 00 4 NUT,PLAIN,HEX:0.5-- 28 X 0.562 HEX,BRS CD PL 73743 ORDER BY DESCRIPTION - 10 211-- 0887-- 00 4 SCREW,METRIC:M2 X 0.4 X 16 MM L,PH,PHILLIPS 0KB01 211-- 0887-- 00 - 11 671-- 4822-- 00 1 CIRCUIT BD ASSY:INTERFACE, DISPLAY, TLA611, 612, 613, 614, 621, 622, 623, 624 80009 671-- 4822-- 00 - 11 671-- 5137-- 00 1 CIRCUIT BD ASSY:EXTERNAL DISPLAY, TLA601, 602, 603, 604 80009 671-- 5137-- 00 - 12 441-- 2186-- 00 1 CHASSIS ASSY:MAIN,0.050 AL,W/HARDWARE TK1943 441-- 2186-- 00 - 13 119-- 5806-- 00 1 POWER SUPPLY:AC-- DC,375W,85-- 275VAC 45-- 66HZ, 95-- 132VAC 360-- 440HZ IN, +3.3VD 35A, +5VD 22 26003 119-- 5806-- 00 - 14 174-- 4370-- 00 1 CA ASSY:DESCRETE,CPD,8,22AWG,10.0L,0.200CTR HDR BOTH ENDS,POWER 060D9 174-- 4370-- 00 - 15 174-- 4372-- 00 1 CA ASSY,SP:RIBBON,CPR1,.28 AWG, 0.100 CTR 40 POS, (CD DRIVE TO RISER BD) 060D9 174-- 4372-- 00 - 16 119-- 6205-- 00 1 DISK,DRIVE:OPTICAL,CD ROM, 40X,644MB16.6MB/SEC 50356 CD-- 532E-- B02 - 17 671-- 4667-- 00 1 CIRCUIT BD ASSY:RISER 80009 671-- 4667-- 00 - 18 441-- 2216-- 00 1 CHASSIS,BRKT:REAR PANEL ,NLX,0.050 AL,ETCH/CLEAR CHROMATE TK1943 441-- 2216-- 00 - 19 211-- 1081-- 00 4 SCREW,MACHINE:M3 X 0.5 X 3.5MM,FLAT WAFER HD PHILLIPS,STL ZI PL 0KB01 211-- 1081-- 00 - 20 211-- 0720-- 00 4 SCR,ASSEM WSHR:6-- 32 X 0.500,PNH,STL,CD,T-- 15 0KB01 ORDER BY DESCRIPTION - 21 156-- 9074-- 00 1 IC,MEMORY:CMOS,DRAM,32MEG X 64, 256MEG, SDRAM, PC100, MT16LSDT3264AG-- 10E,DIMM168 10- 12 MT16LSDT3264AG-- 1 0E TLA600 Series Logic Analyzer Service Manual Mechanical Parts List 1 21 2 20 3 9 7 8 5 6 4 19 4 10 18 11 17 4 4 16 12 15 13 14 4 Figure 10- 3: Power supply, processor, and CD drive TLA600 Series Logic Analyzer Service Manual 10- 13 Mechanical Parts List Replaceable parts list Fig. & index number Tektronix part number 4-- 0 Serial no. effective Serial no. discont’d Qty Name & description Mfr. code Mfr. part number 672-- 1596-- 01 1 CIRCUIT BD ASSY:34 CH,256K ACQUISITION,W/BRACKET,TLA601,611 80009 672-- 1596-- 00 -0 672-- 1597-- 01 1 CIRCUIT BD ASSY:68 CH,256K ACQUISITION,W/BRACKET,TLA602,612 80009 672-- 1597-- 00 -0 672-- 1598-- 01 1 CIRCUIT BD ASSY:102 CH,256K ACQUISITION,W/ONE DAUGHTER BD,STAND-- OFFS,CLIPS,& BRACKET, TLA603, 613 80009 672-- 1598-- 00 -0 672-- 1599-- 01 1 CIRCUIT BD ASSY:136 CH,256K ACQUISITION,W/TWO DAUGHTER BDS,STANDOFFS,CLIPS,& BRACKET,TLA604, 614 80009 672-- 1599-- 00 -0 672-- 1600-- 01 1 CIRCUIT BD ASSY:34 CH,1M ACQUISITION,W/BRACKET,TLA621 80009 672-- 1600-- 00 -0 672-- 1601-- 01 1 CIRCUIT BD ASSY:68 CH,1M ACQUISITION,W/BRACKET,TLA622 80009 672-- 1601-- 00 -0 672-- 1602-- 01 1 CIRCUIT BD ASSY:102 CH,1M ACQUISITION,W/DAUGHTER BD, STANDOFFS,CLIP,& BRACKET,TLA623 80009 672-- 1602-- 00 -0 672-- 1603-- 01 1 CIRCUIT BD ASSY:136 CH 1M ACQUISITION,W/TWO DAUGHTER BDS,STANDOFFS,CLIPS,& BRACKET,TLA624 80009 672-- 1603-- 00 -1 407-- 4818-- 00 2 BRACKET,EMC:GROUNDING,ACQUISITION,0.050 AL,TLA600 SERIES TK1943 407-- 4818-- 00 -2 211-- 0105-- 00 4 SCREW,MACHINE:4-- 40 X 0.188,FLH,STL CD ,POZ 1AW87 MACHINE SCREW: 4-- 40 X .188, 10 -3 211-- 0409-- 00 4 SCR,ASSEM WSHR:4-- 40 X 0.312,PNH,STL,CD,T-- 10 0KB01 211-- 0409-- 00 -4 671-- 3307-- 01 1 CKT BD SUBASSY:COMPARATOR DAUGHTER CARD, TLA603, 604, 613, 614, 623, 624 80009 671-- 3307-- 01 -4 671-- 3307-- 01 2 CKT BD SUBASSY:COMPARATOR DAUGHTER CARD, TLA604, 614, 624 80009 671-- 3307-- 01 -5 129-- 1479-- 00 4 SPACER,POST:1.135 OVERALL,0.510 L SPACING,W/ 0.35 L,0.25 HEX 4-- 40 INT THD X 6-- 32 EXT, 0.75 L TK0588 129-- 1479-- 00 -6 671-- 4818-- 00 1 CIRCUIT BD ASSY:34 CH,ACQUISITION/PROCESSOR,TLA601,611 80009 671-- 4818-- 00 -6 671-- 4819-- 00 1 CIRCUIT BD ASSY:68 CH,ACQUISITION/PROCESSOR,TLA602,612 80009 671-- 4819-- 00 -6 671-- 4820-- 00 1 CIRCUIT BD ASSY:102 CH,ACQUISITION/PROCESSOR,TLA603,613 80009 671-- 4820-- 00 -6 671-- 4821-- 00 1 CIRCUIT BD ASSY:136 CH,ACQUISITION/PROCESSOR,TLA604,614 80009 671-- 4821-- 00 -6 671-- 5240-- 00 1 CIRCUIT BD ASSY:34 CH,1M ACQUISITION/PROCESSOR,TLA621 80009 671-- 5240-- 00 -6 671-- 5241-- 00 1 CIRCUIT BD ASSY:68 CH,1M ACQUISITION/PROCESSOR,TLA622 80009 671-- 5241-- 00 -6 671-- 5242-- 00 1 CIRCUIT BD ASSY:102 CH,1M ACQUISITION/PROCESSOR,TLA623 80009 671-- 5242-- 00 10- 14 TLA600 Series Logic Analyzer Service Manual Mechanical Parts List Replaceable parts list (cont.) Fig. & index number Tektronix part number Serial no. effective Serial no. discont’d Qty Name & description Mfr. code Mfr. part number -6 671-- 5243-- 00 1 CIRCUIT BD ASSY:136 CH,1M ACQUISITION/PROCESSOR,TLA624 80009 671-- 5243-- 00 -7 211-- 1050-- 00 13 SCREW,MACHINE:6-- 32 X 0.312 L,PNH,CAD PLT,T15 0KB01 OBD -8 407-- 4811-- 00 1 BRACKET,ECB:ACQUISITION,AL,TLA600 SERIES TK1943 407-- 4811-- 00 -9 361-- 1774-- 00 1 SPACER,BAR:GROUNDING,ACQUISITION,0.090 AL, TLA603, 613, 623, TK1943 361-- 1774-- 00 -9 361-- 1774-- 00 2 SPACER,BAR:GROUNDING,ACQUISITION,0.090 AL, TLA601, 602, 611, 612, 621, 622 TK1943 361-- 1774-- 00 1 2 2 3 3 9 4 5 5 7 6 7 8 7 Figure 10- 4: Acquisition assembly TLA600 Series Logic Analyzer Service Manual 10- 15 Mechanical Parts List 1 2 3 4 5 Figure 10- 5: Accessories Replaceable Parts List Fig. & index number Tektronix part number Serial no. effective Serial no. discont’d Qty Name & description Mfr. code Mfr. part number STANDARD ACCESSORIES 5-- 1 -2 -3 -4 -5 10- 16 161-- 0104-- 05 1 CA ASSY,PWR:3,1.0MM SQ,250V/10A,2.5 M (OPTION A3 - AUSTRALIAN) S3109 198-- 010 161-- 0066-- 11 1 CA ASSY,PWR:3,1.0MM SQ,250V/10A,2.5 METER,-AUSTRALIAN 80126 ORDER BY DESCRIPTION 161-- 0104-- 06 1 CA ASSY,PWR:3,1.0MM SQ,250V/10A,2.5 M (OPTION A1 - EUROPEAN) S3109 198-- 010 161-- 0066-- 09 1 CA ASSY,PWR:3,0.75MM SQ,250V/10A,99 INCH EUROPEAN 2W733 ORDER BY DESCRIPTION 161-- 0104-- 07 1 CA ASSY,PWR:3,1.0MM SQ,240V/10A,2.5 M (OPTION A2 - UNITED KINGDOM) S3109 209010 161-- 0066-- 10 1 CA ASSY,PWR:3,1.0 MM SQ,250V/10A,2.5 - UNITED KINGDOM PLUG TK2541 ORDER BY DESCRIPTION 161-- 0167-- 00 1 CA ASSY,PWR:3,0.75MM SQ,250V/10A,2.5 M (OPTION A5 - SWITZERLAND) S3109 ORDER BY DESC 161-- 0154-- 00 1 CA ASSY,PWR:3,1.0MM SQ,250V/10A,2.5 METER,STR,IEC320,RCPT, - SWITZERLAND 5F520 86515030 161-- 0306-- 00 1 CA ASSY,PWR:3,1.0MM SQ,250V/10A,2.5 M (OPTION AC - CHINA) TK6253 92-- 2637-- 250BKH -------- 1 CABLE ASSY,PWER:3,18 AWG,92 L (STANDARD CABLE - SEE FIG 10-- 1-- 6) 161-- 0104-- 08 1 CA ASSY,PWR:3,18 AWG,250/10A,98 INCH L,RTANG,IEC320,RCPT X STR,NEMA 6-- 15P,US, TK6372 161-- 0104-- 08 161-- 0066-- 12 1 CA ASSY,PWR:3,18 AWG,250V/10A,98 INCH,STR,IEC320,RCPT X NEMA 6-- 15P,US, S3109 ORDER BY DESCRIPTION 016-- 1441-- 00 1 POUCH, PLASTIC:POUCH (STANDARD CABLE - SEE FIG 10-- 1-- 1) TK2582 TK1441 BLACK CORDURA 016-- 1524-- 03 1 MOUSE PAD:TEKTRONIX TLA SERIES 22670 016-- 1524-- 02 071-- 0863-- XX 1 MANUAL,TECH:USER,TLA SERIES TK2548 071-- 0863-- XX TLA600 Series Logic Analyzer Service Manual Mechanical Parts List Replaceable Parts List (Cont.) Fig. & index number Tektronix part number Serial no. effective Serial no. discont’d Mfr. code Mfr. part number MANUAL,TECH:RACKMOUNT INSTRUCTION,TDS7000,TLA600 SERIES TK2548 071-- 0716-- 02 1 KEYBOARD:104 WINDOWS,RT5156TW, 0D1M6 122761-- 001 119-- 6574-- 00 1 POINTER ASSY:MOUSE,THREE BUTTON,WHEELED,W/PS2 CONNECTOR, 46628 952442-- 0403 407-- 4435-- 01 2 BRACKET,SUPPORT:1.2MM THK CRS,LOGIC ANALYZER PROBE,SATIN NICKEL PL TK0JL 407-- 4435-- 01 156-- 4827-- 00 1 IC,MEMORY:CMOS,SDRAM,8MEG X 64,SYNC MODULE,UNBUFFERED,3.3V,MC-- 458CB646-- A10 6Y440 MT8LSDT864AG-- 10 EC7 650-- 4209-- 04 1 DISK DRIVE ASSY:WINCHESTER,2.5 IN,10.0GB,SINGLE PLATTER, W/SOFTWARE,TLA600 SERIES 80009 650-- 4209-- 04 650-- 4210-- 04 1 DISK DRIVE ASSY WINCHESTER,2.5 IN,30.0 GB,SINGLE PLATTER, W/SOFTWARE;TLA600 SERIES (OPTION 1J) 80009 650-- 4210-- 04 119-- 6493-- 00 1 DISK DRIVE:WINCHESTER,2.5 IN,10GB,SINGLE PLATTER,IDE,07N4390, 9F560 119-- 6493-- 00 119-- 6494-- 00 1 DISK DRIVE:WINCHESTER,2.5 IN,30.0GB,SINGLE PLATTER,IDE,07N4392,(OPTION 1J) 9F560 119-- 6494-- 00 119-- 6340-- 00 1 DISPLAY,MONITOR:17 IN,COLOR,MAX RESOLUTION (OPTION 1M) 61058 TX-- D7S55 119-- 6460-- 00 1 DISPLAY,MONITOR:21 INCH,COLOR,30-- 95 KHZ,0.25MM DOT PITCH,1800 X 1440 MAX RES, ON SCREEN DISPLAY, 0V618 P815 016-- 1790-- 00 1 KIT:RACKMOUNT (OPTION 1R) 80009 016-- 1790-- 00 ---------- 1 LACART (OPTION 1K) 80009 LACART Qty Name & description 071-- 0716-- 02 1 119-- 5662-- 00 OPTIONAL ACCESSORIES TLA600 Series Logic Analyzer Service Manual 10- 17 Mechanical Parts List Replaceable parts list Fig. & index number Tektronix part number Serial no. effective Serial no. discont’d Qty Name & description Mfr. code Mfr. part number ADJUSTMENT/VERIFICATION FIXTURE 10-- 6-- 1 131-- 5267-- 00 1 CONN,HDR:PCB,MALE,STR,2 X 40,0.1 CTR 00779 104326-- 4 -2 131-- 5829-- 00 1 CONN,SHUNT:JUMPER,FEMALE,STR,1 EA,2MM,4MM H, 00779 382575-- 3 -3 131-- 5990-- 00 1 CONN,HDR:PCB,MALE,STR,1 X 36,0.079 CTR 55322 TMM-- 136-- 02-- G-- 2 -4 131-- 0608-- 00 5 CONN,TERMINAL:PRESSFIT/PCB,MALE,STR,0.025 SQ,0.248 MLG X 0.137 TAIL,50 GOLD,PHZ BRZ,W/FERRULE 22526 48283-- 018 -5 131-- 6024-- 00 1 CONN,HDR:PCB,MALE,STR,2 X 25,0.079CTR 53387 151250-- 8422-- TY -6 105-- 1089-- 00 2 LATCH ASSY:LATCH HOUSING ASSY,VERTICAL MOUNT,2/PKG,0.48 H X 1.24 L,W/PCB SINGLE CLIP 60381 105-- 1089-- 00 -7 131-- 6134-- 01 2 CONN,PLUG:SMD,MICTOR,PCB,FEMALE 00779 767004-- 1 -8 210-- 0457-- 00 6 NUT,PL,ASSEM WA:6-- 32 X 0.312,STL CD PL,W/LOCKWASHER 0KB01 ORDER BY DESCR -9 348-- 0048-- 00 6 FOOT,CAMERA:BLACK VINYL W/6-- 32 STUD 80009 348-- 0048-- 00 - 10 210-- 0586-- 00 4 NUT,PL,ASSEM WA:4-- 40 X 0.25,STL CD PL 0KB01 ORDER BY DESCR - 11 671-- 3599-- 00 1 CKT BD ASSY:DESKEW TEST FIXTURE (A14) 80009 671-- 3599-- 00 - 12 150-- 5009-- 00 1 DIODE,OPTO:LED,HI-- EFFIC RED,626NM,3.4MCD AT 10MA 50434 HLMP-- 6305-- 021 - 13 159-- 5009-- 00 1 FUSE,SMD:1.5A,125V,FAST BLOW,0.1 X 0.1 X 0.24,UL RECOGNIZED,CSA CERTIFIED 75915 45101.5 - 14 131-- 5527-- 00 1 JACK,POWER DC:PCB,MALE,RTANG,2MM PIN,11MM H(0.433) X 3.5MM(0.137) TAIL,9MM(0.354) W,TIN,W/SWI TK2449 DJ-- 005-- A - 15 214-- 2957-- 00 2 HEAT SINK,SEMIC:TRANSISTOR,TO-- 220 13103 6072B - 16 210-- 1178-- 00 2 WASHER,SHLDR:TRANSISTOR,TO-- 220,0.2”ODX0.116 13103 7721-- 7PPS - 17 211-- 0372-- 00 4 SCREW,MACHINE:4-- 40 X 0.312,PNH,STL CD PL,TORX T10 93907 B80-- 00020-- 003 - 18 342-- 0355-- 00 2 INSULATOR,PLATE:TRANSISTOR,SILICONE RUBBER 55285 7403-- 09FR-- 51 - 19 131-- 3378-- 00 2 CONN,RF JACK:BNC,50 OHM,FEMALE,RTANG,PCB/REAR PNL,0.5-- 28 THD,0.625 H X 0.187 TAIL,W/O MTG FL 00779 227677-- 1 10- 18 TLA600 Series Logic Analyzer Service Manual Mechanical Parts List 17 2 1 16 3 4 5 18 15 6 19 7 8 14 13 12 11 9 10 Figure 10- 6: Adjustment/verification fixture exploded view TLA600 Series Logic Analyzer Service Manual 10- 19 Mechanical Parts List 10- 20 TLA600 Series Logic Analyzer Service Manual