1
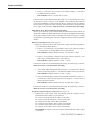
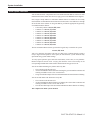
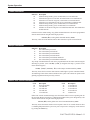
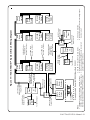
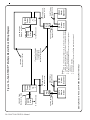
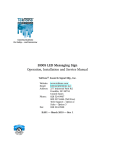
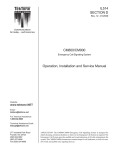
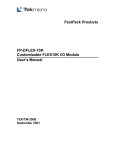
IL667
SECTION C
Rev. 7a - 02/2003
Tek-STATUS™ RS800™ Room Status System
Operation, Installation and Service Manual
Alpha Communications®
42 Central Drive
Farmingdale, NY 11735-1202
Phone: (631) 777-5500
Fax: (631) 777-5599
Website:
www.alpha-comm.com
Email:
[email protected]
TOLL-FREE Technical #:
1-800-666-4800
APPLICATION: The Tek-STATUS™ Room Status System The Tek-STATUS™ system is
designed for use in doctors’ offices and other medical facilities that require visual indication
of the status of patient rooms. Tek-STATUS™ is a microcontroller-based system that consists of a Master Station, Remote Dome Stations and 4-Button Peripheral Stations, Emergency Call Switches, Code Call Switches and a Power Supply. A Master Expander and an
Annunciator Panel can also be added to the installation.
Operation, Installation and Service Manual
Copyright © 2002–2003 TekTone® Sound & Signal Mfg., Inc., All rights reserved.
No part of this publication may be copied without the express written permission of TekTone® Sound & Signal Mfg., Inc. The content
of this manual is furnished for informational use only, is subject to change without notice, and should not be construed as a commitment
by TekTone® Sound & Signal Mfg., Inc. TekTone® Sound & Signal Mfg., Inc. assumes no responsibility or liability for any errors or
inaccuracies that may appear in this documentation.
TekTone, the TekTone logo, Tek-Call, Tek-Care, Tek-Check-In, Tek-Com, Tek-Digicare, Tek-Door, Tek-Entry III, Tek-Guard, TekMicro, Tek-Micro II, Tek-MMARS II, TekNIOS, TekNIOS II, Tek-Paging, Tek-Phone, Tek-Safe, Tek-Select II, Tek-Sentry, TekSound, Tek-Status, Tek-Trio and Tek-View are either registered trademarks or trademarks of TekTone® Sound & Signal Mfg., Inc. in
the United States and/or other countries. All other trademarks are the property of their respective owners.
ii • IL667 Tek-STATUS™ Manual
Table of Contents ————————————————————
System Introduction ............................................................................... v
A Word about ESD (Electrostatic Discharge) ...................................... vi
System Installation .................................................................................. 1
Equipment Descriptions .............................................................................................. 1
RS816 Master Station .......................................................................................... 1
RS840 Master Expander ...................................................................................... 1
RS850 Remote Indication & Control Panel ......................................................... 1
LI804 Remote Dome Station ................................................................................ 1
SF804 4-Button Peripheral Station ...................................................................... 1
PK800A Power Supply ........................................................................................ 3
SF155B Emergency Station ................................................................................. 3
SF156B Code Call Station ................................................................................... 3
Equipment Locations ................................................................................................... 3
RS816 Master Station .......................................................................................... 3
RS840 Master Expander ...................................................................................... 3
PK800A Power Supply ........................................................................................ 4
LI804 Remote Dome Station ................................................................................ 4
SF804 4-Button Peripheral Station ...................................................................... 4
RS850 Remote Indication & Control Panel ......................................................... 4
SF155B Emergency Station and SF156B Code Call Station ............................... 4
Wiring Installation ....................................................................................................... 4
Cable Specifications ............................................................................................. 5
General System Options ....................................................................................... 5
RS840 Master Expander Installation & Wiring ................................................... 5
Multiple Master Installation & Wiring ................................................................. 5
Multiple Power Supply Installation & Wiring...................................................... 6
Wiring Checkout & System Component Installation ................................................... 6
Main Power Distribution, Part 1 .......................................................................... 6
LI804 Remote Dome Station Installation & Programming .................................. 7
Main Power Distribution, Part 2 .......................................................................... 7
Peripheral Component Interface Connections ...................................................... 7
Field Data Wiring Connections ............................................................................ 8
System Installation ............................................................................................... 8
Initial System Checkouts ............................................................................................. 9
System Operation ................................................................................. 10
System Initialization .................................................................................................. 10
Programming Basics .................................................................................................. 10
Global Commands ..................................................................................................... 11
Unique Commands .................................................................................................... 11
Global Tone Control Commands ............................................................................... 11
Status Advance & Lamp Reset .................................................................................. 12
Using the RS840 Master Expander ........................................................................... 12
Basic System Configuration Example ....................................................................... 12
Enhanced System Operation ............................................................... 13
General ...................................................................................................................... 13
Data Buss ........................................................................................................... 13
DSN Buss ........................................................................................................... 13
Using Multiple Master Stations ................................................................................. 13
Enhanced System Configuration Example #1 ........................................................... 14
Enhanced System Configuration Example #2 ........................................................... 14
IL667 Tek-STATUS™ Manual • iii
Table of Contents
Passing Visual Information .................................................................. 16
RS850 Remote Indication & Control Panel Installation ..................... 17
General ...................................................................................................................... 17
RS850 Addressing ..................................................................................................... 17
LI804 Remote Dome Station Indication .................................................................... 17
Illustrations & Wiring Diagrams
Figure 1—RS816 Master Station ................................................................................ 2
Figure 2—RS840 Master Expander ............................................................................ 2
Figure 3—RS850 Remote Indication & Control Panel ............................................... 2
Figure 4— LI804 Remote Dome Station .................................................................... 2
Figure 5—SF804 4-Button Peripheral Station ............................................................ 2
Figure 6—PK800A Power Supply .............................................................................. 2
Figure 7—SF155B Emergency Station ....................................................................... 2
Figure 8—SF156B Code Call Station ......................................................................... 2
Figure 11—Tek-STATUS™ System Block Wiring Diagram ...................................... 19
Figure 12—Tek-STATUS™ Multiple Master Block Wiring Diagram ....................... 20
Figure 13—PL467 Wall Plate Wiring Diagram ........................................................ 21
Figure 14—Tek-STATUS™ Group Configuration ..................................................... 22
Figure 15—LI804 Remote Dome Station Programming ........................................... 23
iv • IL667 Tek-STATUS™ Manual
System Introduction ———————————————————
The Tek-STATUS™ Room Status System is a flexible microcontroller-based system that
provides visual indication of the status of examination rooms within a doctor’s office or
other medical facility. Status indications are provided by addressable LI804 Remote Dome
Lamps and are also displayed on the Master Station. Provisions for Emergency and Code
annunciations are also available.
The RS816 Master Station and RS840 Master Expander (if required) make up the console
that displays room status. The Master Station console provides facilities for:
•
•
•
•
•
Changing the status of a room
Displaying the status of assigned rooms
Selecting the default status indications
Custom assignment of status indications
Audible and visual indication of emergency calls, code calls and service requests.
The features of all Tek-STATUS™ components are discussed in greater detail in the System
Installation: Equipment Descriptions section.
Detailed wiring and a plug-in design provides ease of installation in new and existing facilities.
Because the system’s flexibility allows it to be installed in many configurations, it is necessary
to distinguish the components that make up a “Basic” versus an “Enhanced” Tek-STATUS™
Room Status System.
A Basic Tek-STATUS™ Room Status System is limited to:
•
•
•
•
•
•
•
RS816 Master Station—one
RS840 Master Expander—one
LI804 Remote Dome Stations—up to 40
SF804 4-Button Peripheral Stations—one per LI804
SF155B Emergency Call Stations—one per LI804
SF156B Code Call Stations—one per LI804
PK800A Power Supply requirements are described in the Wiring Installation:
General System Options section.
An Enhanced Tek-STATUS™ Room Status System employs a DSN buss to enable master to
master communication and RS850 Remote Indication & Control Panels. An Enhanced system
is limited to:
•
•
•
•
•
•
•
•
RS816 Master Stations—up to 10. (Note: If 10 RS816 Master Stations are used, one
must be configured as a lobby station and will have no associated LI804 Remote Dome
Stations. See Enhanced System Operation: Using Multiple Master Stations.)
RS840 Master Expanders—one per RS816
RS850 Remote Indication & Control Panels—up to 6
LI804 Remote Dome Stations— up to 40 per RS816
SF804 4-Button Peripheral Stations—one per LI804
SF155B Emergency Call Stations—one per LI804
SF156B Code Call Stations—one per LI804
PK800A Power Supply requirements are described in the Wiring Installation:
General System Options section.7
IL667 Tek-STATUS™ Manual • v
A Word about ESD (Electrostatic Discharge)————————
What Is It? Static electricity is a result of triboelectric charging of two dissimilar nonconductive materials rubbed together, like rubbing your feet on a carpet on a cold winter
day, or in a dry climate. The resulting charge is detected when you reach out to touch a
doorknob, or some other metallic object. The resulting discharge may be only startling, or in
severe cases it may even be painful. The actual electrical charge is dependent on the materials
rubbed together, humidity, rate of separation and other factors.
What Can It Do? While this effect may be disturbing to humans, the effect on electronic
equipment is often more serious, ranging from disrupting the operation to actual damage of
the components. These effects result from the high voltages that may be developed. The
simple act of walking across a carpet may develop as much as 30,000 volts; changing a bed
sheet may create a charge of 100,000 volts or more. Such voltages readily cause arcing (the
spark you see in the dark when you grab the doorknob, after walking across the carpet, etc.)
The arcing is evidence of a discharge path. Due to the high voltage involved, the discharge
current can jump to any nearby metallic object. If the discharge is to or through an electronic
device, such as the Tek-STATUS™ Room Status System, the operation of the equipment may
be affected. If the discharge current passes through internal components, these components
may be damaged or their operation degraded.
What Can We Do About It? The manufacturer of the Tek-STATUS™ Room Status System
has already taken steps to protect the equipment from electrostatic discharge (ESD) effects.
However, since the cause of the problem is not in the equipment, but in the environment,
further measures are required of the installer and the user to achieve complete protection.
What Can The Installer Do? In humid climates or in places where the relative humidity is
kept at 65% or greater, there will likely be few problems with ESD. Where problems may
occur, the following measures can be taken.
1. Ground all exposed metal surfaces, such as the PK800A Power Supply enclosure.
2. Install Tek-STATUS™ Room Status System wiring in metal conduit. The conduit must
be electrically continuous and be grounded.
3. Use the specified cable type for the installation of the Tek-STATUS™ Room Status
System. Any deviation from the specified cable type, such as the use of open
conductors, invites inductive coupling of discharge currents that can cause the same
problems as direct discharge currents.
4. Ground your body before handling system components. This can be done using a wrist
strap, or simply by contacting a grounded surface. Use caution to avoid hazardous
voltages while grounded.
What Can The User Do? The most common cause of system failure due to ESD that can be
attributed to the user is usually improper movement and installation of equipment. It is
recommended that if it is necessary to move a component of the Tek-STATUS™ that has
already been installed, a qualified installation person should be contacted.
This information is provided to make you aware of ESD problems so that precautions may
be taken to avoid damage and disruption of system operation.
vi • IL667 Tek-STATUS™ Manual
System Installation ———————————————————–
Equipment Descriptions
Read the following instructions concerning system equipment, as well as the installation and
power-up guidelines, to determine installation methods before proceeding.
RS816 Master Station
The RS816 Master Station (see Figure 1) provides all the necessary controls for the TekSTATUS™ Room Status System. The front panel of the RS816 displays the status of up to
16 rooms using 64 LED indicators arranged in two 4x8 matrices—4 indicators per room.
These matrices provide the nurse station or other designated area with a visual indication
of the status of all rooms attached to the system. Programming the system is accomplished
using the keypad, which is above the matrices. In the event of a loss of power, all
programming will return when system power is restored. All inputs to the master station
are accomplished by means of a modular connector cable between the master station and
a wall-mounted modular jack.
RS840 Master Expander
The RS840 Master Expander (see Figure 2) expands the capacity of the RS816 Master
Station to 40 rooms, by adding 24 rooms in three additional 4x8 matrices. All programming
for the RS840 is accomplished at the RS816. System interface is accomplished be means
of a modular connector cable between the RS816 and the RS840.
RS850 Remote Indication & Control Panel
The RS850 Remote Indication & Control Panel (see Figure 3) is designed to be installed
in areas that provide services and support to the doctor or nursing staff, such as X-ray or
laboratories. The RS850 supports only one lamp from each associated LI804 Remote
Dome Station, which is used to indicate that a service is required in a particular room.
The RS850 provides an audible and visual indication of a requirement, as well as a
means of acknowledging the call by pressing the associated switch on the membrane
keypad. The RS850 is connected to the system by means of a modular connector cable
and a PL467 Wall Plate.
LI804 Remote Dome Station
The LI804 Remote Dome Station (see Figure 4) provides visual indication of a room’s
status. The LI804 consists of four colored dome lamps and the necessary operational
electronics, and it is mounted near the room for which it indicates status information.
The LI804 is addressable, and each unit must have a unique address. Primary input to the
LI804 originates from the SF804 4-Button Peripheral Station. In turn, the LI804
communicates bi-directionally with the RS816 Master Station.
The LI804 may also be used as a zone lamp—prioritizing and annunciating call activity
in any one zone or in all zones. Connecting pin #1 to pin #9 changes its function to a zone
light. The dome will annunciate calls by priority. An LI804 configured in this fashion
does not occupy an address, but counts towards the limit established for maximum devices
per run and per power supply. Zone selection is accomplished by setting the corresponding
dipswitch to the “on” position (see Figure 15). Stations addresses 0–15 belong to Zone
1, addresses 16–31 belong to Zone 2, and addresses 32–40 belong to Zone 3.
SF804 4-Button Peripheral Station
The SF804 4-Button Peripheral Station (see Figure 5) consists of a wall-mounted switch
assembly that is wired to an LI804 Remote Dome Station. The SF804 must be used in
conjunction with a LI804, and cannot operate as a stand-alone device. Mount the SF804
4-Button Station within an examination room. When one of the buttons on the SF804 is
pressed, the corresponding LI804 dome lamp will change state, and a light within the
button switch is turned on. This verifies that the switch closure has been made and that
the corresponding dome lamp has been turned on. The buttons’ colors (yellow, green,
red and white) correspond with the LI804 dome lamp colors.
IL667 Tek-STATUS™ Manual • 1
R
TE
EN
W
RO
C
5
CE
AN
L
NC
N
TIO
LK
TA
0
FU
MN
LU
CO
4
9
3
8
2
1
7
6
ULT
FA
WER
PO
ON
TY
IOR
PR
Figure 1—RS816 Master Station
Figure 2—RS840 Master Expander
Figure 3—RS850 Remote Indication & Control Panel
Figure 4—LI804 Remote Dome Station
Figure 6—PK800A
Power Supply
Figure 5—SF804 4-Button Peripheral Station
Figure 7—SF155B Emergency Station
2 • IL667 Tek-STATUS™ Manual
Figure 8—SF156B Code Call Station
System Installation
PK800A Power Supply
The PK800A Power Supply (see Figure 6) is designed to power the Tek-STATUS™
Room Status System, It has +24VDC outputs for the remote dome stations and +5VDC
outputs for the master station, master expander and remote indication & control panel.
The PK800A power supply is short-circuit protected so that momentary shorts will not
cause a power supply failure. If a short on either of the power supply’s outputs remains
for more than a few seconds, the 4 amp fuse will blow. After the short has been cleared
and the fuse replaced, the power supply will return to normal operation.
SF155B Emergency Station
The SF155B Emergency Station (see Figure 7) is for use in any location where activation
of an emergency signal is required. The SF155B employs a slide switch activator and
can be used with or without the supplied pull cord. When this switch is activated, the
green and amber lamps on the associated LI804 Remote Dome Station will flash
alternately, as will the corresponding indicators on the master station or master expander.
The master station will also emit a slow repeating tone. The SF155B panel includes a red
call-assurance LED that lights when a call has been placed. The SF155B is not supervised.
An emergency call overrides any normal annunciation that may be present on the LI804
Remote Dome Station. The system’s previous status will return after the emergency call
has been cleared.
SF156B Code Call Station
The SF156B Code Call Station (see Figure 8) is for use in any location where activation
of a code signal is required. The SF156B employs a slide switch activator. When this
switch is activated, the red and white lamps on the associated LI804 Remote Dome
Station will flash alternately, as will the corresponding indicators on the master station or
master expander. The master station will also emit a slow repeating tone. The SF156B
panel includes a red call-assurance LED that lights when a call has been placed. The
SF156B is not supervised.
A code call overrides any annunciation that may be present on the LI804. The system’s
previous status will return after the code call has been cleared.
Equipment Locations
Locate the Tek-STATUS™ equipment in accordance with the following information. The
installation of all system equipment must meet the requirements of the current National
Electrical Code, ANSI/NFPA #70. Do not locate or install Tek-STATUS™ components in or
near areas of high humidity, static electricity, radiation or heat.
RS816 Master Station
Locate the RS816 Master Station in an accessible area at the nurses station and/or reception
area. For optimum operation, locate the RS816 in an area with an average temperature of
approximately 24°C (75°F) with 70–80% relative humidity.
The interface to the system is accomplished via a PL467 wall plate. The maximum cable
length between the wall plate and the RS816 is 7'. The modular interface cable is supplied
with the master station. Place the PL467 wall plate so that it is convenient for cable runs
to the LI804 Remote Dome Stations. Wire length of the data buss to the last LI804 must
not exceed 1000'. Also see the section Equipment Locations: PK800A Power Supply for
the maximum wire lengths of the power lines.
RS840 Master Expander
Locate the RS840 Master Expander (if used) adjacent to the RS816 Master Station. The
supplied modular interface cable is approximately 16".
IL667 Tek-STATUS™ Manual • 3
System Installation
PK800A Power Supply
Mount the PK800A Power Supply in an area with good ventilation. The total wire length
between the PK800A and any PL467 wall plate must not exceed 18'. The total wire
length between the power supply and any LI804 Remote Dome Station must not exceed
250'. Additional PK800A power supplies must be used if any LI804 Remote Dome
Stations are located more than 250' from the power supply.
The 24VAC / 60 Hz. input to the power supply is provided by a transformer supplied by
the installer. The wire length between output from the transformer and the input to the
power supply must not exceed 3'. The transformer must meet these parameters:
Input Voltage: 120VAC / 60 Hz. Single Phase
Output Voltage: 24VAC / 60 Hz. Single Phase
Output Power: 100VA / (Continuous Service)
LI804 Remote Dome Station
Mount the LI804 Remote Dome Station in the corridor above or beside the door of its
associated room, in a location that provides unobstructed visibility of the dome lights.
(See the sections Equipment Locations: RS816 Master Station and Equipment Locations:
PK800A Power Supply for maximum wire lengths.) No more than sixteen LI804s may
be on a data buss run, regardless of run length.
SF804 4-Button Peripheral Station
One SF804 4-Button Peripheral Station is required for each LI804 Remote Dome Station
(except an LI804 used as a zone lamp). Mount the SF804 within the room of the associated
LI804. Wire length from the SF804 to its associated LI804 must not exceed 25'. An
SF804 is not needed if a room requires only code or emergency calls to be annunciated.
RS850 Remote Indication & Control Panel
Locate the RS850 Remote Indication & Control Panel in an accessible area of the
designated laboratory or doctor’s office. For optimum operation, locate the panel in an
area with an average temperature of approximately 24°C (75°F), with 70–80% relative
humidity.
The interface to the system is accomplished via a PL467 wall plate. The maximum cable
length between the wall plate and the RS850 is 7'. The modular interface cable is supplied
with the RS850. Wire length from the RS850’s wall plate to the RS816’s wall plate must
not exceed 250'.
SF155B Emergency Station and SF156B Code Call Station
Mount SF155B Emergency Stations and the SF156B Code Call Stations (if used) on a
wall, with convenient access for operation. (Also consider whether the emergency station
will be operated with the pull cord when determining location of the SF155B.) Wire
length from the SF155B or SF156B to the LI804 must not exceed 50'.
Wiring Installation
This section of the manual describes how to wire a basic Tek-STATUS™ Room Status System,
and includes a list of the cable types required to accomplish the installation. This section of
the manual and the wiring diagrams (Figures 11–15) must be fully read and understood
before attempting to install the system. Give special attention to the specified cable lengths
for each component of the Tek-STATUS™ system. Do not substitute cable types, particularly
data cables, for those listed in this manual. Tek-STATUS™ uses current state-of-the-art digital
processing between the master station, master expander, remote indication & control panel,
and remote dome stations. If the electrical characteristics of the data cable are different than
that specified, distortion of the digital data and unreliable system operation can result.
4 • IL667 Tek-STATUS™ Manual
System Installation
Caution: If this equipment is installed near strong magnetic fields (such as transmitting
antennas, microwave energy or radiology-type operations), all cable runs must be
installed in metal conduit and an earth ground shorter than 10 feet must be attached to
a single point on the conduit. The conduit-to-ground system must have an overall
impedance of less than 0.1 ohms as indicated on a 500 volt insulation tester.
Cable Specifications
Use these cable types to install the Tek-STATUS™ system:
•
•
•
•
•
•
Power Supply Interconnect—two conductor, #14 AWG, stranded
Field Communications Buss—one twisted (8 twists/ft min.), shielded pair, #24 AWG,
stranded, low capacitance (<24pf/ft)
SF804 4-Button Peripheral Stations—six conductor, #22 AWG, stranded—plus one
conductor, #18 AWG, stranded
Master Communications Buss—one twisted (8 twists/ft min.), shielded pair, #24 AWG,
stranded, low capacitance (<24pf/ft)
SF155B Emergency and SF156B Code Stations—four conductor, #22 AWG, stranded
DSN Buss—one twisted, shielded pair, #24 AWG, stranded, low capacitance (<24pf/ft)
General System Options
In a standalone configuration, the RS816 Master Station provides annunciation for up to
16 rooms. Adding an RS840 Master Expander provides annunciation for up to 40 rooms.
The complete system also includes PK800A Power Supplies, LI804 Remote Dome
Stations and SF804 4-Button Peripheral Stations.
Tek-STATUS™ is capable of supporting up to ten RS816 Master Stations.
Multiple PK800A Power Supplies are required for extended system applications (such
as a system with multiple master stations, and installations that use more than eight LI804
Remote Dome Stations). This is due to both the signal loss associated with long cable
runs, and the current required by the many components attached to the power supply.
Determine the number of power supplies required, as follows:
One PK800A Power Supply can support:
• One RS816 Master Station and up to eight LI804 Remote Dome Stations, or
• One RS816 Master Station, one RS840 Master Expander and up to eight LI804
Remote Dome Stations, or
• One RS850 Remote Indication & Control Panel and up to eight LI804 Remote Dome
Stations, or
• Up to eight LI804 Remote Dome Stations
(Note: One PK800A can support one RS816 and one RS840 and one RS850 with up to
eight LI804s if the wire lengths are strictly adhered to. This means that the PL467 wall
plate for the RS816 Master Station must be less than 30' from the PL467 wall plate for
the RS850 Remote Indication & Control Panel. This is not practical in most applications.)
RS840 Master Expander Installation & Wiring
To install an RS840 Master Expander, connect the supplied short modular cable between
the AUX modular jack at the back of the RS816 Master Station and the LINE modular
jack at the back of the RS840 Master Expander. This cable provides the required power
and the data interface connections. No other connections are required (see Figure 11).
Multiple Master Installation & Wiring
Tek-STATUS™ can support up to ten RS816 Master Stations. The master stations are
connected from wall plate to wall plate using two pair of #24 AWG shielded stranded/
low capacitance cable (see the section Wiring Installation: Cable Specifications). Two
of the shielded wires in this cable are used for data transmission between the master
stations, while the remaining two wires are used as a common power supply return (see
Figure 12).
IL667 Tek-STATUS™ Manual • 5
System Installation
Multiple Power Supply Installation & Wiring
Multiple PK800A Power Supplies are required to support large system configurations.
Refer to the section Wiring Installation: General System Options to determine the number
of power supplies required for this specific Tek-STATUS™ installation.
NOTE: When using multiple power supplies, the positive (+) outputs of the power
supplies are never connected together. Connecting the positive outputs of power
supplies together can damage the devices. All the power supplies used in a single
Tek-STATUS™ installation must have a common GROUND connection.
Wiring Checkout & System Component Installation
Before installing any Tek-STATUS™ components, a complete checkout of the system wiring
must be performed to verify that there are no shorted wires and that continuity exists between
specific points.
There are numerous methods to accomplish this task. This procedure will guide you through
verification of a typical Tek-STATUS™ wiring installation, consisting of these components:
2–PK800A Power Supplies
1–RS816 Master Station
1–RS840 Master Expander
1–SF155B Emergency Station
1–SF156B Code Call Station
12–LI804 Remote Dome Stations
12–SF804 4-Button Peripheral Stations
Main Power Distribution, Part 1 (See Figure 11)
1. Without power to the system, check these points for continuity on every PK800A:
a. Any GROUND pin to any +5 VDC pin.
b. Any GROUND pin to any +24 VDC pin.
Desired Result: No continuity.
Expected Failure: If there is continuity present, the fuse in the power supply will
blow. This indicates that the main power is shorted and the wiring must be corrected
before proceeding.
c. Any +24 VDC pin on one PK800A to any +24 VDC pin on another PK800A.
Desired Result: No continuity.
Expected Failure: If there is continuity present, the two power supply outputs
are shorted. This can cause overheating and possible failure of the power supply.
d. Any GROUND pin on one PK800A to any GROUND pin on another PK800A.
Desired Result: Continuity present
Expected Failure: If continuity does not exist, the Tek-STATUS™ components
that are attached to one of the power supplies will not receive operational power
or may function erratically.
2. With power connected to the system, check the DC voltage at the following points on
every PK800A:
a. Positive (+) test lead to any +5 VDC screw terminal; Negative (–) test lead to any
GROUND screw terminal.
Desired Result: +5 VDC (± .5 VDC)
6 • IL667 Tek-STATUS™ Manual
System Installation
b. Positive (+) test lead to any +24 VDC screw terminal; Negative (–) test lead to
any GROUND screw terminal.
Desired Result: between +24 VDC and +27 VDC.
If desired results are not obtained during this testing, one of two problems exist: either
the field power wiring is incorrect, or the PK800A is not functioning. Disconnect all
wiring from the PK800A in question and repeat the test. If desired results are obtained,
there is a short or a wiring error in the field wiring. If desired results are not obtained, the
power supply is not functioning. Make all necessary corrections before proceeding.
LI804 Remote Dome Station Installation & Programming
Remove power from the system, and then install all LI804 Remote Dome Stations. As
each LI804 is installed, its unique address must be set. This is accomplished by positioning
the J3 jumper and the switches on the 4-switch dipswitch, as shown in Figure 15. Failing
to perform this programming step will result in improper operation of the remote dome
stations.
Main Power Distribution, Part 2 (See Figure 11)
1. With power connected to the system, check the DC voltage at the following points on
every LI804 Remote Dome Station:
a. Positive (+) test lead to Pin 15 (Green/White) of the 15-pin connector; Negative
(–) test lead to Pin 13 (Orange/White) of the 15-pin connector.
Desired Result: Voltmeter indicates between +24 VDC and +27 VDC.
b. Positive (+) test lead to Pin 1 (Brown) of the 15-pin connector; Negative (–) test
lead to Pin 13 (Orange/White) of the 15-pin connector.
Desired Result: Voltmeter indicates +5 VDC ± .5 VDC.
If the desired results are not obtained during this testing, the field wiring is incorrect.
Make all necessary corrections before proceeding.
c. At the SF804 4-Button Peripheral Station: Positive (+) test lead to Pin 1 (Brown)
of the 6-pin connector; Negative (–) test lead to Pin 6 (Blue) of the 6-pin connector.
Desired Result: Voltmeter indicates +5 VDC ± .5 VDC.
d. At the SF155B (Emergency Station) and/or SF156B (Code Station): Positive (+)
test lead to Pin 1 (Brown) of the 6-pin connector; Negative (–) test lead to Pin 2
(Red) of the 6-pin connector.
Desired Result: Voltmeter indicates between +24 VDC and +27 VDC.
If the desired results are not obtained during this testing, the field wiring is incorrect.
Make all necessary corrections before proceeding.
Peripheral Component Interface Connections (See Figure 14)
1. Without power to the system, check the following points for continuity on every
LI804 Remote Dome Station (15-pin connector):
Pin 5 (Green) of the SF155B to Pin 6 (Blue) of the LI804.
Pin 5 (Green) of the SF156B to Pin 7 (Violet) of the LI804.
Pin 2 (Red) of the LI804 to Pin 2 (Red) of the SF804.
Pin 3 (Orange) of the LI804 to Pin 3 (Orange) of the SF804.
Pin 4 (Yellow) of the LI804 to Pin 4 (Yellow) of the SF804.
Pin 5 (Green) of the LI804 to Pin 5 (Green) of the SF804.
Desired Result: Continuity exists. The voltmeter should indicate less than .2 ohms
of resistance.
IL667 Tek-STATUS™ Manual • 7
System Installation
2. Verify that Pin 3 (Orange), Pin 4 (Yellow) and Pin 6 (Blue) of the SF155B and SF156B
are not connected to anything.
If any of the associated wiring is shorted, or is not connected to the correct input pin on
the LI804, incorrect data will be sent to the microprocessor. These wiring errors will
result in incorrect or no annunciations at the required locations. Make all necessary
corrections before proceeding.
Field Data Wiring Connections (See Figure 14)
To properly verify the field data wiring connections, insert a tone generator or buzzer at
the PL467 wall plate that the RS816 Master Station will be connected to. The field data
wiring consists of a single twisted-shielded pair. The positive (+) and negative (–)
connections are the only connections that are physically made to the LI804 Remote Dome
Station circuit board. The associated cable shield must be carried through from one LI804
to the next, but the shields are not electrically connected to the LI804.
Before executing this test, remove power input from all PK800A Power Supplies.
1. Temporarily connect an audio tone generator or buzzer to Pin 3 (+) and Pin 8 (–)
of the modular wall jack.
2. At the first LI804 Remote Dome Station, momentarily attach an 8-ohm speaker
between Pin 2 (+) (Red) and Pin 4 (–) (Yellow) of the 4-pin connector.
Desired Result: A tone or buzz should be heard from the speaker. If the desired
results are not obtained during this testing, the field wiring is incorrect. Make all
necessary corrections before proceeding.
3. Repeat Step 2 at every installed LI804 Remote Dome Station.
4. Disconnect the audio tone generator or buzzer from Pin 3 (+) of the modular wall
jack and attach it to Pin 4 (+) of the modular wall jack. Do not remove the wire
that is attached to Pin 8 (–) of the modular wall jack.
5. At the first LI804 Remote Dome Station, momentarily attach an 8-ohm speaker
between Pin 3 (Orange) and Pin 4 (Yellow) of the 4-pin connector.
Desired Result: A tone or buzz should be heard from the speaker. If the desired
results are not obtained during this testing, the field wiring is incorrect. Make all
necessary corrections before proceeding.
6. Repeat Step 5 at every installed LI804 Remote Dome Station.
7. Disconnect the tone generator or buzzer from the modular wall jack.
System Installation
After successfully completing the steps outlined previously in this section, it is safe to
attach the remaining Tek-STATUS™ components to their respective connectors. Install
the Tek-STATUS™ components using the supplied cables.
8 • IL667 Tek-STATUS™ Manual
System Installation
Initial System Checkouts
After all Tek-STATUS™ components have been installed and the address switches for each
LI804 Remote Dome Station have been set, apply power to the PK800A Power Supplies.
Next, assign a unique address to each RS816 Master Station. Use address #0 for a lobby
master that has no LI804 Remote Dome Stations associated with it. Use addresses #1 through
#9 for all other master stations. To assign an address, perform the appropriate keypad entry
at each RS816 Master Station:
•
•
•
•
•
•
•
•
•
•
at the Lobby Master: FUNCTION, 80, ENTER
at Master #1: FUNCTION, 81, ENTER
at Master #2: FUNCTION, 82, ENTER
at Master #3: FUNCTION, 83, ENTER
at Master #4: FUNCTION, 84, ENTER
at Master #5: FUNCTION, 85, ENTER
at Master #6: FUNCTION, 86, ENTER
at Master #7: FUNCTION, 87, ENTER
at Master #8: FUNCTION, 88, ENTER
at Master #9: FUNCTION, 89, ENTER
Then at each RS816 Master Station, perform this keypad entry to initialize the system:
FUNCTION,
99,
ENTER
After a few moments, the RS816 will emit two short beeps to indicate that the system is
ready to begin normal operation. At this point, the Tek-STATUS™ system should be fully
operational using system default settings.
To verify system operation, press each of the four buttons, one at a time, on every SF804 4Button Peripheral Station while verifying that both the same-colored lamp on the
corresponding LI804 Remote Dome Station and the button being pressed are lit.
Activate each SF155B Emergency Station and verify that:
•
•
•
The red LED on the SF155B is lit.
All associated RS816 Master Station are flashing the green and amber indicators and
emitting an audible tone at a slow on and off rate.
The green and amber lamps of the associated LI804 Remote Dome Station are flashing.
Activate each SF156B Code Station and verify that:
•
•
•
The red LED on the SF156B is lit.
All associated RS816 Master Stations are flashing the red and white indicators and
emitting an audible tone at a fast on and off rate.
The red and white lamps of the associated LI804 Remote Dome Station are flashing.
This completes the initial system checkout.
IL667 Tek-STATUS™ Manual • 9
System Operation ——–————————————————–—
Tek-STATUS™ has been designed to provide many selectable annunciation types, so that the
system may be customized to accommodate the specific need of an installation. Selecting
the desired annunciation type is accomplished at the master station keypad. When the system
is first initialized, Tek-STATUS™ defaults to a Light On/Light Off annunciation. If this type
of annunciation is satisfactory, no programming changes are necessary.
System Initialization
System initialization is required whenever the number of installed LI804 Remote Dome
Stations changes, or to restore the system to the original factory default settings. When a
system initialization is performed, all previous programming, whether global or unique,
will be lost. To accomplish a system initialization, perform the following sequence of
keystrokes at the master station:
FUNCTION,
99,
ENTER
After the initialization has completed, the master station will emit two short beeps to indicate
that the system is ready to resume normal operation.
Programming Basics
All changes to the system programming are accomplished at the associated RS816 Master
Station. All active indications must be cleared or reset before attempting any programming
changes. System programming is divided into two sections:
•
•
Global Commands
Unique Commands
For a complete list of global and unique commands see the section System Operations:
Global and Unique System Programming Codes.
Global commands change the type of annunciation for any given RS816 Master Station, and
the type chosen applies to all LI804 Remote Dome Stations associated with that master.
Unique commands are used to change the annunciation type of one specific LI804 Remote
Dome Station.
This is a typical example of using global and unique commands:
•
At the master station, enter this global command:
FUNCTION,
91,
ENTER
This command makes all amber and green dome lamps operate in an On/Off
configuration, while the red and white dome lamps operate in a Flash/On/Off
configuration.
•
If this configuration is correct, except that the white lamp for room #1 (i.e., the room
that displays in column 1 of the master station) must operate in the On/Off configuration, then at the master station, enter this unique command:
COLUMN,
1, ROW, 4, FUNCTION, 11,
ENTER
This changes only the white lamp for room #1 (i.e., column 1) to operate in the
On/Off configuration.
10 • IL667 Tek-STATUS™ Manual
System Operation
Global Commands
Function
90
91
92
93
94
95
96
Description
All dome lamps (amber, green, red and white) set to On/Off mode.
All amber and green set to On/Off. All red and white set to Flash/On/Off.
All amber set to On/Off. All green, red and white set to Flash/On/Off.
All amber set to On/Flash/Off. All green, red and white to Flash/On/Off.
All dome lamps (amber, green, red and white) set to Flash/On/Off.
All dome lamps (amber, green, red and white) set to Flash/Off.
All amber set to On/Off. All green set to Flash/Fast Flash/Off. All red and white
to Flash/On/Off.
Function 90 is the default setting. Any global command function code can be programmed
from the master station using the following keystrokes:
FUNCTION,
90 (or other global command number),
ENTER
This entry causes all of the attached remote dome stations to operate in On/Off mode.
Unique Commands
Function
11
12
15
16
18
19
Description
Sets selected lamp to On/Off.
Sets selected lamp to Flash/Off.
Sets selected lamp to On/Flash/Off.
Sets selected lamp to Flash/On/Off.
Sets selected lamp to Flash/Fast Flash/Off
Sets selected lamp to On/Flash/Fast Flash/Off
Any unique command function code can be programmed from the master station using the
following keystrokes: (Note: COLUMN, X, ROW, X, designates the lamp’s position on the
master station keypad.)
COLUMN,
1, ROW, 1, FUNCTION, 12 (or other unique command number), ENTER
This entry causes the first remote dome station’s amber light to operate in Flash/Off mode.
All remaining remote dome stations attached to the system will continue to operate in the
globally programmed mode previously selected.
Global Tone Control Commands
Code
40
41
42
43
44
Description
Tone off (default)
3 second tone
6 second tone
9 second tone
12 second tone
Code
45
46
47
48
49
Description
15 second tone
18 second tone
21 second tone
24 second tone
constant tone
Global tone control command settings cause the master station to emit a repeating tone for
the specified duration when there is a flashing lamp/LED on the system. Program any code
from the master station using the following keystrokes:
FUNCTION,
44 (or other global tone control command number), ENTER
This entry causes the master station to emit a repetitive tone for 12 seconds whenever there
is a flashing lamp/LED on the system. Any tone except code or emergency can be silenced
by pressing the CANCEL key.
IL667 Tek-STATUS™ Manual • 11
System Operation
Status Advance & Lamp Reset
Advance the status of a dome lamp through its normal sequence using the following keystrokes:
COLUMN,
column#, ROW, row#, ADVANCE
This keypad entry will turn off a flashing lamp whose mode has been programmed as On/
Flash/Off, or will make the same lamp that is on begin flashing. (This function creates the
same effect as if the associated SF804 button had been pressed.)
To reset a dome lamp without stepping through the status levels, enter these keystrokes:
COLUMN,
column#, ROW, row#, RESET
Using the RS840 Master Expander
The RS840 Master Expander is designed to increase the capacity of the RS816 Master
Station from 16 remote dome stations to 40 stations. As each additional LI804 Remote
Dome Station is installed, set its address using its programming jumper at J3 (see Figure
15). Remote dome stations for rooms 1–16 do not require a jumper at J3, so the jumper is
stored attached to only one pin. Install the J3 jumper between pins 1 and 2 for rooms 17–32,
and between pins 2 and 3 for rooms 33–40.
The remote dome stations associated with the master expander are programmed using the
RS816 Master Station keypad. Whenever the quantity of dome lamp stations attached to the
master station is changed, the system must be initialized using this command:
FUNCTION,
99, ENTER
The system’s programming may then be customized using the global and unique commands
previously described.
Basic System Configuration Example:
System components:
• One (1) RS816 Master Station
• One (1) RS840 Master Expander
• Forty (40) LI804 Remote Dome Stations
• Forty (40) SF804 4-Button Peripheral Stations
Preliminary system checks:
• Refer to sections Wiring Checkout & System Component Installation: LI804 Remote
Dome Station Programming and System Operation: Using the RS840 Master
Expander.
• Verify that the correct address programming has been performed on the LI804.
Programming:
• Enter these keystrokes at the RS816: FUNCTION, 81, ENTER, FUNCTION, 99, ENTER.
After approximately 20 seconds, the RS816 will emit two beeps, indicating that it has
searched the data buss for all attached LI804 Remote Dome Stations. Do not make
any key entries to the system until the two beeps are heard.
• The system should now be fully operational.
12 • IL667 Tek-STATUS™ Manual
Enhanced System Operation ———————————————
The enhanced operational capabilities of the Tek-STATUS™ Room Status System allow the
connection of up to ten RS816 Master Stations and their RS840 Master Expanders (if required)
together to form a versatile interactive system. The RS816 Master Station is also used to:
•
•
•
•
Display the status of assigned rooms
Program the types of status indications
Assign specific custom status indications both audibly and visually
Indicate emergency and code conditions
Tek-STATUS™ is capable of supporting many system configurations. This section provides
examples of various installed system configurations and the proper sequence of programming
keystrokes to enable all the functions of the Tek-STATUS™ system. (Note: These are only
examples—the system can be configured in ways other than those described here.)
General
Tek-STATUS™ components can be returned to system defaults any time during system
programming by pressing these keystrokes at each RS816 Master Station:
FUNCTION,
81, ENTER, FUNCTION, 99, ENTER
To return multiple RS816 Master Stations to the default configuration, perform the keystrokes
one at a time on each RS816. Verify that the two-beep verification tone has sounded before
proceeding to the next RS816. These keystrokes assign address #1 to each RS816, and sets
associated remote dome stations to On/Off mode.
Before proceeding with the various programming configurations, review the basic TekSTATUS™ communication paths. Tek-STATUS™ uses two paths of communication:
Data Buss
The data buss is the communication link between the master station and the installed
dome lamp assemblies for that master station. In order for the appropriate master station
to communicate with the correct dome lamp assembly, each dome lamp assembly must
have a unique address. (Refer to sections Wiring Checkout & System Component
Installation: LI804 Remote Dome Station Programming and System Operation: Using
the RS840 Master Expander.)
DSN Buss
The DSN buss is the communication link between all the installed master stations. In
order for the master stations to communicate with each other on the DSN buss, each
master station must have a unique address. (Refer to sections System Operation: Using
Multiple Master Stations.)
Using Multiple Master Stations
Tek-STATUS™ can support up to 9 masters plus a lobby master. For example, a large medical
facility with multiple doctors and a central point of patient entry might install a master
station in the central lobby, plus a master station and associated remote dome stations at
each doctor’s nurses station. When a patient arrives to see a specific doctor, the receptionist
can notify the appropriate nurses station that a patient has arrived.
To accomplish these intermaster communications, assign a unique address to each master
station. The control codes range from 80 through 89, representing lobby station address #0,
plus master station addresses #1 through #9. In the above example, set the lobby master
station to address #0 using these keystrokes at the lobby master station:
FUNCTION,
80,
ENTER
IL667 Tek-STATUS™ Manual • 13
Enhanced System Operation
Master station #0 (control code 80) cannot have remote dome stations associated with
it. Assign control codes sequentially to each of the remaining master stations using these
keystrokes at each master station:
FUNCTION,
(control code 81–89),
ENTER
To place a call from the lobby to master #1, press these keys on the lobby master station:
TALK,
1
These keystrokes cause an audible beep at master #1. To acknowledge the audible beep,
press CANCEL at master #1, silencing the beep tone.
Enhanced System Configuration Example #1:
System components:
• One (1) RS816 Master Station installed in the lobby
• One (1) RS816 Master Station at the nurses station
• Sixteen (16) LI804 Remote Dome Stations
• Sixteen (16) SF804 4-Button Peripheral Stations
Preliminary system checks:
• Refer to section System Component Installation: LI804 Remote Dome Station
Programming.
• Verify that the correct address programming has been performed on the LI804.
Programming:
• Enter these keystrokes at the lobby RS816: FUNCTION, 80, ENTER.
• Enter these keystrokes at the nurses station RS816: FUNCTION, 81, ENTER, FUNCTION,
99, ENTER. After approximately 20 seconds, the RS816 will emit two beeps, indicating
that it has searched the data buss for all attached LI804 Remote Dome Stations. Do
not make any key entries to the system until the two beeps are heard.
• Enter these keystrokes at the lobby RS816: FUNCTION, 99, ENTER. After approximately
20 seconds, the RS816 will emit two beeps, indicating that it has searched the DSN
buss for all attached RS816 Master Stations and RS850 Remote Indication & Control
Panels. Do not make any key entries to the system until the two beeps are heard.
• The system should now be fully operational.
To place a call from the lobby to the nurses master station, press these keys on the lobby
master station:
TALK, 1
These keystrokes cause an audible beep at the nurses master station. To acknowledge the
audible beep, press CANCEL at the nurses master station, silencing the beep tone.
Enhanced System Configuration Example #2:
System components:
• One (1) RS816 Master Station installed in the lobby
• Two (2) RS816 Master Stations located at two separate nurses stations
• Thirty-two (32) total LI804 Remote Dome Stations. (Sixteen connected to each of the
nurses station RS816 Master Stations.)
• Thirty-two (32) total SF804 4-Button Peripheral Stations
14 • IL667 Tek-STATUS™ Manual
Enhanced System Operation
Preliminary system checks:
• Refer to section System Component Installation: LI804 Remote Dome Station
Programming.
•
Verify that the correct address programming has been performed on each set of LI804
Remote Dome Stations.
Programming:
• Enter these keystrokes at the lobby RS816: FUNCTION, 80, ENTER.
•
Enter these keystrokes at the first nurses station RS816: FUNCTION, 81, ENTER.
•
Enter these keystrokes at the second nurses station RS816: FUNCTION, 82, ENTER.
Note: The above steps set the addresses of the installed master stations to 0, 1 and 2.
•
Enter these keystrokes at the lobby RS816: FUNCTION, 99, ENTER. After approximately
20 seconds, the RS816 will emit two beeps, indicating that it has searched the DSN
buss for all attached RS816 Master Stations and RS850 Remote Indication & Control
Panels. Do not make any key entries to the system until the two beeps are heard.
•
Enter these keystrokes at the first nurses station RS816: FUNCTION, 99, ENTER. After
approximately 20 seconds, the RS816 will emit two beeps, indicating that it has
searched the data buss for all attached LI804 Remote Dome Stations. Do not make
any key entries to the system until the two beeps are heard.
•
Enter these keystrokes at the second nurses station RS816: FUNCTION, 99, ENTER.
After approximately 20 seconds, the RS816 will emit two beeps, indicating that it has
searched the data buss for all attached LI804 Remote Dome Stations. Do not make
any key entries to the system until the two beeps are heard.
•
The system should now be fully operational.
Note: Because Tek-STATUS™ is an extremely flexible system, all possible configurations
cannot be individually addressed. Therefore these guidelines are provided to aid in the
programming process:
•
Each RS816 Master Station must have a unique address (FUNCTION 80–89).
•
Each LI804 Remote Dome Station must have a unique address relative to its associated
RS816.
•
Master to master communication is accomplished via the DSN buss. If changes are
made to the DSN buss configuration, initialize each installed RS816 Master Station
(FUNCTION, 99, ENTER) so that it learns the new DSN buss configuration.
•
The communication between any given master station and its attached LI804 Remote
Dome Stations is accomplished via the data buss. If any changes are made to the
addresses or the quantity of attached LI804 Remote Dome Stations, initialize the
associated RS816 Master Station (FUNCTION, 99, ENTER) so that it learns the new data
buss configuration.
•
All active indications must be cleared or reset before attempting any programming
changes.
IL667 Tek-STATUS™ Manual • 15
Passing Visual Information ———–———————————––
Tek-STATUS™ installations consisting of multiple RS816 Master Stations can echo indications
from one master station to another master station. Any master station can be temporarily
taken “offline” and its status displays reassigned to another master station (if the second
master station has sufficient capacity for the status displays of both masters). A master station
cannot receive data from more than one master at a time, and cannot display the status of
more than 40 LI804 Remote Dome Stations. (See the section System Installation: Wiring
Installation: General System Options.)
The following commands are used to pass visual information from one RS816 Master Station
to another. (Before proceeding, turn off all dome lights.) Enter these commands at the RS816
that is forwarding its data:
FUNCTION,
1, (address of RS816 that data is being passed to), ENTER
To transfer status displays from master #1 to master #2, press these keys on master #1:
FUNCTION,
1, 2, ENTER
To return the masters to defaults (no data passed to any other master), turn off all dome
lights, and then press these keys on the RS816 Master Station that was forwarding its data:
FUNCTION,
16 • IL667 Tek-STATUS™ Manual
1, 0, ENTER
RS850 Remote Indication & Control Panel Installation ––––—
General
The RS850 Remote Indication & Control Panel is designed to be used as an indicator for
services requested. A maximum of six RS850 Remote Indication & Control Panels can be
installed per Tek-STATUS™ system.
For example, the RS850 might be mounted in an X-ray laboratory so that a doctor or nurse
in an examination room could summon the X-ray technician. To initiate the summons, the
nurse/doctor presses a specific button on the SF804 4-Button Peripheral Station.
At the RS850 Remote Indication & Control Panel, an LED indicator will illuminate to indicate
which examination room placed the call, and a double beep will sound approximately every
three seconds. The summons is acknowledged by pressing the appropriate button on the
RS850. This silences the beep tone and changes the state of both the indicator light and the
associated remote dome light to the next indication—in this example, from flashing to steady.
After accomplishing the assigned task, the X-ray technician presses the appropriate button
on the SF804 Remote Dome Station. This turns off both the associated indicator light on the
RS850 and the corresponding light on the LI804 Remote Dome Station.
RS850 Addressing
Because up to six RS850 Remote Indication & Control Panels can be installed on a system,
each RS850 must be assigned a unique address (addresses 2–7). This table provides the
dipswitch settings for these RS850 panel addresses:
Address
2
3
4
5
6
7
Reset
Switch 1
Off
On
Off
On
Off
On
X
Switch 2
Off
Off
On
On
Off
Off
X
Switch 3
Off
Off
Off
Off
On
On
X
Switch 4
Off
Off
Off
Off
Off
Off
On
LI804 Remote Dome Station Indication
When using an RS850 Remote Indication & Control Panel, one of the buttons on each
SF804 Remote Dome Station is assigned to place calls to the RS850. The type of indication
provided by that button is programmed from these available indication codes:
Indication
Code
1
2
5
6
8
9
Description
Sets selected lamp to On/Off.
Sets selected lamp to Flash/Off.
Sets selected lamp to On/Flash/Off.
Sets selected lamp to Flash/On/Off.
Sets selected lamp to Flash/Fast Flash/Off
Sets selected lamp to On/Flash/Fast Flash/Off
IL667 Tek-STATUS™ Manual • 17
RS850 Remote Panel Installation
Indication codes are programmed from the associated RS816 Master Station using the
following keystrokes: (Note: COLUMN, X, ROW, X, designates the lamp’s position on the
master station keypad.)
COLUMN,
3, ROW, 1, FUNCTION, 4 (the RS850’s address), 2 (an indication code), ENTER
If entered on the keypad of master station #1, this entry causes the amber lamp of its LI804
Remote Dome Station #3 to operate in Flash/Off mode at RS850 Remote Panel #4. All
remaining remote dome stations attached to the system will continue to operate in the globally
programmed mode previously selected.
Note: The RS850 Remote Indication & Control Panel produces both audible and visual
signals only when one of the Slow Flash modes is used. All other modes produce only visual
indications.
18 • IL667 Tek-STATUS™ Manual
IL667 Tek-STATUS™ Manual • 19
RS816
Master
Station
LINE
RS840
Master
Expander
CA037 Factory
Supplied Cable
To 120 VAC Source
SS100
Xfrmr
24 VAC 100 VA
Notes:
1. 1 PK800A can support 1 RS816, 1 RS840, 8 LI804,
8 SF804, 8 SF155B and 8 SF156B. Equipment above
this limit requires additional PK800A Power Supplies.
RS850
Annunciator
Panel
CA037/7 Factory
Supplied Cable
SF156B
Code Blue
Station
SF155B
Emergency
Station
SF804
Room
Station
LI804
Dome
Lamp
SF156B
Code Blue
Station
SF155B
Emergency
Station
SF804
Room
Station
LI804
Dome
Lamp
5. All wiring is stranded.
6. Read entire manual to ensure all wiring requirements are met!
2 #14 AWG Cable,
Maximum run 18'
2. DO NOT “T” tap LI804 common cables.
3. 8 LI804 maximum on a common run.
4. When using multiple PK800A units connect all
grounds together (common).
See
Note 4
PK800A
Power
Supply
PL467
Wall
Plate
1 Twisted Pair Shielded,
Low Capacitance,
#24 AWG Cable,
Maximum run 1000 feet
3 #22 AWG Cable,
Maximum run 50 feet
3 #22 AWG Cable,
Maximum run 50 feet
6 #22 AWG Cable +
1 #18 AWG Wire,
Maximum run 25 feet
2 #18 AWG Cable,
Maximum run 3 feet
SF156B
Code Blue
Station
SF155B
Emergency
Station
SF804
Room
Station
LI804
Dome
Lamp
Drawing Number & Name: IL667 RS800 Block Rev2 112002 1
To RS840
To PL467
AUX
Rear View of RS816
CA037/7 Factory
Supplied Cable
1 Twisted Pair Shielded,
Low Capacitance,
#24 AWG Cable,
Maximum run 1000 feet
through to end
2 #14 AWG Cable,
Maximum run 18'
See
Note 4
PK800A
Power
Supply
PL467
Wall
Plate
To 120 VAC Source
SS100
Xfrmr
24 VAC 100 VA
2 #18 AWG Cable,
Maximum run 3 feet
2 #14 AWG Cable,
Maximum run 250 feet
through to end
Figure 11—Tek-STATUS™ System Block Wiring Diagram
20 • IL667 Tek-STATUS™ Manual
RS816
Master
Station
RS840
Master
Expander
CA037 Factory
Supplied Cable
2 #14 AWG Cable,
Maximum run 18'
CA037/7 Factory
Supplied Cable
RS816
Master
Station
See
note
#3
RS840
Master
Expander
CA037 Factory
Supplied Cable
2 #14 AWG Cable,
Maximum run 18'
PK800A
Power
Supply
PL467
Wall
Plate
To 120 VAC Source
SS100
Xfrmr
24 VAC 100 VA
2 #18 AWG Cable,
Maximum run 3 feet
Notes:
1. A maximum of 10 master stations can be connected in this fashion
to share system information. See text for more detailed information.
2. DO NOT “T” tap data buss cables.
3. When using multiple PK800A units connect all grounds together
(common)
4. All wiring is stranded.
5. Read entire manual to ensure all wiring requirements are met!
1 Twisted Pair Shielded
#24 AWG Cable
Low Capacitance
Maximum run 1000 feet
1 #14 AWG Cable
Maximum run 1000 feet
Drawing Number & Name: IL667 RS800 Block2 Rev1 091902 1
CA037/7 Factory
Supplied Cable
See
note
#3
PK800A
Power
Supply
PL467
Wall
Plate
To 120 VAC Source
SS100
Xfrmr
24 VAC 100 VA
2 #18 AWG Cable,
Maximum run 3 feet
Figure 12—Tek-STATUS™ Multiple Master Block Wiring Diagram
IL667 Tek-STATUS™ Manual • 21
NC
NC
+DATA
RED
+
+
+
WALL PLATE
PL467
Install jumpers as shown
+
+
+
+
4
3
2
1
BLUE
ORANGE
BLACK
RED
6
7
8
+
+
+
+
Install jumpers as shown
+
+
+
5+
4
3
2
1
+DATA
NOTE: DATA SHIELD
FEEDS THROUGH
TO END OF RUN
(GROUND)
WHITE
BROWN
YELLOW
GREEN
(+5 VDC)
-DATA
BLUE
ORANGE
BLACK
+
+
+
+
+
+
+
Install jumpers as shown
6
7
8
5+
4
3
2
1
(REAR VIEW)
DSN Buss
BLUE
ORANGE
6
7
8
5+
TO RS816 MASTER
-DATA
(+5 VDC)
RED
BLACK
(REAR VIEW)
-DATA
+DATA
TO RS816 MASTER
(REAR VIEW)
WALL PLATE
PL467
TO RS850 ANNUNCIATOR
WALL PLATE
PL467
IL667 PL467 Wiring Rev1 102202 1
(+5 VDC)
Notes:
1. ALL Power/Ground connections: #14 AWG
2. ALL Data connections: #24 Twisted/ Shielded pair, low cap.
3. When using multiple PK800A units connect all grounds together (common)
4. All wiring is stranded.
5. Read entire manual to ensure all wiring requirements are met!
To additional
PL467s for
RS816s
Figure 13—PL467 Wall Plate Wiring Diagram
(GROUND)
WHITE
BROWN
YELLOW
GREEN
(GROUND)
WHITE
BROWN
YELLOW
GREEN
DSN
to Field
DSN
to Field
NOTE: DATA SHIELD
FEEDS THROUGH
TO END OF RUN
+DATA
-DATA
NOTE: DATA SHIELD
FEEDS THROUGH
TO END OF RUN
+DATA
-DATA
22 • IL667 Tek-STATUS™ Manual
+
+
+
+
+
+
+
4
3
2
1
+5VDC
+5VDC
+5VDC
N/C
+24VDC
+24VDC
+24VDC
24VAC
24VAC
N/C
N/C
GND
GND
GND
PK800A
#14 AWG Cable
Max. run:
18' to PL467
250' through to end of run
Install jumpers as shown
6
7
8
5+
117 VAC
Transformer
SS100
(GROUND)
WHITE
BROWN
YELLOW
GREEN
*
3
4
2
1
*
SYS POWER
- DATA
+ DATA
COMMON
LI804
DOME LAMP
BROWN
RED
ORANGE
YELLOW
+ DATA
- DATA
COMMON
+24 VDC
SYS COMMON
SYS COMMON
24 VDC
13
14
15
*
1
+5 VDC
BUTTON 1 2
BUTTON 2 3
BUTTON 3 4
BUTTON 4 5
EMERG 6
CODE 7
N/C 8
N/C 9
N/C 10
N/C 11
N/C 12
1
2
3
4
5
6
BROWN
GREEN
+24 VDC
COMMON
N/C
N/C
EMERG
N/C
EMERG
STATION
SF155B
Green/White
Yellow/White
BROWN
RED
ORANGE
YELLOW
GREEN
BLUE
RED
ORANGE
YELLOW
GREEN
BLUE
BLUE
YELLOW
Red/White
Orange/White
Brown/White
RED
BROWN
ORANGE
#22 AWG Cable
Max. run:
25' to SF804
50' to SF155B/156B
#18 AWG Cable
Black
Brown
Red
Orange
Yellow
Green
Blue
Violet
Gray
White
TO OTHER
LI804 DOMES
Notes:
1. DO NOT “T” tap LI804 common cables.
2. 8 LI804 maximum on a common run.
3. When using multiple PK800A units connect all
grounds together (common)
4. All wiring is stranded.
5. Read entire manual to ensure all wiring requirements are met!
6. WARNING: Components may be damaged if
connectors are plugged in backwards!
2 #18 AWG Cable
Max. run 3'
NOTE: DATA SHIELD
FEEDS THROUGH
TO END OF RUN
1 Twisted Pair Shielded,
Low Capacitance,
#24 AWG Cable
Max. run:
1000' through to end
Drawing Name & Number: IL667 RS800 Wiring Rev0 100901 1
(+5 VDC) BLUE
ORANGE
BLACK
RED
TO RS816 MASTER
(REAR VIEW)
WALL PLATE
PL467
Figure 14—Tek-STATUS™ Group Configuration
+5 VDC
BUTTON 1
BUTTON 2
BUTTON 3
BUTTON 4
SYS COMM.
1
2
3
4
5
6
+24 VDC
COMMON
N/C
N/C
CODE
N/C
CODE
STATION
SF156B
1
2
3
4
5
6
SF804
ROOM
STATION
IL667 Tek-STATUS™ Manual • 23
MSB
J3
1
2
3
4
5
6
7
8
9
10
11
12
13
14
15
ADDRESS RANGE SELECT
3
2
1
1 2 3 4
LSB
ON
3
2
1
3
2
1
J3
J3
OFF
ON
ON
OFF
OFF
ON
ON
OFF
OFF
ON
ON
OFF
OFF OFF
OFF OFF
OFF OFF
OFF
OFF
ON
OFF
ON
OFF
ON OFF
ON
OFF
2-3
2-3
2-3
2-3
2-3
SW3 SW4
OFF
ON
ON
OFF
ON
ON
OFF
OFF
OFF
ON
OFF
ON
OFF
ON
OFF
ON
36
37
38
39
40
33
34
35
ROOM NUMBER
28
29
30
31
32
20
21
22
23
24
25
26
27
17
18
19
ROOM NUMBER
ADDRESS TABLE
2-3
2-3
2-3
ON
SW1 SW2
ON
OFF
OFF
ON
OFF ON
OFF
ON
ON
OFF
OFF
ON
ON
OFF
J3
1-2
1-2
1-2
1-2
1-2
1-2
1-2
1-2
1-2
1-2
1-2
1-2
1-2
OFF
ON
ON
OFF
OFF OFF
OFF
OFF
OFF OFF
OFF
OFF
ON
OFF
ON
OFF
ON OFF
ON
OFF
ON
OFF
ON
OFF
ON
OFF
OFF
ON
ON
ON
ON
ON
ON
ON
ON
ON
OFF
1-2
1-2
1-2
OFF
ON
OFF
ON
OFF
ON
OFF
ON
OFF
ON
OFF
ON
SW3 SW4
12
13
14
15
16
4
5
6
7
8
9
10
11
1
2
3
ROOM NUMBER
ADDRESS TABLE
ON
ON
ON
SW1 SW2
ON
ON
ON
ON
J3
ON
OFF
ON
OFF ON
OFF
OFF OFF
OFF
OFF
OFF OFF
OFF
OFF
ON
OFF
ON
OFF
ON
OFF
ON
OFF
ON
OFF
ON
OFF
ON
OFF
OFF
ON
ON
ON
Drawing Name & Number: IL667 LI804 Addressing Rev1 091702 1
LI804
DOME LAMP
1
2
3
4
FIGURE 1
J3
SW3 SW4
OFF
ON
OFF
ON
OFF
ON
OFF
ON
OFF
ON
OFF
ON
OFF
SW1 SW2
ADDRESS TABLE
1 2 3 4
3
2
1
J3
1 2 3 4
MSB
1 2 3 4
MSB
ON
MSB
1 2 3 4
LSB
ZONE 3
ON
LSB
ZONE 2
1
2
3
4
5
6
7
8
9
10
11
12
13
14
15
Notes:
1. Install jumper as shown in Figure 2.
2. Turn dipswitch ON to activate zone.
3. Switch changes applied on power-up.
4. Zone stations do not have an address.
5. Zone dome counts during power supply
calculations. (max # per run, per power supply)
6. Annunciation priority: (decreasing)
fast flash, flash, steady.
7. Zoning:
0-15
Zone #1
16-31 Zone #2
32-40 Zone #3
LI804 Used As Zone Dome
ON
LSB
ZONE 1
ON
MSB
ALL
LSB
MSB
1 2 3 4
LSB
ON
FIGURE 2
LI804
DOME LAMP
1
2
3
4
Figure 15—LI804 Remote Dome Station Programming