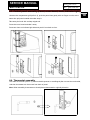
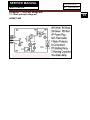
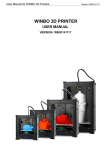
1
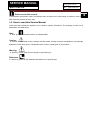
SERVICE MANUAL
Order No. Ref1101S019V0
Chest Freezer
MODEL:HCM071AW
WARNING
This service information is designed for experienced repair technicians only and is not designed for use by the general public. It
dose not contain warnings and cautions to advice non-technical individuals of potential dangers in attempting to service a product.
Product powered by electricity should by serviced or repaired only by experienced professional technicians. Any attempt to service
or repair the product or products dealt with in this service information by anyone else could result in serious injury or death.
2011(HAIER ELECTRICAL APPLIANCES COR. LTD)
©All right reserved. Unauthorized copying and distribution is a violation of law.
Haier Group
SERVICE MANUAL
Issue
Model: HCM071AW
Rev.
2011-01-28
Ref1101S019V0
Contents
Table of Contents ············································································································· 2
1. General Information····································································································· 3
1-1. General guideline ································································································ 3
1-2. Insulation Test ····································································································· 3
1-3. How to read this Service Manual ········································································· 4
2. Product Feature ··········································································································· 5
2-1. Specifications ······································································································ 5
2-2. External views ····································································································· 6
3. Installation, adjustments and maintenance······························································· 7
3-1. Installation ··········································································································· 7
3-2. Defrosting and draining ······················································································· 7
3-3. Cleaning the freezer ···························································································· 8
4. Disassembly ················································································································· 9
4-1. Door assembly (Door, hinge, hinge cover) ·························································· 9
4-2. Compartment Grill assembly ··············································································· 9
4-3. Control panel assembly (Panel, cover board, knob, indicator light)····················· 10
4-4. Thermostat assembly ·························································································· 10
5. Control and display system ························································································ 11
5-1. Control and display panel ···················································································· 11
5-2. Starting the Freezer····························································································· 11
6. System flow principle ·································································································· 12
6-1. Refrigeration flow chart························································································ 12
6-2. Refrigeration flow scenograph············································································· 12
7. Circuit diagram············································································································· 13
7-1. Brief principle diagram ························································································· 13
8. Trouble shooting·········································································································· 14
8-1. Normal phenomena ····························································································· 14
8-2. Abnormal phenomena ························································································· 16
2
SERVICE MANUAL
Issue
Model: HCM071AW
Rev.
2011-01-28
Ref1101S019V0
Chapter 1 General Information
1-1. General Guidelines
When servicing, observe the original lead dress. If a short circuit is found, replace all parts which
have been overheated or damaged by the short circuit. After servicing, see to it that all the protective
devices such as insulation barriers, insulation papers shields are properly installed. After servicing,
make the following leakage current checks to prevent the customer from being exposed to shock
hazards.
1) Leakage Current Cold Check
2) Leakage Current Hot Check
3) Prevention of Electro Static Discharge (ESD) to Electrostatic Sensitive
1-2. Insulation Test
1. Check if there is any leak of current.
2. Cut out the power supply before the repair to avoid an electrical shock hazard.
3. In the case of a live-line test, insulating gloves should be worn to avoid potential electrical shock.
4. Confirm the rated current, voltage and capacity before testing with any kinds of instruments.
5. Watch if the upper door is open when we check something at a lower position.
6. Take out every part in the cabinet before moving the machine, especially things like panels (e.g. glass
shelf).
7. Please wear intact cotton gloves when repair any parts of the evaporator, so that scratches by the
sharp fins can be avoided.
8. If there is a breakdown with the refrigeration system, please surrender the machine to the service
center, else the leaked refrigerant may pollute the atmosphere.
9. The refrigerator use AC of 115V with a frequency of 60Hz.
10. A big fluctuation of voltage may cause a start failure of the refrigerator, a burn-out of the control panel
and compressor, or an abnormal sound from the compressor in operation.
11. Take care not to damage the supply line. Don’t yank at the line; pull the plug out gently from the
receptacle. Don’t press the line under the cabinet or step on it. Take care not to roll on or damage the
supply line when moves the machine from the wall.
12. In the case of leakage of inflammable gases like carbon monoxide, open the door and windows. Don’t
pull out or insert the plugs of the appliance.
13. Don’t touch the refrigeration surface of the freezing compartment when the refrigerator is in operation,
especially when our hand is wet, else we may be glued to the surface.
14. Pull out the plug of power supply during clearance or power outage. Wait at least five minutes to
resume the power supply in order to prevent damage to the compressor caused by continuous restart.
3
SERVICE MANUAL
Issue
Model: HCM071AW
Rev.
2011-01-28
Ref1101S019V0
Photo used in this manual
The illustration and photos used in this Manual may not base on the final design of products, which may
differ from the products in some way.
1-3. How to read this Service Manual
Icons are used to attract the attention of the reader to specific information. The meaning of each icon is
described in the table below:
Note:
A “note” provides information that is not indispensable.
Caution:
A “caution” is used when there is danger that the reader, through incorrect manipulation, may damage
equipment, loose data, get an unexpected result or has to restart (part of) a procedure.
Warning:
A “warning” is used when there is danger of personal injury.
Reference:
A “reference” guides to find additional information on a specific topic.
4
SERVICE MANUAL
Issue
Model: HCM071AW
Rev.
2011-01-28
Ref1101S019V0
Chapter 2 Product Feature
5
2-1. Specification
/
CHEST FREEZERS
/
/
Superfast freezing.
Adjustable thermostat to realize freezing and
cooling
High pressure and microbiological foam filled
door for energy conservation.
convenient water drain.
External controls.
0%CFC.
Comply with RoHS.
/
1.
Type Model
/
HCM071AW
Commercial brand
/
Haier
Product description
Type of appliance (FS=free standing /
BI= built-in)
Climate class
(N=16-32℃ ST=18-38℃
T=18-43℃)
Freezer star rate
/
Chest Freezer
/
FS
/
N
/
*/***
Key index
/
/
Gross capacity
l
203
Total net capacity
Defrosting
(Manual-Automatic)
Kind of coolant (R134a/R600a)
Foaming components
(R141b/C-P)
l
198
/
Manual
/
/
R134a
C-P
/
/
Voltage / frequency/Compressor brand
V/Hz
115V/60Hz
Input power / currency
W/A
1.70A
cm
°C
kWh/year
150/155
≤-18°C
277 kW·h/year
/
K
/
/
Lid (Shape)
Lid (Colour)
Cabinet (Shape)
Cabinet (Colour)
Frame of the cabinet (Colour)
Fascia panel / Handle
(w/b/g/s)
/
/
/
/
/
/
straight edges
white
straight edges
white
white
white/white
Accessories
/
/
Handle
Lock
/
/
-
2.
3.
4.
5.
Technical data
Length of cable / incl. plug
Lowest Temperature
Energy consumption (EN153) per year
Cooling system:(K=Compressor /
A=Absorbtion)
Aesthetics
New!!!
-
SERVICE MANUAL
Issue
Model: HCM071AW
Rev.
6.
Ref1101S019V0
Type of Hinge
/
Metal hinge
Interior Liner
Baskets number and Material
Defrost drain
Interior light
Super freezing lamp (yellow)
Power light
(green)
Fast freeze switch
External Condenser
/
/
/
/
/
/
/
/
Textured Aluminum
1 (metal)
●
/
Product net dimensions
/
/
cm
84.5/94/56
kg
39
/
/
cm
kg
89/99.5/59.5
45
Unit dimensions
(H / W / D)
Net weight
7.
2011-01-28
Packing dimensions & load ability
Packing dimensions
Gross weight
(H / W / D)
6
/-
2-2. External views
Door
Cabinet
Control panel
Drain pipe
SERVICE MANUAL
Issue
Model: HCM071AW
Rev.
2011-01-28
Ref1101S019V0
Chapter 3 Installation, adjustments and maintenance
3-1. Installation
The freezer should be conveniently located for day-to-day use in a dry well-ventilated room.
Do not install the freezer where the temperature will go below 0°F or above 110°F, because it will not
maintain proper temperatures.
Be sure to install the freezer on a floor strong enough to support it when it is fully loaded.
The freezer must be solidly positioned on the floor if it is to function at its best. Shims may be used to
accomplish this wherever the floor is too uneven. If the place selected for the freezer is damp or moist,
place 2 X 4 s (51 mm X 102 mm) under its entire length to assure adequate support.
If the freezer has been inclined more then 45° position, we need wait 24 hours before
restarting the freezer.
3-2 Defrosting and Draining
In most climates, defrosting will be necessary only about twice a year.
To have the freezer operate most efficiently, do not permit more than 1/2” (13 mm) of frost to
accumulate on the shelves.
To remove frost, scrape with a plastic or wood spatula or scraper.
Do not use an ice pick or sharp-edged instrument as it may damage or scratch the freezer.
Do not use any electrical device in defrosting the freezer.
For Complete Defrosting
1. Turn the temperature control to the OFF position and unplug the freezer.
2. Remove all food and place it in corrugated boxes, insulated bags, picnic coolers, etc. Use towels
and newspapers for insulation as needed.
3. With the door/lid open, use pans of hot water to speed loosening of frost. Remove large pieces
before they melt. Chest models have a defrost water drain at the front.
4. Sponge excess water from the bottom of the freezer as it collects to prevent over flowing.
5. After defrosting, clean the inside of the freezer.
6. Replace the drain plug inside the cabinet and the cap on the defrost drain. Fold over and dry the
gasket on the hinge side of the lid.
7. Plug in the freezer. Return the temperature control to its previous position and return food to the
freezer.
Water may drip from the back flange of the lid cover during defrosting. This is normal. Ice
builds up in the lid insulation when the lid is open for adding or removing food, and melts during the
defrosting operation.
7
SERVICE MANUAL
Issue
Model: HCM071AW
Rev.
2011-01-28
Ref1101S019V0
3-3 Cleaning the Freezer
Outside. Protect the paint finish. The finish on the outside of the freezer is a high quality baked-on
paint finish. With proper care, it will stay new-looking and rust-free for years. Apply a coat of appliance
polish wax when the freezer is new and then at least twice a year. Appliance polish wax also works
well to remove tape residue from freezer surfaces.
Keep the finish clean. Wipe with a clean cloth lightly dampened with appliance polish wax or mild
liquid dishwashing detergent. Dry and polish with a clean, soft cloth. Do not wipe the freezer with a
soiled dishwashing cloth or wet towel. Do not use scouring pads, powdered cleaners, bleach, or
cleaners containing bleach.
Inside. Clean the inside of the freezer at least once a year. We recommend that the freezer be
unplugged before cleaning. If this is not practical, wring excess moisture out of sponge or cloth when
cleaning in the vicinity of switches, lights or controls.
Use warm water and baking soda solution-about a tablespoon of baking soda to a quart of water.
Rinse thoroughly with water and wipe dry. Do not use cleaning powders or other abrasive cleaners.
An open box of baking soda in the freezer will absorb stale freezer odors. Change the box ever y three
months.
Care should be taken in moving the freezer away from the wall. All types of floor coverings can
be damaged particularly cushioned coverings and those with embossed surfaces.
8
SERVICE MANUAL
Issue
Model: HCM071AW
Rev.
2011-01-28
Ref1101S019V0
Chapter 4 Disassembly
4-1. Door assembly (Door, hinge, hinge cover)
Unscrew the hinge cover screw with screwdriver, take away the top and bottom cover by pull it, and
then unscrew the screws on the hinge, so the whole hinge could be moved.
Top hinge cover
Bottom hinge cover
4-2. Compartment Grill assembly
Unscrew the two screw of grill; we can take away the grill.
9
SERVICE MANUAL
Issue
Model: HCM071AW
Rev.
2011-01-28
Ref1101S019V0
4-3. Control panel assembly (Panel, cover board, knob, indicator light)
Unscrew the compartment grill (refer 4-2), push the panel claw gently with our finger or tools, at the
same time pull panel outside then take away it.
Take away the knob with a sharp-edged tool.
Press the cover board and take it away.
Press two claws on indicator light side and push it from back to front.
4-4. Thermostat assembly
First take off the knob (refer 4-3), Use turnbuckle spanner or acutilingual plier unscrew the turnbuckle,
and then thermostat can be moved from back of panel.
Note: When assembly thermostat we should placed thermostat in originally direction.
10
SERVICE MANUAL
Issue
Model: HCM071AW
Rev.
2011-01-28
Ref1101S019V0
Chapter 5 Control and display system
5-1. Control panel
Freezing temperature selection is made by setting the control from Min to Max
(coldest).
If we want colder or warmer temperatures, adjust the control one step at a time.
Allow several hours after each one-step adjustment for the freezer temperature
to stabilize.
5-2. Starting the Freezer
1. Clean the inside of the freezer with a mild solution of baking soda and
water
2. Connect cord to power outlet.
3. On models with a Temperature Monitor or High-Temp Alarm Switch, set the
switch to the Min position.
4. Make sure the temperature control is set at 4.
5. Allow freezer to operate for at least four hours before placing food inside.
6. On models with a Temperature Monitor or High-Temp Alarm Switch, set the switch to the ON
position.
11
SERVICE MANUAL
Issue
Model: HCM071AW
Rev.
2011-01-28
Ref1101S019V0
Chapter 6 System flow principle
6-1. Refrigeration flow chart
12
The refrigeration system of direct cooling single-system cooler belongs to the category of a
single-temperature and single-control refrigerating system with one evaporators and is controlled by a
single temperature control.
6-2. Refrigeration flow scenograph
SERVICE MANUAL
Issue
Model: HCM071AW
Rev.
2011-01-28
Ref1101S019V0
Chapter 7 Circuit diagram
7-1. Brief principle diagram
HCM071AW
13
SERVICE MANUAL
Issue
Model: HCM071AW
Rev.
2011-01-28
Ref1101S019V0
Chapter 8 Trouble shooting
14
8-1. Normal phenomena
Problem
Possible Causes
Freezer does not
operate
or
Power-On Light is
not on
Freezer
starts/stops
frequently
too
What To Do
Temperature control in OFF or
Min or 0 position.
Move the control to a temperature setting.
Freezer is unplugged.
Push the plug completely into the outlet.
The fuse is blown/circuit
breaker is tripped.
Replace fuse or reset the breaker
Door/lid left open.
Check to see if package is holding door/lid
open.
Too frequent or too long to
door/lid openings.
Temperature control set too
cold.
See about the operation of the freezer
Door/lid left open.
Check to see if package is holding door/lid
open.
Too frequent or too long
door/lid openings.
Freezer operates
too long
Noisy operation
or
cabinet
vibrates
Freezer
temperature
warm
Temperature control set too
cold.
See About the operation of the freezer
Inadequate air circulation
space around cabinet.
See Preparing to install the freezer
Fast Freeze switch is in the
ON position (on some
models)
See About the operation of the freezer
Floor may be weak, causing
freezer to vibrate when
compressor is on.
Placing 2 X 4s (51 mm X 102 mm) under the
length of the freezer will help support it and
may reduce vibration.
Cabinet is not
solidly on floor
See Preparing to install the freezer Or use
shims for uneven floor
positioned
Door/lid left open.
too
Foods defrosting
Check to see if package is holding door/lid
open.
Too frequent or too long
door/lid openings.
Temperature control OFF or
Min or 0 positions.
Move the control to a temperature setting.
Freezer is unplugged.
Push the plug completely into the outlet.
The fuse is blown/circuit
breaker is tripped.
Replace fuse or reset the breaker
SERVICE MANUAL
Issue
Model: HCM071AW
Rev.
2011-01-28
Ref1101S019V0
Check to see if package is holding door/lid
open.
Door/lid left open.
Too frequent or too long
door/lid openings.
Freezer
temperature
cold
too
Moisture forms
on outside of
cabinet
Interior light does
not
work
(on
some models)
Door/lid
wont
fully close by
itself
Slow
starting
time after being
off
Temperature control set too
cold.
See About the operation of the freezer
Fast Freeze switch is in the
ON position or has run for too
long (on some models)
About the operation of the freezer
Not unusual during periods of
high humidity
Wipe surface dr
No power at outlet.
Replace fuse or reset the breaker
Freezer is unplugged.
Push the plug completely into the outlet.
Light bulb burned out.
Replace bulb.
Package
open.
holding
door/lid
Built-in overload product.
Door/lid left open.
Excessive
build-up
frost
Too frequent or too long
door/lid openings.
Not unusual during periods of
high humidity
Check to see if package is holding door/lid
open.
15
SERVICE MANUAL
Issue
Model: HCM071AW
Rev.
2011-01-28
Ref1101S019V0
8-2. Abnormal phenomena
8-2-1. Compressor doesn’t start
16
SERVICE MANUAL
17
Model: HCM071AW
8-2-2.Poor cooling
Issue
Rev.
2011-01-26
Ref1012S015V0
Sincere forever
Haier Group
Haier Industrial Park, No.1, Haier Road
266101, Qingdao, China
http://www.haier.com