1
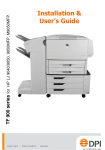
SERVICE
EDGE
The Laser Printer Tech Quarterly
from Liberty Parts Team
Summer 2012
• Up Close: 9000, 9050
jams, firmware, fan errors,
stuck in warming state
• Dedicated to Print
• P4000 series firmware trouble
• Surprising Printer Issues
GIVE ME LIBERTY!
OEM printer parts
For when you need to go to the source.
2nd-Source OEM printer parts
Many factories make OEM parts.
Third-party printer parts
A reliable new-part option and the only option after the OEM is discontinued. LPT tests and
tests and keeps testing to ensure we offer the best third-party parts available.
Remanufactured printer parts
LPT's remanufactured fusers and other assemblies
are its secret weapon. The advantages are clear.
• LPT fusers are remanufactured in the USA. Many
of our competitors have theirs assembled in
Mexico.
• Components proven by years of testing & successful use
• Every LPT remanufactured assembly is individually tested in a live printer.
Call LIBERTY PARTS TEAM at 888-444-8778
SERVICE ED GE, S UMMER 2012
COMPANY
EDITORIAL
On Dedication
Twenty years ago David Reinke asked me
to create the first printer service newsletter. To
share knowledge with our loyal customers and
help them succeed was our idea. And while that
original publication is no more, Service Edge will
abide.
We at Liberty
believe in the future of
printing. For businesses
it means security; for
readers, ease and
tactile experience; for
the country, jobs. It will
endure.
The first
newsletter
dedicated to
laser printer
service, from
Feb. 1992
Certainly the new
technology is exciting. Our interactive printer
diagrams at lbrty.com would not be possible
on the printed page. But we also love printing
newsletters. Customers like hanging on to
them, sticking them in binders, taking them to
the work site. At Liberty, we are committed to
remanufacturing the best fusers in the country.
Since we depend on printing, we show our
commitment by printing ourselves.
We at Liberty promise to keep doing what
we have been doing: saving customers money
on service parts that are better in every way, from
their components to the way we remanufacture
them to the way we test, inspect, package and
ship them.
R. Reinke
Stumped or Stuck?
Call the Kings of
Tech Support
LPT Tech Support is one of the best
things about LPT. They are a very experienced bunch that are happy to
answer your laser printer repair questions. Denny and Craig have worked
in the laser printer parts industry since
1991, Eddie since 1997, and Shawn
has professionally maintained IT
equipment and printers since 1991.
That's an average of 20 years of experience.
LPT clients can contact technical
support direct and toll-free at 866947-9295.
To expedite your call, please be
able to tell us…
1. WHAT is happening
2. WHEN it happens
3. FOR HOW LONG it has been
happening.
4. WHICH TESTS you have run.
5. WHICH REPAIRS you have tried.
After you have told us this information, our tech support providers should be able to help you very
quickly.
THIS ISSUE: HP LJ
9000, 9040, 9050
In recent issues we have been summing
up known issues with older printer models.
Combining recent discoveries with longestablished information, these articles will
help experienced techs brush up while
bringing new printer techs up to speed.
3
SE RV ICE E DGE , SU M M ER 2 0 1 2
P3015 50.3 error (new issue)
Printer REpair article
Surprising
Laser Printer
Problems
In the Fall 2009 issue of Service Edge
we reported on several new issues that
didn't fit the normal troubleshooting patterns. Since then, we've learned more
about what caused these problems.
In addition, we've learned of a
new issue in the P3015 and a very
serious firmware issue in the P4000
series.
Unusual Cause of P3015 50 errors
The P3015 swing gear may be getting stuck, causing 50.3 errors.
Simply wiggling it has fixed the problem for several LPT customers.
P4015 unfused toner
Service Edge is the quarterly laser printer tech bulletin
of Liberty Parts Team, Inc.
Editor-in-Chief: David K. Reinke
Editor: Robert Reinke
Writers: Dennis Kosterman, Robert Reinke
©2012 Liberty Parts Team, Inc.
4
P3015: 50 error
The 50.x error – no matter what “x”
is – is always fuser-related, and is usually fixed by replacing the fuser. However, there have
been
several
cases in which
a P3015 printer
had a 50.3 error
that was caused
by a stuck swing
gear in the fuser
drive area (see figure). Our theory is that
when this gear is stuck, the fuser overheats because the film isn’t turning. This
gear and arm are not available, but it is
usually possible to manipulate the gear
and unstick it. A drop of oil on the pivot
of the swing arm may also help.
P4000 series: Irregular
Motor + Poor Fusing
The problem. The printer hangs in
“Processing Job” (with motor running)
and/or fuses poorly and/or throws 41.8
errors (41.08 in the event log). We have
known for a long time that fusers with
weak heating elements can cause these
issues. Solution: replace the fuser. However, we have recently found that firmware can also cause this. If it is possible
to print a configuration page, do so and
SERVICE ED GE, S UMMER 2012
check the DC controller number.
This should be 16 or higher. If not,
the firmware should be upgraded
to version
0 4 .0 6 0.7
or higher.
According
to HP, this
will
prolong fuser
life
even
if you are not having the issues described above. However: there has
been a firmware upgrade issue…
Avoiding the P4000 series
firmware upgrade issue. There
appears to be some sort of bug in
the firmware (or the firmware download/upgrade routine), so that if
you upgrade the firmware with any
accessories attached to the printer,
it will no longer power up properly
with those accessories attached. In
the most common case (printer with
an optional tray 3 feeder attached),
it will hang in the “Checking Printer” or “Clearing Paper Path” state.
If you remove the optional feeder,
it will work normally. To avoid this
problem, it is very important to remove all optional accessories (any
feeders beyond tray 2, output sorters/stackers, duplexers, envelope
feeders, etc.) before doing the upgrade. Once the upgrade is complete, power off and re-install the
accessories.
Recovery steps for firmware
upgrade issue. If someone has already upgraded their firmware with
accessories attached (be sure to
ask them about this if they call with
a printer that hangs on power-up),
they may be able to recover with the
following procedure:
1. Remove all accessories;
2. Re-send the firmware upgrade
file to the printer (it is important to
wait until the upgrade has finished
before going to the next step – this
may take as long as 30-45 minutes);
3. When the printer displays
that the RFU is finished, power off
and then power back on. Once the
printer has reached the “READY”
state, you can power off again and
re-install the accessories. If the
printer now powers up and works
normally, all is well. If not, you may
have to remove all accessories and
add them back one at a time to see
which one is causing the problem.
In the worst case, an accessory that
still causes the printer to hang on
power-up may need to be replaced.
where none of these things fixed
this problem. We have noticed that
in a normally functioning P3005,
the printer speeds up shortly after
it starts to feed
paper, as the
fuser
drive
switches from
the main motor to the fuser
motor -- and
that the type of jam described above
is often accompanied by a failure to
go to the higher speed. This implies
9000/9050 series:
that the fuser motor (or a bad conHung Warm Up
nection between this motor and the
A related problem occurs in the ECU board) is a more likely suspect
9000 and similar models (9040, than the items mentioned above.
9050), but since these fusers have
solid rollers and heat lamps rather 3050 Power up Errors
than “instant on” ceramic heating
In the 3050 series of all-in-one
elements, you will see the problem printers, you may see “ADF mison power-up. In most printers, if the pick” or “no paper pickup – check
fuser does not reach its operating printer” on power-up. This would
temperature within a short time, the normally lead me to believe that
result will be a 50 error. But we have there was a job in the queue, and
seen
9000 the printer had tried and failed to
printers that pick up paper. So I would troublewill hang in shoot the pickup mechanisms in the
the “warming printer and in the ADF. Strangely
up” state for as
enough, this meslong a half an
sage has nothing
hour before eito do with paper
ther displaying
pick-up! Instead,
the 50 error or
inspect the fuser for
going to “Ready.” On older models,
jammed paper or
I wouldn’t hesitate to blame the forother foreign matematter board for such behavior, but
rial. This is surprison the 9000, it is usually a defective ing because paper stuck in the fuser
fuser or low voltage power supply.
triggers a paper jam error in most
laser printers.
P3005: Paper in Fuser
On the LaserJet P3005, paper
will stop just as it starts to come
out of the fuser, and the printer will
display a paper jam error. Normally
this would indicate that the exit sensor (in the fuser) is not functioning
properly, and the solution would
be to replace the fuser. In the rare
cases where this didn’t fix it, the
next suspect would be the ECU
board (which reads the sensor) or
the cables that connect the fuser to
the board. But we have seen cases
Normal troubleshooting works
well most of the time, but in odd
cases like these, there is no substitute like good powers of observation and a little trial-and-error. We
will continue to inform our readers
whenever we find these sorts of
non-standard error conditions.
LPT
5
SE RV ICE E DGE , SU M M ER 2 0 1 2
9000, 9040/50 fan location
90x0mfp/M90x0 delivery asm
90x0 delivery asm
rear
power supply
front
Fan #
Code
Fan Cools…
Location
Part #
1
57.3
Power Supply
Right end of power
supply
RH7-1657
2
57.4
Formatter/Controller
Near left end of
power supply and AC
receptacle
RH7-5295* (9000,
-mfp); RH7-1623*
(9040/50, -mfp)
3
57.7
Rear Delivery
Part of Delivery Asm.
near rear of printer
RH7-1658
4
57.5
Front Delivery
Part of Delivery Asm.
near front of printer
RH7-1659 (nonmfp); RH7-1658
(mfp)
5
57.1
Cartridge
Right side, upper rear
of printer
RG5-5306
6
57.6
Face Down Tray**
Part of Delivery Asm.,
in middle
RH7-1661**
57.8
Duplexer
In duplexer (need
to replace whole
duplexer)
C8532A
* NOTES: 1. RH7-5295 is a 24-volt fan, and is used on the 9000 and
9000 MFP only; all other models (9040, 9050, and MFP versions of
these) use RH7-1623, which is a 5-volt fan. These fans also have different connectors, and are not interchangeable.
**Fan #6 is not used in mfp models, which lack a face-down tray.
6
Printer REpair article
Fan Errors in the
9000, 9040/50
and the MFPs
The 9000/9040/9050 and their
mfp version share many of the same
fans, but not all. For the first time anywhere, we have created a table showing up-to-date 57 error fan identification
for the entire 9000 family. Combined
with the color diagram, this table will
simplify the 57 error trouble-shooting
process and make ordering the correct
part number easier.
After we show the trouble-shooting
steps, we describe relevant differences between the mfps and non-mfps, as well as between the 9000 and
9040/9050.
Trouble-shooting the 57 error
1. Since guessing could lead to ordering the wrong part, check which of
the following you have.
a. LJ 9000 (9000, 9000n, 9000dn,
9000hn)
b.LJ 9000mfp (9000mfp, 9000L
mfp)
c. LJ 9040 or 9050 (9040, 9040n,
9040dn, 9050, 9050n, 9050dn,
9050dnm)
d.LJ 9040mfp, 9050mfp, M9040,
M9050
2. Identify the problem fan using
our table.
2. Reseat the plug-in of the indicate
fan.
3. Replace fan.
4. Replace the dc controller.
MFP versus Non-MFP
The 9000, 9040 and 9050 have six
fans: 3, 4 and 6 are inside the delivery
assembly, 1 and 2 are by the power
supply, and number 5 can be found at
the upper right for the cartridge.
The multi-function versions share
only four fans with the non-mfps. The
SERVICE ED GE, S UMMER 2012
difference is in the delivery area. As
can be seen in the photos at the left,
the multifunction delivery housing assembly has just two fans (both are RH71658). Lacking a face down tray, they
don't need Fan 6, which is the middle
of the three delivery assembly fans in
standard models.
The 9000 versus the 9040/50
The formatter fan used in the 9000
and 9000mfp is 24-volt. Other models use a 5-volt fan, which is not interchangeable.
In conclusion
We hope this table and diagram help
you reduce errors in ordering replacement parts. We published a similar
table for the LaserJet 9000 only in the
first issue of this publication (see Service Edge, Spring 2007 at lbrty.com).
In that article we pointed out that the
9000 service manual assigned the fans
incorrectly. It said 57.1 is caused by Fan
1, 57.2 by Fan 2 and so on. Manuals for
the 9050 and mfps did not repeat this
error.
Top: 90x0mfp/M90x0 fan
housing/delivery asm;
Right: 90x0 delivery asm
Top: duplexer;
Right, top: 9000 dc controller
Right, bottom: 9040/50 version
At Liberty, you can buy everything!
Known for reliable, American-made,
individually printer-tested fusers, Liberty doesn't stop there. We sell every part
mentioned in this article.
9000mfp fan housing/delivery asm:
RG5-5642
9000 delivery asm: RG5-5643
Duplexer: C8532A
dc controller, 9000: RG5-5778;
9040/9050: RG5-7780
Fan 1: RH7-1657
Fan 2, 9000 and 9000mfp: RH75295
Fan 2, 9040, 9050 and mfp versions: RH7-1623
Fan 3: RH7-1658
Fan 4, non-multi-function: RH7-1659
Fan 4, mfp versions: RH7-1658
Fan 5: RG5-5306
Fan 6, 9000, 9040, 9050: RH71661
LPT
From left: RH7-1657, RH7-5295, RH7-1658
From left: RH7-1659, RG5-5306, RH7-1661
7
SE RV ICE E DGE , SU M M ER 2 0 1 2
PRINTER TECH ARTICLE
pickup rollers.
3. Run paper through all the possible paths, input
and output.
a. If the jam occurs in all paths, look at the registration area and the fuser.
b. If the jam only occurs in certain paths, look at
the pickup and feed rollers associated with the
problem path.
0. WHICH KIND OF JAM?
NOTE: Remove jammed paper from the fuser careA. Look for jammed paper in the paper input unit (near
fully to avoid damaging the rollers.
the cassettes and inside the right door), under the
4. Inspect the printed image.
registration flap (beneath the toner cartridge), in the
fuser, and in the output area (above the fuser). If you
a. If the page, or part of the page, is past the tonfind any, go to step I.
er/transfer area and is blank, either the timing
is so far off that the printer didn’t even attempt
B. If there isn't any jammed paper, power off, disconto generate an image, or the input sensor did
nect the printer from the computer or network, and
not “see” the paper. In either case, the probrestart it. This prevents print jobs from interfering
lem is usually in the input section, even though
with the troubleshooting.
the paper may be found considerably farther
1. If the error occurs at power-up (AND no paper is
along than that.
stuck inside), go to step II.
b. If the image is shifted in the direction of paper
2. If the error only occurs after sending a print job
movement, replace the registration assembly,
(AND no paper is stuck inside), go to III.
which controls image position.
I. PAPER IS FOUND IN PATH
II. STARTUP JAMS: ERROR OCCURS ON POWERUP
On large, fast, high-volume printers like the 9000 family, (NO PAPER FOUND). This always involves one or
it is common to get jams with multiple sheets of paper more of the printer’s paper movement sensors.
stopped at various points along the paper path. When
this happens, it can be hard to tell which of the sheets is A. An actuator arm is stuck or broken. This is the most
common cause. There are four places to check.
the one that caused the problem. If one of them is crum1. Paper feed area (four sensors). If any of the actuator
pled, that is obviously the one – see part A below. If none
arms (see below) are broken or stuck, and cannot
are crumpled, the error code may give a clue – paper
be unstuck, replace the paper input unit (part
jam error codes in this series of printers give you more
number RG5-5681).
details about location, etc. than in most printer moda. Open the right door. Two of the actuator arms
els. Note that the error codes are not foolproof – it is not
are plainly visible (Fig A on page 6.). You
guaranteed that the sheet specified by the error code is
should be able to move these upward with
the one that caused the jam. Even for a single-sheet jam,
your finger, and they should return to the down
you may encounter a situation where the error code tells
position when you release them.
you to “check left door,” then after you do that, “check
right door,” etc. – it will rotate you around to all possible
b. Remove both paper cassettes (slide each tray
jam locations. This shows that the printer doesn’t always
out until it stops, then lift the front and pull it
“know” where the jam is. Still, the error code gives you a
out the rest of the way) and look into the cavplace to start. Otherwise, use the troubleshooting techity. You should see two clusters of three rollers
niques in steps 2-4 of part B below.
each. There is another actuator arm immediately to the right of each of these sets of rollers
A. Jammed paper is crumpled
(Fig. B). These actuators are harder to see and
1. If the paper is folding or crumpling, you can
to manipulate than the first two (in part a), but
usually find the problem at the leading edge of
you should be able to reach them with a small
the paper. This could be a worn or non-turning
screwdriver or pick. You should be able to
roller, an obstruction in the paper path, or a result
move them to the right, and they should return
of paper skewing outside of the paper path.
to the left when released.
B. Jammed Paper is not crumpled
2. Registration area.
1. See where the paper stopped. If the leading edge
a. Open the front door, rotate the large green lestops just after a sensor, that sensor is probably
ver down, and remove the toner cartridge.
malfunctioning. Go to step II.
LJ 9000/40/50
Jam Error Method
8
2. Replace any worn or slick rollers, especially the
SERVICE ED GE, S UMMER 2012
b. The actuator arm is under the
clear mylar, about halfway
back (i.e., in the center of the
paper path) (Figures C & D).
You should be able to move it
down and to the left with your
finger (or with a screwdriver or
pick), and it should spring back
up when released. If this actuator arm is broken or stuck, and
cannot be unstuck, replace
the registration assembly (part
number RG5-5663).
3. Fuser (two sensors).
a. Open the left door of the printer to access the fuser.
b. One actuator arm is plainly
visible. To see the other one,
open the fuser jam access
door, as shown in Fig. E, to expose both actuator arms. You
should be able to move both
arms toward you, and when released, they should go back to
the home position. If either arm
is broken or stuck, and cannot
be unstuck, replace the fuser
(part number RG5-5750).
4. Output area. There are two
actuator arms plainly visible where
the paper exits the printer on top,
but neither of these has anything
to do with paper jam sensing. To
see the one that is used for paper
jam sensing, you have to look very
closely between the rollers (Fig.
F). Manipulating this arm with a
small screwdriver or pick, you
should be able to move it toward
you, and it should go back to its
home position when released. If
it is broken or stuck, and cannot
be unstuck, replace the delivery
assembly (part number RG55643).
A.
B.
C. Mylar strip of registration asm
B. An optical sensor has failed (very rare
unless it’s cracked or broken).
C. The dc controller board is defective
D. There is a bad electrical connection
between one or more sensors and
the dc controller.
E. False 13.20 related to fuser, hvps, or
dc controller.
D. Sensor beneath mylar strip
9
SE RV ICE E DGE , SU M M ER 2 0 1 2
1. In the 9000/9040/9050, there
is a separate jam-detection
mechanism involving a high
voltage applied to the lower fuser
roller, and an internal solenoid
(in the fuser) that periodically
samples this voltage. The intent is
to detect “wrapping jams” (where
paper wraps around the roller).
This mechanism can sometimes
cause a false 13.20 paper jam on
power-up. The cause can be a bad
fuser, high voltage power supply,
dc controller (see separate article
on dc controller issues), or bad
connections between any two of
these.
2. It can be difficult to pinpoint
the exact cause in these cases,
but a good first step is to check
connections at the fuser, and then
replace the fuser. The second
step would be to replace the dc
controller, especially if it is an older
version (see separate article).
E.
III. ERROR OCCURS AFTER PRINT JOB
IS REQUESTED (NO PAPER FOUND).
This always indicates a paper pickup
failure. Some common causes:
A. If the printer has a tray 1 (optional on
these models): With tray 1 open and
empty, print a configuration page
and see if the pickup roller turns (it's
not supposed to when the tray is
empty). If it turns,
1. Replace the tray 1 assembly (part
number C8568-67901), which
has a malfunctioning paper out
sensor.
F.
registration asm
B. Replace any pickup rollers that have
been worn slick.
C. See if the tray 1 pickup roller turns af-
ter a print job is sent. If not:
1. Replace the tray 1 assembly (part
number C8568-67901), which
has a defective mechanism.
2. Replace the dc controller (rare).
D. See if the tray 2 or tray 3 pickup roller
fuser
PIU
turns after a print job is sent. If not:
1. Replace the paper input unit (PIU)
(part number RG5-5681).
LPT
10
SERVICE ED GE, S UMMER 2012
Printer REpair article
Roller Flat-spots and
False 13.20 Jams in
the LaserJet 9000
Two significant problems in the HP
LaserJet 9000 have been corrected by
upgrading the dc controller. Do you
know what these problems are and
how to check your dc controller version? If not, read on!
Firmware is a computer program that
controls the operations of the processors on the formatter and dc controller
boards. Sometimes firmware has unintended results and requires revision.
The LaserJet 9000, which has separate
firmware for its formatter and dc controller boards, has gone through several revisions. The dc controller firmware cannot be downloaded, as can be
done with many newer Laserjet models
Two significant problems in the HP
LaserJet 9000 that have been corrected
by dc controller firmware revisions are:
(1) Flat spots in the lower fuser roller,
caused by prolonged contact with the
hot upper roller when the printer is idle
for extended periods, and
(2) False 13.20 paper jams, caused
by oversensitivity to the fuser “wrapping jam” detection circuit.
To check the dc controller firmware
revision level, print a configuration
page and look at the “printer number.”
This can range from 15 to 1C (in hexadecimal notation – see explanation below). The lower the number, the older
the dc controller is, and the more likely
it is to cause the problems described
above. We do not stock dc controllers
with printer numbers lower than 1A,
and we do not recommend using the
older ones.
If you are having either of the problems described above and you have
one of the older dc controllers, the best
thing you can do is upgrade to a newer
dc controller.
RG5-5778
How to Read Hexadecimal Notation
Hexadecimal notation is a different way of writing numbers, often used in computer and printer applications. Instead
of the 10 digits (0-9) that we are familiar with, it uses 16 digits
(0-9 and A-F). This allows counting up to 16 before we need a
second digit. So the numbers from 0 to 16 (in our regular notation) would be 0, 1, 2, 3, 4, 5, 6, 7, 8, 9, A, B, C, D, E, F, 10 in
hexadecimal notation. In hexadecimal notation, the HP LaserJet 9000 printer numbers are, in order from lowest to highest,
15, 16, 17, 18, 19, 1A, 1B, 1C. Printer number 15 represents the
oldest version; printer number 1C represents the newest.
LPT
11
Prsrt Std
U.S. Postage
Paid
Permit #168
Madison, WI
LIBERTY PARTS TEAM INC.
3517 W. Beltline Hwy.
Madison, WI 53713
888-444-8778
www.lbrty.com
It's wonderful what we can do if we're always doing.
George Washington (1732 - 1799)
Everything you need is at LPT!
The best parts
• OEM • Third-party • 2nd source OEM
• LPT Remanufactured (American-made, individually tested, 6-month warranty;
many of our competitors have theirs assembled in Mexico)
The best tech support
• 20 years average experience in printer service
The best reps
• most LPT account executives have 15-20 years experience
For wholesale HP, Lexmark, Samsung, Oki laser printer parts,
call Liberty Parts Team: 888-444-8778