1
HP LaserJet 9040/9050
User Guide
hp LaserJet 9040/9050 series printers
User Guide
Copyright and License
Trademark Credits
© 2005 Copyright Hewlett-Packard Development Company, L.P.
Adobe, Acrobat, and PostScript are trademarks of Adobe Systems
Incorporated.
ENERGY STAR® is a U.S. registered mark.
Reproduction, adaptation or translation without prior written
permission is prohibited, except as allowed under the copyright laws.
The information contained herein is subject to change without notice.
The only warranties for HP products and services are set forth in the
express warranty statements accompanying such products and
services. Nothing herein should be construed as constituting an
additional warranty. HP shall not be liable for technical or editorial
errors or omissions contained herein.
Publication number: Q3721-90940
Edition 1, 02/2005
HP-UX Release 10.20 and HP-UX Release 11.00 and later on all
HP 9000 computers are Open Group UNIX products,
Linux is a U.S. registered trademark of Linus Torvalds.
Microsoft, Windows and Windows NT are U.S. registered trademarks
of Microsoft Corporation.
UNIX is a registered trademark of The Open Group.
Contents
7
1 Printer basics
Features and benefits of the printer . . . . . . . . . . . . . . . . . . . . . . . . . . . . . . . . . . . . . . . . . . . . . . .7
Parts or accessories . . . . . . . . . . . . . . . . . . . . . . . . . . . . . . . . . . . . . . . . . . . . . . . . . . . . . . .10
External view of printer and accessories . . . . . . . . . . . . . . . . . . . . . . . . . . . . . . . . . . . . . . . . . .14
Layout and basic operation of the control panel . . . . . . . . . . . . . . . . . . . . . . . . . . . . . . . . . . . . .15
Interpreting control-panel lights . . . . . . . . . . . . . . . . . . . . . . . . . . . . . . . . . . . . . . . . . . . . . .16
Using control-panel menus. . . . . . . . . . . . . . . . . . . . . . . . . . . . . . . . . . . . . . . . . . . . . . . . . .16
Paper-handling status LED interpretation . . . . . . . . . . . . . . . . . . . . . . . . . . . . . . . . . . . . . .17
Printer software. . . . . . . . . . . . . . . . . . . . . . . . . . . . . . . . . . . . . . . . . . . . . . . . . . . . . . . . . . . . . .18
Software features . . . . . . . . . . . . . . . . . . . . . . . . . . . . . . . . . . . . . . . . . . . . . . . . . . . . . . . . .18
Printer drivers . . . . . . . . . . . . . . . . . . . . . . . . . . . . . . . . . . . . . . . . . . . . . . . . . . . . . . . . . . . .19
Software for Macintosh computers . . . . . . . . . . . . . . . . . . . . . . . . . . . . . . . . . . . . . . . . . . . .22
Installing the printing system software . . . . . . . . . . . . . . . . . . . . . . . . . . . . . . . . . . . . . . . . .23
Uninstalling the software . . . . . . . . . . . . . . . . . . . . . . . . . . . . . . . . . . . . . . . . . . . . . . . . . . .26
Software for networks. . . . . . . . . . . . . . . . . . . . . . . . . . . . . . . . . . . . . . . . . . . . . . . . . . . . . .27
HP Web Jetadmin . . . . . . . . . . . . . . . . . . . . . . . . . . . . . . . . . . . . . . . . . . . . . . . . . . . . . . . .27
Communicating by using an optional HP Jetdirect print server . . . . . . . . . . . . . . . . . . . . . .29
Communicating by using the HP Jetdirect embedded print server . . . . . . . . . . . . . . . . . . .29
Embedded Web server . . . . . . . . . . . . . . . . . . . . . . . . . . . . . . . . . . . . . . . . . . . . . . . . . . . . . . . .30
Using the embedded Web server . . . . . . . . . . . . . . . . . . . . . . . . . . . . . . . . . . . . . . . . . . . . .30
HP Toolbox . . . . . . . . . . . . . . . . . . . . . . . . . . . . . . . . . . . . . . . . . . . . . . . . . . . . . . . . . . . . . . . . .31
Supported operating systems. . . . . . . . . . . . . . . . . . . . . . . . . . . . . . . . . . . . . . . . . . . . . . . .31
To view the HP Toolbox . . . . . . . . . . . . . . . . . . . . . . . . . . . . . . . . . . . . . . . . . . . . . . . . . . . .31
HP Toolbox sections . . . . . . . . . . . . . . . . . . . . . . . . . . . . . . . . . . . . . . . . . . . . . . . . . . . . . .31
Help system . . . . . . . . . . . . . . . . . . . . . . . . . . . . . . . . . . . . . . . . . . . . . . . . . . . . . . . . . . . . . . . .33
2 Printing tasks
Loading input trays . . . . . . . . . . . . . . . . . . . . . . . . . . . . . . . . . . . . . . . . . . . . . . . . . . . . . . . . . . .36
Loading optional Tray 1 . . . . . . . . . . . . . . . . . . . . . . . . . . . . . . . . . . . . . . . . . . . . . . . . . . . .36
To load optional Tray 1 when the same paper is used for multiple print jobs . . . . . . . . . . .37
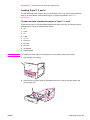
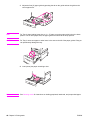
Loading Trays 2, 3, and 4 . . . . . . . . . . . . . . . . . . . . . . . . . . . . . . . . . . . . . . . . . . . . . . . . . .39
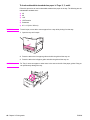
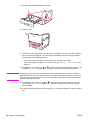
Loading custom-size paper in Trays 2, 3, and 4 . . . . . . . . . . . . . . . . . . . . . . . . . . . . . . . . .45
Configuring the trays by using the Paper Handling menu . . . . . . . . . . . . . . . . . . . . . . . . . .47
Orienting media. . . . . . . . . . . . . . . . . . . . . . . . . . . . . . . . . . . . . . . . . . . . . . . . . . . . . . . . . . . . . .49
Basic printing instructions . . . . . . . . . . . . . . . . . . . . . . . . . . . . . . . . . . . . . . . . . . . . . . . . . . . . . .54
Selecting the output bin . . . . . . . . . . . . . . . . . . . . . . . . . . . . . . . . . . . . . . . . . . . . . . . . . . . . . . .55
Selecting an output location . . . . . . . . . . . . . . . . . . . . . . . . . . . . . . . . . . . . . . . . . . . . . . . . .56
Printing envelopes . . . . . . . . . . . . . . . . . . . . . . . . . . . . . . . . . . . . . . . . . . . . . . . . . . . . . . . . . . .57
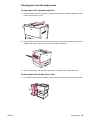
Using the optional 3,000-sheet stacker. . . . . . . . . . . . . . . . . . . . . . . . . . . . . . . . . . . . . . . . . . . .60
Output features. . . . . . . . . . . . . . . . . . . . . . . . . . . . . . . . . . . . . . . . . . . . . . . . . . . . . . . . . . .60
Using the optional stacker/stapler . . . . . . . . . . . . . . . . . . . . . . . . . . . . . . . . . . . . . . . . . . . . . . .60
Selecting the stapler. . . . . . . . . . . . . . . . . . . . . . . . . . . . . . . . . . . . . . . . . . . . . . . . . . . . . . .60
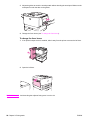
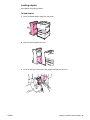
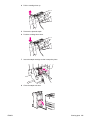
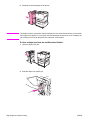
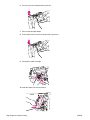
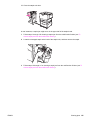
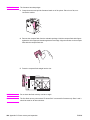
Loading staples . . . . . . . . . . . . . . . . . . . . . . . . . . . . . . . . . . . . . . . . . . . . . . . . . . . . . . . . . .61
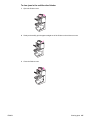
Using the optional multifunction finisher . . . . . . . . . . . . . . . . . . . . . . . . . . . . . . . . . . . . . . . . . . .63
Output features. . . . . . . . . . . . . . . . . . . . . . . . . . . . . . . . . . . . . . . . . . . . . . . . . . . . . . . . . . .63
Using the stapler . . . . . . . . . . . . . . . . . . . . . . . . . . . . . . . . . . . . . . . . . . . . . . . . . . . . . . . . .63
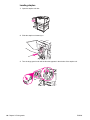
Loading staples . . . . . . . . . . . . . . . . . . . . . . . . . . . . . . . . . . . . . . . . . . . . . . . . . . . . . . . . . .64
Making booklets . . . . . . . . . . . . . . . . . . . . . . . . . . . . . . . . . . . . . . . . . . . . . . . . . . . . . . . . . .66
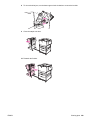
Using the optional 8-bin mailbox. . . . . . . . . . . . . . . . . . . . . . . . . . . . . . . . . . . . . . . . . . . . . . . . .68
Output features. . . . . . . . . . . . . . . . . . . . . . . . . . . . . . . . . . . . . . . . . . . . . . . . . . . . . . . . . . .68
ENWW
Contents iii
Printing both sides of paper (duplexing). . . . . . . . . . . . . . . . . . . . . . . . . . . . . . . . . . . . . . . . . . . 68
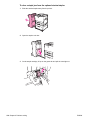
Printing on special paper . . . . . . . . . . . . . . . . . . . . . . . . . . . . . . . . . . . . . . . . . . . . . . . . . . . . . . 70
Printing on letterhead, prepunched paper, or preprinted paper (single-sided) . . . . . . . . . . 70
Printing on letterhead, prepunched paper, or preprinted paper (double-sided). . . . . . . . . . 70
Printing labels . . . . . . . . . . . . . . . . . . . . . . . . . . . . . . . . . . . . . . . . . . . . . . . . . . . . . . . . . . . 70
Printing on transparencies . . . . . . . . . . . . . . . . . . . . . . . . . . . . . . . . . . . . . . . . . . . . . . . . . . 71
Guidelines for custom-size paper, card stock, and heavy paper . . . . . . . . . . . . . . . . . . . . 71
Printing full-bleed images . . . . . . . . . . . . . . . . . . . . . . . . . . . . . . . . . . . . . . . . . . . . . . . . . . 71
3 Advanced printing tasks
Overview . . . . . . . . . . . . . . . . . . . . . . . . . . . . . . . . . . . . . . . . . . . . . . . . . . . . . . . . . . . . . . . . . . 73
Using features in the printer driver . . . . . . . . . . . . . . . . . . . . . . . . . . . . . . . . . . . . . . . . . . . . . . . 74
Setting the registration . . . . . . . . . . . . . . . . . . . . . . . . . . . . . . . . . . . . . . . . . . . . . . . . . . . . . . . 75
Using a different first page . . . . . . . . . . . . . . . . . . . . . . . . . . . . . . . . . . . . . . . . . . . . . . . . . . . . . 76
Including a blank back page. . . . . . . . . . . . . . . . . . . . . . . . . . . . . . . . . . . . . . . . . . . . . . . . . . . . 77
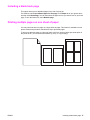
Printing multiple pages on one sheet of paper. . . . . . . . . . . . . . . . . . . . . . . . . . . . . . . . . . . . . . 77
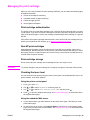
Customizing optional Tray 1 operation. . . . . . . . . . . . . . . . . . . . . . . . . . . . . . . . . . . . . . . . . . . . 78
Printing from optional Tray 1 when the loaded paper is requested . . . . . . . . . . . . . . . . . . . 78
Manually feeding paper from optional Tray 1 . . . . . . . . . . . . . . . . . . . . . . . . . . . . . . . . . . . 78
Specifying paper to print on . . . . . . . . . . . . . . . . . . . . . . . . . . . . . . . . . . . . . . . . . . . . . . . . . . . . 79
Benefits of printing by type and size of paper . . . . . . . . . . . . . . . . . . . . . . . . . . . . . . . . . . . 79
Using the job-storage features . . . . . . . . . . . . . . . . . . . . . . . . . . . . . . . . . . . . . . . . . . . . . . . . . . 80
Printing a private job . . . . . . . . . . . . . . . . . . . . . . . . . . . . . . . . . . . . . . . . . . . . . . . . . . . . . . 80
Releasing private jobs . . . . . . . . . . . . . . . . . . . . . . . . . . . . . . . . . . . . . . . . . . . . . . . . . . . . . 81
Deleting a private job . . . . . . . . . . . . . . . . . . . . . . . . . . . . . . . . . . . . . . . . . . . . . . . . . . . . . . 81
Storing a print job . . . . . . . . . . . . . . . . . . . . . . . . . . . . . . . . . . . . . . . . . . . . . . . . . . . . . . . . 81
Printing a stored job. . . . . . . . . . . . . . . . . . . . . . . . . . . . . . . . . . . . . . . . . . . . . . . . . . . . . . . 82
Deleting a stored job . . . . . . . . . . . . . . . . . . . . . . . . . . . . . . . . . . . . . . . . . . . . . . . . . . . . . . 82
QuickCopying a job . . . . . . . . . . . . . . . . . . . . . . . . . . . . . . . . . . . . . . . . . . . . . . . . . . . . . . . 82
Printing additional copies of QuickCopy jobs. . . . . . . . . . . . . . . . . . . . . . . . . . . . . . . . . . . . 83
Deleting a QuickCopy job . . . . . . . . . . . . . . . . . . . . . . . . . . . . . . . . . . . . . . . . . . . . . . . . . . 83
Proofing and holding a job . . . . . . . . . . . . . . . . . . . . . . . . . . . . . . . . . . . . . . . . . . . . . . . . . . 83
Printing the remaining copies of a held job . . . . . . . . . . . . . . . . . . . . . . . . . . . . . . . . . . . . . 84
Deleting a held job . . . . . . . . . . . . . . . . . . . . . . . . . . . . . . . . . . . . . . . . . . . . . . . . . . . . . . . . 84
4 Security features
Overview . . . . . . . . . . . . . . . . . . . . . . . . . . . . . . . . . . . . . . . . . . . . . . . . . . . . . . . . . . . . . . . . . . 85
Secure Disk Erase . . . . . . . . . . . . . . . . . . . . . . . . . . . . . . . . . . . . . . . . . . . . . . . . . . . . . . . . . . 86
Affected data . . . . . . . . . . . . . . . . . . . . . . . . . . . . . . . . . . . . . . . . . . . . . . . . . . . . . . . . . . . . 86
Gaining access to Secure Disk Erase . . . . . . . . . . . . . . . . . . . . . . . . . . . . . . . . . . . . . . . . . 86
Additional information . . . . . . . . . . . . . . . . . . . . . . . . . . . . . . . . . . . . . . . . . . . . . . . . . . . . . 86
Security lock. . . . . . . . . . . . . . . . . . . . . . . . . . . . . . . . . . . . . . . . . . . . . . . . . . . . . . . . . . . . . . . . 87
Job storage features . . . . . . . . . . . . . . . . . . . . . . . . . . . . . . . . . . . . . . . . . . . . . . . . . . . . . . . . . 87
5 Printer maintenance
Overview . . . . . . . . . . . . . . . . . . . . . . . . . . . . . . . . . . . . . . . . . . . . . . . . . . . . . . . . . . . . . . . . . . 89
Cleaning the printer . . . . . . . . . . . . . . . . . . . . . . . . . . . . . . . . . . . . . . . . . . . . . . . . . . . . . . . . . . 90
General cleaning . . . . . . . . . . . . . . . . . . . . . . . . . . . . . . . . . . . . . . . . . . . . . . . . . . . . . . . . . 90
Printer maintenance kit . . . . . . . . . . . . . . . . . . . . . . . . . . . . . . . . . . . . . . . . . . . . . . . . . . . . . . . 92
To reset the printer maintenance count . . . . . . . . . . . . . . . . . . . . . . . . . . . . . . . . . . . . . . . . 92
To print a configuration page . . . . . . . . . . . . . . . . . . . . . . . . . . . . . . . . . . . . . . . . . . . . . . . . 92
Managing the print cartridge . . . . . . . . . . . . . . . . . . . . . . . . . . . . . . . . . . . . . . . . . . . . . . . . . . . 93
Print cartridge authentication . . . . . . . . . . . . . . . . . . . . . . . . . . . . . . . . . . . . . . . . . . . . . . . . 93
Non-HP print cartridges . . . . . . . . . . . . . . . . . . . . . . . . . . . . . . . . . . . . . . . . . . . . . . . . . . . . 93
Print cartridge storage . . . . . . . . . . . . . . . . . . . . . . . . . . . . . . . . . . . . . . . . . . . . . . . . . . . . . 93
Checking the toner level . . . . . . . . . . . . . . . . . . . . . . . . . . . . . . . . . . . . . . . . . . . . . . . . . . . 93
Print cartridge conditions . . . . . . . . . . . . . . . . . . . . . . . . . . . . . . . . . . . . . . . . . . . . . . . . . . . . . . 94
iv
ENWW
Order the print cartridge . . . . . . . . . . . . . . . . . . . . . . . . . . . . . . . . . . . . . . . . . . . . . . . . . . . .94
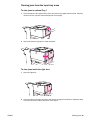
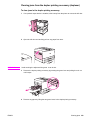
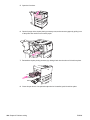
Replace the print cartridge . . . . . . . . . . . . . . . . . . . . . . . . . . . . . . . . . . . . . . . . . . . . . . . . . .95
Recycling . . . . . . . . . . . . . . . . . . . . . . . . . . . . . . . . . . . . . . . . . . . . . . . . . . . . . . . . . . . . . . .95
Using the printer cleaning page . . . . . . . . . . . . . . . . . . . . . . . . . . . . . . . . . . . . . . . . . . . . . .95
6 Problem solving
Overview . . . . . . . . . . . . . . . . . . . . . . . . . . . . . . . . . . . . . . . . . . . . . . . . . . . . . . . . . . . . . . . . . . .97
Clearing jams . . . . . . . . . . . . . . . . . . . . . . . . . . . . . . . . . . . . . . . . . . . . . . . . . . . . . . . . . . . . . . .98
Clearing jams from the input tray areas . . . . . . . . . . . . . . . . . . . . . . . . . . . . . . . . . . . . . . . .99
Clearing jams from the duplex printing accessory (duplexer) . . . . . . . . . . . . . . . . . . . . . .103
Clearing jams from the output areas . . . . . . . . . . . . . . . . . . . . . . . . . . . . . . . . . . . . . . . . .105
To clear jams in the 8-bin mailbox . . . . . . . . . . . . . . . . . . . . . . . . . . . . . . . . . . . . . . . . . . .116
Solving repeated paper jams . . . . . . . . . . . . . . . . . . . . . . . . . . . . . . . . . . . . . . . . . . . . . . .117
Understanding printer messages . . . . . . . . . . . . . . . . . . . . . . . . . . . . . . . . . . . . . . . . . . . . . . .118
Resolving control-panel messages . . . . . . . . . . . . . . . . . . . . . . . . . . . . . . . . . . . . . . . . . . . . . .119
Correcting output quality problems . . . . . . . . . . . . . . . . . . . . . . . . . . . . . . . . . . . . . . . . . . . . . .128
Preventing wrinkles on envelopes . . . . . . . . . . . . . . . . . . . . . . . . . . . . . . . . . . . . . . . . . . .132
Solving common printer issues . . . . . . . . . . . . . . . . . . . . . . . . . . . . . . . . . . . . . . . . . . . . . . . . .133
Using the embedded Web server . . . . . . . . . . . . . . . . . . . . . . . . . . . . . . . . . . . . . . . . . . . . . . .142
Home pages . . . . . . . . . . . . . . . . . . . . . . . . . . . . . . . . . . . . . . . . . . . . . . . . . . . . . . . . . . . .142
Device pages . . . . . . . . . . . . . . . . . . . . . . . . . . . . . . . . . . . . . . . . . . . . . . . . . . . . . . . . . . .143
Networking pages. . . . . . . . . . . . . . . . . . . . . . . . . . . . . . . . . . . . . . . . . . . . . . . . . . . . . . . .143
Printing information pages . . . . . . . . . . . . . . . . . . . . . . . . . . . . . . . . . . . . . . . . . . . . . . . . . . . .144
Checking the printer configuration . . . . . . . . . . . . . . . . . . . . . . . . . . . . . . . . . . . . . . . . . . . . . .145
Menu map . . . . . . . . . . . . . . . . . . . . . . . . . . . . . . . . . . . . . . . . . . . . . . . . . . . . . . . . . . . . .145
Configuration page . . . . . . . . . . . . . . . . . . . . . . . . . . . . . . . . . . . . . . . . . . . . . . . . . . . . . . .146
Supplies status page . . . . . . . . . . . . . . . . . . . . . . . . . . . . . . . . . . . . . . . . . . . . . . . . . . . . .147
Usage page . . . . . . . . . . . . . . . . . . . . . . . . . . . . . . . . . . . . . . . . . . . . . . . . . . . . . . . . . . . .148
PCL or PS font list . . . . . . . . . . . . . . . . . . . . . . . . . . . . . . . . . . . . . . . . . . . . . . . . . . . . . . .149
Jetdirect page. . . . . . . . . . . . . . . . . . . . . . . . . . . . . . . . . . . . . . . . . . . . . . . . . . . . . . . . . . .150
Event log page . . . . . . . . . . . . . . . . . . . . . . . . . . . . . . . . . . . . . . . . . . . . . . . . . . . . . . . . . .151
Printing a paper path test . . . . . . . . . . . . . . . . . . . . . . . . . . . . . . . . . . . . . . . . . . . . . . . . . . . . .152
153
Appendix A Specifications
Overview . . . . . . . . . . . . . . . . . . . . . . . . . . . . . . . . . . . . . . . . . . . . . . . . . . . . . . . . . . . . . . . . . .153
Paper specifications . . . . . . . . . . . . . . . . . . . . . . . . . . . . . . . . . . . . . . . . . . . . . . . . . . . . . . . . .156
Supported sizes of paper for input and output . . . . . . . . . . . . . . . . . . . . . . . . . . . . . . . . .157
Supported types of paper . . . . . . . . . . . . . . . . . . . . . . . . . . . . . . . . . . . . . . . . . . . . . . . . . .160
Labels. . . . . . . . . . . . . . . . . . . . . . . . . . . . . . . . . . . . . . . . . . . . . . . . . . . . . . . . . . . . . . . . .161
Transparencies. . . . . . . . . . . . . . . . . . . . . . . . . . . . . . . . . . . . . . . . . . . . . . . . . . . . . . . . . .161
Envelopes. . . . . . . . . . . . . . . . . . . . . . . . . . . . . . . . . . . . . . . . . . . . . . . . . . . . . . . . . . . . . .161
Card stock and heavy paper . . . . . . . . . . . . . . . . . . . . . . . . . . . . . . . . . . . . . . . . . . . . . . .162
Environmental specifications . . . . . . . . . . . . . . . . . . . . . . . . . . . . . . . . . . . . . . . . . . . . . . . . . .163
Electrical specifications . . . . . . . . . . . . . . . . . . . . . . . . . . . . . . . . . . . . . . . . . . . . . . . . . . .163
Acoustical specifications . . . . . . . . . . . . . . . . . . . . . . . . . . . . . . . . . . . . . . . . . . . . . . . . . .164
Operating environment. . . . . . . . . . . . . . . . . . . . . . . . . . . . . . . . . . . . . . . . . . . . . . . . . . . .164
Appendix B Control-panel menus
Overview . . . . . . . . . . . . . . . . . . . . . . . . . . . . . . . . . . . . . . . . . . . . . . . . . . . . . . . . . . . . . . . . . .165
Retrieve job menu. . . . . . . . . . . . . . . . . . . . . . . . . . . . . . . . . . . . . . . . . . . . . . . . . . . . . . . . . . .166
Information menu . . . . . . . . . . . . . . . . . . . . . . . . . . . . . . . . . . . . . . . . . . . . . . . . . . . . . . . . . . .166
Paper handling menu . . . . . . . . . . . . . . . . . . . . . . . . . . . . . . . . . . . . . . . . . . . . . . . . . . . . . . . .167
Configure device menu . . . . . . . . . . . . . . . . . . . . . . . . . . . . . . . . . . . . . . . . . . . . . . . . . . . . . . .168
Printing submenu . . . . . . . . . . . . . . . . . . . . . . . . . . . . . . . . . . . . . . . . . . . . . . . . . . . . . . . .168
Print quality submenu . . . . . . . . . . . . . . . . . . . . . . . . . . . . . . . . . . . . . . . . . . . . . . . . . . . . .171
System setup submenu . . . . . . . . . . . . . . . . . . . . . . . . . . . . . . . . . . . . . . . . . . . . . . . . . . .173
ENWW
v
I/O submenu . . . . . . . . . . . . . . . . . . . . . . . . . . . . . . . . . . . . . . . . . . . . . . . . . . . . . . . . . . . 175
Resets submenu . . . . . . . . . . . . . . . . . . . . . . . . . . . . . . . . . . . . . . . . . . . . . . . . . . . . . . . . 179
Diagnostics menu. . . . . . . . . . . . . . . . . . . . . . . . . . . . . . . . . . . . . . . . . . . . . . . . . . . . . . . . . . . 180
Service menu . . . . . . . . . . . . . . . . . . . . . . . . . . . . . . . . . . . . . . . . . . . . . . . . . . . . . . . . . . . . . . 180
Appendix C Printer memory and expansion
Overview . . . . . . . . . . . . . . . . . . . . . . . . . . . . . . . . . . . . . . . . . . . . . . . . . . . . . . . . . . . . . . . . . 181
Determining memory requirements . . . . . . . . . . . . . . . . . . . . . . . . . . . . . . . . . . . . . . . . . . . . . 182
Installing memory and fonts . . . . . . . . . . . . . . . . . . . . . . . . . . . . . . . . . . . . . . . . . . . . . . . . . . . 182
To install DDR memory DIMMs . . . . . . . . . . . . . . . . . . . . . . . . . . . . . . . . . . . . . . . . . . . . . 182
To install a flash memory card. . . . . . . . . . . . . . . . . . . . . . . . . . . . . . . . . . . . . . . . . . . . . . 185
Checking memory installation . . . . . . . . . . . . . . . . . . . . . . . . . . . . . . . . . . . . . . . . . . . . . . . . . 188
Saving resources (permanent resources) . . . . . . . . . . . . . . . . . . . . . . . . . . . . . . . . . . . . . . . . 189
Installing EIO cards/mass storage . . . . . . . . . . . . . . . . . . . . . . . . . . . . . . . . . . . . . . . . . . . . . . 189
Appendix D Regulatory information
Environmental product stewardship program. . . . . . . . . . . . . . . . . . . . . . . . . . . . . . . . . . . . . . 191
Protecting the environment . . . . . . . . . . . . . . . . . . . . . . . . . . . . . . . . . . . . . . . . . . . . . . . . 191
Ozone production . . . . . . . . . . . . . . . . . . . . . . . . . . . . . . . . . . . . . . . . . . . . . . . . . . . . . . . 191
Power consumption . . . . . . . . . . . . . . . . . . . . . . . . . . . . . . . . . . . . . . . . . . . . . . . . . . . . . . 191
Toner consumption . . . . . . . . . . . . . . . . . . . . . . . . . . . . . . . . . . . . . . . . . . . . . . . . . . . . . . 191
Paper use . . . . . . . . . . . . . . . . . . . . . . . . . . . . . . . . . . . . . . . . . . . . . . . . . . . . . . . . . . . . . 191
Plastics . . . . . . . . . . . . . . . . . . . . . . . . . . . . . . . . . . . . . . . . . . . . . . . . . . . . . . . . . . . . . . . 192
HP LaserJet printing supplies . . . . . . . . . . . . . . . . . . . . . . . . . . . . . . . . . . . . . . . . . . . . . . 192
HP printing supplies returns and recycling program information . . . . . . . . . . . . . . . . . . . . 192
Material restrictions . . . . . . . . . . . . . . . . . . . . . . . . . . . . . . . . . . . . . . . . . . . . . . . . . . . . . . 192
Material safety data sheet . . . . . . . . . . . . . . . . . . . . . . . . . . . . . . . . . . . . . . . . . . . . . . . . . 193
Appendix E Using accessibility shortcut keys in the Help Viewer
Using F6 to switch between the Navigation and Topic Panes . . . . . . . . . . . . . . . . . . . . . . . . . 195
Shortcut keys for the Help Viewer . . . . . . . . . . . . . . . . . . . . . . . . . . . . . . . . . . . . . . . . . . . . . . 195
Shortcut keys for the Contents tab. . . . . . . . . . . . . . . . . . . . . . . . . . . . . . . . . . . . . . . . . . . . . . 196
Shortcut keys for the Index tab . . . . . . . . . . . . . . . . . . . . . . . . . . . . . . . . . . . . . . . . . . . . . . . . 196
Shortcut keys for the Search tab . . . . . . . . . . . . . . . . . . . . . . . . . . . . . . . . . . . . . . . . . . . . . . . 196
Shortcut keys for the Favorites tab . . . . . . . . . . . . . . . . . . . . . . . . . . . . . . . . . . . . . . . . . . . . . 197
Appendix F Using the HTML Help Viewer
Getting more out of help. . . . . . . . . . . . . . . . . . . . . . . . . . . . . . . . . . . . . . . . . . . . . . . . . . . . . . 199
To find a help topic . . . . . . . . . . . . . . . . . . . . . . . . . . . . . . . . . . . . . . . . . . . . . . . . . . . . . . . . . 199
To create a list of favorite help topics . . . . . . . . . . . . . . . . . . . . . . . . . . . . . . . . . . . . . . . . . . . 200
To copy a help topic . . . . . . . . . . . . . . . . . . . . . . . . . . . . . . . . . . . . . . . . . . . . . . . . . . . . . . . . 200
To print the current help topic . . . . . . . . . . . . . . . . . . . . . . . . . . . . . . . . . . . . . . . . . . . . . . . . . 200
To find topics using the toolbar buttons . . . . . . . . . . . . . . . . . . . . . . . . . . . . . . . . . . . . . . . . . 200
Using the shortcut menu commands . . . . . . . . . . . . . . . . . . . . . . . . . . . . . . . . . . . . . . . . . . . . 201
vi
ENWW
1
Printer basics
Congratulations on your purchase of an HP LaserJet 9040/9050 series printer. If you have not
done so, see the Getting Started Guide that was provided with the printer for setup instructions.
Now that the printer is set up and ready to use, take a few moments to get to know the printer.
This chapter introduces the following information about the printer:
●
Features and benefits of the printer
●
Layout and basic operation of the control panel
●
Printer software
●
Embedded Web server
●
Help system
Features and benefits of the printer
This section lists the major printer features.
Speed and throughput
●
Transmit Once, Raster Image Processing (RIP) ONCE technology
●
Eight-second standby to first page
●
40 pages per minute (ppm) (HP LaserJet 9040 series printer) or 50 ppm (HP LaserJet 9050
series printer) on letter or ISO A4 paper
●
Duty cycle up to 300,000 pages per month
●
533 megahertz (MHz) microprocessor
Resolution
●
600 dots per inch (dpi) with Resolution Enhancement technology (REt)
●
FastRes 1200 provides 1200 dpi quality at full speed
●
Up to 220 levels of gray
Memory
ENWW
●
64 megabytes (MB) of random access memory (RAM), expandable to 512 MB using industry
standard 100-pin double data rate (DDR) dual in-line memory modules (DIMMs) for the base
model HP LaserJet 9040/9050 printer
●
128 MB of RAM, expandable to 512 MB by using industry-standard 100-pin DDR DIMMs for
the HP LaserJet 9040n/9050n and the HP LaserJet 9040dn/9050dn printers
●
Memory Enhancement technology (MEt), which automatically compresses data to use RAM
more efficiently
Features and benefits of the printer 7
User interface
●
Graphic display on control panel
●
Embedded Web server to gain access to support and order supplies (for network-connected
printers)
●
HP Toolbox software to provide printer status and alerts, configure printer settings, and print
internal printer information pages
Language and fonts
●
HP Printer Command Language (PCL) 6 driver
●
HP PCL 5e driver for compatibility
●
Printer Job Language (PJL)
●
Printer Management Language
●
80 scalable TrueType typefaces
●
HP PostScript 3 emulation (PS)
Print cartridge
●
No-shake cartridge design
●
Authentication of HP print cartridges
●
No-pull tab with automatic seal-tab removal
●
Internet-enabled supplies ordering
Paper handling
●
Input
• Optional Tray 1 (multipurpose tray): A multipurpose tray for paper, transparencies,
labels, and envelopes. Holds up to 100 sheets of paper or 10 envelopes.
• Trays 2 and 3: Two 500-sheet trays. These trays automatically sense commonly used
standard paper sizes up to A3- or 11 x 17-size media, and can print on custom-size paper.
• Optional Tray 4 (2,000-sheet input tray): This tray automatically senses commonly used
standard paper sizes up to A3 or 11 x 17, and can print on custom-size paper.
• Optional duplex printing accessory: Provides two-sided printing (both sides of paper).
●
Output
• Standard output bins
•
Standard top bin: The standard top bin is located at the top of the printer and is the
factory default bin. This bin can receive up to 500 sheets of paper.
•
Standard left bin: The left output bin is located on the left side of the printer. This
bin can hold up to 100 sheets of paper.
• Optional 3,000-sheet stacker: A stacking device.
•
Upper bin (face-up): Holds up to 100 sheets of paper.
•
Lower bin (face-down): Holds up to 3,000 sheets of paper.
• Optional 3,000-sheet stacker/stapler: Provides multiposition stapling for up to 50 sheets
of paper per job, or equivalent job height of 5 mm (depending on paper thickness).
•
Upper bin (face-up): Holds up to 100 sheets of paper.
•
Lower bin (face-down): Holds up to 3,000 sheets of paper.
• Optional Multifunction finisher: Provides 1,000 sheets of stacking capacity, stapling for
as many as 50 sheets of paper per document, plus folding and saddle stitching of
booklets that contain up to 10 sheets of paper.
8 Chapter 1 Printer basics
•
Upper bin (straight paper path): Holds up to 1,000 sheets of paper.
•
Lower booklet bin: Holds up to 50 booklets.
ENWW
• Optional 8-bin mailbox: A stacker, collator, or job separator that also provides eight
mailboxes that can be assigned to individual users or workgroups for easy identification
and retrieval. The mailbox can stack 2,000 sheets of A4- or Letter-size paper in all the
bins.
•
Upper bin (face-up): Holds up to 125 sheets of paper.
•
Bins 1 through 8 (face-down): Each holds up to 250 sheets of paper.
Connectivity
●
HP Jetdirect EIO print server cards
• Universal serial bus (USB), serial, and LocalTalk
• Fast Ethernet 10/100TX
• Wireless 802.11b
●
Parallel B connection
●
Local area network (LAN)-connector (RJ-45) for the embedded print server (standard on the
HP LaserJet 9040n/9050n and the HP LaserJet 9040dn/9050dn)
Environmental features
●
Note
The Sleep setting saves energy (meets ENERGY STAR® guidelines, Version 3.0)
See Protecting the environment for more information.
Firmware updates
Use information from the HP Web site to upgrade the printer and system firmware. To download
the latest firmware, go to www.hp.com/go/lj9040_firmware or to www.hp.com/go/
lj9050_firmware and follow the onscreen instructions. To easily send firmware updates to
multiple printers, use the HP Web Jetadmin software (go to www.hp.com/go/webjetadmin).
Note
The firmware for the HP LaserJet 9040n/9050n and the HP LaserJet 9040dn/9050dn includes
the networking modules.
Optional HP EIO hard disk
The EIO hard disk accessory can be used to store selected print jobs, support RIP ONCE
technology, and permanently store downloaded fonts and forms in the printer. Unlike standard
printer memory, many items on the EIO hard disk remain in the printer even when the printer is
turned off. Fonts downloaded to the EIO hard disk are available to all users of the printer.
The EIO hard disk can be write-protected through software for additional security.
Use the device storage manager applet in HP Web Jetadmin to delete files and manage fonts on
a mass-storage device. See Embedded Web server. For more information, see the printer
software Help.
Hewlett-Packard Company occasionally introduces new software tools for use with your printer
and accessories. These tools are available from the Internet. For more information, go to
www.hp.com/support/lj9050_lj9040.
Macintosh users
Use the HP LaserJet Utility to download fonts and files. For more information, see HP LaserJet
Utility or the HP LaserJet Utility Guide online Help that is included with your HP LaserJet Utility
software.
ENWW
Features and benefits of the printer 9
Security features
●
Secure Disk Erase
●
Security lock
●
Job retention
For more information about these features, see Security features.
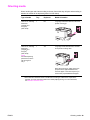
Parts or accessories
The following table describes the parts and accessories that come with or are available to
purchase for use with your printer.
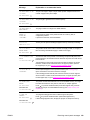
Type of item
Item
Description or use
Order
number
Paper handling,
input
Optional Tray 1
(multipurpose
tray)
Automatically feeds up to 100 sheets
of paper, or smaller amounts of
special media such as envelopes and
labels.
C8568A
Optional Tray 4
(2,000-sheet
feeder)
An optional tray that fits under the
printer for increased input capacity.
C8531A
Optional Duplex
printing
accessory
(duplexer)
Produces automatic printing on both
sides of paper.
C8532A
(standard on the
HP LaserJet
9040n/9050n
and 9040dn/
9050dn models)
(standard on the
HP LaserJet
9040dn/9050dn
model)
10 Chapter 1 Printer basics
ENWW
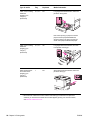
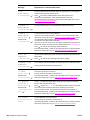
Type of item
Item
Description or use
Order
number
Optional output
devices (one device
can be installed in
any printer)
3,000-sheet
stacker
One 3,000-sheet stacking device.
The device also offers job offset
capabilities.
C8084A
3,000-sheet
stacker/stapler
One 3,000-sheet stacking device that
provides stapling for as many as
50 sheets of paper per document.
The device also offers job offset
capabilities.
C8085A
Multifunction
finisher
A finishing device that provides up to
1,000 sheets of stacking capacity,
stapling for as many as 50 sheets of
paper, plus folding and saddlestitching of booklets that contain up to
10 sheets of paper.
C8088B
8-bin mailbox
A device that provides a face-up bin
(upper bin) and 8 face-down bins that
can be assigned to individual users or
workgroups. The device also
functions as a job separator, stacker,
and sorter/collator.
Q5693A
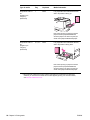
Print cartridge
(average of
30,000 pages at
approximately
5% coverage)
Replacement HP maximum capacity,
smart print cartridge.
C8543X
Staple cartridge
(for stacker/
stapler)
Replacement HP 5,000-staple
cartridge.
C8091A
Staple cartridge
(for multifunction
finisher)
Replacement HP 5,000-staple
cartridge.
C8092A
Printing supplies
ENWW
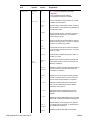
Features and benefits of the printer 11
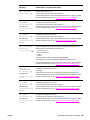
Type of item
Item
Description or use
Memory, fonts, and
mass storage
SDRAM double
data rate (DDR)
memory DIMMs
(100-pin)
The printer has two memory DIMM
slots. One is used by factory-installed
memory.
Improves the ability of the printer to
handle large and stored jobs
(maximum 512 MB with HP-brand
DDR DIMMs).
32 MB
64 MB
128 MB
256 MB
512 MB
Flash memory
cards
(100-pin)
EIO hard disk
12 Chapter 1 Printer basics
Order
number
Q3982A
Q2625A
Q2626A
C2627A
C2628A
Permanent storage for fonts and
forms.
16 MB
32 MB
64 MB
Q2634A
Q2635A
Q2636A
Permanent storage for fonts and
forms. Enables RIP ONCE
technology of print jobs that are too
large to RIP ONCE in RAM.
J6073A
(> 5 GB)
ENWW
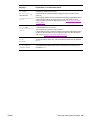
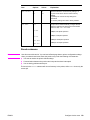
Type of item
Item
Description or use
Cable and interface
accessories
EIO cards
●
●
●
●
Maintenance kit
ENWW
Printer
maintenance kit
●
Order
number
HP Jetdirect Connectivity Card
for USB, serial, and LocalTalk
connectivity
HP Jetdirect 620N Print Server
for Fast Ethernet (10/100BaseTX) networks (RJ-45 only)
(embedded 10/100Base-TX on
the HP LaserJet 9040n/9050n
and 9040dn/9050dn models is
standard)
HP 680n Wireless 802.11b
connectivity
HP Jetdirect 625N Print Server
for Fast Ethernet (10/100BaseTX networks)
J4135A
The kit contains two Type 1
rollers, seven Type 2 rollers, one
transfer roller assembly, and one
fuser assembly.
C9152A (for
110-V models)
J7934A
J6058A
J7960A
C9153A (for
220-V models)
Features and benefits of the printer 13
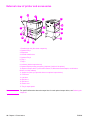
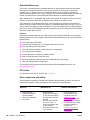
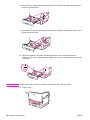
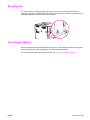
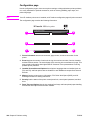
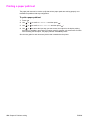
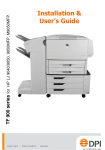
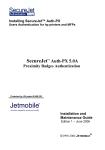
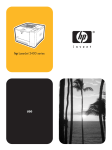
External view of printer and accessories
1
12
1
11
1
1
13
1
2
1
14
1
3
1
10
1
4
1
9
1
8
1
15
1
16
1
17
1
7
1
6
1
5
1. Standard top bin (face-down output bin)
2. Optional Tray 1
3. Right door
4. Vertical transfer door
5. Optional Tray 4
6. Tray 3
7. Tray 2
8. Left door (behind output device)
9. Optional duplex printing accessory (duplexer) (inside of the printer)
10. Optional output device (3,000-sheet stacker, 3,000-sheet stacker/stapler, multifunction
finisher, or 8-bin mailbox)
11. Upper bin (face-up output bin shown on optional output device)
12. Front door
13. Left door
14. EIO slot 1
15. EIO slot 2
16. Power cord
17. Tray 4 output power
Note
For specific information about the output bins for each optional output device, see Selecting the
output bin.
14 Chapter 1 Printer basics
ENWW
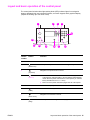
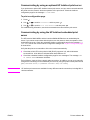
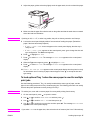
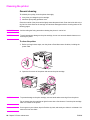
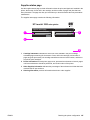
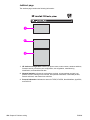
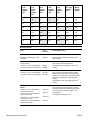
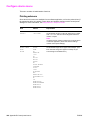
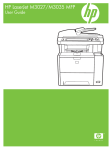
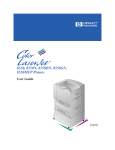
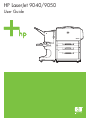
Layout and basic operation of the control panel
The control panel includes three light-emitting diode (LED) indicator lights, four navigation
buttons, dedicated Help, two job-specific buttons, a numeric keypad, and a graphical display
(capable of showing up to four lines of text).
1
2
1
1
3
1
4
1
5
1
12
1
11
1
10
1
9
1
8
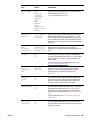
Callout
number
Button
Function
1
MENU
Enters or exits the menus.
2
1
7
1
6
Backs up one step from a selection or from a keypad entry.
(Back Arrow)
3
Navigates to the previous item in the list.
(Up Arrow)
4
●
(SELECT)
●
5
NUMERIC KEYPAD
6
Saves the selected value for that item. An asterisk ( * ) appears next
to the selection, indicating that it is the new default. Default settings
remain when the printer is turned off or is reset (unless you reset all
factory defaults from the Resets menu).
Prints one of the printer information pages from the control panel.
Can be used to specify numeric values.
Returns a numeric entry to its default value.
(Clear)
7
Navigates to the next item in the list.
(Down Arrow)
8
Gets help about the message that currently appears.
(Help)
ENWW
Layout and basic operation of the control panel 15
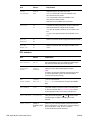
Callout
number
Button
Function
9
STOP
Brings up the Stop menu with the following options:
●
●
●
Cancel the current print job.
Pause the printer.
Resume printing if the printer was paused.
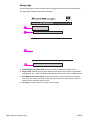
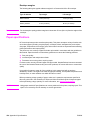
Interpreting control-panel lights
Callout
number
Light
10
Attention
11
Data
12
Ready
Indication
Off
The printer has no error.
On
The printer has a critical error. Turn the printer off and
then on.
Blinking
Action is required. See the control-panel display.
Off
The printer has no data to print.
On
The printer has data to print, but is not ready or is offline.
Blinking
The printer is processing or is printing the data.
Off
The printer is offline or has an error.
On
The printer is ready to print.
Blinking
The printer is going offline; wait for the blinking to stop.
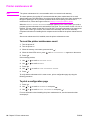
Using control-panel menus
For a complete list of control-panel items and possible values, see Control-panel menus. When
additional trays or other accessories are installed in the printer, new menu items automatically
appear.
To print a control-panel menu map
See Menu map for information about how to print a control-panel menu map.
To change a control-panel setting
Note
1
Press
or MENU to open the menus.
2
Use
or
to scroll to the menu you want, and press
to select it. Depending on the
menu, you might have to repeat this step to select a submenu.
3
Use
4
Use
or
to scroll to the value you want, and press
to select it. An asterisk ( * )
appears next to the selection on the control-panel display, indicating that it is now the default.
5
Press MENU to exit the menu.
or
to scroll to the item you want, and press
to select it.
Settings in the printer driver and software override control-panel settings. (Software settings
override printer driver settings.) If you cannot open a menu or use an item, it is either not an option
for the printer, or your network administrator has locked the function. (The control panel reads
ACCESS DENIED MENUS LOCKED.) See your network administrator.
16 Chapter 1 Printer basics
ENWW
Paper-handling status LED interpretation
Use the following table to interpret the status LED on the optional 2,000-sheet input tray (optional
Tray 4), optional 3,000-sheet stacker, optional 3,000-sheet stacker/stapler, optional multifunction
finisher, and optional 8-bin mailbox.
Light
Optional 2,000-sheet
input tray (Tray 4)
Optional output device (3,000-sheet
stacker, 3,000-sheet stacker/stapler,
multifunction finisher, or 8-bin
mailbox)
Solid green
The accessory is on and
ready.
The accessory is on and ready.
Blinking green
The accessory is in service
mode.
The accessory is in service mode.
Solid amber
The accessory is
experiencing a hardware
malfunction.
The accessory is experiencing a hardware
malfunction.
Blinking amber
The accessory has a jam, or
a page needs to be removed
from the tray, even if the
page is not jammed.
The accessory has a jam, or a page needs to
be removed from the unit, even if the page is
not jammed.
The vertical transfer door
might be open.
Off
The printer might be in
Sleep mode. Press any
button of your choice.
The accessory is not correctly attached to the
printer.
The printer might be in Sleep mode. Press
any button of your choice.
The accessory is not receiving power.
The accessory is not
receiving power.
ENWW
Layout and basic operation of the control panel 17
Printer software
Included with the printer is a CD-ROM that contains the printing-system software. The software
components and printer drivers on this CD-ROM help you to use the printer to its fullest potential.
See the installation notes on the CD-ROM for installation instructions.
Note
For the latest information about the printing system software components, see the readme file on
the Web at www.hp.com/support/lj9050_lj9040. For information about installing the printer
software, see the install notes on the CD-ROM that was included with the printer.
This section summarizes the software that is included on the CD-ROM. The printing system
includes software for the following operating environments:
●
Microsoft® Windows 9X and Windows Millennium Edition (Me)
●
Microsoft Windows NT® 4.0, Windows 2000, and Windows XP
●
IBM OS/2 version 3.0 or later (also available on the Web)
●
Apple Mac OS 7.5 or later
●
Linux (also available on the Web)
The printing system also includes software for network administrators that use the following
network operating systems:
●
Microsoft Windows 9X and Windows Me
●
Microsoft Windows NT 4.0, Windows 2000, and Windows XP
●
Microsoft Windows Server 2003
●
Mac OS (EtherTalk)
●
Linux (Web)
●
UNIX® (Web)
Network printer installation for UNIX and other network operating systems is available from the
Web or through a local HP-authorized distributor.
Note
For a list of printer drivers, updated HP printer software, and product support information, go to
www.hp.com/support/lj9050_lj9040.
Software features
Automatic configuration, Update Now, and Preconfiguration features are available with the
HP LaserJet 9040/9050 series printers.
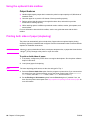
Driver Autoconfiguration
The HP LaserJet PCL 6 and PCL 5e drivers for Windows and the PS drivers for Windows 2000
and Windows XP feature automatic discovery and driver configuration for printer accessories at
the time of installation. Some accessories that Driver Autoconfiguration supports are the
duplexing unit, optional paper trays, and dual inline memory modules (DIMMs).
18 Chapter 1 Printer basics
ENWW
Update Now
If you have modified the configuration of the HP LaserJet 9040/9050 printer since installation, the
driver can be automatically updated with the new configuration in environments that support
bidirectional communication. Click the Update Now button to automatically reflect the new
configuration in the driver.
Note
The Update Now feature is not supported from the client machine in a Point-and-Print
environment. Update Now can be used for locally-installed printers, and by the Point-and-Print
server.
HP Driver Preconfiguration
HP Driver Preconfiguration is a set of tools that you can use to customize and distribute
HP software in managed corporate printing environments. By using HP Driver Preconfiguration,
information technology, (IT) administrators can preconfigure the printing and device defaults for
HP printer drivers before installing the drivers in the network environment. For more information,
see the HP Driver Preconfiguration Support Guide, which is available at www.hp.com/support/
lj9050_lj9040.
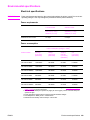
Printer drivers
Use the printer drivers to gain access to the printer features and allow the computer to
communicate with the printer (by using a printer language). Check the installation notes, the
readme file, and the late-breaking readme file on the printer CD-ROM for additional software and
languages.
The following table lists the printer drivers that are included with the printer. The most recent
drivers are available at www.hp.com/support/lj9050_lj9040. (If you do not have access to the
Internet, see the HP support flyer.) Depending on the configuration of Windows-based
computers, the installation program for the printer software automatically checks the computer
for Internet access in order to obtain the latest drivers.
Note
The PCL 5e print driver for all operating systems, plus the PCL 6 and PS drivers for
Windows NT 4.0, are available on the CD-ROM. However, these print drivers are not installed
during typical installation. To install one of these drivers, use the Add Printer Wizard.
Operating system1
PCL 5e
PCL 6
PS2
Windows 9X and Windows
Me
Windows NT 4.0,
Windows 2000
Windows XP
Windows Server 2003
Macintosh OS
➼
➼
➼
➼
➼
➼
➼
➼
➼
➼
➼
➼
➼
➼
➼
➼
➼
➼
PPD3
➼
1.Not all of the printer features are available from all drivers or operating systems. See the contextsensitive Help in your driver for available features.
2.PostScript (PS) 3 emulation is referred to as PS throughout this guide.
3.Only PostScript Printer Description (PPDs) files are included (see PostScript Printer Description
Files (PPDs) and Printer Dialog Extension (PDEs)). If you need the Apple printer driver, it comes
with the Macintosh operating system (OS), or it can be obtained directly from Apple.
ENWW
Printer software 19
Note
If your system did not automatically check the Internet for the latest drivers during software
installation, you can download the latest drivers from www.hp.com/support/lj9050_lj9040. After
you are connected, click Downloads and Drivers to find the driver that you want to download.
You can obtain Model Scripts for UNIX and Linux by downloading them from the Internet or by
requesting them from an HP-authorized service or support provider. You can download the UNIX
installers at www.hp.com/support/net_printing.
Note
If the printer driver that you want is not on the printer CD-ROM or it is not listed here, check the
installation notes, the readme file, and the late-breaking readme file to see if the printer driver is
supported. If it is not supported, contact the manufacturer or distributor of the program that you
are using and request a driver for the printer.
Additional drivers
The following drivers are not included on the CD-ROM, but are available from the Internet or from
HP Customer Care.
●
OS/2 PCL 5e/6 printer driver
●
OS/2 PS printer driver
●
UNIX model scripts
●
Linux drivers
●
HP OpenVMS drivers
Note
The OS/2 drivers are available from IBM and are packaged with OS/2. They are not available in
Traditional Chinese, Simplified Chinese, Korean, or Japanese.
Note
The HP OpenVMS drivers are available from h71000.www7.hp.com.
Choose the correct printer driver for your needs
Select a printer driver based on the way that you use the printer. Certain printer features are
available only in the PCL 6 drivers. See the printer driver Help for available features.
Note
●
Use the PCL 6 driver to take full advantage of the printer features. For general office printing,
the PCL 6 driver is recommended to provide optimum performance and print quality.
●
Use the PCL 5e driver if you need backward compatibility with previous PCL printer drivers
or older printers.
●
Use the PS driver if you are printing primarily from PostScript-specific programs such as
Adobe and Corel, for compatibility with PostScript Level 3 needs, or for PS font DIMM
support.
The printer automatically switches between PS and PCL printer languages.
Printer driver Help
Each printer driver has help screens that can be activated by clicking the Help button, pressing
the F1 key, or clicking the question mark symbol in the upper-right corner in the printer driver
(depending on the Windows operating system in use). These help screens give detailed
information about the specific driver. Printer driver Help is separate from the software program
Help.
20 Chapter 1 Printer basics
ENWW
Gaining access to the printer drivers
Use one of the following methods to gain access to the printer drivers from your computer:
ENWW
Operating
system
Temporarily change
settings
(from a software
program)
Change print job
default settings
(across all software
programs)
Change
configuration
settings (for
example, add a new
input tray)
Windows 9X,
Windows NT, and
Windows Me
On the File menu, click
Print. Select the printer,
and then click
Properties. (The actual
steps can vary; this is the
most common method.)
Click the Start button,
point to Settings, and
then click Printers.
Right-click the
appropriate printer icon,
and then select
Properties (Windows 98
and Windows Me) or
Document Defaults
(Windows NT 4.0).
Click the Start button,
point to Settings, and
then click Printers.
Right-click the
appropriate printer icon,
and then select
Properties. Click the
Configure tab.
Windows 2000
and Windows XP
On the File menu, click
Print. Select the printer,
and then click Properties
or Preferences. (The
actual steps can vary;
this is the most common
method.)
Click the Start button,
point to Settings, and
then click Printers or
Printers and Faxes.
Right-click the printer
icon, and then select
Printing Preferences.
Click the Start button,
point to Settings, and
then click Printers.
Right-click the
appropriate printer icon,
and then select
Properties. Click the
Device Settings tab.
Macintosh OS 9.1
On the File menu, click
Print. Change the
settings that you want on
the various pop-up
menus.
On the File menu, click
Print. As you change
settings on the pop-up
menu, click Save
Settings.
Click the desktop printer
icon. From the Printing
menu, click Change
Setup.
Macintosh OS X
10.1
On the File menu, click
Print. Change the
settings that you want on
the various pop-up
menus.
On the File menu, click
Print. As you change
settings on the various
pop-up menus, click
Save Custom Settings.
These settings are saved
as the Custom option. To
use the new settings, you
must select the Custom
option each time that you
open a program and
print.
Delete the printer and
reinstall it. The driver will
be automatically
configured with the new
options when the driver is
reinstalled (AppleTalk
connections only.)
Configuration settings
might not be available in
Classic mode.
Printer software 21
Operating
system
Temporarily change
settings
(from a software
program)
Change print job
default settings
(across all software
programs)
Change
configuration
settings (for
example, add a new
input tray)
Macintosh OS X.2
On the File menu, click
Print. Change the
settings that you want on
the various pop-up
menus.
On the File menu, click
Print. Change settings
on the various pop-up
menus. On the Presets
pop-up menu, click Save
as, and type a name for
the preset. These
settings are saved in the
Presets menu. To use
the new settings, you
must select the saved
preset option each time
that you open a program
and print.
Open the Print Center.
(Select the hard drive,
click Applications, click
Utilities, and then
double-click Print
Center.) Click the print
queue. On the Printers
menu, click Show Info.
Select the Installable
Options menu.
On the File menu, click
Print. Change settings
on the various pop-up
menus. On the Presets
pop-up menu, click Save
as, and type a name for
the preset. These
settings are saved in the
Presets menu. To use
the new settings, you
must select the saved
preset option each time
that you open a program
and print.
Open the Printer Setup
Utility. (Select the hard
drive, click Applications,
click Utilities, and then
double-click Printer
Setup Utility.) Click the
print queue. On the
Printers menu, click
Show Info. Select the
Installable Options
menu.
Macintosh OS X.3
On the File menu, click
Print. Change the
settings that you want on
the various pop-up
menus.
Configuration settings
might not be available in
Classic mode.
Software for Macintosh computers
The HP installer provides PostScript Printer Description (PPD) files, Printer Dialog Extensions
(PDEs), and the HP LaserJet Utility for use with Macintosh computers.
The embedded Web server can be used by Macintosh computers if the printer is connected to a
network.
PostScript Printer Description Files (PPDs) and Printer Dialog Extension
(PDEs)
Use PPDs, in combination with the PostScript drivers, to gain access to the printer features and
allow the computer to communicate with the printer. An installation program for the PPDs, PDEs,
and other software is provided on the CD-ROM. Use the appropriate PS driver that is provided
with the operating system.
22 Chapter 1 Printer basics
ENWW
HP LaserJet Utility
Use the HP LaserJet Utility to control features that are not available in the driver. Use the
illustrated screens to select the printer features that you want. Use the HP LaserJet Utility to
perform the following tasks:
Note
●
name the printer, assign it to a zone on the network, and download files and fonts
●
configure and set the printer for Internet protocol (IP) printing
The HP LaserJet Utility is not currently supported for OS X, but the utility is supported for the
Classic environment.
Installing the printing system software
The following sections contain instructions for installing the printing system software.
The printer comes with printing system software and printer drivers on a CD-ROM. The printing
system software on the CD-ROM must be installed to take full advantage of the printer features.
If you do not have access to a CD-ROM drive, you can download the printing system software
from the Internet at www.hp.com/support/lj9050_lj9040.
Note
Sample model scripts for UNIX (HP-UX®, Sun Solaris) and Linux networks are available for
download at www.hp.com/support/net_printing.
Installing Windows printing system software for direct connections
This section explains how to install the printing system software for Microsoft Windows 98,
Windows Me, Windows NT 4.0, Windows 2000, Windows Server 2003, and Windows XP.
If you are installing the software on Windows NT 4.0, Windows 2000, Windows Server 2003, or
Windows XP, make sure that you have administrator privileges.
When installing the printing software in a direct-connect environment, always install the software
before connecting the parallel cable. If the parallel cable was connected before the software
installation, see Installing the software after the parallel cable has been connected.
To install the printing system software
1
Close all of the software programs that are open or running.
2
Insert the printer CD-ROM into the CD-ROM drive. If the welcome screen does not open,
start it by using the following procedure:
a On the Start menu, click Run.
b Type the following information: X:/setup (where X is the letter of the CD-ROM drive).
c Click OK.
3
When prompted, click Install Printer and follow the instructions on the computer screen.
4
Click Finish when the installation is complete. You might need to restart the computer.
5
Print a Test Page or a page from any software program to make sure that the software is
correctly installed.
If installation fails, reinstall the software. If this fails, check the installation notes and readme files
on the printer CD-ROM or the flyer that came in the printer box, or go to www.hp.com/support/
lj9050_lj9040 for help or more information.
ENWW
Printer software 23
Installing Windows printing system software for networks
The software on the printer CD-ROM supports network installation with a Microsoft network. For
network installation on other operating systems, go to www.hp.com/support/lj9050_lj9040, or
see the Network Installation Guide that is included with the printer.
The HP Jetdirect print server that is included with the HP LaserJet 9040n/9050n and the HP
LaserJet 9040dn/9050dn printer has a 10/100Base-TX network port. If you need an HP Jetdirect
print server with another type of network port, see Parts or accessories or go to www.hp.com/
support/lj9050_lj9040.
The installer does not support printer installation or printer object creation on Novell servers. It
supports only direct-mode network installations between Windows computers and a printer. To
install your printer and create objects on a Novell server, use an HP utility (such as HP Web
Jetadmin or HP Install Network Printer Wizard) or a Novell utility (such as NWadmin).
To install the printing system software
1
Make sure that the HP Jetdirect print server is configured correctly for the network by printing
a configuration page (see Printing information pages). On the second page, locate the
printer IP address. You might need this address to complete network installation. If the
printer is using DHCP IP configuration, use the name on the second page. Otherwise, if the
printer is shut down for an extended period of time, DHCP does not guarantee that the same
IP address will be issued.
2
Close all software programs that are open or running.
3
Insert the printer CD-ROM into the CD-ROM drive. If the welcome screen does not open,
start it by using the following procedure:
a On the Start menu, click Run.
b Type the following: X:/setup (where X is the letter of the CD-ROM drive).
c Click OK.
Note
4
When prompted, click Install Printer and follow the instructions on the computer screen.
5
Click Finish when installation has completed. You might need to restart the computer.
6
Print a Test Page or a page from any software program to make sure that the software is
correctly installed.
If installation fails, reinstall the software. If this fails, check the installation notes and readme files
on the printer CD-ROM or the flyer that came in the printer box, or go to www.hp.com/support/
lj9050_lj9040 for help or more information.
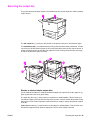
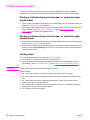
Setting up a Windows computer to use the network printer by using
Windows-sharing
If the printer is directly connected to a computer with a parallel cable, you can share the printer
on the network so that other network users can print to it.
See your Windows documentation for information about how to make Windows-sharing
available. After the printer is shared, install the printer software on all computers that share the
printer.
24 Chapter 1 Printer basics
ENWW
Installing Macintosh printing system software for networks
This section describes how to install Macintosh printing system software. The printing system
software supports Mac OS versions 8.6 through 9.2.x, Mac OS version 10.1, and later.
The printing system software includes the following components:
●
PostScriptR Printer Description (PPD) files
The PPDs, in combination with the PostScript printer drivers, provide access to printer
features. An installation program for the PPDs and other software is provided on the CDROM that came with the printer. Use the Apple LaserWriter 8 printer driver that comes with
the computer.
●
HP LaserJet Utility
The HP LaserJet Utility provides access to features that are not available in the printer driver.
Use the illustrated screens to select printer features and complete the following tasks with
the printer:
• Name the printer.
• Assign the printer to a zone on the network.
• Assign an IP to the printer.
• Download files and fonts.
• Configure and set the printer for IP or AppleTalk printing.
Note
The HP LaserJet Utility is not currently supported for OS X, but the utility is supported for the
Classic environment.
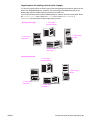
To install printer drivers from Mac OS 8.6 to 9.2
Note
1
Connect the network cable between the HP Jetdirect print server and a network port.
2
Insert the CD-ROM into the CD-ROM drive. The CD-ROM menu runs automatically. If the
CD-ROM menu does not run automatically, double-click the CD-ROM icon on the desktop,
and then double-click the Installer icon. This icon is located in the Installer/ <language>
folder of the Starter CD-ROM (where <language> is your language preference). (For
example, the Installer/English folder contains the Installer icon for the English printer
software.)
3
Follow the instructions on the computer screen.
4
Open the Apple Desktop Printer Utility that is located in the {Startup Disk}: Applications:
Utilities folder.
5
Double-click Printer (AppleTalk).
6
Next to AppleTalk Printer Selection, click Change.
7
Select the printer, click Auto Setup, and then click Create.
8
On the Printing menu, click Set Default Printer.
The icon on the desktop is generic. All of the specific print panels appear in the print dialog box
in a program.
To install printer drivers from Mac OS 10.1 and later
ENWW
1
Connect the network cable between the HP Jetdirect print server and a network port.
2
Insert the CD-ROM into the CD-ROM drive. The CD-ROM menu runs automatically. If the
CD-ROM menu does not run automatically, double-click the CD-ROM icon on the desktop,
and then double-click the Installer icon. This icon is located in the Installer/<language> folder
of the Starter CD-ROM (where <language> is your language preference). (For example, the
Installer/English folder contains the Installer icon for the English printer software.)
Printer software 25
3
Double-click the HP LaserJet Installers folder.
4
Follow the instructions on the computer screen.
5
Double-click the Installer icon for the appropriate language.
6
On your computer hard drive, double-click Applications, double-click Utilities, and then
double-click Print Center.
7
Click Add Printer.
8
Select the AppleTalk connection type on OS X 10.1 and the Rendezvous connection type on
OS X 10.2.
9
Select the printer name.
10 Click Add Printer.
11 Close the Print Center by clicking the close button in the upper-left corner.
Note
Macintosh computers cannot be connected directly to the printer by using a parallel port.
Installing the software after the parallel cable has been connected
If you have already connected a parallel cable to a Windows computer, the New Hardware
Found Wizard appears when you turn on the computer.
To allow the Wizard to search the CD and automatically install the printer software
1
In the New Hardware Found dialog box, click Search CD-ROM drive.
2
Click Next.
3
Follow the instructions on the computer screen.
4
Print a Test Page or a page from any software program to make sure that the software is
correctly installed.
If installation fails, reinstall the software. If this fails, check the installation notes and readme files
on the printer CD-ROM or the flyer that came in the printer box, or go to www.hp.com/support/
lj9050_lj9040 for help or more information.
Uninstalling the software
This section explains how to uninstall the printing system software.
To remove software from Windows operating systems
Use the Uninstaller in the HP LaserJet 9040/9050/Tools program group to select and remove any
or all of the Windows HP printing system components.
1
Click Start and then click Programs.
2
Click HP LaserJet 9040 or HP LaserJet 9050, and then click Tools.
3
Click Uninstaller.
4
Click Next.
5
Select the HP printing system components that you want to uninstall.
6
Click OK.
7
Follow the instructions on the computer screen to complete the uninstallation.
To remove software from Macintosh operating systems
Drag the HP LaserJet folder and PPDs to the trash can.
26 Chapter 1 Printer basics
ENWW
Software for networks
For a summary of available HP network installation and configuration software solutions, see the
HP Jetdirect Print Server Administrator’s Guide. You can find this guide on the CD-ROM that is
included with the printer.
HP Web Jetadmin
Use HP Web Jetadmin to manage HP Jetdirect connected printers within your intranet by using a
browser. HP Web Jetadmin is a browser-based management tool, and should be installed only
on a single network administration server. It can be installed and run on Red Hat Linux; Suse
Linux; Windows NT 4.0 Server and Workstation; Windows 2000 Professional, Server, and
Advanced Server; and Windows XP with Service Pack 1.
To download a current version of HP Web Jetadmin and for the latest list of supported host
systems, visit HP Customer Care Online at www.hp.com/go/webjetadmin.
When HP Web Jetadmin is installed on a host server, any client can gain access to it through a
supported Web browser (such as Microsoft Internet Explorer 5.5 and 6.0 or Netscape
Navigator 7.0).
HP Web Jetadmin has the following features:
●
The task-oriented user interface provides configurable views, saving network managers
significant time.
●
The customizable user profiles let network administrators include only the function that the
user will view or use.
●
Instant e-mail notification of hardware failure, low supplies, and other printer problems can
be routed to different people.
●
Remote installation and management can be completed from any location by using only a
standard Web browser.
●
The advanced autodiscovery locates peripherals on the network, without manually entering
each printer into a database.
●
It offers simple integration into enterprise management packages.
●
Users can quickly find peripherals based on parameters such as IP address, color capability,
and model name.
●
Peripherals can be easily organized into logical groups, with virtual office maps for easy
navigation.
●
Multiple printers can be configured and managed at the same time.
For the latest information about HP Web Jetadmin, go to www.hp.com/go/webjetadmin.
UNIX
The HP Jetdirect Printer Installer for UNIX is a simple printer installation utility for HP-UX and
Solaris networks. It is available for download from HP Customer Care Online at www.hp.com/
support/net_printing.
Utilities
The printer is equipped with several utilities to make it easy to monitor and manage the printer on
a network.
ENWW
Printer software 27
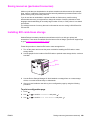
Embedded Web server
This printer is equipped with an embedded Web server, which provides access to information
about printer and network activities. A Web server provides an environment in which Web
programs can run, similar to the way an operating system, such as Windows, provides an
environment for programs to run on your computer. The output from these programs can then be
viewed in a Web browser, such as Microsoft Internet Explorer or Netscape Navigator.
When a Web server is “embedded,” that means that it resides on a hardware device (such as a
printer) or in firmware, rather than as software that is loaded on a network server.
The advantage of an embedded Web server is that it provides an interface to the printer that
anyone who has a network-connected computer or a standard Web browser can use. You do not
need to install or configure any special software. For more information about the HP embedded
Web server, see the Embedded Web Server User Guide. You can find this guide on the CD-ROM
that was included with the printer.
Features
Use the HP embedded Web server to view the printer and network card status and to manage
printing functions from your computer. With the HP embedded Web server, you can complete the
following tasks:
●
view printer status information
●
determine the remaining life on all supplies and order new ones
●
view and change tray configurations
●
view and change the printer control-panel menu configuration
●
view and print internal pages
●
receive notification of printer and supplies events
●
add or customize links to other Web sites
●
select the language in which to show the embedded Web server pages
●
view and change network configuration
For information about the features and functionality of the embedded Web server, see
Embedded Web server.
HP Toolbox
For information about the HP Toolbox, see HP Toolbox.
Other components and utilities
Several software programs are available for Windows and Macintosh OS users, as well as for
network administrators. These programs are summarized in the following table.
Windows
●
●
●
Software installer —
automates the printing
system installation
Online Web registration
HP Toolbox
Macintosh OS
●
●
●
28 Chapter 1 Printer basics
PostScript Printer
Description files (PPDs) —
for use with the PostScript
drivers that come with the
Mac OS
LaserJet Utility (available
from the Internet) — a
printer management utility
for Mac OS users
HP Toolbox (for Mac OS X
v10.2 and later)
Network administrator
●
HP Web Jetadmin —a
browser-based system
management tool (see
www.hp.com/go/
webjetadmin for the latest
●
HP Web Jetadmin software)
HP Jetdirect Printer Installer
for UNIX—available for
download from
www.hp.com/support/
net_printing
ENWW
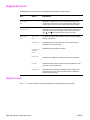
Communicating by using an optional HP Jetdirect print server
If you purchase an optional HP Jetdirect internal print server, and you cannot communicate with
the printer over the network, check the operation of the print server. Check the Jetdirect
configuration page for the message I/O CARD READY.
To print a configuration page
1
Press
.
2
Use
or
to scroll to Information and then press
3
Use
or
to scroll to Print Configuration and then press
.
.
For troubleshooting information, see the documentation that came with the print server.
Communicating by using the HP Jetdirect embedded print
server
The HP LaserJet 9040n/9050n and the LaserJet 9040dn/9050dn have an embedded print
server. If you cannot communicate with the printer over the network, check the operation of the
embedded print server. Check the embedded Jetdirect configuration page for the message I/O
CARD READY, and for the correct network configuration settings. See To print a configuration page
for instructions.
Verify that the print server was able to link to the network automatically:
●
Check that a link LED on the printer's LAN (RJ-45) connector is lit, which indicates a
successful link. A link failure is indicated when both LEDs are off.
●
Check the embedded Jetdirect configuration page for error messages. The message LOSS
OF CARRIER ERROR indicates a link failure.
For link failures, check all of the network cable connections. In addition, you can try to manually
configure the link settings on the embedded print server by using the printer control-panel menus
(MENU, CONFIGURE DEVICE, I/O, EMBEDDED JETDIRECT MENU, LINK SPEED).
Note
ENWW
HP Jetdirect print servers are available for many different network connections, including 802.11
wireless networks.
Printer software 29
Embedded Web server
Using the embedded Web server
The HP LaserJet 9040/9050 series printers come equipped with an embedded Web server.
Open the embedded Web server from a Web browser to obtain the following information about
the printer:
●
Control-panel messages
●
Supplies levels and supplies ordering
●
Tray configuration
●
Printer control-panel menu configurations
●
Printer configuration page
●
Printer Event Log
●
Printer usage (types of print jobs)
●
Network configuration and management
●
E-mail alerts
You can also use the embedded Web server to perform the print-job management functions that
would usually be done at the printer control panel, including these functions:
●
Changing printer settings
●
Changing printer configuration
●
Canceling print jobs
To gain access to the embedded Web server
Note
To use the embedded Web server, you must have an IP-based network and a Web browser.
In your Web browser, type the Internet Protocol (IP) address that is assigned to the printer. For
example, if the printer IP address is 192.0.0.192, you would type this address:
http://192.0.0.192
For more information, see the HP Embedded Web Server User Guide at www.hp.com/support/
lj9050_lj9040.
30 Chapter 1 Printer basics
ENWW
HP Toolbox
The HP Toolbox is a Web-based software program that you can use for the following tasks:
●
Check the printer status.
●
Print internal printer information pages.
You can view the HP Toolbox when the printer is connected to a network. The HP Toolbox
software is automatically installed as part of the typical software installation.
Note
You do not need Internet access to open and use the HP Toolbox. However, if you click a link in
the Other Links area, you must have Internet access to go to the site that is associated with the
link. See Other links for more information.
Supported operating systems
The HP Toolbox is supported for the following operating systems:
●
Windows 98, Windows 2000, Windows Me, Windows Server 2003, and Windows XP
●
Macintosh OS 10.2 or later
Supported browsers
To use the HP Toolbox, you must have one of the following browsers:
●
Microsoft Internet Explorer 5.5 or later (Internet Explorer 5.2 or later for Macintosh)
●
Netscape Navigator 7.0 or later (Netscape Navigator 7.0 or later for Macintosh)
●
Opera Software ASA Opera 7.0 for Windows
●
Safari 1.0 software for Macintosh
All HP Toolbox pages can be printed from the browser.
To view the HP Toolbox
On the Start menu, select Programs, select HP LaserJet 9040 or HP LaserJet 9050, and then
select HP LaserJet Toolbox.
Note
You can also view the HP Toolbox by clicking the system tray icon or the desktop icon.
The HP Toolbox opens in a Web browser.
Note
After you open the HP Toolbox, you can bookmark it in your browser so that you can return to it
quickly in the future.
HP Toolbox sections
The HP Toolbox software contains the following sections and options:
ENWW
●
Status tab
●
Alerts tab
●
Device Settings button
●
HP Toolbox links
●
Other links
HP Toolbox 31
Status tab
The Status tab has links to the following main pages:
●
Device Status. View printer status information. This page indicates various printer
conditions such as a paper jam or an empty tray. Use the virtual control panel buttons on this
page to change printer settings. After you correct a problem with the printer, click the
Refresh button to update the device status.
●
Supplies Status. View detailed supplies status such as the percentage of toner remaining in
the print cartridges and the number of pages that have been printed with the current print
cartridges. This page also has links to order supplies and to find recycling information.
●
Print Info Pages. Print the configuration page and other information pages that are available
for the printer, such as the Supplies Status page, the Demo page, and the Menu Map.
Alerts tab
Use the Alerts tab to configure the printer to automatically notify you of printer alerts. The Alerts
tab has links to the following main pages:
●
Set up status alerts
●
Administrative settings
On the Set up status alerts page, you can turn alerts on or off, specify when the printer should
send an alert, and select from the following types of alerts:
●
a pop-up message
●
a task-bar icon
Click Apply to activate the settings.
On the Administrative settings page, you can set the frequency with which the HP Toolbox
checks for printer alerts. The following settings are available:
●
Less often: every 15000 milliseconds
●
Normal: every 8000 milliseconds
●
More often: every 4000 milliseconds
32 Chapter 1 Printer basics
ENWW
Other links
Each page in the HP Toolbox contains links to the HP Web site for the following information:
●
Product registration
●
Product support
●
Ordering supplies
●
HP Instant SupportTM
●
You must have Internet access to use any of these links. If you use a dial-up connection and
did not connect to the Internet when you first opened the HP Toolbox, you must connect to
the Internet before you can visit these Web sites.
Help system
At any time, you can gain access to the Help system on the printer control panel. Press
on the
control panel.
ENWW
Help system 33
34 Chapter 1 Printer basics
ENWW
2
Printing tasks
This section presents information about the following basic printing tasks:
ENWW
●
Loading input trays
●
Orienting media
●
Basic printing instructions
●
Selecting the output bin
●
Printing envelopes
●
Using the optional 3,000-sheet stacker
●
Using the optional stacker/stapler
●
Using the optional multifunction finisher
●
Using the optional 8-bin mailbox
●
Printing both sides of paper (duplexing)
●
Printing on special paper
35
Loading input trays
This section contains information about loading detectable and undetectable standard-size and
custom-size media into optional Tray 1, Tray 2, Tray 3, and optional Tray 4.
CAUTION
To avoid a jam, never add or remove paper from optional Tray 1 or open Tray 2, Tray 3, or optional
Tray 4 while printing from that tray.
To avoid damaging the printer, print labels and envelopes from optional Tray 1 only. Send labels
and envelopes to the left output bin or upper bin. Print on only one side of labels and envelopes.
Loading optional Tray 1
Optional Tray 1, which holds up to 100 sheets, is available for the printer. For paper
specifications, see Paper specifications.
To load optional Tray 1 for occasional one-time use
Use this procedure if Tray 1 usually remains empty and is used for printing on a variety of sizes
or types of paper.
CAUTION
1
Open optional Tray 1.
2
Load (orient) paper according to the size and the finishing options.
To avoid jams, print sheets of labels one sheet at a time.
36 Chapter 2 Printing tasks
ENWW
Note
3
Adjust the paper guides so that they lightly touch the paper stack, but do not bend the paper.
4
Make sure that the paper fits under the tabs on the guides and that the stack does not extend
above the load-level indicators.
If printing on A3, 11 x 17, or other long media, also pull out the tray extension until it stops.
5
Look at the control-panel display within a few seconds of loading the paper. (Reload the
paper if the time has already elapsed.)
• If TRAY X <TYPE> <SIZE> does not appear on the control-panel display, then the tray is
ready for use.
• If TRAY X <TYPE> <SIZE> appears on the control-panel, press
type configuration. The Size menu appears.
to change the size and
6
Press
to highlight ANY SIZE.
7
Press
display
to select ANY SIZE. The message SETTING SAVED appears on the control-panel
8
When the Type menu appears, press
9
Press
display.
to highlight ANY TYPE.
to select ANY TYPE. The message SETTING SAVED appears on the control-panel
10 If TRAY 1 ANY SIZE ANY TYPE appears on the control-panel display, then the printer is ready
for intermittent use of a variety of paper sizes and types. Press
to accept the size and
type setting.
To load optional Tray 1 when the same paper is used for multiple
print jobs
Use the following procedure if Tray 1 is usually loaded with the same type of paper, and the
paper is not usually removed from Tray 1 between print jobs. The following procedure can usually
increase the printer performance when printing from Tray 1.
CAUTION
Note
ENWW
To avoid a jam, never add or remove paper from a tray while printing from that tray.
1
On the control panel, press
to open the menus.
2
Use
or
to scroll to PAPER HANDLING and then press
3
Use
or
to scroll to TRAY 1 SIZE and then press
4
Use
or
to scroll to the correct size and then press
appears on the control-panel display.
.
.
. The message SETTING SAVED
If you select CUSTOM as the paper size, also select the unit of measure (the X and Y dimensions).
Loading input trays 37
CAUTION
5
Use
or
to scroll to TRAY 1 TYPE and then press
.
6
Use
or
to scroll to the correct type and then press
appears on the control-panel display.
7
Press MENU to exit the menus.
8
Open optional Tray 1.
9
Load (orient) paper according to size and finishing options.
. The message SETTING SAVED
To avoid jams, print sheets of labels one at a time.
10 Adjust the paper guides so that they lightly touch the paper stack, but do not bend the paper.
11 Make sure that the paper fits under the tabs on the guides and does not extend above the
load level indicators.
Note
If printing on A3, 11 x 17, or other long media, also pull out the tray extension until it stops.
12 Look at the control panel within a few seconds of loading the paper. The tray configuration
appears. (Open and close the tray again if the time has already elapsed.)
38 Chapter 2 Printing tasks
ENWW
13 Press MENU to exit the menus. The tray is ready to use.
Loading Trays 2, 3, and 4
The 500-sheet input trays (Trays 2 and 3) come with the printer. Tray 4 is an optional tray that
holds up to 2,000 sheets of standard-size paper. For paper specifications, see Paper
specifications.
To load detectable, standard-size paper in Trays 2, 3, and 4
Follow this procedure to load detectable standard-size paper in the tray. The following are the
detectable sizes, which are marked inside the tray:
CAUTION
ENWW
●
A4
●
Letter
●
A3
●
Legal
●
11 x 17
●
Executive
●
B4 (JIS)
●
B5 (JIS)
●
A4-Rotated
●
Letter-Rotated
To avoid a jam, never add or remove paper from a tray while printing from that tray.
1
Open the tray until it stops.
2
Adjust the left (Y) paper guide by pressing the tab on the guide and set the guide to the
correct paper size.
Loading input trays 39
3
Adjust the front (X) paper guide by pressing the tab on the guide and set the guide to the
correct paper size.
Note
For Tray 4, when loading Letter-size or 11 x 17 paper, move the paper guide lock to the down
position. For all other paper sizes, the paper guide lock should be in the up position.
CAUTION
For Tray 4, never store paper or other items in the area to the left of the paper guides. Doing so
can permanently damage the tray.
4
Note
Load (orient) the paper according to size.
See Orienting media for instructions on loading preprinted, letterhead, and prepunched paper.
40 Chapter 2 Printing tasks
ENWW
5
Set the Custom/Standard switch to Standard.
6
Close the tray.
7
Look at the control panel within a few seconds of closing the tray. (Open and close the tray if
the time has already elapsed.) The control panel indicates the tray size and type
configuration. Complete one of the following actions:
• If the size and type settings are correct, press
to accept the settings.
• If the size and type settings are not correct, press
appears.
8
Note
To change the size setting, use
or
to scroll to the correct size and then press
. The
message SETTING SAVED appears for a moment, and then the tray type menu appears.
Depending on the size that you selected, the printer might prompt you to move the Custom/
Standard switch in the tray to another position. The printer might also prompt you to move the
paper guides. Follow the instructions on the control panel, close the tray, and then repeat this
procedure starting with step 7.
9
To change the type setting, use
or
to scroll to the correct type and then press
.
The message SETTING SAVED appears for a moment, and then the current size and type
settings appear.
10 If the size and type settings are correct, press
use.
ENWW
. The TRAY X SIZE=*<SIZE> menu
to accept the settings. The tray is ready to
Loading input trays 41
To load undetectable standard-size paper in Trays 2, 3, and 4
Follow this procedure to load undetectable standard-size paper in the tray. The following are the
undetectable standard sizes:
CAUTION
CAUTION
●
A5
●
8K
●
16K
●
JIS Executive
●
Statement
●
8.5 x 13 (216 x 330 mm)
To avoid a jam, never add or remove paper from a tray while printing from that tray.
1
Open the tray until it stops.
2
Press the tab on the front paper guide and slide the guide all the way out.
3
Press the tab on the left paper guide and slide the guide all the way out.
For Tray 4, never store paper or other items in the area to the left of the paper guides. Doing so
can permanently damage the tray.
42 Chapter 2 Printing tasks
ENWW
4
Note
Note
ENWW
Load (orient) the paper according to size.
See Orienting media for instructions on loading preprinted, letterhead, and prepunched paper.
5
Adjust the left paper guide by pressing the tab on the guide and sliding the guide until it
gently touches the paper.
6
Adjust the front paper guide by pressing the tab on the guide and sliding the guide until it
gently touches the paper.
When loading Tray 4, make sure that the paper guide lock is in the up position.
Loading input trays 43
7
Set the Custom/Standard switch to Custom.
8
Close the tray.
9
Look at the control panel within a few seconds of closing the tray. (Open and close the tray if
the time has already elapsed.) The control panel indicates the tray size and type settings.
Complete one of the following actions:
• If the size and type settings are correct, press
to accept the settings.
• If the size and type settings are not correct, press
appears.
. The TRAY X SIZE=*<SIZE> menu
10 To change the size setting, use
or
to scroll to the correct size and then press
. The
message SETTING SAVED appears for a moment, and then the tray type menu appears.
Note
Depending on the size that you selected, the printer might prompt you to move the Custom/
Standard switch in the tray to another position. The printer might also prompt you to move the
paper guides. Follow the instructions on the control panel, close the tray, and then repeat this
procedure starting with step 9.
11 To change the type setting, use
or
to scroll to the correct type and then press
.
The message SETTING SAVED appears for a moment, and then the current size and type
settings appear.
12 If the size and type settings are correct, press
use.
44 Chapter 2 Printing tasks
to accept the settings. The tray is ready to
ENWW
Loading custom-size paper in Trays 2, 3, and 4
Use the following procedure to load custom-size paper in the tray.
CAUTION
Note
To avoid a jam, never add or remove paper from a tray while printing from that tray.
1
Open the tray until it stops.
2
Press the tab on the front (X) paper guide and slide the guide all the way out.
3
Press the tab on the left (Y) paper guide and slide the guide all the way out.
4
Load (orient) the paper according to size.
See Orienting media for instructions on loading preprinted, letterhead, and prepunched paper.
5
ENWW
Set the Custom/Standard switch to Custom.
Loading input trays 45
Note
6
Adjust the left (Y) paper guide by pressing the tab on the guide and sliding the guide until it
gently touches the paper.
7
Adjust the front (X) paper guide by pressing the tab on the guide and sliding the guide until it
gently touches the paper.
8
Note the orientation of the paper, as well as the value of the X dimension and the Y
dimension. The X and Y dimensions are marked in the tray. You will need this information for
a later step.
When loading Tray 4, make sure that the paper guide lock is in the up position.
9
Close the tray.
46 Chapter 2 Printing tasks
ENWW
10 Look at the control panel within a few seconds of closing the tray. (Open and close the tray if
the time has already elapsed.) The tray size and type settings appear.
• If the size and type settings are correct, press
to accept the settings. The tray is ready
for use. (You do not need to complete the rest of this procedure unless you want to
configure the exact custom dimension. See the following note for more information.)
• To change the size setting, press
Note
If the size that appears on the control panel is CUSTOM, then the tray size is set to ANY CUSTOM.
The tray will match any custom-size print job, even if the print-job dimensions are different from
the dimensions of the paper that is loaded in the tray. If you prefer, you can specify the exact
dimensions of the custom-size paper that is loaded in the tray. When you specify exact dimensions,
the dimensions appear as the size, rather than CUSTOM.
11 Press
Note
. The TRAY X SIZE=*<SIZE> menu appears.
to select CUSTOM. The UNIT OF MEASURE menu appears.
The printer might prompt you to move the Custom/Standard switch in the tray to another position.
The printer might also prompt you to move the paper guides. Follow the instructions on the control
panel, close the tray, and then repeat this procedure starting with step 10.
12 Use
or
to select the unit of measure (MILLIMETERS or INCHES) and then press
13 Use the numeric keypad or the
then press
.
or
.
keys to specify the X (front to back) dimension and
14 Use the numeric keypad or the
or
keys to specify the Y (left to right) dimension and
then press
. The message SETTING SAVED appears for a moment, and then the TRAY X
TYPE menu appears.
15 To change the type setting, use
or
to scroll to the correct type and then press
The message SETTING SAVED appears for a moment, and then the current size in the
dimension that you selected appears.
16 Press
.
to accept the settings. The tray is ready to use.
Configuring the trays by using the Paper Handling menu
You can configure the paper type and size for the input trays without a prompt on the printer
control-panel display. Use the following procedure to gain access to the Paper Handling menu
and configure the trays.
To configure the paper size for the tray
Note
ENWW
1
On the control panel, press
2
Use
3
Use
or
to scroll to TRAY X SIZE and then press
you want to configure.)
4
Use
5
Touch MENU to exit the menus.
or
or
to open the menus.
to scroll to PAPER HANDLING and then press
to scroll to the correct size and then press
.
. (X is the number of the tray that
.
Depending on the size that you selected, the printer might prompt you to move the Custom/
Standard switch in the tray to another position. The printer might also prompt you to move the
paper guides. Follow the instructions on the control panel, and then close the tray,
Loading input trays 47
To configure the paper type for the tray
1
On the control panel, press
2
Use
3
Use
or
to scroll to TRAY X TYPE and then press
you want to configure.)
4
Use
or
to scroll to the correct type and then press
appears for a moment.
5
Touch MENU to exit the menus.
48 Chapter 2 Printing tasks
or
to open the menus.
to scroll to PAPER HANDLING and then press
.
. (X is the number of the tray that
. The message SETTING SAVED
ENWW
Orienting media
Orient media types and sizes according to the tray from which they will print and according to
whether the media will be duplexed (printed on both sides).
Type of media
Tray
Duplexed
Media Orientation
Letter or A4, including
letterhead
(weights up to
216 g/m2)
(58 lb bond)
1
No*
Long edge toward feed direction; side to be
printed on facing up.
Letter or A4, including
letterhead
(weights up to
216 g/m2)
(58 lb bond)
1
Yes
Long edge toward feed direction; first side
to be printed on facing down.
NOTE
For better duplexing
performance, set the
size and type for
Tray 1.
Note: When printing on paper that is both
prepunched and preprinted/letterhead,
orient the paper in the same way that you
would orient preprinted/letterhead paper.
* When Alternate Letterhead mode is enabled and media type Letterhead or Preprinted is
selected, you must orient the media for two-sided (duplex) printing. For more information,
see Alternate Letterhead mode.
ENWW
Orienting media 49
Type of media
Tray
Duplexed
Media Orientation
Letter or A4, including
letterhead
(weights up to
199 g/m2)
(53 lb bond)
2, 3, or 4
No*
Long edge toward feed direction; side to be
printed on facing down.
Note: When printing on paper that is both
prepunched and preprinted/letterhead,
orient the paper in the same way that you
would orient preprinted/letterhead paper.
Letter or A4, including
letterhead
(weights up to
199 g/m2)
(53 lb bond)
2, 3, or 4
Yes
Long edge toward feed direction; first side
to be printed on facing up.
Other standard sizes
and custom sizes
(weights up to
216 g/m2)
(58 lb bond)
1
No*
Short edge toward feed direction; side to be
printed on facing up.
* When Alternate Letterhead mode is enabled and media type Letterhead or Preprinted is
selected, you must orient the media for two-sided (duplex) printing. For more information,
see Alternate Letterhead mode.
50 Chapter 2 Printing tasks
ENWW
Type of media
Tray
Duplexed
Media Orientation
Other standard sizes
and custom sizes
(weights up to
199 g/m2)
(53 lb bond)
2, 3, or 4
No*
Short edge toward feed direction; side to be
printed on facing down.
Other standard sizes
and custom sizes
(weights up to
216 g/m2)
(58 lb bond)
1
Yes
Short edge toward feed direction; first side
to be printed on facing down.
2, 3, or 4
Yes
Short edge toward feed direction; first side
to be printed on facing up.
NOTE
For better duplexing
performance, set the
size and type for
Tray 1.
Other standard sizes
and custom sizes
(weights up to
199 g/m2)
(53 lb bond)
* When Alternate Letterhead mode is enabled and media type Letterhead or Preprinted is
selected, you must orient the media for two-sided (duplex) printing. For more information,
see Alternate Letterhead mode.
ENWW
Orienting media 51
Type of media
Tray
Duplexed
Media Orientation
Prepunched Letter or
A4
(weights up to
216 g/m2)
(58 lb bond)
1
Either
Long edge with holes toward feed direction;
side to be printed on facing up.
Note: When printing on paper that is both
prepunched and preprinted/letterhead,
orient the paper in the same way that you
would orient preprinted/letterhead paper.
Prepunched Letter or
A4
(weights up to
199 g/m2)
(53 lb bond)
2, 3, or 4
Either
Long edge with holes toward feed direction;
side to be printed on facing down.
Note: When printing on paper that is both
prepunched and preprinted/letterhead,
orient the paper in the same way that you
would orient preprinted/letterhead paper.
* When Alternate Letterhead mode is enabled and media type Letterhead or Preprinted is
selected, you must orient the media for two-sided (duplex) printing. For more information,
see Alternate Letterhead mode.
52 Chapter 2 Printing tasks
ENWW
Type of media
Tray
Duplexed
Media Orientation
Labels, Letter, A4 size
sheets, or
transparencies
Tray 1
only
No
(Never duplex)
Long edge toward feed direction; side to be
printed on facing up.
Envelopes
Tray 1
only
No
(Never duplex)
Short edge toward feed direction; side to be
printed on facing up and the postage end
toward the printer. If height of envelope is
greater than 190 mm (7.5 inches), feed flap
first. Otherwise, feed the flap toward the
rear of printer.
* When Alternate Letterhead mode is enabled and media type Letterhead or Preprinted is
selected, you must orient the media for two-sided (duplex) printing. For more information,
see Alternate Letterhead mode.
Alternate Letterhead mode
Windows drivers include an Alternate Letterhead mode, which is configured in the Device Settings portion
of the printer properties (in the Windows control panel). This mode causes all print jobs with media types of
Letterhead and Preprinted to be treated as two-sided (duplexed), so that you can load paper in the same
way for one-sided and two-sided printing. Because the print speed is the same as it is for two-sided (duplex)
printing, one-sided jobs print at approximately half-speed.
ENWW
Orienting media 53
Basic printing instructions
This section provides the basic instructions for printing when setting options from the printer
driver for this printer (Windows) or the Apple LaserWriter (Macintosh). If possible, you should try
to set printer options from the program in which you are working or from the Print dialog box.
Most Windows and Macintosh programs allow you to set the printer options this way. If a setting
is not available in the program or printer driver, you must set it at the printer control panel.
To print
1
Make sure that paper is loaded in the printer. See Loading input trays or www.hp.com/
support/lj9050_lj9040 for instructions.
2
If you loaded a custom-size media in Tray 2, Tray 3, or optional Tray 4, or if you loaded any
size media in optional Tray 1, set the tray to the size of paper that you loaded. See Loading
input trays or www.hp.com/support/lj9050_lj9040 for instructions.
3
Set the paper size.
• For Windows: On the File menu, click Page Setup or Print. If you select Print, make sure
that this printer is selected and then click Properties.
4
For Macintosh: On the File menu, select Page Setup. Make sure that this printer is selected.
In the paper size box, select:
• The size of paper you are using.
• Custom.
5
Select the orientation, such as Portrait or Landscape.
6
If the printer driver is not already open, on the File menu click Print. In Windows programs,
also click Properties.
7
In the paper source box, select the paper type and size or select the tray from which you
want paper pulled. See Specifying paper to print on.
8
Select any other settings that you want, such as duplexing (if an optional duplexer is installed
in the printer), watermarks, or different first page. For more information about these settings,
see the tasks in this section and in the next section (Advanced printing tasks).
9
The standard output top bin is the default output location. Use this location for output of
standard types of media. For labels, transparencies, and heavy paper, use the left output bin.
Or, you can select an optional output accessory, such as the stacker or stacker/stapler.
10 Select the Print command to print the job.
54 Chapter 2 Printing tasks
ENWW
Selecting the output bin
The printer has several output locations: the standard top bin, the left output bin, and the optional
output devices.
1
2
1
The left output bin (1), located on the left side of the printer, holds up to 100 sheets of paper.
The standard top bin (2) is located at the top of the printer and is the factory default bin. This bin
can receive up to 500 sheets of paper in the correct (face-down) order as they exit the printer. A
sensor causes the printer to stop when the paper bin is full. Printing continues when you empty
or reduce the amount of paper in the bin.
1
4
1
1
3
1
5
1
2
1
6
Stacker or stacker/stapler output bins
For the 3,000-sheet stacker or 3,000-sheet stacker/stapler, the output bins are the upper bin (1)
(face-up) and the lower bin (2) (face-down).
The upper bin (face-up) (1) is the top bin on the stacker or stacker/stapler. This bin holds up to
100 sheets of paper in face-up order as they exit the printer. A sensor causes the product to stop
when the bin is full. Product operation continues when you empty or reduce the amount of paper
in the bin.
Lower bin (face-down) (2) is the lower bin on the stacker or stacker/stapler. This bin holds up to
500 sheets of paper and can stack or staple jobs. This bin is the default output bin.
ENWW
Selecting the output bin 55
8-bin mailbox output bins
If you choose the 8-bin mailbox, the output bins are the upper bin (4) and the eight face-down
bins (3).
The upper bin (4) holds up to 125 sheets of paper.
The network administrator can assign the eight bins (3) to individual users or workgroups. Each
bin can stack up to 250 sheets of paper.
Note
When an 8-bin mailbox device is connected to the printer, the default bin is the printer’s standard
top bin.
Multifunction finisher output bins
If you choose the multifunction finisher, the output bins are the upper bin (5) and the lower
booklet bin (6).
The upper bin (5) is the top bin on the multifunction finisher. This bin provides 1,000 sheets of
stacking capacity, and can offset each job as it is stacked, delivering unstapled jobs face up or
face down. This bin also provides stapling for up to 50 sheets of paper per document. The
upper bin is the default output bin when the multifunction finisher is attached.
The lower bin (4) is the lower bin on the multifunction finisher. This bin provides folding and
saddle stitching of booklets that contain up to 10 sheets of paper.
Selecting an output location
It is recommended that you select an output location (bin) through your program or printer driver.
(Where and how you make selections depends on your program or printer driver.) If you cannot
select an output location from the program or printer driver, set the default printer output location
from the printer control panel.
To select an output location from the control panel
1
Use
or
to scroll to Configure Device and then press
2
Use
or
to scroll to Printing and then press
3
Use
or
to scroll to Paper Destination and then press
4
Use
or
to scroll to the output bin or device you want and then press
. Your network
administrator might have changed the name of the device. An asterisk (*) appears next to
your selection.
56 Chapter 2 Printing tasks
.
.
.
ENWW
Printing envelopes
You can print on envelopes by using optional Tray 1, which holds up to 10 envelopes. Many types
of envelopes can be printed on from optional Tray 1.
Printing performance depends on the construction of the envelope. Always test a few sample
envelopes before purchasing a large quantity. For envelope specifications, see Paper
specifications or go to www.hp.com/support/lj905_lj9040.
CAUTION
Envelopes with clasps, snaps, windows, coated linings, exposed self-stick adhesives, or other
synthetic materials can severely damage the printer. Do not use envelopes with pressure-sensitive
adhesive.
The basic steps for printing envelopes are:
Note
1
Move the fuser levers. See To change the fuser levers.
2
Load the envelopes. See To load envelopes in optional Tray 1.
3
Send the print job. See To print envelopes from a program.
If envelopes are wrinkled when printed, see Preventing wrinkles on envelopes for instructions.
To load envelopes in optional Tray 1
ENWW
1
Open optional Tray 1, but do not pull out the extension. (Most envelopes feed best without
the extension. However, oversize envelopes might need the extension.)
2
Load up to 10 envelopes in the center of optional Tray 1 with the side to be printed on facing
up, and the postage end toward the printer. Slide the envelopes into the printer as far as they
will go without forcing them.
Printing envelopes 57
3
Adjust the guides to touch the envelope stack without bending the envelopes. Make sure the
envelopes fit under the tabs on the guides.
4
Change the fuser levers (see To change the fuser levers).
To change the fuser levers
WARNING!
1
If an optional output device is installed, slide it away from the printer to access the left door.
2
Open the left door.
Avoid touching the adjacent fusing area. It can be hot.
58 Chapter 2 Printing tasks
ENWW
3
Note
Locate and lift up the two blue levers.
Return the fuser levers to the down position after printing an envelope.
4
Close the left door.
To print envelopes from a program
CAUTION
CAUTION
ENWW
1
Load envelopes into optional Tray 1.
2
In your program or in the printer driver, select optional Tray 1 as the source.
3
Set the appropriate envelope size and type. For envelope specifications, see Paper
specifications, or go to www.hp.com/support/lj9050_lj9040.
4
If your program does not automatically format an envelope, specify “Portrait” for page
orientation.
To avoid a printer jam, do not remove or insert an envelope after you begin printing.
5
Set margins to within 15 mm (0.6 inch) from the edge of the envelope. For best print quality,
set margins for a return and mailing address (typical address margins for a Commercial #10
or DL envelope are offered). Avoid printing over the area where the three back flaps meet on
the back of an envelope.
6
To print by type and size of paper, see Specifying paper to print on, or go to
www.hp.com/support/lj9050_lj9040.
7
Select the standard output bin (the default) as the output location. If you print envelopes to
the stacker, stacker/stapler, or multifunction finisher, they exit to the face-up bin of that
accessory.
8
When finished, return the fuser levers to the down position.
Failure to return levers to the down position for standard paper types can result in poor print quality.
Printing envelopes 59
Using the optional 3,000-sheet stacker
Output features
The optional 3,000-sheet stacker provides the following output features:
●
Stacks up to 3,000 sheets of A4- or Letter-size paper
●
Stacks up to 1,500 sheets of A3- or Ledger-size paper
●
Can offset, print jobs or the first page can be offset
Bin 2 (face-down on the 3,000-sheet stacker and 3,000-sheet stacker/stapler) on the output
devices is the default bin for all output.
Using the optional stacker/stapler
The optional 3,000-sheet stacker/stapler can staple documents consisting of a minimum of two
pages, and a maximum of 50 pages (75 g/m2, 20 lb bond paper) or equivalent to 6 mm
(0.2 inches). The pages must be 64 to 199 g/m2 (17 to 53 lb) for all sizes that the engine
supports
Keep in mind these additional points:
●
The stacker can hold up to 3,000 sheets.
●
Heavier media might have a stapling limit of less than 50 pages.
●
If the job you want stapled consists of only one sheet, or if it consists of more than 50 sheets,
the printer will print the job. However it will not be stapled.
Selecting the stapler
You can usually select the stapler through your program or printer driver, although some options
might only be available through the printer driver. Where and how you make selections depends
on your program or printer driver.
If you cannot select the stapler from the program or printer driver, select the stapler from the
printer control panel.
To select stapling as the default from the control panel
1
From the Ready state, use
2
Use
or
to scroll to the stacker/stapler, and then press
3
Use
or
to scroll to Staple and then press
4
Select the number of staples that you want as a default.
5
Use
6
Use
or
to scroll to the output bin or device you want and then press
(*) appears next to your selection.
60 Chapter 2 Printing tasks
or
or
to scroll to Configure Device menu and then press
to scroll to Printing and then press
.
.
.
.
. An asterisk
ENWW
Loading staples
Load staples using this procedure.
To load staples
ENWW
1
Move the stacker/stapler away from the printer.
2
Open the stacker/stapler-unit door.
3
Lift up on the green tab on the empty staple cartridge and pull it out.
Using the optional stacker/stapler 61
4
Insert the new staple cartridge so that it snaps into place.
5
Close the stapler-unit door and attach the stacker/stapler to the printer.
62 Chapter 2 Printing tasks
ENWW
Using the optional multifunction finisher
See the HP LaserJet 9040/9050 Getting Started Guide at www.hp.com/support/lj9050_lj9040 for
more information about the following topics:
●
Stapling documents
●
Saddle stitching
●
Printing booklets
●
Adding a cover to a booklet
Output features
The optional multifunction finisher provides the following output features:
●
Stacks up to 1,000 sheets of A4- and Letter-size paper or up to 500 sheets of A3- and
Ledger-size paper
●
Stacks up to 50 booklets of 5 sheets of A3- and Ledger-size paper
●
Offsets jobs
●
Staples up to 50 sheets of paper per document of A4- and Letter-size paper
●
Staples up to 25 sheets of paper per document A3- and Ledger-size paper
●
Folds single pages
●
Saddle-stitches and folds booklets up to 10 sheets of paper (40 pages)
Using the stapler
The finisher can staple documents consisting of a minimum of two pages, and a maximum of
50 pages of 75 g/m2 (20 lb) A4- or Letter-size media or up to 25 pages of A3- or 11x 17-size
media or equivalent 6 mm (0.2 inch). The pages must be between 64 and 199 g/m2 (17 and
53 lb) for any size supported by the product.
Consider these additional points:
●
The stacker can hold up to 1,000 sheets stacked (not stapled).
●
Heavier media might have a stapling limit of fewer than 50 pages.
If the job you want stapled consists of only one sheet, or if it consists of more than 50 sheets, the
finisher delivers the job to the output bin without staples.
Selecting stapling
You can usually select the stapler through your program or driver, although some options might
be available only through the driver. Where and how you make selections depends on your
program or driver.
If you cannot select the stapler from the program or driver, select the stapler from the product
control panel.
1
Press
to open the menus.
2
Use
and
to scroll to CONFIGURE DEVICE and then press
3
Use
and
to scroll to STAPLES and then press
4
Use
and
to scroll to the desired stapling option and then press
.
.
.
Your stapling options are None, One, or Two staples.
ENWW
Using the optional multifunction finisher 63
Loading staples
1
Open the stapler-unit door.
2
Slide the stapler-unit toward you.
3
Turn the large green knob until the blue dot appears in the window of the stapler-unit.
64 Chapter 2 Printing tasks
ENWW
4
CAUTION
ENWW
Turn the small green knob at the top of the stapler unit clockwise until the staple cartridge
moves to the left of the stapler unit.
The blue dot must appear in the window of the stapler-unit before you remove the staple cartridge.
If you try to remove the staple cartridge before the blue dot appears in the window, you could
damage the finisher.
5
On the empty staple cartridge, squeeze the tabs together and pull the empty cartridge out.
6
Insert the new staple cartridge so that it locks into place.
Using the optional multifunction finisher 65
7
Slide the stapler-unit into the finisher.
8
Close the stapler-unit door.
Making booklets
You can gain access to the booklet-printing feature through some programs, such as desktop
publishing programs. Refer to the user guide that came with your program for information on
making booklets.
If you are using a program that does not support booklet making, you can create booklets by
using your HP drivers.
Note
HP recommends that you use your program to prepare and preview your document for printing,
and hen use your HP driver to print and saddle stitch your booklet.
Use these three main steps to create a booklet from your driver:
●
Preparing your booklet: Arrange the pages on a sheet (booklet imposition) to create a
booklet. You can impose your document from your program or use the booklet-printing
feature in your HP driver.
●
Adding a cover: Add a cover to your booklet by selecting a different first page of a different
paper type. You can also add a cover of the same paper type as your booklet. Booklet covers
must be the same size as the rest of the sheets. However, the covers can be a different
weight from the rest of the booklet. (See Using a different first page for more information
●
Saddle stitching: Paper must be fed into the printer short-edge first. The printer will ask for
rotated paper. The finisher staples the center of your booklet (saddle stitching). If your
booklet is only one sheet of paper, the finisher will fold the sheet, but not staple it. If the
booklet consists of more than one sheet of paper, the finisher will staple and then fold up to
10 sheets per booklet.
66 Chapter 2 Printing tasks
ENWW
The booklet-printing feature of the multifunction finisher allows you to saddle stitch and fold
booklets using the following paper sizes:
●
A3
●
A4-Rotated (A4-R)*
●
Letter-Rotated (Letter R)*
●
Legal
●
11 x 17
See the Multifunction Finisher User’s Guide at www.hp.com/support/lj9050_lj9040 for detailed
information about making booklets.
*A4-R and Letter-R are A4-size and Letter-size media that are rotated 90º in the tray.
ENWW
Using the optional multifunction finisher 67
Using the optional 8-bin mailbox
Output features
●
Handles high-capacity output that increases the printer’s output capacity to 2,000 sheets of
standard media
●
Uses the upper bin to provide 125 sheets of face-up stacking capacity
●
Delivers printed jobs face-down to the eight face-down bins, and each bin provides
250 sheets of stacking capacity
●
Offers stacking options in different operational modes: mailbox, stacker, job separator, and
sorter/collator
For more information about the 8-bin mailbox, see the use guide that came with the 8-bin
mailbox.
Printing both sides of paper (duplexing)
The printer can automatically print on both sides of paper when an optional duplex printing
accessory (duplexer) is installed and configured. See the documentation that is included with the
duplexer for installation instructions.
CAUTION
Never try to print on both sides of labels, envelopes, transparencies, or paper that is heavier than
199 g/m2 (53 lb). Damage to the printer or a jam can result.
To print on both sides of paper
Note
1
If necessary, configure the printer driver to recognize the duplexer. See the printer software
help for instructions.
2
Load (orient) paper for duplexing.
For better duplexing performance, set the size and type for Tray 1.
3
Select the Print on both sides option from the program or printer driver. If you cannot select
this option from one of those locations, set it at the printer control panel. (In the Configure
Device menu, select the Printing menu, select Duplex, and then select ON.)
4
Set the Binding and Orientation options from the Print dialog box, if possible. If not, set
them from the printer control panel. See Layout options for printing on both sides of paper for
more information.
68 Chapter 2 Printing tasks
ENWW
Layout options for printing on both sides of paper
The four print layout options are shown below. Select the binding and orientation options for this
printer from the Print dialog box, if possible. The terminology in the Print dialog box for the
binding edge might be different than the terms that are listed here.
If you cannot set these options from the Print dialog box, set them from the control panel. Select
the Configure Device menu, select the Printing menu, select DUPLEX BINDING or
ORIENTATION, and then select the layout option that you want.
Printing left-to-right
1. Long-edge
portrait (default)
3. Short-edge
portrait
2. Long-edge
landscape
4. Short-edge
landscape
Printing right-to-left
1. Long-edge
portrait (default)
3. Short-edge
portrait
2. Long-edge
landscape
4. Short-edge
landscape
ENWW
Printing both sides of paper (duplexing) 69
Printing on special paper
This section contains guidelines for printing on special media, which includes letterhead,
transparencies, postcards, and custom-size and heavy paper, and printing full-bleed images.
Printing on letterhead, prepunched paper, or preprinted paper
(single-sided)
●
When printing on letterhead, prepunched, or preprinted paper, be sure to correctly orient the
paper. See Orienting media for instructions.
●
If the paper is heavier than 199 g/m2 (53 lb bond) and less than 216 g/m2 (58 lb bond) load it
only in optional Tray 1. See Paper specifications, or go to www.hp.com/support/
lj9050_lj9040 for complete paper specifications.
Printing on letterhead, prepunched paper, or preprinted paper
(double-sided)
●
When printing on letterhead, prepunched, or preprinted paper, be sure to correctly orient the
paper. See Orienting media for instructions.
●
When printing on both sides of prepunched paper, you must select prepunched paper as the
paper type in the Paper Handling menu from the control panel or select prepunched paper
from your printer driver.
Printing labels
CAUTION
●
Orient labels according to the guidelines in Orienting media.
●
Print a stack of up to 50 sheets of labels from optional Tray 1.
●
Use only labels recommended for laser printers. Make sure the labels meet the correct
specifications. (See Paper specifications, or go to www.hp.com/support/lj9050_lj9040.)
Failure to follow these instructions can damage the printer.
Special cautions:
●
Do not load optional Tray 1 to capacity, because labels are heavier than paper.
●
Do not use labels that are separating from the backing sheet, wrinkled, or damaged in any
way.
●
Do not use labels that have the backing sheet exposed. (Labels must cover the entire
backing sheet with no exposed spaces.)
●
Do not feed a sheet of labels through the printer more than once. The adhesive backing is
designed for only one pass through the printer.
●
Do not print on both sides of labels.
70 Chapter 2 Printing tasks
ENWW
Printing on transparencies
CAUTION
●
Transparencies used in this printer must be able to withstand the 200°C (392°F), the
maximum temperature for the printer.
●
Use only transparencies recommended for use in laser printers.
●
Use the left output bin for transparencies. If you select the optional stacker, stacker/stapler,
multifunction finisher, or 8-bin mailbox, use the upper bin for transparencies.
Do not attempt to print on both sides of transparencies. Do not attempt to print on envelopes,
custom paper, or paper that is heavier than 199 g/m2 (58 lb). Printing on other transparencies
can damage the printer.
Guidelines for custom-size paper, card stock, and heavy paper
●
You can print on custom-size paper from optional Tray 1, Tray 2, Tray 3, or optional Tray 4.
●
Any paper heavier than 199 g/m2 (53 lb) must be fed only from optional Tray 1. For paper
specifications, see Paper specifications or go to www.hp.com/support/lj9050_lj9040.
●
If you are printing from optional Tray 1, the edge of the paper feeding into the printer must be
at least 98 mm (3.9 inches) wide to allow rollers inside the printer to grab the paper, and a
maximum of 312 mm (12.3 inches). Measuring from the leading edge to the trailing edge of
the paper, the length must be at least 191 mm (7.5 inches) and a maximum of 470 mm
(18.5 inches).
●
If you are printing from Tray 2 or 3, the edge of the paper feeding into the printer must be at
least 148 mm (5.8 inches) wide to allow rollers inside the printer to grab the paper, and a
maximum of 297 mm (11.7 inches). Measuring from the leading edge to the trailing edge of
the paper, the length must be at least 210 mm (8.3 inches) and a maximum of 432 mm
(17.0 inches).
●
If you are printing from optional Tray 4, the edge of the paper feeding into the printer must be
at least 182 mm (7.2 inches) wide to allow rollers inside the printer to grab the paper, and a
maximum of 297 mm (11.7 inches). Measuring from the leading edge to the trailing edge of
the paper, the length must be at least 210 mm (8.3 inches) and a maximum of 432 mm
(17.0 inches).
Printing full-bleed images
Because the product can print on specially cut paper up to 312 x 470 mm (12.3 x 18.5 inches),
you can print bleed images of up to 297 x 450 mm (11.7 x 17.7 inches) in size by using crop
marks. Full-bleed images can be printed from Tray 1 only. The default for edge-to-edge or fullbleed printing is “off”. See your program help for more information.
ENWW
Printing on special paper 71
72 Chapter 2 Printing tasks
ENWW
3
Advanced printing tasks
Overview
This section presents these advanced printing tasks:
●
Using features in the printer driver
●
Setting the registration
●
Using a different first page
●
Including a blank back page
●
Printing multiple pages on one sheet of paper
●
Customizing optional Tray 1 operation
●
Specifying paper to print on
●
Using the job-storage features
• Printing a private job
• Storing a print job
• QuickCopying a job
• Proofing and holding a job
ENWW
Overview 73
Using features in the printer driver
When you print from a software program, many of the printer features are available from the
printer driver. To gain access to Windows printer drivers, see Gaining access to the printer
drivers.
Note
Settings in the printer driver and software program generally override control-panel settings.
(Software program settings generally override printer driver settings.)
Printer collation
The printer collation feature allows multiple original prints (mopying) that provide you the
following advantages:
●
reduced network traffic
●
faster return to the software program
●
all original documents
Saving printer setup information
Printer drivers allow you to save the printer settings you use most often as the default settings.
For example, the driver might be set to print on 2 sides (duplex).
All printer drivers for Windows 2000 and Windows XP, and PCL 6 and PCL 5e printer drivers for
Windows 9X, ME, and NT 4.0 allow you to save printer settings for multiple kinds of print jobs.
For example, you might want to create a quick set for envelopes, or for printing the first page of a
document on letterhead.
New printer driver features
Look for Quick Sets, Scale to Fit (any page size to any page size), and Booklet Printing
options in the Windows printer driver, or see the printer driver help for more information.
Printing watermarks
A watermark is a notice, such as “Top Secret,” printed in the background of each page in a
document. Check the driver for available options, or see the printer driver online help for more
information.
For Macintosh, you can select “Custom” and specify the text you choose, depending on your
driver version.
74 Chapter 3 Advanced printing tasks
ENWW
Setting the registration
Use the Set Registration feature to center the front and back images on a page that has been
duplexed (printed on both sides). This feature also helps you set edge-to-edge printing to within
approximately 2 millimeters (0.1 inch) of all edges of the paper. Image placement will vary
slightly for each input tray. The alignment procedure must be performed for each tray. The
administrator can use an internal-tray registration page to calibrate each tray.
To set the registration
1
Press
to open the menus.
2
Use
and
to scroll to CONFIGURE DEVICE and then press
3
Use
and
to scroll to PRINT QUALITY and then press
4
Use
and
to scroll to SET REGISTRATION and then press
.
.
.
You can select a tray by specifying a SOURCE. The default SOURCE is tray 2. If you want to set the
registration for tray 2, go to step 7. Otherwise, proceed to the next step.
ENWW
5
Use
and
6
Use
and
to select a tray and then press
display returns to the SET REGISTRATION menu.
7
Use
8
Follow the instructions on the printed page.
and
to scroll to SOURCE and then press
.
. After selecting a tray, the control-panel
to scroll to PRINT TEST PAGE and then press
.
Setting the registration 75
Using a different first page
To print a different first page
Follow these instructions for printing a first page that is different from other pages in the print job.
The instructions are provided for Tray 1, however, you can print a different first page from other
trays.
1
Note
For Windows, select “Use different paper for first page” in your printer driver. Select one tray
for the first page and one of the other trays for the remaining pages. Place the paper for the
first page in the first tray that you selected. (For manual feed, place paper in optional Tray 1
after the job is sent to the printer and the printer requests paper.) For loading optional Tray 1,
place the paper with the side to be printed on facing up, the top of the page toward the rear
of the printer.
For Macintosh computers, select “First from” and “Remaining from” in the Print dialog box.
Where and how you make selections depends on your software program or associated printer
driver. (Some options are only available through the printer driver.)
2
Load the paper for the remaining pages of the document into another tray. You can select the
first and remaining pages by type of paper. For more information, see Specifying paper to
print on.
76 Chapter 3 Advanced printing tasks
ENWW
Including a blank back page
This option allows you to add blank pages to the end of a print job.
For Windows, select Use different paper for first page on the Paper tab of your printer driver,
and then select Back Page. You can then select the paper source you want to use for your back
page. To turn the feature off, select No back page.
Printing multiple pages on one sheet of paper
You can print more than one page on a single sheet of paper. This feature is available in some
printer drivers and provides a cost-effective way to print draft pages.
To print more than one page on a sheet of paper, look for a layout or pages per sheet option in
the printer driver. (This is sometimes called 2-up, 4-up, or n-up printing.)
ENWW
Including a blank back page 77
Customizing optional Tray 1 operation
Customize optional Tray 1 to fit your printing needs.
The printer can be set to print from optional Tray 1:
●
When the tray is loaded and TRAY 1 SIZE=ANY SIZE and TRAY 1 TYPE=ANY TYPE; (formerly
First mode). Print speed might be slower than normal.
●
Only when the type of paper loaded is specifically requested and TRAY 1 SIZE=a specific
size and TRAY 1 TYPE=a specific type (formerly Cassette mode).
Printing from optional Tray 1 when the loaded paper is
requested
When TRAY 1 SIZE=a specific size and TRAY 1 TYPE=a specific type (formerly Cassette mode),
the printer treats optional Tray 1 like the internal trays. Instead of looking for paper in optional
Tray 1 first, the printer pulls paper starting either from the bottom tray upward or starting with the
tray that matches type or size settings selected in the program from which you are printing.
From the program or the Print dialog box, select the type and size for a tray, if possible. If not, set
the type and size from the printer control panel. (See Specifying paper to print on.)
When TRAY 1 SIZE=a specific size and TRAY 1 TYPE=a specific type is set at the printer control
panel, an option appears in the PAPER HANDLING menu to configure size as well as type settings
for optional Tray 1.
Manually feeding paper from optional Tray 1
The manual feed feature is another way of printing special paper from optional Tray 1, such as
envelopes or letterhead.
78 Chapter 3 Advanced printing tasks
ENWW
Specifying paper to print on
You can configure the printer to select paper by type (such as plain or letterhead) and size (such
as letter or A4), as opposed to source (a paper tray).
Printing by Type and Size means that the printer to pulls paper from the first tray that is loaded
with the type or size that you select. Selecting paper by type rather than source is similar to
locking out trays, which helps to protect special paper from accidental use. (However, selecting
the ANY SIZE, ANY TYPE, or PLAIN setting does not turn on the tray lock-out function.)
For example, if Tray 2 is configured for letterhead, and you specify in the driver that you want to
print on plain paper, the printer will not pull the letterhead from Tray 2. Instead, the printer pulls
paper from a tray that has plain paper loaded and is configured for plain paper on the printer
control panel.
Selecting paper by type and size results in significantly better print quality for heavy paper,
glossy paper, and transparencies. Using the wrong setting can result in unsatisfactory print
quality. Always print by type for special print media such as labels or grayscale transparencies.
Always print by size for envelopes.
Benefits of printing by type and size of paper
If you frequently use several kinds of paper, once trays are set correctly, you do not have to check
which paper is loaded in each tray before you print. This is especially helpful when the printer is
shared and more than one person loads or removes paper. Printing by type and size of paper is
a way to be sure that print jobs always print on the appropriate paper.
To set the type for the paper or media you loaded when you are unsure which type (such as bond
or recycled) to choose, check the label on the package of paper. For supported types of paper,
see Paper specifications or go to www.hp.com/support/lj9050_lj9040.
Note
The type and size settings can also be configured from the embedded Web server or
HP Web Jetadmin software for networked printers. See the printer driver online help.
To print by type and size of paper
Note
Settings in the printer driver and software program override control-panel settings. (Software
program settings generally override printer driver settings.)
1
Load and adjust the trays. (See Loading input trays, or go to www.hp.com/support/
lj9050_lj9040.)
2
At the printer control panel, press
press
.
3
Do one of the following:
, use
or
to scroll to PAPER HANDLING, and then
• To allow the printer to automatically pull the type and size of paper loaded in optional
Tray 1: Set TRAY 1 SIZE=ANY SIZE and TRAY 1 TYPE=ANY TYPE.
• To print by type and size from optional Tray 1: Set TRAY 1 SIZE to the size loaded, and set
TRAY 1 TYPE to the type loaded.
• To print by type and size from Tray 2, Tray 3, or optional Tray 4 when the tray is loaded
with standard size paper: Just set the type. If the size is a detectable standard size, it will
be automatically detected. If the size is an undetectable size, set the size.
• To print by type and size from Tray 2, Tray 3, or optional Tray 4 when the tray is loaded
with a custom size paper: set the size and type. For the size, select Custom, and then set
the values using the measurements on the guides in the trays.
4
ENWW
From the program or printer driver, select the type and size of paper.
Specifying paper to print on 79
Using the job-storage features
Four special job-storage features are available for this printer. All four are available when a hard
disk is installed. Private jobs and proof and hold jobs are available in RAM (with no hard disk
installed).
●
Private jobs. When you send a private job to the printer, the job does not print until you
enter a PIN at the printer.
●
Stored jobs. You can download a job such as a personnel form, time sheet, or calendar, to
the printer and allow other users to print the job at any time. Stored jobs are copied to the
optional hard disk and are not deleted if retention space on the printer becomes limited.
●
QuickCopy jobs. You can print the requested number of copies of a job and then store a
copy of the job on the optional hard disk in the printer. Storing the job allows you to print
additional copies of the job later.
●
Proof and hold jobs. This feature provides a quick and easy way to print and proof one
copy of a job and then print the additional copies.
Follow the instructions below to gain access to the job retention features at the computer. Then,
see the specific section for the type of job you want to create.
CAUTION
If you turn the printer off, all QuickCopy, Proof and hold, and Private jobs are deleted.
To gain access to the job storage features
For Windows
1
On the File menu, click Print.
2
Click Properties and click the Job Storage tab.
3
Select the desired Job Storage Mode.
For Macintosh
In newer drivers: Select Job Retention from the pull-down menu in the print dialog box. In older
drivers, select Printer Specific Options.
Printing a private job
The private printing feature lets a user specify that a job is not printed until that user releases it
using a 4-digit personal identification number (PIN) through the printer control panel. The user
specifies the PIN in the driver, and the PIN is sent to the printer as part of the print job.
Note
The private jobs feature uses available printer RAM memory if the printer does not have a hard
disk installed. For moderate to heavy use of this feature, HP recommends installing an optional
hard disk.
To create private jobs
To specify that a job is private from the driver, select the Private Job option, enter a User Name
and Job Name, and type a 4-digit PIN. The job will not print until you enter the PIN at the control
panel.
80 Chapter 3 Advanced printing tasks
ENWW
Releasing private jobs
The user can print a private job from the control panel.
To release private jobs
1
Press
.
2
Use
3
Scroll to USER NAME and press
4
Use
or
to scroll to your job and then press
5
Use
it.)
or
to scroll to Print and then press
6
Use the numeric keypad to type the PIN, and then press
or
to scroll to Retrieve Job and then press
.
.
.
. (The Print icon should have
next to
.
Deleting a private job
A private job is automatically deleted from the printer hard disk accessory after the user releases
it for printing. If you want to delete the job without printing it, use this procedure.
To delete private jobs
1
Press
.
2
Use
3
Scroll to USER NAME and press
4
Use
or
to scroll to your job and then press
5
Use
or
to scroll to Delete and then press
6
Use the numeric keypad to type the PIN, and then press
or
to scroll to Retrieve Job and then press
.
.
.
. (Delete should have
next to it.)
.
Storing a print job
The user can download a print job to the printer hard disk accessory without printing it. The user
can then print the job at any time through the printer control panel. For example, a user might
want to download a personnel form, calendar, time sheet, or accounting form that other users
can access and print.
To store a print job on the hard disk accessory, select the Stored Job option in the driver when
printing from the printer.
Note
The stored job feature uses available RAM memory on the printer if the printer does not have a
hard disk installed. For moderate to heavy use of this feature, HP recommends installing an
optional hard disk.
To create stored jobs
In the printer driver, select the Stored Job option and type a user name and job name. The job
does not print until someone requests it at the printer. See Printing a stored job.
ENWW
Using the job-storage features 81
Printing a stored job
The user can print a job stored on the printer hard disk accessory from the control panel.
To print a stored job
1
Press
.
2
Use
3
Scroll to USER NAME and press
4
Use
5
To print the default number of copies, press
. When
is selected, the screen changes to
Copies=n. To change the number, use the numeric keypad or
and
to select a new
number, and then press
.
or
to scroll to Retrieve Job and then press
or
If Print has
.
.
to scroll to your job and then press
.
next to it, the job is a private job and requires a PIN. See Printing a private job.
Deleting a stored job
Jobs stored on the printer hard disk accessory can be deleted from the control panel.
To delete a stored job
1
Press
.
2
Use
3
Scroll to USER NAME and press
4
Use
or
to scroll to your job and then press
5
Use
or
to scroll to Delete and then press
or
If Delete has
to scroll to Retrieve Job and then press
.
.
.
.
next to it, the job requires a PIN to delete. See Printing a private job.
QuickCopying a job
The QuickCopy feature prints the requested number of copies of a job and stores a copy on the
printer hard disk accessory. Additional copies of the job can be printed later. This feature can be
turned off from the driver.
The default number of different QuickCopy jobs that can be stored on the printer is 32. From the
control panel, you can set a different default number. See JOB STORAGE LIMIT=32.
To create QuickCopy jobs
CAUTION
If the printer needs additional space to store newer QuickCopy jobs, the printer will delete other
stored QuickCopy jobs, starting with the oldest job. To permanently store the job and prevent the
printer from deleting it when space is needed, select the Stored Job option instead of the
QuickCopy option.
In the printer driver, select the QuickCopy option and type a user name and a job name.
When you send the job to print, the printer prints the number of copies you set in the printer
driver. To print more quick copies at the printer, see Printing additional copies of QuickCopy
jobs.
82 Chapter 3 Advanced printing tasks
ENWW
Printing additional copies of QuickCopy jobs
This section describes how to print additional copies of a job stored on the printer hard disk
accessory from the control panel.
To print more copies of a QuickCopy job
1
Press
.
2
Use
3
Scroll to USER NAME and press
4
Use
5
To print the default number of copies, go to the next step. Otherwise, to check or change the
number of copies to print:
or
or
to scroll to Retrieve Job and then press
.
to scroll to your job and then press
.
a Use
or
to scroll to Copies and then press
appears at the top of the window.
. The number of copies to be printed
b To change the number, use the numeric keypad or
and then press
.
6
Use
or
If Print has
.
to scroll to Print and then press
and
to select a new number
. The job prints.
next to it, the job requires a PIN to print. See Printing a private job.
Deleting a QuickCopy job
Delete a QuickCopy job at the printer when you no longer need it. If the printer needs additional
space to store new QuickCopy jobs, the printer will automatically delete other stored QuickCopy
jobs, starting with the oldest job.
Note
Stored QuickCopy jobs can be deleted from the control panel or from HP Web Jetadmin.
To delete a QuickCopy job
1
Press
.
2
Use
3
Scroll to USER NAME and press
4
Use
or
to scroll to your job and then press
5
Use
or
to scroll to Delete and then press
or
If Delete has
to scroll to Retrieve Job and then press
.
.
.
.
next to it, the job requires a PIN to delete. See Printing a private job.
Proofing and holding a job
The proof and hold feature provides a quick and easy way to print and proof one copy of a job
and then to print the additional copies.
To permanently store the job and prevent the printer from deleting it when space is needed for
something else, select the Stored Job option in the driver.
The proof and hold feature uses available RAM memory on the printer if the printer does not
have a hard disk installed. For moderate to heavy use of this feature, HP recommends installing
an optional hard disk.
ENWW
Using the job-storage features 83
To create a proof and hold job
CAUTION
If the printer needs additional space to store newer proof and hold jobs, the printer will delete
other stored proof and hold jobs, starting with the oldest job. To permanently store the job and
prevent the printer from deleting it when space is needed, select the Stored Job option in the
printer driver instead of the Proof and Hold option.
In the printer driver, select the Proof and Hold option and enter a user name and job name.
The printer prints one copy of the job for you to proof. Then, see Printing the remaining copies of
a held job.
Printing the remaining copies of a held job
The user can print the remaining copies of a job held on the printer hard disk accessory from the
control panel.
To print a proof and hold job
1
Press
.
2
Use
3
Scroll to USER NAME and press
4
Use
5
Use
or
to scroll to Print and then press
requested from the computer.
or
to scroll to Retrieve Job and then press
or
If Print has
.
.
to scroll to your job and then press
.
. The job prints the remaining copies
next to it, the job requires a PIN to print. See Printing a private job.
Deleting a held job
When a user sends a proof and hold job, the printer automatically deletes that user’s previous
proof and hold job. If no proof and hold job already exists for that job name and the printer needs
additional space, the printer might delete other proof and hold jobs, starting with the oldest one.
To delete a proof and hold job
1
Press
.
2
Use
3
Scroll to USER NAME and press
4
Use
or
to scroll to your job and then press
5
Use
or
to scroll to Delete and then press
or
If Delete has
to scroll to Retrieve Job and then press
.
.
.
.
next to it, the job requires a PIN to delete. See Printing a private job.
84 Chapter 3 Advanced printing tasks
ENWW
4
Security features
Overview
This section explains important security features available on your printer:
ENWW
●
Secure Disk Erase
●
Security lock
●
Job storage features
Overview 85
Secure Disk Erase
You might need to protect deleted data from unauthorized access on the printer hard drive.
Secure Disk Erase is a security feature that you can use to securely erase print jobs from the
hard drive.
Security levels are set by using HP Web Jetadmin. Three levels of Secure Disk Erase are
available:
●
Non-Secure Fast Erase
This is a simple file-table erase function. Access to the file is removed, but actual data is retained
on the disk until it is overwritten by subsequent data-storage operations. This is the fastest mode.
Non-Secure Fast Erase is the default erase mode.
●
Secure Fast Erase
Access to the file is removed, and the data is overwritten with a fixed, identical character pattern.
This is slower than Non-Secure Fast Erase, but all data is overwritten. Secure Fast Erase meets
the U.S. Department of Defense 5220-22.M requirements for the clearing of disk media.
●
Secure Sanitizing Erase
This level is similar to the Secure Fast Erase mode. In addition, data is repetitively overwritten by
using an algorithm that prevents any residual data persistence. This mode will impact
performance. Secure Sanitizing Erase meets the U.S. Department of Defense 5220-22.M
requirements for the sanitization of disk media.
Affected data
Data affected (covered) by the Secure Disk Erase feature includes temporary files that are
created during the print and copying process, stored jobs, proof and hold jobs, disk-based fonts,
and disk-based macros (forms). Note that stored jobs will only be securely overwritten when they
have been deleted through the Retrieve Job menu on the device after the appropriate erase
mode has been set. (See Deleting a stored job.) This feature will not impact data that is stored
on flash-based printer non-volatile RAM (NVRAM) that retains default printer settings, page
counts, and similar data. This feature does not affect data that is stored on a system RAM disk (if
one is used). This feature does not impact data that is stored on the flash-based system boot
RAM.
Changing the Secure Disk Erase mode does not overwrite previous data on the disk, nor does it
immediately perform a full-disk sanitization. Changing the Secure Disk Erase mode changes
how the printer cleans up temporary data for jobs after the erase mode has been changed.
Gaining access to Secure Disk Erase
Use HP Web Jetadmin to set the Secure Disk Erase feature.
Additional information
For additional information about the HP Secure Disk Erase feature, see the HP support flyer or
go to www.hp.com/go/webjetadmin).
86 Chapter 4 Security features
ENWW
Security lock
The security lock is a mechanical lock that can be used to prevent the removal of internal
computer components, Optional EIO accessories are not protected, however. Purchase the lock
assembly separately, and then install it on the product.
Job storage features
Several job-storage features are available for the printer. These features include printing private
jobs, storing print jobs, quick-copying jobs, and proofing and holding jobs.
For more information about job storage features, see Using the job-storage features.
ENWW
Security lock 87
88 Chapter 4 Security features
ENWW
5
Printer maintenance
Overview
This section explains basic printer maintenance.
ENWW
●
Cleaning the printer
●
Printer maintenance kit
●
Managing the print cartridge
●
Print cartridge conditions
Overview 89
Cleaning the printer
General cleaning
To maintain print quality, clean the printer thoroughly:
●
every time you change the print cartridge.
●
whenever print-quality problems occur.
Clean the outside of the printer with a lightly water-dampened cloth. Clean the inside with only a
dry, lint-free cloth. Observe all warnings and cautions that appear with the cleaning tasks on the
following pages.
WARNING!
Avoid touching the fusing area when cleaning the printer. It can be hot.
CAUTION
To avoid permanent damage to the print cartridge, do not use ammonia-based cleaners on or
around your printer.
To clean the printer
CAUTION
1
Before you begin these steps, turn the printer off and disconnect all cables, including the
power cable.
2
Open the front cover of the printer and remove the print cartridge.
To prevent damage to the print cartridge, use two hands when removing it from the printer.
Do not expose the print cartridge to light for more than a few minutes. Cover the print cartridge
when it is outside of the printer.
Note
If toner gets on your clothes, wipe it off with a dry cloth, and wash your clothes in cold water. Hot
water sets toner into fabric.
90 Chapter 5 Printer maintenance
ENWW
ENWW
3
With a dry, lint-free cloth, wipe any residue from the paper path area, the registration roller,
and the print cartridge cavity.
4
Replace the print cartridge.
5
Turn the green lever back to the locked position.
6
Close the front cover, reconnect all cables, and turn the printer on.
Cleaning the printer 91
Printer maintenance kit
Note
The printer maintenance kit is a consumable and is not covered under warranty.
To ensure optimum print quality, HP recommends that the printer maintenance kit be used
approximately every 350,000 pages. You might need to replace the kit more often, depending on
the type of printing you do. If you have questions about how frequently you should use a
maintenance kit, contact the support center at www.hp.com/support/lj9050_lj9040.
When the PERFORM PRINTER MAINTENANCE message appears on the control panel, you need to
purchase a printer maintenance kit and install the new parts. The part number for the 110-V kit is
C9152A. The part number for the 220-V kit is C9153A. The printer maintenance kit contains two
Type 1 rollers, seven Type 2 rollers, one transfer roller assembly, and one fuser assembly.
Complete instructions for installing the kit components are included in the printer maintenance kit
box.
After a new maintenance kit is installed, reset the printer maintenance count.
To reset the printer maintenance count
1
Turn the printer off.
2
Turn the printer on.
3
When the memory count starts, press and hold
4
When the three LEDs are on, press
5
Press
.
until NEW MAINTENANCE KIT appears on the screen.
.
If the message persists,
1
Use
or
to scroll to CONFIGURE DEVICE.
2
Use
or
to scroll to RESETS.
3
Press
4
Use
5
Press
.
or
to scroll to CLEAR MAINTENANCE MESSAGE.
.
To verify that the maintenance kit is reset to zero, print a configuration page by using the
following procedure.
To print a configuration page
1
Press
.
2
Use
or
to scroll to INFORMATION. and press
3
Use
or
to scroll to PRINT CONFIGURATION. and press
.
For more information about installing the printer maintenance kit, see the instructions that
accompany it.
92 Chapter 5 Printer maintenance
ENWW
Managing the print cartridge
When you use a new, authentic HP print cartridge (C8543X), you can obtain the following types
of supplies information:
●
amount of cartridge life remaining
●
estimated number of pages remaining
●
number of pages printed
●
other supplies information
Print cartridge authentication
The printer will let you know that a cartridge is not a genuine HP print cartridge when you insert
it in the printer. If you insert a used HP cartridge from another HP printer, the printer can take as
many as 20 printed pages to receive the message authenticating that the cartridge is a genuine
HP part.
If the printer control-panel message states that this is not a genuine HP print cartridge and you
believe you purchased an HP cartridge, go to www.hp.com/go/anticounterfeit.
Non-HP print cartridges
Hewlett-Packard Company cannot recommend use of non-HP print cartridges, either new or
remanufactured. Because they are not HP products, HP cannot influence their design or control
their quality. Service or repairs required as a result of using a non-HP print cartridge will not be
covered under the printer warranty.
Print cartridge storage
Do not remove the print cartridge from its package until you are ready to use it.
CAUTION
To prevent damage to the print cartridge, do not expose it to light for more than a few minutes.
Checking the toner level
You can check the toner level by using the printer control panel, the embedded Web server, the
printer software, or HP Web Jetadmin.
Using the printer control panel
1
Press
to open Menu.
2
Use
or
to select INFORMATION and then press
3
Use
or
to select PRINT SUPPLIES STATUS PAGE and then press
4
Press
to print the supplies status page. See Supplies status page for information about
the supplies status page.
.
.
Using the embedded Web server
ENWW
1
In your Web browser, type the IP address for the printer home page. This takes you to the
printer status page.
2
On the left side of the screen, click Supplies Status. This takes you to the supplies status
page, which provides toner level information. See Supplies status page for information about
the supplies status page.
Managing the print cartridge 93
Using printer software
The following conditions must be met in order to use this feature:
●
The HP Toolbox software must be installed on your computer. (HP Toolbox is automatically
installed as part of the typical printer software installation.)
●
The printer must be connected to a network.
●
You must have access to the World Wide Web to order supplies.
To use the printer software
1
On the Start menu, select Programs, and then click HP toolbox.
The HP Toolbox opens in a Web browser.
2
Note
On the left side of the window, click the Status tab, and then click Supplies Status.
If you want to order supplies, click Order Supplies. This opens a browser that produces a URL
where you can purchase supplies. Select the supplies that you want to order and then finish the
ordering process.
Using HP Web Jetadmin
In HP Web Jetadmin, select the printer device. The device status page shows toner level
information.
Print cartridge conditions
Use these procedures when you see a message that relates to the print cartridge, or when you
want to change or replace a print cartridge.
Order the print cartridge
When the print cartridge is low, the message ORDER CARTRIDGE appears on the printer control
panel.
If the ORDER CARTRIDGE message appears but the printer continues printing, the CARTRIDGE LOW
setting is set to CONTINUE (the default setting).
If the printer stops printing when low toner is detected, CARTRIDGE LOW is set to STOP. To resume
printing, press
.
The message ORDER CARTRIDGE will continue to appear until you replace the print cartridge.
Select CARTRIDGE LOW=CONTINUE or CARTRIDGE LOW=STOP from the Configuration menu on the
printer control panel (see System setup submenu).
HP recommends that you place an order for a replacement print cartridge when you first receive
an ORDER CARTRIDGE alert. You can order a cartridge by using the Internet Enabled Supplies
Ordering feature. To do so, click the printer icon on the bottom right of your screen, click the icon
for the printer that you use, and then click the Order Supplies link on the status page. In a
network environment, use the embedded Web server to order supplies online.
94 Chapter 5 Printer maintenance
ENWW
Replace the print cartridge
When the print cartridge is empty, a REPLACE CARTRIDGE message appears on the printer control
panel. The printer continues printing (without customer interaction) until it reaches a drum-out
condition, but HP does not guarantee print quality after this message appears. However, if the
REPLACE CARTRIDGE message results from the drum life being exceeded, the user has to replace
the cartridge immediately, and no override is possible. This is done to protect the printer and the
print cartridge.
Recycling
For information about recycling the print cartridge, see Protecting the environment or go to
www.hp.com/recycle.
Using the printer cleaning page
Note
To ensure good print quality with certain types of paper, use the cleaning page every time the
print cartridge is replaced. If the cleaning page is frequently needed, try a different type of paper.
If toner specks appear on the front or back side of your print jobs, use the following procedure.
From the printer control panel:
Note
1
Use
or
to select Configure Device and then press
.
2
Use
or
to select Print Quality and then press
3
Use
or
to select Create Cleaning Page and then press
4
Follow the instructions on the cleaning page.
5
When toner has been cleaned from inside the printer, shiny black spots will appear on the
page black strip. If white spots appear on the black strip, print another cleaning page.
.
.
In order for the cleaning page to work correctly, print the cleaning page on copier-grade paper
(not bond or rough paper).
Rocking the print cartridge
When you install a print cartridge for the first time, gently rock the cartridge from front to back to
distribute the toner evenly inside the cartridge. Because of the new cartridge design, this is the
only time that you need to rock the cartridge.
Configuring alerts
You can use HP Web Jetadmin or the embedded Web server in the printer to configure the
system to alert you to problems with the printer. The alerts take the form of e-mail messages that
are sent to the e-mail account or accounts that you specify.
You can configure the following items:
ENWW
●
the printer(s) that you want to monitor.
●
which alerts are to be received (for example, alerts for paper jams, paper out, order
cartridge, replace cartridge, and cover open)
●
the e-mail account to which the alerts should be forwarded
Software
Location for information
HP Web Jetadmin
See the HP Web Jetadmin Help system for details on
alerts and how to set them up.
Print cartridge conditions 95
Software
Location for information
Embedded Web server
See Using the embedded Web server for general
information about the embedded Web server.
See the embedded Web server Help system for
details on alerts and how to set them up.
You can also receive alerts through the HP Toolbox software. These alerts display as either a
pop-up window or an animated taskbar icon. The HP Toolbox software does not send alerts in
the form of an e-mail message. You can configure the HP Toolbox software to deliver only the
alerts that you want to receive, and you can also specify how often the software checks the
printer status. See HP Toolbox for more information.
96 Chapter 5 Printer maintenance
ENWW
6
Problem solving
Overview
This section will help you to troubleshoot and solve printer problems.
ENWW
Clearing jams
Occasionally, paper can jam during printing. This section will help you to locate
paper jams, properly clear them from the printer, and solve repeated jams.
Understanding
printer messages
Many different messages can appear on the printer control-panel display.
Some messages tell the current printer status, such as INITIALIZING. Other
messages require action, such as CLOSE RIGHT DOOR. Most of these messages
are self-explanatory. However, some messages indicate a problem with the
printer, or require further action or description. This section lists these types of
messages and tells you what to do if a message persists.
Resolving controlpanel messages
This section lists messages that might appear on the control panel and
explains what causes the message and what action can be taken to resolve
the message
Correcting output
quality problems
The printer should produce print jobs of the highest quality. If print jobs do not
appear sharp and clear, if defects such as lines, specks, or smears appear on
the page, or if paper is wrinkled or curled, use this section to troubleshoot and
solve the print quality problem.
Solving common
printer issues
Before you can eliminate a printer problem, you must understand the location
of the problem. Use the tables in this section to determine the printer problem,
and then follow the corresponding troubleshooting suggestions.
Using the
embedded Web
server
The pages that give information about the printer are on the embedded Web
server.
Printing information
pages
These pages can be printed from the printer control panel.
Checking the
printer configuration
From the printer, you can print information pages, which give details about the
printer and its configuration.
Printing a paper
path test
The paper path test can be used to verify that various paper paths are working
properly.
Overview 97
Clearing jams
If a paper-jam message appears on the printer control panel, look for paper in the locations that
are indicated in the following graphic. You might need to look for paper in locations other than
those that are indicated in the paper-jam message. If the location of the paper jam is not obvious,
look first in the front-door area.
After looking at the graphic, you can go to the procedure for clearing the jam. When clearing
jams, be very careful not to tear the paper. If a small piece of paper is left in the printer, it could
cause additional jams. If jams are a recurring problem, see Solving repeated paper jams.
Note
Loose toner might remain in the printer after a paper jam and cause output quality problems.
These should clear up within a few pages.
Jam locations
1
1
12
1
2
1
11
1
10
1
3
1
9
1
4
1
8
1
7
1
6
1
5
1. Standard top bin (face-down output bin)
2. Optional Tray 1
3. Right door
4. Vertical transfer door
5. Optional Tray 4
6. Tray 3
7. Tray 2
8. Left door (behind output accessory
9. Duplexer (inside the printer)
10. Optional output device
11. Front door and print cartridge area
12. Upper bin (face-up output bin)
98 Chapter 6 Problem solving
ENWW
Clearing jams from the input tray areas
To clear jams in optional Tray 1
1
Check for paper in the optional Tray 1 area, and remove any paper from this area. Carefully
check to be sure you have removed all pieces of torn paper.
2
Open and close the right door to reset the printer.
To clear jams inside the right door
ENWW
1
Open the right door.
2
Check for paper in the right door area, and remove any paper from this area. Carefully check
to be sure you have removed all pieces of torn paper.
Clearing jams 99
3
Open the jam access cover. Pull out and lift the green tab.
4
Remove any paper from this area by pulling it out of the printer.
5
Push the green lever down to original position.
6
Close the right door.
To clear jams in Trays 2 and 3
1
Open the tray until it stops.
2
Check for paper in the tray area, and remove any paper from this area. Carefully check to be
sure you have removed all pieces of torn paper.
100 Chapter 6 Problem solving
ENWW
3
Close the tray.
4
Open and close the right door to reset the printer.
To clear jams in optional Tray 4
ENWW
1
Open the vertical transfer door on optional Tray 4.
2
Check for paper in this area, and remove any paper from this area. Carefully check to be
sure that you have removed all pieces of torn paper.
Clearing jams 101
3
If you did not see any paper in the right access door, open optional Tray 4.
4
Check for paper in the tray area, and remove any paper from this area. Carefully check to be
sure you have removed all pieces of torn paper.
5
Close optional Tray 4.
6
Close the vertical transfer door.
102 Chapter 6 Problem solving
ENWW
Clearing jams from the duplex printing accessory (duplexer)
To clear jams in the duplex printing accessory
WARNING!
ENWW
1
If an optional output device is installed, slide it away from the printer to access the left door.
2
Open the left door and carefully pull out any paper from area.
Avoid touching the adjacent fusing area. It can be hot.
3
Remove the duplex printing accessory by pressing the green lever and pulling the unit out
until it stops.
4
Remove any paper by lifting the two green levers in the duplex printing accessory.
Clearing jams 103
5
Open the front door.
6
Check for paper in the duplex printing accessory area, and remove any paper by pulling it out
of the printer. Be careful not to tear the paper.
7
Reinstall the duplex printing accessory by sliding it back into the slot until it locks into place.
8
Close all open doors. If an optional output device is installed, push it back into place.
104 Chapter 6 Problem solving
ENWW
Clearing jams from the output areas
To clear jams in the standard output bin
1
If the jam extends into the output area, slowly and carefully pull the paper straight out of the
printer so that it does not tear.
2
Open the left door and carefully pull out any paper from area. (If an optional output device is
installed, first move it away from the printer to access the left door.)
3
Close all open doors. If an optional output device is installed, push it back into place.
To clear jams in the left door (fuser area)
1
ENWW
If an optional output device is installed, slide it away from the printer to access the left door.
Clearing jams 105
2
WARNING!
Open the left door.
Avoid touching the adjacent fusing area. It can be hot.
3
Remove any jammed or damaged paper from this area by pulling it out of the printer.
4
Press down on the green tab and carefully check for paper. Be sure to remove all pieces of
torn paper.
5
Close the left door. If an optional output device is installed, push it back into place.
106 Chapter 6 Problem solving
ENWW
To clear jams in the multifunction finisher
ENWW
1
Open the finisher cover.
2
Slowly and carefully pull the paper straight out of the finisher so that it does not tear.
3
Close the finisher cover.
Clearing jams 107
4
Move the finisher away from the printer.
5
Carefully remove any paper from the printer output area.
6
Carefully remove any paper from the finisher input area.
7
Open the stapler-unit door.
108 Chapter 6 Problem solving
ENWW
8
To clear a booklet jam, turn the bottom green knob clockwise to remove the booklet.
9
Close the stapler-unit door.
10 Reattach the finisher.
ENWW
Clearing jams 109
To clear a staple jam from the optional stacker/stapler
1
Slide the stacker/stapler away from the printer.
2
Open the stapler-unit door.
3
On the staple cartridge, lift up on the green tab and pull the cartridge out.
110 Chapter 6 Problem solving
ENWW
ENWW
4
Pull the cartridge lever up.
5
Remove the jammed staple.
6
Push the cartridge lever down.
7
Insert the staple cartridge so that it snaps into place.
8
Close the stapler-unit door.
Clearing jams 111
9
Note
Reattach the stacker/stapler to the printer.
The stapler needs to reload after clearing a staple jam, so the first few documents (no more than
five) might not be stapled. If a print job is sent and the stapler is jammed or is out of staples, the
job will still print as long as the path to the output bin is not blocked.
To clear a staple jam from the multifunction finisher
1
Open the stapler-unit door.
2
Slide the stapler unit toward you.
112 Chapter 6 Problem solving
ENWW
CAUTION
3
Turn the large green knob until the blue dot appears in the window of the stapler unit.
4
Turn the small green knob at the top of the stapler unit clockwise until the staple cartridge
moves to the left of the stapler unit.
The blue dot must appear in the window of the stapler unit before you remove the staple cartridge.
If you try to remove the staple cartridge before the blue dot appears in the window, you could
damage the finisher.
5
ENWW
Remove the staple cartridge.
Clearing jams 113
6
Pull up on the lever labeled with a green dot.
7
Remove the damaged staple.
8
Press down on the lever that is labeled with a green dot.
9
Reinstall the staple cartridge.
10 Slide the stapler unit into the finisher.
114 Chapter 6 Problem solving
ENWW
11 Close the stapler-unit door.
In rare instances, a staple jam might occur in the upper half of the stapler head.
ENWW
1
Follow steps 1 through 4 for clearing a staple jam from the multifunction finisher (see To
clear a staple jam from the multifunction finisher).
2
Locate the damaged staple at the back of the stapler unit, and then remove the staple.
3
Follow steps 10 through 11 for clearing a staple jam from the multifunction finisher (see To
clear a staple jam from the multifunction finisher).
Clearing jams 115
To clear jams in the 8-bin mailbox
Note
Check that the paper in use is not thicker or heavier than what the 8-bin mailbox supports. See
Paper specifications.
1
Move the 8-bin mailbox away from the printer. To do this, stand on the left side of the printer
and pull the 8-bin mailbox straight toward you.
2
Carefully remove the upper (face-up) bin.
3
Pull down the handle on the output paper module and remove any jammed media from this
area.
4
Push the 8-bin mailbox back into place, and then reattach the upper bin.
116 Chapter 6 Problem solving
ENWW
Solving repeated paper jams
Situation
Solution
General
repeated paper
jam problems
1. Check to make sure that paper is correctly loaded in the trays and that all width
guides are correctly set (see Printing tasks).
2. Make sure that the paper tray is set for the size of paper installed and that the
tray is not overloaded with paper.
3. Try turning over the stack of paper in the tray. If you are using prepunched or
letterhead paper, try printing from optional Tray 1.
4. Do not use previously printed paper or torn, worn, or irregular paper. For
recommended paper and other print media for your printer, see Paper
specifications or go to www.hp.com/support/lj9050_lj9040.
5. Check the paper specifications. (See Paper specifications or go to
www.hp.com/support/lj9050_lj9040.) If paper is outside of the recommended
specifications, problems can occur.
6. The printer might be dirty. Clean the printer as described in Cleaning the
printer, or go to www.hp.com/support/lj9050_lj9040.
7. Check that all damaged or jammed paper is removed from printer.
Note
ENWW
If the jams continue, contact your HP-authorized service provider. (See the HP support flyer or
go to www.hp.com/support/lj9050_lj9040.)
Clearing jams 117
Understanding printer messages
Printer messages appear on the printer control-panel display to relay the normal status of the
printer (such as Processing Job), or an error condition (such as Close Right Door) that needs
attention. Resolving control-panel messages lists messages that require attention, or that might
raise questions. Messages are listed in alphabetical order, with numeric messages at the end of
the list. Not all messages are listed, because some (such as Ready) are self-explanatory.
Note
Some printer messages are affected by the AUTO CONTINUE and CLEARABLE WARNINGS settings in
the CONFIGURE DEVICE menu, in the System Setup submenu, on the printer control panel (see
System setup submenu).
Using the printer online Help system
This printer features an online Help system on the control panel that provides instructions for
resolving most printer errors. Certain control-panel messages alternate with instructions about
using the online Help system.
Whenever a ? appears in an error message or a message alternates with FOR HELP TOUCH ?,
press the button to view the Help and use
and
to scroll through the message.
To exit the online Help system, press
.
If a message persists
●
Some messages (for example, requests to load a tray, or a message that a previous print job
is still in the printer memory) allow you to press
to print, or to press STOP, and then select
Cancel Job to clear the job and eliminate the message.
●
If a message persists after performing all of the recommended actions, contact an
HP-authorized service or support provider. (See the HP support flyer, or go to www.hp.com/
support/lj9050_lj9040.)
118 Chapter 6 Problem solving
ENWW
Resolving control-panel messages
Message
Explanation or recommended action
Access Denied
MENUS LOCKED
The printer control-panel function you are trying to access has been locked to
prevent unauthorized access.
See your network administrator.
ACTION NOT CURRENTLY
AVAILABLE FOR TRAY X
Tray size cannot be
ANY SIZE/ANY CUSTOM
A duplexed document was requested from a tray that is set to Any Size or Any
Custom. Duplexing is not allowed from a tray configured to Any Size or Any
Custom. Select another tray or reconfigure the tray.
BAD DUPLEXER
CONNECTION
For help press
The duplex printing accessory is not connected properly to the printer.
Bad Optional tray
connection
The optional tray is not connected properly to the printer. Turn the printer off
and reinstall the optional tray.
BAD TRAY 1 CONNECTION
Optional Tray 1 is not connected properly to the printer.
For help press
Turn the printer off and reinstall optional Tray 1.
<BINNAME> FULL
Remove all paper from
bin
The specified output bin is full.
CANCELING...
The printer is cancelling a job. The message continues while the job is stopped,
the paper path is flushed, and any remaining incoming data on the active data
channel is received and discarded.
CARD SLOT X NOT
FUNCTIONAL
The compact flash card in the specified slot is not working correctly.
Turn the printer off and reinstall the duplex printing accessory.
Empty the bin to continue printing.
For help press
CARTRIDGE FAILURE
Cartridge is loaded and the shipping protection strip cannot be fully removed.
For help press
Return the cartridge for a new one. (See the HP support flyer or go to
alternates with
www.hp.com/support/lj9050_lj9040.)
Return for
Replacement
Checking paper
path
The engine is rotating its rollers to check for possible paper jams. Some pages
might be ejected.
CHOSEN PERSONALITY
NOT AVAILABLE
A print job requested a printer language (personality) that does is not available
with this printer. The job will not print and will be cleared from memory.
To continue press
Print the job using a driver for a different printer language, or add the requested
language to the printer (if available).
alternates with
For help press
ENWW
Resolving control-panel messages 119
Message
Explanation or recommended action
Cleaning...
The printer is processing the cleaning page.
CLEANING DISK
<x>% COMPLETE...
The hard disk or compact flash disk is being cleaned. Contact your network
administrator.
Do not power off
alternates with
For help press
CLOSE RIGHT DOOR
The right door is open and must be closed for printing to continue.
To continue turn off
then on
alternates with
CLOSE RIGHT DOOR
For help press
Creating...
CLEANING PAGE
The printer is generating the cleaning page.
DATA RECEIVED
The printer has received data but is waiting for a form feed or is in the Pause
state.
To print last page
press
Deleting...
The printer is deleting a stored job.
DIFFERENT PAPER SIZES
IN JOB
Different paper sizes are used for a single job in the multifunction finisher.
DUPLEXER ERROR
REMOVE DUPLEXER
The duplexer has been removed. Reinsert the duplexer.
Verify that all pages in the job are configured for the same size paper.
Install duplexer with
power off
EIO X DISK
NOT FUNCTIONAL
For help press
The EIO hard disk is not working correctly.
Remove the EIO hard disk from the slot (a slot number will replace the X)
indicated.
Reseat the EIO hard disk. If the message continues, replace the disk with a
new EIO hard disk.
Event log empty
The user is attempting to view an empty event log by selecting SHOW EVENT LOG
from the control panel.
FINISHING PROCESS NOT
FUNCTIONAL
The external device might not be able to perform the finishing process, but it
could still pass paper. The pages will be completed unfinished.
For help press
INCORRECT
The wrong PIN was typed.
Return to the previous screen and retype the PIN.
120 Chapter 6 Problem solving
ENWW
Message
Explanation or recommended action
INSERT OR
CLOSE TRAY xx
The specified tray must be inserted or closed for printing to continue.
For help press
INSTALL CARTRIDGE
For help press
The print cartridge has been removed or has been installed incorrectly. It must
be replaced or reinstalled correctly for printing to continue.
For help press
The printer does not have enough memory to load the data (for example, fonts
or macros) from the location specified. Touch OK to continue without this
information.
alternates with
If the message persists, add more memory.
Insufficient memory
to load Fonts/Data
[DEVICE]
To continue press
LOAD TRAY XX
[TYPE] [SIZE]
A job is sent that requires a specific type and size that is not available.
To use another tray
press
.
Press
Load the requested paper into optional Tray 1.
to use a type and size that is available in another tray.
alternates with
LOAD TRAY XX
[TYPE] [SIZE]
For help press
LOAD TRAY XX
[TYPE] [SIZE]
The tray is empty or is configured for a different size of paper than the size that
was requested.
For help press
MANUALLY FEED
[TYPE] [SIZE]
Load the requested paper into optional Tray 1.
For help press
To override the message, press
tray.
alternates with
Press
if the desired paper is available in another
to use a type and size that is available in another tray.
To use another tray
press
.
No job to cancel
The STOP button was pressed, but there is no active job or buffered data to
cancel.
The message appears for approximately two seconds before the printer returns
to the READY state.
NON-HP SUPPLY
INSTALLED
alternates with
Economode disabled
ORDER CARTRIDGE
LESS THAN XXXX PAGES
For help press
ENWW
The printer has detected that the supply is not a genuine HP cartridge, and the
message appears for approximately 30 seconds before the printer is returned
to the READY state. If you think you purchased an HP print cartridge, go to
www.hp.com/go/anticounterfeit. Any printer repair that is required as a result
of using a non-HP print cartridge is not covered under the printer warranty.
The print cartridge is low and the CARTRIDGE LOW setting in the SYSTEM SETUP
submenu is set to CONTINUE. Approximately 2 weeks of typical printing capacity
remains in the cartridge. This offers sufficient time to order a new cartridge.
Resolving control-panel messages 121
Message
Explanation or recommended action
Paused
The product is paused but no errors. exist The product will continue to receive
data until the memory is full.
To return to ready
press STOP
PERFORM PRINTER
MAINTENANCE
The printer has passed its prescribed printed page threshold between
maintenance procedures.
For help press
To ensure optimum print quality, the printer prompts you to perform routine
maintenance every 350,000 pages. To order a printer maintenance kit, see the
HP support flyer or go to www.hp.com/support/lj9050_lj9040.
Performing
upgrade
The printer is performing a firmware upgrade.
Receiving upgrade
The printer is receiving a firmware upgrade.
Reinsert Duplexer
The duplexer has been removed. Reinsert it.
Request accepted
please wait
A user requested an internal page. When the current job has finished, the
internal page will be printed.
REPLACE CARTRIDGE
The print cartridge has reached the “out” level. The CARTRIDGE=LOW menu has
been set to CONTINUE. Printing will continue until no more toner is available.
For help press
REPLACE STAPLER
CARTRIDGE
The external stapling device is out of staples. Replace the staple cartridge.
To continue press
REPLACE STAPLES
The external stapling device is out of staples. Replace the staple cartridge.
To continue press
SANITIZING DISK
<x>% COMPLETE
The hard disk or compact flash disk is being cleaned. Contact your network
administrator.
Do not power off
SIZE MISMATCH IN
TRAY xx
Tray xx is loaded with paper that is longer or shorter in the feed direction than
the size configured for the tray.
For help press
STAPLER ALIGN ERROR
The paper in the external paper handling device is not aligned.
STAPLER LOW
ON STAPLES
For help press
The stapler device is running out of staples and needs to be refilled.
STAPLER OUT OF
STAPLES
The stapler device is out of staples and needs to be refilled.
For help press
STAPLING INTERRUPTION
122 Chapter 6 Problem solving
Remove the jammed staple.
ENWW
Message
Explanation or recommended action
TOO MANY PAGES IN JOB
TO STAPLE
The job is too large to staple. The job will be printed unstapled. Reduce the
number of pages in the job to staple.
For help press
TOO MANY PAGES IN JOB
TO FINISH
The job height is greater than the finisher capacity.
For help press
TOO MANY PAGES TO
MAKE BOOKLET
The page content is too large to be saddle stitched.
UNABLE TO
STORE JOB
<JOB NAME>
A job cannot be stored on the printer because of a memory, disk, or
configuration problem.
Waiting for
TRAY XX to lift
The tray is in the process of lifting the paper to the top of the tray for feeding.
10.xx.yy SUPPLY
MEMORY ERROR
The product cannot read or write to at least one supply e-label, or a supply elabel is missing. Reinstall the supply or install a new supply.
If job name is unknown, insert UNTITLED.
For help press
11.XX INTERNAL CLOCK
ERROR
To continue press
The internal clock on this product is not working. The printer still prints, but a
prompt appears to set the date and time whenever the printer is turned off and
then turned on.
Time stamping for documents and events might also be affected. To resolve
this issue, contact an HP-authorized service or support provider. (See the
HP support flyer, or go to www.hp.com/support/lj9050_lj9040.)
13.xy.zz JAM IN
[LOCATION]
Remove jammed paper from the specified location (see Clearing jams).
Open and close the front door to clear the message.
If the message persists after all jams have been cleared, a sensor might be
stuck or broken. Contact an HP-authorized service or support provider. (See
the HP support flyer, or go to www.hp.com/support/lj9050_lj9040.)
20 INSUFFICIENT
MEMORY
The printer received more data than can fit in its available memory. You might
have tried to transfer too many macros, soft fonts, or complex graphics.
For help press
Press
to print the transferred data (some data might be lost), and then
simplify the print job or install additional memory (see Printer memory and
expansion).
alternates with
To continue press
21 PAGE TOO
COMPLEX
The page formatting process was not fast enough for the printer.
For help press
If this message appears often, simplify the print job or add printer memory.
Press
to print the transferred data. (Some data might be lost.)
alternates with
To continue press
ENWW
Resolving control-panel messages 123
Message
Explanation or recommended action
22 EIO x
BUFFER OVERFLOW
Too much data was sent to the EIO card in the specified slot (x). An improper
communications protocol might be in use.
To continue press
Press
to print the transferred data. (Some data might be lost.)
Check the host configuration. If this message persists, contact an
HP-authorized service or support provider. (See the HP support flyer or go to
www.hp.com/support/lj9050_lj9040.)
22 EMBEDDED I/O
BUFFER OVERFLOW
Too much data was sent to the embedded HP Jetdirect print server.
To continue press
22 PARALLEL I/O
BUFFER OVERFLOW
For help press
alternates with
To continue press
Too much data was sent to the parallel port.
Check for a loose cable connection, and be sure to use a high-quality cable.
(See the HP support flyer or go to www.hp.com/support/lj9050_lj9040.) Some
non-HP parallel cables might be missing pin connections or might otherwise
not conform to the IEEE-1284 specification.
This error can occur if the driver you are using is not IEEE-1284 compliant. For
best results, use the HP driver that came with the printer (see Printer drivers).
Press
to clear the error message. (Data will be lost.)
If this message persists, contact an HP-authorized service or support provider.
(See the HP support flyer or go to www.hp.com/support/lj9050_lj9040.)
40 EIO x BAD
TRANSMISSION
The connection between the printer and the EIO card in the specified slot has
been broken.
To continue press
Press
40 EMBEDDED I/O BAD
TRANSMISSION
The connection with the embedded HP Jetdirect print server has been broken.
to clear the error message and continue printing.
Turn the printer off, and then turn the printer on.
To continue press
41.x ERROR
A temporary printing error occurred.
For help press
Turn the printer off, and then turn the printer on.
alternates with
To continue press
If this message persists, contact an HP-authorized service or support provider.
(See the HP support flyer or go to www.hp.com/support/lj9050_lj9040.)
41.3 UNEXPECTED
SIZE IN TRAY xx
A tray (xx) is loaded with paper that is longer or shorter in the feed direction
than the size configured for the tray.
For help press
Press
to get to TRAY xx SIZE=. Reconfigure the size in a tray so the printer
will use a tray that contains the size that is required for the print job.
alternates with
To use another tray
press
If the error does not clear, turn the printer off, and then turn the printer on.
49.xxxxx ERROR
A critical firmware error has occurred.
To continue turn off
then on
Turn the printer off, and then turn the printer on.
124 Chapter 6 Problem solving
If this message persists, contact an HP-authorized service or support provider.
(See the HP support flyer or go to www.hp.com/support/lj9050_lj9040.)
If this message persists, contact an HP-authorized service or support provider.
(See the HP support flyer or go to www.hp.com/support/lj9050_lj9040.)
ENWW
Message
Explanation or recommended action
50.x FUSER ERROR
A fuser error has occurred.
For help press
Turn the printer off, and then turn the printer on.
If this message persists, contact an HP-authorized service or support provider.
(See the HP support flyer or go to www.hp.com/support/lj9050_lj9040.)
51.xy ERROR
A temporary printing error occurred.
For help press
Turn the printer off, and then turn the printer on.
alternates with
If this message persists, contact an HP-authorized service or support provider.
(See the HP support flyer or go to www.hp.com/support/lj9050_lj9040.)
To continue turn off
then on
52.xy ERROR
A temporary printing error occurred.
For help press
Turn the printer off, and then turn the printer on.
alternates with
If this message persists, contact an HP-authorized service or support provider.
(See the HP support flyer or go to www.hp.com/support/lj9050_lj9040.)
To continue turn off
then on
53.xy.zz CHECK RAM
DIMM SLOT [X]
There is a problem with the printer memory. The DIMM that caused the error
will not be used. The following are the values of x:
To continue press
x = Device location
0 = On-board memory
1 = Slot 1
2 = Slot 2
You might need to reseat or replace the specified DIMM.
Turn the printer off, and then replace the DIMM that caused the error.
If this message persists, contact an HP-authorized service or support provider.
(See the HP support flyer or go to www.hp.com/support/lj9050_lj9040.)
55.xx.yy DC
CONTROLLER ERROR
A temporary printing error occurred.
For help press
If the error does not clear, turn the printer off, and then turn the printer on.
alternates with
If this message persists, contact an HP-authorized service or support provider.
(See the HP support flyer or go to www.hp.com/support/lj9050_lj9040.)
To continue turn off
then on
.
56.xx ERROR
A temporary printing error occurred.
For help press
Turn the printer off, and then turn the printer on.
alternates with
If this message persists, contact an HP-authorized service or support provider.
(See the HP support flyer or go to www.hp.com/support/lj9050_lj9040.)
To continue turn off
then on
57.xx ERROR
A temporary printing error occurred.
For help press
Turn the printer off, and then turn the printer on.
alternates with
If this message persists, contact an HP-authorized service or support provider.
(See the HP support flyer or go to www.hp.com/support/lj9050_lj9040.
To continue turn off
then on
ENWW
Press
Resolving control-panel messages 125
Message
Explanation or recommended action
58.xx ERROR
A temporary printing error occurred.
For help press
Turn the printer off, and then turn the printer on.
alternates with
If this message persists, contact an HP-authorized service or support provider.
(See the HP support flyer or go to www.hp.com/support/lj9050_lj9040.
To continue turn off
then on
59.xy ERROR
For help press
A temporary printing error occurred.
alternates with
If this message persists, contact an HP-authorized service or support provider.
(See the HP support flyer or go to www.hp.com/support/lj9050_lj9040.
To continue turn off
then on
60.x ERROR
For help press
Turn the printer off, and then turn the printer on.
An obstruction prevents the tray specified by xx from lifting paper properly for
feeding.
If this message persists, contact an HP-authorized service or support provider.
(See the HP support flyer or go to www.hp.com/support/lj9050_lj9040.
62 NO SYSTEM
A problem exists with the printer firmware.
To continue turn off
then on.
To continue, turn the printer off, and then turn the printer on.
64 ERROR
For help press
A scan buffer error occurred.
alternates with
If this message persists, contact an HP-authorized service or support provider.
(See the HP support flyer or go to www.hp.com/support/lj9050_lj9040.
To continue turn off
then on
If this message persists, contact an HP-authorized service or support provider.
(See the HP support flyer or go to www.hp.com/support/lj9050_lj9040.
Turn the printer off, and then turn the printer on.
68.x STORAGE ERROR
SETTINGS CHANGED
An error occurred in the printer nonvolatile memory (NVRAM), and one or more
printer settings has been reset to its factory default.
For help press
alternates with
Printing can continue, but there might be some unexpected functions because
an error occurred in permanent storage.
To continue press
Pressing
should clear the message.
If this message persists, contact an HP-authorized service or support provider.
(See the HP support flyer or go to www.hp.com/support/lj9050_lj9040.
68.x PERMANENT
STORAGE FULL
The printer NVRAM is full. Some settings saved in the NVRAM might have
been reset to the factory defaults.
For help press
alternates with
Printing can continue, but there might be some unexpected functions because
an error occurred in permanent storage.
To continue press
Pressing
should clear the message.
If this message persists, contact an HP-authorized service or support provider.
(See the HP support flyer or go to www.hp.com/support/lj9050_lj9040.
68.x PERMANENT
STORAGE WRITE FAIL
To continue press
The printer NVRAM is failing to write.
Printing can continue, but there might be some unexpected functions because
an error occurred in permanent storage.
Pressing
should clear the message.
If this message persists, contact an HP-authorized service or support provider.
(See the HP support flyer or go to www.hp.com/support/lj9050_lj9040.
126 Chapter 6 Problem solving
ENWW
Message
Explanation or recommended action
69.x ERROR
A temporary printing error occurred.
For help press
Turn the printer off, reseat the duplex printing accessory, and then turn the
printer on.
alternates with
To continue turn off
then on
If this message persists, remove the duplexer and resume single-sided printing.
If this message continues to persist, contact an HP-authorized service or
support provider. (See the HP support flyer or go to www.hp.com/support/
lj9050_lj9040.
79.xxxx ERROR
To continue turn off
then on
A critical hardware error occurred.
8x.yyyy
The EIO accessory card in slot x has encountered a critical error as specified
by yyyy.
EIO ERROR
8X.YYYY EMBEDDED
JETDIRECT ERROR
ENWW
Turn the printer off, and then turn the printer on.
If the message persists, remove the duplexer and resume single-sided printing.
Contact an HP-authorized service or support provider. (See the HP support
flyer or go to www.hp.com/support/lj9050_lj9040.
The embedded HP Jetdirect print server has encountered a critical error as
specified by YYYY.
Resolving control-panel messages 127
Correcting output quality problems
Use the examples in the image defect table to determine which print quality problem you are
experiencing, and then see the corresponding reference pages to troubleshoot.
Note
The examples below depict letter-size paper that has passed through the printer long-edge first.
(If the paper has passed through the printer short-edge first, lines and repeating defects will run
vertically rather than horizontally.)
See Light print or
fade
See Specks
See Gray
background
See Toner smear
See Loose
toner
See Repeating
defects
See Misformed
characters
See Page skew
See Curl or
wave
See Wrinkles or
creases
128 Chapter 6 Problem solving
See Dropouts
See Lines
ENWW
Light print or fade
●
The print cartridge might be low. Replace the print cartridge.
●
Maintenance might be due. Check this by printing a copy of the supplies status page (see
Supplies status page). If maintenance is due, order and install the printer maintenance kit.
(See the HP support flyer or go to www.hp.com/support/lj9050_lj9040.)
●
The print cartridge might be almost empty. Replace the print cartridge.
Specks
Specks might appear on a page after a jam has been cleared.
●
Print a few more pages to see if the problem corrects itself.
●
If specks occur frequently, set your printer up to automatically run a cleaning page (see
Using the printer cleaning page).
●
Clean the inside of the printer (see General cleaning, or go to www.hp.com/support/
lj9050_lj9040) and run a manual cleaning page to clean the fuser (see Using the printer
cleaning page).
●
Try using a different type of paper.
●
Check for print cartridge leaks. If the print cartridge is leaking, replace it.
Dropouts
●
Make sure that the environmental specifications for the printer are being met (see
Environmental specifications).
●
If the paper is rough and the toner easily rubs off, either try changing the fuser mode to High
1 or High 2, or try using a smoother paper.
●
Try using a different paper type.
Lines
●
Print a few more pages to see if the problem corrects itself.
●
Clean the inside of the printer (see Cleaning the printer, or go to www.hp.com/support/
lj9050_lj9040) and run a manual cleaning page to clean the fuser (see Using the printer
cleaning page).
●
Replace the print cartridge.
●
Maintenance might be due. Check this by printing a copy of the supplies status page (see
Supplies status page). If maintenance is due, order and install the printer maintenance kit.
(See the HP support flyer or go to www.hp.com/support/lj9050_lj9040.)
Gray background
ENWW
●
Do not use paper that has already been run through the printer.
●
Print a few more pages to see if the problem corrects itself.
●
Turn over the stack of paper in the tray. Also, try rotating the paper 180°.
●
At the printer control panel, use the Print quality menu to decrease the toner density setting
(see System setup submenu).
●
Make sure that the environmental specifications for the printer are being met (see
Environmental specifications).
●
Replace the print cartridge.
Correcting output quality problems 129
Toner smear
Also see Loose toner.
●
Print a few more pages to see if the problem corrects itself.
●
Try using a different type of paper.
●
Make sure that the environmental specifications for the printer are being met (see
Environmental specifications).
●
Clean the inside of the printer (see Cleaning the printer, or go to www.hp.com/support/
lj9050_lj9040) and run a manual cleaning page to clean the fuser (see Using the printer
cleaning page).
●
Maintenance might be due. Check this by printing a copy of the supplies status page (see
Supplies status page). If maintenance is due, order and install the printer maintenance kit.
(See the HP support flyer or go to www.hp.com/support/lj9050_lj9040.)
●
Replace the print cartridge.
Loose toner
Loose toner, in this context, is defined as toner that can be rubbed off the page.
●
If paper is heavy or rough, try using a high fuser mode so that toner fuses more completely
onto the paper. At the printer control panel, use Fuser Modes in the Print Quality menu
(see Print quality submenu).
●
If you have observed a rougher texture on one side of your paper, try printing on the nonrough side.
●
Make sure that the environmental specifications for the printer are being met (see
Environmental specifications).
●
Make sure that paper type and quality meet HP specifications (see Paper specifications).
●
Maintenance might be due. Check this by printing a copy of the supplies status page (see
Supplies status page). If maintenance is due, order and install the printer maintenance kit.
(See the HP support flyer or go to www.hp.com/support/lj9050_lj9040.)
Repeating defects
●
Print a few more pages to see if the problem corrects itself.
●
If the distance between defects is 38 mm (1.5 in) or 94 mm (3.8 in), the print cartridge might
need to be replaced.
●
Clean the inside of the printer (see Cleaning the printer, or go to www.hp.com/support/
lj9050_lj9040) and run a manual cleaning page to clean the fuser (see Using the printer
cleaning page).
●
Maintenance might be due. Check this by printing a copy of the supplies status page (see
Supplies status page). If maintenance is due, order and install the printer maintenance kit.
(See the HP support flyer or go to www.hp.com/support/lj9050_lj9040.)
Misformed characters
●
Print a few more pages to see if the problem corrects itself.
●
Make sure that the environmental specifications for the printer are being met (see
Environmental specifications).
●
Maintenance might be due. Check this by printing a copy of the supplies status page (see
Supplies status page). If maintenance is due, order and install the printer maintenance kit.
(See the HP support flyer or go to www.hp.com/support/lj9050_lj9040.)
130 Chapter 6 Problem solving
ENWW
Page skew
●
Print a few more pages to see if the problem corrects itself.
●
Verify that there are no torn pieces of paper inside the printer.
●
Make sure that paper is loaded correctly, all adjustments have been made, and the paper is
under the corner tabs (see Orienting media).
●
Turn over the stack of paper in the tray. Also, try rotating the paper 180°.
●
Make sure that paper type and quality meet HP specifications (see Paper specifications).
●
Make sure that the environmental specifications for the printer are being met (see
Environmental specifications).
Curl or wave
●
Turn over the stack of paper in the tray. Also, try rotating the paper 180°.
●
Make sure that paper type and quality meet HP specifications (see Paper specifications).
●
Make sure that the environmental specifications for the printer are being met (see
Environmental specifications).
●
Try printing to a different output bin.
●
If media is lightweight and smooth, try using a low fuser mode to reduce the heat in the
fusing process. At the printer control panel, use Fuser Modes in the Print Quality menu
(see Print quality submenu).
Wrinkles or creases
ENWW
●
Print a few more pages to see if the problem corrects itself.
●
Make sure that the environmental specifications for the printer are being met (see
Environmental specifications).
●
Turn over the stack of paper in the tray. Also, try rotating the paper 180°.
●
Make sure that paper is loaded correctly, all adjustments have been made, and the paper is
under the corner tabs (see Orienting media).
●
Make sure that paper type and quality meet HP specifications (see Paper specifications).
●
If envelopes are creasing, try storing envelopes so that they lie flat.
Correcting output quality problems 131
Preventing wrinkles on envelopes
If envelopes are wrinkled when printed, first ensure that you are using supported types of
envelopes. Then, use the following procedure to move the fuser levers to the higher position
while printing the envelopes.
To prevent wrinkles on envelopes
1
WARNING!
Open the left door (If an optional output device is installed, first slide it away from the printer).
Avoid touching the adjacent fusing area. It can be HOT.
2
Locate and lift up the two blue levers.
3
Close the left door.
When finished printing the envelopes, return the fuser levers to the down position for standard
paper types.
CAUTION
Failure to return levers in the down position for standard paper types might result in poor print
quality.
132 Chapter 6 Problem solving
ENWW
Solving common printer issues
Troubleshooting checklist
Note
ENWW
●
Ensure that media that is loaded into the trays is from a freshly opened ream, contains no
defects, and is installed correctly with the paper guides adjusted.
●
Verify that the product is using a dedicated circuit and is plugged directly into the wall.
For more information about an optional HP output device, see the user guide that came with the
device.
Situation
Solution
Correct size of paper is not
loaded.
Check paper trays to be sure the correct sizes are loaded as
configured. Also, check that guides are set correctly.
Display is blank, and
internal fans are not
running.
Make sure that the printer power is on. Press all of the buttons on the
printer control panel to see if one is stuck; contact your HP-authorized
service representative if this does not resolve the problem.
Messages appear in the
display.
See Understanding printer messages.
Paper is jammed in the
printer.
Check for paper jams (see Clearing jams).
Printer display is in the
wrong language or shows
unfamiliar characters.
Reconfigure the control-panel display language. See the Getting
Started Guide, or press
while simultaneously pushing the power
switch ON. Hold
until SELECT LANGUAGE appears, and then release
. Use
and
to select the appropriate language. Press
to save your selection. The control-panel display will indicate that the
printer is ready to use. If the new language does not appear in the
display, you might not have pressed
to save your new selection.
Printer is not working at all.
Plug the AC power cord firmly into the grounded power receptacle and
into the printer. (Be sure the power source is energized.)
Printer is turned on, but
internal fans are not
running.
Make sure the line voltage is correct for the printer power configuration.
(See the plate next to the power receptacle on the back of your printer
for voltage requirements.) If you are using a power strip and its voltage
is not within specification, plug the printer directly into the power
receptacle.
Printer voltage is not
correct.
Make sure line voltage is in the correct range. (See the product label
next to the power receptacle on the back of the printer for voltage
requirements.)
Solving common printer issues 133
Situation
Solution
A page fails to print.
Set PRINT PS ERRORS=ON, and then send the job again to print a PS
error page. If this does not identify the problem, try turning off
Resource Saving and I/O Buffering or try installing more memory
(see PCL or PS font list).
A page prints with clipped
margins.
If the page margins are clipped, you might have to print the page at
300-dpi resolution or install more memory. Also try turning off
Resource Saving and I/O Buffering.
A PS error page prints.
●
●
●
●
●
●
Make sure the print job is a PS job.
Check to see whether your program expected you to send a setup
or PS header file to the printer.
Check the printer setup in your software application to make sure
that the printer is selected.
Check cable connections to ensure that they are secure.
Reduce the complexity of the graphic.
Add available memory by turning on Resource Saving.
A text listing of PS
commands prints instead of
your PS print job.
The control-panel PERSONALITY=AUTO setting might have been
confused by a nonstandard PS code. Check the PERSONALITY setting
to see if it is set to PS or PCL. If it is set to PCL, set it to
PERSONALITY=AUTO. If it is set to AUTO, set it to PS for this print job only.
When the job has printed, return the setting to AUTO.
Attempted to use a
disk-resident font, but the
printer substituted a
different font.
If you are using PCL, print the PCL Font Page, and verify that the font
is on the disk. If you are using PS, print the PS Font Page and make
sure that the font is on the disk. If the font is not on the disk, use the
Device Storage Manager or the Macintosh-based HP LaserJet utility to
download the font.
Auto setup did not
automatically set up the
printer.
●
●
●
●
Blank pages print.
●
●
Set up the printer manually by selecting Configure (Windows 9.X
and NT) or Device Settings (Windows 2000 and XP).
Select an alternate PPD (Macintosh). See Using the embedded
Web server.
The PPD might have been renamed. If so, select the renamed
PPD (Macintosh). See Using the embedded Web server.
A network queue might be present.
Turn the printer off and then on.
Make sure the printer cartridge is installed properly.
Cannot access Tray 2 or 3,
or optional Tray 4.
Make sure that the paper tray guides are adjusted correctly for the
paper size you are using. (See Loading input trays, or go to
www.hp.com/support/lj9050_lj9040.)
Cannot clear MANUALLY
FEED [TYPE] [SIZE]
message.
●
134 Chapter 6 Problem solving
●
A previous print job might still be in the printer buffer.
Make sure that optional Tray 1 has the correct paper size loaded.
(See Loading input trays, or go to www.hp.com/support/
lj9050_lj9040.)
ENWW
Situation
Solution
Computer software
problem.
Check that your computer is working correctly by printing from a
program you know works, or by printing a plain text file to see if the
problem is with your program or with your printer driver. (For example,
C:\dir>LPTn where n is the number of the computer port the printer
is connected to, for example LPT1.) To print the page, you might have
to send a form feed command from your computer.
Control-panel settings,
such as RESOLUTION or
ORIENTATION, do not work
or are ignored.
Software commands override control-panel settings (see Using
control-panel menus for information about how your program works
with control-panel settings).
Data from a previous print
job is still in the printer
buffer.
●
●
●
●
●
Data is missing, but there
are no printer messages.
●
●
●
●
Data light is flashing, but
nothing prints.
●
●
●
●
●
ENWW
Make sure that you are using the correct printer driver.
A complex print job might still be processing.
Make sure the printer is not paused. Make sure that PROCESSING.
appears on the control panel
Pull out the print cartridge and check for paper. Reseat the print
cartridge.
Open Trays 2 and 3. Make sure that the appropriate paper is
inserted. (See Loading input trays, or go to www.hp.com/
support/lj9050_lj9040.) Close the trays.
Check your software program to be sure the print file contains no
errors.
Check your cable to make sure it is securely connected to both the
printer and the computer.
Your parallel printer cable might be defective. Use a high-quality
cable. (See the HP support flyer, or go to www.hp.com/support/
lj9050_lj9040 for an HP cable part number.)
Check your network connection.
Make sure that you are using the correct printer driver.
A complex print job might still be processing.
Make sure the printer is not paused. Make sure that PROCESSING
appears on the control-panel display.
Pull out the print cartridge and check for paper. Reseat the print
cartridge.
Open Trays 2 and 3. Make sure that the appropriate paper is
loaded. (See Loading input trays, or go to www.hp.com/support/
lj9050_lj9040.) Close the trays.
Driver might not be set up
to print on both sides of the
paper.
Make sure that the option to print on both sides of the paper is properly
configured in the driver.
Duplex printing accessory
jams.
Make sure that you are using the supported paper weights and sizes.
(See Paper specifications, or go to www.hp.com/support/
lj9050_lj9040.)
Solving common printer issues 135
Situation
Solution
First page takes much
longer to print than
following pages.
●
Garbled pages print, there
are overprints, or only a
portion of a page prints.
●
●
●
●
●
●
General repeated stapler
jam problems.
●
●
Job has incorrect fonts.
●
●
Make sure that the printer control panel shows READY.
Set the Sleep feature for a longer time period (see Configuration
page). If a page takes longer to print due to complex formatting
commands, changing the Sleep setting might not improve print
speed. You might want to simplify the page.
Make sure that your program is configured for the correct printer.
Replace the printer interface (I/O) cable with a cable that you know
works to see if the cable is defective.
Your parallel printer cable might be defective. Use a high-quality
cable. (See the HP support flyer, or go to www.hp.com/support/
lj9050_lj9040 for an HP cable part number.)
Set the PERSONALITY item in the System Setup submenu of the
Configure Device menu to AUTO (see PERSONALITY=AUTO). The
printer might have been set to PCL, and a PS job was sent to the
printer, or vice versa.
Data sent to the printer might be corrupt. Try sending another file
to see if it prints.
Check to see that the job to be stapled is less than 5 mm (0.1 inch)
thick.
Stapler might have some trapped staple wires that are obstructing
the magazine. Remove loose staples and paper dust from the
inside of the stapler (seeTo clear a staple jam from the optional
stacker/stapler).
If you are printing an .EPS file, try downloading the fonts contained
in the .EPS file to the printer before printing. Use the HP LaserJet
Utility (see Software for Macintosh computers).
If the document is not printing with New York, Geneva, or Monaco
fonts, go into the Page Setup dialog box, and select Options to
deselect substituted fonts.
Job is not sent to the
correct printer.
Another printer with the same or similar name might have received the
print job. Make sure that the printer name matches the name selected
in the Chooser (see Using the embedded Web server).
Job prints in Courier (the
printer default font) instead
of the font you requested.
●
●
●
●
136 Chapter 6 Problem solving
The requested typeface is not available in the printer or is not
present on the disk. Use a font download utility to download the
desired font.
Fonts downloaded to memory are lost when the printer is turned
off. They are also lost if Resource Saving is not used, and a
personality switch is performed to print a PCL job. Disk fonts are
not affected by PCL jobs or by turning the printer off.
Print a PS Font Page to verify that the font is available. If a disk font
appears to be missing, it might be because a software utility was
used to delete the font, because the disk was re-initialized, or
because the disk drive is not installed correctly. Print a
configuration page to verify that the disk drive is installed and is
functioning correctly.
Print a Disk Directory to help identify available fonts.
ENWW
Situation
Solution
Job prints on the wrong
side of the paper.
●
●
●
Job was not duplexed.
●
●
●
Job was not stapled.
Print a configuration page to ensure that the duplex printing
accessory is installed properly (see Configuration page).
Make sure the duplex printing accessory has been configured in
the printer driver.
Make sure that the software is not overriding the printer driver
setting.
Jobs sent to the stapler might not be stapled for one or more of the
following reasons:
●
●
●
●
●
●
●
●
One-page jobs will not be stapled.
The stapler is out of staples and AUTO CONTINUE is set to ON.
The wrong size or type of paper was used for the job.
More than 50 pages were sent to the stapler, exceeding its
capacity.
The stapler has bent or broken staples in the stapler head.
A staple jam was recently cleared (up to two sequential jobs might
not be stapled).
The job was sent to a bin other than the stapler bin because the
wrong size or type of paper was used for the job.
The interface cable to the stapler unit might be defective or not
connected properly.
Job went to a different
location than was expected.
The wrong size or type of paper was used for the job. (See Configuring
the trays by using the Paper Handling menu, or go to www.hp.com/
support/lj9050_lj9040.)
Last page did not print and
the Data light is on.
●
●
●
●
●
●
Network or shared printer
problems.
ENWW
Make sure you have loaded the paper correctly. (See Loading
input trays, or go to www.hp.com/support/lj9050_lj9040.)
If you are printing one-sided copies, load paper into optional Tray 1
with the side to be printed facing up. Load paper in Trays 2, 3, and
optional Tray 4 with the side to be printed facing down.
If you are printing two-sided copies, load paper into optional Tray 1
with the first side to be printed facing down. Load paper in Trays 2,
3, and optional Tray 4 with the first side to be printed facing up.
Make sure that you are using the correct printer driver.
Complex print job might still be processing.
Printer might be waiting for the end of a file that did not come with
the job. Press
to send it.
Make sure the printer is not paused. Make sure that PROCESSING
appears on the control-panel display.
Pull out the print cartridge and check for paper. Reseat the print
cartridge.
Open Trays 2 and 3. Make sure that the appropriate paper is
loaded. (See Loading input trays, or go to www.hp.com/support/
lj9050_lj9040.) Close the trays.
Check for network or shared printer problems by connecting your
computer directly to the printer and printing from a program that you
know works. If you suspect network problems, check with your network
administrator or consult the network documentation that came with
your printer network cards.
Solving common printer issues 137
Situation
Solution
Optional Tray 4 will not
work.
The power cord is not firmly plugged in to both the printer and the
power receptacle. Remove and reconnect the power cord.
Paper is loaded into
optional Tray 1, and a load
or manual feed message
appears on the controlpanel display.
Load the correct paper in the tray. (See Loading input trays, or go to
www.hp.com/support/lj9050_lj9040.) If the correct paper is already
loaded, press
.
Paper is not going to the
correct output location.
●
●
Paper jams and paperfeeding problems.
●
●
●
●
Printer does not recognize
the duplex printing
accessory.
●
●
●
Verify that the correct output bin is selected in the printer driver.
For more information about changing printer driver settings, see
the online help.
The paper does not meet the specifications for the output bin. (See
Selecting an output location, or go to www.hp.com/support/
lj9050_lj9040.)
See To clear jams in Trays 2 and 3 or To clear jams in optional
Tray 4.
Ensure that paper specifications are within recommended range.
(See Paper specifications, or go to www.hp.com/support/
lj9050_lj9040.)
Make sure the paper guides are adjusted properly and are not
skewed. (See Loading input trays, or go to www.hp.com/
support/lj9050_lj9040.)
Perform preventive maintenance if requested by the printer.
Print a configuration page to ensure that the duplex printing
accessory is installed properly (see Configuration page).
Turn the printer off. Remove and reinstall the unit. Turn the printer
on.
Make sure that the duplex printing accessory has been configured
in the printer driver.
Printer does not recognize
the hard disk.
Turn the printer off and verify that the hard disk is inserted correctly
and is securely fastened.
Printer does not recognize
optional Tray 4.
●
●
●
●
Printer does not recognize
stapler.
138 Chapter 6 Problem solving
Make sure you selected optional Tray 4 in the printer driver (see
Printer software).
Turn the printer off and then on.
Make sure the power cord is plugged into optional Tray 4.
If the printer still does not recognize optional Tray 4, contact your
dealer or authorized HP service provider.
Check the cable to the stapler. Make sure it is properly connected at
both ends.
ENWW
Situation
Solution
Printer draws paper from
the wrong tray.
●
●
●
●
Printer interface problems.
Print a configuration page from the printer control panel to verify that
the interface configurations shown on the printout match those on the
host computer (see Configuration page).
Printer is paused.
Press STOP. Press
Printer is off or not
connected to an active
power source.
Make sure that all power cables are firmly plugged in to both the printer
components and an active power source. Make sure the printer is on.
Printer is ready, but not
receiving data (the Data
light does not blink).
●
●
●
●
Printer is usually slow to
respond.
●
●
ENWW
Be sure your program is selecting the correct paper size or type.
Make sure that the driver for your program is correctly installed,
configured, and capable of requesting the appropriate paper size
and type.
The size of paper requested is not loaded in the tray selected. The
printer draws paper from the next default tray that contains the
correct size. Load the correct paper in the tray and make sure the
tray is adjusted correctly. Load the tray with enough paper to
complete the print job. To always print from the requested tray, set
USE REQUESTED TRAY to EXCLUSIVELY.
If you selected Tray 2, 3, or optional Tray 4 and did not turn the
printer off when installing it, the printer does not recognize it and
draws paper from the next default tray source. Turn the printer off,
and then back on, and the printer will recognize the tray.
and
to select Resume, and then press
.
Check for loose I/O cable connections at the printer and computer
or network port.
Try your I/O cable on a system that you know works.
Check that the correct interface cable was selected and is securely
connected to both the printer and the computer. If the cable is not
correctly configured, see the HP LaserJet 9050/9040 Series
Printer Getting Started Guide for configuration information.
If connected to a network, print a Jetdirect configuration page to
check for interface or network problems (see Configuration page).
Printer speed is highly dependent on how your software
application is set up, which printer driver you are using, and how
much traffic is on the network. See the getting started guide for
configuration information.
You might need to add more memory (see Installing memory and
fonts).
Printer port problem.
Check that your computer port is configured and working properly. One
way to check this is to connect another printer to that port on your
computer and print from a program you know works.
Printer prints only part of a
page or document.
The connection has been broken during transmission. If you move the
portable device during transmission, the connection can be broken.
IRDA-compliant devices are designed to recover from temporary
connection interruptions. You have up to 40 seconds to re-establish the
connection (depending on the portable device being used).
Solving common printer issues 139
Situation
Solution
Printer prints wrong fonts or
formats.
●
●
Printing stops in the middle
of the job.
●
●
●
●
●
The font is not present in the printer and must be downloaded from
your program, or the proper font DIMM must be installed. Check
your program to make sure the correct printer driver has been
installed and configured. To verify that the font you want is
available, print a PS or PCL font list (see Information menu).
Your software selected a substitute font for one that is not available
in the printer. (See your software program manual for more
information about font selection.)
Check the control-panel display for an error message.
If you are on a network, make sure the computer is correctly
configured and that there is not a network problem (see your
network administrator).
Check the line voltage to make sure that it is steady and within
printer specifications. (See the HP support flyer or go to
www.hp.com/support/lj9050_lj9040.) Turn the printer off and
then back on.
Check the time-out setting in your network program. You might
need to increase it.
If you are trying to copy a file to the printer from the DOS prompt,
use the copy command COPY [filename] LPTn /B printer
port, such as LPT1 (where n is the port number).
Note
To output the page, you might have to send a form feed command from
the computer.
PS print job will not print.
Check the configuration in the PostScript tab of Windows. Check that
Protocol is set to AppleTalk and that Binary Data is not selected.
Software is selecting the
wrong port.
Check your operating system port settings to be sure the print job is
being sent to the correct port (for example, LPT1).
The control panel and
driver are not set to the
same paper size.
Make sure that the custom paper size defined from the control panel
and the custom paper size defined in the driver are the same.
The file you are trying to
print might not have the
option to print on both sides
of the paper turned on.
Make sure that the option to print on both sides of the paper is
configured in the driver.
140 Chapter 6 Problem solving
ENWW
Situation
Solution
The Macintosh computer is
not communicating with the
printer.
●
●
●
●
●
●
The printer driver icon does
not appear in the Chooser.
Make sure the Apple LaserWriter 8 Chooser extension resides in the
Extensions folder. If it does not exist anywhere on your system, you
can obtain the driver from your Macintosh OS system software CD,
from Apple Computer, Inc. For more information, see the HP support
flyer or go to www.hp.com/support/lj9050_lj9040.
Type has been specified as
labels, transparencies, or
envelopes.
●
●
ENWW
Make sure that READY appears on the printer control panel.
Make sure that the correct printer driver is selected in the left half
of the Chooser. Then make sure that the correct printer name is
selected (highlighted) on the right half of the Chooser. An icon will
appear next to the printer name after the driver has been set up
and configured with the PPD.
If the printer resides on a network with multiple zones, make sure
the correct zone is selected in the AppleTalk Zones box in the
Chooser.
Make sure the correct printer has been selected in the Chooser by
printing a configuration page (see Configuration page). Make sure
the name of the printer that appears on the configuration page
matches the printer in the Chooser.
Make sure AppleTalk is active. (Select this in the Chooser or in
the AppleTalk control panel, whichever is applicable for your OS
version.)
Make sure the computer and printer are on the same network.
From Control Panels in the Apple menu, select the Network (or
the AppleTalk) control panel and then select the correct network
(for example, LocalTalk or EtherTalk).
Make sure that the media type can be printed on both sides. (See
the HP support flyer or go to www.hp.com/support/
lj9050_lj9040.)
Change the media type to the proper media type for printing on
both sides.
Solving common printer issues 141
Using the embedded Web server
Home pages
The home pages of the embedded Web server are the informational pages for the printer. These
include:
●
Printer status page
This page shows the printer control panel and any current message. The control-panel
status lights and buttons also appear, so you can change the printer control-panel menu
settings from this page. Consumable life levels and the input tray media configuration also
appear.
●
Configuration page
The printer configuration page appears on this site in the embedded Web server. For more
information, see Configuration page.
●
Event log page
This page shows the printer event log. For more information, see Event log page.
●
Supplies page
This page shows the levels of the consumables for the printer.
●
Usage page
This page shows how much of each media type has been used by the printer.
●
Device identification page
This page lets you name the device for network management needs, and shows the IP
address and server for the printer.
142 Chapter 6 Problem solving
ENWW
Device pages
Use the device pages of the embedded Web server to configure the printer from your computer.
These pages can be password protected. Always consult with your network administrator before
changing the printer configuration.
●
Configure printer page
This page is where you configure all printer settings.
●
Alerts page
This page is where you configure notification recipients for various printer events.
●
E-mail page
The e-mail addresses of notification recipients of printer events are typed into this page.
●
Order supplies page
The remaining life of various consumables appears on this page, and links to the HP Web
site for ordering supplies also appear.
●
Contact information page
The name and e-mail address of the primary point of contact for information about the printer
is typed into this page. The primary point of contact is usually the network administrator.
●
Security page
This page configures the password information for the embedded Web server. Password
information should be configured only by the network administrator.
●
Other links page
This page is used to add other Web sites to the embedded Web server. These sites appear
on the navigational bar throughout the embedded Web server pages.
●
Refresh rate page
This page configures how often the embedded Web server obtains information from the
printer regarding printer status.
●
Language page
The language that the embedded Web server appears in is configured from this page.
●
Device identification page
This page lets you name the device for network management needs, and shows the IP
address and server for the printer.
Networking pages
The network pages of the embedded Web server provide access to HP Jetdirect network
configuration parameters and status. These include:
ENWW
●
Network settings page
This page provides access to network protocol configuration parameters and other settings.
●
Security settings page
Use these pages to control access to the device and set client authentication settings for
connection to 802.11x networks.
●
Diagnostic pages
These pages provide access to network statistics and configuration page settings that are
useful in troubleshooting.
Using the embedded Web server 143
Printing information pages
From the printer control panel, you can print these pages, which contain information about the
printer configuration:
●
Menu map
●
Configuration page
●
Supplies Status page
●
Usage page
●
File Directory page
●
PCL Driver or PS Driver font list
To print an information page
1
Press
.
2
Use
or
to scroll to Information and then press
3
Use
or
to scroll to the information page you want and then press
.
.
To print a configuration page
1
Press
2
Use
or
to scroll to Information and then press
3
Use
or
to scroll to Print Configuration and then press
144 Chapter 6 Problem solving
.
.
.
ENWW
Checking the printer configuration
Information about printer configuration can be found in the Getting Started Guide that came with
the printer.
From the printer control panel, you can print pages that give details about the printer and its
current configuration. The following information pages are described here:
●
Menu map
●
Configuration page
●
Supplies status page
●
Usage page
●
PCL or PS font list
●
File directory page
●
Jetdirect
●
Event log
●
Paper path test
Use this procedure to print these information pages. Then, see the specific sections below for
more information about each page.
Menu map
To see the current settings for the menus and items available on the control panel, print a controlpanel menu map. Many of these values can be overridden from the printer driver or program. You
might want to store the menu map near the printer for reference.
The content of the menu map varies, depending on the options currently installed in the printer.
For a complete list of control-panel items and possible values, see Control-panel menus. To
change a control-panel setting, see Control-panel menus.
ENWW
Checking the printer configuration 145
Configuration page
Use the configuration page to view current printer settings, to help troubleshoot printer problems,
or to verify installation of optional accessories, such as memory (DIMMs), paper trays, and
printer languages.
Note
If an HP Jetdirect print server is installed, an HP Jetdirect configuration page will print out as well.
The configuration page contains the following information:
HP LaserJet 9050 series printer
Configuration Page
1
1
4
2
5
3
6
1
Printer Information lists the serial number, page counts, and other information for the
printer.
2
Event Log lists the number of entries in the log, the maximum number of entries viewable,
and the last three entries. The second page of the event log is the manufacturer’s page. This
page contains information that might assist HP Customer Care representatives in solving
possible printer problems.
3
Installed Personalities and Options lists all printer languages that are installed (such as
PCL and PS), and lists options that are installed in each DIMM and compact flash slot and
EIO slot.
4
Memory lists the printer memory information, PCL Driver Work Space (DWS), and I/O
buffering and Resource Saving information.
5
Security lists the status of the printer control-panel lock, control-panel password, and disk
drive.
6
Paper Trays and Options lists the size settings for all trays and lists optional paper-handling
accessories and output devices that are installed.
146 Chapter 6 Problem solving
ENWW
Supplies status page
Use the supplies status page to obtain information about the print cartridge that is installed in the
printer, the amount of toner left in the cartridge, and the number of pages and jobs that have
been processed. The page also lets you know when you should schedule the next preventative
maintenance.
The supplies status page contains the following information:
HP LaserJet 9050 series printer
1
supplies status page
3
1
2
4
ENWW
1
Cartridge Information indicates the amount of toner available in the print cartridge,
estimated pages remaining for the amount of toner left in the cartridge, total number of
pages and jobs processed, print cartridge manufacture date and serial number, and how to
recycle HP print cartridges.
2
Printer Information lists total printer page count, preventative maintenance interval, pages
until next maintenance should be performed, and serial number of the printer.
3
Other Supplies Information indicates the percentage of the maintenance kit that has been
used and the HP part numbers.
4
Ordering Information provides information about how to order supplies.
Checking the printer configuration 147
Usage page
Use the usage page to obtain information about the page sizes and number of pages printed.
The usage page contains the following information:
1
2
3
4
1
Product Name and Printer Name indicate the series of HP LaserJet printer in use.
2
Usage Totals indicates types of pages that have been printed, the number of single-sided
pages printed, the number of duplexed pages printed, and the total number of pages printed.
3
Print Mode & Paper Path Usage indicates the number of times that each print mode has
been used, the number of times that each input device has been used, and the number of
times that each output bin has been used.
4
Coverage indicates the amount of toner used on a page.
148 Chapter 6 Problem solving
ENWW
PCL or PS font list
Use the font lists to see which fonts are currently installed in the printer. (The font lists also show
which fonts are resident on a hard disk or flash DIMM.)
The PS font list shows the PS fonts installed, and gives a sample of those fonts. The following
describes the information that can be found on the PCL font list:
●
Font gives the font names and samples.
●
Pitch/Point indicates the pitch and point size of the font.
●
Escape Sequence (a PCL 5e programming command) is used to select the designated font.
(See the legend at the bottom of the font list page.)
●
Font # is the number used to select fonts from the printer control panel (not the software
application). Do not confuse the font # with the font ID, described below. The number
indicates the DIMM slot where the font is stored.
• SOFT: Downloaded fonts that stay resident in the printer until other fonts are downloaded
to replace them or until the printer is turned off.
• INTERNAL: Fonts that permanently reside in the printer.
ENWW
●
Font ID is the number you assign to soft fonts when you download them through software.
1
Disk Information indicates the disk model number, serial number, capacity, available free
space, and whether you can write to the disk.
2
File Size column indicates the size of each file under the Directory/File Name column. If a
directory is listed on the line, then Directory appears in this column, and its path is listed in
the Directory/File Name column.
3
Directory/File Name indicates the name of the file. Files in a subdirectory are listed right
after the directory line. The files are not necessarily listed in alphabetic order.
Checking the printer configuration 149
Jetdirect page
The Jetdirect page contains the following information:
1
2
3
1
HP Jetdirect Configuration indicates the printer status, model number, hardware address,
firmware version, port select, port configuration, auto negotiation, manufacturing
identification, and manufactured date.
2
Network Statistics indicates the total packets received, unicast packets received, bad
packets received, framing errors received, total packets transmitted, unsendable packets,
transmit collisions, and transmit late collisions.
3
Protocol Information indicates the status for TCP/IP, IPX/SPX, Novell/NetWare, AppleTalk,
and DLC/LLC.
150 Chapter 6 Problem solving
ENWW
Event log page
The first page of the event log contains the following information:
5
6
1
2
3
4
1
Current Page Count indicates the number of pages printed from the printer.
2
Number indicates the order in which the events occurred. The last event to occur has the
highest number.
3
Page Count indicates the number of pages printed from the printer when the event
occurred.
4
Event indicates the internal event code for each event.
5
Serial Number indicates the serial number of the printer.
6
Description or Personality indicates whether the event occurred due to a problem within a
printer personality or due to a printer jam.
The second page of the event log is the manufacturing page. This page contains information that
might assist HP Customer Care representatives in solving possible printer problems.
To print an event log
ENWW
1
Press
.
2
Use
or
to scroll to Diagnostics and press
3
Use
or
to scroll to Print Event Log and press
.
.
Checking the printer configuration 151
Printing a paper path test
The paper path test can be used to verify that various paper paths are working properly or to
troubleshoot problems with tray configuration.
To print a paper path test
1
Press
.
2
Use
or
to scroll to Diagnostics and then press
3
Use
or
to scroll to Paper Path Test and then press
4
Use
or
to select the input tray you want to test, the output bin, the duplex printing
accessory (if available), and number of copies, pressing
after you set the value for each.
After selecting the last option, the paper path test automatically starts.
.
.
See the user guide for each accessory device that is attached to the printer.
152 Chapter 6 Problem solving
ENWW
A
Specifications
Overview
This section presents some of the printer specifications.
●
Paper specifications
●
Environmental specifications
Paper weight equivalence table
Use this table to determine approximate equivalent basis weight in weight specifications other
than U.S. bond weight. For example, to determine the equivalent of 20 lb U.S. bond weight paper
in U.S. cover weight, locate the bond weight (in row two, first column) and scan across the row to
the cover weight (in the third column). The equivalent is 75 g/m2 (28 lb).
Note
ENWW
Shaded areas indicate a standard weight for that grade.
U.S.
Bond
Weight
(lb)
U.S.
Text/
Book
Weight
(lb)
U.S.
Cover
Weight
(lb)
U.S.
Bristol
Weight
(lb)
U.S.
Index
Weight
(lb)
U.S. Tag
Weight
(lb)
Metric
Weight
(g/m2)
17
43
24
29
35
39
64
20
50
28
34
42
46
75
21
54
30
36
44
49
80
22
56
31
38
46
51
81
24
60
33
41
50
55
90
27
68
37
45
55
61
100
28
70
39
49
58
65
105
32
80
44
55
67
74
120
34
86
47
58
71
79
128
36
91
50
62
75
83
135
Overview 153
U.S.
Bond
Weight
(lb)
U.S.
Text/
Book
Weight
(lb)
U.S.
Cover
Weight
(lb)
U.S.
Bristol
Weight
(lb)
U.S.
Index
Weight
(lb)
U.S. Tag
Weight
(lb)
Metric
Weight
(g/m2)
39
100
55
67
82
91
148
42
107
58
72
87
97
157
43
110
60
74
90
100
163
47
119
65
80
97
108
176
53
134
74
90
110
122
199
58
146
80
98
120
133
216
Printing supplies
Item
Part
number
Description or use
C8543X
Replacement HP maximum capacity, smart
print cartridge.
Print cartridge
average of 30,000 pages at 5%
coverage
HP LaserJet Monochrome
Transparencies
Specifically engineered for use with
HP LaserJet monochrome printers.
Letter (8.5 x 11 in), 50 sheets/box
92296T
A4 (210 x 297 mm), 50 sheets/box
92296U
HP LaserJet Soft Gloss Paper
Letter (8.5 x 11 in), 50 sheets/box
C4179A
A4 (210 x 297 mm), 50 sheets/box
C4179B
Specifications: 4.3 mil thickness. Two-sided
coating.
For use with HP Color LaserJet and
HP LaserJet monochrome printers. Coated
paper, good for business documents with high
impact, such as brochures, sales material, and
documents with graphics and photographic
images.
Specifications: 32 lb. Two-sided satin gloss
coating.
HP Premium Choice LaserJet
Paper
Letter (8.5 x 11 in), 500 sheets/
ream, 10-ream carton
HPU1132
A4 (210 x 297 mm), 500 sheets/
ream, 4-ream carton
CHP410
Tabloid (11 x 17 in), 250 sheets/
ream, 6-ream carton
HPU1732
A3 (420 x 297 mm), 500 sheets/
ream, 4-ream carton
CHP420
154 Appendix A Specifications
For use with HP Color LaserJet and
HP LaserJet monochrome printers. A heavy,
super-bright paper for high-impact documents
such as resumes, brochures, reports, and
presentations.
Specifications: 98 bright, 32 lb.
ENWW
Item
Part
number
HP LaserJet Paper
Letter (8.5 x 11 in), 500 sheets/
ream, 10-ream carton
HPJ1124
Letter (8.5 x 11 in), 3-hole, 500
sheets/ream, 10-ream carton
HPJ113H
Legal (8.5 x 14 in), 500 sheets/
ream, 10-ream carton
HPJ1424
A4 (210 x 297 mm), 500 sheets/
ream, 5-ream carton
CHP310
Tabloid (11 x 17 in), 500 sheets/
ream, 5-ream carton
HPJ1724
HP Printing Paper
Enhances performance for all HP LaserJet
printers. Heavier for letterhead, high-value
memos, legal documents, direct mail, and
correspondence.
Specifications: 96 bright, 24 lb.
Letter (8.5 x 11 in), 500 sheets/
ream, 10-ream carton
HPP1122
For use with laser and inkjet printers. Created
especially for small offices and home offices.
Heavier and brighter than copier paper.
A4 (210 x 297 mm), 500 sheets/
ream, 5-ream carton
CHP210
Specifications: 92 bright, 22 lb.
A3 (420 x 297 mm), 500 sheets/
ream, 5-ream carton
CHP220
HP MultiPurpose Paper
Letter (8.5 x 11 in), 500 sheets/
ream, 10-ream carton
HPM1120
Letter (8.5 x 11 in), 500 sheets/
ream, 5-ream carton
HPM115R
Letter (8.5 x 11 in), 3-hole, 500
sheets/ream, 10-ream carton
HPM113H
Legal (8.5 x 14 in), 500 sheets/
ream, 10-ream carton
HPM1420
Tabloid (11 x 17 in), 500 sheets/
ream, 5-ream carton
HPM1720
HP Office Paper
Letter (8.5 x 11 in), 500 sheets/
ream, 10-ream carton
HPC8511
Letter (8.5 x 11 in), 3-hole, 500
sheets/ream, 10-ream carton
HPC3HP
Legal (8.5 x 14 in), 500 sheets/
ream, 10-ream carton
HPC8514
A4 (210 x 297 mm), 500 sheets/
ream, 5-ream carton
CHP110
Tabloid (11 x 17 in), 500 sheets/
ream, 5-ream carton
HPC1117
For use with all office equipment (laser and
inkjet printers, copiers, and fax machines).
Created for businesses that want one paper
for all their office needs. Brighter and
smoother than other office papers.
Specifications: 90 bright, 20 lb.
For use with all office equipment (laser and
inkjet printers, copiers, and fax machines).
Good for standard, high-volume printing.
Brighter than standard papers.
Specifications: 87 bright, 20 lb.
Letter (8.5 x 11 in), 500 sheets/
ream, 10-ream carton
HPE1120
For use with all office equipment (laser and
inkjet printers, copiers, and fax machines).
Good for high-volume printing.
Letter (8.5 x 11 in), 3-hole, 500
sheets/ream, 10-ream carton
HPE113H
Satisfies U.S. Executive Order 13101 for
environmentally preferable products.
Legal (8.5 x 14 in), 500 sheets/
ream, 10-ream carton
HPE1420
Specifications: 84 bright, 20 lb, 30% postconsumer content.
HP Office Recycled Paper
ENWW
Description or use
Overview 155
Envelope margins
The following table gives typical address margins for a Commercial #10 or DL envelope.
Note
Type of address
Top margin
Left margin
Return address
15 mm (0.6 inch)
15 mm (0.6 inch)
Delivery address
51 mm (2 inches)
85 mm (3.5 inches)
For the best print quality, position margins no closer than 15 mm (0.6 inch) from the edges of the
envelope.
Paper specifications
HP LaserJet printers produce excellent print quality. This printer accepts a variety of media, such
as cut-sheet paper (including recycled paper), envelopes, labels, transparencies, and customsize paper. Properties such as weight, grain, and moisture content are important factors affecting
printer performance and output quality.
The printer can use a variety of paper and other print media in accordance with the guidelines in
this manual. Paper that does not meet these guidelines can cause the following problems:
●
Poor print quality
●
Increased jams and multiple-sheet feeds
●
Premature wear on the printer, requiring repair
For best results, use only HP brand paper and print media. Hewlett-Packard cannot recommend
the use of other brands. Because they are not HP products, HP cannot influence or control their
quality.
It is possible for paper to meet all of the guidelines in this manual and still not produce
satisfactory results. This might be the result of improper handling, unacceptable temperature and
humidity levels, or other variables over which HP has no control.
Before purchasing a large quantity of paper, make sure it meets the requirements specified in
this user guide and in the Guidelines for Paper and Other Print Media guide. Always test paper
before purchasing a large quantity. For more information, see www.hp.com/go/ljpaper.
CAUTION
Using paper outside HP specifications can cause problems for the printer, requiring repair. This
repair is not covered by the HP warranty or service agreements.
156 Appendix A Specifications
ENWW
Supported sizes of paper for input and output
Note
For more information on an optional HP output device, see the user guide that came with the
product.
Tray or Bin
Capacity
Paper
Optional Tray 1
Up to
100 sheets
●
●
Up to
10 envelopes
Maximum
stack height for
transparencies:
10 mm
(0.4 inch)
Trays 2 and 3
Up to
500 sheets
●
●
Up to
2,000 sheets
●
●
●
Up to 500
sheets
●
Up to 50
transparencies
●
●
ENWW
Two-sided printing: 64
to 199 g/m2 (17 to 53 lb
bond)
Print envelopes, transparencies, and
labels from optional Tray 1 only.
●
Standard top
bin
64 to 216 g/m2
(17 to 58 lb bond)
Note
●
Optional Tray 4
Standard detectable sizes:
Letter, Legal, Executive, ISO A3,
ISO A4, ISO A5, 11 x 17, JIS B5,
JIS B4, JPostD,
Custom sizes:
Minimum: 98 x 191 mm
(3.9 x 7.5 inches)
Maximum: 312 x 470 mm
(12.3 x 18.4 inches)
Envelope sizes:
Commercial #10, C5, DL,
Monarch, B5
Transparencies:
0.12 to 0.13 mm thick
(4.7 to 5.5 mils thick)
Weight
2
Standard detectable sizes:
Letter, Letter-R, Legal, Executive,
ISO A3, ISO A4-R, ISO A5, JIS
B4, JIS B5, 11 x 17
Custom sizes:
Minimum: 148 x 210 mm
(5.8 x 8.3 inches)
Maximum: 297 x 431 mm
(11.7 x 17 inches)
64 to 199 g/m (17 to
53 lb bond)
Standard detectable sizes:
Letter, Legal, Executive, ISO A3,
ISO A4, 11 x 17, JIS B4, JIS B5
Standard undetectable sizes:
8K, 16K, JIS Executive, 8.5 x 13
(215 x 330 mm)
Custom sizes:
Minimum: 182 x 210 mm
(7.2 x 8.3 inches)
Maximum: 297 x 431 mm
(11.7 x 17 inches)
64 to 199 g/m2 (17 to
53 lb bond)
Standard sizes:
Letter, Legal, Executive, ISO A3,
ISO A4, ISO A5, 11 x 17, JIS B5,
JIS B4, JPostD, Monarch, 8K,
16K
Custom sizes
Custom types: Transparencies
64 to 199 g/m2 (17 to
53 lb bond)
Paper specifications 157
Tray or Bin
Capacity
Paper
Left output bin
Up to 100
sheets
●
Up to 10
transparencies
●
●
Duplex printing
accessory
●
●
●
●
Optional
3,000-sheet
stacker
Up to
3,000 sheets of
Letter or A4
●
Up to
1,500 sheets of
A3 or 11 x 17
●
●
Optional
3,000-sheet
stacker/stapler
Up to
3,000 sheets of
Letter or A4
●
Up to
1,500 sheets of
A3 or 11 x 17
Up to 50
sheets stapled
●
●
158 Appendix A Specifications
Weight
Standard sizes:
Letter, Legal, Executive, ISO A3,
ISO A4, ISO A5, 11 x 17, JIS B5,
JIS B4, JPostD, Monarch, 8K,
16K
Custom sizes
Custom types: Envelopes, labels
64 to 216 g/m2 (17 to
58 lb bond)
Standard detectable sizes:
Letter, Letter-R, Legal, Executive,
ISO A3, ISO A4, ISO A4-R,
11 x 17, JIS B4, JIS B5
Standard undetectable sizes:
8K, 16K
Custom sizes
Custom types: Duplexing is not
supported for envelopes, labels,
or transparencies
64 to 199 g/m2 (17 to
53 lb bond)
Standard sizes for lower bin:
Letter, Legal, Executive, ISO A3,
ISO A4, ISO A5, 11 x 17, JIS B5,
JIS B4, 8K, 16K
●
Standard sizes for upper bin:
Letter, Legal, Executive, ISO A3,
ISO A4, ISO A5, 11 x 17, JIS B5,
JIS B4, JPostD, Monarch, 8K,
16K
Custom sizes
Custom types: Envelopes, labels,
transparencies, heavy paper
Standard sizes for lower bin:
Letter, Legal, Executive, ISO A3,
ISO A4, ISO A5, 11 x 17, JIS B5,
JIS B4, 8K, 16K
Standard sizes for upper bin:
Letter, Legal, Executive, ISO A3,
ISO A4, ISO A5, 11 x 17, JIS B5,
JIS B4, JPostD, Monarch, 8K,
16K
Custom sizes
Custom types: Envelopes, labels,
transparencies, heavy paper
●
●
●
64 to 199 g/m2 (17
to 53 lb bond) in
lower bin
64 to 216 g/m2 (17
to 58 lb bond) in
upper bin
64 to 199 g/m2 (17
to 53 lb bond) in
lower bin
64 to 216 g/m2 (17
to 58 lb bond) in
upper bin
ENWW
Tray or Bin
Capacity
Paper
Optional
multifunction
finisher
Up to 1,000
sheets of
stacked 20 lb
bond for Letter
and A4 (up to
50 sheets
stapled), and
500 sheets
stacked 20 lb
bond for A3
and 11 x 17 (up
to 25 sheets
stapled)
●
●
●
Weight
Standard sizes:
Letter, Legal, Executive, ISO A3,
ISO A4, ISO A5, JIS B4, JIS B5,
11 x 17
Custom sizes:
Minimum: 98 x 191 mm
(3.9 x 7.5 inches)
Maximum: 312 x 470 mm
(12.3 x 18.5 inches)
Custom types: Envelopes, labels,
transparencies, heavy paper
●
Standard sizes for upper bin
Letter, Legal, Executive, ISO A3,
ISO A4, ISO A5, JIS B4, JIS B5,
11 x 17
Custom sizes
Minimum: 148 x 210 mm
(5.8 x 8.3 inches)
Maximum: 297 x 432 mm
(11.7 x 17 inches)
Standard sizes for 8 mailbox bins
Letter, Legal, Executive, ISO A3,
ISO A4, ISO A5, JIS B4, JIS B5,
11 x 17
Custom sizes
Minimum: 148 x 210 mm
(5.8 x 8.3 inches)
Maximum: 297 x 432 mm
(11.7 x 17 inches)
●
●
64 to 199 g/m2 (17
to 53 lb bond) in
lower booklet bin
64 to 216 g/m2 (17
to 58 lb bond) in
upper bin
Up to 40
booklets of 5
sheets stacked
or 20 booklets
of 10 sheets
stacked
Optional 8-bin
mailbox
Up to 250
sheets of A4
and Letter per
output bin
●
●
●
●
ENWW
●
60 to 135 g/m2 (16
to 36 lb bond) in
8 mailbox bins
60 to 216 g/m2 (16
to 58 lb bond) in
upper bin
Paper specifications 159
Supported types of paper
Use settings on the printer control panel to select the following types of paper and other print
media.
●
Plain
●
Pre-printed
●
Letterhead
●
Transparency (see Transparencies)
●
Prepunched
●
Labels (see Labels)
●
Bond
●
Recycled
●
Color
●
Card stock (see Card stock and heavy paper)
●
Rough
●
Envelope (for Tray 1 only)
Guidelines for using paper
For best results, use conventional 75 g/m2 (20 lb) paper. Make sure the paper is of good quality,
and free of cuts, nicks, tears, spots, loose particles, dust, wrinkles, voids, and curled or bent
edges.
If you are unsure what type of paper you are loading (such as bond or recycled), check the label
on the package of paper.
Some paper causes print quality problems, jamming, or damage to the printer. Do not use
letterhead paper that is printed with low-temperature inks, such as those used in some types of
thermography, and do not use raised letterhead. Coated papers and some transparencies can
wrap around the fuser roller and possibly cause jams.
The printer uses heat and pressure to fuse toner to the paper. Make sure that any colored paper
or preprinted forms use inks that are compatible with the printer fusing temperature (392°F or
200°C for 0.1 second).
Resolving issues with paper and other print media
Use this section to resolve common problems with paper and other print media.
Symptom
Problem
Solution
Poor print quality or
toner adhesion,
problems with feeding
Too moist, too rough, too
smooth, or embossed; faulty
paper lot
Try another kind of paper, between 100
to 250 Sheffield, 4% to 6% moisture
content.
Dropouts, jamming,
curl
Stored improperly
Store paper flat in its moisture-proof
wrapping.
Increased gray
background shading
Too heavy
●
160 Appendix A Specifications
●
Use lighter paper.
Use the left output bin or the upper
bin.
ENWW
Symptom
Problem
Solution
Excessive curl
Too moist, wrong grain
direction or short-grain
construction
●
Jamming, damage to
printer
Cutouts or perforations
Use paper free of cutouts or
perforations.
Problems with feeding
Ragged edges
Use supported types of paper.
Multi-sheet feeding
Paper sticking together
Remove paper, fan it, and reload paper.
Problems with feeding
●
Use the left output bin or the upper
bin.
Use long-grain paper.
Labels
To avoid damaging the printer, use only labels recommended for use in monochrome laser
printers. Never print on the same sheet of labels more than once.
CAUTION
Do not print on both sides of labels, transparencies, envelopes, custom paper, or paper heavier
than 216 g/m2 (58 lb bond). Damage to the printer and jams might result.
Label construction
When selecting labels, consider the quality of each component:
●
Adhesives: The adhesive material should be stable at 200°C (392°F), the maximum fusing
temperature of the printer.
●
Arrangement: Only use full-sheet labels. Labels can peel off sheets with spaces between
the labels, causing serious jams.
●
Curl: Prior to printing, labels must lay flat with no more than 13 mm (0.5 inch) of curl in any
direction.
●
Condition: Do not use labels with wrinkles, bubbles, or other indications of separation.
Transparencies
CAUTION
Transparencies used in the printer must be able to withstand 200°C (392°F), the maximum fusing
temperature of the printer. To avoid damaging the printer, use only transparencies recommended
for use in monochrome laser printers.
Do not print on both sides of labels, transparencies, envelopes, custom paper, or paper heavier
than 216 g/m2 (58 lb bond). Damage to the printer and jamming might result.
If you have problems printing transparencies, use optional Tray 1 and send them to the left output
bin or the upper bin.
Envelopes
Note
ENWW
To print envelopes, use optional Tray 1 and print them either to the left output bin or to the upper bin.
Paper specifications 161
Envelope construction
Envelope construction is critical. Envelope fold lines can vary considerably, not only between
manufacturers, but also within a box from the same manufacturer. Successful printing on
envelopes depends upon the quality of the envelopes. When selecting envelopes, consider the
following components:
●
Weight: See Paper specifications for supported envelope weight.
●
Construction: Prior to printing, envelopes should lay flat with less than 6 mm (0.3 inch) curl
and should not contain air. (Envelopes that trap air can cause problems.)
●
Condition: Make sure envelopes are not wrinkled, nicked, or otherwise damaged.
●
Sizes in optional Tray 1: See Supported sizes of paper for input and output for supported
paper sizes.
Envelopes with adhesive strips or flaps
Envelopes with a peel-off adhesive strip, or with more than one flap that folds over to seal, must
use adhesives compatible with the heat and pressure of the printer. The extra flaps and strips
might cause wrinkling, creasing, or jams.
Envelopes with double-side-seams
Double-side-seam construction has vertical seams at both ends of the envelope rather than
diagonal seams. This style might be more likely to wrinkle. Be sure the seam extends all the way
to the corner of the envelope.
Envelope storage
Proper storage of envelopes helps contribute to good print quality. Envelopes should be stored
flat. If air is trapped in an envelope creating an air bubble, then the envelope might wrinkle during
printing.
Card stock and heavy paper
For optimum printer performance, do not use paper heavier than 216 g/m2 (58 lb bond) in
optional Tray 1 or 199 g/m2 (53 lb) in other trays. Paper that is too heavy might cause misfeeds,
stacking problems, jams, poor toner fusing, poor print quality, or excessive mechanical wear.
Card stock construction
Note
●
Smoothness: 135 to 216 g/m2 (36 to 58 lb bond) card stock should have a smoothness
rating of 100 to 180 Sheffield.
●
Construction: Card stock should lay flat with less than 5 mm (0.2 inches) of curl.
●
Condition: Make sure card stock is not wrinkled, nicked, or otherwise damaged.
●
Sizes: See the sizes listed for Optional Tray 1.
Before loading card stock in optional Tray 1, make sure it is regular in shape and not damaged.
Also, make sure the cards are not stuck together.
162 Appendix A Specifications
ENWW
Environmental specifications
Electrical specifications
WARNING!
Power requirements are based on the country/region where the printer is sold. Do not convert
operating voltages. This may damage the printer and void the product warranty.
Power requirements
Rated short-term current
110-Volt models
230-Volt models
100-127V (+/- 10%)
50/60 Hz (+/- 2 Hz)
220-240V (+/- 10%)
50/60 Hz (+/- 2 Hz)
12 Amps
5.3 Amps
Power consumption
Power consumption (average, in watts)1
Product model2
Printing3
(110-127V)
(220-240V)
Ready4
(110-127V)
(220-240V)
Sleep 25
(Fan off)
(110-127V)
(220-240V)
Off
(110-127V)
(220-240V)
HP LaserJet 9050
1,000 Watts
200 Watts
21 Watts
0.5 Watts
HP LaserJet 9050n
1,000 Watts
200 Watts
21 Watts
0.5 Watts
HP LaserJet 9050dn
1,000 Watts
200 Watts
21 Watts
0.5 Watts
HP LaserJet 9040
900 Watts
200 Watts
21 Watts
0.5 Watts
HP LaserJet 9040n
900 Watts
200 Watts
21 Watts
0.5 Watts
HP LaserJet 9040dn
900 Watts
200 Watts
21 Watts
0.5 Watts
1.Values current as of October 24, 2004. Values subject to change, see www.hp.com/support/
lj9050_lj9040 for current information.
2.The HP LaserJet 9050 print speed is 50 pages per minute (ppm). The HP LaserJet 9040 print
speed is 40 ppm.
3.Power reported is highest values measured using all standard voltages.
4.Heat dissipation in Ready mode = 700 BTU/hour.
5.Default time from Ready mode to Sleep 2 = 60 minutes.
ENWW
Environmental specifications 163
Acoustical specifications
Declared per ISO 9296
Sound power level1
Printing (50 ppm)
LWAd = 7.2 Bels (A) [72 dB(A)]
Ready
LWAd = 5.6 Bels (A) [56 dB(A)]
Printing (40 ppm)
LWAd = 7.0 Bels (A) [dB(A)]
Ready
LWAd = 5.6 Bels (A) [dB(A)]
Sound pressure level3
(Bystander position)
HP LaserJet 9050
Printing (50 ppm)
LpAm = 56 dB(A)
Ready
LpAm = 40 dB(A)
Sound pressure level4
(Bystander position)
HP LaserJet 9040
Printing (40 ppm)
LpAm = 54 dB(A)
Ready
LpAm = 39 dB(A)
HP LaserJet 9050
Sound power level2
HP LaserJet 9040
1.Values current as of October 16, 2003. Values subject to change, see www.hp.com/support/
lj9050_lj9040 for current information.
2.Values current as of October 24, 2004. Values subject to change, see www.hp.com/support/
lj9050_lj9040 for current information.
3.Values current as of October 16, 2003. Values subject to change, see www.hp.com/support/
lj9050_lj9040 for current information.
4.Values current as of October 24, 2004. Values subject to change, see www.hp.com/support/
lj9050_lj9040 for current information.
Note
Configuration tested: The HP LaserJet 9050 printing simplex from Tray 3 at 50 ppm using
A4 paper, and the HP LaserJet 9040 printing simplex from Tray 3 at 40 ppm using A4 paper.
Operating environment
Operating temperature
50°F to 91°F (10°C to 32.5°C)
Relative humidity
10% to 80%
Storage temperature
-40°F to +60°F
Storage humidity
15% to 90%
Speed, in pages per
minute (ppm)
50 ppm (HP LaserJet 9050 series
printer) or 40 ppm (HP LaserJet 9040
series printer)
Expandable memory
Up to 512 MB total, using optional
accessory memory DDR DIMMs
164 Appendix A Specifications
ENWW
B
Control-panel menus
Overview
The control-panel menu layout shows the menus that everyone uses while protecting the menus
that administrators use. Everyone typically uses the first three menus in the list. Administrators
and service technicians use the other items, which can be protected with a personal
identification number (PIN).
Perform most routine printing tasks from the computer by using the printer driver or the software
program. These settings override the printer control-panel settings. See the Help files that are
associated with the software, or, for more information about the printer driver, see Gaining
access to the printer drivers. If you cannot open a menu or use an item, it either is not an option
for the printer or your network administrator has locked the function (ACCESS DENIED MENUS
LOCKED appears on the control panel). See your system administrator for more information.
Note
Printer driver and software commands override the printer control-panel settings.
At the control panel, you can print a menu map that indicates the layout and current settings of
the control-panel menu items (see Menu map).
Additional menu items can appear in the control panel, depending on the options that are
installed in the printer.
This appendix contains information about all the items and possible values that are available on
the printer. (Default values are listed in the “Item” column.)
For more information about an optional HP output device, see the user guide that came with the
device.
This appendix contains information about the following topics:
●
The Retrieve job menu shows jobs that are stored on the device. Jobs are listed by user and
job name. See Using the job-storage features for information about how to store jobs.
●
The Information menu provides a menu map that can be printed and other information
pages.
●
The Paper handling menu is used to set the media type (and the size, if it is not detected) for
each tray.
●
The Configure device menu allows administrators to set defaults, I/O ports, run diagnostics,
and reset the printer.
The following submenus are available on the Configure device menu:
• Printing submenu
• System setup submenu
• I/O submenu
• Resets submenu
ENWW
●
Diagnostics menu provides information about the printer that administrators and service
technicians can use to define settings, see usage information, and troubleshoot problems.
●
The Service menu allows service technicians to monitor printer status and to provide
appropriate assistance during a service call.
Overview 165
Retrieve job menu
Note
If no private, stored, quick copy, or proof and hold jobs are stored on the printer hard disk or in
RAM, the message NO STORED JOB appears when the menu is selected.
1
A list of user names appears.
2
Select a user name, and a list of jobs that are stored for that user appears.
3
Select a job name, and print or delete that job. If a job requires a PIN before it can be printed
or deleted,
appears next to the PRINT or DELETE command and a PIN must be typed. If a
job requires a PIN to delete,
appears next to the DELETE command and a PIN must be
provided.
4
If you select PRINT, the printer prompts you to specify the number of copies to print
(1 to 32,000).
Information menu
To print an information page, scroll to the information page that you want and press
.
.
Item
Explanation
PRINT MENU MAP
Generates a menu map that shows layout and current settings of the control
menu items.
The printer will back up one screen to SET FRONT TO BACK when the page is
completed.
PRINT
CONFIGURATION
Generates a page detailing the current configuration of the printer.
PRINT SUPPLIES
STATUS PAGE
Generates a page that shows the number of pages remaining for each supply in
the printer.
The printer will return to the online READY state when the page is completed.
The printer will return to the online READY state when the page is completed.
PRINT USAGE PAGE
Generates a page that contains information that could be used for cost
accounting. This item is only available if a hard disk is installed.
The printer will return to the online READY state when the page is completed.
PRINT
FILE DIRECTORY
Generates a directory page containing information for all installed mass storage
devices.
The printer will return to the online READY state when the page is completed.
PRINT PCL
FONT LIST
Generates a typeface list of all PCL fonts available on the printer.
PRINT PS
FONT LIST
Generates a typeface list of all PS fonts available on the printer.
166 Appendix B Control-panel menus
The printer will return to the online READY state when the page is completed.
The printer will return to the online READY state when the page is completed.
ENWW
Paper handling menu
When paper handling settings are correctly configured through the control panel, you can print
by selecting the type and size of paper from the printer driver or software application. For more
information, see Specifying paper to print on.
Some items in this menu (such as duplex and manual feed) are available from specific software
programs, or from the printer driver (if the appropriate driver is installed). Printer driver and
software program settings override control-panel settings. For more information, see Using
features in the printer driver.
ENWW
Item
Values
Explanation
TRAY <N>
SIZE=LETTER
ANY SIZE
LETTER
LETTER-ROTATED
LEGAL
A4
A4-ROTATED
EXECUTIVE
EXECUTIVE(JIS)
A3
A5
B4(JIS)
B5(JIS)
8K
16K
8.5 X 13
11 X 17
CUSTOM
ANY CUSTOM
Allows the user to set the paper size for Tray 2, 3, and
optional Tray 4 (if installed) when the custom switch is in
the CUSTOM position. Size is detected if the switch is in
the STANDARD position. Substitute the tray number for
<N>.
TRAY <N>
TYPE=PLAIN
ANY TYPE
PLAIN
PREPRINTED
LETTERHEAD
TRANSPARENCY
PREPUNCHED
LABELS
BOND
RECYCLED
COLOR
CARDSTOCK>163
ROUGH 90-105 G/M2
ENVELOPE *
Allows the user to specify the type of media in each tray.
Substitute the tray number for <N>.
*ENVELOPE appears for Tray 1 only.
Paper handling menu 167
Configure device menu
This menu contains all administrative functions.
Printing submenu
Some items in this menu are available from a software application, or from the printer driver (if
the appropriate driver is installed). Printer driver and program settings override control-panel
settings. For more information, see Using features in the printer driver.
Item
Values
Explanation
COPIES=1
1 to 32,000
Set the default number of copies by selecting any number
from 1 to 32,000. Use the numeric keypad to select the
number of copies.
Note
It is best to set the number of copies from the printer driver
or software application. (Driver and software settings
override control-panel settings.)
DEFAULT PAPER
SIZE=
LETTER
168 Appendix B Control-panel menus
LETTER
LEGAL
A4
EXECUTIVE
11X17
A3
B4(JIS)
B5(JIS)
CUSTOM
A5
LETTER ROTATED
STATEMENT
8.5X13
12X18
A4 ROTATED
RA3
EXECUTIVE(JIS)
DPOSTCARDS(JIS)
8K
16k
ENVELOPE #10
ENVELOPE MONARCH
ENVELOPE C5
ENVELOPE DL
ENVELOPE B5
Set the default image size for paper and envelopes. (The
item name will change from paper to envelope as you
scroll through the available sizes.)
ENWW
Item
Values
Explanation
DEFAULT PAPER
TYPE
PLAIN
PREPRINTED
LETTERHEAD
TRANSPARENCY
PREPUNCHED
LABELS
BOND
RECYCLED
COLOR
CARDSTOCK>163
ROUGH 90-105 G/M2
ENVELOPE *
Allows the user to specify the type of media in each tray.
Substitute the tray number for <N>.
DEFAULT CUSTOM
PAPER SIZE
UNIT OF MEASURE
X DIMENSION
Y DIMENSION
Allows the user to set a custom paper size for any of the
installed trays. Substitute the tray number for <N>. This
menu only appears when the selected tray custom switch
is in the custom size position. The user selects the X and Y
dimensions of the custom paper size using the ruler labels
in the trays.
PAPER
DESTINATION=
STANDARD OUTPUT
STANDARD OUTPUT
LEFT OUTPUT BIN
STANDARD TOP BIN
Allows the user to configure the output paper bin
destination. Only installed optional bins will appear on the
menu.
DUPLEX=OFF
OFF
ON
This item appears only when an optional duplex printing
accessory is installed. Set the value to ON to print on both
sides (duplex) or OFF to print on one side (simplex) of a
sheet of paper.
*ENVELOPE appears for Tray 1 only.
For more information, see the HP support flyer or go to
www.hp.com/support/lj9050_lj9040.
DUPLEX
BINDING=LONG
EDGE
LONG EDGE
SHORT EDGE
Allows the user to change the binding edge for duplex
printing. The menu item is displayed when a duplex
printing accessory is installed in the printer and
DUPLEX=ON.
OVERRIDE A4/
LETTER=
NO
YES
NO
This command is used to print on letter-size paper when
an A4 job is sent, but no A4-size paper is loaded in the
printer (or to print on A4-size paper when a letter job is
sent, but no letter paper is loaded in the printer).
MANUAL FEED=OFF
OFF
ON
Feed the paper manually from optional Tray 1, rather than
automatically from a tray. When MANUAL FEED=ON and
optional Tray 1 is empty, the printer goes offline when it
receives a print job. It then displays MANUALLY FEED [PAPER
SIZE].
For more information, see Manually feeding paper from
optional Tray 1.
EDGE TO EDGE
OVERRIDE=NO
ENWW
NO
YES
Turns the edge-to-edge mode on or off for all print jobs.
This mode can be overridden inside a print job by an edgeto-edge PJL variable.
Configure device menu 169
Item
Values
Explanation
COURIER
FONT=REGULAR
REGULAR
DARK
Select the version of Courier font to use:
REGULAR: The internal Courier font available on the
HP LaserJet 4 Series printers.
DARK: The internal Courier font available on the
HP LaserJet III Series printers.
Both fonts are not available at the same time.
WIDE A4=NO
YES
NO
The Wide A4 setting changes the number of characters
that can be printed on a single line of A4 paper.
YES: Up to 80 10-pitch characters can be printed on one
line.
NO: Up to 78 10-pitch characters can be printed on one
line.
PRINT PS
ERRORS=OFF
ON
OFF
Select ON to print the PS error page when PS errors occur.
PRINT PDF
ERRORS= OFF
OFF
ON
Select ON to print the PDF error page when PDF errors
occur.
PCL submenu
Item
Values
Explanation
FORM LENGTH=60
5 to 128
Sets vertical spacing from 5 to 128 lines for default paper
size. Enter the value using the numeric keypad.
ORIENTATION=
PORTRAIT
PORTRAIT
LANDSCAPE
Allows the user to select default page orientation.
Note
It is best to set the page orientation from the printer driver
or software application. (Driver and software settings
override control-panel settings.)
INTERNAL: Internal fonts.
FONT
SOURCE=INTERNAL
INTERNAL
CARD SLOT X
FONT NUMBER=0
0-999
The printer assigns a number to each font and lists them
on the PCL Font List (See PCL or PS font list). The font
number appears in the Font # column of the printout.
FONT PITCH=10.00
0.44 to 99.99
Using the numeric keypad or
and
, enter a value.
This item might not appear, depending on the font
selected.
SYMBOL SET=PC-8
Variety of
available symbol
sets
Select any one of several available symbol sets from the
printer control panel. A symbol set is a unique grouping of
all the characters in a font. PC-8 or PC-850 is
recommended for line draw characters.
170 Appendix B Control-panel menus
SLOT 1, 2, or 3: Fonts stored in one of the three DIMM
slots.
ENWW
Item
Values
Explanation
APPEND CR TO
LF=NO
YES
NO
Select YES to append a carriage return to each line feed
encountered in backward-compatible PCL jobs (pure text,
no job control). Some environments, such as UNIX,
indicate a new line using only the line feed control code.
This option allows the user to append the required carriage
return to each line feed.
SUPRESS BLANK
PAGES=NO
NO
YES
When set to YES, form feeds are ignored if the page is
blank.
Print quality submenu
Some items in this menu are accessible from a software application, or from the driver (if the
appropriate driver is installed). Driver and software settings override control-panel settings. For
more information, see Using features in the printer driver.
Item
Values
Explanation
SET
REGISTRATION
PRINT TEST
PAGE
Shift the margin alignment to center the image on the page from
top to bottom, and left to right. You can also align the image on the
front, with the image printed on the back.
SOURCE=TRAY 2
ADJUST TRAY
<X>
FUSER MODES
List of paper
types
Configure the fuser mode associated with each paper type.
The fuser mode can only be changed from this menu option in the
control panel.
AUTO: Utilizes the optimum mode for that media type.
NORMAL: Normal temperature, prints at 50 pages per minute (ppm)
(40 ppm for the HP LaserJet 9040).
LOW: Low temperature, prints at 50 ppm (40 ppm for the
HP LaserJet 9040).
HIGH1: Raises the temperature, prints at 50 ppm (40 ppm for the
HP LaserJet 9040).
HIGH2: Raises the temperature, prints at 32 ppm.
SPECIAL: Mode to print at normal speeds with a 40-second delay
added to the beginning of the next job. After each 400 pages are
printed, the first page of that job is printed at a slower speed in
order to clean the fuser. No defects should be noticeable on the
printed page. This is not a preferred setting.
The default value for each paper type is AUTO.
For a complete list of supported paper types, see Paper
specifications.
CAUTION
If you change the fuser mode to HIGH1 or HIGH2, be sure to change
it back to the default when you are done printing. Setting a paper
type to HIGH1 or HIGH2 might shorten the life of some
consumables, such as the fuser, and might cause other failures or
jams.
ENWW
Configure device menu 171
Item
Values
Explanation
RESOLUTION=
FASTRES 1200
300
600
FASTRES 1200
Select the resolution from the following values:
300: Produces draft print quality at maximum printer speed.
300 dpi (dots per inch) is recommended for some bitmapped fonts
and graphics, and for compatibility with the HP LaserJet III family
of printers.
600: Produces high print quality at maximum product speed.
FASTRES 1200: Produces optimum print quality (comparable to
1200 dpi) at maximum product speed.
Note
It is best to change the resolution from the driver or software
application. (Driver and software settings override control-panel
settings.)
RET=MEDIUM
OFF
LIGHT
MEDIUM
DARK
Use printer Resolution Enhancement technology (REt) setting to
produce print with smooth angles, curves, and edges.
All print resolutions, including FastRes 1200, benefit from REt.
Note
It is best to change the REt setting from the driver or software
application. (Driver and software settings override control-panel
settings.)
ECONOMODE
ON
OFF
When set to ON, the printer prints with a reduced amount of toner
per page; however, the print quality of the page is drastically
reduced.
TONER
DENSITY=3
1 to 5
Lighten or darken the print on the page by changing the toner
density setting. The settings range from 1 (light) to 5 (dark), but the
default setting of 3 usually produces the best results.
Note
It is best to change the toner density from the driver or software
application. (Driver and software settings override control-panel
settings.)
SMALL PAPER
MODE=NORMAL
NORMAL
SLOW
172 Appendix B Control-panel menus
When printing narrow media the part of the fuser rollers that do not
make contact with the media swell up and can cause wrinkles.
ENWW
System setup submenu
Items in this menu affect the printer function. Configure the printer according to your printing
needs.
Item
Values
Explanation
DATE/TIME
DATE
DATE FORMAT
TIME
TIME FORMAT
Sets the date and time for the printer. The Real Time Clock is
set to Greenwich Mean Time (GMT).
JOB STORAGE
LIMIT=32
1 to 100
Specifies the number of jobs that can be stored on the printer
hard disk accessory.
JOB HELD
TIMEOUT=
OFF
OFF
1 HOUR
4 HOURS
1 DAY
1 WEEK
Sets the amount of time that quick copy, proof and hold,
private, and stored jobs are kept before being automatically
deleted from the queue.
SHOW ADDRESS=OFF
AUTO
OFF
Sets whether or not the printer IP address will be shown with
the Ready message. If this value is “on,” the address of the
EIO card in slot 1 is shown.
TRAY BEHAVIOR
USE REQUESTED
TRAY
MANUAL FEED
PROMPT
PS DEFER
MEDIA
Specifies the behavior of the tray by indicating which tray the
printer should print from.
USE REQUESTED TRAY sets the tray that the printer should
print from for specified jobs. The values for this menu item
are EXCLUSIVELY (default) and FIRST.
MANUAL FEED PROMPT determines whether or not the product
prompts the use when a job does not match a requested
configured tray. The values for this menu item are ALWAYS
(default) or UNLESS LOADED.
PS DEFER MEDIA sets whether the paper-handling model is
based on PostScript rules or HP rules. The values for this
menu item are ENABLED (default) and DISABLED.
SLEEP DELAY=60
MINUTES
1 MINUTE
15 MINUTES
30 MINUTES
60 MINUTES
90 MINUTES
2 HOURS
4 HOURS
Set how long the printer remains idle before it enters Sleep
mode:
●
●
●
Minimizes the amount of power consumed by the printer
when it is idle.
Reduces wear on the printer electronic components
(Turns off the display backlight).
When you send a print job, press a control-panel button,
open a paper tray, or open the top cover, the printer
automatically exits Sleep mode.
Note
Sleep turns off the backlight on the display, but the display is
still readable.
WAKE TIME
SUBMENU
ENWW
SETTING WAKE
TIME
Sets the time that the printer automatically comes out of
sleep mode. This feature can be set for a different time for
each day of the week.
Configure device menu 173
Item
Values
Explanation
PERSONALITY=AUTO
AUTO
PCL
PS
PDF
XHTML
MIME
Select the default printer language (personality). Possible
values are determined by which valid languages are installed
in the printer.
ON
JOB
Set the amount of time that a clearable warning appears on
the printer control panel.
CLEARABLE
WARNINGS=
JOB
Normally you should not change the printer language (the
default is AUTO). If you change it to a specific printer
language, the printer does not automatically switch from one
language to another unless specific software commands are
sent to the printer.
ON: Warning messages appear on the control panel until
is pressed.
JOB: Warning messages appear on the control panel until the
end of the job from which they were generated.
AUTO CONTINUE=ON
ON
OFF
Determine how the printer reacts to errors.
ON: If an error prevents printing, the message is displayed,
and the printer goes offline for 10 seconds before returning
online.
OFF: If an error prevents printing, the message remains on
the display, and the printer does not print until
is
pressed.
Note
To stop printing when out of staples (when a stapler
accessory is installed), set AUTO CONTINUE=OFF on the
control-panel System setup menu.
CARTRIDGE LOW=
CONTINUE
CONTINUE
STOP
Determine how the printer functions when toner is low. The
CARTRIDGE LOW message first appears when the print
cartridge is almost out of toner. (About 2400 pages can still
be printed at 5% coverage.)
CONTINUE: The printer continues to print while the CARTRIDGE
LOW message is displayed.
STOP: The printer goes offline and wait for further action.
For more information, see Managing the print cartridge.
CARTRIDGE OUT=
CONTINUE
STOP
CONTINUE
Determine how the printer functions when toner is out.
JAM RECOVERY=
AUTO
AUTO
ON
OFF
Determine how the printer functions when a jam occurs.
AUTO: The printer automatically selects the best mode for
printer jam recovery (usually ON). This is the default setting.
ON: The printer automatically reprints pages after a paper jam
is cleared.
OFF: The printer does not reprint pages following a paper
jam. Printing performance might be increased with this
setting.
LANGUAGE=ENGLISH
174 Appendix B Control-panel menus
List of
available
languages
Sets the language that is used on the control panel.
ENWW
I/O submenu
Items in the I/O (input/output) menu affect the communication between the printer and the
computer.
I/O timeout submenu
Item
Values
Explanation
I/O TIMEOUT=15
5 to 300
Select the I/O timeout period in seconds. (I/O timeout refers to the
time, measured in seconds, that the printer waits before ending a
print job.)
This setting allows you to adjust timeout for best performance. If
data from other ports appear in the middle of your print job,
increase the timeout value.
Parallel input submenu
Item
Values
Explanation
HIGH SPEED=YES
YES
NO
The printer accepts faster parallel communications used for
connections with newer computers.
ADVANCED
FUNCTIONS=ON
ON
OFF
Turn the bidirectional parallel communication on or off. The default
is set for a bidirectional parallel port (IEEE-1284).
This setting allows the printer to send status readback messages
to the computer. (Turning the parallel advanced functions on might
slow language switching.)
EIO X Jetdirect submenu
The EIO (enhanced input/output) submenu appears only when an EIO device is installed in an
EIO slot on the printer (such as an HP Jetdirect print server). The items in the menu depend on
the particular accessory product installed. If the printer contains an HP Jetdirect print server EIO
card, you can configure basic networking parameters using the EIO menu. These and other
parameters can also be configured through HP Web Jetadmin or other network configuration
tools (such as by using Telnet or browsing the embedded Web server).
For more information about the EIO submenu, see the documentation that came with the EIO
Jetdirect card.
ENWW
Configure device menu 175
Embedded Jetdirect submenu
Item
Options
Values
Explanation
TCP/IP
ENABLE
ON
Enable the TCP/IP protocol.
Disable the TCP/IP protocol.
OFF
An alphanumeric string, up to 32 characters, used
to identify the device. This name is listed on the
Jetdirect configuration page. The default host name
is NPIxxxxxx, where xxxxxx is the last six digits of
the LAN hardware (MAC) address.
HOST NAME
CONFIG
METHOD
BOOTP
DHCP
AUTO IP
MANUAL
DHCP
RELEASE
DHCP RENEW
MANUAL
SETTINGS
Use DHCP (Dynamic Host Configuration Protocol)
for automatic configuration from a DHCP server. If
selected and a DHCP lease exists, DHCP
RELEASE and DHCP RENEW menus will be
available to set DHCP lease options.
Use automatic link-local IP addressing. An address
in the form 169.254.x.x will be automatically
assigned.
Use the MANUAL SETTINGS menu to configure
TCP/IP parameters.
The current DHCP lease along with the leased IP
address are released.
NO
(default)
The print server does not request to renew the
DHCP lease.
YES
The print server requests to renew the current
DHCP lease.
IP ADDRESS
The unique IP address of the printer.
SUBNET
MASK
The subnet mask for the printer.
SYSLOG
SERVER
DEFAULT
GATEWAY
IDLE
TIMEOUT
176 Appendix B Control-panel menus
Use BootP (Bootstrap Protocol) for automatic
configuration from a BootP server.
The IP address of the syslog server used to receive
and log syslog messages.
The IP address of the gateway or router used for
communications with other networks.
The time period, in seconds, after which an idle
TCP print data connection is closed (default is 270
seconds).
ENWW
Item
Options
Values
Explanation
TCP/IP
DEFAULT IP
AUTO IP
A link-local IP address 169.254.x.x will be set.
LEGACY
The address 192.0.0.192 will be set, consistent
with older Jetdirect products.
PRIMARY
DNS
SECONDARY
DNS
Specify the IP address (n.n.n.n) of the Primary
Domain Name System (DNS) Server.
.
PROXY
SERVER
Specify the IP address (n.n.n.n) of the Secondary
Domain Name System (DNS) Server.
Specifies the proxy server to be used by embedded
applications in your printer. A proxy server is
typically used by network clients for Internet
access. It caches Web pages, and provides a
degree of Internet security, for those clients.
To specify a proxy server, enter its IP address or
fully-qualified domain name. The name can be up
to 64 characters.
For some networks, you may need to contact your
Independent Service Provider (ISP) for the proxy
server address.
Enter the port number used by the proxy server for
client support. The port number identifies the port
reserved for proxy activity on your network, and can
be a value from 0 to 65535.
PROXY PORT
IPX/SPX
ENWW
ENABLE
ON
OFF
Enable the IPX/SPX protocol.
Disable the IPX/SPX protocol.
FRAME TYPE
AUTO
Selects the frame type setting for your network.
AUTO (default) Automatically sets and limits the
frame type to the first one detected.
EN_8023
EN_II
EN_8022
EN_SNAP
Frame type selections for Ethernet networks.
ON
OFF
Enable or disable the AppleTalk protocol.
APPLETALK
ENABLE
DLC/LLC
ENABLE
Enable or disable the DLC/LLC protocol.
SECURE WEB
HTTPS
REQUIRED
For secure, encrypted communications, only
HTTPS access is accepted. The print server will
appear as a secure site.
HTTPS
OPTIONAL
Access using either HTTP or HTTPS permitted.
Configure device menu 177
Item
Options
Values
Explanation
DIAGNOSTICS
LOOPBACK
TEST
YES
NO
CAUTION This test will erase your TCP/IP
configuration.
YES the loopback test will be initiated.
NO the loopback test will not be initiated.
PING TEST
DEST IP
PACKET
SIZE
Specify the size of each packet, in bytes, to be sent
to the remote host. The minimum is 64 (default) and
the maximum is 2048.
TIMEOUT
Specify the length of time, in seconds, to wait for a
response from the remote host. The default is 1
and the maximum is 100.
COUNT
PING
RESULTS
Specify the number of pint test packets to send for
this test. Select a value from 1 to 100. To configure
the test to run continuously, select 0.
PRINT
RESULTS
If the ping test was not set for continuous operation,
you can choose to print the test results. YES to print
results, NO to skip.
EXECUTE
Specify whether to initiate the ping test. Select YES
to initiate, NO to skip.
PACKETS
SENT
Determines the number of packets (0-65535) sent
to the remote host since the most recent test was
initiated or completed.
PACKETS
RECEIVED
Displays the number of packets (0-65535) received
from the remote host since the most recent test
was initiated or completed.
PERCENT
LOST
Displays the percent of ping test packets that wee
sent with no response from the remote host since
the most recent test was initiated or completed.
RTT MIN
Displays the minimum detected round-trip-time
(RTT), from 0 to 4096 milliseconds, for packet
transmission and response.
RTT MAX
RTT AVE
PING IN
PROGRESS
REFRESH
178 Appendix B Control-panel menus
Specify the IP address of the remote host. A valid
IP address must be entered.
Displays the maximum detected RTT, from 0 to
4096 milliseconds, for packet transmission and
response.
Displays the average detected RTT, from 0 to 4096
milliseconds, for packet transmission and response.
Displays whether or not a ping test is in progress.
YES indicates a test in progress, NO indicates that a
test completed or was not run.
Updates the ping test data with current results.
ENWW
Item
Options
Values
Explanation
RESET SECURITY
NO
YES
NO
YES
Specifies wether the current security setting s on
the print server will be saved or reset to factory
defaults.
NO (default) The current security settings are
maintained.
YES Security settings are reset to factory defaults.
LINK SPEED
AUTO
10T HALF
10T FULL
100TX HALF
100TX FULL
The print server will automatically configure itself to
match the network’s link speed and communication
mode. If it fails, 100TX HALF is set.
10Mbps, half-duplex operation.
10Mbps, full-duplex operation.
100Mbps, half-duplex operation.
100Mbps, full-duplex operation.
Resets submenu
Note
Use this menu with caution. You can lose buffered page data or printer configuration settings
when you select these items. Reset the product only under the following circumstances:
●
You want to restore the printer default settings.
●
Communication between the product and computer has been interrupted.
●
You are having problems with a port.
The items in the Resets submenu will clear all memory in the printer, while RESET clears only the
current job.
ENWW
Configure device menu 179
Diagnostics menu
Administrators can use this menu to troubleshoot jam and print quality issues.
Item
Values
Explanation
PRINT EVENT
LOG
Generates a localized LIFO (last in, first out) list of the 50 most
recent entries in the error log. The printed event log shows error
number, page count, error code, and description or personality.
SHOW EVENT LOG
Allows the user to scroll through the contents of the event log from
the printer control panel, and shows the 50 most recent events.
Use
and
to scroll through the event log contents.
PAPER PATH
TEST
PRINT TEST
PAGE
Generates a test page that is useful for testing the paper handling
features of the printer.
SOURCE=TRAY 2
Specifies if paper from all of the trays or from a specific tray is
used when the test is performed.
DESTINATION=
STANDARD
OUTPUT
Specifies which paper paths are tested.
DUPLEX=OFF
Specifies if the duplexer is included when the test is performed.
COPIES=1
Specifies how many sheets of paper from the specified source are
sent when the test is performed.
SENSORS=OFF
Specifies if sensor information is displayed as the paper moves
through the path or if only the status of the device is displayed
during the paper path test.
Service menu
The Service menu is locked. A service technician must type a PIN to open the menu.
180 Appendix B Control-panel menus
ENWW
C
Printer memory and expansion
Overview
This appendix includes:
●
Determining memory requirements
●
Installing memory and fonts
●
Checking memory installation
●
Saving resources (permanent resources)
●
Installing EIO cards/mass storage
The printer has two double data rate (DDR) memory DIMM slots for upgrading various features.
Note
●
To add more printer memory, DDR memory DIMMs are available in 16, 32, 64, 128, and
256 MB, for a maximum of 512 MB.
●
To increase flash memory cards, available in 16, 32, and 64 MB. Unlike standard printer
memory, flash memory cards can be used to permanently store downloaded items in the
printer, even when the printer is off. The printer supports Type 1 and Type 2 flash memory.
●
To add flash memory-based accessory fonts, macros, and patterns, use the appropriate
DDR DIMM.
●
To add other flash memory-based printer languages and printer options, use the appropriate
DDR DIMM.
Single in-line memory modules (SIMMs) used on previous HP LaserJet printers are not
compatible with this printer.
You might want to add more memory to the printer if you often print complex graphics or PS
documents, print with the optional duplex printing accessory, use many downloaded fonts, or
print large paper sizes (such as A3, B4, or 11 x 17).
The printer has two EIO slots for expanding printer capabilities:
●
One or more network cards.
●
A mass storage device, such as a hard disk.
For ordering information, see the HP support flyer, or go to www.hp.com/support/lj9050_lj9040.
ENWW
Overview 181
Determining memory requirements
The amount of memory you need depends on the types of documents you print. Your print
engine can print most text and graphics at 1,200 dpi FastRes without additional memory.
Add memory to your printer if you:
●
commonly print complex graphics.
●
use many temporarily downloaded fonts.
●
print complex documents.
●
print two-sided documents.
●
use advanced functions.
●
print PostScript documents.
Installing memory and fonts
To install DDR memory DIMMs
Use this procedure to install additional memory. Before you begin, print a configuration page
(see To print a configuration page) to find out how much memory is installed in the printer before
adding more memory. The table lists the maximum amount of memory allowed for each DIMM
slot.
Note
On the HP LaserJet 9040/9050 base model, to obtain 512 MB of memory, you need to remove
the 64 MB that came with the printer and replace it with 256 MB.
On the HP LaserJet 9040n/9050n and the HP LaserJet 9040dn/9050dn, to obtain 512 MB of
memory, you need to remove the 128 MB that came with the printer and replace it with 256 MB.
Slot label on the
Configuration page
Slot label on the
Formatter board
Description
Slot 1
J1
64 MB or 128 MB depending on model
Slot 2
J2
Empty
Total
CAUTION
64 MB or 128 MB depending on model
Static electricity can damage DIMMs. When handling DIMMs, either wear an antistatic wrist strap
or frequently touch the surface of the DIMM antistatic package, then touch bare metal on the
printer.
To print a configuration page
1
Press
.
2
Use
or
to scroll to Information and press
3
Use
or
to scroll to Print Configuration and press
182 Appendix C Printer memory and expansion
.
.
ENWW
To install memory
WARNING!
1
If you have not already done so, print a configuration page to find out how much memory is
installed in the printer before adding more memory. (Press 22 on the numeric keypad when
the printer is idle.)
2
Turn the printer off. Disconnect the power cord and any cables.
3
Loosen the two captive thumb screws on the back of the printer.
The formatter has sharp edges.
4
ENWW
Grasp the screws and pull the formatter board out of the printer. Place it on a flat, nonconductive surface.
Installing memory and fonts 183
5
Remove the DIMM from the antistatic package. Hold the DIMM with fingers against the side
edges and thumbs against the back edge. Align the notches on the DIMM with the DIMM
slot. (Check that the locks on each side of the DIMM slot are open, or outward.)
See Installing memory and fonts for the maximum amount of memory for each DIMM slot.
6
Press the DIMM straight into the slot (press firmly). Make sure the locks on each side of the
DIMM snap inward into place. (To remove a DIMM, the locks must be released.)
7
Slide the formatter board back into the printer and tighten the two screws.
184 Appendix C Printer memory and expansion
ENWW
8
Plug in the power cord and connect all cables. Turn the printer on.
To install a flash memory card
CAUTION
ENWW
Do not insert a flash memory card that is designed for use with a digital camera into the printer.
The printer does not support photo printing directly from a flash memory card. If you install a
camera-type flash memory card, a message asking if you want to reformat the flash memory card
appears on the control-panel display. If you choose to reformat the card, all data on the card will
be lost.
1
Turn the printer off and disconnect all power and interface cables.
2
Loosen the two captive thumb screws on the back of the printer.
Installing memory and fonts 185
WARNING!
The formatter has sharp edges.
3
Grasp the screws and pull the formatter board out of the printer. Place it on a flat, nonconductive surface.
4
Remove the compact flash from the antistatic package. Hold the compact flash with fingers
against the side edges and thumbs against the back edge. Align the notches on the compact
flash with the compact flash slot.
5
Press the compact flash straight into the slot.
CAUTION
Do not insert the flash memory card at an angle.
Note
The first flash memory slot marked “Firmware Slot” is reserved for firmware only. Slots 2 and 3
should be used for all other solutions.
186 Appendix C Printer memory and expansion
ENWW
ENWW
6
Slide the formatter board back into the printer and tighten the two screws.
7
Plug in the power cord and connect all cables. Turn the printer on.
Installing memory and fonts 187
Checking memory installation
Follow this procedure to verify that memory is installed correctly:
1
Check that READY appears on the printer control-panel display when the printer is turned on.
If an error message appears, a DIMM might have been incorrectly installed.
2
Press 22 on the numeric keypad. The configuration page prints.
3
Check the memory section on the configuration page and compare it to the configuration
page printed before the DIMM installation. If the amount of memory has not increased, one
of the following situations might have occurred:
• The memory might not be installed correctly. Repeat the installation procedure.
• The memory might be defective. Try a new DIMM, or try installing the DIMM in a different
slot.
Note
If you installed a printer language (personality), check the Installed Personalities and Options
section on the configuration page. This area should list the new printer language.
188 Appendix C Printer memory and expansion
ENWW
Saving resources (permanent resources)
Utilities or jobs that you downloaded to the printer sometimes include resources (for example,
fonts, macros, or patterns). Resources that are internally marked as permanent remain in the
printer memory until you turn the printer off.
If you do not have an embedded or optional hard disk or flash memory card for storing
downloaded resources, you might want to change the amount of memory allocated to each
language when downloading an unusually large number of fonts, or if the printer is in a shared
environment.
The minimum amount of memory that can be allocated to resource saving is 400 KB each for
PCL and PS.
Installing EIO cards/mass storage
Hewlett-Packard constantly introduces new software tools for use with your printer and
accessories. These tools are available from the Internet free of charge. (See the HP support flyer
or go to www.hp.com/support/lj9050_lj9040.)
Follow this procedure to install an EIO card or mass storage device:
1
Turn off the printer and remove the power cord before installing the EIO cards or mass
storage device.
2
Use the graphic for the location of the EIO cards or optional mass storage device, such as a
hard disk.
EIO 1
EIO 2
3
Use the Device Storage Manager for Web Jetadmin to manage fonts on a mass storage
device, or use the LaserJet Utility on a Macintosh.
4
After you have installed a new device, print a configuration page by using the following
procedure.
To print a configuration page
ENWW
1
Press
.
2
Use
or
to scroll to Information and press
3
Use
or
to scroll to Print Configuration and press
.
.
Saving resources (permanent resources) 189
190 Appendix C Printer memory and expansion
ENWW
D
Regulatory information
Environmental product stewardship program
Protecting the environment
Hewlett-Packard Company is committed to providing quality products in an environmentally
sound manner. This product has been designed with several attributes to minimize impacts on
our environment.
Ozone production
This product generates no appreciable ozone gas (O3).
Power consumption
Power usage drops significantly while in Sleep mode, which saves natural resources and saves
money without affecting the high performance of this product. This product qualifies for ENERGY
STAR® (Version 3.0), which is a voluntary program to encourage the development of energyefficient office products.
ENERGY STAR® is a U.S. registered mark. As an ENERGY STAR Partner, Hewlett-Packard
Company has determined this product meets ENERGY STAR Guidelines for energy efficiency.
For more information, see www.energystar.gov.
Toner consumption
Draft mode uses significantly less toner, which might extend the life of the print cartridge.
Paper use
This product's optional automatic duplex feature and N-up printing (multiple pages printed on
one page) capability can reduce paper usage and the resulting demands on natural resources.
ENWW
Environmental product stewardship program 191
Plastics
Plastic parts over 25 grams are marked according to international standards that enhance the
ability to identify plastics for recycling purposes at the end of the product's life.
HP LaserJet printing supplies
In many countries/regions, this product's print cartridge can be returned to HP through the
HP Printing Supplies Returns and Recycling Program. An easy-to-use and free take back
program is available in more than 30 countries/regions. Multi-lingual program information and
instructions are included in every new HP LaserJet print cartridge and supplies package.
HP printing supplies returns and recycling program information
Since 1992, HP has offered HP LaserJet supplies return and recycling free of charge in 86% of
the world market where HP LaserJet supplies are sold. Postage-paid and pre-addressed labels
are included within the instruction guide in most HP LaserJet print cartridge boxes. Labels and
bulk boxes are also available through the Web site: www.hp.com/recycle.
More than 10 million HP LaserJet print cartridges were recycled globally in 2002 through the
HP Planet Partners supplies recycling program. This record number represents 26 million
pounds of print cartridge materials diverted from landfills. Worldwide HP recycled an average of
80% of the print cartridge by weight consisting primarily of plastic and metals. Plastics and
metals are used to make new products such as HP products, plastic trays and spools. The
remaining materials are disposed of in an environmentally responsible manner.
US returns
For a more environmentally responsible return of used cartridges and supplies, HP encourages
the use of bulk returns. Simply bundle two or more cartridges together and use the single, prepaid, pre-addressed UPS label that is supplied in the package. For more information in the U.S.,
call 800-340-2445 or visit the HP Web site at www.hp.com/recycle.
Non-US returns
Non-US customers should call the local HP Sales and Service Office or visit the www.hp.com/
recycle Web site for further information regarding availability of the HP Returns and Recycling
program.
Paper
The printer is suited for use of recycled papers when the paper meets the guidelines outlined in
the HP LaserJet Printer Family Media Specifications Guide. See www.hp.com/support/
lj9050_lj9040 for ordering information. The printer is suited for use of recycled paper according
to EN12281:2002.
Material restrictions
This HP product does not contain added mercury.
This HP product contains a lithium battery located on the formatter board that may require
special handling at end-of-life.
For recycling information, you can contact www.hp.com/recycle or contact your local authorities
or the Electronics Industries Alliance: www.eiae.org.
192 Appendix D Regulatory information
ENWW
Material safety data sheet
Material Safety Data Sheets (MSDS) can be obtained by contacting the HP Web site at
www.hp.com/go/msds or www.hp.com/hpinfo/community/environment/productinfo/safety.
For more information
To obtain information about these environmental topics:
●
Product environmental profile sheet for this and many related HP products
●
HP's commitment to the environment
●
HP's environmental management system
●
HP's end-of-life product return and recycling program
●
MSDS
Visit: www.hp.com/go/environment or www.hp.com/hpinfo/community/environment/.
ENWW
Environmental product stewardship program 193
194 Appendix D Regulatory information
ENWW
E
Using accessibility shortcut
keys in the Help Viewer
The following topics describe how you can navigate in this user guide.
●
Using F6 to switch between the Navigation and Topic Panes
●
Shortcut keys for the Help Viewer
●
Shortcut keys for the Contents tab
●
Shortcut keys for the Index tab
●
Shortcut keys for the Search tab
●
Shortcut keys for the Favorites tab
Notes
●
There are also shortcut menu commands that can be accessed through the keyboard.
●
Shortcut keys also work in secondary and pop-up windows.
●
Every time you use a shortcut key in the Navigation pane, you lose focus in the Topic pane.
To return to the Topic pane, press F6.
●
The Match similar words check box on the Search tab will be selected if you used it for your
last search.
Using F6 to switch between the Navigation and Topic Panes
You can quickly switch between the Navigation pane and the Topic pane by pressing F6 on the
keyboard.
Shortcut keys for the Help Viewer
To close the Help Viewer.
To switch between the Help Viewer and other open windows.
To display the Options menu.
To change Microsoft Internet Explorer settings. The Internet
Options dialog box contains accessibility settings. To change
these settings click the General tab, and then click
Accessibility.
To hide or show the Navigation pane.
To print a topic.
To move back to the previous topic.
ENWW
ALT+F4
ALT+TAB
ALT+O
ALT+O, and then press I
ALT+O, and then press T
ALT+O, and then press P. Or, right-click in
the topic and click Print.
ALT+LEFT ARROW, or ALT+O, and then
press B
Using F6 to switch between the Navigation and Topic Panes 195
To move forward to the next topic (provided you have viewed it
just previously).
To turn on or off search highlighting.
To refresh the topic that appears in the Topic pane (this is
useful if you have linked to a Web page).
To return to the home page (help authors can specify a home
page for a help system).
To stop the viewer from opening a page (this is also useful if
you are linking to the Web and want to stop a page from
downloading).
To jump to a predetermined topic or Web page. The help
author who builds a compiled help (.chm) file can add two
links, on the Options menu, to important topics or Web pages.
When you select a Jump command you go to one of those
topics or Web pages.
To switch between the Navigation pane and the Topic pane.
To scroll through a topic.
To scroll through all the links in a topic or through all the
options on a Navigation pane tab.
ALT+RIGHT ARROW, or ALT+O, and then
press F
ALT+O, and then press O
F5, or ALT+O, and then press R
ALT+O, and then press H
ALT+O, and then press S
ALT+O, and then press 1 or 2
F6
UP ARROW and DOWN ARROW, or PAGE UP
and PAGE DOWN
TAB
Shortcut keys for the Contents tab
To display the Contents tab.
To open and close a book or folder.
To select a topic.
To display the selected topic.
ALT+C
PLUS SIGN (+) and MINUS SIGN (-), or LEFT
ARROW and RIGHT ARROW
UP ARROW and DOWN ARROW
ENTER
Shortcut keys for the Index tab
To display the Index tab.
To type a keyword to search for.
To select a keyword in the list.
To display the associated topic.
ALT+N
ALT+W, and then type the word
UP ARROW and DOWN ARROW
ALT+D
Shortcut keys for the Search tab
ALT+S
ALT+W, and then type the word
ALT+L
ALT+T, and then UP ARROW and DOWN
ARROW
To display the selected topic.
ALT+D
The following options are only available if full-text search is enabled.
To search for a keyword in the result list of a prior search.
ALT+U
To search for words similar to the keyword. For example, to find ALT+M
words like “running” and “runs” for the keyword “run.”
To only search through topic titles.
ALT+R
To display the Search tab.
To type a keyword to search for.
To start a search.
To select a topic in the results list.
196 Appendix E Using accessibility shortcut keys in the Help Viewer
ENWW
Shortcut keys for the Favorites tab
To display the Favorites tab.
To add the currently displayed topic to the Favorites list.
To select a topic in the Favorites list.
To display the selected topic.
To remove the selected topic from the list.
ENWW
ALT+I
ALT+A
ALT+P, and then UP ARROW and DOWN
ARROW
ALT+D
ALT+R
Shortcut keys for the Favorites tab 197
198 Appendix E Using accessibility shortcut keys in the Help Viewer
ENWW
F
Using the HTML Help Viewer
The following topics provide information about navigating and using this guide. For more
information, click one of the following topics:
●
Getting more out of help
●
To find a help topic
●
To create a list of favorite help topics
●
To copy a help topic
●
To print the current help topic
●
To find topics using the toolbar buttons
●
Using the shortcut menu commands
Getting more out of help
Here are some tips on how to find more information when using the HTML Help Viewer:
●
To link to another topic, a Web page, a list of other topics, or a program, click the colored,
underlined words.
●
To view topics that contain related information, click the words, “Related Topics,” which may
appear at the end of a topic, and then click the title of the topic you want.
●
To see if a word or phrase contained in a topic is in the index, select the word, and then press
F1.
●
If you are viewing content from the Web in the Topic pane, you can click Stop or Refresh on
the toolbar to interrupt a download or refresh a Web page.
●
If you use a particular Help topic often, you can add it to your favorites list.
●
Right-click the Contents tab or Topic pane for shortcut menu commands.
To find a help topic
In the Navigation pane, click one of the following tabs:
Note
ENWW
●
To browse through a table of contents, click the Contents tab. The table of contents is an
expandable list of important topics.
●
To see a list of index entries, click the Index tab, and then type a word or scroll through the
list. Topics are often indexed under more than one entry.
●
To locate every occurrence of a word or phrase that may be contained in a Help file, click the
Search tab, and then type the word.
Click the contents entry, index entry, or search results entry to display the corresponding topic.
Getting more out of help 199
To create a list of favorite help topics
1
Locate the Help topic you want to make a favorite topic.
2
Click the Favorites tab, and then click Add.
Notes
●
To return to a favorite topic, click the Favorites tab, select the topic, and then click Display.
●
If you want to rename a topic, select the topic, and then type a new name in the Current
topic box.
●
To remove a favorite topic, select the topic and then click Remove.
To copy a help topic
Note
1
In the Topic pane, right-click the topic you want to copy, and then click Select All.
2
Right-click again, and then click Copy. This copies the topic to the Clipboard.
3
Open the document you want to copy the topic to.
4
Position your cursor where you want the information to appear.
5
On the Edit menu, click Paste.
If you want to copy only part of a topic, select the text you want to copy, right-click, and then click
Copy.
To print the current help topic
Right-click a topic, and then click Print.
Note
If you print from the Contents tab (by right-clicking an entry, and then clicking Print) you will see
options to print only the current topic, or the current topic and all subtopics.
To find topics using the toolbar buttons
There are five navigational buttons that can be located on the toolbar in the Help Viewer. You can
click these buttons to find help topics:
Note
●
Back displays the last topic you viewed.
●
Forward displays the next topic in a previously displayed sequence of topics.
●
Next displays the next topic listed in the table of contents.
●
Previous displays the previous topic listed in the table of contents.
●
Home displays the Home page topic for the help file you are viewing.
●
Refresh updates Web content that is currently displayed in the Topic pane.
●
Stop stops downloading file information. Click this button to stop a Web page from
downloading.
The toolbar in your Help Viewer may not contain all of these navigational buttons.
200 Appendix F Using the HTML Help Viewer
ENWW
Using the shortcut menu commands
There are several commands on the shortcut menu that you can use to display and customize
information.
Note
ENWW
Command
Description
Right-click in the table of
contents, and then click Open
All.
Right-click in the table of
contents, and then click Close
All.
Right-click, and then click Print.
Right-click in the table of
contents, and then click
Customize
Opens all books or folders in the table of contents. This command only
works if the Contents tab is displayed.
Closes all books or folders. This command only works if the Contents
tab is displayed.
Prints the topic.
Opens the Customize Information Wizard, which allows you to customize
the documentation. If the help file was built with information types, you
can use this wizard to select a subset of topics to view. For example, you
could choose to see only overview topics.
These commands can be accessed through the keyboard. You can click SHIFT+F10 to display the
shortcut menu, and then click the appropriate shortcut keys. Or, you can enable Mousekeys. Use
a Mousekey combination to display the shortcut menu, and then click the appropriate shortcut
keys.
Using the shortcut menu commands 201
202 Appendix F Using the HTML Help Viewer
ENWW
Index
Numerics
B
2,000-sheet tray. See Tray 4
3,000-sheet stacker
bins 55
capacity 8
features 60
lights, status 17
locating 14
paper sizes supported 158
part number 11
3,000-sheet stacker/stapler
bins 55
capacity 8
error messages 122
lights, status 17
loading staples 61
locating 14
not recognized 138
paper sizes supported 158
part number 11
printing to 60
staple jams, clearing 110
staple jams, frequent 136
stapling, troubleshooting 137
8-bin mailbox
bins, types of 56
capacity 9
features 68
jams, clearing 116
lights, status 17
locating 14
paper sizes supported 159
part number 11
back page, settings 77
background, gray 129, 160
bad connection error messages 119
base memory 7
battery information 192
bidirectional communication settings 175
binding edge, settings 169
bins, output
8-bin mailbox 56
capacities 8
full, error messages 119
jam locations 98
jams, clearing 105
locating 14, 55
multifunction finisher 56
paper path test, printing 152
paper sizes supported 157
selecting 56, 169
stacker 55
stacker/stapler 55
troubleshooting 138
black dots, troubleshooting 95, 129
blank pages
adding 77
suppressing 171
troubleshooting 134
bleeds, printing 71
blinking lights
control panel 16
paper-handling devices 17
booklets, creating 66
both sides, printing on
loading paper 49
printing 68
settings 169
troubleshooting 135, 137
browsers, HP Toolbox requirements 31
buffers
data remaining in, troubleshooting 135
overflow, error messages 124, 126
bulk returns, recycling 192
buttons, control-panel 15
A
A4 paper
override settings 169
Wide A4 settings 170
accessories, part numbers 10
acoustical specifications 164
action not currently available error message 119
adding paper 36
address, IP 142, 173
adhesive labels
fuser mode 171
loading 53
printing 36, 70
specifications 161
alerts page, embedded Web server 143
alerts, setting up 32, 95
alignment
tray registration 75, 171
troubleshooting 131
allocating memory 189
Alternate Letterhead mode 53
anticounterfeit Web site 93
Appletalk settings 177
Attention light 16
authentication, print cartridges 93
auto continue, settings 174
auto setup, troubleshooting 134
autoconfiguration, driver 18
ENWW
C
capacities, trays and bins 8, 157
cardstock
fuser mode 171
printing 71
specifications 162
carriage returns, settings 171
Index 203
cartridges, print
authentication 93
error messages 119, 121, 122
features 8
low 174
non-HP 93, 121
ordering 94
out, settings 174
part numbers 11, 154
recycling 192
removing 90
replacing 95
status, viewing in HP Toolbox 32
storing 93
supplies status page 147
toner level, checking 93
usage information 148
cartridges, staple
error messages 122
part numbers 11
characters
dropouts, troubleshooting 129
misformed, troubleshooting 130
Chooser, Macintosh 141
cleaning page, printing 95
cleaning the printer 90
clearable warnings, settings 174
clipped margins, troubleshooting 134
clock, setting 173
clothing, toner on 90
collation features 74
complex pages, troubleshooting 123
configuration page
information on 146
Jetdirect 29
printing 144, 166
viewing from embedded Web server 142
Configure device menu 168
configure printer page, embedded Web server 143
connectivity options 9
consumables. See supplies
contact information page, embedded Web server 143
Contents tab shortcut keys 196
control panel
blank, troubleshooting 133
buttons 15
Configure device menu 168
Diagnostics menu 180
EIO menu 175
help system 118
I/O menu 175
Information menu 166
language, selecting 133, 174
lights 16
locked menus 16
menu map, printing 145, 166
menus 165
messages 118
Paper handling menu 167
Parallel input submenu 175
PCL menu 170
Print quality menu 171
Printing submenu 168
Resets 179
Retrieve job menu 166
Service menu 180
settings, changing 16
settings, overriding 74
System setup submenu 173
copies, number of 168
count, printer maintenance 92
204 Index
counts, page 146, 151
Courier font settings 170
covers, booklet 66
creases, troubleshooting 131
crop marks, printing 71
curl, troubleshooting 131, 161
Current Page Count 151
custom-size paper
loading 45, 50, 51
printing 71
sizes supported 157
tray settings 169
cut-off pages, troubleshooting 136
D
dark setting, toner density 172
Data light 16, 139
data transmission settings 175
data, missing 135
date, setting 173
DC controller error messages 125
default settings
driver, changing 21
number of copies 168
paper type 169
restoring 179
saving 74
defect tables, image quality 128
deleting jobs
private 81
proof and hold 84
QuickCopy 83
stored 82
density settings 172
device identification page, embedded Web server 142, 143
device pages, embedded Web server 143
Device Status, viewing in HP Toolbox 32
diagnostic pages, embedded Web server 143
Diagnostics menu 180
different first page 76
different paper size error message 120
DIMMs
error messages 125
installing 183
part numbers 12
slots 181, 182
verifying installation 188
directory, file 144, 166
disk
erase, security feature 86
error messages 120
features 9
file directory, printing 144, 166
information page 149
installing 189
job retention 80, 173
not recognized 138
part number 12
DLC/LLC settings 177
doors
jam locations 98
left, clearing jams 105
locating 14
right, clearing jams 99
dots per inch (dpi) settings 172
dots, troubleshooting 95, 129
ENWW
double-sided printing
loading paper 49
printing 68
settings 169
troubleshooting 135, 137
downloading firmware 9
dpi (dots per inch) settings 172
draft printing 172
Driver Work Space (DWS) 146
drivers
autoconfiguration 18
features 20
help 20
included 19
preconfiguration 19
saving settings 74
settings 21
settings, overriding 74
troubleshooting 135
troubleshooting Macintosh 141
Update Now button 19
dropouts, troubleshooting 129
duplex printing accessory
bad connection error message 119
features 8
jam locations 98
jams, clearing 103
locating 14
not recognized 138
paper sizes supported 158
part number 10
reinsert error message 122
remove error message 120
troubleshooting 135
duplexing
layout options 69
loading paper 49
printing 68
settings 169
troubleshooting 135, 137
duty cycle 7
DWS (Driver Work Space) 146
E
Economode 172
edges not printing, troubleshooting 134
edge-to-edge printing 71, 75, 169
EIO cards
buffer overflow, error messages 124
error messages 127
installing 189
part numbers 13
slots 14
supported 9
EIO disk
erase, security feature 86
error messages 120
features 9
file directory, printing 144, 166
information page 149
job retention 80, 173
not recognized 138
part number 12
EIO menu 175
electrical specifications 163
Electronic Industries Alliance 192
e-mail page, embedded Web server 143
e-mail, receiving alerts 95
embedded print server 29
ENWW
embedded Web server
accessing 30
features 28
pages 142
energy specifications 163
Energy Star compliance 191
envelopes
default image size, setting 168
loading 53, 57
margins 59, 156
printing 36, 57
sizes supported 157
specifications 161
storing 162
wrinkles, troubleshooting 132
environmental protection information 191
environmental specifications 164
EPS files, troubleshooting 136
equivalence table, paper 153
erasing disk 86
error messages
alphabetical list 119
control panel lights 16
numerical list 123
settings 174
troubleshooting 118
Ethernet cards supported 9
event log
embedded Web server page 142
information on 146, 151
printing 151
viewing 180
expansion slots
DIMMs 181, 182
EIO 9
Installed Personalities and Options 146
F
face-down bin. See standard top bin
face-up bin. See bins, output
factory default settings, restoring 179
faded print, troubleshooting 129
FastRes 7, 172
Favorites tab
adding help topics 200
shortcut keys 197
features
drivers 20
job retention 80
printer 7
software 18
feeding modes, trays 78, 79
file directory, printing 144, 166
finding help topics 199, 200
finisher, multifunction. See multifunction finisher
firmware
error messages 124
upgrading 9
first page
different paper for 76
speed, specifications 7
speed, troubleshooting 136
flash memory
DIMMs, part numbers 12
DIMMs, upgrading 181
installing 185
slots 182
flashing lights
control panel 16
paper-handling devices 17
Index 205
folding booklets 66
font DIMMs, part numbers 12
fonts
Courier settings 170
EPS files, troubleshooting 136
included 8
lists, printing 144, 149, 166
PCL settings 170
storing on hard disk 9
troubleshooting 134, 140
form lines, settings 170
fraud Web site 93
front door
jam locations 98
locating 14
front-to-back registration 75
full-bleed images, printing 71
fuser area, clearing jams 105
fuser error messages 125
fuser levers, setting 58, 59
fuser modes 171
G
garbled pages, troubleshooting 136
glossy paper, HP 154
gray background, troubleshooting 129, 160
guidelines, paper 156, 160
H
hard disk
erase, security feature 86
error messages 120
features 9
file directory, printing 144, 166
information page 149
installing 189
job retention 80, 173
not recognized 138
part number 12
heavy paper
fuser mode 171
printing 71
specifications 162
help
control panel 118
copying topics 200
drivers 20
favorite topics 200
finding topics 199, 200
key, control-panel 15
printing topics 200
shortcuts 195, 201
using Help Viewer 199
Help Viewer
shortcut keys 195
using 199
home pages, embedded Web server 142
HP Driver Preconfiguration 19
HP FastRes 7
HP fraud Web site 93
HP Jetdirect print servers
EIO menu 175
error messages 127
information page 150
part numbers 13
troubleshooting 29
HP LaserJet Monochrome Transparencies 154
HP LaserJet Paper 155
HP LaserJet Soft Gloss Paper 154
HP LaserJet Utility 23
206 Index
HP MultiPurpose Paper 155
HP Office Paper 155
HP Office Recycled Paper 155
HP OpenVMS drivers 20
HP Premium Choice LaserJet Paper 154
HP Printing Paper 155
HP Printing Supplies Returns and Recycling Program 192
HP Toolbox
alerts, setting up 96
features 28, 31
toner level, checking from 94
HP Web Jetadmin
alerts, configuring 95
features 27
firmware upgrades 9
toner level, checking from 94
HTTPS settings 177
humidity, operating environment 164
I
I/O buffer overflow, error messages 124
I/O menu 175
IBM OS/2 support 20
image quality
cleaning page, printing 95
defect tables 128
settings 171
image size, setting default 168
Index tab shortcut keys 196
Information menu 166
information pages
configuration 146
event log 151
font lists 149
JetDirect 150
menu map 145
printing 144, 166
supplies status 147
usage 148
viewing from embedded Web server 142
ink cartridges. See print cartridges
input trays
action not currently available error message 119
behavior settings 173
capacities 8, 157
error messages 121
included 8
jam locations 98
jams, clearing 99
loading 36
locating 14
orientation, paper 49
paper path test 152
paper sizes, supported 157
part numbers 10
registration 75, 171
selecting 79
settings, viewing 146
size error messages 124
troubleshooting 134, 139
Installed Personalities and Options 146
installing
EIO cards 189
flash memory cards 185
Macintosh software 25
memory 182
network software 24
Windows software 23
insufficient memory 123
interface problems, troubleshooting 139
ENWW
IP address 142, 173
IPX/SPX settings 177
J
jams
8-bin mailbox 116
clearing 98
duplex printing accessory 103
error messages 123
frequent, troubleshooting 117
left door 105
locations 98
multifunction finisher 107
preventing 36
recovery settings 174
right door 99
standard output bin 105
staple, frequent 136
staple, multifunction finisher 112
staple, stacker/stapler 110
Tray 1 99
Tray 2 or 3 100
Tray 4 101
Jetadmin, HP Web
alerts, configuring 95
features 27
firmware upgrades 9
toner level, checking from 94
Jetdirect print servers
EIO menu 175
error messages 127
information page 150
part numbers 13
troubleshooting 29
job retention
error messages 123
features, accessing 80
job storage limit, setting 173
private jobs 80
proof and hold 83
QuickCopy 82
Retrieve job menu 166
Security Disk Erase 86
stored jobs 81
timeout settings 173
jobs, canceling 16
K
keys, control-panel 15
L
labels
fuser mode 171
loading 53
printing 36, 70
specifications 161
landscape orientation
setting as default 170
two-sided printing 69
language page, embedded Web server 143
language, control panel 133, 174
languages, printer
automatic switching 20
default, setting 174
error messages 119
included 8
list of installed, printing 146
LaserJet Monochrome Transparencies 154
LaserJet Paper, HP 155
LaserJet Paper, HP Premium Choice 154
ENWW
LaserJet Soft Gloss Paper 154
LaserJet Utility 23
last page, not printing 137
LEDs
control-panel 16
paper-handling devices 17
left door
clearing jams 105
jam locations 98
locating 14
left output bin
locating 55
paper sizes supported 158
letterhead
Alternate Letterhead mode 53
fuser mode 171
printing on 70
light print
setting, toner density 172
troubleshooting 129
lights
control-panel 16
paper-handling devices 17
line feed settings 171
line spacing settings 170
lines, troubleshooting 129
links, embedded Web server 143
Linux support 18
loading
envelopes 53, 57
labels 53
letterhead 53
orienting paper 49
standard-size paper 39, 42
staples in multifunction finisher 64
staples in stacker/stapler 61
transparencies 53
Tray 1 36
LocalTalk support 9
lock, security 87
locked menus, control panel 16
long edge binding, settings 169
loose toner, troubleshooting 130
low print cartridges, settings 174
M
Macintosh
Appletalk settings 177
Chooser, troubleshooting 141
communications, troubleshooting 141
driver settings 21
drivers included 19
HP LaserJet Utility 23
installing software 25
operating systems supported 18
PPDs and PDEs 22
uninstalling software 26
mailbox
bins, types of 56
capacity 9
features 68
jams, clearing 116
lights, status 17
locating 14
paper sizes supported 159
part number 11
Index 207
maintenance kit
ordering 122
part numbers 13
replacing 92
status 147
manual feed
control panel settings 169
first page 76
messages, troubleshooting 138
selecting 78
troubleshooting 134
manufacturing page 151
map, menu 144, 145, 166
margins
clipped, troubleshooting 134
envelopes 59, 156
settings 171
mass storage devices
installing 189
management tools 9
mass storage devices. See also hard disk
Material Safety Data Sheet (MSDS) 193
media
cardstock specifications 162
curl, troubleshooting 131
custom-size, loading 45
default image size, setting 168
first page, different 76
fuser modes 171
HP 154
labels 70
letterhead 53
loading 36
orientation 49
prepunched, loading 52
recycled 155
sizes, supported 157
small, mode for 172
special 70
specifications 156, 160
standard-size, loading 39, 42
tray selection 79
troubleshooting 160
type, setting default 169
types supported 160
weight equivalence table 153
media jams. See paper jams
memory
allocation 189
base 7
configuration page, printing 146
DIMM error messages 125
flash cards, installing 185
installing 182
insufficient 123
job retention features 80
NVRAM errors 126
part numbers 12
requirements, determining 181, 182
verifying installation 188
Menu button 15
menu map, printing 144, 145, 166
menus, control panel
Configure device 168
Diagnostics 180
EIO 175
I/O 175
Information 166
locked 16
map, printing 145, 166
navigating 16
Paper handling 167
Parallel input 175
PCL 170
Print quality 171
Printing 168
Resets 179
Retrieve job 166
Service 180
System setup 173
using 165
mercury statement 192
messages
alphabetical list 119
control panel lights 16
numerical list 123
settings 174
troubleshooting 118
microprocessor speed 7
misalignment, troubleshooting 131
misformed characters, troubleshooting 130
missing data, troubleshooting 135
modes
Alternate Letterhead 53
fuser 171
Sleep 173
Tray 1 78
trays 79
mopying (multiple original prints) 74
Mousekeys feature 201
MSDS (Material Safety Data Sheet) 193
multifunction finisher
bins, output 56
booklets, creating 66
capacity 8
different paper size error message 120
error messages 122
features 63
lights, status 17
locating 14
paper jams, clearing 107
paper sizes supported 159
part number 11
staple jams, clearing 112
staple jams, frequent 136
stapler, using 63
staples, loading 64
stapling, troubleshooting 137
multiple original prints (mopying) 74
multiple pages per sheet 77
MultiPurpose Paper, HP 155
multipurpose tray. See Tray 1
N
naming printer 142
narrow media settings 172
networking pages, embedded Web server 143
208 Index
ENWW
networks
HP Jetdirect print servers 29
installing software 24
operating systems supported 18
settings page, embedded Web server 143
software for 27
speed settings 179
troubleshooting 137
No back page 77
noise specifications 164
non-HP media 156
non-HP print cartridges 93, 121
nonvolatile memory errors 126
notification settings, embedded Web server 143
number of copies 168
n-up printing 77
NVRAM errors 126
O
Office Paper, HP 155
Office Recycled Paper, HP 155
online help. See help
OpenVMS drivers 20
operating environment specifications 164
operating systems supported 18
order supplies page, embedded Web server 143
ordering
parts and accessories 10
print cartridges 94
through embedded Web server 143
orientation
default 170
loading media 49
two-sided printing 69
OS/2 support 20
other links page, embedded Web server 143
output bins
8-bin mailbox 56
capacities 8
full, error messages 119
jam locations 98
jams, clearing 105
locating 14, 55
multifunction finisher 56
paper path test, printing 152
paper sizes supported 157
selecting 56, 169
stacker 55
stacker/stapler 55
troubleshooting 138
output quality
cleaning page, printing 95
settings 171
troubleshooting 128
overhead transparencies
HP LaserJet 154
loading 53
printing 71
specifications 161
overprints, troubleshooting 136
override A4/letter 169
overriding settings 74
ozone statement 191
P
page orientation
default 170
loading media 49
two-sided printing 69
page skew, troubleshooting 131
pages not printing
all 134
last 137
partial 136, 139
stops mid-job 140
pages per minute 7, 164
Pages Per Sheet 77
paper
curl, troubleshooting 131
custom-size, loading 45
default image size, setting 168
first page, different 76
fuser modes 171
letterhead 53
loading 36
orientation 49
prepunched, loading 52
recycled 155
sizes, supported 157
small, mode for 172
specifications 156, 160
standard-size, loading 39, 42
tray selection 79
troubleshooting 160
type, setting default 169
types supported 160
weight equivalence table 153
Paper handling menu 167
paper input trays. See trays
paper jams
8-bin mailbox 116
clearing 98
duplex printing accessory 103
error messages 123
frequent, troubleshooting 117
left door 105
locations 98
multifunction finisher 107
preventing 36
recovery settings 174
right door 99
standard output bin 105
Tray 1 99
Tray 2 or 3 100
Tray 4 101
paper path test, printing 152
paper-handling status LEDs 17
parallel connections, error messages 124
Parallel input submenu 175
part numbers 10
part numbers, supplies 154
partial pages, troubleshooting 136
path test, printing 152
paused printing 139
pausing the printer 16
PCL drivers 19, 20
PCL font list, printing 144, 149, 166
PCL menu 170
PDEs, Macintosh 22
PDF error page 170
permanent resources 189
page counts 151
page counts, viewing 146
ENWW
Index 209
personalities
automatic switching 20
default, setting 174
error messages 119
included 8
list of installed, printing 146
PINs
control panel menus 165
error messages 120
releasing private jobs 80
Service menu 180
plastics, recycling 192
platforms supported 18
portrait orientation
setting as default 170
two-sided printing 69
ports
parallel, error messages 124
troubleshooting 139, 140
postcards
printing 71
specifications 162
PostScript emulation drivers 19, 20
PostScript error pages 134, 170
PostScript font list, printing 149, 166
PostScript jobs, troubleshooting 140
PostScript Printer Description Files (PPDs), Macintosh 22
power cord, locating 14
power specifications 163
PPDs, Macintosh 22
preconfiguration, driver 19
Premium Choice LaserJet Paper 154
preprinted paper
fuser mode 171
printing on 70
prepunched paper
fuser mode 171
loading 52
printing 70
print cartridges
authentication 93
error messages 119, 121, 122
features 8
low 174
non-HP 93, 121
ordering 94
out, settings 174
part numbers 11, 154
recycling 192
removing 90
replacing 95
status, viewing in HP Toolbox 32
storing 93
supplies status page 147
toner level, checking 93
usage information 148
print jobs, canceling 16
print jobs, resuming 16
print quality
cleaning page, printing 95
settings 171
troubleshooting 128
Print quality menu 171
print servers
EIO menu 175
error messages 127
Jetdirect page 150
part numbers 13
troubleshooting 29
Printer Dialog Extension (PDEs), Macintosh 22
210 Index
printer drivers
autoconfiguration 18
features 20
help 20
included 19
preconfiguration 19
saving settings 74
settings 21
settings, overriding 74
troubleshooting 135
troubleshooting Macintosh 141
Update Now button 19
printer languages
automatic switching 20
default, setting 174
error messages 119
included 8
list of installed, printing 146
printer maintenance kit
ordering 122
part numbers 13
replacing 92
status 147
printer status page, embedded Web server 142
printing
basic instructions 54
private jobs 81
proof and hold jobs 84
QuickCopy jobs 83
stored jobs 82
troubleshooting 134
Printing Paper, HP 155
Printing submenu 168
private jobs
control panel settings 166
deleting 81
options 80
printing 80
Security Disk Erase 86
timeout settings 173
processor speed 7
proof and hold jobs
control panel settings 166
creating 83
deleting 84
options 80
printing 84
Security Disk Erase 86
timeout settings 173
protocol settings 176
PS drivers 19, 20
PS error pages 134, 170
PS font list, printing 144, 149, 166
PS jobs, troubleshooting 140
Q
quality
cleaning page, printing 95
settings 171
troubleshooting 128
quick sets 74
QuickCopy jobs
control panel settings 166
creating 82
deleting 83
options 80
printing 83
Security Disk Erase 86
timeout settings 173
ENWW
R
RAM. See memory
Ready light 16
recovery, jam 174
recycled paper 155
recycling supplies 192
refilling paper 36
refilling staples
3,000-sheet stacker/stapler 61
multifunction finisher 64
refresh rate page, embedded Web server 143
registration, tray 75, 171
releasing jobs
private 81
proof and hold 84
stored 82
removing software 26
repeating defects, troubleshooting 130
replacing
print cartridges 95
printer maintenance kit 92
reports
configuration page 146
event log 151
font lists 149
JetDirect page 150
menu map 145
printing 144, 166
supplies status page 147
usage page 148
viewing from embedded Web server 142
Resets menu 179
resetting printer maintenance count 92
resolution 7
Resolution Enhancement technology (REt) 7, 172
resolution settings 172
resource saving 189
restoring default settings 179
resuming printing 16
REt (Resolution Enhancement technology) 7, 172
Retrieve job menu 166
review copies, printing 83
right door
clearing jams 99
jam locations 98
locating 14
RIP ONCE technology 9
RIP Once technology 7
rollers, included in maintenance kit 13
S
saddle stitching 66
saving settings 74
scan buffer errors 126
Search tab shortcut keys 196
security
embedded Web server settings 143
lock 87
settings 179
status, configuration page 146
Web sites, settings 177
Security Disk Erase 86
serial number
cartridges 147
disk accessory 149
printer 146
Service menu 180
Set Registration 75, 171
ENWW
settings
configuration page 146
control panel, changing 16
driver 21
image quality 171
overriding 74
restoring defaults 179
saving 74
shared printers, troubleshooting 137
sharing, Windows 24
short edge binding, settings 169
shortcuts, help 195, 201
sizes, paper
error messages 124
selecting trays by 79
supported 157
skewed pages, troubleshooting 131
Sleep mode
Energy Star compliance 191
power consumption 163
settings 173
slots
DIMM 181, 182
EIO 9
Installed Personalities and Options 146
locating 14
slow printing, troubleshooting 136, 139
small paper mode 172
smeared toner, troubleshooting 130
Soft Gloss Paper 154
software
CD-ROM, contents 18
features 18
installing on Macintosh 25
installing on Windows 23
Macintosh 22
network 27
settings, overriding 74
troubleshooting 135
uninstalling 26
special media, printing on 36, 70
specifications
acoustical 164
card stock 162
envelopes 161
environmental 164
labels 161
paper 156, 160
power 163
transparencies 161
specks, troubleshooting 95, 129
speed
data transmission settings 175
network settings 179
pages per minute 7
print 164
processor 7
resolution settings 172
troubleshooting 136, 139
stacker
bins 55
capacity 8
features 60
lights, status 17
locating 14
paper sizes supported 158
part number 11
selecting output location 56
Index 211
stacker/stapler
bins 55
capacity 8
error messages 122
lights, status 17
loading staples 61
locating 14
not recognized 138
paper sizes supported 158
part number 11
printing to 60
selecting output location 56
staple jams, clearing 110
staple jams, frequent 136
stapling, troubleshooting 137
standard top bin
features 55
jam locations 98
jams, clearing 105
locating 14
paper sizes supported 157
staple cartridges
error messages 122
loading in multifunction finisher 64
loading in stacker/stapler 61
part numbers 11
staple jams
frequent, troubleshooting 136
multifunction finisher, clearing 112
stacker/stapler, clearing 110
stapling documents
troubleshooting 137
using the 3,000-sheet stacker/stapler 60
using the multifunction finisher 63
status messages
alphabetical list 119
control panel lights 16
numerical list 123
settings 174
troubleshooting 118
status page, embedded Web server 142
Status tab, HP Toolbox 32
status, supplies
information page 147
page, printing 144, 166
viewing in embedded Web server 142
viewing in HP Toolbox 32
Stop button 16
stopped printing, troubleshooting 140
storage devices
installing 189
management tools 9
storage devices. See hard disk
stored jobs
control panel settings 166
creating 81
deleting 82
error messages 123
options 80
printing 82
Security Disk Erase 86
timeout settings 173
storing
envelopes 162
print cartridges 93
printer 164
212 Index
supplies
error messages 123
ordering 143
part numbers 154
recycling 192
status, viewing in embedded Web server 142
status, viewing in HP Toolbox 32
supplies status page
information on 147
printing 144, 166
symbol sets 170
System setup submenu 173
T
TCP/IP settings 176, 178
temperature, operating environment 164
temporary printing errors 125
test, paper path 152
text, troubleshooting
dropouts 129
misformed 130
time, setting 173
timeout settings
held jobs 173
I/O 175
Sleep mode 173
toner
adhesion problems 160
density settings 172
level, checking 93
loose, troubleshooting 130
smear, troubleshooting 130
specks, troubleshooting 95, 129
usage information 148
washing off clothing 90
toner cartridges. See print cartridges
Toolbox, HP
alerts, setting up 96
features 28, 31
toner level, checking from 94
transparencies
fuser mode 171
HP LaserJet 154
loading 53
printing 71
specifications 161
Tray 1
bad connection, error message 119
capacity 8
custom-size paper specifications 71
envelopes, loading 53, 57
error messages 121
feeding modes, setting 78
first page, different paper for 76
fuser levers, setting 58, 59
jam locations 98
jams, clearing 99
labels, loading 53
loading 36
loading paper 49
locating 14
manual feed messages, troubleshooting 138
manual feed mode 78
paper sizes supported 157
part number 10
registration 75
ENWW
Tray 2
capacity 8
custom-size paper specifications 71
jam locations 98
jams, clearing 100
loading custom-size paper 45
loading paper, orientation 50
loading standard-size paper 39, 42
locating 14
paper sizes supported 157
registration 75
settings 167
troubleshooting 134
Tray 3
capacity 8
custom-size paper specifications 71
jam locations 98
jams, clearing 100
loading custom-size paper 45
loading paper, orientation 50
loading standard-size paper 39, 42
locating 14
paper sizes supported 157
registration 75
settings 167
troubleshooting 134
Tray 4
capacity 8
custom-size paper specifications 71
jam locations 98
jams, clearing 101
lights, status 17
loading custom-size paper 45
loading paper, orientation 50
loading standard-size paper 39, 42
locating 14
not recognized 138
paper sizes supported 157
part number 10
power, troubleshooting 138
registration 75
settings 167
troubleshooting 134
trays
action not currently available error message 119
behavior settings 173
capacities 8, 157
error messages 121
features 8
included 8
jam locations 98
jams, clearing 99
loading 36
locating 14
orientation, paper 49
paper path test 152
paper sizes, supported 157
part numbers 10
registration 75, 171
registration/calibration 75
selecting 79
settings, viewing 146
size error messages 124
troubleshooting 134, 139
ENWW
troubleshooting
checklist 133
control panel 133
control-panel messages 118
curled pages 131
faded print 129
fonts 134, 140
gray background 129
HP Jetdirect printer servers 29
jams, clearing 98
jams, frequent 117
lights, control-panel 16
lights, paper-handling devices 17
lines 129
Macintosh 141
manual feed 134, 138
missing data 135
networks 137
pages not printing 134
paper 160
paper path test 152
partial pages 136
paused printing 139
ports 139, 140
printer, sending to 136
PS print jobs 140
quality 128
repeating defects 130
skew 131
software 135
specks 129
speed 139
staple jams, clearing 110
staple jams, frequent 136
stapling 137
stopped printing 140
toner smear 130
trays 134
TrueType fonts, included 8
two-sided printing
layout options 69
loading paper 49
printing 68
settings 169
troubleshooting 135, 137
typefaces. See fonts
types, paper 160
default, setting 169
fuser modes 171
selecting trays by 79
tray settings 167
U
uninstalling software 26
UNIX
carriage return settings 171
HP Jetdirect Printer Installer utility 27
support 18
Update Now button 19
upgrading
EIO cards supported 9
firmware 9
memory 181, 182
upper output bin, locating 14
usage page
embedded Web server 142
information on 148
printing 144, 166
USB support 9
Index 213
V
vertical line spacing settings 170
vertical transfer door
jam locations 98
locating 14
voltage, troubleshooting 133
W
washing off toner 90
watermarks, printing 74
wave, troubleshooting 131
Web Jetadmin
alerts, configuring 95
features 27
firmware upgrades 9
toner level, checking from 94
Web sites
anticounterfeit 93
Electronic Industries Alliance 192
environmental information 193
firmware upgrades 9
Material Safety Data Sheet (MSDS) 193
paper specifications 156
recycling information 192
security settings 177
Windows software 9
weight, paper
equivalence table 153
heavy 162
supported 157
Wide A4 setting 170
Windows
driver settings 21
drivers included 19
installing software 23
networks, installing software 24
operating systems supported 18
uninstalling software 26
wrinkles, troubleshooting
envelopes 132
pages 131, 161
wrong side, pages printing on 137
214 Index
ENWW
© 2005 Hewlett-Packard Development Company, L.P.
www.hp.com
*Q3721-90940*
*Q3721-90940*
Q3721-90940