1
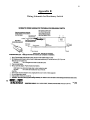
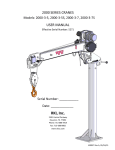
Rope A Phobia Identification Product Name: _____________________________________________________ Model: ____________________________________________________ Specialty Items: _____________________________________________ Serial Number: ______________________________________________ VIN Number: ________________________________________________ Date Manufactured: __________________________________________ Company Name: ____________________________________________ Customer Name: ____________________________________________ Phone Number: _____________________________________________ Address: ___________________________________________________ ___________________________________________________ 720 West 200 South Logan, Utah 84321 888-563-0163 2 RAP Operations Manual 2006 Table of Contents Table of Contents Change of Owner/Operator Form Welcome Notice of Copyright Confidentiality Agreement Receipt and Acknowledgment Training Overview Product Overview 1) Spectrum Sports International a) Physical Dimensions and Clearances b) Mechanical Engineering Approval c) Required Personnel 2) Setting up the Rope A Phobia a) Ground Procedures b) Safety Procedures c) Installing the Elements d) Inspecting the Elements 3) Take Down of the Rope A Phobia 4) Inspections and Preventative Maintenance a) Daily Inspections b) Weekly Inspections c) 3 Month Inspections d) Annual Inspections e) Trip Preparation Checklist f) Rope A Phobia Storage (Winterization) g) Cleaning & Maintenance h) Preventative Maintenance Schedule i) Rope A Phobia Service Log 5) Warranty a) Limited Warranty Acknowledgment (Sign & return to Spectrum Sports) 6) Day-to-day Operations a) Equipment b) Rules and Safety Tips c) Entertainment Tips 7) Marketing Ideas to consider 8) Conclusion Page 2 4 5 6 7 8 9 10 12 15 16 19 20 21 25 26 27 3 Appendices Appendix A Appendix B Appendix C Appendix D Appendix E Appendix F Appendix G Appendix H Rope A Phobia Engineering Stamp of Approval Wiring Schematic for Breakaway Switch ASTM Recommended Injury and Illness Reporting Rope A Phobia Accessories & Parts Order Form Wiring Schematic for Mobile Transportation Auto belay diagram Assembly diagrams NDT schedule and Diagram 28 29 30-32 33 35 36-37 38-43 44-47 CHANGE OF OWNER/OPERATOR FORM 4 Original Owner of Rope A Phobia: Company Name: _______________________________________________________________________ Contact name (s): _______________________________________________________________________ Bill to Address: _________________________________________________________________________ City: ______________________________ State: ______________________ Zip: _________________ Phone: ____________________ Alt. Phone: _______________________ Fax: __________________ Former RAP Location: ___________________________________________________________________ City: ______________________________ State: ______________________ Zip: _________________ Date Sold: _______________________________ New Owner/Operator Information: Company Name: _______________________________________________________________________ Contact name (s): _______________________________________________________________________ Bill to Address: _________________________________________________________________________ City: ______________________________ State: ______________________ Zip: _________________ Phone: ____________________ Alt. Phone: _______________________ Fax: __________________ RAP Location: __________________________________________________________________________ City: ______________________________ State: ______________________ Zip: _________________ Rope A Phobia Information: Mobile Other: __________________________ Serial # ______________________________ VIN # _______________________________ Year: ________________________________ *Please mail or fax to: Spectrum Sports Int’l, Inc 720 West 200 South Logan, Utah 84321 Attn: Krissy Fax: (435) 792-3884 Phone: (888) 563-0163 (Toll Free) 5 Welcome It is with great pleasure that I congratulate you on your Rope A Phobia (RAP) purchase and welcome you to Spectrum Sports International (SSI). We are excited about our products and feel confident that through proper planning, placement, and hard work the Rope A Phobia will be a rewarding and profitable purchase. Our philosophy is centered on a commitment to excellence in meeting the needs of our customers, and providing a quality product that is safe, exciting, and profitable. We encourage you to likewise develop a standard of quality and service that makes you the leader in supplying turn-key amusement products for the amusement, entertainment, and special attractions market. Our part in making our team successful is: A commitment to proper, effective and profitable design. Each of our products is stamped by a certified engineer, which means that you can rest assured you have purchased a product that will be safe. Testing designs before the sale. Maximum customer throughput generating high profits. Experience in the industry, from large amusement parks to birthday rental entrepreneurs. All manufacturing is done in-house, which provides for exceptional Quality Control. Your part in building a successful business using Spectrum Sports International products is: Commitment to safe operation. Consistent inspection for proper maintenance. Effective and active marketing and promotion. We are looking forward to a long and prosperous relationship. Should you have any comments or questions, please do not hesitate in calling. Sincerely, Spectrum Sports Team Copyright 1996 – 2006 Spectrum Sports International 6 Reproduction or translation of any part of this work beyond that permitted by Section 107 or 108 of the 1976 United States Copyright Act without permission of the copyright owner is unlawful. Requests for permission or further information should be addressed to Spectrum Sports International. Confidentiality Agreement 7 This manual and the content within this manual are for the exclusive use and operation of the Rope A Phobia product, by the owner of the respective product and its authorized personnel and for Spectrum Sports International. This manual is designed to provide accurate and authoritative information in regard to the subject matter covered. This manual may not be reproduced in whole or part in any form or by any means without the prior written consent of Spectrum Sports International. Confidentiality This manual contains proprietary information belonging to Spectrum Sports International. It is to be viewed only by persons employed by Spectrum Sports International and/or Rope A Phobia owners and authorized personnel. Distribution This manual is not to be distributed to any persons other than those actively engaged in the operating and/or marketing of the Rope A Phobia product and customers serviced by the owner of the Rope A Phobia. Disposition This manual is the property of the Rope A Phobia owner and Spectrum Sports International and must be discarded or returned to Spectrum Sports International upon receipt of an updated manual. Revision Spectrum Sports International may make periodic additions, deletions and modifications to this manual at any time without prior notification. These updates will, in the judgment of Spectrum Sports International, add to the quality of services offered. Notice Of Changes In the event that revisions are made to this manual, Spectrum Sports International will send the appropriate pages reflecting such changes as are deemed necessary and a revised document will be issued to the individual for replacement. Any pages that are then outdated must be destroyed and discarded. In the event that replacement pages are sent, Spectrum Sports International will provide a cover letter outlining the revision and the effective date of any procedural changes. Receipt and Acknowledgment 8 This Operations Manual is an important document intended to help you become acquainted with the Rope A Phobia, Spectrum Sports International and includes guidelines as to safe and recommended operation. Please read the following statement; respond to Spectrum Sports International in writing with any questions or if the intent of this document is unclear. As an owner, I have received and read my copy of the Rope A Phobia Spectrum Sports International Operations Manual. I understand that the information outlined in this manual is subject to change at the sole discretion of Spectrum Sports International at any time. As an owner of the Rope A Phobia or an authorized representative, it is my responsibility to keep this manual up-to-date with any changes that are made by Spectrum Sports International. In addition, if there is anything about the product and/or this manual that is unclear or not understood, it is my responsibility to seek clarification and not use the product until the issue is understood. Unless informed in writing, Spectrum Sports International assumes that the customer understands the Rope A Phobia product and that there are no questions regarding the product and/or the contents of this document. It is the customer’s sole responsibility to clarify any question or concern with Spectrum Sports International before use and/or operation. Training Overview This manual is an introduction to the Rope A Phobia and its operation. The purpose of this manual is to provide a compilation of information that will assist you in proper and safe operation. The philosophy of Spectrum Sports International is centered on a commitment to excellence in meeting the needs of its customers and associates by providing them with the enclosed information. The manual is designed to provide the Rope a Phobia owner with the information, tips, and techniques that will help the owner and employees operate the unit as effectively and safely as possible. This manual is no way a total representation of all facts. Safe operation of this product is the sole responsibility of the Rope A Phobia owner/operator. Good and reasonable judgment must be used when traveling, promoting and/or operating the ride. Product Overview 9 Rope A Phobia is the latest interactive mobile product from Spectrum Sports Int’l. From the creators of the first mobile climbing walls with Auto-Belay, we are bringing you the latest mobile attraction. Rope A Phobia is an instant hit for all businesses from mobile operators to party rentals, corporate events to team building; with the Rope A Phobia you will be on the cutting edge- you will be the trend setter. With 8 elements (all inter-changeable) you can have up to 12 people on the ride at one time. The estimated time to complete the Rope A Phobia is only a few minutes. Each element will challenge all ages and their ability to deal with their fear of heights. Elements can be changed if you want to create a different thrill. With the broad range of elements you will be able to accommodate all ages, from young to old. Rope A Phobia will be a revenue maker each time you set it up. Welcome to the Rope A Phobia product. As the originators and inventors of the Auto-Belay, Spectrum Sports Int’l products are industry leaders in innovation, safety, design and customer satisfaction. Designed for the amusement, entertainment, and recreation industries, Spectrum Sports products are engineered with safety, customer appeal and customer throughput in mind. Complete with the first redundant Auto-Belay device, the Rope A Phobia maximizes profit and safety. The Rope A Phobia is designed to meet ASTM F24 standards for the Amusement Industry. Upon request before the order is placed or contract agreed each unit can be inspected by a third party C.W.I. (Certified Welding Inspector). This means that the Rope A Phobia is designed, manufactured, tested, and supported by comprehensive quality assurance and quality control measures to ensure product reliability and safety. The enclosed information is an outline as to the procedures for safe operation and set-up of the product. Rope A Phobia 10 The Rope A Phobia has been designed to travel down the road in a down/closed fashion. Spectrum Sports Int’l recommends a maximum towing speed of 55 M.P.H. As a reminder, please follow any and all rules established by a state or interstate highway system that you would travel in the course of conducting your business or transport of the product. Please abide by all traffic laws and warnings. It is the owners’ responsibility to ensure all the trailer lights and brakes are functioning properly before each use. Refer to your axle manual for assistance Transport Dimensions – The dimensions for the Rope A Phobia when in travel are: Width – 7’ – 10” Height – 12’ – 0” Length – 32’ – 0” Operational Dimensions – The dimensions for the Rope A Phobia when in full operation are: Width – 20’ Height – 22’ Length – 32’ Mechanical Engineering Approval – The Rope A Phobia has been designed and reviewed by engineers that stand behind the Rope A Phobia design. If it is necessary for you to receive a copy of the engineering analysis, SSI will provide a copy contingent upon the signing of a “non-disclosure/non-compete agreement”. Please call Spectrum Sports International for details. * CUSTOMER IS RESPONSIBLE FOR FINDING WHAT CURRENT CODES ARE REQUIRED TO OPERATE THIS PRODUCT WITHIN THEIR STATE. Required Personnel - The Rope A Phobia can be operated with 2 or 3 people. However, for efficient operations, SSI recommends at least 3-4 people to set-up and operate the attraction for optimal performance and safety. Spectrum Sports International recommends one operator to be at the exit rail to assist the participants in exiting the RAP. A second operator is ideal for fitting new participants with the correct size harness and puck safety cable and placing them on the first element, the Cargo Rope ladder, as this ensures safety and thru put. A third operator should be up on the RAP at the end of the 7th element and at the beginning of the 8th element (Fireman’s Pole). This operator is crucial and should be well-trained on the process of hooking up the Auto-Belay to the puck safety line and assisting the participants to the ground. This operator also directs and/or gives encouragement to other participants as they go from element to element. IMPORTANT NOTICE: All employees need to be trained on the OPERATIONS AND SAFETY of the RAP. Only MATURE and SENSIBLE operators should work on this product. 11 Hitch and Wiring - IMPORTANT NOTE: Make the necessary changes to your towing vehicle’s hitch so the trailer is horizontal to the ground when in tow. Refer to your axle manual for more information on proper towing of your trailer. You may have to change the hitch receiver to accomplish this. To pull the Rope A Phobia you will need a 2 5/16-inch ball on your vehicle and a female seven - (7) prongwiring plug (See Appendix F) for wiring. Remember that your towing vehicle must be equipped with an electric trailer brake controller that is adjusted correctly. The ability to raise and lower the upper frame from the trailer depends upon the battery being fully charged, since not having a fully charged battery will affect the raising and lowering of the ride. In the event that there is insufficient power to raise/lower the unit you may need to use jumper cables from a towing vehicle or some type of battery charger to raise/lower the unit. Please refer to your battery manual for more useful information about your batteries. Please note that your “female” electrical connection on your vehicle must terminate as close to the hitch as possible. The “male” pigtail of the trailer is a perfect length for the appropriate turn radius without dragging on the ground. However, if the connection is anywhere other than next to the actual hitch, the pigtail may not be long enough to reach. Refer to Appendix B for Wiring Schematic for the Breakaway Switch. 12 Setting up the Rope A Phobia We highly recommend setting up your Rope A Phobia (RAP) on a flat surface before your first event to become familiar with the set up procedure. Your RAP can be set up on surfaces that have been compacted, blacktop, concrete, established lawns, etc. Do not set up the RAP if current winds exceed 35mph or a storm is approaching. Make sure the desired location is free from overhead obstacles, utility lines/cables or any other obstacle(s) as the RAP is being raised. At least two people will be required to set up and assemble the RAP ride. During your first several events allow at least one hour to set-up and inspect the ride before you open it to customers. As you become more familiar with your ride you will be able to shorten this time. For your protection it is recommended that you wear a properly fitted harness and secure the safety tether into the outside operator cable while performing any assembly while on the RAP. If for any reason you have questions regarding the operation of this ride or set up call Spectrum Sports International for further instruction. The following set up procedures can be done from the ground. Refer to the assembly appendix often as you read the following steps. • Disconnect trailer from towing vehicle. • Check and inspect the Auto-Belay at the back of ride. Air pressure should be 45-55 psi. Check to make sure the oil is visible in the oil lens. If not visible, depressurize the belay tank and add oil until it is visible. Add only enough oil to fill the oil lens, and then add the correct amount of air pressure. There is more information regarding the Auto-Belay throughout this manual. • Pull out the jack extension pins to extend jacks out so the holes in trailer align with jack extension holes. Reinsert pin in hole. • Pull jackleg pin so the leg drops to the ground. You may have to lift the jackleg up for the holes to align. Reinsert pin. Now you can support the entire ride with the 6 jacks. Do not raise the trailer tires off the ground as it is not necessary! • Very carefully remove the straps holding the wings up. Lower one wing at a time. Do not drop the wings since doing so will damage the hinge bolts. The wings are heavy and require two people to be lowered safely. • Remove the entrance cargo net frame located at the back of the ride, which will require at least two people. With the caster wheels on the ground move the cargo net frame to the front drivers side wing, pin the cargo net frame tabs to the tabs on the driver side front wing tabs. See attachment of cargo net frame in the assembly appendix. • Remove the aluminum entrance rail and attach the stand off legs. Remove the fireman pole and pole base from the ride which can be done from the ground level. See entrance rail connection in the assembly appendix. 13 The following set up procedures will require you to wear a body harness and safety cable attached to the operator cable which is located on the top outside frame members of the upper frame. Do not raise the ride until told to do so. Do not attempt to do the following without two able-bodied people that have read this and have a basic understanding of the instruction. Tools required: A ratchet with a 3/4" socket and 3/4" open end/close end wrench. • Set the top part of the entrance rail onto the entrance wing and the other end on to the ground. With one person standing on the wing and the other on the ground, raise the rail into position by lifting it overhead and pinning the rail to the angle iron clips on either side. See “Entrance Rail Connection” page. • Unpin the RAP sign on the upper frame and then lift into position and insert pin to hold it up. • Insert flags in all the flag mounts located on top of ride. • Install elements “if” they were removed prior to transportation and any straps that might have been used to secure the elements for transportation. • Install all safety pads on the vertical tubes and horizontal cross tubes on the upper frame. Attach a pad to the entrance wing grating and to the cargo net frame pin. Install a pad at the exit / fireman pole wing (it wraps onto the front of the wing to protect people if they swing into the wing frame). • Take extreme care when doing this next step not to kick or damage the belay cable in any way. Unpin the side exit rail from the mount and swing it into position between the two angle iron clips and secure it with 4, 1/2" x 1 1/2" bolts/nuts. Do not kink the belay cable when installing the side exit rail. Refer to attachment of exit components in the assembly appendix. • After the side exit rail is in place look at the belay cable routing to ensure it is in the groove of the pulleys overhead, two on the exit rail and the one above the Auto-Belay. • Now you are ready to raise the ride. Remove cover cap from pendant plug socket, which is located on the driver’s side of trailer near the front of trailer. Carefully insert the yellow pendant (remote) plug end into socket; it will only go on one way. Be careful not to force plug into socket, as the pins are small and can break off. Secure plug by threading the black ring onto plug socket. • Make sure everything is done on the upper frame before you raise the ride up. Once again, make sure there is proper clearance above the flags and sign for the RAP before raising it. • Press the “UP” button and hold it down the entire time as the RAP is being raised. • Hold the “UP” button down until the ride stops going up. Both of the hydraulic cylinders are now fully extended. Remove pendant from plug socket and store it in a cargo box until needed to lower the ride down. Screw the plug socket cap back on to socket. • Insert the anti let-down pins as shown in the assembly pages. Note: the pins are not the primary locking mechanism; they are just a back up. The hydraulic power unit has a check valve that locks the cylinders into place. • Now that the ride is fully raised you can install the fireman pole element. With one person in a harness and clipped into the operator safety cable at the side exit area, help guide the fireman pole into the large pipe at end of the side exit rail and pin it in position. The other person on the 14 ground will lift the fireman pole to the person above with the hole in the end. Make sure the fireman pole base piece is on the pole and the locking collars are on the base before pinning the fireman pole to the side exit rail. Refer to assembly appendix. • Tighten the locking collars at the bottom of fireman pole. This gives additional support to the exit rail. • Pull the belay cable down several s with a piece of rope to check the retraction of the cable. Have the employee on the ride come down the fireman pole for a check of the operation of the belay. Note: this is the most important part of the ride. The operator MUST be thorough when attaching the carabineer attached to the auto belay cable to the passenger puck eyebolt each and every time. You must open the first Anti Roll Back Plate (referred to as ARB) to allow the puck to pass; this is when you attach the belay cable carbineer to the eye bolt of the puck. Double check that the carabineer is secured overhead before opening the second ARB before your passenger goes down the fireman pole. You have two chances to secure the belay carabineer to the passenger. It must fully retract every time so you can operate the fireman pole element safely. Once at the bottom of the fireman pole unhook the carabineer from the quick link and release the belay cable so it retracts up to the exit rail. • Do a walk through of the entire ride with a correctly fitted harness and proper sized safety cable attached to a safety puck. Insert a puck into entrance rail and pass the first ARB to keep the puck in the rail. Climb up the cargo net while advancing the safety cable/puck as you climb the net. • Remember you are inspecting the ride as you go from element to element. • Put out the Warning and Safety signs. • Now the ride is ready to operate safety. Please call if you have any additional questions about the ride. Take Down of the Rope A Phobia 15 Please take the following steps to ensure safe and proper takedown of the Rope A Phobia. Remember you must be in a harness and safety cable when working on the upper frame when the ride is in the up position. • • • • • • • • • • • • • • • • • • • • Before lowering the upper frame you must first remove the fireman pole with two people. Remove the anti-let down pins from the trailer, in front of the rollers that are attached to the scissor members. Now the RAP can be lowered. Plug the pendant into the socket. Push and hold the down button until the upper frame comes in contact with the trailer. Make sure the entrance stand-off legs and the cargo net frame moves with the upper frame as it is being lowered. You don’t want an obstruction to bind the stand-off legs or cargo net frame while lowering the upper frame. With the upper frame resting on the trailer you can remove the entire entrance rail at this time. It is your option to remove all, some or none of the rope or cable elements from the upper frame. Unbolt the side exit rail from the upper frame, swing it back and secure it to the mount with the same pin as you use for the fireman pole. Take caution not to damage the belay cable when moving the side exit rail. Store the fireman pole on the trailer. Load the entrance cargo net frame and secure it for transportation. Store and secure the entrance rail and stand-off legs for transportation. We recommend removing all pads so not to lose them while transporting. Remove the flags and lower the sign. Raise all trailer jacks. Pull jackleg pin, raise the jackleg to the highest pinhole and insert pin. Continue to fully raise the jackleg to the highest possible position. Stop turning jack handle when you feel resistances. Pull jack extension pin and slide jack towards trailer. Align both holes and insert pin to hold jack during traveling. Attach towing vehicle to trailer and insert hitch closure pin and secure hitch. When attaching the safety chains to towing vehicle, crisscross them to form an “X”. Secure trailer plug. As always, make sure to obey all traffic laws and regulations. It is your responsibility to ensure the trailer lights, brakes and break away switch are in working order. Do not exceed 55 MPH when towing the Rope A Phobia. 16 Inspections & Preventative Maintenance Daily Inspections Please note that these inspections guidelines are a minimum. Please take caution and ensure that any and all working parts and safety related products are thoroughly inspected and that all bolts are secure before use. Auto-Belay Cable must be inspected daily. Replace cable if one of the following is true: 1. A single broken wire in any strand any place on the cable. 2. If the cables have been on the ride for more than 1 year. 3. If there are any twists, frays or kinks. 4. If you have purchased a used ride. 5. If any of the individual wires in a strand have a flat spot more than ½ the diameter of the smallest wire. Inspect the Side Exit rail. 1. Make sure the two A.R.B. work. Stop the puck from passing without assistance from an operator, and then allow the puck to pass with an operator moving the A.R.B. handle. Inspect the entrance rail. 1. Make sure each and every one of the A.R.B. moves smoothly back in forth. Inspect oil level of Auto-Belay. 1. Add oil if low. One quart will rise level 3 1/2" so add oil slowly. Use ISO 32 hydraulic oil. Here is a variety of brand names that will help you find this type of oil; Texaco Rando 32, Chevron AW-32, and Mobile DTE-24. Inspect air pressure and make adjustments accordingly. Add air if low. Inspect each and every harness before you open the ride. Read and understand the manual. 1. If in doubt replace a worn harness with a new one. Inspect each and every safety puck cable for wear. Replace annually. Make sure to check the function of swivel and carabineer 1. Read and understand the manual for each. Breakaway System 1. Check battery charge and switch operation before each use. Refer to Dexter Axel Operation & Maintenance Manual (included with RAP Manual). Please note that these inspection guidelines are a minimum. Please take caution and ensure that any and all working parts and safety related products are thoroughly inspected and that all bolts are secure before use. 17 Weekly Inspections (in addition to Daily Inspections) Maintain a fully charged battery. This will greatly depend on the use of the RAP unit. A battery charger will be required to do this. Refer to Battery Manual insert included with RAP manual. Tire Pressure. Check the pressure of all tires including the spare. Inflate to manufactures specifications. Inspect all pulleys. Pulleys can be inspected while the RAP is in the down position, ground level. Visual inspection Visually inspect all structural components: Scissor arms, Trailer, etc. Check all bolt-on axle hardware and tighten if required. 3 Month Inspection (in addition to Daily and Weekly Inspections) Grease pivot zerks Grease all wheel bearings. Refer to Dexter Axle operation and maintenance manual. Grease hitch ball and trailer hitch. Brake adjustment. Refer to Dexter Axle operation and maintenance manual. Wheel nuts and bolts. Refer to Dexter Axle operation and maintenance manual. Tire condition. Refer to Dexter Axle operation and maintenance manual. Oil level in hydraulic power unit. 1. With the wall in the down position, oil level should be 2”- 2 ½” from top. Do not over fill. Use ISO 32 hydraulic oil. The following are several ISO 32 oil brand names; Texaco Rando 32, Chevron AW-32 or Mobile DTE-24. Check all hydraulic hoses. Check all hoses for external wear, cracks, splits, etc. Call if you have any questions. Annual Inspection (in addition to Daily, Weekly and Quarterly Inspections) Replace Auto-Belay cable annually. Re-torque all nuts and bolts on RAP annually. Replace all Quick Links holding elements. Replace all safety cables with pucks. Check the four load runners, two that roll on trailer and two that roll on upper frame for smooth operation, if bearing feels rough replace. Replace the four scissor bolts, two that attach the scissor to trailer and the two bolts that attach the scissor to the upper frame every three years from date of purchase regardless of ride activity. The main scissor is the life of the ride. 18 Trip Preparation Checklist 1. Check hitch. Is it showing wear? Is it properly lubricated? 2. Fasten safety chains and breakaway switch actuating cable. Make certain the breakaway battery (battery at the rear of trailer) is fully charged. 3. Make sure in-line fuse to battery is okay, not burned. 4. Inspect towing hookup for secure attachment. 5. Do not overload! Stay within your gross vehicle rated capacity. 6. Inflate tires according to manufactures specifications; inspect tires for cuts, excessive wear, etc. 7. Check wheel-mounting nuts/bolts with a torque wrench. Torque, in proper sequence, to levels specified in the Dexter Axle Operation and Maintenance Manual. Check and re-torque after the first 10 miles, 25 miles and again at 50 miles. Check periodically thereafter. 8. Make certain brakes are synchronized and functioning properly. 9. Check operation of all lights 10. Check that your trailer is towing in a level position and adjust hitch if required. 11. Do not exceed 55 mph when towing ride. Rope A Phobia Storage (Winterization) If your RAP will not be in service for a period of 30 days or more, we recommend the following procedures to keep your unit free from defects and in optimal operating condition. Remove pucks from rail Disconnect battery cables from battery (disconnect ground cable first). Store battery indoors (off the ground). Remove swivels and carabineers from belay cable. Store trailer on jacks, not tires. Lubricate the trailer plug, hose fittings, power unit and cylinder rod on with silicone spray to keep from rusting. Store entire unit under roof or tarp. Grease pivot pins, jacks and trailer hitch. Refer to Dexter Axle Service Manual for axle and wheel care If you have any questions or concerns, please call Spectrum Sports International at (435) 792-3883 or toll free (888) 563-0163. Cleaning and Maintenance 19 Under no circumstances should any unqualified person(s) service the unit. Any work to the steel frame, hydraulic Auto-Belay and cabling should be performed by an experienced person in the field of service who is certified, bonded, etc., to perform the work. It is the owners’ responsibility to ask for such certification and/or bonding verification. Cleaning of the unit should be similar to an automobile (i.e. car wash with spray washers and mild detergents). For harnesses, please refer to the original manufactures recommendations. 20 Rope A Phobia Preventative Maintenance Schedule Inspection Date: _____________________ Inspected by: _____________________________ J J J J Daily Auto-Belay Cable – Check every inch of cable for fraying, if frayed, replace cable immediately. Auto-Belay Cable Ends – Ensure that there are no broken strands by crimp. Auto-Belay Cables are tracking along pulleys without restriction. Harness Stitching – If stitching is pulling apart, send to Spectrum Sports International for repair or replace immediately. Belay Tank Pressure – Pressure Gauge reading between 40-60 psi Carabineer – If the auto locking Carabineer is not locking positively or sticking open, replace immediately. J J J J Weekly Pulley Wear – Inspect pulley’s closely to ensure proper function, replace if worn. Hydraulic Hose – Inspect for road damage and proper function. No leaks! Tire Pressure – Check tire for proper pressure Lug nuts – Make sure lug nuts are secured and that they are NOT rusting into place. Rust/corrosion will inhibit a tire change, if necessary. If needed, back off the lug nut and re-secure. You may want to use a rust inhibitor for lubricating and protection purposes. Cable Slack – With rope; test the full length to ensure proper Auto-Belay function. Resistance while pulling down the rope and retraction of the cable when rope is release. J J J Note: At a minimum, please make copies from this page and use as directed! Thank you and have Fun! Rope A Phobia Service Log 21 Spectrum Sports highly recommends keeping accurate and detailed records of ALL service and maintenance performed on your Rope A Phobia. This specific information is important for warranties; timing of suggested replacement parts and is also necessary information for Building Inspectors and/or Leasers Date Service/Maintenance Performed By Whom Warranty 22 The warranty is established from the date of a signed receipt and acknowledgement along with a signed product warranty (refer to the following page). Should it be determined that the defect is due to abuse or misuse, any and all warranty rights or responsibilities are void. Spectrum Sports International reserves the right to void warranty service on any modification to product done by customer Please refer to the following pages for the Limited Warranty Acknowledgement. Warranty will NOT be effective unless registered, by completing this form and mailing to Spectrum Sports International within 15 days of purchase. 23 LIMITED LIABILITY WARRANTY Equipment manufactured by Spectrum Sports International, 720 West 200 South, Logan, UT 84321 is warranted free from defect in material and workmanship for a period of 90 days from the date of purchase. Equipment not manufactured by Spectrum Sports International is covered to the extent of warranty provided by the original manufacturer and this warranty does not cover any equipment, new or used, purchased from anyone other than Spectrum Sports International. All replacement parts shall be covered under warranty for a period of 90 days from date of purchase. SPECTRUM SPORTS INTERNATIONAL MAKES NO OTHER REPRESENTATION OF WARRANTY OF ANY OTHER KIND, EXPRESSED OR IMPLIED, WITH RESPECT TO THE GOODS SOLD HEREUNDER, WHETHER AS TO MERCHANTABILITY, FITNESS FOR A PARTICULAR PURPOSE, OR OTHERWISE. Spectrum Sports International’s sole obligation under this warranty shall be to repair or replace any part or parts which, to Spectrum Sports International’s satisfaction, prove to be defective upon prepaid return to Spectrum Sports International, 720 West 200 South, Logan, UT 84321. In such a case, once the necessary repair(s) has/have been made or a replacement part secured, Spectrum Sports International will pay the cost to return the item back to the customer. This obligation does not, however, include labor to install replacement parts, nor does it cover any failure due to accident, abuse, neglect, or use in disregard of instructions furnished by Spectrum Sports International. In no event shall damages for defective goods exceed the purchase price of the goods, and SPECTRUM SPORTS INTERNATIONAL SHALL NOT BE LIABLE FOR INCIDENTAL OR CONSEQUENTIAL DAMAGES WHATSOEVER. All claims in regard to the parts or equipment must be made within ten (10) days after Purchaser learns of the facts upon which the claim is based. Authorization must be obtained from Spectrum Sports International prior to returning any equipment, components, or parts. This warranty is voided by failure to comply with these notice requirements. Production output is dependent on feed stock, input, and many other variables beyond the control of Spectrum Sports International and therefore, Spectrum Sports International makes no guarantees expressed or implied as to production performance. NOTICE The warranty on Spectrum Sports International equipment remains valid only when genuine Spectrum Sports International replacement parts are employed. If purchaser defaults in making payment for any parts or equipment, this warranty shall be void and shall not apply to such parts and equipment. No late payment or cure of default in payment shall extend the warranty period provided herein. Spectrum Sports International is not responsible for damage to any associated instruments, equipment or apparatus nor will Spectrum Sports International be held liable for loss of profit or other special damages for any reason. The Buyer, their employees, agents and successors in interest assume all risks and liabilities for the operation, use and/or misuse of the product(s) described herein and agree to indemnify, hold harmless and defend the seller from any and all claims and actions arising from any cause whatsoever, including sellers negligence for personal injury incurred in connection with the use of said product(s) and any and all damages proximately resulting there from. CAUTION 24 Only technically qualified individuals who have fully read and understand the provided instructions should operate the equipment. The equipment should be operated only in accordance with these instructions. The operator should follow all of the warnings and cautions set forth in the manual and the operator should follow and employ all applicable standard laboratory safety procedures. LIMITATION OF REMEDY During the period of warranty, Spectrum Sports International, will at its option, either repair or replace defective parts or items. To obtain repair or replacement, call or fax Spectrum Sports International customer service for a return authorization number. Include the following information: name, address, date of purchase, address where the product is currently being used, office phone or mobile phone (if at an event), and your product model and VIN # for mobile products. At your expense, ship or deliver the product to Spectrum Sports International, 720 West 200 South, Logan, Utah 84321. Replaced or repaired items will be shipped back to you at no cost and will be shipped by the same manner as it was received (i.e., overnight, ground, etc.). For items that must be received before the defective part is sent to Spectrum Sports International, it is REQUIRED that a valid credit card be charged for the warranty item before Spectrum Sports International will ship. Once Spectrum Sports International receives the defective part; a credit will be issued back to the credit card. RELEASE OF LIABILITY I understand and am aware that the use of mobile climbing walls is a hazardous activity. I understand that I am solely responsible for safe operation, daily inspection and maintenance and customer adherence to the rules. I understand that rock climbing involves a risk of injury to any and all parts of my body and the customers who use this product. I HEREBY AGREE TO FREELY AND EXPRESSLY ASSUME AND ACCEPT ANY AND ALL RISKS OF INJURY OR DEATH TO THE USER OF THIS EQUIPMENT. Initials: ________________ I will agree that I will release Spectrum Sports International, its manufacturer, its distributors and retailers from any and all responsibility or liability for injuries or damages to the user of the Climbing products I am purchasing, or to any other person. I agree not to make a claim against or sue Spectrum Sports International, its manufacturers, its distributors or retailers for injuries or damages relating to use of the equipment, other than such claims as are allowed by the limited warranty set forth above. Initials: _______________ AGREEMENT 25 I understand how to operate the climbing product safely. This means that I do understand, but not necessarily limited to, how the Auto-Belay works on the climbing products, how to perform daily safety inspections, the rules, and in general manage crowd and staffing operational issues. Initials: ________________ ACKNOWLEDGEMENT I have carefully read this limited warranty, limited remedy, and release of liability and fully understand its contents. I am aware that this is a release of liability and a contract between myself and Spectrum Sports International, and its manufacturers, distributors and retailers and I sign it of my own free will. Serial #: ________________ VIN # _________________________________________ Date: ___________________ Customer’s Name: ______________________________________ Customer Business Name: ________________________________ Customer’s Signature: ___________________________________ Day-to-Day Operations 26 Now that the Rope A Phobia is set-up and ready for operation and you’ve performed the appropriate inspections, its time to address the issues of proper climbing. Equipment - All elements on the RAP are wear dated items set up with cable, rope, quick links and/or cargo netting. We strongly recommend that all wear dated items be inspected daily and replaced if there is any question of safety. Each unit is equipped with safety harnesses. We recommend the Singing Rock Body Harness. For children, we recommend the Singing Rock Kid (full body) Harness. Any of these products can be ordered from Spectrum Sports Int’l. Rules and Safety Tips - First, insure that an operator double-checked the wearing of the harness and has properly instructed the participant of the rules; which are: 1. 2. 3. 4. 5. 6. 7. 8. The minimum height of a participant should be 36”. Must be in good health. Listen to and obey employee at all times. Participant cannot be intoxicated. No smoking, alcohol, food or beverage allowed on the Rope A Phobia. No swinging or rough housing on the elements. No participants without proper harness and safety cable/puck attachments. No open toe shoes. As a note, it may be necessary for the operator to retrieve a participant who may be frozen in place or afraid to come down off of the ride. As an additional note, although Helmets are not required, we strongly recommend their use. Entertainment Tips – Never forget that Rope A Phobia is a fun attraction and will draw attention. Use this unique feature to book company picnics, birthday parties, corporate promotion events, special events, public attractions, fairs and festivals, to name a few. Never forget that the RAP can be equipped for corporate advertising. The operator should be someone who enjoys people and has a positive rapport with people, making your attraction fun for everyone! Marketing Ideas to Consider 27 This information is in no way comprehensive. It is a dynamic list that keeps growing. However, for the purpose of brainstorming and generating ideas, the following are marketing considerations. Corporate Sponsorship Sports Event Marketing Fairs Parties Charity Events Graduation Parties Tourist Attractions Trade Shows School Events Amusement Park Lease Street Festivals Radio and Television Station promotions Etc. Make sure to work with your local Chamber of Commerce, Convention Bureaus, Non-profit Organizations and Advertising/Public Relations Firms to ensure your RAP is marketed to its fullest potential. 28 Conclusion This guideline has been written to assist in the proper installation and operation of the Rope A Phobia. SSI has tried in its best effort to address relative issues; however, there may be additional information learned or situations that occur that we are unaware of at this time. Please, do not hesitate to call with any technical questions, Monday thru Friday 8:00 a.m. to 5:00 p.m. MST. Remember, there may be questions, issues, and/or concerns that may arise through the use of this product that are not listed or addressed in this manual, please call Spectrum Sports and we will provide any additional documentation or diagrams that are needed. It is the responsibility of the owner and/or operator of this product to contact Spectrum Sports International if any questions or concerns arise. As with any amusement device, physical harm can occur and operators and participants must realize that this product is a physical activity and that proper care should be taken to ensure safety. Please exercise good common sense and good judgment while operating and transporting the Rope A Phobia. 29 Appendix A The certified engineering documentation is a lengthy document. Any person needing a copy of these documents please call Spectrum Sports International and one will be forwarded to you as soon as possible. However, be aware that a confidentiality/noncompete agreement must be signed before this document will be provided. For additional information, please contact Spectrum Sports International. 888-563-0163 30 Appendix B Wiring Schematic for Breakaway Switch 31 Appendix C The following documentation in this appendix defines the procedures for classifying “Injury and Illness” data related to amusement rides and devices. Should an accident or an illness occur because of participation of the Rope A Phobia, please make sure you obtain the suggested information enclosed within this document. Spectrum Sports highly recommends completing an Incident Report and faxing a copy to our facility for the sole purpose of reviewing incidents that may be related to the manufacturing of our products and to reduce or eliminate similar occurrences. 32 33 34 Appendix D The following form is the Rope A Phobia order form for replacement or accessory needs. Please fax form or call Spectrum Sports Int’l to place order. 35 Spectrum Sports Int'l 720 W est 200 South, Logan, Utah 84321 Tel: (888)563-0163 (435)792-3883 Fax: (435)792-3884 http://w ww .spectrumsports.com SHIP TO: BILL TO: Date: __________ Contact:___________________________ Company:_________________________________________ Address: ______________________________________________ Company:____________________________________________ ______________________________________________________ Phone:_____________________Fax: __________________ Check box if you are the original owner of RAP. Order Taken By: ___________________________________ Comments: (If different than Ship To Address) Address:__________________________________________________ _________________________________________________________ Attn:____________________________ Phone:___________________ PRODUCT INFORMATION: Year:________________ VIN #:________________________________________________ Paym ent Type: C.O.D. ______ CC ______ Card #:_____________________________________ Exp Date:_______________ Name on Credit Card: ______________________________ Address on Card: ________________________________________ CVC: _______________ Shipping: UPS ___ Fed Ex ___ Via: Ground _____ 3-day _____ 2 -day ____ Overnight _____ Other ___________ Description Quantity Please make check or money order payable to: Spectrum Sports Int'l Call for special arrangements for international orders. *Effective 5/2006 Unit Price $ $ $ $ $ $ RAP Full Body Harness M/L RAP Full Body Harness L/XL Child Full Body Harness Safety Puck Assembly Specify Length:________________ Carabineers-auto locking Quick Link Pads Jack Jack Handle Repair Kit 2 Button Pendant Belay Cable Entrance Cargo Net (45" x 144") Element 2 - Bridge Element 3 - Rope Swings Element 4 - "X" Cable Element 5 - Tight Cable Element 6 - Rope Buckets Element 7 - Cargo Net (72" x 81") Pins (Call for specific pin and pricing) $ $ $ $ $ $ $ $ $ $ $ Total M erchandise: Discount Shipping & Handling: *C.O.D. (Additional Charge - $10.00) Sales Tax (on subtotal) Total 90 90 54 60 19 5 Call for pricing 150 16 200 150 660 404 414 103 82 280 680 Call for pricing $_____________________ $_____________________ $_____________________ $____________________ $_____________________ (Utah residents only - 6.35%) TOTAL DUE $_____________________ 36 Wiring Diagram for Bargman 7 and 9 Circuit, 12V Electrical Connectors Double Filament Bulb Stop & Left-hand Signal To Terminal #5 Red Green Electric Brake To Terminal #2 #1 Terminal to Common Ground White Auxiliary Ground Or Extra Auxiliary Circuit To Terminal #7 #5 Terminal to Stop and Left turn Red Blue Black #4 Terminal to Battery Charge Yellow #57 Conctr. #7 Auxiliary Ground or Backup light Yellow #3 Terminal to Tail Running, License Light Green Battery Charge To Terminal #4 Black Green White Common Ground To Terminal #1 Brown #6 Terminal to Stop & Right turn Blue Brown #2 Terminal to Electric Brake Double Filament Bulb Stop & Right-hand Signal To Terminal # 6 Trailer Side Truck or Car Side Refer to information in Dexter Axle Manual Appendix E Tail/Running & License light To Terminal #3 37 Appendix F 38 39 Appendix G Assembly Pages 40 41 42 43 44 45 NDT Schedule for Rope A Phobia 46 47 48