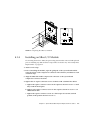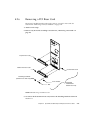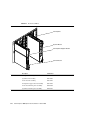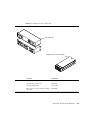
1
Sun Enterprise™ 10000 System
Service Manual
Sun Microsystems, Inc.
4150 Network Circle
Santa Clara, CA 95054 U.S.A.
650-960-1300
Part No. 805-2917-16
March 2002, Revision A
Send comments about this document to: [email protected]
Copyright 2002 Sun Microsystems, Inc., 4150 Network Circle, Santa Clara, CA 95054 U.S.A. All rights reserved.
This product or document is distributed under licenses restricting its use, copying, distribution, and decompilation. No part of this product or
document may be reproduced in any form by any means without prior written authorization of Sun and its licensors, if any. Third-party
software, including font technology, is copyrighted and licensed from Sun suppliers.
Parts of the product may be derived from Berkeley BSD systems, licensed from the University of California. UNIX is a registered trademark in
the U.S. and other countries, exclusively licensed through X/Open Company, Ltd.
Sun™, Sun Microsystems, the Sun logo, AnswerBook2, docs.sun.com, and Solaris are trademarks, registered trademarks, or service marks of
Sun Microsystems, Inc. in the U.S. and other countries. All SPARC trademarks are used under license and are trademarks or registered
trademarks of SPARC International, Inc. in the U.S. and other countries. Products bearing SPARC trademarks are based upon an architecture
developed by Sun Microsystems, Inc. The Energy Star logo is a registered trademark of EPA.
The OPEN LOOK and Sun Graphical User Interface was developed by Sun Microsystems, Inc. for its users and licensees. Sun acknowledges the
pioneering efforts of Xerox in researching and developing the concept of visual or graphical user interfaces for the computer industry. Sun holds
a non-exclusive license from Xerox to the Xerox Graphical User Interface, which license also covers Sun’s licensees who implement OPEN
LOOK GUIs and otherwise comply with Sun’s written license agreements.
Federal Acquisitions: Commercial Software—Government Users Subject to Standard License Terms and Conditions.
DOCUMENTATION IS PROVIDED “AS IS” AND ALL EXPRESS OR IMPLIED CONDITIONS, REPRESENTATIONS AND WARRANTIES,
INCLUDING ANY IMPLIED WARRANTY OF MERCHANTABILITY, FITNESS FOR A PARTICULAR PURPOSE OR NON-INFRINGEMENT,
ARE DISCLAIMED, EXCEPT TO THE EXTENT THAT SUCH DISCLAIMERS ARE HELD TO BE LEGALLY INVALID.
Copyright 2002 Sun Microsystems, Inc., 4150 Network Circle, Santa Clara, CA 95054 Etats-Unis. Tous droits réservés.
Ce produit ou document est distribué avec des licences qui en restreignent l’utilisation, la copie, la distribution, et la décompilation. Aucune
partie de ce produit ou document ne peut être reproduite sous aucune forme, par quelque moyen que ce soit, sans l’autorisation préalable et
écrite de Sun et de ses bailleurs de licence, s’il y en a. Le logiciel détenu par des tiers, et qui comprend la technologie relative aux polices de
caractères, est protégé par un copyright et licencié par des fournisseurs de Sun.
Des parties de ce produit pourront être dérivées des systèmes Berkeley BSD licenciés par l’Université de Californie. UNIX est une marque
déposée aux Etats-Unis et dans d’autres pays et licenciée exclusivement par X/Open Company, Ltd.
Sun, Sun Microsystems, le logo Sun, AnswerBook2, docs.sun.com, et Solaris sont des marques de fabrique ou des marques déposées, ou
marques de service, de Sun Microsystems, Inc. aux Etats-Unis et dans d’autres pays. Toutes les marques SPARC sont utilisées sous licence et
sont des marques de fabrique ou des marques déposées de SPARC International, Inc. aux Etats-Unis et dans d’autres pays. Les produits portant
les marques SPARC sont basés sur une architecture développée par Sun Microsystems, Inc.
L’interface d’utilisation graphique OPEN LOOK et Sun™ a été développée par Sun Microsystems, Inc. pour ses utilisateurs et licenciés. Sun
reconnaît les efforts de pionniers de Xerox pour la recherche et le développement du concept des interfaces d’utilisation visuelle ou graphique
pour l’industrie de l’informatique. Sun détient une licence non exclusive de Xerox sur l’interface d’utilisation graphique Xerox, cette licence
couvrant également les licenciés de Sun qui mettent en place l’interface d’utilisation graphique OPEN LOOK et qui en outre se conforment aux
licences écrites de Sun.
LA DOCUMENTATION EST FOURNIE “EN L’ETAT” ET TOUTES AUTRES CONDITIONS, DECLARATIONS ET GARANTIES EXPRESSES
OU TACITES SONT FORMELLEMENT EXCLUES, DANS LA MESURE AUTORISEE PAR LA LOI APPLICABLE, Y COMPRIS NOTAMMENT
TOUTE GARANTIE IMPLICITE RELATIVE A LA QUALITE MARCHANDE, A L’APTITUDE A UNE UTILISATION PARTICULIERE OU A
L’ABSENCE DE CONTREFAÇON.
Please
Recycle
Contents
Preface
1.
2.
xv
Component Replacement Guidelines, Indicators, and Nomenclatures
1.1
Configuration Rules
1.2
Testing the System
1.3
Reviewing System Temperatures
1.4
Hardware Indicators
1-1
1-3
1-4
1-4
1-5
1.4.1
Fans
1-6
1.4.2
Centerplane Support Boards
1.4.3
Control Board
1-8
1.4.4
System Board
1-9
1.5
Inserting a Board
1.6
Standard Torque Settings
1.7
Field Replaceable Units
1-13
1.8
Component Numbering
1-14
1.9
System Block Diagrams
1-24
1-7
1-10
1-11
Power and Cooling Component Replacement Procedures
2.1
SSP Replacement
2.2
Disk Replacement
2.3
AC Input Module Replacement
2-1
2-1
2-1
2-2
Contents
iii
2.4
2.5
2.6
2.7
2.8
iv
2.3.1
Isolating a Failed AC Input Module
2.3.2
Powering Off an AC Input Module
2.3.3
Removing an AC Input Module
2.3.4
Installing an AC Input Module
2.3.5
Powering On an AC Input Module
2.3.6
Verifying an AC Input Module
48-Volt Power Supply Replacement
2-2
2-2
2-4
2-4
2-4
2-4
2-5
2.4.1
Isolating a Failed Power Supply
2.4.2
Powering Off a 48-Volt Power Supply
2.4.3
Removing a 48-Volt Power Supply
2.4.4
Installing a 48-Volt Power Supply
2.4.5
Powering On a 48-Volt Power Supply
2.4.6
Verifying a Power Supply
Power Shelf Replacement
2-5
2-5
2-5
2-5
2-6
2-6
2-6
2.5.1
Removing a Power Shelf
2.5.2
Installing a Power Shelf
2-6
2-8
DC Breaker Module Replacement
2-9
2.6.1
Isolating a Failed DC Breaker
2-9
2.6.2
Removing a Circuit Breaker
2-9
2.6.3
Installing a Circuit Breaker
2-10
2.6.4
Verifying a DC Breaker
2-11
Universal AC Sequencer Replacement
2-11
2.7.1
Isolating a Failed AC Sequencer
2.7.2
Powering Off a Remotely Controlled AC Sequencer
2.7.3
Removing an AC Sequencer
2.7.4
Installing an AC Sequencer
2.7.5
Configuring an AC Sequencer
2.7.6
Powering On a Remotely Controlled AC Sequencer
2.7.7
Verifying an AC Sequencer
Fan Tray Replacement
2-18
Sun Enterprise 10000 System Service Manual • March 2002
2-11
2-12
2-12
2-12
2-13
2-18
2-18
2.9
3.
2.8.1
Isolating a Failed Fan Tray
2.8.2
Powering Off a Single Fan Tray or a Group of Fan Trays
2.8.3
Removing a Fan Tray
2.8.4
Installing a Fan Tray
2.8.5
Powering On a Fan Tray or a Group of Fan Trays Using SSP Version
3.0 2-20
2.8.6
Powering On the Fan Trays Using SSP Version 3.1 or Subsequent
Compatible Version 2-20
2.8.7
Verifying a Fan Tray
Replacing an Air Filter
2-18
2-19
2-19
2-20
2-21
Control and System Board Replacement Procedures
3.1
3.2
3.3
2-18
Control Board Replacement
3-1
3-1
3.1.1
Isolating a Failed Control Board
3.1.2
Setting Up the Network for a Replacement Control Board
3.1.3
Powering Off a Control Board
3.1.4
Removing a Control Board
3.1.5
Installing a Control Board
3.1.6
Powering On a Control Board
3.1.7
Configuring a Newly Installed Control Board as the Primary
Control Board 3-8
3.1.8
Verifying a Control Board
System Board Replacement
3-1
3-2
3-5
3-6
3-7
3-7
3-8
3-9
3.2.1
Isolating a Failed System Board or Mezzanine Board
3.2.2
Powering Off a System Board
3.2.3
Removing a System Board
3.2.4
Installing a System Board
3.2.5
Powering On a System Board
3.2.6
Configuring a System Board
3.2.7
Verifying a System Board or Mezzanine Board
3-9
3-9
3-10
3-10
3-11
3-12
System Board Component Replacement
3-12
3-13
Contents
v
4.
System Board I/O Component Replacement Procedures
4.1
4.2
4.3
5.
SBus Component Replacement
Removing an SBus Card
4-1
4.1.2
Installing an SBus Card
4.1.3
Removing an SBus I/O Module
4.1.4
Installing an SBus I/O Module
4-2
4-4
4-5
4-7
4.2.1
Accessing PCI Components
4.2.2
Removing a PCI Card
4-9
4.2.3
Installing a PCI Card
4-10
4.2.4
Removing a PCI I/O Module
4.2.5
Installing a PCI I/O Module
4.2.6
Removing a PCI Riser Card
4.2.7
Installing a PCI Riser Card
4.2.8
Completing a PCI Component Replacement Procedure
Personality Plate Replacement
4-8
4-12
4-13
4-15
4-16
4.3.1
Removing a Personality Plate
4.3.2
Installing a Personality Plate
Memory Component Replacement
5.1.1
5.2
4-17
4-20
5.3
5.4
Isolating a Failed DIMM
5-1
5-1
Removing a System Board DIMM
5.2.1
5-3
Configuring Memory on a System Board
Installing a System Board DIMM
5-4
5.3.1
Removing a Memory Module
5.3.2
Installing a Memory Module
Processor Component Replacement
5-4
5-6
5-7
5.4.1
Removing a Processor Module
5.4.2
Installing a Processor Module
Sun Enterprise 10000 System Service Manual • March 2002
4-16
4-17
System Board Memory and CPU Module Replacement Procedures
5.1
vi
4-1
4.1.1
PCI Component Replacement
4-1
5-7
5-8
5-3
5-1
6.
Centerplane Support Board and Fan Centerplane Replacement Procedures
6.1
6.2
7.
6-1
6.1.1
Isolating a Failed Centerplane Support Board
6.1.2
Powering Off a Centerplane Support Board
6.1.3
Removing a Centerplane Support Board
6.1.4
Installing a Centerplane Support Board
6.1.5
Powering On a Centerplane Support Board
6.1.6
Verifying a Centerplane Support Board
Fan Centerplane Replacement
6.2.1
Removing a Fan Centerplane
6.2.2
Installing a Fan Centerplane
Centerplane Replacement
6-1
6-2
6-2
6-2
6-3
6-3
6-4
Centerplane Replacement Procedures
7.1
8.
Centerplane Support Board Replacement
6-4
6-4
7-1
7-1
7.1.1
Isolating a Failed Centerplane
7-1
7.1.2
Setting Up the System Prior to Replacing the Centerplane
7.1.3
Powering Off the System
7.1.4
Removing the Centerplane Assembly From the Card Cage
7.1.5
Installing the Centerplane Assembly Into the Card Cage
7.1.6
Powering on the System
7-10
7.1.7
Verifying a Centerplane
7-10
8.2
Mechanical Component Replacement
7-5
7-8
8-1
8-1
8.1.1
Replacing a Styling Panel and End Panel
8.1.2
Replacing an Access Door
8-1
8-1
8.1.2.1
Removing an Access Door
8-1
8.1.2.2
Replacing an Access Door
8-2
Cable Replacement
7-2
7-4
Mechanical Component and Cable Replacement Procedures
8.1
6-1
8-3
8.2.1
Replacing Remote Power Control Cables
8.2.2
Replacing an AC Power Cord
8-6
8-6
Contents
vii
9.
8.2.3
Replacing an Internal Cabinet Cable
8.2.4
Replacing an Internal Card Cage Cable
Software Procedures
8-7
9-1
9.1
Restoring the Thermal Calibration Information Using SSP Version 3.0
9.2
Configuring a Control Board Using SSP Version 3.0
9.3
Configuring a Control Board Using SSP Version 3.1 and Subsequent
Compatible Versions 9-6
9.4
Recovering From a Hung Domain
9.4.1
9-1
9-3
9-8
Determining If a Domain Is Hung
9.4.1.1
9-8
Restoring a Hung Domain
9-8
9.5
Upgrading the CBE Flash PROM on the Control Board Using SSP Version
3.1 and Subsequent Compatible Versions 9-10
9.6
Changing the Clock Multiplier
Glossary
Index
viii
8-6
Glossary-1
Index-1
Sun Enterprise 10000 System Service Manual • March 2002
9-13
Figures
FIGURE 1-1
Caution Graphic on Critical System Components 1-2
FIGURE 1-2
Compression Connector
FIGURE 1-3
Component Numbering—Front
1-20
FIGURE 1-4
Component Numbering—Back
1-21
FIGURE 1-5
System Board Component Numbering 1-22
FIGURE 1-6
Memory Bank Locations 1-23
FIGURE 1-7
Memory DIMM Locations
FIGURE 1-8
SBus Slot and Remote Power Control Numbering 1-24
FIGURE 1-9
Fan, Power, and Control Block Diagram I
1-25
FIGURE 1-10
Fan, Power, and Control Block Diagram II
1-26
FIGURE 1-11
System Board Block Diagram 1-27
FIGURE 1-12
Sun Enterprise 10000 System Interconnect Diagram
FIGURE 2-1
Circuit Breaker Labels 2-9
FIGURE 2-2
Remote Power Control
FIGURE 2-3
Remote Power Control Addressing
FIGURE 2-4
Basic Remote Power Connection
FIGURE 2-5
Air Filter Replacement
FIGURE 4-1
Replacing System Board SBus Card 4-2
FIGURE 4-2
Replacing the SBus I/O Module
1-11
1-23
1-28
2-14
2-15
2-17
2-22
4-5
ix
x
4-6
FIGURE 4-3
Tightening Pattern for the SBus I/O Module
FIGURE 4-4
Cone Washer and Standoff
FIGURE 4-5
PCI Components
FIGURE 4-6
PCI Front Cover Removal 4-9
FIGURE 4-7
PCI Card Removal 4-9
FIGURE 4-8
Installing a PCI Filler Panel
FIGURE 4-9
PCI Slot Numbering 4-11
FIGURE 4-10
Inserting a PCI Card 4-12
FIGURE 4-11
Replacing the PCI I/O Module 4-13
FIGURE 4-12
Tightening Pattern for the PCI I/O Module 4-14
FIGURE 4-13
Cone Washer and Standoff
FIGURE 4-14
Removing a PCI Riser Card 4-15
FIGURE 4-15
PCI Front Cover Removal 4-17
FIGURE 4-16
PCI Front Bracket Removal
FIGURE 4-17
Installing a Personality Plate
FIGURE 4-18
Installing a Personality Plate—Top View 4-19
FIGURE 4-19
Personality Plate Identification 4-20
FIGURE 4-20
Installing a Personality Plate—Top View 4-21
FIGURE 4-21
Installing a Personality Plate
FIGURE 5-1
Memory Bank Locations 5-3
FIGURE 5-2
Memory DIMM Locations
FIGURE 5-3
Replacing the System Board Memory Module 5-5
FIGURE 5-4
Tightening Pattern for the Memory Module 5-6
FIGURE 5-5
Cone Washer and Standoff
FIGURE 5-6
Replacing System Board Processor Module 5-8
FIGURE 5-7
Tightening Pattern for the Processor Module 5-10
FIGURE 7-1
Cable Labeling
FIGURE 7-2
Centerplane Test Points 7-4
4-6
4-8
4-10
4-14
4-18
4-19
4-22
5-4
5-7
7-2
Sun Enterprise 10000 System Service Manual • March 2002
FIGURE 7-3
Carrier Plate Alignment Pin and Centerplane Connectors
FIGURE 8-1
Internal Cabinet Cable Connections
FIGURE 8-2
Power Shelf Cable Connections 8-4
7-6
8-3
Figures
xi
xii
Sun Enterprise 10000 System Service Manual • March 2002
Tables
1-5
TABLE 1-1
Temperature Levels
TABLE 1-2
LED Categories 1-5
TABLE 1-3
Fan Components
TABLE 1-4
Fan Tray LEDs
TABLE 1-5
Centerplane Support Board
TABLE 1-6
Centerplane Support Board LEDs 1-7
TABLE 1-7
Control Board 1-8
TABLE 1-8
Control Board LEDs
TABLE 1-9
System Boards
TABLE 1-10
System Board LEDs
TABLE 1-11
Torque Specifications
TABLE 1-12
Customer Availability and MTTR Objectives
TABLE 1-13
Processor Numbering 1-15
TABLE 1-14
I/O Numbering
TABLE 2-1
Power Redundancy 2-3
TABLE 2-2
AC Input Module Control of Power Supplies 2-3
TABLE 2-3
Circuit Breaker Wiring
TABLE 3-1
Power Redundancy 3-11
TABLE 3-2
When to Run autoconfig(1M)
1-6
1-6
1-7
1-8
1-9
1-9
1-12
1-13
1-17
2-10
3-13
xiii
xiv
5-2
TABLE 5-1
DIMM and MM Conversion
TABLE 5-2
Bank Conversion
TABLE 7-1
Component Serial Numbers 7-3
TABLE 8-1
System Interconnect Cable Chart 8-5
TABLE 8-2
Component Serial Numbers 8-8
5-2
Sun Enterprise 10000 System Service Manual • March 2002
Preface
The Sun Enterprise 10000 System Service Manual provides detailed instructions for
replacing field replaceable components on the Sun Enterprise™ 10000 system.
Using UNIX Commands
This document may not contain information on basic UNIX® commands and
procedures such as shutting down the system, booting the system, and configuring
devices.
See one or more of the following for this information:
■
Solaris Handbook for Sun Peripherals
■
AnswerBook™ online documentation for the Solaris™ software environment
■
Other software documentation that you received with your system
xv
Typographic Conventions
Typeface
Meaning
Examples
AaBbCc123
The names of commands, files,
and directories; on-screen
computer output
Edit your .login file.
Use ls -a to list all files.
% You have mail.
AaBbCc123
What you type, when
contrasted with on-screen
computer output
% su
Password:
AaBbCc123
Book titles, new words or
terms, words to be emphasized
Read Chapter 6 in the User’s Guide.
These are called class options.
You must be superuser to do this.
Command-line variable;
replace with a real name or
value
To delete a file, type rm filename.
Shell Prompts
Shell
Prompt
C shell
machine-name%
C shell superuser
machine-name#
Bourne shell and Korn shell
$
Bourne shell and Korn shell superuser
#
xvi Sun Enterprise 10000 System Service Manual • March 2002
Related Documents
Application
Title
Part
Number
Service
Sun Enterprise 10000 System Read Me First
805-2913
Sun Enterprise 10000 System Unpacking Guide
805-2915
Sun Enterprise 10000 System Overview
805-0310
Sun Enterprise 10000 System Site Planning Guide
805-2914
Sun Enterprise 10000 Hardware Installation and De-Installation Guide
805-4651
Sun Enterprise 10000 System Service Guide
805-2917
Sun Enterprise 10000 System Service Reference I
805-3622
Sun Enterprise 10000 System Service Reference II
805-3623
Sun Enterprise 10000 System Service Processor Quick Reference
805-3827
Accessing Sun Documentation Online
The docs.sun.comSM web site enables you to access a select group of Sun technical
documentation on the Web. You can browse the docs.sun.com archive or search
for a specific book title or subject at:
http://docs.sun.com
Preface
xvii
Sun Welcomes Your Comments
Sun is interested in improving its documentation and welcomes your comments and
suggestions. You can email your comments to Sun at:
[email protected]
Please include the part number (805-2917-16) of your document in the subject line of
your email.
xviii
Sun Enterprise 10000 System Service Manual • March 2002
CHAPTER
1
Component Replacement
Guidelines, Indicators, and
Nomenclatures
In the Sun Enterprise 10000 system, hot-swapping a component refers to physically
removing a component while the remaining system components are operational.
However, prior to hot-swapping, the component must be removed as a resource for
the operating system.
The basic procedures for hot-swapping a component include:
1. Using dr(1M) or hostview(1M) on components that can be hot-swapped to
remove the component as a resource for the system.
Caution – Do not turn off power to a system board with the system board circuit
breaker. It is possible to arbstop the entire platform when the board is powered on
again.
2. Removing power from the component using either the power(1M) or fan(1M)
command or hostview(1M).
Caution – If the possibility exists for tools or people to come in contact with power
connectors, remove power from the component through the AC input module
breakers.
3. Removing and replacing the component.
1-1
Caution – Do not remove any component that has a yellow LED lit. These critical
components also contain the “hand” graphic shown in FIGURE 1-1. Prior to removal,
extinguish the yellow LEDs by using either hostview(1M) or the power(1M)
command.
IF TH E Y E LLOW LE D S A R E LIT —
D O N OT R E MOV E TH E C OMP ON E N T!
FIGURE 1-1
Caution Graphic on Critical System Components
4. Applying power to the component or to the cabinet in cases where power does
not automatically resume.
5. Using dr(1M) or hostview(1M) to re-introduce the hot-swapped component as a
resource for the system.
Allocating components as resources is covered in the following documents:
■
■
■
■
■
■
1-2
Sun
Sun
Sun
Sun
Sun
Sun
Enterprise
Enterprise
Enterprise
Enterprise
Enterprise
Enterprise
10000 Dynamic Reconfiguration User Guide
10000 Dynamic Reconfiguration Reference Manual
10000 DR Configuration Guide
Server Alternate Pathing 2.3.1 User Guide
Server Alternate Pathing 2.3.1 Reference Manual
Server Alternate Pathing 2.3.1 Installation Guide and Release Notes
Sun Enterprise 10000 System Service Manual • March 2002
1.1
Configuration Rules
The following rules apply when configuring components on the Sun Enterprise
10000 system:
■
When installing peripherals into the Sun Enterprise 10000 cabinet:
RSM trays are the only peripherals used in the Sun Enterprise 10000 cabinet.
Only three RSM trays can be used in the Sun Enterprise 10000 cabinet.
All supported peripherals are listed in the Computer Systems price list and
International Configuration Guide.
A second control board is optional.
Two centerplane support boards are required to utilize a 144-bit data bus and four
address buses.
The system is shipped with two centerplane support boards. Should one fail, the
system will function with only a 72-bit data bus and two address buses.
Systems ordered with eight or less system boards are configured with fans, power
supplies, AC input modules, and with all boards on the same side (back), plus a
centerplane support board, AC input module, power supply, and two fans on the
front.
■
■
■
■
■
■
■
The following rules apply when configuring components on the system board:
■
■
■
■
■
All processor modules in the system must be the same speed.
All processor modules on a system board must have the same cache size.
For increased processor performance, avoid populating processors 0 and 1
together and processors 2 and 3 together.
For increased I/O performance, avoid populating SBus 00 and 01 together and
SBus 10 and 11 together.
When configuring memory on a system board:
All sockets within a bank must be fully populated.
All DIMM sizes must be equal.
■
For increased performance on partially populated memory boards, do not use
banks 0 and 2 together or banks 1 and 3 together.
It is necessary to run autoconfig(1M) on the SSP when any system board or
system board module (processor, memory, I/O) is installed for the first time.
It is necessary to run autoconfig(1M) on the SSP when any replacement system
board or system board module (processor, memory, I/O) with a different part
number than the original is installed.
■
■
■
■
Chapter 1
Component Replacement Guidelines, Indicators, and Nomenclatures
1-3
1.2
Testing the System
It might be necessary to run autoconfig(1M) after the Sun Enterprise 10000
system is powered on and before performing diagnostic testing of the system.
Information about autoconfig(1M) is located in
/opt/share/man/autoconfig1m.
The Sun Enterprise 10000 uses hpost(1M) to diagnose system problems. To use
hpost(1M), you must be logged in the SSP as ssp. Information on hpost(1M) is
located in /opt/share/man/hpost1m.
Sun’s sunvts(1M) diagnostic can be used as a verification of the system. To use
sunvts(1M), you must be logged into the host as superuser. Information on
sunvts(1M) is located in /opt/share/man/man1m.
1.3
Reviewing System Temperatures
Use the hostinfo -t command to examine the temperature data being reported.
The output should be similar to the following sample:
Starfire MIBs
=============
Ambient temperature readings(C): Sen0
Sen1
Sen2
Average
----------------------------------------------------------------19.336 20.654 19.971
19.987
System Brd
CIC0
CIC1
MC
XDB2
XDB3
PROC0
PROC1
PROC2
PROC3
3p3VDC VDCCore 5VDC
---------------------------------------------------------------------------------------------------------0
29.203 29.72
30.306 25.905 27.41
44.747 47.566 45.919 49.049 47.435 43.65
39.134
2
25.672 24.733 25.836 23.407 22.716 39.227 41.796 40.566 44.984 41.087 41.575 31.077
13
29.092 29.461 29.448 24.463 26.644 42.177 44.925 42.051 46.264 42.918 42.918 29.734
Control Brd 5VDC
5VDCPer 5VDCFan Sen0
Sen1
Sen2
----------------------------------------------------------0
32.664 27.049 31.443 19.336 20.654 19.971
1
33.274 21.312 27.293 19.141 8.105
18.897
Centerplane TMP0
TMP1
TMP2
TMP3
TMP4
TMP5
TMP6
TMP7
TMP8
TMP9
------------------------------------------------------------------------------------------0
25.997 25.886 24.522 22.582 26.258 25.722 23.448 23.098 23.502 23.358
1
25.002 24.261 21.924 21.671 24.724 24.07
21.737 21.322 21.768 21.656
Support Brd 3p3VDC1 3p3VDC2
---------------------------0
24.852 27.415
1
26.683 34.251
1-4
Sun Enterprise 10000 System Service Manual • March 2002
The following temperature specifications (TABLE 1-1) must not be exceeded:
Temperature Levels
TABLE 1-1
ASIC1
Processors
2
Power Supply
3
Ambient Temperature
4
Warning Level
Maximum Level
Fatal Level
80˚ C
85˚ C
90˚ C
80˚ C
85˚ C
90˚ C
80˚ C
85˚ C
90˚ C
30˚ C
35˚ C
38˚ C
1. This includes CICs, MC, XDBs, and all centerplane entries.
2. This includes all PROC entries.
3. This includes all VDC entries.
4. This includes all SEN entries.
1.4
Hardware Indicators
The purpose of the LED indicators is to provide a method of isolating errors should
the SSP or the SSP’s communication path be faulty. The purpose of the LEDs is
limited to four primary categories as listed in TABLE 1-2.
TABLE 1-2
LED Categories
LED Color
Purpose
Yellow
Each hot-swappable device has at least two yellow LEDs. If any yellow
LED is on, then it is NOT safe to be removed or serviced. Two LEDs are
used for redundancy. On each applicable component, all yellow LEDs will
be enclosed in a rectangle on the silkscreen. In addition to the functional
identification of each yellow LED, a silkscreen legend will be placed near
the LEDs (refer to left). These yellow LEDs are, in many cases, indicators of
the state of the software-controlled power supplies.
Green
Indicates the status of housekeeping power supplies.
Green
Provides status indications valuable to determine the state of the boards or
interfaces prior to having full communication with the SSP.
Green
Displays the state of generally programmable registers useful for debug.
Chapter 1
Component Replacement Guidelines, Indicators, and Nomenclatures
1-5
1.4.1
Fans
Fan components and LEDs are listed in TABLE 1-3 and TABLE 1-4.
TABLE 1-3
Total maximum # of fan
shelves per system
# of fan trays per fan
shelf
# of yellow LEDs per
fan tray
# of fans per fan tray
4
4
4
2
TABLE 1-4
1-6
Fan Components
Fan Tray LEDs
LED Name
Color
Purpose
PWR1
Yellow
When lit, 24 VDC is present
and this fan tray is NOT
safe to service.
Sun Enterprise 10000 System Service Manual • March 2002
1.4.2
Centerplane Support Boards
Centerplane support board components and LEDs are listed in TABLE 1-5 and
TABLE 1-6.
TABLE 1-5
Centerplane Support Board
Total maximum # per
system
Total # per side
# of green LEDs per
board
# of yellow LEDs per
board
2
1
4
2
TABLE 1-6
Centerplane Support Board LEDs
LED Name
Color
Purpose
5VDC HK
Green
5.0 VDC housekeeping
3.3VDC HK
Green
3.3 VDC housekeeping
3.3VDC
Yellow
VDD signal on the control board
is on indicating 3.3 volts DC is
present and the control board is
NOT safe to service.
HK S/W
Green
Displays the state of a designated
bit position on the power control
JTAG ring of this board.
Chapter 1
Component Replacement Guidelines, Indicators, and Nomenclatures
1-7
1.4.3
Control Board
Control board components and LEDs are listed in TABLE 1-7 and TABLE 1-8.
TABLE 1-7
Total maximum # per
system
Total # per side
# of green LEDs per
board
# of yellow LEDs per
board
2
1
17
2
TABLE 1-8
1-8
Control Board
Control Board LEDs
LED Name
Color
Purpose
5VDC HK
Green
5.0 VDC housekeeping
3.3VDC HK
Green
3.3 VDC housekeeping
5VDC
Yellow
5VDC
Yellow
VDC on the control board is present
and the control board is NOT safe to
service.
5VDC FAN
Green
5.0 VDC fan control power is present
5VDC PER
Yellow
5.0 VDC peripheral cabinet power
control voltage is present
HK S/W
Green
Displays the state of bit 8 on the
power control JTAG ring of this board.
S/W 7- S/W 0
Green
Programmable bits that indicate the
state of an 8-bit read/write register
located in the SPARClite’s address
space. When the Control Board
Executive is operating correctly, a
marching 1s pattern can be seen on
S/W0-S/W6. S/W7 indicates the
network is operational.
XMIT
Green
Ethernet interface transmit status
REC
Green
Ethernet interface receive status
LINK
Green
Ethernet interface link status
COLL
Green
Ethernet interface collision status
JTAG MASTER
Green
Indicates that this control board is the
system JTAG Master
Sun Enterprise 10000 System Service Manual • March 2002
1.4.4
System Board
System board components and LEDs are listed in TABLE 1-9 and TABLE 1-10.
TABLE 1-9
System Boards
Total maximum # per
system
Total # per side
# of green LEDs per
board
# of yellow LEDs per
board
16
8
11
3
HK S/W was used for hardware debug and was not programmed for use by the
software. S/W 7- S/W 0 indicate the state of an 8-bit read/write register located in
the SPARClite’s address space. When the Control Board Executive is operating
correctly, a marching 1s pattern can be seen on S/W0-S/W6. S/W7 indicates the
network is operational.
TABLE 1-10
System Board LEDs
LED Name
Color
Purpose
5VDC HK
Green
Indicates that 5.0 VDC
housekeeping power is present.
3.3VDC HK
Green
Indicates that 3.3 VDC
housekeeping power is present.
3.3VDC
Yellow
VCC on the system board is present
and the system board is NOT safe
to service.
5VDC
Yellow
VDD signal on the system board is
on, indicating 5 volts DC is present,
and the system board is NOT safe
to service.
VDD_Core
Yellow
VDD_Core on the system board is
present and that the system board is
NOT safe to service.
HKS/W
Green
Displays the state of a designated
bit position on the power control
JTAG ring of this board.
S/W 7- S/W 0
Green
Eight LEDs that are programmable
through a register in the bootbus
space of the PC ASIC connected to
the I?O module, which can be read
and written either by JTAG or by
resident software.
Chapter 1
Component Replacement Guidelines, Indicators, and Nomenclatures
1-9
1.5
Inserting a Board
These are general guidelines for inserting boards into the Sun Enterprise 10000
system. To reduce the risk of damage to the centerplane connector, take the
following precautions:
■
Thoroughly inspect (visually) both the centerplane connector and the daughter
board connector before insertion.
■
■
■
Look for damage to either the male or female connector plastic housing.
Look for foreign material in both the male and female connector plastic
housing.
Look for bent or damaged pins on all mating connectors.
Note – If any of these conditions exist, do not try to repair or replace parts unless
you have been trained to do so.
■
■
■
Never set or bump a connector against another surface.
Never touch or probe the centerplane connector pins.
When inserting a board into a centerplane slot:
Firmly press the board in by hand with evenly distributed pressure across the
front panel until the resistance is too high for manual insertion.
■
Use the insertion/ejection handles to evenly apply pressure until the connector
is fully seated.
Always use the ejection handles when removing boards from the centerplane.
Never try to force the connector using the insertion/ejection handles if the board
becomes cocked or jammed.
Never use damaged components.
■
■
■
■
1-10
Sun Enterprise 10000 System Service Manual • March 2002
1.6
Standard Torque Settings
Components requiring specific torque settings when being secured, such as the
processor module in FIGURE 1-2, are listed in TABLE 1-11.
Compression connector
FIGURE 1-2
Compression Connector
Always follow the standard torquing procedures listed in the processor, I/O, and
memory mezzanine replacement procedures. When retorquing a part, remember to
loosen or back out the screw before retightening it. This will assure the proper
torque is applied and will also reduce the chances of breaking a screw.
Note – A torque wrench has been included with the system in the document pouch.
Chapter 1
Component Replacement Guidelines, Indicators, and Nomenclatures
1-11
TABLE 1-11
Torque Specifications
Torque Specification for Manufacturing
Use of 6.0 in/lbs Permitted In the Field
Relative to spec
+/- 0.06 Nm1
N/A
Unless range stated
+/- 0.5 in/lbs
N/A
M3
7.0 in/lbs (0.8 Nm)
Yes
M5
33.3 in/lbs (3.76 Nm)
Yes
Tolerance range:
Non-specified component screws:
Specific Components:
Captive compression connections, #4-40 hex
Low torque (approx.)
3.0 in/lbs (0.34 Nm)
No, tighten less than 6.0 in/lbs
Final torque
6.0 in/lbs (0.68 Nm)
Yes
I/O, processor, and memory module #4-40 hex
Captive, low torque (approx.)
3.0 in/lbs (0.34 Nm)
No, tighten less than 6.0 in/lbs
Captive, final torque
6.0 in/lbs (0.68 Nm)
Yes
5 in/lbs (0.6 Nm)
Yes
7.0 - 8.8 in/lbs (0.798 - 0.998 Nm)
Yes
7.0 in/lbs (0.8 Nm)
Yes
5.3 in/lbs (0.6 Nm)
Yes
33.3 in/lbs (3.76 Nm)
No, hand tighten
Circuit breaker
M3 screw
System board cover
M3 screw
I/O memory module
M3 screw
Fan centerplane
M3 screw
Centerplane
M5 screw
1. Newton meters
1-12
Sun Enterprise 10000 System Service Manual • March 2002
1.7
Field Replaceable Units
TABLE 1-12 lists the estimated time required for replacement of the field-replaceable
units (FRUs) in the Sun Enterprise 10000 system, provided the new component is onsite and properly configured. The estimates do not include any time required by
software for system reconfiguration (power cycling, autoconfig) or the shutdown
and bring up required for the nonconcurrent service items.
Caution – The control board and centerplane support board are different from other
hot-swappable items in that the others can be dynamically reconfigured out of the
system without rebooting. However, if a control board or a centerplane support
board is in use by a running domain, you must halt the domain to hot-swap it.
Customer Availability and MTTR Objectives
TABLE 1-12
Field Replaceable Unit
Mean time to repair
Online Service
Control board
10 min.
Yes, if two configured and
not in use by system
Centerplane support board
5 min.
Yes, if not in use by system
Centerplane
1 hour
No
System board
30 min.
Yes
UltraSPARC module
20 min.
Yes
Dual in-line memory module (DIMM)
10 min.
Yes
Memory module
30 min.
Yes
I/O module
20 min.
Yes
SBus cards
10 min.
Yes
I/O cables
15 min.
Yes
Fan tray
5 min.
Yes
System Service Processor (SSP)
30 min.
Yes
SSP keyboard
5 min.
Yes
SSP monitor
10 min.
Yes
SSP peripheral
30 min.
Yes
SSP modem
10 min.
Yes
48-volt power supply
5 min.
Yes, if not in use by system
Chapter 1
Component Replacement Guidelines, Indicators, and Nomenclatures
1-13
TABLE 1-12
1.8
Customer Availability and MTTR Objectives (Continued)
Field Replaceable Unit
Mean time to repair
Online Service
AC input unit
5 min.
Yes, if not in use by system
Exterior cosmetic panel
5 min.
Yes
Power control module
5 min.
Yes
DC breaker
15 min.
Yes, if not in use by system
AC sequencer
15 min.
Yes, if not in use by system
Power shelf
60 min.
No
Fan centerplane
20 min.
No
Air filter
5 min.
Yes
I/O power cord
5 min.
Yes
RSM tray
30 min.
Yes
Component Numbering
All addressable components are identified by a standard set of numbering as listed
in TABLE 1-13 and TABLE 1-14. Locations of all the components are shown in FIGURE 1-3
and FIGURE 1-4 .
1-14
Sun Enterprise 10000 System Service Manual • March 2002
TABLE 1-13
Processor Numbering
Component
Solaris ID
Hostview ID
POST ID
System Board 0
Proc. Mod. 0
Proc. Mod. 1
Proc. Mod. 2
Proc. Mod. 3
/SUNW,UltraSPARC@0,0
/SUNW,UltraSPARC@1,0
/SUNW,UltraSPARC@2,0
/SUNW,UltraSPARC@3,0
SB0
00
01
02
03
sysbd 0
proc 0.0
proc 0.1
proc 0.2
proc 0.3
System Board 1
Proc. Mod. 0
Proc. Mod. 1
Proc. Mod. 2
Proc. Mod. 3
/SUNW,UltraSPARC@4,0
/SUNW,UltraSPARC@5,0
/SUNW,UltraSPARC@6,0
/SUNW,UltraSPARC@7,0
SB1
04
05
06
07
sysbd 1
proc 1.0
proc 1.1
proc 1.2
proc 1.3
System Board 2
Proc. Mod. 0
Proc. Mod. 1
Proc. Mod. 2
Proc. Mod. 3
/SUNW,UltraSPARC@8,0
/SUNW,UltraSPARC@9,0
/SUNW,UltraSPARC@a,0
/SUNW,UltraSPARC@b,0
SB2
08
09
10
11
sysbd 2
proc 2.0
proc 2.1
proc 2.2
proc 2.3
System Board 3
Proc. Mod. 0
Proc. Mod. 1
Proc. Mod. 2
Proc. Mod. 3
/SUNW,UltraSPARC@c,0
/SUNW,UltraSPARC@d,0
/SUNW,UltraSPARC@e,0
/SUNW,UltraSPARC@f,0
SB3
12
13
14
15
sysbd 3
proc 3.0
proc 3.1
proc 3.2
proc 3.3
System Board 4
Proc. Mod. 0
Proc. Mod. 1
Proc. Mod. 2
Proc. Mod. 3
/SUNW,UltraSPARC@10,0
/SUNW,UltraSPARC@11,0
/SUNW,UltraSPARC@12,0
/SUNW,UltraSPARC@13,0
SB4
16
17
18
19
sysbd 4
proc 4.0
proc 4.1
proc 4.2
proc 4.3
System Board 5
Proc. Mod. 0
Proc. Mod. 1
Proc. Mod. 2
Proc. Mod. 3
/SUNW,UltraSPARC@14,0
/SUNW,UltraSPARC@15,0
/SUNW,UltraSPARC@16,0
/SUNW,UltraSPARC@17,0
SB5
20
21
22
23
sysbd 5
proc 5.0
proc 5.1
proc 5.2
proc 5.3
System Board 6
Proc. Mod. 0
Proc. Mod. 1
Proc. Mod. 2
Proc. Mod. 3
/SUNW,UltraSPARC@18,0
/SUNW,UltraSPARC@19,0
/SUNW,UltraSPARC@1a,0
/SUNW,UltraSPARC@1b,0
SB6
24
25
26
27
sysbd 6
proc 6.0
proc 6.1
proc 6.2
proc 6.3
System Board 7
Proc. Mod. 0
Proc. Mod. 1
Proc. Mod. 2
Proc. Mod. 3
/SUNW,UltraSPARC@1c,0
/SUNW,UltraSPARC@1d,0
/SUNW,UltraSPARC@1e,0
/SUNW,UltraSPARC@1f,0
SB7
28
29
30
31
sysbd 7
proc 7.0
proc 7.1
proc 7.2
proc 7.3
Chapter 1
Component Replacement Guidelines, Indicators, and Nomenclatures
1-15
1-16
TABLE 1-13
Processor Numbering (Continued)
Component
Solaris ID
Hostview ID
POST ID
System Board 8
Proc. Mod. 0
Proc. Mod. 1
Proc. Mod. 2
Proc. Mod. 3
/SUNW,UltraSPARC@20,0
/SUNW,UltraSPARC@21,0
/SUNW,UltraSPARC@22,0
/SUNW,UltraSPARC@23,0
SB8
32
33
34
35
sysbd 8
proc 8.0
proc 8.1
proc 8.2
proc 8.3
System Board 9
Proc. Mod. 0
Proc. Mod. 1
Proc. Mod. 2
Proc. Mod. 3
/SUNW,UltraSPARC@24,0
/SUNW,UltraSPARC@25,0
/SUNW,UltraSPARC@26,0
/SUNW,UltraSPARC@27,0
SB9
36
37
38
39
sysbd 9
proc 9.0
proc 9.1
proc 9.2
proc 9.3
System Board 10
Proc. Mod. 0
Proc. Mod. 1
Proc. Mod. 2
Proc. Mod. 3
/SUNW,UltraSPARC@28,0
/SUNW,UltraSPARC@29,0
/SUNW,UltraSPARC@2a,0
/SUNW,UltraSPARC@2b,0
SB10
40
41
42
43
sysbd 10
proc 10.0
proc 10.1
proc 10.2
proc 10.3
System Board 11
Proc. Mod. 0
Proc. Mod. 1
Proc. Mod. 2
Proc. Mod. 3
/SUNW,UltraSPARC@2c,0
/SUNW,UltraSPARC@2d,0
/SUNW,UltraSPARC@2e,0
/SUNW,UltraSPARC@2f,0
SB11
44
45
46
47
sysbd 11
proc 11.0
proc 11.1
proc 11.2
proc 11.3
System Board 12
Proc. Mod. 0
Proc. Mod. 1
Proc. Mod. 2
Proc. Mod. 3
/SUNW,UltraSPARC@30,0
/SUNW,UltraSPARC@31,0
/SUNW,UltraSPARC@32,0
/SUNW,UltraSPARC@33,0
SB12
48
49
50
51
sysbd 12
proc 12.0
proc 12.1
proc 12.2
proc 12.3
System Board 13
Proc. Mod. 0
Proc. Mod. 1
Proc. Mod. 2
Proc. Mod. 3
/SUNW,UltraSPARC@34,0
/SUNW,UltraSPARC@35,0
/SUNW,UltraSPARC@36,0
/SUNW,UltraSPARC@37,0
SB13
52
53
54
55
sysbd 13
proc 13.0
proc 13.1
proc 13.2
proc 13.3
System Board 14
Proc. Mod. 0
Proc. Mod. 1
Proc. Mod. 2
Proc. Mod. 3
/SUNW,UltraSPARC@38,0
/SUNW,UltraSPARC@39,0
/SUNW,UltraSPARC@3a,0
/SUNW,UltraSPARC@3b,0
SB14
56
57
58
59
sysbd 14
proc 14.0
proc 14.1
proc 14.2
proc 14.3
System Board 15
Proc. Mod. 0
Proc. Mod. 1
Proc. Mod. 2
Proc. Mod. 3
/SUNW,UltraSPARC@3c,0
/SUNW,UltraSPARC@3d,0
/SUNW,UltraSPARC@3e,0
/SUNW,UltraSPARC@3f,0
SB15
60
61
62
63
sysbd 15
proc 15.0
proc 15.1
proc 15.2
proc 15.3
Sun Enterprise 10000 System Service Manual • March 2002
I/O Numbering
TABLE 1-14
SBus
PCI
Component
POST
Solaris ID
Front Panel
Label
System Board 0
I/O Port 0
I/O Port 1
I/O Port 2
I/O Port 3
sysbd 0
scard 0.0.0
scard 0.0.1
scard 0.1.0
scard 0.1.1
/sbus@40
/sbus@40
/sbus@41
/sbus@41
SB0
SBUS
SBUS
SBUS
SBUS
0
0
1
1
SLOT
SLOT
SLOT
SLOT
0
1
0
1
SB0
SB0.0.0
SB0.0.1
SB0.1.0
SB0.1.1
System Board 1
I/O Port 0
I/O Port 1
I/O Port 2
I/O Port 3
sysbd 1
scard 1.0.0
scard 1.0.1
scard 1.1.0
scard 1.1.1
/sbus@44
/sbus@44
/sbus@45
/sbus@45
SB1
SBUS
SBUS
SBUS
SBUS
0
0
1
1
SLOT
SLOT
SLOT
SLOT
0
1
0
1
SB1
SB1.0.0
SB1.0.1
SB1.1.0
SB1.1.1
System Board 2
I/O Port 0
I/O Port 1
I/O Port 2
I/O Port 3
sysbd 2
scard 2.0.0
scard 2.0.1
scard 2.1.0
scard 2.1.1
/sbus@48
/sbus@48
/sbus@49
/sbus@49
SB2
SBUS
SBUS
SBUS
SBUS
0
0
1
1
SLOT
SLOT
SLOT
SLOT
0
1
0
1
SB2
SB2.0.0
SB2.0.1
SB2.1.0
SB2.1.1
System Board 3
I/O Port 0
I/O Port 1
I/O Port 2
I/O Port 3
sysbd 3
scard 3.0.0
scard 3.0.1
scard 3.1.0
scard 3.1.1
/sbus@4c
/sbus@4c
/sbus@4d
/sbus@4d
SB3
SBUS
SBUS
SBUS
SBUS
0
0
1
1
SLOT
SLOT
SLOT
SLOT
0
1
0
1
SB3
SB3.0.0
SB3.0.1
SB3.1.0
SB3.1.1
System Board 4
I/O Port 0
I/O Port 1
I/O Port 2
I/O Port 3
sysbd 4
scard 4.0.0
scard 4.0.1
scard 4.1.0
scard 4.1.1
/sbus@50
/sbus@50
/sbus@51
/sbus@51
SB4
SBUS
SBUS
SBUS
SBUS
0
0
1
1
SLOT
SLOT
SLOT
SLOT
0
1
0
1
SB4
SB4.0.0
SB4.0.1
SB4.1.0
SB4.1.1
System Board 5
I/O Port 0
I/O Port 1
I/O Port 2
I/O Port 3
sysbd 5
scard 5.0.0
scard 5.0.1
scard 5.1.0
scard 5.1.1
/sbus@54
/sbus@54
/sbus@55
/sbus@55
SB5
SBUS
SBUS
SBUS
SBUS
0
0
1
1
SLOT
SLOT
SLOT
SLOT
0
1
0
1
SB5
SB5.0.0
SB5.0.1
SB5.1.0
SB5.1.1
System Board 6
I/O Port 0
I/O Port 1
I/O Port 2
I/O Port 3
sysbd 6
scard 6.0.0
scard 6.0.1
scard 6.1.0
scard 6.1.1
/sbus@58
/sbus@58
/sbus@59
/sbus@59
SB6
SBUS
SBUS
SBUS
SBUS
0
0
1
1
SLOT
SLOT
SLOT
SLOT
0
1
0
1
SB6
SB6.0.0
SB6.0.1
SB6.1.0
SB6.1.1
Chapter 1
Cable
Label
Solaris ID
Front Panel
Label
Cable
Label
/pci@40
SB0
PCI 0.0
SB0
PCI0.0.0
/pci@41
PCI 1.0
PCI0.1.0
/pci@44
SB1
PCI 0.0
SB1
PCI1.0.0
/pci@45
PCI 1.0
PCI1.1.0
/pci@48
SB2
PCI 0.0
SB2
PCI2.0.0
/pci@49
PCI 1.0
PCI2.1.0
/pci@4c
SB3
PCI 0.0
SB3
PCI3.0.0
/pci@4d
PCI 1.0
PCI3.1.0
/pci@50
SB4
PCI 0.0
SB4
PCI4.0.0
/pci@51
PCI 1.0
PCI4.1.0
/pci@54
SB5
PCI 0.0
SB5
PCI5.0.0
/pci@55
PCI 1.0
PCI5.1.0
/pci@58
SB6
PCI 0.0
SB6
PCI6.0.0
/pci@59
PCI 1.0
PCI6.1.0
Component Replacement Guidelines, Indicators, and Nomenclatures
1-17
TABLE 1-14
I/O Numbering (Continued)
SBus
PCI
Component
POST
Solaris ID
Front Panel
Label
System Board 7
I/O Port 0
I/O Port 1
I/O Port 2
I/O Port 3
sysbd 7
scard 7.0.0
scard 7.0.1
scard 7.1.0
scard 7.1.1
/sbus@5c
/sbus@5c
/sbus@5d
/sbus@5d
SB7
SBUS
SBUS
SBUS
SBUS
0
0
1
1
SLOT
SLOT
SLOT
SLOT
0
1
0
1
SB7
SB7.0.0
SB7.0.1
SB7.1.0
SB7.1.1
System Board 8
I/O Port 0
I/O Port 1
I/O Port 2
I/O Port 3
sysbd 8
scard 8.0.0
scard 8.0.1
scard 8.1.0
scard 8.1.1
/sbus@60
/sbus@60
/sbus@61
/sbus@61
SB8
SBUS
SBUS
SBUS
SBUS
0
0
1
1
SLOT
SLOT
SLOT
SLOT
0
1
0
1
SB8
SB8.0.0
SB8.0.1
SB8.1.0
SB8.1.1
System Board 9
I/O Port 0
I/O Port 1
I/O Port 2
I/O Port 3
sysbd 9
scard 9.0.0
scard 9.0.1
scard 9.1.0
scard 9.1.1
/sbus@64
/sbus@64
/sbus@65
/sbus@65
SB9
SBUS
SBUS
SBUS
SBUS
0
0
1
1
SLOT
SLOT
SLOT
SLOT
0
1
0
1
SB9
SB9.0.0
SB9.0.1
SB9.1.0
SB9.1.1
System Board 10
I/O Port 0
I/O Port 1
I/O Port 2
I/O Port 3
sysbd 10
scard 10.0.0
scard 10.0.1
scard 10.1.0
scard 10.1.1
/sbus@68
/sbus@68
/sbus@69
/sbus@69
SB10
SBUS
SBUS
SBUS
SBUS
0
0
1
1
SLOT
SLOT
SLOT
SLOT
0
1
0
1
SB10
SB10.0.0
SB10.0.1
SB10.1.0
SB10.1.1
System Board 11
I/O Port 0
I/O Port 1
I/O Port 2
I/O Port 3
sysbd 11
scard 11.0.0
scard 11.0.1
scard 11.1.0
scard 11.1.1
/sbus@6c
/sbus@6c
/sbus@6d
/sbus@6d
SB11
SBUS
SBUS
SBUS
SBUS
0
0
1
1
SLOT
SLOT
SLOT
SLOT
0
1
0
1
SB11
SB11.0.0
SB11.0.1
SB11.1.0
SB11.1.1
System Board 12
I/O Port 0
I/O Port 1
I/O Port 2
I/O Port 3
sysbd 12
scard 12.0.0
scard 12.0.1
scard 12.1.0
scard 12.1.1
/sbus@70
/sbus@70
/sbus@71
/sbus@71
SB12
SBUS
SBUS
SBUS
SBUS
0
0
1
1
SLOT
SLOT
SLOT
SLOT
0
1
0
1
SB12
SB12.0.0
SB12.0.1
SB12.1.0
SB12.1.1
1-18
Cable
Label
Sun Enterprise 10000 System Service Manual • March 2002
Solaris ID
Front Panel
Label
Cable
Label
/pci@5c
SB7
PCI 0.0
SB7
PCI7.0.0
/pci@5d
PCI 1.0
PCI7.1.0
/pci@60
SB8
PCI 0.0
SB8
PCI8.0.0
/pci@61
PCI 1.0
PCI8.1.0
/pci@64
SB9
PCI 0.0
SB9
PCI9.0.0
/pci@65
PCI 1.0
PCI9.1.0
/pci@68
SB10
PCI 0.0
SB10
PCI10.0.0
/pci@69
PCI 1.0
PCI10.1.0
/pci@6c
SB11
PCI 0.0
SB11
PCI11.0.0
/pci@6d
PCI 1.0
PCI11.1.0
/pci@70
SB12
PCI 0.0
SB12
PCI12.0.0
/pci@71
PCI 1.0
PCI12.1.0
TABLE 1-14
I/O Numbering (Continued)
SBus
PCI
Component
POST
Solaris ID
Front Panel
Label
System Board 13
I/O Port 0
I/O Port 1
I/O Port 2
I/O Port 3
sysbd 13
scard 13.0.0
scard 13.0.1
scard 13.1.0
scard 13.1.1
/sbus@74
/sbus@74
/sbus@75
/sbus@75
SB13
SBUS
SBUS
SBUS
SBUS
0
0
1
1
SLOT
SLOT
SLOT
SLOT
0
1
0
1
SB13
SB13.0.0
SB13.0.1
SB13.1.0
SB13.1.1
System Board 14
I/O Port 0
I/O Port 1
I/O Port 2
I/O Port 3
sysbd 14
scard 14.0.0
scard 14.0.1
scard 14.1.0
scard 14.1.1
/sbus@78
/sbus@78
/sbus@79
/sbus@79
SB14
SBUS
SBUS
SBUS
SBUS
0
0
1
1
SLOT
SLOT
SLOT
SLOT
0
1
0
1
SB14
SB14.0.0
SB14.0.1
SB14.1.0
SB14.1.1
System Board 15
I/O Port 0
I/O Port 1
I/O Port 2
I/O Port 3
sysbd 15
scard 15.0.0
scard 15.0.1
scard 15.1.0
scard 15.1.1
/sbus@7c
/sbus@7c
/sbus@7d
/sbus@7d
SB15
SBUS
SBUS
SBUS
SBUS
0
0
1
1
SLOT
SLOT
SLOT
SLOT
0
1
0
1
SB15
SB15.0.0
SB15.0.1
SB15.1.0
SB15.1.1
Chapter 1
Cable
Label
Solaris ID
Front Panel
Label
Cable
Label
/pci@74
SB13
PCI 0.0
SB13
PCI13.0.0
/pci@75
PCI 1.0
PCI13.1.0
/pci@78
SB14
PCI 0.0
SB14
PCI14.0.0
/pci@79
PCI 1.0
PCI14.1.0
/pci@7c
SB15
PCI 0.0
SB15
PCI15.0.0
/pci@7d
PCI 1.0
PCI15.1.0
Component Replacement Guidelines, Indicators, and Nomenclatures
1-19
PS4
PS5
AC2
PS6
PS7
AC3
FT8
FT9
FT10
FT11
CSB1
SB8
SB9
SB10
SB11
SB12
SB13
SB14
SB15
CB1
FT12
FT13
FT14
FT15
FIGURE 1-3
1-20
Component Numbering—Front
Sun Enterprise 10000 System Service Manual • March 2002
AC0
PS0
PS1
AC1
PS2
PS3
AC sequencer (no number)
RPC0
RPC1
RPC2
RPC3
RPC4
FT0
FT1
FT2
FT3
CSB0
CB0
SB0
SB1
SB2
SB3
SB4
SB5
SB6
SB7
FT4
FT5
FT6
FT7
FIGURE 1-4
Component Numbering—Back
Chapter 1
Component Replacement Guidelines, Indicators, and Nomenclatures
1-21
MM2.7
MM0.7
MM2.6
MM0.6
MM2.5
MM0.5
MM2.4
MM0.4
MM3.7
MM1.7
MM3.6
MM1.6
MM3.5
MM1.5
MM3.4
MM1.4
MM2.3
MM0.3
MM2.2
MM0.2
MM2.1
MM0.1
MM2.0
MM0.0
MM3.3
MM1.3
MM3.2
MM1.2
MM3.1
MM1.1
MM3.0
MM1.0
Proc 3
Proc 2
Proc 1
Proc 0
SBus 0 Slot 0
SBus 0 Slot 1
SBus 1 Slot 0
SBus 1 Slot 1
FIGURE 1-5
1-22
System Board Component Numbering
Sun Enterprise 10000 System Service Manual • March 2002
Bank 1
Bank 3
Centerplane side
Bank 0
FIGURE 1-6
Bank 2
Memory Bank Locations
MM3.7 - P32
MM1.7 - P30
MM3.6 - P28
MM1.6 - P26
MM3.5 - P24
MM1.5 - P22
MM3.4 - P20
MM1.4 - P18
MM3.3 - P31
MM1.3 - P29
MM3.2 - P27
MM1.2 - P25
MM3.1 - P23
MM1.1 - P21
MM3.0 - P19
MM1.0 - P17
MM2.7 - P16
MM0.7 - P14
MM2.6 - P12
MM0.6 - P10
MM2.5 - P8
MM0.5 - P6
MM2.4 - P4
MM0.4 - P2
MM2.3 - P15
MM0.3 - P13
MM2.2 - P11
MM0.2 - P9
MM2.1 - P7
MM0.1 - P5
MM2.0 - P3
MM0.0 - P1
Centerplane side
FIGURE 1-7
Memory DIMM Locations
Chapter 1
Component Replacement Guidelines, Indicators, and Nomenclatures
1-23
RPC0
RPC1
RPC2
RPC3
RPC4
SBUS 0 SLOT 0
CB0 CB1 REMOTE
ON/OFF
SBUS 0 SLOT 1
SBUS 1 SLOT 0
PCI 0.0
RPC0
SBUS 1 SLOT 1
RPC1
RPC2
PCI 1.0
RPC3
RPC4
FIGURE 1-8
1.9
SBus Slot and Remote Power Control Numbering
System Block Diagrams
Use FIGURE 1-9, FIGURE 1-10, FIGURE 1-11, and FIGURE 1-12 when diagnosing failed
components.
1-24
Sun Enterprise 10000 System Service Manual • March 2002
Cooling subsystem
Top fan centerplane
Control
board
CB0
Centerplane
Bottom fan centerplane
Fan tray 8
Fan tray 0
Clk/Cntl
Status (5)
Fan tray 9
Clk/Cntl
Status (5)
Fan tray 1
Fan tray 10
Fan tray 2
Fan tray 11
Fan tray 3
48 Volt
power
subsystem
AC
power
cont.
AC1
Clk/cntl
Status (1)
Clk/cntl
Status (1)
Clk/cntl
Status (1)
Clk/cntl
Status (1)
Power shelf
Power
AC
power supply
cont.
PS0 &
AC0
PS1
Power
supply
PS2 &
PS3
JTAG+
TAS
TMS
TDO
TCK
TDI
Power shelf
Power
AC
power supply
cont. PS4 &
AC3
PS5
AC
power
cont.
AC4
Power
centerplane
TAS
TMS
TDO
TCK
TDI
Power
supply
PS6 &
PS7
AC In
AC In
Peripheral power subsystem
Remote power
control module
Peripheral power dist. unit
Peripheral power dist. unit*
Peripheral power dist. unit*
Peripheral power dist. unit*
Peripheral power dist. unit*
*located in peripheral expansion cabinets
FIGURE 1-9
AC In
Clk/cntl
Status (5)
Clk/cntl
Status (5)
Clk/cntl
Status (5)
Clk/cntl
Status (5)
Clk/cntl
Status (5)
Control board CB1
Fan, Power, and Control Block Diagram I
Chapter 1
Component Replacement Guidelines, Indicators, and Nomenclatures
1-25
Control board CB0
JTAG+
TAS
TMS
TDO
TCK
TDI
JTAG
board
controller
Interconnect
Phase
Processor
Clocks
Sys_Reset
DC pwr src
Reset
System
boards
1-16
Serial
interface
System
clocks &
resets
JTAG
board
controller
JTAG+
TAS
TMS
TDO
TCK
TDI
Centerplane ASIC
JTAG
JTAG
board
Clocks
Sys_Reset
DC pwr Src
Reset
CB_Clk_Inter_Out (17)
CB_Phase (2)
Centerplane
support bd CP0
Resets
+5
+3.3
Centerplane ASIC
JTAG
JTAG
board
Interconnect
Phase
Clocks
Sys_Reset
DC pwr src
Reset
Power
scan ring
A to D
A to D
controller
Control board CB1
Centerplane
Fan, Power, and Control Block Diagram II
Sun Enterprise 10000 System Service Manual • March 2002
3.3 V
pwr
+3.3
CB_Clk_Inter_Out (17)
CB_Phase (2)
Centerplane
support bd CP1
Resets
Housekeeping power
1-26
+3.3
Housekeeping power
JTAG+
TAS
TMS
TDO
TCK
TDI
FIGURE 1-10
3.3 V
pwr
A to D
A to D
controller
Interconnect
Phase
Power
scan ring
+5
+3.3
Global address arbiter (GAARB)
Global address router (GAMUX)
Global address arbiter
Global address router
Global address arbiter
Global address router
Coherency
interface
cntrl (CIC)
Coherency
interface
cntrl (CIC)
Coherency
interface
cntrl (CIC)
Coherency
interface
cntrl (CIC)
Memory
controller
(MC)
Port
controller
(PC)
Port
controller
(PC)
Port
controller
(PC)
Local data
arbiter (LDARB)
U P A
Data
buffer
(XDB)
Data
buffer
(XDB)
d a t a
UltraSPARC
b u s e s
UltraSPARC
UltraSPARC
Pack/
unpack
a d d r e s s
I/O bridge
Memory
I/O bridge
U P A
UltraSPARC
Local address
arbiter (LAARB)
Global address arbiter
Global address router
b u s e s
Data
buffer
(XDB)
Data
buffer
(XDB)
Local data router (LDMUX)
Global data
arbiter (GDARB)
FIGURE 1-11
Global data
router (GDMUX)
System Board Block Diagram
Chapter 1
Component Replacement Guidelines, Indicators, and Nomenclatures
1-27
Global address arbiter (4)
Global address router (4)
System boards (up to 16)
Global data interconnect (16 x 16)
Global data arbiter (1/2)
All global devices are
located on the centerplane
FIGURE 1-12
1-28
Sun Enterprise 10000 System Interconnect Diagram
Sun Enterprise 10000 System Service Manual • March 2002
CHAPTER
2
Power and Cooling Component
Replacement Procedures
Note – All commands performed through the Hostview GUI (hostview(1M)) can
also be performed by other SSP user commands such as the power(1M) command or
the fan(1M) command.
2.1
SSP Replacement
Procedures for replacing the SSP are covered in the Sun Enterprise 10000 Hardware
Installation and De-Installation Guide, part number 805-4651.
2.2
Disk Replacement
Refer to the most recent version of the Hardware Configuration Guide for a listing of
supported devices. Procedures for replacing supported devices are listed in the
service manuals that accompany those devices.
2-1
2.3
AC Input Module Replacement
2.3.1
Isolating a Failed AC Input Module
Use the following checklist to assist with fault isolation.
■
Verify that the system has sufficient power by typing:
ssp# power
Number of Good 48V Power Supplies
Required Number of 48V Power Supplies
.
.
.
■
■
■
■
■
: 8
: 8
Check that the breakers are on.
Check that the LEDs on the AC input module are on.
Verify that the cables in the back and front of the AC input module are inserted
properly.
Verify that the AC input module is firmly seated.
Check for error messages in /var/opt/SUNWssp/adm/domainname/messages.
If all else is all right, but the LEDs are not on, this is a failed item.
2.3.2
Powering Off an AC Input Module
1. Verify that the system has sufficient power, even with two power supplies
powered off, by using hostview(1M) or by typing:
ssp# power
2-2
Sun Enterprise 10000 System Service Manual • March 2002
2. Using TABLE 2-1, determine if additional system boards must be powered off prior
to powering off two 48-volt power supplies.
Use TABLE 2-1 to confirm that the amount of available power is sufficient for the
number of system boards installed. If additional system boards must be powered off,
see Section 3.2.2, “Powering Off a System Board” on page 3-9.
TABLE 2-1
Power Redundancy
Number of System
Boards
Required Power Supplies for N+2 Power Supply or
N+1 AC Input Unit Redundancy
Required 200V, 30A
single-phase circuits
1—2
4
2
3—5
5
3
6—8
6
3
9—12
7
13—16
8
4
1
4
1. If two supplies are failing, no AC module may be removed unless the two failed supplies are under the same
AC module control.
3. Power off both power supplies controlled by the AC input module to be changed
by using hostview(1M) or by typing:
ssp# power -off -ps x
ssp# power -off -ps y
Where x and y are the pairs of power supplies 0/1, 2/3, 4/5, and 6/7 that are
controlled by an AC input module (TABLE 2-2).
TABLE 2-2
AC Input Module Control of Power Supplies
AC Input Module
Top 48-Volt Power Supply
Bottom 48-Volt Power Supply
AC0 controls:
PS0
PS1
AC1 controls:
PS2
PS3
AC2 controls:
PS4
PS5
AC3 controls:
PS6
PS7
Refer to power(1M) for additional information.
Chapter 2
Power and Cooling Component Replacement Procedures
2-3
2.3.3
Removing an AC Input Module
Caution – If the yellow LEDs are lit, do not remove the component. See
Section 2.3.2, “Powering Off an AC Input Module” on page 2-2.
1. Open the access door.
2. Open the door to the power shelf.
3. Disconnect the power cord from the AC input module and the wall receptacle.
4. Loosen the captive one-half-turn screw latch until it releases.
5. Pull out the AC input module and place on a flat, sturdy, ESD-protected surface.
2.3.4
Installing an AC Input Module
1. Insert the AC input module into the power shelf.
2. Tighten the captive one-half-turn screw latch.
3. Connect the power cord to the AC input module and the AC wall receptacle.
2.3.5
Powering On an AC Input Module
1. Power on the two breakers located on the AC input module.
2. Close the door to the power shelf.
3. Close the access door.
2.3.6
Verifying an AC Input Module
Use the following checklist to confirm that a component is operational.
■
■
■
2-4
Confirm that the fans on the adjacent power supplies are on.
Use hostview or the power command to check the power status.
Verify that the power supply on status was detected by
/var/opt/SUNWssp/adm/domain-name/messages.
Sun Enterprise 10000 System Service Manual • March 2002
2.4
48-Volt Power Supply Replacement
2.4.1
Isolating a Failed Power Supply
Use the following checklist to assist with fault isolation.
■
■
■
■
2.4.2
Check that the power supply fans are on.
Confirm that the power supply is properly seated.
Check the power status on hostview.
Check for error messages in /var/opt/SUNWssp/adm/domain-name/messages.
Powering Off a 48-Volt Power Supply
● Power off the 48-volt power supply by using hostview(1M) or by typing:
ssp# power -off -ps x
Where x = 0–7. Refer to power(1M) for additional information.
2.4.3
Removing a 48-Volt Power Supply
Caution – If the yellow LEDs are lit on the power supply, do not remove the
component. See Section 2.4.2, “Powering Off a 48-Volt Power Supply” on page 2-5.
1. Open the access door.
2. Open the door to the power shelf.
3. Pull out the 48-volt power supply and place on a flat, sturdy, ESD-protected
surface.
2.4.4
Installing a 48-Volt Power Supply
1. Insert the 48-volt power supply into the power shelf.
Chapter 2
Power and Cooling Component Replacement Procedures
2-5
2. Push firmly to engage the rear connectors.
2.4.5
Powering On a 48-Volt Power Supply
1. Locate the AC input module for the power supply that is off (see TABLE 2-2).
2. On the AC input module, power both breakers on.
3. Close the door to the power shelf.
4. Close the access door.
2.4.6
Verifying a Power Supply
Use the following checklist to confirm that a component is operational.
■
■
■
Check that the power supply fans are on.
Check the power status using hostview or the power command.
Check for error messages in /var/opt/SUNWssp/adm/domain-name/messages.
2.5
Power Shelf Replacement
2.5.1
Removing a Power Shelf
Caution – The power shelves are NOT considered hot-swappable. This procedure
requires powering off the AC power to the system and disconnecting the AC power
cords. Also, the side panel nearest the power shelves must be removed. Therefore, it
might be necessary to move the cabinet to provide work space in this area.
Since the system must be powered off, the operating system and all of the domains
must be systematically brought down and then halted.
1. Power off the system by typing:
ssp# power -off -all
2-6
Sun Enterprise 10000 System Service Manual • March 2002
2. Power off the AC circuit breakers at the AC input modules in the power shelf to
be removed.
3. Disconnect the AC power cords from the AC input modules and allow them to
hang loose.
4. Remove the AC input modules and DC power supplies from the power shelf.
5. Remove the access door by retracting the hinge pins located at the top and bottom
of the front (or rear) access door, enabling it to be removed from the cabinet.
Remove the door and set aside.
6. Remove the three M4 flat-head Phillips screws securing the vertical trim strip to
the frame.
Pull the trim strip off its brackets and set it aside.
7. Remove the AC power cords from in front of the side mounting flange for the
power shelf.
8. Remove the two M4 panhead Phillips screws securing the door catch bracket to
the frame.
Remove the door catch and set aside.
9. Remove the two screws attaching the power shelf to the frame.
10. Remove the door assembly from the power shelf by opening the door for the
power shelf and removing the four M4 panhead Phillips screws securing the door
to the frame.
Set the door assembly aside and retain the screws and washers.
11. Remove the side panel on the cabinet.
a. Disengag the magnets securing the side panel to the cabinet.
b. Pull the panel out from the cabinet at the bottom.
c. Lift the side panel up and off its support brackets.
Set the side panel aside.
12. Verify that the cables at the rear of the power shelf are properly identified.
See Section 8.2, “Cable Replacement” on page 8-3 for proper connection of cables.
13. Disconnect the power cables from the rear of the power shelf.
The #4-40 panhead Phillips screws and washers securing connectors to the power
shelf are not captive to the connectors. Be careful not to lose this hardware.
14. Disconnect the rear support brackets by removing the two M4 panhead Phillips
screws securing the two support brackets to the cabinet at the rear of the power
shelf.
Chapter 2
Power and Cooling Component Replacement Procedures
2-7
15. Slide the power shelf out of the cabinet.
16. Once free from the cabinet, remove the two rear support brackets from the old
power shelf and install the two rear support brackets on the new power shelf.
2.5.2
Installing a Power Shelf
1. Slide the power shelf into the cabinet.
2. Secure the rear support brackets with the two M4 panhead Phillips screws secure
to the cabinet at the rear of the power shelf.
3. Connect the power cables to the power shelf. Tighten the thumbscrews or
the #4-40 panhead Phillips screws and washers as necessary.
If necessary see Section 8.2, “Cable Replacement” on page 8-3 for proper connection
of cables.
4. Secure the power shelf to the cabinet.
5. Connect the door assembly to the power shelf using the four M4 panhead Phillips
screws.
6. Install the vertical trim strip.
7. Install the AC input modules and DC power supplies.
8. Connect the AC power cords to the AC input modules.
9. Route the power cords through the vertical trim strip.
10. Using the breakers on the AC input module, power on the AC input modules.
11. Power on the system by typing:
ssp# power -on -all
12. Replace the access and side doors.
13. Move the cabinet to its original position.
14. Run diagnostics to verify the operation of the system.
2-8
Sun Enterprise 10000 System Service Manual • March 2002
2.6
DC Breaker Module Replacement
2.6.1
Isolating a Failed DC Breaker
Use the following checklist to assist with fault isolation.
■
Referring to the circuit breaker labels (FIGURE 2-1) determine which component or
components remained off, following a power-on command.
■
■
■
If a group of four fan trays are off, suspect the associated circuit breaker.
If a control board and centerplane support board are off, suspect the associated
circuit breaker.
If a single system board is off, suspect the associated circuit breaker.
FIGURE 2-1
2.6.2
Circuit Breaker Labels
Removing a Circuit Breaker
1. Open the access door.
2. Remove the two M4 panhead Phillips screws securing the circuit breaker panel to
the power shelf.
Retain the screws.
Caution – When the system is powered on, there is 48VDC available at the circuit
breakers. This does not create an electric shock hazard, however, there is
considerable energy in these circuits.
Use caution to prevent any bare circuit breaker terminals or exposed wire terminals from
coming in contact with the frame.
Chapter 2
Power and Cooling Component Replacement Procedures
2-9
3. Remove the circuit breaker panel by gently working it toward you.
Once loose, pull it out with the cable assemblies attached.
4. Power off the circuit breaker(s) to be removed.
5. Remove the two M3 flat-head Phillips screws that attach the circuit breaker to the
panel.
Retain the screws.
6. Loosen and remove the circuit breaker from the panel by gently pushing it back
and through the panel.
Cut and remove the tie-wraps as needed.
7. Remove the circuit breaker(s).
The wire attached to the upper terminal of the circuit breakers is connected to the
48 VDC power bus. This wire should be removed first, followed by the remaining
wires.
2.6.3
Installing a Circuit Breaker
1. Use TABLE 2-3 to connect the wires to the breaker in their respective positions.
TABLE 2-3
Circuit Breaker Wiring
Primary Power Shelf:
Slot#
Wire
FT4-7
Secondary Power Shelf:
label#1
Slot#
Wire label#
W1
SB8
W1
FT0-3
W2
SB9
W12
CSB0/CB0
W3
SB10
W3
SB0
W5
SB11
W2
SB1
W4
SB12
W5
SB2
W7
SB13
W4
SB3
W6
SB14
W7
SB4
W9
SB15
W9
SB5
W8
CSB1/CB1
W8
SB6
W11
FT8-11
W6
SB7
W10
FT12-15
W11
1. The source wires are all common, and therefore unlabeled, and can be connected to any circuit breaker.
2-10
Sun Enterprise 10000 System Service Manual • March 2002
Caution – Verify breaker alignment prior to insertion to prevent possible damage of
the breaker mating slot.
2. Insert the circuit breaker into the available circuit breaker slot.
3. Install the two M3 flat-head Phillips screws to attach the breaker to the panel.
4. Torque the M3 flat-head Phillips screws to 0.6 Nm (5 inch pounds).
5. Bundle the wires neatly using tie-wraps as needed.
6. Insert the cable bundle into the power shelf and push the circuit breaker panel
back into place on the power shelf.
7. Replace the two M4 panhead Phillips screws to fasten the panel to the power
shelf.
8. Torque the M4 panhead Phillips screws to 1.0 Nm (9 inch pounds).
9. Close the access door.
2.6.4
Verifying a DC Breaker
Use the following checklist to verify that a DC breaker(s) are operational.
■
■
■
Check that the component or components powered on.
Check the power status using hostview or the power command.
Check for error messages in /var/opt/SUNWssp/adm/domain-name/messages.
2.7
Universal AC Sequencer Replacement
2.7.1
Isolating a Failed AC Sequencer
Use the following checklist to assist with fault isolation.
■
■
■
■
■
Verify that the LEDs are on.
Confirm that the components powered by the AC sequencer are on.
Check cables.
Check the REMOTE/LOCAL switch.
For remotely controlled AC sequencers, issue a power -P command.
Chapter 2
Power and Cooling Component Replacement Procedures
2-11
■
■
2.7.2
If the AC sequencer still is not on, switch to LOCAL to determine if it will
power on. If it powers on in LOCAL, suspect the configuration, the control
board, the cables, or the remote power control module.
On remotely controlled I/O cabinets, check that the keyswitch is in the OFF
position.
Powering Off a Remotely Controlled AC
Sequencer
● Type:
ssp# power -off -p x
Where x = 0-4. This command powers off the AC sequencers that are controlled by
the remote power control module indicated by x, and all peripherals powered by
this AC sequencer will power off. Refer to power(1M) for more information.
2.7.3
Removing an AC Sequencer
Caution – If the switched outlet green lights are lit, do not remove the component.
See Section 2.7.2, “Powering Off a Remotely Controlled AC Sequencer” on page 2-12.
1. Open the access door.
2. Note the origination of all power cords connected to the AC sequencer.
3. Power off the AC circuit breaker on the AC sequencer.
4. Disconnect all cables from the AC sequencer and the remote power control
modules.
5. Remove the four Phillips screws that secure the AC sequencer.
6. Remove and place the unit on a flat, sturdy, ESD-protected surface.
2.7.4
Installing an AC Sequencer
1. Place the AC sequencer into the cabinet and align the attachment slots to the holes
on the RETMA rails.
2-12
Sun Enterprise 10000 System Service Manual • March 2002
2. Use the four Phillips screws to secure the AC sequencer to the RETMA rails.
3. Connect the power cord to the AC sequencer and to the wall receptacle.
4. Connect the cables from the peripherals to the AC sequencer and the remote
power control modules.
5. Power on the AC circuit breaker on the AC sequencer.
6. Close the access door.
2.7.5
Configuring an AC Sequencer
I/O cabinets can be controlled remotely from the control board using the power(1M)
command. To do this, the control board must be connected to the AC sequencer. To
facilitate multiple control boards, this connection is done with remote power cables
and a remote power control module.
The control board has five remote power control connections, RPC0-RPC4. These are
connected from both control board 0 (CB0) and control board 1 (CB1) to the remote
power control modules located in the processor cabinet I/O space. The output of a
remote power control module is then connected to an AC sequencer located either in
the processor cabinet I/O space or an I/O expansion cabinet (see FIGURE 2-2).
Chapter 2
Power and Cooling Component Replacement Procedures
2-13
Control board 0
(CB0)
Control board 1
(CB1)
RPC0
RPC1
RPC2
RPC3
RPC4
Remote power
control modules
CB0 CB1
Remote
ON/OFF
AC sequencer
FIGURE 2-2
Remote Power Control
Remote power control modules can be programmed to addresses 0–5. When the
control board issues a command and address, each remote power control module
programmed for that address will respond.
You can connect a remote power control module address to a single AC power
sequencer or to a string of AC power sequencers. When the command
power -p 3 -off is issued, the remote power control module or modules that are
programmed for address 3 will power off (see FIGURE 2-3). Subsequently, all AC
power sequencers attached to those remote power control modules and their
associated peripherals will also power off.
2-14
Sun Enterprise 10000 System Service Manual • March 2002
Control board issues a command to RPC 3
All remote power control modules programmed to address 3 respond to control board command
Address=3
Address=0
Address=3
All AC sequencers attached to
remote power control modules
programmed to address 3 also
respond to control board commands
for that address
FIGURE 2-3
Remote Power Control Addressing
Chapter 2
Power and Cooling Component Replacement Procedures
2-15
Note the following rules when configuring the AC sequencers (see FIGURE 2-4):
■ To remotely control an AC sequencer in the Sun Enterprise 10000 system cabinet,
set the REMOTE switch to the REMOTE position.
2-16
■
To remotely control AC sequencers in the I/O expansion cabinet that have system
interface cables connecting them, set all the REMOTE switches to the REMOTE
position and turn the key switch in the front of the I/O expansion cabinet to the
OFF position.
■
To remotely control AC sequencers in the I/O expansion cabinet that do not have
system interface cables connecting them, set all REMOTE switches to the
REMOTE position, daisy-chain the AC sequencers, and turn the key switch in the
front of the I/O expansion cabinet to the OFF position.
Sun Enterprise 10000 System Service Manual • March 2002
Located In the I/O Expansion Cabinet
Peripheral tray
Universal AC sequencer
Located In the Processor Cabinet
For remote control, only one
of these cables are connected.
Back of AC sequencer
Universal AC sequencer
Universal AC sequencer
RPC0
RPC1
RPC2
RPC3
RPC4
Remote power
control modules
Control board 0
(CB0)
FIGURE 2-4
Control board 1
(CB1)
Basic Remote Power Connection
Chapter 2
Power and Cooling Component Replacement Procedures
2-17
2.7.6
Powering On a Remotely Controlled AC
Sequencer
● Type:
ssp# power -on -p x
Where x = 0-4. This command powers on the AC sequencers that are controlled by
the remote power control module indicated by x. All peripherals powered by this
AC sequencer will power on. Refer to power(1M) for more information.
2.7.7
Verifying an AC Sequencer
Use the following checklist to confirm that a component is operational.
■
Confirm that components powered by sequencer are on.
2.8
Fan Tray Replacement
2.8.1
Isolating a Failed Fan Tray
Use the following checklist to assist with fault isolation.
■
■
■
2.8.2
Check that the LEDs are on.
Check the fan status using hostview or execute a hostinfo -F command.
Check the /var/opt/SUNWssp/adm/domain-name/messages file for fan error
messages.
Powering Off a Single Fan Tray or a Group of Fan
Trays
Note – SSP version 3.0 does not properly detect power when an SSP command
restores power. Therefore, remove and reinsert the fan with power on.
2-18
Sun Enterprise 10000 System Service Manual • March 2002
● Power off a fan tray by using hostview(1M) or by typing:
■
For a single fan tray, where x = 0-15:
ssp# fan -t x -p off
■
For a group of trays, where x = front (ft8-15), rear (ft0-7):
ssp# fan -1 x -p off
Refer to fan(1M) for more information.
Caution – To maintain adequate system cooling, limit the amount of time a fan is
off to less than 10 minutes.
2.8.3
Removing a Fan Tray
Caution – If the yellow LEDs are lit, do not remove the component. See
Section 2.8.2, “Powering Off a Single Fan Tray or a Group of Fan Trays” on
page 2-18.
1. Open the access door.
2. Grasp the handle and pull the fan tray straight out.
Initially, you will encounter higher resistance due to the retention mechanism; this is
normal.
3. Set the fan tray aside.
2.8.4
Installing a Fan Tray
1. Place the bottom surface of the fan tray onto the top of the support of the fan shelf
angle bracket.
2. Slide the fan tray in until initial engagement begins with the mating connector.
3. Using firm, steady pressure, fully insert the fan tray into the fan tray slot.
4. Close the access door.
Chapter 2
Power and Cooling Component Replacement Procedures
2-19
2.8.5
Powering On a Fan Tray or a Group of Fan Trays
Using SSP Version 3.0
Note – SSP version 3.0 does not properly detect power when an SSP command
restores power. Therefore, remove and reinsert the fan with power on.
● Power on a fan tray by using hostview(1M) or by typing:
■
For a single fan tray, where x = 0-15:
ssp# fan -t x -p on
■
For a group of trays, where x = front (ft8-15), rear (ft0-7):
ssp# fan -l x -p on
In future releases of the software, power will be reinstated to a fan tray upon
insertion. Refer to fan(1M) for more information.
2.8.6
Powering On the Fan Trays Using SSP Version 3.1
or Subsequent Compatible Version
● Power on all of the fan trays by using hostview(1M) or by typing:
ssp# fan -p on
Power will be reinstated to a fan tray upon insertion. Refer to fan(1M) for more
information.
2.8.7
Verifying a Fan Tray
Use the following checklist to confirm that a component is operational.
■
■
2-20
Check that the LEDs are on.
Check the fan status using hostview or execute a hostinfo -F command.
Sun Enterprise 10000 System Service Manual • March 2002
2.9
Replacing an Air Filter
The Sun Enterprise 10000 system has four front and four rear air filters which
provide approximately 150 CFMs per system board. These air filters require periodic
replacing. To prevent restricted air flow and possible equipment failure, perform this
procedure when the filters contain trapped particles, or every three months.
Note – Do not try to clean the air filters. They deteriorate over time and are easily
damaged. Replace dirty air filters with new ones.
Note – The air filters can be changed without powering off the Sun Enterprise 10000
system. However, the integrity of the I/O cable connections is put at risk when the
I/O cables are moved to change the air filters. This must be considered if the Sun
Enterprise 10000 system is not powered off to change the air filters.
1. Open the front and rear cabinet doors to get access to the filters shown in
FIGURE 2-5.
2. Look at the underside of the filters with an inspection mirror and flashlight to
determine if they are dirty.
Look at the surrounding area for evidence of excessive amounts of dirt and dust.
Large amounts of dirt and dust might indicate that the filters are loading up quickly
and require more frequent inspections and changes.
Caution – Large amounts of dirt and dust might indicate that the Sun Enterprise
10000 system must be powered off to change the filters. Dust and dirt can be drawn
into the Sun Enterprise 10000 system cabinet when the filters are removed and the
cooling fans are running.
3. Remove the faceplate by removing four screws.
4. With one hand, reach under the cabinet and slide the filter toward you.
Chapter 2
Power and Cooling Component Replacement Procedures
2-21
FIGURE 2-5
Air Filter Replacement
5. Remove the filter and discard.
6. Insert a clean air filter into the air filter slot, pushing toward the center of the
cabinet until it stops.
7. Reinstall the faceplate with the four screws.
8. Close the access door.
2-22
Sun Enterprise 10000 System Service Manual • March 2002
CHAPTER
3
Control and System Board
Replacement Procedures
Note – All commands performed through the Hostview GUI (hostview(1M)) can
also be performed by other SSP user commands such as the power(1M) command or
the fan(1M) command.
3.1
Control Board Replacement
3.1.1
Isolating a Failed Control Board
Use the following checklist to assist with fault isolation.
■
■
■
■
Check for any error messages during post.
On the SSP, check for any error messages in
/var/opt/SUNWssp/adm/messages.
On the SSP, if available, use redx to examine any arbstop dump files or record
stop dump files located in /var/opt/SUNWssp/adm/domain-name.
On specific domains, if system call dump files are available, use ADB to examine
/var/crash/domain-name.
3-1
3.1.2
Setting Up the Network for a Replacement
Control Board
Modify the host SSP network files with the Ethernet address of the replacement
control board. To verify that the host SSP network files are correctly set up, view the
/etc/ethers, /etc/hosts, and /etc/nsswitch.conf files for the appropriate
entries.
■
■
■
/etc/hosts requires IP address and hostname of control boards.
/etc/ethers requires MAC address of control boards.
/etc/nsswitch.conf must point to files for all entries.
1. Log in to the SSP as root.
3-2
Sun Enterprise 10000 System Service Manual • March 2002
2. Manually edit the /etc/hosts file with the domain(s) and control board(s) IP
address if this information is not already in an NIS database.
This procedure is dependent on whether local files or NIS are used. The control
board(s) IP address is customer-supplied. Correct entries should look similar to the
following /etc/hosts sample. Differences due to the spare SSP are commented.
Note – SSP software only supports standard class C addresses for the control board
subnet.
CODE EXAMPLE 3-1
Sample /etc/hosts File
# Entries for dom_subnet.
xxx.xxx.xx.xxx domain1_hostname
xxx.xxx.xx.xxx domain2_hostname
...
xxx.xxx.xx.xxx domainn_hostnname
(n is the number of domains)
#
# Entries on both ssp’s.
# NOTE : On the spare SSP,make sure “loghost”
# belongs to the spare.
#
xxx.xxx.xx.xxx main_ssp_hostname loghost
xxx.xxx.xx.xxx spare_ssp_hostname
#
# The next three entries need to be on cb0_subnet.
#
xxx.xxx.xx.xxx main_ssp_hostname-le0
xxx.xxx.xx.xxx spare_ssp_hostname-le0
xxx.xxx.xx.xxx cb0_hostname
#
# The next three entries need to be on cb1_subnet.
#
xxx.xxx.xx.xxx main_ssp_hostname-hme1
xxx.xxx.xx.xxx spare_ssp_hostname-hme1
xxx.xxx.xx.xxx cb1_hostname
CODE EXAMPLE 3-2 shows an example of a main SSP /etc/hosts file is given
assuming:
■
■
■
xf4 and xf4-b3 are host domains.
xf4-ssp is the main SSP and xf4-ssp1 is the spare SSP.
xf4-cb0 and xf4-cb1 are the hostnames for the two control boards.
Chapter 3
Control and System Board Replacement Procedures
3-3
CODE EXAMPLE 3-2
Sample Main SSP /etc/hosts File
#/etc/hosts
#
#dom_subnet (xxx.yyy.49.zzz). The 49 subnet
#
129.153.49.8
xf4
129.153.49.9
xf4-b3
127.0.0.1
localhost
129.153.49.113 xf4-ssp loghost
129.153.49.114 xf4-ssp1
#
#cb0_subnet (xxx.yyy.151.zzz). The 151 subnet
#
129.153.151.113 xf4-ssp-le0
129.153.151.114 xf4-ssp1-le0
129.153.151.123 xf4-cb0
#
#cb0_subnet (xxx.yyy.152.zzz). The 152 subnet
#
129.153.152.113 xf4-ssp-hme1
129.153.152.114 xf4-ssp1-hme1
129.153.152.127 xf4-cb1
Note – The /etc/hosts file is actually a link to ./inet/hosts.
3. Manually edit the /etc/ethers file with the domain(s), control board(s), and
SSP(s) Ethernet address if this information is not already in the NIS database.
Correct entries should look similar to the following /etc/ethers sample:
8:0:20:87:58:a5
0:0:be:01:00:1e
0:0:be:01:00:57
0:0:be:a6:50:2f
8:0:20:87:58:aa
xf4-ssp
xf4-cb0
xf4-cb1
xf4-b3
xf4-ssp1
Note – The control board(s) Ethernet address is located on the front of each control
board.
3-4
Sun Enterprise 10000 System Service Manual • March 2002
4. Edit the /etc/nsswitch.conf file on both the main and the spare SSP.
■
If using local configuration files, the files should appear as in the following
example:
hosts:
ethers:
netmasks:
bootparams:
■
files
files
files
files
If using NIS, the files should appear as in the following example:
hosts:
ethers:
netmasks:
bootparams:
nis
nis
nis
nis
[NOTFOUND=return] files
[NOTFOUND=return] files
[NOTFOUND=return] files
files
Note – The name information server (nis) is customer-network configuration
dependent.
3.1.3
Powering Off a Control Board
1. Use hostview(1M) to confirm that the control board is not the clock or JTAG
master.
If the control board to be changed has a “J” and a “C” in its hostview icon, you
must switch the primary control board to the alternate control board. See either
Section 9.2 “Configuring a Control Board Using SSP Version 3.0” on page 9-3 or
Section 9.3 “Configuring a Control Board Using SSP Version 3.1 and Subsequent
Compatible Versions” on page 9-6.
2. Power off the control board either by using hostview(1M) or by typing:
ssp% power -off -cb x
Where x = 0-1, the alternate control board. Refer to power(1M) for more information.
Caution – Do not turn off a primary control board or system problems will occur.
Chapter 3
Control and System Board Replacement Procedures
3-5
Note – A warning message queries the user to continue to power off or not. This
warning message ensures that the user is physically present to power “on” or “off”
the control board. A remote power-on command does not exist.
3.1.4
Removing a Control Board
Caution – If the yellow LEDs are lit, do not remove the component. See
Section 3.1.3, “Powering Off a Control Board” on page 3-5.
1. Open the Sun Enterprise 10000 system cabinet access door that is enclosing the
control board to be replaced.
Note – The control board to be removed will have its yellow LEDs off. If the yellow
power LEDs are on, do not remove the board. Check the other control board to see if
its yellow LEDs are off. If they are off, then that is the control board that has been
powered off for replacement.
2. Note the location of all cables connected to the control board to be replaced.
3. Attach a wrist strap.
4. Disconnect the cables from the control board.
5. Unlock the control board handle by placing one hand on the handle to hold it in
place while using the other hand to pull down on the locking lever that rests on
the handle.
6. Pull down on the handle carefully and remove the board.
7. Place the removed control board on a flat, sturdy, ESD-protected surface.
3-6
Sun Enterprise 10000 System Service Manual • March 2002
3.1.5
Installing a Control Board
1. Confirm that the event monitoring daemon is running by typing:
ssp% edd_cmd
The returned message should show State = started-monitoring. If not, you
must restart the event monitoring daemon by typing:
ssp% edd_cmd -x start
Refer to edd(1M) and edd_cmd(1M) for additional information.
2. Reinstall the control board:
Caution – Do not install the control board completely until Step a—Step g have
been performed and all cables are attached.
a. Firmly grasp the board by the handle and position it into the appropriate
control board slot.
b. Insert the control board part way to ensure it will not fall.
c. Reconnect all cables that were removed in Step 2 of Section 3.1.4, “Removing a
Control Board” on page 3-6.
d. With the handle extended, slide the board into the slot until it begins to mate
with the centerplane connector.
e. Apply firm pressure to the faceplate to engage the board with the centerplane
connector.
f. Use the insertion handle to fully seat the board.
g. Lock the handle by pulling up the locking lever into position until it is fully
nested with the handle.
3.1.6
Powering On a Control Board
Control boards are powered on upon insertion. When power is on, the yellow LEDs
are lit. No power-on commands are necessary for the control board.
Chapter 3
Control and System Board Replacement Procedures
3-7
3.1.7
Configuring a Newly Installed Control Board as
the Primary Control Board
Once a failed primary control board has been designated as an alternate and
replaced, it is the system administrator’s option to reinstate it as the primary control
board. To reinstate the original primary control board, see Section 9.2 “Configuring a
Control Board Using SSP Version 3.0” on page 9-3 or Section 9.3 “Configuring a
Control Board Using SSP Version 3.1 and Subsequent Compatible Versions” on
page 9-6.
3.1.8
Verifying a Control Board
All domains must be off before testing a control board.
1. Log in to the SSP as ssp.
When prompted for the SUNW_HOSTNAME, use the name of the domain to be tested.
2. Prepare the domains for testing by typing:
ssp% power -off -all
ssp% power -on -all
3. From the same SSP window, run POST by typing:
ssp% bringup -A off -l64
Answer y when prompted to configure the centerplane. The bringup process can
take up to 90–180 minutes depending on system configuration. Refer to the
bringup(1M) or hpost(1M) man page for more detail.
3-8
Sun Enterprise 10000 System Service Manual • March 2002
3.2
System Board Replacement
3.2.1
Isolating a Failed System Board or Mezzanine
Board
Use the following checklist to assist with fault isolation.
■
■
■
■
3.2.2
Check for any error messages during post.
On the SSP, check for any error messages in
/var/opt/SUNWssp/adm/messages.
On the SSP, if available, use redx to examine any arbstop dump files or record
stop dump files located in /var/opt/SUNWssp/adm/domain_name.
On specific domains, if system call dump files are available, use ADB to examine
/var/crash/domain_name.
Powering Off a System Board
1. Use hostview(1M) to verify that the system board is not part of a running
domain.
Caution – Do not turn off power to a system board with the system board circuit
breaker. It is possible to arbstop the entire platform when the board is powered on
again.
2. Power off a system board by using hostview(1M) or by typing:
ssp# power -off -sb x
Where x = 0-15. Refer to power(1M) for more information.
Chapter 3
Control and System Board Replacement Procedures
3-9
3.2.3
Removing a System Board
1. Open the access door.
Caution – If the yellow LEDs are lit, do not remove the component. See
Section 3.2.2, “Powering Off a System Board” on page 3-9.
2. Disconnect all cables from the system board.
3. Attach a wrist strap and unlock the handles by lifting the locking levers that
reside on each of the handles.
4. Use the handles to extract the system board and place it on a flat, sturdy, ESDprotected surface with the components side up.
3.2.4
Installing a System Board
These procedures are designed to prevent the weight of the system boards from
resting on the plastic power connectors. Follow these procedures carefully so that
the plastic power connectors are not loosened or damaged.
!
Caution – Do not attempt to connect a system board to a centerplane that has a
damaged plastic power connector. A bad connection can result in fire.
1. Confirm that the event monitoring daemon is running by typing:
ssp% edd_cmd
The returned message should show State = started-monitoring. If not, you
must restart the event monitoring daemon by typing:
ssp% edd_cmd -x start
Refer to edd(1M) and edd_cmd(1M) for additional information.
2. Attach a wrist strap and install a system board by firmly grasping the board by the
handles and positioning it onto the card cage rail.
3. Slide the system board in carefully until the guide pins at the centerplane
connector begin to engage the system board.
3-10
Sun Enterprise 10000 System Service Manual • March 2002
4. Gently press on the bottom of the system board face just below the I/O panel so
that the rear of the system board is tilted upwards.
This action prevents or minimizes force on the power module housings.
!
Caution – If you feel any abnormal resistance during installation, remove the
system board and examine the connector for damage. A bad connection can result in
fire.
5. While keeping the rear of the system board tilted upwards, press firmly on the
face of the system board to seat it as far as possible without using the insertion
handles.
The system board should now be approximately a quarter inch from the fully seated
position.
6. Fully seat the system board using the insertion handles and latch them.
If you feel any abnormal resistance, remove the system board and examine the
connector carefully for damage.
7. Lock the insertion handles by sliding the locking levers into position until they
are fully nested with the handles.
3.2.5
Powering On a System Board
1. Determine the amount of system power available by typing power.
See TABLE 3-1 to confirm that the amount of available power is sufficient for the
number of system boards to be installed.
TABLE 3-1
Power Redundancy
Number of System
Boards
Required Power Supplies for N+ 2 Power Supply
or N+1 AC Input Unit Redundancy
Required 200V, 30 A
single phase circuits
1–2
4
2
3–5
5
3
7–8
6
3
9–12
7
13–16
8
4
1
4
1. If two supplies are failing, no AC module may be removed unless the two failed supplies are under the same
AC module control.
Chapter 3
Control and System Board Replacement Procedures
3-11
2. Power on a system board by using hostview(1M) or by typing:
ssp# power -on -sb x
Where x = 0-15. Refer to power(1M) for more information.
3. If using SSP version 3.0, restore the system board’s thermal calibration data.
See Section 9.1 “Restoring the Thermal Calibration Information Using SSP Version
3.0” on page 9-1.
3.2.6
Configuring a System Board
After a system board is powered on:
■ It is necessary to run autoconfig(1M) on the SSP when a system board is
installed for the first time in a previously unused slot.
■ It is necessary to run autoconfig(1M) on the SSP when a replacement system
board with a different part number is installed.
3.2.7
Verifying a System Board or Mezzanine Board
1. Log in to the SSP as ssp.
When prompted for the SUNW_HOSTNAME, use the name of the domain to be tested.
2. From the same SSP window, run POST by typing:
ssp% bringup -A off -l64
Answer y when prompted to configure the centerplane. The bringup process can
take up to 90–180 minutes depending on system configuration. Refer to the
bringup(1M) or hpost(1M) man page for more detail.
3-12
Sun Enterprise 10000 System Service Manual • March 2002
3.3
System Board Component Replacement
Mezzanine board or personality plate replacement requires the system board to be
removed and then re-installed. See Section 3.2.3, “Removing a System Board” on
page 3-10 and Section 3.2.4, “Installing a System Board” on page 3-10 for assistance.
For unpopulated system boards, install multiple mezzanine modules in the following
sequence and see TABLE 3-2 for instructions to run autoconfig(1M):
1. I/O modules
See Section 4.1.4, “Installing an SBus I/O Module” on page 4-5 or Section 4.2.5,
“Installing a PCI I/O Module” on page 4-13.
2. Memory module
See Section 5.3.2, “Installing a Memory Module” on page 5-6.
3. Processor module
See Section 5.4.2, “Installing a Processor Module” on page 5-8.
4. SBus cards or PCI Cards
See Section 4.1.2, “Installing an SBus Card” on page 4-2 or
Section 4.2.7, “Installing a PCI Riser Card” on page 4-16 and
Section 4.2.3, “Installing a PCI Card” on page 4-10.
5. DIMMs
See Section 5.2.1, “Configuring Memory on a System Board” on page 5-3, and
Section 5.3.2, “Installing a Memory Module” on page 5-6.
TABLE 3-2
When to Run autoconfig(1M)
Sun Enterprise 10000 system Component
Run autoconfig
I/O modules
Yes*
Memory module
Yes*
Processor module
Yes*
SBus cards or PCI cards
No
DIMMs
No
*It is necessary to run autoconfig(1M) only when a replacement module has a different Sun part number.
Chapter 3
Control and System Board Replacement Procedures
3-13
3-14
Sun Enterprise 10000 System Service Manual • March 2002
CHAPTER
4
System Board I/O Component
Replacement Procedures
Note – All commands performed through the Hostview GUI (hostview(1M)) can
also be performed by other SSP user commands such as the power(1M) command or
the fan(1M) command.
4.1
SBus Component Replacement
4.1.1
Removing an SBus Card
1. Attach a wrist strap.
2. See Section 3.2.3, “Removing a System Board” on page 3-10.
After removal, place the system board on a flat, sturdy, ESD-protected surface with
the FRU side up.
3. Remove the four Phillips screws from the system board cover and remove the
cover.
4. Disengage the SBus card by pulling up on the handle.
Caution – The connector housing can break if the SBus card is tilted too far.
5. Lift the SBus card from the socket at an angle while guiding the faceplate out
from the back panel opening (FIGURE 4-1).
4-1
6. Place the SBus card in an antistatic bag.
7. If the SBus card is not immediately replaced, install a filler panel (part number
340-2305) in the system board faceplate opening.
Caution – Be sure to install the filler panel in each vacant slot opening. A missing
filler panel can impair system cooling and FCC regulatory compliance.
SBUS 0 SLOT 0
SBUS 0 SLOT 1
SBUS 1 SLOT 0
SBUS 1 SLOT 1
Personality plate with
EMI gasket
FIGURE 4-1
4.1.2
Replacing System Board SBus Card
Installing an SBus Card
If converting from PCI to SBus, the personality plate must be removed and replaced
prior to installing any SBus electrical components.
Note – SBus cards require that the black handles be installed on the cards in order
to be installed into the Sun Enterprise 10000 system.
4-2
Sun Enterprise 10000 System Service Manual • March 2002
1. Determine the slot for installing the SBus card.
For maximum I/O performance, avoid populating SBus 0 Slot 0 and SBus 0 Slot 1
together and SBus 1 Slot 0 and SBus 1 Slot 1 together.
2. If a filler panel covers the desired SBus slot, lift the two tabs and detach the filler
panel.
3. Attach a wrist strap and take the SBus card out of the protective packaging.
Inspect the pins in the connector to make sure they are not bent.
4. Guide the SBus card faceplate under the springfingers and against the rear face of
the personality plate.
The I/O connectors of the SBus card should be accessible through the opening in the
personality plate.
5. To align the connector and socket, push the card toward the personality plate
against the compliant EMI gasket.
6. Hold the SBus card by the edges near the connector and firmly but gently press
the card down until the connector is fully seated.
Caution – Do not rock the card onto the socket; the plastic connector housing can
break.
7. Replace the system board cover and secure with four Phillips screws, tightening
to a torque of 0.8 Nm (7.1 inch pounds).
8. See Section 3.2.4, “Installing a System Board” on page 3-10 to confirm that the
event monitoring daemon is running prior to installing the system board.
9. Check for blacklisted components.
If SBus cards have been newly added to a system board, confirm that the PCs on
those system boards are not blacklisted. PCs are blacklisted at the factory when a
system board does not have any SBus cards installed.
During the bringup process, observe the list of blacklisted components.
Alternatively, to retrieve the blacklist file, refer to the blacklist(1M) man page.
Blacklisted PCs will need to be unblacklisted prior to creating a domain that would
include those PCs.
In the following example, a domain will be created using system boards 14 and 15
and the blacklist file is located at $SSPVAR/etc/starfire1. Each board in this
domain will have an SBus SOC (disk) and HME (network) controller.
Chapter 4
System Board I/O Component Replacement Procedures
4-3
a. See if the PCs have been blacklisted by typing:
ssp% more $SSPVAR/etc/starfire1/blacklist
pc 2.2 3.2 5.2 6.2 7.2 10.2 11.2 12.2 13.2 14.2 15.2
b. Unblacklist the PCs on system boards 14 and 15 by editing the
$SSPVAR/etc/starfire1/blacklist file and remove 14.2 and 15.2 from the pc
line.
4.1.3
Removing an SBus I/O Module
1. See Section 3.2.3, “Removing a System Board” on page 3-10.
After removal, place the system board on a flat, sturdy, ESD-protected surface with
the FRU side up.
2. Remove the four Phillips screws from the system board cover and remove the
cover.
3. Note the locations of each SBus card and remove all SBus cards as described in
Section 4.1.1, “Removing an SBus Card” on page 4-1.
4. Loosen and remove the five Phillips screws from the I/O module.
5. Unscrew the six 3/32-inch hex-head screws located on the compression connectors.
6. Remove the SBus I/O module (FIGURE 4-2).
After removal, place the SBus I/O module on a flat, ESD-protected surface or into an
antistatic bag.
4-4
Sun Enterprise 10000 System Service Manual • March 2002
FIGURE 4-2
4.1.4
Replacing the SBus I/O Module
Installing an SBus I/O Module
If converting from PCI to SBus, the personality plate must be removed and replaced
prior to installing any SBus electrical components. See Section 4.3, “Personality Plate
Replacement” on page 4-17.
1. Attach a wrist strap.
2. Prior to installing the module, wipe the gold pads of the system board and the
exposed contacts of the compression connector with a lint-free, nonabrasive cloth
or alcohol wipe.
3. Align the SBus I/O module compression connectors to the system board
compression connector locations.
4. Tighten the six captive connector screws clockwise with a 3/32-inch hex driver.
a. Tighten the captive connector screws in the sequence shown in FIGURE 4-3 until
they touch the metal plate.
b. Tighten each captive connector screw in the sequence shown in FIGURE 4-3 an
additional 1/2 turn.
c. Tighten the captive connector screws to a final torque of 0.68 Nm (6.0 inch
pounds) in the pattern shown in FIGURE 4-3.
Chapter 4
System Board I/O Component Replacement Procedures
4-5
FIGURE 4-3
1
5
3
2
6
4
Tightening Pattern for the SBus I/O Module
5. Install discrete attachment hardware through the board and into the threaded
standoff of the system board.
Later versions of the system board include discrete hardware with a captive washer.
If a separate washer is used, see FIGURE 4-4 for proper orientation of cone washer.
Cone washer
FIGURE 4-4
Cone Washer and Standoff
6. Tighten discrete attachment hardware to a torque setting of 0.7–0.8 Nm (6.0–7.0
inch pounds).
7. Install SBus cards, if necessary. See Section 4.1.2, “Installing an SBus Card” on
page 4-2.
8. Replace the system board cover and secure with Phillips screws tightening to a
torque of 0.8 Nm (7.1 inch pounds).
4-6
Sun Enterprise 10000 System Service Manual • March 2002
9. See Section 3.2.4, “Installing a System Board” on page 3-10 to confirm that the
event monitoring daemon is running prior to installing the system board.
10. Run autoconfig(1M) if you:
4.2
■
Replace an SBus I/O module with an SBus I/O module that has a different Sun
part number.
■
Replace a PCI I/O module with an SBus I/O module.
■
Install an SBus I/O module in a previously unused slot.
PCI Component Replacement
Before you can install PCI components onto a system board, that board must belong
to a domain that has Solaris 2.6 operating environment or subsequent compatible
versions installed. The SSP must be running version 3.1 or subsequent compatible
versions. For information about installing Solaris operating environment, refer to
documentation that shipped with the Solaris CD, which contains procedures for
installing Solaris 2.6 operating environment on a new domain or upgrading a
domain to Solaris 2.6 operating environment.
The board on which you wish to install the PCI components must also be physically
removed from the system. If the system is up, and the domain to which the board
belongs is running, you must remove the board logically before you do so physically.
The Dynamic Reconfiguration User's Guide tells how to do so with the DR Detach
feature.
Chapter 4
System Board I/O Component Replacement Procedures
4-7
System board
PCI card
Personality
plate
PCI filler panel
PCI I/O module
PCI front
bracket
PCI front cover
Top PCI riser card
Bottom PCI riser card
FIGURE 4-5
4.2.1
PCI Components
Accessing PCI Components
1. Attach a wrist strap.
2. See Section 3.2.3, “Removing a System Board” on page 3-10.
After removal, place the system board on a flat, sturdy, ESD-protected surface with
the FRU side up.
3. Remove the four Phillips screws from the system board cover and remove the
cover.
4. Loosen the four captive screws on the PCI front cover and remove from the system
board front cover (FIGURE 4-6).
4-8
Sun Enterprise 10000 System Service Manual • March 2002
PCI front cover
FIGURE 4-6
4.2.2
PCI Front Cover Removal
Removing a PCI Card
1. Attach a wrist strap.
2. Remove the PCI retention screw from the top flange of the PCI card.
3. Disengage the card from the riser card and remove it from the system board
assembly (FIGURE 4-7).
PCI retention screw
FIGURE 4-7
PCI Card Removal
Chapter 4
System Board I/O Component Replacement Procedures
4-9
4. Place the PCI card in an antistatic bag.
5. If the PCI card is not immediately replaced, install a filler panel (part number
240-2391-01) onto the PCI front bracket using the PCI retention screw (FIGURE 4-8).
PCI front bracket
PCI retention screw
PCI filler panel
FIGURE 4-8
4.2.3
Installing a PCI Filler Panel
Installing a PCI Card
If converting from SBus to PCI, the personality plate and I/O module must be
removed and replaced prior to installing any PCI electrical components. See
Section 4.3, “Personality Plate Replacement” on page 4-17 and Section 4.1.3,
“Removing an SBus I/O Module” on page 4-4
1. Determine the slot for installing the PCI card (FIGURE 4-9).
4-10
Sun Enterprise 10000 System Service Manual • March 2002
PCI 0.0
PCI 1.0
FIGURE 4-9
PCI Slot Numbering
2. If a filler panel covers the PCI slot, remove the PCI retention screw on the top
flange to remove the filler panel (FIGURE 4-8).
Retain the screw to attach the PCI card.
3. Attach a wrist strap and take the PCI card out of the protective packaging. Inspect
the connector to make sure it is not damaged.
4. Confirm that the installed riser card is the correct voltage for the PCI card to be
installed.
PCI cards and risers cards are available in multiple voltages. Inspect the keyed
connector on the PCI card to confirm that it will properly mate with the riser
connector. If not, obtain and install the correct riser card (Section 4.2.6, “Removing a
PCI Riser Card” on page 4-15 and Section 4.2.7, “Installing a PCI Riser Card” on
page 4-16).
5. Guide the PCI card from behind the system board faceplate, through the opening,
and place the PCI card edge into the mating connector (FIGURE 4-10).
Chapter 4
System Board I/O Component Replacement Procedures
4-11
PCI retention screw
PCI card edge
FIGURE 4-10
Inserting a PCI Card
6. Confirm alignment of the PCI card, then firmly push the card into the connector
until fully seated.
7. Install the PCI retention screw into the mating flange and tighten to a torque of
0.8 Nm (7.1 inch pounds).
4.2.4
Removing a PCI I/O Module
1. Note the location of each PCI card.
2. Attach a wrist strap and remove all PCI cards.
SeeSection 4.2.2, “Removing a PCI Card” on page 4-9.
3. Remove the five Phillips screws from the I/O module.
4. Loosen the six captive 3/32-inch hex screws located on the compression
connectors.
5. Remove the I/O module (FIGURE 4-11).
After removal, place it on a flat, sturdy ESD-protected surface.
4-12
Sun Enterprise 10000 System Service Manual • March 2002
PCI I/O module
FIGURE 4-11
4.2.5
Replacing the PCI I/O Module
Installing a PCI I/O Module
If converting from SBus to PCI, the personality plate must be removed and replaced
prior to installing any PCI electrical components. See Section 4.3, “Personality Plate
Replacement” on page 4-17.
1. Attach a wrist strap.
2. Prior to installing the module, wipe the gold pads of the system board and the
exposed contacts of the compression connector with a lint-free, nonabrasive cloth
or alcohol wipe.
3. Align the PCI I/O module compression connectors to the system board
compression connector locations.
4. Align the standoffs on the system board with the I/O module.
5. Tighten the six captive connector screws clockwise with a 3/32-inch hex driver.
a. Tighten the captive connector screws in the sequence shown in FIGURE 4-12 until
they touch the metal plate.
b. Tighten each captive connector screw in the sequence shown in FIGURE 4-12 an
additional 1/2 turn.
c. Tighten the captive connector screws to a final torque of 0.68 Nm (6.0 inch
pounds) in the pattern shown in FIGURE 4-12.
Chapter 4
System Board I/O Component Replacement Procedures
4-13
FIGURE 4-12
1
5
3
2
6
4
Tightening Pattern for the PCI I/O Module
6. Install discrete attachment hardware through the board and into the threaded
standoff of the system board.
See FIGURE 4-13 for proper orientation of separate cone washer.
Cone washer
FIGURE 4-13
Cone Washer and Standoff
7. Tighten discrete attachment hardware to a torque setting of 0.7–0.8 Nm (6.0–7.0
inch pounds).
8. Install PCI cards, if necessary. SeeSection 4.2.3, “Installing a PCI Card” on
page 4-10.
4-14
Sun Enterprise 10000 System Service Manual • March 2002
4.2.6
Removing a PCI Riser Card
The PCI I/O module must be removed to remove or install a riser card. See
Section 4.2.4 “Removing a PCI I/O Module” on page 2-11.
1. Attach a wrist strap.
2. Remove any PCI cards according to Section 4.2.2, “Removing a PCI Card” on
page 4-9.
Top PCI riser card
Bottom PCI riser card
Countersink screw
Fastening hardware
(bottom riser card only)
Cone washer
Nut
FIGURE 4-14
Fastening
hardware for
bottom riser only
Removing a PCI Riser Card
3. To remove the bottom PCI riser card, remove the fastening hardware shown in
FIGURE 4-14.
Chapter 4
System Board I/O Component Replacement Procedures
4-15
4. Pull the riser card straight out from the PCI I/O module mating connector.
5. Place the riser card in an antistatic bag.
4.2.7
Installing a PCI Riser Card
If converting from SBus to PCI, the personality plate and I/O module must be
removed and replaced prior to installing any PCI electrical components. See
Section 4.3, “Personality Plate Replacement” on page 4-17 and Section 4.1.3,
“Removing an SBus I/O Module” on page 4-4.
1. Confirm that the riser card is the correct voltage for the PCI card to be installed.
PCI cards and risers cards are available in multiple voltages. Inspect the keyed
connector on the PCI card to confirm that it will properly mate with the riser
connector. If not, obtain the correct riser card.
2. Attach a wrist strap and insert the riser card into the mating connector on the PCI
I/O module.
Press firmly to seat completely into the connector.
3. If installing the bottom riser, use the fastening hardware as shown in FIGURE 4-14,
torque to a setting of 0.6 Nm (5.3 inch pounds).
4. Install any PCI cards according to Section 4.2.3, “Installing a PCI Card” on
page 4-10.
4.2.8
Completing a PCI Component Replacement
Procedure
1. Install the PCI front cover onto the front of the system board tightening to a
torque setting of 0.8 Nm (7.1 inch pounds).
2. Replace the system board cover and secure with screws tightening to a torque
setting of 0.8 Nm (7.1 inch pounds).
3. See Section 3.2.4, “Installing a System Board” on page 3-10 to confirm that the
event monitoring daemon is running prior to installing the system board.
4. Run autoconfig(1M) if you:
4-16
■
Replace a PCI I/O module with a PCI I/O module that has a different Sun part
number.
■
Replace an SBus I/O module with a PCI I/O module.
■
Install a PCI I/O module in a previously unused slot.
Sun Enterprise 10000 System Service Manual • March 2002
4.3
Personality Plate Replacement
Personality plates are located behind the system board faceplate. Therefore, all of the
following components must be removed for access to the personality plate:
■
■
■
■
■
4.3.1
PCI front covers (if used)
PCI front brackets (if used)
PCI risers (if used)
I/O modules
I/O cards
Removing a Personality Plate
1. Attach a wrist strap.
2. See Section 3.2.3, “Removing a System Board” on page 3-10.
After removal, place the system board on a flat, sturdy, ESD-protected surface with
the FRU side up.
3. Remove the four Phillips screws from the system board cover and remove the
cover.
4. Remove the PCI front cover, if necessary, as shown in FIGURE 4-15.
PCI front cover
FIGURE 4-15
PCI Front Cover Removal
5. Remove the I/O cards, if necessary. See Section 4.1.1, “Removing an SBus Card”
on page 4-1 or Section 4.2.2, “Removing a PCI Card” on page 4-9.
Chapter 4
System Board I/O Component Replacement Procedures
4-17
6. Remove the I/O module, if necessary. See Section 4.1.3, “Removing an SBus I/O
Module” on page 4-4 or Section 4.2.4, “Removing a PCI I/O Module” on page 4-12.
7. Remove the PCI front brackets, if necessary, by removing the four screws shown
in FIGURE 4-16.
FIGURE 4-16
PCI Front Bracket Removal
8. Compress the personality plate to the backside of the system board faceplate to
relieve the stress on the screws. Sustain this force while removing the three
screws securing the personality plate (FIGURE 4-17).
Caution – The compliant EMI gasket puts force on the three attachment screws.
This force needs to be relieved while removing each screw to prevent the threads
from becoming damaged and rendering the personality plate useless.
4-18
Sun Enterprise 10000 System Service Manual • March 2002
Compress
personality plate
and faceplate
while installing or removing
attachment screws
Remove/install
attachment
screws here
FIGURE 4-17
Installing a Personality Plate
9. Lift the personality plate out as noted in top view (FIGURE 4-18).
Personality Plate
EMI gasket
Angled flange(s)
Front stiffener with notch
FIGURE 4-18
Installing a Personality Plate—Top View
Chapter 4
System Board I/O Component Replacement Procedures
4-19
4.3.2
Installing a Personality Plate
Personality plates are located behind the system board faceplate. All PCI front
covers, front brackets, and risers (if used), I/O modules, and I/O cards must be
removed for access to the personality plate.
1. Confirm that the type of personality plate you are installing is correct for your
application (FIGURE 4-19).
Angled flanges
SBus
Personality
Plate
FIGURE 4-19
4-20
PCI
Personality
Plate
Personality Plate Identification
Sun Enterprise 10000 System Service Manual • March 2002
2. Attach a wrist strap.
3. Install the personality plate by aligning the angled flange to the notch of the front
stiffener.
4. Swing the personality plate into place against the EMI gasket as shown in
FIGURE 4-20.
Do not place the personality plate between the EMI gasket and faceplate.
Personality Plate
EMI gasket
Angled flange(s)
Front stiffener with notch
FIGURE 4-20
Installing a Personality Plate—Top View
5. Compress the personality plate against the EMI gasket to align the screw holes.
Sustain this force to relieve stress on the screw threads while installing the three
attachment screws as noted in FIGURE 4-21.
Chapter 4
System Board I/O Component Replacement Procedures
4-21
Compress
personality plate
and faceplate
in this direction
while removing
attachment screws
Remove/install
attachment
screws here
FIGURE 4-21
Installing a Personality Plate
6. If using PCI components, install the PCI front bracket.
7. Replace the I/O module, if necessary. See Section 4.1.4, “Installing an SBus I/O
Module” on page 4-5 or Section 4.2.5, “Installing a PCI I/O Module” on page 4-13.
8. Install the I/O cards, if necessary. See Section 4.1.2, “Installing an SBus Card” on
page 4-2 or Section 4.2.3, “Installing a PCI Card” on page 4-10.
9. If using PCI components, install the PCI front cover.
10. Replace the system board cover and secure with screws tightening to a torque of
0.8 Nm (7.1 inch pounds).
11. See Section 3.2.4, “Installing a System Board” on page 3-10 to confirm that the
event monitoring daemon is running prior to installing the system board.
4-22
Sun Enterprise 10000 System Service Manual • March 2002
CHAPTER
5
System Board Memory and CPU
Module Replacement Procedures
Note – All commands performed through the Hostview GUI (hostview(1M)) can
also be performed by other SSP user commands such as the power(1M) command or
the fan(1M) command.
5.1
Memory Component Replacement
5.1.1
Isolating a Failed DIMM
Note – An occasional correctable memory error that the Solaris operating
environment calls "Persistent" or "Intermittent" on a DIMM is normal. A DIMM only
needs to be replaced if the number of these type of correctable errors experienced on
the same DIMM is three or more in a 24 hour period and the SSP Recordstop
corresponding to the Solaris operating environment error message indicates the
DIMM is the source of the errors, not another component. Systems that experience
uncorrectable errors or correctable errors called "Sticky" require immediate service,
but once again the SSP Arbstop, Recordstop, or POST log needs to be examined to
ensure the DIMM is the source of the errors, not another component.
5-1
Use the following checklist to assist with fault isolation.
■
■
■
In the suspect domain, check /var/adm/messages for DIMM error messages.
Check the domain’s console window for error messages
Review the POST messages either by running POST or, if available, access the
POST log files in /var/opt/SUNWssp/adm/domain_name/post. Use TABLE 5-1
and TABLE 5-2 to determine the failed component.
DIMM and MM Conversion
TABLE 5-1
DIMM to Bits
MM to Banks
DIMM 0: lo half bits [17:0]
MM0 = Bank 0
DIMM 1: lo half bits [35:18]
MM1 = Bank 1
DIMM 2: lo half bits [53:36]
MM2 = Bank 2
DIMM 3: lo half bits [71:54]
MM3 = Bank 3
DIMM 4: hi half bits [17:0]
DIMM 5: hi half bits [35:18]
DIMM 6: hi half bits [53:36]
DIMM 7: hi half bits [71:54]
Bank Conversion
TABLE 5-2
High Half
Low Half
Bank 0
5-2
Bank 1
Bank 2
Bank 3
DIMM
BITS
MM
P#
BITS
MM
P#
BITS
MM
P#
BITS
MM
P#
0
0-17
0_0
1
0-17
1_0
17
0-17
2_0
3
0-17
3_0
19
1
18-35
0_1
5
18-35
1_1
21
18-35
2_1
7
18-35
3_1
23
2
36-53
0_2
9
36-53
1_2
25
36-53
2_2
11
36-53
3_2
27
3
54-71
0_3
13
54-71
1_3
29
54-71
2_3
15
54-71
3_3
29
4
0-17
0_4
2
0-17
1_4
18
0-17
2_4
4
0-17
3_4
20
5
18-35
0_5
6
18-35
1_5
22
18-35
2_5
8
18-35
3_5
24
6
36-53
0_6
10
36-53
1_6
26
36-53
2_6
12
36-53
3_6
28
7
54-71
0_7
14
54-71
1_7
30
54-71
2_7
16
54-71
3_7
32
Sun Enterprise 10000 System Service Manual • March 2002
5.2
Removing a System Board DIMM
1. Attach a wrist strap.
2. See Section 3.2.3, “Removing a System Board” on page 3-10 to remove the system
board and place it on a flat, sturdy, ESD-protected surface with the FRU side up.
3. Remove the four Phillips screws from the system board cover and remove the
cover.
4. Unlatch the sides of the DIMM connector and lift the DIMM out of its holder.
5.2.1
Configuring Memory on a System Board
Follow these DIMM configuration guidelines:
■
■
■
■
All sockets within a bank must be fully populated.
DIMM sizes should be equal. However, if mixed sizes are used, the larger DIMMs
will be limited to the smallest DIMM size used.
For increased performance on partially populated memory boards, do not use
banks 0 and 2 together or banks 1 and 3 together.
On the silkscreen, in the replacement guide, and in the diagnostics, MMx
indicates bank number.
Bank 1
Bank 3
Centerplane side
Bank 0
FIGURE 5-1
Bank 2
Memory Bank Locations
Chapter 5
System Board Memory and CPU Module Replacement Procedures
5-3
MM3.7 - P32
MM1.7 - P30
MM3.6 - P28
MM1.6 - P26
MM3.5 - P24
MM1.5 - P22
MM3.4 - P20
MM1.4 - P18
MM3.3 - P31
MM1.3 - P29
MM3.2 - P27
MM1.2 - P25
MM3.1 - P23
MM1.1 - P21
MM3.0 - P19
MM1.0 - P17
MM2.7 - P16
MM0.7 - P14
MM2.6 - P12
MM0.6 - P10
MM2.5 - P8
MM0.5 - P6
MM2.4 - P4
MM0.4 - P2
MM2.3 - P15
MM0.3 - P13
MM2.2 - P11
MM0.2 - P9
MM2.1 - P7
MM0.1 - P5
MM2.0 - P3
MM0.0 - P1
Centerplane side
FIGURE 5-2
5.3
Memory DIMM Locations
Installing a System Board DIMM
1. Attach a wrist strap.
2. Verify key orientation of the DIMM with respect to the connector.
3. Install the DIMM into the connector by applying firm pressure and pushing the
DIMM straight into connector until it clicks into place.
4. Replace the system board cover and secure with Phillips screws tightening to a
torque of 0.8 Nm (7.1 inch pounds).
5. See Section 3.2.4, “Installing a System Board” on page 3-10 to confirm that the
event monitoring daemon is running prior to installing the system board.
5.3.1
Removing a Memory Module
1. Attach a wrist strap.
2. See Section 3.2.3, “Removing a System Board” on page 3-10 to remove the system
board and place it on a flat, sturdy, ESD-protected surface with the FRU side up.
5-4
Sun Enterprise 10000 System Service Manual • March 2002
3. Remove the four Phillips screws from the system board cover and remove the
cover.
4. Remove the eight Phillips screws from the memory module.
5. Loosen the ten captive 3/32-inch hex screws located on the compression connector.
6. To remove the memory module, lift straight out and place on a flat, ESD-protected
surface (FIGURE 5-3).
FIGURE 5-3
Replacing the System Board Memory Module
Chapter 5
System Board Memory and CPU Module Replacement Procedures
5-5
5.3.2
Installing a Memory Module
1. Prior to installing the module, wipe the gold pads of the system board and the
exposed contacts of the compression connector with a lint-free, nonabrasive cloth.
2. Align the memory module compression connectors to the system board
compression connectors.
3. Tighten the ten captive connector screws clockwise with a 3/32-inch hex driver.
a. Tighten the captive connector screws in the sequence shown in FIGURE 5-4 until
they touch the metal plate.
b. Tighten each captive connector screw in the sequence shown in FIGURE 5-4 an
additional 1/2 turn.
c. Tighten the captive connector screws to a final torque of 0.68 Nm (6.0 inch
pounds) in the pattern shown in FIGURE 5-4.
7
1
6
9
5
2
10
4
FIGURE 5-4
3
8
Tightening Pattern for the Memory Module
4. Install discrete attachment hardware through the cone washer and into the board
and standoff (FIGURE 5-5).
5-6
Sun Enterprise 10000 System Service Manual • March 2002
FIGURE 5-5
Cone Washer and Standoff
5. Tighten discrete attachment hardware to a torque setting of 0.8 Nm (7.1 inch
pounds).
6. Install memory DIMMs, if necessary. See Section 5.3, “Installing a System Board
DIMM” on page 5-4.
7. Replace the system board cover and secure with Phillips screws tightening to a
torque of 0.8 Nm (7.1 inch pounds).
8. See Section 3.2.4, “Installing a System Board” on page 3-10 to confirm that the
event monitoring daemon is running prior to installing the system board.
9. Run autoconfig(1M) if you:
■
■
Replace a memory module with a memory module that has a different Sun part
number.
Install a memory module in a previously unused slot.
5.4
Processor Component Replacement
5.4.1
Removing a Processor Module
1. Attach a wrist strap.
2. See Section 3.2.3, “Removing a System Board” on page 3-10 to remove the system
board and place it on a flat, sturdy, ESD-protected surface with the FRU side up.
Chapter 5
System Board Memory and CPU Module Replacement Procedures
5-7
3. Remove the four Phillips screws from the system board cover and remove the
cover.
4. Loosen the five captive 3/32-inch hex screws located on the compression connector.
5. To remove the processor module, lift up and away from obstructions and place on
a flat, ESD-protected surface (FIGURE 5-6).
Processor 3
Processor 2
Processor 1
Processor 0
FIGURE 5-6
5.4.2
Replacing System Board Processor Module
Installing a Processor Module
1. If no processor modules exist on this board, install them in the following order:
5-8
Sun Enterprise 10000 System Service Manual • March 2002
1. Processor 0
2. Processor 2
3. Processor 1
4. Processor 3
For increased processor performance, avoid populating processors 0 and 1 together
and processors 2 and 3 together.
2. Verify that the new processor module speed is the same as all other processor
modules that are installed or will be installed in the system.
Mixing processors speeds in a system will cause processors that do not match the
system clock speed to fail. Refer to sys_clock(1M).
3. Verify that the new processor module cache size is the same as all other processor
modules that are installed or will be installed on the system board.
Mixing cache sizes on a system board will result in the larger caches sizes being
limited to the size of the smallest. If possible, move dissimilar processor modules to
another system board.
4. Attach a wrist strap.
5. Remove the thin, blue plastic strip from the processor board thermal pad on the
system board, if present.
This blue plastic strip covers a white thermal pad that provides thermal relief for the
cache on the processor module. When a processor module is installed, it should be
removed permanently.
6. Prior to installing the module, wipe the gold pads of the system board and the
exposed contacts of the compression connector with a lint-free, nonabrasive cloth.
7. Align the processor module compression connectors to the system board
compression connectors.
Chapter 5
System Board Memory and CPU Module Replacement Procedures
5-9
8. Tighten the five captive connector screws clockwise with a 3/32 hex driver.
a. Tighten the captive connector screws in the sequence shown in FIGURE 5-7 until
they touch the metal plate.
b. Tighten each captive connector screw in the sequence shown in FIGURE 5-7 an
additional 1/2 turn.
c. Tighten the captive connector screws to a final torque of 0.68 Nm (6.0 inch
pounds) in the pattern shown in FIGURE 5-7.
5
3
2
4
2
3
FIGURE 5-7
5
1
1
4
Tightening Pattern for the Processor Module
9. Replace the system board cover and secure with Phillips screws tightening to a
torque of 0.8 Nm (7.1 inch pounds).
10. See Section 3.2.4, “Installing a System Board” on page 3-10 to confirm that the
event monitoring daemon is running prior to installing the system board.
11. Run autoconfig(1M) if you:
5-10
■
Replace a processor module with a processor module that has a different Sun part
number.
■
Install a processor module in a previously unused location.
■
Install a processor module onto a system board that has been newly installed into
a system board slot that was previously unused.
Sun Enterprise 10000 System Service Manual • March 2002
CHAPTER
6
Centerplane Support Board and Fan
Centerplane Replacement
Procedures
Note – All commands performed through the Hostview GUI (hostview(1M)) can
also be performed by other SSP user commands such as the power(1M) command or
the fan(1M) command.
6.1
Centerplane Support Board
Replacement
6.1.1
Isolating a Failed Centerplane Support Board
Use the following checklist to assist with fault isolation.
■
■
■
■
Check for any error messages during POST.
On the SSP, check for any error messages in
/var/opt/SUNWssp/adm/messages.
On the SSP, if available, use redx to examine any arbstop dump files or record
stop dump files located in /var/opt/SUNWssp/adm/domain_name.
On specific domains, if system call dump files are available, use ADB to examine
/var/crash/domain_name.
6-1
6.1.2
Powering Off a Centerplane Support Board
Powering off a centerplane support board also powers off one-half of the
centerplane. Therefore, be sure to either blacklist one-half of the centerplane or have
all of the domains down.
● Power off a centerplane support board by using hostview(1M) or by typing:
ssp# power -off -csb x
Where x = 0-1. Refer to power(1M) for more information.
6.1.3
Removing a Centerplane Support Board
1. Open the access door.
Caution – If the yellow LEDs are lit, do not remove the component. See
Section 6.1.2, “Powering Off a Centerplane Support Board” on page 6-2.
2. Attach a wrist strap and unlock the handle by pulling up on the locking lever that
resides on the handle.
3. Use the handle to extract the centerplane support board and place on a flat, sturdy,
ESD-protected surface.
6.1.4
Installing a Centerplane Support Board
1. Confirm that the event monitoring daemon is running by typing:
ssp% edd_cmd -x start
Refer to edd(1M) and edd_cmd(1M) for additional information.
2. Attach a wrist strap and firmly grasp the centerplane support board by the handle
and position it onto the control board carrier.
3. With the handle extended, slide the board into the slot until it begins to mate with
the centerplane connector.
6-2
Sun Enterprise 10000 System Service Manual • March 2002
4. Apply firm pressure to the faceplate to engage the board with the centerplane
connector.
5. Push the insertion handle to fully seat the board.
6. Lock the handle by sliding the locking lever into position until it is fully nested
with the handle.
6.1.5
Powering On a Centerplane Support Board
● Power on the centerplane support board by using hostview(1M) or by typing:
ssp# power -on -csb x
Where x = 0-1. Refer to power(1M) for more information.
6.1.6
Verifying a Centerplane Support Board
All domains must be off before testing the centerplane support board.
1. Log in to the SSP as ssp.
When prompted for the SUNW_HOSTNAME, use the name of the domain to be tested.
2. Prepare the domains for testing by typing:
ssp% power -off -all
ssp% power -on -all
3. From the same SSP window, run POST by typing:
ssp% bringup -A off -l64
Answer y when prompted to configure the centerplane. The bring-up process can
take up to 90–180 minutes depending on system configuration. Refer to the
bringup(1M) or hpost(1M) man page for more detail.
Chapter 6
Centerplane Support Board and Fan Centerplane Replacement Procedures
6-3
6.2
Fan Centerplane Replacement
6.2.1
Removing a Fan Centerplane
Caution – The fan centerplane is NOT considered hot-swappable. This procedure
requires turning off the AC power to the system and disconnecting the AC power
cords.
1. Since the system must be powered off, the operating system and all of the
domains must be systematically brought down and then halted.
2. Power off the system by typing:
ssp# power -off -all
3. Power off the breakers on the AC input modules.
4. Open the access doors.
5. Attach a wrist strap and remove all of the fan trays from the front and rear of the
fan centerplane that is to be replaced.
See Section 2.8.3, “Removing a Fan Tray” on page 2-19.
6. Verify that the control cables are properly identified.
7. Disconnect the power cable and four control cables from the fan centerplane.
8. Remove and retain the ten fastener subassemblies (screw, washer, and spacer)
using a 2.5-hex driver.
9. Remove the fan centerplane from the cabinet.
6.2.2
Installing a Fan Centerplane
1. Attach a wrist strap.
2. From the front, insert the fan centerplane into the cabinet.
6-4
Sun Enterprise 10000 System Service Manual • March 2002
3. Align the holes and insert the all the fastening hardware.
Using a 2.5-hex driver, tighten to a torque of 0.6 Nm (5.3 inch pounds).
4. Connect the power cable and four control cables to the fan centerplane.
5. Install the fan trays.
See Section 2.8.4, “Installing a Fan Tray” on page 2-19.
6. Close the access doors.
7. Using the breakers on the AC input module, power on the AC input modules.
8. Power on the system by typing:
ssp# power -on -all
Chapter 6
Centerplane Support Board and Fan Centerplane Replacement Procedures
6-5
6-6
Sun Enterprise 10000 System Service Manual • March 2002
CHAPTER
7
Centerplane Replacement
Procedures
Note – All commands performed through the Hostview GUI (hostview(1M)) can
also be performed by other SSP user commands such as the power(1M) command or
the fan(1M) command.
7.1
Centerplane Replacement
Caution – The centerplane is NOT considered hot-swappable. This procedure
requires turning off the AC power to the system.
7.1.1
Isolating a Failed Centerplane
Use the following checklist to assist with fault isolation:
■
■
■
■
Check for any error messages during post.
On the SSP, check for any error messages in
/var/opt/SUNWssp/adm/messages.
On the SSP, if available, use redx to examine any arbstop dump files or record
stop dump files located in /var/opt/SUNWssp/adm/domain_name.
On specific domains, if system call dump files are available, use ADB to examine
/var/crash/domain_name.
7-1
7.1.2
Setting Up the System Prior to Replacing the
Centerplane
1. Locate two Phillips screw drivers (No.1 and No.2), one small straight-slot
screwdriver, one small flashlight, one digital volt meter (DVM), and one set of
centerplane handles with captive attachment hardware.
2. Secure or remove all loose clothing, jewelry, and watches that might get caught on
internal mechanical components.
3. Verify that all I/O cables are properly identified.
If needed, install new labels as shown in FIGURE 7-1.
Connection Between Control Board 0/Ethernet and Ethernet Hub
CB0-ENET
CB0-ENET
Connection Between System Board 0-SBUS 1/SLOT 1/LE0 and Ethernet Hub
SB0 - SBUS 1 - SLOT 1
ENET - LE0
SB0 - SBUS 1 - SLOT 1
ENET - LE0
Connection Between Control Board 0/RPC 0 and Remote Power Control 0/CB0
CB0-RPC0
CB0-RPC0
Connection Between System Board 0/PCI 0.0 and I/O cabinet 0, Tray 0
SB0 - PCI 0.0
CAB0 - TRAY 0
SB0 - PCI 0.0
CAB0 - TRAY 0
Connection Between AC controller 0 top receptacle and the power plug
AC0 TOP
AC0 TOP
Connection Between AC power sequencer in I/O cabinet 1 and the power plug
CAB 1 - AC SEQ 0
FIGURE 7-1
CAB 1 - AC SEQ 0
Cable Labeling
4. Set up an ESD-protected staging area for several system boards, control boards,
centerplane support boards and four fan trays.
7-2
Sun Enterprise 10000 System Service Manual • March 2002
Caution – System boards, centerplane support boards, control boards, SBus cards,
and the centerplane are all VERY susceptible to electrostatic discharge. Therefore, all
possible precautions should be taken to protect these boards against static damage.
Transport board assemblies on an ESD-protected cart whenever possible. Use an
ESD wrist strap when handling.
5. Open and remove all access doors.
6. Attach a wrist strap.
7. In the table below, note the serial numbers and locations of the system boards and
the serial number and revision of the new centerplane.
TABLE 7-1
Component Serial Numbers
Location
Serial Number
Location
CB0
CB1
CSB0
CSB1
SB0
SB15
SB1
SB14
SB2
SB13
SB3
SB12
SB4
SB11
SB5
SB10
SB6
SB9
SB7
SB8
Serial Number
New Centerplane:
Chapter 7
Centerplane Replacement Procedures
7-3
8. On the side of the new centerplane without the stiffener, use a DVM to check that
VDD_CSB0 (use C29) and VDD_CSB1 (use C118) are not less than 100 ohms.
C29
C118
FIGURE 7-2
Centerplane Test Points
9. Visually inspect guide pins and signal pins for possible damage.
7.1.3
Powering Off the System
1. Systematically bring down the operating system and then halt the domains.
2. Power off the system by typing:
ssp# power -off -all
3. Power off the breakers on the AC input modules.
7-4
Sun Enterprise 10000 System Service Manual • March 2002
7.1.4
Removing the Centerplane Assembly From the
Card Cage
From the back side:
1. Attach a wrist strap.
2. Disconnect the I/O cables from the control board, system board 0, and system
board 1.
3. Remove the control board, centerplane support board, system board 0, and system
board 1.
4. Disengage the remaining boards from the centerplane.
Caution – The carrier plate assemblies from both sides of the centerplane must be
removed. If the carrier plate assembly is removed from only the front side, the
alignment pin on the remaining carrier plate assembly can damage the new
centerplane when it is installed.
5. Remove the carrier plate assembly that holds the control board and centerplane
support board.
Remove six Phillips screws, three on the top and three on the bottom of the carrier
plate assembly.
6. Remove the top row of fan trays (FT0-FT3).
7. Disconnect the power cables on the top of the centerplane (FIGURE 7-3).
8. Note the position of the ribbon cables on the left side of the centerplane and then
disconnect them.
Verify that the ribbon cables are properly identified.
Chapter 7
Centerplane Replacement Procedures
7-5
Front carrier plate
Power connections
(typical)
Rear carrier plate
Ribbon
connectors
Centerplane
Alignment pin
FIGURE 7-3
7-6
Phillips screw
(6 places)
Carrier Plate Alignment Pin and Centerplane Connectors
Sun Enterprise 10000 System Service Manual • March 2002
From the front side:
1. Attach a wrist strap.
2. Verify that a flat, sturdy, ESD-protected surface is available nearby for the
centerplane.
3. Disconnect all I/O cables.
4. Remove all boards and place them on a flat, sturdy ESD-protected surface.
5. Remove the carrier plate assembly that holds the control board and centerplane
support board.
Remove six Phillips screws, three on the top and three on the bottom of the carrier
plate assembly.
6. Carefully install the centerplane handles onto the stiffener.
Caution – Centerplane handle installation and removal must be done with care to
prevent possible pin damage.
7. Fully unscrew the 27 captive Phillips screws from around the perimeter of the
stiffener.
8. Grasping the handles, gently slide the centerplane assembly straight toward you.
After the centerplane is clear of the large guide pins, the centerplane assembly will
drop slightly and rest on plastic guides on the bottom of the assembly.
9. Continue to slide the centerplane assembly straight toward you.
10. To remove the centerplane assembly from the card cage, angle the centerplane
assembly to enable the left side to exit first.
11. Place the centerplane assembly on a flat, sturdy, ESD-protected surface.
12. Carefully remove the centerplane handles.
Caution – Centerplane handle installation and removal must be done with care to
prevent possible pin damage.
Chapter 7
Centerplane Replacement Procedures
7-7
7.1.5
Installing the Centerplane Assembly Into the Card
Cage
From the front side:
1. Attach a wrist strap.
2. Carefully install the centerplane handles onto the stiffener.
Caution – Exercise caution to prevent the screwdriver from slipping and coming in
contact with the centerplane.
3. Holding the centerplane assembly by the handles, angle the centerplane assembly
to enable entry of the right side into the card cage.
4. With the plastic guides resting on the bottom rails, gently slide the centerplane
assembly toward the center of the cabinet.
5. As the centerplane assembly nears the center of the cabinet, tilt the top of the
centerplane assembly slightly away from you and firmly push forward, causing
the centerplane assembly to rise up on the plastic ramps and engage with the
alignment pins.
Confirm that no cables are trapped between the centerplane and the cabinet.
6. Partly install the 27 captive Phillips screws, then fully secure the centerplane to
the cabinet.
Alternate sides from top to bottom, left to right, as you tighten. Torque to 3.76 Nm
(33.3 inch pounds).
7. Carefully remove the centerplane handles.
Caution – Failure to remove the centerplane handles may result in system board
damage.
8. Reinstall the carrier plate that holds the control board and centerplane support
board.
Install the carrier plate in the correct position by carefully inserting the center guide
rail alignment pin into the centerplane hole. Install and tighten the six Phillips
screws.
7-8
Sun Enterprise 10000 System Service Manual • March 2002
9. Reinstall all systems boards and, if previously installed, the control board and
centerplane support board.
Use TABLE 7-1 to verify board position. When installing a board, verify that the board
top and bottom rail are inserted into the card guides. Push firmly to mate the board
connectors with the centerplane connectors.
10. Reconnect all I/O cables.
Use the I/O cable labels to verify cable position.
From the back side:
1. Attach a wrist strap.
2. Reconnect the ribbon cables on the left side of the centerplane and the power
cables on the top of the centerplane.
Use a flashlight to assist with correct placement of the connectors. Fold the ribbon
cables to enable insertion of boards.
3. Reinstall the carrier plate that holds the control board and centerplane support
board.
Install the carrier plate in the correct position by carefully inserting the center guide
rail alignment pin into the centerplane hole. Install and tighten the six Phillips
screws.
4. Reinstall all system boards, the control board, and centerplane support board.
Use TABLE 7-1 on page 2-3 to verify board position. When installing any board, verify
that the board top and bottom rail are inserted into the card guides.
5. Reinstall the top row of fan trays (FT0-FT3).
6. Reconnect all I/O cables.
Use the I/O cable labels to verify cable position.
7. Fully engage all remaining system boards.
Chapter 7
Centerplane Replacement Procedures
7-9
7.1.6
Powering on the System
1. Turn on all AC input breakers.
2. Power on the system by typing:
ssp# power -on -all
3. Replace the access doors.
4. Place the handles and old centerplane in FRU box for shipping.
5. If using SSP version 3.0, restore the system boards thermal calibration data.
See Section 9.1, “Restoring the Thermal Calibration Information Using SSP Version
3.0” on page 9-1.
6. Run diagnostics to verify operation of the system.
7.1.7
Verifying a Centerplane
All domains must be off before testing the centerplane.
1. Log in to the SSP as ssp.
When prompted for the SUNW_HOSTNAME, use the name of the domain to be tested.
2. Prepare the domains for testing by typing:
ssp% power -off -all
ssp% power -on -all
3. From the same SSP window, run POST by typing:
ssp% bringup -A off -l64
Answer y when prompted to configure the centerplane. The bring-up process can
take up to 90–180 minutes depending on system configuration. Refer to the
bringup(1M) or hpost(1M) man page for more detail.
7-10
Sun Enterprise 10000 System Service Manual • March 2002
CHAPTER
8
Mechanical Component and Cable
Replacement Procedures
8.1
Mechanical Component Replacement
8.1.1
Replacing a Styling Panel and End Panel
1. Using both hands, firmly grasp the panel on each side near the top, lift straight up
and then out away from the cabinet.
2. To replace, reverse Step 1 while aligning the top two tabs and the lower lip with
receptacles on the cabinet frame.
8.1.2
Replacing an Access Door
8.1.2.1
Removing an Access Door
1. Open the access door.
2. On the upper hinge, grasp the hinge pin and pull down to release the upper part
of the door.
3. Holding the door in a perpendicular position with respect to the cabinet, angle the
top of the access door away from cabinet while lifting the lower hinge pin up and
away from the lower hinge.
8-1
8.1.2.2
Replacing an Access Door
4. To replace, place the lower pin on the lower hinge.
5. While pulling down on the upper hinge pin, align the upper pin with the upper
hinge. Release the hinge pin to engage.
8-2
Sun Enterprise 10000 System Service Manual • March 2002
8.2
Cable Replacement
For cable identification, see Appendix A. FIGURE 8-1 and FIGURE 8-2 identify the
silkscreen numbers on the cabinet that corresponds to the cable connections. See
TABLE 8-1.
Back Power Shelf
J1
J2
J3
J4
J5
J11
J12
J6
J7
J8
J9
J10
J13
J14
J15
J16
FIGURE 8-1
Internal Cabinet Cable Connections
Chapter 8
Mechanical Component and Cable Replacement Procedures
8-3
J1
J3
J4
J5
J2
J6
J7
J8
J9
J10
J2
J8
J7
J6
J1
J5
J4
J3
J10
J9
Rear View of Back Power Shelf
FIGURE 8-2
8-4
Power Shelf Cable Connections
Sun Enterprise 10000 System Service Manual • March 2002
Rear View of Front Power Shelf
TABLE 8-1
System Interconnect Cable Chart
From
To
Function
CC-J10
PS1-J8
Sys-6/Sys-7
CC-J9
PS1-J7
Sys-4/Sys-5
CC-J8
PS1-J6
Sys-2/Sys-3
CC-J7
PS1-J5
Sys-0/Sys-1
CC-J6
PS1-J4
Ctl-0/Fan-0 (top)
CC-J5
PS2-J7
Sys-15/Ctl-1
CC-J4
PS2-J6
Sys-14/Fan-2 (top)
CC-J3
PS2-J5
Sys-12/Sys-13
CC-J2
PS2-J4
Sys-10/Sys-11
CC-J1
PS2-J3
Sys-8/Sys-9
CC-J12
PS1-J11
PS1-top AC Control
CC-J11
PS2-J11
PS2-top AC Control
CC-J16
PS1-J3
Fan-1 (Bottom)
CC-J15
PS2-J8
Fan-3 (Bottom)
CC-J14
PS1-J12
PS1-Bot AC Ctl
CC-J13
PS2-J12
PS2-Bot AC Ctl
PS1-J1
PS2-J2
PS1-PS2 Jumper Rtn
PS1-J2
PS2-J1
PS1-PS2 Jumper Rtn
PS1-J9
PS2-J10
PS1-PS2 Jumper -48V
PS1-J10
PS2-J9
PS1-PS2 Jumper -48V
Legend: (CC)-Cardcage Bulkhead, (PS1)-Power Shelf 1, (PS2)-Power Shelf 2
Chapter 8
Mechanical Component and Cable Replacement Procedures
8-5
8.2.1
Replacing Remote Power Control Cables
To hot-swap a remote power control cable, see Section 2.7.2, “Powering Off a
Remotely Controlled AC Sequencer” on page 2-12 and Section 2.7.6, “Powering On a
Remotely Controlled AC Sequencer” on page 2-18.
8.2.2
Replacing an AC Power Cord
To hot-swap an AC power cord, see Section 2.3.3, “Removing an AC Input Module”
on page 2-4.
8.2.3
Replacing an Internal Cabinet Cable
Caution – The internal cabinet cables are NOT considered hot-swappable. These
procedures require turning off the AC power to the system.
1. Systematically bring down the operating systems and then halt the domains.
2. Power off the system by typing:
ssp# power -off -all
3. Power off the breakers on the AC input modules.
4. Remove the side panel nearest to the power shelves.
See Section 8.1.1, “Replacing a Styling Panel and End Panel” on page 8-1.
5. Disconnect and remove the cable.
6. Install the new cable.
7. Reinstall the side panel.
See Section 8.1.1, “Replacing a Styling Panel and End Panel” on page 8-1.
8. Power on all AC input breakers.
9. Power on the system by typing:
ssp# power -on -all
8-6
Sun Enterprise 10000 System Service Manual • March 2002
8.2.4
Replacing an Internal Card Cage Cable
Caution – The internal card cage cables are NOT considered hot-swappable. These
procedures require turning off the AC power to the system.
1. Systematically bring down the operating systems and then halt the domains.
2. Power off the system by typing:
ssp# power -off -all
3. Power off the breakers on the AC input modules.
4. Replacing a Lower Fan Centerplane to Bulkhead Power Cable
a. Remove fan trays ft4–ft6.
b. Disconnect and remove the cable.
c. Install the new cable.
d. Reinstall fan trays.
e. Skip to Step 8.
5. Replacing the Fan Centerplane to Bulkhead Power Cable Harness
a. Remove fan trays ft0–ft3 and ft8–ft11.
b. Disconnect and remove the cable.
c. Install the new cable.
d. Reinstall fan trays.
e. Skip to Step 8.
6. Replacing a Fan Centerplane to Bulkhead Sense Cable
a. For the upper cables, remove fan trays ft0–ft2, for the lower cables, remove fan
trays ft4–ft6.
b. Disconnect and remove the cable.
c. Install the new cable.
d. Reinstall fan trays.
e. Skip to Step 8.
Chapter 8
Mechanical Component and Cable Replacement Procedures
8-7
7. Replacing a Fan Centerplane to Centerplane Cable
a. Confirm that the cables attached to CB0, SB0, and SB1 are labeled with the
SBus location number and remote power control connections.
b. In the table below, record the serial numbers and locations of SB0 and SB1.
TABLE 8-2
Component Serial Numbers
Location
Serial Number
SB0
Location
SB1
c. Disconnect the cables from CB0, SB0, and SB1.
d. Remove CB0, CSB0, SB0, and SB1.
e. Disconnect and remove the cable.
f. Install the new cable.
g. Reinstall CB0, CSB0, SB0, and SB1.
h. Reconnect all cables to CB0, SB0, and SB1.
8. Turn on all AC input breakers.
9. Power on the system by typing:
ssp# power -on -all
8-8
Sun Enterprise 10000 System Service Manual • March 2002
Serial Number
CHAPTER
9
Software Procedures
Note – All commands performed through the Hostview GUI (hostview(1M)) can
also be performed by other SSP user commands such as the power(1M) command or
the fan(1M) command.
9.1
Restoring the Thermal Calibration
Information Using SSP Version 3.0
This procedure is performed automatically by SSP version 3.1 and subsequent
compatible versions.
The system boards and centerplane contain ASICs which require thermal calibration
data in order for the SSP software to correctly report temperature data. The initial
thermal calibration of the system boards and centerplane is done during the
manufacturing process using the thermcal(1M) command. The resulting thermcal
calibration data is then written to EEPROMs resident on the boards. Once done, the
thermcal(1M) procedure need not be repeated.
The SSP software requires the correct thermal calibration data for each system board
and centerplane resident in the system. A data file containing this information is
created by the thermcal_config(1M) command. In order for this data file to be
correct, thermcal_config(1M) must be executed during SSP software installation
or when system boards or centerplanes are replaced, added, or moved to new slots.
Failure to execute this procedure in these cases will prevent the SSP software from
correctly monitoring the system's temperature which could result in the system
overheating and failure.
9-1
1. Type:
ssp% edd_cmd -x stop
This stops the edd daemon monitoring scripts.
2. Type:
ssp% thermcal_config
The thermcal_config(1M) command requires approximately 10 minutes to
complete on a system containing 16 system boards. The thermcal_config(1M)
command reads thermal data on every system board, as well as the centerplane
configured in the system, and creates a file (thermcaldata.tcl).
It is important to note any errors that the thermcal_config(1M) command
encounters when performing this operation. The $SSPVAR/adm/messages contains
additional messages related to problems the thermcal_config(1M) command
encounters. Use the following command (in a separate window) to monitor the
messages file:
ssp% tail -f $SSPVAR/adm/messages
If the thermcal_config(1M) command encounters problems while attempting to
read thermal data, you must repeat Step 2 until no errors occur.
Note – If errors of this type persist (especially for the same board), it is likely that
the board is not thermally calibrated. In this case, contact your service
representative.
3. Type:
ssp% edd_cmd -x start
This restarts edd event monitoring.
9-2
Sun Enterprise 10000 System Service Manual • March 2002
9.2
Configuring a Control Board Using SSP
Version 3.0
The following outlines the current procedure for switching from a primary (usually
control board 0) to a secondary control board. Use this procedure for the SSP 3.0
release of software.
Caution – Failure to follow these steps can result in crashed domains arbitration
stops (arbstops).
Caution – Do not edit the /var/opt/SUNWssp/.ssp_private/cb_config file
manually. Instead, use the ssp_config(1M) command described below.
1. Shut down all running host domains.
Issue the standard Solaris shutdown command for all domains that are running the
Solaris operating environment.
2. From a main SSP window, as user ssp, power off all system components except
the control boards.
ssp% power -off -all
3. Log in to the main SSP as root.
4. Obtain the host names and IP addresses for the two control boards.
5. As user root, execute the ssp_config(1M) command.
The following is a sample with snax-cb0 as the current primary control board.
After running this command, snax-cb1 is the primary control board.
Chapter 9
Software Procedures
9-3
CODE EXAMPLE 9-1
The ssp_config(1M) Command
ssp# /opt/SUNWssp/bin/ssp_config
Beginning setup of this workstation to act as a MAIN or SPARE SSP.
Platform name
= snax
Control Board 0 = snax-cb0 => 129.153.49.181
Control Board 1 = snax-cb1 => 129.153.49.182
Primary Control Board = snax-cb0
Is this correct? (y/n): n
The platform name identifies the entire host machine to
the SSP software. The platform name occupies a different
name space than domain names(hostnames of bootable systems).
Please enter the name of the platform this ssp will service [snax]:
Do you have a control board 0? (y/n): y
Please enter the host name of the control board 0 [snax-cb0]:
I could not automatically determine the IP address of snax-cb0.
Please enter the IP address of snax-cb0: 129.153.49.181
You should make sure that this host/IP address is set up properly
in the /etc/inet/hosts file or in your local name service system.
Do you have a control board 1? (y/n): y
Please enter the host name of the control board 1 [snax-cb0]:
I could not automatically determine the IP address of snax-cb1.
Please enter the IP address of snax-cb1: 129.153.49.182
You should make sure that this host/IP address is set up properly
in the /etc/inet/hosts file or in your local name service system.
Please identify the primary control board.
Is Control Board 0 [snax-cb0] the primary? (y/n) n
Is Control Board 1 [snax-cb1] the primary? (y/n) y
Platform name
Control Board 0
Control Board 1
Primary Control
= snax
= snax-cb0 => 129.153.49.181
= snax-cb1 => 129.153.49.182
Board = snax-cb1
Is this correct? (y/n): y
Are you currently configuring the MAIN SSP? (y/n) y
MAIN SSP configuration completed
9-4
Sun Enterprise 10000 System Service Manual • March 2002
6. If you have a spare SSP, perform the following.
a. Repeat Step 4 and Step 5 on the spare SSP. Remember to answer n to the
following question during ssp_config:
Are you currently configuring the MAIN SSP? (y/n) n
b. From the root window on the main SSP, reboot the SSP.
ssp# init 6
c. From the root window on the spare SSP, reboot the SSP.
ssp# init 6
d. After the main SSP reboots, log in as user ssp and invoke hostview(1M).
Note – Wait at least a minute after the SSP displays the console login prompt before
attempting the hostview command. This allows time for the SSP daemons to start.
ssp% hostview &
Verify that the J and C symbols are shown on control board 1. This indicates that the
JTAG connection and clock distribution signals are coming from control board 1.
If hostview fails to respond, use ping to verify that you can communicate with
control board 1 or visually examine the LEDs for correct operation and take
appropriate action(s) to correct the problem. For example, verify that the link
integrity LED is on, indicating a good Ethernet connection, or try running snoop on
the SSP to verify the control boards are correctly configured.
7. Issue the following power command on the main SSP to power on all system
components.
ssp% power -on -all
8. Use bringup(1M) on each domain.
Chapter 9
Software Procedures
9-5
To revert back to control board 0, repeat the procedure and specify control board 0 as
the primary. Remember to perform the appropriate steps shown above for the spare
SSP as well.
9.3
Configuring a Control Board Using SSP
Version 3.1 and Subsequent Compatible
Versions
This procedure details how to switch a primary control board to an alternate control
board. This requires updating the cb_config file to allow the ssp_config script to
execute and resetting the control board with cb_reset. Since this includes changing
clock sources to the system boards, centerplane, and centerplane support boards, all
domains must be halted and the system must be idle.
1. Log in to the SSP console as root.
2. Change to single-user mode by typing:
ssp# init S
3. Stop all SSP daemons from running by typing:
ssp# /opt/SUNWssp/bin/ssp_terminate
9-6
Sun Enterprise 10000 System Service Manual • March 2002
4. Change the control board configuration by typing:
ssp# /opt/SUNWssp/bin/ssp_config cb
The following output is a representative session of this command:
ssp# /opt/SUNWssp/bin/ssp_config cb
Configuring control boards
Platform name
Control Board 0
Control Board 1
Primary Control
= allxf1
= xf1-cb0 =>
= xf1-cb1 =>
Board = xf1-cb0
Is this correct? (y/n): n
Do you have a control board 0? (y/n): y
Please enter the host name of the control board 0 [xf1-cb0]:
Do you have a control board 1? (y/n): y
Please enter the host name of the control board 1 [xf1-cb1]:
Please identify the primary control board.
Is Control Board 0 [xf1-cb0] the primary? (y/n) y
Platform name
Control Board 0
Control Board 1
Primary Control
= allxf1
= xf1-cb0 => 129.153.49.148
= xf1-cb1 => 129.153.49.149
Board = xf1-cb0
Is this correct? (y/n):
5. Reboot the SSP.
6. Use hostview to verify that the J and C symbols are in the appropriate icon for
the new primary control board.
Chapter 9
Software Procedures
9-7
9.4
Recovering From a Hung Domain
To recover from a hung domain, you must be logged in to the SSP as user ssp with
two login sessions. Both login sessions must have their environment pointed at the
correct domain. Use the domain_status and domain_switch commands to set up
the environment. Use one session as a system console for the domain with the
netcon command. Use the other session for all SSP commands.
9.4.1
Determining If a Domain Is Hung
1. Verify that netcon responds to a carriage return and that you can ping the
domain from the SSP.
If you cannot perform these functions, you either have a system problem or a hung
domain.
■
■
Confirm a system problem by checking power status and hostview warnings.
Confirm a hung domain by issuing a telnet to the domain.
2. Use UNIX commands to determine the cause of sluggish behavior.
■
■
9.4.1.1
Use ps -elf to look for slow processes.
Use df -lk to check file system usage and to determine who are current users
and what processes they are running.
Restoring a Hung Domain
1. Issue the following SSP commands and save the output to a file:
ssp% check_host -v
ssp% hostinfo -h
2. Attempt to force the domain into OpenBoot™ PROM by typing:
ssp% sigbcmd -p[bootproc] obp
Observe netcon session activity. If you see the ok> prompt, then the sigbcmd
command was successful.
9-8
Sun Enterprise 10000 System Service Manual • March 2002
■
If the sigbcmd worked, issue the following sequence of commands.
When finished, save the contents of the window buffer to a file, or cut and paste
them to a file. This data is useful in analyzing the cause of the hang condition.
ok> ctrace
This will give you trace before going into OpenBoot PROM. Symbols will not be
available if the kernel is a nondebug kernel.
ok> .registers
This command gives you a global register dump at the time of entering OpenBoot
PROM.
ok> .locals
This command gives you a local register dump at the time of entering OpenBoot
PROM.
ok> sync
Sync issues a callback to the kernel to get a core dump. The system should dump
core and reboot after issuing this OpenBoot PROM command.
■
If the sigbcmd command did not work, attempt to force the system to panic with
the hostint command on the SSP.
■
If the hostint command does not work, try a sigbcmd -p[bootproc] panic.
This is a more forceful version of the hostint command.
3. When all else fails, issue a bringup command to restore the domain to operation.
Chapter 9
Software Procedures
9-9
9.5
Upgrading the CBE Flash PROM on the
Control Board Using SSP Version 3.1 and
Subsequent Compatible Versions
This procedure can only be used with SSP version 3.1.
1. Install the CBE SSP patch.
Search the SunSolve database for the latest patch information.
2. Log in to the SSP as user ssp.
When prompted for the SUNW_HOSTNAME, use either the platform name or the name
of an existing domain.
3. Open a netcon session to the domain in another window.
4. Log in to the domain as root.
5. Notify users that the system is going down.
6. Halt the system using the appropriate Solaris commands.
The basic command for halting the system should be shutdown(1M). Refer to the
man page for options and other considerations. For example:
# cd /
# shutdown -i0 -g0 -y
7. Wait for the system-halted message and the OpenBoot PROM >ok prompt to be
displayed on the netcon console window.
8. Repeat on each domain before proceeding.
9. On the SSP, power off all of the system boards by typing:
ssp:domain# power -off -all
9-10
Sun Enterprise 10000 System Service Manual • March 2002
10. On the SSP console, log in as root and type:
ssp# /opt/SUNWssp/bin/ssp_config
Beginning setup of this workstation to act as a MAIN or SPARE SSP.
Platform name
Control Board 0
Control Board 1
Primary Control
= allxf4
= xf4-cb0 =>
= xf4-cb1 =>
Board = xf4-cb0
Are you currently configuring the MAIN SSP? (y/n) y
MAIN SSP configuration completed
The flash_boot.ima file and the cbe.ima file are copied into /tftpboot.
11. Type:
ssp# exit
ssp% cb_reset
Resetting host e10000-cb0...
Resetting host e10000-cb1...
12. Wait for daemons to reconnect.
Monitor /var/opt/SUNWssp/adm/messages for the following message before
proceeding:
Jun 22 11:56:46 xf4-ssp (SUNW_HOSTNAME: allxf4) actionsysclock: Fan Speed being set.
Jun 22 11:57:03 xf4-ssp (SUNW_HOSTNAME: xf4-b2) actionsysclock: System clock being set.
13. Type:
ssp% cb_prom -e
cb_prom: Erase PROM
cb_prom: Erase complete
Chapter 9
Software Procedures
9-11
14. Type:
ssp# cd /tftpboot
ssp% cb_prom -p flash_boot.ima
cb_prom: Program PROM with file flash_boot.ima...
cb_prom: Program complete.
15. Type:
ssp% cb_reset
Resetting host e10000-cb0...
Resetting host e10000-cb1...
16. Check that the /var/opt/SUNWssp/adm/messages file shows the new PROM
version:
Mar 12 14:44:51 e10000-cb0 cbe: cbe: NOTICE: MT! initiated
Prom Version = 3.47
17. Configure the other control board as primary.
See Section 9.3, “Configuring a Control Board Using SSP Version 3.1 and Subsequent
Compatible Versions” on page 9-6.
18. Reboot the SSP.
ssp# init 6
19. Log in to the SSP as user ssp.
When prompted for the SUNW_HOSTNAME, use either the platform name or the name
of an existing domain.
20. Repeat Step 10 through Step 16.
21. Reconfigure the original primary control board as the current primary control
board.
See Section 9.3, “Configuring a Control Board Using SSP Version 3.1 and Subsequent
Compatible Versions” on page 9-6.
9-12
Sun Enterprise 10000 System Service Manual • March 2002
9.6
Changing the Clock Multiplier
Use this procedure when changing to different speed processor modules. To upgrade
from a 250MHz processor module to a 336MHz processor module, the clock
multiplier must change from 3:2 to 2:1. To do this, all domains must be down and
the new processors installed onto the system board.
1. Change the multiplier value by typing:
ssp% sys_clock -p two-to-one -s
This updates the ssp_resource file.
Caution – Do not run the sys_clock command with any of its command-line
options on a running system.
2. Check the multiplier value by typing:
ssp% sys_clock
Chapter 9
Software Procedures
9-13
9-14
Sun Enterprise 10000 System Service Manual • March 2002
APPENDIX
A
Illustrated Parts Breakdown
The illustrations and tables in this appendix supplement the removal and
replacement procedures described in previous chapters.
Part numbers in this section might differ from those found in your system. Before
ordering replacement parts, find the label on the part to be replaced and place your
order using that number. Be sure you select the right part number for the entire
assembly instead of the individual components.
Note – For information about additional capacity drives and other replacement
options, contact your sales representative.
A-1
A.1
List of Components
AC input module
48-volt power
Disk trays or filler panels
(located on opposite side)
AC power sequencer
Circuit breakers
Fan trays
System boards
Centerplane support board
Control board
Fan trays
Air filters
Processor cabinet
(includes disk)
FIGURE A-1
A-2
System Components
Sun Enterprise 10000 System Service Manual • March 2002
TABLE A-1
List of Replaceable Components (1 of 3)
General Category
Description
Part Number
Page
Cabinet
Access panel - left
Call for PN
page A-7
Access panel - right
Call for PN
page A-7
Styling panel
Call for PN
page A-7
End panel
Call for PN
page A-7
Centerplane assembly
F501-4348
page A-8
System board assembly
F501-4903
page A-8
Control board assembly
F501-4345
page A-8
Centerplane support board assembly
F501-4346
page A-8
Control board filler panel assembly
F540-3064
page A-8
System board filler panel assembly
F540-3063
page A-8
I/O module assembly for SBus support
F501-4478
page A-9
SBus filler panel
340-1763-04
page A-9
Memory module assembly
F501-4776
page A-9
DIMM module (32 Mbyte)
F501-2653
page A-9
DIMM module (128 Mbyte)
F501-2654
page A-9
Processor modules
2530A
page A-9
PCI I/O module
F501-4830
page A-10
5.0-volt riser card
F501-4777
page A-10
3.3-volt riser card
F501-4778
page A-10
PCI filler panel
240-2391-01
page A-10
Customer service accessory kit
565-1398
N/A
Board Assemblies
System Board
Components
Miscellaneous
Appendix A
Illustrated Parts Breakdown
A-3
TABLE A-1
List of Replaceable Components (2 of 3)
General Category
Description
Part Number
Page
SBus Boards
SCSI, fast/wide, diff. (DWIS/S - isp)
1062A
N/A
SCSI, fast/wide, single (SWIS/S - isp)
1063A
N/A
SCSI/Ethernet, diff. (DSBE/S - esp)
1052A
N/A
SCSI/Ethernet, single, (FSBE/S - esp)
1053A
N/A
SunSwift SBus adapter (fas/hme)
1018A
N/A
Ultra SCSI RAID controller
6536A
N/A
SBus Fibre Channel Card (SOCHA)
1057A
N/A
Quad Ethernet (SQEC)
1058A
N/A
Sun FastEthernet 2.0, 10/100 (hme)
1059A
N/A
SunFDDI SAS (5.0)
1025A
N/A
SunFDDI DAS (5.0)
1026A
N/A
SunATM 2.0 - 155, fiber
1060A
N/A
SunATM 2.0 - 155, UTP
1061A
N/A
SunATM-622 MFiber
1064A
N/A
SunISDN
1012A
N/A
Token ring (tr)
1014A
N/A
Serial (HSI/S)
1019A
N/A
Control Board
Components
Mezzanine board
Call for PN
page A-11
SIMM module
Call for PN
page A-11
System Power
Components
Power shelf assembly (left)
F540-3060
page A-12
Power shelf assembly (right)
F540-3069
page A-12
AC input module assembly
F540-3441
page A-12
Power supply, 48 VDC
F300-1368
page A-12
Circuit breaker assembly, DC distribution
F140-2901
page A-12
AC sequencer
F300-1290
page A-13
AC sequencer power cord
F530-2265
page A-13
Remote power control module assembly with
cable
F540-3440
page A-13
Peripheral Power
Components
A-4
Sun Enterprise 10000 System Service Manual • March 2002
TABLE A-1
List of Replaceable Components (3 of 3)
General Category
Description
Part Number
Page
Cooling Components
Fan centerplane
F501-4365
page A-14
Fan tray assembly
F540-3409
page A-14
Fan tray filler panel
F540-3075
page A-14
Peripheral filler panel
Call for PN
page A-14
Air filter, card cage
F370-2845
page A-14
Remote power control module to control board,
5 feet (1524 mm)
F530-2401
page A-15
Remote power control module to control board,
10 feet (3048 mm)
F530-2400
page A-15
Remote power control module to AC sequencer,
20 feet (6096 mm)
F530-2403
page A-15
Remote power control module to AC sequencer,
20 inches (508 mm)
F530-2402
page A-15
AC power cord, U.S.A., 20.0 feet (610 cm)
F530-2379
page A-16
AC power cord, European, 20.0 feet (610 cm)
F530-2380
page A-16
Cable, internal to cabinet, card cage bulkhead to
power shelf, orange, power, 50 inches (1270
mm)
F530-2393
page A-17
Cable, internal to cabinet, card cage bulkhead to
power shelf, orange, power, 24 inches (610 mm)
F530-2392
page A-17
Cable, internal to cabinet, primary to secondary
power shelf, 12 inches (305 mm)
F530-2391
page A-17
Internal cable, power shelves to bulkhead,
power control (sense), 52 inches (1322 mm)
F530-2395
page A-18
Internal cable, power shelves to bulkhead,
power control (sense), 36.02 inches (915 mm)
F530-2394
page A-20
Cable, internal card cage, power, lower fan
centerplane to bulkhead, 10.0 inches (254 mm),
quantity 1
F530-2399
page A-18
Cable, internal card cage, fan centerplane to
bulkhead, quantity 1
F530-2396
page A-19
Cable, internal card cage, fan centerplane to
bulkhead, 22.0 inches (559 mm), quantity 4
F530-2398
page A-20
Cable, internal card cage, fan centerplane to
centerplane, 22.0 inches (559 mm), quantity 4
F530-2397
page A-20
Cables
Appendix A
Illustrated Parts Breakdown
A-5
TABLE A-2
Optional Components List
Marketing Number
Part Number
Description
X2720A
595-4619-011
Control board
X2731A
605-1603-01
PCI option
X2730A
595-4620-01
SBus I/O module
X2750A
X2752A
SSP
X2760A
595-4621-01
System board
X3850A
595-4622-01
X3851A
595-4623-01
European power cord
X3875A
595-4624-01
AC input module
X7025A
595-4625-01
Memory module
X9671A
595-4626-01
Fan tray
X9681A
595-4627-01
Remote power control module
X9685A
595-4628-01
48 VDC power supply
1. Revisions are current as of 6/11/98
A-6
Sun Enterprise 10000 System Service Manual • March 2002
U.S.A. power cord
A.2
Illustrated Parts Breakdown
FIGURE A-2
Sun Enterprise 10000 Cabinet
End Panel
Access Panel - Right
Access Panel - Left
Styling Panel
Description
Part Number
Access panel - left
Call for PN
Access panel - right
Call for PN
Styling panel
Call for PN
End panel
Call for PN
Appendix A
Illustrated Parts Breakdown
A-7
FIGURE A-3
Board Assemblies
Centerplane
System Board
Centerplane Support Board
Control Board
A-8
Description
Part Number
Centerplane assembly
F501-4348
System board assembly
F501-4903
Control board assembly
F501-4345
Centerplane support board assembly
F501-4346
Control board filler panel assembly
F540-3064
System board filler panel assembly
F540-3063
Sun Enterprise 10000 System Service Manual • March 2002
System Board and SBus Components
FIGURE A-4
System Board
I/O Module
SBus Module
Memory Module
DIMMs
Processor Module
Description
Part Number
I/O module assembly for SBus support
F501-4478
Memory module assembly
F501-4776
DIMM module (32 Mbyte)
F501-2653
DIMM module (128 Mbyte)
F501-2654
Processor modules
2530A
SBus filler panel
340-1763-04
Appendix A
Illustrated Parts Breakdown
A-9
FIGURE A-5
PCI Components
System board
Personality
plate
PCI filler panel
PCI card
PCI front
bracket
PCI front cover
PCI I/O module
Top PCI riser card
Bottom PCI riser card
A-10
Description
Part Number
PCI I/O module
F501-4830
5.0-volt riser card
F501-4777
3.3-volt riser card
F501-4778
PCI filler panel
240-2391-01
Sun Enterprise 10000 System Service Manual • March 2002
FIGURE A-6
Control Board Components
SIMM
Mezzanine module
Description
Part Number
Mezzanine board
Call for PN
SIMM module
Call for PN
Appendix A
Illustrated Parts Breakdown
A-11
FIGURE A-7
System Power Components
AC Input module
48 VDC power supply
A-12
Description
Part Number
Power shelf assembly (left)
F540-3060
Power shelf assembly (right)
F540-3069
AC input module assembly
F540-3441
Power supply, 48 VDC
F300-1368
Circuit breaker assembly, DC distribution
F150-2901
Sun Enterprise 10000 System Service Manual • March 2002
FIGURE A-8
Peripheral Power Components
AC sequencer
Remote power control module
Description
Part Number
AC sequencer
F300-1290
AC sequencer power cord
F530-2265
Peripheral filler panel
Call for PN
Remote power control module assembly
with cable
F540-3440
Appendix A
Illustrated Parts Breakdown
A-13
FIGURE A-9
Cooling Components
Fan Centerplane
Fan Tray
A-14
Description
Part Number
Fan centerplane
F501-4365
Fan tray assembly
F540-3409
Fan tray filler panel
F540-3075
Air filter, card cage
F370-2845
Sun Enterprise 10000 System Service Manual • March 2002
FIGURE A-10
Remote Power Control Cable
Pin 1
Socket 1
Connector A
Connector B
Description
Part Number
Remote power control module to control
board, 5 feet (1524 mm)
F530-2401
Remote power control module to control
board, 10 feet (3048 mm)
F530-2400
FIGURE A-11
Sequencing Cable
Socket 1
Pin 1
Connector A
Connector B
Description
Part Number
Remote power control module to AC
sequencer, 20 feet (6096 mm)
F530-2403
Remote power control module to AC
sequencer, 20 inches (508 mm)
F530-2402
Appendix A
Illustrated Parts Breakdown
A-15
FIGURE A-12
Domestic Power Cord
P2
P1
P3
Description
Part Number
AC power cord, U.S.A., 20.0 feet (610 cm)
F530-2379
FIGURE A-13
European Power Cord
P2
P1
P3
A-16
Description
Part Number
AC power cord, European, 20.0 feet
(610 cm)
F530-2380
Sun Enterprise 10000 System Service Manual • March 2002
FIGURE A-14
Pin 1
Card Cage Power Cable
P1
P2
Pin 1
Description
Part Number
Cable, internal to cabinet, card cage
bulkhead to power shelf, orange, power,
50 inches (1270 mm)
F530-2393
Cable, internal to cabinet, card cage
bulkhead to power shelf, orange, power,
24 inches (610 mm)
F530-2392
FIGURE A-15
Pin 1
Power Cross-over Cable
P1
P2
Description
Part Number
Cable, internal to cabinet, primary to
secondary power shelf, 12 inches (305 mm)
F530-2391
Appendix A
Pin 1
Illustrated Parts Breakdown
A-17
FIGURE A-16
Card Cage Power Control (Sense) Cable
Pin 1
P1
P2
Pin 1
Description
Part Number
Internal cable, power shelves to bulkhead,
power control (sense), 52 inches (1322 mm)
F530-2395
Internal cable, power shelves to bulkhead,
power control (sense), 36.02 inches (915
mm)
F530-2394
FIGURE A-17
Pin 1
Lower Fan Power Cable
Pin 1
J12
J11
P1
A-18
Description
Part Number
Cable, internal card cage, power, lower fan
centerplane to bulkhead, 10.0 inches (254
mm), quantity 1
F530-2399
Sun Enterprise 10000 System Service Manual • March 2002
Pin 1
FIGURE A-18
J1
Centerplane and Upper Fan Power Cable
Front
Pin 1
J2
J3
J4
P75
J5
J6
P51
P52
P53
P54
P55
P56
P57
P58
Pin 1
J7
Pin 1
Pin 1
J8
Pin 1
J9
J10
Back
Description
Part Number
Cable, internal card cage, fan centerplane to
bulkhead, quantity 1
F530-2396
Appendix A
Illustrated Parts Breakdown
A-19
FIGURE A-19
Fan Sense Cable
P1
P2
Stripe
Pin 1
Pin 1
Description
Part Number
Cable, internal card cage, fan centerplane to
bulkhead, 22.0 inches (559 mm), quantity 4
F530-2398
FIGURE A-20
Fan Signal Cable
P1
P2
Pin 1
A-20
Stripe
Description
Part Number
Cable, internal card cage, fan centerplane to
centerplane, 22.0 inches (559 mm),
quantity 4
F530-2397
Sun Enterprise 10000 System Service Manual • March 2002
Pin 1
Glossary
arbstop
ASIC
autoconfig
BBSRAM
BDA
Centerplane
Centerplane support
board
CIC
CLM
Control board
Correctable Error
CSR
Degraded mode
Arbiter stop condition.
Application Specific Integrated Circuit
Automatic configuration of the SSP’s JTAG scan database.
Bootbus SRAM
Board Descriptor Array
A double-sided backplane where eight system boards, one centerplane support
board, and one control board connect perpendicular into each side.
Board that connects into the centerplane and supplies clocks, JTAG, and
control functions for one-half of the centerplane. Normally, two centerplane
support boards are used; each connecting into opposite sides of the
centerplane.
Coherency Interface Controller. Handles coherency transactions for the three
port controllers on a board. Connects to one of four global address buses.
Snoops for one quarter of the address space.
Centerplane Loopback Mode
Board that connects into the centerplane and provides the system’s JTAG,
clock, fan, power, serial interface, and Ethernet interface functions.
Any error that can be corrected so that processing can continue with no loss of
data. This includes automatic correction by hardware, algorithmic correction
by software, and correction by hardware with software intervention.
Correctable errors are all hardware-initiated.
Control and Status Register
Mode in which only half of the centerplane is in use (72 bits of data, two
address buses, and one centerplane support board).
Glossary-1
Domain
DR
Dtags
ECC
Externally Initiated
Reset (XIR)
Fatal Error
Dynamic Reconfiguration
Duplicate tags. Three SRAMs attached to each coherent interface controller
provide coherency information that duplicates that maintained in each
UltraSPARC processor module. This off-loads coherency snooping from the
processor.
Error Correction Code
Refer to XIR
A class of unrecoverable error that necessitates that the system be rebooted;
may be hardware- or software-initiated. This type of unrecoverable error
results in an arbiter stop condition which requires SSP interaction.
GAARB
Global Address Arbiter. Arbitrates for a global address bus. Implemented by a
Sun Enterprise 10000 arbiter chip.
GAB
Global Address Buses. Four 16:16, 48-bit wide multiplexers that connect
together a coherent interface controller from each system board. The
multiplexers broadcast one of the inputs to all the outputs. Implemented by 16
XMUX ASICs. Functions like a snoopy bus for coherency purposes, but is
really a point-to-point address router.
GDARB
GDR
Host name
I/O module
JBC
JTAG
LAARB
LAR
Glossary-2
A set of one or more system boards that act as a separate system capable of
booting and running the Solaris operating environment and independently of
any other domains.
Global Data Arbiter. Arbitrates for the global data router’s 16x16 crossbar.
Global Data Router. Sixteen 16:1, 144-bit wide multiplexers that connect
together the local data routers on each system board. Implemented by 12
XMUX ASICs.
Another term for domain name. Short for the environment variable
SUNW_HOSTNAME which is used to instruct SSP commands which domain the
command is intended for.
A daughter card containing two SYSIO chips. Each SYSIO controls an SBus,
and has sockets for two SBus cards and an embedded SCSI and Ethernet
interface.
JTAG Board Controller
The IEEE 1149.1 serial scan interface, named for the Joint Test Action Group
that originally developed it.
Local Address Arbiter. Arbitrates for the local address router.
Local Address Router. Four bidirectional 3:1 multiplexors that connect the
three local address buses to four coherency interface controllers. Implemented
inside the four coherency interface controllers on each board.
Sun Enterprise 10000 System Service Manual • March 2002
LBIST
Logic Built-in Self-test
LDARB
Local Data Arbiter. Arbitrates for the local data router.
LDMUX
Local Data MUX. One mode of the XMUX.
LDR
Local Data Router. Two unidirectional 144-bit-wide 4:1 multiplexers that
connect the four UPA databuses on a system board with the global data router.
Implemented by four XMUX ASICs per system board.
MC
Memory Controller chip. Accepts memory addresses from the four coherency
interface controllers, and data from the data buffer (XDB), and performs
reading and writing of 64-byte blocks of data into one to four banks of
memory.
Memory bank
Memory module
NPB
POST
PC
PCS
Platform
PUP
RED_state Trap
(REDMODE)
SIR
512-data bits, plus 64-ECC bits, made up of eight DIMMs.
A daughter card containing 32 DIMMs.
Non-Processor Board
Power-on self-test.
Port Controller ASIC. Interfaces UPA modules to the Sun Enterprise 10000
system. The PC controls address flow between the UPA port and the four
coherency interface controllers, and controls data flow between the UPA port
and the data buffer (XDB).
POST Controller and Sequencer. The SSP-resident component of POST.
The platform name is a logical name given to a Sun Enterprise 10000 system. A
platform name does not correspond to any host on the network.
Pack/Unpack. A mode of the XMUX ASIC used on the memory module.
A SPARC v9 processor takes a trap at an offset 0xa0 (PA = 0x1ff f000 00a0)
when processor reset or trap occurs and TL is at MAX_TL -1 or system
software sets PSTATE.RED to 1.
Software Initiated Reset. A software initiated reset is initiated by a SIR
instruction within any processor. This pre-processor reset has a trap type 4 at
physical address offset 0x80 (PA = 0x1ff f0000 0080).
SMD
Shared Memory Domain
SOC
Serial Optical Channel. Connects two Fibre Channels to an SBus.
SSP
System board
System Service Processor. A networked SPARCstation™ from which the
system is booted and diagnosed.
A large circuit board containing a memory module, four UltraSPARC processor
modules, and two I/O modules.
Glossary-3
System clock
System Controller
(SC)
The interconnect clock. It is centrally distributed to all UPA ports and within
the interconnect.
The central controller in the interconnect. It orchestrates the cache coherency,
data flow, flow control and memory operations.
UDB
UltraSPARC Data Buffer. Two chips that connect the UltraSPARC-I processor
and its external cache to the 144-bit wide UPA port.
UPA
Multiprocessor Ultra Port Architecture. UPA refers to the module interface
which plugs into the interconnect. The UPA module may contain a processor,
or it may contain an I/O controller, graphics device and so on.
Uncorrectable Error
Same as Unrecoverable Error.
Unrecoverable Error
An error which cannot be corrected through hardware or software action. Error
detected by the hardware indicating that data has been lost. This type of error
is fatal and results in an arbiter stop condition.
Watchdog Reset
(WDR)
XBAR
XDB
XARB
XIR
XMUX
Glossary-4
A SPARC V9 processor signals itself internally to take a Watchdog Reset
(WDR) trap at physical address offset 0x40 (PA = 0x1ff f0000 0040) when a trap
occurs and TL is at MAX_TL.
Data Crossbar. An application of the XMUX on the centerplane.
Data Buffer chip. Buffers cache lines that are in transit between a UPA data
port or a memory bank and the local data router.
Arbiter Chip. Has modes to implement three functional units: the local address
arbiter, the local data arbiter, and the global address arbiter.
Externally Initiated Reset. An externally initiated reset is sent to the CPU by
the XIR pin. It causes a SPARC V9 XIR which has a trap type 0x3 at physical
address offset 0x60 (PA = 0x1ff f000 0060).
Multiplexer chip. Has modes to implement four functional units: the global
address router, the local data router, the global data router, and the 144/576-bit
wide pack/unpack on the memory module.
Sun Enterprise 10000 System Service Manual • March 2002
Index
A
AC input module
installing, 2-4
powering off, 2-2
powering on, 2-4
removing, 2-4
replacement, 2-2 to 2-4
AC sequencer
installing, 2-12
powering off, 2-12
powering on, 2-18
removing, 2-12
replacement, 2-11 to 2-18
air filter
replacement, 2-21
assembly drawing See illustrated parts breakdown
autoconfig, 1-3, 1-4, 1-13, 3-12, 3-13, 4-7, 4-16, 5-8,
5-11
B
board insertion, 1-10
breaker, DC
replacement, 2-9 to 2-11
C
cable connections, 8-2
power shelf, 8-3
cables
internal to cabinet
card cage power, A-17
card cage power control (sense), A-18
power cross-over, A-17
internal to card cage
centerplane and upper power, A-19
fan sense, A-20
fan signal, A-20
lower fan power, A-18
power cord (domestic), A-16
power cords (European), A-16
remote power control cables, A-15
replacement, ?? to 7-9, 8-2 to ??
internal to cabinet, 8-5
internal to card cage, 8-6
power cords, 8-5
remote power control cables, 8-5
sequencing, A-15
cache size, processor module configuration, 1-3
caution
power, 1-1
removing components, 1-2
yellow LED, 1-2
centerplane
installing, 7-8
removing, 7-5
replacement, 7-1 to 7-10
centerplane support board
configuration, 1-3
installing, 6-2
powering off, 6-2
powering on, 6-3
removing, 6-2
replacement, 6-1 to 6-3
circuit breaker
installing, 2-10
Index-1
removing, 2-9
component number
back, 1-21
system board, 1-22
component numbering, 1-14
front, 1-20
configuration, 1-3
centerplane support board, 1-3
disk trays, 1-3
internal I/O, 1-3
memory, 1-3
processor module cache size, 1-3
processor module speed, 1-3
configuration, power and cooling for less than or
more than 8 system boards, 1-3
control block diagram, 1-26
control board
installing, 3-7
powering off, 3-5
powering on, 3-7
removing, 3-6
replacement, 3-1 to 3-7
control board, redundant, 1-3
D
designators See component numbering
disk trays, configuration, 1-3
dr(1M), 1-1, 1-2
drawing, assembly See illustrated parts breakdown
H
hostview(1M), 1-1, 1-2
hot swap procedure, 1-1
hpost(1M), 1-4
I
I/O, internal configuration, 1-3
illustrated parts breakdown, A-1 to A-20
inserting a board, 1-10
installing
AC input module, 2-4
AC sequencer, 2-12
cables, ?? to 7-9, 8-2 to ??
centerplane, 7-8
centerplane support board, 6-2
circuit breaker, 2-10
control board, 3-7
fan centerplane, 6-4
fan tray, 2-19
memory, 5-4
memory module, 5-6
PCI components, 4-7
PCI I/O module, 4-13
power shelf, 2-8
power supply, 48-volt, 2-5
processor module, 5-9
SBus card, 4-2
SBus I/O module, 4-5
system board, 3-10
interconnect diagram, 1-28
F
fan centerplane
installing, 6-4
removing, 6-4
replacement, 6-4 to ??
fan tray
installing, 2-19
powering off, 2-18
powering on, 2-20
removing, 2-19
replacement, 2-18 to 2-20
fan(1M), 1-1
field replaceable units (FRUs), 1-13
filler panel
SBus card, 4-3, 4-11
Index-2
M
memory
configuration, 1-3
installing, 5-4
removing, 5-2
replacement, 5-2
memory module
installing, 5-6
removing, 5-4
replacement, 5-4
mezzanine boards
replacement, 5-8 to 5-11
MTTR of FRUs, 1-13
Sun Enterprise 10000 System Service Manual • March 2002
replacement, 5-8
N
numbered components, 1-14
R
P
panels
replacement, 8-1
parts, illustrated See illustrated parts breakdown
PCI components
installing, 4-7
PCI I/O module
installing, 4-13
removing, 4-12
replacement, 4-12
power
caution, 1-1
power shelf
installing, 2-8
removing, 2-6
replacement, 2-6 to ??
power supply, 48-volt
installing, 2-5
powering off, 2-5
powering on, 2-6
removing, 2-5
replacement, 2-5 to 2-6
power(1M), 1-1, 1-2
powering off
AC input module, 2-2
AC sequencer, 2-12
centerplane support board, 6-2
control board, 3-5
fan tray, 2-18
power supply, 48-volt, 2-5
system, 7-4
system board, 3-9
powering on
AC input module, 2-4
AC sequencer, 2-18
centerplane support board, 6-3
control board, 3-7
fan tray, 2-20
power supply, 48-volt, 2-6
system, 7-9
system board, 3-11
processor module
installing, 5-9
removing, 5-8
redundant control board, 1-3
removing
AC input module, 2-4
AC sequencer, 2-12
cables, ?? to 7-9, 8-2 to ??
centerplane, 7-5
centerplane support board, 6-2
circuit breaker, 2-9
control board, 3-6
fan centerplane, 6-4
fan tray, 2-19
memory, 5-2
memory module, 5-4
PCI I/O module, 4-12
power shelf, 2-6
power supply, 48-volt, 2-5
processor module, 5-8
SBus card, 4-1
SBus card filler panel, 4-3, 4-11
SBus I/O module, 4-4
system board, 3-10
removing component, caution, 1-2
replacement
AC input module, 2-2 to 2-4
AC sequencer, 2-11 to 2-18
air filter, 2-21
breaker, DC, 2-9 to 2-11
cables, ?? to 7-9, 8-2 to ??
centerplane, 7-1 to 7-10
centerplane support board, 6-1 to 6-3
control board, 3-1 to 3-7
fan centerplane, 6-4 to ??
fan tray, 2-18 to 2-20
memory, 5-2
memory module, 5-4
mezzanine boards, 5-8 to 5-11
panels, 8-1
PCI I/O module, 4-12
power shelf, 2-6 to ??
power supply, 48-volt, 2-5 to 2-6
processor module, 5-8
SBus card, 4-1
SBus I/O module, 4-4
SSP, 2-1
Index-3
system board, 3-8 to 3-12
rules, configuration, 1-3
S
SBus card
filler panel, 4-3, 4-11
installing, 4-2
removing, 4-1
replacement, 4-1
SBus I/O module
installing, 4-5
removing, 4-4
replacement, 4-4
SBUS x SLOT x, 1-17
SBx, 1-15
SBx.x.x, 1-15, 1-17
speed, processor module configuration, 1-3
SSP
replacement, 2-1
SunVTS, 1-4
SunVTS(1M), 1-4
sysbdx, 1-15, 1-17
system
powering off, 7-4
powering on, 7-9
system board
installing, 3-10
powering off, 3-9
powering on, 3-11
removing, 3-10
replacement, 3-8 to 3-12
T
testing, 1-4
thermal calibration, 3-12, 9-1
torque settings
general, 1-11
Index-4
Sun Enterprise 10000 System Service Manual • March 2002