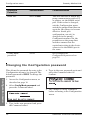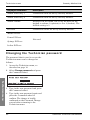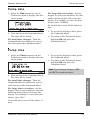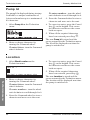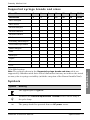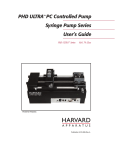
1
Syringe Pump
Technical User
Manual
Published by Graseby Medical Limited.
All possible care has been taken in the preparation of this publication, but
Graseby Medical Limited accepts no liability for any inaccuracies that may be
found.
Graseby Medical reserves the right to make changes without notice both to this
publication and to the product which it describes.
Copyright © 2004 Graseby Medical Limited
No part of this publication may be reproduced, transmitted, transcribed, or stored
in a retrieval system or translated into any human or computer language in any
form or by any means without the prior permission of Graseby Medical Limited.
GRASEBY MEDICAL LIMITED
Colonial Way,
Watford,
Hertfordshire,
United Kingdom,
WD24 4LG
Telephone:
Facsimile:
+44 (0)1923 246434
+44 (0)1923 231595
http://www.smiths-medical.com
Registered in England. Company number 995550
Trademarks and acknowledgements:
“Graseby”; “Smiths”; “omnifuse”; “omnistack”;
trademarks of the Smiths Group plc.
and “Flo-Safer” are all
All other trademarks are acknowledged as the property of their respective owners.
Graseby Medical Ltd.
This manual contains technical
information to enable authorised
personnel to configure an Omnifuse
pump.
Configuration menu
The manual includes the following
sections:
Covers all the parameters in the
Configuration menu and explains how to
set configuration and clinician
passwords. Describes how to access
pump history.
Warnings and Cautions
Technician menu
This gives a list of Warnings and
Cautions which you must be aware of
before using the pump. These are
repeated on the relevant pages in the
manual.
Describes the Technician menu, giving
step-by-step instructions for setting the
technician password, pump date and
time and the Pump Id and Location.
Setup
This lists the specifications for the
Omnifuse pump and the standards with
which it complies.
Explains how to carry out initial checks,
describes all the functions that are tested
on power-up and outlines the acceptance
tasks that may be carried out.
Note: For complete operating
instructions, refer to the Omnifuse
Instruction Manual (part number
0151-0839).
Omnifuse Technical User Manual
Specifications and Standards
Using this manual
Using this manual
Warnings/Cautions
Graseby Medical Ltd.
Warnings/Cautions
Using this manual
Warnings
Warnings details dangerous conditions
that could lead to death or serious injury
to the user or patient, that can occur if
the instructions in this manual are not
obeyed.
1.
2.
WARNING: To avoid over- or under- infusion,
always verify that the brand and size of the
loaded syringe are the same as the brand and
size displayed on the screen before starting an
infusion. Failure to do so may result in an
inaccurate delivery of medication, resulting in
patient injury or death.
WARNING: To avoid incorrect or inappropriate
configuration of the pump, the Configuration
must only be selected by qualified persons or
authorised personnel. Incorrect pump
configuration could lead to inappropriate
infusion resulting in patient injury or death.
3.
WARNING: This equipment is not suitable for
use in the presence of flammable
anaesthetics, oxygen-enriched or explosive
atmospheres. The use of the device in such
atmospheres may lead to explosion or fire.
4.
WARNING: To avoid possible malfunction of
the pump, do not expose the pump to X- rays,
gamma rays or ionizing radiation, or to the RF
interference or strong electric/magnetic fields
emitted (for example) by diathermy equipment
or mobile telephones. If the pump is used in
the presence of, or in combination with
Magnetic Resonance Imaging (MRI) machines
it must be protected from the magnetic field
emitted by such equipment. Malfunction of the
pump can cause incorrect infusion or loss of
infusion resulting in patient injury or death.
5.
6.
7.
WARNING: Operation of the pump outside the
temperature limits defined in the specification
may result in erroneous operation. Ensure that
the temperature is within the specified limits.
Failure to do so may result in patient injury or
death.
WARNING: In order to ensure that the
intended infusion is performed, data must be
entered correctly. Before confirming any
displayed data the user should ensure that it
is correct. Failure to do so may result in
compromised function of the product, patient
injury or death.
WARNING: Failure to follow the Maintenance
Procedures described in Chapter 2 of the
Omnifuse Service Manual may result in
compromised function of the product and lead
to patient injury or death.
8.
WARNING: It is essential that clinical staff
remain within visual and audible range of the
pump so that they can respond promptly to
critical alarms. Failure to respond promptly to
an alarm may result in patient injury or death.
9.
WARNING: The user should ensure that the
performance offered by the pump is fit for the
intended purpose. Failure to do so may result
in compromised function of the product,
patient injury or death.
10. WARNING: When the pump is carrying out an
infusion, to ensure that electrical safety is
maintained only items of equipment that
conform to EN60950 are to be connected to
the RS232 connector situated at the base of
the pump, otherwise patient safety may be
compromised.
11. WARNING: While Graseby Medical Limited
have taken all reasonable steps to ensure that
the pump operates correctly while under
remote control, it is the responsibility of the
person who designs and implements the
controlling device to ensure that the resulting
system (pump and controlling device) is fit for
its intended purpose. Failure to do so may
result in compromised function of the product,
patient injury or user injury.
12. WARNING: Do not use a faulty pump. If the
pump detects a fault, a continuous alarm will
sound and the screen will display a System
Fault message. If this happens, switch the
pump off, disconnect it from the mains and
take it to a suitably qualified engineer.
Incorrect performance of the pump can cause
complications resulting in patient injury or
death.
13. WARNING: Failure to use the mains lead
supplied with the pump will compromise the
pump’s ability to resist fluid ingress, resulting
in possible user or patient injury or death.
14. WARNING: Correct management of battery
charging is essential to ensure that the pump
can operate on batteries for the time specified.
Failure to do so may lead to impaired
functioning of the pump, resulting in patient
injury or death.
15. WARNING: The occlusion alarm level must be
checked before starting an infusion to ensure
that it is appropriate for that infusion. Failure
to do so may result in an unacceptably slow
time to occlusion alarm, resulting in patient
injury or death.
Omnifuse Technical User Manual
Warnings/Cautions
16. WARNING: If an occlusion alarm occurs,
immediately clamp the line to eliminate the
possibility of a bolus being delivered to the
patient. Then inspect the fluid pathway for
kinks, clogged catheter, etc. in order to
remove the occlusion prior to restarting the
infusion. An unintentional bolus of medication
can result in patient injury or death.
23. WARNING: To avoid syphoning of the syringe
contents (free flow), ensure that the syringe is
correctly loaded into the pump, that the
syringe plunger is properly engaged by the
pump’s pusher block and that the pump is
placed not more than 80cm above the infusion
site. Syphoning can result in over-infusion
leading to patient injury or death.
17. WARNING: Use only the syringes and
administration sets listed in Specifications
and Standards at the end of this manual.
Failure to do so may result in an inaccurate
delivery. Graseby Medical does not
guarantee performance of the pump if
syringes other than those listed are used.
Incorrect function or performance of the pump
can cause complications resulting in patient
injury or death.
24. WARNING: To avoid over-infusion, do not
purge the infusion line when the
administration set is connected to the patient.
Over-infusion of medication can result in
patient injury or death.
18. WARNING: When using the In-line Occlusion
Sensing option, use only a Graseby Medical or
Graseby Medical-approved extension set (part
number 0130-0041). Graseby Medical does not
guarantee performance of the pump if
unapproved extension sets are used. Failure
to observe this warning may lead to
compromised performance of the pump,
resulting in patient injury or death.
19. WARNING: The volume of fluid contained in
the connecting tubing is a residual amount
and will not be infused. Allowance must be
made for this extra volume of fluid when
initially filling the syringe and purging the
system. Under-delivery of medication can
cause complications resulting in patient injury
or death.
20. WARNING: To avoid patient embolism, ensure
that the patient tubing is purged of all air
bubbles before administering any medication.
The pump provides a purge facility to assist
with this process. The presence of air within
the medication can result in complications
leading to patient injury or death.
21. WARNING: For safe operation of the pump, the
syringe must be correctly loaded. Ensure that
the syringe plunger is properly aligned before
closing the barrel clamp. Failure to do so may
result in inaccurate delivery, resulting in
patient injury or death.
22. WARNING: Ensure that your fingers are not in
the path of the pusher during syringe loading
or unloading. Failure to do so may result in
user injury.
Omnifuse Technical User Manual
25. WARNING: To avoid the pump becoming
detached from an IV pole always make sure
that the pump is securely fixed to the pole.
Always check the security and stability of the
assembly with the pump mounted.
If no IV pole is used make sure that the pump
is completely stable on a horizontal surface.
Failure to observe this warning may cause
damage to the Omnifuse pump and harm the
user or the patient. As a result, the user or
patient may suffer direct injury, or the
Omnifuse pump may fail to operate correctly,
leading to patient injury or death.
26. WARNING: Following a significant liquid spill
onto the pump, it should be wiped dry and
inspected by service personnel before being
returned to service. Failure to do so may result
in compromised functioning of the pump,
leading to patient or user injury or death.
27. WARNING: To avoid syphoning of the syringe
contents (free flow), ensure that the patient
line is clamped before loading or unloading
the syringe. Syphoning can result in overinfusion leading to patient injury or death.
28. WARNING: When the Omnifuse pump is fitted
with a lockable cover, the cover and
associated security software should always be
used in accordance with local protocol. The
lockable cover protects the syringe and its
contents from tampering; the security
software ensures that the infusion parameters
are not interfered with. Failure to use the
security software together with the lockable
cover could result in an inaccurate delivery
leading to patient injury or death.
Using this manual
Graseby Medical Ltd.
Warnings/Cautions
Graseby Medical Ltd.
Cautions
Using this manual
Cautions details dangerous conditions
that may occur and cause damage to the
pump if the instructions in this manual
are not obeyed.
1.
CAUTION: Refer all service, repair and
calibrations only to qualified technical
personnel. Unauthorised modifications to the
pump must not be carried out.
2.
CAUTION: When turning the pump on, if
screens similar to those illustrated are not
displayed do not use the pump, and send the
pump to authorised service personnel.
3.
CAUTION: Do not attempt to move the pump’s
pusher by hand. Always use the syringe Load
key W to move the pusher. Failure to observe
this caution may cause mechanical damage to
the pump.
4.
CAUTION: Never carry the pump except by the
handle. Failure to do so may result in damage
to the case, or you may drop the pump and
cause it internal damage.
5.
CAUTION: Do not use cleaning and
disinfecting agents other than the approved
ones specified here.
6.
CAUTION: The pump must not be immersed in
any liquids or exposed to strong organic
solvents. Wipe off spills immediately, and do
not allow fluid or residues to remain on the
pump. Additionally, the pump is not designed
to be autoclaved, steam-sterilised, EtOsterilised or subjected to temperatures in
excess of 45° C (113º F). Failure to observe
this caution may cause serious damage to the
pump.
7.
CAUTION: Failure to use the mains lead
retainer means that the pump may be
accidentally disconnected from the mains
supply.
8.
CAUTION: Users should bear in mind that the
syringe-ear clamp is for location only and may
not be powerful enough to hold the syringe in
place against the powerful negative backpressures that may be encountered in certain
clinical applications
Omnifuse Technical User Manual
Graseby Medical Ltd.
Contents
Contents
Introduction .............................................................................................. 1
Who should read this manual? .......................................................................1
Omnifuse pump variants .................................................................................2
Setup ......................................................................................................... 3
Contents of the box ........................................................................................3
Visual checks and assembly ..........................................................................4
Switch on and power-up function test .............................................................5
Acceptance tests ...................................................................................... 7
Configuration menu ................................................................................. 10
Accessing the Configuration menu .................................................................10
Configuration parameters ...............................................................................12
Changing the Configuration password ...........................................................16
History ............................................................................................................17
Access the Technician menu ..........................................................................18
Technician parameters ...................................................................................20
Changing the Technician password ...............................................................22
Pump date ......................................................................................................23
Pump time ......................................................................................................23
Pump Id ..........................................................................................................24
Location ..........................................................................................................24
Protocols ................................................................................................... 25
Syringe performance ............................................................................... 26
Specification ............................................................................................. S-1
Standards .................................................................................................. S-7
Startup curves .......................................................................................... S-8
Trumpet curves ........................................................................................ S-9
Omnifuse Technical User Manual
Contents
Technician menu ...................................................................................... 18
Contents
Graseby Medical Ltd.
Contents
Omnifuse Technical User Manual
Graseby Medical Ltd.
Introduction
Introduction
This manual is designed to provide
technical details regarding the Omnifuse
pump. It covers tasks such as pump
configuration and acceptance testing.
It supplements the Omnifuse Instruction
Manual (part number 0151-0839) which
is for use by regular pump users.
Who should read this manual?
The reader must be trained and familiar
with the use of the Omnifuse pump and
its options, and have appropriate
experience of the technical aspects of
syringe pumps. This ensures that the
effects of any change made to the pump
set-up using the Configuration and
Technician menus are fully understood.
This manual should be read by people
who need to configure the pump:
For step-by-step instructions on how to
use the features described in this
manual, please read the Omnifuse
Instruction Manual.
• A clinician deciding how a pump
should be configured for specialised
use.
• A member of a biomedical
engineering department who is
configuring the pump for use in a
particular environment.
• A technician servicing a pump.
• All users of the Graseby Omnifuse
Technician PC Software, since the
Configuration and Technician menu
options described here can also be set
up via that software.
Introduction
• A member of a team setting up
protocols for use of a pump in a
particular environment.
Omnifuse Technical User Manual
1
Introduction
Graseby Medical Ltd.
Omnifuse pump variants
The standard Omnifuse is not fitted with
an In-line occlusion sensor, or Lockable
cover.
For environments where In-line
occlusion sensing or a Lockable cover are
required, three Omnifuse pump variants
are available. The variants may be
specified when the pump is purchased, or
a standard pump can be returned to
Graseby Medical and upgraded to one of
the variants.
The three variants are:
• Omnifuse with In-line Occlusion
Sensing
• Omnifuse with Lockable Cover
• Omnifuse with In-line Occlusion
Sensing and Lockable Cover.
In-line Occlusion Sensing
Lockable Cover
The Lockable cover pump variant may be
used in clinical areas where it is
necessary to prevent the syringe from
being removed and to prevent any
change to the flow rate for the infusion.
The Lockable cover prevents physical
access to the syringe, except by an
authorised person with a key. The cover
can be used with or without the
Omnifuse’s Security software. This
prevents accidental changes to the
infusion rate, or access to the bolus
feature once the infusion is started.
In-line Occlusion Sensing and
Lockable Cover
The Omnifuse is also available as a
pump fitted with both the In-line sensor
and the Lockable cover.
For clinical applications where occlusion
pressure needs to be monitored very
precisely, for example in a Neonatal unit,
the pump should be ordered with an inline occlusion sensor.
This is used with a special extension set,
which includes a pressure sensing disc,
to monitor occlusion pressure in the
infusion line while the pump is infusing.
Introduction
If required, an infusion can be started
without the in-line sensor, in which case
the pump reverts to the standard dryside occlusion sensing.
With In-line sensing in use, the pump
can display a graph showing the changes
in pressure during an infusion.
2
Omnifuse Technical User Manual
Graseby Medical Ltd.
Setup
Setup
When the pump is first unpacked, the
following assembly and acceptance tasks
may be completed as required.
Contents of the box
When first opened, the box should
contain:
• Omnifuse syringe pump.
• Manuals:
• Instruction Manual
• Technical User Manual
• Quick Reference Guide.
• Mains lead, which must be fitted to
the pump so that it meets the IPX4
fluid ingress rating requirement.
• Two keys are supplied with an
Omnifuse which has a Lockable
cover.
• A CD containing Omnifuse Drug
Protocol Management System 01530084 is supplied if Drug Protocol
software has been ordered.
When the pump is unpacked
• Complete the visual checks to ensure
that no damage has occurred during
transit.
Note: Do not attempt to use the pump
if it is visibly damaged when
unpacked. Contact your Graseby
Medical distributor.
Setup
• Mains lead retainer and screw. See
Visual checks and assembly on
page 4 for fitting instructions.
Additional items for pump options
Omnifuse Technical User Manual
3
Setup
Graseby Medical Ltd.
Visual checks and assembly
• Check that the items in Contents of
the box on page 3 are present and
correct.
• Check the pump case for any signs of
damage.
• Peel the protective cover from the
LCD screen and check that there is
no damage to the screen.
• If required, record the serial number
which is shown on the label, on the
base of the pump.
Fit mains lead retainer
The pump is supplied with a separate
mains lead. A mains lead retainer is also
provided to prevent the lead from being
accidentally or deliberately pulled out of
the pump socket.
When it is fitted, the lead cannot be
removed without unscrewing the
retainer.
Socket cover
A cover is provided to protect the RS232
socket. This pushes over the socket and
is held in place by friction.
Setup
WARNING: Failure to use the mains lead
supplied with the pump will compromise
the pump’s ability to resist fluid ingress,
resulting in possible user or patient
injury or death.
CAUTION: Failure to use the mains lead
retainer means that the pump may be
accidentally disconnected from the
mains supply.
4
Omnifuse Technical User Manual
Graseby Medical Ltd.
Setup
Switch on and power-up function test
Before switching on:
1. Fit the mains lead retainer and
RS232 cover as shown on page 4.
• After a few seconds the red screen
shows the serial number and
software version.
2. Connect the pump to the AC mains
supply.
3. Ensure that the mains LED
illuminates. This diagram shows the
position of the LEDs illuminated
during the power-up tests:
• While this screen is displayed, the
pump completes the Power-On SelfTests (POST).
• When the tests are complete, the
pump beeps again and the screen
changes to the normal display colour.
Switching on:
• The red alarm LED is extinguished
and the infusion LED changes from
green to amber and is then
extinguished.
1. Press the On/Off key S on the
pump.
• The Pump Id and Location screen is
displayed:
2. Observe the screens, listen for the
beeps and confirm the following
sequence:
• The pump beeps and briefly displays
the red opening screen:
See Pump Id on page 24, for step-bystep instructions on how to change
the text.
• After a few seconds, the pump beeps
twice and the following screen is
displayed:
Omnifuse Technical User Manual
5
Setup
• The green infusion, yellow AC mains
supply and red alarm LEDs
illuminate.
Setup
Graseby Medical Ltd.
Fault checklist
If the pump identifies a faulty
component, a system fault screen is
displayed, for example:
• If the LEDs do not follow the
prescribed sequence, a LED may be
defective or there may be a more
serious fault.
• If the screen display does not follow
the prescribed sequence, the LCD is
defective or there may be a more
serious fault.
• If the sounder sequence is not
followed, the sounder may be
defective or there may be a more
serious fault.
If the pump is under warranty, press the
On/Off key S to switch off and return
the pump to the supplier.
Setup
6
Omnifuse Technical User Manual
Graseby Medical Ltd.
Acceptance tests
Acceptance tests
The following tests must be completed on
new pumps on delivery, and pumps
returned from Graseby Medical Ltd.
after repair, service or upgrade.
Faulty units should be returned.
Test
Method
Correct result
1.0
Mechanical
inspection.
Before applying
power, ensure that the
case and exposed
parts are not
damaged.
No visible damage.
2.0
Electrical
safety test.
Using a test voltage of
500V DC, measure the
insulation resistance
between the mains
inlet and exposed
metal parts.
The insulation must exceed
200 Mohm.
3.0
Initial power
on.
With the AC mains
supply not connected,
press On/Off S.
Ensure that the following events
occur in the order shown:
• A single beep sounds.
• All three LEDs illuminate.
• The LCD display turns RED.
• The screen displays
PERFORMING SELF TEST.
• A single beep sounds and all
LEDs extinguish.
Acceptance tests
• The infusion LED briefly
illuminates amber.
• The screen displays LOAD
SYRINGE.
3.1
4.0
Keyboard
tests - AC
connected.
Connect AC mains
supply.
The yellow AC mains supply
LED illuminates.
Press and hold the On/
Off key S for about
three seconds.
The display goes blank and the
yellow AC LED remains
illuminated.
Omnifuse Technical User Manual
7
Acceptance tests
4.1
Graseby Medical Ltd.
Test
Method
Correct result
Keyboard
tests - AC
connected.
Press the
On/Off key
As 3.0
4.2
S
Press all the keys on
the numeric keypad in
turn (press the On/Off
key S very briefly).
Ensure that the Lockable cover
is open and that a brief beep
sounds as each key is pressed.
4.3
Command
wheel checks.
Using the Command
wheel, program a test
infusion with a BD
Plastipak syringe
fitted and select a rate
of 99.9 ml/hr.
Check that the Command wheel
can change the operation of the
pump and that it can confirm
selections.
5.0
AC mains
failure.
Start the infusion (see
4.3).
Ensure that as the infusion
runs, the infusion LED flashes
green.
Remove or switch off
the external AC mains
supply.
Ensure that the alarm sounds
intermittently and the message
AC MAINS FAILURE
is displayed, but the pump
continues to run on the internal
batteries.
Acceptance tests
Ensure that the screen returns
to the Infusion screen and that
the message AC MAINS
FAILURE appears on it. Check
that the error screen is displayed
periodically with a double beep.
8
Reconnect the AC
supply.
Ensure that the yellow AC
mains LED illuminates and that
the error message is no longer
displayed.
Press the Stop key U
Ensure that the green Infusion
LED shows steady and that the
Infusion screen shows the
infusion status.
Omnifuse Technical User Manual
Graseby Medical Ltd.
Test
Acceptance tests
Method
Correct result
Press the Start key T
Run the infusion until the Near
Empty Point is reached. Check
that the infusion LED now
flashes amber.
Press and release the
Stop key U
The amber LED ceases to flash
but remains illuminated.
Press and hold the
Stop key U
The amber LED is no longer
illuminated.
Press and hold the On/
Off key S for about
three seconds.
The display goes blank and the
yellow AC mains LED remains
illuminated.
Battery charging
Pump configuration
Before using the pump for clinical
purposes, plug it into the AC mains
supply and charge it for at least 10 hours.
During charging, the battery icon
appears at the left of the display.
When the tests have been successfully
completed, the pump must be configured
before clinical use.
For details of enabling or disabling
features, see Accessing the Configuration
menu on page 10.
To enter or change the Pump Id and/or
Ward Location, see Technician
parameters on page 20.
It is recommended that the default
passwords should be changed. See
Changing the Configuration
password on page 16 and Changing the
Technician password on page 22.
Acceptance tests
When the batteries are fully charged, the
icon disappears. The battery icon is
displayed when the pump operates from
the batteries.
If Drug protocols are to be loaded onto
the pump, see Protocols on page 25.
Omnifuse Technical User Manual
9
Configuration menu
Graseby Medical Ltd.
Configuration menu
The Configuration menu is used to
enable or disable parameters and set
values for parameters that affect the
pump operation. It is protected by an
access code and password.
To restore default (factory)
Configuration menu settings use the
Graseby Omnifuse Technician PC
software, part number 0151-0266.
Accessing the Configuration menu
To access the Configuration menu:
Configuration password
1. Unlock and open the cover.
The default password is 55555.
2. Switch on the pump and wait until
the screen displays this screen:
If the correct password has not been
entered after three attempts, the pump
will return to the LOAD SYRINGE
screen.
The password can be changed using the
Config Mode password parameter, see
Changing the Configuration
password on page 16.
Note: The Configuration menu can
only be accessed when the cover is
open.
If a password is forgotten, it can be
retrieved using the Graseby Omnifuse
Technician PC software.
3. Simultaneously press keys 7, 9 and 1
and release them when the password
screen is displayed:
Configuration menu
4. Enter the five-digit password.
As each digit is entered, an asterisk
(*) is displayed.
5. Press the Command wheel to accept
the password and enter the
Configuration menu. To correct an
error, press Cancel X and re-enter
the password.
10
Omnifuse Technical User Manual
Graseby Medical Ltd.
Configuration menu
Using the Configuration menu
Exit the Configuration menu
When the correct Configuration
password is entered, the list of
configuration parameters is displayed:
Press the Stop key U to return to the
original screen.
For a full list, see Configuration
parameters on page 12.
Change a setting or value
1. Turn the Command wheel and scroll
up or down the menu until the
required parameter is highlighted.
2. Press the Command wheel.
3. Turn the Command wheel until the
required value is selected.
Configuration menu
4. Press the Command wheel to set the
new value.
Omnifuse Technical User Manual
11
Configuration menu
Graseby Medical Ltd.
Configuration parameters
The following table shows the
Configuration parameters with preset
values and default settings (in bold), in
the order that they are listed on the
pump.
Notes: The pump may further limit
infusion, bolus and purge rates
depending on syringe size.
Displayed
Parameter
Values/Default
Maximum Infusion
rate
50 / 100 / 200 / 400 /
800 ml/h
Maximum Bolus rate
50 / 100 / 200 / 400 /
800 ml/hour
Purge rate
50 / 100 / 200 / 400 or
800 ml/h
KVO rate
0 (off) then 0.05 to
2ml/hour.
Default 0.1 ml/hr
Adjustable in 0.01 ml
steps between 0.05
and 0.1
Comments/Notes
This configures the minimal
flow rate to which the pump will
switch when the syringe near
empty state ends.
Configuration menu
Adjustable in 0.1 ml
steps between 0.1
and 2.0
Near empty type
Time based/ Volume
based.
Near empty point
Time based 1 / 2 / 3 / 5
/10 minutes
Volume based AUTO /
0.2 / 0.5 / 1 / 2 / 3 / 5 /
10ml
12
AUTO means the pump
calculates the near empty point
on the basis of the size of
syringe detected.
Omnifuse Technical User Manual
Graseby Medical Ltd.
Configuration menu
Displayed
Parameter
Values/Default
Comments/Notes
Rate change / running
Enabled / Disabled
Allows infusion rate to be
altered when an infusion is
running.
Bolus
Enabled / Disabled
BOLUS hotspot available.
Bolus preset
Enabled / Disabled
Preset bolus available as well as
hands-on bolus.
Preset volume mode
Enabled / Disabled
Preset time mode
Enabled / Disabled
Intermittent mode
Enabled / Disabled
Intermit. start delay
Enabled / Disabled
Circadian rhythm
Enabled / Disabled
Infusion in ml/min
Enabled / Disabled
Infusion in mg/kg/h
Enabled / Disabled
Infusion in mg/kg/min
Enabled / Disabled
Infusion in µg/kg/h
Enabled / Disabled
Infusion in µg/kg/min
Enabled / Disabled
Infusion in ng/kg/h
Enabled / Disabled
Infusion in ng/kg/min
Enabled / Disabled
Infusion in mg/h
Enabled / Disabled
Infusion in mg/min
Enabled / Disabled
Infusion in µg/h
Enabled / Disabled
Infusion in µg/min
Enabled / Disabled
Infusion in ng/h
Enabled / Disabled
Infusion in ng/min
Enabled / Disabled
Drug conc. entry
User-mix / Pre-mix
Omnifuse Technical User Manual
Configuration menu
Appear on Configuration menu
when Extra Infusion Modes
option installed on pump.
13
Configuration menu
Graseby Medical Ltd.
Displayed
Parameter
Values/Default
Comments/Notes
Use Drug Protocols?
Yes / No
Menu of protocols is displayed
to the user after syringe
loading.
If set to No, the pump displays
the programming steps instead.
User Programming
Enabled / Disabled
Effective only when Use Drug
Protocols? is set to YES.
Enabled - a User Programming
option appears on the Drug
Protocol menu, for step-by-step
programming.
Disabled - user must choose a
pre-loaded protocol.
Configuration menu
Occlusion Lock Level
NO LOCK / Level 1 /
Level 2 /Level 3 /Level
4 /Level 5
Limits the occlusion alarm
levels which are available to the
pump user.
In-line pressure sens.
Enabled / Disabled
Must be enabled to use the inline pressure sensor.
In-line alarm limit
1-999 mmHg
Maximum setting user can
enter for the in-line occlusion
alarm when in-line pressure
sensing is enabled.
Lockable cover
Security / No Security
Infusion cannot start unless
cover is locked, keypad is locked
once infusion is started.
View Shift Totals
Enabled / Disabled
Shift Start Times
Shift 1 = 00:00-24:00
Shift 2 = 00:00-24:00
Shift 3 = 00:00-24:00
Default all 00:00
Allows setting of up to three
shift start times. Time changes
between BST and GMT are not
automatic.
SLEEP mode
Enabled / Disabled
Enables the ASLEEP function.
Nurse call back time
30 Seconds / 1 min /
2 mins / 3 mins / 4 mins
/ 5 mins
This sets the interval after
which the NOT INFUSING
repeated warning is displayed.
14
Omnifuse Technical User Manual
Configuration menu
Displayed
Parameter
Values/Default
History
See History on page 17.
Display contrast
0 (low) to 20 (high)
default 10
Display brightness
0 (dim) to 20 (bright)
Key beep volume
0 (off) to 10 (loud)
(default 7)
Key beep
Yes / No
Bolus beep
Yes / No
Red LCD flash on
alarm
Yes / No
If No is chosen, the display
remains green during an alarm.
Operating alarm
sound
Alarm 1 / Alarm 2 /
Alarm 3 / Alarm 4 /
Alarm 5
Each of the five alarm tones can
be reviewed by pressing the
Alarm Silence key V when this
feature is selected.
Back-light on-time
30 seconds / 1.5mins /
2 mins / 2.5mins / 3
mins
When the pump is powered by
the internal batteries, the
display backlight goes out if the
pump has not been touched
during the selected time.
Omnifuse Technical User Manual
Comments/Notes
If set > 10, when operating on
battery, the pump uses
brightness level 10. Brightness
returns to configured level if
pump is connected to AC mains
supply.
15
Configuration menu
Graseby Medical Ltd.
Configuration menu
Graseby Medical Ltd.
Displayed
Parameter
Values/Default
Comments/Notes
Baud rate
9600 / 19200
This sets the rate at which the
pump communicates with a PC
or printer via the RS232 serial
port. If this value is changed,
exit the Configuration menu,
switch the pump off and then on
again for the change to become
effective. Serial port
configuration can only be
changed via the pump’s
Configuration menu. Set the
parameter on the pump first
and then ensure that the
equivalent setting in the device
connected to the RS232 port is
the same.
Config Mode
password
55555
See Changing the
Configuration password on
page 16.
Changing the Configuration password
This allows the password for entry to the
Configuration menu to be changed. The
default password is 55555. To change the
password:
4. Type in the new password again and
press the Command wheel to
confirm.
Configuration menu
1. Access the Configuration menu, as
described on page 10.
2. Select Config Mode password and
press the Command wheel.
5. The change is briefly confirmed
before returning to the Configuration
menu.
3. Type in the new password and press
the Command wheel.
16
Omnifuse Technical User Manual
Graseby Medical Ltd.
Configuration menu
History
A record of pump actions during a
selected period may be examined by
selecting History on the Configuration
menu. Up to 3000 events with dates and
times may be reviewed. If the number of
events exceeds 3000, the earliest events
are progressively overwritten.
You can download more history details to
a PC, to view, save or print using the
Graseby Omnifuse Technician PC
software. This aids diagnosis during
servicing, and provides a permanent
record of the pump’s history.
1. Select History on the menu and
press the Command wheel. The
History display screen appears. To
exit without viewing any events,
press Stop U.
2. Turn the Command wheel
(clockwise) to highlight the Start
time and press the wheel.
3. Turn the Command wheel or use
the keypad to alter the start time,
then press the wheel to accept.
4. Repeat steps 3 and 4 to set the Start
date, Stop time, and Stop date.
5. Check the period you have chosen
to display, then press the Command
wheel to select OK.
The time and date for each event is
displayed on the bottom line of the
screen when the event is
highlighted.
7. Turn the Command wheel to scroll
through the events.
8. To exit from the Pump History
event list, press Stop U twice to
return to the Configuration menu.
Omnifuse Technical User Manual
17
Configuration menu
6. There is a brief delay while the
pump retrieves the history.
Technician menu
Graseby Medical Ltd.
Technician menu
The Technician menu provides access to
technical information about the pump.
It can also be used to define the pump
date, time, Id and location which appears
when the pump powers up.
The Technician menu is protected by an
access code and password.
Access the Technician menu
To access the Technician menu:
Technician password
1. Unlock and open the cover and
ensure that there is no syringe in the
pump.
The default password is 44444.
2. Switch on the pump and wait until
the screen displays:
If the correct password has not been
entered after three attempts, the pump
will return to the LOAD SYRINGE
screen.
The password can be changed using the
Change password parameter, see
Changing the Technician password on
page 22.
Note: The Technician menu can only
be accessed from the LOAD SYRINGE
screen when the cover is open.
If a password is forgotten, it can be
retrieved using the Graseby Omnifuse
Technician PC software.
3. Simultaneously press keys 8 2 and .
and release them when the password
screen is displayed:
Technician menu
4. Enter the five-digit password.
As each digit is entered, an asterisk
(*) is displayed.
5. Press the Command wheel to accept
the password and return to the
menu. Correct a mistake using
Cancel X.
18
Omnifuse Technical User Manual
Graseby Medical Ltd.
Technician menu
Using the Technician menu
Exit the Technician menu
When the Technician menu is entered,
the list of parameters is displayed:
Press the Stop key U to return to the
LOAD SYRINGE screen.
The screen displays mainly technical
information about the pump, but a few
parameters can be changed. Use the
Command wheel to scroll through the list
of parameters.
Technician menu
The parameters, their possible values
and how to use them are described on the
following pages.
Omnifuse Technical User Manual
19
Technician menu
Graseby Medical Ltd.
Technician parameters
The following table shows the Technician
menu parameters in the order in which
they appear on the pump’s display.
It also shows adjustable parameters (in
bold) for example, date time, Pump Id,
Ward Location.
The display shows fixed information,
checks and tests for example, battery
usage.
Parameters can be adjusted using the
Graseby Omnifuse Technician PC
software.
Displayed Parameter
Description
Total volume infused
Shows the total volume infused by the pump since
manufacture.
Battery voltage
Shows the battery voltage in millivolts.
Battery usage
When selected, displays the number of times the pump
has been run on battery power for durations of:
•
•
•
•
less than 1 hour
between 1 and 4 hours
between 4 and 10 hours
over 10 hours.
Select the RETURN hotspot to return to the
Technician menu.
Technician menu
CRC
The Cyclic Redundancy Check for the main pump
software. This is used to check that the software has
not been corrupted.
Primary Software ver
Displays the version of the primary software loaded
into the pump.
Secondary Software ver
Displays the version of the secondary software loaded
into the pump.
Date
View or change the pump date in dd/mm/yyyy format
(see page 23).
Time
View or change the pump time between 00:00 and
23:59 in hh:mm format. Time changes between GMT
and BST are not automatic (see page 24).
Service Recall Period
Displays current Service Recall setting of none / 6 / 12
months. The user is advised when the current date in
the pump exceeds the last service date plus the service
recall period.
20
Omnifuse Technical User Manual
Graseby Medical Ltd.
Technician menu
Displayed Parameter
Description
Date Pump Serviced
Displays the date the pump was most recently
serviced in dd/mm/yyyy format.
Service Due Message
Select to view text displayed when the service interval
(if set) expires. The message can be changed using the
Graseby Omnifuse Technician PC software.
Inf. Param. Defaults
If Disabled, the pump uses saved parameters from the
previous infusion on power up or programming
sequence restart as normal.
If Enabled, infusion parameters will always be reset
zero, forcing the user to re-program the infusion
parameters.
Syringe Brands
Displays a list of brands that can be individually
Enabled or Disabled. At least one brand must be
enabled at any time.
Syringe Dimensions
Displays dimensions of the custom syringe in the
pump after being defined via the Graseby Omnifuse
Technician PC software. If a custom syringe has not
been defined, the parameter will not appear in the
menu.
Pump Id
The pump identifier (up to 20 characters) (see
page 24).
Ward Location
The pump’s location (up to 20 characters) (see
page 25).
History Download
Create a PC file of the pump history. Refer to the
Omnifuse Service manual, part number 0151-0700.
Change Password
Select to change Technician password see page 22.
Fcal
Calibration value for use by Graseby Medical.
Msf
Calibration value for use by Graseby Medical.
Pcal
Calibration value for use by Graseby Medical.
Asf
Calibration value for use by Graseby Medical.
Cont. Alarm freq.
Calibration value for use by Graseby Medical.
Omnifuse Technical User Manual
Technician menu
Press U to return to the Technician menu.
21
Technician menu
Graseby Medical Ltd.
Displayed Parameter
Description
Alarm Tone Freq. 1
Calibration value for use by Graseby Medical.
Alarm Tone Freq. 2
Calibration value for use by Graseby Medical.
Alarm Volume
Displayed on the menu, but set by the user via the
keypad to volume 1 (quietest) to 2 or 3 (loudest). The
default setting is 3.
R1 to R6
Calibration values for use by Graseby Medical.
Main PCB rev.
Power PCB rev.
Syringe PCB rev.
Not used
In-line PCB rev.
Changing the Technician password
The password that is used to access the
Technician menu can be changed as
follows:
1. Access the Technician menu, as
described on page 18.
2. Select Change password and press
the Command wheel.
Technician menu
3. Type in the new password and press
the Command wheel.
4. Type in the new password again and
press the Command wheel to
confirm. The change is briefly
confirmed on the Password Change
screen before returning to the
Technician menu.
22
Omnifuse Technical User Manual
Graseby Medical Ltd.
Technician menu
Pump date
1. Select the Date parameter on the
Technician menu to display the date
on the pump.
For large date corrections - use the
keypad. As you enter numbers, the date
builds up from right to left across the
display. For example, to enter the date
shown, enter 11022003.
An invalid date resets all the values to
zero.
2. Turn and press the Command wheel.
The time will be boxed.
For small date changes - Turn the
Command wheel to display the correct
date then press the Command wheel.
3. To accept the displayed date, press
the Command wheel.
4. To return to the Technician menu
highlight OK and press the
Command wheel.
Pump time
1. Select the Time parameter on the
Technician menu to display the time
on the pump.
3. To accept the displayed time, press
the Command wheel.
4. To return to the Technician menu,
highlight OK and press the
Command wheel.
Note: Time changes between GMT
and BST are not automatic.
2. Turn and press the Command wheel.
The time will be boxed.
Technician menu
For small time changes - Turn the
Command wheel to display the correct
time then press the Command wheel.
For large time corrections - use the
keypad. As you enter numbers, the time
builds up from right to left across the
display. For example, to enter the time
shown, enter 1036.
An invalid time resets all the values to
zero.
Omnifuse Technical User Manual
23
Technician menu
Graseby Medical Ltd.
Pump Id
The pump Id is displayed during startup.
It should be a unique combination of
letters and numbers up to a maximum of
20 characters.
1. Select Pump Id on the Technician
menu:
To enter numbers - turn the wheel
anti-clockwise to scroll through 0 to 9.
3. Press the Command wheel to store a
character and move on to the next.
4. To correct an entry, press the Cancel
key X on the keypad. This erases
the character and moves the cursor
back one space.
5. When all the required characters
have been entered press Stop T.
2. Enter or change characters by
turning the Command wheel:
To enter letters - turn the Command
wheel clockwise.
The new Pump Id is stored and the
screen returned to the Technician menu.
The Id will be displayed next time the
pump is switched on.
Location
1. Select Ward Location on the
Technician menu:
LOCATION
:
Use wheel to change parameter value
Technician menu
2. Enter or change characters by
turning the Command wheel:
To enter letters - turn the Command
wheel clockwise.
4. To correct an entry, press the Cancel
key X on the keypad. This erases
the character and moves the cursor
back one space.
5. When all the required characters
have been entered, press Stop T.
The new Location is stored and the
screen returned to the Technician menu.
The location will be displayed next time
the pump is switched on.
To enter numbers - turn the wheel
anti-clockwise to scroll through 0 to 9.
3. Press the Command wheel to store a
character and move on to the next.
24
Omnifuse Technical User Manual
Graseby Medical Ltd.
Protocols
Protocols
Drug Protocols provide a way of preprogramming some or all of the
parameters required for an infusion into
the pump.
• Protocols can only be added, removed
or altered by an authorised person
using the Omnifuse Drug Protocol
Management System, part number
0153-0084.
Protocols are created and stored on a PC
or network as a collection, and then down
loaded to a pump.
A collection may contain up to fifty
protocols which is the maximum number
that can be down loaded to a pump. An
individual protocol can be used in several
collections. A collection can be down
loaded to several pumps so that each
ward or department will have a standard
set of protocols available on all pumps.
Name only protocols require that the
user of the pump has to enter all the
infusion parameters prior to running an
infusion. All other protocols define both
configuration and infusion parameters
required for that infusion. The exception
is Patient Weight which cannot be stored
in a protocol as weight is patient
dependent. However the protocol can
contain an upper and lower limit for this
to ensure that the entered weight is
appropriate for the infusion being
programmed.
Protocols
The parameters are entered via an
interactive dialogue that guides the
person defining the protocol through the
data to be entered. The required dialogue
screens are dynamically generated based
on choices made as parameters are
entered.
A protocol may be as simple as a drug
name, but will usually define the
infusion mode and values for the infusion
parameters relevant to that infusion
mode. It is possible to either define the
limits between which each parameter
can be adjusted, or to set the parameter
to a single fixed value that cannot be
altered by the user of the pump.
Omnifuse Technical User Manual
25
Syringe performance
Graseby Medical Ltd.
Syringe performance
The accuracy of infusions depends
ultimately on the accurate performance
of the pump and the precision of the
syringe barrel diameter. Syringe
variations can therefore contribute
significantly to errors in drug delivery.
However, syringe performance varies
widely among manufacturers.
These include:
• variations in the syringe barrel
diameter
• syringe stiction.
Syringe stiction
Syringe stiction is a condition where the
syringe plunger travels in a start- andstop manner down the barrel. This is
caused by static friction between the
syringe bung and the inside of the barrel.
This error results in alternate over- and
under-infusing of drugs over a short
period.
Syringe stiction may also result in small
(under 0.5 ml) doses being less than
expected when delivered.
Barrel diameters
Syringe barrel diameter error results in
under- or over-infusing by an amount
proportionate to any difference between
the real syringe diameter and the
nominal diameter, which is the figure
provided by the syringe manufacturer
and registered in the pump’s memory.
Syringe performance
26
Omnifuse Technical User Manual
Specification/Standards
Specification
Specification
Standards
Page
1
8
Graseby Medical Ltd.
Specification
Weight
3.5 kg (approx)
Dimensions
384 mm x 170 mm x 92 mm (not including pole
clamp)
Orientation
Horizontal, either mounted on a pole or flat on a
stable horizontal surface
Display
LCD super twist with viewable area of
approximately 105 mm x 32 mm. Green backlight
when connected to AC mains supply and for up to
3 minutes (configurable) following a key-press
when operating on battery. Backlight flashes red
during an alarm unless configured Off
Data retention time
More than 12 months
Operating temperature
5° to 40°C
Storage temperature
-20° to 55°C
Relative humidity
20% to 90% non-condensing (operating)
Atmospheric pressure
700 - 1060 millibars (operating)
Alarm volume
Louder than 65 dBA at 1 metre at maximum
volume
Software options
Extra Infusion modes and Mass Units
Specification
Drug Protocols
Graphics
Remote Control
Omnifuse Instruction Manual
Specification – 1
Graseby Medical Ltd.
Pump variants
Description
Part numbers
Omnifuse Syringe Pump:
UK and Ireland Model
0159-0001
Australian Model
0159-0740
Canadian (English) Model
0159-0711
Omnifuse with In-line Occlusion Sensing:
UK and Ireland Model
0152-0001
Australian Model
0152-0740
Canadian (English) Model
0152-0711
Omnifuse with Lockable Cover:
UK and Ireland Model
0157-0001
Australian Model
0157-0740
Canadian (English) Model
0157-0711
Omnifuse with In-line Occlusion Sensing and Lockable Cover:
UK and Ireland Model
0158-0001
Australian Model
0158-0740
Canadian (English) Model
0158-0711
Specification
Power supply
AC power supply
100 - 240 V at 50/60 Hz. 50 W
Battery type
Set of three Cyclon™ sealed lead-acid batteries
Battery operating time
10 hours at 5 ml/h
Battery charge time
10 hours
Backup battery
Single 3 V lithium battery
Specification – 2
Omnifuse Instruction Manual
Graseby Medical Ltd.
Infusion flow rates
Range
0.1 to 800 ml/h dependent on syringe size
Accuracy
±2% measured over the 2nd hour of an infusion at
1 ml/h and at 5 ml/h with a Braun Omnifix 50 ml
syringe and 150 cm extension set
Bolus accuracy
±5% with a Braun Omnifix 50 ml syringe and
150 cm extension set measured over 25 boluses of
1 ml each
KVO rate
Between 0.05 ml/h and 2 ml/h
Purge rate
50, 100, 200, 400, 800 ml/h (upper limit dependent
on syringe size)
Bolus rate
0.1 to 800 ml/h (upper limit dependent on syringe
size) in increments of:
• 0.1 ml/h up to 100 ml/h
• 1 ml/h above 100 ml/h
Syringe Size (ml)
Flow Rate (ml/h)
2
50 ml/h
3
50 ml/h
5
100 ml/h
10
200 ml/h
20
400 ml/h
25
400 ml/h
30
600 ml/h
50/60
800 ml/h
Omnifuse Instruction Manual
Specification
Ma x i mu m i n f us io n flo w ra tes
Specification – 3
Graseby Medical Ltd.
Programming ranges
Continuous infusion rate programming ranges by infusion unit
Unit
Range
Increment
ml/h
0.1 to 800
0.1 up to 100, 1 above 100
ml/min
0.01 to 13.0
0.01 up to 10, 0.1 above 10
mg/kg/h
0.1 to 99.9
0.1
µg/kg/h
1 to 999
1
ng/kg/h
1 to 999
1
mg/h
0.1 to 500
0.1 up to 100, 1 above 100
µg/h
0.1 to 999
0.1 up to 100, 1 above 100
ng/h
0.1 to 999
0.1 up to 100, 1 above 100
mg/kg/min
0.01 to 99.9
0.01 up to 10, 0.1 above 10
µg/kg/min
0.1 to 999
0.1 up to 100, 1 above 100
ng/kg/min
1 to 999
1
mg/min
0.01 to 50.0
0.01 up to 10, 0.1 above 10
µg/min
0.01 to 99.9
0.01 up to 10, 0.1 above 10
ng/min
1.00 to 99.9
0.01 up to 10, 0.1 above 10
Specification
Infusion pressure
Maximum
infusion pressure
Specification – 4
1250 mmHg
Note: This value is approximate and is the pressure at the
front face of the syringe plunger. It also assumes an ideal
syringe with no stiction and a low infusion rate.
Omnifuse Instruction Manual
Graseby Medical Ltd.
Occlusion sensing - p r e s s u r e l e v e l s
Alarm levels
Approximate pressure in mmHg
Level 1
180
Level 2
300
Level 3
500
Level 4
750
Level 5
1250
Note: Approximate pressure at the front face of the syringe
plunger assuming an ideal syringe with no stiction and a low
infusion rate.
Occlusion sensing - time to occlusion
Alarm level and
infusion rate
Number of minutes to
occlusion
Bolus on occlusion release
Level 1 @ 1 ml/h
15
Less than 0.1 ml
Level 1 @ 5 ml/h
2.5
Level 5 @ 1 ml/h
More than 100
Level 5 @ 5 ml/h
21
Note: Values are approximate and are determined using the
method described in EN 60601-2-24 clause 51.6b using a
Braun Omnifix 50 ml syringe and a 150 cm line (part number
0128-0122).
Note: Values are for a 50 ml syringe. Values are reduced for
smaller syringes.
Omnifuse Instruction Manual
Specification – 5
Specification
Less than 1.0 ml
Graseby Medical Ltd.
Accessories
Flo-Safer™ extension sets
Length
Part number
Syringe extension sets
150 cm
0128-0122
200 cm
0128-0198
150 cm
0128-0253
200 cm
0128-0254
Syringe extension set with pressure sensing disc
150 cm
0130-0041
Polyethylene-lined syringe extension sets with antisyphon valve
150 cm
0128-0257
200 cm
0128-0258
Low-priming volume syringe extension set with antisyphon valve
100 cm
0128-0259
Epidural syringe extension sets with anti-syphon
valve (Yellow)
150 cm
0128-0261
200 cm
0128-0262
150 cm
0128-0263
200 cm
0128-0264
Syringe extension sets with anti-syphon valve
Epidural syringe extension sets (Yellow)
Specification
Software
Part number
Graseby Omnifuse Technician PC software
0151-0266
Omnifuse Drug Protocol Management System
0153-0084
Omnistack
Part number
Omnifuse pump stacking system
0156-0001
Wheelbase
0156-0096
Pole assembly for wheelbase
Specification – 6
Long
0156-0097
Short
0156-0098
Omnifuse Instruction Manual
Graseby Medical Ltd.
Supported syringe brands and sizes
Brand/Size
2
3
5
10
20
30
50/60
Brand/Size
2
3
5
10
20
30
50/60
BD Plastipak
BD Precise
Braun Euroject
Braun Omnifix
Braun Perfusor
Codan
Faulding Pharmaject*
Fresenius Injectomat
IMS Pumpjet*
JMS
Monoject
Nipro
Terumo
* Pre-filled syringe
Note: The syringes shown in the Supported syringe brands and sizes table are
supported by Omnifuse with their critical dimensions but may not achieve the stated
accuracy due to syringe variability (with the exception of the Braun Omnifix 50ml).
Symbols
Symbol
Meaning
The applied part is Type CF
Identifies the Potential Equalisation Terminal located on the body of
the pole clamp
~
The pump should be operated from an AC power source
Omnifuse Instruction Manual
Specification – 7
Specification
TOP
Standards
Graseby Medical Ltd.
Standards
Electrical
safety
Fluid ingress
protection
CE marking
Design standards
Disposal
Classified as Internally Powered Equipment:
Class 1, Type CF insulation on all inputs
IPX4 Splash-proof
The CE mark demonstrates that the pump conforms to
the requirements of European Council Directive 93/42/
EEC concerning medical devices. The number 0473
identifies the Notified Body under which the Quality
Systems operated within Graseby Medical Ltd. are
assessed
EN60601-1, EN60601-1-2, EN60601-1-4, EN60601-2-24
When the time comes to dispose of the pump, its
batteries or any of its accessories, do so in the best way
to minimise any negative impact on the environment.
You may be able to use recycling or disposal schemes. To
find out about these, contact your local waste disposal
service.
Separate any other parts of the equipment where
arrangements can be made for their recovery; either by
recycling or energy recovery.
Specification
The only pump components which are potentially
harmful enough to require separate disposal according
to manufacturer’s instructions or local regulations are:
• Main batteries (lead acid)
• Back-up battery on main PCB (lithium)
• LCD display (contains harmful chemicals and may
explode if incinerated)
Note: Existing national or local regulations concerning
waste disposal must take precedence over the above
advice
Patents
Specification – 8
Applied for
Omnifuse Instruction Manual
Graseby Medical Ltd.
Standards
Specification
Startup curves
Omnifuse Instruction Manual
Specification – 9
Standards
Graseby Medical Ltd.
Trumpet curves
Specification
Specification – 10
Omnifuse Instruction Manual
For further information, please contact your local distributor or
Graseby Medical direct on +44 (0)1923 246434
Graseby Medical Ltd.
Colonial Way, Watford, Herts, UK, WD24 4LG
Telephone: +44 (0)1923 246434, Facsimile: +44 (0)1923 231595
http://www.smiths-medical.com
Part No. 0151-0840-C
January 2004
© 2004 Graseby Medical Ltd
Smiths Medical - A part of Smiths Group plc