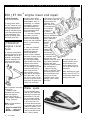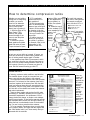
1
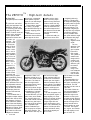
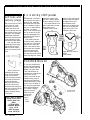
The Kawasaki Technical Magazine
Summer 1990
The ZEPHYR
W
TM
Vol. 3 No. 2
: High-tech details
ith all the fanfare and hoopla surrounding the spectacular new ZX-6 and ZX-11, the ZR550-B1
may have rolled into your store almost unnoticed. The truth is that behind the ZEPHYR’s understated deep blue paint and clean, sweeping lines lies a bike armed to the sprockets
with high-tech features. See Page 2 . . .
ROUTE LIST: o
P L E A S E
SERVICE
R E T U R NT O
o
PARTS
S E R V I C E
o
SALES
L I B R A R Y
Inside!
n Service tips galore. . .
S H O P
The ZEPHYR
by Jerry Heil
Training Development Coordinator
A quick look over before
taking the handsome new
ZR550-B1 ZEPHYR out
for a morning ride reveals
a long list of high-tech
details. Eccentric chain adjusters on the swingarm
ensure optimal wheel
alignment and save time
on chain adjustment. The
swingarm itself
is aluminum,
made of 75mm
x 30mm boxsection extrusions, and it
boasts a grease
fitting installed
just in front of
the tire to speed
maintenance.
Rear wheel
travel is a
generous 4.5 in.
Piggybackstyle reservoir
shocks give
the bike a traditional look and
make it easy to adjust
spring preload by turning
the cam collars. The
nitrogen gas-charged
shock absorbers have fourway adjustable rebound
and compression damping; the rider can select
the damping that best
suits the road and load
conditions.
The rear brake has a
dual piston caliper and the
230mm disc has an effective diameter of 217mm.
Front brakes are 300mm
discs of the semi-floating
type and have an effective
diameter of 272mm. Front
calipers are dual-piston
type. Both front and rear
calipers use sintered
2
l
K-Tech News
TM
T A L K / T E C H N I C A L
: High-tech details
bronze-type rectangular
brake pads though the
parts are not interchangeable from front to rear.
These brakes coupled
to a 394 lb. dry weight
give the ZEPHYR truly impressive stopping performance!
Stout 39mm front fork
tubes with 3mm wall thickness support the front
justable and the clutch
lever is five-way adjustable to fit any size hand.
Push-to-cancel turn signals are a handy addition.
Dual trip odometers can
be used to keep track of
the distance from the last
fuel stop and total trip
mileage.
A quiet but healthy exhaust note comes from
suspension. Rake is 27
degrees and trail is 4.1 inches. Front wheel travel is
5.5 inches. The frame is
built from high tensile
steel tubes with a 1.6mm
wall thickness. The
ZEPHYR is 40mm longer
than the GPz models with
a wheelbase of 1440mm.
While throwing a leg
over the ZEPHYR, you will
notice many more details.
The custom-looking textured seat is wide, comfortable and very low at just
30.3 inches off the ground.
The “superbike”-style
tubular handlebars provide a sporty but comfortable riding position. The
brake lever is four-way ad-
the four-into-one pipe.
Dual overhead cams borrowed from the KZ550-H
model open the single intake and exhaust valve in
each cylinder. The reliable
new ZEPHYR uses valves,
tappets, and shims common to all the KZ550 engines.
Air and oil together cool
the four-cylinder engine. A
large-capacity oil cooler
keeps oil viscosity uniform
for strong performance,
longer engine life and
lower hydrocarbon emissions. The carburetors are
Keihin CVK30s (the GPz
model had 26mm carbs)
and a large capacity air
box is used.
A digital ignition triggered by a single-pulse
coil keeps the spark plugs
firing with just the right advance for the best possible performance. The
advantage of digital ignition is that a very complex
and effective advance
curve is possible. Maximum spark advance angle
is 36 degrees with plugs
firing 13
degrees BTDC
at idle.
The construction of the
ZEPHYR engine is similar
to the GPz
550 models.
The cylinder is
anadvanced
design with increased cooling fin density
while the cylinder head is
hardened
using a new
heat treatment
process. Big
end rod bearings are made from ultratough Kelmet.
The transmission is a
six speed with fifth and
sixth gears overdriving the
countershaft. The fifth
gear ratio is 0.961; sixth is
a tall 0.851.
The result of these engine and transmission improvements is that the
ZEPHYR’s engine runs
smoother at lower rpm’s
and pulls strongly through
the mid-range. At highway
speeds, the engine is extremely smooth and no
balancer shafts are used
or needed. The suspension, engine, and chassis
work well together on all
types of roads. o
C O M M U N I C A T I O N S
®
Updated: The JET SKI Watercraft Training Manual
by Ray St.John
Supervisor, Technical Writing
timing, port durations, oil
capacities, carburetor adjustments, engine clearances and pump thrust
are but a few of
the many specifications listed in
this book. Besides
being a handy service
department
tool, it is al:so a useful
quick-reference guide
for providing information to your customers.
Order Part Number
99926-1015-01.
(Dealer cost of this
new Handbook is
$4.17 as of this writing. Just as with the
The JET SKI® Watercraft
Training Manual, updated
recently to include the
JS650SX, JB650 JET
MATETM and other p
’89 models, is now available to all Kawasaki
dealers. This new
book, used in Kawasaki’s Technical
Training classes,
explains how all
the systems of
Kawasaki’s watercraft work including the
jet pump, the carburetor,
the fuel vent check valve,
the stop switch relay circuit and many others.
The manual is 48 pages
long and includes many
detailed drawings and
diagrams. This manual is
not a substitute for your attendance at the training
classes, of course, but is
nonetheless a valuable
resource. Order Part Number 99929-1033-02.
(Dealer cost, as of this
printing, is still only $4.17
the Parts Retail Price
Guide for the latest pricing
information.)
n Copies of the Service
Specifications Handbook,
covering all JET SKI®
watercraft from 1974
through 1988, are still
available. Meanwhile,
we’ve added a new one
covering ’88 and ’89
models. Information on
new Training Manual, check
the latest Parts Retail Price
Guide before ordering.)o
ZX-11 poster
A new ZX-11 poster is on it’s way! This “ghost” view of
the ZX1100-C1 is beautifully detailed and will be a real
interest-grabber in your shop or show room.
Kawasaki ZX1100-C1
Microby “Micro” Mike Jeffers
Parts Publications Specialist
Well, it’s summertime again! Your parts and service
counters are crowded with customers wanting things
yesterday. The last thing you need to deal with is an irate
customer who has just received a JET SKI® watercraft
hull only to find out that it does not include the hardware,
pads etc. Several of the watercraft microfiche have been
revised, particularly the “Hull” sections. Please check
closely and make sure that all the parts required are included when ordering the hull part number. Assemblies
are indicated with an enclosing box or circle. If the parts
are not circled, they are not part of the assembly and
must be ordered separately.
CONTINUED ON PAGE 4
The new poster should be available by the time you
read this from Kawasaki’s Technical Training Department. Call 714/770-0400 Ext. 2472 to order, or write:
Kawasaki Motors Corp., U.S.A.
Technical Training Department
P.O. Box 25252
Santa Ana, CA 92799-5252
Dealer cost is $2.99 plus $1.95 shipping and handling per order (plus applicable sales taxes for California
dealers). You may send a check with your order or we
can charge your parts account. o
The Technical Magazine
l
3
G U E S T
Summer 1990
Vol. 3 No. 2
©1990 Kawasaki Motors
Corp., U.S.A. (KMC).
All rights reserved.
by Tevis Moffett
Product Support Specialist
Publisher
Kawasaki Tech Services
I recently had the oppor-
Executive Editor
Gary Herzog
Editor-in-Chief
Gregg Thompson
Regional Editors
North and East
Fred DeHart
Central and South
Walter Rainwater
West and Corporate
Patrick Kelly
Contributors
Jerry Heil, Mike Jeffers,
Tevis Moffett, Kenny
Osberg, Keith Pestotnik,
Sharon Reynolds,
Ray St. John, Bill Zito
P
O
T
Not just another pretty place
K-Tech News Staff
Publications Manager
Don Church
S
unity to attend the annual
Open House at
Anderson’s Cycle World in
Bloomfield Hills, Mich.
This event, always held on
he last Saturday in
February, has been a tradiion for over 40 years in
he southeastern Michigan
own. Motorcycle enthusiasts in the area have
come to not only expect it
but look forward to it.
I left thinking we could
all learn something from
his very special promotional event and how
Anderson’s Cycle World is
operated.
To attract potential new
customers, Anderson’s offers refreshments and
door prizes throughout the
Jay of the Open House. At
the end of the day, two
Grand Prizes are given
away. Winners need not
be present but to be
eligible for these and other
door prizes, customers fill
out a form with information
about themselves. These
forms are used to develop
a mailing list for future
sales events and promotions. The door prizes and
refreshments, meanwhile,
add to the festive atmosphere while encouraging
on-the-spot sales.
A real crowd pleasing
part of the event is indoor
short track racing! Anyone
with a valid motorcycle
driver’s license can race,
but he must supply his
own helmet and boots.
(Long pants and shirts are
also required, but there’s
no problem finding them
during winter in Michigan.)
The open house is held
in February to give potential customers an early
“first look” at the new
year’s products.
Anderson’s advertises on
local TV and radio stations
as well as in newspapers.
Word is further spread by
Andy Anderson, Sr. (center) started the business in
1942. Andy, Jr. (right) is the current owner.
Graphics/Production
Graphic Art
Gregg Thompson
MicroCONTlNUED FROM PAGE 3
Copy Editor
Pat Shibata
Production
Nickless Communications
Published by Kawasaki. All
suggestions become the
property of KMC. Sending a
service suggestion gives
Kawasaki permission to
publish and/or use it without
further consideration.
Specifications subject to
change without notice.
4
l
K-Tech News
n A new microfiche that should be beneficial to all of you is the Watercraft Service
Bulletin microfiche (P/N 99961-0312).
This includes all service bulletins from
1975 through 1989 and it will be updated
yearly. The service bulletin microfiche has
been categorized into model segments,
such as JS300-A/B, JS400/440-A, JS550A/B, JF650-A/B, JS650-A and so forth.
The bulletins are listed in chronological
order within each section. This microfiche
is a handy tool for cross-checking past
and present warranty work. The individual
service bulletins will still appear on Row
N of the affected model microfiche
n When ordering painted parts on motorcycle microfiche, please remember that
the colors indicated in the part description
do not necessarily describe the colors of
the part itself, but rather the overall paint
scheme of the vehicle. As you know,
many models have two or more color
schemes, so when ordering a fender, for
example, keep in mind the primary colors
of the vehicle. If you’re unsure of the
color description, check the Specification
grids on Row A or the Title page.
n As always, I would appreciate any suggestions or inquiries from you. You can
reach this department by phone, (714)
770-0400 ext. 2573, or you can fill out the
Micro-K report card (P/N M99995-152). o
G U E S T
getting touring groups and
local charities involved.
Kawasaki Team Green
off-road rider Larry
Roeseler and dirt track
road racing star Bubba
Shobert were on hand this
year to talk motorcycles
and sign autographs. In
spite of a surprise snow
storm, turn out was impressive and 160 vehicles
were sold. Not bad for one
day in February in the middle of a snow storm!
Anderson’s also has
two smaller open houses
Anderson’s provides the
motorcycles; for the other
courses, the rider brings
his own. All students must
bring their own helmets
and dress properly. Owner
Andy Anderson understands that promoting
rider safety is not only
good for the individual
rider, but also the motorcycle industry in general.
I came back from my
visit with the impression
that the employees at
Anderson’s are like one
big family. And big is the
S P O T
employees with fairness
and genuine concern.
And, along with several
hundred past, present and
future customers, I had a
wonderful chance to experience the result first
hand at Anderson’s very
successful winter Open
House.o
Be nice to travelers!
Indoor short track races help entertain the crowd.
at appropriate times
during the year. One
focuses on watercraft and
the other on ATVs. Special
events and programs are
always scheduled to
promote customer awareness and interest in
whatever product line the
open house is intended to
spotlight.
This year, Anderson’s
Cycle World has begun offering rider training
programs. There are three
different courses: Riding
and Street Skills, Experienced Rider Course,
and Performance Based.
For the basic course
(Riding and Street Skills),
correct word: At peak
times of the year,
Anderson’s has about 100
employees! Chuck Heil,
service manager there for
11 years, told me their
employee turnover is very
low. He attributes this to
the way Andy treats his
employees. According to
Chuck, Andy works hard
to make all his employees
feel as though they belong
and does what he can to
help them solve problems
as they arise.
I was reminded that no
matter how large or small
a business is, it will always benefit from an
owner who treats his
many or us toil 50 weeks a year anticipating those
two weeks we are free to relax and get away on vacation. So do our customers. For many of them, vacation time has finally arrived.
We all know how wonderful it is when our vacations
work out just as planned and travels are both worryand trouble-free. But sometimes vacations do not go
so smoothly. Consider the plight of a customer who
experiences a mechanical failure while on vacation.
He may wind up stuck in a strange city, possibly far
from home, in need of a Kawasaki dealer’s service.
The success of this particular vacation is suddenly
put in the dealer’s hands.
Unfortunately, Consumer Services receives more
than a few desperate calls from stranded travelers.
The dealer “is completely booked for three weeks,” or
has suggested “it doesn’t look serious. Try riding
another 300 miles.”
While we understand that summer is a very busy
season for you, we ask that you put yourself in the
customer’s shoes: How would you feel if you were
stranded and couldn’t find anyone to help?
Any time someone at a Kawasaki dealership exerts
extra effort aiding a stranded traveler, everyone
profits. The customer goes on with his vacation, confident again in both Kawasaki equipment and our
dealer network, and you can bet he won’t hesitate to
tell his friends about the experience. As you know,
happy customers can be our best advertisers and it is
much less costly to maintain a current customer than
to develop a new one.
We do hope everyone has a great summer and that
all your vacation plans go smoothly.
- Sharon Reynolds
Consumer Services
The Technical Magazine
l
5
T I P S
F R O M
T H E
S P E C I A L I S T S
650 JET SKI® engine lower end repair
by Keith Pestotnik
Rocky Mountain Kawasaki
In the torn down 650cc
JET SKI® engine on your
workbench in front of you,
you may find that some
“fretting” has taken place
in the main bearing bores
of the crankcases. The
amount of fretting varies,
but usually is not bad
JF650-B1/2
engine cover
hook
In the past, the JF650-B1
and B2 engine cover hook
was available only as an
assembly. Unfortunately,
the hook assembly is expensive and the whole
thing had to be ordered
just to replace a lost circlip
or hinge pin.
Because of this,
Kawasaki has recently
made the hinge pin,
washer and circlip (Etype) available separately.
- Gregg Thompson
Note: The part numbers
are as follows:
Hinge Pin 92043-3728
E Clip . . . 92033-3719
Washer .410S0800
6
l
K-Tech News
enough to affect performance-until the engine is
disassembled. Then, on
reassembly, it is virtually
impossible to match up
the fretting pattern between the main bearings
and center seal and the
crankcase halves.
To save the crankshaft
and cases, you must
remove the high spots
from the main bearings,
center seal and crankcase
bores. Try the following
procedure:
1. Clean the crankcase
parting line, then reassemble using the two
dowels and all bolts.
Leave out the crankshaft
and seals. Properly torque
the-crankcase halves.
2. Using a good quality
rigid cylinder hone, oil the
bearing bores and the
stones, insert the hone
into the bearing bores and
rotate the hone only by
hand. Apply as much
stone pressure as possible, but do not drive the
hone with a drill. You do
not want to “clean” the entire bore, only remove the
high spots. Go slowly and
check your work often.
Water spots
Is your otherwise
shiny
®
new JET SKI watercraft
suffering from water spot
discoloration? The problem is probably mineral
deposits in the water left
to dry on the boat. You
can clean the decals with
a hard water spot remover
(bathroom cleaner). Lime
Away and Shower Power
are two brands that work
well. - Kenny Osberg
3. Use a worn out 1/2-inch
wide mill file to clean the
labyrinth seal of the
crankshaft. Once
again, remove only
the high spots here.
Do not attempt
to clean its entire surface.
4. Remove any
aluminum transferred to the
main bearings using a
similar techniqueagain, grind
carefully
5. Thoroughly
clean and
prepare all
the parts for
final assembly
6. Clean and dry
the crankcase bearing bores, the outer
diameter of the main bearings and the crankshaft
labyrinth seal using
Kawasaki Contact Cleaner
(P/N K61080-001C).
7. Apply a “thin pink
smear” of LOCTlTE® Stud
and Bearing Mount (red)
(P/N K61079-002) to the
bearing bore of both
crankcase halves. Use it
sparingly. Less is better
than more.
8. Continue with reassembly following procedures outlined in the
Service Manual. Do not
vary on torque values or
patterns.o
HINT: Mounting the crankshaft in red LOCTITE® on
a new engine will prevent
fretting in the future.
S H O P
T A L K
AlI 650 JET SKI® cylinders are not alike
by Gregg Thompson
Sr. Product Support Specialist
There have been some
changes made in JS and
JF650 cylinders over the
years, resulting in a list of
several part numbers for
what seem to be nearly
identical parts. Some
changes were simply
refinements for product im-
11005-3707 - This part is
modified for mounting the
fuel pump assembly to the
cylinder on the TS model
which was introduced in
1989. Bosses are added
to the outside of the
cylinder as well as inside
the water jacket so the
fuel pump can be bolted
directly to it. This cylinder
can be used on all 650s.
JS65OB Cylinder
provement; some were
needed for a specific
model application. The following is a list of the part
numbers and a brief
description of the changes
and model application:
11005-3702 - This is the
original 650 cylinder and it
fits X-2s and SXs.
11005-3705 - This part supersedes the above and
has an improved cylinder
liner design. The O.D. at
the top of the liner was increased from 82.5mm to
86.5mm to reduce the
chances of head gasket
leakage. This part fits all X2s and SXs.
11005-3708 - There are
several versions of this
part number. Depending
on when it was manufactured, one of these
cylinders may have the
Fuel pump mounting bosses and the added
material inside the water
jacket, or the mounting
bosses outside but no
added material inside the
water jacket, or no mounting bosses and no added
material inside the water
jacket. The 3708 cylinder
will bolt up to all 650
models (including the JET
MATE™) except the TS.
However, if you happen to
get your hands on the ver-
sion with both the mounting bosses and the added
material in the water jack-
et, you can drill and tap
the bosses and use it on
the Tandem Sport.o
Lean mean water machine
On Kawasaki JET SKI® watercraft, any leak between
the fuel tank and the fuel pump can result in a lean-running condition that can be tough to diagnose. Because
the fuel is being drawn, rather than pumped through
those lines, a leak doesn’t necessarily result in any
visible fuel leakage. Instead, air leaks into the lines and
is pumped to the carburetor causing the lean condition.
With a test tank and one easy-to-make special tool,
you can quickly and easily determine whether a problem
is caused by a fuel system air leak. The special tool is
simply a remote fuel system made from an oil bottle, a
fuel filter, some fuel line and an inline restrictor.
Disconnect the fuel supply line from the fuel pump
(which is on the carburetor on 440 and 550A models)
and the fuel return line from the carburetor. Then connect the lines to the remote tank and run the vehicle in
your test tank. If the lean-running condition has disappeared, inspect the boat’s fuel system very carefully for
air leaks. That is almost certainly the cause of the problem.
On JS440 and 550 models that have the fuel pump
mounted on the carburetor, the fuel inlet fitting is mounted
with a single
screw on the
outside plate of
the fuel pump.
If it is installed
off-center, it
can leak air
directly into the
pump and can
trigger
the
same problem.
When performing this test,
you can visually inspect this
inlet fitting to
make sure it is
installed
properly.
- Keith
Pestotnik
The Technical Magazine
l
7
T I P S
F R O M
T H E
S P E C I A L I S T S
®
Which JET SKI oil should I use?
You may have noticed
that Kawasaki’s
Fall/Winter Accessories
Catalog shows two Marine
Product Oils. The Marine
Product Engine Oil is the
same as the original JET
SKI® TC-W Oil; the
Marine Product High Performance Oil is the new
NMMA-certified TC-WII oil
(see the separate Tips
item). This new classification tests oils to be sure
they flow smoothly under
conditions typical of oil injection systems where oils
are likely to sit for a long
period and be subjected to
heat and moisture.
JET SKI® Oil (or Marine
Product Engine Oil as it is
now called) has proven to
be a superior quality oil
and also functions well in
oil injection systems. It is
still highly recommended
by Kawasaki for all JET
SKI® watercraft. But, if the
customer must use a different brand of oil,
Kawasaki owner’s
manuals recommend that
a TC-WII oil be used to
guard against the use of
an inferior TC-W oil since
there is a wide range of
quality of TC-W oils
(another reason why the
TC-WII classification was
developed).
Within the next few
years, TC-W oils will be
replaced completely by
TC-WII oils.
The High Performance
Oil is recommended for
customers who have
modified their boats or
ride aggressively. It
provides extra protection
in severe use conditions.
- Don Church
8
l
K-Tech News
K-TECH extra! Metric conversion chart!
When measuring parts and figuring clearance it is always a good idea to use “metric
precision” measuring tools if possible. This eliminates the need for mathematical conversion. It’s faster and there’s little possibility of error.
There are times, however, when a technician will need to convert from metric to U.S.
specifications or vice versa. In this and following issues of K-Tech News we will include
an insert with one or more handy conversion charts printed on it. We suggest you
make copies of these for each of your service personnel and post or file the originals
somewhere in your shop for easy reference. - Fred DeHart
TC-W vs. TC-WII: What’s the difference?
Recently, the Boating Industry Association (BIA)
joined with several other
marine industry organizations to form the National
Marine Manufacturers Association (NMMA). At the
same time, it was decided
to develop a new test procedure for certifying
marine two-stroke oils. In
so doing, the NMMA
chose new engines to be
used for certification testing which in turn required
some changes be made to
the test procedures. Additional changes were made
in order to improve the
quality of the oils that
were certified.
The new certification is
called “TC-WII.” Although
NMMA (formerly BIA) TC-W
oils are still on the market,
they will gradually be replaced by TC-WII oils. By
1994, licenses will no longer
be granted for the manufacture and sale of TC-W oil.
Two of the new tests for
the TC-WII certification
are in the areas of endurance testing and oil injection system testing. In
the former, the candidate
oil is mixed with fuel at a
100:1 ratio. (In the original
TC-W certification, a 50:1
gas/oil mix was used.) In
the oil injection phase of
the procedure, oils are
tested to be sure they
don’t react to moisture or
other types of oil by gelling and thus blocking
fuel injection lines.
- Gregg Thompson
T I P S
F R O M
T H E
S P E C I A L I S T S
Is it oil pressure or is it fuel level?
On both the ZX-11 and
ZX-6, the oil pressure and
fuel level warning systems
are tied together. When oil
pressure is low, the oil
pressure sensor grounds
both the oil warning light
and the fuel level warning
circuit relay. Consequently, any time the oil light
comes on, the fuel light
also comes on.
The reason for this is to
provide a test mode for
the fuel warning system.
When the ignition switch is
EN450, EX500
oil pressure
If you ever run into a stubborn oil pressure lightone that won’t go out-on
an EN450 or EX500
during the pre-delivery service or after rebuilding the
engine, there probably is
no oil flow in the engine at
all! Apparently, either the
pump loses its prime or an
airlock occurs between
the pump and the filter
and no oil flows. This condition can usually be corrected by taking the oil
filter off and the spark
plugs out, and cranking
the engine over until oil
starts to flow from the filter
mounting plate.
This problem could
result in a delayed failure
of the balancer bearings
after several hundred
miles. The first symptom
of balancer bearing failure
is usually oil leaking from
the water pump drain hole.
The oil seal leaks because
the worn bearings allow
excessive radial movement in the balancer shaft.
- Tevis Moffett
turned on before the engine is started, there is no
oil pressure so the oil light
and fuel warning circuit
relay are both turned on
by the oil pressure sending unit. If the fuel level
warning system is functioning properly, the fuel lights
will come on.
A diode between the oil
pressure and fuel level
warning circuits prevents
the fuel level warning system from turning on the oil
light. It wouldn’t hurt to let
your
customers
know that if
their fuel and oil
warning lights come on
together while the engine
is running, the real problem is oil pressure.
- Gregg Thompson
Police Motocycles: To cool or not too cool
by Bill Zito, National Police Motorcycle Coordinator
In my travels around the country, some of the most-often asked questions are
about installing aftermarket oil coolers on police motorcycles.
Kawasaki Motors Corp., U.S.A., does not recommend the installation of oil
coolers on our police motorcycles. Police motorcycles encounter high engine
temperatures only while being operated at very low speeds, such as in a parade. In
order for an oil cooler to be effective, it must have sufficient air flow through it and at
low vehicle speeds there is simply not enough air flow to significantly lower the oil
temperature.
Some oil coolers can even create problems under
these conditions because of the police motorcycle
engine’s low-pressure lubrication system. Under normal conditions, with the engine warm, the system
produces about 3psi at 3,000rpm. The addition of
the oil cooler radiator, lines and fittings can result in
much lower pressures. In some oases, the added
restriction can result in no oil delivered to the top
end below 3,000rpm.
Kawasaki recommends an oil and filter change
after the vehicle has been operated in a manner
which would create very high engine temperatures.
If the vehicle is being operated in high ambient
temperatures (above 90° F), you may want to shorten the interval between oil changes. And always use a high-quality 20W-50 oil that specifies it is for motorcycle fourstroke engines.
The distinction is important: Motorcycle four-stroke engine oils are formulated for
high temperatures but they’re also designed to lubricate the transmission without
breaking down. The high loads and wiping action of the transmission gears result in
shear damage to the polymers in the oil. The polymers are what allow the oil to
maintain high viscosities at high temperatures. Motorcycle oils are formulated to
resist this “molecular shear” and thus retain their lubrication qualities in a motorcycle engine longer than other oils.
Tell your police motorcycle customers that KMC recommends they save themselves the inconvenience and expense of installing oil coolers, and just to change the
oil more often under extreme conditions. Then sell them a quality motorcycle oil.o
The Technical Magazine
l
9
T I P S
F R O M
T H E
S P E C I A L I S T S
4 x 4 sticky shift pedal
Golf tees and
battery plugs
Did you ever pull off a twostroke oil line or a fuel
tank gas line and then
wonder what to do with
the oil or gas that was suddenly flowing all over your
work area? You probably
grabbed the first bolt or
screw that would plug the
line and forced it in! But
here are two better ideas:
First, golf tees work
surprisingly well for plugging oil lines and most
small fuel lines. Keep a
few in your tool box at all
times.
Occasionally a KLF300-C
4x4 customer will report a
sticking shift pedal-the
shift shaft does not return
to the “centered” position
after up- or down-shifting,
he notes. If it doesn’t
return to the centered position, of course, the clutch
will stay disengaged and
not transmit any power to
the drive train.
This problem may be
caused by sharp edges on
one side of the shift-shaft
pawl and the secondary
clutch cam-release plate.
These parts are stamped
from steel plate which
leaves a sharp edge on
one side of the part. Sometimes this edge can cause
excessive friction when
the part is sliding against
another causing it to stick.
The simple solution is to
put a small radius on that
sharp edge where
needed. Using a small
KAF450-B Mule kit
Second, those red
packaging plugs that
come out of the battery
vents can be used to
cover the pipe protruding
from most oil tanks and
some fuel petcocks.
Recycle a few of those
into your tool box and
save time later looking for
that bolt you stuck into the
oil line because you
weren’t thinking ahead...
- Fred DeHart
Have a time- or moneysaving service tip to
share? Send it to:
Editor
K-TECH NEWS
Kawasaki Motors
Corp., U.S.A.
9950 Jeronimo
Irvine, CA 92718
10
l
K-Tech News
If you have a KAF450-B
MULE 1000 transmission
apart to install the kit P/N
99995-1193 (see “Mule
1000 Transmission Improvements” in the Winter
’89 issue of K-Tech
News), check that all the
needle bearing races in
the two case halves are
seated all the way in their
bores. If not, the dogs on
the new gears might clash
when the transmission
is in neutral. Tapping
lightly on each of
these races will
assure they
are all the
way in.
- Tevis
Moffett
grinder or file, remove just
enough material to radius
the edge and no more.
The smoother those
edges are, the better they
work. Do not change the
shape of the piece. The
illustration shows the
edges that may need attention.
- Keith Pestotnik
T I P S
F R O M
T H E
S P E C I A L I S T S
How to determine compression ratios
Whether you are building
a drag bike or blueprinting
a classic, you need to
know how to determine
the actual compression
ratio of each cylinder.
Here’s how to go about it:
1. With the piston at Top
Dead Center (TDC),
smear a little grease
around the edge of the
crown to seal the piston
and cylinder.
2. Install the cylinder
head gasket and cylinder
head with valves in place.
Torque the head to specs.
3. Fill a graduated
burette with solvent or
light machine oil.
4. With the spark plug
hole in a vertical position,
measure how much liquid
it takes to fill the combustion chamber to the bottom of the spark plug hole.
Now you’ll need to do
some math:
5. Add the amount of
solvent you poured into
the cylinder, in milliliters
(for example, 35ml) to the
displacement of the
cylinder in cubic cen-
timeters (300cc would
be the displacement
of one cylinder in a
1200cc four-cylinder
engine).
6. Divide the sum of
the two numbers (335
in our example) by the
amount of solvent you
poured
into the
cylinder
(35ml).
The result is the compression ratio of that cylinderin
our example, as outlined
below, the ratio is 9.57 to 1.
Step 5: 35ml + 300cc = 335
Step 6: 335 / 35 = 9.57
Result: CR = 9.57:1
Easy, even if you aren’t a
mathematician!
-Steve Rice
WEST
CONTlNUED FROM PAGE 12
to help you get your skills up to speed. Of course, we
know you are too busy to attend training classes now,
but our training season begins again in October.
In the meantime, keep track of those areas in which
you would like to improve your skills and then keep an
eye out for the October training schedule which will arrive in plenty of time for you to reserve your place in
class. We look forward to seeing you then! o
SOUTH & CENTRAL
CONTlNUED FROM PAGE 12
of informing customers what conditions need attention.
The checklist (shown at right) is a two-part form; you
keep a copy and give the original to the customer.
You might have noticed the drive chain and sprockets
were worn, for instance, but the customer chose not to
have them replaced at the present time. With the additional hard mileage these parts will accumulate during
the summer, they will surely need to be replaced in the
fall. Note this on the checklist and contact the customer
later about replacement.
There are many repairs and services that fall under
the heading of “ultimately necessary but not urgent” or
preventative maintenance: tire replacement, fork oil
change, brake fluid change, or maybe a new stainless
steel jet pump impeller. A good service manager will contact customers about service work during the winter. By
taking the time to make detailed notes on the checklist
now, you won’t miss a potential winter customer.
Try to be complete: Sometimes when you write down
just a couple of words, you forget what the original idea
was. With detailed notes, you’ll know exactly what you
discussed with the customer.
Your customers will
really appreciate the
off -season
reminder.
Making
regular use
of this
checklist
will help
keep your
service
department
busy all
year ‘round.
o
The Technical Magazine
l
11
R E G I O N A L
N E W S
Training
Schedule
East Region
North Region
Central Region
South Region
West Region
KMC Instructors are working now on the
1991 Program schedule. Classes will
begin again in October. All dealers will
receive a copy of the winter class
schedule but don’t forget to watch this
space in the Fall and Winter issues of
K-Tech News.
WEST
SOUTH & CENTRAL
NORTH & EAST
Up to your
elbows. . .now
Service busy?
You bet!
Diagnostic
tools
by Patrick Kelly
9950 Jeronimo Road
Irvine, CA 92718
(714) 770-0400
by Walter Rainwater
6110 Boat Rock Blvd. S.W.
Atlanta, GA 30378
(404) 349-2000
by Fred DeHart
201 Circle Drive N., #107
Piscataway, NJ 08854
(201) 469-1221.
As this issue of K-Tech
News reaches you, you
are probably up to your
elbows in grease. The
phone is ringing off the
hook and the work orders
are stacking up. The
sounds of air tools spinning and engines running
fill the air. The service
season is at its peak!
But are you keeping up
with the pace? Are your
technical skills and
knowledge up to the challenge or do you find yourself spending more than
your fair share of time
troubleshooting and repairing each job?
If the answer to that last
question is “yes,” then you
should consider technical
raining from Kawasaki.
We offer a wide variety of
classes, covering everything from JET SKI®
watercraft to generators,
By the time you read this,
you will be in the busiest
part of the season. Your
service department will be
full to bursting with your
customer’s motorcycles
and watercraft, in for
repairs or service. And, of
course, all your customers
will be anxious to get their
bikes and boats back
quickly so they can ride.
Many want only the absolutely necessary repairs
performed now. This, then,
is the time to make sure
your service records are
complete and accurate
and your follow-up system
n place so you can contact the customer about
additional service work
later.
Don’t forget about the
Visual Inspection Checklist (P/N 99995-769) which
is available from Kawasaki
specifically for the purpose
With service work beginning to pile up at the door,
your Service Department
IS going to need all the
help it can get this summer!
Here is a list of what I
consider the basic diagnostic tools a dealership’s
Service Department
should have. How many
does your Service Department have available?
CONTINUED ON PAGE 11
12
l
K-Tech News
CONTlNUED ON PAGE 11
oVacuum pressure tester
o Leakdown tester
o Compression gauge
o Oil pressure gauge
o Timing light
oCoil tester
o Multimeter
o CDI tester
o Carb sticks or vacuum
gauge set
o Fuel level gauges
o Dial bore gauge
o Dial indicator and stand
o Full set of micrometers
o Torque wrench
o Air pressure gauge
o Feeler gauges
o Plastigage
Some of you may
believe that many of these
tools are useful only for
making adjustments. But
all of the tools listed can
also help you diagnose
problems as well.
Take a timing light, for
example. This is one of
the only tools that will indicate whether the
electronic advance is
working properly. It can
also show whether or not
a spark plug is firing inside the cylinder under
compression.
Give some thought to
the other tools listed and
see how many ways you
can think of to use them
for diagnostic purposes. In
future issues, we will discuss some of these tools
and their uses. o