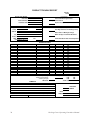
1
Operations Manual Bowling Center Operating Procedures September 2005 / 53-900194-000 Bowling Center Operating Procedures Manual © September 2005 by the Brunswick Bowling and Billiards Corporation. All rights reserved. Frameworx, Classic, Vector, Vector Plus and GS Pinsetter area registered trademarks of the Brunswick Bowling and Billiards Corporation. Reorder Part No. 53-900194-000 Notice: If available, updates to this manual can be found on-line at www.brunswickbowling.com. All information contained in this document is subject to change without notice. Brunswick Bowling and Billiards 525 West Laketon Avenue P.O. Box 329 Muskegon, MI 49443-0329 U.S.A. 231.725.3300 2 Bowling Center Operating Procedures Manual Contents Administrative ................................................................................................................................ 4 TYPICAL MECHANIC’S CLIPBOARD SYSTEM FOR BCOP PROCEDURES ....................... Mechanic’s Training Program ................................................................................................... Mechanic’s Training Program Form ......................................................................................... Service Bulletins ........................................................................................................................ 4 4 5 7 Pinsetters ..................................................................................................................................... 10 GS SERIES PREVENTIVE MAINTENANCE PROGRAM .........................................................10 Instructions for GS Pinsetters Preventive Maintenance Work Schedule ................................. 11 GS Pinsetters Preventive Maintenance Work Schedule Form .................................................18 GS Pinsetters Pending Items Form ..........................................................................................20 GS Pinsetters Parts Usage Log Form ......................................................................................21 GS PINSETTERS DAILY STOP RECORDS ..................................................................................22 GS Series Stop Sheet Form ......................................................................................................23 GS Series Pinsetter Error Codes Form ....................................................................................24 GS SERIES PINSETTER WEEKLY FRAMES PER STOP RECORDS .......................................25 GS Series Pinsetter Weekly Stop Report Form ........................................................................26 GS SERIES PINSETTER MONTHLY FRAMES PER STOP RECORDS ....................................27 Universal Monthly Frames Per Stop Record Form ..................................................................28 CONTROL COUNTER MALFUNCTION REPORT ....................................................................29 Control Counter Malfunction Report Form ..............................................................................30 Automatic Scorers ....................................................................................................................... 31 AUTOMATIC SCORER PREVENTIVE MAINTENANCE SCHEDULE ..................................31 Automatic Scorer Preventive Maintenance Schedule Form ....................................................32 Lanes ............................................................................................................................................ 33 LANE PREVENTIVE MAINTENANCE SCHEDULE ................................................................33 General Lane Maintenance Schedule ......................................................................................34 Lane Preventive Maintenance Schedule Form ........................................................................35 Bowling Equipment - Product Trouble Report and Warranty Policy ........................................ 36 BRUNSWICK PRODUCT TROUBLE REPORT ..........................................................................36 Product Trouble Report Form ..................................................................................................38 Universal Date Codes Form ....................................................................................................39 Error Codes Form ....................................................................................................................40 Warranty Schedule ...................................................................................................................41 Bowling Center Maintenance ..................................................................................................... 45 KEY AREAS TO NOTE: ..................................................................................................................45 Climate Control ........................................................................................................................45 Cleanliness ...............................................................................................................................45 BOWLING CENTER MAINTENANCE SCHEDULE ..................................................................46 Bowling Center Maintenance Schedule Form .........................................................................47 Bowling Center Safety ................................................................................................................. 51 General Safety Tips ..................................................................................................................51 Customer Safety ......................................................................................................................51 Prevent Slips and Falls .............................................................................................................52 Center Manager’s Monthly Inspection Report Form ...............................................................53 Monthly Safety Check List Form .............................................................................................54 Bowling Center Operating Procedures Manual 3 Administrative TYPICAL MECHANIC’S CLIPBOARD SYSTEM FOR BCOP PROCEDURES Mechanic’s Training Program Training on safety, customer relations, commitment, communication and organization are key for successful preventive maintenance programs and customer service. All bowling center lane maintenance mechanics, pinsetter technicians, assistant mechanics and chief mechanics will be trained through the mechanics’ training program. The focus is to train every chief mechanic. They will start the training procedures at each bowling facility for other mechanical positions. Once a mechanic has been trained, they are then eligible to train other mechanics for the same procedure. Select the training item for the position of the mechanic. Enter the mechanic’s name and the date they were hired for that position. Each item has certain duties pertaining to the maintenance position. To be fully trained in each level, all job duties must be dated and signed. It is recommended that each item, from a newly hired person, be completed first, before proceeding to the next item(s). If a mechanic was initially trained as a Lane Maintenance Mechanic and is being promoted to a Pinsetter Technician, only the items that are new will require training, dating and signature when completed. 4 Bowling Center Operating Procedures Manual Mechanics Training Program Mechanics Name - 1 2 3 4 5 1 2 3 4 5 6 7 1 2 3 4 5 1 2 3 4 5 6 7 8 9 10 11 12 13 14 15 1 2 3 4 5 6 7 8 Pinsetters Pinsetter Safety , GS Series Pinsetter Stops, GS Series Pinsetter Cleaning, GS Series Basic Pinsetter Part Replacement, GS Series Preventive Maintenance Program, GS Series Automatic Scorers Scorer Safety, Frameworx / Classic / Vector Scorer Basic Operations , Frameworx / Classic / Vector Cleaning Scorer Consoles and Overheads Trouble Shooting , Frameworx / Classic / Vector Basic PCB Replacement, Frameworx / Classic / Vector Preventive Maintenance, Frameworx / Classic / Vector Advanced Scorer Operation, Frameworx / Classic / Vector Control Counter Date Hired Items Date Trainer Signature Basic Command Network / Classic / Centermaster / Vector/ Vector Plus Equipment Switches, Location and Operation Basic Control Desk Operations Basic Office Computer Advanced Computer Operations Bowling Equipment Ball Hoods and Rack Safety / Ball Lift Safety Switch Masking Unit Safety Bowlers Seating Safety Cleaning Hoods and Racks Vacuuming Ball Lifts Vacuum Hand Dryers Basic Ball Lift and Rack Trouble Shooting Basic Ball Lift and Rack Part Replacement Basic Telefoul Cleaning and Adjustment Basic Masking Unit Repair and Adjustment Return and Division Capping / Gutter Replacement Ball Lift Replacement and Adjustment Telefoul Replacement and Adjustment Bankshot / Pinball Wizard Repair and Adjustment Lightworx Repair and Adjustment Lanes Lane and Approach Safety Precautions Gutter and Approach Mops Operations / Safety Lane Duster Operation / Safety Lane Cleaner and Conditioner Safety Cleaning and Conditioning Lanes Cleaning Pin Decks Cleaning Flat Gutters Cleaning Kickbacks Bowling Center Operating Procedures Manual 5 Mechanics Training Program 9 10 11 12 13 14 15 16 17 18 1 1 2 3 4 5 6 7 8 9 1 2 3 4 5 6 Changing Dusters Changing Ball and Pin Wipers Spot Cleaning Synthetic Approaches Buffing Synthetic Approaches USBC / FIQ Lane and Approach Requirements Lane and Approach Inspections Basic Repairs to Approach, Lanes and Pit Ends Rotation and Washing of Bowling Pins Adjusting / Sealing Synthetic Lane Panels and Joints Synthetic Lane Panel Replacement Laundering Washing and Drying Ball / Pin Wipers and Dusters Administrative Maintain Inventory and Supplies Complete All Daily Maintenance Work Forms Assist Chief Mechanic With Scheduling Control of All Supplies and Parts Scheduling of Mechanics Ordering of Supplies for Manager Approval Follow / Understanding of BCOP Manual PTR Warranty Parts and Equipment Maintain Shop and Back Aisle in an Organized Manner Other Duties Assist Management Where Needed Basic Building Repair and Maintenance Replacement of Burnt out Lamps and Bulbs Basic Lighting Repairs Basic Painting Skills General Comments Bowling Center Operating Procedures Manual Service Bulletins All bowling center mechanics will be responsible for maintaining a 3-ring binder to collect all service bulletins. Each bowling facility is required to have a 3-ring notebook binder. The binder will consist of a table of contents and service bulletins. The outside of the binder will be marked “Service Bulletins” for identification purposes. Chief Mechanics should review each service bulletin for the maintenance tip(s) or procedure change. They should adjust their daily, weekly or monthly preventive maintenance programs to incorporate the new changes. NOTE: Copies of Service Bulletins are available for downloading at website www.brunswickbowling.com on the Customer Service and Support pages. Bowling Center Operating Procedures Manual 7 Sample Service Bulletin - Page 1 SERVICE BULLETIN Subject: GS-Series Pinsetter - New Ball Cushion Frame Assembly Date: 8/23/04 Distribution: GS Pinsetter Customers Bulletin No. SB04-5 We are pleased to announce the following information regarding a GS-Series Pinsetter component part improvement. Based on feedback from our customers and distributors, we have thickened the material on our ball cushion frames. We have also added a new mounting bracket for the cushion shock. The previous version of mounting bracket was a welded assembly. This resulted in some issues with weld stress areas in the cushion material. The new cushion shock bracket is bolted to the cushion frame. Refer to Figure 1. NEW STYLE CUSHION SHOCK 99-020402-002 NEW STYLE SHOCK MOUNTING BRACKET NEW STYLE CUSHION FRAME ASSEMBLY 47-025639-009 FIGURE 1 (C) 2004 Brunswick Bowling & Billiards Corporation, 525 West Laketon Avenue, P.O. Box 329, Muskegon, Michigan 49443-0329 8 Page 1 of 2 Bowling Center Operating Procedures Manual Sample Service Bulletin - Page 2 The new style of heavy duty ball cushion frame went into production pinsetters starting with series 512 machines. The part number for the new heavy duty ball cushion frame, which includes the shock mounting bracket, is 47025639-009. Note: When ordering this new ball cushion frame assembly, you must make sure that the cushion shock you are using is the new style shock, refer to Figure 1, without the shock fluid reservoir. The older type shock will not fit into the new cushion frame shock bracket. Part number of the new shock is 99-020402-002. This new ball cushion frame assembly is usable in all models of GS-Series pinsetters. If you have any questions about this Service Bulletin, call the Customer Support Line at 1-800-323-8141 (USA). For assistance in international bowling centers, contact your local Brunswick area office. Glenn Josey Worldwide Installation Training/Audit Manager David E. Rice Director of Worldwide Service Page 2 of 2 Bowling Center Operating Procedures Manual 9 Pinsetters GS SERIES PREVENTIVE MAINTENANCE PROGRAM All chief mechanics and their mechanical staff should be responsible for the inspection and completion of the Pinsetter Preventive Maintenance Program. Each Pinsetter should be inspected every 6 months, this inspection program does not take the place of normal inspection, adjustments and troubleshooting of the Pinsetter, but is an added, intensive program. 1. The chief mechanic and his mechanical staff, on a regular schedule, will inspect each Pinsetter following the instructions set forth in this procedure. 2. Each center is required to have a 2 or 3-ring notebook binder. The binder will consist of one GS Pinsetter Preventive Maintenance Work Schedule, one GS Parts Pending Items, and one GS Parts Usage Log) for each Pinsetter. The outside of the 2 or 3-ring binder will be marked as GS Pinsetter Maintenance program for identification purposes. 3. The GS Pinsetter Maintenance program binder will also include one copy of the preventive maintenance work schedule instruction. 4. Check off the appropriate box with an “X” when that portion of the Pinsetter has been inspected, adjusted or corrected per the preventive maintenance work schedule. 5. If pending or part replacement is needed, and an inspection has been completed, then mark the box with a half of an “X”, after replacement and adjustment of the pending item(s) are completed, finish marking the box. 6. All parts that are used to complete the GS Pinsetter Maintenance program inspection must be written on the parts usage form for future ordering. 7. All parts that are needed to complete the GS Pinsetter inspection must be written on the parts pending form. 10 Bowling Center Operating Procedures Manual Instructions for GS Pinsetters Preventive Maintenance Work Schedule Elevator Assembly 1. Inspect condition of the frames welds. Check for loose or missing hardware inspect all metal for stress cracks. 2. Inspect all shafts, bearings, sprockets, chains and pulleys for condition and adjustment. Check all pin shovels and shovel hardware. Inspect all shovel pivot levers, inspect centering guide condition and tighten all hardware. 3. Inspect condition and mounting of guards and verify guard identification labels are in place. 4. (Series 42 and below) Inspect condition, location and adjustment of rubber knockout cords and pin ejecting flap. 5. (Series 42 and below) Inspect condition, adjustment and hardware on the pin turn wires. 6. (Series 12 and below) Inspect welds, hardware and adjustments of single feed pin chute assembly. (Series 13 through 42) Check the adjustment, mounting hardware and welds and condition of the dual feed pin chute. Inspect the “Y” switch, flipper stoppers, deflector shoes and rubber cords for proper adjustment and condition. 7. Inspect the mounting and adjustment of the elevator control switch. Check the mounting and function of the mechanic’s rear control box and trouble light. Verify that all elevator cables are intact, routed correctly and secured. 8. (Series 43 and above) Inspect the mounting hardware, condition and adjustments of the shark assembly and pin guide wedges. Check the shovel cam for adjustment and condition. Check the alignment and mesh of the drive and drive spur gears. Inspect the condition and operation of the fin switch. Inspect the tensioning and condition of the transfer belts. Inspect the mounting hardware and condition of the deflector shoe. Inspect the spring for the fin switch. 9. (Smart shark) Inspect the condition, alignment, adjustment and operation of the pin count switch. Check that all switch and switch mounting bracket hardware is tight. Check for correct cable routing. 10. (Smart Shark) Check the smart shark solenoid and solenoid linkage. Check for proper operation of the smart shark. Check all mounting hardware and fasteners. Transport Assembly 11. Inspect the condition of the welds and feet on the long pit transport frame. Inspect the condition of the welds and mounting hardware on the short pit side frames. 12. Inspect the mounting hardware and condition of the transport band boards. Check the condition and tracking of the transport band carpet. Inspect the front and rear rollers for bearing and shaft condition, correct tensioning and alignment in mounting slots. Inspect the condition and operation of the centering guide rollers. Tighten end caps on the front roller and oil bearing. Inspect the bearing blocks on the rear roller and oil bearings. Bowling Center Operating Procedures Manual 11 13. Inspect the condition and tensioning of the transport band drive belts. Inspect the mounting hardware on the idler and tensioner assemblies. Check the condition of the idler pulleys. 14. Inspect the condition and mounting hardware on the pin feed deflectors and mounting brackets. Check the adjustment on the pin feed deflectors and tighten the hardware. Ball Cushion and Pit Curtain 15. Inspect the condition and mounting hardware on the ball cushion board and the impact strips. Check the attachment of the rubber cushion to the board and the facing to the rubber cushion. Inspect the cushion frame welds, and check the mounting hardware. Inspect the nylon cushion bearings for wear and check the location and hardware on the stop collars. Inspect the cushion assembly for proper adjustment and stress cracks. 16. Inspect the mounting, adjustment and fluid level in the ball cushion shock absorber. Inspect the mounting and location of the shock absorber. 17. Inspect the mounting and rubber overflow pad on the single feed overflow chute. Inspect the condition and mounting of the dual feed overflow chute. Inspect the condition of the chute felt and check the bond to the metal on units so equipped. Check the condition of the pin wipers. Inspect the condition and adjustment of the overflow socks. Check chutes for metal or plastic stress cracks. Check all plastic overflow chute mounting bumpers and mounting brackets. 18. Inspect the condition of the pit curtain and check the mounting hardware. Ball Accelerator Assembly 19. Inspect the condition of the frame welds. Check that foot guards are in place. Inspect the condition and location of the ladder. 20. Inspect the condition and mounting hardware on the ball door protector plates. Inspect condition and mounting hardware on the ball door wedges. Inspect the condition and mounting hardware on the kickback phenolic plates. 21. Inspect the accelerator motor and motor bearings for smooth operation. Check the motor power cord. Inspect the alignment of the motor. Check for excessive noise or vibration. 22. Inspect the condition of the flat belt. Inspect the flat belt guard for proper adjustment. Inspect the driving drum condition and check for smooth operation. Verify that all driving drum hardware is in place. Driving drums should be pulled out and bearings oiled. Inspect accelerator tracks for worn covers. 23. Inspect the ball door locking mechanism for proper adjustment. Check the condition of the ball door, all door button and door locking bolt. Inspect the ball door solenoid for correct operation and check the routing of the solenoid cable. Verify that ball door shafts and collars rotate freely. 12 Bowling Center Operating Procedures Manual Sweep Wagon Assembly 24. Inspect the condition of the sweep wagon frame and frame welds. Check the roller mounting and adjustment. Inspect the condition of the leaf springs if so equipped. Check the condition of the pusher rods and pusher rod bushings. Inspect the conditions of the protector blocks and block mounting hardware. Check all sweep wagon hardware. 25. Inspect the condition of the sweep board and adapters. Check the adjustment of the sweep board and adapters. 26. Inspect the condition of all sweep release mechanism components. Check all sweep release mounting hardware. Inspect for missing springs or worn linkage and pivot bushings. Check the condition of the chain and clevis. Check the operation of the solenoid. Inspect the solenoid cable routing. The cable should be secured on both sides of the solenoid plug. 27. Inspect the sweep attenuator and sweep shock absorber for loose or missing hardware. Check the sweep shock absorber fluid level. Check the attenuator and G-Switch cable for proper adjustment. Inspect all pivot points for wear. Inspect the G-Switch cable routing. Setting Table Assembly 28. Inspect the setting table frame for wear or broken welds. Check for loose or missing hardware. Check the vertical swing shaft stop bolts for proper adjustment. Inspect the condition of the vertical helper springs (for units so equipped). Check the metal around swing shaft supports for stress cracks. 29. Check for loose or missing spotting tong and geared rack hardware. Inspect the S.T. Switch mounting and check the adjustment. Inspect the condition of the tongs, gears, and toothed racks. Check the operation of the tongs. Inspect the tong dampers for wear and tighten spotting tong hardware. 30. Inspect all cable channels and conduits for wear. Check that all Channels and conduits are secured to the frame. Inspect the condition of the table harness plug and its mounting bracket and hardware. 31. Inspect all welds on the swing shafts and connection rods. Check for loose or missing connecting rod hardware. Check the adjustment of the stop collars. Inspect the swing shaft bearings for wear. Inspect the condition of the table spring. Inspect the condition and mounting of the table jam roller. Check the adjustment of the horizontal stop bolt. Verify that all pin holders are secured to the square shafts. For older round shaft pinholder mounting, check the ground screws. 32. Inspect the TS-1 Jam Switch mounting and adjustment. Check the actuator arm and cam for free operation. Check for loose or missing hardware and springs. Inspect the TS-2 jam switch mounting and adjustment. Bowling Center Operating Procedures Manual 13 33. Inspect all pin holders and pin holder solenoids for correct mounting. Check the switch fingers for correct pivoting. Inspect all pin holder switches for tight mounting. Check all pin holder connectors and wiring for routing and connection. Inspect the adjustment on the pin detector plates. Check the adjustment on the switch actuator springs in units so equipped. 34. Inspect the mounting of the table racks to the table. Check the adjustment and condition of the small and large roller support assemblies on tower up pinsetters. Inspect the condition of the toothed racks and or chain drives. Check the condition of the T-Stop. Check the mounting of the O.O.R. Actuator cam. Inspect the condition of the chain, clevis, pivot bearing, and master chain link. Drive Frame Assembly 35. Inspect the welds and condition of the sweep shaft. Check the sweep shaft supports for secure mounting. Inspect the sweep shaft bearings for signs of wear. Inspect the connecting rods and verify all hardware is in place and secure. 36. Inspect the condition and welds on the L.H. and R.H. drive assemblies. Check for loose or missing hardware. Inspect all cable channels and cables for condition and routing. Check for any worn shaft bearings. Check the chain tensioners for condition and adjustment. Inspect the frame counter for correct operation. 37. Inspect the spotting tong drive for loose or missing hardware. Check for loose or worn gears. Check the spotting tong solenoids for proper operation. Check the spotting tong clutch for correct operation and check the condition of the clutch shaft. Inspect the mesh between the square shaft drive and the spur gear. Check the condition of the square shaft drive gear. 38. Inspect the motors for correct mounting and alignment. Check the condition of all V-Belts. Inspect the motor cables for correct routing. Check the condition of the motor tensioning springs. Check all motor mounting plate bushings. Check for excessive Vibration in the motor and belt operation. Wipe all motor belts down by removing the belts. Wrap a rag around the belts and clean thoroughly. Blow dust out of the motor fan covers as needed. 39. Inspect the stroke limiter for a bent or cracked plate and loose or missing hardware. Check the mounting and fluid level in the stroke limiter shock absorber. Check the condition of the rubber bumper. Check the solenoid for proper operation. Inspect the square shaft, the linkage and the square shaft latch for correct adjustment. Be sure the stroke limiter plate is not rubbing on the tower rack. 40. Inspect the condition of the double V-Belts. Check for loose or missing tensioner mounting hardware. Check the tensioner shaft and bearings for loose or noisy operation and clean belts. Remove the tensioner assembly from the machine. Clean and oil the bearings. 41. Inspect the condition of the setting table and sweep motor drive assemblies. Check for worn or damaged chains. Inspect the pinion shafts and gears for adjustment and condition. Check for loose or missing bearing plate hardware. Inspect the condition of bearing plate bearings and drive sprocket shafts. Inspect the master links on the chains. 14 Bowling Center Operating Procedures Manual 42. Inspect the condition of the guide tower assembly. Check the mounting and adjustment on the TS- 2 and O.O.R. Switch. Check for correct switch and cable mounting. Check for loose or missing guide tower hardware. Inspect the condition of the lift chain sprocket. Check the condition of the table jam lever and spring. 43. Inspect the sweep and table drive shaft assemblies. Check for shaft wear. Check for chain wear and proper tensioning. Inspect the crank arms and verify they are secure on the shafts. Check the sprockets for wear. Inspect the pinion shaft assembly on pinsetters so equipped. Check the shaft and bearings for wear. Inspect pinion gears for wear on pinsetters so equipped. Check the adjustment of the pinion gears to the tower racks on pinsetters so equipped. Inspect pinion gears for cracks. 44. Inspect the switch cluster. Check the switch cluster housing to make sure it is secure. Check the adjustment on the A, B, C, and D Switch. Check the adjustment on the switch cam. Check all scorer switches on pinsetters so equipped. Main Frame Assembly 45. Inspect the main frame. Check for wear points or broken welds. Check for loose or missing hardware. Check the main support braces and verify they are secure. 46. Inspect the pinlight fixture. Check and verify that the fixture is securely mounted. Check the lamps and lamp sockets. Check the power cord routing. 47. Inspect the guards. Check for wear points or broken welds. Check for loose or missing hardware. Check for any missing guards. Check the work platform and the work platform braces and hardware. 48. Inspect the electrical box mounting. Check and verify that the mounting plate and rubber bumpers are secure. Check and verify that all electrical box mounting receptacles and hardware are in place and secure. Make sure the grounding straps are connected. Distributor Assembly 49. Inspect the distributor frame assembly. Check for worn or damaged frame components and welds. Check for loose or missing hardware. Check and verify that the dust pan is secure. Check the distributor rails and extensions for wear or cracks. Check the distributor stations for wear or cracks. Inspect the lower pin guides for bent or missing parts. Check the corner turn rails and corner pin turn devices for loose or missing hardware and for correct adjustment. 50. Inspect the distributor shafts, pulleys and belting. Check for worn or damaged shafts or bearings. Check for worn or cracked pulleys. Inspect the condition of the distributor belting. Check the condition of distributor gears and verify proper gear mesh. Check the alignment of all shafts, pulleys and belting. Check for any missing shaft, bearing or pulley hardware. 51. On series 12 and below, inspect the pin separators and pin centering devices. Check the condition, mounting and adjustment on the pin separators. Check the condition, mounting and adjustment on the pin centering devices. Bowling Center Operating Procedures Manual 15 52. Inspect the distributor pin stations. Verify all pin stops are in place. Check the pin sliders for free operation. Check the pin slider for cracks or breaks. Check for loose or missing pin station hardware. Check the ejector flaps for wear or cracking. Check the retaining bows for wear or cracking. Check for worn, cracked or misadjusted pin release levers. Verify that all pin station springs are in place. Inspect the top and bottom housing for cracks or wear. Electrical 53. Inspect the electrical boxes and box mounting hardware. Check the ground straps and verify that they are in place and secure. Verify that all cables are routed correctly. Inspect all box covers to verify they are in place and secure. Check the pin light bypass switch for operation on units so equipped. Are all box switch guards in place? Check all cables and box connectors for correct seating. Check the 5-VOLT power supply adjustment on silver box, universal silver box, and consolidated electronics. 54. Inspect the ball detector and reflector. Check and verify all mounting hardware is secure. Check the ball detector assembly for proper adjustment. 55. On stand-alone units, inspect the player control station. Verify that the player control station is mounted securely, the cable is routed correctly and that the unit is operating properly. 56. Inspect the ball rack reset button. Check for correct operation and check the cable routing and connection. 57. On units so equipped, inspect the manager’s control box. Check on/off switches for proper operation. Are both indicator lamps working? Verify that both frame counters work. Power Ball Lift - Even Lane 58. Check the condition and mounting of the ball lift tires. Check the condition of the lift tire shafts and bearings. Check the condition and operation of the ball lift clutch. 59. Check the ball lift motor for correct operation and mounting. Check the motor pulley for proper alignment. Check the drive belt condition and alignment. Check the top idler pulley. 60. Check the ball lift tracks for correct mounting. Check the condition of the lift rubber track and leather tracks and verify that they are secure. Check for loose or worn rubber and leather tracks. Administration And Organization 61. Is a spare parts and inventory control system in place? Are adequate parts on hand and are these parts on inventory and accessible? Are all spare motors labeled for status? Are all spare electronics boards labeled for status? 62. Verify that the correct hand tools are in place. Are the hand tools organized for ready access? 63. Verify that the correct cleaning and lubrication products and supplier are on hand. Check and verify the supplies are adequate and that the correct approved materials are in use. 16 Bowling Center Operating Procedures Manual 64. Verify that you have current product operation manuals and product service part manuals. Are Service Bulletins in the center? 65. Verify that the center is using Preventive Maintenance forms and these forms have been appropriately checked and that the parts pending and parts usage reports are up to date. Cleaning And Lubrication 66. Verify that the Preventive Maintenance Pinsetter Cleaning schedule is being used and that all technicians and mechanics responsible are properly cleaning the pinsetters and recording this work on the schedule. 67. Check the GS Pinsetter Operation and Service Manual for proper lubrication and maintenance schedules. Please refer to Section 7, starting at Page 7-3 in the GS Series Pinsetter Operations and Service Manual. Do not over lubricate any areas of the automatic pinsetter. 68. Verify that safety training has taken place with all technical personnel working on the pinsetters and other bowling equipment. Bowling Center Operating Procedures Manual 17 GS SERIES PINSETTERS PREVENTIVE MAINTENANCE WORK SCHEDULE INSPECT – CORRECT – CLEAN – LUBRICATE ELEVATOR ASSEMBLY 1 FRAME AND WELDED ASSEMBLIES 2 DRIVE TRAIN AND SHOVELS 3 PINSETTER GUARDS 4 RUBBER CORDS AND EJECTING FLAPS 5 PIN TURN WIRES 6 PIN CHUTE ASSEMBLY FOR SINGLE AND DUAL FEED 7 ELEVATOR ELECTRICAL COMPONENTS 8 SHARK SWITCH AND PIN TURN ASSEMBLIES 9 PIN COUNT SWITCH (SMART SHARK) 10 SMART SHARK SOLENOID AND LINKAGE ADJUST 1 2 3 4 5 6 7 8 TRANSPORT BAND ASSEMBLY 11 MAIN FRAME, FEET AND SIDE FRAMES 12 TRANSPORT BAND BOARD, CARPET AND ROLLERS 13 TRANSPORT BAND DRIVE BELTS AND PULLEYS 14 PIN FEED DEFLECTORS BALL CUSHION AND PIT CURTAIN 15 CUSHION BOARD, FRAME, FACING AND BEARINGS 16 SHOCK ABSORBERS AND PULLEYS 17 SINGLE AND DUAL FEED OVERFLOW CHUTES 18 PIT CURTAIN BALL ACCELERATOR ASSEMBLY 19 FRAME AND WELDED ASSEMBLIES 20 BALL DOOR PROTECTOR, FIBER PLATES, RINGS 21 MOTORS AND DRIVE BELT 22 FLAT BELT AND DRIVING DRUM 23 BALL DOOR AND LOCKING ASSEMBLIES SWEEP WAGON ASSEMBLY 24 SWEEP WAGON FRAME 25 SWEEP BOARD AND ADAPTERS 26 SWEEP RELEASE MECHANISM 27 SWEEP ATTENUATOR AND HYDRAULIC SETTING TABLE ASSEMBLY 28 FRAME AND WELDED ASSEMBLIES 29 SPOTTING TONGS AND GEARED RACKS 30 TABLE HARNESS AND CABLE CHANNELS 31 SWING SHAFTS AND CONNECTING RODS 32 TABLE JAM SWITCH 33 PIN HOLDERS AND PIN SWITCHES 34 SETTING TABLE ROLLERS AND ROLLER SUPPORTS DRIVE FRAME ASSEMBLY 35 SWEEP SHAFT AND DRIVE 36 RIGHT AND LEFT DRIVE FRAME ASSEMBLY 37 SPOTTING TONG DRIVE ASSEMBLY 38 MOTORS, BELTS AND MOTOR MOUNTINGS 39 STROKE LIMITER ASSEMBLY 40 FRONT PULLEY AND V BELT TENSIONER 41 SETTING TABLE AND SWEEP MOTOR DRIVES 42 GUIDE TOWER ASSEMBLY 43 SWEEP, TABLE AND DRIVE SHAFT ASSEMBLIES 44 SWITCH CLUSTER AND SCORER SWITCHS 18 Bowling Center Operating Procedures Manual ADJUST 1 2 3 4 5 6 7 8 MAIN FRAME ASSEMBLY 45 SWITCH CLUSTER / SWITCHES 46 PINLIGHT FIXTURE 47 GUARDS AND WORK PLATFORM 48 ELECTRICAL BOXES AND MOUNTING HARDWARE DISTRIBUTOR ASSEMBLY 49 FRAME AND WELDED ASSEMBLIES 50 SHAFTS, PULLEYS AND BELTING 51 PIN TURN, PIN CENTERING DEVICES 52 PIN STATIONS AND SLIDERS ELECTRICAL COMPONENTS 53 BOXES AND MOUNTING HARDWARE 54 BALL DETECTOR AND REFLECTORS 55 PLAYER CONTROL STATION IF SO EQUIPPED 56 BALL RACK RESET BUTTON 57 MANGERS CONTROL BOX POWER BALL LIFT (EVEN LANES) 58 BALL LIFT TIRES 59 MOTOR AND DRIVE BELTS 60 BALL LIFT TRACKS / RUBBERS / LEATHERS ADMINISTRATION AND ORGANIZATION 61 INVENTORY CONTROL 62 HAND AND POWER TOOLS 63 CLEANING AND LUBRICATION SUPPLIES 64 OPERATING MANUALS 65 PARTS PENDING AND PARTS USAGE CLEANING AND LUBRICATION 66 PINSETTER CLEANING SCHEDULE 67 PINSETTER LUBRICATION SCHEDULE 68 PINSETTER SAFETY TRAINING DATE PERFORMED Bowling Center Operating Procedures Manual 19 Pinsetter Pending Items - GS Series Pinsetters Repair - Adjust - Lubricate Pinsetter Pending Work Item Date Inspected Date Completed Mechanics Name Center name: _____________________________ Pinsetter number: _________ 20 Bowling Center Operating Procedures Manual GS Series Pinsetters Pinsetter Parts Useage Log Pinsetter Part Number Part Name Center name: _______________________________________ Bowling Center Operating Procedures Manual Mechanic's Name Pinsetter number: _________ 21 GS PINSETTERS DAILY STOP RECORDS All chief mechanics and their mechanical staff will be responsible for the timely recording of all pinsetter malfunctions on the GS Series pinsetter daily stop records. 1. Each facility should have one daily stop record sheet for each pinsetter. This sheet will be kept on a clipboard located on the back of each pinsetter and every month a new stop sheet will be posted with a new date. 2. The chief mechanic and mechanical staff upon the correction of any pinsetter malfunction, will record the lane number, the frame count (off the frame counter on the pinsetter), the error code of the problem, the corrective action taken to prevent this stop again and the initials of the mechanic who cleared and repaired the stop. A list of GS Series error codes must be used to correctly identify the problem. 3. At the beginning of each day, the chief mechanic will be responsible for transferring the previous daily stops onto the weekly frames per stop records. 4. The GS Series pinsetter daily stop records should be used as a tool for preventive maintenance programs. It becomes apparent when reoccurring problems exist on particular pinsetters. 5. We suggest that all daily completed stop records should be kept on file for a period of one year. 22 Bowling Center Operating Procedures Manual GS-Series Stop Sheet Date Frame Count Error Code Bowling Center Operating Procedures Manual Machine No. ________________ Corrective Action Mech. Initials 23 GS Series Pinsetter Error Codes Std. Code Extend Code* Std. Code Extend Code* l—l ** Power Up in Progress 60 A Found Switch A is Not Expected But Found -ll- ** No Errors 61 B Found Switch B is Not Expected But Found The Lane Initialized 62 C Found Switch C is Not Expected But Found A0 ** PCS Not Communicating 63 D Found Switch D is Not Expected But Found A1 ** PCS Not Sending Correct Response 64 SM Found F0 ** External RAM Testing Failure 65 G Found Switch G is Not Expected But Found F1 ** Prom Check Sum Failure 66 ST Found Switch ST is Not Expected But Found 80 ** Battery Back-up RAM Failure 67 P0 Pin OOR Out-of-Range 70 A Ntfnd Switch A Expected But Not Found 01 Pin 1 Ld Pin Loading Time Out Pin 1 71 B Ntfnd Switch B Expected But Not Found 02 Pin 2 Ld Pin Loading Time Out Pin 2 72 C Ntfnd Switch C Expected But Not Found 03 Pin 3 Ld Pin Loading Time Out Pin 3 73 D Ntfnd Switch D Expected But Not Found 04 Pin 4 Ld Pin Loading Time Out Pin 4 74 SM Ntfnd 05 Pin 5 Ld Pin Loading Time Out Pin 5 75 G Ntfnd Switch G Expected But Not Found 06 Pin 6 Ld Pin Loading Time Out Pin 6 76 ST Ntfnd Switch ST Expected But Not Found 07 Pin 7 Ld Pin Loading Time Out Pin 7 90 Invld 0 Invalid Machine State 0 08 Pin 8 Ld Pin Loading Time Out Pin 8 91 Invld 1 Invalid Machine State 1 09 Pin 9 Ld Pin Loading Time Out Pin 9 92 Invld 2 Invalid Machine State 2 10 Pin 10 Ld Pin Loading Time Out Pin 10 93 Invld 3 Invalid Machine State 3 50 Detect 10 #10 Pin Not Detected in Diagnostics 94 Invld 4 Invalid Machine State 4 51 Detect 1 #1 Pin Not Detected in Diagnostics 95 Invld 5 52 Detect 2 #2 Pin Not Detected in Diagnostics EJ Elev Jam 53 Detect 3 #3 Pin Not Detected in Diagnostics EL Pin Cnt Pin Count Switch Shorted for 5 seconds 54 Detect 4 #4 Pin Not Detected in Diagnostics J1 TS1 Jam Jam Switch TS1 55 Detect 5 #5 Pin Not Detected in Diagnostics J2 TS2 Jam Jam Switch TS2 (Tower) 56 Detect 6 #6 Pin Not Detected in Diagnostics * BA 57 Detect 7 #7 Pin Not Detected in Diagnostics CPU Lost CPU Lost 58 Detect 8 #8 Pin Not Detected in Diagnostics 59 Detect 9 #9 Pin Not Detected in Diagnostics None Switch SM is Not Expected But Found OOR Found Switch OOR is Not Expected But Found Switch SM Expected But Not Found Invalid Machine State 5 Elevator Jam Accelerator Motor (overload) Nexgen CPU Malfuncton NOTE: NextGen Electronics displays either Standard Code or Extended Code where as Consolidated displays Standard Code. * = Nexgen Electronics only ** = Consolidated Electronics only 24 Bowling Center Operating Procedures Manual GS SERIES PINSETTER WEEKLY FRAMES PER STOP RECORDS All chief mechanics will be responsible for the timely recording of all games or frames and the recap of all daily stops, from the GS Series daily stop records. 1. At the beginning of each month, a new Weekly Frames per Stop record sheet will be used. Include the day, and date for reference. 2. Each facility will have one Weekly Frames per Stop sheet for all pinsetters. The form that is in use will be kept posted on a clipboard located in the mechanics’ shop. 3. At the beginning of each day, the chief mechanic will be responsible for transferring the previous daily stops onto the weekly frames per stop sheet and obtaining the number of games bowled or total frames. The frames or games number will be obtained from the manager’s console, or command network system, or pinsetter meter readings. Pinsetter meter readings require a daily meter reading, and if done, should only be done on a weekly basis. 4. Each style of stops should be recorded, out of range (oor), respots (rs), ball returns (br) and others. 5. Total each day the number of stops. 6. If you are using total number of games for record keeping from management, you will need to convert these games to frames. Multiply the number of games times 11. This is your total frames. 7. Divide the number of frames by the number of stops. This is your frames per stop (fps). 8. At the end of each week and month, recap and cross check all frames per stop and pinsetter stops. 9. The GS Series Weekly Frames per Stop records should be used as a tool for preventive maintenance programs. The goal is to have the highest pinsetter frames per stops. 10. We suggest that you keep all weekly frames per stop records on file for a period of 2 years. Bowling Center Operating Procedures Manual 25 GS-Series Pinsetter Weekly Stop Report Center Name ____________________________________________________ Week Ending __________________ Daily Frame Totals Daily Stop Totals Monday Tuesday Wednesday Error Code Description 1 Pin 1 – Time Out of Jam 2 Pin 2 – Time Out of Jam 3 Pin 3 – Time Out of Jam 4 Pin 4 – Time Out of Jam 5 Pin 5 – Time Out of Jam 6 Pin 6 – Time Out of Jam 7 Pin 7 – Time Out of Jam 8 Pin 8 – Time Out of Jam 9 Pin 9 – Time Out of Jam 10 Pin 10 – Time Out of Jam *11 Pin Jam – Left-Hand Corner *12 Pin Jam – Right-Hand Corner *13 Pin Jam – Left Distributor Lane 1 *14 Pin Jam – Left Center Distrib. Lane 2 *15 Pin Jam – Right Center Distrib. Lane 3 *16 Pin Jam – Right Distributor Lane 4 *17 Pin Jam – Shark Switch *18 Pin Jam – Pin Guide Wedges *19 Pin Jam – Pin Head First *20 Pin Stuck In Elevator *21 Pin Under Pin Feed Deflector *22 Pin in Ball Accelerator *23 Ball Stuck in Pit *24 Ball Stuck In Ball Lift *25 Pin Blocking Ball Door *26 Pin Jammed in Setting Table *27 Spotting Tongs Jammed *28 Sweep Roller Not in Slot *29 Belt Broken *30 Belt Loose *31 Overflow Chute/Sock Jam #7 Pin Side *32 Overflow Chute/Sock Jam #10 Pin *50 Pin Holder Switch Malfunction 60 Switch A Not Expected but Found 61 Switch B Not Expected but Found 62 Switch C Not Expected but Found 63 Switch D Not Expected but Found 64 Switch SM Not Expected but Found 65 Switch G Not Expected but Found 66 Switch ST Not Expected but Found 67 Switch OOR Not Expected but Found 70 Switch A Expected but Not Found 71 Switch B Expected but Not Found 72 Switch C Expected but Not Found 73 Switch D Expected but Not Found 74 Switch SM Expected but Not Found 75 Switch G Expected but Not Found 76 Switch ST Expected but Not Found 90 Invalid Machine State 0 91 Invalid Machine State 1 92 Invalid Machine State 2 93 Invalid Machine State 3 94 Invalid Machine State 4 95 Invalid Machine State 5 98 Electronic Box Failure 99 Part Broken/Other (Explain on Back) EJ Elevator Jam EL Pin Count Switch Failure J1 Jam Switch TS1 J2 Jam Switch TS2 (Tower) PO Out-of-Range Thursday Friday Saturday Sunday Total * These code numbers are not displayed by the Pinsetter CPU LED display. Explain problems or irregularities on the back of this report 26 Bowling Center Operating Procedures Manual GS SERIES PINSETTER MONTHLY FRAMES PER STOP RECORDS All chief mechanics will be responsible for the timely recording of the FPS from the Pinsetter Weekly Frames Per Stop Records. This form will be used for GS Series Pinsetters. 1. At the beginning of each month, the chief mechanic should total the fps from the pinsetter weekly frames per stop records. 2. Record the total fps from the universal pinsetter monthly frames per stop records sheet. 3. Compare previous months of fps to determine if the pinsetters are operating better or worse. 4. Try to determine the best approach for obtaining consistent monthly frames per stop on the pinsetters. 5. All universal pinsetter monthly frames per stop records will be kept until the form expires. The expired form should be filed in the mechanics’ shop for record keeping. 6. The current form should be kept on a clipboard in the mechanics’ shop. Bowling Center Operating Procedures Manual 27 UNIVERSAL MONTHLY FRAMES PER STOP RECORD 2004 2005 2006 2007 2008 2009 2010 2011 2012 2013 2014 2015 JANUARY FEBRUARY MARCH APRIL MAY JUNE JULY AUGUST SEPTEMBER OCTOBER NOVEMBER DECEMBER JANUARY FEBRUARY MARCH APRIL MAY JUNE JULY AUGUST SEPTEMBER OCTOBER NOVEMBER DECEMBER 28 Bowling Center Operating Procedures Manual CONTROL COUNTER MALFUNCTION REPORT All counter control and management personnel, while on duty at the control counter, are responsible for recording Pinsetter and equipment malfunctions on the Control Counter Malfunction Report sheet. 1. At the start of each day, the control counter malfunction report should be dated and signed in the appropriate areas on the form. During any shift change, the new counter control personnel should also sign the form. 2. As Pinsetter and equipment malfunctions occur, either reported or observed by the counter control personnel, the malfunction should immediately be recorded on the Control Counter Malfunction Report sheet. 3. The control counter malfunction report is not limited to the recording of just the problems listed on the form. Any problems concerning safety, lighting, heating, air conditioning, bowling equipment or anything our customers or employees report as a problem, should be noted in the comments section. 4. It is the responsibility of the chief mechanic, on a daily basis, to check this report. This will allow the mechanics to have the input of customers and employees. Cross checking of maintenance information is a vital source of preventive maintenance. 5. The counter control malfunction report should be kept on a clipboard at the control counter and old reports kept on file in the manager’s office for a period of 1 year. Bowling Center Operating Procedures Manual 29 Control Counter Malfunction Report Lane Number 1 2 3 4 5 6 7 8 9 10 11 12 13 14 15 16 17 18 19 20 36 37 38 39 40 Ball Return Blackout Pin Respot Failed to Cycle Out of Range Foul Light Multiple Cycles Ball Hit Sweep P.C.S. Lights Scorer Console Scorer Overhead Score Correction Scorer Lockup ______________________________________________________________________ ______________________________________________________________________ ______________________________________________________________________ Comments ______________________________________________________________________ Lane Number 21 22 23 24 25 26 27 28 29 30 31 32 33 34 35 Ball Return Blackout Pin Respot Failed to Cycle Out of Range Foul Light Multiple Cycles Ball Hit Sweep P.C.S. Lights Scorer Console Scorer Overhead Score Correction Scorer Lockup ______________________________________________________________________ ______________________________________________________________________ ______________________________________________________________________ Comments ______________________________________________________________________ DATE: ____________ 30 SIGNATURE: _____________________________ Bowling Center Operating Procedures Manual Automatic Scorers AUTOMATIC SCORER PREVENTIVE MAINTENANCE SCHEDULE All chief mechanics will be responsible for completion and documentation of the items listed on the Automatic Scorer Preventive Maintenance Work Schedule. 1. The chief mechanic and mechanical staff on a daily, weekly and monthly routine will complete all the work assignments listed on the Automatic Scorer Preventive Maintenance Schedule. 2. For daily service, check off the appropriate box with an “X” n the schedule when the work is completed in each area. The Automatic Scorer Preventive Maintenance Schedule contains maintenance instructions that cover all current versions of Brunswick scorers. 3. For monthly services, place the mechanics’ initial n the shaded box that pertains to the work needed. Again, the Automatic Scorer Preventive Maintenance Schedule contains maintenance for all scorers. 4. If pending work or parts replacement exists, do not check off that area of the work schedule until all work has been completed. 5. The work schedules that are in use should be posted on a clipboard in the mechanics’ shop area. All completed forms should be kept on file in the mechanics’ shop for a period of 2 years. Bowling Center Operating Procedures Manual 31 32 Bowling Center Operating Procedures Manual MONTH: ____________ Clean Lower Console Monitors Clean Upper Overhead Monitors Clean Lower Console, L.G.P. or Scoring Computer Circuit Board Connectors Clean Scorer Keypads and Consoles Clean Ball Detects and Reflectors Check Service Light Operation Check Intercom Operation Check Auto Foul Signal Function Check Console/ Keypad Condition / Mounting Inspect Cables and Connectors Adjust Overhead Monitors Adjust Lower Console Monitors Verify Scoring is Correct Check Console Power Supply Check Incoming L.G.P. / Scoring Computer / Power Voltage Check L.G.P. / Console / Keypad / Scoring Computer Mounting Check 1st and 2nd Ball Light Operation Check Table Switches on GS Series Pinsetters Run GS Pinsetters in Machine Diagnostics Check all Diagnostic Indicator LED's Check Pinsetter to Scorer Cable Routing MONTH FOR SERVICE Check Error Log Check Console Keypad Check Managers Keypad Check Activity Report Check Foul Unit Operation Check Ball Detects DAY OF THE MONTH Jan. Feb. Mar. Apr. May June July Aug. Sept. 29 Nov. 27 28 Oct. 1 2 3 4 5 6 7 8 9 10 11 12 13 14 15 16 17 18 19 20 21 22 23 24 25 26 AUTOMATIC SCORER PREVENTIVE MAINTENANCE SCHEDULE Dec. 30 31 Lanes LANE PREVENTIVE MAINTENANCE SCHEDULE All chief mechanics will be responsible for the verification and compliance to this maintenance schedule by the Lane Maintenance Staff. 1. Enter the month the Lane Preventive Maintenance Schedule starts. 2. A designated person(s) will be assigned to complete the items listed on the Lane Maintenance Schedule. This person is typically called the Lane Person. 3. Upon completion of each task, the Lane Person will place an “X” in the appropriate shaded block. 4. The form that is in use will be kept posted on a clipboard in the mechanics’ shop. All completed forms should be kept on file in the mechanics’ shop for a period of 1 year. Bowling Center Operating Procedures Manual 33 General Lane Maintenance Schedule There are many items related to lanes that require routing scheduled maintenance. To serve as a reminder of the maintenance that must be performed, a list of the routine maintenance items and a schedule of lane responsibilities follow. Daily Maintenance 1. Dust caps and gutters 2. Dust lanes 3. Dust approaches 4. Dust ball hood and rack 5. Clean lane and pin deck 6. Condition lanes 7. Clean lane machine 8. Spot clean approaches 9. Inspect approaches 10. Wash soiled laundry 11. Clean and polish house balls, as required 12. Clean hoods and racks Weekly Maintenance 1. 2. 3. 4. 5. 6. Clean bowler seating Buff synthetic approaches Change carpet covers Change pin dusters Change ball wipes Clean bowler seating (A) 25% of all the equipment to schedule Monthly Maintenance 1. Dust masking units 2. Clean upper overheads 3. Clean lower consoles 4. Vacuum hand dryers 5. Clean flat gutters 6. Clean kickbacks 7. Vacuum ball lifts 8. Inspect lanes 9. Inspect pit ends, screws plugs, and joints 10. Clean caps and gutter (A) 25% of all the equipment per week 34 Bowling Center Operating Procedures Manual LANE PREVENTIVE MAINTENANCE SCHEDULE DAILY, WEEKLY, AND MONTHLY Day of the Month Dust Masking Units Code 1 2 3 4 5 6 7 8 Month ___________________ 9 10 11 12 13 14 15 16 17 18 19 20 21 22 23 24 25 26 27 28 29 30 31 AS Dust Caps and Gutters Clean Caps and Gutters AS Dust Lanes Dust Approaches Dust Ball Hoods/Racks Clean Upper Overheads A Clean Lower Consoles A Clean lane/Pindecks Condition lanes Clean Lane Machine Spot Clean Approaches Vacuum Hand Dryers A Clean Hoods and Racks Clean Bowler Seating A Buff Synthetic Approach Clean Flat Gutters A Clean Kickbacks A Change Carpet Covers A Change Pin Dusters A Change Ball Wipes A Vacuum Ball Lifts A Inspect Approaches Inspect Lanes Inspect Pit Ends A Wash Soiled Laundry Clean/Polish House Balls KEY CODES: AS (A) 25% Of All Equipment (AS) As Needed Bowling Center Operating Procedures Manual 35 Bowling Equipment Product Trouble Report and Warranty Policy BRUNSWICK PRODUCT TROUBLE REPORT All center personnel have the responsibility to reduce cost and product liability. All Brunswick parts carry a limited warranty period and can be replaced or credited to the center. 1. Enter date of preparation. 2. Enter the original order number from the original invoice or contact your local sales office. 3. Enter the original order date. 4. Enter the contract number, which is obtained from the original invoice or contact your local sales office. 5. Enter the installation date or the date the product was received. All new products should be placed into service as soon as possible and dated. 6. Check the box “Replace Discrepant Parts with New”. The only item you should check the box “issue credit” is when you have already filled the warranty part with another vendor’s part. 7. Enter the region or territory number located on the original invoice. 8. Enter your Brunswick customer number located on your original invoice. 9. Enter your center name and address. 10. Check “hold bags and shoes for Muskegon disposition” for bowling bags and shoes or check “return parts to Muskegon/Antigo” for all other parts. Do not ship defective parts unless Brunswick warranty department advises. 11. Enter the number of failed parts for each item. 12. Enter the complete Brunswick part number for each part. 13. Enter the complete Brunswick part name for each part. 14. Enter the defect code found on the back of the first page of the PTR. 15. Enter the date code of the defective part if it has one. 36 Bowling Center Operating Procedures Manual 16. Enter any comments that might help the warranty department in processing the claim or describe the failure(s). 17. Take pictures of failed warranty items. 18. Sign the product trouble report in the originator box. 19. Forward the product trouble report originals to your local service manager or distributor sales office for processing and keep the customer copy, packing slip, originator and shipping labels. 20. The local sales office should sign in the other approvals box and follow up with a status report for each bowling facility. 21. All new PTR’s written must have a different PTR number. Bowling Center Operating Procedures Manual 37 PRODUCT TROUBLE REPORT PTR NO. DATE: Original Order Number ( Check One) Order Date Issue Credit Memo Against This Contract Number Replacement Order # Installation Date Region Replace Discrepant Parts With New Customer No. (Check One) Center Address Hold Bags and Shoes For Muskegon Disp. Return Parts To Muskegon/ Antigo City Country Within 30 Days Or Claim Will Be Denied State Contact Name/ Phone # QTY ZIP PART NUMBER Int'l Do Not Return Parts Unless Requested DISCREPANT PARTS PART NAME PROBLEM DATE CODE Invoice Amount/Repair charge Freight Charge/ Packing Handling Charges DM TOTAL COMMENTS MUSKEGON USE ONLY 535 535 535 535 535 535 535 535 535 535 535 535 535 535 535 535 535 535 535 535 Exchange Rate US$ 0.00 US$ 0.00 US$ 0.00 0.00 TOTAL US$ 0.00 WARRANTY DISPOSITION APPROVED DENIED ORIGINATOR 38 APPROVALS (OTHER) DATE SIGNED Bowling Center Operating Procedures Manual Brunswick Universal Date Codes For All Bowling Products Month ( 1ST Letter) Year (2nd Letter) January A July G 1995 I 2001 O 2007 Z February B August H 1996 J 2002 P 2008 A March C September I 1997 K 2003 R 2009 B April D October J 1998 L 2004 S 2010 C May E November K 1999 M 2005 T 2011 D June F December L 2000 N 2006 Y 2012 E Bowling Center Operating Procedures Manual 39 40 Bowling Center Operating Procedures Manual WARRANTY SCHEDULE PRODUCT AND INSTALLATION WARRANTY A. WHO THIS WARRANTY COVERS. 1. Original Buyer. This warranty is made to the original Buyer only and is not transferable without Brunswick’s prior written consent, except that a Buyer of new equipment who is a general residential contractor may transfer this warranty to the owner of the residence where the products are installed. 2. Contingent on Payment and Training. Brunswick’s warranty obligations are contingent on Buyer’s payment in full in accordance with the applicable payment schedule and, if applicable, signing the Completion Certificate when presented by Brunswick or a Brunswick-certified installer. Brunswick’s warranty obligations for pinsetters, automatic scoring equipment, and electronic center network systems are contingent on Buyer’s fulfillment of the training requirements set forth in Section 11 of the Sales Contract. B. WHAT THIS WARRANTY COVERS. Unless otherwise indicated below, Brunswick warrants new products to be free from defects in materials and workmanship for the periods set forth below. Brunswick provides no warranty for GS Pinsetters, ProLane, Anvilane®, and lane systems components, center network systems, and software that are not installed by Brunswick or a Brunswick-certified installer. 1. GS Pinsetters installed by Brunswick or a Brunswick-certified installer. (a) Electrical Components - high voltage and low voltage sections of the electronics boxes, motors, solenoids, switches, and cables only - 1 year after installation. (b) Wear Components - belts (including the transport band and accelerator belts), elevator chain guides, elevator pan shovel guides, socks, and overflow chute liners only - 1 year after installation. (c) Other Components - 2 years after installation. (d) Noise & Vibration - Brunswick makes no warranty regarding noise or vibration. 2. Lanes. (a) American Bowling Conference Specifications - Brunswick warrants lanes will meet ABC specifications for 30 days after installation. (b) Breaks, Cracks and Wear - Brunswick warrants lanes against breaks and cracks on the top surface only and wear deeper than the printed layer of laminate for 5 years after installation. (c) Delamination (separation of the lane such that one or more of its layers returns to its original state as individual sheets of material). • ProLane lanes - Brunswick warrants ProLane lanes against delamination for as long as Buyer owns them. • Anvilane® lanes - Brunswick warrants Anvilane lanes against delamination for 5 years after installation. (d) Lane Components - foundations, pindecks and ball return tracks only - 1 year after installation. Bowling Center Operating Procedures Manual 41 (e) Noise & Vibration - Brunswick makes no warranty regarding noise or vibration. 3. Center Network Systems, and Software installed by Brunswick or a Brunswick-certified installer. (a) Scoring Systems and Center Network Systems (including peripherals and associated electronics). - 1 year after installation, except for items listed in 3(b) below. (b) Computers, terminals, and third party software. - Brunswick passes through original manufacturer’s warranty only and does not separately warrant computers, terminals, or third party software. See product documentation for details. (c) Brunswick Software. Brunswick warrants that software will perform in accordance with functional specifications at delivery. This warranty does not apply to center network systems with modified computer hardware, additional computers, terminals, or peripherals that have been added to the center network system, or if software other than that provided by Brunswick is installed on or used with center network systems without Brunswick’s written approval. The following software is approved for center network systems without Brunswick’s written approval but is not supported by Brunswick: • CenterMaster: Windows NT 4.0, Service Pack 5; Microsoft Access; Crystal Reports, version 8.0; Microsoft Office 97 (and components thereof); McAffee VirusScan 5.0; Microsoft Internet Explorer 5.0; and CDE BLS. • Vector Plus: Windows 2000; Microsoft Access; Crystal Reports, version 8.0; Microsoft Office 2000 (and components thereof); McAffee VirusScan 5.0; Microsoft Internet Explorer 6.0; Quickbooks; and CDE BLS. • Vector Windows 2000; CDE BLS and Tournament software. During support of the center network system, an image of the original Brunswick software may be reloaded onto the customer’s center network system to restore operation. Brunswick is not responsible for reinstalling or supporting non-Brunswick software. 4. Furniture and Center Enhancements. Modernization Products, consisting of seating/tables, masking units, mod-wall systems, house ball storage racks, kickbacks, pindecks, ball return systems, power ball lifts, ball hoods and racks, capping and gutters, Pinball Wizard bumpers, Bank Shot bumpers, Cosmic lighting, Lightworx®, Cosmic sound systems, Cosmic video systems, and Tel-E-Foul® units, are warranted as follows: (a) Installed by Brunswick or a Brunswick-certified installer - 1 year after installation. (b) Not Installed by Brunswick or a Brunswick-certified installer - 1 year after delivery. 5. Small Goods. (a) Pins - Limited 1 year after delivery or 3,000 lines, whichever occurs first. (b) Finishes, Supplies, Service Parts - 90 days after delivery. (c) Maintenance Machines for Lanes and Accessories - as specified in the applicable product manual. (d) Polyester house balls - 90 days after delivery. (e) Urethane house balls - two years after delivery. (f) Rental shoes - 90 days after delivery. 42 Bowling Center Operating Procedures Manual 6. Installation. Brunswick warrants labor associated with installation by Brunswick employed installers of New Products (excluding Small Goods) as follows: (a) Lanes and Components - 1 year after installation is completed. (b) Other New Products (excluding Small Goods) - 90 days after installation is completed. This installation warranty does not cover required adjustments or maintenance. Buyer is responsible for the cost of service calls made during the installation warranty period if the call results from Buyer’s failure or inability to perform such adjustments or maintenance. This installation warranty does not cover installation of New Products that are installed by third party installers. 7. Used Products. Used equipment and software are provided “as is,” “with all faults,” and without warranty unless specifically stated otherwise in writing. C. WHAT THIS WARRANTY DOES NOT COVER. THIS WARRANTY DOES NOT COVER DAMAGE OR DEFECTS CAUSED BY: 1. Repairs, replacements, or modifications made by anyone other than Brunswick or a Brunswickcertified installer. 2. Abuse, misuse, tampering, or neglect. 3. Buyer’s failure to maintain products in accordance with applicable product manual and service bulletins published from time to time. 4. Buyer’s failure to meet specified electrical requirements, including proper installation by a qualified electrician of surge suppressors supplied by Brunswick. 5. Water, atmospheric conditions, moisture, storms, lightning, movement of the building, lane foundations (i.e., joists, stringers, underlayment, and underlying wood lane if lane is installed over a wood lane), panels, or other surfaces, or from other causes over which Brunswick has no control. 6. Lane cleaning, conditioning or maintenance machines. 7. Removal or reinstallation of lanes or shrinking, swelling, sticking, or slipping of lane foundations (i.e., joists, stringers, underlayment and underlying wood lane if lane is installed over a wood lane), panels, or surfaces due to temperature or humidity conditions outside limits specified in applicable product manual. 8. Improper Product installation by a third-party installer. D. WHAT BRUNSWICK WILL DO. Unless otherwise specifically stated in this warranty, Brunswick may repair or replace the defective part (or correct installation), refund Buyer’s purchase price, or credit the cost of a replacement part, as determined by Brunswick. Buyer has no other remedies under this warranty. E. HOW AND WHEN TO MAKE WARRANTY CLAIMS/OBTAIN SERVICE. Warranty claims must be made as described below within 30 days of learning of a defect. Additionally, all claims must be made no more than 10 days after the expiration of the warranty period. Bowling Center Operating Procedures Manual 43 1. Lanes and Components. Within 30 days of learning of a defect, Buyer must notify Brunswick in writing, describing the defect. Notices should be sent to: Brunswick Bowling & Billiards Corporation 525 West Laketon Avenue Muskegon, Michigan 49441 Attention: Director of Service 2. Scoring System, System Electronic Assemblies and Software. If troubleshooting procedures described in the applicable service manual do not resolve the issue, return the assembly to the nearest Brunswick Rapid Exchange Center or Automatic Scorer Exchange Depot (listed in the applicable service manual), freight prepaid, with an Electronic Assembly Repair Traveler. Brunswick will send an exchange assembly, freight prepaid, within a reasonable time, but at least two business days after receipt of Buyer’s assembly. 3. Parts (Other Than Scoring System Electronic Assemblies and Software). Purchase a replacement Brunswick part and return the original part, freight prepaid, along with a description of the defect and the invoice for the replacement part to: Brunswick Bowling & Billiards Corporation 525 West Laketon Avenue Muskegon, Michigan 49441 Attention: C&R Department If Brunswick determines that the returned part is defective, Brunswick will credit Buyer’s account for the purchase price of the replacement part. F. TIME LIMIT FOR BRINGING SUIT. No action arising out of any claimed breach of warranty may be brought more than 1 year after the cause of action has accrued. G. DISCLAIMER OF WARRANTY. Brunswick makes no warranty, express or implied (including any implied warranty of merchantability or fitness for a particular purpose) other than those expressly set out in this Schedule. Oral or written statements made by Brunswick dealers, distributors, agents, or sales representatives that are inconsistent with this warranty are not authorized by Brunswick and have no force or effect. 44 Bowling Center Operating Procedures Manual Bowling Center Maintenance Bowling center operators are continuously faced with presenting their customers with a clean and well-run facility. In order to be of assistance, Brunswick has developed an extensive list of basic maintenance tasks that must be a part of every bowling center’s normal mode of operation. These tasks should be done on a scheduled basis in order to ensure that the bowling center continues to operate trouble free and that your bowling customers enjoy a pleasurable experience while in the bowling center. These basic maintenance procedures will be very useful tools both for someone opening a new bowling center and for the proprietor working to upgrade a center that has deteriorated to a point where customer satisfaction has become an issue. We have found that the bowling experience is enhanced when the entire entertainment complex is clean and the atmosphere is controlled so that temperature and humidity are kept at a comfortable level that is consistent with Brunswick equipment requirements. KEY AREAS TO NOTE: Climate Control Brunswick has designed its equipment to conform to acceptable bowler comfort levels. Operating Brunswick equipment outside of these levels can result in permanent problems with the equipment that may not be covered by warranty. 1. Humidity levels must be maintained at a constant level and as close as possible to 40%. A minimum of 35% is possible and a maximum of 50% is permissible if temperature within the bowling center is maintained within the recommended temperature range. Failure to maintain proper humidity levels can result in problems with your equipment that may not be covered by warranty. 2. Temperature settings should be maintained at a constant temperature of 72°F + 4° or 22°C + 2°C. Failure to may will not be covered by warranty. 3. Air conditioning and heating systems need to be designed to ensure air quality and to adequately control humidity and temperature. Systems should be designed to automatically handle the arrival of active bowlers that will increase temperatures and raise humidity levels. If automatic controls are not available, the center should anticipate bowlers arriving and take steps to ensure bowler comfort and viable operating conditions. In addition, heating, cooling and ventilation systems need to be maintained on a scheduled basis. Cleanliness In addition to cleaning and maintaining the bowling equipment, i.e. lanes, approaches, pinsetters, it is important to maintain many areas inside and outside of the bowling center that can affect proper operation and customer enjoyment. Below are some key issues that need to be addressed to maintain a consistent environment throughout the building. Operating Brunswick equipment in bowling centers that are not kept clean can result in permanent problems with the equipment that may not be covered by warranty. 1. Parking lot and access doorways to the center must have measures taken to eliminate grit, sand and dirt from entering the center. Parking lots should be paved with concrete or blacktop surfaces and undergo regular cleaning and sealing. 2. Carpeting in the bowler’s concourse area and entryway rugs are excellent ways to trap outside dirt and keep it away from the bowler playing areas. Brunswick strongly recommends carpet in Bowling Center Operating Procedures Manual 45 these two areas. Brunswick specifically recommends against the use of carpet in the bowler’s seating area adjacent to the approach. All carpeted areas need to be vacuumed daily at a minimum to help control the dirt and spills. Attention to the types of cleaning solutions used to clean the carpet must be made as the maintenance process must not leave a solution residue on the carpet. 3. Where tile flooring is used, the tile needs to be cleaned daily and spills cleaned up as they occur. While a flooring surface that does not require waxing is preferred, some centers have surfaces requiring wax as a part of regular maintenance. If a surface coating is used, it must be a hard surface coating (such as an acrylic floor finish) that will not transfer onto bowling shoes or the lanes. 4. Seasonal issues with periods of rain or snow can result in excess moisture, salt and dirt being carried into the center. A higher level of cleaning vigilance must be undertaken at this time. 5. Bowling shoes – the rental shoes, shoe storage trays (if used) and the storage shelving must be cleaned on a regular basis to control the dirt, grit and sand that are tracked in by street shoes. It is preferable to keep street shoes away from the normal storage locations of rental shoes as this dirt, etc. can be tracked into the bowlers’ area and on to the lane surfaces. Using the above guidelines and the attached “Bowling Center Maintenance Schedule” will go a long way in keeping your bowling center clean, looking good and providing a positive environment for the customers you want enjoying your center for many years to come. BOWLING CENTER MAINTENANCE SCHEDULE All chief mechanics and janitorial staffs will be responsible for the completion, documentations and compliance with the items listed on the bowling center maintenance schedule. The chief mechanic, manager and staff should collaborate on the cleanliness of the facility and address areas where attention is needed. 1. The local janitorial staff, either contracted or facility employed, under the supervision of the chief mechanic and manager, should complete all the work assignments listed on the bowling center maintenance schedule. 2. Items not listed on the bowling center maintenance report can be added on a separate form. The bowling center maintenance schedule is only a recommended list of duties necessary for daily, monthly and quarterly cleaning. Certain items such as carpet cleaning, floor care and glass may need to be done more frequently. 3. At the end of each janitorial work shift, the work assignments from the schedule that are completed should be checked off. The chief mechanic and/or manager should check areas of the facility for satisfactory completion of the work items on a daily basis. 4. The completed bowling center maintenance schedules should be kept on file in the mechanics’ shop. The forms that are being used should be posted on a clipboard in the janitorial storage area. 5. Failure by the responsible staff persons to complete this schedule on a thorough and timely basis can result in damage to bowling equipment, lanes and furniture in the bowling center. 46 Bowling Center Operating Procedures Manual Bowling Center Operating Procedures Manual 47 DAY OF MONTH AREA / ITEM ENTRY WAY SWEEP/MOP/FLOOR CLEAN ANY FURNITURE EMPTY TRASH AND ASHTRAYS DUST AND CLEAN WALLS DUST AND CLEAN SIGNS WASH ENTRY WAY DOORS CONTROL COUNTER SWEEP/MOP/VACUUM FLOOR CLEAN COUNTER TOP/SIDES EMPTY TRASH AND ASHTRAYS CLEAN ANY FURNITURE MANAGERS OFFICE AREA SWEEP/MOP/FLOOR EMPTY TRASH AND ASHTRAYS DUST AND CLEAN WALLS CLEAN OFFICE FURNITURE CONCOURSE SWEEP/MOP/VACUUM FLOOR EMPTY TRASH AND ASHTRAYS DUST / CLEAN WALLS CLEAN TABLES AND CHAIRS CLEAN COUNTER TOP/SIDES SPOT CLEAN CARPET WIPE OFF LOCKER DOORS CLEAN SIGNS AND DISPLAYS 1 2 3 4 5 6 7 8 9 10 11 12 13 14 15 16 17 18 19 20 21 22 23 24 25 26 27 28 29 30 X - COMPLETED ITEMS MECHANIC SIGNATURE_________________________ MONTH/YEAR ____________________________ DAILY ITEMS MAINTENANCE SIGNATURE________________________ CENTER NAME ___________________________ BOWLING CENTER MAINTENANCE SCHEDULE 31 48 Bowling Center Operating Procedures Manual MONTH/YEAR _______________ DAY OF MONTH AREA / ITEM KITCHEN AND BACK BAR SWEEP/MOP FLOOR CLEAN COUNTER TOP/SIDES EMPTY TRASH DUST AND CLEAN WALLS DUST AND CLEAN DISPLAYS FLUSH EQUIPMENT DRAINS CLEAN SINKS AND FAUCETS CLEAN SODA DISPENSERS CLEAN ANY FURNITURE RESTAURANT AND BAR SWEEP/MOP/VACUUM FLOOR EMPTY TRASH AND ASHTRAYS DUST AND CLEAN WALLS CLEAN TABLES AND CHAIRS CLEAN COUNTER TOP/SIDES CLEAN BAR STOOLS CLEAN GLASS AND MIRRORS MENS/LADIES RESTROOM SWEEP/MOP FLOOR EMPTY TRASH AND ASHTRAYS DUST AND CLEAN WALLS CLEAN TOILETS AND URINALS CLEAN AND FILL DISPENSERS CLEAN MIRRORS CLEAN PARTITIONS CLEAN / WIPE HAND DRYERS CLEAN SINKS AND COUNTERS BILLIARD AND GAME ROOM SWEEP / MOP FLOOR CLEAN ANY FURNITURE EMPTY TRASH AND ASHTRAYS DUST / CLEAN WALLS CLEAN VIDEO GAMES CLEAN/DUST BILLIARD TABLES 1 2 3 4 5 6 7 8 9 10 11 12 13 14 15 16 17 18 19 20 21 22 23 24 25 26 27 28 29 30 31 Bowling Center Operating Procedures Manual 49 MONTH/YEAR _______________ DAY OF MONTH AREA / ITEM EMPLOYEE BREAK/LOCKERS SWEEP AND MOP FLOOR EMPTY TRASH AND ASHTRAYS DUST AND CLEAN WALLS CLEAN TOILETS AND URINALS CLEAN SINKS AND COUNTERS CLEAN AND FILL DISPENSERS BOWLERS AREA SWEEP/MOP FLOOR EMPTY TRASH AND ASHTRAYS DUST AND CLEAN WALLS CLEAN TABLES AND SEATING CLEAN COUNTER TOP/SIDES CLEAN SCORER CONSOLES CLEAN BALL STORAGE AREA CLEAN BALL HOODS/RACKS CLEAN HOUSE BALLS CLEAN GLASS AND MIRRORS SWEEP/MOP SIDE AISLES PRO SHOP SWEEP/MOP/VACUUM FLOOR EMPTY TRASH AND ASHTRAYS CLEAN WALLS & DISPLAYS OFFICES AND STOREROOMS SWEEP/MOP/VACUUM FLOOR EMPTY TRASH/ASHTRAYS DUST AND CLEAN WALLS DUST AND CLEAN SHELVING JANITORIAL STORAGE ROOM SWEEP/MOP FLOOR CLEAN WALLS AND SHELVING CLEAN MOPS AND EQUIPMENT CLEAN BUFFER AND VACUUM PROPER SUPPLIES IN STOCK JANITOR SCHEDULE POSTED 1 2 3 4 5 6 7 8 9 10 11 12 13 14 15 16 17 18 19 20 21 22 23 24 25 26 27 28 29 30 31 50 Bowling Center Operating Procedures Manual MONTH QUARTERLY PERIOD CLEAN ALL CARPET STRIP BOWLERS AREA FLOOR ITEM CLEAN ALL FLOOR DRAINS CLEAN GRILL AND FRYER FILTERS CLEAN GRILL AND FRYER HOODS CLEAN INSIDE ALL ICE MACHINES CLEAN INSIDE ALL COOLERS DUST / CLEAN EXHAUST VENTS DUST/CLEAN CEILING FANS DUST ALL AIR CONDITIONING GRILLS DUST ALL LIGHTING FIXTURES ITEM MONTH/YEAR ______________ JANUARY JANUARY - MARCH FEBRUARY MARCH MAY JUNE APRIL - JUNE QUARTERLY ITEMS APRIL MONTHLY ITEMS JULY SEPTEMBER JULY - SEPTEMBER AUGUST NOVEMBER DECEMBER OCTOBER - DECEMBER X - COMPLETED ITEMS OCTOBER X - COMPLETED ITEMS Bowling Center Safety All employees are responsible for safety and keeping the bowling facilities safe and secure. It Is Your Responsibility To … 1. Comply with all workplace safety, security, and housekeeping rules as outlined. 2. Know what acts and circumstances could cause unsafe conditions or incidents and how to prevent them. 3. Know what to do in case of an emergency. 4. Immediately notify your Supervisor or manager of any safety/security hazards or incidents that take place. 5. Be alert to safety hazards. Correct them if you can, or notify your Supervisor or Manager if you recognize a potential hazard you cannot correct. General Safety Tips 1. Always follow safety procedures. 2. Report all customer, or employee incidents to your Supervisor or Manager. They are responsible for responding to injuries/incidents occurring in the bowling center. Customer Safety You play an important part in the safety of customers. Observe your surroundings for safety hazards as you perform your job. Promptly correct the hazards that you can. Report any hazards that you cannot eliminate, to the Supervisor or Manager. Walkways 1. Walkways must be kept clear. Keep equipment, bowling balls, bags, shoes, etc. out of walkways. Politely move items out of walkways. 2. Wet floors/spills need to be immediately cleaned up! Use CAUTION signs over wet areas. 3. Spills can contaminate bowlers’ shoes – make certain floors are kept clean. 4. Carpets and tiles should be in good condition. No ripples or torn seams in carpet. No chipped tiles. 5. Carpet runners and mats should be lying smooth with no curled edges. 6. Observe sidewalks and parking lots for cracks, potholes, or any uneven surface that could cause a trip hazard. Bowling Center Operating Procedures Manual 51 Rest Rooms 1. Check every half hour during peak hours of operation. a. Floors dry; wet floors cleaned up promptly! b. Mats in place, lying smoothly. c. Equipment in good condition. d. Hand dryer nozzles secured downward. e. Supplies stocked. f. Partitions secure; handrails and hardware secure, not broken or missing. Prevent Slips and Falls Slips and falls are one of the most common causes of incidents within the bowling center. 1. It is very important that all floors (carpet & tiles) are kept clean at all times. 2. Always be on the look out for spills and wet floors. Clean up all spills right away! 3. Place a CAUTION sign on all wet floors – During mopping. During wet weather – REQUIRED at Entrance/Exit area. 4. Always check the bowlers’ area after birthday parties and between league play to make certain that the area is clean and the floors are dry – no spills! 5. Approaches need to be monitored frequently to make certain that there are no spills, sticky spots, powder or other contamination that may cause a slippery condition, or sticky condition, to exist. Clean approaches as directed by your Supervisor or Manager. 6. Bowling shoes are required while bowling. If a customer is seen bowling in socks or street shoes – advise them politely of the requirement. If they refuse to comply, notify the Supervisor on duty. 7. Carpet runners/mats used throughout the facility should be lying smooth, no curled edges, and secure in place. If edges curl or the carpet runner becomes saturated, remove and replace with new carpet runner. 8. During winter weather, keep walks and parking areas free of ice and snow. The use of CAUTION signs is recommended. 52 Bowling Center Operating Procedures Manual CENTER MANAGERS MONTHLY INSPECTION REPORT DATE: _________________ CENTER NAME________________________ E FINDINGS G F COMMENTS U PINSETTER AREA Cleaning Lubrication P/M Schedule Followed Malfunction Records Parts Records Safety LANES Daily Sequence Followed Monthly Sequence Followed Pindecks Equipment & Supplies Lane Machine Automatic Scorer System Ball Returns A/C & HEATING Filters Cooling Tower / Condenser Equipment Room Air Handler Thermostat & Covers PM Schedule Posted / Followed Heating Equipment RESTROOMS Floors Toilets / Urinals Dispensers Basins Hand Dryers Waste Containers Partitions PUBLIC AREAS Control Counter Meeting Room Playroom Concourse / Carpet & Tile Billiards Area COCKTAIL LOUNGE / BAR Floor / Carpet & Tile Counters & Back Bar Coolers Furniture RESTAURANT Filters / Hood Refrigerators & Coolers Floor Walls BUILDING EXTERIOR Parking Lot Roof Building Structure Gutters & Downspouts Entrance Doors Center Mechanic: Center Manager: Bowling Center Operating Procedures Manual E - Excellent G - Good F - Fair U - Unsatisfactory 53 Monthly Safety Check List Month: _________________ Center Name -__________________________ Item 1 Product Container Labeling 2 Entry Decals 3 Entry and Exit Hazards 4 Doors Unlocked During Business 5 Panic Hardware Equipped on Doors 6 Exit Light Condition 7 Loose Carpet Hazards 8 Carpet Cleanliness 9 Stairs / Steps / Ramps / Wet Floors Date Signed Comments 10 Bowling Approach Hazards 11 Bowler Area Seating 12 Concourse Chairs and Tables 13 Bar Stools and Tables 14 Houseballs and Houseball Racks 15 Poster and League Standing Frames 16 Rental Shoe Condition / Cleanliness 17 Wall Molding and Trim 18 Soda Dispensers Clean 19 Grills and Fryers - Clean 20 Hoods and Filters - Clean 21 Hoods and Ducts - Semi Annual Cleaning 22 Water Heaters 23 Auto Fire Extinguisher Systems 24 Auto Fuel Shut Off Systems 25 CO2 Tanks Chained Up 26 Hand Fire Extinguisher - Type and ID 27 Hand Fire Extinguisher - Annual Certification 28 Hand Fire Extinguisher Required Amount / Type 29 Concourse/Bowler Area Outlets/ Lights / Wiring 30 Support Areas Outlets / Lights / Wiring 31 Emergency Lighting Systems 32 Pinsetter Area Outlets / Lights / Wiring 33 No Smoking Signs in Pinsetter Aisle 34 Combustible Cans - Rags and Waste 35 Flammable Storage Cabinets 36 Bench Grinder Safety Covers 37 All Pinsetter Guards in Place 38 Equipment Decals - Pinsetter Area 39 Equipment Decals - Bowlers Area 40 Electrical Panels - Clear / ID'd / Covered 41 Employee First Aid Kits Stocked 42 Auto Sprinkler Systems Certified 43 Safe Ladders / Properly Stored 54 Bowling Center Operating Procedures Manual