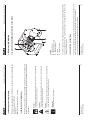
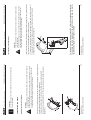
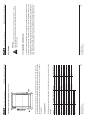
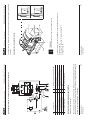
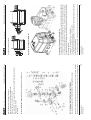
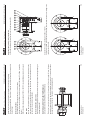
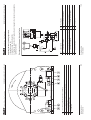
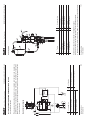
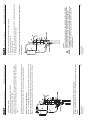
1
Italy Headquarters Installation, use and maintenance manual Manuale Installazione, Uso e Manutenzione Argani Idraulici Installation, operation and servicing manual for Hydraulic Winches Handbuch zur Installation, Verwendung und War-tung von Hydraulikwinden Installation Operation and Service Manual Hydraulic winches 73 4.9 PULLEYS ....................................................................................................................................92 4.8 INSTALLING THE CABLE...........................................................................................................90 4.7 CHECKS .....................................................................................................................................87 4.6 HYDRAULIC DIAGRAM ..............................................................................................................87 4.5 INSTALLATION ...........................................................................................................................85 4.4 MOUNTING ON BASE PLATE....................................................................................................84 4.3 WINCH HANDLING ....................................................................................................................84 4.2 HANDLING – STORAGE ............................................................................................................83 4.1 MACHINE PACKING ...................................................................................................................83 4 TRANSPORT, HANDLING AND INSTALLATION ............................................................................83 3.1 GENERAL SAFETY INSTRUCTIONS ........................................................................................82 3 SAFETY INFORMATION ..................................................................................................................82 2.10 TECHNICAL DATA ....................................................................................................................81 2.9 ELECTROMAGNETIC FIELDS ...................................................................................................81 2.8 NOISE .........................................................................................................................................81 2.7 RESIDUAL RISKS.......................................................................................................................81 2.6 SAFETY DEVICES......................................................................................................................80 2.5 ENVIRONMENTAL CONDITIONS ..............................................................................................80 2.4 NON-PERMITTED USE ..............................................................................................................80 2.3 INTENDED USE .........................................................................................................................80 2.2 DESCRIPTION OF FUNCTIONS ................................................................................................79 2.1 MAIN PARTS AND GENERAL DESCRIPTION OF THE WINCH ...............................................79 2 TECHNICAL INFORMATION ............................................................................................................79 1.9 SYMBOLS USED IN THIS MANUAL ..........................................................................................78 1.8 STANDARDS AND LAWS IN FORCE .........................................................................................78 1.7 GUARANTEE ..............................................................................................................................77 1.6 RECEIPT .....................................................................................................................................77 1.5 INSTRUCTIONS FOR REQUESTING TECHNICAL ASSISTANCE ...........................................77 1.4 EXCLUSION OF LIABILITY ........................................................................................................76 1.3 USING THIS INSTRUCTION MANUAL ......................................................................................76 1.2 WINCH IDENTIFICATION DATA .................................................................................................75 1.1 MANUFACTURER’S IDENTIFICATION DATA ............................................................................75 1 GENERAL INFORMATION ...............................................................................................................75 INDEX Hoisting Solutions - Power Transmission Installation Operation and Service Manual Hydraulic winches 74 11 NOTES ..........................................................................................................................................139 10.13 AUTOMATIC CABLE GUIDE ................................................................................................135 10.12 UNLOCKING THE DRUM “AUTOMATICALLY” ....................................................................134 10.11 UNLOCKING THE DRUM WITH MANUAL BALL VALVES ...................................................130 10.10 LOAD CELL STRAIN GAUGE LIMITER ..............................................................................127 10.9 LOAD LIMITER WITH STRAIN GAUGE .................................................................................122 10.8 HYDRAULIC ROTARY LIMIT SWITCH (GCLS) .....................................................................118 10.7 “STROMAG” ELECTRIC ROTARY LIMIT SWITCH ................................................................116 10.6 “TER” ELECTRIC ROTARY LIMIT SWITCH ...........................................................................112 10.5 CABLE GLAND/HYDRAULIC LIMIT SWITCH ........................................................................110 10.4 CABLE GLAND/ELECTRIC LIMIT SWITCH ...........................................................................108 10.3 SLOW CABLE DETECTOR ....................................................................................................108 10.2 ELECTRIC LIMIT SWITCH .....................................................................................................107 10.1 CABLE GLAND (AVAILABLE FOR ALL WINCH SERIES) ........................................... 107 10 ACCESSORIES ............................................................................................................................107 9 ANALYSIS OF RESIDUAL RISKS .................................................................................................106 8.1 CABLE REPLACEMENT...........................................................................................................104 8 REPLACEMENT OF PARTS ..........................................................................................................104 7.1 PROBLEMS, CAUSES AND SOLUTIONS ...............................................................................102 7 PROBLEMS AND SOLUTIONS .....................................................................................................102 6.7 DISMANTLING AND DISPOSAL ..............................................................................................101 6.6 CLEANING ................................................................................................................................101 6.5 OIL QUANTITY .........................................................................................................................100 6.4 GEARBOX LUBRICATION..........................................................................................................96 6.3 CABLE ........................................................................................................................................95 6.2 SERVICING SCHEDULE ............................................................................................................95 6.1 WARNING ...................................................................................................................................95 6 SERVICING INFORMATION .............................................................................................................95 5.1 START-UP ...................................................................................................................................94 5 START-UP INFORMATION ...............................................................................................................94 Hoisting Solutions - Power Transmission Hydraulic winches 1 General information 75 Installation Operation and Service Manual Information !"#$%&%#'!()*#(*#&!"#+$"*&+,-%&+(*#./%&"#0%1#*("#%/&"3"$#4*$"3#%*1# circumstances. Plate details a = Model. b = Serial number. c = Max. capacity. d = Max. pull. e = Code. f = Year. g = Max. speed. h = Lifting pressure. 1.2 WINCH IDENTIFICATION DATA DINAMIC OIL S.p.A. Via Togliatti, 15 41030 Bomporto (MO) – Italy Telephone: +39 059 812611 – Fax: +39 059 812606 E-mail: [email protected] 1.1 MANUFACTURER’S IDENTIFICATION DATA 1 GENERAL INFORMATION Hoisting Solutions - Power Transmission 1 General information Hydraulic winches The manufacturer is hereby released of any liability deriving from: I Incorrect installation or installation which is not in accordance with applicable laws. I Use of the machine by untrained and/or unauthorised personnel. I Partial or total disregard of the instructions. I Lack of servicing. I Unauthorised alterations or repairs. I Non-permitted uses. I O'"#(6#*(*P(3+7+*%/#'.%3"#.%3&'#%*$K(3#.%3&'#&!%&#%3"#*(&#'."-+,-#&(#&!"#0($"/> I Environmental circumstances beyond the manufacturer’s control. 1.4 EXCLUSION OF LIABILITY 76 456893"($"%,"-#3"(.'%.#:$+!#+!"#,'((",+#+",!%$,*1#*;$1$+<=#>%':1"-?"#'&#("?01*+$'%.#*%-# laws, capable of carrying out the necessary operations, and identifying and avoiding potential hazards while handling, installing, operating and servicing the machine. 1 General information Hydraulic winches 77 I Dinamic Oil S.p.A. guarantees that its products are free from material or construction $"6"-&'#6(3#&!"#$43%&+(*#(6#&!"#74%3%*&""#."3+($#'!()*#(*#&!"#=+*%0+-#:+/#(3$"3#-(*,30%&+(*# at the time of purchase. I During the guarantee period, Dinamic Oil S.p.A. will repair or replace any parts or components that are unserviceable due to ascertained defects in materials or construction. Under this guarantee, any defective pieces must be sent to Dinamic Oil S.p.A., which will examine them so as to determine the cause. I This guarantee is strictly limited to the repair or replacement of products. - The manufacturer will therefore not accept claims demanding reimbursement for direct or indirect damages of any nature under any circumstance. The merchandise may only be sent once authorised by Dinamic Oil S.p.A.. I This guarantee does not extend to O-rings or gaskets in general. I This guarantee does not cover any costs associated with the installation or removal of defective parts from the purchaser’s equipment. I This guarantee does not extend to any products that have been repaired, altered or simply disassembled, even partially. I This guarantee does not extend to any products that have been subject to misuse, incorrect or careless assembly, or tampering. I This guarantee, recognised by Dinamic Oil S.p.A. through its authorised sellers, excludes and replaces any other guarantee of any nature. 1.7 GUARANTEE 56#%*1#$%0%7"'8#$"6"-&'#(3#$",-+"*-+"'#%3"#*(&"$8#+00"$+%&"/1#-(*&%-&#&!"#Dinamic Oil S.p.A. 9%/"'#:6,-"#;#<+*-!#=".%3&0"*&8#&"/>#?@A#BCA#DEFGEE#;#6%H#?@A#BCA#DEFGBG> 1.6 RECEIPT In the event of machine malfunction or failure requiring technical assistance from a specialist technician, or to request spare parts, contact the manufacturer or reseller directly by phone or fax. Installation Operation and Service Manual This manual contains the information required for the operator to understand and correctly use &!"#)+*-!># !"#0%*4%/#%/'(#3"6"3'#&(#+&#%'#%#0%-!+*"8#%/&!(47!#=+3"-&+J"#FBBGKLFKMN#-/%''+,"'# the winch as partly completed machinery. !"#(3+7+*%/#+*'&34-&+(*'#%3"#.3(J+$"$#21#&!"#0%*46%-&43"3#+*#5&%/+%*># (#64/,/#/"7%/#(3#-(00"3-+%/# requirements, the original instructions may be supplied by the manufacturer in other languages. !"#$%&'()*+$'%#,'%+*$%"-#!"("#$.#$%+"%-"-#&'(#/0*1$2"-#3"(.'%%"1#4567 If there are any doubts concerning the correct interpretation of the instructions, the manufacturer '!(4/$#2"#-(*&%-&"$#6(3#%*1#*"-"''%31#-/%3+,-%&+(*'> To make it easier to consult, the manual has been divided into chapters relating to the main concepts. For quick searches, please use the index. Reproduction or publication, in whole or in part, of the information contained in this manual without written authorisation from the manufacturer is prohibited. Using this instruction manual for purposes other than those described without written authorisation from the manufacturer is prohibited. Any violation will be prosecuted according to the law. Hoisting Solutions - Power Transmission 1.5 INSTRUCTIONS FOR REQUESTING TECHNICAL ASSISTANCE Installation Operation and Service Manual 1.3 USING THIS INSTRUCTION MANUAL Hoisting Solutions - Power Transmission 1 General information Hydraulic winches Information Important information or procedures. Caution Information and procedures indicated by this symbol which are not strictly adhered to may result in minor in-jury or damage to the machine. Attention Information and procedures indicated by this symbol which are not strictly adhered to may result in death or severe injury. Danger Information and procedures indicated by this symbol which are not strictly adhered to will result in death or serious injury. 78 The following symbols used in the manual highlight op-erations which are considered safety hazards. It is therefore absolutely essential that the instructions highlighted by these symbols are adhered to. 1.9 SYMBOLS USED IN THIS MANUAL 2 Technical information Hydraulic winches 79 The winch is controlled by the distributor of the operating machine that it is installed on. The drum rotates to wind and unwind the cable bearing the load. The brake is released when the motor is started and is activated when the motor is stopped. 2.2 DESCRIPTION OF FUNCTIONS The winch consists of a drum (containing a planetary gearbox and a negative parking brake) driven by a hydraulic motor, with a cable wound around it for lifting loads. The whole unit is installed on a support frame. Legend A = Hydraulic motor. B = Negative parking brake. C = Planetary gearbox. D = Drum. E = Support structure. 2.1 MAIN PARTS AND GENERAL DESCRIPTION OF THE WINCH Installation Operation and Service Manual The winch has been designed and constructed in accor-dance with Directive 2006/42/EC and the following reference standards: ISO 4301/01 FEM 1.001 3rd edition (points 2, 3, 4, 5 and 8) Hoisting Solutions - Power Transmission 2 TECHNICAL INFORMATION Installation Operation and Service Manual 1.8 STANDARDS AND LAWS IN FORCE Hoisting Solutions - Power Transmission 2 Technical information Hydraulic winches 80 Valve for locking and controlling the lowering operation !+'#.%3&#+'#!1$3%4/+-%//1#-(*&3(//"$#%*$#,&&"$#$+3"-&/1#(*&(#&!"#!1$3%4/+-#0(&(38#%*$#"''"*&+%/#6(3# the winch to function safely. It prevents the load from slipping out of the motor’s control while it is being lowered. 2.6 SAFETY DEVICES U02+"*&#&"0."3%&43"#6(3#.3(."3#4'"V#2"&)""*#WEB#XN#%*$#?LB#XN8#4*/"''#(&!"3)+'"#'."-+,"$# in the winch data sheet. 2.5 ENVIRONMENTAL CONDITIONS The winch must never be used to lift or transport people (unless otherwise described in the data sheet). The winch must never be put into service before the machine that it will be installed on has been declared compliant with the provisions of Directive 2006/42/EC. 2.4 NON-PERMITTED USE 2 Technical information Hydraulic winches 81 The winch technical data can be found in the relevant data sheet provided in the proposal. T/"%'"#-!"-S#&!%&#&!"#-($"#(*#&!"#+$"*&+,-%&+(*#./%&"#(6#&!"#)+*-!#+'#&!"#'%0"#(*#&!"#&"-!*+-%/# datasheet. 2.10 TECHNICAL DATA In the version of the winch with cable gland/limit switch and load limiter, the electromagnetic "0+''+(*'#%3"#*(&#'+7*+,-%*&> 2.9 ELECTROMAGNETIC FIELDS !"#*(+'"#/"J"/'#"0+&&"$#%3"#*(&#'+7*+,-%*&> 2.8 NOISE Even if all safety standards have been observed and implemented according to the rules described in this manual, some residual risks may remain. The most recurrent of these include: I Friction from the cable. I Crushing between cable and drum. I Inverse rotation of the drum due to human error. I MQ"-&+(*#(6#R4+$'#$4"#&(#(+/#/"%S+*7#4*$"3#.3"''43"> Keep in mind that operating any machine will carry a degree of risk. Every type of operation should be performed with the utmost attention and concentration. For the complete table of residual risks, see paragraph 9. Installation Operation and Service Manual The winch is designed to lift and lower loads by winding and unwinding the cable around the drum. Using the winch with values greater than those listed in the technical data is considered “improper use” and is therefore “not permitted”. Under these circumstances, the manufacturer will accept no liability for any damage caused to persons or objects, and will withdraw any kind of guarantee. Hoisting Solutions - Power Transmission 2.7 RESIDUAL RISKS Installation Operation and Service Manual 2.3 INTENDED USE Hoisting Solutions - Power Transmission 3 Safety information Hydraulic winches 82 The machine is packed according to the agreements made with the Customer, taking into account the distance and type of transport chosen. In general the winches are packed in wooden boxes with joists to facilitate harnessing and lifting. The packaging varies depending on the quantity of merchandise that it contains. The weight and dimensions are shown on the transport documents or on the packaging itself. I Read this manual carefully before attempting installation, operation or servicing. I The user must be familiar with applicable standards on safe working practices and know how to use both the operating machine and the installed winch. The user is responsible for his/ her own safety as well any other persons present in the vicinity of the machine working area. I All operators must be suitably trained to assemble, use, adjust and operate both the operating machine and the in-stalled winch. I Do not allow unauthorised personnel to use the machine. I Do not start or set the machine in motion if it is faulty. I Do not attempt to locate hydraulic leaks with bare hands; use a piece of paper or wood instead. I Fluid escaping through a very small hole might be almost invisible, but still capable of penetrating the skin. I 56#R4+$#-(0"'#+*&(#-(*&%-&#)+&!#&!"#'S+*8#'""S#0"$+-%/#%''+'&%*-"#+00"$+%&"/18#%'#&!"3"#0%1# be risk of infection or skin disease. I Z"6(3"# 3"0(J+*7# %*1# -%.'8# ./47'# (3# R"H+2/"# &42"'8# "*'43"# &!"3"# +'# *(# .3"''43"# +*# &!"# hydraulic circuit. 4 Transport, handling and installation Hydraulic winches 83 Use a suitable means of transport to lift and move the packed unit, taking into account the type of packaging. If the package is moved with a fork-lift truck, ensure the weight is balanced on the forks. If the package is moved with a hoist or hook, ensure the load is balanced in the harness. Use lifting accessories that are suitable and meet legal standards. While lifting and positioning the unit, take care not to let it swing too much, to prevent it from hitting something. The storage area must be protected from atmospheric agents and not be excessively damp or dusty. !"#%02+"*&#&"0."3%&43"#04'"#2"&)""*#WFB#XN#%*$#?YB#XN#)+&!#%#0%H+040#!40+$+&1#/"J"/# of 90 % with no condensation. 4.2 HANDLING – STORAGE Attention Do not tilt or overturn the package while lifting or during transport. 4.1 MACHINE PACKING Installation Operation and Service Manual 3.1 GENERAL SAFETY INSTRUCTIONS Hoisting Solutions - Power Transmission 4 TRANSPORT, HANDLING AND INSTALLATION Installation Operation and Service Manual 3 SAFETY INFORMATION Hoisting Solutions - Power Transmission Installation Operation and Service Manual 4 Transport, handling and installation Hydraulic winches 4.4 MOUNTING ON BASE PLATE - Tighten each screw to the correct tightening torque shown in the “Tightening torques” table. 84 - If one of the winch’s weight bearing points is raised from the plate, insert a shim “A” to prevent undue tension in the unit when the screws are tightened. - Place the winch on the plate and check &!%&#&!"#6%'&"*+*7#./%&"'#/+"#."36"-&/1#R%&#(*# the anchoring surface. - Ensure that the plate that the winch will be 6%'&"*"$#&(#+'#R%&#%*$#'&43$1> For lifting procedures, strap the winch using two belts wrapped around the ends of the drum [,7>#U\8#(3#%&&%-!#+&#%&#&!"#+*$+-%&"$#.(+*&'#[,7>#Z\#+6#.3"'"*&> 4.3 WINCH HANDLING Hoisting Solutions - Power Transmission 592 M22 73 2130 1570 1060 843 615 435 314 201 127 86 2500 1840 1240 987 719 509 368 235 148 4 Transport, handling and installation Hydraulic winches Attention Winch installation and post-installation checks must be carried out according to applicable legislation in the country where the machine is used. 4.5.1 Warnings 4.5 INSTALLATION 1500 432 M20 M30 306 M18 744 214 M16 1100 137 M14 M27 86 M24 50 M12 Class 10.9 Class 12.9 85 Installation Operation and Service Manual $?!+"%$%?#+'(/0"#@*10".#4A)6 Class 8.8 M10 Tightening torques Hoisting Solutions - Power Transmission Installation Operation and Service Manual Installation Operation and Service Manual = Lifting line = Connection to brake V2 C3 4 Transport, handling and installation Hydraulic winches 87 4 Transport, handling and installation Hydraulic winches 86 = Connection to drainage = Pressure relief valve = Distributor with gate open This measurement should be made by disconnecting the two tubes from the valve and connecting them with a T-piece that has an attachment for a pressure gauge with a maximum scale of 60 bar. D 2 1 Check the pressure in the return line of the circuit 4.7 CHECKS = Lowering line V1 Typical hydraulic diagram for winch without accessories 4.6 HYDRAULIC DIAGRAM Hoisting Solutions - Power Transmission !"#$+'&3+24&(3#04'&#!%J"#+&'#7%&"#(."*#%*$#2"#+*#%*#]^_#-(*,743%&+(*> If the distributor has multiple elements, connect the winch to the last element closest to the outfeed side. Connect the delivery opening of the element to the winch motor in position “V2”. The hydraulic system must meet the applicable standards and be made with appropriate !('"'8#,/&"3'#%*$#J%/J"'> 4.5.2 Hydraulic system Before mounting, ensure the winding direction of the cable is the same as that shown by the arrow on the winch. Winches which rotate in the opposite direction to the standard can be supplied on request (anticlockwise). The winch can be mounted with the anchoring surface facing downwards, upwards or in any other position between the two. Hoisting Solutions - Power Transmission Installation Operation and Service Manual 4 Transport, handling and installation Hydraulic winches Legend D = Distributor. M = Motor. V = Valve. m = Pressure gauge. P = Pump. R = T-piece. 88 Caution Backpressure values higher than 5 bar dangerously restrict the braking torque, and J%/4"'#/()"3#&!%*#E#2%3#-(4/$#-%4'"#+*'46,-+"*&#'4../1#&(#&!"#0(&(3> Information This backpressure must be between 5 and 1 bar. Hoisting Solutions - Power Transmission Installation Operation and Service Manual 4 Transport, handling and installation Hydraulic winches Caution M*'43"#&!"#(+/#R()#$("'#*(&#-%4'"#&!"#-(*&%+*"3#&(#(J"3R()8#)%'&+*7#(+/#%*$# releasing polluting substances into the environment. If there is a risk of this occurring, stop the test immediately and only resume once the container has been replaced with a larger one. 89 I If the two tubes do not release oil into the container, the distributor has its gate closed. If the two tubes do release oil, the gate is open. I Disconnect the tubes from the valve and place their ends in a container large enough for the purpose. Start the pump while keeping the distributor in the centre. If you do not have safety instructions, you may proceed as follows: Legend D = Distributor. M = Motor. V = Valve. P = Pump. Ensure the control distributor has its gate open Hoisting Solutions - Power Transmission Installation Operation and Service Manual 4 Transport, handling and installation Hydraulic winches 90 56#&!"#-%2/"#+'#*(&#'46,-+"*&/1#-(0.%-&#$43+*7#&!"#+*+&+%/#0(4*&+*7#.!%'"8#+�%1#7"&#-%47!.#+*# the coils underneath and damaged when load is applied to it. 1) Place the end of the cable into the slot on the drum and then into the pocket “A”. 2) Fold the cable around the thimble “B”. Then secure the cable and thimble in the slot by .4//+*7#,30/1> Attention The winding direction of the cable must be the same as the drum rotation direction shown by the arrow. Ensure that the emergency switch is working and that a skilled operator is on hand and ready to stop the winch in the event of entangling or other irregularities that could cause harm to the operator in the vicinity of the cable. Installing the cable with a thimble 4.8 INSTALLING THE CABLE Information Do not release used oil into the environment. Collect it and send it to authorised centres for disposal. Hoisting Solutions - Power Transmission Installation Operation and Service Manual 4 Transport, handling and installation Hydraulic winches 91 For the cable to wind correctly, a preload of 5 % of the cable’s breaking load is required. The breaking load varies depending on the cable’s diameter and type, and must be $%-$,*+"-#;<#+!"#.0331$"(#'%#+!"#,*;1"B.#,"(+$2,*+"7 56#&!"#-%2/"#+'#*(&#'46,-+"*&/1#-(0.%-&#$43+*7#&!"#+*+&+%/#0(4*&+*7#.!%'"8#+�%1#7"&#-%47!.#+*# the coils underneath and damaged when load is applied to it. 1) Place the end of the cable in the slot on the edge of the drum and then into the clamps “A”. !"#.3(&34'+(*#]Z_#63(0#&!"#,*%/#-/%0.#04'"#%&#/"%'&#&)+-"#&!"#$+%0"&"3#(6#&!"#-%2/"> 2) Tighten the clamp screws by the same amount. Attention The winding direction of the cable must be the same as the drum rotation direction shown by the arrow. Ensure that the emergency switch is working and that a skilled operator is on hand and ready to stop the winch in the event of entangling or other irregularities that could cause harm to the operator in the vicinity of the cable. Installing the cable with clamps Hoisting Solutions - Power Transmission 4 Transport, handling and installation Hydraulic winches 92 Installation Operation and Service Manual Legend H = Depth of groove. a = Angle between the sides of the groove. d = Nominal diameter of the cable. 1 = Maximum angle “b”: • smooth drum = 1°30 (tg b = B/A) • threaded drum = 2° (tg b = B/A) 2 = Groove radius “r” = 0,5375 x d. 3 = Groove minimum height “h” = 2 x d. 4 = Angle between the pulley grooves “a” = between 30° and 60°. 4.9 PULLEYS Hoisting Solutions - Power Transmission 11,2 12,5 14,0 16,0 18,0 20,0 22,4 25,0 M1 M2 M3 M4 M5 M6 M7 M8 28,0 25,0 22,4 20,0 18,0 16,0 14,0 12,5 4 Transport, handling and installation Hydraulic winches 93 The pitch diameter of the return pulley must comply with the ISO 4308-1 standard, according &(#&!"#0"-!%*+'0#-/%''+,-%&+(*> 89*)31"E `(3#%#0"-!%*+'0#-/%''+,-%&+(*#(6#aC8#&!"#3%&+(#2"&)""*#&!"#.+&-!#$+%0"&"3#(6#&!"#.4//"1#%*$# the diameter of the cable must be no lower than 20. Drums h1 = D/d D",!*%$.)#,1*..$2,*+$'% Pulleys h2 = C/d Installation Operation and Service Manual C$*)"+"(.#+'#;"#,!'."%#*,,'(-$%?#+'#)",!*%$.)#,1*..$2,*+$'% Hoisting Solutions - Power Transmission 5 Start-up information Hydraulic winches 94 I Check the condition of the lifting parts (cable, hook, etc.) before using the winch. I When carrying out start-up operations, the operator and any other team members must remain a safe distance from the cable, to avoid injury in the event of it breaking. I !"#,3'")#/+6&+*7#(."3%&+(*'#'!(4/$#2"#-%33+"$#(4&#)+&!#%#0($"'&#/(%$#*(#0(3"#&!%*#E#0"&3"# from the ground, to check that the lowering operation is controlled. I Carry out manoeuvres gradually, avoiding sudden movements and swinging. I Bring the winch to its limit position and gently push the distributor lever to purge any air from the system. Danger Before work commences, signs or other appropriate measures must be in place to warn users that it is forbidden to approach or remain in the danger zone due to loads being lifted. A danger warning plate must be placed on the machine informing users of the danger presented by the running cables wrapped around the pulleys and drum, and forbidding anyone from approaching the moving parts. This plate must be reproduced in the user manual of the crane or the operating machine that it is installed on. Safety instructions 6.2 SERVICING SCHEDULE • 8 hours • • • 250 hours Frequency •(*) 500 hours 6 Servicing information Hydraulic winches Cable lubrication I Clean the cable to remove any traces of dirt, dust or sand. I To reduce corrosion, lubricate the cable with a specialist product. 95 Cable inspection I Check the condition of the cable carefully, along its en-tire length. If it has any dents, crushed sections, bulges or a number of broken strands, it must be replaced with a cable of the same '."-+,-%&+(*'#%*$#/"*7&!> I Replace the cable when its nominal diameter has re-duced by 10 % due to wear or the elementary strands breaking. I Replace the cable when corrosion or any kind of warp-ing occurs. I Replace the cable when the lead coating on the cable lug is damaged. 6.3 CABLE 6.4 4.4 6.3 6.4 6.3 Chapter in manual [b\#N%331#(4&#&!"#,3'&#-!%*7"#%6&"3#CBB#)(3S+*7#!(43'8#%*$#&!"*#(*-"#."3#1"%3> Gearbox oil change Screw tightness check Cable lubrication Oil level check Cable inspection Operation Installation Operation and Service Manual Attention Ensure that the machine that the winch is installed on is stopped and cannot be started while being serviced. 6.1 WARNING 5.1 START-UP Hoisting Solutions - Power Transmission 6 SERVICING INFORMATION Installation Operation and Service Manual 5 START-UP INFORMATION Hoisting Solutions - Power Transmission Installation Operation and Service Manual 6 Servicing information Hydraulic winches 96 To change the oil: I Place a container under the winch to collect the used oil. I Turn the drum to so that the oil level hole is at the bottom. I Completely drain the oil. I 43*#&!"#$340#'(#&!%&#&!"#/"J"/#!(/"#+'#(*#&!"#!(3+d(*&%/#%H+'#%*$#&!"#,//+*7#!(/"#+'#%&#&!"#&(.> I U$$#(+/#&!3(47!#&!"#,//+*7#!(/"#4*&+/#+&#R()'#(4&#(6#&!"#/"J"/#!(/"> I c",&#/"J"/#-%.#]Z_#%*$#,//+*7#-%.#]U_> O*)+*$#&!"#-%2/"#4*&+/#,//+*7#-%.#]U_#%*$#/"J"/#-%.#]Z_#%3"#J+'+2/">#56#&!"#(+/#/"J"/#+'#/()8#&(.#4.# through the hole in cap “A” until oil escapes from the hole in cap “B” (in horizontal position). For oil types, see section “6.5 Oil quantity”. Information Do not release used oil into the environment. Collect it and send it to authorised centres for disposal. 6.4.1 Oil level check and change (winch series NP - NPA - A - S - SE - SW - SF) 6.4 GEARBOX LUBRICATION Hoisting Solutions - Power Transmission Installation Operation and Service Manual 6 Servicing information Hydraulic winches To change the oil: I Place a container under the winch to collect the used oil. I Turn the drum so that the oil drain hole “C” is at the bottom. I Completely drain the oil. I Close the drain hole “C” with the appropriate cap. I U$$#(+/#&!3(47!#&!"#,//+*7#!(/"#4*&+/#+&#R()'#(4&#(6#&!"#/"J"/#!(/"> I c",&#/"J"/#-%.#]Z_#%*$#,//+*7#-%.#]U_> 97 If the oil level is low, top up through the hole in cap “A” until oil escapes from the hole in cap “B” (in horizontal position). For oil types, see section “6.5 Oil quantity”. Information Do not release used oil into the environment. Collect it and send it to authorised centres for disposal. 6.4.2 Oil level check and change (winch series SR - SWR - SFR) Hoisting Solutions - Power Transmission Installation Operation and Service Manual 6 Servicing information Hydraulic winches 98 To change the oil: I Place a container under the winch to collect the used oil. I Turn the drum so that the oil level hole is at the bottom “C”. I Completely drain the oil. I 43*#&!"#$340#'(#&!%&#&!"#!(/"#(6#/"J"/#-%.#]Z_#+'#(*#&!"#!(3+d(*&%/#%H+'#%*$#&!"#!(/"#(6#,//+*7# cap “A” is at the top. I U$$#(+/#&!3(47!#&!"#,//+*7#!(/"#4*&+/#+&#R()'#(4&#(6#&!"#/"J"/#!(/"> I c",&#/"J"/#-%.#]Z_#%*$#,//+*7#-%.#]U_> If the oil level is low, top up through the hole in cap “A” until oil escapes from the hole in cap “B” (in horizontal position). For oil types, see section “6.5 Oil quantity”. Information Do not release used oil into the environment. Collect it and send it to authorised centres for disposal. 6.4.3 Oil level check and change (winch series S - SE) Hoisting Solutions - Power Transmission VISIBLE OIL LEVEL Installation Operation and Service Manual 6 Servicing information Hydraulic winches 99 To change the oil: I Place a container under the winch to collect the used oil. I Remove cap “C” and drain the oil completely. I U$$#(+/#&!3(47!#&!"#,//+*7#!(/"#]U_#4*&+/#&!"#(+/#3"%-!"'#&!"#/"J"/#]Z_#2"&)""*#&!"#0+*>#%*$# 0%H>#,//+*7#+*$+-%&(3'#]U_#%2(J"> I c",&#-%.#]U_> If the oil level is low, top up through the hole in cap “A” until the oil reaches the level “B” between the min. and max. indicators. For oil types, see section “7.5 Oil quantity”. Information Do not release used oil into the environment. Collect it and send it to authorised centres for disposal. NOT VISIBLE OIL LEVEL 6.4.4 Oil level check and change (winch series SRD - SWD - WDD) Hoisting Solutions - Power Transmission Installation Operation and Service Manual 0.8 1.2 1.4 3.5 1 1.7 3.5 6 NPA18-NPA19 A30 A44 A60 A80 S15-S19 S20-S25-S27 S30/2-S35/2 S45/2 9.5 SE45 6 Servicing information Hydraulic winches 6 SE30-SE35 SE20/3-SE25/3-SE27/3 3.5 1.2 NP05-NP10-NP12 SRD G230 SRD F180 SRD E150 SRD D120 SRD C100 SRD B80 SRD A60 SE45V S45V/2 SE30V-SE35V 14 10 7 5 4 4.5 2.5 9.5 7 6 100 Oil type ISO VG 150 SE20/3 V-SE25/3 V-SE27/3 V 3.5 Oil type HLP ISO VG 46 Series 0.6 Series The following table contains the quantities of oil (in litres) for the main series of winches in the catalogue. 6.5 OIL QUANTITY !"#)+*-!#04'"#73"%'"$#(*#&!"#7"%3'#,&&"$#+*'+$"#&!"#$340#%*$#(*#&!"#$340#74+$"#3+*7'> For the lubrication, use Renbrand EP/2 - Q8 lithium gear grease or equivalent. After every 250 hours of operation, grease the internal parts of the drum using the lubricators “P” located on the supports. F7G7H#I"*(;'9#10;($,*+$'%#:$+!#?("*."#(winch series P) Hoisting Solutions - Power Transmission Installation Operation and Service Manual 6 Servicing information Hydraulic winches 101 !"#0%-!+*"#04'"#$+'0%*&/"$#21#&"-!*+-%//1#'."-+%/+'&8#e4%/+,"$#."3'(**"/#)+&!#&!"#3"e4+3"$# knowledge of hydraulics and mechanics. Components must be separated according to the materials they are composed of and sent to authorised collection centres. In accordance with the WEEE Directive (Waste Electrical and Electronic Equipment), the electrical and electronic parts, marked with the relevant symbol, must be disposed of at authorised collection centres. 6.7 DISMANTLING AND DISPOSAL Attention Clean the winch with detergents that comply with applicable standards. In order to prevent damage, do not point the jet at the electrical equipment when washing with liquid under pressure. 6.6 CLEANING Hoisting Solutions - Power Transmission Installation Operation and Service Manual 7 Problems and solutions Hydraulic winches With the distributor set in the centre, the load tends to lower Replace the springs. This should be done at an authorised workshop or by the manufacturer. Brake springs are broken 102 Connect the motor drain hole directly to the tank Wind the cable in the direction shown by the arrow (see paragraph 4.5) N!"-S#&!"#-+3-4+&#,/&"3# cartridge and replace it if necessary. Remove the valve and clean it. Excessively high backpressure Cable wound in opposite direction to that shown by the arrow Impurities in the valve The load being lowered tends to fall ATTENTION!!! 5*'46,-+"*&#-+3-4/%&+(*#0%1#2"# caused by prolonged choking (6#&!"#(+/#R()#21#&!"#(."3%&(3# manoeuvring the lever of the distributor. This is dangerous Purge the circuit Lift gradually increasing loads until the winch rotates normally and the noise disappears. If this happens, increase the quantity of oil in the circuit. If this is not possi-ble, contact the manufacturer’s tech-nical (6,-"> Presence of air in the circuit 5*'46,-+"*&#-+3-4/%&+(*#(6#(+/#+*# the cir-cuit Solution Noise in the hydraulic circuit Possible cause Noise while lifting without loads, ac-companied by jerky rotation Problem In the event of the winch malfunctioning, please refer to the table below to identify the problem, its cause and possible solutions. If the problem persists, contact one of the Manufacturer’s authorised workshops. 7.1 PROBLEMS, CAUSES AND SOLUTIONS 7 PROBLEMS AND SOLUTIONS Hoisting Solutions - Power Transmission 7 Problems and solutions Hydraulic winches Load cannot be lifted Check the motor drainage. 56#&!"#(+/#R()#"H-""$'#E#/+&3"# per min-ute, replace the motor. Damaged motor 103 Ensure the pressure relief valve on the control distributor is set correctly. Installation Operation and Service Manual 5*'46,-+"*&#.3"''43"#+*#&!"# hydraulic circuit Hoisting Solutions - Power Transmission 8 Replacement of parts 8 Replacement of parts Hydraulic winches Installing See paragraph 4.8 “Installing the cable”. Installing See paragraph 4.8 “Installing the cable”. Hydraulic winches 1) Completely unwind the cable. 2) Loosen the clamp screws “A”. 3) Unthread the cable. Removing the cable with clamps Hoisting Solutions - Power Transmission 1) Completely unwind the cable. 2) Remove the cable and thimble “B” from pocket “A”. 3) Unthread the cable. Removing the cable with a thimble 104 Installation Operation and Service Manual The cable must always be replaced when: I It has a number of broken strands (approximately 10 %). I It is permanently warped (reduction in cross section, dented, squashed, etc.). I The lead coating on the cable lug is damaged. I Corrosion or any kind of warping occurs. 8.1 CABLE REPLACEMENT 8 REPLACEMENT OF PARTS Hoisting Solutions - Power Transmission 105 Installation Operation and Service Manual The customer is responsible for protecting the operator from potential risks related to moving parts The customer is responsible for protecting the operator from potential risks related to moving parts The customer is responsible for choosing the requirements for guards and protective devices The customer is responsible for ,&&+*7#%*1#,H"$#74%3$' The customer is responsible 6(3#,&&+*7#%*1#%$Q4'&%2/"#74%3$'# restricting access The customer is responsible for choosing the requirements for guards and protective devices Risks posed by surfaces, edges or angles Risks related to moving parts Choice of protection against risks arising from moving parts General requirements for guards and pro-tective devices Fixed guards Adjustable guards restricting access Special requirements for protective devices 1.3.4 1.3.7 1.3.8 1.4.1 1.4.2.1 1.4.2.3 1.4.3 19 22 23 25 26 28 29 9 Analysis of residual risks 106 The customer is responsible for protecting the operator from risks due to rough surface edges or corners during installation. c+'S'#$4"#&(#6%//+*7#(3#R1+*7#(2Q"-&' 1.3.3 18 Hydraulic winches The operation and servicing manual ex-plains how to unpack and handle winches. The customer is responsible for taking these instructions into account while handling. Description Note Remarks Installation Operation and Service Manual Directive 2006/42/ CE J%%"9#K 9 ANALYSIS OF RESIDUAL RISKS Hoisting Solutions - Power Transmission Installation Operation and Service Manual 10 Accessories Hydraulic winches Adjusting the cable gland/limit switch 107 This safety device can detect the maximum winding of the cable (excluding the 4÷5 coils which are always compulsory), using an electric microswitch. The signal from the microswitch can be used to stop the machine. (available for all winch series) 10.2 ELECTRIC LIMIT SWITCH This device presses the cable onto the drum, so that it can be wound more effectively. There are no adjustments to be made to this device. 10.1 CABLE GLAND (available for all winch series) 10 ACCESSORIES Hoisting Solutions - Power Transmission Installation Operation and Service Manual 10 Accessories Hydraulic winches 108 This safety device can detect the the maximum winding of the cable (excluding the 4÷5 coils which are always compulsory), using an electric microswitch. It also presses the cable onto the drum so that it can be wound more effectively. The signal from the microswitch can be used to stop the machine. (available for all winch series) 10.4 CABLE GLAND/ELECTRIC LIMIT SWITCH 1) Put lever “A” into the desired position. 2) Adjust screw “B” until it excites microswitch “C”. 3) Tighten screw “B”. Adjusting the slow cable detector This device can detect when the cable is slow, using an electric microswitch. The signal from the microswitch can be used to stop the machine. (available for all winch series) 10.3 SLOW CABLE DETECTOR 1) Loosen screws “C” and “E”. 2) Place levers “A” and “B” in the desired position. 3) Adjust screw “C” until it excites microswitch “D”. 4) Loosen screws “C” and “E”. Hoisting Solutions - Power Transmission 10 Accessories Hydraulic winches 1) Insert a shim “A” with the same diameter as the cable under the roller end. 2) Loosen screw “B”. 3) Turn lever “C” until screw “D” excites microswitch “E”. 4) Tighten screw “B”. 109 Installation Operation and Service Manual Information Carry out the operation with the cable completely unwound. Adjusting the cable gland/limit switch Hoisting Solutions - Power Transmission Installation Operation and Service Manual = Connection to brake = Connection to drainage = Distributor with gate open = Pressure relief valve C3 D 1 2 8 7 6 5 4 3 = Limit switch activation key = Fuse = Lowering stroke limit microswitch = Lifting stroke limit microswitch = Reset microswitch = Discharge activation solenoid valve NO HOISTING 10 Accessories Hydraulic winches 110 This safety device can detect the the maximum winding of the cable (excluding the 4÷5 coils which are always compulsory), using a hydraulic microswitch. It also presses the cable onto the drum so that it can be wound more effectively. (available for all winch series) 10.5 CABLE GLAND/HYDRAULIC LIMIT SWITCH = Lowering line = Lifting lin V1 V2 LOWERING Typical hydraulic diagram for winch with cable gland/electric limit switch Hoisting Solutions - Power Transmission Installation Operation and Service Manual 10 Accessories Hydraulic winches 1) Insert a shim “A” with the same diameter as the cable under the roller end. 2) Loosen screw “B”. 3) Turn lever “C” until screw “D” excites microswitch “E”. 4) Tighten screw “B”. Information Carry out the operation with the cable completely unwound. Adjusting the cable gland/limit switch 111 The signal from the microswitch is used to stop the machine, and the system is completely automatic. Hoisting Solutions - Power Transmission Installation Operation and Service Manual = Connection to brake = Connection to drainage C3 D 1 3 2 = Distributor with gate open = Lower limit position hydraulic valve = Pressure relief valve 10 Accessories Hydraulic winches 113 10 Accessories Hydraulic winches 112 Installation Operation and Service Manual The limit switch is designed to be used in an industrial environment, even in harsh climatic -(*$+&+(*'# [&"0."3%&43"'# 3%*7+*7# 63(0# WFC# XN# &(# ?YB# XN8# %*$# '4+&%2/"# 6(3# 4'"# +*# &3(.+-%/# environments). The device is not suitable for use in environments with potentially explosive atmospheres, corrosive agents or a high percentage of sodium chloride (saline mist). Contact Operation, servicing and adjustment Hoisting Solutions - Power Transmission This device is used to control the winch’s movement. After a set number of turns, the cams operate the electric switches, starting the predetermined movement. It is commonly used as an upper and lower limit switch. (only available for series S, SE, SW, SF and SFR winches) 10.6 “TER” ELECTRIC ROTARY LIMIT SWITCH = Lowering line = Lifting line V1 V2 Typical hydraulic diagram for winch with cable gland/hydraulic limit switch Hoisting Solutions - Power Transmission Installation Operation and Service Manual 10 Accessories Hydraulic winches 114 Correctly installing the limit switch I Remove the cover (33), unscrewing the fastening screws (32). I Join the limit switch shaft (54, 61) to the gearbox shaft, ensuring the two shafts are not 0+'%/+7*"$># 5&# +'# %$J+'%2/"# &(# 4'"# -(4./+*7'# [LA8# CE\8# R"H+2/"# '!%6&'# (3# %..3(.3+%&"# $3+J"# systems. I Securely fasten the limit switch to prevent the device from vibrating abnormally during (."3%&+(*>#:*/1#4'"#6""&#(3#&!"#R%*7"#[LY\#&(#6%'&"*#+&>#5*'"3&#&!"#04/&+.(/%3#-%2/"#+*&(#&!"#/+0+&# switch using the appropriate cable gland (41). I Strip the multipolar cable so that it is the right length to make the electrical connection to the switches (07). I Tape the stripped part of the multipolar cable. I Clamp the cable in the cable gland (41). I Make the electrical connections to the switches (07), adhering to the contacts diagram shown on the switches them-selves. Tighten the screws to a torque of 0.8 Nm; clamping capacity of the terminals 1×2.5 mm² - 2×1.5 mm² (UL - (c)UL: 60 °C or 75 °C copper conductors (Cu) with AWG 16-18 rigid or soft cable). I Adjust the operating point of the cams (08). To make the correct adjustment, loosen the central screw (03) of the cam pack, adjust the operating point of each individual cam (08) with its adjustment screw (09, 10, 12, 13) (numbered screws indicate the cams in ascending with oils, acids and solvents may damage the device. The limit switch must be fastened using %..3(.3+%&"#6""&#(3#%*#%..3(.3+%&"#R%*7"#[LY\>#a+'%/+7*0"*&'#2"&)""*#&!"#/+0+&#')+&-!#'!%6&# (54, 61) and the gearbox shaft that it is connected to must be eliminated. For this reason, it is %$J+'%2/"#&(#4'"#%..3(.3+%&"#-(4./+*7'#[LA8#CE\8#R"H+2/"#'!%6&'#(3#%..3(.3+%&"#$3+J"#'1'&"0'# (not supplied as standard). The operating point of the cams (08) must be adjusted using the relevant screws (09, 10, 12, 13) after the the central screw (03) has been loosened. Tighten the central screw (03) once the adjustment has been made. The switches (07) are used as an auxiliary control for contactors or electromagnetic loads in general (utilisation category AC-15 according to EN 60947-5-1). The switches (07) have con-tacts with positive opening operation (EN 60947-5-1). Connecting more than one phase to each switch (07) is not rec-ommended. Do not oil or grease the control elements (08) or the switches (07). To facilitate electric wiring, the set of cams/switches (35) can be removed from the limit switch by loosening the fastening screws (15) on the base. Do not loosen the screws (01) located on the upper section of the set of cams/switches to avoid removing the individual ele-ments of the pack itself. Once wiring has been completed, the set of cams/switches (35) must be put back and cor-rectly screwed in place, taking care to couple the plastic hexagonal bushings (14, 38). The limit switch must be +*P'&%//"$#21#'S+//"$8#e4%/+,"$#."3'(**"/># !"#"/"-&3+-#)+3+*7#04'"#."36(30"$#.3(6"''+(*%//1# and in accordance with regulations in force. Before the limit switch is installed and serviced, the machine’s main power supply must be switched off. Hoisting Solutions - Power Transmission Installation Operation and Service Manual 10 Accessories Hydraulic winches ",!%$,*1#.3",$2,*+$'%.#'&#.:$+,!". Utilisation category: AC-15 Nominal utilisation current: 3 A Nominal utilisation voltage: 250 V Nominal thermal current: 10 A Nominal isolation voltage: ~300 V Mechanical duration: 1×10⁶ operations ",!%$,*1#.3",$2,*+$'%. Compliant with Community Directives: 2006/95/EC and 2006/42/EC Compliant with Standards: EN 60204-1, EN 60947-1, EN60947-5-1 and EN 60529 9&(3%7"#%02+"*&#&"0."3%&43"V#2"&)""*#WLB#XN#%*$#?YB#XN :."3%&+*7#&"0."3%&43"V#2"&)""*#WFC#XN#%*$#?YB#XN Protection rating: IP65 Appliance class: Class II Cable inlet: M20 cable gland CE marking 115 Periodic servicing I Check that the screws (32) on the cover (33) are well tightened. I Check that the screws on the switch terminals (07) are well tightened. I Check that the central fastening screw (03) on the cams (08) is well tightened. I Check that the wiring is in good order (especially in the clamping area on the switch). I Check that the front (52) and rear (42) bearing covers are positioned correctly. I Check the condition of the rubber (34) on the inside of the cover (33) and that the cable gland (41) is properly clamping the multipolar cable. I Check that the limit switch’s casing (33, 43, 44) is not damaged. I Check that the limit switch (54, 61) and the gearbox shaft are correctly aligned. I Check that the limit switch is properly fastened. Any changes made to the limit switch’s components will invalidate the values on the device’s 3"7+'&3%&+(*#./%&"#%*$#+$"*&+,-%&+(*8#%*$#+*J%/+$%&"#+&'#74%3%*&"">#56#%*1#(6#+&'#.%3&'#*""$#&(#2"# replaced, only original spare parts may be used. TER will not accept any liability for any damage resulting from the device being used improperly or installed incorrectly. order from the bottom to the top of the pack), then tighten the central screw (03). I Close the limit switch again, taking care to correctly position the rubber (34) on the inside of the cover (33). Hoisting Solutions - Power Transmission Installation Operation and Service Manual 10 Accessories Hydraulic winches 117 10 Accessories Hydraulic winches (only available for series S, SE, SW, SF, SFR, SRD, SWD and WDD winches) 10.7 “STROMAG” ELECTRIC ROTARY LIMIT SWITCH 116 Installation Operation and Service Manual This device is used to control the winch’s movement. After a set number of turns, the cams operate the electric switches, starting the predetermined movement. It is commonly used as Operation, servicing and adjustment an upper and lower limit switch. Hoisting Solutions - Power Transmission Construction of the geared cam limit switch The geared limit switch consists of a gearbox and switch combination which are located within a housing. The torque is positively transmitted from the input shaft to the switching shaft and, when using the precise adjustment “FV” of the cam discs, it is also transmitted up to the contact. !"#7"%3#!(4'+*7#+'#0%$"#(6#7/%''#,2"3#3"+*6(3-"$#'1*&!"&+-#0%&"3+%/8#&!"#-%.#+'#*("+*6(3-"$> Mounting as required. T3(&"-&+(*#5T#GC#&(#=5f#g=M#BLYB#W#EKMf#GBCFA> The continuous service temperature is –25°C to +80°C. U&#@#'+$"'#&!"#!(4'+*7#+'#.3(J+$"$#)+&!#.3"#W#-4&#!(/"'#6(3#-%2/"#"*&3+"'#)!+-!#-%*#2"#(."*"$# by the customer if necessary. `(3#,H+*7#(6#&!"#-%2/"#"*&3+"'8#+*'"3&#,H+*7#*4&'># !"'"#*4&'#%3"#.3(&"-&"$#%7%+*'&#&(3'+(*># !"# For more information, please visit: http://www.terinternational.net/home.php "30+*%/#+$"*&+,-%&+(*V#%--(3$+*7#&(#Mf#CBBE@ Terminal connection: with self-lifting clamping screw Clamping capacity: 1×2.5 mm², 2×1.5 mm² (UL - (c)UL: 60 °C or 75 °C copper conductors (Cu) with AWG 16-18 rigid or soft cable) Tightening torque: 0.8 Nm CE marking Hoisting Solutions - Power Transmission Installation Operation and Service Manual 10 Accessories Hydraulic winches 118 This device is used to control the winch’s movement. After a set number of turns, the cams operate the hydraulic switches, starting the predetermined movement. It is commonly used as an upper and lower limit switch. The system is completely automatic. (only available for series SRD, SWD and WDD winches) 5M7N#OPCQJRSKT#QU JQP#SKDK #VWK TO#4ITSV6 For more information, please visit: http://www.stromag.com/produkte/endschalter/schneckengetriebe/schneckengetriebe-gknstromag-lightcam.html Cam discs The cam discs are provided with 40_ contact cams as standard. On request cam discs with any other cam angle can be provided at extra charge. Special cam discs are already made in our )(3S'#%'#."3#&!"#-4'&(0"3h'#'."-+,-%&+(*> Contact connections The standard contact 99 has glands for 2 x 1.5 mm2 cables. 5*#&!"#.%3&+-4/%3#-%'"#&!"#4&+/+'%&+(*#(6#')+&-!+*7#-(*&%-&'#)+&!#R%&#./47'#G>@#H#B>D#00#+'#.(''+2/"> Caution! <+&!#-(**"-&+(*#J(/&%7"'#"H-""$+*7#FC#gUN#(3#GB#g=N8#+*'4/%&"$#R%&#./47'#(*/1#04'"#4'"$> thread lengths of the required glands are stated on the dimensional drawing. !"#!(4'+*7#+'#.3(J+$"$#)+&!#6(30"$#6""&>#56#3"e4+3"$8#%*#%$$+&+(*%/#R%*7"#-%*#2"#'-3")"$#&(# the shaft input. Hoisting Solutions - Power Transmission Installation Operation and Service Manual T 10 Accessories Hydraulic winches C5 A HOISTING B C4 C4 A T HOISTING B C5 119 L6#Loosen the screws (3) and grub screws (7 and 8) Turn the winch drum in the direction to lift the load, and check that the cams are rotating in the right direction (5 and 6). Adjusting the hydraulic rotary limit switch 56#Take out the screws (9), remove the cover (11) and the gasket (10). Hoisting Solutions - Power Transmission Installation Operation and Service Manual 10 Accessories Hydraulic winches 120 Place the gasket in the rubber (10), close the cover (11), and reapply the 7 M5 screws (9). Max. tightening torque 6 Nm. Once calibration is complete, grease the internal parts of the limit switch system thoroughly, especially the rocker arm and the end of the two locking valves. H6 Perform a few tests to ensure the winch stops in the correct position, both when lifting and lowering. LOWERING LIMIT G6#Unwind nearly all of the cable from the winch drum. Stop the drum with at least 6-7 coils of cable wound. Rotate the external cam (6) and bring it into contact with the rocker arm (4), then tighten grub screw M4 (8). Slowly turn the drum in the direction to lower the load, and check that, when the winch automatically stops, there are still at least 4-5 coils of cable wound around the drum. Once complete, tighten the 4 screws (3). LIFTING LIMIT X6 Position the crane hook 70-80 cm lower than the point where the winch should stop. Rotate the internal cam (5) and bring it into contact with the rocker arm (4), then tighten grub screw M4 (7). Slowly turn the drum in the direction to lift the load, and check that the winch automatically stops before the hook or counterweight hit the return pulley. To calibrate the system, carry out the following steps: If the cams are rotating anticlockwise, the valve to make the drum stop while it is lifting is the valve on the right (B). If the cams are rotating clockwise, the valve to make the drum stop while it is lifting is the valve on the left (A). :*-"#&!"#J%/J"#!%'#2""*#+$"*&+,"$#6(3#'&(..+*7#&!"#$340#)!+/"#+&#+'#/+6&+*78#&!"#(&!"3#J%/J"#)+//# stop it while it is lowering. For the system to work correctly, the valve controlling the LIFTING MUST BE CONNECTED to attachment C4 of the overcentre valve, while the valve making the machine stop while LOWERING must be connected to attachment C5. Hoisting Solutions - Power Transmission = Lifting line = Connection to brake = Connection to drainage V2 C3 D 10 Accessories Hydraulic winches = Lowering line V1 3 2 1 = Rotary limit switch drainage = Pressure relief valve = Distributor with gate open 121 Installation Operation and Service Manual Typical hydraulic diagram for winch with hydraulic rotary limit switch Hoisting Solutions - Power Transmission 10 Accessories Hydraulic winches Electric/hydraulic diagram 122 Consists of a strain gauge transducer and an electronics board. It stops the machine when the load being lifted exceeds the maximum weight permitted. = Discharge activation solenoid valve NO = Lifting limit microswitch = Fuse = Electronics board 3 5 7 9 10 8 6 4 2 D V2 Hydraulic winches 10 Accessories Vcc 12-24 RED BLACK YELLOW WHITE J6 M0 R N J2 B G 1 4 2 3 1 J3 EV 1 2 J4 DL2 DL1 P5 = Strain gauge transducer = Limit switch activation key = Lowering limit microswitch = Reset microswitch = Pressure relief valve = Connection to drainage = Lifting line 123 Installation Operation and Service Manual 2 3 4 5 6 7 8 9 10 11 J7 J1 P2 P1 (+) Diagram of connections on the electronics board Overall dimensions = Connection to brake = Distributor with gate ope 1 = Lowering line Hoisting Solutions - Power Transmission C3 V1 (only available for series NP, NPA, P, S and SE winches) Installation Operation and Service Manual 10.9 LOAD LIMITER WITH STRAIN GAUGE Hoisting Solutions - Power Transmission Installation Operation and Service Manual Negative power supply Alarm signal Service negative Relay output: contact C Relay output: contact NO Relay output: contact NC Service negative Reset input Pre-alarm signal - 3 4 5 6 7 8 9 10 11 Test input 2 System earth connection C"2%$+$'% To be used when impossible to con-nect the box to earth Notes Test button Test button Notes Relay output: contact NO Relay output: contact C 3 4 10 Accessories Hydraulic winches - 2 C"2%$+$'% Relay output: contact NC 1 Terminal - Additional Imax alarm output = 3 A Notes 124 Positive signal. Connect the other end of the indicator to a service negative Max. current 0.5 A. Reset button Imax 8 A Alarm output Max. current 0.5 A Positive signal Connect directly to the battery negative terminal Connect directly to the battery positive terminal Notes J7 connector: additional alarm output 1 Terminal J6 connector: connection to earth Service positive C"2%$+$'% 1 Terminal J4 connector: test input Positive power supply 2 C"2%$+$'% 1 Terminal J3 connector: power supply, alarm output, alarm and prealarm signals Hoisting Solutions - Power Transmission Installation Operation and Service Manual 10 Accessories Hydraulic winches 125 Calibration must be only be performed once the winch has been installed. The board has an internal relay (5-6 contacts, max. 8 A), or it can control an external relay (J7 connector max. 3 A). The board can check it is functioning correctly (not calibration) with an external button connected to the J4 connector, contacts 1-2. Make the connections and press the external button. The board MUST be locked, simultaneously switching on the alarm and prealarm DL2 - DL1. Introduction Calibrating the electronics board 5*6(30%&+(*V#%#,*%/#-%/+23%&+(*#-!"-S#(6#&!"#0%-!+*"#+'#3"-(00"*$"$#%6&"3#%#*402"3#(6#/+6&+*7# tests have been performed to take account any settlement. Checks after mounting I Check that the battery voltage is correct (within the range of values allowed for the board, %*$#)+&!(4&#('-+//('-(."#R4-&4%&+(*'#+*#&!"#'+7*%/'\ I N!"-S#&!%&#&!"#2(H#-/('"'#.3(."3/1#%*$#&!%&#&!"#-%2/"#7/%*$'#%3"#'46,-+"*&/1#&+7!&"*"$ I Check that the device can be switched off using the master switch I Check that the box’s metal board is electrically connected to the vehicle mass. Hoisting Solutions - Power Transmission Installation Operation and Service Manual 10 Accessories Hydraulic winches Lift a load less than 10 % of the winch’s maximum load capacity on the last groove. Calibrating the prealarm 126 Make the electrical connections as shown in the diagram, and start the current. If the red LED DL2 switches on, turn the P2 trimmer clockwise until it switches off. With the winch stopped, use the machine arm to lift a load greater than 10 % of the winch’s maximum pull, with the cable wound around the last groove. 56#&!"#-%/+23%&+(*#+'#."36(30"$#(*#%#73((J"#(&!"3#&!%*#&!"#/%'&#(*"8#-(*&%-&#(43#&"-!*+-%/#(6,-"> Now, turn the P2 trimmer anticlockwise until the red LED lights up. Calibrating the load limiter Hoisting Solutions - Power Transmission Installation Operation and Service Manual 10 Accessories Hydraulic winches 127 This device can detect and restrict the load on the hook, using two load cells attached to the winch’s anchoring surface. (The anchoring surface is supplied with the winch.) The winch is not fastened rigidly to the surface, and its load can make it imperceptibly move around, acting on the load cells. An electronics board then turns the signal coming from the load cells into a signal that can be used as an alarm to stop the machine and to see the load being lifted. (only available for series P9, S19, S20, SE20 and SE30 winches) 10.10 LOAD CELL STRAIN GAUGE LIMITER Adjust the alarm output delay time from 0 to 5 seconds using the P5 trimmer. Each clockwise turn of the trimmer increases the relay’s closing time by 0.5 seconds Calibrating the alarm output delay time A) If the yellow LED DL1 is lit, turn the P1 trimmer clockwise until it goes off. B) If the yellow LED DL1 is off, turn the P1 trimmer anticlockwise until it lights up. Hoisting Solutions - Power Transmission = Slack adjustment screws and preload for load cells = Anchoring surface = Cell touch probe screws = Load cells 2 3 4 5 10 Accessories Hydraulic winches = Connecting rod between winch and surface 128 Installation Operation and Service Manual 1 Hoisting Solutions - Power Transmission Installation Operation and Service Manual NC C V1 HOISTING V2 = Electronics board 9 10 Accessories Hydraulic winches = Lifting limit microswitch = Fuse 5 = Discharge activation solenoid valve NO = Distributor with gate open C NC LOWERING = Connection to brake = Lowering line 56 7 3 1 C3 V1 C 12-24 Vcc NC 1 2 Electrohydraulic diagram with load cell limiter 10 8 6 4 2 D V2 = Load cells 129 = Limit switch system activation key = Lowering limit microswitch = Reset microswitch = Pressure relief valve = Connection to drainage = Lifting line Adjusting the load cell strain gauge limiter 1) Loosen the screw (2) 2) Insert the screw (4) into the cell (5). 3) Tighten the screw (2) until it touches the winch support (the cells can be preloaded by tightening it further). Hoisting Solutions - Power Transmission Installation Operation and Service Manual 10 Accessories Hydraulic winches = Connection to brake F D = Connection to drum unlock controller V2 C6 P C6 C3 C6 = Connection to brake V1 D C3 1 = Lowering line 3 V1 2 Typical hydraulic diagram C3 P D V2 F = Connection to hand pump = Connection to drainage = Lifting line 130 This emergency device allows the drum to be unlocked, and the load to be lowered in a controlled manner. It is usually operated using a hand pump. In addition to the parts listed below, this accessory requires a special overcentre valve which must be requested at the time the winch is ordered. (only available on request) 10.11 UNLOCKING THE DRUM WITH MANUAL BALL VALVES Hoisting Solutions - Power Transmission = 3-way ball valve = Flexible tube 4 5 V1(B) C6 3 V2(A) 4 10 7 6 5 12 11 10 9 8 7 = 2-way ball valve = T-piece = 2-way ball valve = 2-way ball valve = Flexible tube = Overcentre valve Installation Operation and Service Manual 10 Accessories Hydraulic winches 131 Assemble the components as shown in the diagram on page 3. Dinamic Oil recommends the following sizes of connectors and ball valves: I U$$+&+(*%/#&%*S#[F\#%&#/"%'&#C#/+&3"'#+*#'+d"8#,//"$#)+&!#L#/+&3"'#(6#&!"#'%0"#(+/#4'"$#+*#&!"#)+*-!8# = Hydraulic motor = Flexible tube 3 6 = Tank 12 11 2 9 = T-piece 2 1 8 1 Parts required Hoisting Solutions - Power Transmission Installation Operation and Service Manual 2 9 12 11 V1(B) 3 V2(B) 4 10 7 6 5 10 Accessories Hydraulic winches 132 Operation in emergency conditions, unlocking the drum As shown in the diagram below, in emergency conditions the following procedure must be followed: 8 1 Operation in normal usage conditions As shown in the diagram below, during normal winch operation, the ball valves (10 and 12) <&&.$+>$9&$E&C+$>C&<*$+-&$9"##$%"#%&$'()$,#>D&.*$"<.$+-&$FG/"B$9"##$%"#%&$'H)$=:D+$"##>/$7>/$ 9&+/&&<$+-&$=>+>?$.?"0<"A&$A"+&$"<.$+-&$7&809#&$+:9&$'I)$'=",-0<&$,><<&,+0><$+>$+-&$+"<E)6 The additional tank (2) must be placed higher than the motor (6). This placement allows the 7&809#&$+:9&$';)$"<.$+-&$=>+>?$+>$?&="0<$@:##$>@$>0#$.:?0<A$+-&$&=&?A&<,B$#>/&?0<A$C-"D&6 %&&%-!"$#)+&!#i_j#Z9T 3-way ball valve (4), attached with at least ½”G BSP. !"##$%"#%&$'()*$"++",-&.$/0+-$123$!456 T-piece (11) for nominal pressures of 150 bar, see winch data sheet for attachment sizes. Ball valve (10 and 12) for other pressures (>300 bar), see winch data sheet for attachment sizes. Hoisting Solutions - Power Transmission Check the oil level using the visual level on the side of the tank 2 Close the ball valves (10 and 12) Open the ball valve (9) U-&+J%&"# &!"# @P)%1# 2%//# J%/J"# [L\# &(# %//()# R()# 2"&)""*# &!"# 0(&(3# $3%+*%7"# 7%&"# %*$# &!"# R"H+2/"#&42"#[@\#-(**"-&"$#&(#&!"#%$$+&+(*%/#&%*S> Installation Operation and Service Manual 10 Accessories Hydraulic winches Caution Once the emergency operation has been performed, it is important that the system is restored as shown in the “Operation in normal usage conditions” section to prevent the winch from malfunctioning or being damaged. The diagrams in those instructions are to be used as a guide only. For other ,'%2?0(*+$'%.=#("&"(#+'#+!"#$%.+(0,+$'%.#.!':%#!"("#*%-#+!"#"%+($".#$%#+!"# relevant data sheet. 133 The drum unlock controller can only be activated once this sequence of operations has been completed. I I I I Hoisting Solutions - Power Transmission Installation Operation and Service Manual = Connection to tank Serb 10 Accessories Hydraulic winches = Connection to brake C3 F B = Connection to drum unlock controller A C6 C3 = Connection to brake C6 C3 P C6 D S1 = Lowering line D D D A F C3 Typical hydraulic diagram S1 P D B SERB. PIL. = Connection to tank = Connection to hand pump = Connection to drainage = Lifting line 134 This emergency device allows the drum to be unlocked, and the load to be lowered in a controlled manner. It is usually operated using a hand pump. In addition to the parts listed below, this accessory requires a special overcentre valve which must be requested at the time the winch is ordered. (only available on request) 10.12 UNLOCKING THE DRUM “AUTOMATICALLY” Hoisting Solutions - Power Transmission Installation Operation and Service Manual 10 Accessories Hydraulic winches Rotate the drum until the slot is at the top. TOLLOK SHAFT CLAMPING 135 Adjusting the automatic cable guide Operate the winch by turning the drum in the winding direction, bringing the box to face the side where the cable will be installed. While continuing to turn the drum, the box will reach its limit position. As soon as it stops, stop the winch. Unscrew the shaft clamping screws. This will free the threaded bar from the rotation of the drum, meaning the cable guide box will stay still even when the drum is turning. This device is used to correctly guide the cable onto the drum. The system is completely ":+>="+0,*$ "<.$ "##>/D$ +-&$ /0<,-$ +>$ 9&$ :D&.$ &%&<$ /-&<$ +-&$ ,"9#&$ 0D$ D0A<0J,"<+#B$ +0#+&.$ 'D&&$ paragraph 4.9 (only available on request) 10.13 AUTOMATIC CABLE GUIDE Unlocking the drum To unlock the drum, a hand pump just needs to be connected to gate P shown on the data sheet. By applying pressure, it is possible to lower the cable in a controlled manner. The maximum pressure in gate P is 100 bar. Hoisting Solutions - Power Transmission 10 Accessories Hydraulic winches 10 Accessories Hydraulic winches 137 Installation Operation and Service Manual 136 Hoisting Solutions - Power Transmission Tighten the shaft clamping screws and activate the winch. If everything has been done correctly, the drum will make a complete turn, and the box will then start moving, remain-ing one coil behind the drum. BOX SLOT Installation Operation and Service Manual Feed the cable onto the cable guide rollers, threading it through the slot and locking it with the clamps or thimble, tak-ing care not to let the cable protrude out of the sides. Hoisting Solutions - Power Transmission Installation Operation and Service Manual 10 Accessories Hydraulic winches 138 N>$="E&$+-0D$".M:D+=&<+*$/0<.$+-&$J?D+$#"B&?$>@$,"9#&6 When the cable starts to climb to wind the second layer, the box will reach its limit position. The drum completes a turn and the box has to restart from its initial position. If the box is a long way behind the drum, the shaft clamping screws should be unscrewed, the ,"9#&$:</>:<.$9B$><&$+:?<*$"<.$+-&<$+-&$D-"@+$,#"=C0<A$D,?&/D$?&J++&.6 O</0<.$ +-&$ ,"9#&$ 9",E$ +>$ +-&$ J?D+$ #"B&?*$ "<.$ +?B$ /0<.0<A$ 0+$ "A"0<6$ L@*$ ><$ +-&$ >+-&?$ -"<.*$ +-&$ box is ahead of the drum, i.e. practically aligned with the turn of the drum, the shaft clamping screws should be unscrewed, the cable wound by one turn, and then the shaft clamping screws ?&J++&.6$O</0<.$+-&$,"9#&$9",E$+>$+-&$J?D+$#"B&?*$"<.$+?B$/0<.0<A$0+$"A"0<6 Repeat until the right adjustment is achieved. K0<.$+-&$J?D+$#"B&?$>@$,"9#&6 K-&<$+-&$,"9#&$=>%&D$@?>=$+-&$J?D+$+>$+-&$D&,><.$#"B&?*$+-&$,"9#&$A:0.&$D->:#.$",+$0<$+-&$D"=&$ way it did at the beginning, with the box remaining one coil behind the drum. However, the cable guide does have a tendency to get out of sync as the layers build up, since the amount of available cable for winding increases. L+$0D$+-&?&@>?&$0=C>?+"<+$+>$".M:D+$+-&$DBD+&=$/-&<$=>%0<A$@?>=$+-&$J?D+$+>$D&,><.$#"B&?6 Hoisting Solutions - Power Transmission Hydraulic winches 11 Notes 139 Installation Operation and Service Manual This manual is also available in digital format on our website: http://www.dinamicoil.it/ 11 NOTES Hoisting Solutions - Power Transmission