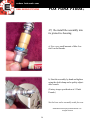
1
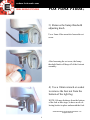
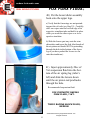
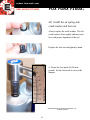
enduro fork seals .com
FOX FORX F100X®
REAL WORLD CYCLING
PICTORIAL SERVICE MANUAL
THESE INSTRUCTIONS ARE OPTIMIZED FOR
ENDURO FORK SEALS™
RECOMMENDED PARTS
FOR SERVICING THE
FOX FORX F100X®
-Plastic bucket/drain pan
-2mm Allen wrench
-Flat-bladed screwdriver
-Pocket screwdriver
-26mm 6-point socket
-10mm socket
-Ratchet wrench
-Adjustable flat-jawed wrench
-Torque wrench
-Fox Bullet Piston Insertion Tool (optional)
-Clean, “lint-free” rags
-7 wt. fork fluid
-Fox 5cc Float Fluid Pillow Pack (or 80 wt.
fully synthetic gear oil)
-“Super-Slick Grease” or “PrepM”
-Oil syringe (or other measuring device)
-Shock pump
-13mm wrench
-Rod clamps (optional)
©2005 Real World Cycling/enduroforkseals .com
All rights reserved.
1
enduro fork seals .com
FOX FORX F100X®
REAL WORLD CYCLING
TABLE OF CONTENTS
TOOLS REQUIRED ..................................................................1
SLIDER/LOWER ASSEMBLY, REMOVAL ............................3-9
SEAL REMOVAL ......................................................................9-10
SLIDER/LOWER ASSEMBLY, CLEANING ...........................10-12
ENDURO FORK SEALS™ INSTALLATION .........................12-16
AIR PISTON REMOVAL ..........................................................17-18
STANCHION TUBES, CLEANING .........................................19
AIR PISTON, RE-INSTALLATION .........................................19-22
FOX FLOAT FLUID® ...............................................................21
SLIDER/LOWER ASSEMBLY, RE-INSTALLATION ............23-24
SUSPENSION FLUID ...............................................................23, 37
DAMPER ASSEMBLY, TEAR DOWN.....................................25-27
DAMPER RE-ASSEMBLY .......................................................28-34
TERRALOGIC ..........................................................................25-28
DAMPER RE-INSTALLATION ...............................................34-38
AIR SPRING SETTINGS ..........................................................39
ADJUSTMENTS .......................................................................39
ENDURO FORK SEALS,™ CARE OF ....................................40
2
enduro fork seals .com
FOX FORX F100X®
REAL WORLD CYCLING
1) Adjust the rebound dial to approximately mid-point. (Right side
of the fork from rider’s view)
This is to avoild putting pressure on the rebound adjusting components while removing the retaining screw.
2) Adjust the Bump Sensitivity
Threshold knob to approximately
mid-point. (Right side, bottom of the
fork from rider’s view)
©2005 Real World Cycling/enduroforkseals .com
All rights reserved.
3
enduro fork seals .com
FOX FORX F100X®
REAL WORLD CYCLING
3) Remove the bump threshold
adjusting knob.
Use a 2mm Allen wrench to loosen the set
screw.
After loosening the set screw, the bump
threshold knob will drop off of the foot-nut
assembly.
4) Use a 10mm wrench or socket
to remove the foot nut from the
bottom of the right leg.
NOTE: Oil may discharge from the bottom
of the fork at this stage, so have an oil collecting bucket in place underneath the fork.
©2005 Real World Cycling/enduroforkseals .com
All rights reserved.
4
enduro fork seals .com
FOX FORX F100X®
REAL WORLD CYCLING
5) Invert the foot nut and thread
it back part way onto the damper
rod.
Do not thread the foot nut up higher than
the threshold adjusting rod. The purpose
of this step is to allow the rod to be driven
up into the fork leg without damaging the
adjusting nub. For now, move to the other
fork leg.
6) Loosen the foot nut on the air
spring side (rider’s left) so that 4
or 5 threads are showing.
Again, be sure and have something ready
to catch the oil.
7) Release air from the fork leg
by depressing the Schrader valve
at the top.
A small amount of oil may discharge with
the air.
©2005 Real World Cycling/enduroforkseals .com
All rights reserved.
5
enduro fork seals .com
FOX FORX F100X®
REAL WORLD CYCLING
8) Using a plastic-faced mallet
(or other suitable means), give
the foot nut a sharp upwards
blow to drive the rod into the
lower leg.
Note that the exposed threads disappear
when the rod is succesfully driven into the
lower leg.
9) Remove the foot nut and be
ready for oil...
Push the rod up into the leg to allow proper
drainage.
The left leg contains about 20cc of 7wt
synthetic suspension fluid.
©2005 Real World Cycling/enduroforkseals .com
All rights reserved.
6
enduro fork seals .com
FOX FORX F100X®
REAL WORLD CYCLING
10) Returning to the damper leg,
drive the rod up into the lower
assembly.
Be prepared for oil...
11) Remove the rebound adjuster
knob.
Hold the knob securely to keep it from
rotating.
Loosen the set screw with a 2mm Allen
Wrench.
If you have difficulty pulling the knob
straight up and off, use some needle-nosed
pliers.
©2005 Real World Cycling/enduroforkseals .com
All rights reserved.
7
enduro fork seals .com
FOX FORX F100X®
REAL WORLD CYCLING
12) Remove the damper assembly.
a) Use a 26mm 6-point socket to loosen the
top cap.
b) As you lift the damper assembly out of
the fork, the remaining damping oil will
drain out the bottom of the lower leg.
c) Over the oil collection bucket, shake the
damper up and down (to activate the “brass
mass valve) and drain out the oil. Periodically pump the rod in and out and continue
shaking the damper up and down until the
bulk of the oil is drained.
d) Set the damper assembly (pictured
at right) aside for now.
©2005 Real World Cycling/enduroforkseals .com
All rights reserved.
8
enduro fork seals .com
FOX FORX F100X®
REAL WORLD CYCLING
13) Pull the lowers off of the
stanchion tubes.
14) Remove the wiper seals.
Start by gently prying at the notches under
the outer edge of the wiper, moving from
notch to notch until the wiper begins to lift
out of the seal head area.
©2005 Real World Cycling/enduroforkseals .com
All rights reserved.
9
enduro fork seals .com
FOX FORX F100X®
REAL WORLD CYCLING
15) Remove and discard the
foam rings.
(New rings are provided with your Enduro
Seal Kit)
16) Inspect the lower/slider assembly. If the lowers are exceptionally clean inside, proceed to
step 21. Otherwise, proceed to
step 17.
17) This is a bottom-out bumper. There is one in the bottom of
each of the lower legs. It’s easier
to clean the lowers with these
removed (otherwise they trap dirt
and moisture during the cleaning
process).
Usually, inverting the lowers and tapping
the legs against the palm of your hand
will break the bottom-out bumpers loose.
Keeping the fork inverted, use a small diameter rod to push them past the bushings
and out of the through the tops. You can
also pull them out of the top using a wire
with a hook bent into the end.
©2005 Real World Cycling/enduroforkseals .com
All rights reserved.
10
enduro fork seals .com
FOX FORX F100X®
REAL WORLD CYCLING
18) Clean the lower assembly.
a) Place the lowers in a suitable sink or
container. Spray the inside of the legs with
a biodegradable degreaser.
b) Using a suitable bottle brush, scub the
inside of the legs with the degreaser.
c) ADD VERY HOT WATER AND DISH
SOAP TO THE BRUSH and continue
scrubing.
d) RINSE THOROUGHLY WITH VERY
HOT WATER. The hot water not only
helps to cut the oil; it also heats up the
lower assembly so that during the drying process, much of the work is done by
evaporation.
©2005 Real World Cycling/enduroforkseals .com
All rights reserved.
11
enduro fork seals .com
FOX FORX F100X®
REAL WORLD CYCLING
19) Dry the lowers with a lintfree absorbant towel.
If necessary, use a blow drier to remove
any remaining moisture.
20) Don’t forget to drop the bottom-out bumpers into each lower
leg. Use a rod to push them flat
on the bottom of the legs.
21) Use Super-Slick Grease®
to lubricate the seal reception
area of the lowers. Note that the
machining is stepped. The foam
rings go past this ledge, and sit
directly on top of the bushings.
The inner oil seal, when pressed
down onto the foam ring, will
rest just above this ledge.
©2005 Real World Cycling/enduroforkseals .com
All rights reserved.
12
enduro fork seals .com
FOX FORX F100X®
REAL WORLD CYCLING
22) Insert a new foam ring into the seal head.
The foam ring will sit directly on top of the bushing.
23) Lubricate the outside edge of the new inner oil seal
before starting it inot the seal head. Please take note of the
correct orientation of the oil seal:
The groove and garter spring
face down (toward the oil).
The writing faces up (away
from the oil).
©2005 Real World Cycling/enduroforkseals .com
All rights reserved.
13
enduro fork seals .com
FOX FORX F100X®
REAL WORLD CYCLING
24) Start the new oil seal into the seal
head as evenly as possible.
25) Using a seal press or an inverted
socket (pictured), press the new oil
seal until it is evenly seated against
the foam ring.
©2005 Real World Cycling/enduroforkseals .com
All rights reserved.
14
enduro fork seals .com
FOX FORX F100X®
REAL WORLD CYCLING
26) Lubricate the outside edge of
the new wiper.
27) Start the wiper into the seating area by hand.
NOTE: If you have difficulty starting them
by hand, place the wipers in the freezer for
a few minutes. This causes the steel ring
inside of them to contract, slightly reducing the outside diameter and easing installation.
28) Fully seat the wiper against the
lower assembly.
You may be able to do this by hand. If necessary, a
short section of PVC pipe works well.
©2005 Real World Cycling/enduroforkseals .com
All rights reserved.
15
enduro fork seals .com
FOX FORX F100X®
REAL WORLD CYCLING
29) Grease the insides of the
seal and wiper and push the
foam ring toward the outer circumference of the leg. Be sure
the foam ring does not protrude
past the oil seal.
(The idea is to keep the fork
stanchions from catching on
the foam rings when the fork is
re-assembled)
COMPLETE STEPS 21-29 FOR THE
OTHER SIDE OF THE LOWERS;
THEN SET THE LOWERS ASIDE
FOR NOW...
©2005 Real World Cycling/enduroforkseals .com
All rights reserved.
16
enduro fork seals .com
FOX FORX F100X®
REAL WORLD CYCLING
30) Release any remaining air
from the air spring Schrader
valve and remove the top cap.
Use a 26mm 6-point socket to remove the
top cap.
31) Drain the 5cc of FLOAT fluid
(or equivalent).
Not sure what was last used in this fork, but it
doesn’t look so good....
©2005 Real World Cycling/enduroforkseals .com
All rights reserved.
17
enduro fork seals .com
FOX FORX F100X®
REAL WORLD CYCLING
32) Remove the Air Shaft/Air
Piston assembly.
a) Push up on the shaft until just before it
disappears into the upper leg.
b) Use a rod or similar device to push the
air piston up to the top of the fork crown.
c) Carefully push the air piston past the top
cap threads and remove it from the upper
assembly.
©2005 Real World Cycling/enduroforkseals .com
All rights reserved.
18
enduro fork seals .com
FOX FORX F100X®
REAL WORLD CYCLING
33) Clean and dry the inside of both
stanchion tubes.
34) Use Super-Slick Grease® or other
suspension grease to lube the left side
threads and the outer diameter of the air
piston.
©2005 Real World Cycling/enduroforkseals .com
All rights reserved.
19
enduro fork seals .com
FOX FORX F100X®
REAL WORLD CYCLING
35) Re-insert the Air Shaft/Air
Piston assembly into the left
upper leg.
TIP: To protect
the air piston seals
and make the job
much easier, use
the Fox 32mm
Bullet Tool to
guide the piston
back into the leg.
As you gently push the piston past the
threads, guide the rod through the hole
at the bottom of the the stanchion tube.
You can then ease the piston head past the
threads by pulling on the rod as you apply
downward pressure on the piston.
(At this point you may come to appreciate the importance of the lubrication used
in step 31, as it can be difficult to get the
piston head past the threads)
©2005 Real World Cycling/enduroforkseals .com
All rights reserved.
20
enduro fork seals .com
FOX FORX F100X®
REAL WORLD CYCLING
36) Inject 5cc of FLOAT Fluid
(or 80wt fully synthetic gear oil)
into the air chamber.
This layer of oil sits on top of the piston
helping to form the air seal and provide
lubrication.
The 5cc Fox Float Fluid Pillow Pack is a
convenient way to get just the right amount
of fluid on top of the air piston.
37) Lubricate the O-ring and
threads of the top cap. Tighten
the top cap by hand.
©2005 Real World Cycling/enduroforkseals .com
All rights reserved.
21
enduro fork seals .com
FOX FORX F100X®
REAL WORLD CYCLING
38) Torque the top cap.
FOX says to torque to 165 inch-pounds.
Seems like about half of that would be
adequate...
39) Add about 50 PSI to the air
chamber to keep the air shaft
fully extended.
©2005 Real World Cycling/enduroforkseals .com
All rights reserved.
22
enduro fork seals .com
FOX FORX F100X®
REAL WORLD CYCLING
40) Put the lower/slider assembly
back onto the upper legs.
a) Verify that the foam rings are not protruding past the oil seals (see Step 29). Carefully
start one wiper onto the beveled edge of its
respective stanchion tube and hold it in place
while you work the other wiper over its respective stanchion.
b) Slide the lowers part way onto the stanchion tubes and invert the fork (the threads of
the air piston rod should NOT be protruding
through the hole in the bottom of the lower
leg or you have pushed the lowers too far
onto the stanchions)..
41) Inject approximately 20cc of
7wt suspension fluid into the bottom of the air spring leg (rider’s
left) and slide the lowers down
until the air piston rod prodrudes
through the hole.
Recommended suspension fluid:
FOX SYNTHETIC RACING
FORK FLUID, 7 WT.
OR
TORCO RACING SHOCK FLUID,
MEDIUM
23
©2005 Real World Cycling/enduroforkseals .com
All rights reserved.
enduro fork seals .com
FOX FORX F100X®
REAL WORLD CYCLING
42) Install the air spring side
crush washer and foot nut.
Always replace the crush washer. The old
crush washers fit too tightly and may interfere with proper alignment of the rod.
Replace the foot nut and tighten by hand.
c) Torque the foot nut to 40-50 inchpounds. Set the fork aside to service the
damper.
©2005 Real World Cycling/enduroforkseals .com
All rights reserved.
24
enduro fork seals .com
FOX FORX F100X®
REAL WORLD CYCLING
43) Remove the Terralogic/Base
Valve from the damper assembly.
(Skip to Step #55 if you do not want to
open and inspect the damper assembly)
Note: In working with the various shafts
and other cylindrical parts, use the Fox
Forx “Shaft Clamps” or a suitable substitue
(the pictured tool is part of a copper tubing
flare tool). The key point here is to securely grasp the parts without scratching or
distorting them.
a) Clamp the base valve assembly.
b) Use a 13mm wrench on the seal head assembly to back the damper tube out of the
base valve assembly. If the seal head itself
starts unthreading, you may need to clamp
the damper tube and use a wrench to wind
off the base valve.
c) Remove the base valve assembly from
the clamp (still pictured in the clamp).
©2005 Real World Cycling/enduroforkseals .com
All rights reserved.
25
enduro fork seals .com
FOX FORX F100X®
REAL WORLD CYCLING
44) Drain remaining oil from the
Terralogic/Base Valve assembly.
Shake the assembly over the oil collection bucket. (In the picture, the clamp
is removed for clarity, but should be left
attached for the next step)
45) Remove the Terralogic/base
valve from its protective “housing.”
a) Use a good quality adjustable wrench on
the “flats” of the base valve and unsrew it
from the housing.
b) Slide out the “Brass Mass” assembly.
©2005 Real World Cycling/enduroforkseals .com
All rights reserved.
26
enduro fork seals .com
FOX FORX F100X®
REAL WORLD CYCLING
46) Test the action of the “Brass
Mass” valve.
As pictured at left, the brass assembly rests
in the “up” position, concealing the oil
port.
Simulating “bumps” by quickly thrusting
the assembly upwards will cause the brass
assembly to drop down, exposing the oil
prort (see below).
©2005 Real World Cycling/enduroforkseals .com
All rights reserved.
27
enduro fork seals .com
FOX FORX F100X®
REAL WORLD CYCLING
47) Re-install the assembly into
its protective housing.
a) Use a very small amount of blue Loctite® on the threads.
b) Start the assembly by hand and tighten
using the shaft clamp and a quality adjustable wrench.
(Factory torque specification is 55 Inch
Pounds.)
Set the base valve assembly aside for now.
©2005 Real World Cycling/enduroforkseals .com
All rights reserved.
28
enduro fork seals .com
FOX FORX F100X®
REAL WORLD CYCLING
48) Remove the damper assembly from the damper tube.
a) Clamp the damper tube and loosen the
seal head with a 13mm wrench.
b) Remove the damper assembly for inspection. If the seal head needs to be
replaced, proceed to step 49. Otherwise,
skip ahead to Step #54.
49) Remove the Top Cap from
the Damper Assembly.
a) Remove the detent ball set screw.
©2005 Real World Cycling/enduroforkseals .com
All rights reserved.
29
enduro fork seals .com
FOX FORX F100X®
REAL WORLD CYCLING
b) Remove the spring. If the detent ball is loose, remove it now and set it aside. If it does not want to roll
out, leave it in place for now.
c) Secure the shaft and loosen the top cap
using a 6-point 26mm socket wrench.
d) Pull the top cap off the end of the shaft.
If the detent ball has not yet been removed,
be careful not to lose it.
e) The easiest way to remove the detent
ball is to push it straight back and let it fall
out of the center of the top cap.
©2005 Real World Cycling/enduroforkseals .com
All rights reserved.
30
enduro fork seals .com
FOX FORX F100X®
REAL WORLD CYCLING
50) Remove, inspect, and re-install the seal head from the damper shaft.
a) Slide the seal head off of the shaft.
b) Inspect the seal located near the top of
the seal head. Lubricate with Super-Slick
Grease®.
c) Lubricate the end of the shaft to reduce
the chance of damaging the seal when installing the seal head.
d) Slide the seal head onto the shaft.
©2005 Real World Cycling/enduroforkseals .com
All rights reserved.
31
enduro fork seals .com
FOX FORX F100X®
REAL WORLD CYCLING
51) Re-install the damper shaft
into the damper tube and torque
the seal head to 55 inch-pounds.
52) Re-install the top cap onto
the damper rod.
a) Lube the O-ring(s).
b) Thread the top cap on by hand.
c) Torque to 55-90 inch-pounds.
©2005 Real World Cycling/enduroforkseals .com
All rights reserved.
32
enduro fork seals .com
FOX FORX F100X®
REAL WORLD CYCLING
53) Re-install the detent ball into
the damper top cap.
a) Put a small dab of grease on the ball
bearing and drop it into place.
b) Insert the spring into the hole, on top
of the detent ball. Wipe the opening and
threads clean of grease.
c) Adequately coat the set screw threads
with “blue” Lockite®. This not only keeps
the screw in place put also FORMS AN
AIR SEAL.
d) Tighten the set screw until it is flush
with the flat surface.
©2005 Real World Cycling/enduroforkseals .com
All rights reserved.
33
enduro fork seals .com
FOX FORX F100X®
REAL WORLD CYCLING
54) Attach the base valve assembly to the damper tube.
Apply a small amount of Locktite® to the
threads and torque to 55 inch-pounds.
You are now ready to re-install the damper assembly into the fork leg.
55) Install the damper assembly
into the right leg.
a) Lube the O-rings at the bottom of the
damper.
©2005 Real World Cycling/enduroforkseals .com
All rights reserved.
34
enduro fork seals .com
FOX FORX F100X®
REAL WORLD CYCLING
b) Guide the end of the damper rod through
the hole in bottom of the leg.
c) Hand thread the top cap 3 or 4 turns into
the top leg to keep the damper assembly
properly aligned while you tighten the foot
nut.
d) Invert the fork and place a new crush
washer over the shaft end. Apply some
grease or anti-seize compond on the threads.
e) Pry the old crush washers out of the foot
nuts (if you haven’t already) and hand tighten
the foot nut.
©2005 Real World Cycling/enduroforkseals .com
All rights reserved.
35
enduro fork seals .com
FOX FORX F100X®
REAL WORLD CYCLING
f) Torque the foot nut to about 50 inchpounds.
56) Re-install the bump threshold adjuster knob.
a) Line up the knob set screw with the
detent on the shaft extention.
b) Torque the set screw to 4 inch-pounds.
©2005 Real World Cycling/enduroforkseals .com
All rights reserved.
36
enduro fork seals .com
FOX FORX F100X®
REAL WORLD CYCLING
57) Add the proper amount
of suspension fork fluid to the
damper side.
a) Unthread the top cap (remember in
Step #52c the top cap was only partially
threaded in).
b) Release the air from the air chamber
(left leg) and partially compress the fork.
c) Add 155cc of Fork Fluid in stages,
compressing and extending the fork and
pumping the damper after adding the fluid
incrementally. NOTE: 150cc for F80X.
Recommended suspension fluid:
FOX SYNTHETIC
RACING FLUID, 7 WT.
or
TORCO RACING SHOCK FLUID,
MEDIUM
©2005 Real World Cycling/enduroforkseals .com
All rights reserved.
37
enduro fork seals .com
FOX FORX F100X®
REAL WORLD CYCLING
58) Tighten the top cap.
Thread the top cap in by hand and torque
to specification (Fox recommends 165
inch-pounds, but anything over 55 inchpounds should be adequate).
59) Install the rebound adjustment knob.
Torque the retaining screw to 11 inchpounds.
©2005 Real World Cycling/enduroforkseals .com
All rights reserved.
38
enduro fork seals .com
FOX FORX F100X®
REAL WORLD CYCLING
60) Set the initial air spring pressure on
the left side:
RIDER WEIGHT
<125 LBS.
125-135 LBS.
135-145 LBS.
145-155 LBS.
155-170 LBS.
170-185 LBS.
185-200 LBS.
200-215 LBS.
215-230 LBS.
230-250 LBS.
AIR PRESSURE
45 PSI
50 PSI
55 PSI
65 PSI
75 PSI
85 PSI
95 PSI
105 PSI
115 PSI
125 PSI
Use the above guidlines to get started, adjusting the pressure up or down based on desired ride quality, whether or
not the fork tends to bottom out, etc.. Be sure to replace
the blue air cap.
61) Make initial rebound and bump threshold
adjustments.
The red knob at the top of the right fork leg is the rebound
adjuster knob. Turning it clockwise will result in slower
rebound. Turning it counter-clockwise will result in faster
rebound.
In theory, the “FX” fork series is always “locked out” to rider
input--only being activated by actual bumps on the trail.
The size of bump required to “overcome” the lockout can
be adjusted by use of the blue “bump threshold” adjustment.
As indicated, full counter-clockwise adjustment requires the
least amount of input from the ground to activate the suspension. If the knob is turned clockwise, a larger bump will be
required to activate the suspension.
©2005 Real World Cycling/enduroforkseals .com
All rights reserved.
39
enduro fork seals .com
FOX FORX F100X®
REAL WORLD CYCLING
PROPER CARE OF YOUR
ENDURO FORK SEALS™
Even in relatively clean and dry
conditions, you will find that the
stanchions and top edges of the
wipers get dirty.
Use a soft, clean cloth to carefully
clean the stanchion tubes and wipers.
Drizzle some Stanchion Lube™ onto
the clean stanchion tubes and allow
it so settle on the tops of the wipers.
Stanchion Lube™
by Finish Line®
Compress the fork a few times.
Using a soft cloth work the excess Stanchion Lube™ into the
upper legs.
Before each ride, rotate your
bike backwards over the rear
wheel, allowing the oil to prelube the stanchion/bushing
interface and inner oil seal.
This will extend the life of your
seals and bushings.
©2005 Real World Cycling/enduroforkseals .com
All rights reserved.
40