1
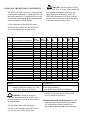
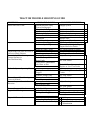
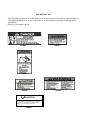
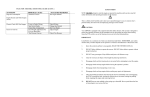
TRACTOR MODEL:
VR31-50-----VR31-60
OWNER’S/SERVICE
MANUAL
SAFETY FIRST
NOTE: DO NOT attempt to start the engine or operate this machine until you have read all
safety information and operating procedures in this manual.
This is a Safety Alert Symbol used to alert you to possible danger to you or someone else’s
personal safety. Be alert to the accompanying messages in this manual.
CAUTION:
Your ZIPPER is equipped with an Ignition Interlock Safety System. This system is designed to
protect the operator and others in the immediate area by preventing the engine from starting
when the PTO switch is on or the Steering Levers are not in the locked position.
IMPORTANT
Listed below are a common set of rules you should read and follow. REMEMBER, your safety
and the safety of others depends on the operator’s awareness and adherence to these basic rules.
1.
.
2.
Know the controls and how to stop quickly. READ THE OWNERS MANUAL
3.
DO NOT carry passengers. Keep children and pets a safe distance away.
4.
Clear the work area of objects which might be picked up and thrown.
5.
Disengage clutch and lock steering levers in neutral before attempting to start the engine.
6.
Disengage clutch and stop engine before leaving the operator’s position.
7.
Disengage clutch when transporting or not in use.
8.
Disengage clutch and stop engine before making any repairs of adjustments.
9.
Take all possible precautions when leaving the mower unattended, such as disengaging
the PTO, lowering the deck, locking the steering levers in neutral, setting the parking
brake, stopping the engine and removing the key.
10.
DO NOT stop or start suddenly when going up or downhill. Mow up and down the face
of steep slopes; never across the face.
DO NOT allow children to operate the mower. DO NOT allow adults to operate without
proper instruction.
11.
Reduce speed and exercise extreme caution on slopes and in sharp turns to prevent
tipping or loss of control. Be especially cautious when changing direction on slopes.
12.
Always stay alert for holes, rocks, and roots in the terrain and other hidden hazards.
13.
Watch out for traffic when crossing or near roadways.
14.
When using any attachments, never direct discharge of material toward bystanders nor
allow anyone near the mower while in operation.
15.
Handle gasoline with care (it is highly flammable)
a. Use approved gasoline container.
b. Never remove the fuel cap or add gasoline to a running or hot engine.
c. Do not fill tank indoors and wipe up any spilled gasoline
d. Exhaust fumes are dangerous. DO NOT run the engine indoors.
16.
Keep the tractor and attachments in good operating condition and keep safety devices
working properly.
17.
Keep all nuts, bolts and screws tight to be sure the equipment is in safe working
condition.
18.
Never store the equipment with gasoline in the tank inside a building where fumes
may reach an open flame or spark. Allow engine to cool before storing in any enclosure.
19.
To reduce fire hazard, keep the engine free of grass, leaves, or excessive oil and grease.
20.
The tractor and attachments should be stopped and inspected for damage after striking a
foreign object, and the damage should be repaired before restarting and operating the
equipment.
21.
DO NOT change the engine governor settings or overspeed the engine.
22.
When using the mower, proceed as follows:
a. Mow only in daylight or in good artificial light.
b. Never make a cutting height adjustment while engine is running.
c. Shut off engine when removing the grass catcher or unclogging the chute.
d. Check the blade bolt tightness at frequent intervals.
23.
Disengage power to mowing deck before backing up. DO NOT mow in reverse unless
absolutely necessary and then only after careful observation of the entire area behind the
mower.
Dealer Preparation For Operation
Customer Note: Your ZIPPER Dealer is
Expected to complete the following
predelivery operations and review all safety
precautions in this manual with you before
or upon delivery of this machine.
NOTE: All references to “Right, Left,
Front, and Back” are from sitting in the
driver’s seat.
WHEELS
Remove packing crate from the machine and
install the drive wheels and tail wheel. Fill
the tail wheel with grease
BATTERY
Connect positive cable first, and then
connect the ground cable.
IGNITION INTERLOCK SAFETY
SYSTEM
DANGER: Failure of the
IGNITION INTERLOCK SAFETY
SYSTEM, together with operation of the
machine could result in personal injury.
Check the Interlock Safety System to make
sure it is functioning properly. The engine
must not start unless the steering levers are
in the neutral locked position and the PTO
switch is off. The engine must kill if the
operator leaves the seat with the steering
levers down and/or PTO switch in the on
position.
MACHINE CHECK LIST
The following list should be performed
before starting the engine on a new machine.
1. Check the engine oil level (see engine
manual for oil recommendations)
2. Check the oil level in the hydrostatic
oil tank located at the right side of the
engine. The oil level should be 1”
below the top of the tank. (See
Hydraulic System for oil
recommendations)
3. Fill fuel tank with fresh clean gasoline
(see engine manual for recommended
fuels)
4.
Check tension on the hydraulic pump
drive, deck drive, and blade drive belts.
(see belt adjustment section for proper
belt adjustments)
5. Check pressure in all tires ( see fig. 1)
The drive wheels and gauge wheels must
have equal pressure to maintain an even
cut.
TIRE PRESSURE PSI
Drive Tires………………10-14
Tail Wheel……………….10-16
Gauge Wheel……………..8-12
6. Check the blade bolts to be sure they
are tight. Also check the deck belt
tension.
WARNING: Never operate the deck
without the grass chute and belt guard in
place.
REGISTRATION & DELIVERY
Fill out the warranty registration card and
mail the proper copy to ZIPPER MOWERS
within 10 days.
Warranty is registered under Model and
Serial Number located under the front of
the left hand control panel on the tractor
and under the left hand deck cover on the
deck.
Upon delivery of the machine, go over all
the controls and how to operate the unit as
covered in this manual. Emphasize all the
safety precautions covered in the manual.
Both dealer and customer must sign the
warranty registration card upon delivery.
MACHINE OPERATION
NOTE: The design and configuration of
equipment, hazard control and accident
prevention are dependant upon the proper
training of personal involved in the operation,
transportation, maintenance and storage of the
equipment. DO NOT let children or
unqualified operators run the equipment.
STARTING THE ENGINE
NOTE: The PTO switch must be in the off
position and the steering levers in the neutral
lock position before the engine starter will
engage. In this manual it will be referred to as
the IGNITION INTERLOCK SAFETY
SYSTEM. (IISS)
WARNING: never operate this machine
with the IISS disconnected, bypassed or
malfunctioning.
WARNING: Engine exhaust gases
contain poisonous carbon monoxide. Avoid
breathing fumes and never run the engine in a
closed building or confined area.
IMPORTANT: Always apply the parking
brake before starting the engine.
1. Pull choke out to the CLOSED position. On
a warm engine leave choke in the OPEN
position.
2. Open throttle to half speed.
3. Turn ignition key to START. Return key to
ON position as soon as engine starts.
NOTE: The ignition switch has an
integrated light switch so it has 2 ON
positions; one is to turn on headlights.
4. Slowly push the choke down to the OPEN
position after the engine starts to warm up.
5.
Allow the engine to warm up at a
low RPM for 2 to 5 min. before putting
the engine under full load
IMPORTANT DO NOT crank the engine
continuously more than 10 seconds at a time.
If the engine does not start, allow a 1 min.
cool down period between start attempts.
Failure to follow these guidelines can burn out
the starter.
STOPPING THE ENGINE
1. Run engine at half speed for a minimum of
one minute with no load for cool down
purposes.
2. Turn ignition key to OFF and remove key.
3. Apply the parking brake.
STEERING CONTROL
After starting the engine, release the parking
brake and fold down the steering levers.
NOTE: If the steering levers are folded down
before the parking brake is released it will kill
the engine.
The steering levers control forward and reverse
movement, speed of travel as well as turning
and braking. Each lever controls the direction
and speed of the corresponding drive wheel. To
go forward, push both levers forward at the
same time. To go backward, pull both levers
toward the operator at the same time. To turn
the machine to the right, move the right lever
back and/or the left lever forward. To turn left,
move the left lever back and/or the right lever
forward.
NOTE: When turning always make sure both
drive wheels are rotating this helps prevent turf
damage.
CAUTION: Any sudden movement of the
steering levers will result in sudden braking or
opposite direction of travel.
BRAKING
Forward or reverse movement is slowed or
stopped by returning the steering levers toward
the neutral position.
NOTE: The parking brake is for parking
only. DO NOT use to slow or stop the
machine or you risk damage to the hydraulic
drive system.
ENGAGING THE DECK OR ATTACHMENTS
The deck is driven by an electric clutch attached
to the engine crankshaft. To engage the deck, set
the engine throttle to 1/3 speed and lift up on the
PTO switch located on the R/H control panel aft
of the steering lever. (Red switch)
WARNING: Operator must be in the
seat for the PTO to Activate. If the attachment
runs without the operator in the seat, stop
engine and repair IISS before further use.
When side discharge deck is in use extreme
caution must be taken not to direct discharge
in the direction of persons or pets.
For best operation of the deck, the engine
should be run at full throttle and the ground
speed controlled by the steering levers
Ref
A
A
A
A
A
A
A
Service at Intervals Indicated
Verify Ignition Safety System
Check Engine Oil
Check Hydraulic Oil
Visually Inspect Tractor
Visually Inspect Tires
Clean Underside of Deck
Lube Deck Gauge Wheels
B
A
Clean Air Filter Element
Lube Gauge Wheel Fork Tubes
A
A
C
C
B
A
A
A
Lube Spindle Housing
Check Battery and Connections
Change Engine Oil (2)
Change Oil Filter (2)
Change Air Filter Cartridge (1)
Check Tire Pressure
Torque Wheel Nuts
Change Hydraulic Oil & Filter (3)
Daily
4
Daily
After
Prestart Stopping Hr.
X
X
X
X
X
X
X
NOTES:
1. More often under dusty conditions
2. Initial oil and filter change is at 5 hrs.
3. Initial filter change is at 100 hrs
WARNING: When servicing the
machine, shut down machine, remove key,
lock steering levers in neutral lockout and
set parking brake.
The preceding table is for your quick
reference. The maximum intervals between
services are listed. If dry and/or dusty
8
Hr.
25
Hr
40
Hr
100
Hr
500
Hr
X
X
X
X
X
X
X
X
X
X
X
REFERENCE:
A-See Owners Manual
B-See Engine Manual
C-See Both Owners and Engine Manuals
conditions are encountered, time between
service should be decreased.
Routine lubrication and maintenance are the
most important steps toward longer machine
life, reducing down-time, upkeep costs,
increasing productivity and quality mowing
IGNITION SAFETY SYSTEM
BREAK IN SERVICES
Check the IISS daily, prior to operation. This
system is important to the safety of persons in
the area as well as operator safety. It should be
repaired immediately if malfunctioning. To
check the system, follow these steps.
A new engine requires special break-in
maintenance. Read the appropriate section of
the engine manual. Engine oil and filter should
be changed after first 5 hours of operation.
1.
Begin with the parking brake engages,
PTO switch off and steering levers in neutral
lock position.
2.
Move the steering levers into the
operating position and turn the ignition key to
start. The starter should not respond.
3.
Return the levers to the neutral lock
position and pull the PTO switch to on and
turn ignition key. The starter should not
respond.
If the starter responds to either of these tests,
turn off ignition switch and make necessary
corrections before further operation of the
machine. Otherwise proceed with preoperative
checks.
All new belts should be checked and adjusted
after the first 5 hours of operation. See belt
adjustment section on proper belt adjustment.
WARNING: Never check or adjust any
belts with engine running. Never operate
machine without replacing belt guards after
adjusting belts.
HYDRUALIC SYSTEM
IMPORTANT: Care must be taken to keep any
dirt or moisture from entering the hydraulic
system. Minute amounts of either will greatly
reduce the life of the components. Care should
be taken to remove all dirt from around the
breather cap before removal.
SEAT SWITCH
The hydraulic tank is located at the right hand
side of the engine.
The seat switch should be checked before each
operation. The machine should not be operated
with an inoperative switch. To check the seat
switch, follow these steps.
Check hydraulic oil daily. Oil level should be 1”
below the top of the tank. To check the oil,
remove breather cap, oil should be visible in the
contaminant screen inside the tank.
1. Start engine while seated in the operator’s
seat. Move steering lever to operating
position and rise from the seat- the engine
should kill.
IMPORTANT: Use only 10W-30-engine oil in
the hydraulic system and an approved 25micron rated oil filter.
2. Move the steering lever back to neutral lock
and restart the engine. Pull the PTO switch
to on position and rise from the seat – the
deck should disengage and the engine
should kill.
If the engine fails to kill during either of these
tests, turn off ignition switch and correct
immediately.
The hydraulic filter should be changed after the
first 100 hours of operation, then every 500
hours thereafter.
NOTE: If the performance of the drive system
becomes sluggish or there is an appearance of
dirt or water in the oil, the oil and filter should
be changed in the system.
MOVING THE MOWER
WITHOUT POWER
Do not exceed a speed of more than 2 mph
when the moving the mower without power.
In order to transport the mower without power,
you must first release the hydraulic pressure by
using the bypass valve located on each pump.
Lift the mower seat to gain access to the pump
valves. The valves are a 5/8” hex head located
on the valve block of each of the pumps, with a
cross hole through it. Loosen the bypass valve
on each pump, three turns counterclockwise.
Move the mower and tighten the bypass valve
on each pump three turns clockwise.
Great care must be taken to insure that all
particles that may cause contamination to the
system be removed from around the filter and
housing before removal. To clean around the
filter use a solvent and brush to remove oil and
dirt. Then use compressed air to final clean the
area. Also use compressed air to clean the oil
cooler located on the top of the engine by
blowing through the cooling fins from the
inboard side.
WARNING: Hydraulic oil escaping under
pressure can penetrate the skin. Before
applying pressure to hydraulic system, make
sure all connections are tight and all hoses
and lines are in good condition. To find a
leak under pressure, use a piece of cardboard
or wood-NEVER use your hands. Shut
engine off and remove ignition key before
opening any hydraulic lines. Eye protection
should be worn when servicing the hydraulic
system.
IMPORTANT: Always keep the transmission
pump oil cooler and cooling fins clean.
Extra heat caused by oil and dirt build up on
the pump or oil cooler will cause premature
wear on the hydraulic system
ELETRICAL SYSTEM
The electrical system is a 12-volt neg.
ground. The factory-installed battery is a
U1L9. The battery is located on the Left
Hand side of the engine. Check battery
connections every 40 hours to ensure they
are clean and tight.
WARNING: When jumpstarting a low or
dead battery, keep away from open flame or
spark. Always wear eye protection. Do not
breathe battery fumes and avoid skin contact
with battery acid. If contact does occur,
flush area with cold water and consult
physician.
WARNING: When jumpstarting a battery
follow these steps to avoid sparks that could
cause gases to explode.
1. Attach the first jumper cable from the
positive (+) terminal of the good battery
to the positive (+) of the dead battery.
2. Attach the second cable from the
negative (-) terminal of the good battery
to the negative (-) terminal of the dead
battery.
IMPORTANT: A 40-amp fuse protects the
electrical system. If there is an overload on the
circuit, the fuse will blow. The cause of the
overload should be located and fixed before
installing a new fuse.
ENGINE OIL SYSTEM
Check engine oil level at the start of each day
and again after 4 hours of operation. Oil must
always be between the marks on the dipstick.
Refer to engine manual for oil change intervals.
To change oil, park track on a level surface,
remove key, put steering lever in the neutral
lock position and apply parking brake. Place an
oil pan under the drain plug, located on the R/H
side of the engine. and remove drain plug.
Remove the old filter. Lubricate gasket on new
filter with new oil and install. Tighten filter by
hand only. Replace oil drain plug and add new
oil (oil fill hole located on aft valve cover). DO
NOT overfill. See engine manual for capacity,
API service class and viscosity.
LUBRICATON
WARNING: During normal operation, oil
heats to a level that may cause severe burns.
Allow engine to cool before service.
Use SAE multi-purpose grease on all grease
zerks.
ENGINE AIR FILTER
VR31-50 VR31-60
Clean/change outer element every 150 hours.
Clean/change inner element every 250 hours.
These procedures should be performed more
often in dusty conditions. See engine manual for
further instructions.
NOTE: The best time to grease the bearings on
your ZIPPER is right after you have completed
mowing and cleaned the machine.
There are 7 grease zerks on the machine. The
deck gauge wheels should be greased every 8
hours. The spindle bearings and gauge fork
bearings should be greased every 40 hours
BLADE CARE
DANGER: Never inspect of remove
blades with engine running or key in ignition.
Always remove key and set parking brake.
ENGINE COOLING SYSTEM
The engine is an air-cooled unit. Grass, chaff or
dirt may clog the rotating screen and the aircooling system. Yearly or every 100 hours
remove the cooling shrouds and clean cooling
fins. Also, clean dirt and oil from the external
surfaces of engine, this may also cause improper
cooling. In dusty conditions clean more often.
IMPORTANT: Never attempt to make engine
adjustments while engine is running. Do not
operate engine without cooling shrouds
installed, this will cause overheating.
FUEL SYSTEM
WARNING: Observe usual fuel handling
precautions. Do not smoke while refueling. Do
not fill tank with engine running or while engine
is hot. Keep fuel away from open flame or
spark. Keep fuel in proper container. Read and
observe all safety precautions in this manual
Fuel capacity is 12 gal. Always use clean fresh
fuel. Unleaded gasoline is recommended. See
manual for further recommendations.
An inline fuel filter is located just before the
engine. If filter becomes clogged, it should be
replaced. There is a fuel shutoff valve located at
the bottom of the tank. This valve should be
closed to prevent fuel loss when changing filter
And servicing the engine
For best results keep the mower blades
sharpened.
Do not sharpen blades while mounted on the
spindles. Blades may be sharpened on a grinder
or by filing. When grinding, care should be used
to maintain blade balance. A blade balancer
should be used after sharpening. Unbalanced or
bent blades will cause excessive vibration and
decrease the life of the deck
WARNING: Never use any form of heat
to straighten a bent blade. Never weld a cracked
or broken blade- REPLACE THEM.
BELT ADJUSTMENT.
WARNING: Never check or adjust any
belt with engine running.
NOTE: Do not over tighten any belt. A belt that
is to tight will run hotter, create unnecessary
side pressure on bearings and cause premature
failure of belts and bearings.
WARNING: Do not operate machine
without all belt guards and deck covers in place.
BELT ADJUSTMENT
There are two belts that can need periodic
adjustment: The drive belt from engine to
the pumps and the drive belt from the engine
to the mower deck.
Both of these belts can be adjusted at the
back of the machine with the springs and
idler arms located on the on the engine plate
Tighten the jam nut until spring and belt are
tight. If the belt is cracked, split or does not
have enough adjustment, replace the belt.
WARNING: Never check or adjust any
belt with engine running.
STEERING ADJUSTMENT
The machine has been set at the factory so that it
will not creep forward or backward while the
engine is running and the steering levers are in
the neutral lock position. However, if the
machine should begin to creep or one wheel
runs faster than the other, adjustments must be
made. Contact authorized ZIPPER dealer for
steering cable adjustment.
EXTERIOR SURFACE
The machine should be washed regularly to
maintain its appearance.
WARNING: When washing the inside of
machine, DO NOT direct water spray around
the hydraulic oil tank breather cap.
The mower deck should be cleaned after each
day of use for best mowing results. Water
pressure from a garden hose will clean the
underside of the deck if the grass clippings have
not dried. Otherwise, a putty knife or other flat
object may be needed to remove dried clippings
and dirt.
STORAGE:
To insure the machine will be ready for the next
mowing season, the following steps should be
taken when storing the machine at the end of the
season.
1. Wash the machine to remove all grass, dirt
and debris.
2. Visually inspect for any worn or damaged
parts that need replaced and order them from
your ZIPPER dealer.
3. Lubricate the machine according to
lubrication instructions.
4. Lightly oil the underside of deck to prevent
rusting.
5. Drain fuel tank and run engine to remove all
gas from carburetor.
6. Perform other engine operations as outlined
under storing engine in the engine manual.
7. Remove battery and store in a dry place.
Protect the battery from freezing
temperatures. Occasionally charging the
battery during storage will extend battery
life.
8. Store machine in dry place away from
flames
TRACTOR TROUBLE SHOOTING GUIDE
SYMPTOMS
Starter Does Not Crank
Engine Cranks But Does Not Start
Engine Runs with Loss of Power or
Excessive Black Exhaust
Tractor Jerky When Starting or
Tractor Operates in
One Direction Only
PROBABLE CAUSES
Ignition Interlock Safety
System Not Engaged
Safety Switch Faulty
PTO Switch in On Position
PTO Switch Faulty
Weak or Dead Battery
Fuse Blown
For Additional Causes
No Gas or Line Plugged
No Fire at Spark Plug
Numerous Other Causes
Restriction in Air Cleaner
Poor Compression or Timing
Steering Need Adjustment
Hydraulic Pump or Wheel
Motor Faulty
Oil has been Contaminated
with Water or Dirt
SUGGESTED REMEDIES
Engage System
Replace Switch
Put Switch in Off Position
Replace Switch
Recharge or Replace Battery
Replace Fuse
See Owner’s Manual
Fill Tank or Replace Line
Clean or Replace Spark Plug See
Engine Manual or Dealer
See Engine Manual or Dealer
Service Air Cleaner
See Engine Manual or Dealer
Adjust Steering
See Your Dealer
Drain Oil From System and
Replace or See Your Dealer
Hydraulic System Operating Hot
Tractor Creeps When Steering
Levers in Neutral
Tractor Creeps or Veers in One
Direction
Cooling fins or Oil Cooler
Plugged
Hydraulic Pump Faulty
Steering Out of Adjustment
Clean Cooling Fins and/or Oil
Cooler
See Your Dealer
Adjust Steering
Steering Out of Adjustment
Wheel Motor Faulty
Adjust Steering
Tractor Creeps with Brake on.
Engine Over Heating
Brake Band Worn
Intake Screen Clogged
Cooling Fins Clogged
Engine Oil Pressure Low
Low Oil Level
Oil Sending Unit Faulty
Oil Diluted or Grade Too Light
See Your Dealer
See Your Dealer
Clean Screen
See Engine Manual for Cleaning
Add Oil
See Your Dealer
Change Oil and Check for Source
of Contamination
TRACTOR TROUBLE SHOOTING GUIDE (CONT.)
SYMPTOMS
High Oil Consumption
PROBABLE CAUSES
Numerous Causes
SUGGESTED REMEDIES
See Engine Manual
Engine Knocks and Other Engine
Noises
Electric Clutch Will Not Engage
Grass Cut Uneven
Loose or Faulty Wiring
Seat Switch Faulty
Clutch Out of Adjustment
Deck Height Adjustment Not
Even on Both Sides
Tire Pressure Uneven
Check Wiring
Change Seat Switch
See Your Dealer
Adjust Height
Check Tire Pressure
HAZARD DECALS
These decals have been placed on the deck to instruct the operator and to warn of safety hazards. It is
very important that they are in place and visible at all times. Replace damaged or missing decals
immediately.
Order by part numbers shown.
1006004
1006003
1006006
1006001
WARNING
DO NOT ALTER ELECTICAL SYSTEM
WRONG WIRING CONNECTIONS WILL DAMAGE
ELECTRICAL COMPONENTS AND MAY MAKE
THE SAFETY SWITCHES INOPERABLE
1006002
1006005
ZIPPER WARRANTY
As a condition of the Zipper Mower warranty the owner and operator are fully
responsible for having read, and understand the proper operation and care of the Zipper
unit before attempting to operate the Machine.
Zipper Mowers warrants its products, upon date of delivery to the original
purchaser for one year (12 months) for commercial use and two years (24 months) for
private estate use.
Zipper Mowers warrants that it will repair, or replace without charge to the
original purchaser for materials and labor of any component or part manufactured by
Zipper found to be defective in material and/or workmanship.
This warranty will not take effect unless the owner registration, supplied with the
machine, is signed and returned to: Zipper Mowers within 10 days of purchase.
PO Box 246
Augusta, KS. 67010
To obtain warranty service, the unit or part must returned to an authorized
distributor or dealer, transportation prepaid. Upon receipt of the warranty claim and part,
Zipper will commence performance of its obligations under this warranty.
This warranty is void if the part or component product has been repaired or
serviced by anyone other than an authorized distributor or dealer, or if the product is
damaged from failure to operate as instructed, or because of accident, misuse or abuse, or
if the product is damaged from failure to comply with proper maintenance as instructed.
THIS WARRANTY DOES NOT COVER:
Normal maintenance and/or replacement of maintenance and wear items such as
lubricants, filters, blades, brakes, spark plugs, belts, rubber hoses, light bulbs, ignition &
tune up parts and repainting or touch up.
Tires, Belts and Batteries are considered to be consumable wear items, and are warranted
for a period of 90 days against materials or workmanship defects, not for wear or abuse.
Damage or Defects resulting from misuse, neglect, alteration, accident or negligence.
Damage, or Defects resulting from repairs or modifications by persons other than an
authorized Zipper Dealer
Engines which are warranted by their respective manufacturers
Transportation to and from dealership or services calls made by dealers, ie., driving time,
towing, pickup and delivery.