1
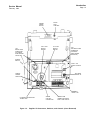
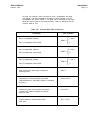
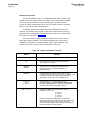
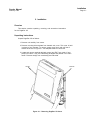
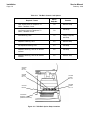
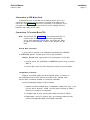
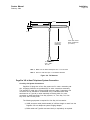
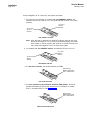
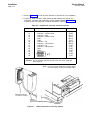
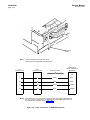
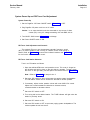
AT&T
SERVICE MANUAL
PagePac® VS (AT&T VERSION)
INSTALLATION
AT&T
SERVICE MANUAL
PagePac* VS
INSTALLATION
SM–722994–004
Issue 1, February 1984
*Registered Trademark of Harris Corporation Dracon Division
Copyright ©HARRIS CORPORATION 1984.
Table of Contents
Service Manual
Page i
February 1984
Table of Contents
1. Introduction
Page
1-1
Overview
1-1
System Components
1-1
Power Requirements
1-2
Environmental Requirements
1-2
Functional Description
Connectors
Switches and Controls
1-2
1-2
1-6
2. Installation
2-1
Overview
2-1
Unpacking Instructions
2-1
Mounting Site Selection
2-2
To Mount the Unit
2-3
Installation of Optional Circuit Cards
FM Tuner Card
Talk-Back Control Card
2-3
2-3
2-5
Connections to CPE Music Card
2-7
Connections to Terminal Block TB1
Ground Wire Connection
Loudspeaker Connection
Music-On-Hold Connection
External FM Antenna Connection
Off-Premises or Remote Amplifier Connection
2-7
2-7
2-7
2-8
2-8
2-8
PagePac VS to Host Telephone System Connection
COM KEY* 416 System Connections
Horizon* Connections
Dimension* Connections
2-9
2-9
2-13
2-15
*Registered Trademark of AT&T
Service Manual
Table of Contents/List of Figures
February 1984
Page ii
Table of Contents (Cont’d.)
2. Installation (Cont’d.)
System Power-Up and FM Tuner Card Adjustment
System Power-Up
FM Tuner Card Adjustment and Controls
FM Tuner Card Station Selection
FM Tuner Card Music-On-Hold Volume Adjustment
3. System Operation and Test
Page
2-17
2-17
2-17
2-17
2-18
3-1
Overview
3-1
Com-Key 416 Operation and Test
Zone Selection by DSS Buttons
Dial Zone Selection
3-2
3-2
3-2
Horizon Operation and Test
3-3
Dimension Operation and Test
3-4
Talk-Back Test
3-5
FM Background Music Test
3-5
4-1
4. Maintenance
4-1
Overview
List of Figures
1-1
1-2
1-3
1-4
2-1
2-2
2-3
2-4
PagePac VS
PagePac VS Connectors, Switches, and Controls
(Cover Removed)
CPE Music Card Installed
Terminal Block TB1
Removing PagePac VS Cover
PagePac VS Mounting Space Requirements
Opening PagePac VS Talk-Back/FM Tuner Card
Protective Cover
Installation of Optional Circuit Cards
1-1
1-3
1-4
1-4
2-1
2-2
2-4
2-4
List of Figures/Tables
Service Manual
Page iii
February 1984
List of Figures (Cont’d.)
2-5
2-6
2-7
2-8
2-9
2-10
Talk-Back Option Strap Locations
FM Antenna
Cable Connection to Com Key System
Cable Connection to HORIZON CS System
Cable Connection to DIMENSION System
FM Tuner Card Controls and Indicator
Page
2-6
2-9
2-12
2-14
2-16
2-19
List of Tables
1-A
1-B
2-A
2-B
2-C
2-D
4-A
Terminal Block TB1 Connections
PagePac VS Switch Functions
Talk-Back Control Card Options
PagePac VS lnitial Setup
PagePac VS Com Key Connector Pinouts
FM Tuner Card Controls and Indicator
Trouble Analysis
1-5
1-6
2-6
2-11
2-12
2-20
4-1
Service Manual
February 1984
FCC Registration
Page A
Federal Communication Commission (FCC) Registration
Compliance
In compliance with Part 68 of the FCC Rules and Regulations, the
customer is advised as follows:
Standard Plugs and Jacks
Direct connection to the network must be through a USOC-type jack.
Registered terminal equipment or protective circuitry may not be used with
party lines or coin telephone lines.
Notification to Telephone Company
Customers connecting terminal equipment to the telephone network
shall, before such connection is made, give notice to the telephone company
of the particular line(s) to which such connection is to be made and shall
provide to the telephone company the FCC registration number and the
ringer equivalence of the registered protective circuitry. Notice of final disconnect shall also be given.
Separate Wiring
Compliance with FCC Registration requires that wiring between
PagePac VS and the loudspeakers be in a cable harness separate from all
other leads. It is also a requirement that the PagePac VS be installed by a
trained and authorized agent of the manufacturer or under the supervision of
a licensed professional engineer, as provided for in section 68.215 of the
FCC Rules and Regulations.
Separate Housing
The PagePac VS has its own housing and mounts externally to the
associated telephone system.
Incident of Harm
Should terminal equipment cause harm to the telephone network, the
telephone company shall, where practicable, notify the customer that temporary discontinuance of service may be required. However, where prior
notice is not practicable, the telephone company may temporarily disconnect
service forthwith, if such action is reasonable in the circumstances. In case of
temporary discontinuance, the telephone company shall (1) promptly notify
the customer of such temporary discontinuance, (2) afford the customer the
opportunity to correct the situation which gave rise to the temporary discontinuance, and (3) inform the customer of his right to bring a complaint to the
Commission pursuant to the procedure set out in Subpart E of Part 68.
FCC Registration
Service Manual
February 1984
Page B
Changes in Telephone Company Facilities, Equipment,
Operations or Procedures
The telephone company may make changes in its communications
facilities, equipment, operations or procedures, when such action is
reasonably required in the operation of its business and is not inconsistent
with the rules and regulations of Part 68. If such changes can be reasonably
expected to render any customer’s terminal equipment incompatible with the
telephone company communications facilities, or require modification or
alteration of such terminal equipment, or otherwise materially affect its use or
performance, the customer shall be given adequate notice in writing, to allow
the customer an opportunity to maintain uninterrupted service.
Repairs
Repair of registered terminal equipment and registered protective circuitry shall be accomplished only by the manufacturer or by its authorized
agent. This applies at any time during and after the warranty period.
Equipment Malfunctions
When trouble is experienced, the customer shall disconnect the
registered equipment from the telephone line to determine if the registered
equipment is malfunctioning, and that, if the registered equipment is malfunctioning, the use of such equipment shall be discontinued until the problem
has been corrected.
Registration Number
The type of connecting arrangement (jack) to be ordered from the
telephone company is indicated below as typical. Other standard jacks may
be used for specific applications.
●
Typical Connecting Jack:
USOC RJ-18C
●
FCC Registration Number:
APF9Q9-70328-OT-N
●
Ringer Equivalence:
0.8B
Introduction
Service Manual
Page 1-1
February 1984
1. Introduction
Overview
This service manual contains installation, test and maintenance procedures for PagePac VS, a 35-watt zone paging unit designed to operate
with most telephone systems. Connection instructions for compatible host
systems are contained in Section 2.
PagePac VS provides up to three separate paging zones (zone paging)
and all call paging (paging into all zones at once). Audio output to the paging
loudspeakers can be set at either 70.7 or 25 volts AC. Three optional
features, Talk-Back, FM background music, and Music-On-Hold, are also
available.
Operating instructions for the various telephone systems to which
PagePac VS may be connected, as well as ordering and warranty information
are contained in the PagePac VS User’s Guide.
System Components
PagePac VS is a single self-contained unit housed within a protective
plastic cover (Figure 1-1). Optional features such as Talk-Back, FM
background music and Music-On-Hold are provided by one or two plug-in circuit cards. If ordered, these cards are shipped in the same container with
PagePac VS.
Other components needed to complete the paging system are
loudspeakers, speaker wire, and connectors, all of which must be ordered
separately. Refer to Section 2, Installation, for connectors required to connect
PagePac VS to various types of telephone systems.
Figure 1-1
PagePac VS
Service Manual
Introduction
February 1984
Page 1-2
Power Requirements
PagePac VS can be connected to any 110-120 volt, 60 Hz AC power
source through the unit’s 6-foot power cord which is equipped with a 3-prong
plug.
Caution: Damage may occur if the unit is connected to a source of
direct current (DC) or an AC voltage greater than 120 volts
RMS, 60 Hz.
Environmental Requirements
PagePac VS is designed for indoor installation only and must be
mounted in an area free of moisture and temperature extremes. Clear areas
must be provided above and below the unit to ensure adequate cooling
airflow. Physical dimensions of the unit, including cover, are:
Width
Height
Depth
Weight
-
14½ inches (36.8 cm)
18 inches (45.7 cm)
5¼ inches (13.3 cm)
25 pounds (11.3 kg)
Functional Description
Figure 1-2 shows the location of the PagePac VS connectors, switches,
and controls. A description of their purpose and function follows.
Connectors
●
TRUNK - A standard 6-conductor modular jack used for interfacing with
HORIZON ® or DIMENSION® Systems.
●
416 COM KEY - A standard 25-pair connector used for interfacing with COM
K E Y® or MERLIN® Systems.
●
J101 - Card connector which accepts optional plug-in FM tuner card. A
Customer Provided Equipment (CPE) music card (Figure 1-3) is already installed in J101. This card allows background music to be provided from an
external source, such as a Hi Fi or radio, when the FM tuner card is not
used.
●
J102 - Card connector which accepts optional plug-in talk-back control card.
Note: A talk-back continuity card is placed in talk-back connector J102
at the factory. This continuity card must be in place whenever a talkback control card is not installed.
●
Terminal Block TB1 - A quick-disconnect terminal block which provides connections for loudspeakers, system ground, off-premise or remote amplifier,
Music-On-Hold option, and FM antenna. The terminals of TB1 are arranged in
a row along the top and bottom of the block, with an upper and lower terminal assigned to each connection (Figure 1-4). Either or both terminals may
Introduction
Service Manual
Page 1-3
February 1984
MUSIC
GAIN
CONTROL
POWER
ON/OFF
SWITCH
T/R IC1/IC2
SELECT
SWITCH
J101
MUSIC CARD
CONNECTOR
(FM TUNER
CARD SHOWN
INSTALLED)
LC IC1/IC2
SELECT
SWITCH
J102
TALK-BACK CARD
CONNECTOR
(TALK-BACK
CARD SHOWN
INSTALLED)
OP/BUSY
SWITCH
25/70.7 VAC
SELECT SWITCH
S1
(ZONES)
YES/NO
SWITCH
TALK-BACK
SWITCH S2
TERMINAL
BLOCK TB1
6-CONDUCTOR MODULAR
TRUNK JACK
Figure 1-2.
25-PAIR
COM KEY
CONNECTOR
DSS BUTTON
ENABLE SWITCHES
DSS-7 THRU DSS-10
PagePac VS Connectors, Switches, and Controls (Cover Removed)
Service Manual
Introduction
February 1984
Page 1-4
J101
MUSIC CARD
CONNECTOR
(CPE MUSIC
CARD SHOWN
INSTALLED)
CONNECTIONS
FOR EXTERNAL
MUSIC SOURCE
Figure 1-3.
CPE Music Card Installed
UPPER TERMINAL
LATCH (TYPICAL)
UPPER
TERMINAL
(TYPICAL)
TERMINAL
BLOCK TB1
LOWER
TERMINAL
(TYPICAL)
LOWER TERMINAL
LATCH (TYPICAL)
Figure 1-4. Terminal Block TB1
Introduction
Service Manual
Page 1-5
February 1984
be used. For example, when connecting a Zone 1 loudspeaker, the cable
from ZONE 1 can be connected to the upper or lower terminals, or if two
loudspeakers are used in ZONE 1, one cable can be connected to the upper
terminals, and the other to the lower terminals. Table 1-A describes the connections made to TB1.
Table 1-A.
Terminal Block TB1 Connections
Connection
TB1 Terminals
1 and 2
Zone 1 loudspeaker cable(s)
ZONE 1
S
Zone 1 loudspeaker cable shield
1 and 2
Zone 2 loudspeaker cable(s)
ZONE 2
S
Zone 2 loudspeaker cable shield
1 and 2
Zone 3 loudspeaker cable(s)
ZONE 3
S
Zone 3 loudspeaker cable shield
Earth-ground wire (water pipe or telephone
system ground)
GND G
Off-premise or remote amplifier input cable
(balanced 600-ohm, 0dB paging output is controlled
by Zone 1)
0db R1 and T1
Telephone system music-on-hold input cable
(1 watt music output is supplied by optional
FM tuner card)
8 Ω 1 and 2
Antenna leads for use with optional FM
tuner card
ANT 1 and 2
Service Manual
Introduction
February 1984
Page 1-6
Switches and Controls
The Power ON/OFF switch is a combination power switch, power on/off
indicator and circuit breaker. When the switch is set to ON, power is applied
to the unit and the switch is lit by an internal lamp. If a power overload
occurs, the switch automatically trips to the OFF position, power is removed
from the unit, and the switch lamp goes out.
The MUSIC GAIN control adjusts the level of background music provided by the optional FM tuner card or CPE music card and heard over the
paging system’s loudspeakers. The switches and controls of the optional FM
tuner card are described in Section 2.
The Power ON/OFF switch and MUSIC GAIN control may be used at
times during system operation. The remaining switches are set at time of
installation and should not require resetting during normal operation. The
purpose and function of each switch is described in Table 1-B.
Table 1-B. PagePac VS Switch Functions
Switch
Function
S1
Selects 25 or 70.7 VAC output to loudspeakers.
S2
Selects which zones will have Talk-Back feature
(if provided); A = All Call.
(ZONES)
YES/NO
Selects either zone paging or immediate all call
paging (all zones cut-through immediately on
package access).
OP/BUSY
T/R IC1/IC2
and
LC IC1/IC2
DSS 7, 8, 9, 10
Selects OPERATE or BUSY mode. BUSY is used
to “BUSY OUT” the unit any time it is off or fails but is still
connected to AT&T Information Systems equipment;
OPERATE is used when unit is available for use.
Selects either IC1 or IC2 as audio source for
COM KEY systems only (both switches must always
be in the same position). In single primary telephone
systems, both switches are always set to IC1.
Enables or disables zone selection DSS leads on
COM KEY systems only.
7 = Zone 1
8 = Zone 2
9 = Zone 3
10 = All Call
Numbers correspond to DSS buttons on station set.
ON position enables the DSS lead, and the corresponding
station set button may be used to select indicated
zone; when DSS operation is not used for zone selection,
switches should be in OPEN position.
Installation
Service Manual
Page 2-1
February 1984
2. Installation
Overview
This section contains unpacking, mounting, and connection instructions
for the PagePac VS.
Unpacking Instructions
Unpack PagePac VS as follows:
1 . Remove unit carefully from carton.
2 . Remove mounting-hole template from beneath unit cover. This cover is held
in place by four magnets. To remove, grasp cover firmly and pull free of
chassis as shown in Figure 2-1. Set template aside for future use.
3 . Locate and remove optional talk-back control and FM Tuner cards (if supplied) from carton. They are individually packaged and packed in the main
carton. Remove card(s) from container(s) and set aside.
COVER
CHASSIS
Figure 2-1. Removing PagePac VS Cover
Service Manual
Installation
February 1984
Page 2-2
Mounting Site Selection
PagePac VS is designed to be wall-mounted at an indoor location. Ensure location chosen is free from adverse conditions such as excessive heat,
moisture, or vibration and allows a minimum of 6 inches (15.2 cm) free air
space both above and below the unit. See Figure 2-2 for mounting space
requirements.
Ensure also that an AC power source is within 6 feet of the location
unless an extension cord is to be used. A standard AC wall outlet may be
used, but it should not be controlled by a switch.
CLEAR
ZONE
18 IN.
WITH COVER
(45.7 CM)
6 IN.
(15.2 CM)
30 IN.
(76.2 CM)
14½ IN. (36.8 CM)
CLEAR
ZONE
6 IN.
(15.2 CM)
NOTE: Clear zones must remain free of obstructions at all times.
Figure 2-2. PagePac VS Mounting Space Requirements
Service Manual
Installation
February 1984
Page 2-3
To Mount the Unit
The following tools and equipment are required:
●
Four round-head mounting screws. Screw heads should not exceed ½ inch
in diameter.
●
Slot or Phillips screwdriver, as required.
Mount the unit as follows:
1. Mark the location of the four mounting screws using the cardboard template
supplied with the unit.
2. Install the four mounting screws.
3. Mount the unit on the wall using the four keyhole cutouts located on the
chassis backplate; tighten the four mounting screws.
Installation of Optional Circuit Cards
Optional PagePac VS features are provided by the plug-in talk-back control and FM tuner cards. If one or both cards have been ordered, they will be
found packaged separately and included in the main carton. They must be
configured and installed to provide the desired features.
FM Tuner Card
FM Tuner Card, PEC 58300, provides both FM background music and
Music-On-Hold. Install the card as follows:
1 . Open the talk-back/FM tuner card protective cover. This cover is hinged on
the left side and held in place on the right side by magnets. To open, grasp
the cover on the right side, pull and open to the left as shown in Figure 2-3.
2 . Remove the CPE music card; save for future use, if needed, to allow CPE
music source.
3 . Plug FM tuner card into connector J101 as shown in Figure 2-4. See System
Power-Up and FM Tuner Card Adjustment Procedure (page 2-17) for tuning
instructions.
4 . Close the talk-back/FM tuner card protective cover.
Service Manual
Installation
February 1984
Page 2-4
TALK-BACK/
FM TUNER CARD
PROTECTIVE
COVER
Figure 2-3. Opening PagePac VS Talk-Back/FM Tuner Card Protective Cover
J101
TALK-BACK
CONTROL CARD
FM TUNER
CARD
J102
Figure 2-4. Installation of Optional Circuit Cards
Installation
Service Manual
February 1984
Page 2-5
Talk-Back Control Card
Talk-Back Control Card, PEC 58000, provides two-way communication
between the telephone and paging loudspeakers. A voice-activated switch on
the card is controlled by the person making the page. When that person
speaks, the paging system functions in a normal manner. But when he/she is
silent, the loudspeakers become sensitive microphones. If someone in the
paging zone replies, the voice is amplified and transmitted back to the
telephone.
Note: When the talk-back control card is installed, shielded speaker
wire should be used.
The talk-back control card can provide a single one-second 440 Hz
warning tone to the loudspeaker(s) whenever a talk-back zone is dialed.
Although this initial warning tone is an option, it must always be selected.
Cards are shipped with this feature activated. An additional option provides
repetitive one-second tones every 15 or 30 seconds for as long as the system
remains in the listen mode, or until the person paging speaks or abandons
the page and replaces the handset.
Prior to installation into the PagePac VS, the talk-back card must be
configured (optioned) to produce the desired features. Configure and install
the card as follows:
1. Configure talk-back control card for the desired features by adding or removing option straps on option block as shown in Table 2-A and Figure 2-5.
2. Open the talk-back/FM tuner card protective cover. This cover is hinged on
the left side and held in place on the right side by magnets. To open, grasp
the cover on the right side, pull and open to the left as shown in Figure 2-3.
3. Set DIP switch S2 (Figure 1-2) for zones in which talk-back is to be enabled.
For example, if Zone 1 is to have talk-back, set switch S2-1 to ON.
TALK-BACK
SWITCH S2
TALK-BACK ZONE 1
4. Remove talk-back continuity card.
Note: Save the talk-back continuity card to restore one-way paging in the
event of a talk-back control card malfunction or to remove the talkback feature at a future time.
5. Plug talk-back control card into connector J102 in the manner shown for FM
tuner card in Figure 2-4.
6. Close the protective talk-back/FM tuner card cover.
Service Manual
Installation
February 1984
Page 2-6
Table 2-A. Talk-Back Control Card Options
Required Feature
Option
Strap No.
Remarks
High Sound Level At Telephone To
Switch Talk-Back Circuit
7-8
Remove strap
Low Sound Level At Telephone To
Switch Talk-Back Circuit
7-8
Add strap
Initial Warning Tone
1-2
Always required;
add strap
Repetitive Warning Tone
3-4
Remove strap
No Repetitive Warning Tone
3-4
Add strap
Repetitive Warning Tone at 15-Second
Intervals
5-6
Add strap
Repetitive Warning Tone at 30-Second
Intervals
5-6
Remove strap
OPTION
STRAP
NO. 5-6
OPTION
STRAP
NO. 7-8
OPTION
STRAP
NO. 3-4
OPTION
STRAP
NO. 1-2
OPTION
BLOCK
TALK-BACK
CONTROL CARD
(SHOWN INSTALLED)
Figure 2-5. Talk-Back Option Strap Locations
Service Manual
Installation
February 1984
Page 2-7
Connections to CPE Music Card
If background music is provided from an external source (Hi Fi, etc.),
connect the wires from this music source to terminals MT and MR on the
CPE music card (Figure 1-3); the order of connection is not important. The input signal from the external source must be dry (no DC voltage), 600-ohm,
balanced, and 0 dBm (0.776V max.).
Connections To Terminal Block TB1
Note: Terminal block TB1 (Figure 1-3) is a quick-disconnect type. To
connect a wire to TB1, strip insulation back approximately
¼-inch, press applicable terminal latch, and insert wire. Either
the upper or lower terminals, or both, at each position may be
used.
Ground Wire Connection
A ground wire is required for all installations interfacing with HORIZON
or DIMENSION systems. Connect ground wire to TB1 as follows:
Caution: Do Not install a ground wire if the host system is a Com Key.
1. Connect ground wire (HORIZON or DIMENSION systems only) to terminal
GND G.
2. Connect other end to the same earth ground used for the host system.
Loudspeaker Connection
PagePac VS provides paging into three separate zones. A maximum of
two loudspeaker runs per zone may be connected to TB1. Speaker cable
may be either 2-conductor shielded or 2-conductor unshielded.
Connect loudspeaker cable(s) to TB1 as follows:
1. Separate and strip insulated wires in loudspeaker cable(s) from Zone 1. Connect one wire to terminal 1, ZONE 1 and the other to terminal 2, ZONE 1;
the order of connection is unimportant.
2. If shielded cable is used, connect cable shield to terminal S, ZONE 1.
3. Repeat steps 1 and 2 for Zones 2 and 3 by connecting cables from the
zones to the applicable ZONE 2 and ZONE 3 terminals.
Service Manual
Installation
February 1984
Page 2-8
Music-On-Hold Connection
If Music-On-Hold is to be provided from the optional FM tuner card, connect a 2-conductor cable from the host telephone system’s Music-On-Hold
input to terminals 1 and 2, 8Ω on TB1. The order of connection is unimportant. These terminals provide up to a 1-watt output from the FM tuner card.
Output is adjusted with the MON VOL control on the FM tuner card
(Figure 2-10).
Note: When MON VOL is adjusted, the level of the background music
on the loudspeakers is also changed.
External FM Antenna Connection
An FM antenna is required for both FM background music and MusicOn-Hold. An indoor antenna of the type shown in Figure 2-6 will be sufficient
in most areas. The antenna can be made from 22 AWG twisted-pair wire or
300-ohm television twin lead. In some areas a more extensive antenna
system may be required to ensure good reception. Connect antenna leads to
TB1 as follows:
1. Connect antenna leads to terminals ANT 1 and ANT 2; the order of connection is unimportant.
2. Orient antenna for best reception; attach to a wall with tape or non-metallic
hardware.
Caution: If an outdoor antenna is connected to the antenna terminals, the
antenna system must be grounded in accordance with Articles 810
and 820 of the National Electrical Code ANSI/NFPA No. 60-1968.
Off-Premises or Remote Amplifier Connection
If the paging system includes an off-premises or remote amplifier, connect a cable from the amplifier’s audio inputs to terminals 0db R1 and T1 on
TB1. The order of connection is unimportant. Terminals R1 and T1 provide a
balanced, 600-ohm 0 dBm output.
Off-premise or remote paging is under control of Zone 1. To page into
the off-premise or remote location, the user accesses Zone 1. An all-call page
will also access the remote or off-premise location.
Installation
Service Manual
Page 2-9
February 1984
59 IN.
29½ IN.
½ IN.
UP TO 8 FT
MAXIMUM
FEED LINE
STRIP AND TWIST
ENDS TOGETHER
(2 PLACES)
TO TERMINALS
ANT 1 AND 2
ON TB1
Note 1: Make from 22 AWG twisted-pair wire or TV twin lead.
Note 2: Attach to wall with tape or nonmetallic hardware.
Figure 2-6. FM Antenna
PagePac VS to Host Telephone System Connection
Com Key 416 System Connections
PagePac VS plugs into a Com Key system as if it were a secondary station. All paging functions are provided with no other connections necessary.
The interface is made with a 25-pair A25B connector cable. If necessary, this
connector can be extended to a backboard using a standard B25A cable
terminated on a Type 66 (or other standard) connecting block for crossconnection to older technology Com Key systems, i.e., Com Key 718, Com
Key 1434, and Com Key 2152.
The following equipment is required for Com Key 416 connection:
●
A25B connector cable (double-ended) of sufficient length to reach from the
PagePac VS to a telephone system bridging adapter.
●
B25A cable and Type 66 connector block (or equivalent), as required.
Service Manual
Installation
February 1984
Page 2-10
Connect PagePac VS to a Com Key 416 system as follows:
1 . For Com Key 416 operation on systems with two PRIMARY stations, set
switches T/R and LC to either IC1 or IC2 (both switches must be in the same
position).
LC IC1/IC2
SELECT
SWITCH
T/R IC1/IC2
SELECT
SWITCH
TWO PRIMARY STATIONS
Note: Once this path is selected, the remaining intercom path will not have
access to the PagePac VS. Com Key 416 standard paging and Hands
Free Answer on Intercom (HFAI) will continue to function normally and
may coexist with PagePac VS on the same host system.
2 . On systems with one PRIMARY station, set switches T/R and LC to IC1.
LC IC1/IC2
SELECT
SWITCH
T/R IC1/IC2
SELECT
SWITCH
ONE PRIMARY STATION
3. For dial zone selection, set all DSS switches to OPEN.
DSS BUTTON
ENABLE SWITCHES
DSS-7 THRU DSS-10
DIAL ZONE SELECTION
4. For zone selection by Direct Station Selection (DSS) button, set the applicable DSS switch to ON for each active zone. For example, to activate
Zone 1, set switch DSS-7 to ON (Table 2-B).
DSS BUTTON
ENABLE SWITCHES
DSS-7 THRU DSS-10
DIRECT STATION SELECTION
Service Manual
Installation
February 1984
Page 2-11
Table 2-B. PagePac VS Initial Setup
Position
Switch
Operating Feature
Selectable Zone Paging
All Call Paging
Unit Operative
Unit Inoperative
(ZONES)
(ZONES)
OP/BUSY
OP/BUSY
YES
NO
OP
BUSY
Audio Source (Com Key Only)
IC1 Access
T/R and LC
IC1
T/R and LC
(See Notes 1 and 2)
IC2
DSS-7 (1)
DSS-7 (1)
DSS-8 (2)
DSS-8 (2)
DSS-9 (3)
DSS-9 (3)
DSS-10 (4)
DSS-10 (4)
(See Notes 2 and 3)
ON
OPEN
ON
OPEN
ON
OPEN
ON
OPEN
S2-1
S2-1
S2-2
S2-2
S2-3
S2-3
S2-A
S2-A
ON
OPEN
ON
OPEN
ON
OPEN
ON
OPEN
25 VAC Output
S1
25
70 VAC Output
S1
70
IC2 Access
DSS Button Zone Selection
(Com Key Only)
DSS
DSS
DSS
DSS
DSS
DSS
DSS
DSS
7
7
8
8
9
9
10
10
Enabled (Zone 1)
Disabled (Zone 1)
Enabled (Zone 2)
Disabled (Zone 2)
Enabled (Zone 3)
Disabled (Zone 3)
Enabled (All Call)
Disabled (All Call)
Talk-Back
Zone 1 Enabled
Zone 1 Disabled
Zone 2 Enabled
Zone 2 Disabled
Zone 3 Enabled
Zone 3 Disabled
All Call Enabled
All Call Disabled
(See Note 4)
Note 1:
For dial zone selection, ensure switches DSS-7 thru DSS-10 are set to OPEN.
Note 2:
HORIZON CS or DIMENSION systems do not require specific setting of switches T/R, LC,
and DSS-7 thru DSS-10.
Note 3:
Number in parenthesis denotes marking on DSS DIP switch.
Note 4:
Talk-Back on All Call is not recommended, as the combined noise levels from all
loudspeakers may be too high to allow usable talk-back.
Service Manual
Installation
February 1984
Page 2-12
5 . Refer to Table 2-B and set all other switches as required for your installation.
6 . Connect a A25B connector cable (double-ended) between the 25-pair 416
COM KEY connector and a telephone system bridging adapter (Figure 2-7).
Pinouts for the 416 COM KEY connector are listed in Table 2-C.
Table 2-C. PagePac VS Com Key Connector Pinouts
Circuit
Pin No.
13
15
16
18
21
22
38
40
41
43
46
47
48
49
50
Intercom 1, Ring
Intercom 1, Lamp Control
Intercom 2, Ring
Intercom 2, Lamp Control
DSS7
DSS9
Intercom 1, Tip
Intercom 1, Lamp Power
Intercom 2, Tip
Intercom 2, Lamp Power
DSS8
DSS10
Color Code
(G-BK)
(S-BK)
(BL-Y)
(G-Y)
(BL-V)
(O-V)
(BK-G)
(BK-S)
(Y-BL)
(Y-G)
(V-BL)
(V-O)
(V-G)
(V-BR)
(V-S)
*Caution: Do not connect external ground to this pin when used with
Com Key 416.
Note: Connect the 25-pair A25B cable to bridging adapter
as if the PagePac VS were a secondary station.
BRIDGING ADAPTER
TO COM KEY SYSTEM
25-PAIR
A25B CABLE
(DOUBLE-ENDED)
Figure 2-7.
Cable Connections to Com Key System
Installation
Service Manual
Page 2-13
February 1984
HORIZON Connections
The following equipment is required:
●
6-conductor modular cord (RJ-18C standard telephone 6-conductor modular
connectors) of sufficient length to reach from the PagePac VS to a compatible trunk circuit modular connector on the host system.
●
An LC73 trunk circuit with an appropriate connector and trunk port dial code
(10X) assignment.
HORIZON CS trunk operation does not require any specific settings for
switches T/R, LC, and DSS-7 thru DSS-10 on the PagePac VS. These functions are selected automatically when the modular TRUNK jack is used. Connect as follows:
1 . Refer to Table 2-B and set the PagePac VS switches as required for your
installation.
2. Connect the 6-conductor modular cord between the PagePac VS TRUNK
connector and an appropriate trunk circuit modular connector on the host
system (Figure 2-8).
Note: The tip and ring interface between the PagePac VS and a HORIZON
CS trunk circuit is made via the TRUNK connector described above.
3. Enter the appropriate data, shown below, into the HORIZON CS system via
the Service Access Unit (SAU).
Horizon CS System
Item
Data
1
2
3
4
5
6
7
07
0000
0200
10X
1
NA
NA
Installation
Service Manual
February 1984
Page 2-14
MODULAR
CORD
Note 1: Connect modular cord to the LC73 trunk circuit
through the appropriate connecting block.
LC73
TRUNK CIRCUIT
RJ-18
MODULAR JACK
MODULAR CORD
PAGEPAC VS
TRUNK CONNECTOR
(MODULAR)
PIN
T
T
GREEN
3 (T)
R
R
RED
4 (R)
WHITE
1 (MB)
BLUE
6 (MB)
Note 2: The LC73 uses only the tip and ring, or pins 3 and 4 as indicated. Pins 2
and 5 are not used at all. Pins 1 and 6 provide a busy out feature not used
with the HORIZON CS.
Figure 2-8. Cable Connections to HORIZON CS System
Service Manual
Installation
February 1984
Page 2-15
DIMENSION Connections
The following equipment is required:
●
6-conductor modular cord (RJ-18C standard telephone 6-conductor modular
connectors) of sufficient length to reach from the PagePac VS to a compatible trunk circuit modular connector on the host system.
●
An LC13 circuit pack with an appropriate connector, a trunk group assignment, and a paging access code assignment.
DIMENSION trunk operation does not require any specific settings for
switches T/R, LC, and DSS-7 thru DSS-10 on the PagePac VS. These functions are selected automatically when the modular TRUNK jack is used.
Connect as follows:
1 . Refer to Table 2-B and set the PagePac VS switches as required for your
installation.
2 . Connect the 6-conductor modular cord between the PagePac VS TRUNK
connector and an appropriate trunk circuit modular connector on the host
system (Figure 2-9).
Note: The tip and ring interface between the PagePac VS and a
DIMENSION trunk circuit is made via the TRUNK connector
described above.
3 . Prepare the LC13 circuit pack as you would for a Loop Trunk Type 54
(loudspeaker paging).
●
For DIMENSION types 100 and 400, use Procedure 13.
●
For DIMENSION types 600 and 1200, use Procedure 100.
4 . Set the LC13 circuit pack switches as shown below.
CKT 0
Switch
Position
J4
J5
J6
OPEN
OPEN
OPEN
CKT 1
Switch
Position
J1
J2
J3
OPEN
OPEN
OPEN
Service Manual
Installation
February 1984
Page 2-16
MODULAR
CORD
Note 1: Connect modular cord to the LC13 circuit
pack through the appropriate connecting block.
LC13
CIRCUIT PACK
RJ-18
MODULAR JACK
MODULAR CORD
PAGEPAC VS
TRUNK CONNECTOR
(MODULAR)
PIN
T
T
GREEN
3 (T)
R
R
RED
4 (R)
S
S
WHITE
1 (MB)
S1
S1
BLUE
6 (MB)
Note 2: Only half of the LC13 circuit pack is required when connecting to the Page Pac
VS. The S and S1 connections are required only when MAKE BUSY function
is provided (see OP/BUSY switch. Table 1-B).
Figure 2-9. Cable Connections to DIMENSION System
Installation
Service Manual
February 1984
Page 2-17
System Power-Up and FM Tuner Card Adjustment
System Power-Up
1 . Set the PagePac VS Power ON/OFF switch (Figure 1-2) to OFF.
2. Plug PagePac VS power cord into an AC outlet.
Caution: In no case should this unit be connected to any source of direct
current (DC) or any AC voltage exceeding 120 volts RMS, 60 Hz.
3 . Turn MUSIC GAIN control (Figure 1-2) to midrange.
4 . Set Power ON/OFF switch to ON.
FM Tuner Card Adjustment and Controls
The optional FM tuner card incorporates automatic frequency control
(AFC), a built-in speaker to aid in tuning in a station, and a visual tuning indicator. Refer to Figure 2-10 for control and indicator locations and Table 2-D
for the function and use of each control.
FM Tuner Card Station Selection
Tune in an FM station as follows:
1. Open the talk-back/FM tuner card protective cover. This cover is hinged on
the left side and held in place on the right side by magnets. To open, grasp
the cover on the right side, pull and open to the left as shown in Figure 2-3.
Note: Refer to Figure 2-10 for steps 2 thru 9.
2. Set tuner SPK switch to ON to disconnect the paging system loudspeakers.
The FM station should now be heard from the built-in monitor speaker.
3. If necessary, adjust monitor speaker volume with tuner MON VOL control.
Adjust with a small screwdriver clockwise to increase volume,
counterclockwise to decrease volume.
4. Set tuner AFC switch to OFF.
5. Turn tuning dial to the desired station. The TUNE indicator will light when the
station is precisely tuned.
6. Set tuner AFC switch to ON.
7. Set tuner SPK switch to OFF to reconnect paging system loudspeakers. The
monitor speaker should now be off.
Service Manual
Installation
February 1984
Page 2-18
8. Set tuner MON VOL control to midrange.
9. Check that tuner ANT switch is still set to EXT.
10. If Music-On-Hold option is not connected, close talk-back/FM tuner card protective cover, and reinstall PagePac VS cover.
11. Adjust music level with PagePac VS MUSIC GAIN control (Figure 1-2).
Note: If your PagePac VS is being supplied with background music from an
external source, through the CPE music card, the PagePac MUSIC
GAIN control should be set to a midrange position. Music tuning and
volume control adjustments must then be made from the external
music source.
FM Tuner Card Music-On-Hold Volume Adjustment
Adjust Music-On-Hold volume as follows:
1. Adjust Music-On-Hold volume with the tuner MON VOL control (Figure 2-10).
Adjust with a small screwdriver clockwise to increase volume and
counterclockwise to decrease volume.
2 . If necessary, readjust background music volume with PagePac VS MUSIC
GAIN control (Figure 1-2).
3 . Check that tuner ANT switch is still set to EXT.
4 . Close talk-back/FM tuner card protective cover.
5 . Reinstall PagePac VS cover.
Installation
Service Manual
Page 2-19
February 1984
MONITOR
SPEAKER
FM TUNER
CARD
FM TUNER CARD
CONTROL PANEL
TUNING
DIAL
MON VOL
(MONITOR VOLUME)
CONTROL
TUNE
INDICATOR
AFC
SWITCH
SPK (SPEAKER)
SWITCH
ANT (ANTENNA)
SWITCH
MON
VOL
TUNE
ON
AFC
OFF
ON
SPK
OFF
EXT
ANT
INT
Figure 2-10. FM Tuner Card Controls and Indicator
FM TUNER
CARD CONTROL
PANEL
Service Manual
Installation
February 1984
Page 2-20
Table 2-D.
Control
FM Tuner Card Controls and Indicator
Purpose
Remarks
MON VOL
Control
Controls volume of both monitor
speaker and background music
provided to paging system loudspeakers.
Note: Background music volume
should be controlled with MUSIC
GAIN control.
Set to midrange unless music-onhold adjustment is required; adjust
with small screwdriver clockwise to
increase volume or counterclockwise to decrease volume.
TUNE
Indicator
Red LED lights when FM station is
tuned to center frequency.
Use for precise station tuning
with AFC switch set to off.
AFC
Switch
Enables Automatic Frequency Control (AFC) in the ON position;
switches AFC out in the OFF
position.
Leave in ON position for normal
operation; set to OFF position for
station tuning.
SPK
Switch
Facilitates FM station tuning. In the
ON position, background music to
loudspeakers is disconnected and
built-in monitor speaker is operative;
in the OFF position, monitor
speaker is disconnected and system
loudspeakers are operative.
Leave in OFF position for normal
operation; set to ON position for FM
station tuning.
ANT
Switch
Selects internal (INT) or external
(EXT) antenna for FM tuner card.
Set to EXT position when tuner is
used with PagePac VS.
Tuning
Dial
Tunes stations on 88 to 108 MHz
FM broadcast band.
Use in conjunction with TUNE indicator for precise station tuning.
System Operation and Test
Service Manual
Page 3-1
February 1984
3 . System Operation and Test
Overview
This section contains instructions for operating and testing the PagePac
VS with Com Key 416, HORIZON, and DIMENSION paging systems, and
testing talk-back and FM background music options.
Service Manual
System Operation and Test
February 1984
Page 3-2
Com Key 416 Operation and Test
Zone Selection By DSS Buttons
Operate Com Key system and test DSS zone selection paging as
follows:
1 . Pick up handset.
2 . On telephone instrument, press intercom button (IC1 or IC2) assigned to paging access.
3 . Make your page by momentarily pressing on telephone instrument each DSS
button listed below that corresponds to an active zone or All Call; ensure
page is heard in the applicable zone(s).
Zone Selection
Zone
DSS Button
All Call
1
2
3
10
7
8
9
4 . When page is completed, replace handset (hanging up receiver releases the
PagePac VS).
Dial Zone Selection
Operate Com Key system and test dial zone selection paging as follows:
1 . Pick up handset.
2 . On telephone instrument, press intercom button (IC1 or IC2) assigned to paging access.
3 . Make your page by selecting from list below each active zone or All Call, and
dialing the assigned dial code; ensure page is heard in the applicable
zone(s).
Zone Selection
Zone
Dial Code
All Call
1
2
3
1
4
5
6
4 . When page is completed, replace handset.
Note: Dial zone selection available with Touch Tone operation only.
Service Manual
System Operation and Test
February 1984
Page 3-3
Horizon Operation and Test
Operate HORIZON System and test paging as follows:
1. Pick up handset.
2. Select either a free station line or the pool-facility key assigned to paging,
then dial the paging access code (10X).
3. Make your page by selecting from list below each active zone or All Call and
dialing the assigned dial code; ensure page is heard in the applicable
zone(s).
Zone Selection
Zone
Dial Code
All Call
1
2
3
1
4
5
6
4. When page is completed, replace handset (hanging up receiver releases the
PagePac VS).
Service Manual
System Operation and Test
February 1984
Page 3-4
Dimension Operation and Test
Operate DIMENSION System and test paging as follows:
1. Pick up handset.
2. Select the PAGE button or a free line button and listen for dial tone. Dial the
paging access code (no second dial tone will be received).
3. Make your page by selecting from list below each active zone or All Call, and
dialing the assigned dial code; ensure page is heard in the applicable
zone(s).
Zone Selection
Zone
Dial Code
All Call
1
2
3
1
4
5
6
4. When page is completed, replace handset (hanging up receiver releases the
PagePac VS).
Service Manual
System Operation and Test
February 1984
Talk-Back Test
Select any station with access to paging and page into each zone optioned for talk-back. Two-way communication between the telephone and the
zone loudspeaker(s) should be possible. Warning tones should occur as optioned (Table 2-A).
Caution: Use talk-back control card with speakers and speaker wiring comparable in quality with AT&T Information Systems products. Use of
poor quality components or unshielded wiring may result in inferior
talk-back performance.
FM Background Music Test
Select any station with access to paging into each zone. Background
music should be switched off in all zones during page and returned when
receiver at testing station is replaced.
Page 3-5
Maintenance
Service Manual
Page 4-1
February 1984
4. Maintenance
Overview
Trouble conditions originating outside of PagePac VS, such as shorted
wiring or AC power failure, should be located and cleared using normal
telephone repair procedures. A Dracon TS21 Lineman’s Test Set (or
equivalent) in the MONITOR mode, is an ideal tool to use for checking continuity of the speaker and input wiring.
The PagePac VS and optional circuit cards do not require periodic
maintenance and are not field repairable. If a unit fails to function properly, it
should be returned to AT&T Information Systems for repair. For warranty and
nonwarranty service of this product, call the Service Number that is provided
for your Communications System.
Should a talk-back control card malfunction, the card may be removed
and the talk-back continuity card (P/N 22080-002) reinstalled in connector
J102 to restore one-way paging until the defective card can be replaced.
Refer to Table 4-A for a list of common troubles and possible causes and
solutions.
Service Manual
Maintenance
February 1984
Page 4-2
Table 4-A. Trouble Analysis
Trouble
Background music okay,
music silenced when
seized, can’t page
Possible Cause
Possible Solution
Defective talk-back control card
Isolate faulty card
by substituting talkback continuity card
Defective PagePac VS
Replace unit
Background music okay,
music not silenced when
seized, can't page
Defective PagePac VS
Replace unit
Page and music okay
but unable to use talkback, or music okay,
music silenced when
seized, but talk-back
locked in listen mode
Defective talk-back control card
Replace talk-back
control card
Background music and
page dead in all
zones
Defective talk-back control card
Isolate faulty card
by monitoring path
with test handset
and by substituting
talk-back continuity
card
Defective PagePac VS
Replace unit
Paging system power off
Check AC power source
Defective FM tuner card
Isolate fault by monitoring 8Ω terminals
on terminal block TB1
MON VOL control on FM tuner set
too high
Adjust volume
Defective PagePac VS
Replace unit
Switch S2 improperly set
Check switch S2
Defective talk-back control card
Replace talk-back
control card
Page okay but music
dead or distorted
Talk-back is inoperative in some or all
zones