1
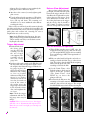
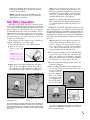
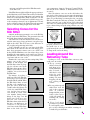
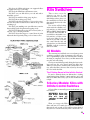
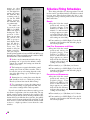
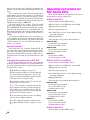
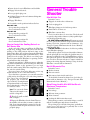
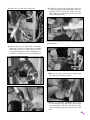
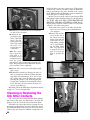
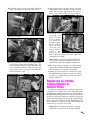
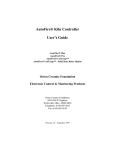
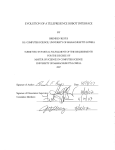
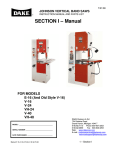
Paragon Switch
Operated
Ceramic Kiln
Instruction and
Service Manual
1
INTRODUCTION
Thank you for purchasing a Paragon kiln. We are confident that the kiln will give you many years of relaxation and creative enjoyment—provided you read and follow the manuals. Though you may be excited to
fire your kiln, first read the manuals that came with your kiln. The more you know about your kiln, the
more you will enjoy it.
This manual covers the kiln switches and the Orton Auto-Cone® automatic shutoff. Before you read this
manual, read "Paragon Ceramic Kiln Instruction and Service Manual" and "Safe Installation of the Electric Kiln," which are also shipped with your new kiln. Please contact the factory if you do not have copies.
You can also download them at www.paragonweb.com. Select "Support" and then "Instruction Manuals"
from the drop menu. The manuals are listed alphabetically.
Also, go to www.paragonweb.com and select "Products," then "Books & DVDs" from the drop menu. The
books we recommend will enhance your kiln experience.
At www.paragonweb.com you will also find online videos for many of the procedures shown in this
manual. As you read each section, you can go online to watch an actual demonstration from your
computer.
Throughout the manual you will find photos of the Dawson Kiln Sitter®. These photos also apply to the
Orton Auto-Cone, which has replaced the Dawson Kiln Sitter. (Orton, the company that makes pyrometric cones, began making the Auto-Cone in 2009.) The Auto-Cone is Orton’s version of the Kiln
Sitter. To avoid confusion, we refer to the Auto-Cone as the Kiln Sitter throughout this manual.
Even though your Paragon kiln has an Orton Auto-Cone automatic shut-off, check the kiln at the expected shut-off time. The Kiln Sitter is reliable, but since it is a mechanical device, it can malfunction
and overfire the kiln. The warranty on your kiln does not cover damage from overfiring, regardless of the
circumstances. It is the operator’s responsibility to make sure the kiln turns off when the firing is completed. Never leave your kiln unattended near the end of the firing.
Check your new kiln frequently during the first few firings and note the color change inside the kiln. After
awhile you can learn to estimate, with considerable accuracy, when the kiln is about to shut off just by observing the color.
If you call us about your kiln, please have the model number, part
number (P/N), and voltage from the kiln's electrical data plate handy.
(The plate is attached to the side of the switch box.) Write that information on the cover of the manual for quick reference.
Do not be concerned that your kiln makes a clicking sound during
firing. Infinite control switches click as they cycle on and off until
turned to high. The sound is normal.
Special thanks to Mel Jacobson for reading the manuscript and offering suggestions. Feel free to send
comments about this manual to [email protected].
©2010, by Paragon Industries, L.P. IM-239/12-09
2
2011 South Town East Blvd.
Mesquite,Texas 75149-1122
Toll Free: 800-876-4328
972/288-7557
Toll Free Fax: 888-222-6450
Fax: 972-222-0646
[email protected]
www.paragonweb.com
IMPORTANT
Please read each page of this manual in
detail before you operate your kiln. Warranty does not cover damage caused by
failure to follow instructions.
Contents
The Kiln Sitter and Limit Timer
4
How the Kiln Sitter Works . . . . . . . . . . . . . . . . . 4
TOXIC GLAZES
How to Adjust the Kiln Sitter . . . . . . . . . . . . . . 5
Some glazes may be toxic when used for
surfaces that will be in contact with food
or drink. When you make food or drink
containers, select a glaze that has been
formulated, tested and labeled as approved for surfaces that will be in contact with food or drink. Follow the glaze
man u fac turer's in struc tions ex actly,
without any variations. You can learn
more about glaze safety in Mastering
Cone 6 Glazes, by John Hesselberth and
Ron Roy.
Kiln Sitter Operation . . . . . . . . . . . . . . . . . . . . . 7
IMPORTANT SAFETY RULES
Selecting Cones for the Kiln Sitter . . . . . . . . . . 9
Loading Around the Refractory Tube. . . . . . . . 9
Summary of Kiln Sitter Operation . . . . . . . . . 10
Kiln Switches
11
All Models: The Clicking Sound . . . . . . . . . . . 11
S-Series Models:
Kilns with Infinite Control Switches. . . . . . . . 11
S-Series Firing Schedules . . . . . . . . . . . . . . . . 12
l
An electric ceramic kiln is extremely safe to operate
provided you follow these safety rules:
How to Control the Cooling Rate
of an S-Series Kiln . . . . . . . . . . . . . . . . . . . . . . 13
l
Unplug kiln when not in use.
l
Do not touch hot sides.
SnF-Series Models:
Non-Digital Automatic Kilns. . . . . . . . . . . . . . 13
l
Keep unsupervised children away.
l
Place kiln on stand before connecting power.
l
Do not install closer than 12" from any wall or combustible surface.
General Trouble Shooter
15
l
Do not open lid until kiln has cooled to room temperature and all switch(es) are off. Cooling time is
usually twice the firing time.
Kiln Sitter Trouble Shooter
17
l
Fire only in a well ventilated, covered, and protected
area.
l
Keep cordset away from hot sides of kiln.
l
DANGEROUS VOLTAGE! Do not touch heating
elements with anything.
l
Disconnect kiln before servicing.
l
Do not leave kiln unattended while firing.
l
Wear firing safety glasses when looking into the
peephole of a hot kiln.
l
Turn the switches off after the Kiln Sitter fires to
completion.
Operating Instructions for
SnF-Series Kilns. . . . . . . . . . . . . . . . . . . . . . . . 14
Maintenance
18
Maintaining the Kiln Sitter . . . . . . . . . . . . . . . 18
Replacing the Porcelain Tube Assembly . . . . 19
Cleaning or Replacing the
Kiln Sitter Contacts . . . . . . . . . . . . . . . . . . . . . 22
Replacing an Infinite Control
Switch or Switch-Timer. . . . . . . . . . . . . . . . . . 23
3
The Kiln Sitter and
Limit Timer
WARNING: Since proper operation and
control of the Kiln Sitter and Limit Timer
rest wholly with the operator, we cannot
extend our warranty to cover any damage caused by overfiring regardless of
the circumstances.
DO NOT LEAVE THE KILN SITTER
UNATTENDED!
For the longest life of
your kiln and for safety,
all kiln switches must
be in the OFF position
be fore the Kiln Sit ter
plunger is pushed in.
Pushing in the plunger
with kiln switches on
will result in extra wear
on the Kiln Sitter contact points.
The Kiln Sitter with the weight in the raised position.
How the Kiln Sitter Works
The Kiln Sitter is elegantly simple and reliable. But it
is subjected to the harsh temperatures and atmosphere
of the kiln and must be adjusted from time to time. This
is easier to do when you know how it works.
A correctly adjusted Kiln Sitter shuts off the power to
your kiln when a properly inserted, small, pyrometric
cone or pyrometric bar sags under the actuating rod.
When the plunger (see photo and diagram) is pressed, a
locking slide holds the plunger down, closing the four
contact points of the Kiln Sitter electrical contacts. The
kiln then receives power. When the cone or bar fires to
maturity and sags, the actuating rod that rests on top of
the cone sags with it. The release claw rises at the same
time, causing the weight on the front of the Kiln Sitter to
fall. The weight unlocks the locking slide, releasing a
plunger. The contact points separate, interrupting the
current to the kiln.
4
The Kiln Sitter with the weight in the lowered position.
Q What is the clanking noise that comes
from my kiln when it
shuts off?
A That is the sound of
the falling Kiln Sitter
weight. The weight releases a switch and
shuts off the kiln.
The Limit Timer is a
clock motor that acts as a
backup safety shutoff. It is
designed to prevent an
Setting the Limit Timer.
overfiring should the Kiln Sitter malfunction and fail to
shut off the kiln.
Turn the Limit Timer dial to the number of hours you
think the firing will take, and add 30 minutes. When you
start the kiln, the countdown timer will begin. Should the
Kiln Sitter weight fail to drop, the Limit Timer will shut
off the kiln when the timer runs out of time. Since the
Limit Timer is a backup shutoff, always set it for more
time than you estimate that the firing will need.
The Limit Timer will help you learn to estimate future
firing times. For example, if you set the timer knob at 10
before firing, and the white dot indicator is on 1 when firing is completed, you know the firing took 9 hours. When
you become familiar with the firing times for your ware,
you will be able to set the Limit Timer accurately to shut
off 30 minutes after the expected firing time.
Q What is the purpose of the Limit Timer?
A The Limit Timer is designed to prevent an
overfire should the Kiln Sitter weight fail to drop.
The Limit Timer may be set for any period up to 20
hours. If the firing will take more than 20 hours, you can
reset the knob at any time during the firing.
Caution: Never set the Limit Timer beyond 20
hours. This could result in an overfire should the
Limit Timer motor stop running.
Q If I turn the Limit Timer dial to 5, the Kiln Sit-
How to Adjust the
Kiln Sitter
Note: Never lubricate the Kiln Sitter. Lubricants
will only attract dust.
Your kiln will arrive with
the firing gauge in place on
the cone supports and the
ac tu at ing rod in serted
through the center hole.
Remove the rubber band
that holds the gauge in
place; then remove the
gauge. Save the gauge for
future adjustment. Do not
fire with the gauge in place!
Note: Store the firing gauge, Kiln Sitter allen
wrenches, and storage bag in a handy place near
the kiln along with a small bottle of kiln wash.
Note: Most people think the firing gauge is only to
keep the actuating rod from bouncing during
shipping. Please do not throw the gauge away!
You will need it to keep the Kiln Sitter adjusted to
factory specifications.
Guide Plate Adjustment
ter always shuts off at around 4 hours. What
Limit Timer settings should I use for greenware,
underglaze, and glaze?
A If the Kiln Sitter shuts off at 4 hours, turning
the dial to 5 gives you a one-hour margin of safety.
This means that after the cone bends and shuts
the kiln off, there is still one hour left on the Limit
Timer. If the Kiln Sitter cone fails to bend, the
kiln will continue to fire for another hour before
the Limit Timer shuts it off. We suggest setting
the Limit Timer half way between 4 and 5 so that
you have a 30-minute safety margin. Keep a firing
log book so you can estimate firing time for each
type of ware.
The primary value of the Kiln Sitter is the convenience
of relief from closely watching the large cones through
the peepholes and the uniform firing that the Kiln Sitter
gives from one firing to the next. It is a mechanical device
and cannot be considered fully automatic nor relieve the
user from responsibility for damage due to overfiring. It
must be kept in good working order and tested before
EACH firing.
Your Kiln Sitter was adjusted properly when shipped
from the factory, but vibration during shipping may have
moved the guide plate. You MUST adjust the Kiln Sitter,
as we will show you next, before you fire your kiln.
1 Check the position of the
actuating rod. (The actuating rod is easier to see if
you hold a small mirror
inside the kiln.) The rod should be centered sideways in the refractory tube's oblong slot. If not,
loosen the two guide plate adjusting screws and
move the plate to the
right or left, as necessary.
Note: The easiest way
to ad just the guide
plate is to loosen the
screws so that they
barely hold the guide
plate in place. Then
gently nudge the plate
5
sideways. If you loosen the screws completely, the
guide plate is more difficult to adjust.
2 After the rod is centered, securely tighten guide
plate screws.
3 Test the full travel of the actuating rod. Watch the
actuating rod inside the kiln as you move the release claw up and down. The actuating rod
should be free to move within the tube without
touching the sides.
If the rod does not fall freely to the bottom of the tube,
check the guide plate to see that its slot is parallel to the
direction of travel of the release claw. If not, straighten the
guide plate and readjust rod centering. Be sure to
retighten the two screws securely.
Release Claw Adjustment
After you have adjusted the trigger height, check the amount of play
between the trigger and the release
claw. Raise the weight and lower the
release claw over the trigger. Look
at the Kiln Sitter from the side to
check the play between the trigger
and the release claw. It should be
1/16" (2 mm). To adjust, loosen the
setscrew on top of the release claw.
Note: As the Kiln Sitter develops wear, the actu-
ating rod may no longer fall freely within the tube.
This is usually caused by a corroded tube assembly. Replace the tube.
Trigger Adjustment
1 Inside the kiln, slide
the fir ing gauge
over the end of the
actuating rod and
the two slot ted
cone supports. The
actuating rod fits
into the fir ing
gauge hole.
2 Lift the weight on the outside of the Kiln Sitter all
the way to the fully raised position. At the end of
the weight is the adjustable trigger. With the firing gauge in place, the
trigger should just clear
the release claw, coming
as close as pos si ble
without touching. If the
trigger is too high to
clear release claw or if it
is too low, loosen the set
screw in the center of
the weight, move the
trigger up or down until
it just clears the release
claw, and retighten the
set screw.
Note: Check the trigger
adjustment with the firing gauge after every 12
firings.
Caution: If the set screw is too loose, the trigger
will slide out of adjustment with repeated use.
But if the set screw is too tight, you can strip out
the threads.
6
Test the Mechanical Operation
1 With all kiln switches turned OFF, raise the
weight and lower the release claw over the trigger. The weight MUST NOT be able to stand up
alone, and the trigger MUST lean against the release claw.
2 With your other hand, hold up the end of the ac-
tuating rod inside the kiln. Let go of the release
claw. The release claw should hold the weight up
while you hold up the end of the
actuating rod inside the kiln.
3 Set the Limit Timer clock.
Push the plunger all the way in
until it locks into position.
(The Limit Timer clock
MUST be set be fore the
plunger will lock.)
4 From inside the kiln, move the
actuating rod slowly downward
until the claw releases the trigger. The weight
should fall all the way to the bottom, releasing the
plunger and allowing the button to pop out to its
original position. Repeat the operation 6 - 12 times
to loosen the mechanism.
Note: For reliable operation of the Kiln Sitter, the
kiln should be level. You can level it by inserting
shims under the stand legs.
Kiln Sitter Operation
Regardless of your firing experience, check the operation of your new Kiln Sitter by watching large pyrometric
cones placed in the kiln behind a peephole for at least 12
firings. (These are called witness cones. See "Paragon
Ceramic Kiln Instruction and Service Manual.") We recommend that you use large witness cones in every firing.
Their cost is less than the smallest piece of greenware,
and using witness cones is the only way to check the
accuracy of your Kiln Sitter.
Keep a firing log book so that you can accurately estimate the firing time for each type of ware.
1 Turn the kiln switch(es) to the OFF position.*
2 Remove the metal
fir ing gauge and
save.
Note: It is a good idea to have two sets of cone
supports. They easily slide out of their slots. Coat
the extra set with kiln wash while the other set is
in the kiln. The fresh set will be dry and ready the
next time you load the kiln. Do not allow kiln
wash to build up on the cone supports.
Note: Keep a small bottle of kiln wash near the
kiln. A nail polish bottle with the built-in brush is
a convenient applicator. Shake the bottle before
each use.
WARNING: You MUST apply kiln wash before each
firing. Otherwise the cone could stick to the metal and
prevent the Kiln Sitter from shutting off the kiln. Remove
old kiln wash and apply new before each firing. Do not allow kiln wash to touch the cone or the inside of Kiln Sitter
tube. Make sure the kiln wash has dried before inserting
the cone.
Note: Examine the cone supports each time you
fire the kiln, and replace them if they are corroded or warped. Use emery cloth to remove
traces of greenware, corrosion, or bits of melted
cones. These foreign materials can catch on the
cone, preventing it from slumping freely.
Caution: Do not fire
4 Check that the sensing rod moves up and down
with the metal gauge
in place! Se ri ous
damage to the kiln
and Kiln Sitter will
result.
5 Raise the weight and lightly press the release claw
freely and is centered in the tube. (Do not fire the
kiln if the sensing rod movement is sluggish,
which may indicate that corrosion has built up inside the tube. If necessary, replace the tube.)
3 Apply a thin coat of high fire kiln wash to the upper
edges of the cone supports and the lower side of
the actuating rod. The application of kiln wash
should be thin enough to dry in 5 to 10 minutes.
Apply kiln wash to the cone supports. Let the kiln wash dry before
inserting the cone.
down over the trigger.
6 After checking the number on the small pyromet-
ric cone to be sure it is correct, place the cone under the actuating
rod and on top of
the cone supports.
The cone should
be centered on the
cone supports, and
the rod should rest
on the center of the
Applying the kiln wash is easier
if you remove the cone supports.
*To turn off the Paragon SnF kiln: Turn the top switch to the OFF position. The second switch (and third, if you have one) is a switch-timer.
Turn the switch-timer pointer to a number, then turn clockwise until it
clicks and points to "On." Turn it clockwise one more click to the right
to turn it off.
cone. Never apply pressure to the cone when you
load it into the Kiln Sitter. Handle cones as if they
were extremely fragile.
7
against the Kiln Sitter or bumping into it can also
move the guide plate out of alignment, preventing the actuating rod from dropping. This will
overfire the kiln.
Set the Limit Timer.
Push in the plunger.
9 Set the Limit Timer dial to the estimated firing
time plus 30 minutes. (This must be done before
the plunger will lock into position.)
10 Push in the plunger (the button on the front of
the Kiln Sitter).
11 Fire your ware. Occasionally check the pyrometLoading a cone into the Kiln Sitter requires two hands or a helper.
ric witness cones through the peepholes.
Note: Experienced kiln opera-
Note: The cone has a number stamped onto one
of the sides. Place the cone in the Kiln Sitter with
the number side down. That side is the strongest
of the three sides. Placing that side down lessens
the chance of the cone breaking as it bends.
7 Load the kiln for firing, placing the correct pyro-
metric cones behind each peephole. Keep all
ware and kiln shelves at least 1/2" away from the
sides, top and bottom of the end of the cone supports and actuating rod.
tors keep a small timer with
them as a reminder that the
kiln is firing. You could set the
alarm on a digital wristwatch
for the estimated firing time
less 20 minutes. Go back and
check the kiln when the alarm
sounds. Do not leave the kiln
unattended, especially near
the estimated shutoff time.
Set the alarm on a digital watch to re mind
yourself that the kiln is
firing.
8 Keep the area outside the Kiln Sitter clear of ob-
jects that could interfere with the falling weight.
The Kiln Sitter weight must fall completely to
the bottom of the sitter to shut off the kiln.
Note: Keep chairs, stools, and small loading ta-
bles away from the kiln. Many of these items are
the same height as the Kiln Sitter weight. It is
easy for someone to come by and move a stool or
small table up against the weight, which would
prevent it from dropping, thus causing an
overfire.
Note: Never set anything on top of the kiln or lean
anything against the kiln's switch box. We know
of cases where a kiln shelf leaning against the
Kiln Sitter prevented the weight from dropping
and caused an overfire. Leaning something
8
Note: Leave the top peephole plug out during the
entire firing. This practice extends the life of the
Kiln Sitter tube by allowing moisture to exit the
kiln through the peephole instead of through the
tube. But if you use the Orton down-draft
KilnVent, keep all peephole plugs inserted
throughout the firing. Leave the KilnVent on
during firing and cooling. If you turn the
KilnVent off when the kiln fires to maturity,
moisture can build up inside the Kiln Sitter tube
as the kiln cools.
If the Kiln Sitter weight is still in the upper position after the kiln shuts off, the Limit Timer turned off the kiln.
Let the kiln cool to room temperature and examine the
small cone in the Kiln Sitter. Find out why the cone did
not shut off the kiln. You may have loaded the wrong cone,
or the actuating rod may be out of adjustment. You may
need to add more time to the Limit Timer the next time
you fire so that the falling weight shuts off the kiln.
Selecting Cones for the
Kiln Sitter
Only the small Orton pyrometric cone or the Bell bar
may be used in the Kiln Sitter. The pyrometric bar will
fire a little hotter than the small pyrometric cone.
The small cone or the bar may not react to heat in exactly the same way as a large pyrometric cone placed upright on the shelf. This is because of the difference in
size, weight, and positioning in the kiln.
A rule of thumb is to fire one cone hotter in the Kiln
Sitter than on the shelf. For the first few firings, place
three large pyrometric witness cones on a shelf a few
inches from the Kiln Sitter cone. One of these large cones
should be the same number as the small cone or bar in
the Kiln Sitter. The other two large cones should be one
cone hotter and one cone cooler.
Examine the cones after your first testing firing. If the
witness cone of the correct
number is still straight, and
the Kiln Sitter shut off properly, fire a hotter cone in the
Kiln Sitter the next time. If the
witness cone bends too far or
“puddles,” fire a cooler cone in
the Kiln Sitter.
ness cone fired to matuFor instance, if you have a Wit
rity.
small cone 05 in the Kiln Sitter, the large cones on the shelf
should be 04, 05, and 06. When
the Kiln Sitter shuts off and
the kiln cools completely, inspect the cones. If the large
cone 05 on the shelf bent to six
o'clock, the small Kiln Sitter
cone and the large witness
cone should be of the same An underfired witness cone.
cone number during future
firings. If the large cone 04
bent to six o'clock, use a cone
rated one cone cooler in the
Kiln Sitter than on the shelf. If
the large cone 06 bent to six
o'clock, use a cone rated one
cone hotter in the Kiln Sitter
than on the shelf. (See the An overfired witness cone.
cone temperature charts in “Paragon Ceramic Kiln Instruction & Service Manual” to understand how cones
are rated.)
Since the witness cones are on the shelf where the
ware is placed, the witness cones measure the maturity of
the ware more accurately than the small cone in the Kiln
Sitter. To get like firings, you must place the cone in the
Kiln Sitter exactly the same way each time. You MUST
always center the cone so that at least 3/16" of the thick
end of the cone extends past the cone support. Do not try
to get a hotter firing except by using a hotter cone, and
vice versa.
If your Kiln Sitter is
properly adjusted and
the small cone is correctly inserted, the cone in the Kiln Sitter will bend into a
U" shape at the end of the firing.
Loading Around the
Refractory Tube
Loading too close to the Kiln Sitter refractory tube
could cause an overfire.
1 Keep ce ramic
shelves at least 1/2
inch above or below the Kiln Sitter
tube. If jarred, a
shelf that is even
with the tube
could stop the actuating rod from
dropping all the
way, causing an
overfire.
2 Do not position poorly
stilted ware near the
end of the refractory
tube. If some one
bumps the kiln, an unsta ble stilted piece
could fall against the
actuating rod, causing
an overfire.
3 Never load moist
greenware in your kiln.
It could explode, and a
piece of clay could lodge beneath the actuating rod
or inside the porcelain tube.
9
Set the Limit Timer.
Push in the plunger.
9 Never leave the Kiln Sitter unattended during fir-
ing. Though it shuts off the kiln automatically, it
still needs the operator's attention.
Check the Kiln Sitter cone with a flash light before
closing the lid and firing the kiln.
4 Before closing the lid, shine a flashlight down
into the kiln to check the cone and actuating rod
one last time. Position the shelves so that they do
not block the view of the Kiln Sitter cone from
above.
Note: Do not allow a piece of glazed ware to ex-
tend past a shelf and over the Kiln Sitter cone. If
the glaze drips from the ware onto the cone and
actuating rod, the cone could harden, fail to bend,
and overfire the kiln.
Summary of Kiln Sitter
Operation
1 Turn the kiln switch(es) to the OFF position.
2 Clean off old kiln wash from the cone supports
and rod and apply new before each firing.
3 Check that the sensing rod moves freely and is
centered in the tube. Check that the weight falls
when you lift the release claw.
4 Raise the weight and lower the release claw over
the trigger.
5 Check that the number on the small pyrometric
cone is correct. Place the cone under the actuating rod and on top of the cone supports.
6 Load the kiln; place pyrometric cones behind
each peephole.
7 Set the Limit Timer dial to the estimated firing
time plus 30 minutes.
8 Push in the plunger.
10
Kiln Shuts Off Too Soon or Too Late
Adjust the Kiln Sitter as shown on pages 5 - 6.
Kiln Sitter Shuts Off Before Witness Cones Bend
1 Raise the weight.
2 Press in the plunger.
3 Gently lower the weight.
WARNING: This puts the kiln on MANUAL CONTROL and prevents the Kiln Sitter from cutting off automatically. When large witness cones bend, turn the kiln
switch(es) to the OFF position. Then trip the Kiln Sitter
by raising the weight and dropping.
4 Before the next firing, use the firing gauge to
check the adjustment of the Kiln Sitter trigger
(see page 6). See also "Selecting Cones for the
Kiln Sitter," page 9.
Witness Cones Bend Before Kiln Sitter Shuts Off
1 Turn the kiln switch(es) to the OFF position.
2 After the kiln has cooled, compare the small cone
in the Kiln Sitter with the witness cones on the
shelves. Determine if the small cone bent almost
to the cut off point. In most cases, firing a few
minutes longer with the Kiln Sitter cutting itself
off would have no adverse effect on the ware.
However, avoid overfiring glass, reds, and porcelain.
3 See "Selecting Cones for the Kiln Sitter," page 9.
Points To Remember
DO adjust the guide plate if the rod does not fall freely
to the bottom of the oblong slot.
DO leave clearance inside the kiln around the actuating rod.
DO check the Kiln Sitter with pyrometric witness
cones.
DO place the Kiln Sitter cone in the same position
each time for the same firing results.
DO use a hotter cone for a hotter firing.
DO clean off old kiln wash from cone support holders
and apply new before each firing.
DO check the Kiln Sitter adjustments often.
DO NOT use your kiln before you read and understand this section.
DO NOT fire with the firing gauge in place.
DO NOT throw firing gauge away.
DO NOT load shelves and ware so close to the refractory tube that either would interfere with the drop of the
actuating rod.
DO NOT put anything near your kiln sitter exterior
that would keep the weight from dropping freely.
DO NOT let kiln wash get into the refractory tube, or
onto the cone or heating elements.
DO NOT adjust the trigger to control shut off point.
Adjust the shut off point by using cooler or hotter cones.
Kiln Switches
This section cov ers the
switches on the S- and
SnF-series kilns. To find out
which kiln you have, please see
the small black electrical data
plate attached to the side of the
switch box.
You can also tell by looking
at the switch box. Infinite control switches are labeled with
MIN and MAX. Switch-timers
are labeled with HOURS. If
your kiln has only infinite control switches, read the section
for S-series kilns. If the top
switch on your kiln is an infinite control but the 2nd and
3rd switch(es) are labeled with
HOURS, read the section for
SnF-series kilns.
The infinite control switch.
The SnF switch-timer.
All Models
The warranty on your kiln does not cover damage from
overfiring, regardless of the circumstances. It is the operator's responsibility to make sure the kiln turns off when
the firing is completed. Never leave your kiln unattended
near the end of the firing.
Check your new kiln frequently during the first few firings, and note the color change inside the kiln. After
awhile you can learn to estimate, with considerable accuracy, when the kiln is about to shut off just by observing
the color inside the kiln.
The Clicking Sound of the Infinite Control
Do not be alarmed when your kiln makes a clicking
sound during firing. Infinite control switches on S- and
SnF-series kilns click as they cycle on and off until turned
to high.
S-Series Models: Kilns with
Infinite Control Switches
S-Series kilns are manually operated with infinite control switches.
WARNING: Af ter the
Kiln Sit ter shuts the
kiln off, turn al l
switches to their OFF
position.
When you engage the Kiln
Sitter and turn on a switch, the elements controlled by
that switch cycle on and off. You will hear them hum as
they turn on. A click followed by silence means the ele-
11
ments for that
switch have cycled
off. The higher the
setting, the longer
the elements stay
on during each cycle. On the MAX
(High) po si tion,
the elements stay
on continuously.
The switch can
be turned from
MIN, 1 - 5, to MAX.
MIN is the slowest
heating rate. The 3
po si tion is Medium. As you turn
the switch from
MIN to progressively higher numbers, the kiln begins to heat at a
faster rate. The
switch is called an
infinite control be- The infinite control switches.
cause you can position the pointer anywhere between MIN and MAX to vary
the firing rate. When you finally turn the switch to MAX,
the kiln will fire at the maximum rate.
Q Is there any documentation that has the ap-
These firing schedules are only suggestions. You will
need to test fire your kiln to find the schedule best suited
for your ware. Most S-Series kilns also have a general-purpose firing schedule printed on the front of the
kiln's switch box.
Decals
1 Prop the lid in the vented
position and remove the
peep hole plug(s). Turn
switch(es) to MIN for 45
minutes or until moisture
no longer appears on a mirror held near the lid. (Moisture indicates that steam is
still coming out of the kiln.)
2 Turn switch(es) to MAX (High). Close the lid
from the vented position and insert the plug in
the bottom peephole.
Low-Fire Greenware and Glaze
1 Prop the lid in the vented
position and remove the
peep hole plug(s). Turn
switch(es) to MIN for 2
hours or until moisture no
longer appears on a mirror
held near the lid. (Moisture
indicates that steam is still
coming out of the kiln.)
proximate rate of speed on the infinite control
switch? For example, the heating rate when the
knob is set to 2.5.
2 Turn switch(es) to 3 (Medium) for 2 hours.
A The heating rate at a particular infinite control
3 Turn switch(es) to MAX (High). Close the lid
setting varies from one kiln to another. This is
because the rate at each setting depends on the
size of the kiln, voltage, age of elements, type of
insulation, etc.
Q Instructions for certain glazes state that the
kiln should be fired at a certain rate per hour.
How do you know how fast the kiln is firing?
A Use a pyrometer to figure the firing rate at
each switch setting on your particular kiln. The
rate at those settings will be fairly repeatable.
If your S-series kiln has more than one switch, you can
use them to help balance the heat in the kiln. The top
switch controls heating elements in the top half of the
kiln; the bottom switch controls heating elements in the
bottom half. If your kiln has three switches, the middle
switch controls elements in the middle of the kiln. To add
more heat to a section of the kiln, turn the switch for that
section to a higher position sooner than the other
switches.
12
S-Series Firing Schedules
from the vented position and insert the plug in
the bottom peephole.
Porcelain and Stoneware
1 Prop the lid in the vented
position and remove the
peep hole plug(s). Turn
switch(es) to MIN for 1 1/2
hours or until moisture no
longer appears on a mirror
held near the lid. (Moisture
indicates that steam is still
coming out of the kiln.)
2 Turn switch(es) to 3 (Medium) for 1 1/2 hours.
3 Turn switch(es) to MAX (High). Close the lid
from the vented position and insert the plug in
the bottom peephole.
How to Control the Cooling
Rate of an S-Series Kiln
After you hear the Kiln Sitter weight drop and the kiln
shuts off, turn the kiln switches to the OFF position. Add
more time on the Limit
Timer. Raise the weight and
press the Kiln Sitter plunger
(the button that turns on the
Kiln Sitter). Then gently lower
the weight. The kiln is now firing again. Please be aware that
the Kiln Sitter is operating on
manual and will not shut off
the kiln.
With a pyrometer, adjust
the switches to maintain the
desired cooling rate. When the
needle on the pyrometer goes
too high, lower the switch set- A pyrometer measures the
tings. When the needle goes heat inside a kiln.
too low, raise the switch
settings.
If you don't have a pyrometer, you can still control the
cooling rate by observing the
color of the firing chamber. (You
can see the color through the
peephole and around the edge of
the lid.) You might want to experiment with a test sample before adjusting the cooling rate of
a full load of ware.
Note: You can set the Limit
Timer for the length of the
desired cooling time.
Set the Limit Timer.
SnF-Series Models:
Non-Digital Automatic
Kilns
The SnF-series kilns fire in stages. Set the switches at
the beginning of the firing, and the kiln will automatically
go through its firing stages,
turning itself up at the proper
time.
WARNING: Af ter the
Kiln Sit ter shuts the
kiln off, turn al l
switches to their OFF
position.
The top switch is an infinite control. When you engage
the Kiln Sitter and turn on the top switch, the elements
controlled by that switch cycle on and off. You will hear
them hum as they turn on. A click followed by silence
means the elements for that switch have cycled off. The
higher the setting,
the longer the elements stay on during
each cycle. On the
MAX (Maximum, or
High) position, the
el e ments stay on
continuously. The
setting on the top
switch remains the
same throughout the
fir ing unless you
manually change it.
The
sec ond
switch is a timer. It
does not cycle on and
off like an infinite
control. When you
turn the timer knob
pointer to a number,
you are NOT turning on the heating ele ments for that
switch. Instead, you
are setting the timer
for the hours of firing that will elapse before its elements turn on. The
switch-timer will begin counting down its time only when
the top switch is turned on.
The third switch (if your kiln has one) is also a timer.
The third switch begins counting down its time only
when the second switch runs out of time.
When the timers run out of time, they click on. To turn
them back off, turn clockwise one more click. Do this after the Kiln Sitter shuts off at the end of a firing.
In summary, the heating elements controlled by the
top switch come on at the beginning of the firing. The elements powered by the second switch (and third, if your
kiln has one) remain off until the timer runs out of time.
SnF-82 & SnF-82-3
These kilns fire in two stages: LOW and HIGH. Turn
the top switch to the amount of power that you want during LOW, the first stage.
The second switch is a timer. Turn the switch pointer
to the number of hours that you want to fire the kiln on
LOW. As the kiln fires, you will notice that the pointer
gradually moves toward the ON position. When the time
is up, the second switch turns on stage two elements full
power. The kiln is then firing on HIGH.
Look inside your kiln. It has eight rows of brick grooves
each containing an element. Counting down from the
top, switch #1 controls elements 2, 4, 6 and 8. Switch #2
controls elements 1, 3, 5 and 7.
SnF-24, SnF-24-3 & SnF-28-3
SnF kilns with three switches fire in three stages:
LOW, MEDIUM, and HIGH. Three-switch kilns operate the same as the two-switch kilns just described except
13
that you add one more stage. Turn the top switch to the
amount of power that you want during LOW, the first
stage.
The second switch is a timer. Turn the switch pointer
to the number of hours that you want to fire the kiln on
LOW. As the kiln fires, you will notice that the pointer
gradually moves toward the ON position. When the time
is up, the second switch turns on its elements full power.
The kiln is then firing on MEDIUM.
The third switch is also a timer. Turn the switch
pointer to the number of hours that you want to fire the
kiln on MEDIUM. The third switch will begin counting
down the time only when the second switch turns on.
When the third switch’s time is up, the third switch turns
on its elements full power. The kiln is then firing on
HIGH.
Look inside your kiln. It has 12 rows of brick grooves
each containing an element. Counting down from the
top, switch #1 controls elements 3, 6, 9 and 12. Switch #2
controls elements 2, 5, 8 and 11. Switch #3 controls elements 1, 4, 7 and 10.
SnF-66 & SnF-66-3
Operating Instructions for
SnF-Series Kilns
These switch settings are only guidelines. Feel free to
change them to suit your firing needs.
SnF-82 & SnF-82-3
1 Turn switches to their OFF position.
2 Insert desired cone in Kiln Sitter and load kiln.
3 Engage lid vent if desired.
4 Leave peephole plugs out.
5 Set Limit Timer for the total estimated firing
time plus 30 minutes.
6 Engage Kiln Sitter.
7 Set switches to the positions indicated below:
Cone 015 - 022
Set top switch to position #3.
Set second switch to 1 Hr.
These kilns have four elements. During LOW, the
four elements are powered by the top switch. It is an infinite control. Turn the top switch to the amount of power
that you want during LOW, the first stage. When the second switch runs out of time, the elements all turn on full
power.
Cone 04 - 014
Changing Firing Speed of an SnF Kiln
SnF-24, SnF-24-3 & SnF-28-3
To fire slower, turn the top switch to a lower number
and the 2nd (and 3rd) switch(es) to a higher number. To
fire faster, turn the top switch to a higher number and the
2nd (and 3rd) to a lower.
Set top switch to position #4.
Set second switch to 2 Hrs.
Cone 03 - 8
Set top switch to MAX.
Set second switch to 3 Hrs.
1 Turn switches to their OFF position.
2 Insert desired cone in Kiln Sitter and load kiln.
3 Engage lid vent if desired.
Q My SnF kiln is taking too long to fire.
4 Leave peephole plugs out.
A If the top switch setting is too low, the kiln will
5 Set Limit Timer for the total estimated firing
not reach maximum temperature, because the
elements for that switch will not get hot enough.
Turn that switch to a higher setting.
Q Should I set switches 2 and 3 to one hour if I
want the kiln to fire one hour?
A No. The elements for switches #2 and #3
turn on when the switches are in the ON position.
The switches are countdown timers, and the
numbers they point to are hours of time that will
elapse before the switches turn on.
Q Do you make the kiln fire hotter by turning
switch 2 and 3 to higher numbers?
A No. The higher the number on switch 2 and 3,
the longer it will take for those switches to turn
on.
time plus 30 minutes.
6 Engage Kiln Sitter.
7 Set switches to the positions indicated below:
Cone 015 - 022
Set top switch to position #3.
Set second switch to 1 Hr.
Set third switch to 1 Hr.
Cone 04 - 014
Set top switch to position #5.
Set second switch to 1 Hr.
Set third switch to 2 Hrs.
Cone 03 - 8
Set top switch to MAX.
Set second switch to 2 Hrs.
Set third switch to 2 Hrs.
SnF-66 & SnF-66-3
1 Turn switches to their OFF position.
14
2 Insert desired cone in Kiln Sitter and load kiln.
3 Engage lid vent if desired.
4 Leave peephole plugs out.
5 Set Limit Timer for the total estimated firing time
plus 30 minutes.
6 Engage Kiln Sitter.
7 Set switches to the positions indicated below:
Cone 015 - 022
Set top switch to position #2.
Set second switch to 1 Hr.
Cone 04 - 014
Kiln Will Not Fire
n
Probable Causes:
Tripped circuit breaker or blown fuse
n
Cord not plugged in
n
Kiln Sitter plunger not locked into position
n
Limit Timer clock not set
Kiln Sitter contacts dirty
Check circuit breakers or fuses first. Check the wall
receptacle voltage with a voltmeter. (Only a qualified person should perform this test.)
66 & 66-3 Kilns of All Series: Elements are wired
in series; one broken element can prevent the kiln from
heating. Check the elements with an ohmmeter. (See
“Paragon Ceramic Kiln Instruction & Service Manual,”
publication IM-104.)
S & SnF-series: Set the timer clock before pushing
in the Kiln Sitter plunger.
If the wall receptacle checks out okay with a voltmeter,
and the pilot light does not light, the problem may be a
disconnected switch box wire or dirty Kiln Sitter contacts.
Disconnect the power to the kiln and remove the switch
box. Check for disconnected wires. Compare switch box
wiring to the wiring diagram. If wiring is okay, check the
Kiln Sitter contacts with an ohmmeter.
n
Set top switch to position #3.
Set second switch to 2 Hrs.
Cone 03 - 8
Set top switch to position #4.
Set second switch to 3 Hrs.
How to Control the Cooling Rate of an
SnF-Series Kiln
At the end of the firing, you will hear the Kiln Sitter
weight drop, shutting off the kiln. First, turn the kiln
switches to the OFF position. Add more time on the
Limit Timer. Raise the weight and press the Kiln Sitter
plunger (the button that turns on the Kiln Sitter). Then
gently lower the weight. The kiln is now firing again.
Please be aware that the Kiln Sitter is operating on manual and will not shut off the kiln.
Turn the top switch to 3. With a pyrometer, adjust the
top switch to maintain the desired cooling rate. When the
temperature shown on the pyrometer goes too high,
lower the switch setting. When the temperature goes too
low, raise the switch setting.
If you need more heat in the kiln, turn off the top
switch and turn on one of the switch-timers.
If you don't have a pyrometer, you can still control the
cooling rate by observing the color of the firing chamber.
(You can see the color through
the peephole and around the
edges of the lid.) You might want
to experiment with a test sample
before adjusting the cooling rate
of a full load of ware.
Note: You can set the Limit
Timer for the length of controlled cooling time.
Q How do I candle an SnF
General Trouble
Shooter
Set the Limit Timer.
kiln overnight?
A Engage the Kiln Sitter. Set the Limit Timer to
the number of hours that you want to candle the
kiln. Leave the switch-timers turned off. Set the
top switch to MIN. Prop the lid and leave out the
peephole plugs.
Not All Elements Fire
n
Probable Causes:
Broken element
n
Defective switch
Disconnected wire inside switch box
To find which element has burned out, check the elements with an ohmmeter. (See “Paragon Ceramic Kiln
Instruction & Service Manual.”)
n
Slow Firing, And/Or Kiln Will Not Reach
Maximum Temperature
n
Probable Causes:
Low voltage
n
Moisture from greenware
n
Worn elements
Loading the kiln heavier than usual
Firing moist greenware can slow the firing to a crawl. It
will also rust kiln parts and shorten element life.
Keep a firing log book. If the firing time gradually increases over a long period, it is probably due to worn
rather than broken elements.
n
15
Before replacing elements, make sure the problem is
not merely low voltage, which can double firing time and
strain elements. It is common during hot summer days. If
low voltage is a problem, schedule firing during off-peak
hours when the voltage is higher.
You may also be firing a 240 volt kiln on a 208 volt outlet. (240 and 208 volt receptacles look the same.) If you are
not sure which voltage you have, call your power company.
Kiln Heats Unevenly
Fuse Blows Or Circuit Breaker Trips
The infinite control switch makes a clicking noise during operation. This is the sound of a bimetallic timer
turning the elements on or off to control the firing rate.
When the switch is about to fail, it sometimes makes a
faint popping instead of a clicking noise. This is a sign to
order a new switch.
Probable Causes:
n New elements are higher amperage than the kiln was
designed for.
n
Probable Causes:
Overloaded circuit
A short in the receptacle wiring or kiln wiring
If the kiln blows a fuse or trips a breaker immediately,
the problem is a short in the kiln wiring or circuit wiring.
Do not attempt to fire until corrected.
If the fuse blows or breaker trips after the kiln has fired
for some time, the problem is an overloaded circuit, not a
short circuit. (A short circuit or “short” causes a large
amount of current to flow, generating so much heat that
the fuse or breaker opens the circuit almost instantly.)
Make sure no other appliances are used on the kiln’s circuit. Have an electrician check the circuit wire and
breaker sizes. If the breaker trips only once in awhile, you
may have a weak breaker that should be replaced.
Wire heats when an electric current passes through it.
If the same current passes through both a small wire and
a large wire, the smaller wire will reach a higher temperature. A fuse uses this principle to protect the wiring in a
building. It has a small, short wire of low melting temperature metal connected in such a manner that all current
passing through the circuit must also pass through the
fuse. A circuit breaker uses a tiny heating element to heat
a thermostat, which interrupts the current when the
maximum safe amount is reached.
A loose or poor connection at the fuse or breaker will
generate heat. If the fuse or circuit breaker panel feels
unusually warm, have your electrician check for loose
connections, particularly at the center screw of the fuse
socket, even in a new fuse box.
n
Hot Plug Or Outlet
If you smell burning plastic, turn off the breaker immediately. Touch the wall receptacle faceplate. If it feels
hot, replace the receptacle. Replace the kiln cord if it has
been damaged by heat. Do not fire until repaired.
Note: As the kiln fires, it is a good habit to place
your hand on the kiln's power cord to check the
temperature. It is okay if the cord is slightly
warm, but it should never feel hot.
Middle Elements Do Not Glow Red
The middle elements in most Paragon kilns do not
glow as bright as the top and bottom elements. Do not be
concerned as long as the kiln is firing properly.
16
You can increase heat in a section of the kiln by loading
that section lighter; lower heat by loading heavier. Increase mass to lower temperature; decrease mass to raise
temperature. Fire the kiln more slowly. Slow firing gives
the heat time to even out inside the firing chamber.
Infinite Control Switch Wears Out
Prematurely
n
Push-on connectors are loose.
n
The kiln's heat shield is missing.
n
A 120 volt switch is installed on a 240 volt kiln.
The kiln room is too hot.
Loose connectors over-heat the switch by creating a
tiny electrical arc inside the connector.
The kiln's heat shield is a sheet metal channel that
helps guide heat away from the switch box. The heat
shield is under the porcelain insulators of most kilns.
120 volt and 240 volt switches look the same; the voltage is printed on the switch body.
Switches burn up more frequently on hot summer
days. In this case, use a fan to circulate air through the kiln
switch box. But do not blow air against the outside of the
firing chamber.
n
The SnF Switch-Timer Fails
n
Probable Causes:
Disconnected wire
Defective switch-timer motor
Paragon SnF kilns use an infinite control switch plus
one or two switch-timers. (The Limit Timer on the Kiln
Sitter is a different type of timer.)
A wire from the PL terminal on the infinite control
switch powers a clock motor on the switch-timer. After
the correct amount of time has elapsed, the switch-timer
turns on additional elements.
If you have just replaced a switch-timer, and the new
timer does not operate, the reason is usually a crossed
wire. The easiest way to track down the problem is to
trace the wires inside the switch box using the kiln's wiring diagram. (Before examining the wiring, please unplug or disconnect the kiln.)
n
Kiln Sitter Trouble
Shooter
The Kiln Sitter Fails To Shut Off
n
Probable Causes:
The cone is sticking to the cone supports. This prevents the cone from sagging properly.
n
There is no play between the trigger and the release
claw.
n
The actuating rod is not centered in the porcelain
tube.
n
The Kiln Sitter Plunger Overheats
If the Kiln Sitter overheats, the white plastic plunger
can get so hot that it melts. Ways to prevent this:
1 Make sure the high temperature washer on the
porcelain tube is pressed against the firebrick kiln
wall. A spring wire retainer keeps the washer in
place. This helps prevent heat from escaping the
kiln.
2 Check the wires that are connected to the Kiln Sit-
ter contact block. If they are loose or corroded,
they will cause the block to overheat. This, in turn,
overheats the plunger. Heating and cooling of the
kiln can loosen the screws over time.
3 Has anyone ever replaced the wires that are at-
tached to the Kiln Sitter contact block? Another
reason for overheating is that the wires are too
light a gauge.
The kiln is not level.
The wrong cone was loaded in the Kiln Sitter.
If the Kiln Sitter does not shut off when the weight
drops, see “Clean the Back Side of the Kiln Sitter,” next
page.
n
The Limit Timer Clock Does Not Operate.
n
n
Probable Causes:
One of the wires that connects the clock motor to
the power has burned out.
The timer motor is burned
out.
The Kiln Sitter
Plunger (Button)
Won't Stay Pressed In
n
Probable Causes:
The Limit Timer is set to
0.
n
Something is obstructing
the locking slide.
n
The locking slide is rusted
or dirty.
The spring for the locking
slide is broken.
A wire may be in the way of the Kiln Sitter plunger
mechanism, preventing it from locking in the on position.
Sometimes heat causes a wire to move inside the switch
box.
Something may have fallen into the switch box and is
interfering with the plunger: a matchstick, a piece of
dried clay, a lost screw. If anything lodges where the contact blocks come together, the plunger will not stay locked
on.
The locking catch is rusted or has material stuck to it.
To free the catch, try rotating the Limit Timer knob past
20 hours while pressing the Kiln Sitter plunger.
n
4 Circulate air with a fan if the firing room tempera-
ture rises past 110 degrees F. (Measure room
temperature about 3 feet from the kiln.)
The Kiln Sitter Gives Inconsistent Firing
Results
n
n
Probable Causes:
The actuating rod is bent.
The actuating rod is corroded.
The cone supports are
warped or corroded.
The actuating rod in the
Kiln Sitter rests on top of the
cone. As the cone bends, the
rod moves downward and re- Slide out the cone supports to
leases a trigger that shuts off examine.
the kiln.
As the rod corrodes, it no longer moves freely inside
the porcelain tube. The rod's pivot point causes sluggish
movement of the rod. If your Kiln Sitter is giving inconsistent results, this is one of the possible causes. When
you raise the rod from inside the kiln and let go, the rod
should drop freely.
The tip of the rod corrodes as it ages. That is natural.
However, if the corrosion extends all the way up to the
pivot point inside the porcelain tube, your kiln is most
likely subjected to too much moisture.
The solution to excessive moisture inside the kiln is to
dry the ware longer before firing. You could also leave the
kiln on low for a longer period at the beginning of the firing. It is better, though, to dry the ware thoroughly before
placing it inside the kiln.
Leave the top peephole plug out. This allows moisture
to exit the kiln through the peephole instead of through
the Kiln Sitter tube. But if you use the Orton down-draft
Vent Master, keep all peephole plugs inserted throughout
the firing. Leave the Vent Master on during both firing
n
17
and cooling. If you turn the Vent Master off when the kiln
fires to maturity, moisture can build up inside the Kiln
Sitter tube as the kiln cools.
If the Kiln Sitter tube corrodes even though you use a
Vent Master, make sure that you have enough negative
pressure inside the kiln. Orton recommends holding a
match above one of the air intake holes in the lid. The air
flowing into the hole should pull the flame toward the
hole.
Cones Break In The Kiln Sitter
n
Probable Causes:
Hairline cracks in cones
n
Too much pressure against cone
n
Fast firing
Kiln Sitter is out of adjustment
When handled roughly, cones develop hairline cracks,
which can break during firing. This is the most common
reason for cone breakage in the Kiln Sitter.
The Kiln Sitter sensing rod binding at the pivot point
can exert too much pressure against the cone. Binding of
the rod can be due to glaze buildup inside the porcelain
tube. Make sure the sensing rod can pivot freely.
The cone has a number stamped onto one of the sides.
You should place the cone in the Kiln Sitter with the
number side down. That side is the smoothest of the
three sides. Placing that side down lessens the chance of
breakage.
Maintenance
Caution: Whenever you turn off the circuit
breaker to your kiln, tape the breaker box door
shut and leave a note saying, "WORKING ON
KILN. BREAKER OFF."
Note: When replacing parts, mark wires with col-
ored tape for easy reassembly of the kiln. It is also
useful to photograph the switch box with a cell
phone before you remove any
parts. Refer to the photo if necessary as you install the new
part.
n
Note: Never apply pressure to the cone when you
load it into the Kiln Sitter. Handle cones as if they
were extremely fragile.
Taking a picture with a cell
phone.
Labeling wires with tape.
Maintaining the Kiln Sitter
Note: You can see some of the these procedures
on video at www.paragonweb.com.
Adjust the Kiln Sitter every dozen or so firings. Please
see pages 5 - 7.
Clean the Back Side of the Kiln Sitter
If the Kiln Sitter does not shut off when the weight
drops, the locking slide inside the Kiln Sitter may be corroded or dirty. About once a year, clean the back side of
the Kiln Sitter:
1 Disconnect the power
from the kiln.
2 Make sure there is no
cone or firing gauge
in the Kiln Sitter.
3 Remove the screws
from the switch box
that houses the Kiln
Sitter. Pull the box
straight out to avoid
damaging the Kiln
Sitter tube.
18
Place the vacuum hose directly over the Kiln Sitter tube.
4 Leaving the wires attached to the Kiln Sitter, clean
the backside of the Kiln Sitter. Canned air is helpful. (But do not blow air into the Kiln Sitter tube.)
uum hose directly over the tube. This removes debris and
rust from around the pivot point. Do not blow compressed air into the tube.
Debris from exploding ware inside the kiln sometimes
lodges in the Kiln Sitter refractory tube. These fragments
can interfere with the travel of the actuating rod, resulting
in an overfire. After you have removed exploded clay fragments from the firing chamber, always check the refractory tube for debris. It may not be readily apparent that
fragments are inside the tube. Check the travel of the actuating rod. It should be free to move up and down
without binding.
Note: Probe the inside of the Kiln Sitter tube with
a clean artist’s brush. Keep the brush near the
kiln for checking the tube.
Replacing the Porcelain
Tube Assembly
5 Reinstall the switch box. Arrange the wires so they
do not interfere with the locking slide that trips
when the weight drops. (You can see how the locking slide works by lifting the weight, pressing the
plunger, and then dropping the weight.) Also, arrange the wires inside the switch box so that wires
do not touch the element connectors or the kiln
case.
Clean the Kiln
Sitter Tube
Each time you
vacuum the kiln,
also vacuum the
Kiln Sitter tube assembly. First, remove the cone
supports from the
Kiln Sitter tube.
Then place a vac-
Remove the cone supports before vacuuming the Kiln Sitter tube.
Replace the porcelain tube assembly when the movement of the sensing rod becomes sluggish or when the
sensing rod is bent. Be sure the replacement tube assembly is the correct length for you kiln.
1 Disconnect the power to the kiln.
2 Make sure there is no cone or firing gauge in the
Kiln Sitter.
3 Remove and save the
screws at the side of
the switch box that
hold it to the kiln and
remove the box, carefully pulling straight
out to avoid damaging
the Kiln Sitter tube.
You may need to prop
the box on a chair or
other object as you lean
the box against the
kiln. Leave the wires
attached to the Kiln
Sitter.
19
4 Re move the 2
screws holding
the guide plate to
the front of the
Kiln Sitter.
If your kiln is direct wired, you will also need to disconnect the electrical terminal box.
5 Remove the guide plate.
6 Remove the 2 screws that hold the porcelain tube
bracket to the Kiln Sitter.
Prop the switch box on a chair or other object. Do not strain the wires.
Note: While you have the Kiln Sitter out, it is a
good idea to clean the back side of the Kiln Sitter
with compressed air.
20
7 Remove the porcelain tube and bracket.
9 You will see a notch on the top of the new tube as-
sembly. Align that notch with the pin on the tube
assembly bracket. Install the washer and nut.
(The washer goes under the nut on the front of the
tube assembly bracket.)
Align the notch on the new Dawson tube assembly with the pin on the
bracket. This assures that the porcelain tube slot will be perfectly vertical inside the kiln.
8 (Steps 8 and 9 are for Dawson tube assemblies.
Skip steps 8 and 9 for Orton tube assemblies,
which have the tube assembly bracket permanently attached.) Remove the nut holding the porcelain tube assembly to the tube assembly bracket.
Tighten the nut on the Dawson tube assembly.
10 Remove the release claw from the old porcelain
tube and install it on the new tube.
11 Some porcelain tube assemblies have a fiber
washer and spring ring, which help to prevent heat
from entering the switch box. Transfer the fiber
washer and spring ring, if any, to the new porcelain
tube.
Installing the bracket to the new tube assembly (Dawson tubes).
21
12 Install the porcelain tube bracket to the Kiln Sit-
ter (the reverse of step 6).
13 Re in stall the
guide plate to the
front of the Kiln
Sitter. Tap the
guide plate from
side to side until
the rod is centered in the porcelain tube.
Note: The easiest
way to adjust the
guide plate is to
loosen the screws
so that they barely
hold the guide
plate in place. Then gently nudge the plate sideways. The guide plate is more difficult to adjust if
you loosen the screws completely.
tact block, which causes the current to arc. This, in turn,
overheats the contacts, sometimes melts the Kiln Sitter
button, and damages the wires attached to the contact
block. While you have the Kiln Sitter opened, examine the
wires and replace if damaged by heat.
Another reason for worn contacts is pressing the Kiln
Sitter plunger when the kiln switches are already turned
on. TURN OFF ALL KILN SWITCHES BEFORE
PRESSING THE KILN SITTER PLUNGER. Engaging the plunger with the switches turned on causes the
contacts to arc and become pitted.
1 Disconnect the power to the kiln. Check that
there is no cone or firing gauge on the Kiln Sitter
cone supports.
2 Remove and save the
screws at the side of
the switch box that
hold it to the kiln and
remove the box, carefully pulling straight
out to avoid damaging the Kiln Sitter
tube. You may need
to prop the box on a
piece of wood as you
lean it against the
kiln.
14 After the rod is centered, securely tighten guide
plate screws.
15 Reinstall the switch box. Arrange the wires so
they do not interfere with the locking slide that
trips when the weight drops. (You can see how
the locking slide works by lifting the weight,
pressing the plunger, and then dropping the
weight.) Also, arrange the wires inside the switch
box so that wires do not touch the element connectors or the kiln case.
Important: Check the Kiln Sitter adjustments shown
on pages 5 - 7 before firing the kiln.
If your kiln is direct wired, you will also need to disconnect the electrical terminal box.
Cleaning or Replacing the
Kiln Sitter Contacts
The contact block is behind the Kiln Sitter plunger
(the button that starts the Kiln Sitter). Pressing the
plunger closes the electrical contacts inside the block.
Sometimes the contact block needs cleaning. It is not
uncommon to find spider webs or bugs inside the contact
block if the kiln has been in storage for a few years. Dirt or
other foreign objects interfere with the closing of the con-
22
Prop the switch box on a chair or other object. Do not strain the wires.
3 You will see 4 large screws on the back of the Kiln
Sitter. Label the wires attached to the screws.
4 After removing the four nuts, lift the porcelain
switch block out. You will find four nylon washers
under the porcelain switch block. Do not lose
these, or the contacts will no longer be parallel.
5 Clean the con4 Remove the wires.
tacts with a soft
pencil eraser. Do
not use sandpaper, which destroys the coating
on the contacts.
This can later
cause the contacts to stick together
and
overfire the kiln.
If the contacts are pitted and burned, replace the
contact block assembly.
Note: While you are working inside the Kiln Sit-
5 Using a nut driver, remove the four nuts holding
the porcelain contact block together. Note: The
screws may fall out the front of the Kiln Sitter unless you hold them in place while you remove the
nuts. Or place a piece of tape over the Kiln Sitter
front to hold the screws.
ter, check the condition of the wires that are attached to the contact block. Replace brittle wires.
6 Wipe the pencil eraser particles and dirt from the
contacts. Reassemble the Kiln Sitter making sure
all the washers are back where they belong.
7 Arrange the wires inside the switch box so that
when the Kiln Sitter is in place, no wire is touching
the kiln case or Kiln Sitter porcelain tube. Reinstall the switch box.
Replacing an Infinite
Control Switch or
Switch-Timer
Look at your wiring diagram to see which elements are
controlled by each switch. (You can download the kiln's
wiring diagram at www.paragonweb.com. Select Support,
then Kiln Wiring Diagrams from the drop menu.) If the
elements to a particular switch are not firing, check those
elements and the wiring to the switch. (See the kiln maintenance section of “Paragon Ceramic Kiln Instruction &
Service Manual” to check an element.) If the wiring and
elements are good, replace the switch.
Note: If push-on terminals do not have a snug fit,
gently squeeze the end of the terminal with pli-
23
ers. If the push-on terminal is damaged from excessive heat, replace the wire and terminal.
1 Pull off the
switch knob with
fingertips. Some
switch knobs are
held in place by a
setscrew on the
side of the knob.
If knob won't
come off when
you pull it, check
to see if a setscrew is securing it to the shaft.
4 Replace heat-damaged wires. Bend a wire to test
it. If it sounds like it is cracking, replace it, because the insulation is flaking.
5 Check the label printed on the side of the switch
to be sure that it is the correct voltage.
2 Disconnect the power to the kiln. Check that
there is no cone or firing gauge on the Kiln Sitter
cone supports.
3 Remove and save the
screws at the side of
the switch box that
hold it to the kiln and
remove the box, pulling straight out to
avoid damaging the
Kiln Sitter tube. You
may need to prop the
box on a piece of
wood as you lean the
box against the kiln.
6 Hold the new switch at the side of the switch box
in the same position as the defective switch. Remove and transfer one wire at a time from the old
switch to the new one making sure each connection is tight.
6 Remove the single nut from the front of the de-
If your kiln is direct wired, you will also need to disconnect the electrical terminal box.
fective switch. (Some switches are fastened to
the front of the switch box with two screws. Remove the screws.) Remove the old switch and put
the new one in place making sure it is right side
up.
7 Reinstall the shaft nut
checking to make sure it is
not backwards. Tighten so
the switch will not turn
during operation. If the
switch is held in place with
two screws, re in stall
screws.
8 As the switch box is moved
back into place, check to see that no wires are
touching the kiln case, the element connectors,
or the Kiln Sitter tube. Wires touching the case
or element connectors will burn.
9 Tighten switch box screws. Insert knob on switch
shaft.
24
Prop the switch box on a chair or other object. Do not strain the wires.